Sales order
Sales Order
A sales order is an archive that contains products/services ordered by a particular business partner (client) or customer as well as the prices and terms and conditions. The sales order includes the customer’s information, such as the address, the points earned for loyalty, the details of the product being sold and the date of delivery and other information. Each sales order has a unique sales order number that helps the customer confirm the details of their order and learn the date of the delivery of the product and payment details. All new sales orders are added through a console and the Sales Orders tab. The items sold from the inventory are then shipped to the customer or delivered to the location provided by the customer. The process of creating a sales order includes finding an existing customer or creating a new customer, then creating “bill to” and “ship to” addresses.
Creating a Sales Order
A sales order can be created using two methods – • From the Sales Orders tab (record level) • With the Enterprise Point of Sale tab
Creating a sales order through the Sales Orders tab:
1. Click on the Sales Orders tab as shown below.  2. Once in the Sales Orders section, you can track the sales orders already filled in and create new sales orders. 3. When filling in a new sales order, enter the following information:
- The details about the estimated delivery date and the date of fulfilment of the sales order.
- In the Information section, fill in the order name for ease of tracking. Fill in the customer details.
- Fill in the Order Details section using the price list, order type and subscription of the order, if any.
- Fill in the information about loyalty points, return details and payment details in their respective sections.
- In the Address section, customers’ pre-saved addresses can be selected in the “bill to” and “ship to” address fields.
- Fill in the order details and other instructions, then save.
4. Existing orders also have options to edit after saving. In addition, you can import records of previous to existing sales orders using the import option located at the top right-hand corner of the Sales Orders tab. In the sales order, besides the estimated delivery date, there is the fulfilled date, which shows the date on which the goods are to be delivered as indicated in the purchase orders. Additionally, you can track goods that are ready for shipping, those that have been held, and those that have been fulfilled.
Creating Sales Order Lines
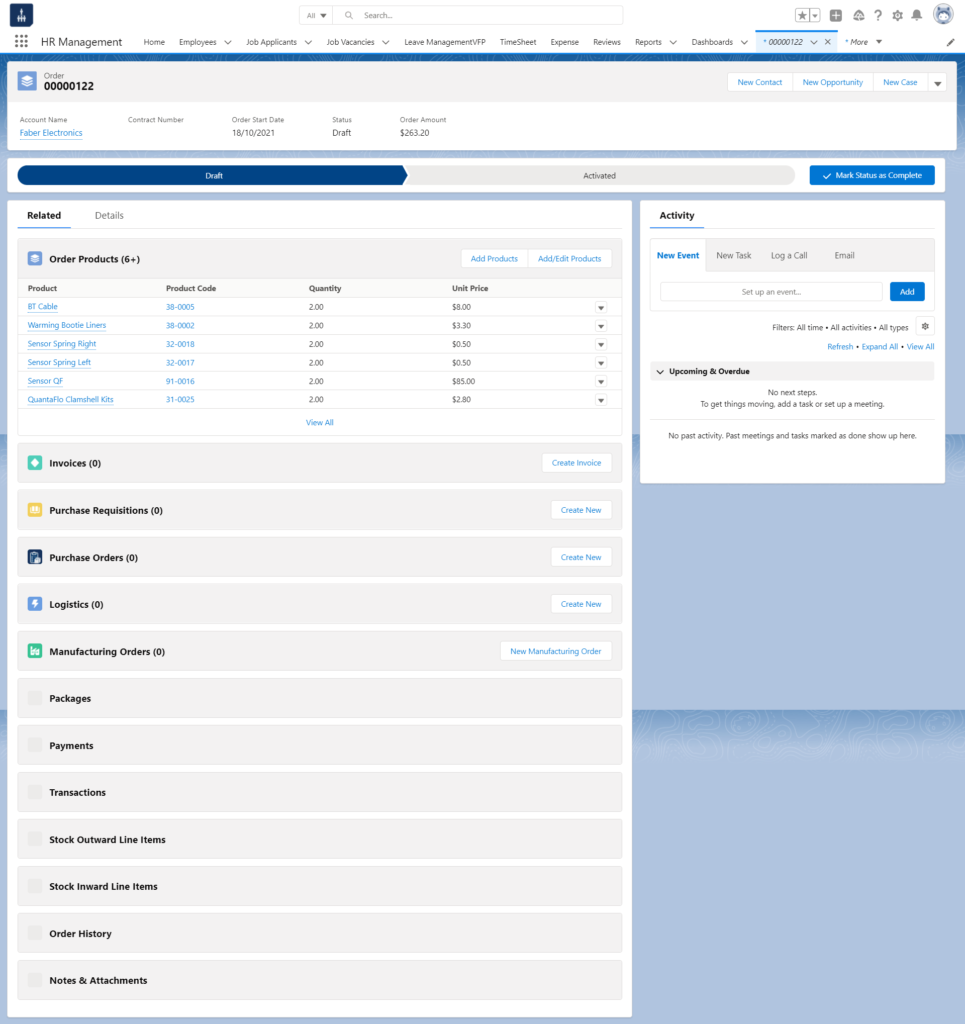
Sales order lines contain details about the specific items being sold. A sales order can contain more than one sales order line. The sales order contains the sales order lines with details about the quantity to sell, each item with a unique SOLI number. The sales order lines are found in the tab related to the sales order. You will click on the sales order, then click on the specific sales order you want to view. The sales order is located on the Details tab. Click on the “related” tab that is located next to the “details” section. Here you will find the sales order line items that are related to the sales order. Additionally, there are invoices, purchase orders, work orders, and other features related to the sales order in that tab. The tabs also include a link that allows the user to add new items, as seen on the right end of the Sales Order Items tab.
Return Merchandise Authorisations
 A customer makes a sales return by sending goods back to your business. The Sales Order Related list includes a return-of-purchase section that gives the customer room to return the goods if they are faulty or for any other stated reason. Additionally, the sales order contains RMA lines to process the section that contains the information about the items to return. The Return Purchase Authorization holds the information about the return on goods.
Fields to note:
| Organization Section | |
| Field | Description |
| Organisation | It defines the name of the organisation/Account |
| Organisation Business Unit | It defines the Business Unit name of the Account/Organisation |
| Redeem Voucher Amount | Redeem Voucher Amount Describes the amount that can be redeemed using the voucher |
| Customer Purchase Order Reference | When a sales order is converted into a purchase order, this field is auto-populated with a unique number |
| Amount Paid | Describes the amount paid by the customer for a sales order |
| Authorized | Inventory, Purchase Order and Work Order can be created only if a sales order is authorized |
| Ready For Shipment | Indicates whether the sales order is ready for shipping |
| Number of Fulfilled Items | Indicates the fulfilled number of items from the sales order |
| Total Number of Items | Indicates the total number of items in the sales order |
| Estimated Delivery Date | Provides the estimated delivery date of the sales order |
| Fulfilled Date | Provides the fulfillment date of the sales order |
| RMA Lines to Process | Details the RMA line items |
| Information Section | |
| Order Name | Describes the unique sales order number |
| Code | Auto-generated code for each record |
| Channel | Describes the name of the sale point |
| Stage | Gives the sales order’s current stage |
| Status | Gives the status of the sales order |
| Customer Profile | Describes the profile of the customer |
| Barcode | Gives the Barcode of the Sales order |
| Contact | Describes the contact name for the customer |
| Customer | Describes the name of the customer |
| Is Invoice Sent | This is checked if the invoice for the sales order is sent |
| Is Back Order | Indicates whether the sales order is a backorder |
| Order Details Section | |
| Total Vat | Describes the sum of VAT on selected sales order line items |
| Total Other Tax | Describes the sum of taxes on selected sales order line items |
| Sub Totals | Describes the sum of the selected sales order line items |
| Amount | Describes the total amount of the sales order, including VAT, taxes and discounts |
| Total Discounts | Describes the sum of the discount amount on selected sales order line items |
| Price List | Gives the price list of the products/items being added |
| Total Tax Amount | Describes the sum of taxes, including VAT and other taxes on selected sales order line items |
| Order Type | Gives the profile type of the sales order |
| Total Due | Describes the amount due on the sales order |
| Subscription | Indicates whether the sales order is being subscribed |
| Return and Loyalty Details Section | |
| Loyalty Points | Describes the number of loyalty points earned by the customer |
| Loyalty Amount | Describes the equivalent amount |
| Customer Id | Describes the unique customer ID |
| Payment Details section | |
| Payments Status | Gives the payment status |
| Sales Order Amount | Defines the complete sales order amount |
| Payment Method | Indicates the types of payments which can be used |
| Payment Mode | Mode used for the payment |
| Due Amount | The total amount which must be paid |
| Address Details section | |
| Bill-To Address | Describes the address to which the customer is billed |
| Ship-To Address | Describes the address that will be used for shipment |
| Order Dates Section | |
| Book Date | The date when the sales order is booked |
| Request Date | The date when the sales order is requested |
| Order Date | The date when the sales order is created |
| Special Instructions | Instructions for the sales order, if any |
| Hold Status | Status for the sales order being held |

Creating the sales order from Enterprise Point of Sale Tab:
The orders created through Enterprise Point of Sale are for a situation when a customer walks into a store/outlet, orders a product, pays for it, and takes the product home or opts for the available shipment options. Upon confirming the sales order, the sales invoice is created automatically. Each sales order has a unique number to enable simple tracking. The order console where the sale orders are processed is as shown below. It is referred to as Enterprise Point of Sale (EPOS) in ERP Mark 7. 1. Click on the Enterprise Point of Sale tab as shown below 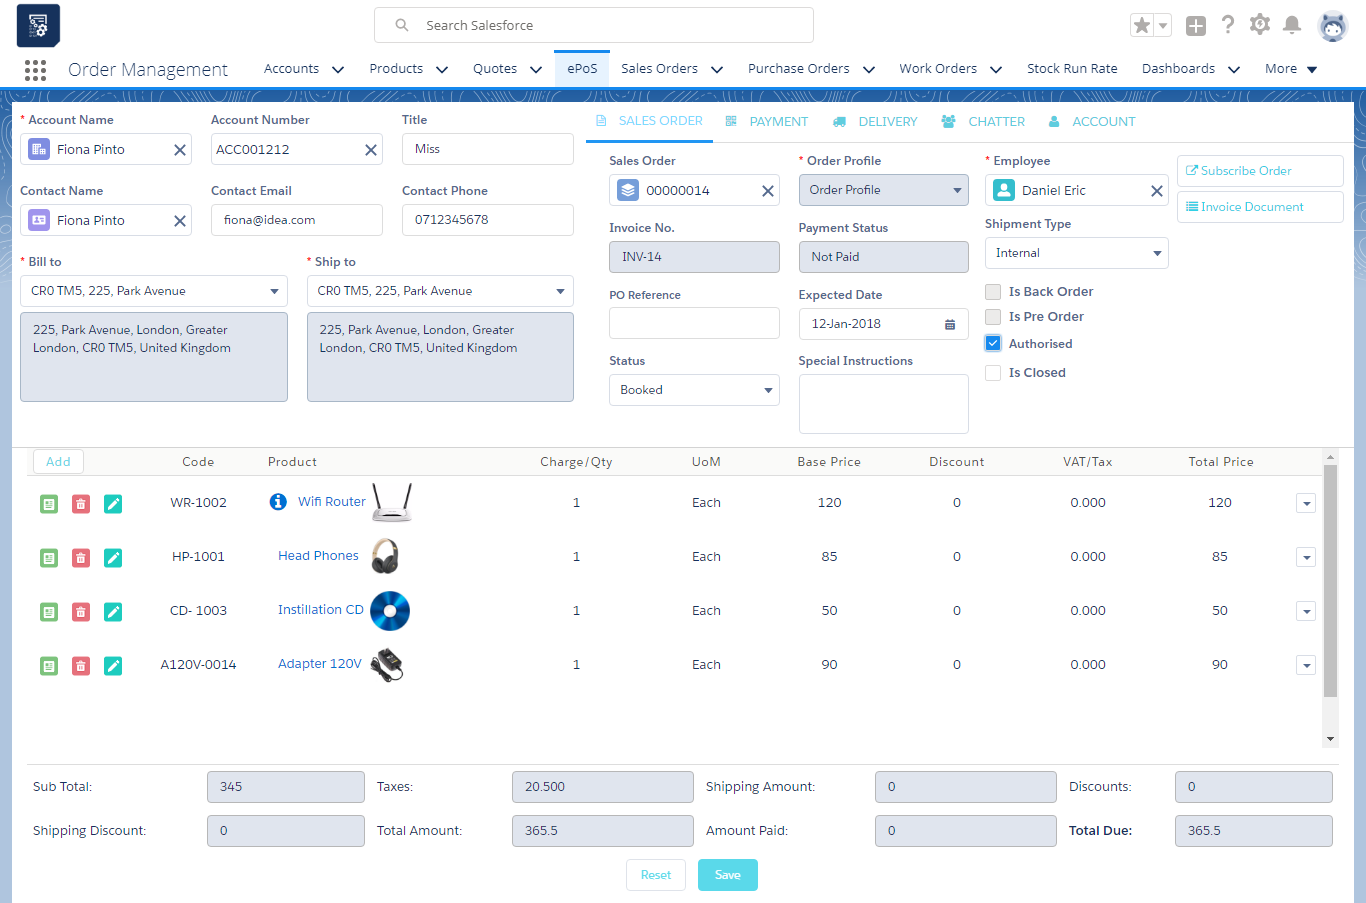 2. Under the Customer Details section Select the Customer Name and Contact Name and the other details auto-populates such as the Email, Phone, customer ID, Bill To, and Ship To address of the contact. Type the first few characters of the customer name in the Account Name field to browse for a valid customer name. While browsing, you may scroll down or use the arrow keys to highlight the correct customer name. Select the customer to retrieve the customer’s contact information and billing/shipping addresses. For example, say you get an order from Scott Bill and you type “Sco”. The system displays a lookup of customers in the system whose names begin with “Sco”. This brings you closer to finding Scott Bill in the system, as shown below. 3. If you cannot locate the customer name in the lookup, you can enter a new customer without exiting the POS page or switch to other windows. Simply click on the Account tab located on the right-hand side of the screen. On the Account tab, you will be prompted to add:
- Customer
- Address
- Contact
You will be able to add a new customer, both the “bill to” and “ship to” addresses, and a new contact for the new or existing customer. Based on the selection made, the relevant screens appear to add information. To return to the new orders, click on the Sales Orders tab on the right-hand panel after saving your new customer. 4. Once the customer name is entered, the contact details, such as contact name, email address, phone number, account ID, customer profile, and address details, are retrieved automatically. You may select the retrieved “bill to” address or select a different “bill to” address if one or more “bill to” addresses are saved for the selected customer. This change will be made for this order only and not on the customer account. 5. A single “bill to” address/a single customer may have several “ship to” addresses. Select the “ship to” address from the available picklist for the selected customer. The “ship to” address describes the location where the order is to be shipped. If the “ship to” address required for the order has not been saved in the customer account, click on the Accounts tab to create new address information. This will take you to the “Add New Address” screen, where a “ship to” address can be recorded. Clicking on the Sales Orders tab will bring you back to the screen where new orders can be recorded. 6. Under the Order Details section, Channel/Division, Sold By, Request Date, Status, and Sales Order Profile are auto-populated. 7. If you want to select an existing sales order then, click on the lookup and select the sales order. 8. If you are creating a new sales order, then a new sales order number is generated after adding the product line items and saving the order.
Adding product line items from EPOS
- To add products, click on the “Add New +” button.
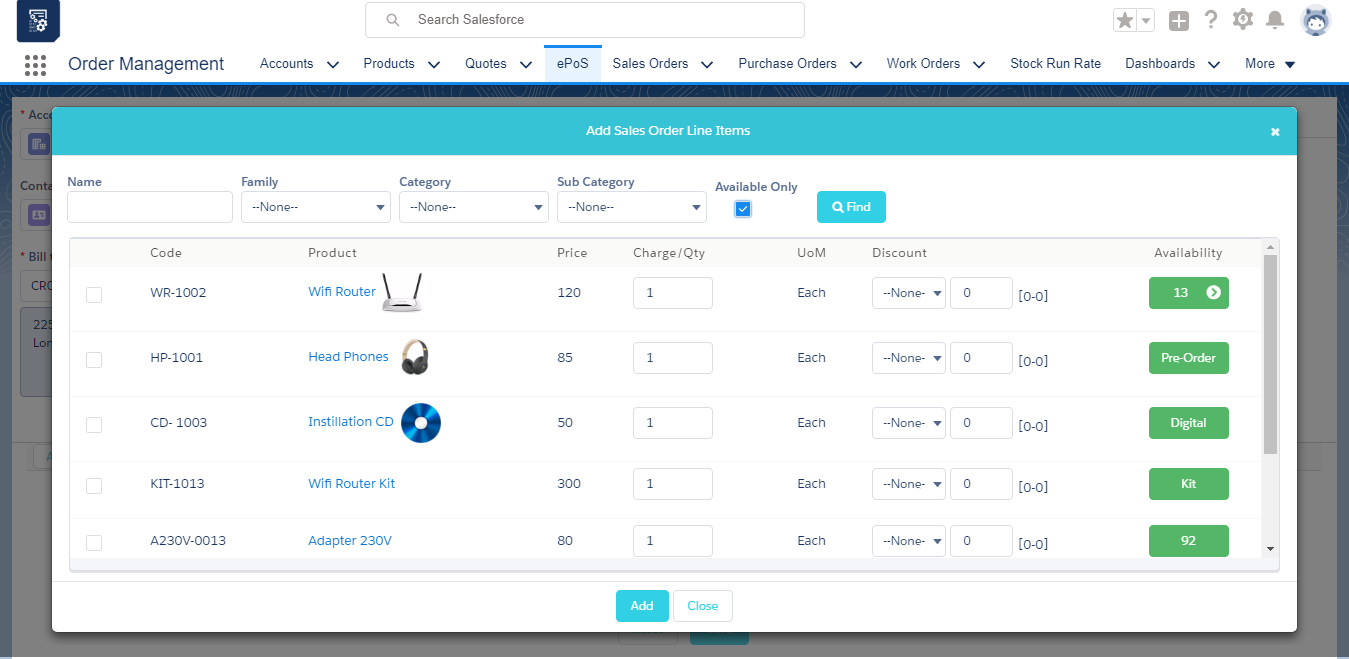
- In the “Add New Products” pop up, select the product family and click the “Find” button or type the name of the product to find the product.
- From the list of products, select the checkboxes of the desired product. Enter the quantity and select the discount plan, then click the “Add” button. The selected products will now appear in the product line item section as shown below.
 4. To save the sales order with the selected product line items, click the “Save” button. This will generate a unique sales order number. 5. Product line items can be edited or deleted and every product can have comments added by using the action buttons next to the product line item code.
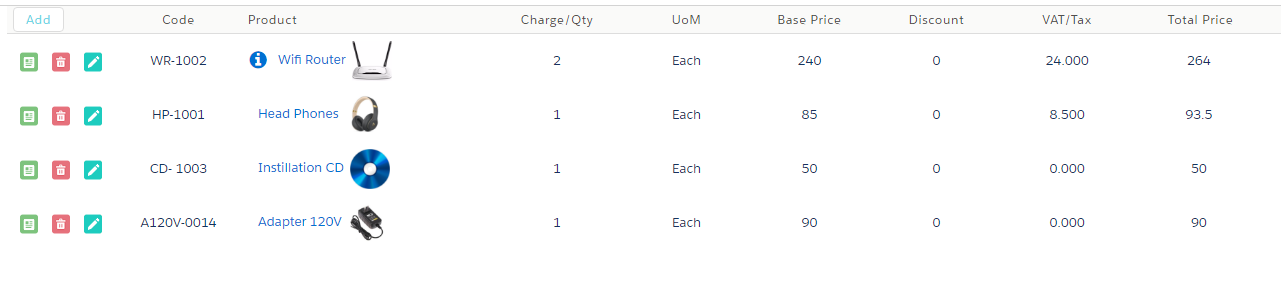
View/ Edit Sales Orders of the existing customers:
After the order is entered, a customer will be able to inquire about or update the order. For example, if the order was entered on August 15th and not closed, the customer can return and inquire about/update the order at any time in the future. The customer can either remove the products or add a few more products to the sales order. The process to view/edit a sales order is discussed below.
- Select the customer name from Account Lookup and retrieve the customer details.
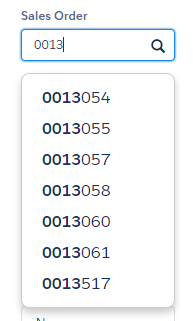
- On the Sales Orders tab located on the right-hand side of the screen, enter the unique sales order number in the “Sales Order Lookup” field.
- For example, say you get an order from Scott Bill and he would like to update sales order number 00135. You enter 001 and the system displays a lookup of sales orders in the system beginning with 001. This brings you closer to finding sales order number 00135 in the system, as shown below.
- The system displays the details of the selected sales order. You may add products to the product line item section.
- To add products, click on the “Add New +” button.
- In the “Add New Products” pop up, select the product family and click the “Find” button or type the name of the product to find the product.
- From the list of products, select the checkboxes of the desired product, enter the quantity, select the discount plan and click the “Add” button. The selected products will now appear in the Product Line Item section, as shown below.
Explanation of Fields in the Product Line Item Section:
Code:
Every product is assigned a unique number in the system and the same is displayed in the product line item section when a product is selected. It can be a system-generated code or a company-specified product code.
Product and Preview:
This displays the product name and its image in the product line item section. The products displayed add new product pop up are displayed only if the stock is available in your company’s inventory.
Quantity:
This displays the quantity of a particular product purchased and the price of the product depending on the quantity purchased.
Base Price, Discount, Vat, Tax, Total Price:
This displays the price of the product assigned to the customer’s profile. Discount is the reduction of a certain percentage of the base price allowed to the customer for the purchased product. Discount may or may not be applicable to every product. VAT and Tax are the addition of a certain percentage to the base price allowed to the customer for the purchased product. Total Price is the amount of the product displayed after calculating the discount and taxes. It is the final price a customer pays for the product purchased. For example, a product is sold for $100 and has overall taxes of about 14% (i.e., VAT = 7% and Tax = 7%) along with a 10% discount on it. The total price is calculated using the following formula. Total Price = ((Base Price *Quantity)-Discount Amount) + (VAT +Other Tax Amount)
Invoices and Payments:
The Invoices tab in ERP Mark 7 can be used to manage customer invoices that contain order information about purchased products. Users can view or send the invoice via email to the client. The tab allows users to generate an invoice document as a PDF.
An invoice is created in two ways:
- From the Sales Orders tab (record level)
- From the Enterprise Point of Sale tab
Creating an invoice through the Sales Orders tab:
- Create the sales order as described in Creating a sales order through the Sales Orders tab.
- From the related tab, find “Invoices” and click the “New” button.
- Select the “Sales” record type and click the “Next” button.
- Enter the organisation details, the purchase order number, the sales order number, and the amount details under the Organisation Details section.
- If the invoice needs to be reflected on the organisation’s finance, select the “Posted” checkbox and the posted date.
- Fill in the Information section with details like tax receipt number, customer account, and active checkbox, then click “Save” to create an invoice record.
Creating an invoice through the Enterprise Point of Sale tab:
- Create the sales order as described in “Creating the sales order from the Point of Sale Tab”.
- When the sales order is saved from the EPOS tab, an invoice record is created automatically with complete amount details of purchased products.
- Click the “View/Send Invoice” button to view the invoice template. The console provides an option to send an invoice attachment to the customer’s email address.
The function that is used to receive payments from customers who have purchased your products and services and who have not already paid for them.
When you sell a product/service, the order is created through order processing. The order processing functionality provides for the entry of payments and can be done via the following payment methods.
- Cash
- Bank/Cheque
- Credit Card/Debit Card
- Loyalty
The system can accept partial payments and has the ability to record multiple payments for each sales order.
When the customer books a sales order, the system typically creates an invoice in the system which can be sent to the customer’s email ID.
Making a Payment
Payments can be made using one of two methods –
- From the Sales Order tab (record level)
- With the Enterprise Point of Sale tab.
Creating payments through Sales Order Tab:
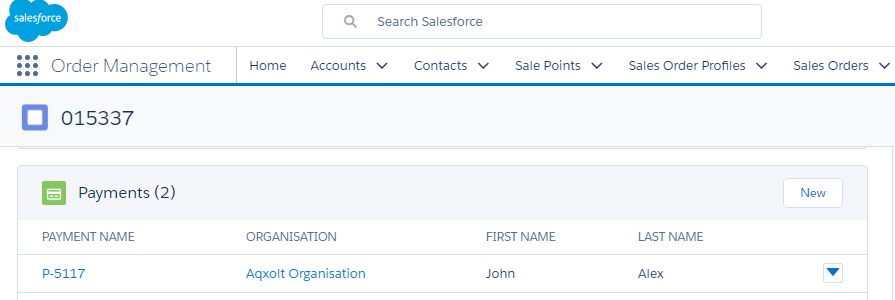
- Open the Sales Order record for which the payment must be made. On the related tab, scroll down and select “Payments”. Click on the “New” button.
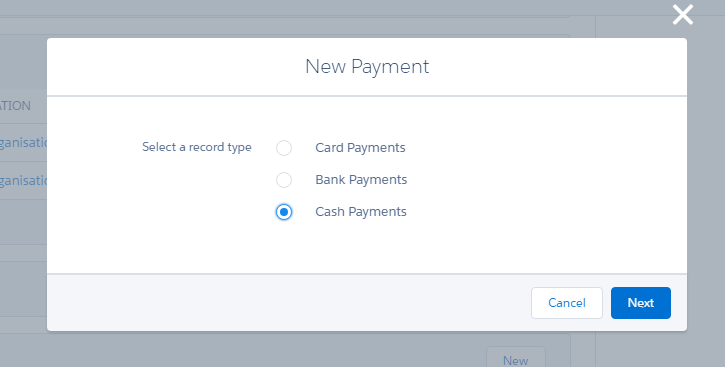
- From the New Payment Record Type pop-up, select “Cash Payments” and click the “Next” button.
- Fill in the organisation and sales order details under the Organisation Details section. Fill in the payment details under the Information section. Click the “Save” button to create a payment record for the selected sales order.
When the payment is made for the selected sales order, the status of the sales order is changed to either paid, underpaid or overpaid based on the amount that has been given in the payment record.
Loyalty – If a customer is a regular customer of the organisation, he would have received loyalty points for every purchase he made. Each loyalty point can be assigned a value of the currency and the customer can make the payment using these loyalty points.
Credit/Debit – A customer can use credit/debit cards to make a payment by swiping the card at the time of sale. If he is a returning customer and wishes to save the card details for future use, he can do so.
Payments from Point of Sale tab:
In a scenario in which a customer walks in the store/outlet and makes a payment to the sales order, the POS page helps the user complete the sales order and payment process without having to navigate to different setups.
- Create the sales order from the POS tab (as described in Create Sales Order through POS).
- Navigate to the Payments tab and click on any of the payment options. Payments can be made using the following four methods:
- Credit/Debit
- Bank/Cheque
- Cash
- Loyalty
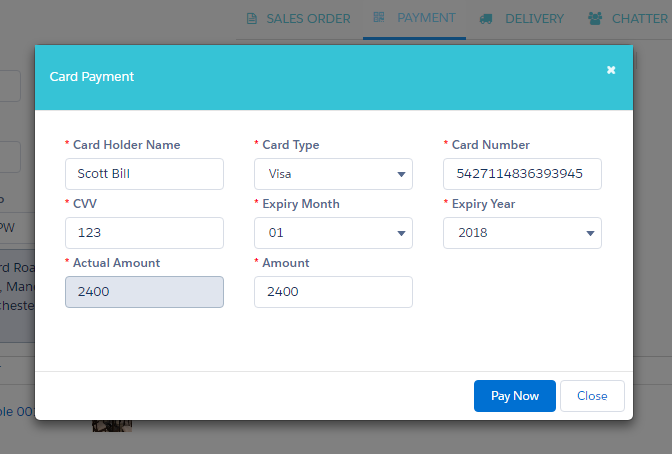
Credit/Debit
- To make the payment through Credit/Debit card, click on the “Payments tab” and click on the “Credit/Debit” button located on the right side of the screen.
- Enter the card details in the Card Information section and click the “Pay Now” button to complete the payment process for a sales order.
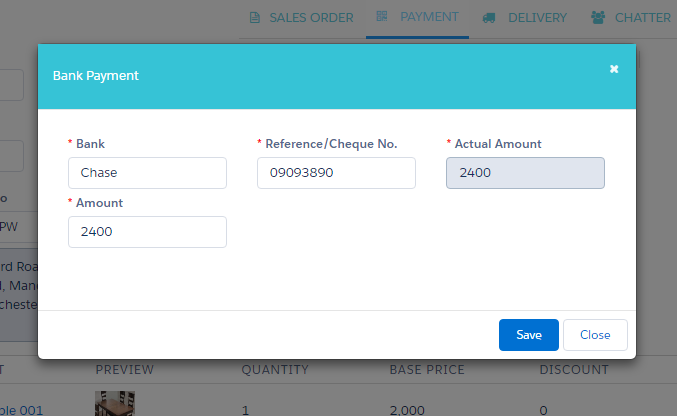
Bank/Cheque
- To make the payment through Bank/Cheque, click on the “Payments tab” and click on the “Bank/Cheque” button located on the right side of the screen.
- Enter the bank name and reference cheque number into the Bank Information section. Click the “Pay Now” button to complete the payment process for a sales order.
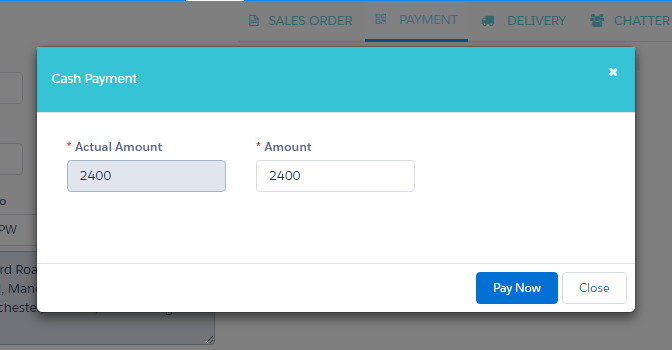
Cash
- To make the payment through Cash, click on the “Payments tab” and click on the “Cash” button located on the right side of the screen.
- Enter the amount to be paid and click the “Pay Now” button to complete the payment process for the sales order.
Loyalty

Regular customers earn loyalty points as a reward for their regular purchases with the organisation. They can use these points for payments. Loyalty points can be assigned to currency values. For example, 1 loyalty point = 1 pound or as per the organisation’s decision.
- To make the payment through Loyalty, click on the “Payments tab” and click on the “Loyalty” payment option located on the right side of the screen.
- The system will automatically reduce the amount to be paid by the equivalent loyalty points.
- The customer can pay the rest of the amount with any of the other payment options.
Apply Credits
- To make the payment through Credit points, navigate to the “Payments tab” in ePoS and click on the “Apply Credits” button.

- The system will automatically fetch the Invoice Amount, Total Due and Available Credit. Enter the “Redeem Credit” amount and click the “Pay Now” button.
- You will see that a Credit type payment record has been created.