Manufacturing Order
Manufacturing Workbench
The Manufacturing Workbench provides a centralized interface with three powerful tabs — Planner, Schedule, and Builder. The Planner tab displays all existing manufacturing orders with real-time status updates. The Scheduler tab enables users to easily create, reschedule, or prioritize new production orders using an intuitive drag-and-drop Gantt view. The Builder tab lists every active work order, allowing shop floor teams to start, pause, complete, or record production directly from a single screen.
Manufacturing Workbench has three tabs –
A. Planner
B. Schedule
C. Builder
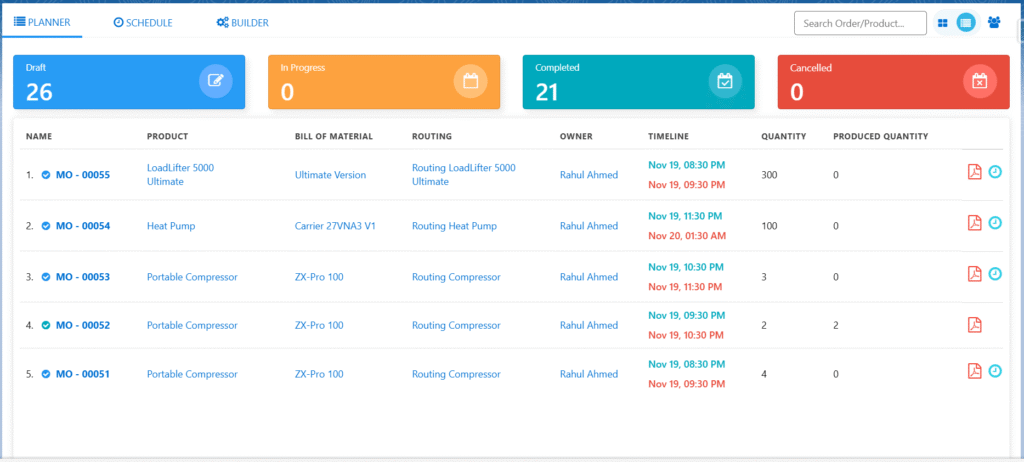
A. Planner
- Shows all Manufacturing Orders in a simple list with full details: product Name, Bill of Materials (BOM), Routing, planned Start and End Dates, Total Quantity to make, Quantity already Produced, and Status.
- Easily filter by Status — Draft, In Progress, Completed, or Cancelled — and see the exact count for each status.
- Just type in the Search Bar to quickly find any order by MO number, Product Code, or Product Name.
- Click the PDF icon next to any order to open or download the complete Manufacturing Order document right away.
B. Scheduler
The Scheduler lets users quickly schedule new Manufacturing Orders right from the timeline.
The Scheduler offers three quick selection modes: Product, Sales Order, or Manufacturing Order.
Choose Product to instantly view and schedule all manufacturable products in your catalog.
Select Sales Order to see only the products linked to open customer orders that still need to be fulfilled.
Pick Manufacturing Order to display every existing MO, ready for scheduling or rescheduling with simple drag-and-drop.
Follow the steps to schedule a manufacturing order –
- Navigate to the Manufacturing Workbench tab using the App Launcher or find the tab in the App Navigation menu.
- To Schedule a manufacturing order, click on the Schedule tab.
- On the left-hand side, you will find all the manufacturable products, or you can search using the Search Bar provided.
- Select the product that needs to be manufactured. You can see the Process Cycles in the scheduler to schedule these process cycles for a specific time and date.
- Enter the required quantity to manufacture in the Quantity field provided.

- Click on the Schedule MO button available at the bottom of the page to schedule the Manufacturing Order.
- After clicking on the Schedule MO button, the system will take the users to the Manufacturing Order screen.
Manufacturing Order Screen –
The Manufacturing Order screen displays all key production details in the upper section: Product, Production BOM, Routing, Source Order and Order Product (if applicable), Start Date, End Date, and complete cost breakdown (Labour Cost, Overhead Cost, Material Cost, and Scrapped BOM Cost if any). (Costs are calculated automatically upon completion of component allocation.)
The lower section is divided into dedicated tabs — Material Requirement Plannings (MRPs), Work Orders, Product Status, and Serial Number/Batches — each showing its respective detailed information in a clear, organized view.
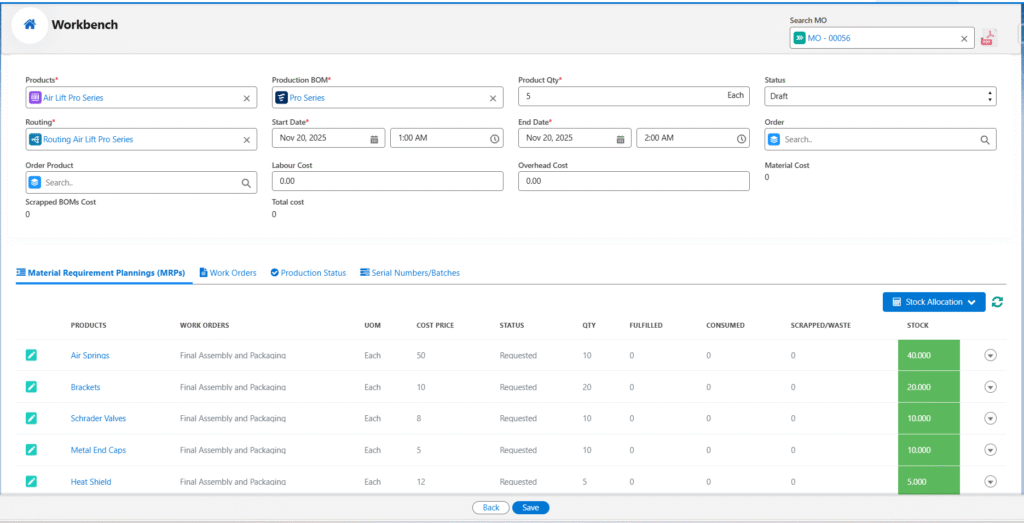
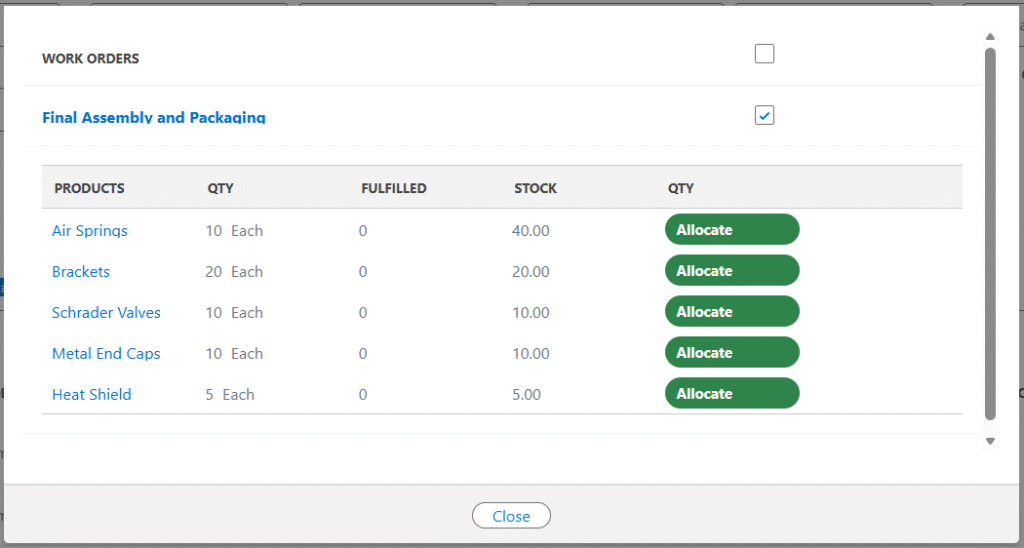
Material Requirement Plannings (MRPs) –
- This shows the Bill of Materials required to produce the final product.

- Now allocate the stock for all the BOMs as required for the manufacturing of the product.
- Click the Stock Allocation drop down and click Auto Stock Allocation to fulfil stock automatically.
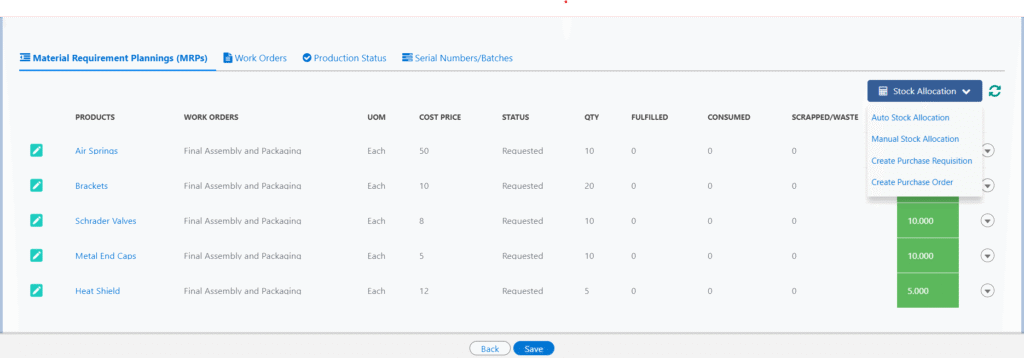
- When Auto Stock Allocation is selected and the end product is serialized, the system opens a popup modal requiring manual allocation of each serial number one by one.
- Note 1: For Normal or Lot-Tracked end products, the system instantly allocates available stock automatically upon clicking the Auto Stock Allocation button — no manual one-by-one allocation is required.
- Click the Manual Stock allocation button to allocate stock manually.
- Clicking the Stock Allocation dropdown and selecting manual stock allocation, the below page will appear to enter the stock required for each BOM.
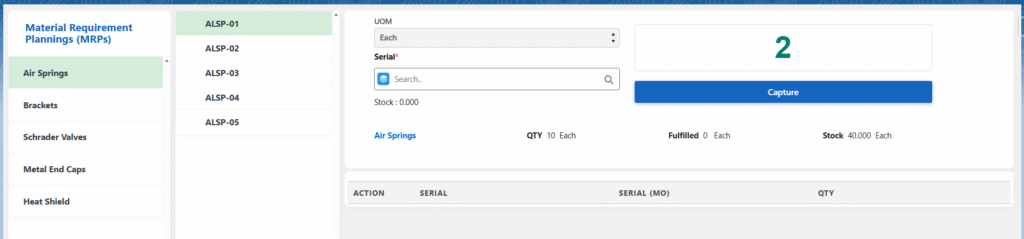
- Select the MRP record and manually enter the values and click the Capture button. For serialized end products, you must manually select the required Serial Numbers.
- Similarly, allocate the required quantities for all the BOMs.
- When all the stock is fulfilled, click on the Work Order tab.
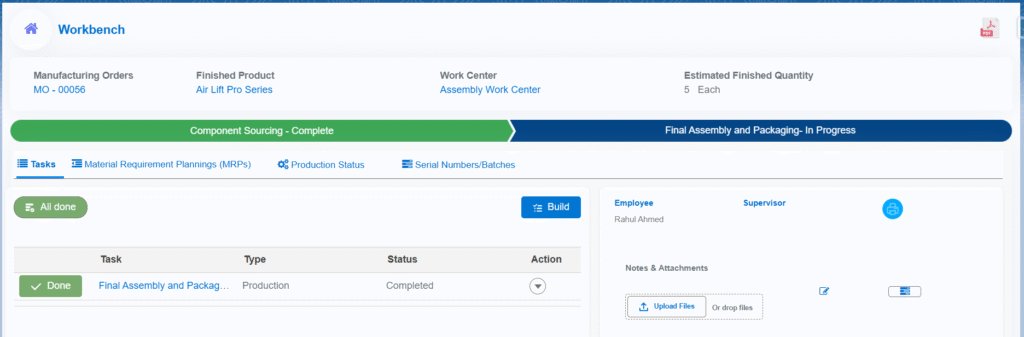
Work Order –
Shows all the work orders that need to be completed to produce the final product.
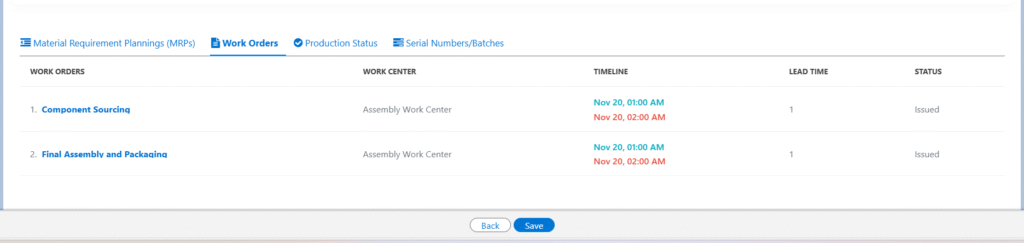
- Selecting the first work order instantly opens the Job Execution page.
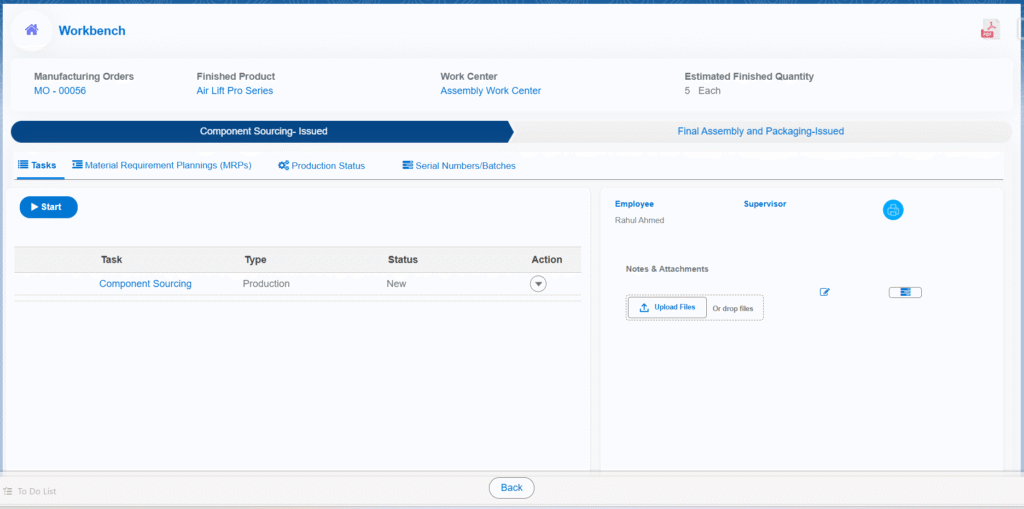
- The first work order is selected by default — simply click the Start button to begin; the work order status instantly changes to In Progress.
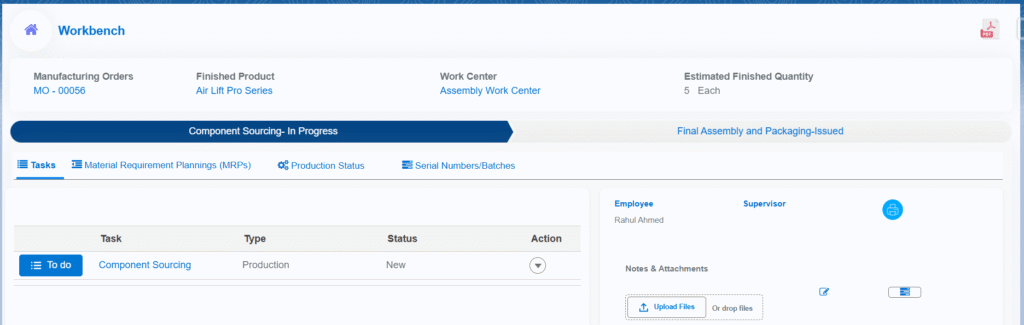
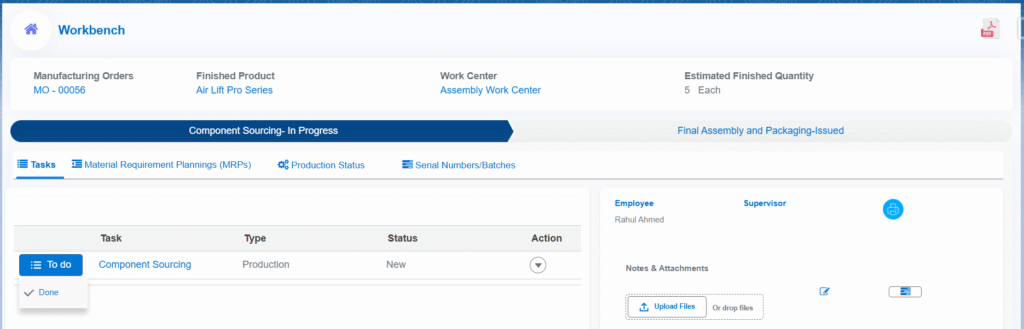
- Complete each task one by one: hover over the To Do button, click the Done option that appears, and the task will be marked as completed. Repeat the same quick step for all tasks linked to the work order until everything is finished.
- Once all tasks are completed, the Complete WO button appears — click it to mark the work order as Done.
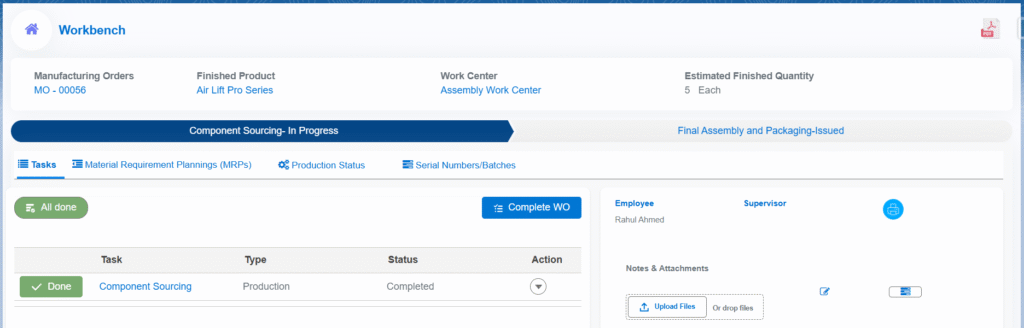
- Note 2: If an MRP is associated with the work order, the Build button will appear. If no MRP is linked, the Complete WO button is shown instead.
- Clicking the Complete WO button instantly updates the work order Status to Complete.
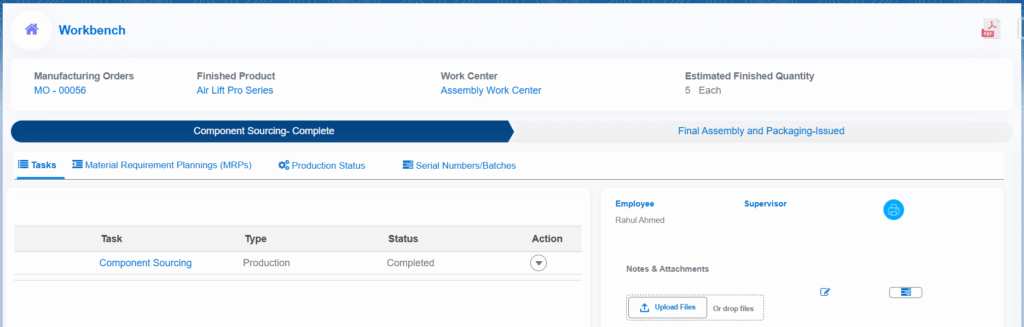
- Click next Work Order to automatically load and start execution of the following work order.
- Start the work order, complete all tasks, then click the Build button.
- Clicking the Build button opens the final production screen, where users can manufacture and scrap the end product, consume MRP components, and record any additional scrap.
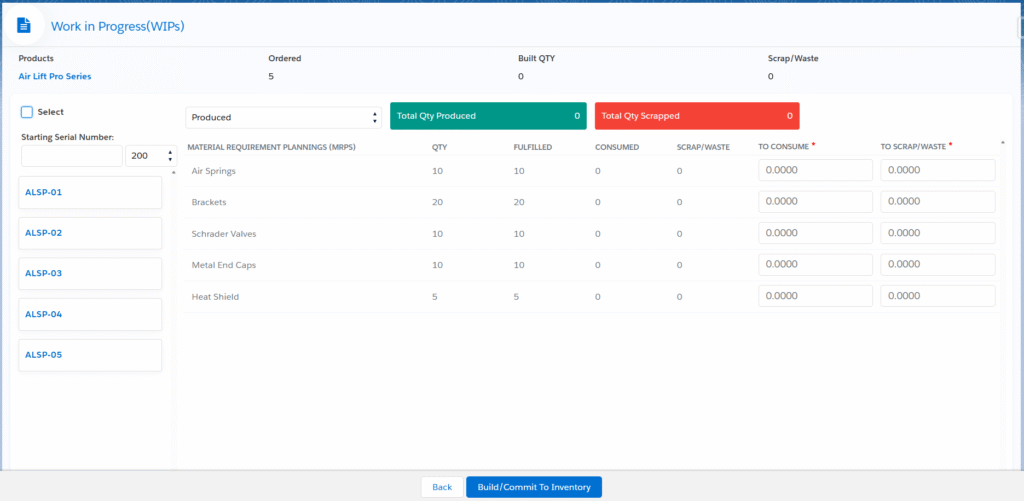
- If the end product is a serialized product: select the exact Serial Numbers to manufacture — the Total Qty Produced and TO CONSUME field auto-updates.
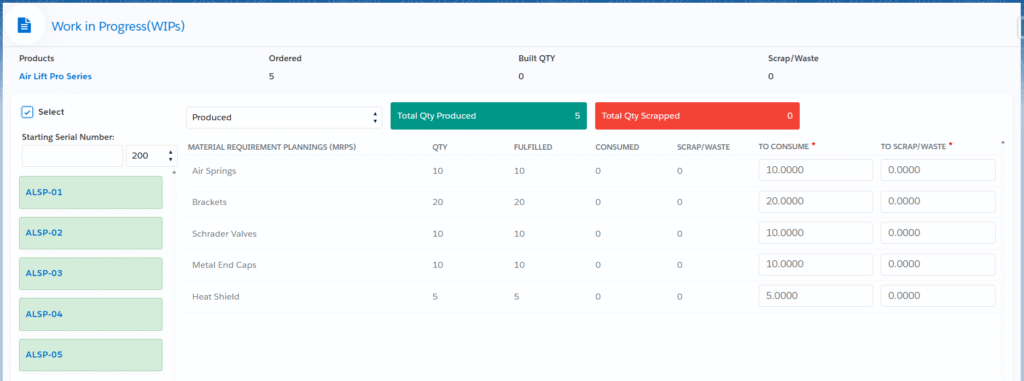
- Note 3: If the end product is Normal and Lot Tracked, users need to enter the build quantity at the top.
- Once Serial Numbers are selected, click Build / Commit to Inventory to manufacture and add the finished items to stock.
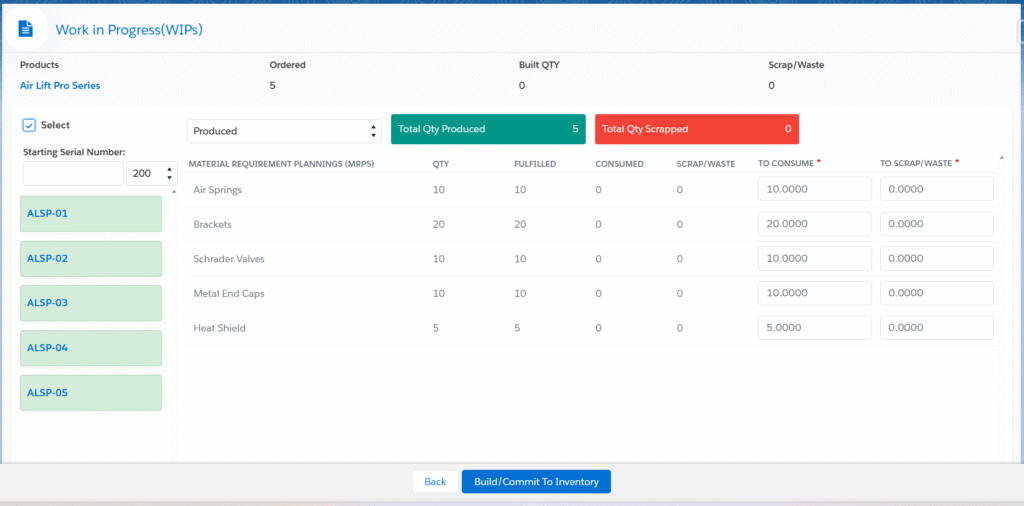
- Clicking Build / Commit to Inventory instantly creates inventory records, generates stock inward entries, and automatically assigns the selected serial numbers to each finished item.

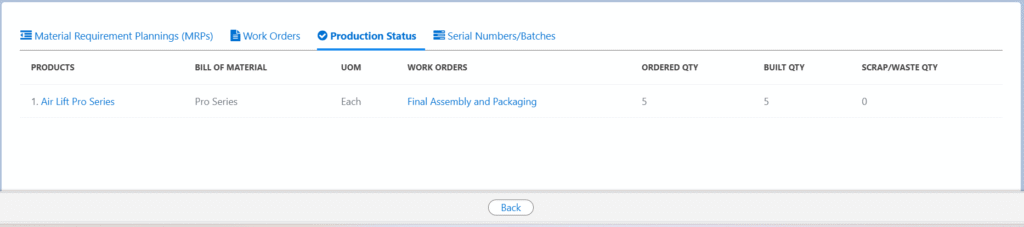
Production Status –
Displays real-time production status, clearly showing the quantity successfully built and the quantity scrapped.
Serial Numbers/Batches –
The system automatically generates and displays Serial Numbers (for serialized products) or Batch Numbers (for lot-tracked products). Users can regenerate serial numbers in the desired sequence using the Generate Serial Numbers button or edit batch number format anytime with the Edit functionality for consistent naming.

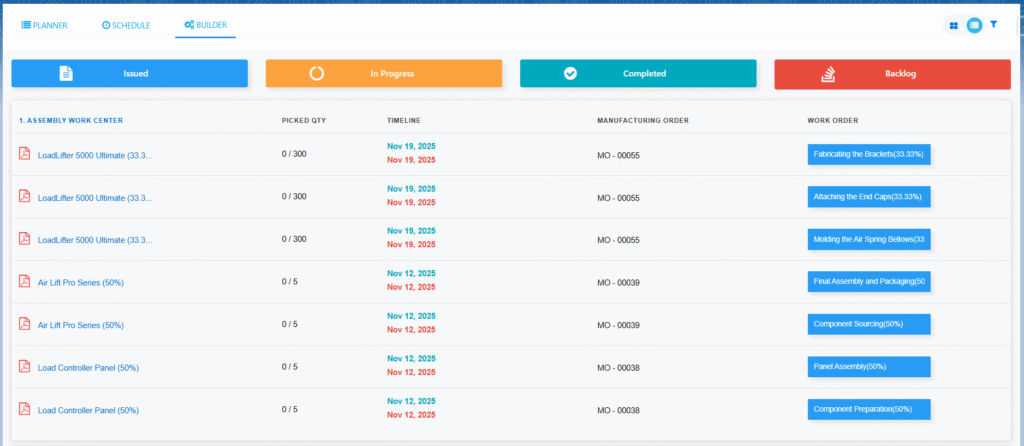
C. Builder
- The Builder tab displays all active work orders from various Manufacturing Orders, neatly grouped by Work Center.
- Click the Work Order name on the right-hand side to instantly navigate to the Job Execution screen.
- Tap the PDF icon next to any work order to view or download its complete details.
- Easily filter work orders by Site, Work Center, Order reference, or Duration for quick access to the exact tasks you need.
- Work Orders can also be filtered by their current status — Issues, In Progress, Completed, or Backlog — for quick visibility and focus.