Invoice and Its Types
Invoices
An invoice is a formal document issued by a seller to a buyer, requesting payment for goods or services provided. It typically includes details such as the invoice number, date, item descriptions, prices, taxes, and total amount due. Invoices play a crucial role in tracking sales, managing cash flow, and maintaining accurate financial records. They also serve as legal proof of a transaction between the buyer and seller.
In our Axolt system, there are three different types of invoices:
A. Advance
B. Sales
C. Schedule
A. Advance Invoice
An advance invoice is a bill sent to a customer before goods or services are delivered, requesting payment in advance. It helps secure funds upfront for future work or delivery.
Steps to Create an Advance Invoice
- Navigate to the Accounts Receivable tab using the App Launcher or find the tab in the App Navigation menu.
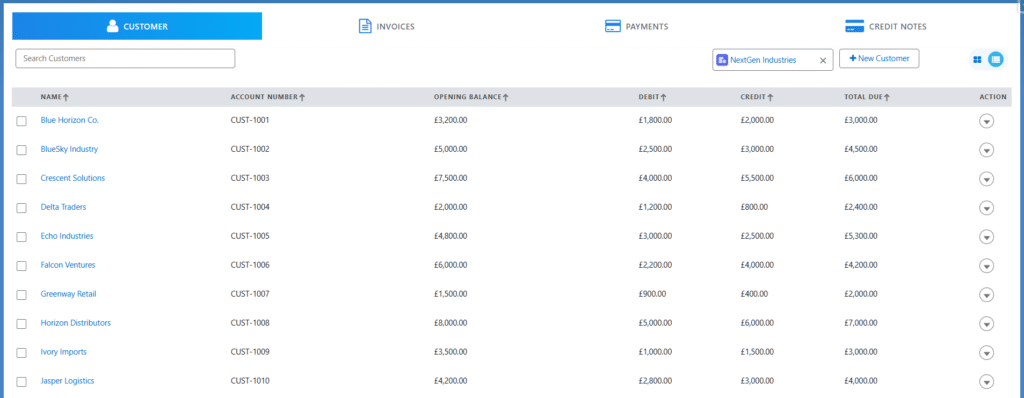
Note 1: An advance invoice can be created from Accounts Receivable or from the Invoice related list of an order.
- Click on the + New Invoice button and, from the pop-up screen, select the Advance option.
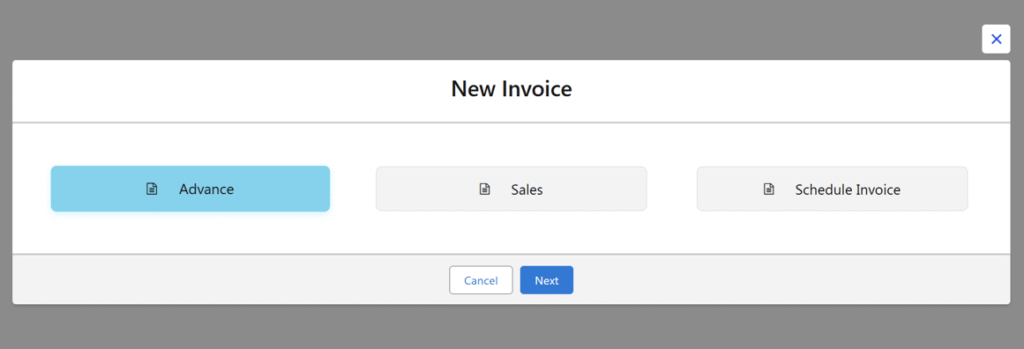
- It will be navigated to the Advance Invoice creation page.
- From the Order lookup, select the Order. Other details like Customer Account, Company, Invoice Date, Invoice Due Date Payment Terms if applicable and Order Line Items will be auto populated.
- Select the line item and enter the Down Payment Percentage or Down Payment Amount.
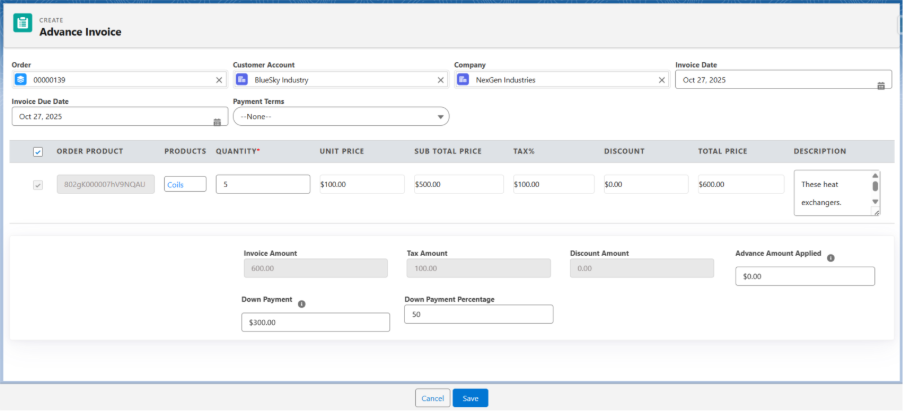
- Click on Save.
Note 2: Advance invoice cannot be Posted. The Payment record created against the advance invoice can be posted.
Note 3: In order to make the remaining payment, we can either create a Sales invoice or a Schedule Invoice.
Steps to Make Payment for an Advance Invoice
- From the Invoices tab, click on the drop-down of the advance invoice and select Record Payment.

- Clicking on Record Payment will navigate to the payment creation page.
- Received From, Customer Balance, and Available Credits fields will be auto populated.
- Enter the Payment Amount and Reference Number and select the Payment Account from the lookup.
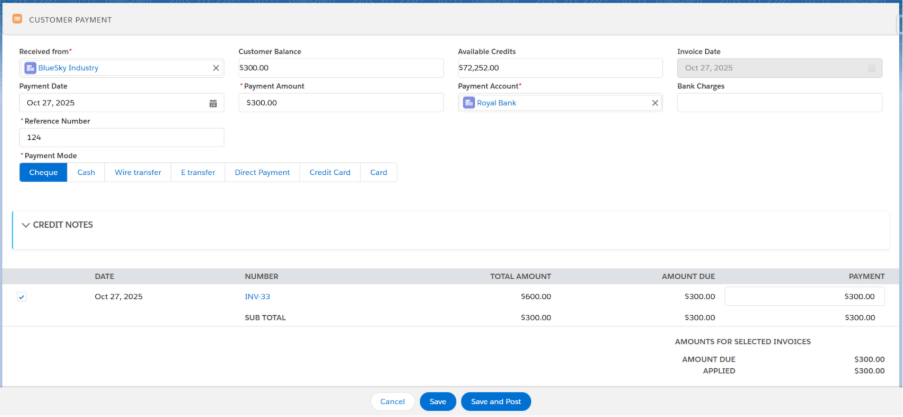
- Select the line item and click on Save or Save and Post.
Note 3: Clicking on Save will save the Payment, and you have to manually post the payment for ledger entries to be created.
Note 4: Clicking on Save and Post will create the Transaction and its Ledger Entries automatically.
B. Sales Invoice:
A sales invoice is a formal document issued by a seller to a buyer detailing the goods or services provided, their quantities, prices, and total amount due.
It serves as an official record of the transaction and a request for payment.
Note 5: A Sales Invoice can be created for the full amount, or if an Advance Amount has been Paid, a Sales Invoice can be created for the remaining amount.
Steps to Create a Sales Invoice
- Navigate to the Accounts Receivable tab using the App Launcher or find the tab in the App Navigation menu.
Note 6: A sales invoice can be created from Accounts Receivable tab, from the Invoice related list of an Order, or by checking the Issue Invoice checkbox from the EPOS screen and also from Order record level.
- Click on the New Invoice button and from the pop-up screen, select the Sales option.
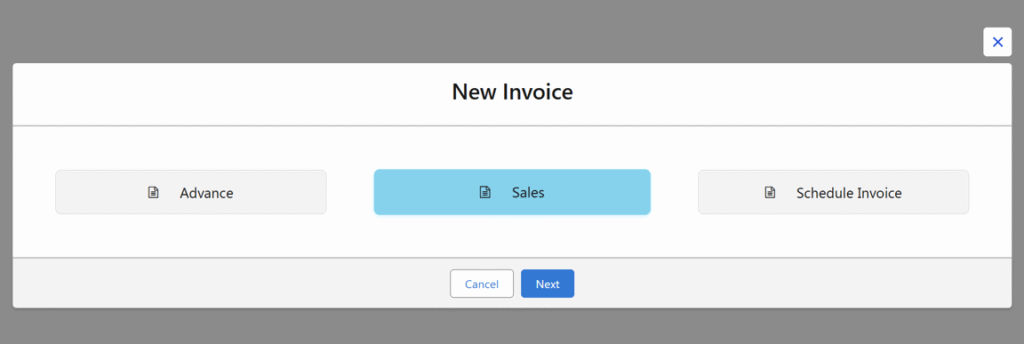
- It will be navigated to the Sales Invoice creation page.
- From the Order lookup, select the Order. Other details like Customer Account, Company, Invoice Date, Invoice Due Date Payment Terms if applicable and Order Line Items will be auto populated.
Note 7: If the invoice is created for the remaining amount of the order, the Advance Amount Applied field will be populated.
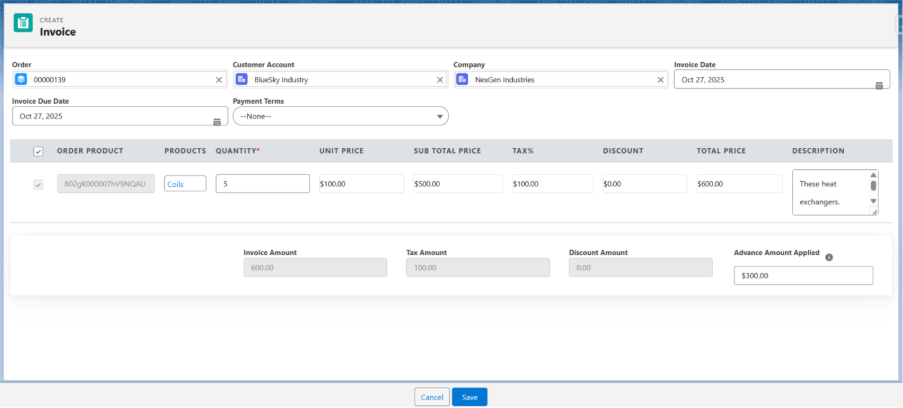
- Select the Line Item and click on Save.
- Click on the dropdown of the invoice and select the Post button.

Note 8: Posting the invoice will create the transactions and its ledger entries against the invoice.
- Once the invoice is posted, the Record Payment option appears in the dropdown.
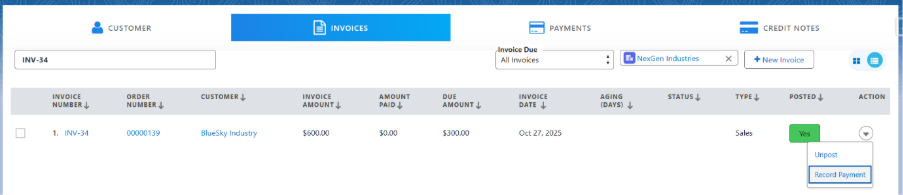
- Clicking on the Record Payment option from the dropdown will navigate you to the Payment creation screen.
- Enter the Payment Amount and Reference Number and select the Payment Account from the lookup.
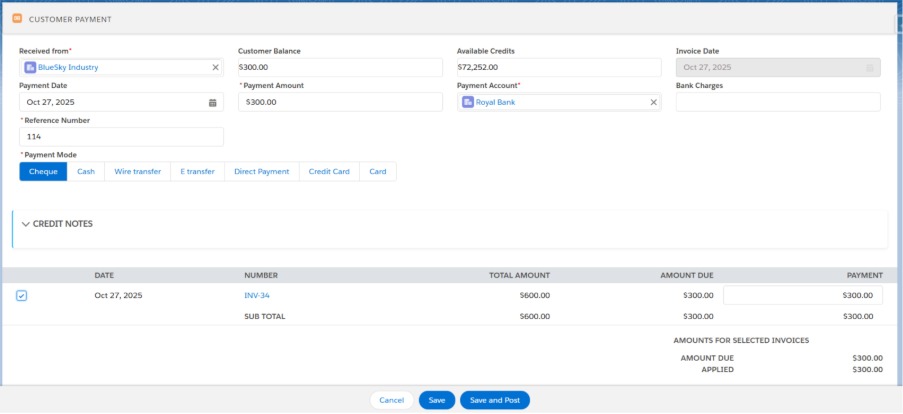
- Select the Payment Mode such as Cash, Cheque, Direct payment, Card etc.
- Click on Save or Save and Post.
Note 9: Clicking on Save will save the Payment, and we have to manually post the payment for Transaction and Its ledger entries.
Note 10: Clicking on Save and Post will create the Transactions and its Ledger Entries automatically.
C. Schedule Invoice
A schedule invoice is a type of invoice generated for recurring or installment-based payments, allowing the total amount of an order to be billed in multiple scheduled parts over a period of time.
Steps to Create a Schedule Invoice
- Navigate to the Accounts Receivable tab using the App Launcher or find the tab in the App Navigation menu.
Note 11: A schedule invoice can be created from Accounts Receivable tab or from the Invoice related list of an order.
- Click on the + New Invoice button and from the pop-up screen, select the Schedule option.
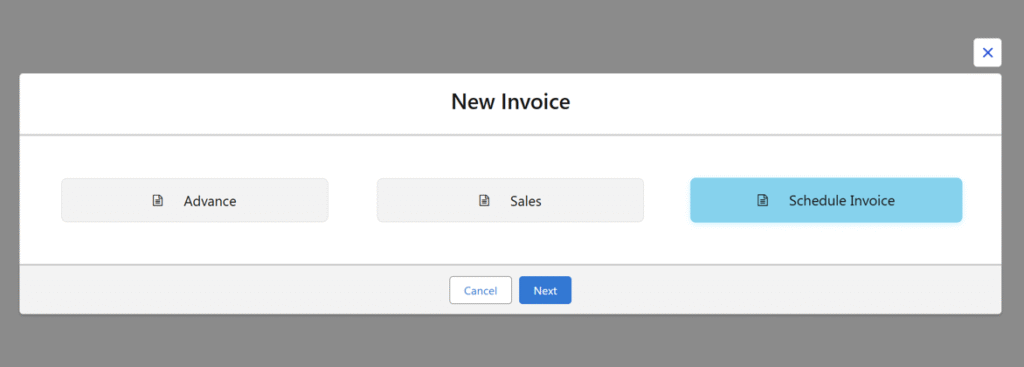
- It will be navigated to the Schedule Invoice creation page.
- From the Order lookup, select the Order. Other details like Customer Account, Company, Invoice Date, Invoice Due Date, Payment Terms (if applicable) and Order line items will be auto populated.
- Enter the Invoice Amount Percentage.
Note 12: In a schedule invoice, you can enter the percentage of the total order amount to be invoiced at a stage. For example, if you enter 50%, the invoice will be for half of the total amount. Later, another invoice can be created for the remaining 50%, or the full remaining amount can be paid at once.
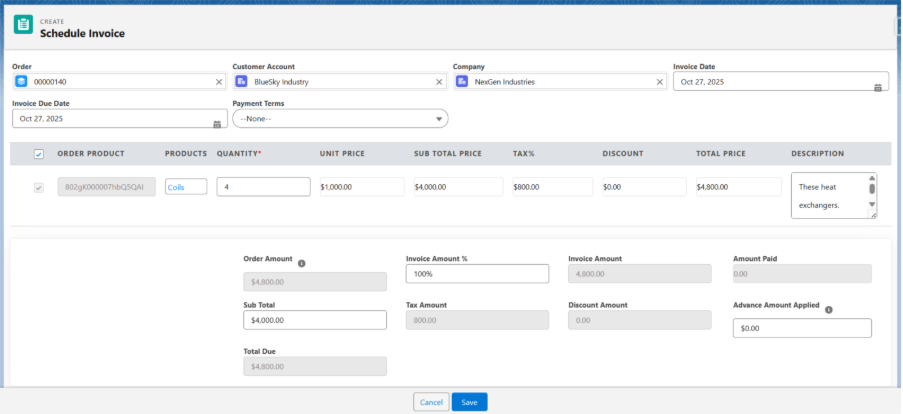
- Click on Save.
Note 13: If an advance invoice is created and paid, the amount will be reflected in the Paid Amount Applied field based on the schedule invoice percentage.
- Click on the dropdown of the invoice and select the Post button.

Note 14: Posting the invoice will create the Transaction and its Ledger Entries against the invoice.
- Once the invoice is posted, the Record Payment option appears in the dropdown.
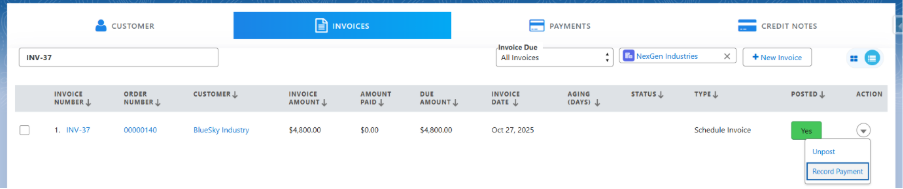
- Clicking on the Record Payment option from the drop-down will navigate you to the Payment Creation screen.
- Enter the Payment Amount and Reference Number and select the Payment Account from the lookup.
- Select the Payment Mode such as Cash, Cheque, Direct Payment, Card etc.
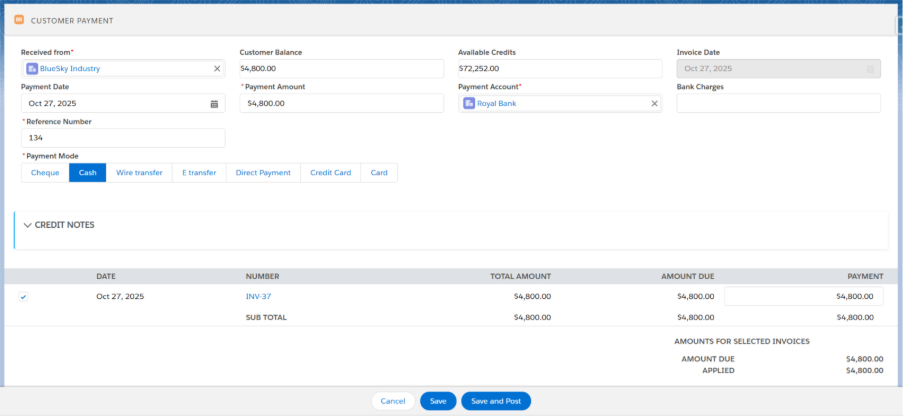
- Click on Save or Save and Post.
Note 15: Clicking on Save will save the payment, and we have to manually post the payment for ledger entries to be created.
Note 16: Clicking on Save and Post will create the ledger entries automatically.
