
Sales order (ePos)
On this page
Overview of the screen
Purpose of EPOS
EPOS (electronic point of sale) is the screen sales staff use to sell to a customer from start to finish. On one screen you can find or create the customer, build the order, check stock and credit, confirm the order, create the invoice, take payment and send the order documents. Axo, the built-in AI assistant, checks the order for you and can do many of the steps when you ask it in your own words.
The two main sections
EPOS has two main sections. You move between them with the Orders Overview button at the top left.
- Order Workspace – where you build and finish one order. It opens when you start or open an order and has three tabs: Order, Billing & Payment and Customer.
- Order Overview – the list of all sales orders with drafts, status counts, filters and bulk actions. Use it to find orders and see what needs attention.
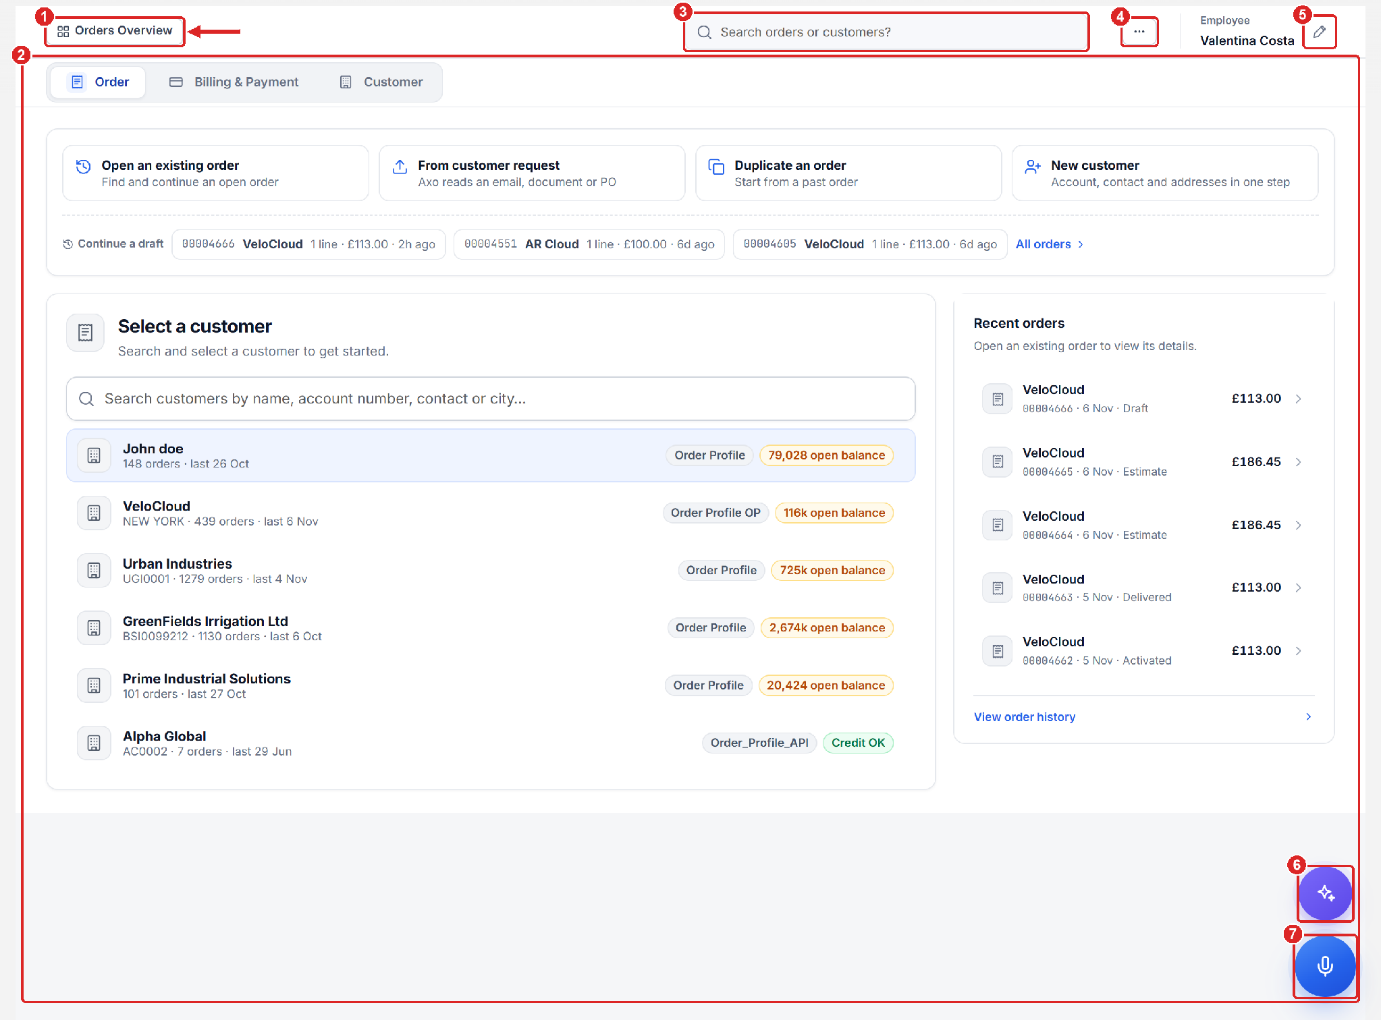
- Orders Overview – opens the Order Overview section: every order, drafts, status counts and filters.
- Order Workspace – where you build one order: the Order, Billing & Payment and Customer tabs.
- Search orders or customers – find any order or customer from anywhere on the screen.
- More actions (…) – duplicate, reload, open the order record, Customer 360, discard changes.
- Employee – the sales rep the order is recorded for. Click the pencil to change it.
- Axo assistant – chat button.
- Axo assistant – voice button.
Order Workspace
When no order is open, the Order Workspace shows the ways to start an order, your latest drafts, the customer list and your recent orders.
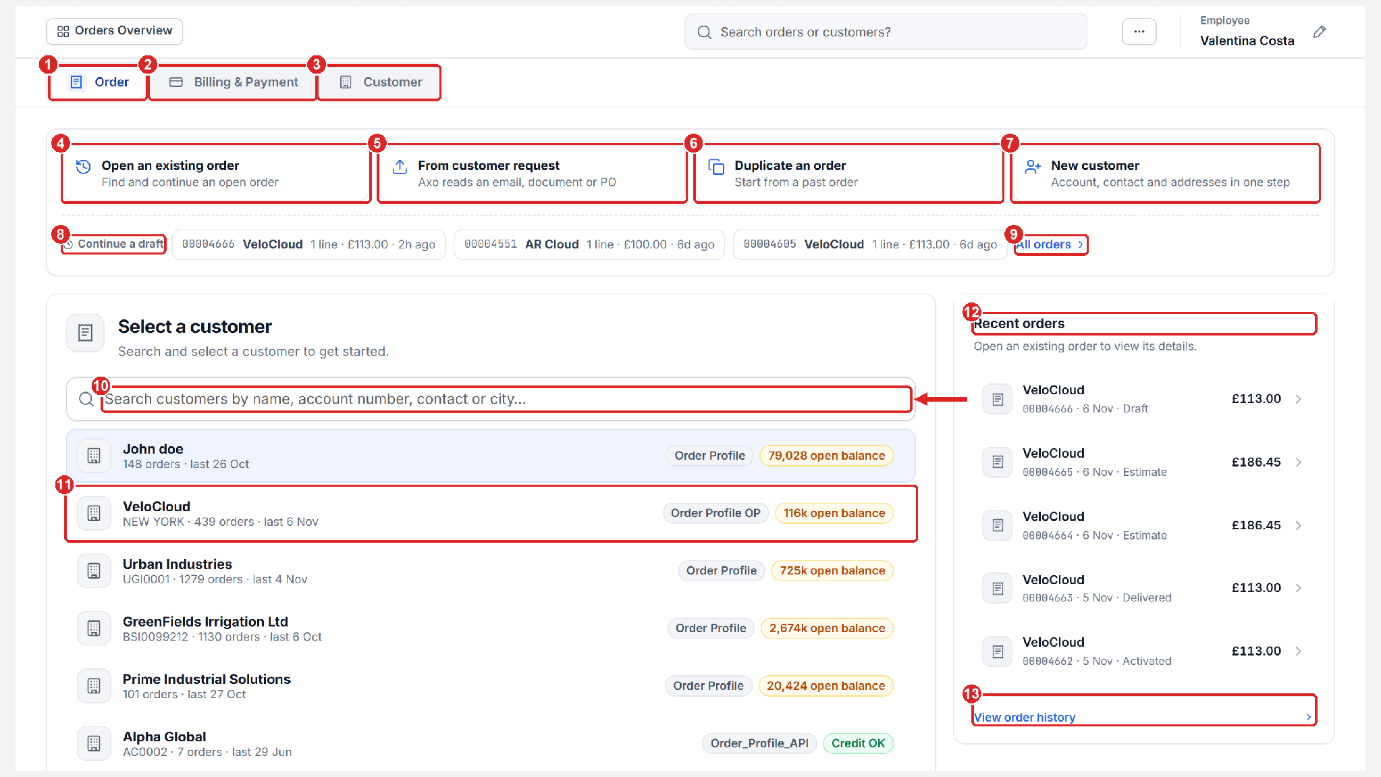
- Order tab – displays the details of the customer, order and order line items.
- Billing & Payment tab – from this tab, you can create invoices and payments, and view the invoices and payments for the selected order.
- Customer tab – displays the account, contacts, addresses, notes and activity of the selected customer.
- Open an existing order – find and continue an order that is not finished.
- From customer request – Axo reads an email, document or PO and fills the order.
- Duplicate an order – copy the lines of a past order into a new one.
- New customer – create the account, contact and addresses in one step.
- Continue a draft – the three most recent draft orders. Click one to reopen it.
- All orders – opens the full order list in the Order Overview.
- Select a customer – search by name, account number, contact or city.
- Customer row – name, account number, order count, last order date, order profile and open balance (or Credit OK).
- Recent orders – the latest orders. Click a specific one to open it.
- View order history – opens the complete history in the Order Overview.
The top bar is always visible. Click … (More actions) for the order tools, and the pencil next to Employee to change the sales rep.
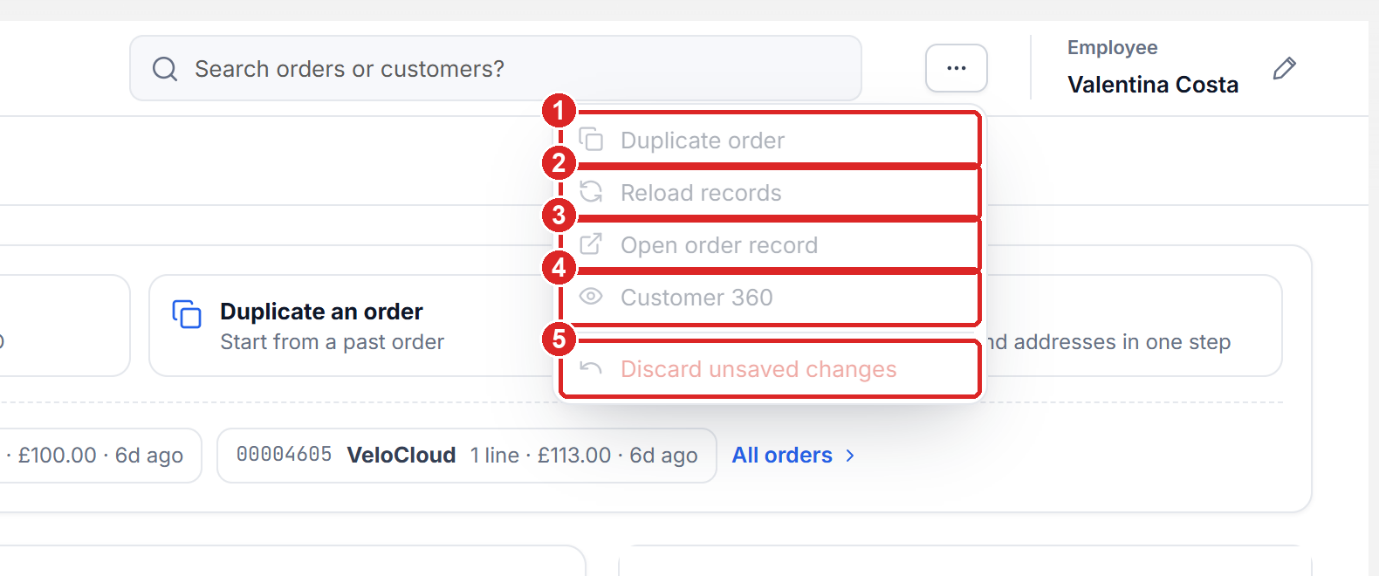
- Duplicate order – copies the open order into a new draft.
- Reload records – refreshes the order, lines and prices from the server.
- Open order record – opens the full order record page in a new tab.
- Customer 360 – opens the complete customer view.
- Discard unsaved changes – throws away edits made since the last save.
Order Workspace – Order tab
After you choose a customer, the Order tab shows the order header, the product finder, the order lines and the order summary side by side.
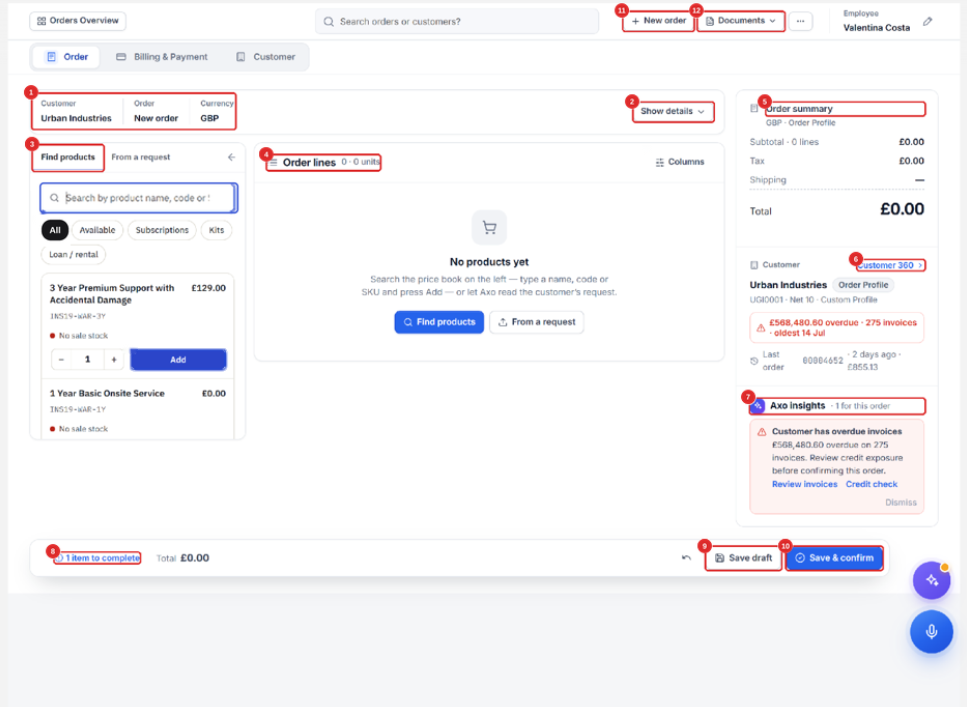
- Order header – displays the customer name, order number (after save) and currency of the order.
- Show details – displays the other details of the order, such as customer contact, bill-to and ship-to addresses, order profile and order date.
- Find products / From a request – from the product finder, search for products, or let Axo read a request. Products can be filtered by All, Available, Subscriptions, Kits and Loan / rental.
- Order lines – displays every product on the order, with line and unit count.
- Order summary – displays the order summary including subtotal, tax, shipping and total.
- Customer card – displays profile, payment terms, overdue balance and last order. Customer 360 opens the full view.
- Axo insights – warnings and tips for this order (for example overdue invoices).
- Checklist – what is still missing before the order can be confirmed.
- Save draft – saves the order without confirming it.
- Save & confirm – saves and confirms the order.
- New order – start another order.
- Documents – preview, download or send the order document.
Order Workspace – Billing & Payment tab
The Billing & Payment tab shows the money side of the order: order total, amount paid, balance due, the customer’s available credit, the invoices and the payments. Before the order is confirmed, invoices and payments are not available yet.
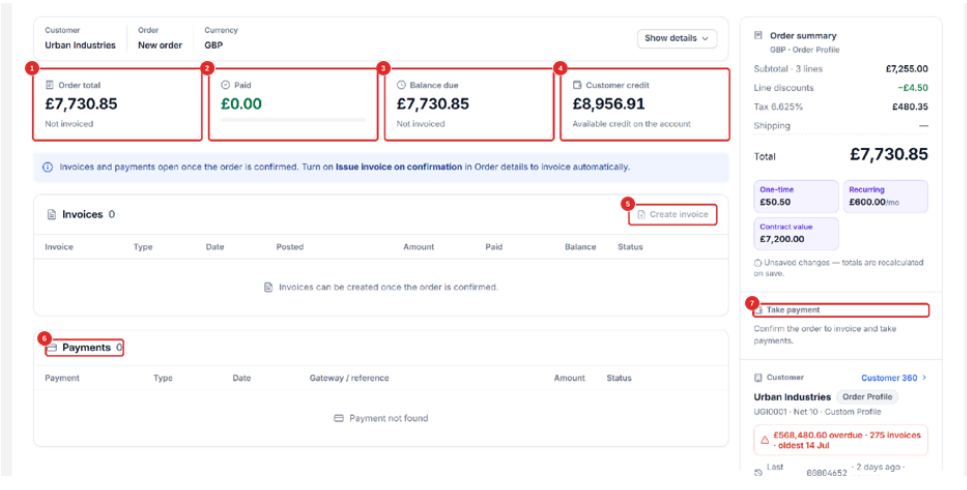
- Order total – displays the total order amount and its invoice state.
- Paid – money received so far, with a progress bar.
- Balance due – what the customer still owes.
- Customer credit – credit still available on the account.
- Create invoice – becomes active after the order is confirmed.
- Payments – displays every payment taken for this order.
- Take payment – becomes active after confirmation.
Order Workspace – Customer tab
The Customer tab shows everything about the selected customer: account fields, contacts, addresses, credit and payments, recent orders and the last invoices. You can update account information and switch the order contact or addresses from here.
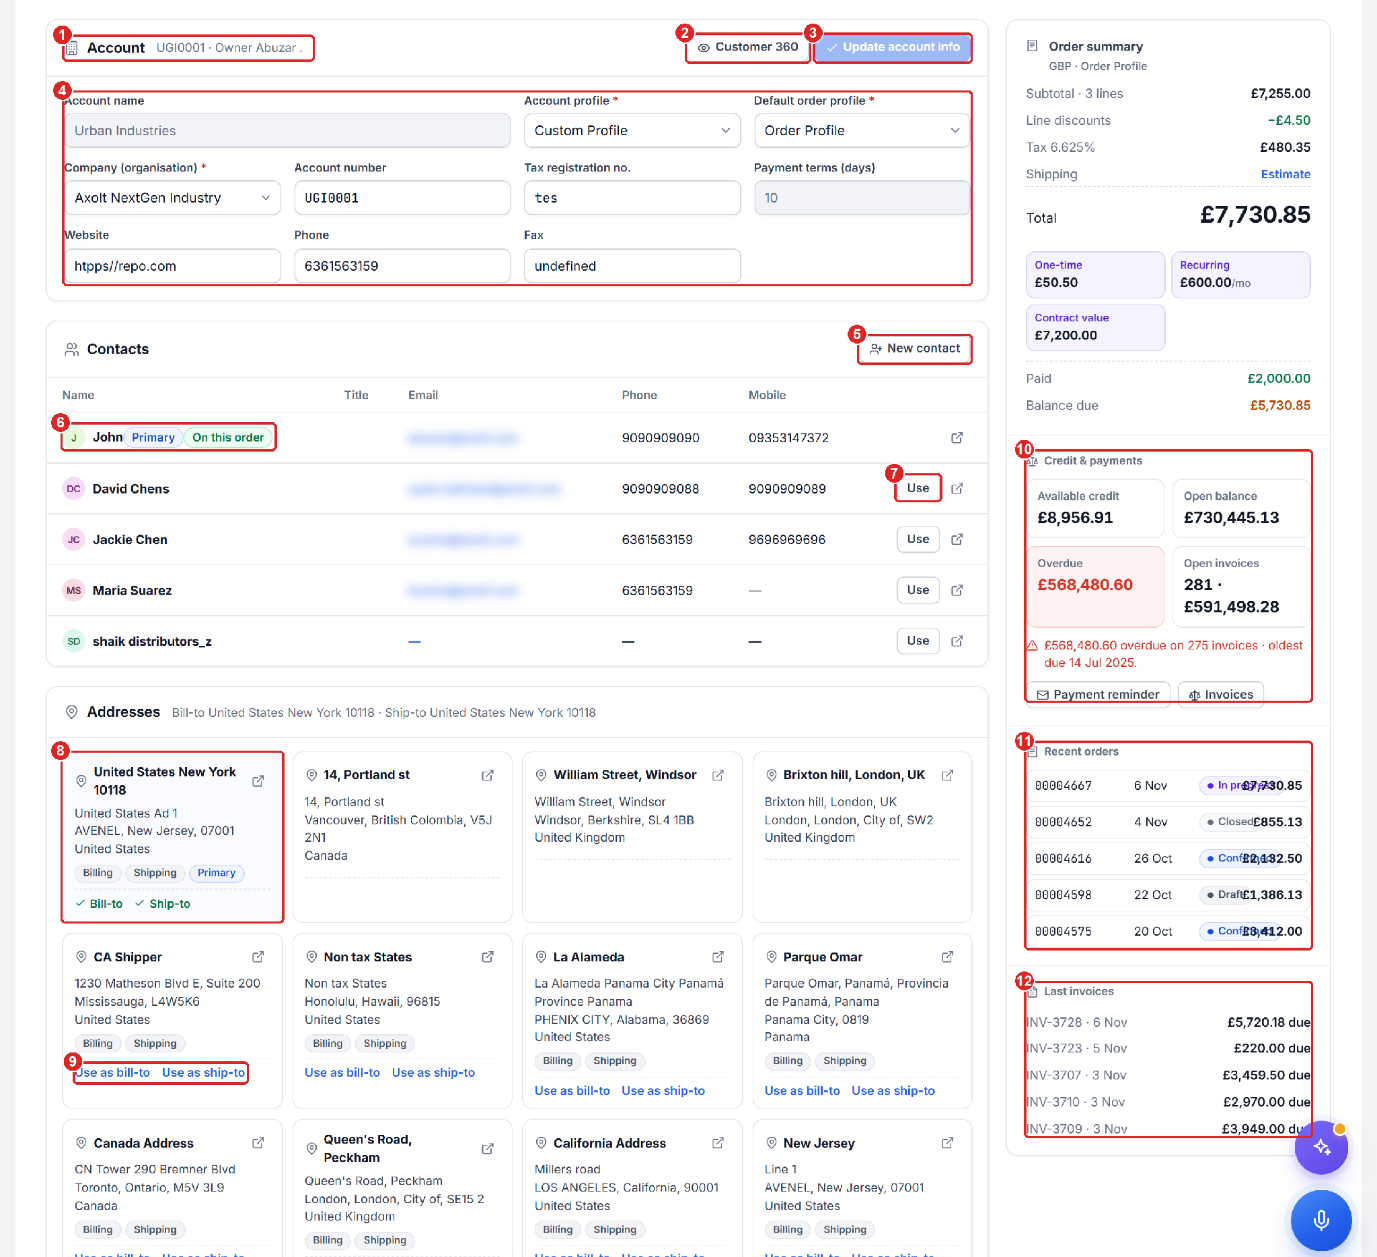
- Account – displays the account number and owner.
- Customer 360 – the full customer view.
- Update account info – saves changes made to the account fields.
- Account fields – Account name, Account profile, Default order profile, Company (organisation), Account number, Tax registration no., Payment terms (days), Website, Phone, Fax.
- New contact – adds a contact to the customer.
- Use as bill-to / Use as ship-to – switch the order address in one click.
- Credit & payments – available credit, open balance, overdue amount and open invoices, plus Payment reminder and Invoices.
- Recent orders of this customer with status and total.
- Last invoices with the amount still due.
Order Overview at a glance
The Order Overview lists every sales order. At the top you see your drafts, a Needs attention card and status cards (Draft, Confirmed, In progress, Completed, Closed & cancelled). Below them is the order list with tabs, search, filters and quick actions. Order Overview explains every part of it.
Starting and creating orders
Top actions
The four cards at the top of the start screen are the quickest ways to begin.
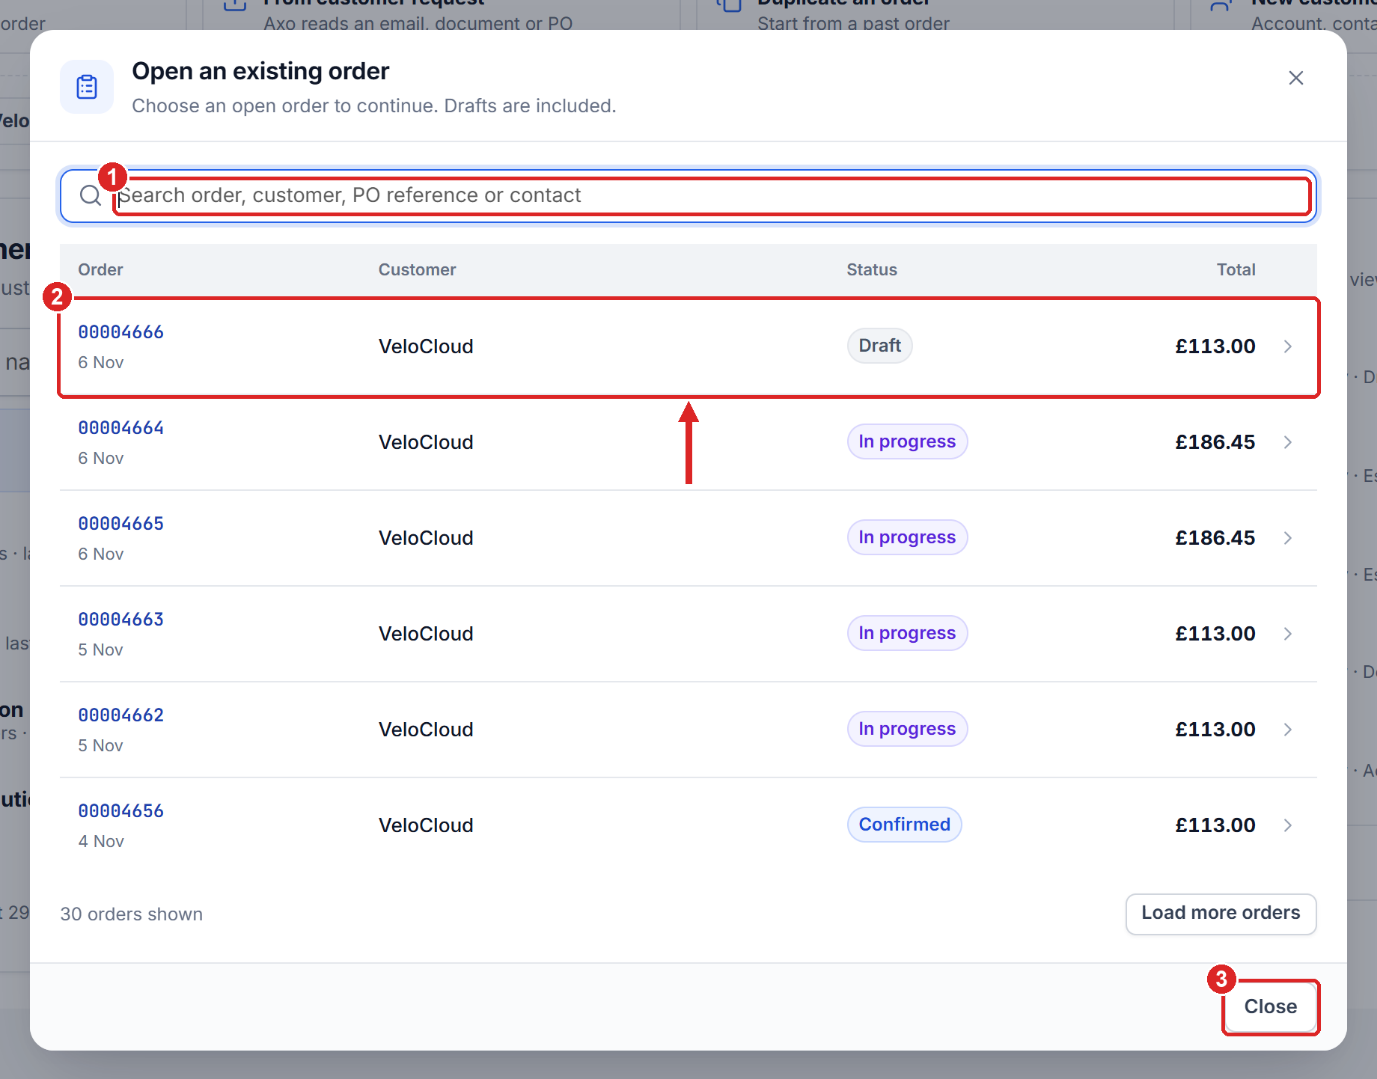
Open an existing order
Click Open an existing order.
Type an order number, customer, PO reference or contact in the search box, or scroll the list, and select the required order.
Duplicate an order
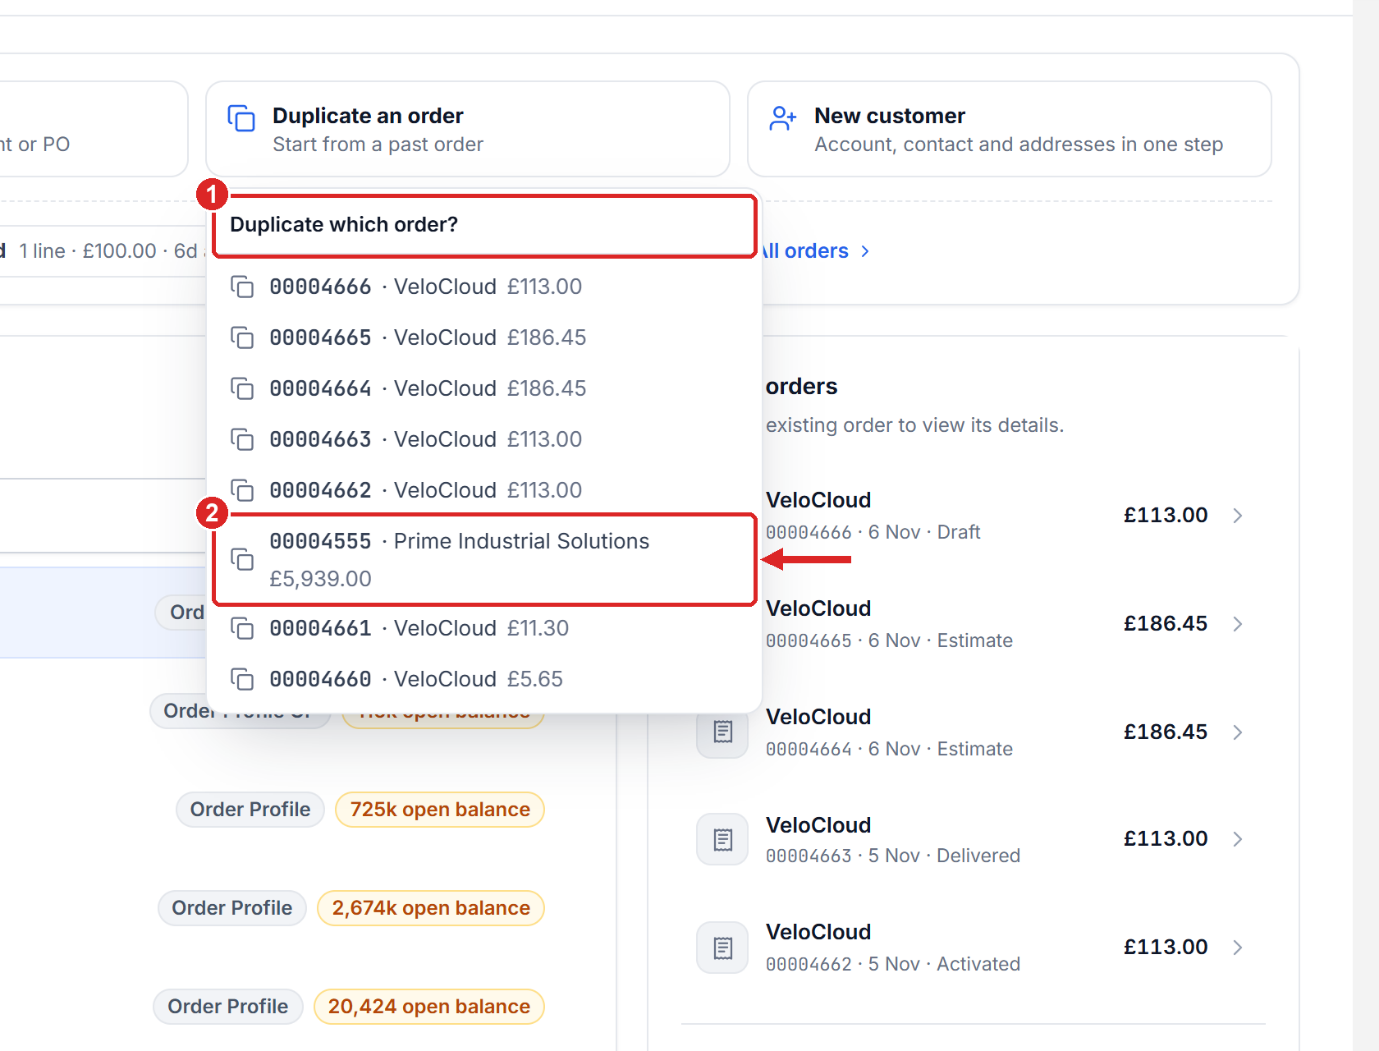
Click Duplicate an order.
In Duplicate which order?, click the order you want to copy.
A new draft opens with the same customer and lines. Check quantities, dates and prices, then save.
From customer request
Use this when the customer sends a purchase order, RFQ or email. Axo reads it and suggests the order lines.
Click From customer request and choose the Customer.
Click + File to attach the document, or paste the text in Or paste the request.
Click Find these products. Review every suggested line before it is added to the order.
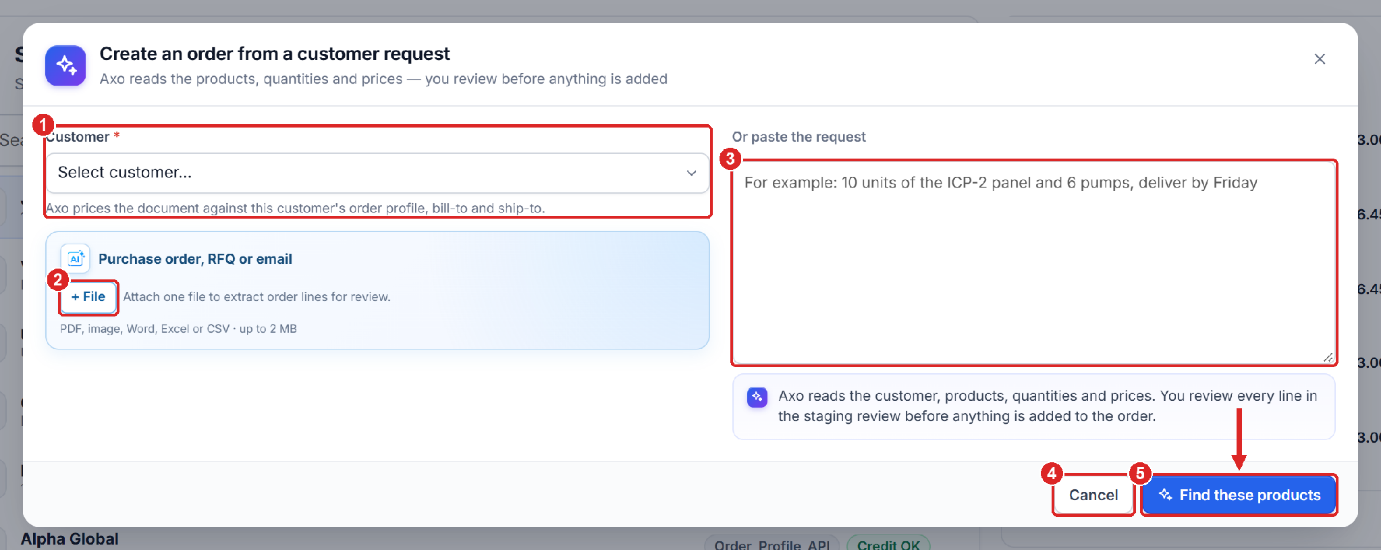
- Customer – pick the customer. Axo prices the request with this customer’s order profile, bill-to and ship-to.
- + File – attach the purchase order, RFQ or email (PDF, image, Word, Excel or CSV, up to 2 MB).
- Or paste the request – paste the text of an email instead of attaching a file.
- Cancel – close without changes.
- Find these products – Axo reads the request and shows every line for review before anything is added.
New customer
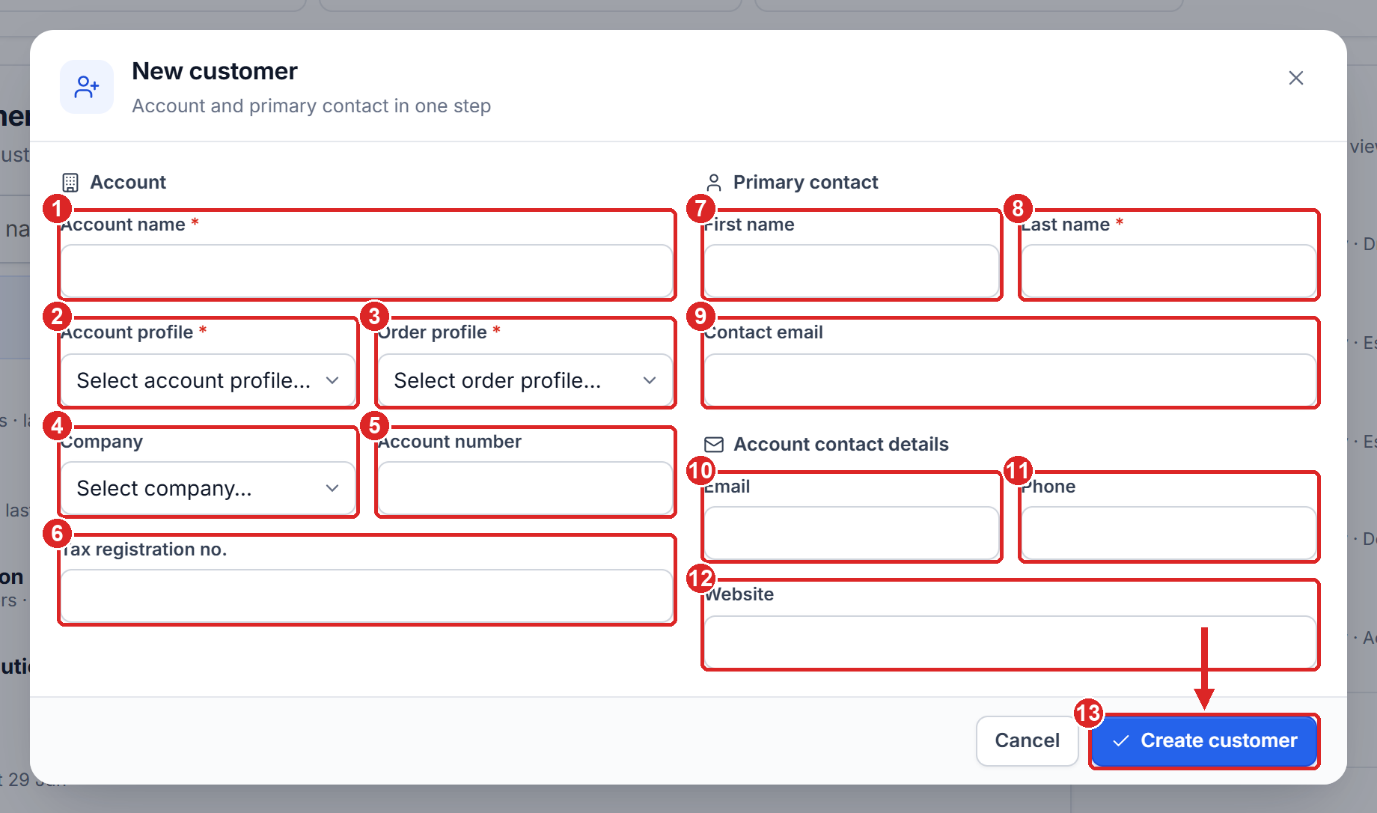
Create a customer without leaving EPOS. The account and its primary contact are created in one step.
Click New customer.
Fill in the Account fields. Account name, Account profile and Order profile are required.
Fill in the Primary contact. Last name is required.
Add the Account contact details if you have them.
Click Create customer. The new customer is selected for the order.
Create a new order
Every new order starts with a customer.
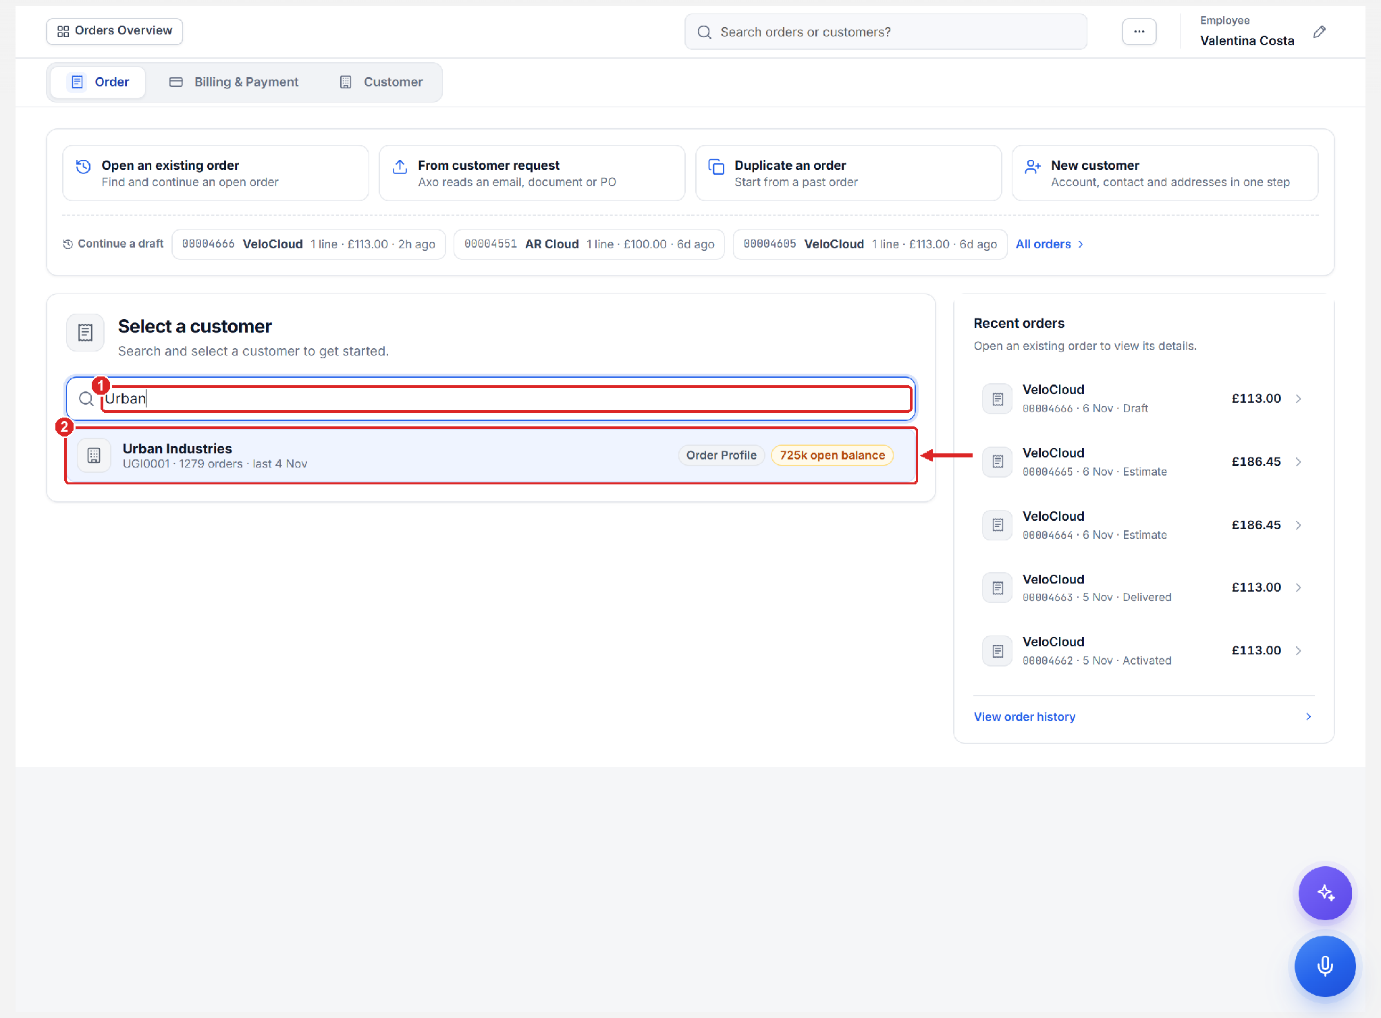
Select a customer
In the Select a customer section, type the name of the customer, account number, contact or city to search.
Click the customer. A new order opens on the Order tab.
Order details
Click Show details in the order header to see and change every order field. It displays the contact, bill-to and ship-to details, order profile and other details. Most fields are filled in from the customer and their order profile.
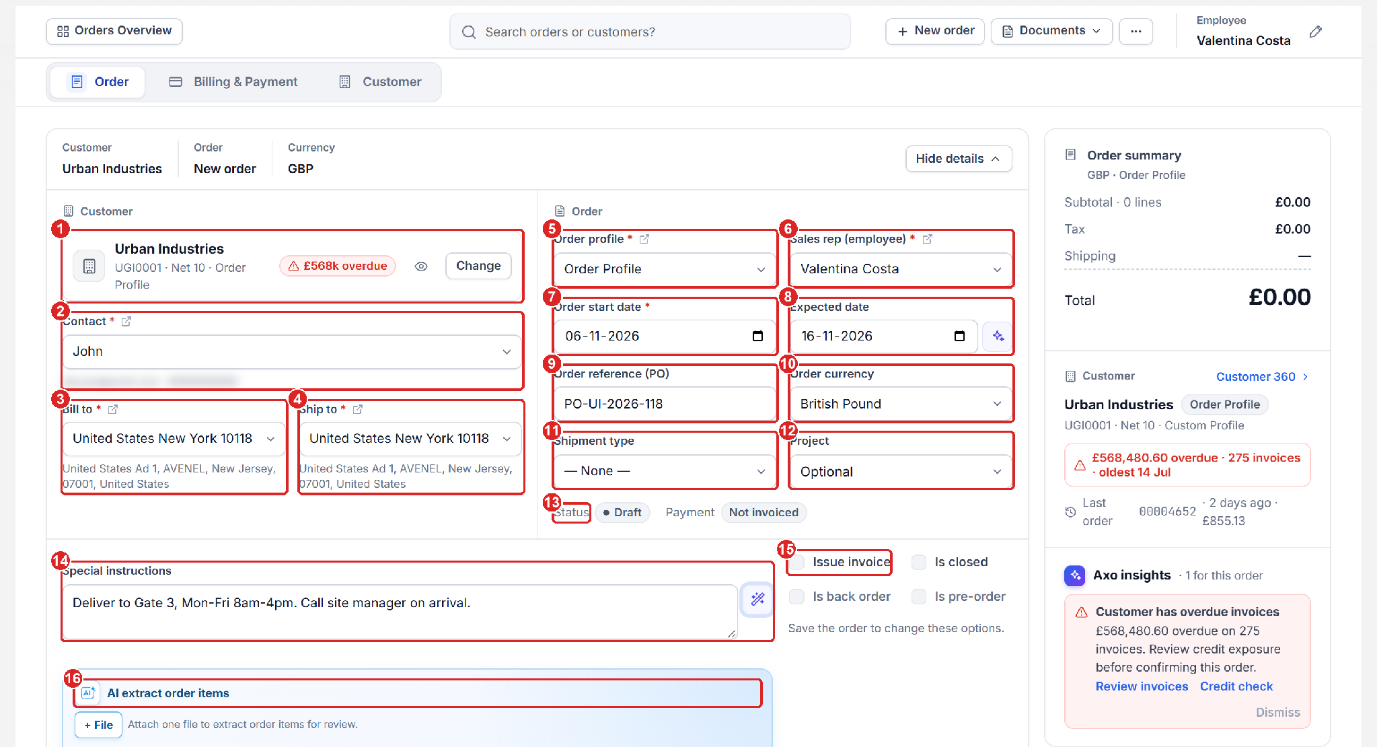
- Issue invoice, Is closed, Is back order, Is pre-order – order options. They can be changed after the order is saved.
- AI extract order items – attach a PO or email and Axo extracts the lines for review.
- Click the sparkle button next to Expected date to let Axo check whether the date can be met, and the wand next to Special instructions to let Axo rewrite the notes clearly.
Add products
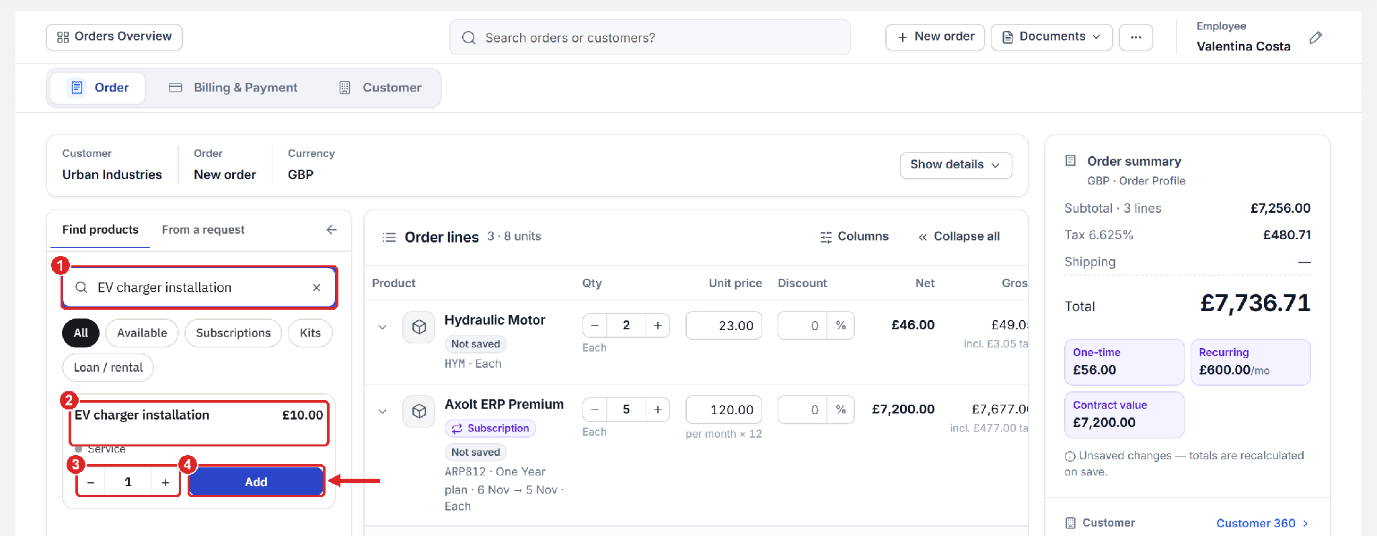
Once all the details are entered, click Add product to add products to the order. You can also search for a product using filters such as Subscriptions and Kits.
Search for the product in the Product finder section and click Add to add it.
The stock is shown against every product. Enter the quantity of the product you want to order.
Subscription product
For a subscription product, select the product and choose the term (Plan – one month, two months, a year or a custom plan), enter the quantity, enter the start date and end date, and click Add.
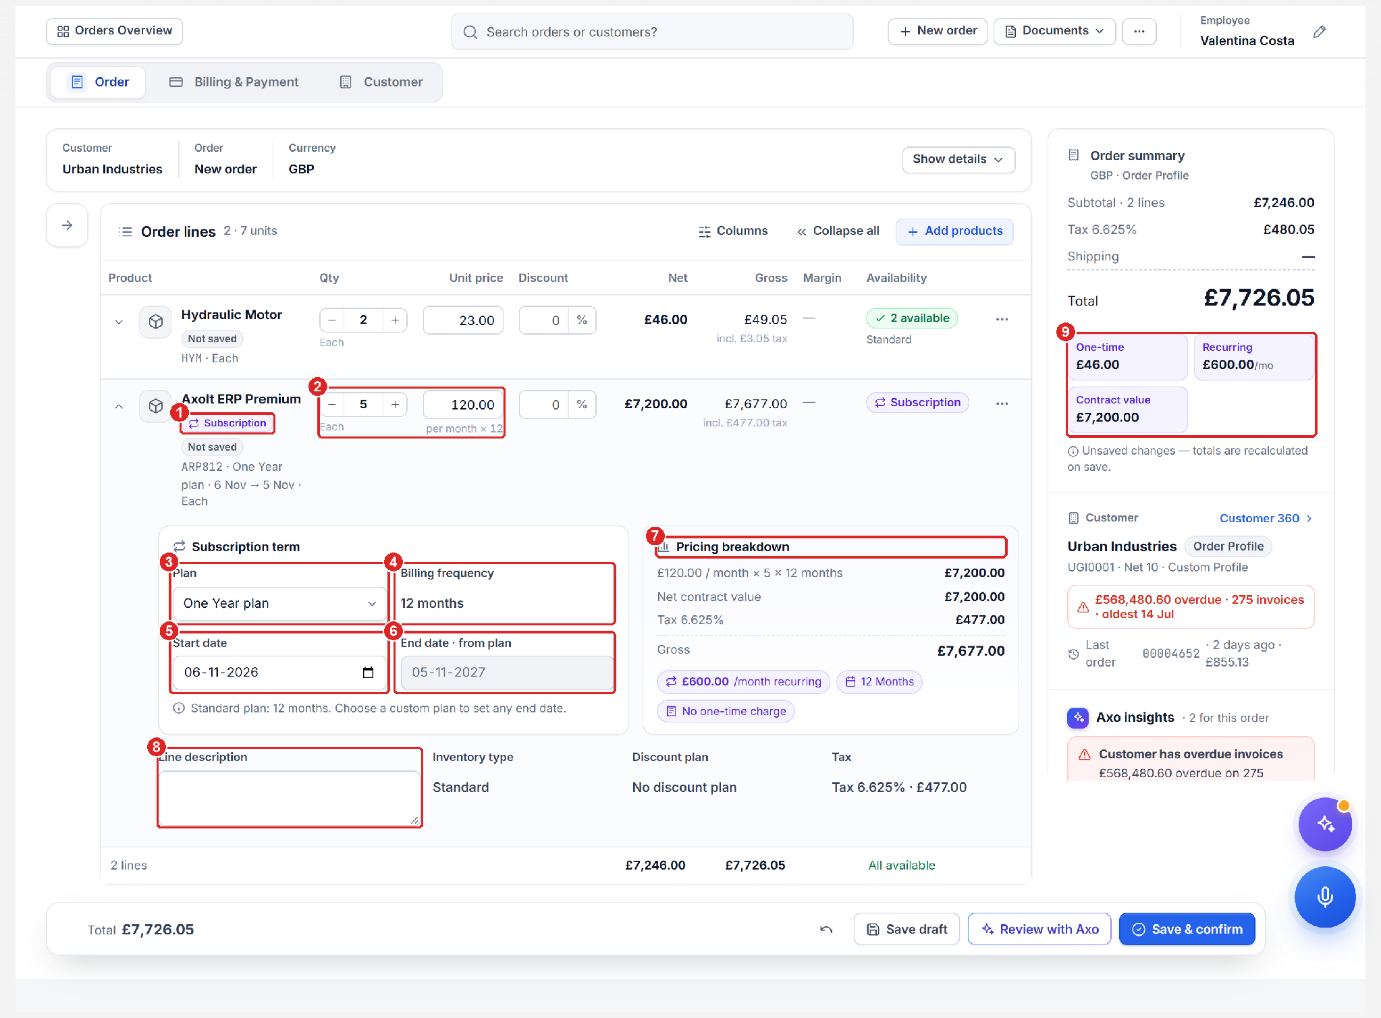
- Subscription badge – this line repeats every billing period.
- Quantity (seats) and Unit price per month. “per month × 12” shows the multiplier for the term.
- Plan – change the subscription plan at any time before saving.
- Billing frequency – how often the customer is invoiced (from the plan).
- Start date – when the service starts.
- End date – worked out from the plan. Choose Custom Plan to type any end date.
- Pricing breakdown – monthly price × quantity × months, net contract value, tax and gross.
- Line description – optional text printed on the order line.
- The order summary splits One-time and Recurring amounts and shows the total Contract value.
Loan / rental product
Click the Loan / rental filter and search for the product – here Infusion Pump X200 – Batch.
Make sure the Loan / Sale switch is on (loan).
Choose the Loan policy – here 1 week policy.
Click Add. The loan line opens with its loan terms.
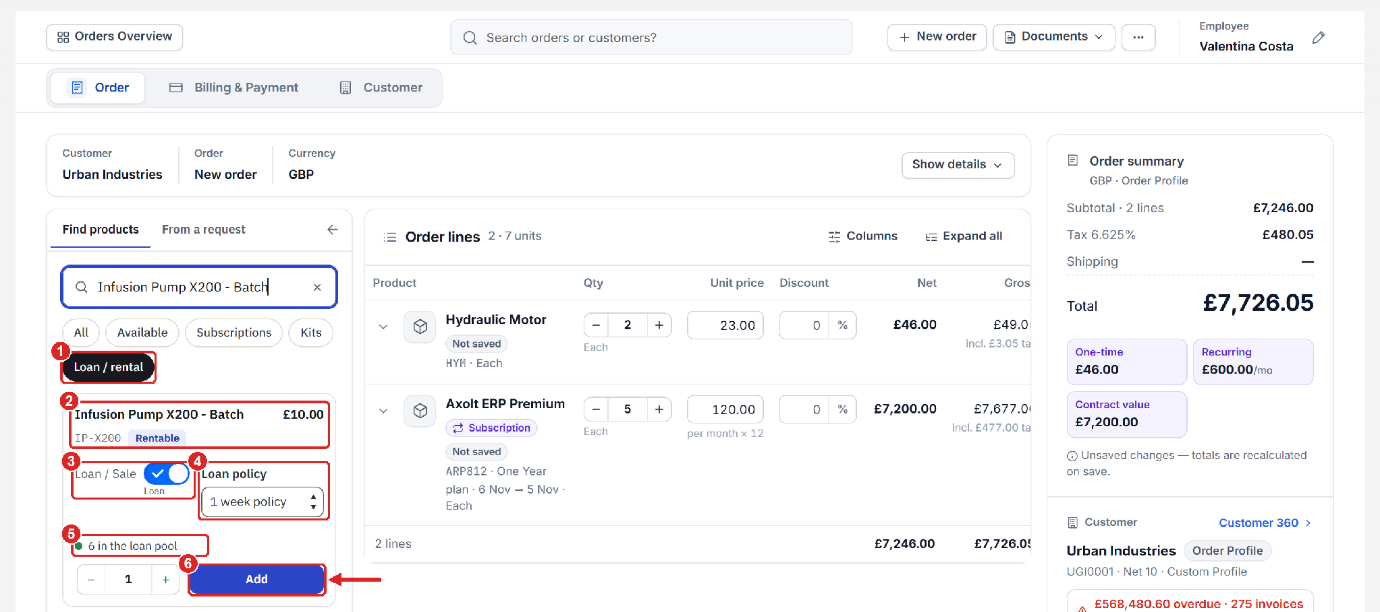
- Loan / rental filter – shows only products that can be lent or rented.
- Loan / Sale switch – when it is on, the product is added as a loan; otherwise it is a normal sale.
- Loan policy – the rental rules (None, 1 week policy or Custom policy).
- Loan pool stock – units free to lend.
- Add – the loan line opens with its loan terms.
Check the loan terms: start and end date, base fee, overdue charge, replacement value and the required deposit.
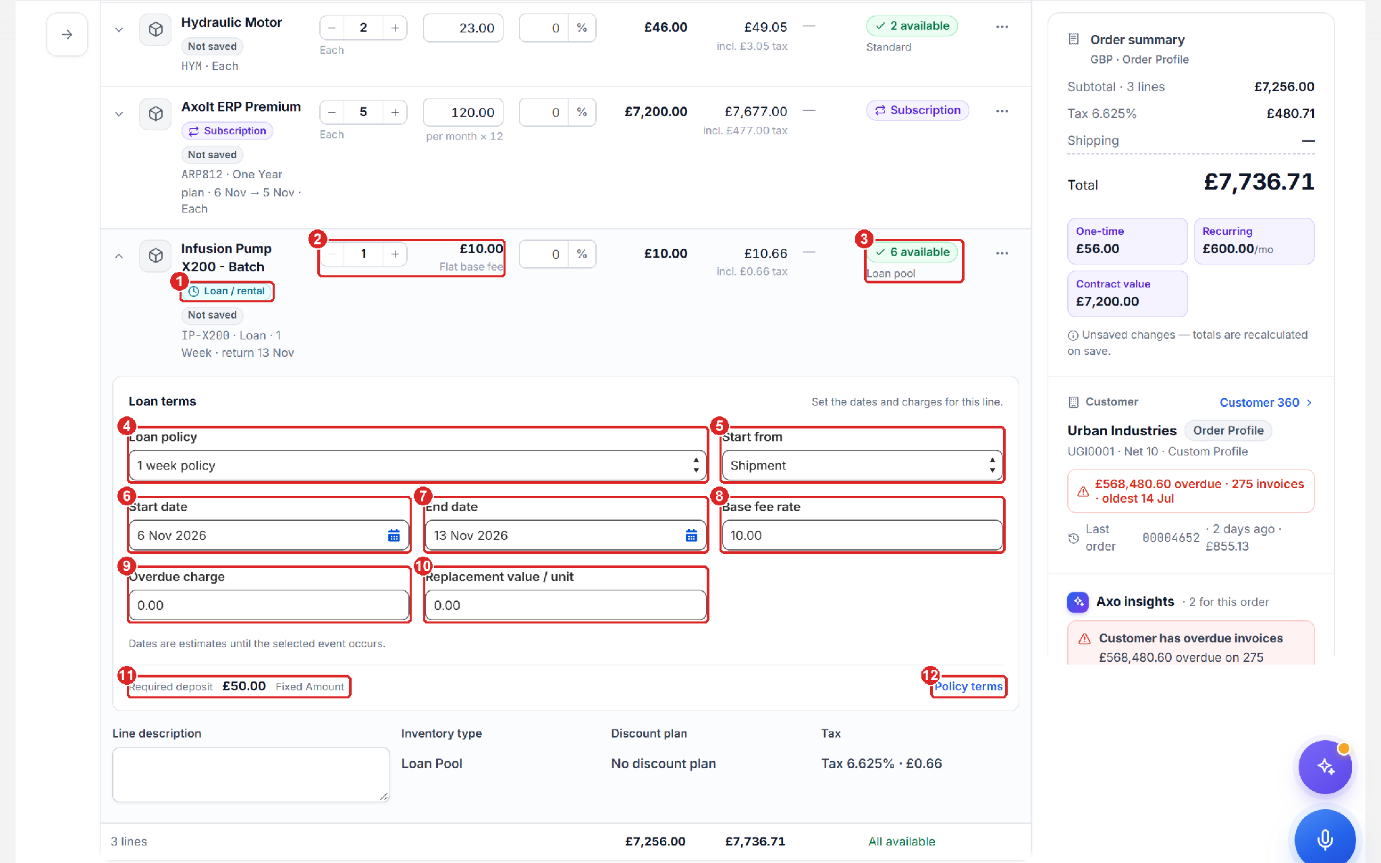
- Loan / rental badge – this line is a loan, not a sale.
- Quantity and the flat base fee from the loan policy.
- Availability – units free in the loan pool.
- Loan policy – the rental rules for this line.
- Start from – what starts the loan clock (for example Shipment).
- Start date – estimated loan start.
- End date – estimated return date (from the policy; 1 week here).
- Base fee rate – the rental charge.
- Overdue charge – charged if the item comes back late.
- Replacement value / unit – charged if the item is not returned.
- Required deposit – deposit due for this loan (here £50.00, fixed amount).
- Policy terms – opens the full loan policy.
Kit product
Kits are sold as one product but are built from several components. A kit marked Kit, built to order is assembled when the order is fulfilled.
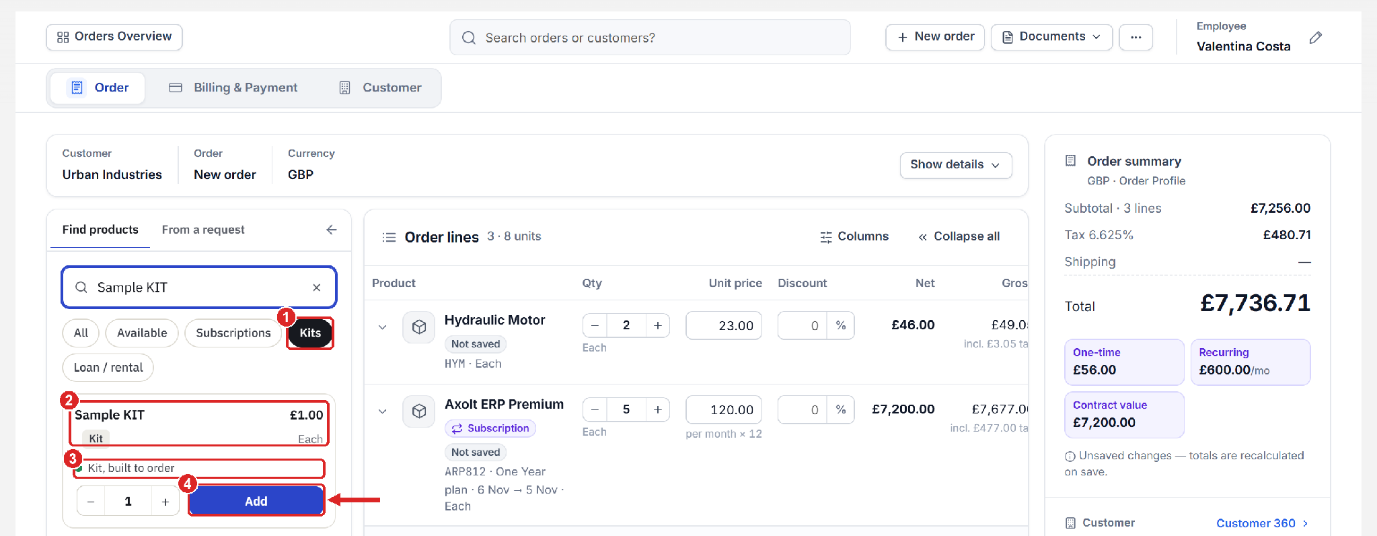
To add a kit product, select the Kit filter, search for the product and click Add.
Edit lines and review with Axo
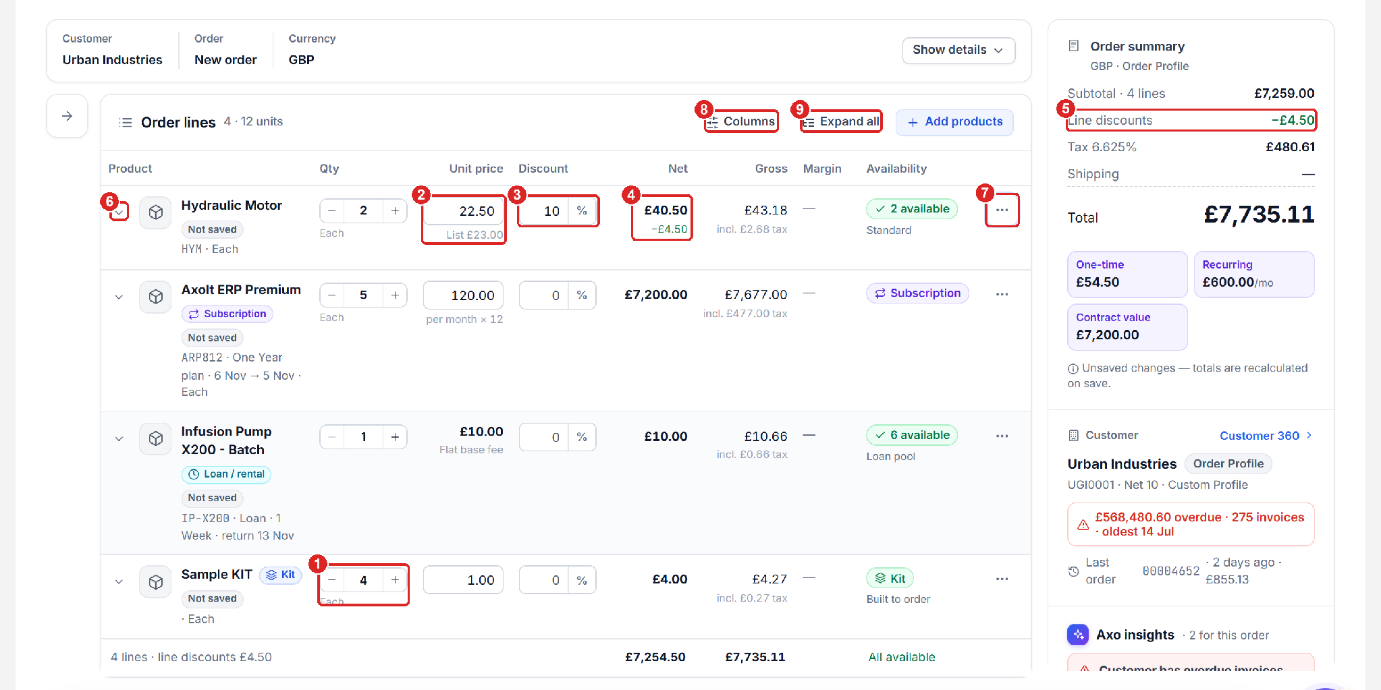
Once all the products are added, you can change the quantity of line items, enter the unit price and enter a discount.
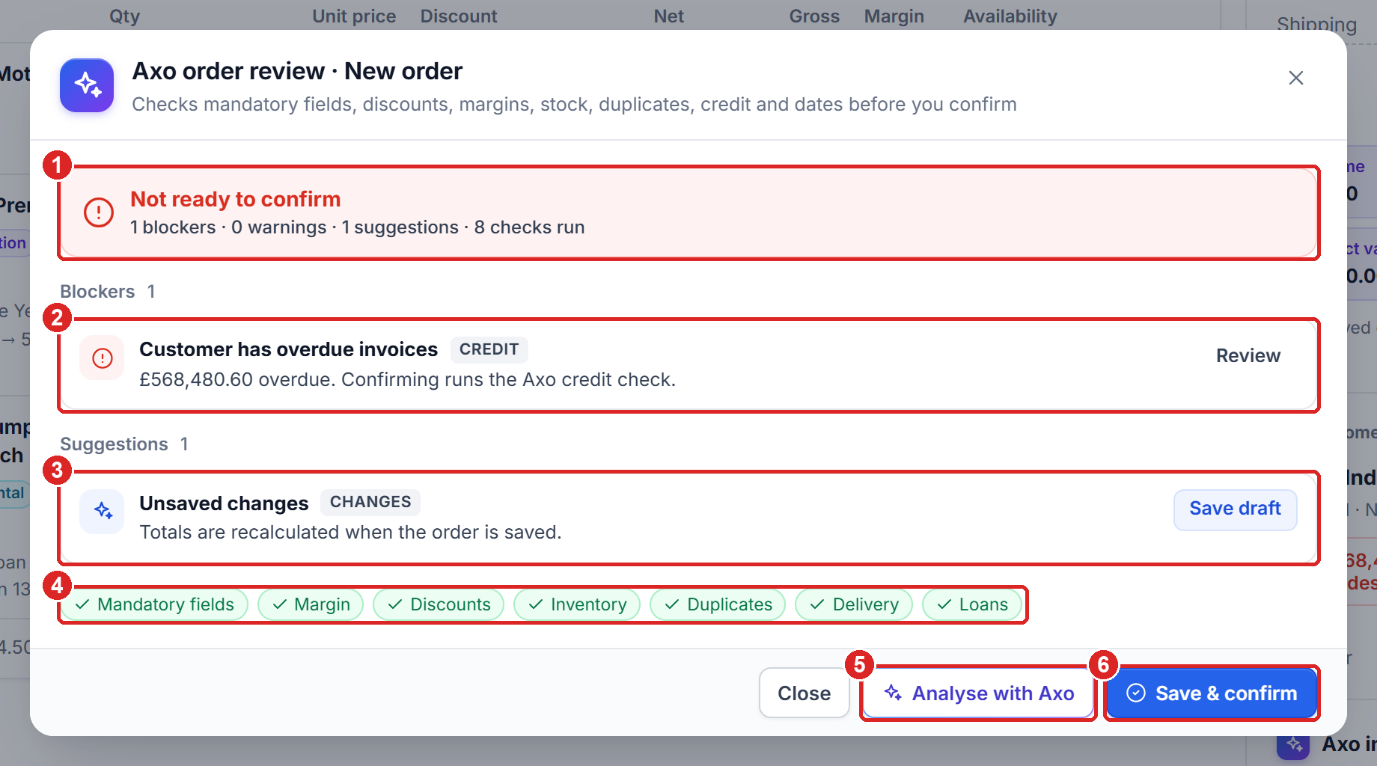
Before confirming, click Review with Axo. Axo checks mandatory fields, margin, discounts, stock, duplicates, delivery and loans, and lists anything that blocks the order.
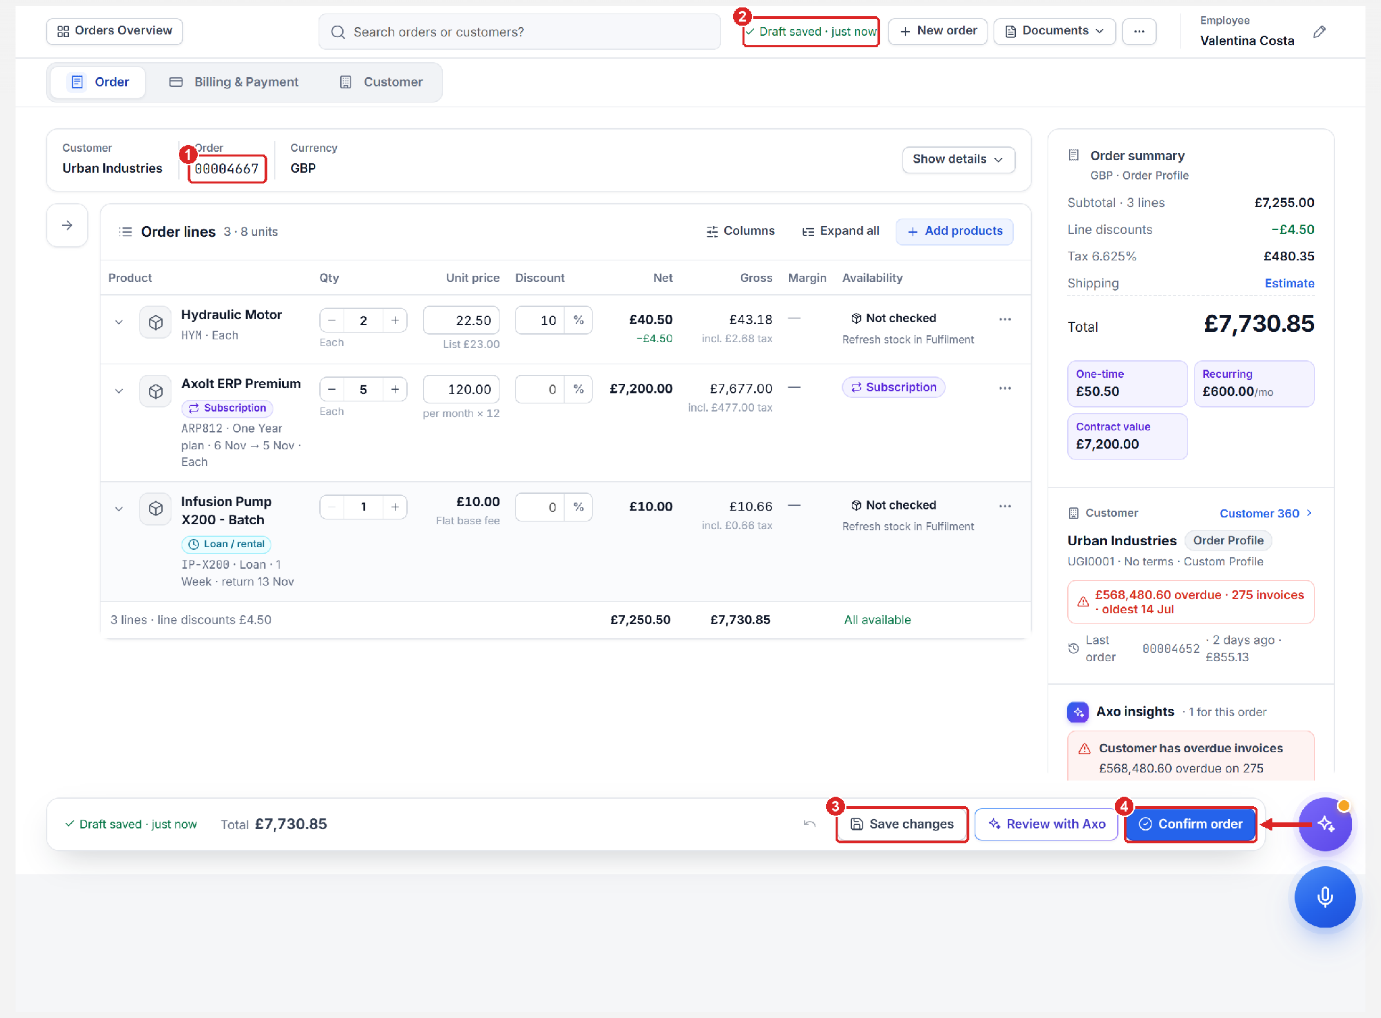
Save and confirm
Once all the details are entered, click Save & confirm to confirm the order right away, or click Save draft to save it as a draft.
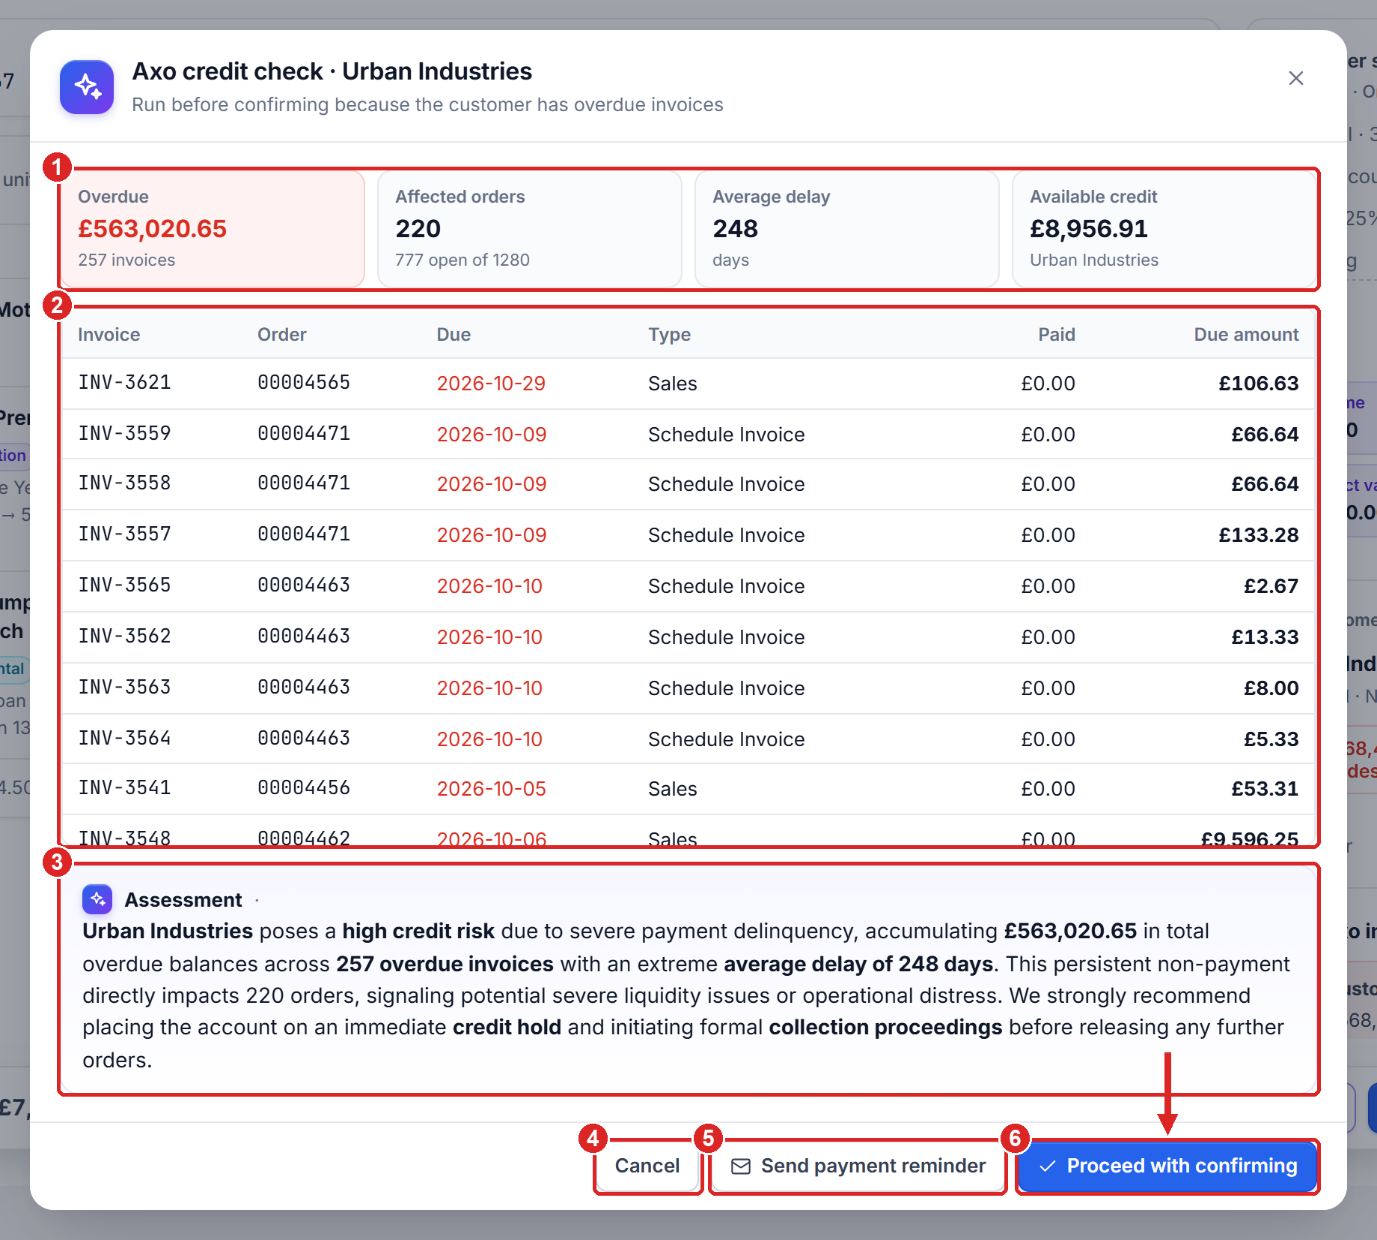
- Credit figures – Overdue amount, Affected orders, Average delay and Available credit.
- Overdue invoices – invoice, order, due date, type, paid and due amount.
- Assessment – Axo’s written view of the credit risk.
- Cancel – go back without confirming.
- Send payment reminder – emails the customer a reminder about overdue invoices.
- Proceed with confirming – confirm the order anyway.
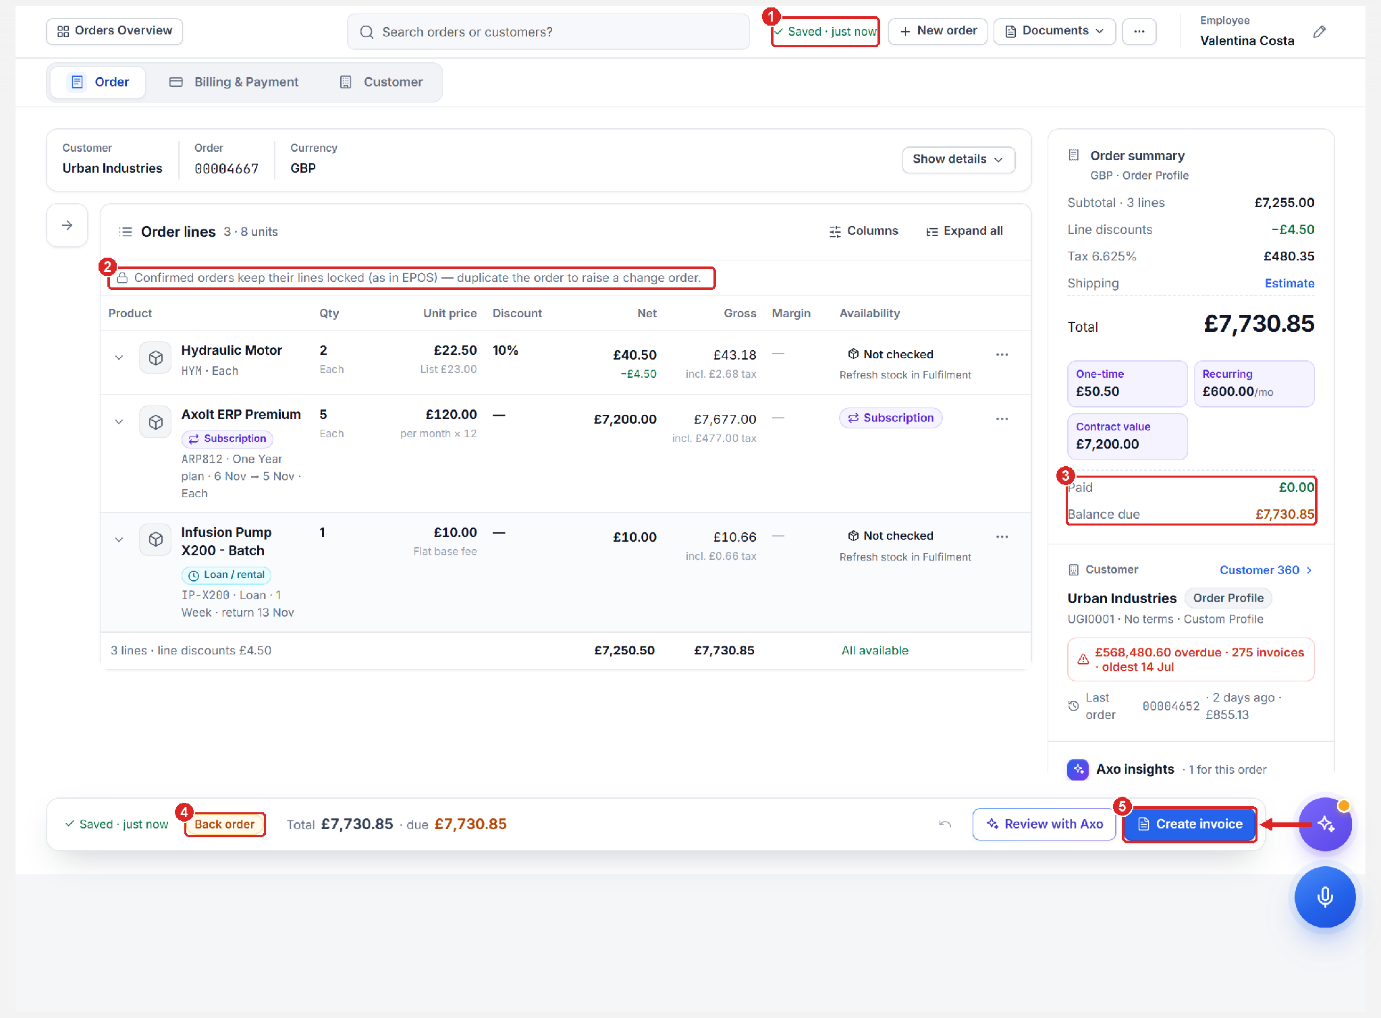
After confirmation the lines are locked and the next step, Create invoice, appears in the action bar.
Create an invoice
- Click Create invoice to create an invoice against the order. You can click it in the action bar or on the Billing & Payment tab.
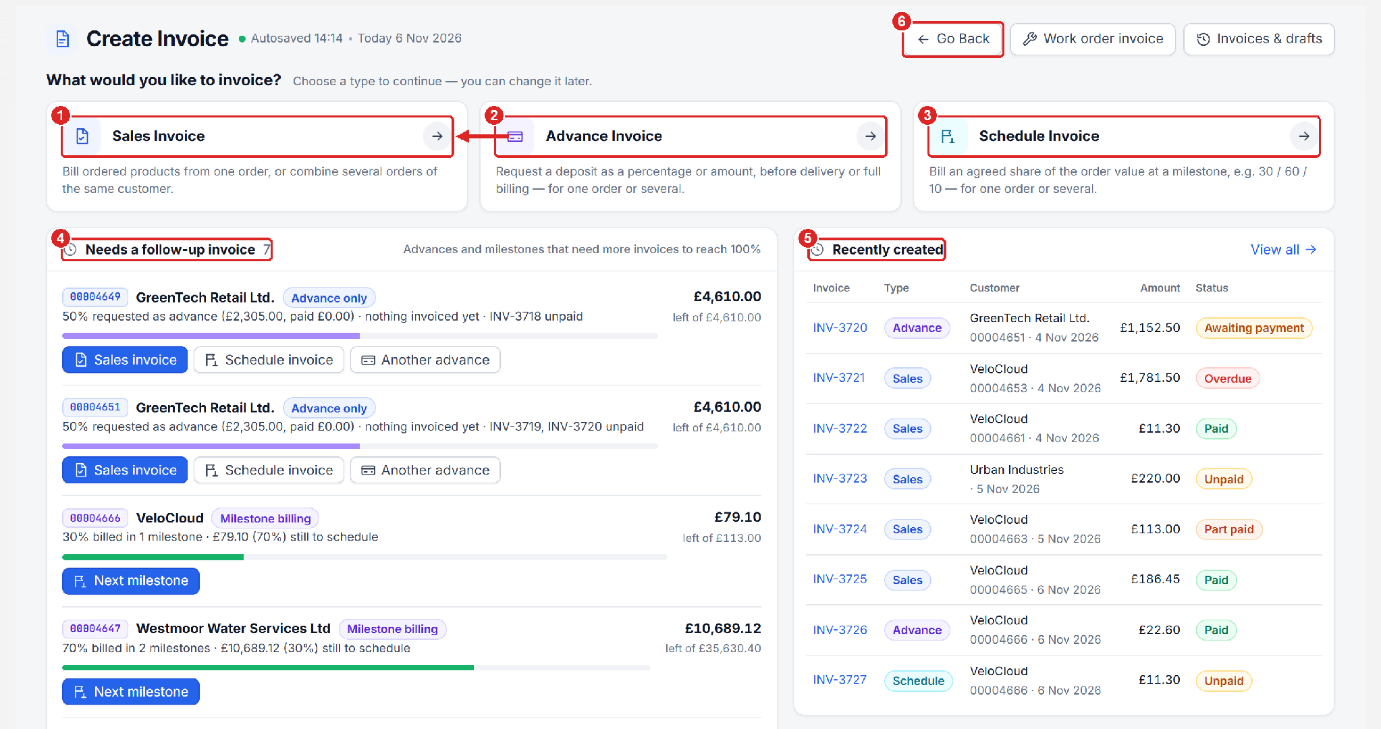
- Choose the invoice type: Sales, Schedule or Advance. To learn more about invoices, see Accounts Receivable.
- Check the invoice date, due date, contact and lines. Change Qty to invoice to invoice only a specific quantity, and enter a description.
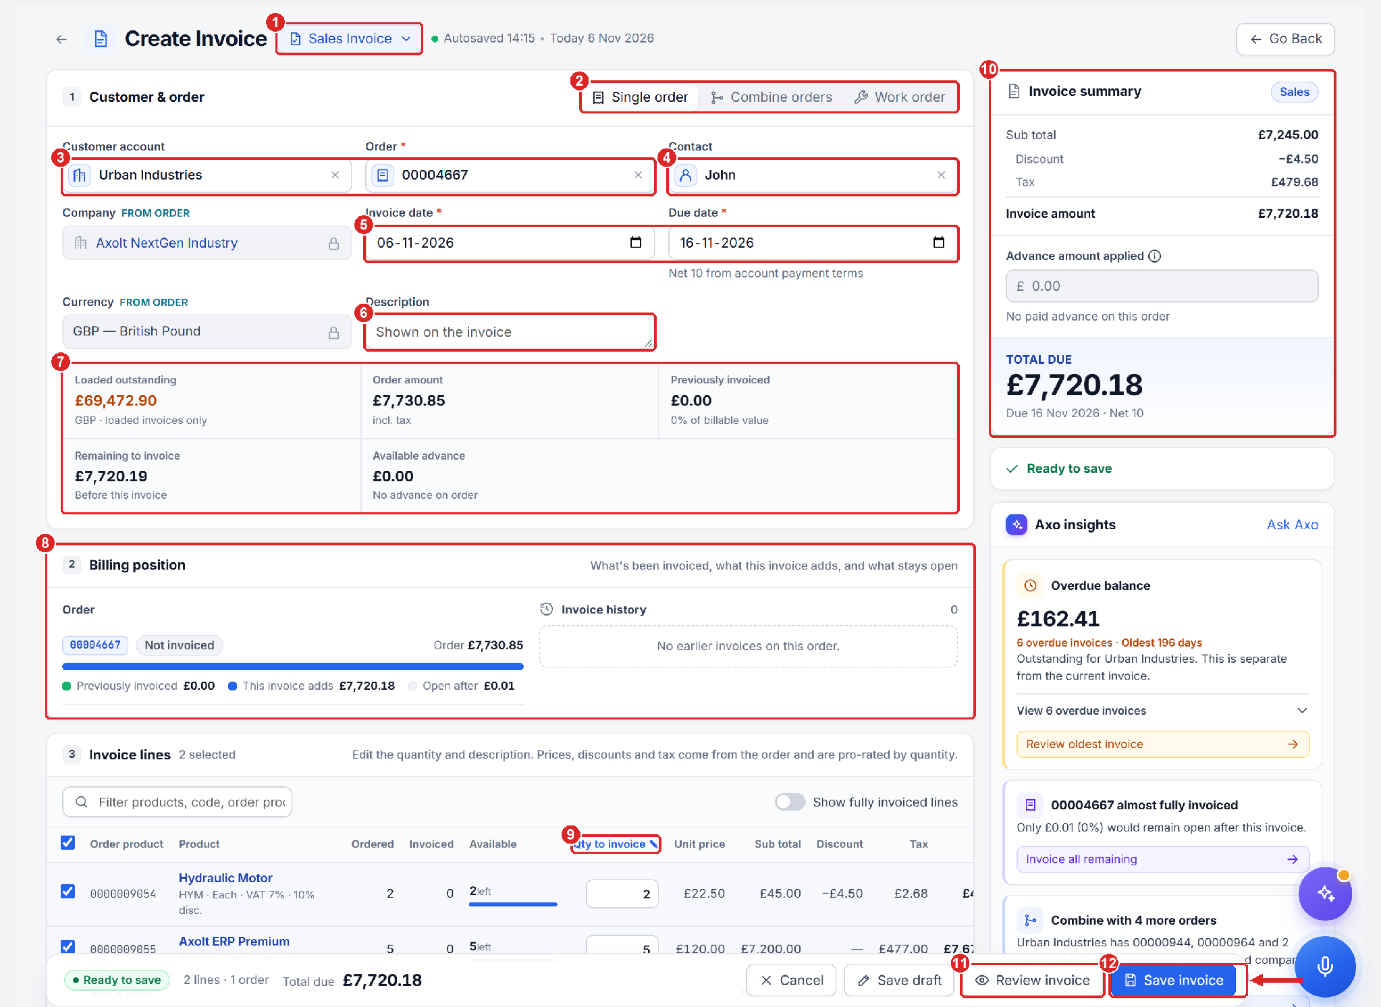
- Click Review invoice to review the invoice.
- Click Save invoice.
- Once the invoice is saved, click New invoice to create another invoice, or click More actions to open, post or print the new invoice.
Post the invoice
Back in EPOS, the invoice appears on the Billing & Payment tab. Click Post to post it to the accounts – a posted invoice can be paid.
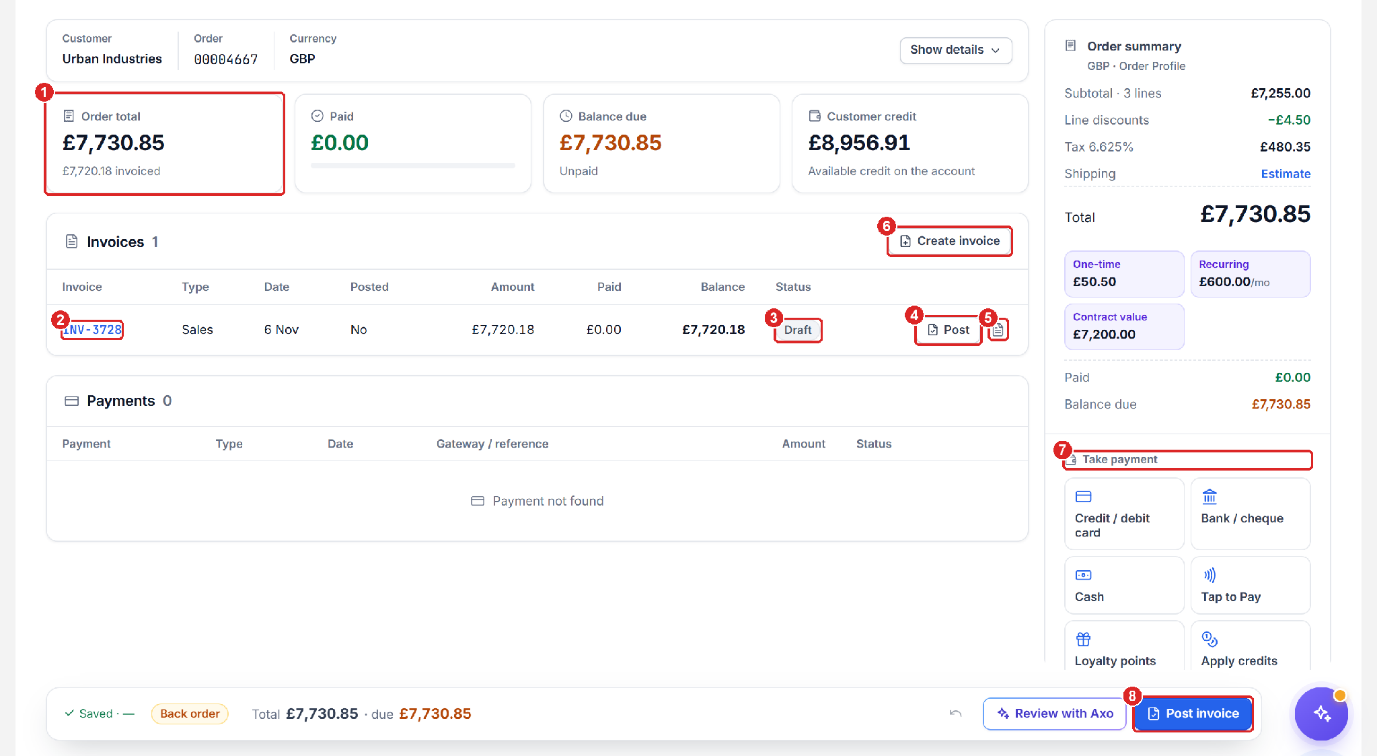
Take payment
Once the invoice is posted, the payment button is enabled. Click Pay on the invoice row, or Take payment in the action bar.
You can take payment in EPOS in several ways:
Credit / debit card
When you choose Credit / debit card, the card payment screen opens.
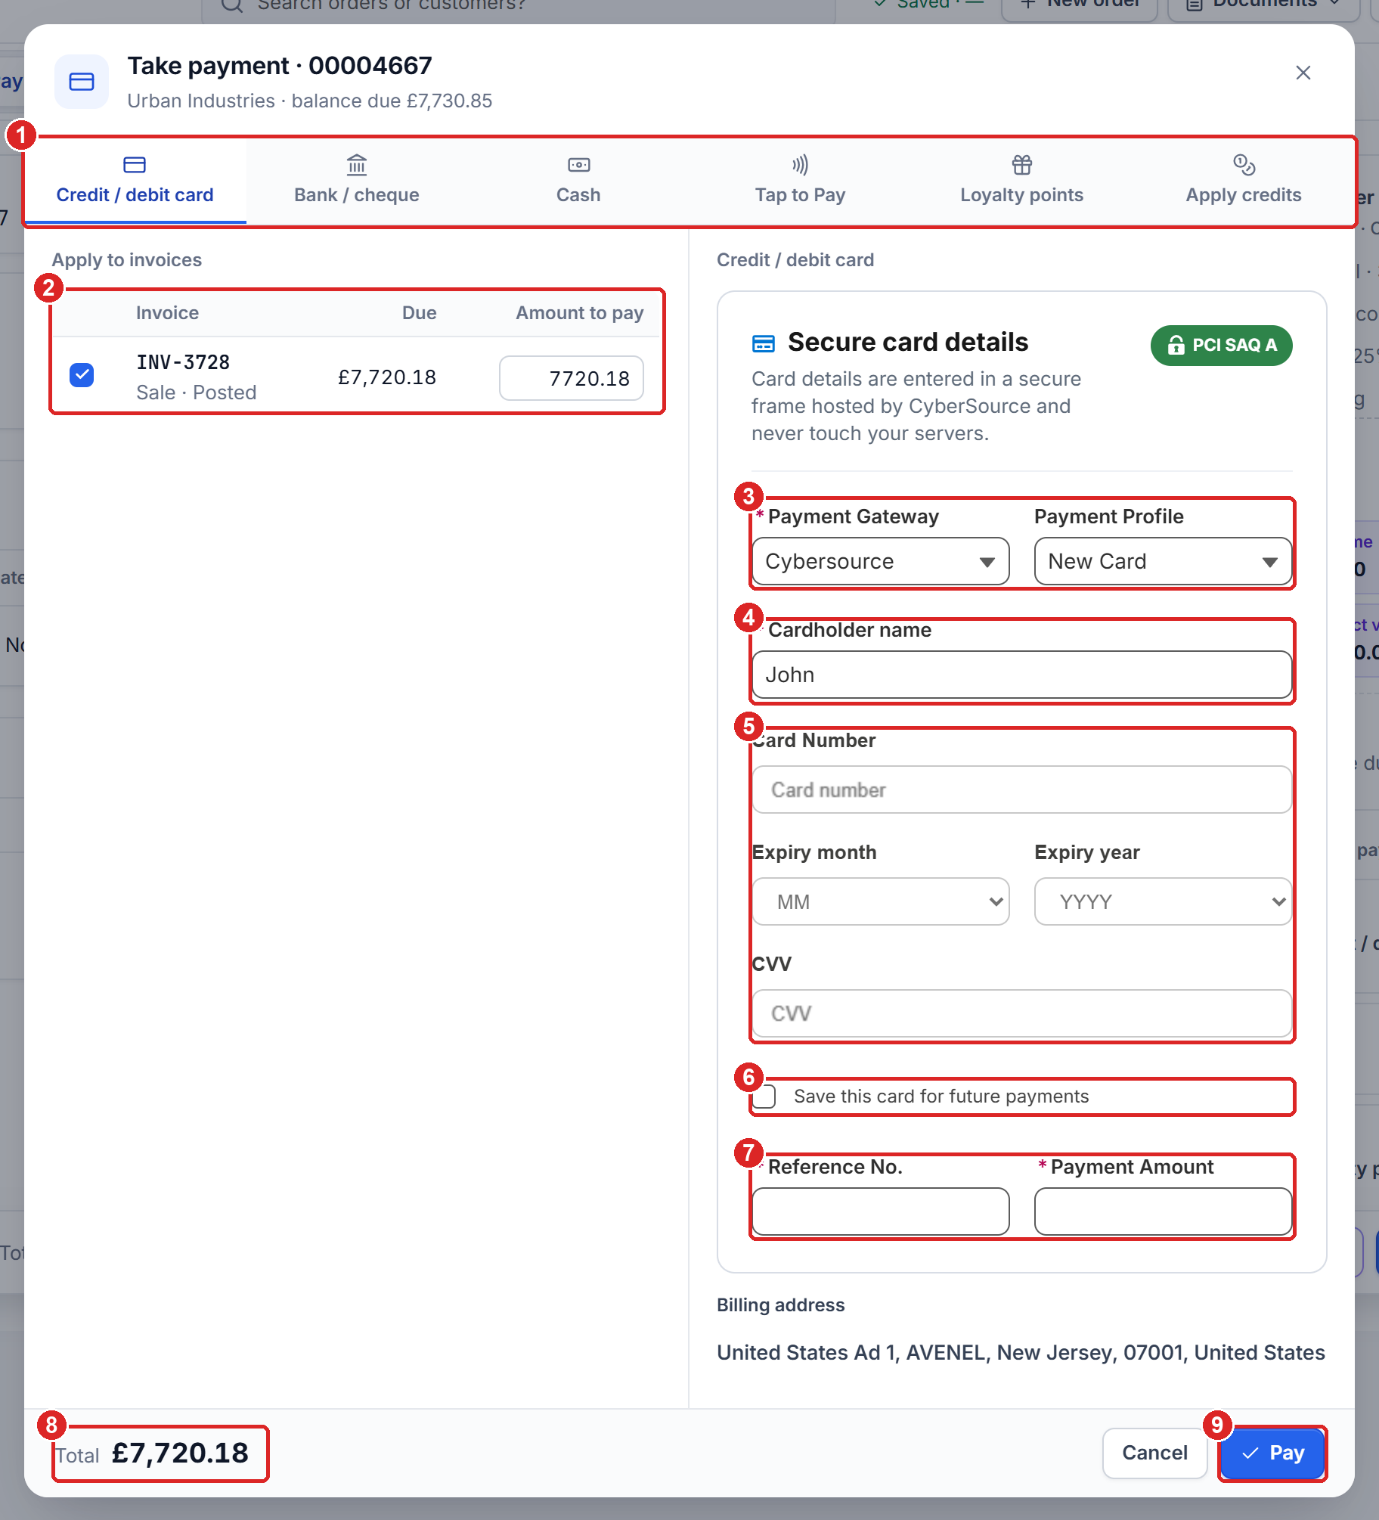
- Under Apply to invoice, enter the amount to pay.
- Under Credit / debit, enter the customer’s card details: name, card number, expiry month and year, CVV, reference number and payment amount.
- Click Pay to take the payment.
Bank / cheque
When you choose Bank / cheque, the bank payment screen opens.
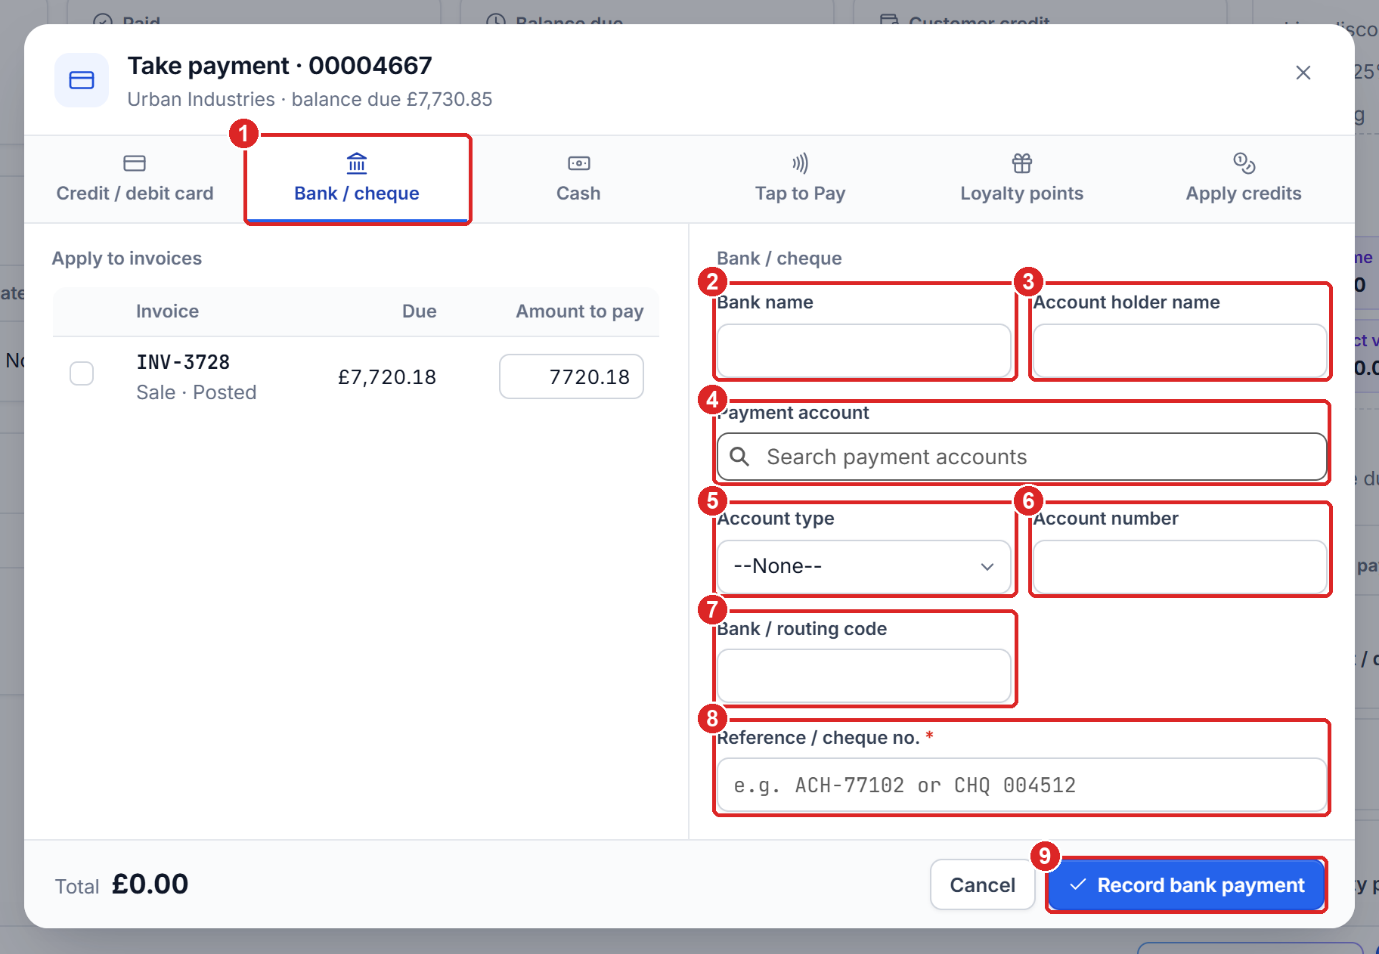
- Under Apply to invoice, enter the amount to pay.
- Under Bank / cheque, enter the bank name and account holder name, select the payment account, and enter the account type, account number and reference number.
- Click Record Bank Payment to record the payment.
Cash
When you choose Cash, the cash payment screen opens.
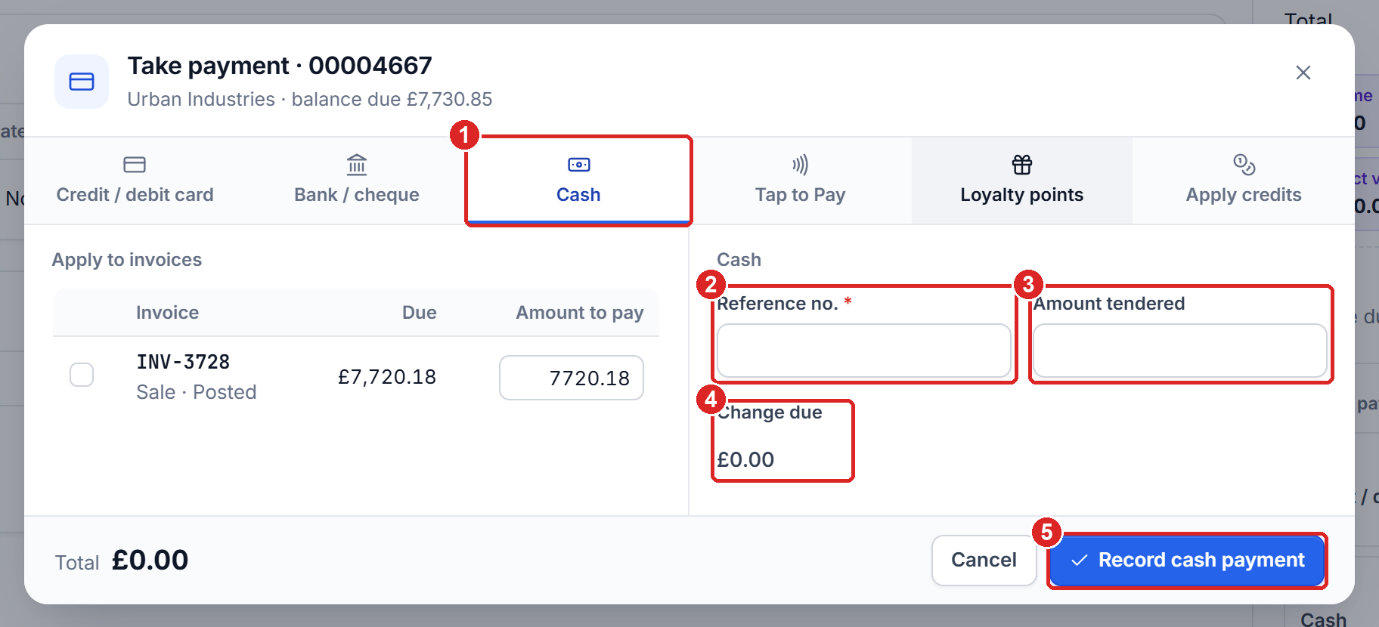
- Under Apply to invoice, enter the amount to pay.
- Under Cash, enter the reference number and amount tendered.
- Click Record Cash Payment to record the payment.
Tap to Pay
When you choose Tap to Pay, the Tap to Pay screen opens.
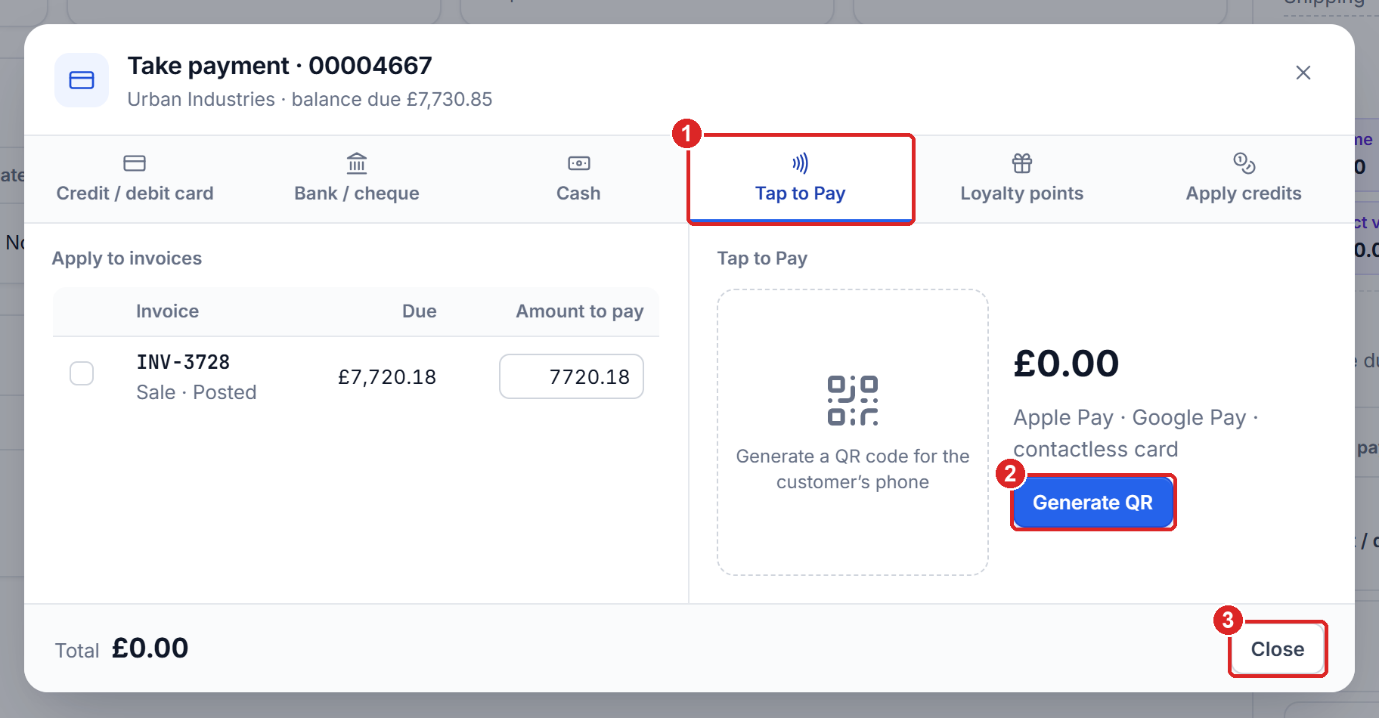
- Under Apply to invoice, enter the amount to pay.
- Under Tap to Pay, click Generate QR. Scan the QR code and pay with any of the options, such as Apple Pay, Google Pay or a contactless card.
Loyalty points
When you choose Loyalty points, the loyalty points screen opens.
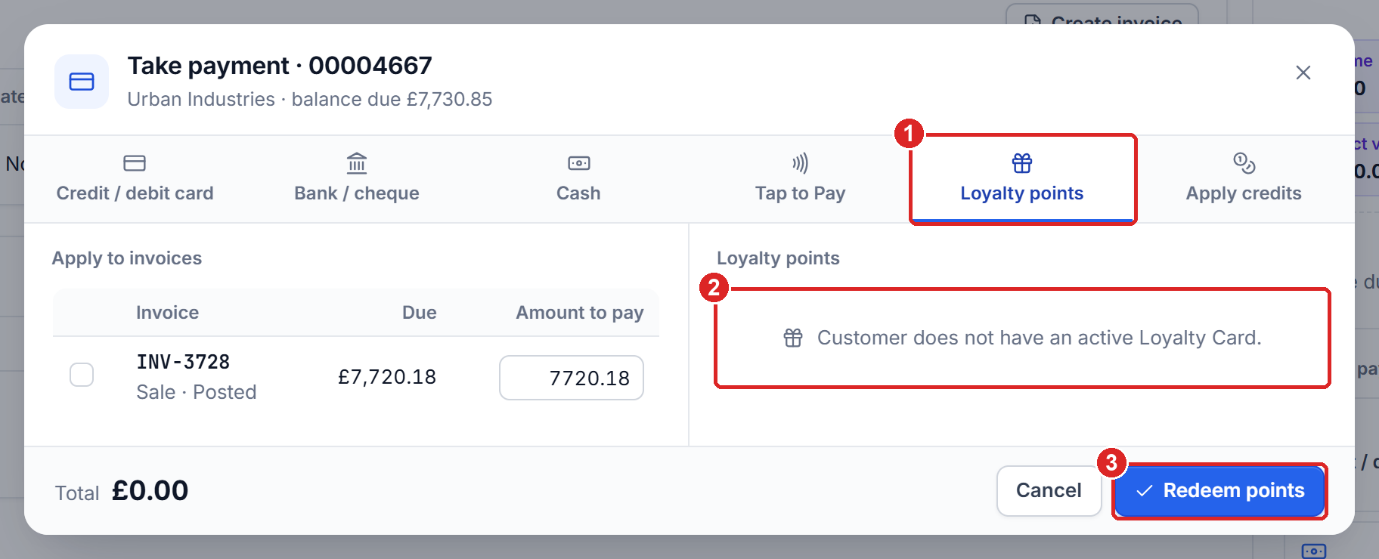
If the customer has an active card, the tab shows the points balance and lets you redeem points against the invoice.
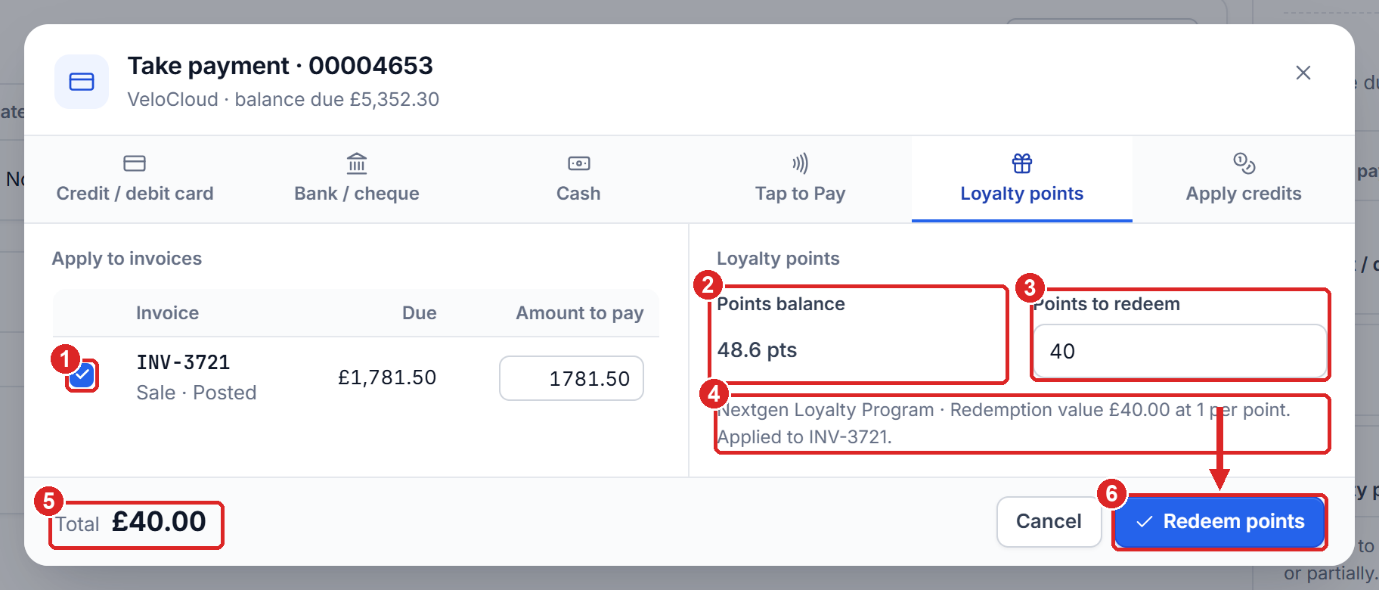
- Under Apply to invoice, enter the amount to pay.
- Under Loyalty points, Points balance shows the customer’s active points. Under Points to redeem, enter the amount to redeem.
- Click Redeem Points to pay with loyalty points.
Apply credits
Apply credits displays the customer’s open credit notes, which you can use to pay the invoice.
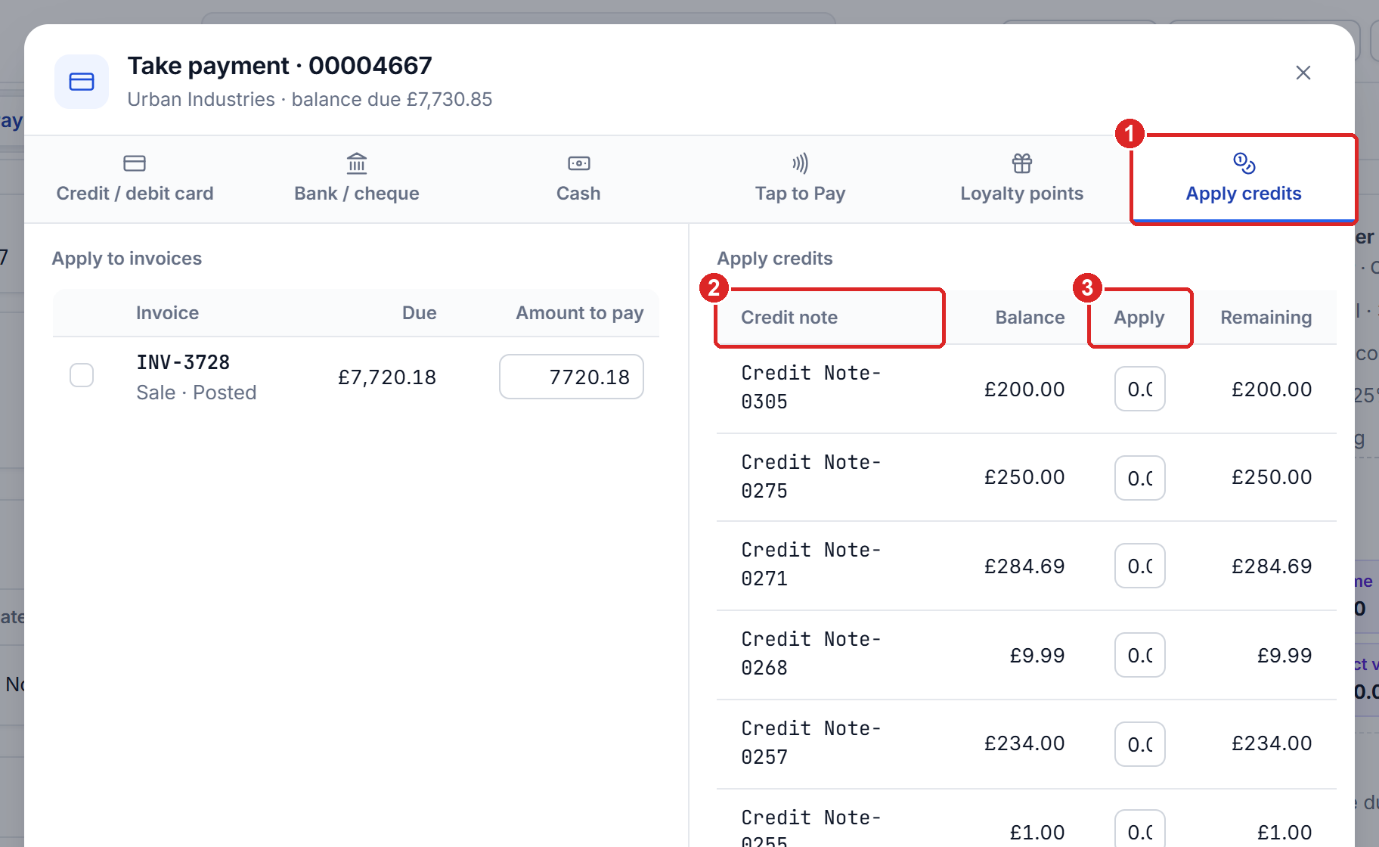
- Under Apply to invoice, enter the amount to pay.
- Under Apply credits, enter the amount against the credit note you want to use, and take the payment.
Order documents
Click Documents in the top bar. The order document and invoice document are displayed. Click the document you want to print, email or download it.
Order Overview
Click Orders Overview at the top left of EPOS. The Order Overview shows every sales order with its payment, fulfilment and status, so you can see at once what needs attention.
Cards and status counts
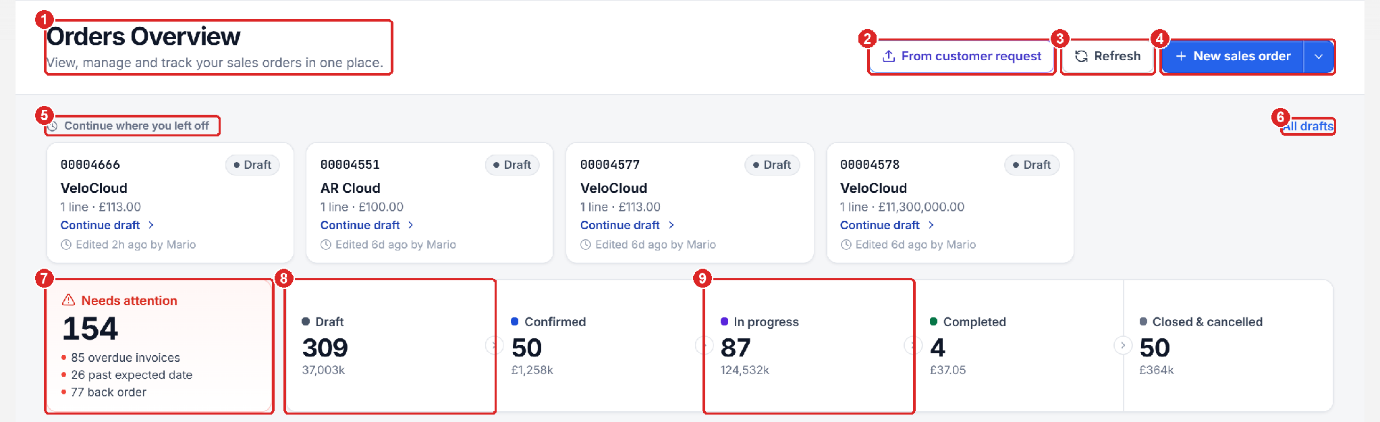
- Orders Overview – displays all sales orders in one place.
- From customer request – Axo builds an order from an email, PO or document.
- New sales order – starts a new order in the workspace. The arrow opens more ways to start an order.
- Continue where you left off – your latest drafts. Click Continue draft on a card to reopen it.
- All drafts – shows every draft in the list below.
- Needs attention – orders with overdue invoices, past expected dates or back orders. Click to filter.
- Status cards – Draft, Confirmed, In progress, Completed, Closed & cancelled with count and value. Click a card to filter the list.
Order list
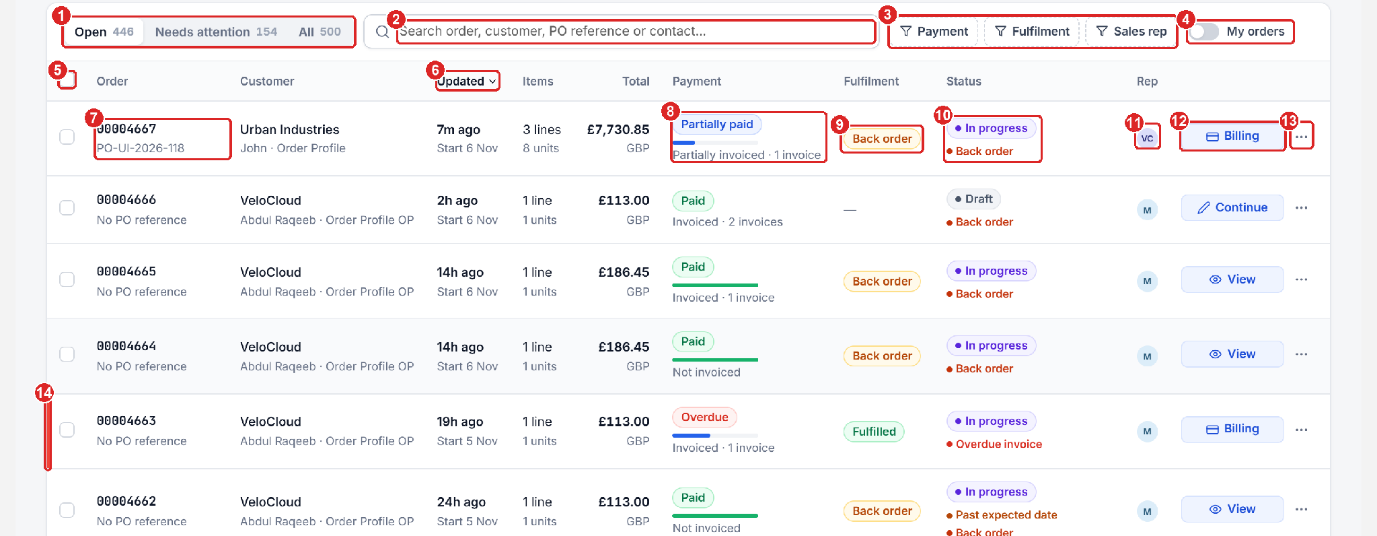
- List tabs – the Open, Needs attention and All tabs with counts.
- Search bar – search for an order by order number, customer, contact and more.
- Each row displays an order with its items, total amount, payment status and more.
- My orders – when it is on, only the orders you created are shown.
- Payment filter – filter by payment status, such as Unpaid, Partially paid, Paid or Overdue.
- Fulfilment filter – filter by fulfilment status, such as Not started, Ready to ship or Picked & packed.
- Actions (…) – the actions for each order: Quick view, Order document, Duplicate order and Open record.
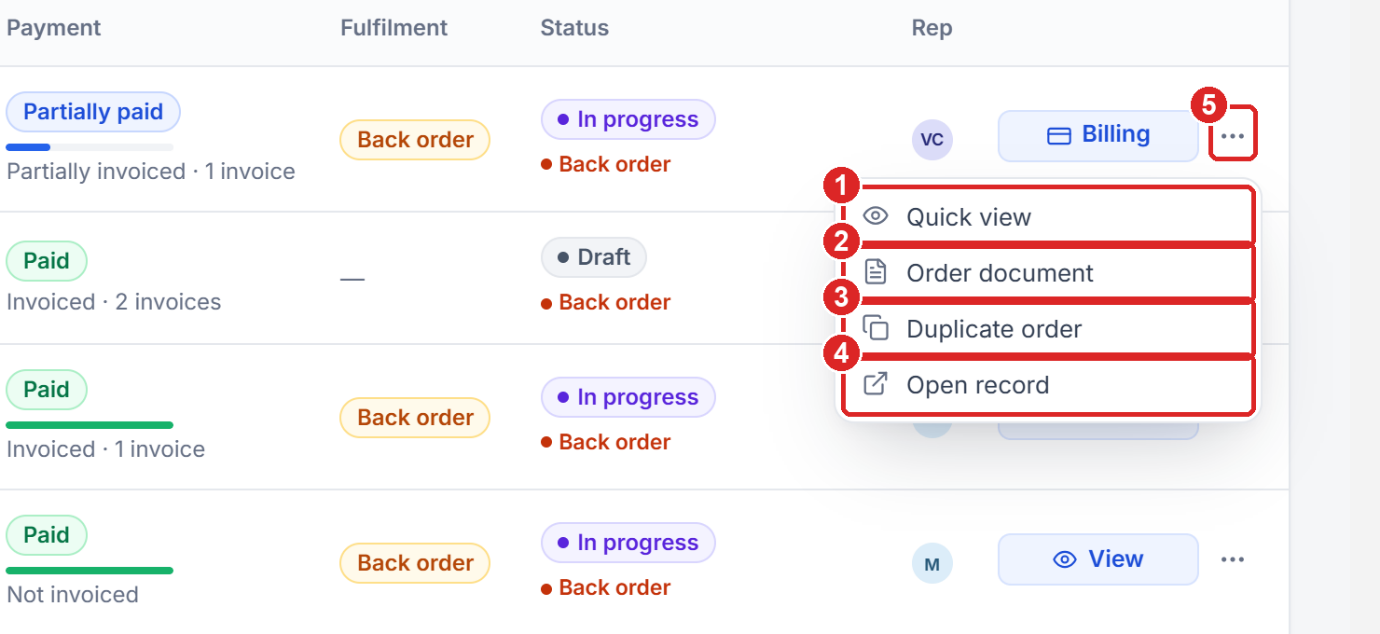
- Quick view – a summary of the order without leaving the list.
- Order document – opens the document preview.
- Duplicate order – copies the order into a new draft.
- Open record – opens the full order record.
Axo Assistant
Axo is the AI assistant built into EPOS. It reads the open order, the customer and your company data, answers questions and carries out steps for you. Axo never saves on its own – you always confirm saving.
- Click the purple Open Axo Chat button at the bottom right of the screen. A dot on the button means Axo has an insight for you.
- Click the blue microphone button (Start Axo Voice) to talk to Axo instead.
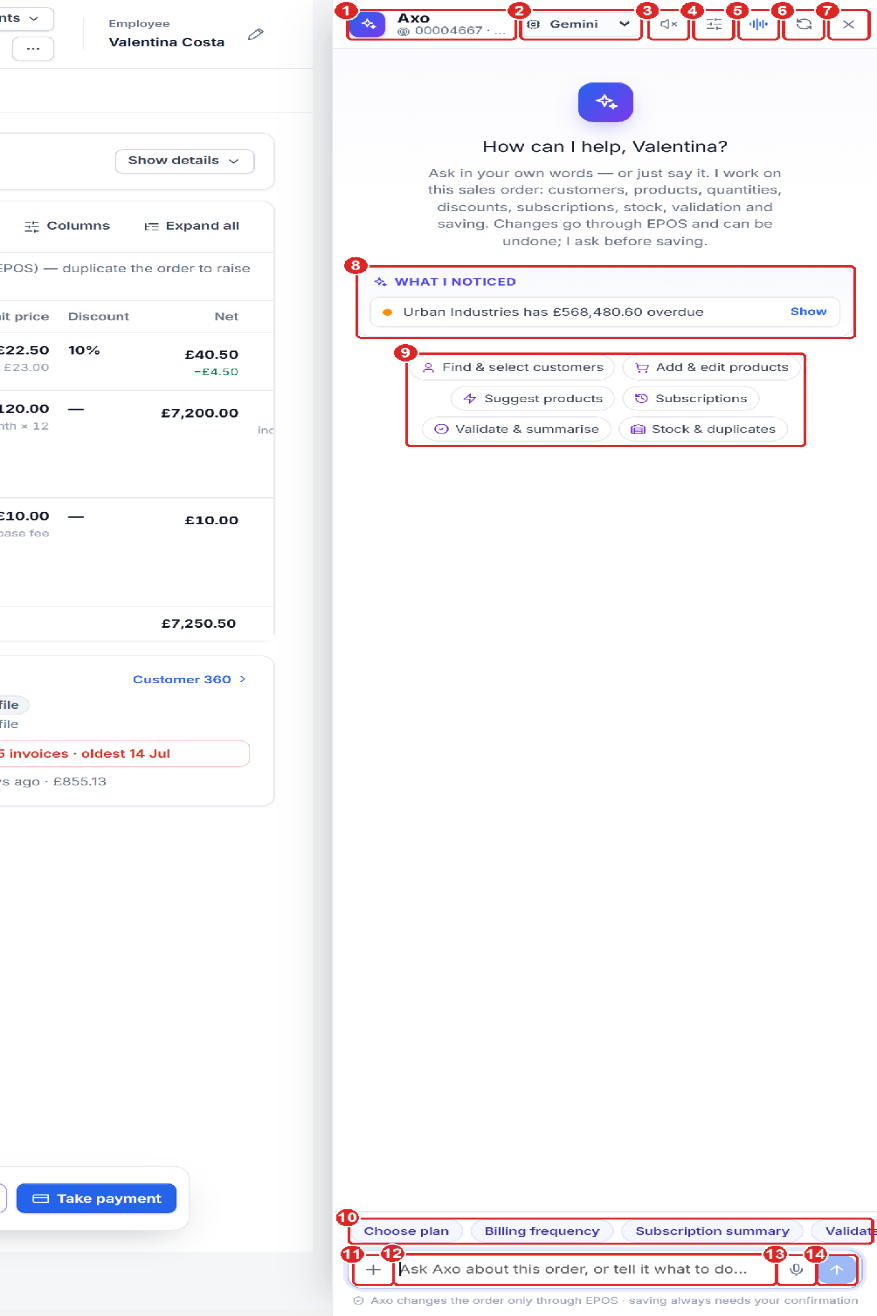
- Axo header – displays the order Axo is working on.
- AI model – choose the model (for example Gemini).
- Spoken replies – turn spoken answers on or off.
- Voice & speed – voice settings.
- Switch to Axo Voice – talk to Axo instead of typing.
- New chat – clears the conversation.
- Close – hides the assistant.
- What I noticed – warnings Axo found on this order. Click Show for details.
- Capability chips – what Axo can do: find customers, add and edit products, suggest products, subscriptions, validate, stock and duplicates.
- Suggestion chips – one-click prompts for this order (Choose plan, Billing frequency, Summarise order…).
- + – attach a file (PDF, up to 2 MB) for Axo to read.
- Prompt box – type a question or an instruction.
- Microphone – speak your message; it is typed in the box for you.
- Send (Shift + Enter).
What Axo can do
- Find & select customers – “Start a new order for Alpha Global”.
- Add & edit products – “Add 2 Infusion Pump X200 – Batch”, “Set the discount on line 1 to 5%”.
- Suggest products – based on the customer’s history.
- Subscriptions – choose plans and billing frequency.
- Validate & summarise – check the order before saving.
- Stock & duplicates – check stock and find duplicate lines.
- Credit – overdue invoices and credit checks.
Example prompts and results
Summarise this order
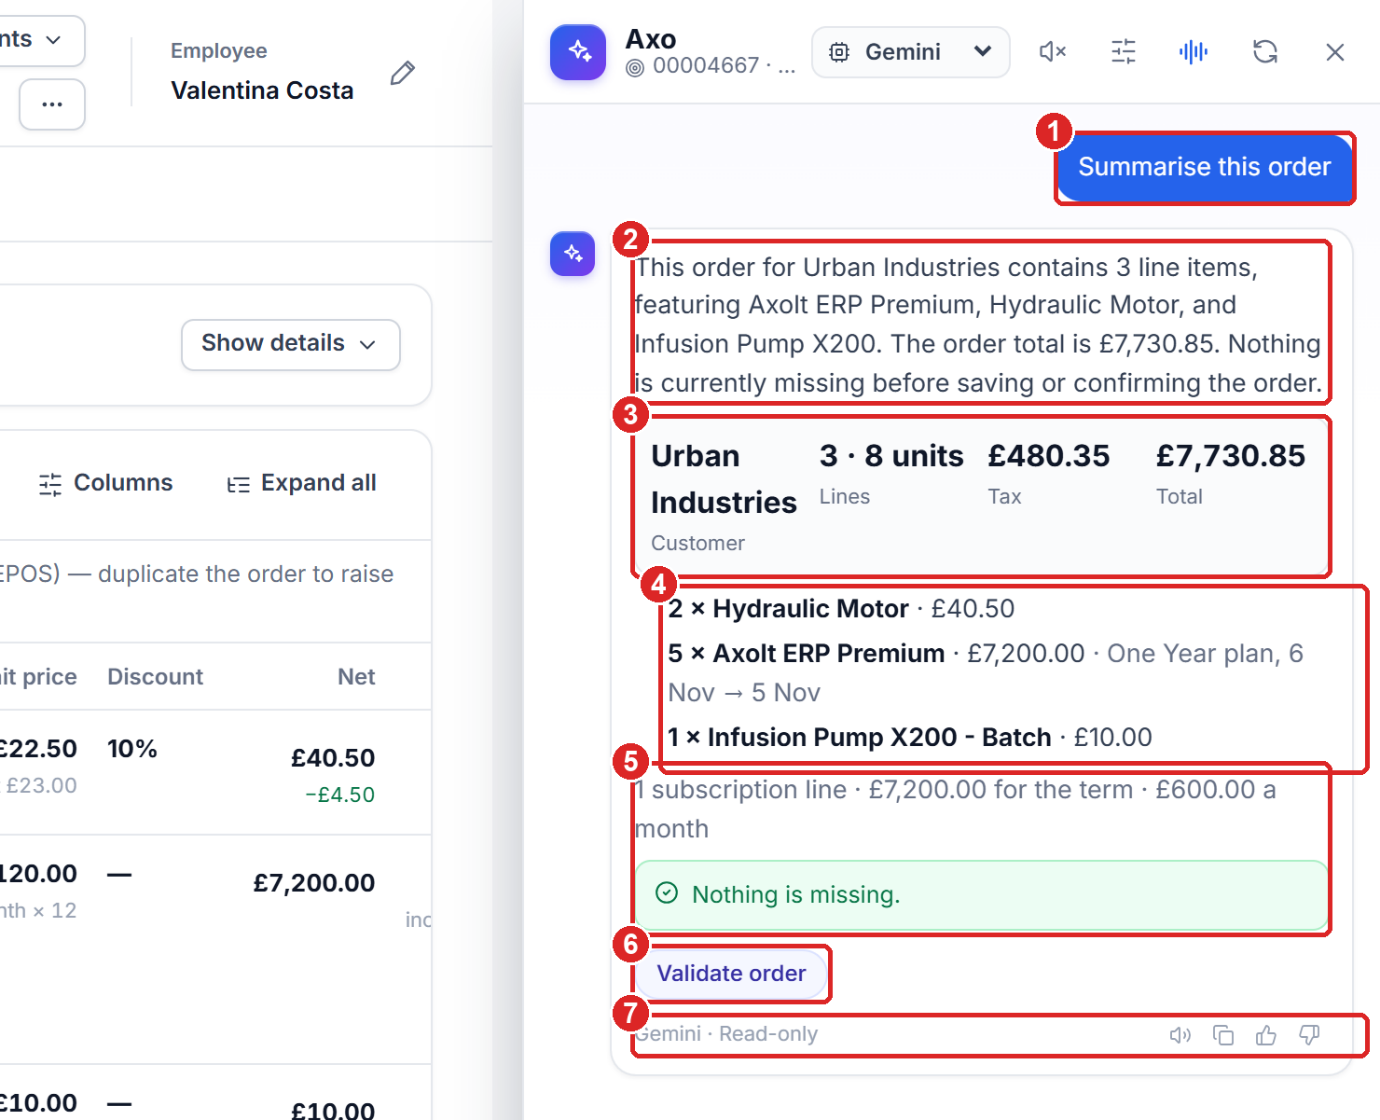
- Your prompt – Summarise this order.
- Axo’s answer in plain words.
- Summary card – customer, lines and units, tax and total.
- Each line with quantity and value (subscription plan and dates included).
- Checks – recurring value and Nothing is missing before saving.
- Follow-up action – click Validate order to run the next step.
- Model used and Read-only (nothing was changed). Icons: read aloud, copy, thumbs up / down.
Is Hydraulic Motor in stock?
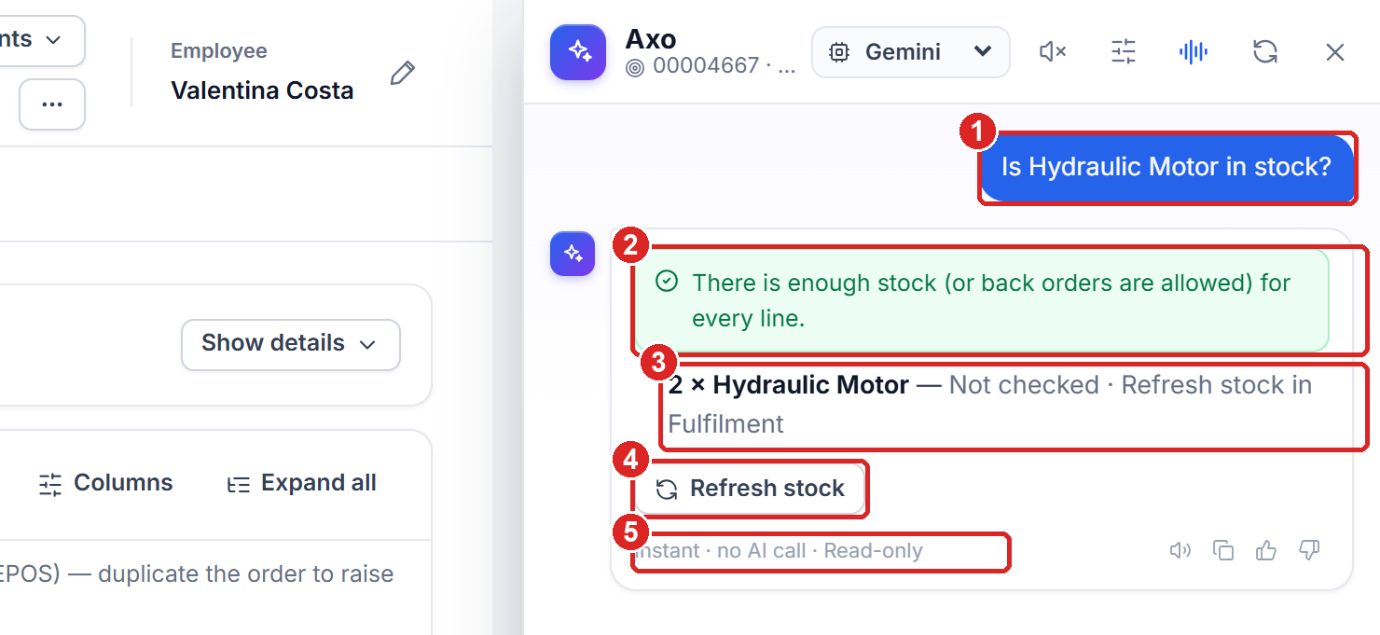
- Prompt – Is Hydraulic Motor in stock?
- Stock result for the order lines.
- The line checked and its stock state.
- Refresh stock – gets the latest stock figures.
- Instant · no AI call – Axo answered from the order data without using the AI model.
Axo Voice
Click Switch to Axo Voice in the chat header, or the microphone button, to talk to Axo. Axo listens, answers aloud and shows the answer on screen.
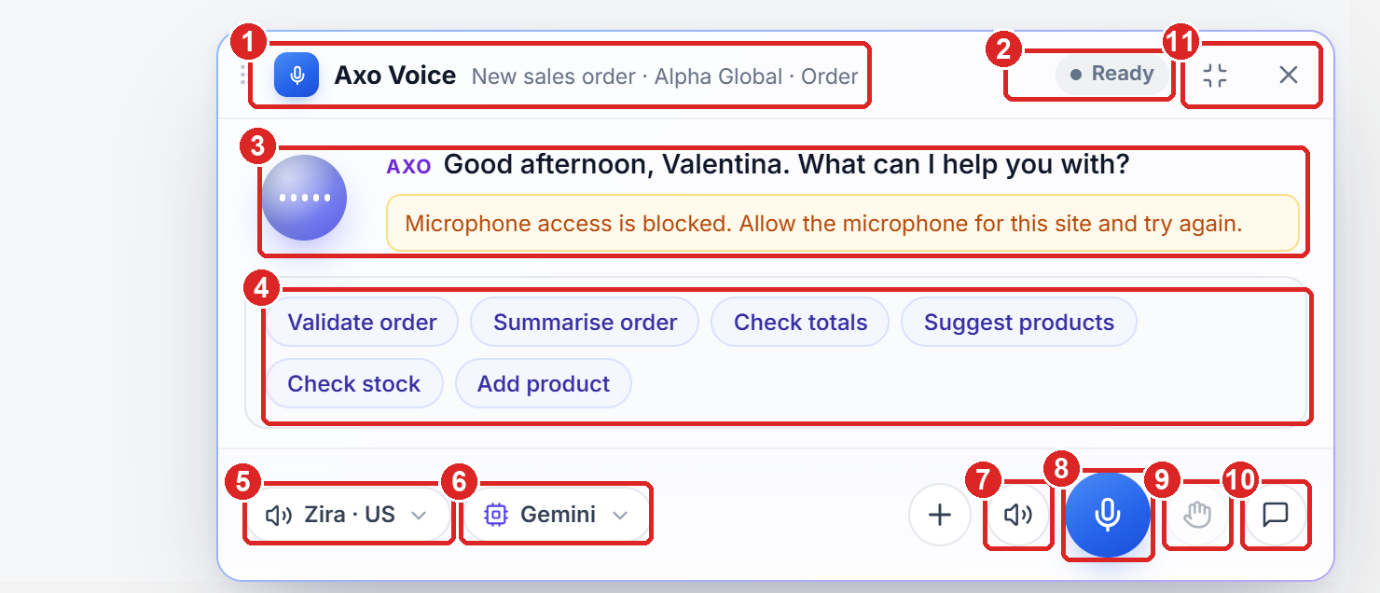
- Axo Voice – shows what it is working on (new sales order, Alpha Global, Order).
- Axo’s spoken reply, also written on screen.
- Quick commands – say them or click them (Validate order, Check stock, Add product…).
- Voice – the voice and accent used for replies.
- Controls – Mute Axo’s voice, Pause / resume listening, Interrupt (stop Axo while it is talking), and open the conversation in Axo Chat.
- Minimise and Close.
Was this article helpful?