Shipments
Shipping is a key component of a customer’s supply chain, manufacturing, and retail success. Axolt offers a comprehensive solution to streamline the shipping process, providing accurate delivery dates and times. Axolt facilitates real-time communication with UPS, FedEx, and internal shipments, ensuring seamless integration and tracking.
The shipping process begins with the following:
Creation of Sales Order.
Outbound Logistic (Pick, Pack, Ship)
Note 1: When creating a Sales Order from the EPoS, the shipment cost can be estimated from the Delivery section of the Epos Screen.
Note 2: Once a sales order is created, it becomes available for Pick, Pack and Ship.
Note 3: Axolt supports UPS, FedEx and internal shipment.
Follow the steps to create shipment:
- Navigate to the Outbound Logistic screen using the App Launcher or find the tab in the App Navigation menu.
- Select the Sales Order to be shipped.
- Pick all line items of the order or select partial line items, then click Save.
- Click on Pack section from PICK section to navigate to the package creation page.
- In the package detail section, select the Package Type and Shipment Type (which can be UPS, FedEx, or Internal Shipment.).
- When selecting the Package Type, the Length, Width, Height, Weight Unit, will be auto-populated. Users need to enter the Weight manually.
- All line items and their quantities will be auto-selected (user can modify to create packages partially).
- Click on the Save button to create the package record.
- Users can use the Edit button to modify the package details, or they can use the Delete button to delete any packages.
- Note 4: To make your sales order ready for shipment, check the Ready to Ship checkbox in the logistic record of the sales order.
Note 5: Follow the link below to know the complete process of Pick and Pack from Outbound Logistic.
Shipment Creation Process –
- UPS Shipment
To create a shipment with UPS, follow the steps below.
- Click the Ship icon from the Pack section, which will direct you to the UPS shipment creation page.
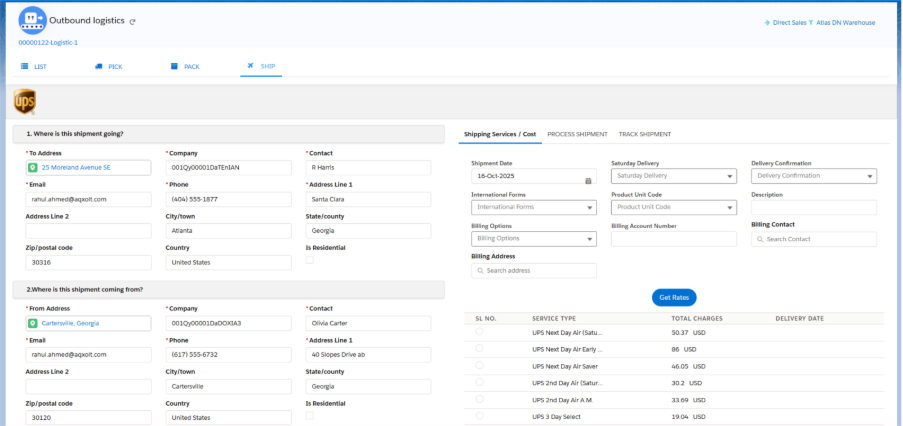
- The left side of the shipment page includes shipping details such as the TO Address, FROM Address, and Package Details.
- Click the Get Rates button to view the available UPS services.
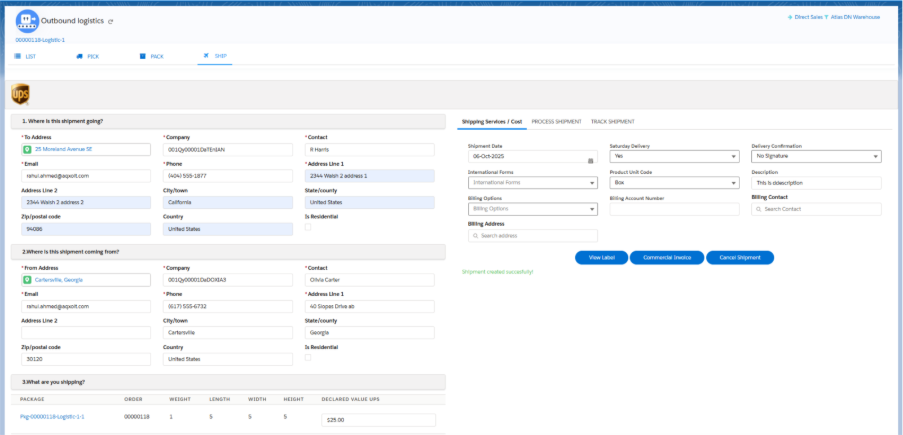
- After selecting a particular UPS service, the Initiate Shipment button will be enabled.
- Click on Initiate Shipment to create the shipment.
- The UPS shipment will be created.
The right side has three sections:
Shipping Services/Cost.
Process Shipment.
Track Shipment.
Shipping Services/Cost:
- This section populates the Shipment Date and other details such as Weekend Delivery, International forms, Product Unit Code, Delivery Confirmation, and Description.
Process Shipment:
- This section populates the Shipment Name, Shipment Status.
- Click on View UPS Label to generate the UPS label, which can be printed and attached to the package.
- Click on View Invoice to view the sales order invoice, which is also printable.
- Clicking on Cancel Shipment will cancel the shipment.
Track Shipment:
- Once a shipment is dispatched, clicking on the Track Shipment section will generate a tracking number and provide real-time tracking of the package.
2. FedEx Shipment
To create a shipment with FedEx, follow the steps below.
Upon selecting the Shipment Type FedEx from the Package creation page, the following process continues:
- Click the Ship icon from the Pack section, which will direct you to the FedEx shipment creation page.
- The left side of the shipment page includes shipping details such as the To Address, From Address, and the Package Details.
- Click on the Get Rates button to view the available FedEx services.
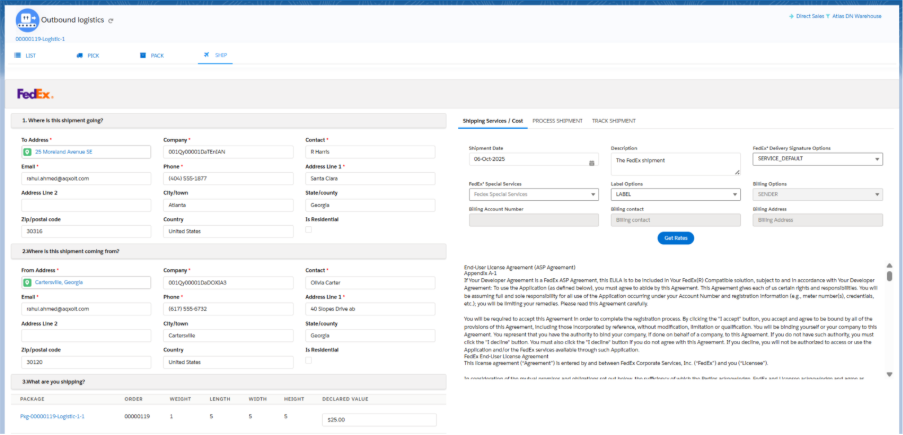
- Select a FedEx Service Type.
- After selecting a particular FedEx service, the Initiate Shipment button will be enabled.
- Click on Initiate Shipment to create the shipment for FedEx.
The right side has three sections:
Shipping Services/Cost
Process Shipment
Track Shipment
Shipping Services/Cost:
- This section populates the Shipment Date and includes other details, such as Description, Signature Services and Special Services.
Process Shipment:
- This section populates the Shipment Name, Shipment Status and other pickup details.
Track Shipment:
- Once a shipment is dispatched, clicking on the Track Shipment section will generate a tracking number and provide real-time tracking information for the package.
3. Internal Shipment
Upon selecting the shipment type as Shipment from Package creation page, the following process continues:
- It brings you to the Shipment screen, where delivery details can be added.
- Add the Delivery Date and click Save.
- This creates a Shipment record, which can be seen on the Sales Order and Logistic Order related lists.
The right side has three sections:
PickUp/DropOff:
Checklist:
Delivery:
PickUp/DropOff:
- Navigate to the Pickup/Dropoff tab to create delivery flows.
- Click on New, fill in the Name, Status, and other available details, then click Save.
Checklist:
- Navigate to the Checklist tab to verify the number of items delivered against the ordered quantity.
- Check the checkbox and click Verify if the entire quantity has been delivered.
- Verifying the items will make the line items non-editable.
- By default, the Delivered quantity is set to the ordered quantity, and the Status is set to Delivered. The delivered quantity can be adjusted based on the physical delivery quantity.
Delivery:
- Navigate to the Delivery tab and captures the customer’s signature, Name, Delivery Date, and Time.
- Attachments and Notes can also be added.
