ERP – Environment Setup Guide
Basic ERP Environment Setup – Core Processes
Before using any ERP modules or flows, the initial admin setup must be fully completed — otherwise, key features and modules will not function correctly.
The following core master records and configurations are required to enable smooth operation of all ERP processes:
A. Company Account and its Contacts and Address setup
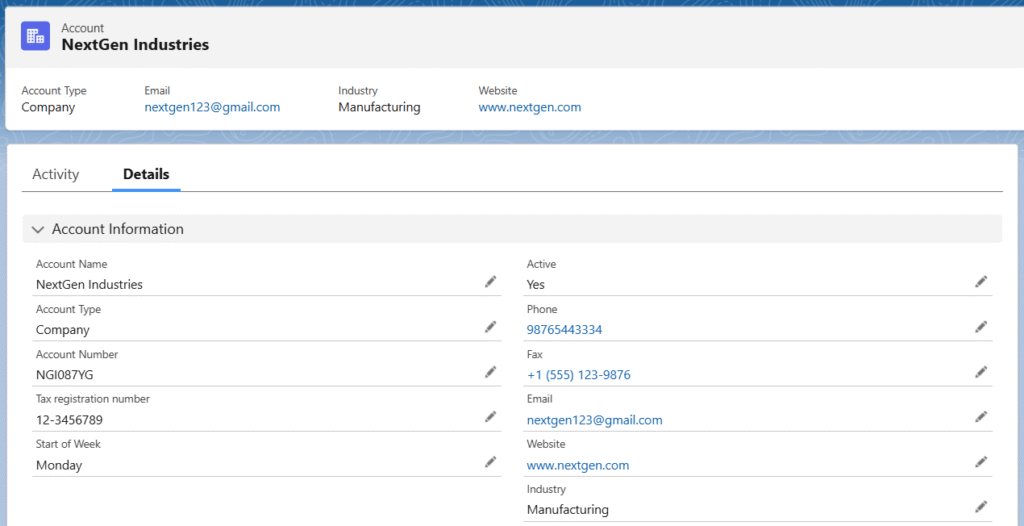
Before any transactions, products, or customer records can be used, you must create at least one Company Account representing your own organization. During creation, complete the following required details:
Company name, registration number, tax IDs, and other legal information
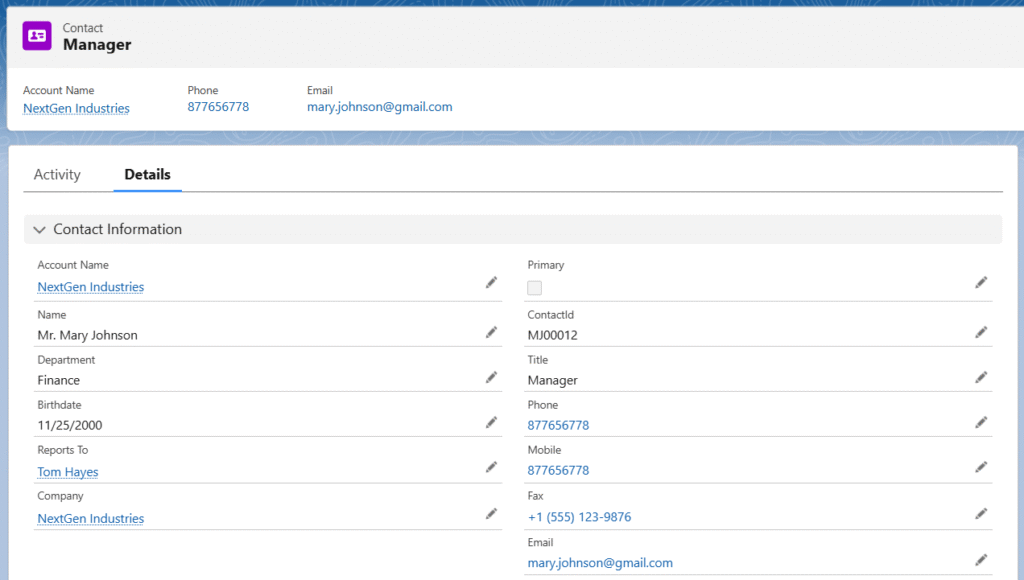
Contact
Billing and Shipping Addresses
This step is mandatory and must be completed first.
B. Operational Structure (Configure After the Company Account is created)
Once the Company Account with Contact and Address is created, you can then set up: (Channels, Distribution Channels, Sites (Warehouses), Locations and Storage Containers (if applicable), Carts, Profiles (Price Books & Tax Records) for pricing and taxation etc.
C. Vendor/supplier account, customer account, and their related records setup
We need to set up the vendor accounts and their contact and address records to run the Purchase Order, Return Purchase Order, and Supplier RFP flows.
We need to set up the customer accounts and their contact and address records to run the Order and RMA flows.
D. Cost Card and Approved Vendor/Supplier Setup for Products
To purchase a particular product from the selected approved vendors, we need to have the approved vendors and cost card records. Also, the Purchase from Approved Vendor checkbox should be checked at the product record level.
E. Credentials setup for payments, shipments, e-commerce, and docusign
To use the payment (Authorize.Net, PayPal, Stripe, etc.) and shipment (UPS, FedEx), DocuSign functionalities, we need to set up the credentials in the system.
F. User record update and employee setup –
The logged-in user’s Company record should be “solo.” Also, one employee record should be available for the logged-in user.
A. Company account and its related records setup –
Company Accounts represent a legal company or organization within the platform. In Salesforce, every Organization must have at least one Company Account.
Depending on your business needs, you can create multiple Company Accounts for the same legal entity. For example:
One Company Account for the US, covering its channels, warehouses, and locations.
Another Company Account for the UK, with its own channels, warehouses, and locations.
All transactions within the Organization are categorized and tracked by the respective Company Account, giving you clear visibility and separation when needed.
Each Company Account can contain multiple Channels and their associated Distribution Channels. Every Distribution Channel can have its own Sites (Warehouses), and each Site/Warehouse can include various Locations, Storage Containers, and Carts for precise inventory management.
Follow the steps to create a Company account:
- Navigate to the Accounts tab from the app launcher and click the + New button.
- Select the Record Type as Company Account and click Next.
- On the account creation page, enter the Account Name (company name).
- Ensure the Active checkbox is selected, and the Account Type is set to Company.
- Enter other optional information and click Save to create the Company account.
Contacts and Address setup for the Company account
a. Contacts- Contacts serve as the primary points of communication for the company. Multiple contacts can be associated with a single company account.
Follow the steps to create a Contact record:
- Navigate to the related tab of the created company account record and locate the Contacts related list.
- Click the New button.
- The Account Name will be auto selected. Enter the First Name and Last Name, Phone, and Title. Ensure the Contact Status is set to Active.
- Enter other optional details if required and click Save to create the new contact record for the company.
Note 1: If the contact is a primary contact, select the Primary checkbox. (If the field is not available on the page, add it from the page layout.)
b. Address- The Address object stores complete physical address information (street, city, state/province, postal code, country, latitude/longitude etc.) as a reusable record. It allows the same validated address to be linked to multiple objects (e.g., accounts, locations, work orders, or custom objects) without duplicating data.
Follow the steps to create an Address record:
- Navigate to the related tab of the created company account record and locate the Address related list.
- Click the New button.
- The created Account will be auto selected. Select the created Contact from the Contact lookup.
- Ensure the Active checkbox is checked.
- Check the Primary Address checkbox if the address is the primary address. If the same address is used for both billing and shipping, check the Is Billing Address and Is Shipping Address checkboxes.
- Enter the Address, select the Country, enter the City, select the State/Province and enter the ZIP/Postal Code.
- Enter other optional details if required, then click Save to create the company’s address.

B. Operational Structure (Configure After the Company Account is created)
a. Channel: Channels refer to the mode of business (like retail sales, online sales, and third-party distributors).
Follow the steps to create a Channel record –
- Go to the related list of the created Company account and find the Channel object (related list).
OR
- Find the Channels tab from the App Launcher.
- Click the New button.
- Enter the Channel Name, Shipper Name, select the Ship From Address, enter Phone, select the Company (created Company account), ensure the Active checkbox is checked, enter City, Street, State/Province, Country, and Zip/Postal Code,
- Click Save to create the channel record.
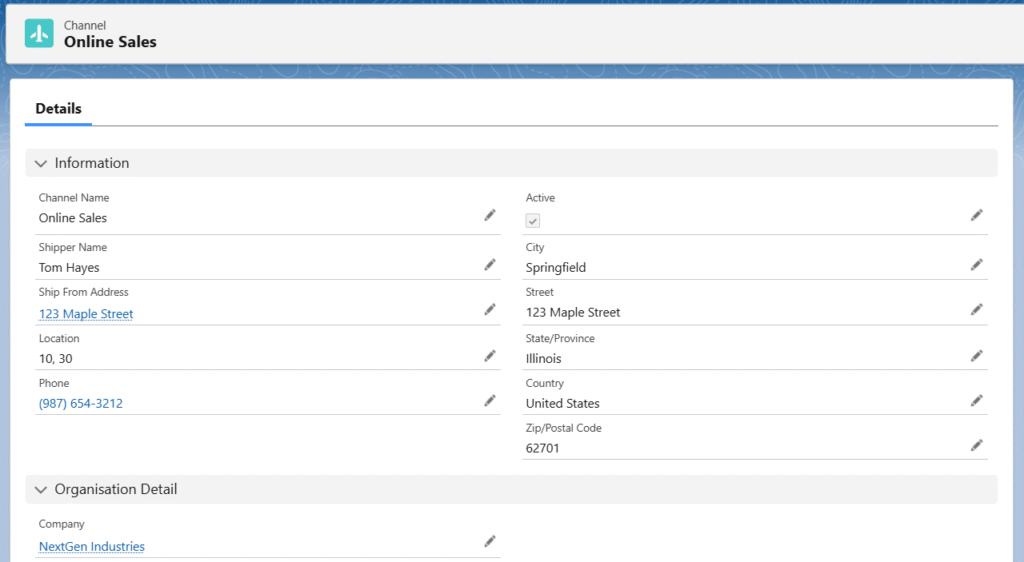
Note 2: One Company can have multiple channels.
b. Distribution Channel: The distribution channel is a group of warehouses/sites from where items are shipped.
Follow the steps to create a Distribution Channel record –
- Go to the related list of the created channel and find the Distribution Channel object (related list),
or
- Find the Distribution Channel tab from the App Launcher.
- Click the New button.
- Enter the Distribution Channel Name. The Channel Name will be auto selected. Create a new Site (refer to the Site creation process below), select or create a Contact, ensure the Active and Return Handling checkboxes are selected, check the Primary checkbox if the DC is the primary DC, select the Priority (according to the requirement).
- Click Save to create a new distribution channel record.
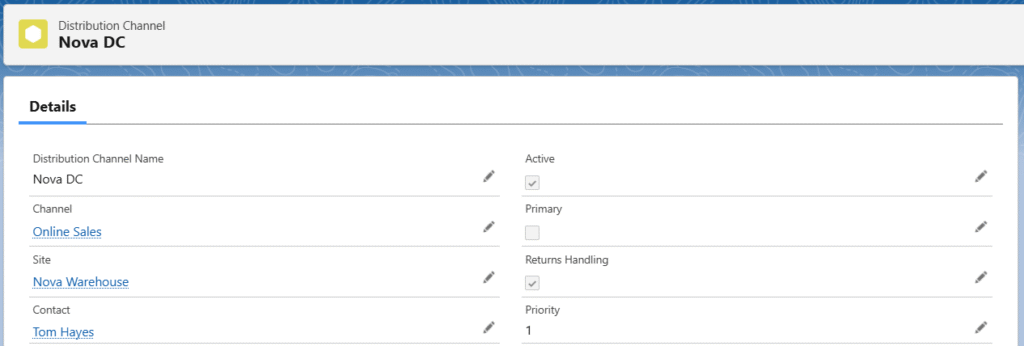
Note 3: Channels can have multiple distribution channels but only one site/warehouse record should be available for each distribution channel.
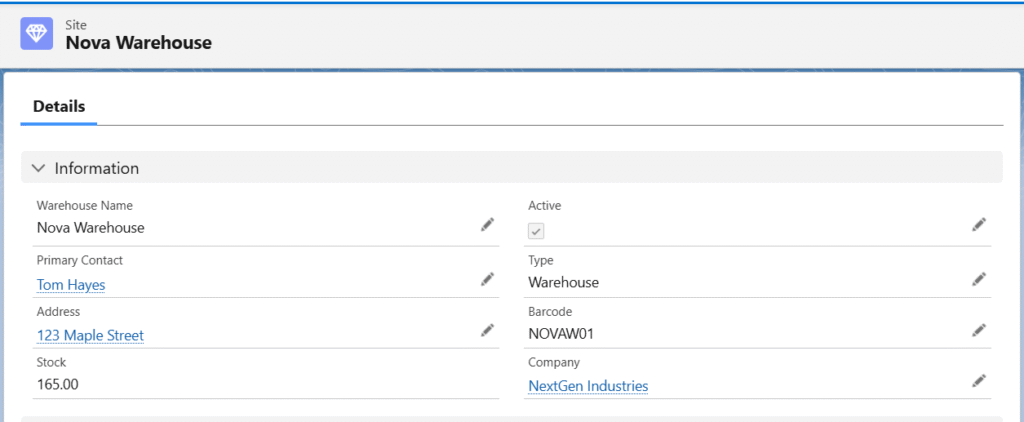
c. Site (Warehouse) – Site or Warehouse is a physical building (Ex. warehouse).
Follow the steps to create a Site record –
- Click on the Site lookup field on the Distribution Center creation page.
- Click on the + New Site button.
- Enter the Warehouse Name, select the Primary Contact, enter the Capacity of the Site, Address, Company (created Company Account), Active checkbox should be checked, Type should be ‘Warehouse’, enter a Barcode.
- Click on the Save button to create the Site/Warehouse record.
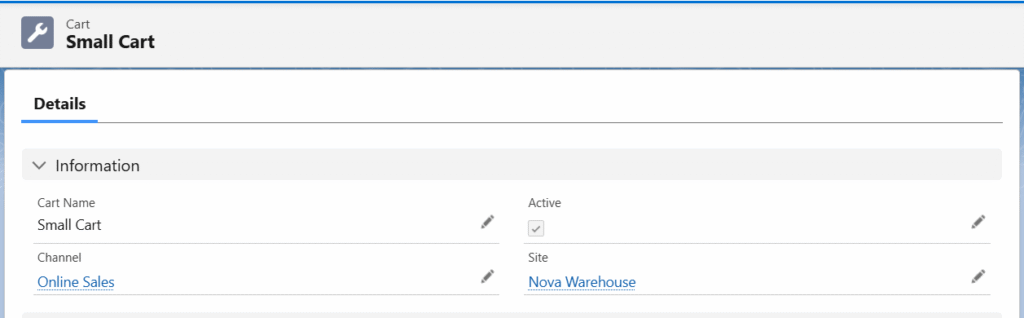
d. Cart – The cart can be used on the Stock Transfer page to transfer inventory/stocks from one site to another or from one location to another.
Follow the steps to create a Cart record –
- Find the Cart tab from the App Launcher,
OR
- Go to the related list of the created site and find the Cart object (related list).
- Click the New button.
- Enter the Cart Name. The Site will be auto selected. Ensure the Active checkbox is checked, select the Channel (created channel), enter the Account or Employee (if required).
- Click Save to create the cart record.
e. Location – The cardboard, bin, shelf, or a floor of the warehouse can be considered a location.
Follow the steps to create a Location record –
- Go to the related list of the created site and find the Locations object (related list).
- Click the New button.
- Enter the Location Name. The Site will be auto selected. Ensure the Active checkbox is checked, select a Location Type (any), enter the Barcode, select the Company (created company account),
- Click Save to create the location record.

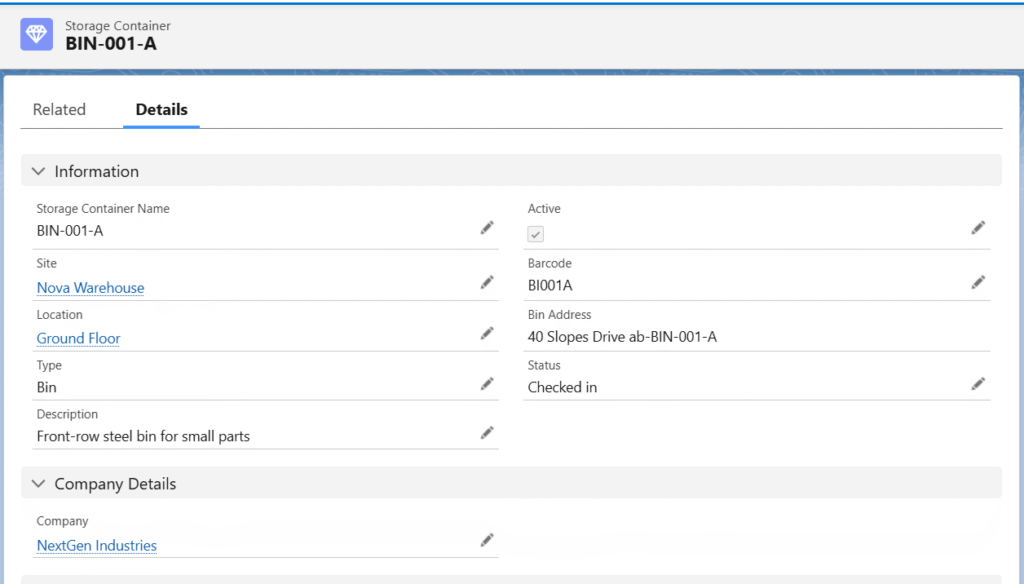
f. Storage Container – The bin, pallet, shipping container, bucket, or bottle can be considered a storage container for a location.
Follow the steps to create a Storage Container record –
- Go to the related list of the created site and find the Storage Container object (related list).
- Click the New button.
- Enter the Storage Container Name. The Site will be auto-selected. Ensure the Active checkbox is checked, select the created Location, select a Type (any), enter a Barcode, select the Company (created company account),
- Click Save to create the storage container record.
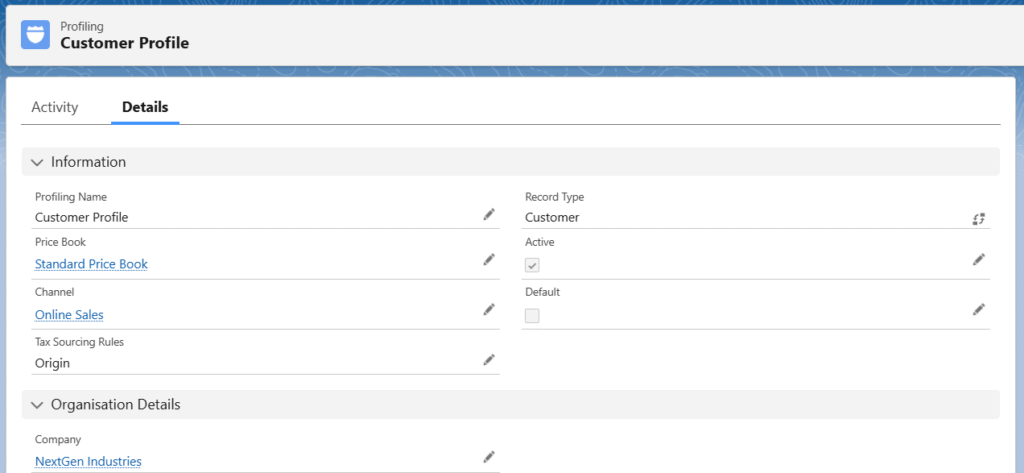
g. Profiling – Profiles control tax rules, pricing strategies, and product visibility for customers.
Each Profile is linked to one Price Books that define list prices, currency, and tax settings. Profiles are assigned directly to Customer Accounts.
When creating Orders, Quotes, Opportunities, or any sales documents, the system automatically applies:
* Pricing from the Profile’s linked Price Book(s)
* Tax calculations based on the Tax Records defined for that Profile
This ensures consistent and accurate pricing across all transactions.
Follow the steps to create a Profile record:
- Navigate to the Profiling tab using the App Launcher or find the tab in the app navigation menu.
- Click the New button.
Create a Customer Profile –
- Select the Record Type Customer to create the Customer Profile.
- Once the record type is selected, click on the Next button.
- Enter the Profile Name, select the Channel, and select the Tax Sourcing Rule (Origin/Destination).
- Ensure the Company is auto selected and check the Active checkbox.
- Click the Save button to create the Profile record.
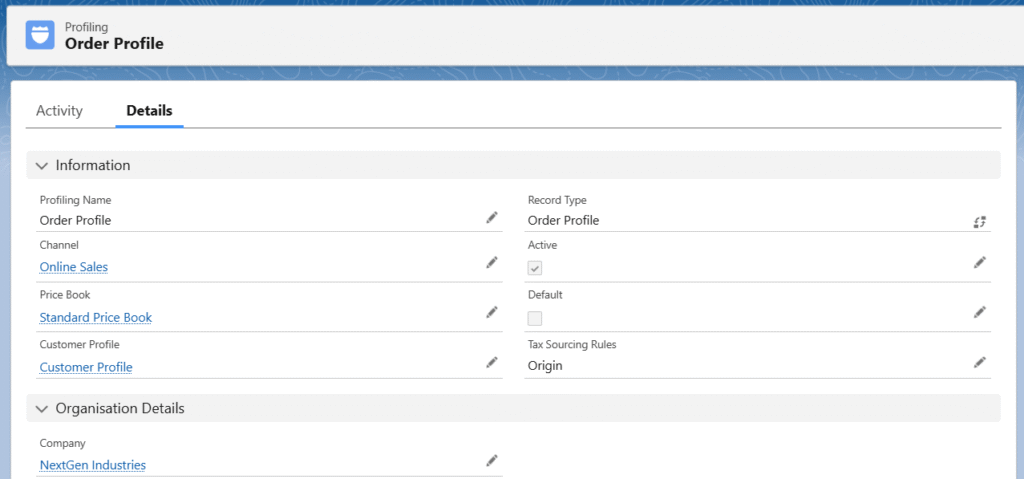
Create an Order Profile –
- Select the Record Type Order to create the Order Profile.
- Once the record type is selected, click on the Next button.
- Enter the Profile Name, select the Channel, select the created Account Profile (Exp – US Customer Profile), and select the Price Book.
- Ensure the Company is auto selected, check the Active checkbox, and mark as default if this is the default Order Profile.
- Click the Save button to create the Order Profile record.
Note 4: A Customer Profile must be assigned to the Order Profile.
C. Vendor/Supplier Account, Customer Account, and Their Related Records Setup –
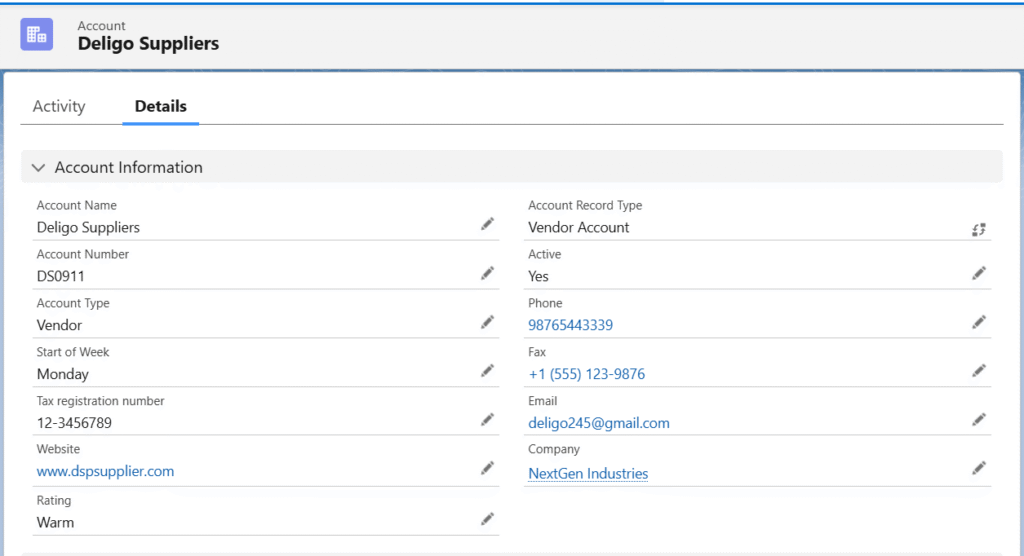
a. Vendor/Supplier – Accounts classified as suppliers from whom we procure goods or services. They are selected on Purchase Orders to record and track incoming inventory or expenses.
Follow these steps to create a Vendor/Supplier account –
- Navigate to the Accounts tab using the App Launcher or find the tab in the App Navigation menu.
- Click the New button to create a vendor account.
- Select the Record Type as Vendor and click on the Next.
- Enter the Account Name, set the Account Type to Vendor, and choose the Company account (created company account).
- Set the Active to Yes and enter other optional details (if applicable).
- Click the Save button to create the vendor account.
Note 5: If a user registers themselves in the ERP Supplier Portal Community, a Vendor Account and Contact record will be created automatically.
Note 6: Users can create new vendor Accounts, Contacts, and Addresses from the Create Purchase Order page by clicking on the Vendor, Vendor Contact, or Vendor Address lookup field, the new record creation button will appear.
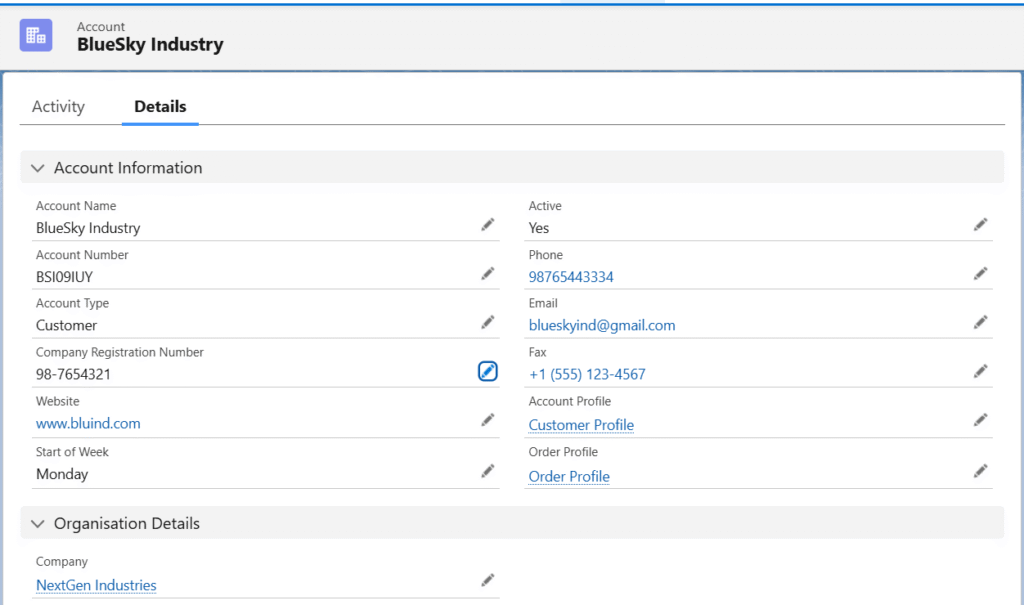
b. Customer – Accounts classified as buyers or clients to whom we sell products or services. They are associated with Opportunities, Quotes, and Sales Orders to manage the entire sales cycle from lead to revenue.
Follow the steps below to create a Customer account –
- Navigate to the Accounts tab using the App Launcher or find the tab in the App Navigation menu.
- Click the New button to create a vendor account.
- Select the Record Type Customer Account.
- Enter the Name of the customer in the Account Name field and select Customer in the Account Type field.
- Select the Company account.
- Set the Active to Yes, select the Account Profile (created customer profile Exp- Customer Profile) and Order Profile (created order profile Exp- Order Profile).
- Enter other optional details if required and click the Save button to create the customer account.
Note 7: Follow the same steps to create contacts and addresses for customers and the Vendors, as mentioned in the contact and address creation steps above.
D. Cost Card and Approved Vendor/Supplier Setup for Products
a. Cost Card –Cost Cards define the exact purchasing cost of a product from a specific Approved Vendor based on order quantity. Each Cost Card is linked to a product and vendor and includes quantity ranges along with the corresponding unit cost. Multiple Cost Cards can be added for the same product-vendor pair to reflect volume-based pricing. When creating Purchase Orders, the system makes Cost Cards selectable on the Create Purchase Order screen only when the Purchasing Vendor matches the Cost Card Vendor. It then automatically applies the correct unit cost from the active Cost Card based on the ordered quantity, ensuring accurate landed costs and adherence to negotiated pricing.
Follow the steps below to create a Cost Card –
- From the product record, locate the Cost Cards related list.
- Click the New button.
- The product will be auto selected. Enter the Cost Card Name.
- Select the created Vendor account from the Supplier lookup and enter the Vendor Part Number (if applicable).
- The Active checkbox should be checked, enter the Start Date and End Date, Quantity and Cost per Quantity, select the Company Account, and click Save.

b. Approved Vendor – Approved Vendors can be directly linked to specific Products (or Product records) in the system.
This association designates them as trusted sources from which the product may be purchased. Once linked, only these Approved Vendors will appear as selectable options when creating Purchase Orders, Requisitions, or RFQs for that product — ensuring procurement compliance and restricting purchases to pre-qualified suppliers.
Follow the steps below to create an Approved Vendor –
- From the product record, locate the Approved Vendors related list.
- Click the New button. The product will be auto selected.
- Enter the Approved Supplier Name, the Approved Supplier Name should match the vendor’s name.
- Select the created vendor account from the Vendor lookup.
- Create/Select the available cost card from the Cost Card lookup (if applicable). Set the Status to Approved.
- Set the Type to Primary.
- Enter the Lead Time (days) and click Save to create the approved vendor.
Note 8: To purchase a product from specific or approved vendors, the product must have Approved Vendors assigned, and the Purchase from Approved Vendor checkbox should be checked on the product record detail page.

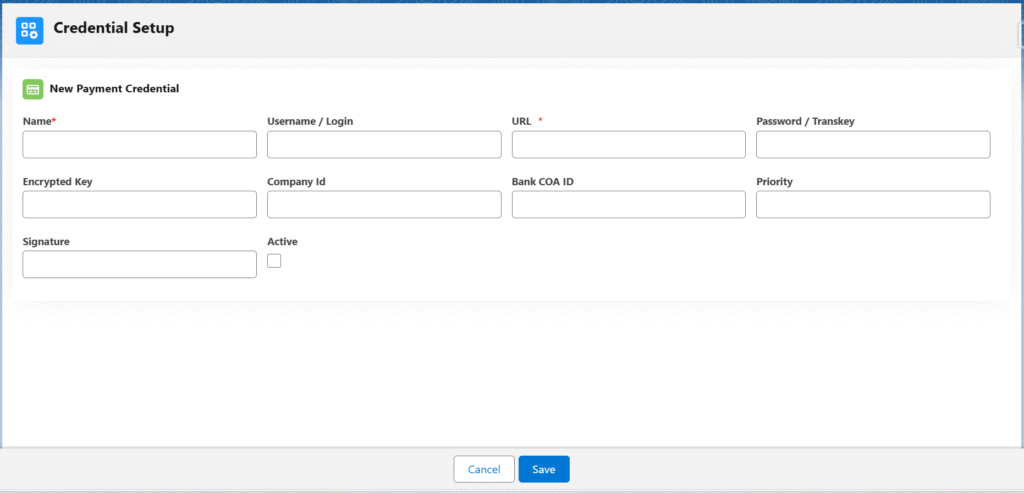
E. Credentials Setup – To enable payment gateways (Authorize.Net, PayPal, Stripe, etc.), shipping carriers (UPS, FedEx, DHL, etc.), and electronic signature services (DocuSign), the required credentials and connection settings must be configured in the system.
These credentials are securely stored as Custom Settings in the system, allowing easy management, deployment across environments, and version control without exposing sensitive data in code or custom settings.
Follow the steps below to set up credentials for payment:
- Navigate to the Credentials Setup tab using the App Launcher or find the tab in the App Navigation menu.
- Click on the Payments section to set up credentials for different types of payments.
- Click the New button.
- On the Credentials setup page, enter the Name, Username/Login, URL, Password/Trans key, Encrypted Key, Company ID, Bank COA ID, check the Active checkbox, and click Save.
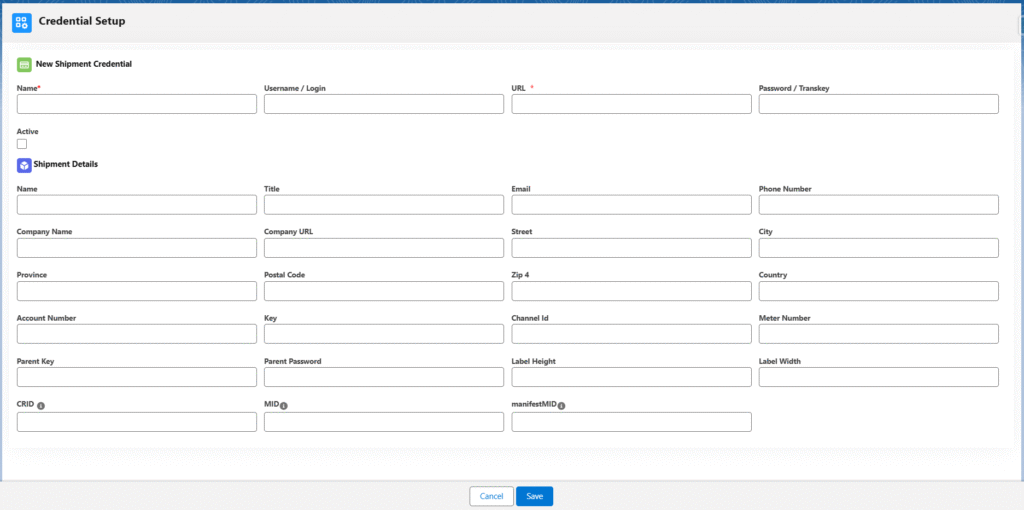
Follow the steps below to set up credentials for Shipment:
- Go to the Shipments section by clicking on the Shipments tab.
- Click the New button.
- On the Credentials setup page, enter the Name, Username/Login, URL, Password/Trans Key and check the Active checkbox in the first section.
- In the Shipper Details section, enter the Name, Title, Email, Phone Number, Company Name, Company URL, Street, City, Province, Postal Code, Country, Account Number, Key, Meter Number, Parent Key, Parent Password, and any other optional details if required, then click Save.
Follow the steps below to set up credentials for E-Commerce:
- Go to the Shipments section by clicking on the E-Commerce tab.
- Click the New button.
- On the Credentials setup page, enter the Name, Seller ID, Marketplace ID, Secret Key, Access Key, URL, Order Profile ID, Communication Email ID, check the Active checkbox, and click Save.

F. User record update and Employee setup –
- a) The logged-in user’s company needs to be marked as solo at the user record level.
- Navigate to the setup area by clicking the Setup button in the upper-right corner.
- Enter User in the Quick Find box. Once the User option appears, click on it.
OR
- Click the View Profile button in the upper-right corner. Click on the Username. Once the basic user record appears, click the User Details button on the right-hand side of the user record.
- Once the user record appears, click the Edit button, select the company picklist value SOLO and click Save.
- Note 9: If the picklist field is not available on the user record page, add it from the page layout.
- b) One employee record should be available for the logged-in user.
- Find the Employee tab from the app launcher.
- Click the New button to create a new employee record from the Employee object.
- Note 10: Refer to the steps mentioned above to create the Company account, Channel, Profiles, etc.
- On the employee record creation page, enter the employee’s Full Name, select the Employee User (logged-in user), Employee Profile, Channel (created channel record), and Company (created Company account). The Active checkbox should be selected.
- Enter other optional data and click the Save button to create the employee record for the logged-in user.
