Routing and Routing Link Code
A. Routing
A master manufacturing plan that combines the selected product version and its process cycles into a complete production sequence, while offering options like enabling auto or manual stock allocation, setting lead times, and defining quality checkpoints.
Follow the steps to create Routing
- Navigate to the Products tab using the App Launcher or find the tab in the App Navigation menu.
- Select the manufacturing product, then in the product record, find and select the Routing related list.
- In the Routing section, you can view existing routings or create a new one.
- To create a new routing, click the New button.
- Select the Manufacturing Routing Record Type and click Next.
- Enter the Routing Code, the BOM Product will be auto selected.
- Select the Bill of Material and the Channel where the manufacturing process is performed.
- Set Status to Certified and select Type as Parallel.
- Select the Process or create a new one, assign the Raw Material Site, and Finished Product Site.
- Check the Auto Stock Allocation checkbox to enable one-click stock allocation directly from the Manufacturing screen.
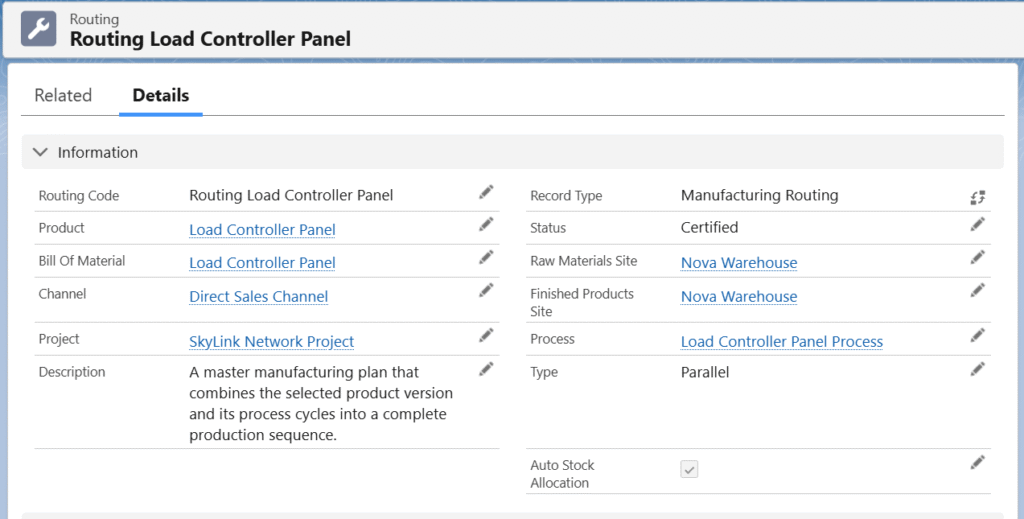
Routing – Field Description
| Fields | Descriptions |
| Routing Code | Name of the routing |
| Product | The product being manufactured |
| Bill of Material | Specific version of the product manufactured |
| Channel | Indicates the source or channel |
| Project | Links the Routing to a specific project for tracking and reporting |
| Descriptions | Detailed notes or instructions about the Routing |
| Record Type | Defines the category of the record |
| Status | Current state of the routing (e.g., Certified) |
| Raw Material Site | Warehouse or site for raw materials |
| Finished Products Site | Warehouse or site for finished products |
| Process | Manufacturing process linked to the routing |
| Type | Specifies the Routing category |
| Auto Stock Allocation | Enable one-click stock allocation directly from the Manufacturing screen |
B. Routing Link Code
Links a specific BOM line item to its corresponding Process Cycle and Operation, ensuring accurate material consumption at the right manufacturing step.
Follow the steps to create Routing Link Code
- Navigate to the Process Cycle related list and select the Routing Links tab.
- To create a new routing link, click the New button.
- Process Cycle will be auto selected, Enter the Routing Link Code and Description (if applicable).
- Click Save.
- Note 1: Routing links are assigned to BOM line items along with the corresponding Process Cycle Name to control material consumption at the exact manufacturing step.
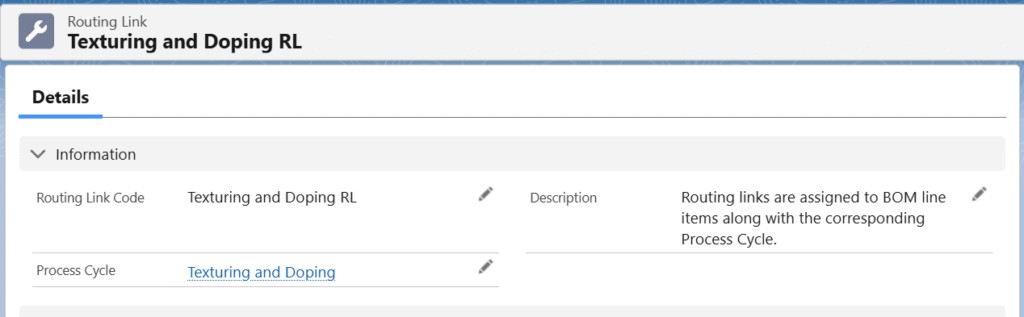
Routing Link Code – Field Description
| Fields | Description |
| Routing Link Code | Name of the routing link. |
| Process Cycle | The process cycle associated with the routing link |
| Description | Description of the routing link |
The Routing and the Routing Link Code can be created in just a few clicks from the MO Product Configuration screen — no need to manually fill every field one by one. Simply enter minimal key information and the system instantly generates all related records in seconds.
