Material Requirement Planning (MRP)
Material Requirements Planning (MRP) supports production planning and inventory management; it ensures that materials are available for production and products are available for delivery to customers. It helps manufacturers plan production schedules, manage inventory levels, and ensure timely procurement of materials. MRP uses demand forecasts, production schedules, and current inventory data to calculate the required quantities and timing of materials needed to meet production demands.
The Axolt system uses a standard MRP algorithm. The MRP algorithm plays a crucial role in optimizing Material Requirements Planning (MRP) by ensuring timely availability of materials for production while minimizing excess inventory.
It works by:
Demand Calculation: Forecasting product demand based on customer orders and production schedules.
Inventory Check: Comparing existing stock with required materials to calculate net requirements.
Order Scheduling: Creating planned orders for materials, considering lead times and production schedules to prevent delays.
Order Release: Triggering Purchase or Manufacturing Orders at the right time to ensure smooth flow in the production process.
This algorithm ensures efficient material flow, reducing shortages, overstock, and production delays in MRP systems.
MRP Algorithm Selection: Detailed Descriptions and Usage Guidelines
Lot-for-Lot (L4L): The Lot-for-Lot algorithm is a demand-driven approach in which the order quantity matches the exact quantity required for a specific time. It does not consider any additional inventory, meaning the exact amount needed is ordered without surplus.
Usage: Ideal when inventory carrying costs are high and there is a need to minimize excess stock.
Fixed Order Quantity (FOQ): Fixed Order Quantity is a method in which a predefined quantity is ordered whenever the stock level reaches a certain reorder point. The order quantity remains constant regardless of demand fluctuations.
Usage: This is useful for products with consistent demand and where the order quantity is optimized for cost efficiency.
Economic Order Quantity (EOQ): EOQ is a classic inventory management formula that calculates the optimal order quantity to minimize total inventory costs, including ordering and holding costs. It assumes constant demand and lead time.
Usage: Best used in stable demand scenarios where the objective is to balance order size and frequency to reduce overall costs.
Period Order Quantity (POQ): The Period Order Quantity algorithm involves ordering enough inventory to cover a set number of periods or cycles. The quantity ordered is variable but always aligns with the demand forecast for the period.
Usage: Suitable for businesses that experience periodic demand and want to align orders with these cycles.
Safety Stock Method: This algorithm accounts for the need for safety stock, which is extra inventory held to prevent stockouts due to demand variability or supply delays. The system calculates the reorder point considering the safety stock level.
Usage: Useful in environments with unpredictable demand or long lead times, where avoiding stockouts is crucial.
Just-In-Time (JIT): The JIT algorithm aims to minimize inventory levels by ordering materials just in time for production. This method reduces holding costs but requires accurate demand forecasting and reliable suppliers.
Usage: Best for companies looking to reduce inventory costs and maintain strong supplier relationships to ensure timely delivery.
Demand Driven MRP (DDMRP): DDMRP is an advanced planning and execution methodology that uses strategic inventory positioning and buffer management. It focuses on real-time demand signals to drive production and inventory decisions.
Usage: Ideal for complex supply chains with variable demand, helping to balance inventory and service levels effectively.
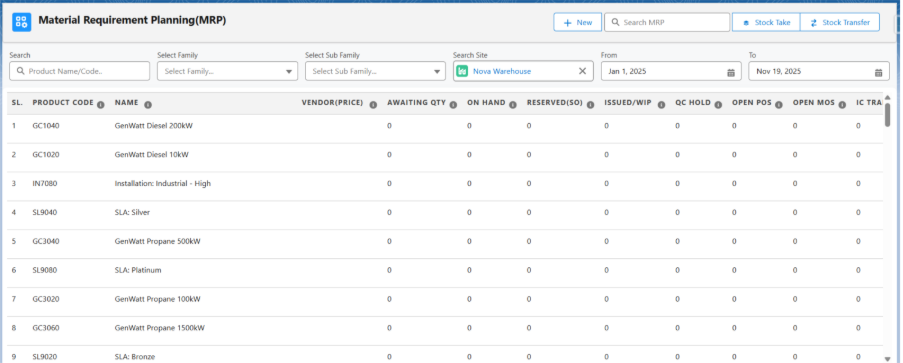
Material Require Planning (MRP) Screen –
Navigate to the Material Require Planning (MRP) tab using the App Launcher or find the tab in the App Navigation menu.
Family Filter: Allows users to select a broader product category, such as Furniture, Mobile, or Electronic Products. This filter helps refine the search to target a specific category of products.
Sub-Family Filter: After selecting a Family, this filter refines the search further within that category. For instance, if Mobile is selected under Family, the Sub Family filter might provide options like Laptop, Desktop, etc.
Site Filter: Users can specify the location (ex: Nova Warehouse) to view MRP data relevant to that specific site.
Date Range: Define the period for which the MRP data should be displayed using the From and To date pickers. This allows users to focus on data relevant to a specific timeframe.
Understanding the Data Table Columns on the MRP Home Screen
SL (Serial Number): Represents a sequential number assigned to each product entry. Which makes it easier to reference specific products in the list.
Product Code: A unique identifier for each product in the system. It’s crucial for accurate tracking and inventory management.
Name: The name of the product, which helps users identify items more easily.
Vendor (Price): Displays the vendor associated with the product and the price. It’s essential for procurement and cost analysis.
Awaiting Quantity: Shows the quantity of the product that has been ordered but not yet received. This helps in tracking incoming stock.
On Hand: Represents the current stock available in the inventory. It’s critical to determine whether additional orders are necessary.
Reserved (SO): The quantity reserved for sales orders (SO). This ensures that stock is set aside for confirmed orders.
Material Requirement Planning (MRP) Section
- Create Manufacturing Order: This option allows users to generate a manufacturing order directly from the MRP interface. It enables the scheduling of production activities based on current material needs and available resources.
Note 1: The Create Manufacturing Order option is enabled only for manufacturable products and requires a complete manufacturing setup (BOM, Routing, and Process Cycles etc.) to function.
- Create Transfer Order: Users can create transfer orders to move inventory between different Distribution Centers, Sites, or Warehouses within the Company. This ensures that materials are available where they are needed most, facilitating efficient production processes.
- Stock Take: This feature is used to initiate a stock-taking process, which involves data. It helps maintain accuracy in inventory management and identifies discrepancies.
- Stock Transfer: This option enables the transfer of stock from one location to another within the same Company. It is useful for balancing inventory levels across multiple sites to meet varying demand.
- History Tracking: The History Tracking feature allows users to view and track past actions and changes related to material requirements, stock movements, and manufacturing orders. It provides a historical record that is essential for audit trails and for understanding the progression of inventory and production activities over time.
Note 2: The Stock Take and Stock Transfer options can be displayed on the MRP home screen by enabling the custom settings Show Stock Take and Show Stock Transfer in MRP. Once activated, users can create Stock Take and Stock Transfer records directly from the MRP screen without leaving the module.
Steps to create a Material Requirement Planning (MRP) –
- Navigate to the Material Require Planning (MRP) tab using the App Launcher or find the tab in the App Navigation menu.
- To create MRP, click on the + New button, this will Navigate to Create Material Require Planning (MRP) screen.
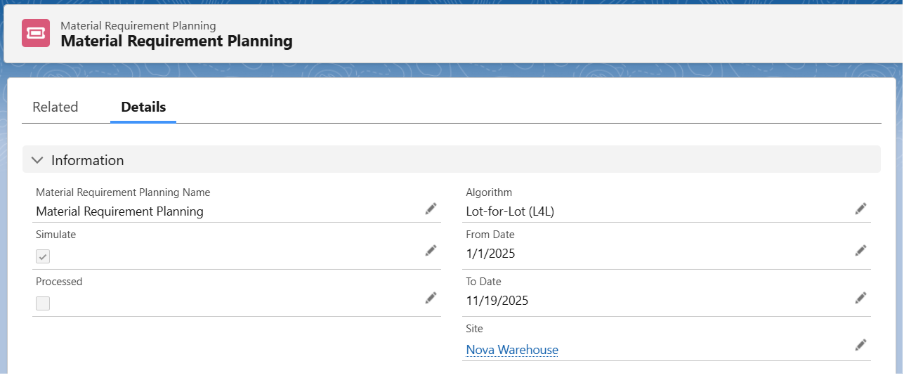
- MRP Name is auto generated but editable; From Date defaults to January 1 of the current year, To Date defaults to today (both fully adjustable as required), and Site is automatically populated from the employee’s record. Select the desired Algorithm. These fields define the parameters for the Material Requirement Planning process.

- After filling in all the required fields, click the + Products button.
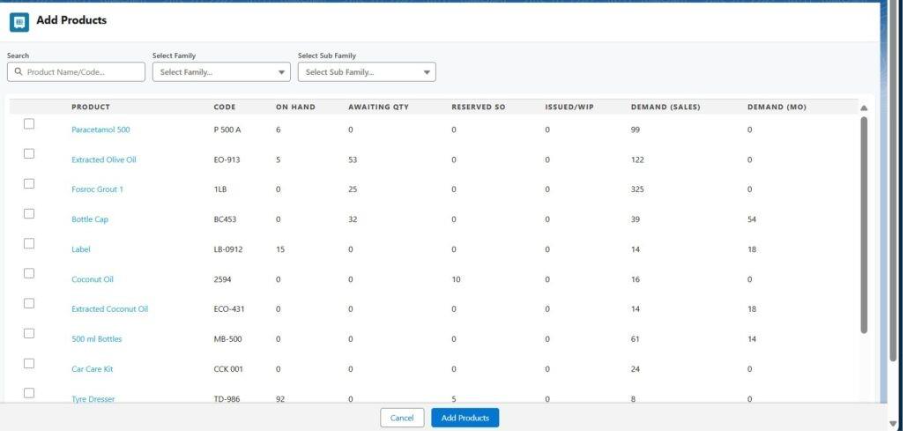
- Select the relevant products you want to include in the MRP, and then click the Add Products button.
- Once you’ve selected the products, select the appropriate Reordering Rule, and then click the Save button.
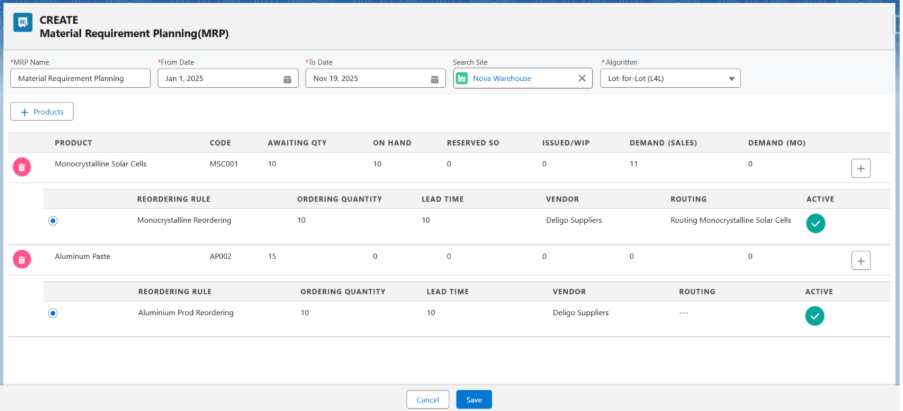
- Note 3: If the current rule is inactive. You’ll need to mark it as active before proceeding. Alternatively, you can create a new Reordering Rule by following the steps below.
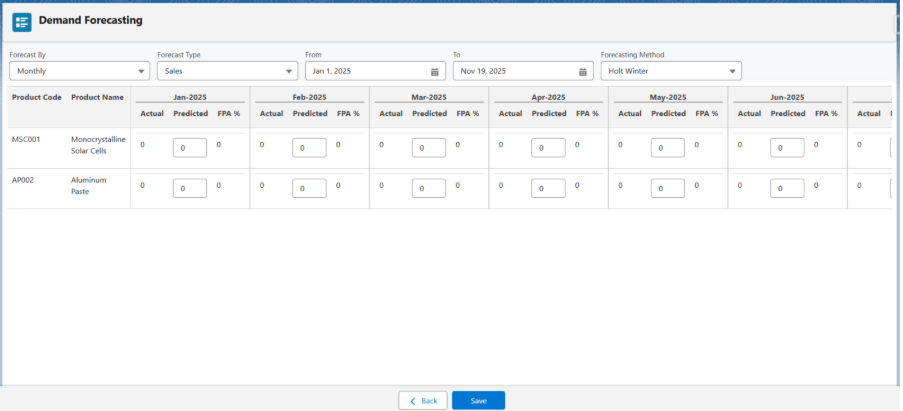
- Once you click the Save button, you will get a forecast where you will have the actual and predicted products, which can be changed.
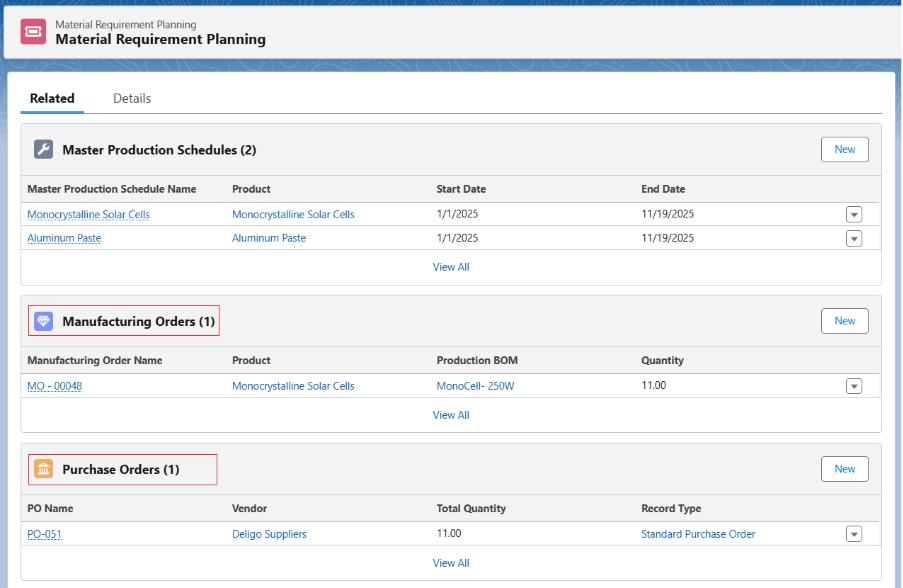
- After saving this, the MRP is created. By clicking on the Simulate checkbox, the Purchase Order and the Manufacturing Order will be created under the Related tab.
- Note 4: Since we used manufacturable and purchasable product, both manufacturing order and purchase order is created after simulating.
Creating a new Reordering Rule –
- To add a reordering rule, click on the Plus (+) icon. You can then enter Reordering Rule Name, Lead Time (in Days), Ordering Quantity, Vendor or Routing (depends on product type), Min Quantity, Max Quantity and Warning Quantity.
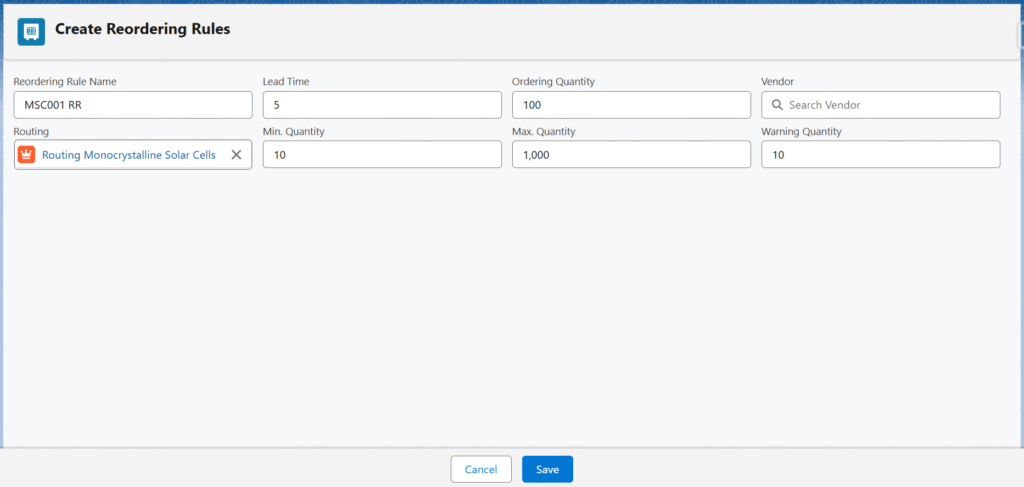
- Note 5: While creating a new reordering rule, if the product is Manufacturable, select the Routing and if the product is Purchasable, select the Vendor. Rest everything is same for creating a reordering rule.
