Budget Planner
A Budget Planner is a tool that helps users or businesses organize and manage their financial resources efficiently. It allows the creation and management of different types of budget plans based on specific projects or goals.
Key Features of Budget Planner:
- Centralized Management: All financial planning happens within Salesforce, allowing budgets to be linked directly to projects, departments, or customers.
- Flexibility: The planner supports three different types of budget plans, allowing diverse project management needs.
- Tracking & Forecasting: Users can track expenses and adjust budgets accordingly as projects progress.
- Real-Time Visibility: Since it’s integrated with Salesforce, users receive up-to-date insights into financial health and project status.
Types of Budget Plans:
A. Cost Budget:
- A Cost Budget allows you to create budget plans with an initial budget for projects. This type of budget can be adjusted later as needed.
- Ideal for projects where the primary concern is controlling costs.
- You define an overall cost limit, and the planner tracks expenses against this. It helps ensure that spending does not exceed a set limit.
- Useful for internal projects or when managing fixed costs like overhead, salaries, and fixed resources.
B. Time and Material Budget:
- Like the cost budget, but here the budget is allocated for both materials and time-based work, allowing for flexible tracking of resources and labour.
- Suitable for projects where costs are directly tied to hours worked and materials used.
- The budget is calculated based on time (labour hours) and materials consumed during the project. It allows for flexibility, adjusting based on work done.
- Ideal for service projects, consulting work, or construction, where time and resources fluctuate.
C. Fixed Budget:
- It is like the cost budget plan, but once the budget is set, it cannot be changed.
- Best for projects with a set budget and deliverables.
- The budget is fixed, and the project must be completed within this financial limit. Any adjustments to the scope may require re-negotiation.
- Often used for client projects with a clear start and end, like software development or a marketing campaign.
Note 1: The budget is allocated for the projects from the Project workbench.
Steps to Create a new Project from Project Workbench:
- Navigate to the Project Workbench tab using the App Launcher or find the tab in the App Navigation menu.
- Click on the + Project button. This will navigate you to a project creation page.
- Enter the required details, such as the project Name, Manager, Start Date, End Date, Company, Status, Account, Contact, Team and Description.
- Click on the Save button will be renavigated to project workbench.
Note 2: budget can be allocated for the created project from the Project Workbench by using the Allocate Budget button.
Budget Plan Creation Process:
A. Cost Budget Plan:
- Navigate to the Budget tab using the App Launcher or find the tab in the app navigation menu.
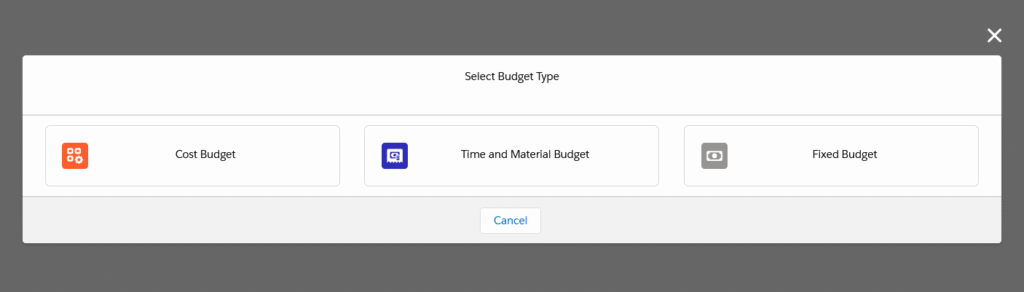
- To create a New Budget Plan, click + Budget Plan, select the Budget Type (Cost Budget), and you’ll be navigated to the Budget Allocation page. Select Year and Company.
- In the budget configuration, you can set a Threshold Limit. By default, this is set to 90%, meaning you will be notified when 90% of your budget is consumed.
- Select the Periodicity of the budget (Monthly, Quarterly, or Yearly). By default, it is set to Monthly, meaning the budget applies to the current Month.
- If quarterly is selected, you will be asked to enter the Budget Amount for 4 quarters.
- If yearly is selected, you will need to enter the Budget Amount for all 12 months.
- Choose between Posted Actual Expenditure or No Posted Actual Expenditure. If you select Posted Actual Expenditure, expenses will be reflected in the journal during billing.
- In the project look-up, choose the Project for which the Budget is being set.
- Select the budget Sub-Category, which will auto-populate related Account details.
Note 3: Budget Sub-Categories come from the Chart of Accounts tab. You can either select an existing sub-category or navigate there to create a new one if necessary.
Note 4: To make the chart of account available in budget category then, In the chart of account Available for budgeting Process checkbox should be checked.
- Enter the Budget Amount for the selected sub-category.
- If needed, click the New button to allocate the budget for additional Sub-Categories.
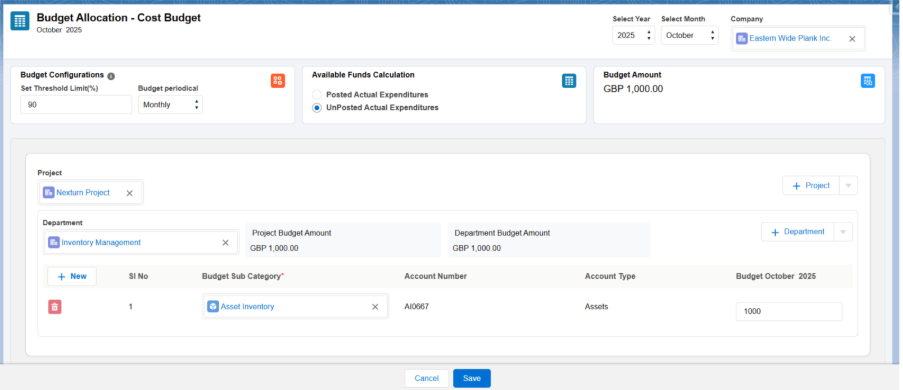
- Click Save to save the cost Budget Plan.
- The budget plan will be saved for the selected company. You can find it using the search bar or by filtering by Company. Click on the name of the budget plan to edit or modify it.
- The newly created budget plan will be saved as Draft. You can Edit or Delete it at this stage.
- To approve the budget plan, click the drop-down and then select Submit for Approval option, then status will be changed to Submit for Approval.

Note 5: When a budget plan is in Submitted for Approval status, it cannot be edited or deleted..
- An email will be sent to the assigned user for approval. Once approved, the status will change to Approved. Alternatively, you can go to the Budget Plan tab, select the budget plan to approve, and approve it on the related page.

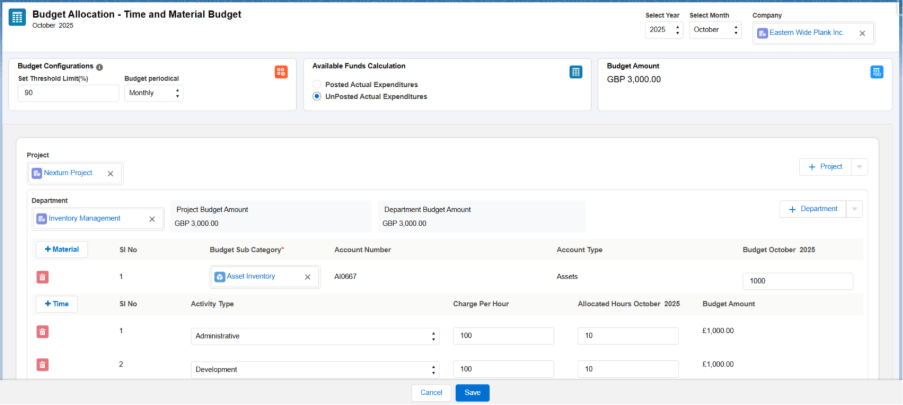
B. Time and Material Budget Plan:
- Navigate to the Budget tab using the App Launcher or find the tab in the App Navigation menu.
- To Create a new Budget Plan, click + Budget Plan, select the Budget Type (Time and Material Budget), and you’ll navigated to the Budget Allocation page. Select choose the Year and the Company for which the budget plan is being created.
- In the budget configuration, you can set a Threshold Limit. By default, this is set to 90%, meaning you will be notified when 90% of your budget is consumed.
- Select the Periodicity of the budget (Monthly, Quarterly, or Yearly). By default, it is set to Monthly, meaning the budget applies to the current Month.
- If quarterly is selected, you will be asked to enter the Budget Amount for 4 quarters.
- If yearly is selected, you will need to enter the Budget Amount for all 12 months.
- Choose between Posted Actual Expenditure or No Posted Actual Expenditure. If you select Posted Actual Expenditure, expenses will be reflected in the journal during billing.
- In the Project look-up, choose the Project for which the budget is being set.
- In the Material section, select the budget Sub-Category, which will auto-populate related account details and enter the Budget Amount.
- In the Time section, select the Activity Type, enter Charge Per Hour and Allocated Hours, then Budget Amount will be calculated automatically.
Note 6: To add more Material and Time budget click on the + Material and + Time icon.
Note 7: Follow the same process of Submit for Approval for Time and Material Budget, as mentioned above in Cost budget.
C. Fixed Budget Plan:
The process for creating a fixed budget plan is like that of a cost budget plan. Once the budget plan is created, you will not be able to modify it.
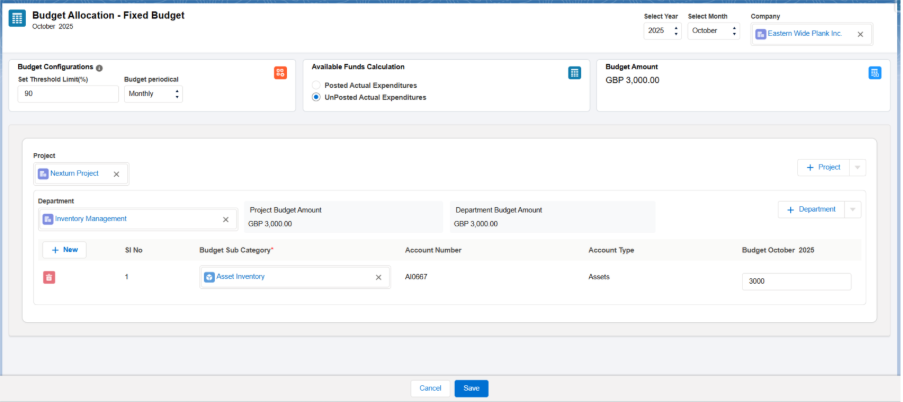
Since it’s a fixed budget, the only actions you can perform are:
- Forecasting the budget.
- Deleting the budget plan if necessary.
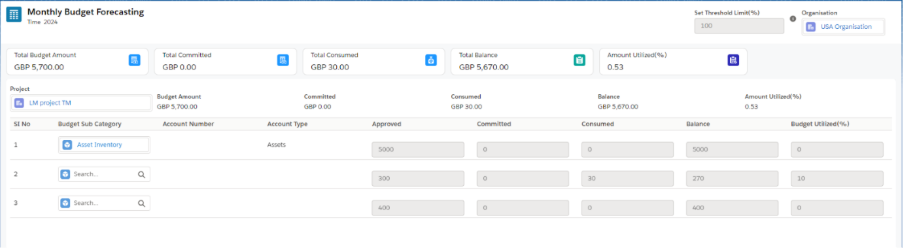
Manage forecasting

- Click on the Forecasting icon to be directed to the Forecasting page.
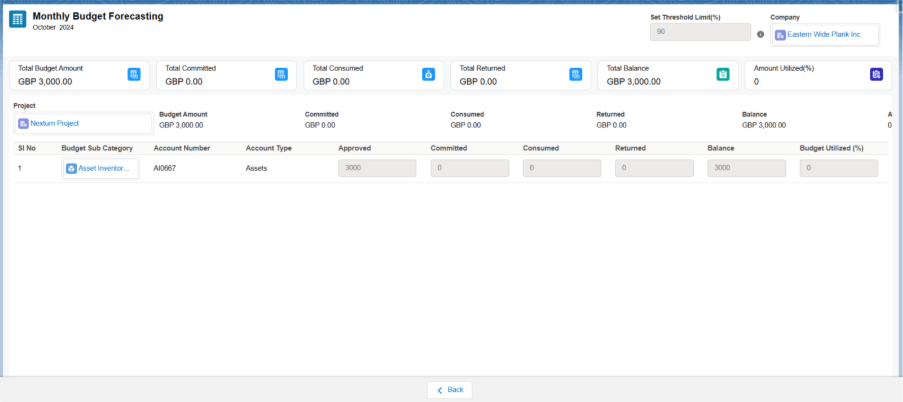
- Total Budget Amount: Displays the total budget amount allocated.
- Total Committed: Shows the total amount committed to costs. For time and material budgets, this is displayed directly as Total Consumed.
- Total Consumed: The total amount utilized from the allocated budget.
- Total Balance: The remaining balance, calculated by subtracting the Total Committed amount from the Total Budget Amount.
- Amount Utilized (%): Shows the percentage of the total budget that has been utilized.
Create a Purchase Order to See Budget Plan Changes
Steps to Create a Purchase Order
- Add the project you previously created from the Project Workbench in the project field.
- In the Chart of Accounts, select the chart of accounts corresponding to the budget plan, which aligns with the project sub-category.
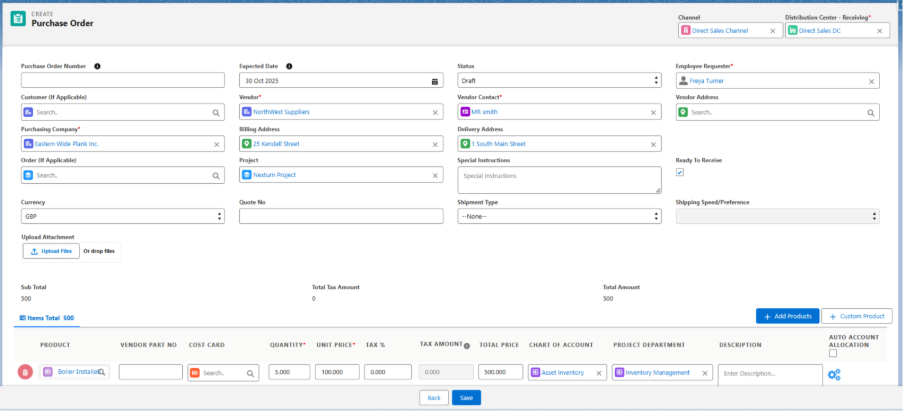
- When you create the purchase order, the amount will appear in the Committed section of the budget plan.

- To fully consume the purchase order, a bill needs to be created.
Steps to Create a Bill for the Purchase Order:
- Navigate to the Accounts Payable tab using the App Launcher or find the tab in the App Navigation menu.
- In the Accounts Payable, click on the Purchase Order tab.
- Select the purchase order you created to create the bill for it.
- Click on the drop-down icon in the right corner of the purchase order and select + New Bill.

- Enter Vendor Bill Number and attach any necessary supporting attachments.
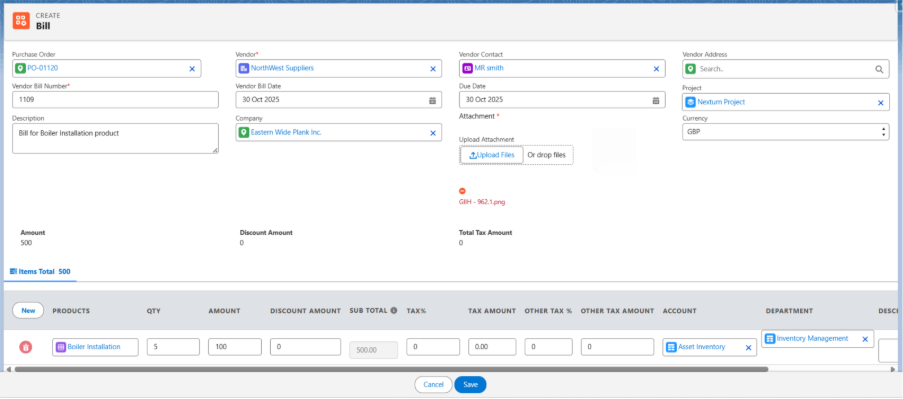
- After entering all the Bill details click on Save, once saved, the amount will move from the Committed section to the Consumed section of the budget plan.

Observing Changes in a Time and Material Budget Plan:
Material Budget: The process for allocating material is same as described for the Cost Budget Plan for its Sub-Categories.
Time Allocation:
- Navigate to the My Timesheets tab.
- Select the Employee, the Project they worked on, the Activity Performed, and the Hours Worked.
Note: Projects listed are based on the current user’s resource team. Ensure that the resource team for the project includes active users and they are of available dates.
- Save the timesheet entry. The time allocated by the employee will be recorded.
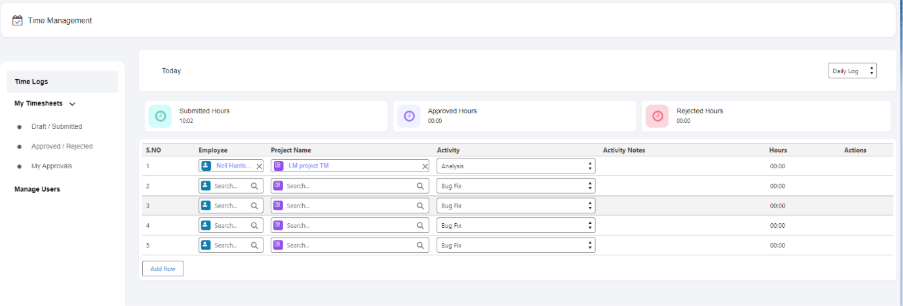
Budget Changes:
- Unlike the cost Budget Plan, there will be no Committed Amount. The allocated time will directly reflect in the Consumed section of the Budget Plan.