Accounts Payable
Accounts Payable (AP) refers to the amount of money a company owes to its suppliers or vendors for goods or services received but not yet paid for. It is recorded as a liability on the company’s balance sheet and represents short-term debt that must be settled within a specific period, usually under agreed payment terms.
Navigate to the Accounts Payable tab using the App Launcher or find the tab in the App Navigation menu.
Vendor Tab
- The Vendor tab displays a list of all vendors.
- Vendors can be filtered based on selected Companies, and a new vendor can be created by clicking the +New Vendor button.
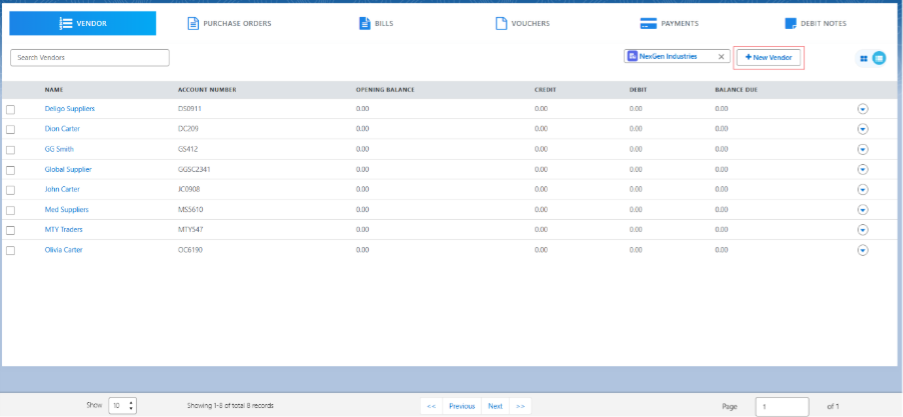
- Vendors can be searched by vendor Name and Account Number using the Search bar.
- We can create new Purchase Order, new Bill, new Debit Note by clicking on the drop-down of the particular vendor.
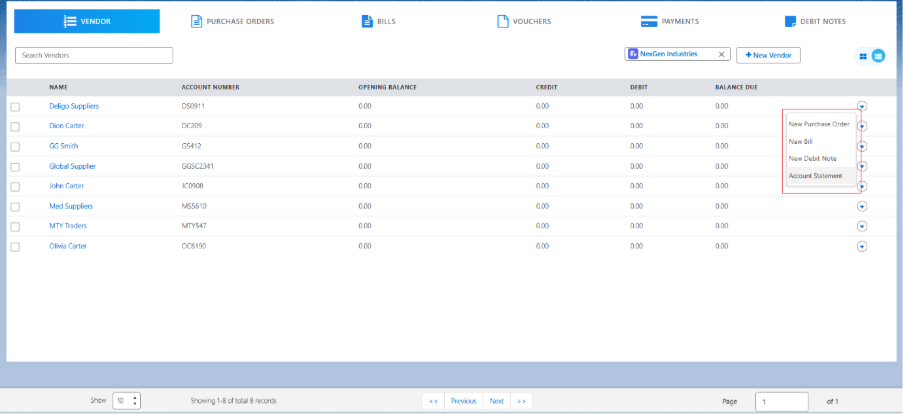
- Vendor’s Account Statement can be viewed by clicking the drop-down list next to the vendor.
- Vendors can be sorted using Sort functionality.
- Selecting a particular vendor, and navigating to the purchase order tab, will only display Purchase Orders related to that vendor.
Purchase Order Tab
- Under the Purchase Order tab, users can search for Purchase Orders by purchase order Number or Vendor.
- Purchase orders can be filtered based on selected Companies.
- Purchase Orders can be sorted using Sorting functionality.
- Purchase orders can be edited by using Edit Purchase Order option from the drop-down menu of the specific purchase order.
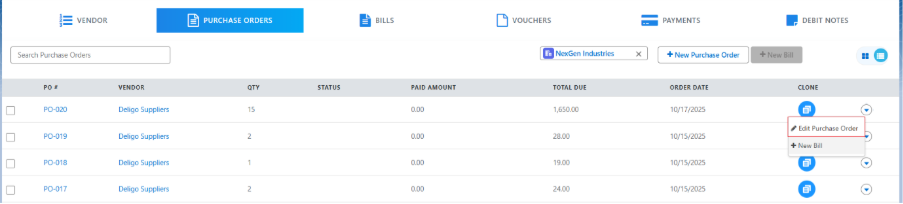
- A new Purchase Order can also be created from the Purchase Order section using the + New Purchase Order button.
- A new Bill can also be created from the Purchase Order section, select the particular purchase order and choose the New Bill option from the dropdown.
- The Purchase Order is auto populated, enter the Vendor Bill Number and upload the Attachment. You can also add more products to the same bill by clicking the Add button or delete them using the Delete button.
- On the product line item, add Taxes and a Description if required, select the Chart of Account to capture the amount paid.
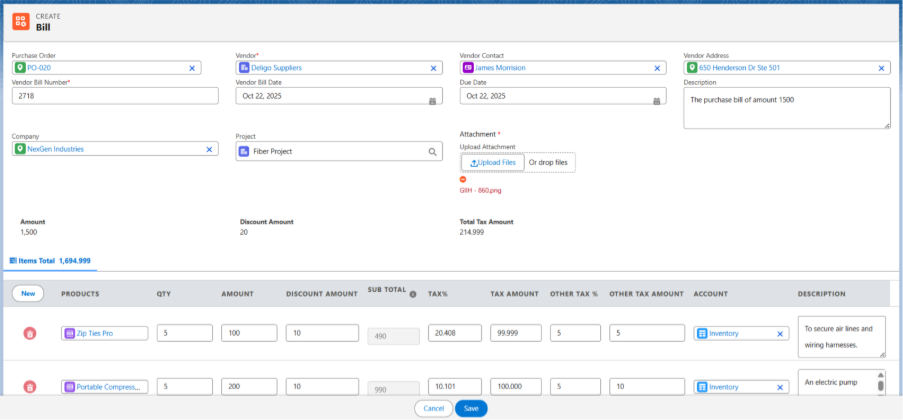
- Enter other option details if required and click on Save.
Note 1: When a bill is created from the PO section, the user is automatically redirected to the Bills section.
Note 2: A single Bill can be created for multiple Purchase Orders from the PO section, if the vendor is the same, by selecting multiple POs and clicking the + New Bill button; available button at the top right corner of the page.
Once the PO Bill is created, the Bill details need to be matched with the Received Items.
The steps for the Match Bill functionality are mentioned below in the Bill section.
Bills Tab
- Under the Bills tab, users can Search for bills by Bill Number, Purchase Order or Vendor.
- Bills can be filtered based on selected Companies.
- Bills can be sorted using Sort functionality.
- Bills can also be filtered by Bill Due Date using the Overdue Bills option.
- A new bill can be created by clicking on + New Bill button at the top right corner of the page.
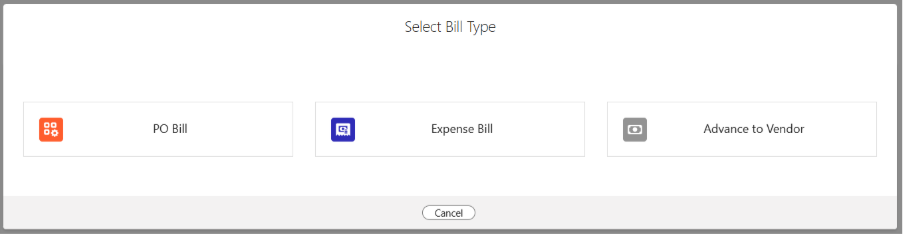
There are three types of bills:
A. PO Bill: A bill is created against a purchase order for goods or services received.
To create a PO bill from the Bill section, the user needs to select the correct Purchase Order from the Lookup on the Create Bill page. Refer to the steps mentioned above.
B. Expense Bill: A bill recorded for business expenses.
C. Advance to Vendor Bill: A bill representing an advance payment made to a vendor before goods or services are delivered.
Follow the Steps to create an Expense Bill:
- A pop-up screen will appear, select the Expense Bill option.
- After selecting the Expense Bill option, you will be directed to the Create Bill page.
- From the Look up, select Vendor, Vendor Contact, Vendor Address, Vendor Bill Number and other details.
- Click on the New button to add the expense line items to the bill.
- Select the Expense Account, Quantity, Amount, Discount (if applicable), Tax (if applicable) and other details.

- Click on Save.
Note 3: Expense Bill cannot be matched.
Follow the Steps to create an Advance Bill:
- From Bill section click the + New Bill button from the top-right corner.
- A pop-up screen will appear, select the Advance to Vendor option.
- After selecting the Advance to Vendor option, you will be directed to the Create Bill page.
- Select the Purchase Order from the look-up, and all the other details will be auto-populated along with line items.
- Enter the Advance Amount to be paid in Amount field.
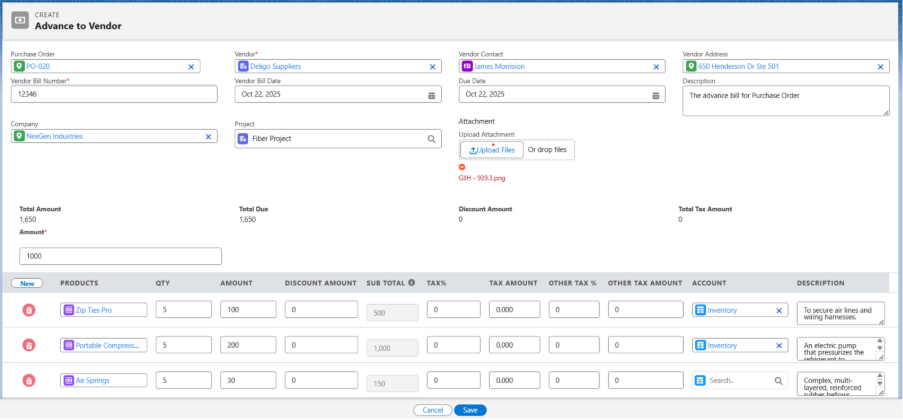
- Click the Save button.
Note 4: From this point, the process to create a Voucher and make the payment remains the same.
Note 5: The Advance to Vendor bill cannot be Posted.
Follow the below steps to match the PO bills
- Select the Purchase Order and click on the Bill section. Then select the bill to match and click the Match Bill button at the top right.
Note 6: It will only allow matching the bill when the items have already been Received in the inventory.
- On the Match Bill page, select the Bill line items one by one and select its corresponding Stock Inward line items.
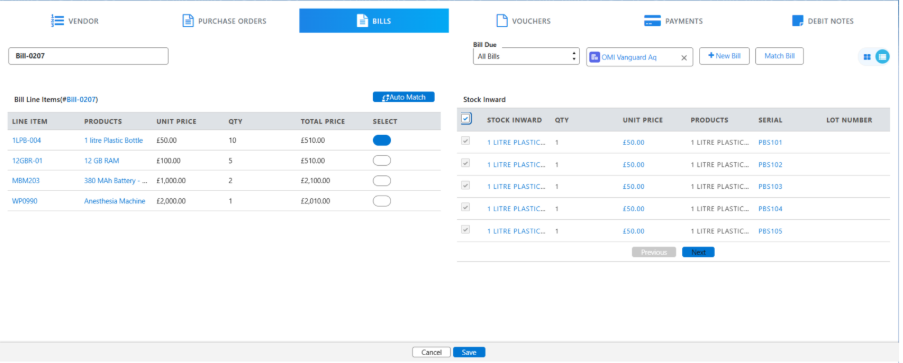
- Click the Save button.
- Now post the bill by selecting the Post option from the dropdown next to that bill.

Note 7: Posting a bill creates a Transaction and Ledger Entries against the bill.
- When the bill is posted, the New Voucher option appears in dropdown.

- Click New Voucher to create a voucher.
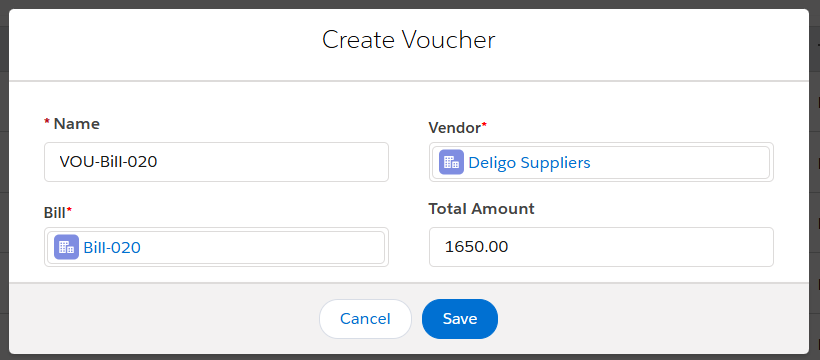
- Click the Save button to create the voucher.
Voucher Section
- Under the Voucher tab, users can search for vouchers by voucher number, Purchase order, or vendor.
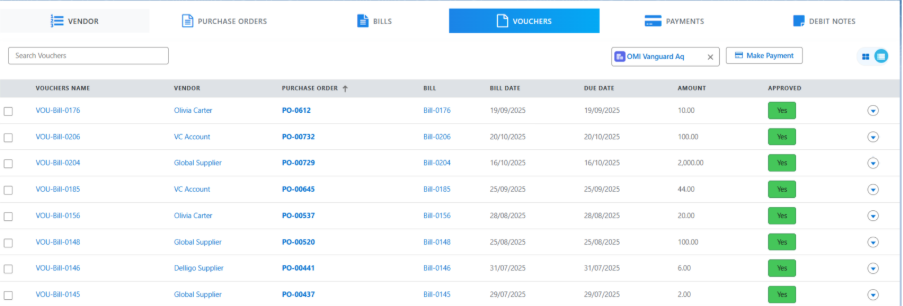
- Vouchers can be filtered based on the selected organization.
- Voucher can be edited by clicking on Edit Voucher button next to the voucher.
- If the voucher is created from bill section, we can Approve/Un-Approve the voucher by clicking on the Approve/Un-Approved button from the drop down.

Note 8: Once the Voucher is created, we cannot make the payment against the voucher until its Approved.
- Once the Voucher is approved, we can make payment by clicking the drop down button against the voucher.
- On the payment screen, select the Payment Date, Reference Number, Payment Account, and enter the Amount Paid.
Screenshot…
- Select a Payment Method, then click Save. Now, your payment is complete.
Note 9: Debit Notes can also be used/applied to make payment if available.
Payments Tab
- Under the Payments tab, users can search for payments by Payment Number, Bill Number, Purchase Order, or Vendor.

- Payments can be filtered based on the selected Companies.
- Payments can be made from voucher section as mentioned above.
- Payments can be edited by clicking on Edit Payment button against the payment.
- We can Post/Un-Post the payment by clicking on the Post/Un-Post button from the drop down.
Cheque Payment: Coming Soon…
Debit Notes Tab:
- The Debit Notes tab displays a list of all Debit Notes.
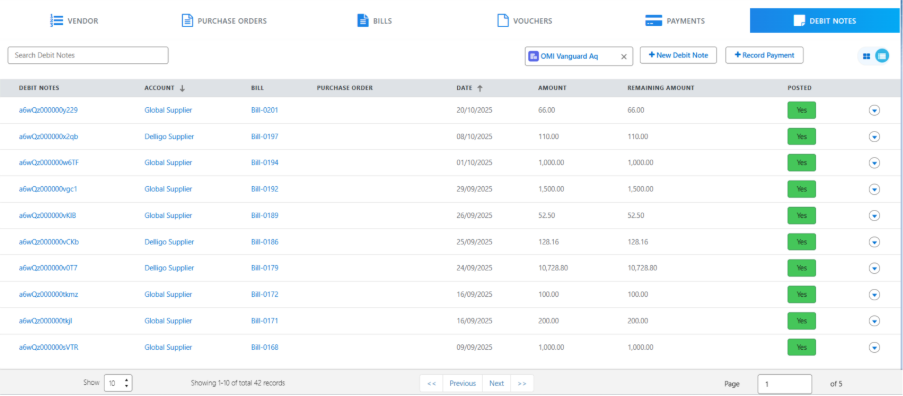
- Under the Debit Notes tab, users can search for a debit note by its name.
- Debit Notes can be filtered based on the selected Companies.
- Debit Notes can be created directly from the Debit Notes tab by clicking the + New Debit Note button, or from the Vendor tab by clicking the drop-down next to the Vendor.
Follow the steps to create a new Debit Note:
- Navigate to the debit note section.
- Click on the + New Debit Note button; it will navigate to debit note creation screen.
- Select the Bill from the look-up for which you want to create a debit note for, selecting a bill other detail will be populated.
- Enter the Debit Note Number and upload the Attachment.
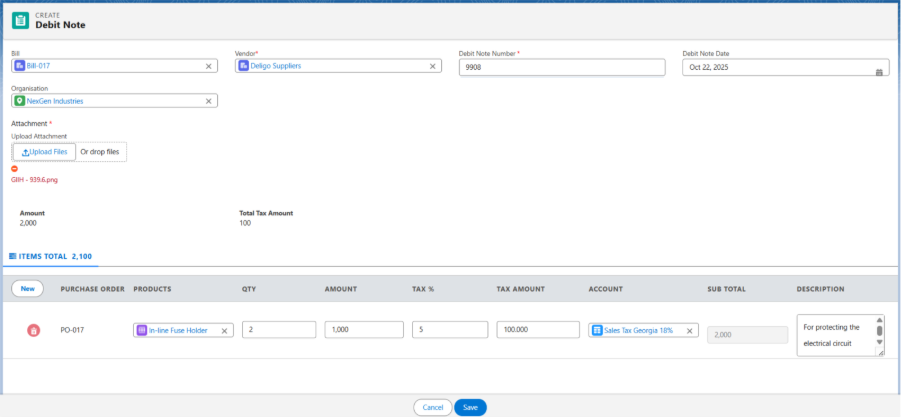
- Click on Save.
Note 10: A Debit Note can be used to adjust the amount payable to a supplier when making a Payment.
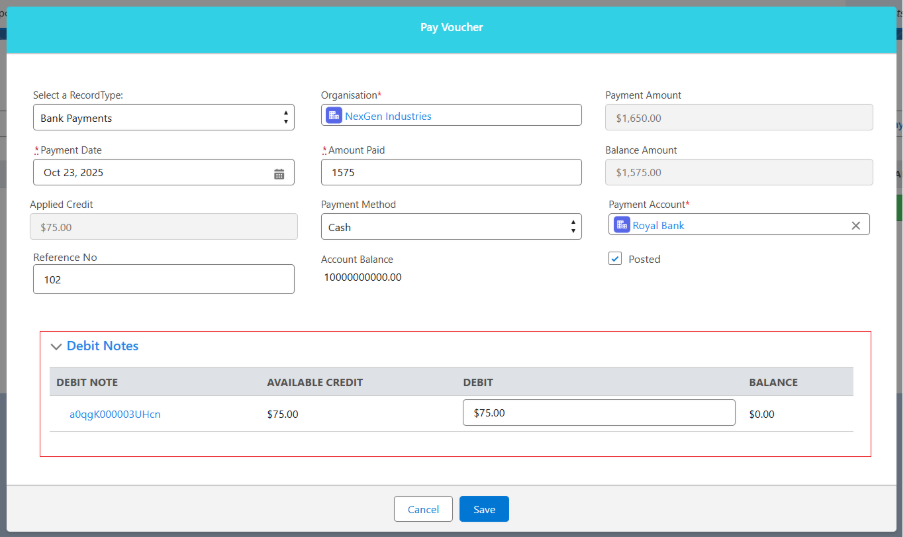
Note 11: When a debit note is applied, the amount will be reflected in the Debit Note Applied Amount field on the payment record.
Note 12: Additionally, a Debit Applied on Voucher record will be created, containing the Amount along with the Debit Note and Voucher details.
