Sales Order
A sales order is a record that contains the products or services ordered by a business partner (client) or customer, along with the prices, terms and conditions, and other relevant details. The sales order includes the customer’s information, such as the address, contact, loyalty points earned, product details, delivery date, and payment information. Each sales order is assigned a unique sales order number, which allows the customer to confirm the order details, including the delivery date and payment information. The items sold from the inventory are then shipped or delivered to the location provided by the customer. The process of creating a sales order involves locating an existing customer or creating a new one and then establishing “Bill-To” and “Ship-To” addresses.
Create an Order from one of two options:
A. Initiate a new Order on the Enterprise Point of Sale (EPoS) screen.
B. Convert an existing quote into an Order.
Convert a quote into an Order.
A. Initiate a new order on the Enterprise Point of Sale screen.
- Navigate to the EPoS screen using the App Launcher or find the tab in the App Navigation menu.
- Employee is auto populated of the Logged-in User.
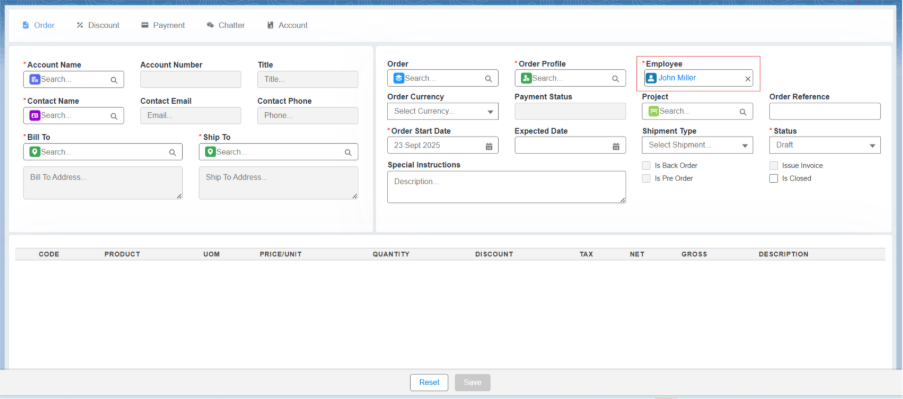
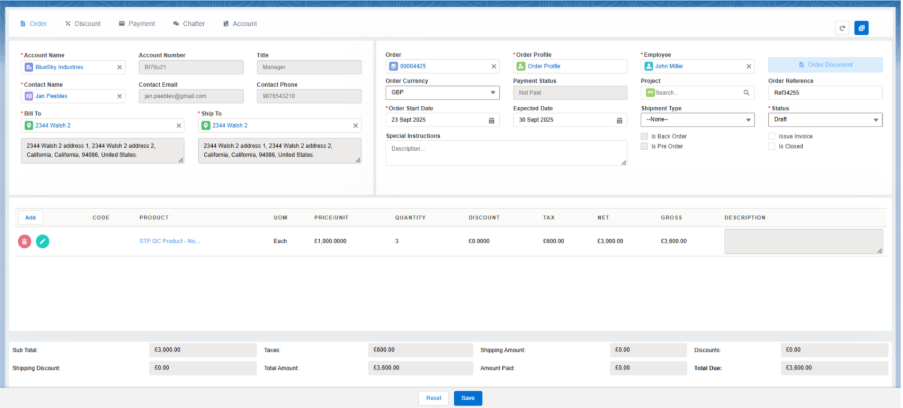
3. Under the Customer Details section, select the Customer from the look-up. Once the customer is selected, the Account Name, Account Number, Order Profile, Order Currency, along with Contact details such as Contact Title, Contact Phone, Contact Email, Bill-To, and Ship-To address of the account are auto-populated.
Note 1: If you cannot locate the Customer name in the Account Name lookup, you can create a new customer without exiting the EPoS page by simply clicking on the Accounts section. On the Accounts section, you will be prompted to add Customer Account, Contact, and Address.
Refer to the below link to follow the steps –
Create a new Account, Contact, and Address directly from the EPoS.
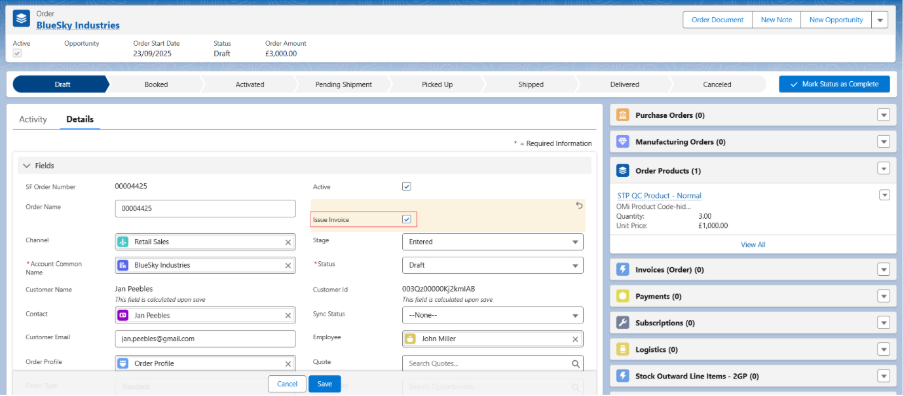
- Under the Order Details Section, other details such as the Order Start Date, Expected Date, and Status are auto populated.
- The customer Currency is assigned in the customer account record. The currency can vary based on the customer’s location.
- If you want to select an existing sales order, click on the order lookup and select the sales order.
Note 2: – If you are creating a new sales order, a new sales order number is generated upon Saving the order by adding the order products.
Adding Order Product to the Sales Order
- To add Order Products, click on the Add button.
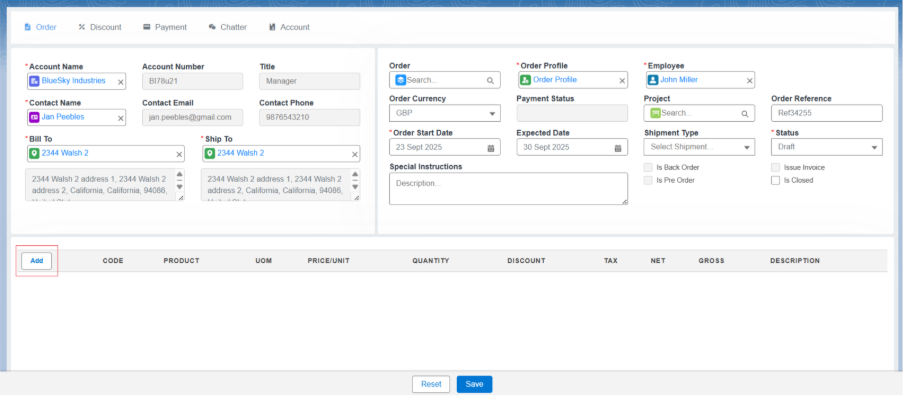
- In the Add Products screen, select the required/desired products by checking the Checkboxes or by using the Search Bar available at the top of the page.
- Enter the Quantity and select the Discount Plan if available or enter the Discount/Unit manually. Users are allowed to Override the price/unit if needed. Click the Add Products button. The selected products will now appear in the product line-item section.
Note 3: Products that are in Stock, marked as Allow Back Orders or classified as Kits are allowed to be added to the orders.
- To create the sales order with the selected product line items, click the Save button. This will create the Sales Order and generate a unique sales Order Number.
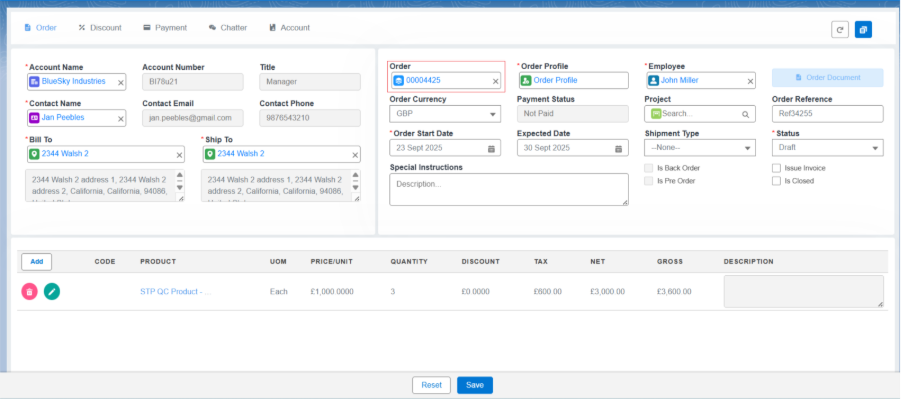
Note 4: Taxes are applied to the Net Price (total discounted price) based on the tax address and Bill-To address. The tax is calculated in the order of priority: ZIP/postal code, then City, then State, and finally Country.
Field Description of Product Line-Item Section:
Code:
Every product is assigned a unique code in the system, and the same code is displayed in the product line-item section when the product is selected.
Product:
This displays the product name in the product line-item section. The products shown in the “Add Product” screen are displayed only if the product has a Price Book associated with it.
Associate a price book with products using these steps:
• Navigate to the Product record level.
• From the related list of the product, find and select Price Book.
• Click on the dropdown and select Add Standard Price Book.
• The product and standard price book look-up will be auto populated.
• Enter the list price.
• Click on Save.
Note 5: Once the Standard Price Book is added, users can also associate custom Price Books with varying amounts and currencies.
Note 6: For the product to appear on the EPoS Add Products screen, the Price Book assigned to the Customer Profile must match the Product’s Price Book.
Quantity: This displays the quantity of a particular product the company is selling to the customer.
Unit Price: The cost of a single item or unit before any discounts or taxes are applied.
Discount: An amount subtracted from the original price to reduce the cost for the buyer.
Tax: An additional charge added to the price by the government.
Net Price: Discounted Amount
Gross/Total Price: The Total Price is the amount of the product displayed after calculating the discount and taxes.
Total Price = ((Unit Price * Quantity) – Discount Amount) + (VAT + Other Tax Amount)
———————————————————————————————————————————————————————————————————-
You can create Invoices and process Payments using the Enterprise Point of Sale (EPoS) screen by following these steps:
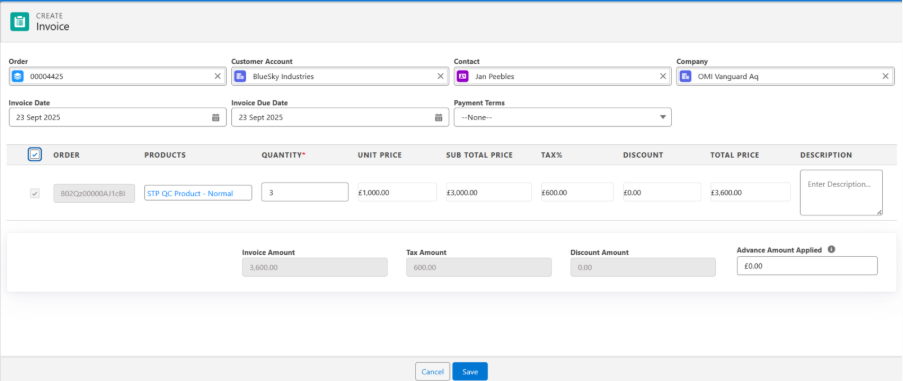
An invoice is a detailed document issued by a seller to a buyer, listing goods or services provided along with their prices. It serves as a request for payment for the products or services delivered.
The Invoices tab is used to manage customer invoices containing order details for products sold. Users can view invoices, send them to clients via email, and generate invoice documents in PDF format.
An invoice is created in Three ways:
- From the Enterprise Point of Sale Screen. (Epos).
- From the Sales Orders ab record level.
- From Accounts Receivable.
Creating an Invoice through the Enterprise Point of Sale (Epos) Tab:
There are two ways to create an invoice from the Epos screen:
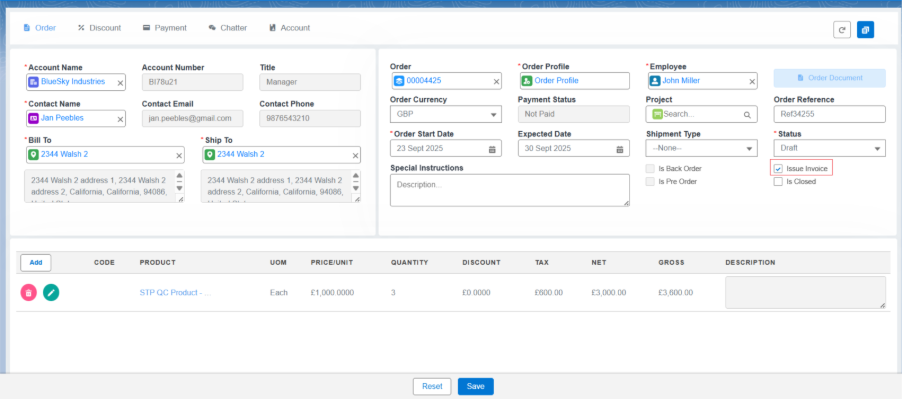
- When the Sales Order is saved from the EPoS screen, check the Issue Invoice checkbox and click on Save, an invoice (Sales) record is automatically created with complete amount details of the products.
Or
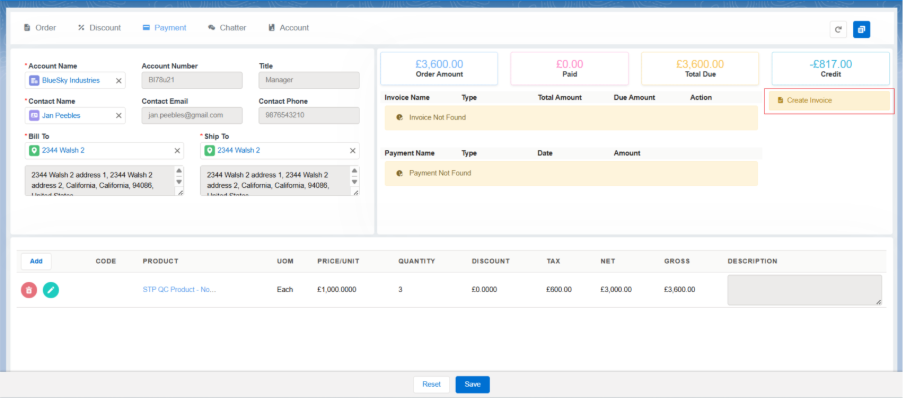
- Use the Create Invoice button available in the Payment section to create different kinds of invoices, such as Advance, Sales, or Schedule.
- Clicking the Create Invoice button will direct you to the invoice creation page.
- Refer to the below link to create different types of invoices –
Creating an invoice through the Sales Orders record level:
- Open the created Sales Order record, click on Edit, check the Issue Invoice checkbox, and save the Sales Order. The system will automatically create a Sales invoice with all information.
Or
- From the Order Related List, find Invoices and click the Create Invoice button.
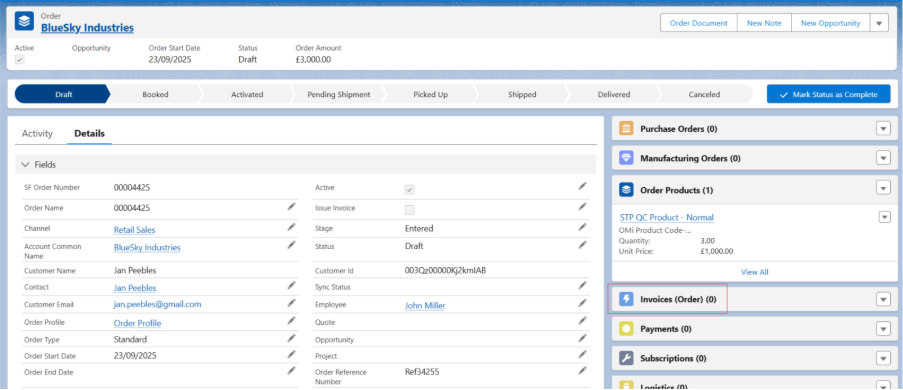
- Select any Record Type as required and click the Next button.
- All invoice and invoice line-item details will be auto populated. Just select the line items and click Save to create the Sales Invoice.
Note 6: If the record type is Advance, enter the Down Payment amount or Down Payment Percentage and click Save to create an Advance invoice.
Note 7: If the record type is selected as Schedule, enter the Invoice Amount % and click Save to create the Schedule Invoice.
Note 8: Check the Posted checkbox of the invoice to create the Transactions and Ledger Entries for the invoice (Sales and Schedule).
Note 9: Advance invoices cannot be posted; only their payments can be posted.
Create Invoice from Accounts Receivable.
Create an invoice from the Accounts Receivable page.
Making a Payment against the created Invoice:
Payments can be made using one of two methods:
- From the Enterprise Point of Sale tab (EPoS).
- From the Accounts Receivable
Payments from Epos tab:
Follow the steps to create a Payment from Epos:
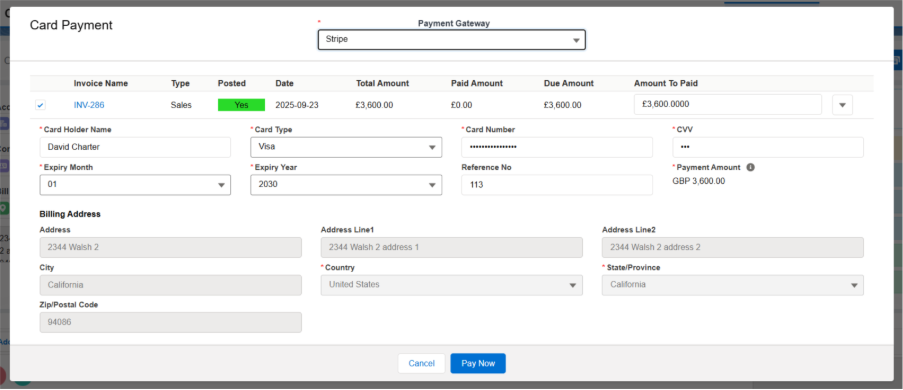
- Invoice needs to be created and Posted before making the Payment.
- Navigate to the Payments tab and click on any of the payment options. Payments can be made using the following five methods:
- Credit/Debit
- Bank/Cheque
- Cash
- Loyalty.
- Apply Credits
- Credit/Debit:
- To make the payment through a Credit/Debit card, click on the Payments tab and then click on the Credit/Debit button located on the right side of the screen.
- Select the available Payment Gateway method from the top of the page.
- Enter the valid card details in the Card Information section and click the Pay Now button to complete the payment process for the Sales Order.
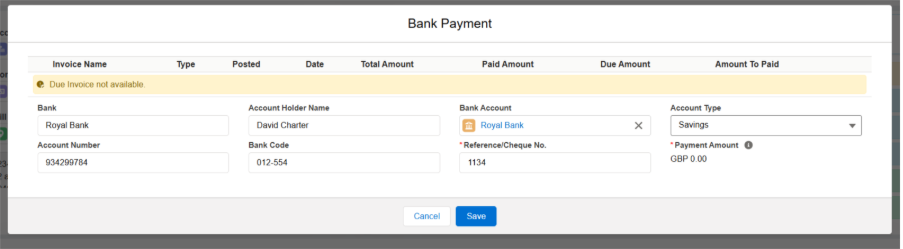
2. Bank/Cheque:
- To make the payment through Bank/Cheque, click on the Payments tab and then click on the Bank/Cheque button located on the right side of the screen.
- Enter the Bank Name, Account Holder Name, Select Payment Account from the Bank Account look up field, select Account Type, Account Number, Bank Code and the Reference/Cheque Number in the Bank Information section. Click the Save button to complete the payment process for the Sales Order.
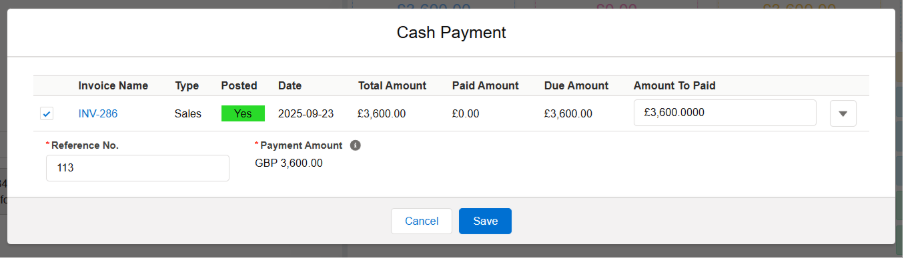
3. Cash:
- To make the payment through Cash, click on the Payments tab and then click on the Cash button located on the right side of the screen.
- Complete amount will auto be populated in the Amount to Paid field. Enter Reference Number and click the Save button to complete the payment process for the Sales Order.
- Users can do the Partial Payments as well by overriding the Amount to Paid field.
4. Loyalty:
- Regular customers earn Loyalty Points as a reward for their regular purchases with the organization. They can use these points for payments. Loyalty points can be assigned a currency value.
- To make the payment through Loyalty, click on the Payments tab and then click on the Loyalty payment option located on the right side of the screen.
- The system will automatically reduce the Amount to be Paid by the equivalent loyalty points.
- The customer can pay the remaining amount with any of the other payment options.
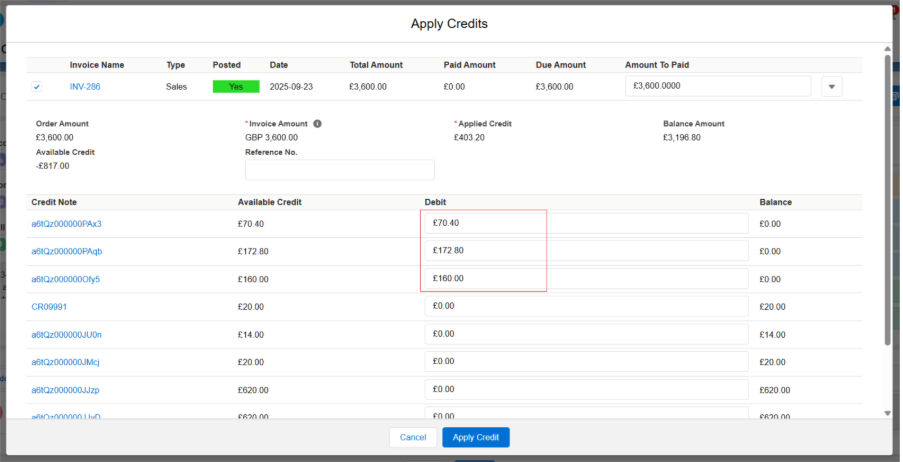
5. Apply Credits:
- To make the payment through Credit Points, navigate to the Payments tab in EPoS and click on the Apply Credits button.
- The system will automatically fetch the invoice details and all available Credit Notes below the invoice details.
- Select the invoice and apply the Credits from any of the Credit Notes, then click on the Apply Credit button.
- You will see that a Credit-Type payment record has been created.