Community Setup
Communities Overview Communities are a great way to share information and collaborate with people who are key to your business processes, such as customers, partners, or employees. Whether you call it a portal, a help forum, a support site, HR central, or something else, an online community is a great place to connect with the important folks in your life in a new and different way. Use easy point-and-click branding tools with ever-evolving Lightning templates or go with Visualforce to create branded collaboration spaces. Step 1
Enable Communities
Enabling Communities is the first step to creating communities.
Note: After you enable Communities, you can’t disable it.
If your org’s access to Communities is suspended for non-payment, all your communities are deactivated, including the communities in Preview. When Communities is re-enabled, all communities are inactive. You can activate these communities, but you can’t return to the Preview state.
1. From Setup, enter Communities Settings in the Quick Find box, then select
Communities Settings.
Note: If you don’t see this menu, Communities might not be available for your Salesforce org. Contact your Salesforce account executive.
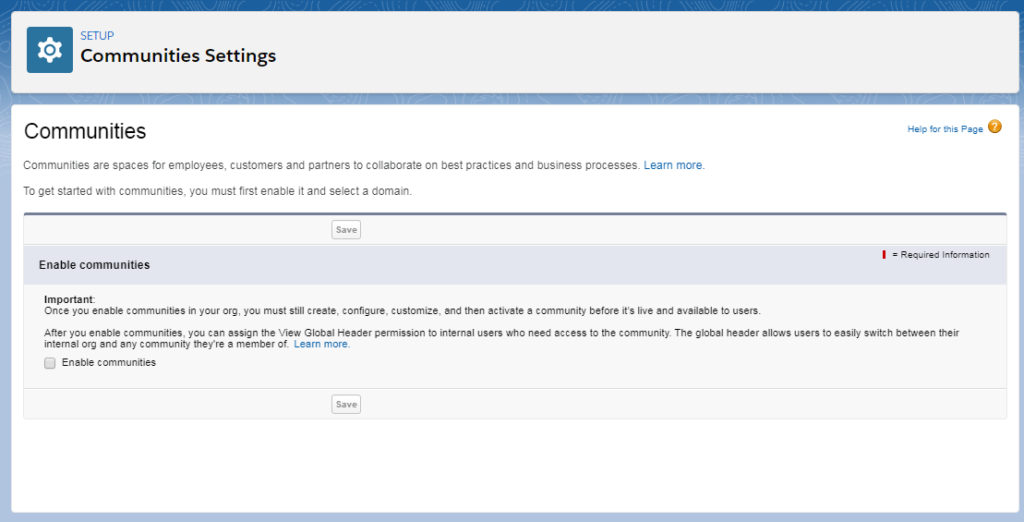
2. Select Enable communities.
3. Select a domain name for your communities, and click Check Availability to make sure that it’s not already in use.
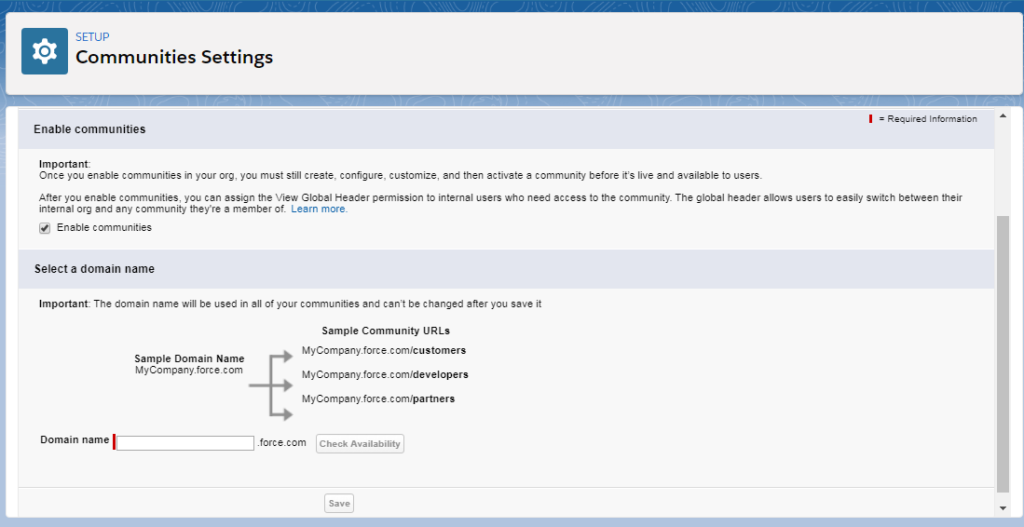
You use something recognizable to your users, such as your company name.
The Communities domain name is the same for all communities. You create a unique URL for each community when creating it by entering a unique name at the end of the URL. For example, if your Communities domain name is UniversalTelco.force.com and you’re creating a customer community, you can enter customers to create the unique URL UniversalTelco.force.com/customers.
Important: You can’t change the domain name after you save it.
You can designate a custom domain by entering it in on the Domain Management page.
From Setup, enter Domains in the Quick
Find box, then select Domains.
4. Click Save.
Step 2 Create Communities
- To create a community, from Setup, enter All in the Quick Find box, select All Communities, and then click New
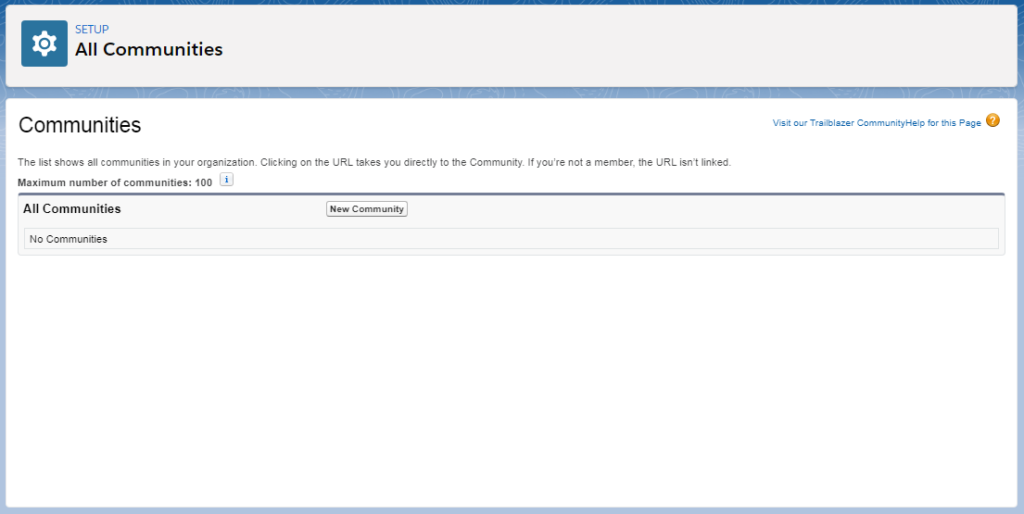
Step 3 Community Template.
- The Community Creation wizard opens with several templates for you to choose from. If you have Lightning Bolt solutions available in your org, they are listed in the wizard.
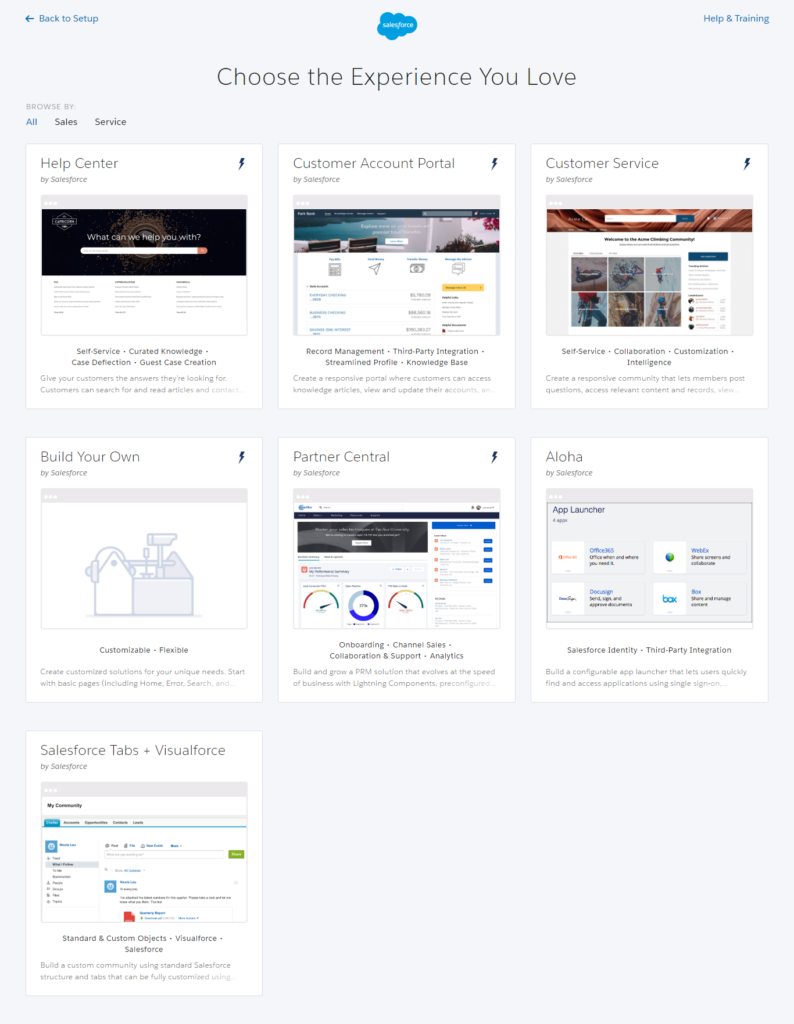
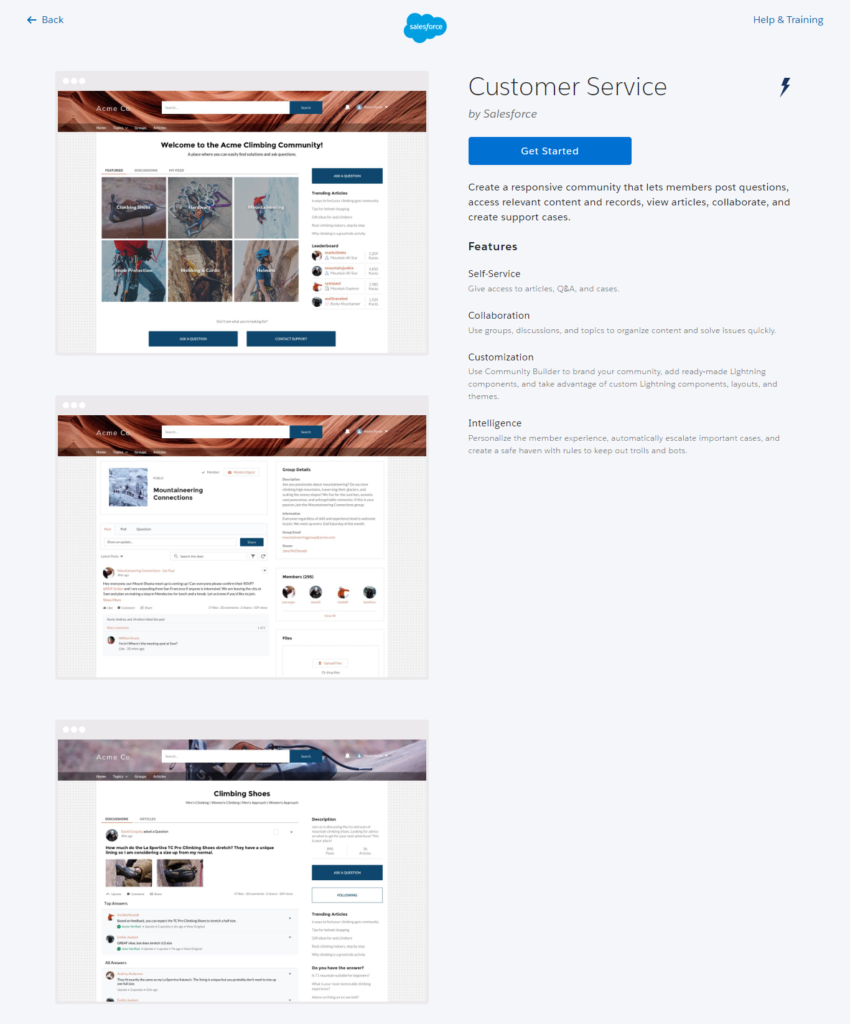
To see more information about a template, select it. Customer Service
A powerful, responsive self-service template with multiple prebuilt theme options. The Customer Service template lets users post questions to the community, search for and view articles, collaborate and contact support agents by creating cases. Supports Knowledge, Chatter Questions, and cases.
Step 4
Experience Builder.
- Select the template that you want to use.
- Read the template description and key features, and click Get Started.
- Enter a community name.
Note: If you’re creating multiple communities, differentiate the beginning of the community name. Community names are truncated in the global header drop-down menu. Users can see up to 32 characters of the name, and names include the status. Make sure that the visible part of the name allows users to distinguish between multiple communities.
For URL, enter the name of your community.
This name is appended to the Communities domain that you created when you enabled communities for this org. For example, if your Communities domain name is UniversalTelco.force.com and you’re creating a customer community, you can enter customer to create the unique URL UniversalTelco.force.com/customers.
Note: You can create one community that doesn’t have a custom URL.
- You can change your community name and URL after the community is activated, but users aren’t redirected to the new URL. So be sure to inform your community members before changing the name or URL.
- Click Create.
The community is created in Preview status. Now you’re ready to build and customize or manage and moderate your community.
When you create a community, Salesforce supplies default pages for login, self-registration, change password, forgot password, and your home page. These pages are based on which template you use to create your community. You can customize these default pages at any time in the Login & Registration page of the Administration workspace.
IMPORTANT After you create a community, your profile is added to the list of profiles that have access to the community. Then all users with this profile can log in to the community after it’s active. If you don’t want all users with your profile to have access to the community, remove the profile, and give yourself access through a different profile or permission set. Then create a profile specifically for your community users.Step 5 Access Experience Workspaces
The streamlined Experience Workspaces centralizes community moderation, building, and administration. Access Experience Builder, administration, dashboards, and other features from one place.
- From Setup, enter Communities Settings in the Quick Find box, then click Communities Settings.
- Enable Experience Workspaces under Community Management Settings. Click Save.
- From Setup, enter All Communities in the Quick Find box, then click All Communities. To access a community’s workspace area, click Workspaces next to its name.
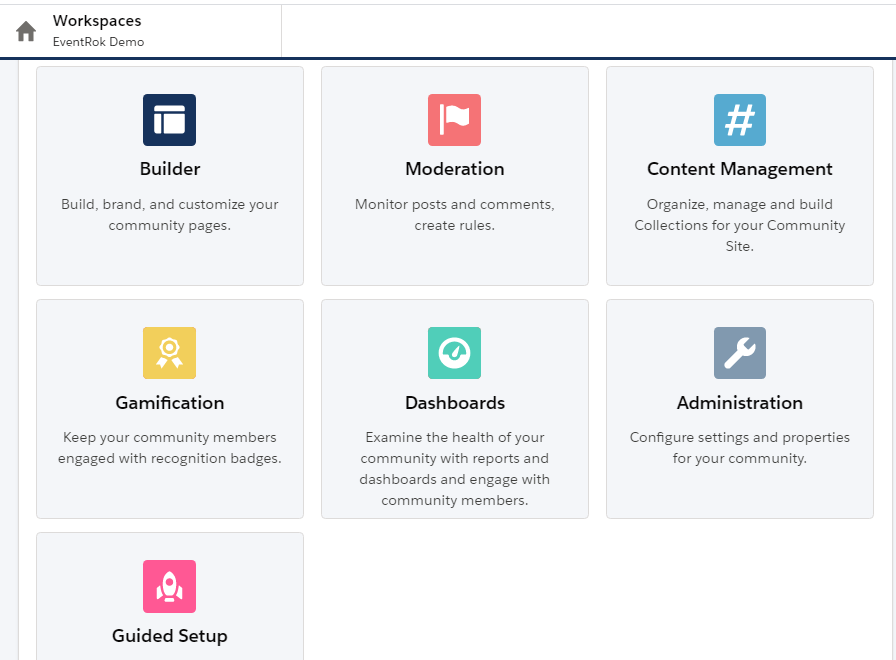
Manage Your Community with Experience Workspaces Experience Workspaces is your one-stop-shop for building, setting up, and monitoring your community. You can access Experience Builder and Administration workspaces to manage your community’s setup and branding. Community managers can view dashboards for groups, members, feed activity, and license usage, and manage the community’s reputation system. Moderators can see which items have been flagged for review.
Note: You can customize your community at any time, but if you plan on making major changes, we recommend deactivating the community first.
- To enable Experience Workspaces, in Setup, enter Communities Settings in the Quick Find box. Under Community Management Settings, select Enable Experience Workspaces. Experience Workspaces is enabled by default for all communities.
- To go back to Community Manager, in Setup, enter Communities Settings in the Quick Find box. Under Community Management Settings, deselect Enable Experience Workspaces.
Builder
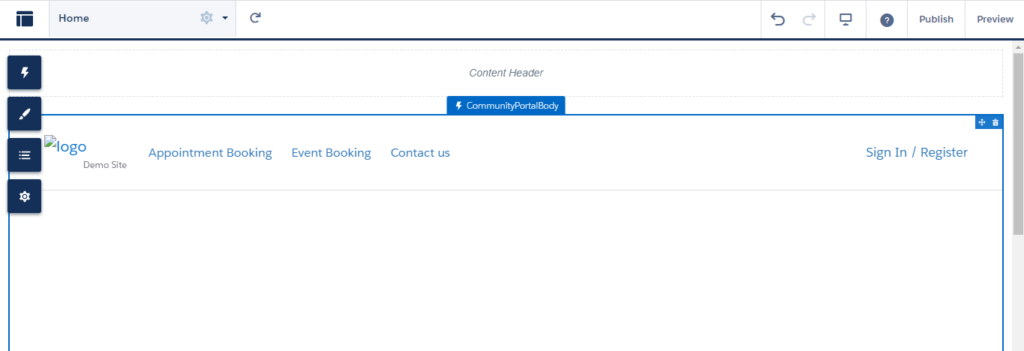
Experience Builder lets you brand and design your community pages. Create and customize pages, modify or add Lightning components, customize the community’s navigation menu, and manage page-level settings as shown in the screenshot below.
IMPORTANT If you’re an administrator and accidentally remove yourself from a community, you can’t access the Administration settings in Experience Workspaces. To add yourself back to the community or make other membership updates, use the API.
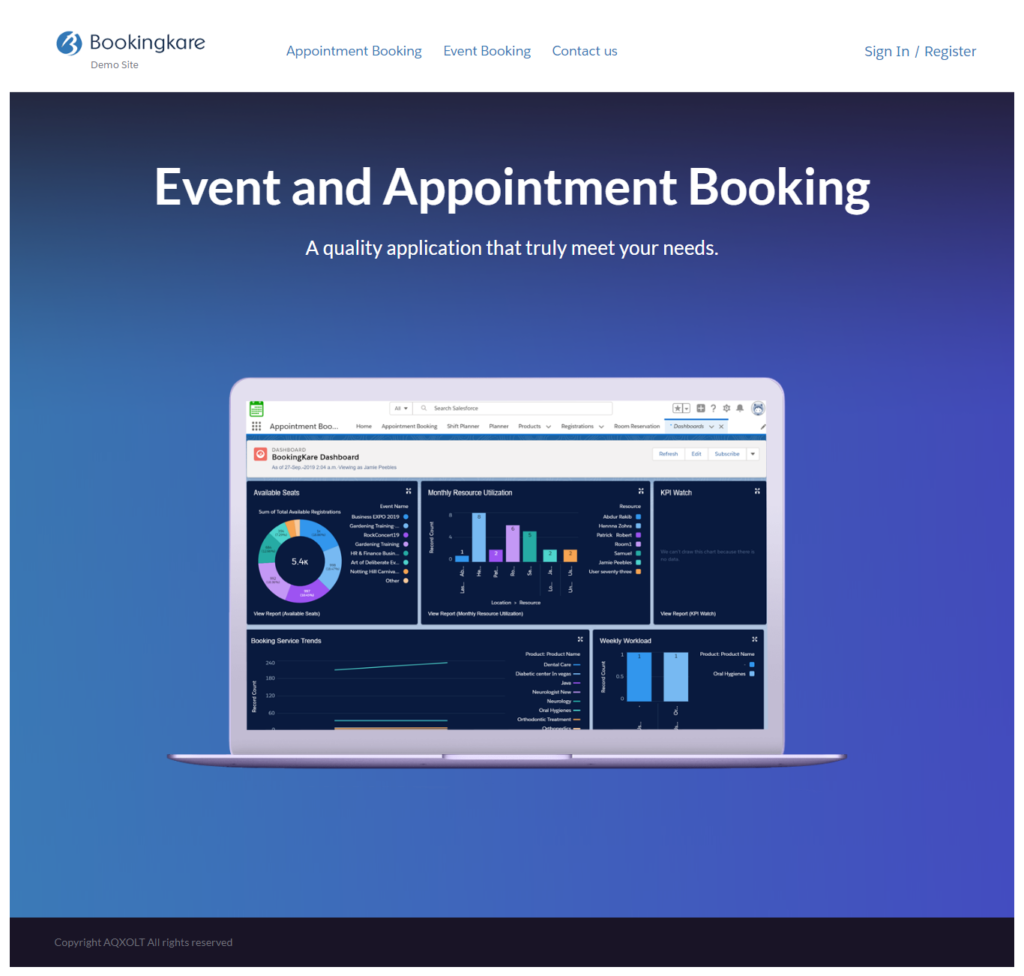
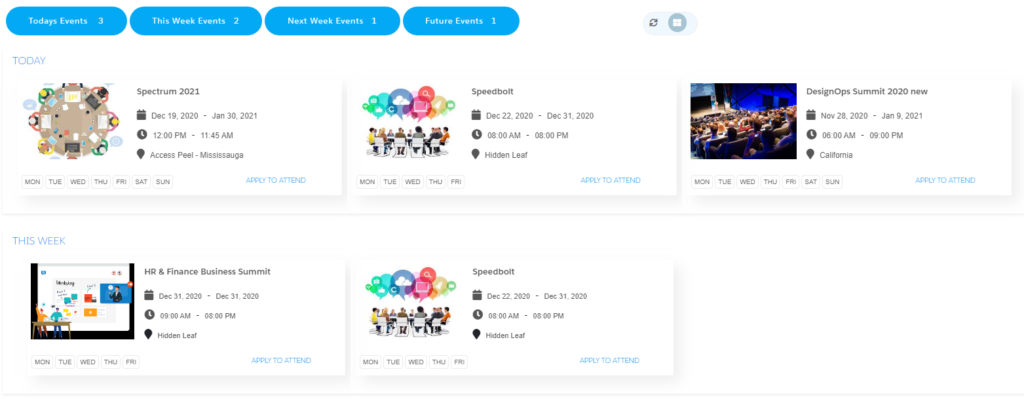
A community for Event Booking
- For setting up a community for Event booking, follow the same 5 steps of community setup.
- After reaching the builder section. You can create an Event booking component by clicking on the component option.
- When clicking on the component button you find the list of components that can be added to the builder page.
- Search for the Event booking component and drag it onto the builder page.
Note: If you already have the template components on the builder page, you can delete them from the delete icon of each section before adding your own component. When the component is on the page, it will appear as below.
- Similarly, you can add as many components as required on the page and manage the page structure from the page structure button on the left.
- There is also a Setting Button-through which you can change the setting of the community page and find information regarding that. Shown below
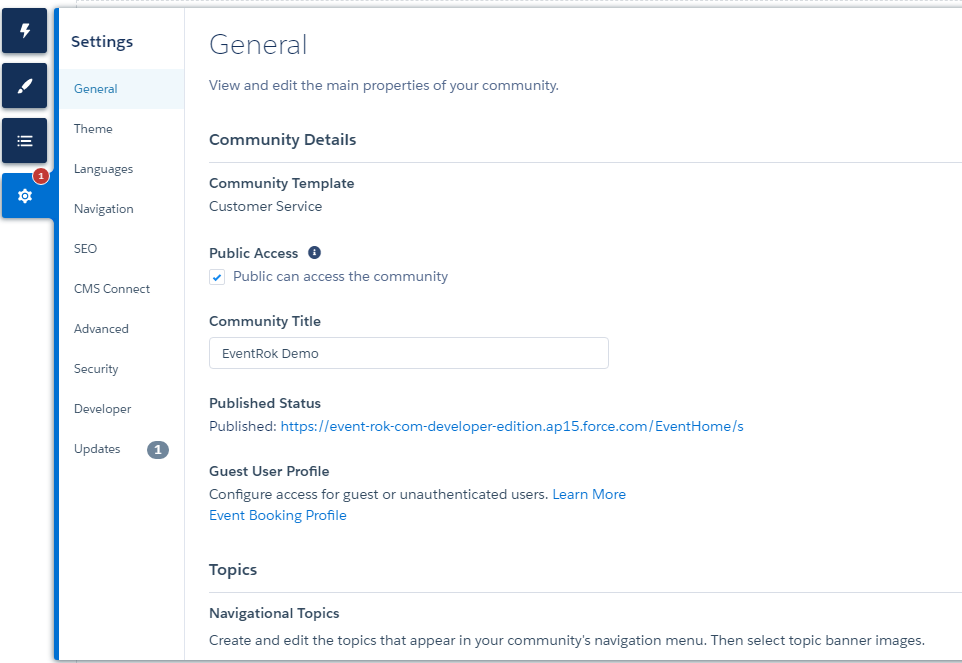
- In the setting, you have Public access check box, tick this box when you want the public to access this community.
- You can give a title for the community in the Community Title box.
- Published Status – This is a link from where customers can access the Event Booking Community.
- Guest User Profile – This is the profile link of guest users from where you can authorize or unauthorize the user.
- If Users have no access to the components, this can be managed by clicking on Event Booking Profile from the settings.
- Note- Access can be given from profiles and sharing settings. In profiles make sure all the objects, fields, and tabs have access to the User. In sharing settings, check for any restrictions on the Guest user access.
- When completed, click on the Preview button to view the page before saving to make more changes if required.
- Click Publish button on the top right to save and publish your community.
- You can also select the View mode button to set it for phone, Tablet, and Desktop.
- You have now created your Event Booking Community.
- Follow Step 6 for more information on managing your community.
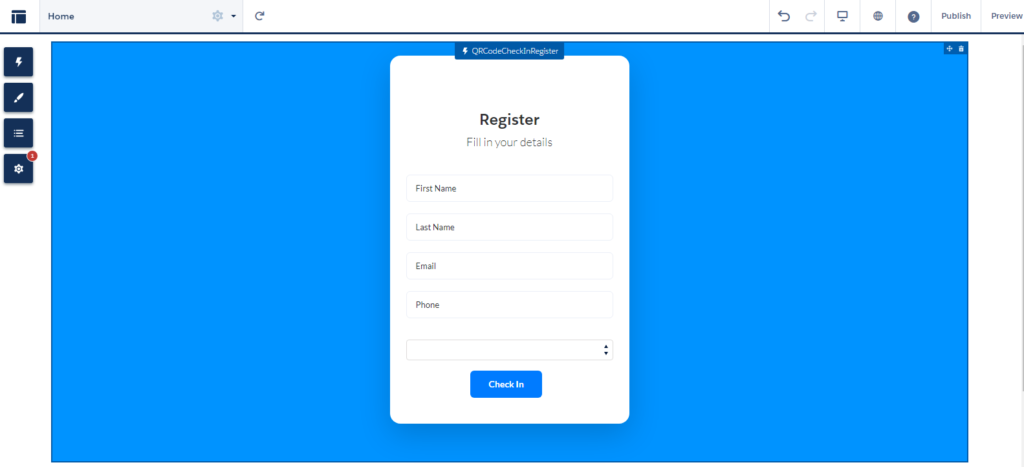
A community for QR Check-In
- For setting up a community for QR Check-In, follow the same 5 steps of community setup.
- After reaching the builder section. You can create a QR Check-In component by clicking on the component option.
- When clicking on the component button you find the list of components that can be added to the builder page.
- Search for the QRcodeCheckInRegister component and drag it onto the builder page.
Note: If you already have the template components on the builder page, you can delete them from the delete icon of each section before adding your own component. When the component is on the page, it will appear as below.
- Similarly, you can add as many components as required on the page and manage the page structure from the page structure button on the left.
- There is also a Setting Button-through where you can change the setting of the community page and find information regarding that.
- In the setting, you have Public access check box, tick this box when you want the public to access this community.
- You can give a title for the community in the Community Title box.
- Published Status – This is a link from where customers can access QR Check-In
- Guest User Profile – This is the profile link of guest users from where you can authorize or unauthorize the user.
- If Users have no access to the components, this can be managed by clicking on QR Check-In Profile from the settings.
- Note- Access can be given from profiles and sharing settings. In profiles make sure all the objects, fields, and tabs have access to the User. In sharing settings, check for any restrictions on the Guest user access.
- When completed, click on the Preview button to view the page before saving to make more changes if required.
- Click Publish button on the top right to save and publish your community.
- You can also select the View mode button to set it for phone, Tablet, and Desktop.
- You have now created your QR Check-In
- Follow Step 6 for more information on managing your community.
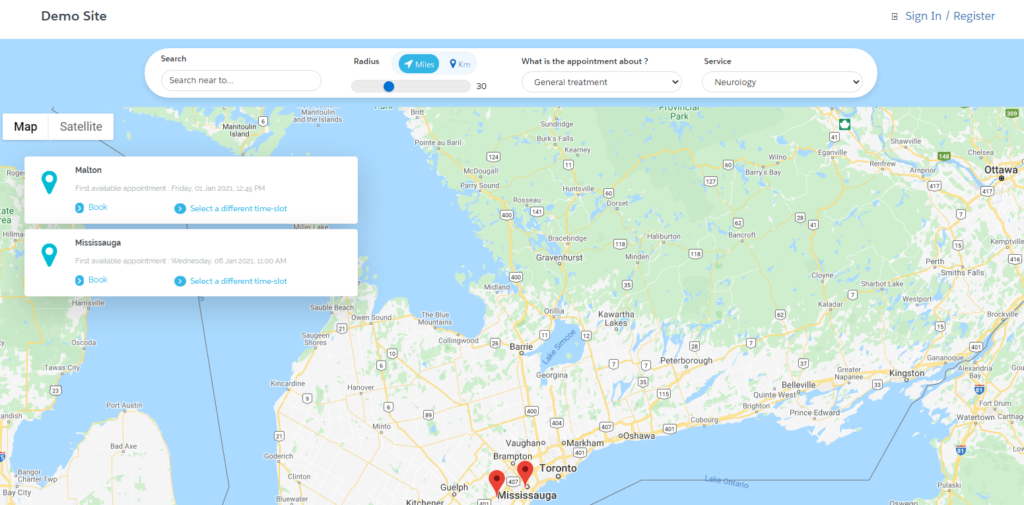
A community for Appointment Booking
- For setting up a community for Appointment Booking, follow the same 5 steps of community setup.
- After reaching the builder section. You can create an Appointment Booking component by clicking on the component option.
- When clicking on the component button you find the list of components that can be added to the builder page.
- Search for the Appointment Booking component and drag it onto the builder page.
- When the component is on the page, it will appear as below.
Note: If you already have the template components on the builder page, you can delete them from the delete icon of each section before adding your own component.
- Similarly, you can add as many components as required on the page and manage the page structure from the page structure button on the left.
- There is also a Setting Button-through where you can change the setting of the community page and find information regarding that.
- In the setting, you have Public access check box, tick this box when you want the public to access this community.
- You can give a title for the community in the Community Title box.
- Published Status – This is the link from where customers can access Appointment Booking
- Guest User Profile – This is the profile link of guest users from where you can authorize or unauthorize the user.
- If Users have no access to the components, this can be managed by clicking on Appointment Booking Profile from the settings.
- Note- Access can be given from profiles and sharing settings. In profiles make sure all the objects, fields, and tabs have access to the User. In sharing settings, check for any restrictions on the Guest user access.
- When completed, click on the Preview button to view the page before saving to make more changes if required.
- Click Publish button on the top right to save and publish your community.
- You can also select the View mode button to set it for phone, Tablet, and Desktop.
- You have now created your Appointment Booking
- Follow Step 6 for more information on managing your community.
Step 6
Set the Default Number of Community Roles Set the default number of roles created when adding partner or customer accounts to communities. These settings apply if your community is set up with Partner Community, Customer Community Plus, or Lightning External Apps Plus user licenses. The limit is three roles; the system default is one. For example, if three partner roles are currently created when an account is enabled for your community–Executive, Manager, and User–but you need only the User role for new accounts, you can reduce the number to one role.
1. Use Super User Access to grant specific users access to data owned by other users in their accounts.
- From Setup, enter Communities Settings in the Quick Find box, then select Communities Settings.
- Select the number of roles per account.
- If you’re using Partner Community licenses, set the Number of partner roles.
- If you’re using Customer Community Plus licenses, set the Number of customer roles.
- Click Save.
Note: This setting does not affect the number of roles for existing accounts.
Step 7
Customize Communities Update basic community settings like your community URL, community name, members, login options, and general preferences in the Administration section of Experience Workspaces or Community Management. You can customize your community at any time, but if you plan to make major changes, we recommend deactivating the community first.
- Open Experience Workspaces or Community Management.
- Click Administration, then select what you want to customize.IMPORTANT: The options available in Community Management or Experience Workspaces are based on your community template selection, permissions, and preferences. For example, if your community doesn’t use topics, you don’t see the Topics section. Some options in the following list might not appear in your community by default. To display all sections, go to Administration | Preferences and enable Show all settings in Community Management or Show all settings in Experience Workspaces.
- Members
- Tabs
- Branding
- Login & Registration
- Emails
- Pages
- Preferences
- Settings
- To share the community with stakeholders while it’s still in Preview, copy the URL displayed on the Administration | Settings page.
- By sharing your community in Preview, you can get useful feedback to incorporate before going live. Also, by having early members post, comment, and share records, your community appears active when members log in to the community for the first time.
- Keep in mind that you must add users as members of the community before you can share the community URL.
- After you finish customizing your community, activate the community to make it available to members. If you enable welcome emails when you activate them, a welcome email is sent to all members. If users are new portal users, their welcome email includes their username and password.
1. Share a Link to Your Community. You can allow members to preview your community before making it active. You can only share the link for a preview community with users who were added as members of the community. Sharing a link to a community in Preview status allows you to easily gather stakeholder feedback. The community functions just as it will when you make it active, so stakeholders can try out all functionality and review your branding and customizations. Additionally, you can take advantage of having early members who can post, comment, and share records so that members enter an active community from their first login.
- Open Experience Workspaces or Community Management.
- Click Administration | Settings.
- Copy the URL displayed on the page and share it with your stakeholders.
- Keep in mind that you can only share the URL with users who you added as members of the community.
2. Update Your Community Settings. Manage your community name, description, community status, and community template all from one location. You can change your community name and URL after the community is activated, but users aren’t redirected to the new URL. So be sure to inform your community members before changing the name or URL.
- Open Experience Workspaces or Community Management.
- Click Administration | Settings.
- Edit your community settings as needed.
- Select the pencil icon next to the community you want to change, and make your changes. You can change your URL from this page. However, if you’ve already activated your community, users aren’t redirected to the new URL.
- Manage the status of your community.
- Change your community template.
3. Deactivate a community.
- You may want to deactivate a community if you need to:
- Add or remove members
- Add, remove, or change the order of tabs
- Change the colour scheme
- Change the community URL
- Open Experience Workspaces or Community Management.
- Click Administration | Settings.
- Click Deactivate.
- Your community is inactive and offline.
- When a community is inactive, members still see it in the menu, but can’t access it unless they have the “Create and Set Up Communities” permission.
4. Enable optional community Features. Enable other optional features in your community such as user nicknames, guest access, private messages, direct messages, content flagging, and reputation levels.
- To use these settings, Chatter must be enabled in your organization.
- Open Experience Workspaces or Community Management.
- Click Administration | Preferences.
- Change the desired settings.
- Click Save.
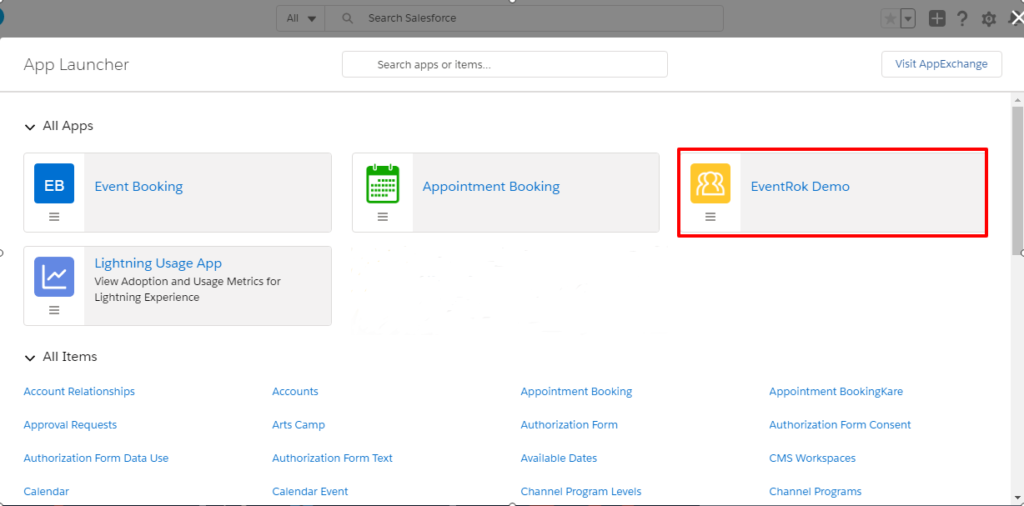
Step 8Community App
- Users can also access the community site from the app launcher where the community app will be created with the name of that community that you create. As shown on the screen below:
On clicking on the community app that you created you will be redirected to a similar site as shown in the screenshot below: