Planner
Planner enables users to Request(plan) or Approve(Post on the live system) their Appointment, by creating the Resource, Resource group, Teams, Product from the App Launcher and Creating Location, Work planner, Resource requirements, Time management, Registration and Scheduler from the Planner tab.
Resource
Once the resource group is created add the right people to the group as a resource workforce. You can either add workforce or you can enable the efficiency of the activities like equipment setup, room, etc., by selecting the appropriate record type. You can add the resource by following these steps:
Create a resource
- Navigate to app launcher and click the Resources tab.
- Click on the new button and select a record type as Workforce.
- Enter the resource name and Select the user.
- Enter the Email address and phone number.
- Select the resource group and Select team this allows a group of resources to assign the task.
- If the resource is supervisor check the supervisor checkbox this allows you to see other resources and can manage their appointments.
- Check Override holiday’s checkbox is true this option allows you to check that resource for the nonworking time during which the selected resource will work.
- Enter the description and image URL
- Enter the start and end date of the resource availability
- Click on the Save button to create a resource record
Resource group
Create a resource group that is responsible to carry out a set of tasks or specializing in a particular skill.
Create a Resource Group
- Navigate to the app launcher and click the Resource Group tab and click on the new button.
- Enter the resource group name
- Enter the Start Date and End Date
- And save the record to create a resource group record
Teams
Managing the team helps you stay committed. Take full control over appointment activities by creating a team and managing their availability and time offs.
- Navigate to the app launcher and select the Team.
- On the right-hand side, the corner clicks the New button to create a new Team.
- Enter team name and select account.
- Enter the description of the team to determine the goals and purpose of the team is bean created.
- And click on the Save button to create a team record.
Product/Service
Create a product
- Navigate to the app launcher and click on the product tab.
- Enter the product name, product code, and duration (In minutes).
- Select qualification (this option lets the customer is to identify if the customer is eligible for the service).
- Select the category, type, and subtype from the pick-list and select the active checkbox it will allow you to select based on location and program from the console.
- Select the membership program and enter the session duration and description of the service.
- Check to allow invite checkbox this option allows you to invite the customer to book an appointment.
- Allow multi-booking checkbox allows you to book multiple slots at a time.
- Allow voice/video checkbox this option allows you to send voice/video msgs and will appear on the registration page during booking an appointment.
- Allow Waiting list checkbox this option allows you to check if the maximum registration is a threshold (exceeded) and if the checkbox is true then it allows the registration record in the waiting list.
- Check the auto resource allocation checkbox this option allows the availability of the resource.
- Allow not available slot checkbox is true, this option allows you to block out times when you will not be available for appointments.
- Check allows purpose captures checkbox.
- Check allows information capture checkbox is true, this option allows you to capture information of the customer for their services.
- Allow where the (Location/Voice/Video) checkbox is true, this option allows you to share your current location through voice/video if it is checked it will be visible on the registration page.
- Enter the URL for the image and banner image.
Price book
The standard Price book is the default (standard) price for the products and services in the standard price book. When you create a product record, Salesforce creates a standard price book entry. Custom price book entries are the custom (list) prices for the products and services in your custom price books.
Creating a Price Book Entry
- Select created product and click on the related list tab
- Find the price book and click on the new button
- Enter the list price and check the active checkbox
- And save the record.
Create membership Program
- Navigate to the app launcher and click on the membership program tab
- Click on the new button and enter the following details
- Enter the Program Name, Start and End date of a member
- Enter the description and save the record to create a membership program
Locations
- Click on the planner tab on the sub-tab and click on new to create a new Location
- Enter Location Name, Account, City, Country, and Address,
- Enter the province/state and postal code and select the active checkbox.
- And save the record to create a location.

Work Planner
Creating a Work Planner to execute an event can help simplify your work and track progress. You can create a work planner by following these steps:
- Navigate to the app launcher and click on the Planner tab.
- Click on the sub-tab of the work planner tab and click on Add button to create a new work planner.
- Enter the work planner’s name.
- Select the product/service and location of the work planner.
- Enter the minimum and maximum threshold this option allows the resource value that can be assigned to the tasks.
- Select the status as Approved and if you select the status as Requested that means that the task is only been planned and will not be available on the live system.
- Enter the description of the work planner.
- And save the record to create a work planner
Resource Requirement
Once the work is planned, figure out the resource required in your event planning, this could be a resource that belongs to a specific skill set or a resource group. You can create the resource requirement by following these steps:
- Navigate to the Planner Tab from the app menu.
- On the Planner tab, click the Resource Requirement sub-tab and click the new button
- Enter resource allocation name
- Select a work planner and select a resource group and save the record.
Time management
As a supervisor, you can manage your team members’ availability, time off, and break times easily with the Booking Kare Time management application. You can manage the time by following these steps:
- Navigate to the time management tab and select the Team, Membership, and Location from the pick-list. You will be presented with the screen below.
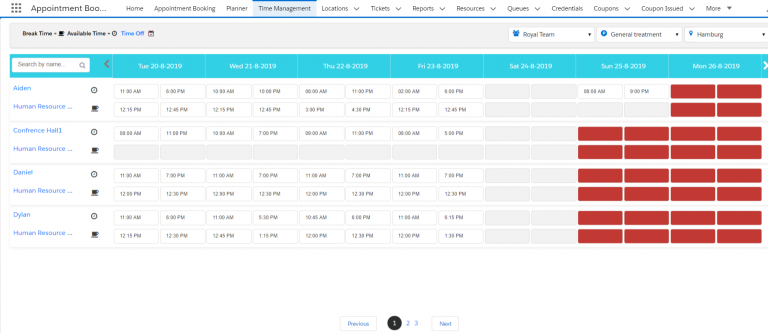
- You can view all the resources and their availability of start and end time
- You can also change/manage the availability of the resource from the start and end time from the pick-list
- And also can manage the resource start break time and end break time from the pick-list.
- You can also click on the next and previous button to see other resources
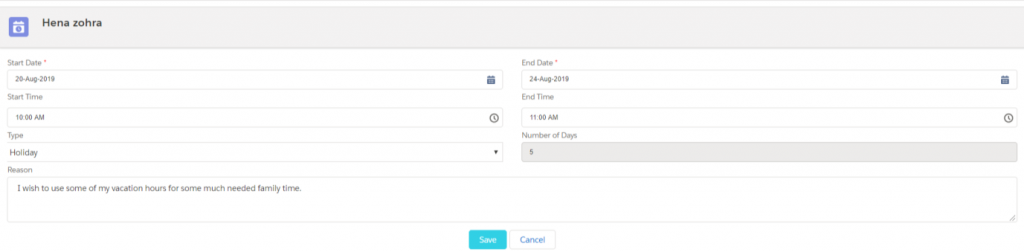
- And also can manage time off by clicking time off of the resources
- And also you can manage other resources by lookup for which resource you need to give time off
- Click on the book time off button and the page will navigate to time off-page
- Select the start date and end date of the resource
- Select the start time and end time of the resource
- Select type and no of days
- Enter Reason and save the record to create time off for the resource.
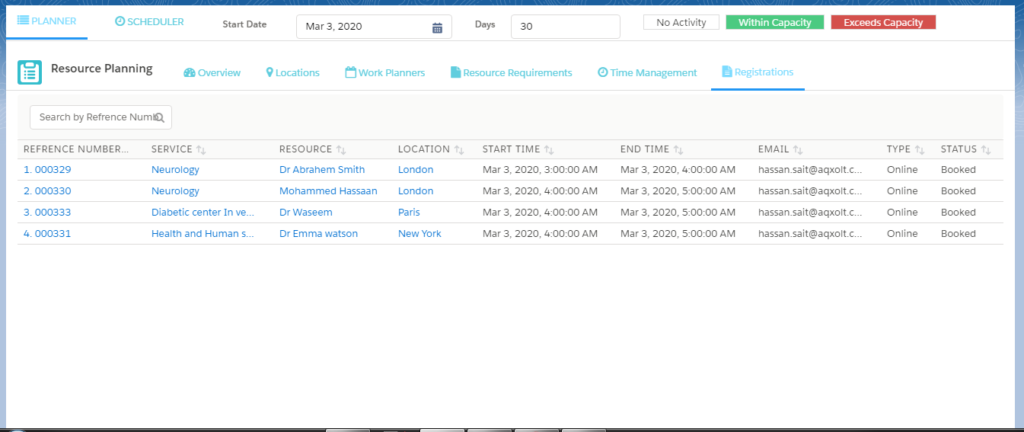
REGISTRATION On booking the appointment you will find all the booked appointments along with their Reference Number, Service selected, Resource, Location, Start Time, End Time Email, Type, and Status
- Navigate to the app launcher and click on the Planner tab.
- Click on the sub-tab of the registration tab.
- You will be displayed with only those registered who have the Record type as Resource Service in the registration.
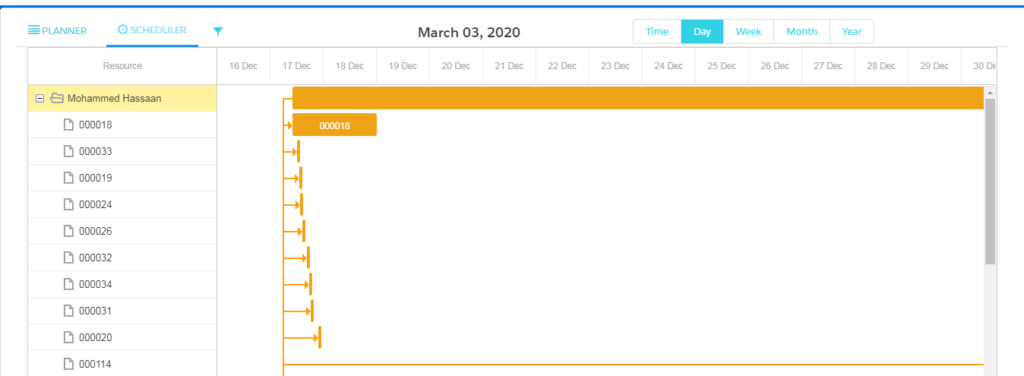
SCHEDULER As a superuser/supervisor/Administrator you can access the scheduler to view the registrations of a particular user or all the users based on Time, Day, Month, and also Year.
- Navigate to the app launcher and click on the Planner tab.
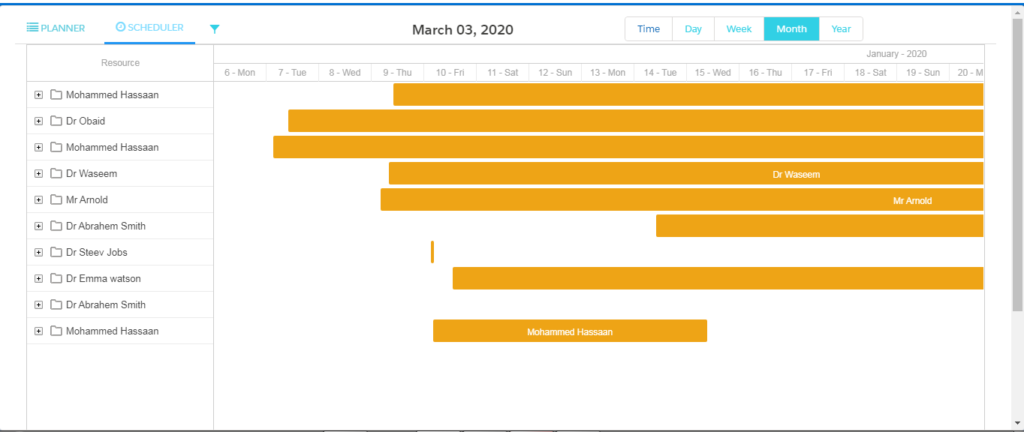
- Click on the sub-tab of the Scheduler tab.
- You will be navigated to the screen below.
- You can also filter by Search Location and Search Resource filter present on the screen.
- On the left column, you will be displayed with the list of resources (users) Along with their registrations.
- Click on the + button present before the resource to view the registrations of that particular user.
- You can also view the scheduled appointment based on Time, Day, Week, Month, and Year.