Shift Planner
Shift Planner
A shift planner is a tool that helps manage resources efficiently across businesses. It helps in planning the staff shifts and booking appointments for a user or resource according to their availabilities. It is the best way for super users and supervisor users to manage and utilize the availability of the staff effectively.
A Superuser can manage the availabilities of all the users under the organization
A Supervisor User can manage only your team members’ availability, time offs and break-times
A user can manage only its own availability, time offs, and break-times easily with Shift Planner.
How to Find Shift Planner:
- Click on App Launcher
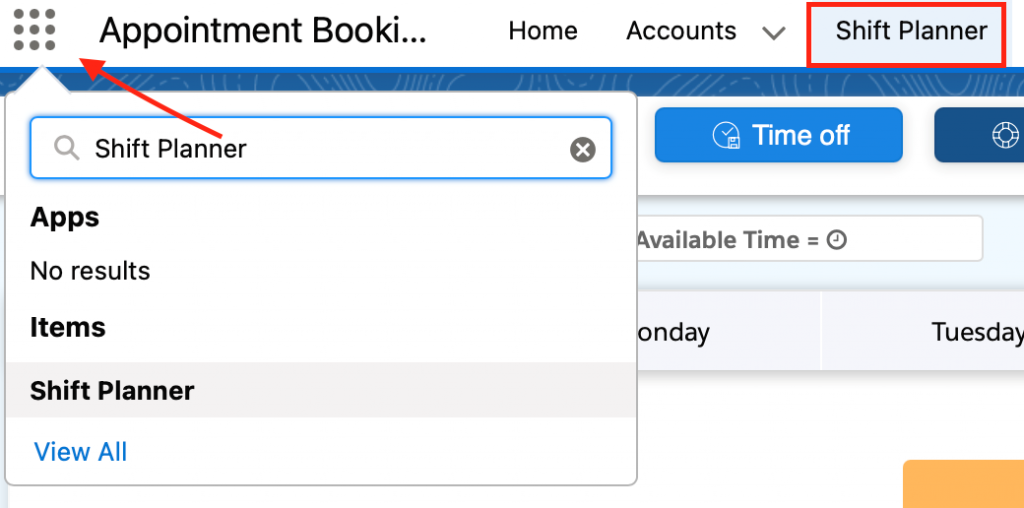
- Or You can click on the ‘Shift Planner’ Tab
- Shift Planner screen Appears
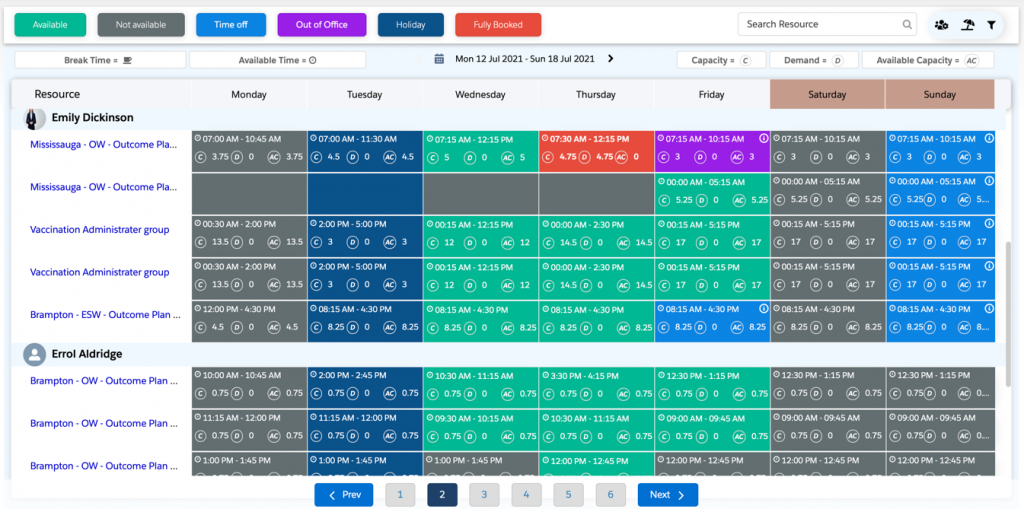
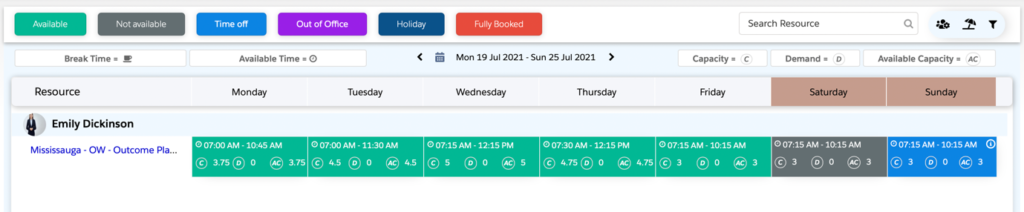
Understand the Features of Shift Planner Screen

Available – This tile represents the Available Slot for booking an appointment
Not Available – This tile represents Slot is not available for booking an appointment
Time Off – This tile represents Time off/ breaks
Out of Office – This tile represents temporarily unavailable
Holiday – This tile represents public holidays or temporary leaves
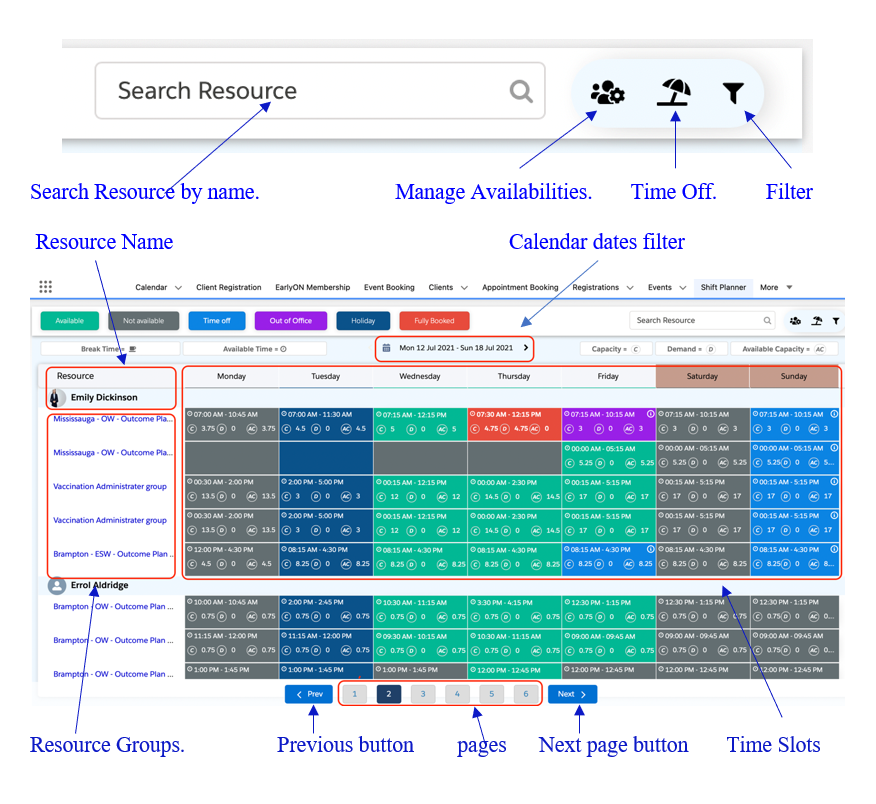
Fully Booked – This tile represents that All available slots have been completely booked..

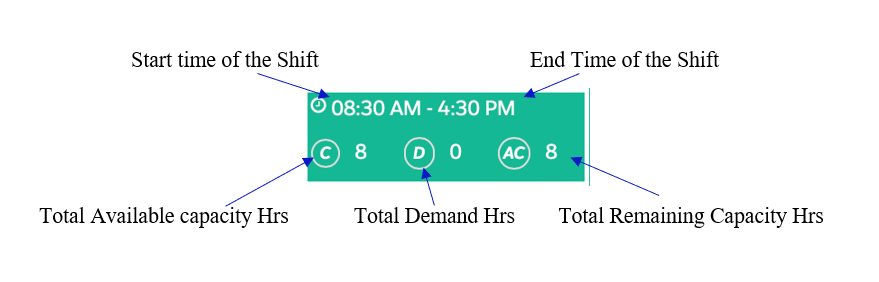
C – Indicates the total Capacity Hours of a resource for the day
D – Indicates the total Demand Hours for the resource for the da
AC – Indicates Available capacity Hours for the resource after demands and time off
How to Book Appointment from Shift Planner:
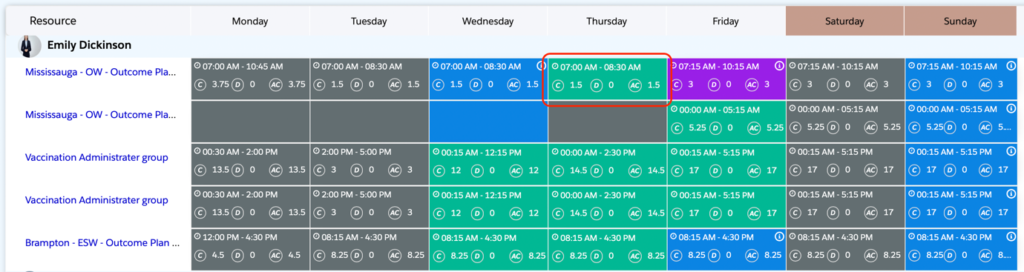
Let’s Create an Appointment for ‘Emily’ in Mississauga to work in the OW group on Wednesday.
- Select the Available time slot for a resource and resource Group.
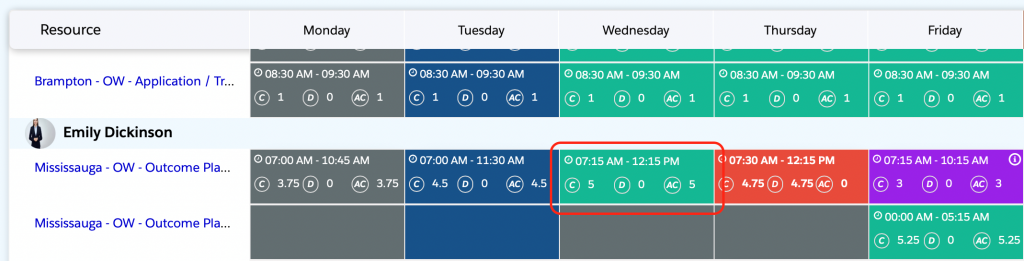
The time slot shows start time and End time, capacity, demand, and Available capacity
- Click the Time Slot
- Click on Book Appointment Button. This will take you to Appointment Booking Screen to confirm the booking.
How to Manage Availability of a Resource.
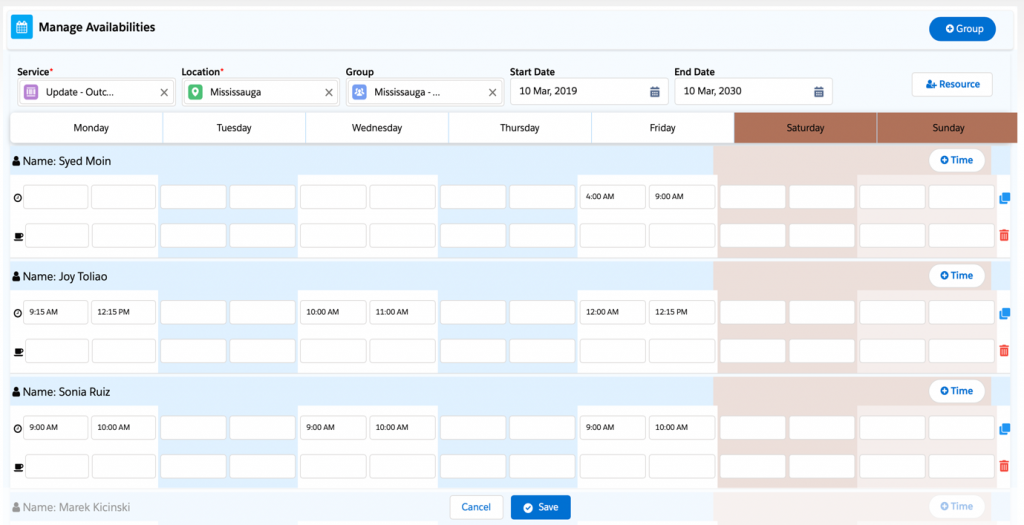
Let’s Create a new resource group for Neurology in Norwich. Let’s add ‘Ryan Lee’ and his availability who is a ‘Resource’ or ‘user’ working in the Neurology Group.
Manage Availability is a feature That allows you to manage the available slots of the users on the shift planner. From this feature, you can create a Resource Group, Resource, and multi-time slots.
- Click on Manage availability Button

- The screen shows
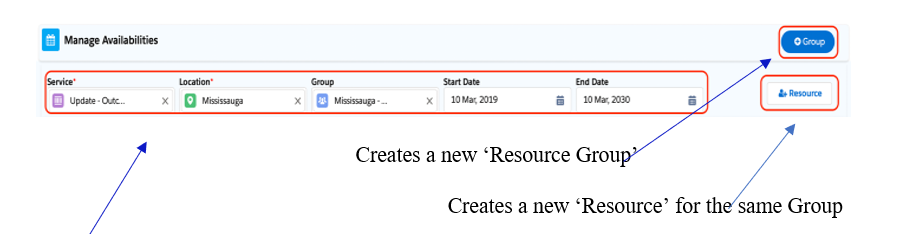
Enter the fields to manage the availability of that particular ‘Service, Location, group and dates’.
- Click on the ‘Group’ Button.
- Enter the Group Information for which you wish to add the new resource
- Enter Service, location, Group, Start date, and End date.
6. Select the Resource Name and Team then add the availability times as shown below
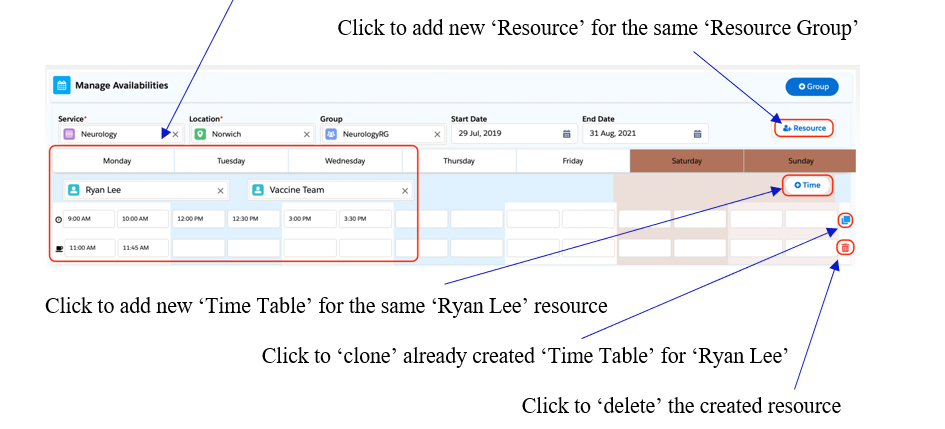
- Click the ‘Save’ Button. A new Resource group and Resource will be created and it can be viewed on the shift planner screen.
How to Manage Availabilities for Each resource
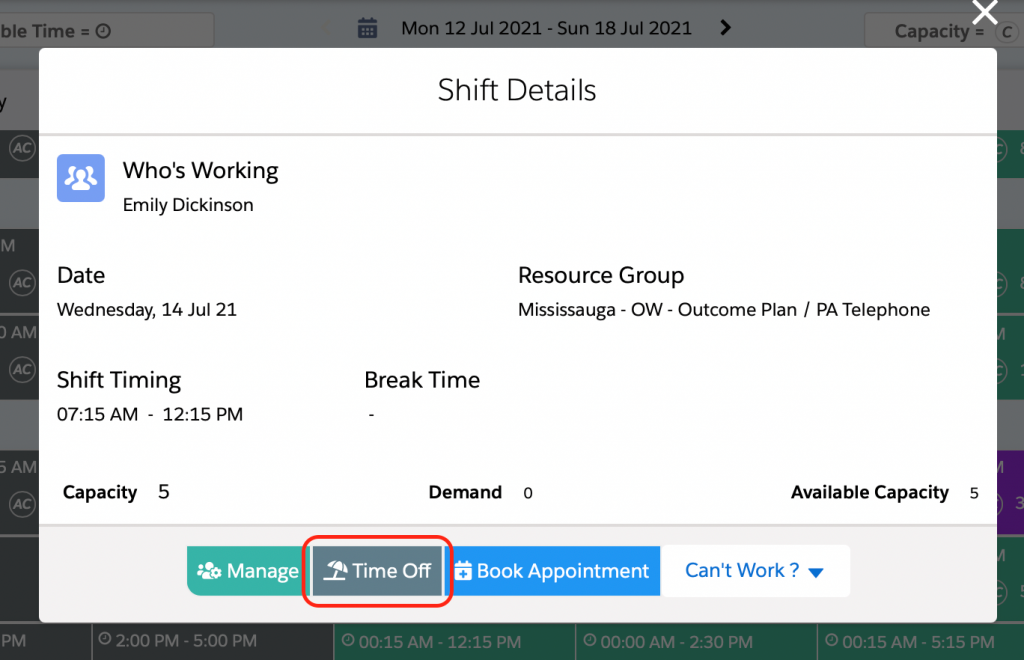
Instead of going to manage availabilities. You can also click the ‘Manage’ button from the time slots.
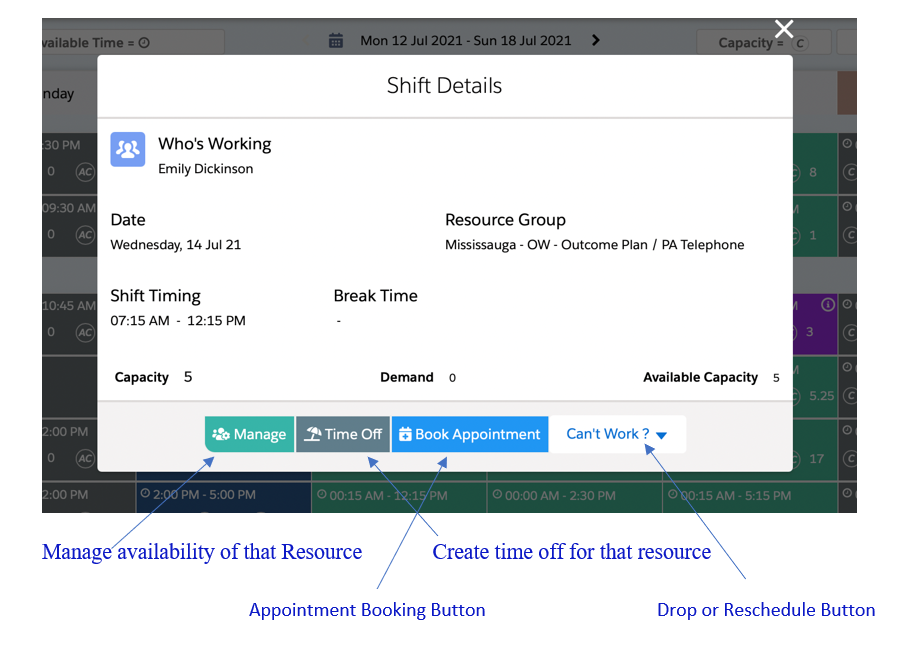
Let’s manage Emily’s Availability for Wednesday
- Click on the Time slot. The pop shows up
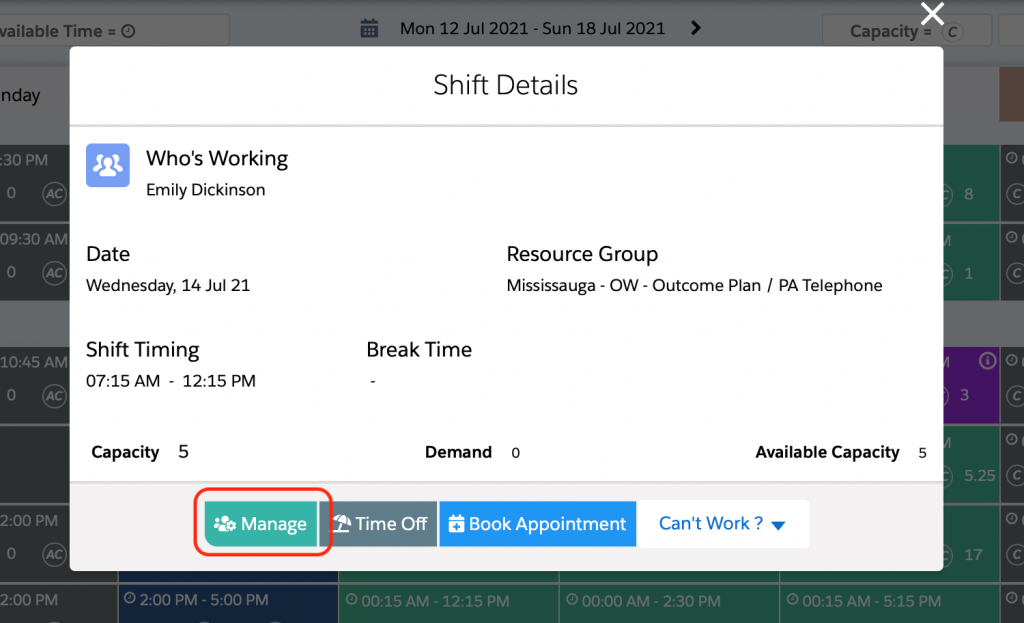
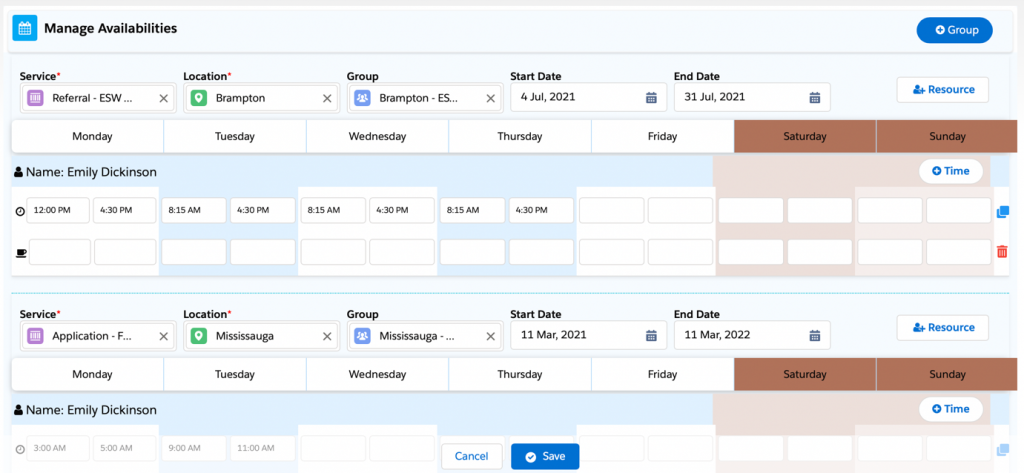
2. Click on the ‘Manage’ button. The next screen takes you directly to Emily’s availabilities Page to edit.
3. Once changes are made click the ‘Save’ Button.
How to create a ‘Time Off’
Emily has an urgent meeting to attend and she would be unavailable for the service. So she decides to create a Time off for that date and time.
Let’s Create a Time off for Emily for the same slot on Wednesday.
- Click on the ‘Time off’ Button
- The time off screen appears.

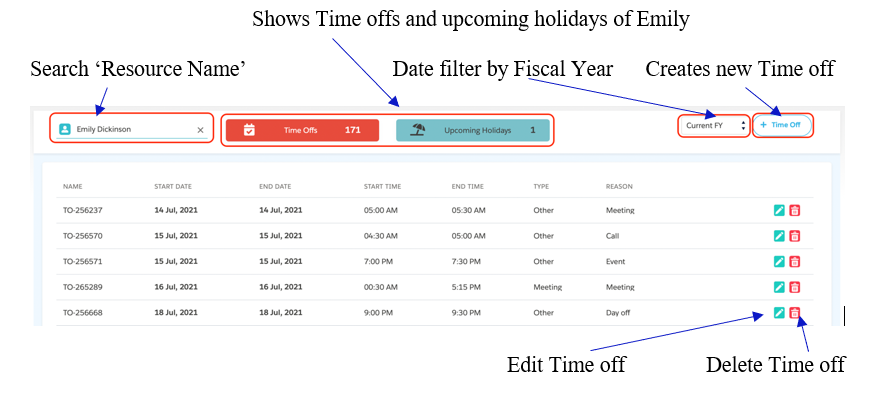
- Click the ‘Time Off’ Button. And Enter the Details of Time off.
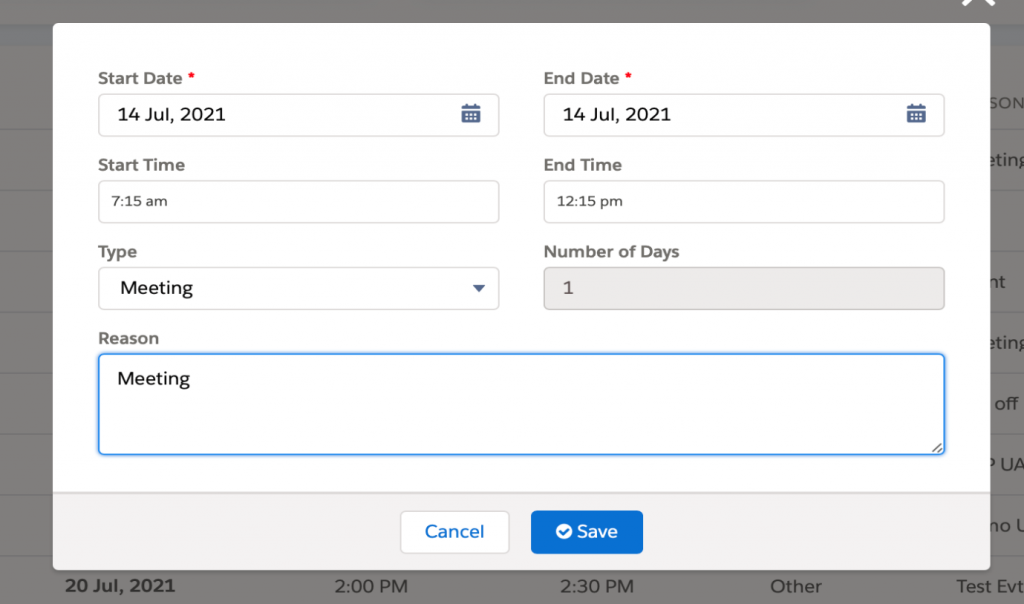
- Click ‘Save’. A time off will be created for Emily and it can be viewed on the shift planner screen in blue.

Time off can also be created by directly clicking on the time slot on the shift planner screen.
- Click the ‘Time slot’. The pop-up shows
- Click on the ‘Time off’ button and follow steps 1-4 from How to create time off.
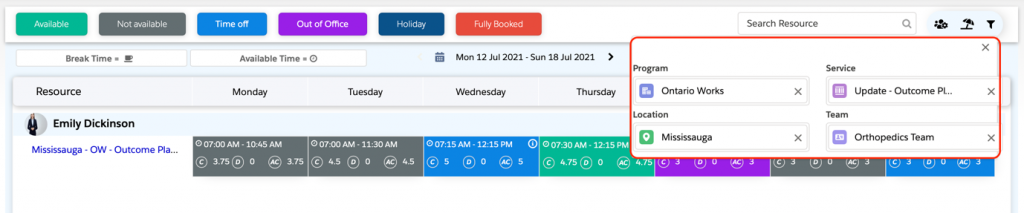
How to filter Shift Planner
A supervisor opens the shift planner and looks for Emily’s resources to book an appointment for her availability. He quickly finds using the filter icon.
Let’s find Emily’s shift schedule at the Mississauga Location for the Ontario works program.
- Click on the filter icon.

- Enter the Program, Location, Service, and Team. Emily’s resource Shows up.
How to find time slots for future dates
If you want to book an Appointment with Emily for future dates.
- Click on the calendar date icon to show the available time slots in the future dates

- The next available time slots show up for future dates.
How to Drop a Shift
Jamie is a doctor who works in a health care department. He has to drop a shift due to an emergency situation. He can do so from the shift planner by selecting the time slot that he wants to drop. This only applies to available timeslots.
Let’s find the available time slot for Jamie and drop the shift.
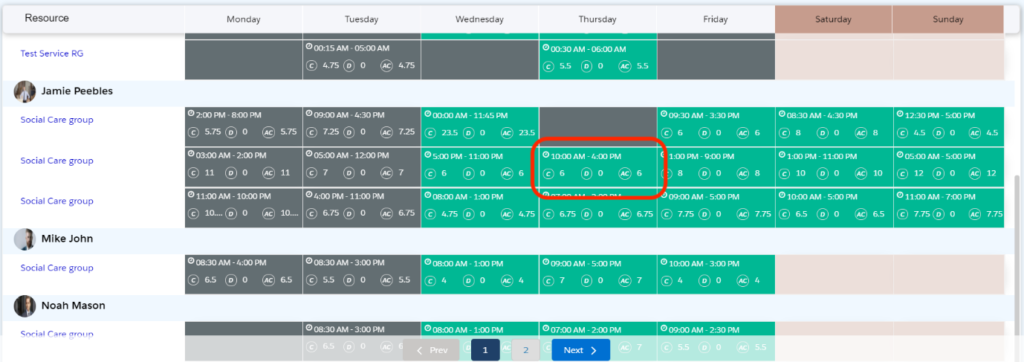
- Click on the Available Time slot
- The pop-up shows details. Click on the ‘Can’t work?’ Button and select ‘Drop Shift’
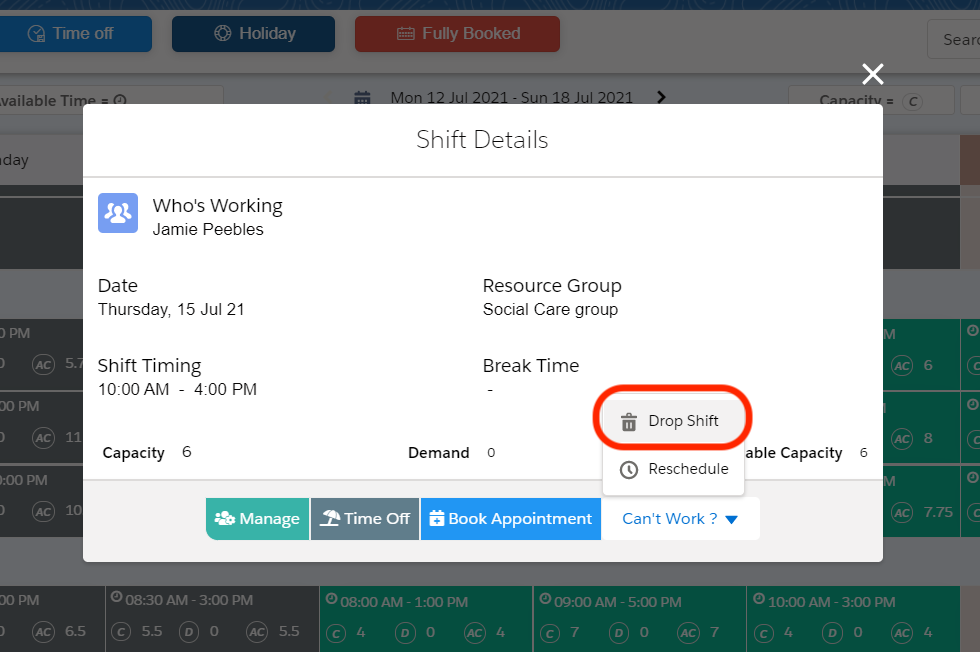
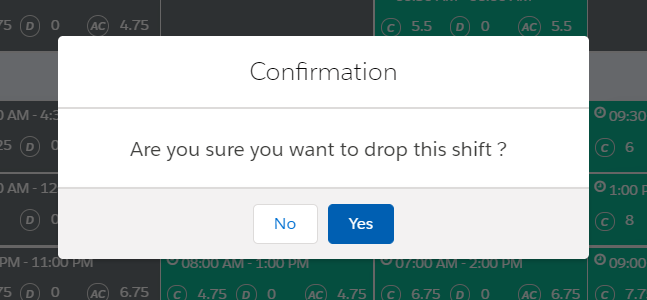
- Click ‘Yes’ to confirm
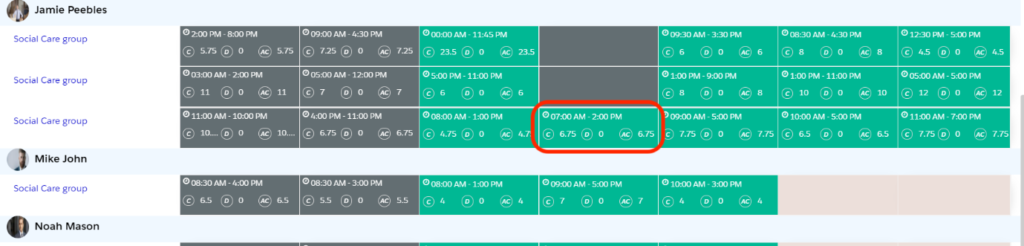
- The shift will be dropped and the timeslot will be greyed out which means it is ‘not available’

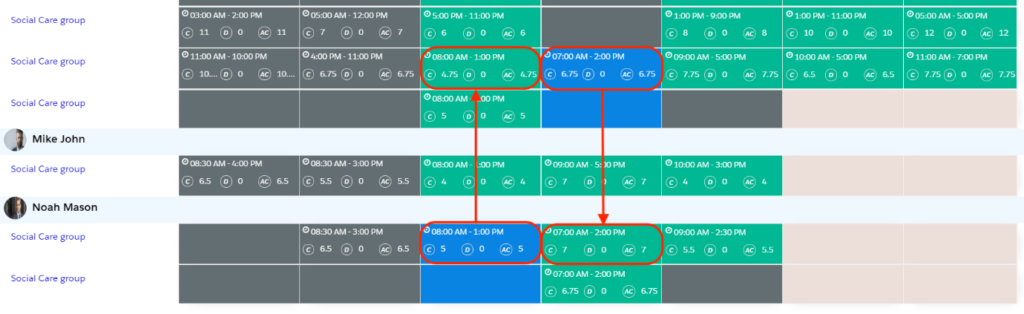
How to Swap a Shift
Jamie receives a notification for an urgent meeting but he has the shift to cover at the same time. So he decides to swap the shift with his colleagues by sending a swap shift request. Once the request is approved by one of his colleagues. Shift Planner swaps the available timeslots of those resources for the selected date and time.
Let’s swap a timeslot of Jamie with Noah’s timeslot.Click on the Available timeslot that has to be swapped.
- Click on ‘Can’t work?’ Button. And click the ‘Swap Shift’ Button.

- The next screen shows the available timeslots of other resources to swap with.
- Select the resource timeslots that you want to send the request.
- For Example, let’s select two different users’ time slots and send them requests.
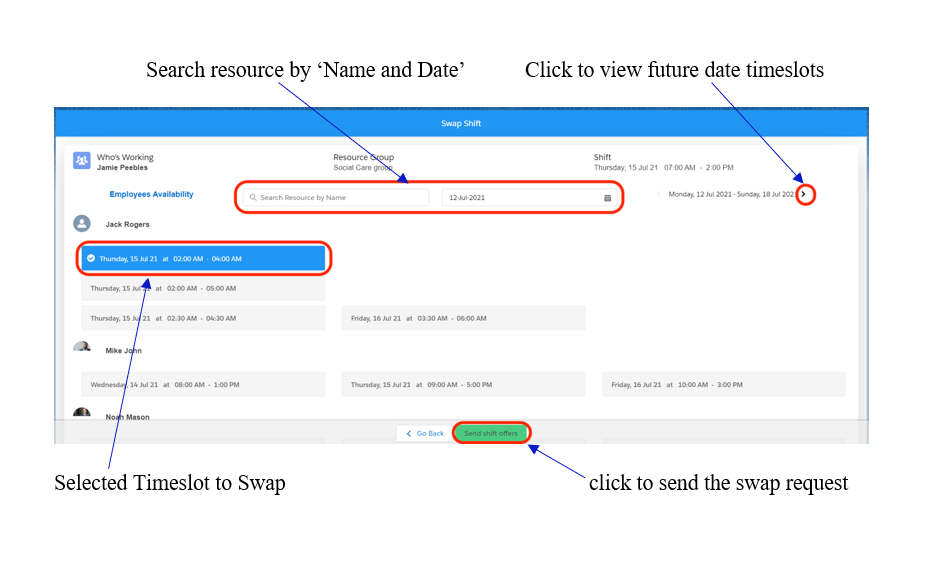
- Jamie sends requests to Roger and Noah.
- Click the ‘Send Swap Offers’ Button
Noah decides to swap the shift with Jamie. So he navigates to shift planner and clicks on the Dashboard icon to approve the request.
- Click on the Dashboard icon.

- The screen shows all the requests received and Requests sent for approval.
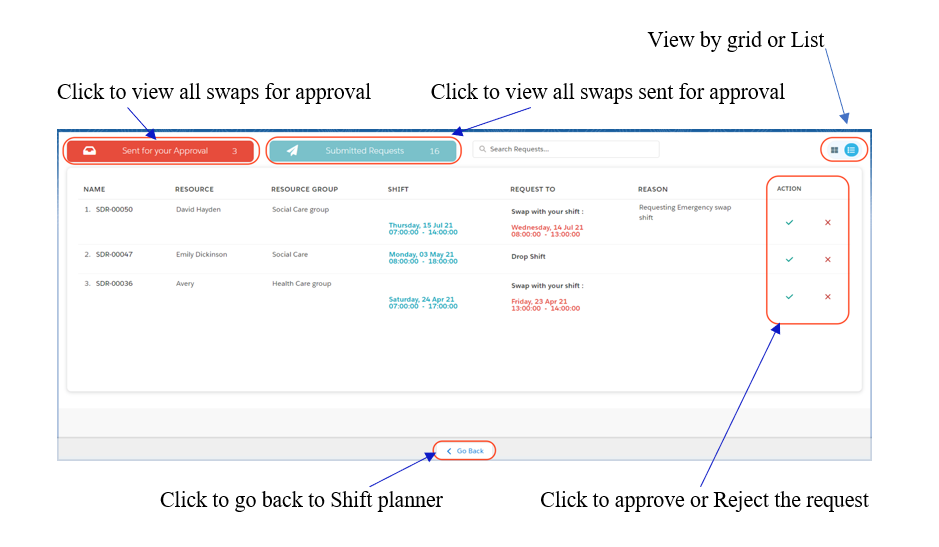
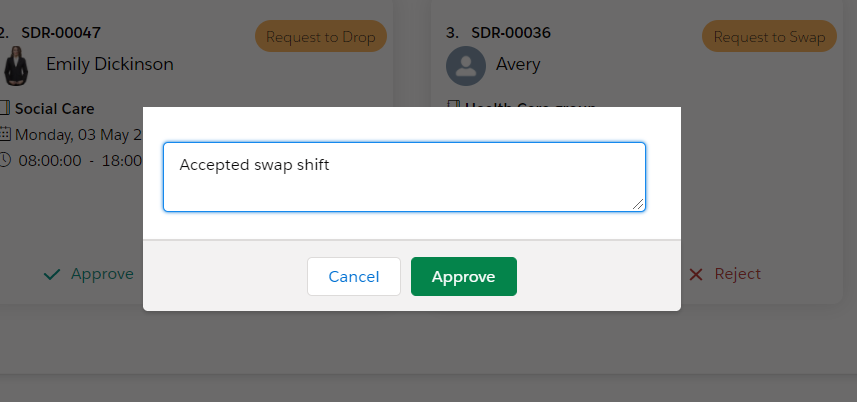
- Noah clicks the ‘Approve’ tick mark action to approve the request and enters the reason.
- Clicks on the ‘Approve’ Button.
- Once the request is approved. Jamie can view the Timeslots swapped with Noah’s timeslot making the swapped timeslots as ‘blue’ which means Time off and Available time slot as green which means ‘Available’. Visa versa for Noah’s Timeslots.
How to Reschedule your availability
Emily would like to modify her availability on a particular day and hour as she will be unavailable for a complete length of time which was previously set up on the shift planner.
So she makes changes directly from the shift planner by clicking the timeslot that she wants to change it.
- Click on the timeslot on the shift planner screen for Emily’s resources.
- A pop-up shows up with ‘Can’t work?’ Button.
- Click on the ‘Reschedule’ button
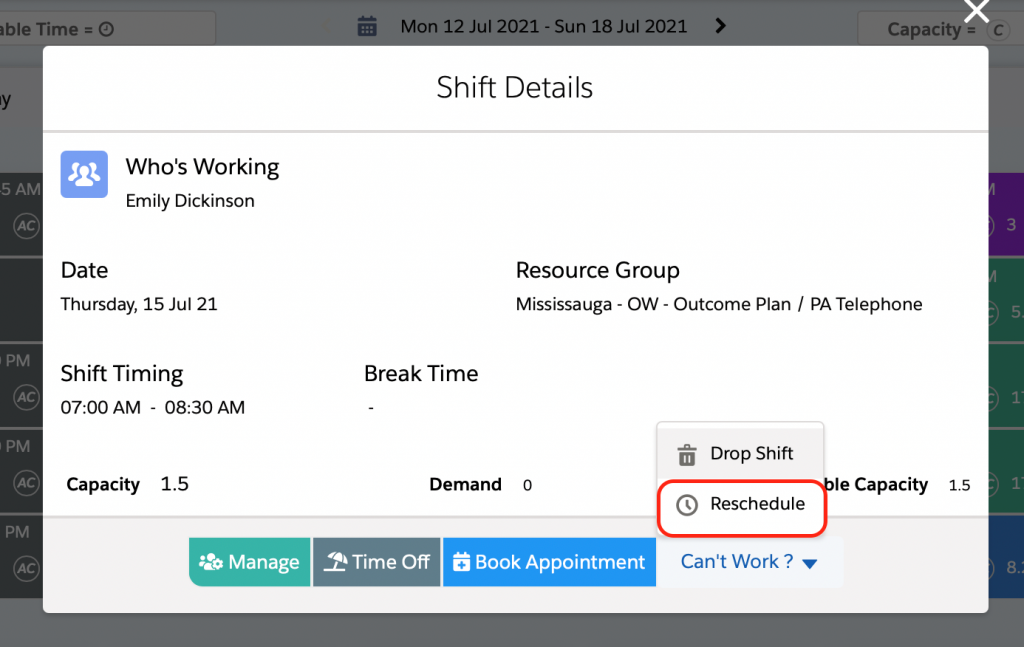
- A pop-up shows up to change the Start and End times of the Shift.

- Change the times and if required you can add Break start and end times as well.
- Click the ‘Save’ Button
- The time slot changes the Start and end time of the shift and also changes the Demand and Capacity hours accordingly.

