
Outbound Logistics
On this page
Getting started with Outbound Logistics
Overview
The Outbound Logistics Workspace is where your warehouse team picks, packs, and ships everything that leaves a site, including sales orders, transfer orders, return-to-vendor purchase orders (purchase orders for items going back to a vendor), and work orders.
Each outbound is stored as a logistic record (for example, 00004524-Logistic-1). From one workspace you can take it from the pick list all the way to a booked shipment with tracking.
Every outbound moves through the same four steps: Pick, Pack, Ship, and Delivered. If you ship only some of the packages, the rest can be picked, packed, and shipped later, and the outbound shows as Part-shipped.
Who uses the workspace
| Role | What they do here |
|---|---|
| Picker | Picks items from their locations, lots, and serial numbers, either by hand or by scanning. |
| Packer | Puts the picked items into packages and seals them. |
| Shipper | Compares carrier rates, books the shipment, prints labels, and tracks delivery. |
| Warehouse lead | Monitors the queue, opens the outbounds that need attention, and prints documents. |
Quick start
To ship an outbound, follow these six steps. Each one is explained in detail later in this guide.
Open the workspace
Find Outbound Logistics Workspace in the App Launcher or the App Navigation menu.
Start a pick
On the home screen, select an outbound that is Ready to pick, then select Start pick.
Pick every line
Set the quantity and select Pick on each line (or scan). When all units are picked, select Continue to Pack.
Pack the items
Create a package, add the picked items, and select Seal. When everything is packed, select Continue to Ship.
Ship
Tick the packages to send, select a carrier rate, then select Create shipment. Print the labels.
Track
Select Track on the home screen until the outbound shows Delivered.
The home screen
Open the Outbound Logistics Workspace from the App Launcher or the App Navigation menu. The home screen shows the queue of all outbounds for the selected warehouse. Each row shows how far the outbound has progressed and the next action to take.
The numbers below match the numbered areas in the home screen screenshot.
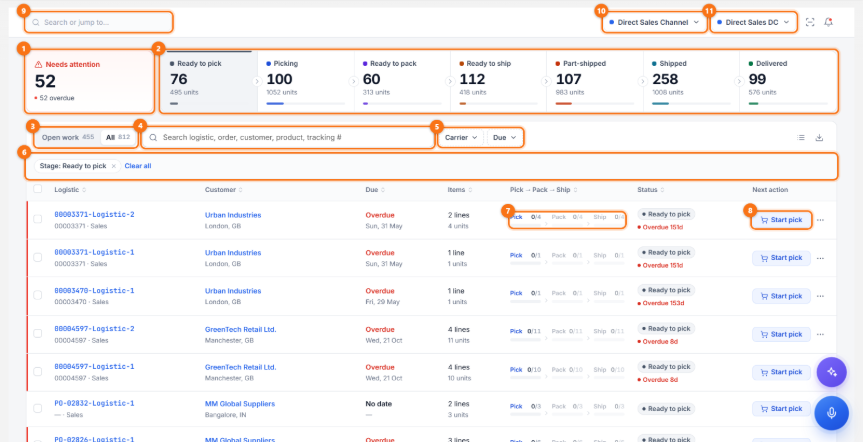
| # | Part | What it does |
|---|---|---|
| 1 | Needs attention | Shows the outbounds that are overdue, or that are due today and have not been picked yet. |
| 2 | Stage tiles | Show the number of outbounds and units at each stage: Ready to pick, Picking, Ready to pack, Ready to ship, Part-shipped, Shipped, and Delivered. Select a tile to show only the outbounds at that stage. |
| 3 | Open work / All | Open work hides finished outbounds. All shows every outbound. |
| 4 | Search | Finds an outbound by logistic number, order, customer. |
| 5 | Filters | Filter the list by Carrier or Due date. |
| 6 | Active filters | Shows the filters you are using. Select × on a filter to remove it, or select Clear all to remove every filter. |
| 7 | Pick → Pack → Ship | Shows how many units have been picked, packed, and shipped, out of the total units. |
| 8 | Next action | Opens the next step for the outbound: Start pick, Continue pick, Pack, Ship, Pick rest, Pack rest, Ship rest, or Track once the outbound has shipped. |
| 9 | Search or jump to | Opens a quick search box. You can also open it by pressing Ctrl + K. |
| 10 | Channel | Switches the sales channel. |
| 11 | Warehouse | Switches the distribution centre whose queue you see. |
Select the scan icon next to the warehouse selector to open Scan anything (see Scanning). The icons on the right side of the toolbar let you change the row density and export the list.
Outbound stages
The stage shown on the home screen is worked out from the units on the outbound. It updates automatically as you pick, pack, and ship.
| Stage | When it shows |
|---|---|
| Ready to pick | No units have been picked yet. |
| Picking | Some units are picked, but not all. |
| Ready to pack | Every unit is picked, but not every unit is in a package. |
| Ready to ship | Every unit is in a package and nothing has shipped yet. |
| Part-shipped | Some packages have shipped, and others are still waiting. |
| Shipped | Every unit has shipped, but not every shipment is delivered yet. |
| Delivered | Every shipment is delivered, or the outbound is closed. |
Open an outbound
You can open an outbound in several ways. The simplest is clicking on the logistic number on its row. You can also scan its barcode, search for it with Ctrl + K, or use the row menu.
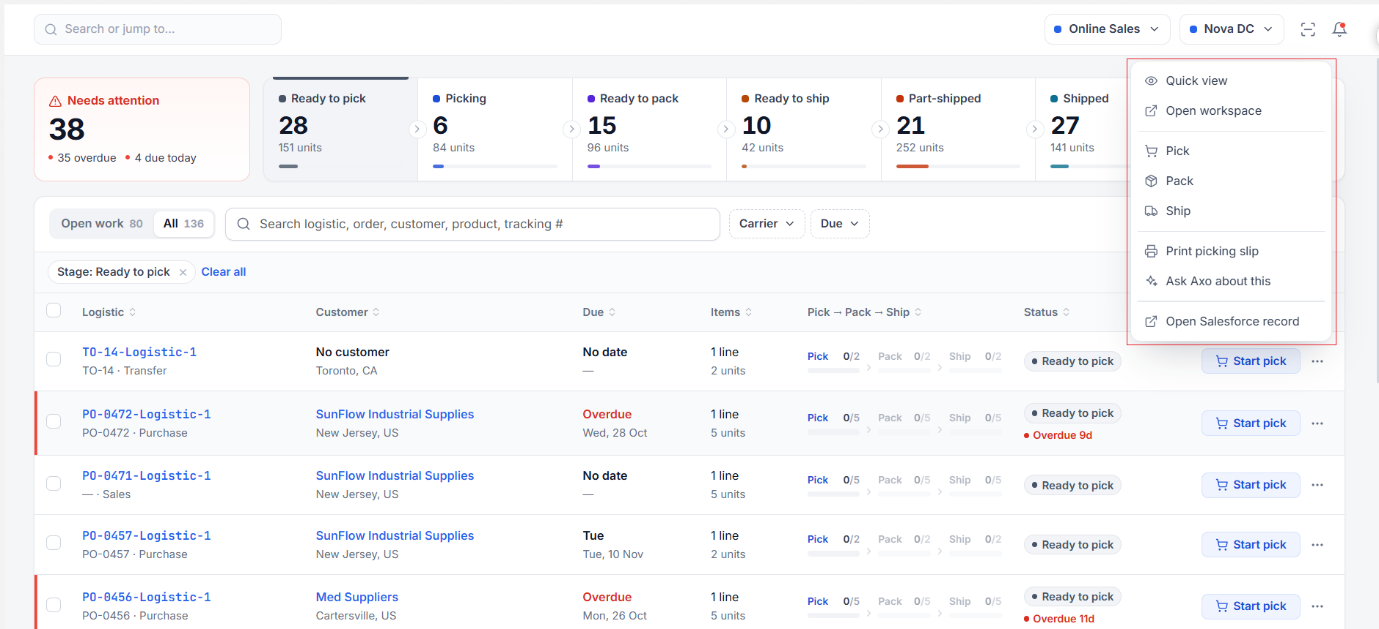
Select the ⋯ (more options) icon at the end of a row to open the row menu:
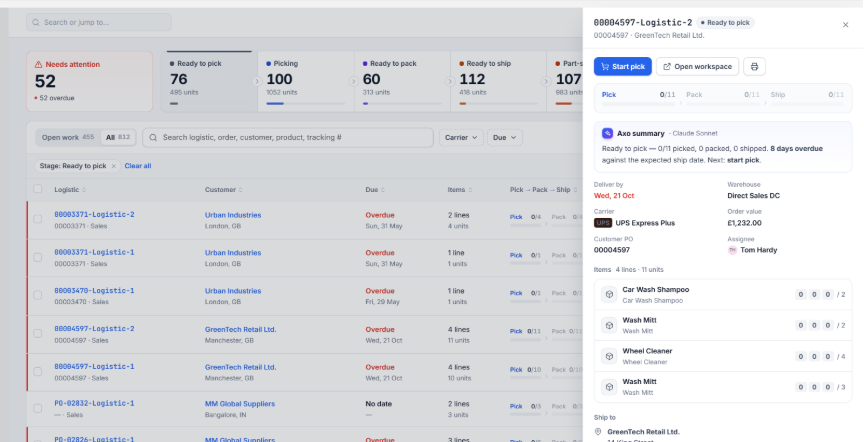
- Quick view: Opens a side panel on the right without leaving the list. It shows the outbound’s progress, an Axo summary of where it stands, the delivery date, carrier, order value, assignee, item lines, and ship-to address.
- Open workspace: Opens the full workspace for the outbound.
- Pick, Pack, Ship: Opens that step directly.
- Print picking slip: Prints the picking slip for the outbound.
- Ask Axo about this: Lets you ask Axo a question about the outbound. This appears only if Axo is turned on (see Axo).
- Open Salesforce record: Opens the outbound’s record in Salesforce.
Step 1: Pick
In the Pick step you collect every line of the outbound from its stock locations. The Pick screen lists every line that needs to be picked, shows where the stock is available, and shows how many lines have been picked and how many are remaining.
How to pick
On the home screen, select the outbound, then select Start pick. This opens the Pick screen.
For each line, check the Source location. If the stock is in more than one place, choose where to pick from.
Set the quantity with − and +, then select Pick. Lines with serial numbers or lots work a little differently (see Advanced picking).
Repeat for every line. To pick everything at once from the selected stock, select Pick all available and confirm.
When every unit is picked, the progress card shows Pick complete — ready to pack. Select Continue to Pack.
Each pick is saved as soon as you make it. The bottom bar shows Saved automatically. You can leave and come back later, and your picks will still be there.
The Pick screen
The numbers below match the numbered areas in the Pick screen screenshot.
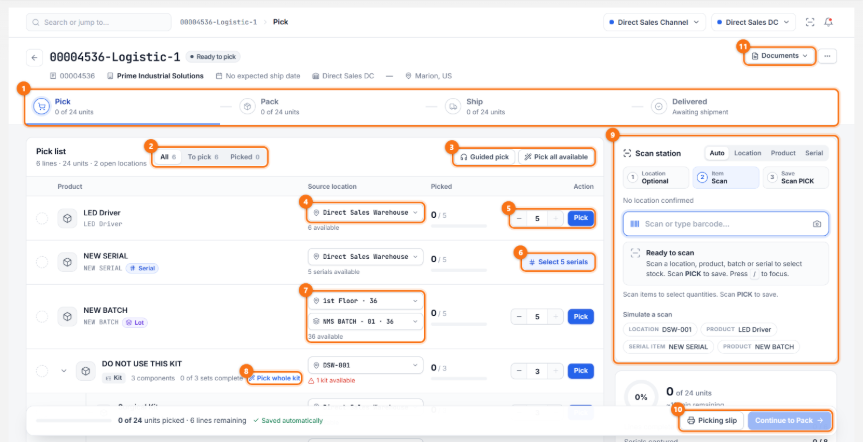
| # | Part | What it does |
|---|---|---|
| 1 | Step bar | Shows Pick, Pack, Ship, and Delivered, with the units completed in each step. Select a step to jump to it. |
| 2 | Tabs | Filter the list to show All lines, lines To pick, or lines already Picked. |
| 3 | Guided pick / Pick all available | Guided pick takes you through the list one stop at a time, in location order, and can be used by voice. Pick all available picks every line from its selected stock after you confirm. |
| 4 | Source location | Where to pick from. The list shows the warehouse stock and every location or bin that holds the product, with the quantity at each. |
| 5 | Quantity and Pick | Set the quantity with − and +, then select Pick. |
| 6 | Select serials | Serialised lines open the serial sheet instead of a quantity box. |
| 7 | Location and lot | Lot-tracked lines also have a lot list. It shows only the lots in stock at the chosen location. |
| 8 | Pick whole kit | Picks a kit as complete sets. Expand the kit to see its components. |
| 9 | Scan station | Scan locations, products, lots, and serial numbers (see Scanning). |
| 10 | Picking slip / Continue to Pack | Print the picking slip, or move to the next step once picking is done. |
| 11 | Documents | Shows all pick and pack documents for this outbound. |
Picked lines and Undo
Once a line is picked, its status changes to Picked. To reverse a pick, select Undo on the picked line and confirm. The stock is released again, and the line returns to To pick. Serialised lines also show the picked serial numbers.
In the Pick screen screenshot for picked lines, the numbered areas are:
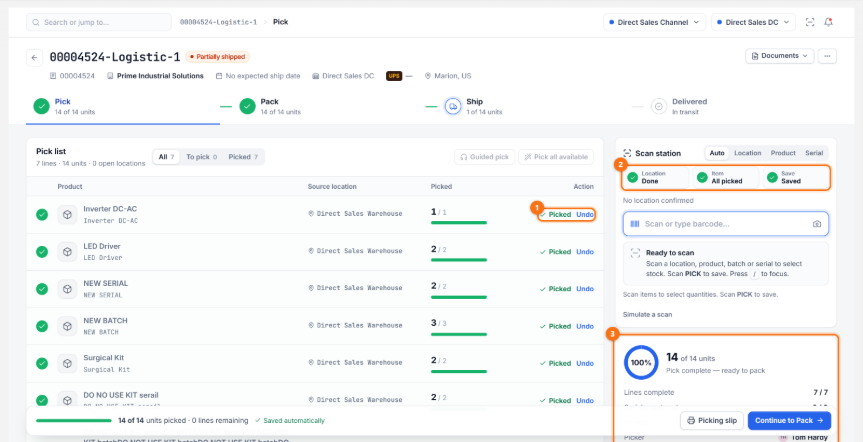
- Picked / Undo: Shows that the line is picked and lets you reverse it.
- Scan steps: Each step turns green when it is done: Location, Item, and Save.
- Progress card: Shows the percentage picked, units, completed lines, serial numbers captured, and kit sets. When everything is picked, it shows Pick complete — ready to pack, and the Continue to Pack button is enabled.
To see only the picked lines, use the Picked tab. To hide them, use the To pick tab. To pick the components of a kit one by one, select the arrow to expand the kit.
Step 2: Pack
In the Pack step you put the picked items into packages and seal them. You can create several packages for the picked items, or one package for all of them. A package is saved when you seal it. A package that is not sealed yet is only a draft on your screen.
How to pack
Select New package and choose the package type.
Select the package to make it the one you are packing into.
Add items from Ready to pack. Before you seal, you can drag items from one package to another. Kits always move as complete sets.
Check the package details: dimensions, weight, and declared value.
In the package details, select the Shipment type for the package, such as UPS, FedEx, or In-House.
Select Seal Package to save the package.
When every item is in a sealed package, select Continue to Ship.
The Pack screen
The numbers below match the numbered areas in the Pack screen screenshot.
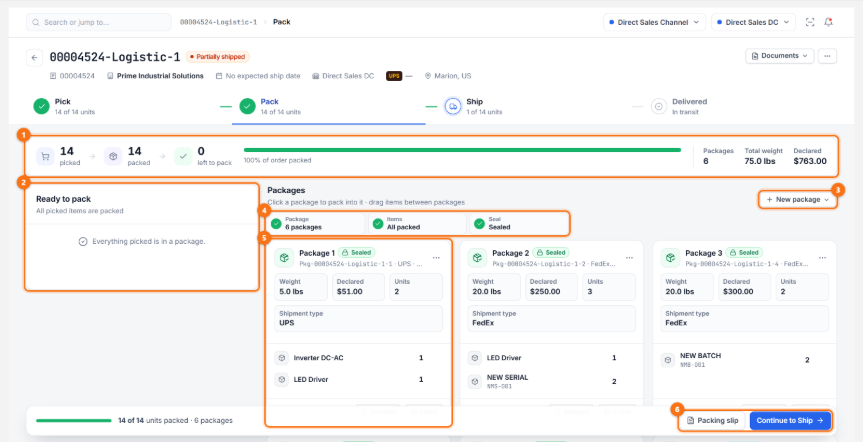
| # | Part | What it does |
|---|---|---|
| 1 | Progress | Shows the units picked, packed, and left to pack, along with the number of packages, the total weight, and the declared value. |
| 2 | Ready to pack | Lists the picked items that are not in a package yet. To add an item, select the add button on it (the button names the package it will go into, for example Package 2), or scan the item. To add several items at once, tick them and select Move selected. You can also select Pack everything into one package. |
| 3 | New package | Starts a new package. Choose the package type from the list. |
| 4 | Checklist | Package, Items, and Seal turn green as each one is completed. |
| 5 | Package card | Shows the weight, declared value, units, shipment type, and contents of the package. The buttons at the bottom of the card let you seal, reopen, or label the package. The ⋯ menu offers Edit details, Print package label, Print packing list, and Delete package. |
| 6 | Packing slip / Continue to Ship | Print the packing slip, or move to the next step once everything is packed. |
Package details
These fields are on each package. The shipment type and shipment mode decide which carriers you can choose in the Ship step.
| Field | Notes |
|---|---|
| Shipment type | Optional. Choose a carrier (for example, UPS) to get rates from that carrier only in the Ship step. Leave it as –None– to compare all carriers. |
| Shipment mode | Choose Parcel, LTL, or TruckLoad. This decides which carriers can give a quote. |
| Package type | Chosen from the package types set up for your organisation. The default is Package. |
| Dimensions and Weight | Filled in from the standard size of the package type, if one is set up. Change them to match the actual package. |
| Declared value | Used for carrier insurance and customs. |
For freight shipments and dangerous goods, see Advanced package details. You can also fill in these optional fields: name, equipment type, shipment preference speed, PO number, deposit tag, and description.
Step 3: Ship
In the Ship step you choose which packages to send, compare live carrier rates, and book the shipment. When you book, the shipment and its labels are saved to Salesforce.
How to ship
In What’s shipping, tick the packages you want to send now. Packages you leave unticked stay for a later shipment. One shipment can hold only one shipment type.
In Carrier & service, compare the live rates. Use the tabs to filter by carrier, and select the refresh icon to get the rates again. Select the rate you want. The cheapest rate is marked.
Check the Addresses: Ship to (select Edit to change it), Ship from, and Billing (Sender, Recipient, or Third party, with the billing account number).
In Service options, set the ship date, delivery confirmation, description of goods, and reference.
Check the Shipment summary: packages, declared value, chosen service, who pays, and the total.
Select Create shipment, then confirm the carrier and service.
Before booking, Create shipment checks three things:
- The outbound is ready to ship.
- At least one sealed package is selected. Open packages cannot be shipped.
- The ship date is not in the past.
The Ship screen
The numbers below match the numbered areas in the two Ship screen screenshots.
Top of the screen
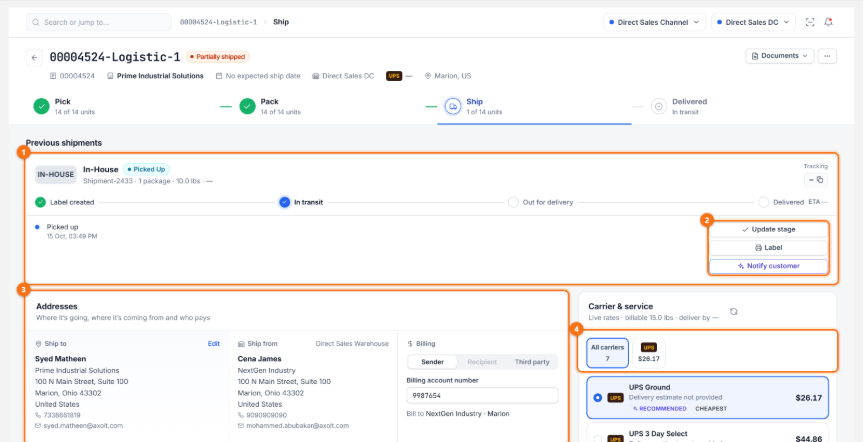
- Previous shipments: Shows each shipment already booked for this outbound, with its carrier, tracking number, and progress: Label created, In transit, Out for delivery, and Delivered.
- Shipment actions: Buttons to manage a booked shipment.
- Update stage: Records the next step of an In-House delivery (picked up, dropped off, or delivered).
- Label: Reprints the label.
- Track: Gets the latest carrier scan.
- Notify customer: Drafts a shipping email with the tracking number. Choose a friendly, formal, or brief style. Edit the To, Cc, subject, and text, then send it.
- Addresses: Shows the Ship to and Ship from addresses, and the Billing option with the billing account number.
- Carrier & service: Shows live rates from every carrier that can take these packages.
Bottom of the screen
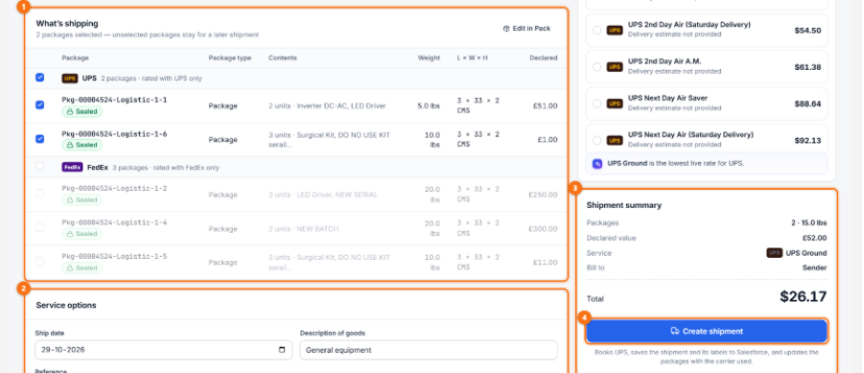
- What’s shipping: Packages are grouped by shipment type. Tick the packages to send now. If you tick a package of another shipment type, the selection moves to that group. Select Edit in Pack to go back and change packages.
- Service options: Ship date, delivery confirmation, description of goods, and reference. Only options that every carrier on the screen supports are shown.
- Shipment summary: Packages, declared value, chosen service, who pays, and the total.
- Create shipment: Books the carrier, saves the shipment and its labels, and records the carrier on each package.
Which carriers you see
- A package with a shipment type (for example, FedEx) is rated by that carrier only.
- A package with the shipment type –None– is rated by every carrier that handles its shipment mode: Parcel, LTL, or TruckLoad.
- Only carriers that your organisation has active credentials for are offered.
- In-House (your own delivery) always appears as a no-charge option. You can enter a charge and tracking number yourself.
- Freightview quotes are fetched only when you turn on Include Freightview quotes.
- Carriers that could not give a quote are grouped into one line: N carriers didn’t return rates. Select Show reasons to see why.
After booking
When the shipment is created, the Shipment created dialog opens and shows a preview of each package’s label. From here, you can select Print label (or Print all labels) to send the labels to your printer, select Email customer to open the shipping email draft, or select Back to Outbound to return to the home screen.
If you did not ship every package, the outbound shows as Part-shipped. Pick, pack, and ship the rest later by using Pick rest, Pack rest, or Ship rest on the home screen.
Tracking and delivery
After an outbound has shipped, select Track in the Next action column on the home screen to open its Ship step. In Previous shipments, you can see each shipment’s progress: Label created, In transit, Out for delivery, and Delivered.
- For a carrier shipment, select Track to get the latest carrier scan.
- For an In-House delivery, select Update stage to record each step yourself: picked up, dropped off, and delivered.
- To reprint a label, select Label. To email the customer the tracking number, select Notify customer.
When every shipment on the outbound is Delivered, the outbound moves to the Delivered stage on the home screen. Once everything has shipped, the Ship step also shows a delivery summary: the ship-to address, the estimated or actual delivery date compared with the deliver-by date, the number of shipments and packages, and the total freight.
What is saved, and when
- Pick: Every pick is saved as you make it. The bottom bar shows Saved automatically.
- Pack: A package is saved when you seal it. A package that is not sealed yet is only a draft on your screen.
- Ship: The shipment is saved when you select Create shipment. This books the carrier, saves the shipment and its labels, and records the carrier on each package.
- Partial shipments: You can ship part of an outbound. Packages you leave unticked in the Ship step stay for a later shipment, and the outbound shows as Part-shipped.
If you scan the PICK or SAVE command barcodes, they trigger the same saves (see Scanning).
Advanced picking
Use these options when a line has serial numbers or lots, when you want to pick several outbounds in one trip, or when you want to be guided or work by voice.
Selecting serial numbers
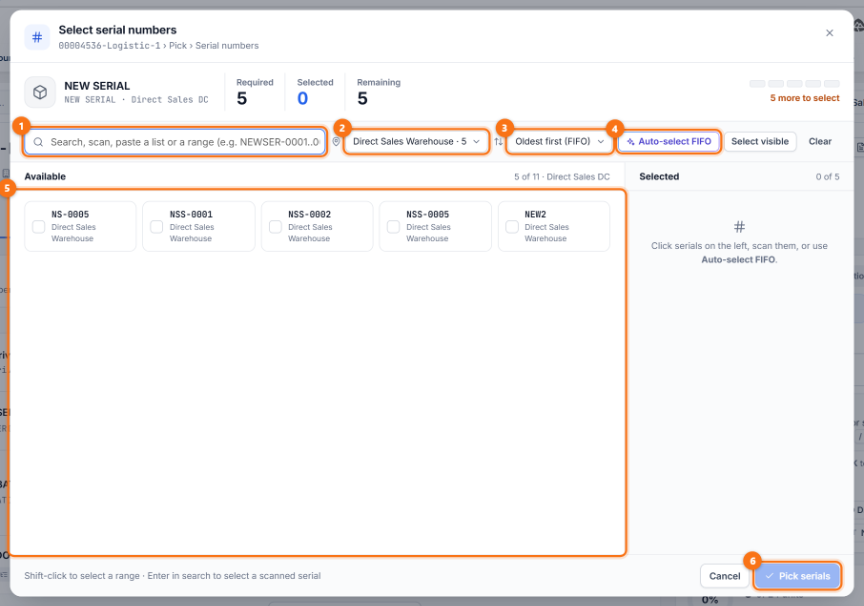
A serialised line is a product where each unit has its own serial number. Instead of a quantity box, it shows Select serials, which opens the Select serial numbers window.
In this window, you can type or scan a serial number and press Enter, or paste a list or a range of serial numbers (for example, NEWSER-0001..0010). You can also choose a location to see the serial numbers held there and how many there are. Serial numbers are sorted oldest first (FIFO, first in, first out) by default.
To choose serial numbers, select Auto-select FIFO to have the oldest ones chosen for you, select Select visible to tick every serial number on the screen, or select a tile in the Available list to choose that serial number. Hold Shift and select to choose a range. To clear your selection, select Clear.
The top of the window shows how many serial numbers are required, selected, and remaining. Once you have selected the required number, select Pick serials to save your selection.
Lots
A lot-tracked line is a product whose units are grouped in batches. These lines also show a lot list under the location. The list shows only the lots that are in stock at the chosen location.
Wave picking
Wave picking lets you pick several outbounds in one trip through the warehouse.
On the home screen, tick the outbounds you want to include.
Select Create wave pick, then select Release wave.
The selected outbounds open together on one combined pick list.
Guided pick
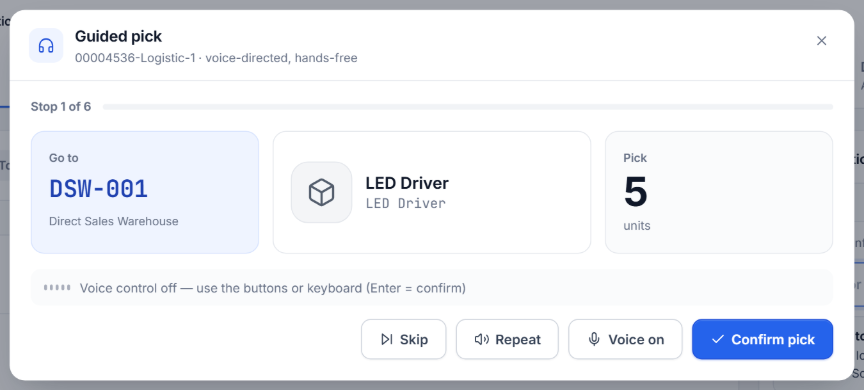
Guided pick takes you through the pick list one stop at a time, in location order. Each stop shows where to go, the product, and how many units to pick. To start it, select Guided pick on the Pick screen.
Use the buttons at the bottom of the dialog to move through the list:
- Confirm pick (or press Enter): Saves the pick for this stop and moves to the next one.
- Skip: Leaves this stop for later and moves to the next one.
- Repeat: Reads the instruction aloud again.
- Voice on: Turns on hands-free mode. Axo reads each stop aloud and listens for your confirmation. Voice is off until you turn it on.
Lots and serial numbers are chosen in the same way as on the pick list. You can close the dialog at any time. The picks you have already confirmed are saved.
Advanced package details
You only need these fields for freight shipments or dangerous goods. For ordinary parcels, the fields in Package details are enough.
- Freight class and NMFC code: Used for LTL freight. LTL (less than truckload) is freight shipping for loads that do not fill a whole truck. NMFC is the National Motor Freight Classification code that carriers use to price freight.
- Is hazmat?: Turn this on for dangerous goods (hazardous materials). Then enter the hazmat ID, primary hazard class, and packaging group.
- TruckLoad: A Shipment mode for loads that fill a whole truck. It decides which carriers can give a quote.
- Other optional fields: Name, equipment type, shipment preference speed, PO number, deposit tag, and description.
Scanning
You can scan with a handheld USB or Bluetooth scanner, which works anywhere on the page, or with your device’s camera. The camera uses the webcam on a laptop and the phone’s camera in the Salesforce mobile app.
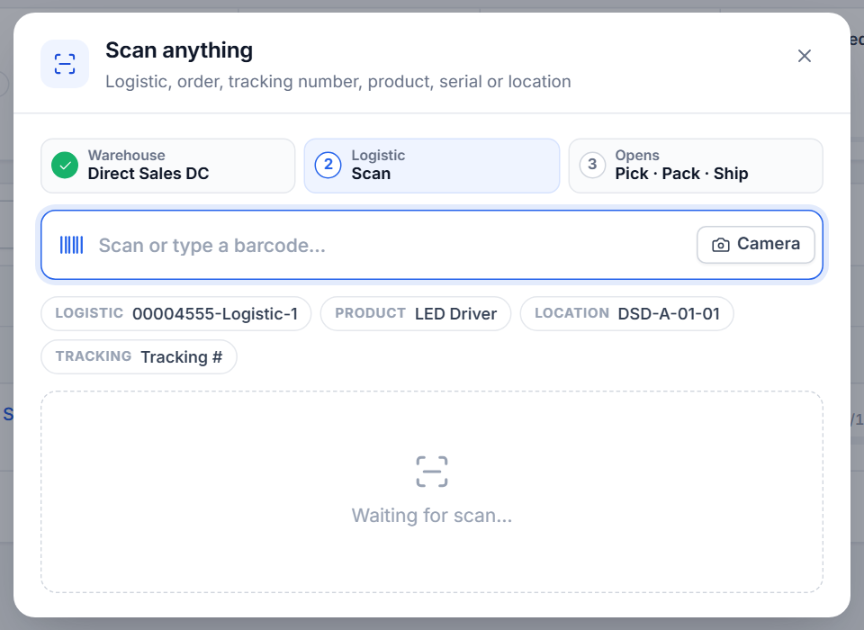
Scan anything
From the home screen, select the scan icon at the top right to open the Scan anything window. Scan a logistic number, order, tracking number, product, serial number, or location, and the matching outbound opens at the right step (Pick, Pack, or Ship). If several outbounds match, the list is filtered to show only those outbounds.
Scanning in Pick
The scan station in the Pick step has three steps: scan a location (optional), scan the item (a product, lot, or serial number), and then scan PICK to save. The mode buttons (Auto, Location, Product, and Serial) tell the scan station what your next scan is.
Scanning in Pack
In the Pack step, scan a package and then scan its items. Each product scan packs one unit, and a kit counts as one set. Scan SAVE to seal the package.
Command barcodes
You can print these barcodes and scan them to run a command:
| Barcode | What it does |
|---|---|
| PICK | Saves the picks you have scanned. |
| SAVE | Saves your work, or seals the package in Pack. |
| ORDER, PACK, SHIP | Moves to that part of the outbound. |
| ADDALL, REMOVEALL | In the serial sheet, selects or clears every serial number. |
Axo
Axo is the built-in assistant. You can ask it about outbounds in plain language, or let it help you pick, pack, and ship hands-free by voice. Axo saves nothing until you confirm each change, and it uses the same checks as the screen. Axo does not book carriers.
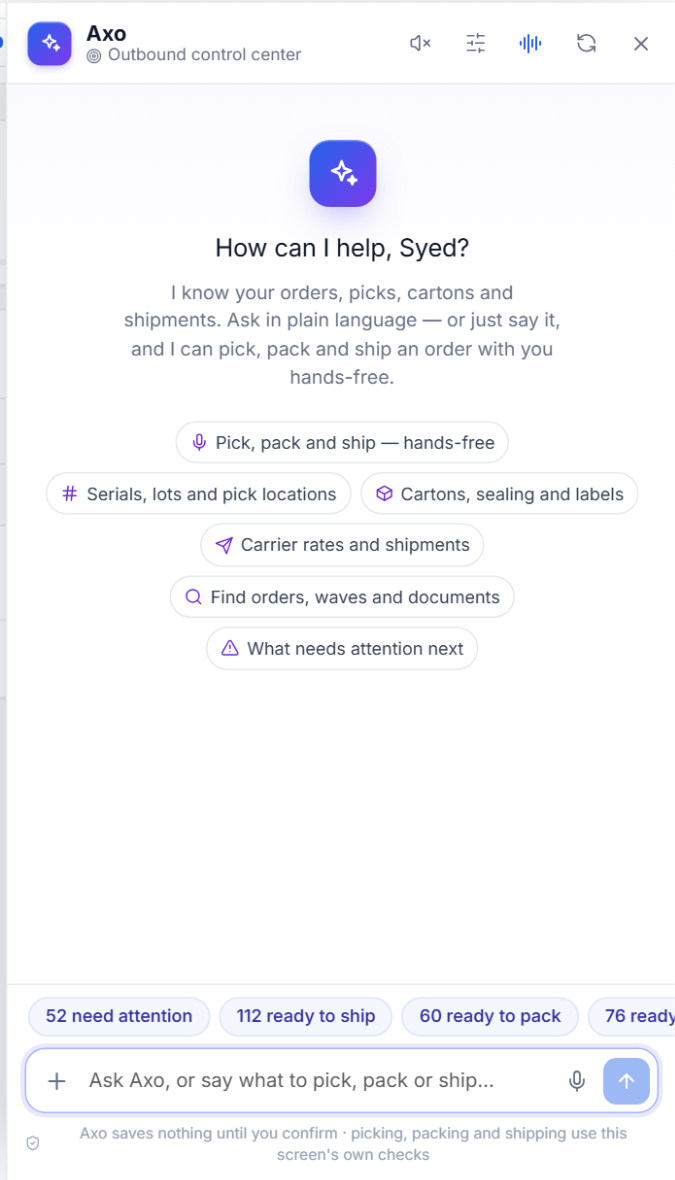
- Open Axo: Select the purple sparkle button at the bottom right, or press Ctrl + J. Select the blue microphone button to talk to Axo.
- Start from a suggestion: Choose one of the suggestions, such as hands-free pick, pack, and ship; serials, lots, and pick locations; packages, sealing, and labels; carrier rates and shipments; finding orders, waves, and documents; or what needs attention next.
- Quick links: The chips above the message box take you straight to the outbounds that need attention or are ready to ship, ready to pack, or ready to pick.
Documents, exporting, and other tools
Documents
Select Documents at the top right of any outbound to print, email, or download its paperwork. To print picking slips for many outbounds at once, tick them on the home screen and select Picking slips.
Working on several outbounds
Tick the rows on the home screen to show the selection bar. From there you can select Create wave pick (one pick list across several outbounds), print Picking slips for all of them, or Export them.
Outbound menu
Select the ⋯ button at the top right of an open outbound to open the summary panel with Quick view & activity, preview the packing list with Print packing list, or open the logistic record in standard Salesforce with Open Salesforce record.
Notifications
The bell icon in the top bar lists what needs your attention, and a red dot means there is something new. Two kinds of notification appear: N overdue (outbounds past their expected ship date, which you can select to filter the list to them) and Delivered (an outbound was delivered to the customer).
Exporting
Select the download icon on the right of the list toolbar to export every outbound in the current view as a CSV file. To export only some outbounds, tick them and select Export in the selection bar.
List display
Use Rows at the bottom of the list to show more outbounds per page, and select the density icon to make the list more compact.
Keyboard shortcuts
| Keys | Action |
|---|---|
| Ctrl + K (⌘ + K on a Mac) | Search and jump to an outbound. |
| Ctrl + J | Open Axo. |
| / | Put the cursor in the scan or search box. |
| Enter | Submit a scan or a message. |
| Shift + click | Select a range of serial numbers. |
| Esc | Close dialogs and panels. |
Behind the scenes: what changes when you pick, seal, and ship
When you pick
Every pick (using Pick, Confirm pick, Pick all available, or scanning PICK) is saved immediately and updates these records:
- Stock line for the item: Before the pick, the stock is reserved for this outbound. After the pick, the picked quantity moves to its own line with the status Committed, along with the pick date and time. Any quantity that is not picked stays Reserved.
- Serial numbers: Before the pick, they are available. After the pick, they are not available, so no other order can pick them.
- Outbound line: The picked quantity goes up by the amount you picked.
- Outbound stage: Changes from Ready to pick to Picking while units are still left, and then to Ready to pack once every unit is picked.
When you select Undo on a picked line, the stock line goes back to Reserved, and its picked quantity and date are cleared. Any serial numbers become available again, and the line returns to To pick.
When you seal a package
- Package: Created, or updated if you reopened it, with its type, dimensions, weight, declared value, and shipment type. Its status stays blank until it ships.
- Package contents: One content line is created for each product, linked to the outbound line it came from.
- Outbound line: The packed quantity goes up by the number of units in the package.
- Outbound stage: Changes to Ready to ship once every unit is in a package.
When you create a shipment
- Shipment: Created with the carrier, service, tracking number, freight charge, and labels. Its status is Shipped.
- Packages: Linked to the shipment, with the tracking number and carrier saved on each package. Their status is Shipped, and they are locked.
- Outbound stage: Changes to Part-shipped while packages are left, and to Shipped once every unit has shipped.
Was this article helpful?