
RMA Process
On this page
Return Merchandise Authorization
User Guide
Create RMAs, pack the returned goods and book the return shipment
About this guide
This guide shows customer service representatives, returns coordinators and receiving teams how to handle customer returns in Axolt with the RMA screen from choosing the customer and the order the goods came from, to a saved RMA with its packages, a booked return shipment and the documents the customer needs.
It follows one return from start to finish, step by step, screen by screen:
- Create the RMA choose the customer and the original order, add the items that are coming back, and record why each one is returned and how it will be resolved.
- Pack and ship pack the returned items into packages, compare live carrier rates and create the return shipment with its label.
- Documents and approval send the RMA document and the return label to the customer, then authorize the RMA.
Part 1 · Getting started
What an RMA is, how to open the RMA screen and how to find your way around it.
- What is an RMA?
- Opening the RMA screen
- A tour of the screen
1. What is an RMA?
A return merchandise authorization records what a customer is sending back, why, and what you will do about it.
When a customer wants to send goods back, you create an RMA against the order the goods were shipped on. The RMA lists each returned product with its quantity, serial numbers or batches, the reason for the return and the resolution a refund, a repair or a replacement. It also carries the packages and the return shipment that bring the goods back to your receiving center.
1.1 The five steps
The RMA screen guides you through five steps, shown in the step bar across the screen. You can move between them at any time; the last two open once the RMA is saved.
| Step | What you do | Result |
|---|---|---|
| Return details | Choose the customer, the original order, the contact and ship-from address, the freight type and the receiving center. | The RMA knows who is returning what, from where, to where. |
| Items | Add the products that are coming back, with quantities, serial numbers and batches. | Return lines checked against what the order shipped. |
| Resolution | Record the reason and the resolution for each line, and any restock or shipping charges. | The estimated refund. Save & continue saves the RMA and gives it its number. |
| Package | Pack the returned items into packages and seal them. | Package records with their contents, size and weight. |
| Shipment | Compare carrier rates and create the return shipment. | A booked return shipment, tracking number and return label. |
1.2 How a return is resolved
Every return line has an acceptance type. It decides what happens to the goods and whether the line counts toward the refund:
| Acceptance type | What it means |
|---|---|
| Return | The goods come back and the line counts toward the refund amount. |
| Repair | You repair the goods and send them back to the customer. |
| Replacement | You send the customer a replacement unit. |
| Loan Return | A loan product goes back to your loan pool. There is no refund. Loan products use this type automatically. |
1.3 Key terms
| Term | Meaning |
|---|---|
| Original order | The order the goods were shipped on. Only closed orders whose goods were shipped can be returned. |
| Returnable | What was shipped on the order line and is not already on another RMA. |
| Receiving center | The distribution center that receives the return, with its receiving site and address. |
| Freight type | How the goods come back with a carrier such as UPS or FedEx, in house, or arranged by the customer. |
| Package | A box or other container the customer ships the goods in. Each package belongs to one RMA. |
| Authorize | Approve the RMA. Authorizing locks its line items. |
2. Opening the RMA screen
Start a return from the order, from the RMA tab, or open an RMA you already created.
Note: Only closed orders or fully shipped orders will be shown on the RMA screen. If the order is not closed, or not all of its quantity has been shipped and delivered, Create RMA shows a message and no RMA is started.
2.1 Create an RMA from an order
- Open the order the customer is returning goods from.
- Select Create RMA in the order’s actions.
- The RMA screen opens in a new browser tab with the customer and the order already chosen, and the Add return items window open.
2.2 Create an RMA from the RMA tab
- Open the Return Merchandise Authorisations tab from the App Launcher or your navigation bar.
- Select New. The RMA screen opens on Return details with nothing chosen yet. Continue with Chapter 4.
2.3 Open an RMA you already created
Open the RMA record and select Edit, or select the RMA name in the record menu at the top left of the RMA screen (Chapter 12). The RMA opens at the step it has reached.
3. A tour of the screen
One screen holds the whole return: what is coming back, why, how it is packed and how it travels.
The screen has four areas: the top bar with the record and its tools, the return’s context (customer, original order and receiving center), the step bar, and the work area of the current step with the side panel beside it. The figure shows a new RMA on the Items step.
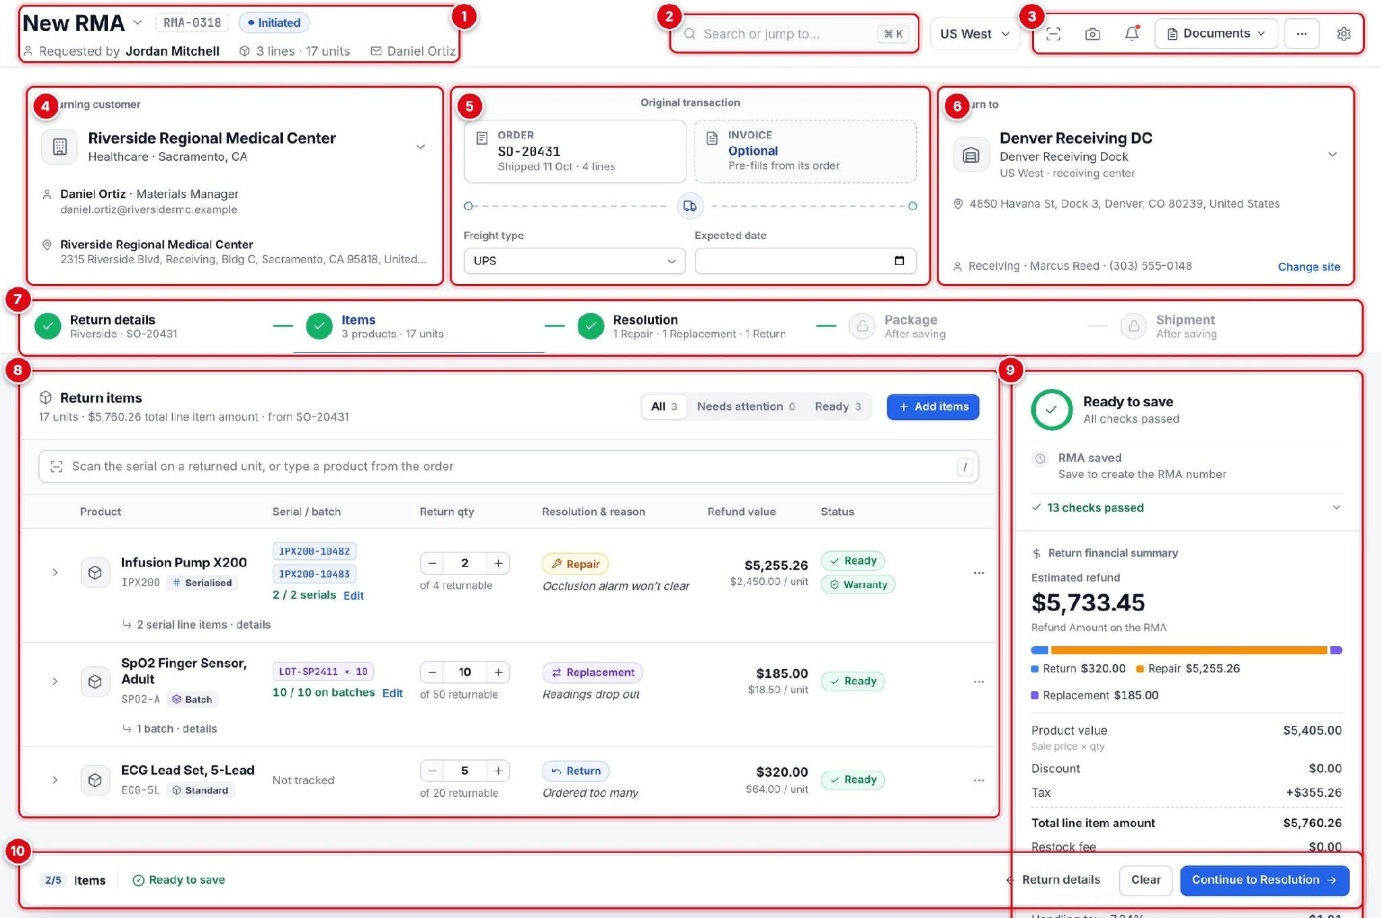
- Record – The RMA name and status, who requested it, how many lines and units, and the customer contact. Before the first save the name is the next number in your series.
- Search or jump to… – Find another RMA, an order or an action (⌘ / Ctrl + K).
- Toolbar – Channel, scanner, camera, notifications, Documents, more actions and settings.
- Returning customer – The customer, the contact and the ship-from address.
- Original transaction – The order (and optional invoice) the goods came from, the Freight type and the Expected date.
- Return to – The receiving center, its receiving site, address and receiving contact.
- Step bar – The five steps, each with a short status. Package and Shipment open after save.
- Main card – The work of the current step here, the return items.
- Side panel – What still blocks the save, the checks that passed, and the financial summary with the estimated refund.
- Footer – The step you are on, whether the RMA is ready, and the buttons to go back, clear or continue.
3.1 The top bar

- Record Menu – Open another RMA or start a new one.
- Search or jump to… – The command palette: RMAs, orders, steps and actions.
- Channel – Your channel. It sets the default receiving center on new RMAs.
- Scanner – Go to the scan box. A barcode scanner works anywhere on the screen.
- Camera – Scan a barcode with your device’s camera.
- Notifications – Updates on your RMAs, such as a return shipment in transit.
- Documents – The RMA document, the return shipping label and the package labels.
- More – Activity, New RMA, All RMAs, the RMA record, Authorize RMA and Close RMA.
- Settings – RMA settings, scanner sounds and keyboard shortcuts.
Part 2 · Creating an RMA
From the customer and the original order to a saved RMA with its reasons, resolutions and refund.
4. Customer and original order
Follow the steps below to create an RMA
4.1 Choose the customer
- Select a customer card, or type in the search box and select the customer, order or invoice. Choosing an order or an invoice chooses its customer too.
- The customer’s contact and ship-from address are filled in from the customer. Change either one in the Returning customer card if the goods come from somewhere else.
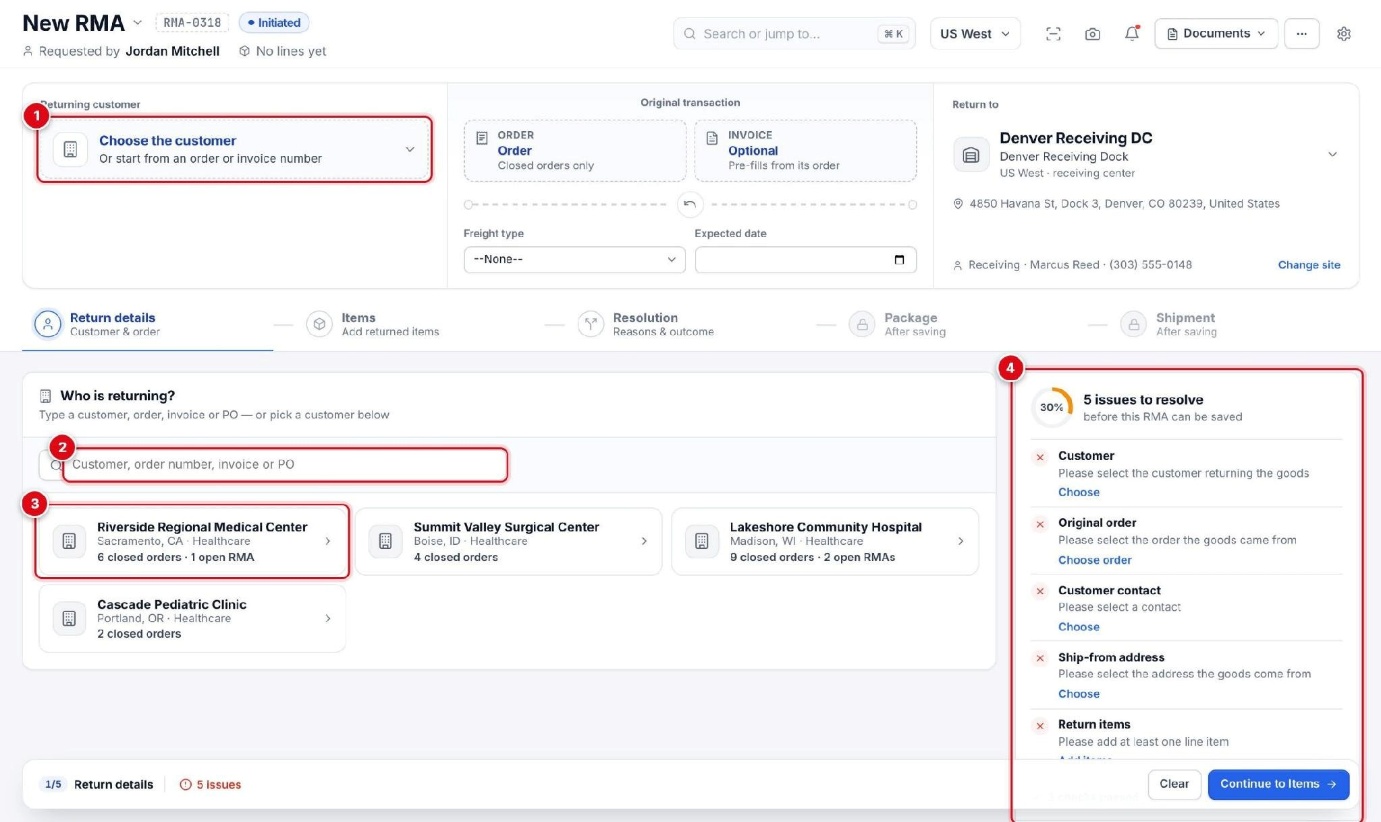
- Choose the customer – Opens a search for customers, orders and invoices.
- Search – Type a customer name, order number, invoice number or customer PO.
- Customer cards – Your recent customers, with their closed orders and open RMAs. Select one to choose it.
- Issues to resolve – What the RMA still needs before it can be saved, each with a link to fix it.
- Once the customer is selected, it displays all orders. Choose the order you want to create the RMA for.
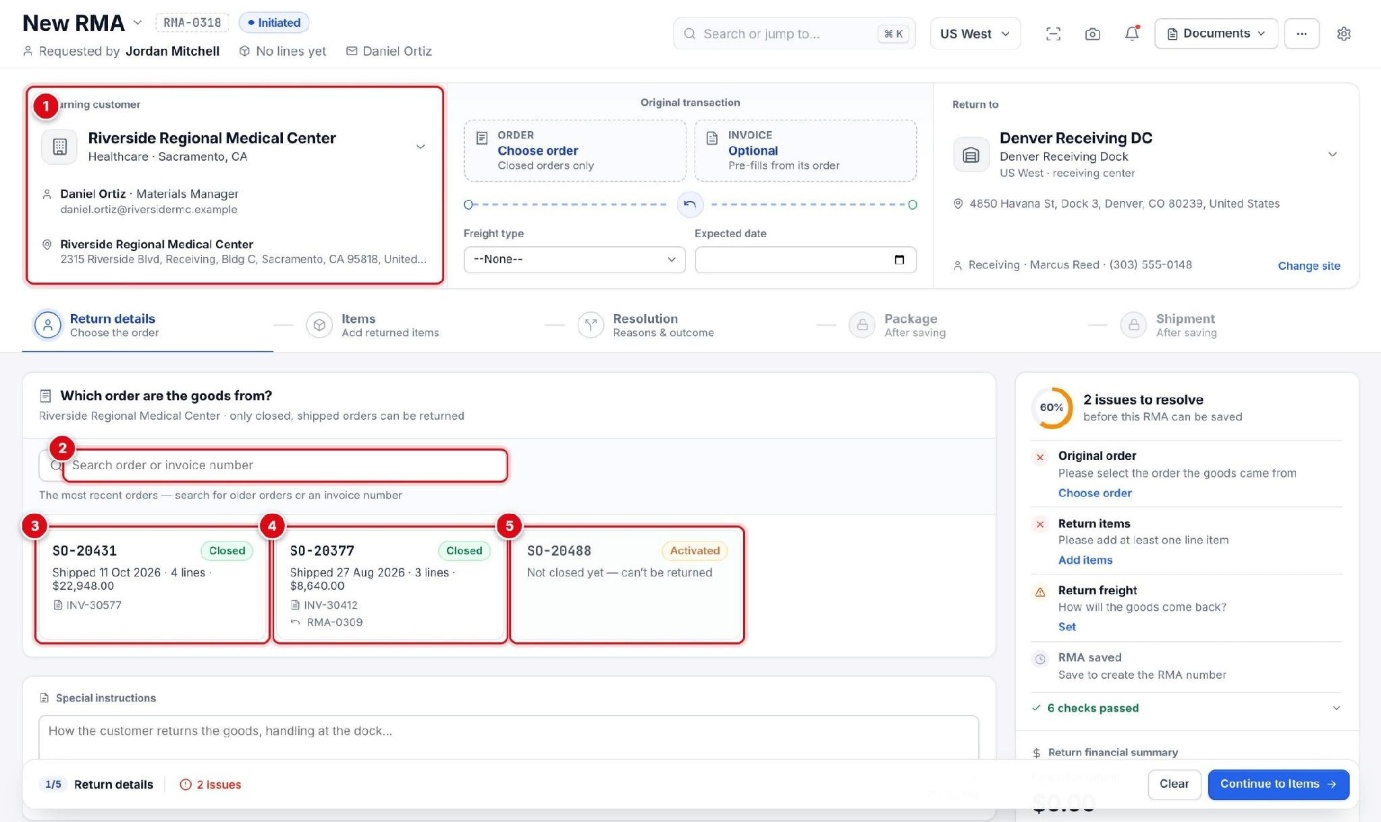
- Returning customer – The customer, the contact and the ship-from address.
- Search – Find an older order or an invoice number. The cards show the most recent orders.
- Returnable order – A closed order, with its ship date, lines, value and invoice. Select it to continue.
- Order with an RMA – An order that already has an RMA shows it on the card. You can still return what is left on it.
- Order Not Closed – An activated order that is not closed yet can’t be returned.
- When you select the order, the screen moves to Items and opens Add return items with the order’s lines.
4.2 Freight, expected date and receiving center

- Contact – The customer contact for this return. Select it to choose another contact.
- Ship-from address – Where the goods are collected. Select it to choose another address.
- Order – The original order. Select it to choose another order.
- Invoice – Optional. Choosing an invoice fills in its order.
- Freight type – How the goods come back. It starts with the order’s shipping method.
- Expected date – When you expect the goods at the receiving center.
- Return to – The receiving center. Select it to choose another distribution center.
- Change site – Choose another receiving site of the receiving center.
| Freight type | What happens next |
|---|---|
| UPS, FedEx | Every package ships with that carrier. The Shipment step shows its live rates and books the return label. |
| In house | Your own transport brings the goods back. The shipment has an optional charge and tracking number, and no carrier label. |
| Customer To Ship | The customer arranges the shipment with their own carrier. Packages and a carrier label are optional. |
| Others | Packages and a carrier label are optional. |
- Use Special instructions under the order cards for notes on how the customer returns the goods or how the dock should handle them.
Note: The channel in the top bar (for example US West) decides which receiving center a new RMA starts with. Change it there if you work for another channel.
5. Add the items that are coming back
Pick the lines from the original order, set the quantities and identify serial numbers and batches.
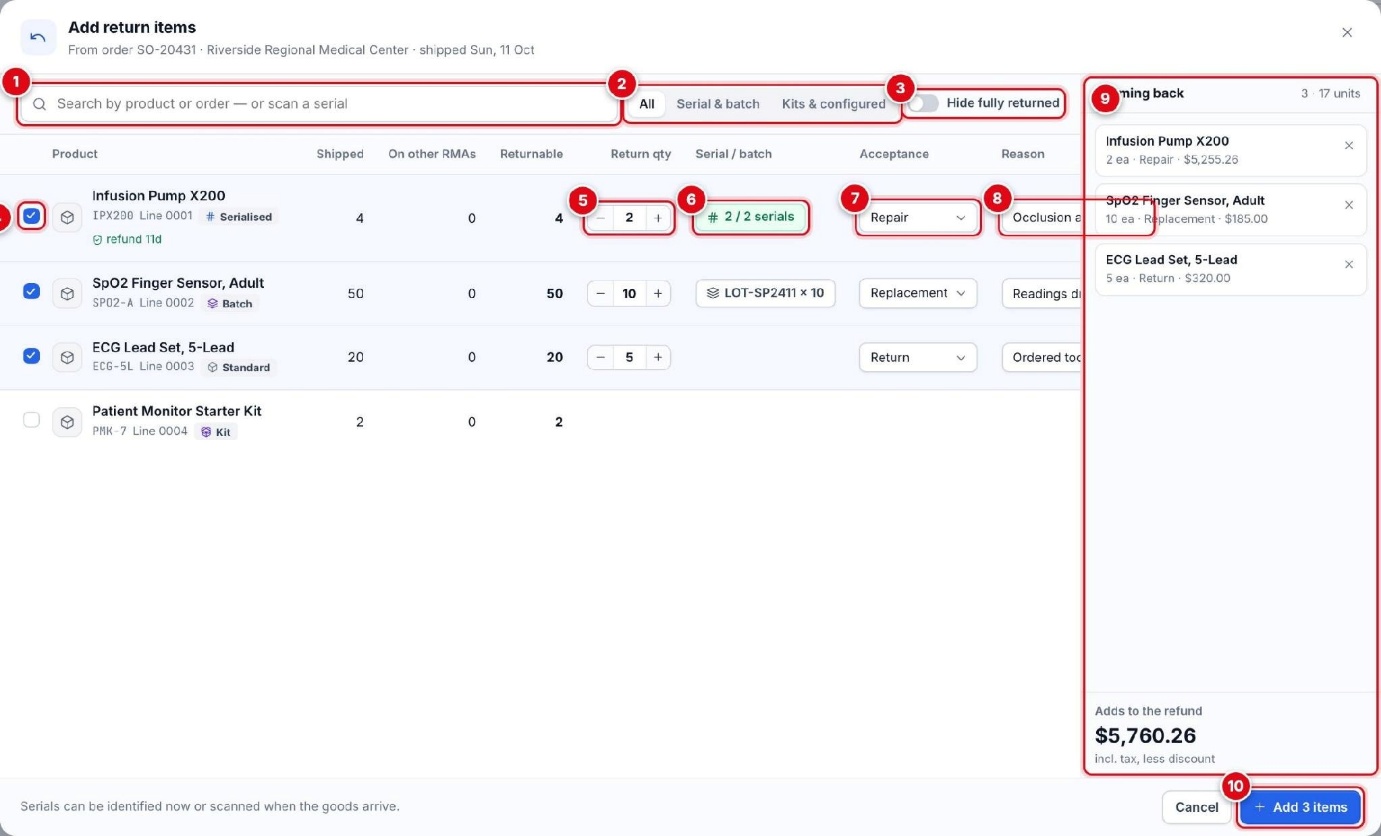
- Search – Find a product or order line, or scan a serial number to tick its line.
- Filters – All, Serial & batch or Kits & configured lines.
- Hide fully returned – Hide lines with nothing left to return.
- Tick – Tick a line to return it. Selecting anywhere on the row ticks it too.
- Return qty – How many units come back. It can’t be more than Returnable.
- Serial / batch – Which serial numbers or batches come back.
- Acceptance – Return, Repair, Replacement or Loan Return for loan products.
- Reason – Why the line comes back. You can also add it on the Resolution step.
- Coming back – The lines you ticked, with quantity, acceptance and value, and the amount they add to the refund.
- Add items – Adds the ticked lines to the RMA.
- Tick each line that is coming back.
- Set the Return qty with − and +, or type it.
- For serial-tracked and batch-tracked lines, check the serial numbers or batches (see below).
- Choose the Acceptance and type the Reason, if you know them now.
- Select Add N items.
5.1 Serial numbers
A serial-tracked line (marked Serialised) is saved as one RMA line item per serial number. When every shipped serial comes back they are selected for you. Otherwise select N / N serials on the line to choose them.
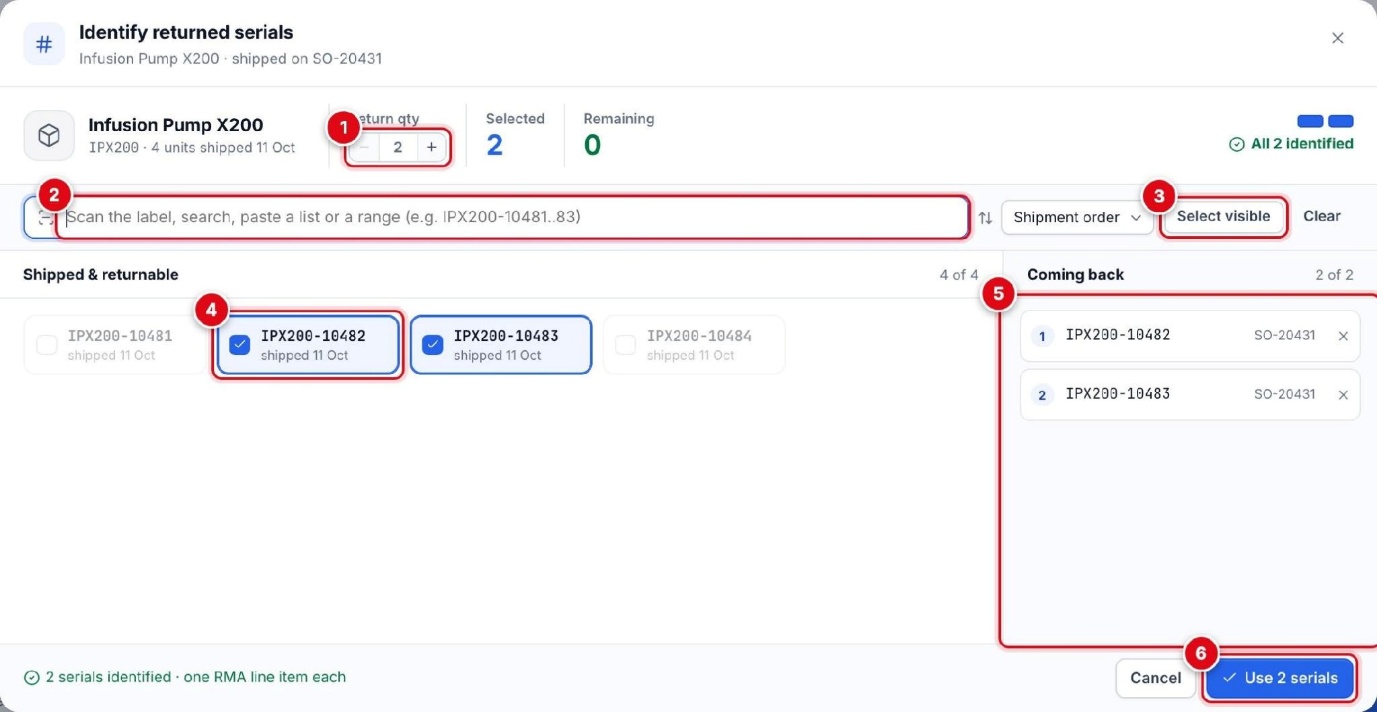
- Return qty – How many serials come back.
- Scan or search – Scan the label, search, paste a list or type a range such as IPX200-10481..83.
- Select visible – Select every serial the search shows. Clear removes them all.
- Serial tiles – The serials shipped on the order and still returnable. Select a tile to add or remove it.
- Coming back – The serials you chose. Select × to remove one.
- Use N serials – Saves the choice to the line.
5.2 Batches
A batch-tracked line (marked Batch) is saved as one RMA line item per batch. Set how many units come back from each batch.
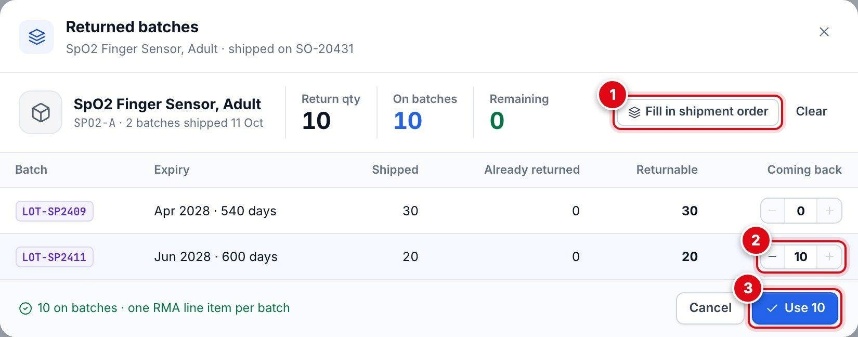
- Coming back on each batch row sets its quantity.
- Fill in shipment order spreads the return quantity over the batches in the order they were shipped.
- Clear sets every batch to zero.
- Use N saves the batches to the line.
5.3 Kits
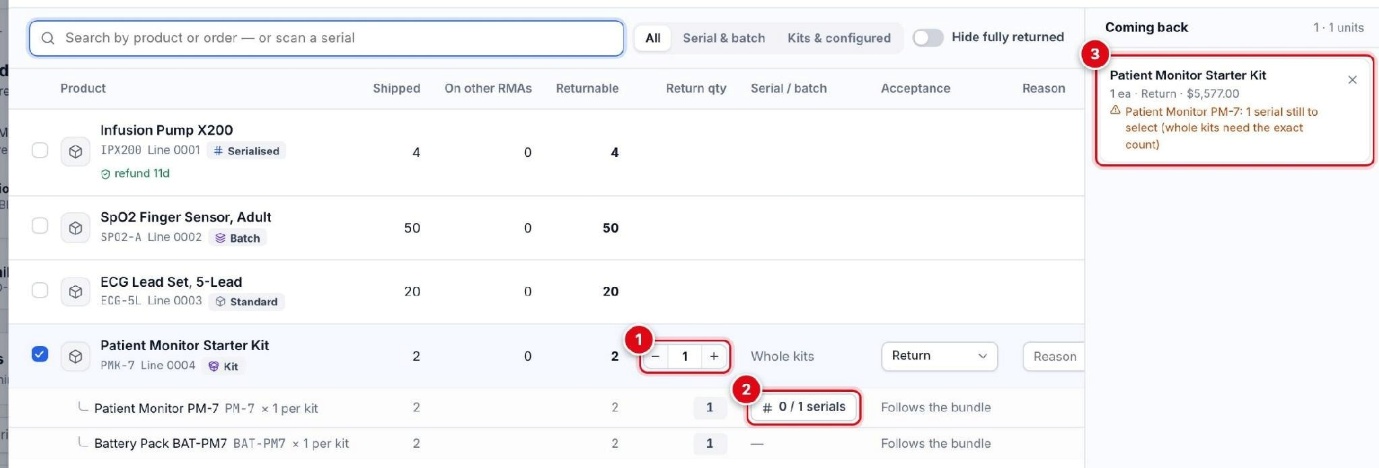
- Kit Quantity – Kits come back whole: set how many kits.
- Component serials – Choose the serial numbers for each serial-tracked component.
- Coming back – Shows what is still missing, for example a component serial to select.
Note: The components follow the kit. Each component’s quantity is the kit quantity multiplied by its quantity per kit, and its acceptance type follows the kit’s. The RMA is saved with one line per component, and the kit’s refund is the sum of its components’ prices.
6. Review the return items
Check quantities, serials, resolutions and refund values before you save.
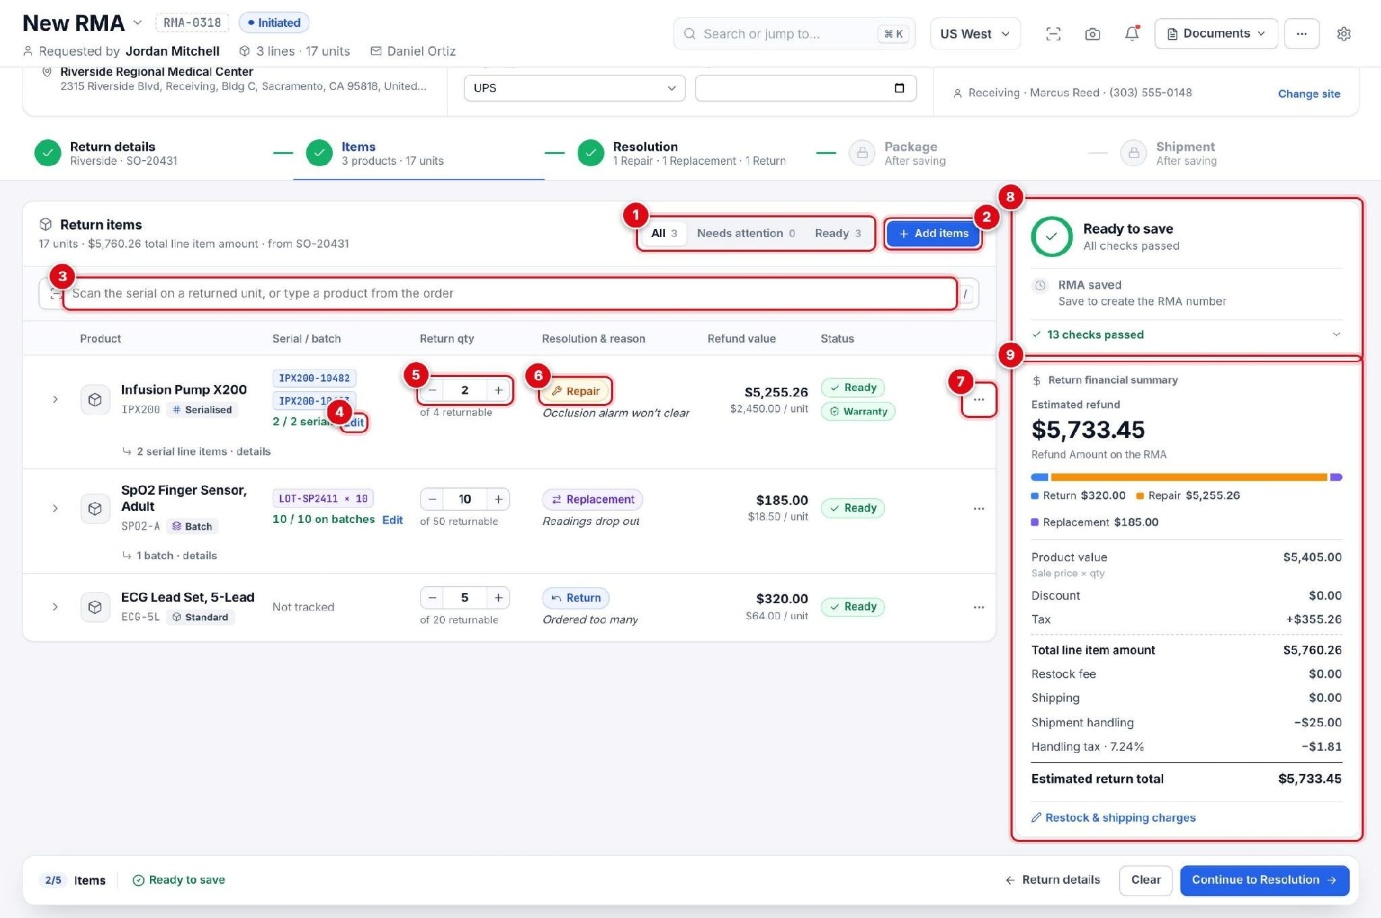
- Filters – All, Needs attention or Ready lines.
- Add items – Opens Add return items to add more lines from the order.
- Scan box – Scan the serial on a returned unit, or type a product from the order. Press / to jump here.
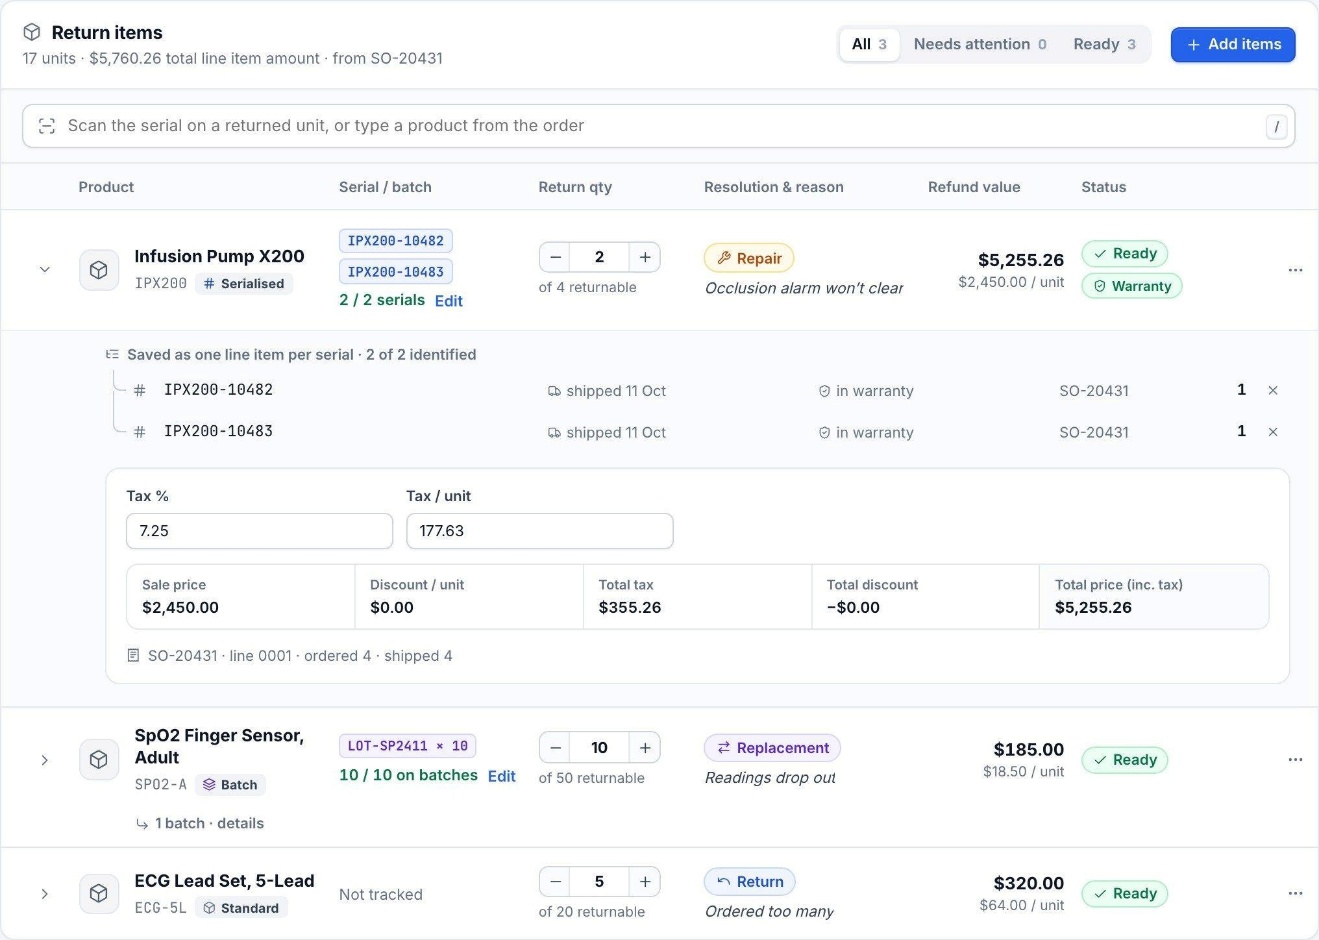
- Serial / batch – The serials or batches on the line. Edit changes them.
- Return qty – Change the quantity with − and +.
- Resolution & reason – The acceptance type and reason. Select it to change them on the Resolution step.
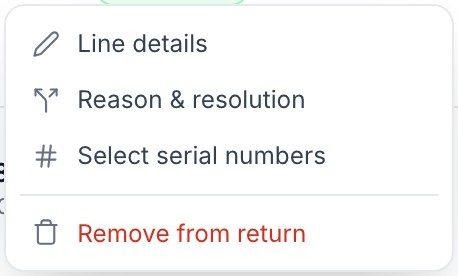
- Line menu – Line details, Reason & resolution, Select serial numbers, Remove from return.
- Readiness – Ready to save, or the issues still to resolve.
- Financial summary – The estimated refund and how it is made up.
- Each line shows its Status: Ready when it is complete, or what it still needs for example serials to select or a quantity over what can be returned. A Warranty tag shows that the line is under warranty.
6.1 Line details
Select anywhere on a line to open its details: one row per serial or batch with its ship date and warranty, the tax percent and tax per unit, and the sale price, discount, tax and total of the line.
The line menu (…) opens the details, jumps to the line on the Resolution step, opens the serial numbers, or removes the line from the return.
7. Reasons, resolution and charges
Record why each line comes back and how it is resolved, and deduct any restock or shipping charges.
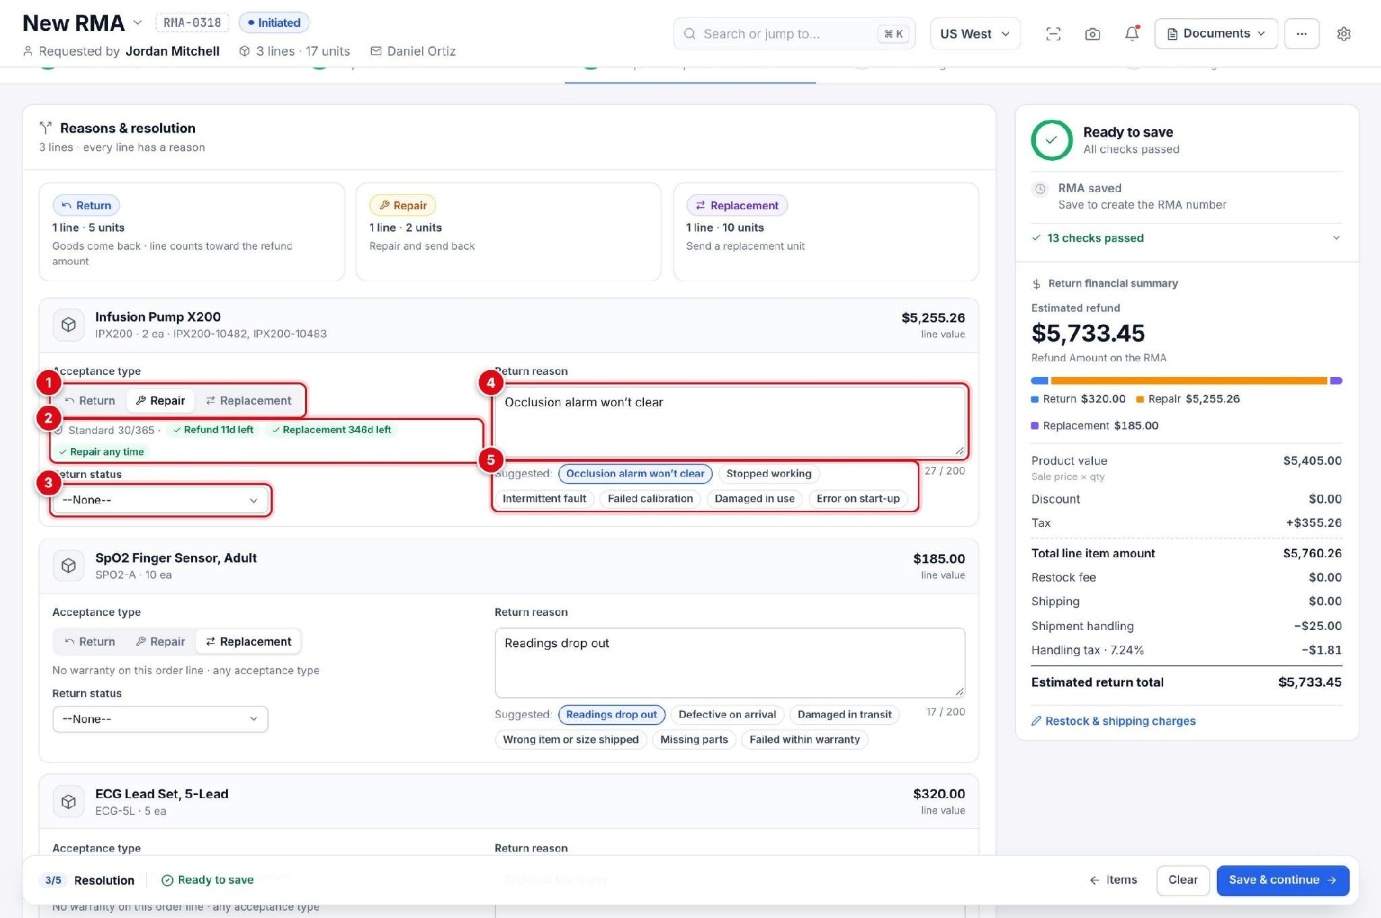
- Acceptance Type – Return, Repair or Replacement for the line.
- Warranty – The warranty policy and the days left to refund or replace. Repair is possible at any time.
- Return status – What happens to the goods: Customer Return, Discard, Quality Check or Re-sell.
- Return reason – Why the line comes back, up to 200 characters. Add one for every line before the customer is notified.
- Suggested reasons – Reasons used recently for this product and acceptance type, then common ones. Select one to fill the reason.
At the top of the step, one card per acceptance type shows how many lines and units it covers. Each line below has its own card with the acceptance type, the return status and the reason.
7.1 Warranty windows
When an order line has a warranty policy, the line shows how many days are left for a refund and for a replacement. A Return after the refund window, or a Replacement after the replacement window, can’t be saved. The issue in the side panel offers to switch the line to an acceptance type that is still allowed.
7.2 Restock and shipping charges
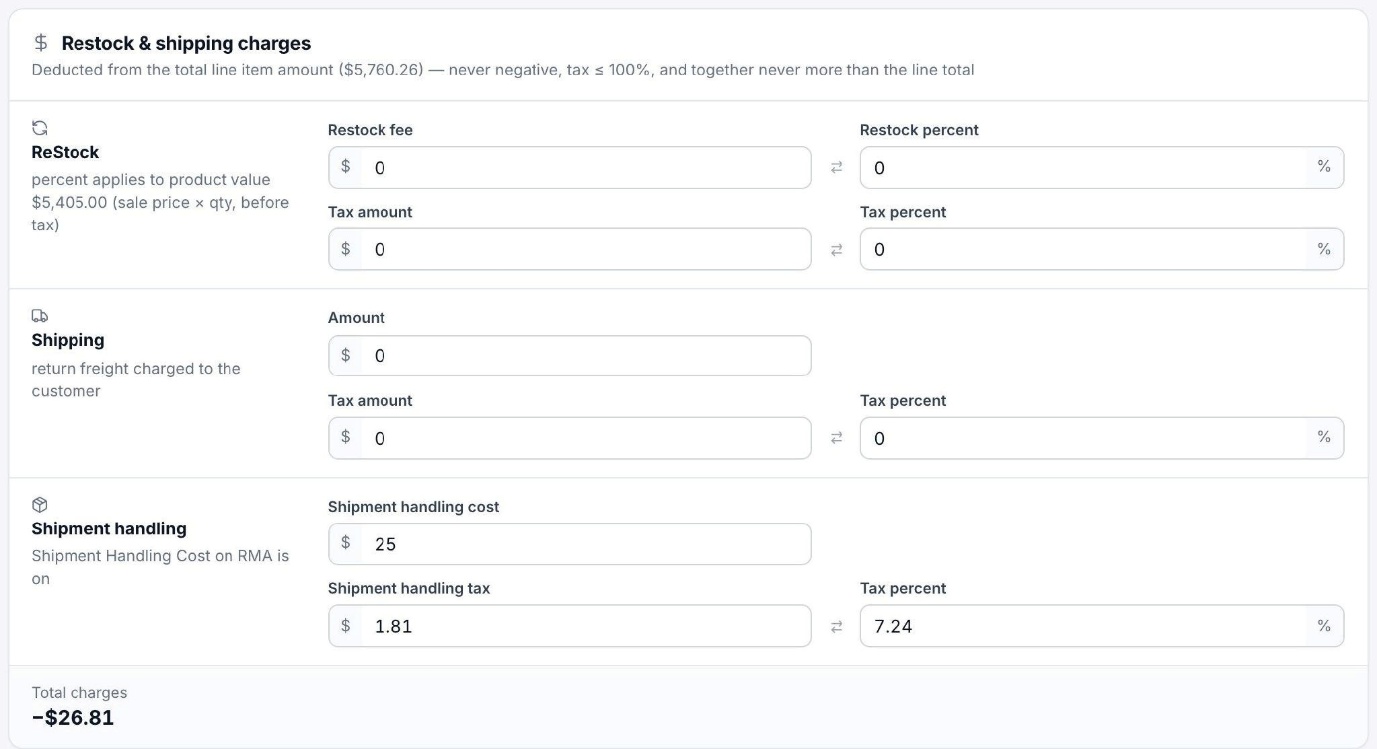
- Restock – A restock fee, as an amount or a percent of the product value (sale price × quantity, before tax), with its tax.
- Shipping – Return freight charged to the customer, with its tax.
- Shipment Handling – A handling cost and its tax. It appears when your administrator has turned on the shipment handling cost on RMAs.
The charges are deducted from the total line item amount. They can’t be negative, their tax can’t be more than 100%, and together they can’t be more than the line total. Select Restock & shipping charges in the financial summary to jump here from any step.
7.3 The financial summary
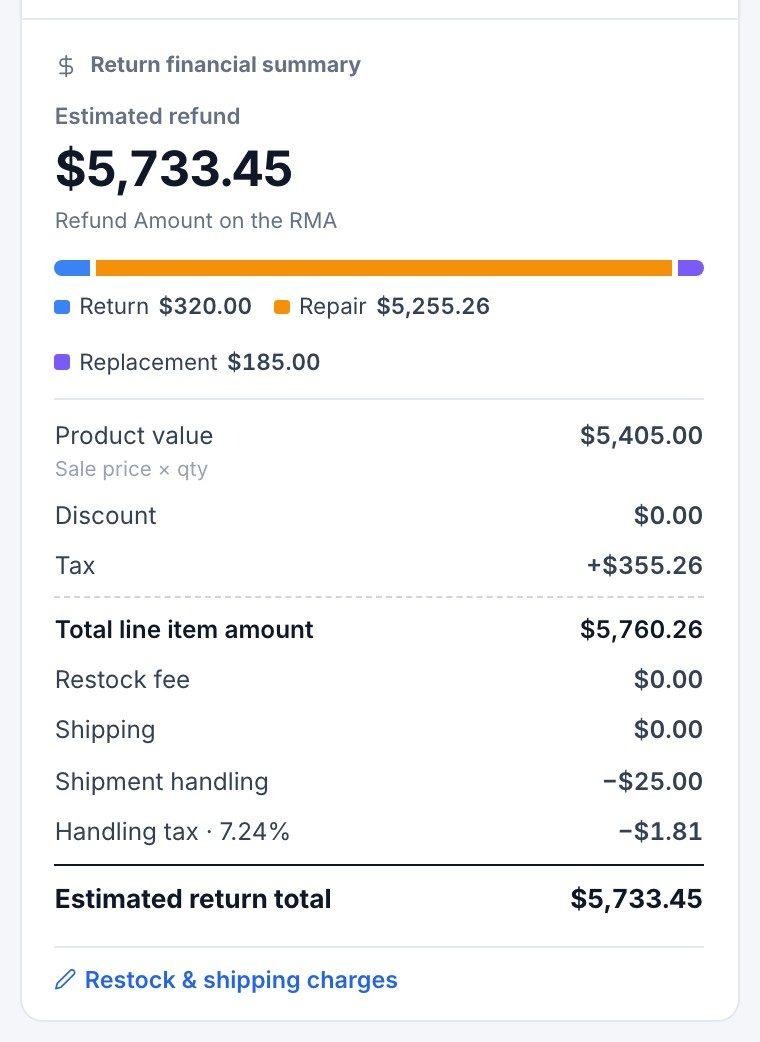
The Estimated refund is the Refund Amount on the RMA. The bar splits the line value by acceptance type.
Below it you see the product value (sale price × quantity), the discount and tax, the Total line item amount, each charge and the Estimated return total.
Note Repairs and replacements
Only Return lines count toward the refund. Repair and replacement lines are shown so you can see the value that is coming back.
8. Check and save the RMA
Save once every check passes by clicking Save & continue. Saving gives the RMA its number, and the screen moves on to Package.
The side panel checks the RMA as you work. When every check passes it shows Ready to save; until then it counts the issues to resolve, each with a link to fix it.
8.1 What the checks look at
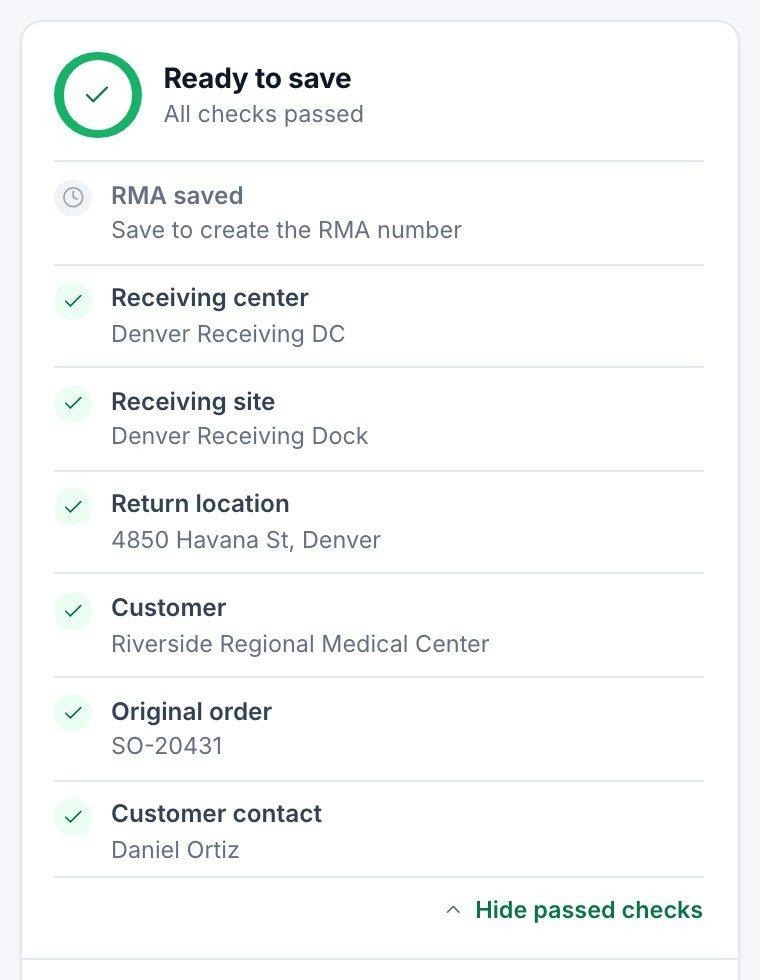
Select N checks passed in the side panel to see every check:
| Check | Passes when |
|---|---|
| Receiving center, site, location | The return has a receiving center, site and address. |
| Customer, order, contact | The customer, original order and customer contact are chosen. |
| Ship-from address | The goods have an address to come from. |
| Return items | The RMA has at least one line. |
| Return quantities | Every quantity is within what was shipped and not yet returned. |
| Serials & batches | All serials and batches are identified. |
| Warranty return windows | Each line is within its refund or replacement window. |
| Return reasons | Every line says why it is coming back. |
| Return freight | The freight type is set. |
Part 3 · Packing, shipping and documents
Pack the returned goods, book the return shipment, send the documents and authorize the RMA.
9. Pack the return
Put the returned items into packages so the carrier can rate and ship them.
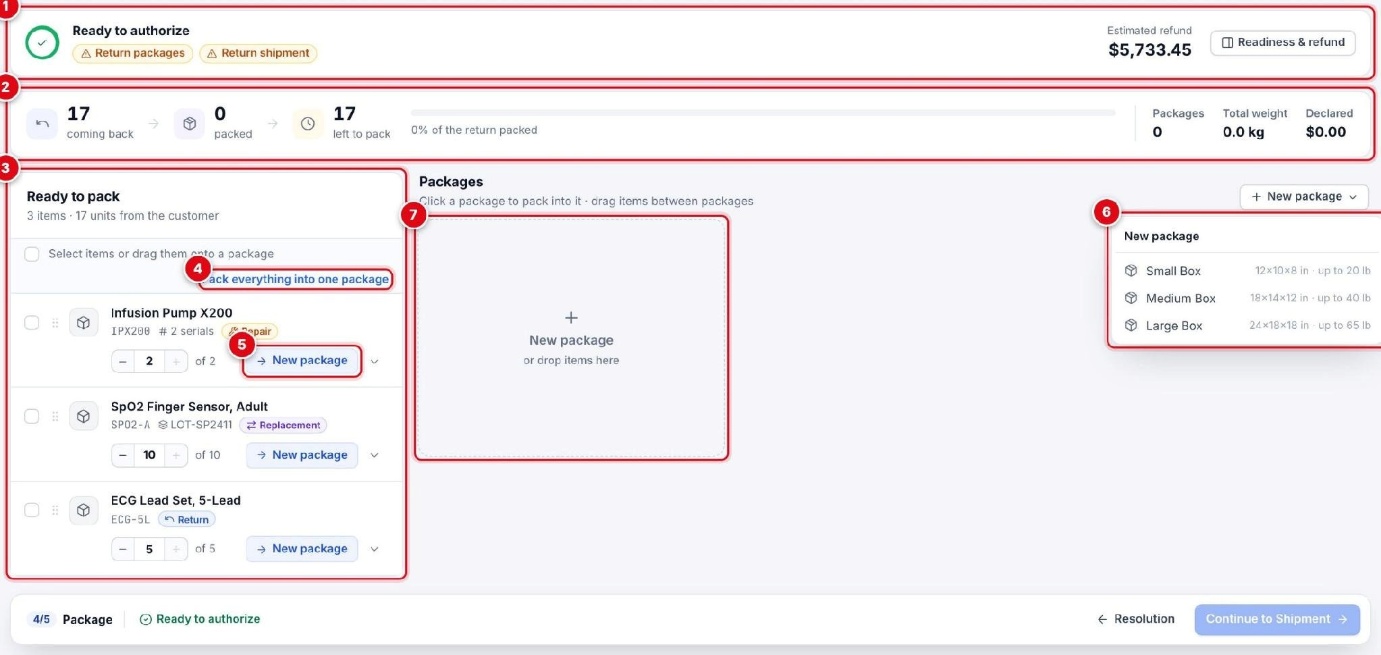
- Readiness – Whether the RMA is ready to authorize, what is still open, and the estimated refund.
- Packing Progress – Units coming back, packed and left to pack, and the packages’ weight and declared value.
- Ready to pack – The return items not yet in a package. Tick them or drag them onto a package.
- Pack everything – Puts every item into one package.
- New package – Packs this item into a new package. The arrow next to it offers the other packages.
- Package types – The package types your administrator set up, with their size and weight limit.
- New package – Start an empty package, or drop items here.
- Select Pack everything into one package, or use New package to choose a package type.
- Add items with the item’s New package button, or select a package and then the items. Use − and + to pack part of an item; drag items between packages.
- Check the package’s size, weight and declared value (Details).
- Select Seal package.
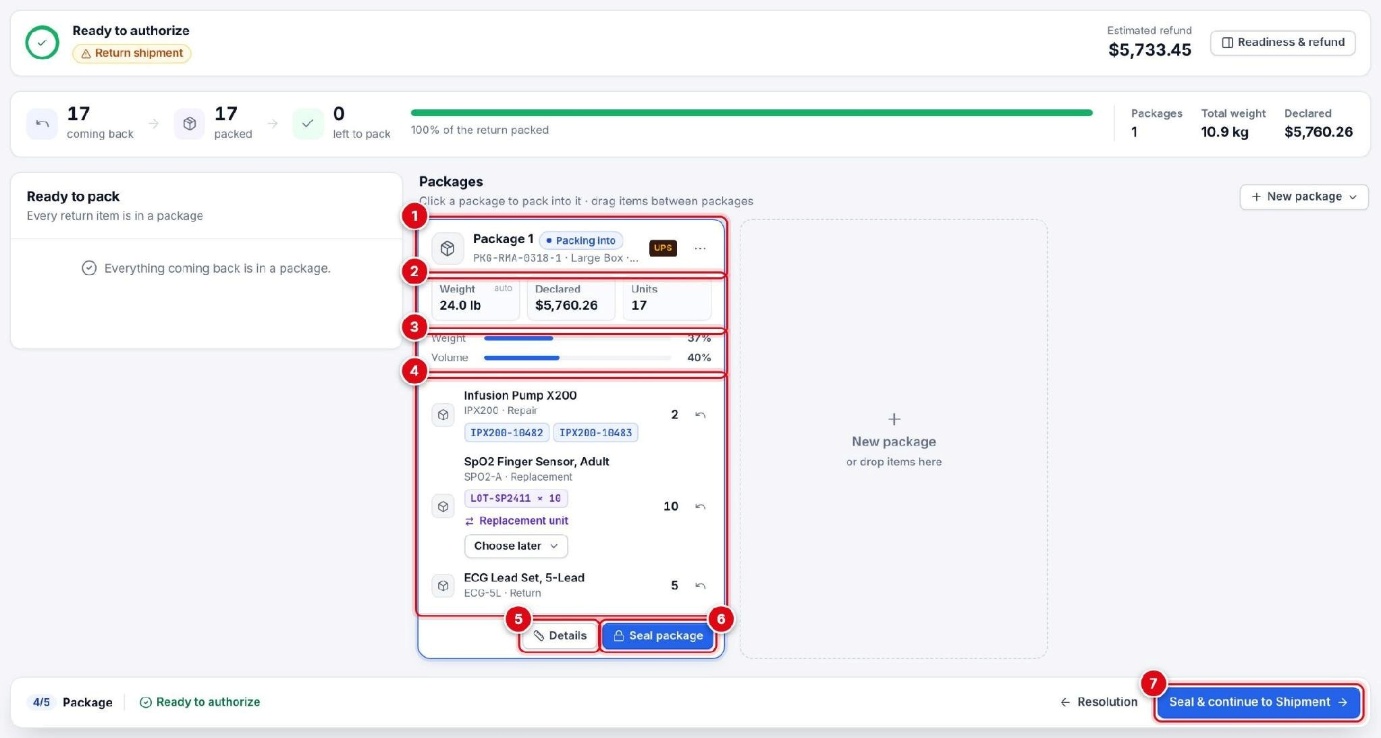
- Package – The package name (PKG- and the RMA name), its type, size and shipment type.
- Weight and value – The weight, worked out from the items or entered by you, the declared value and the units.
- Capacity – How much of the type’s weight limit and volume the package uses.
- Contents – The items in the package, with their serials or batches.
- Details – Opens the package details.
- Seal package – Saves and closes the package for shipping.
- Continue – Seals an open package and goes to Shipment.
9.1 Package details
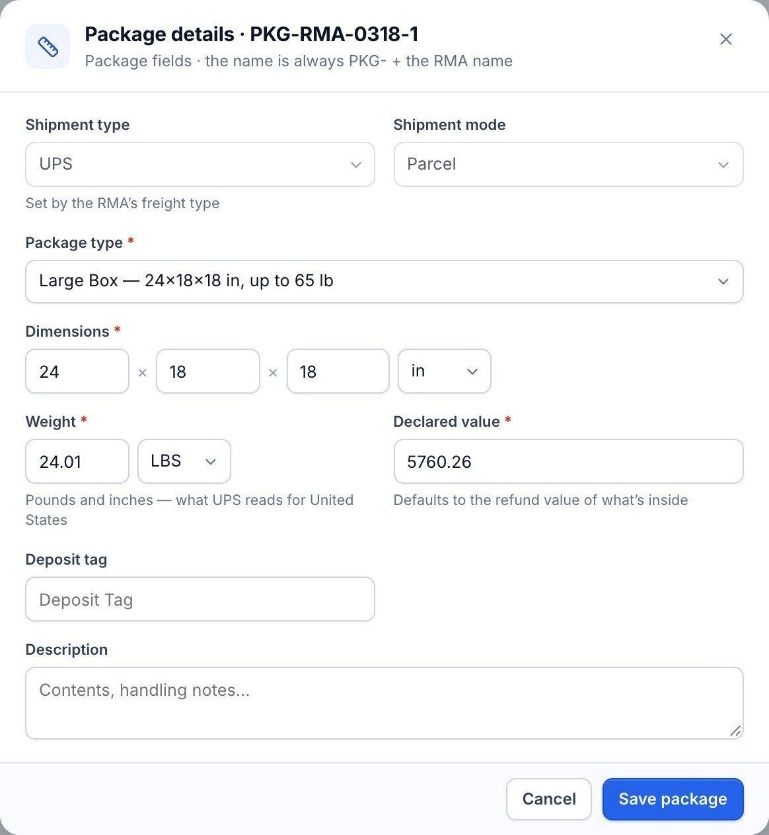
| Field | What it holds |
|---|---|
| Shipment type | The carrier. When the freight type names a carrier, it is set for you. |
| Shipment mode | Parcel for carriers; for in-house shipments also LTL, TruckLoad or Pickup. |
| Package type | The types offered for this shipment type. |
| Dimensions, Weight | In the units the carrier reads for the ship-from country, for example pounds and inches in the United States. |
| Declared value | Defaults to the refund value of what is inside. |
| Deposit tag, Description | Optional notes for the package. |
Note: A sealed package shows Reopen to make changes and Label for its package label. Packages of different shipment types never ship together.
10. Create the return shipment
Compare live carrier rates, book the shipment and send the customer the return label.
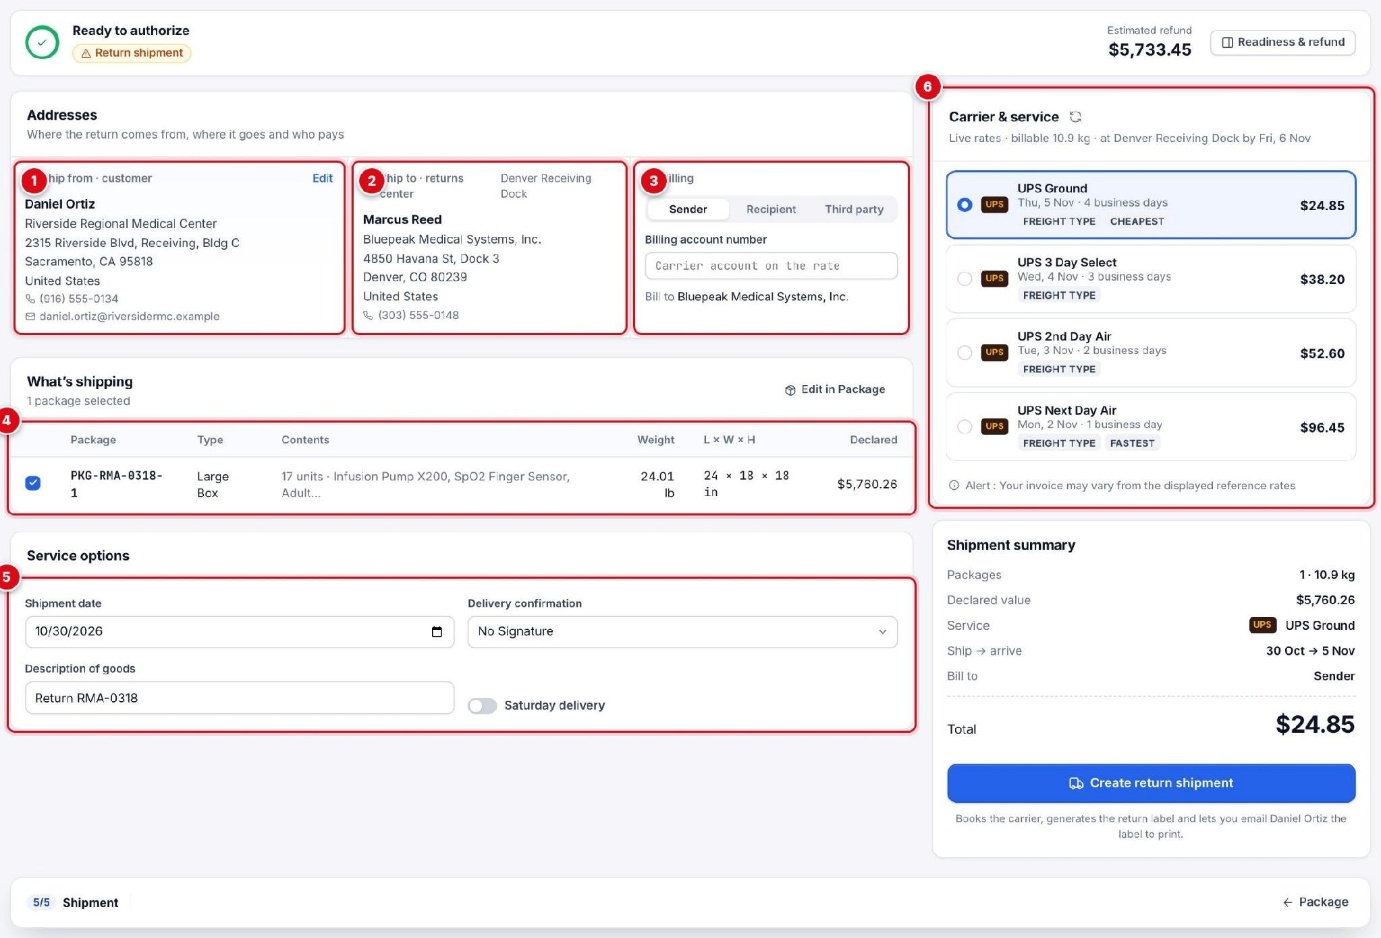
- Ship from – The customer’s address and contact. Edit changes them for this shipment.
- Ship to – The returns center, its contact and address.
- Billing – Who pays: Sender, Recipient or Third party, with the billing account number.
- What’s shipping – The sealed packages in this shipment, with weight, size and declared value.
- Service options – Shipment date, delivery confirmation, description of goods and Saturday delivery.
- Carrier & service – Live rates from the carrier.
An address card flags details carriers reject for example a postal code that doesn’t match the country with a link to the address so you can correct it.
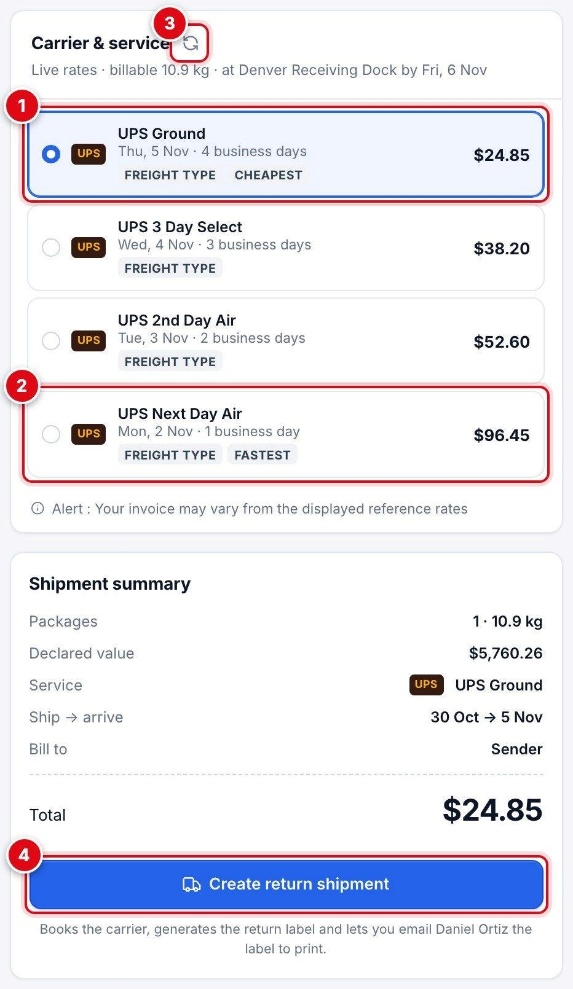
| # | What it shows |
|---|---|
| 1 | A rate: the service, delivery date, business days and price. CHEAPEST and FASTEST mark the best ones; FREIGHT TYPE shows the carrier set by the RMA’s freight type. |
| 2 | The fastest service. |
| 3 | Refresh the rates, for example after changing an address or a package. |
| 4 | Create return shipment books the selected service. |
With more than one carrier, tabs switch between them. If your packages have different shipment types, a switch picks which group you ship.
10.1 Book the shipment
- Select a rate.
- Select Create return shipment.
- Check the summary from, to, arrival date and charges and select Create return shipment again.
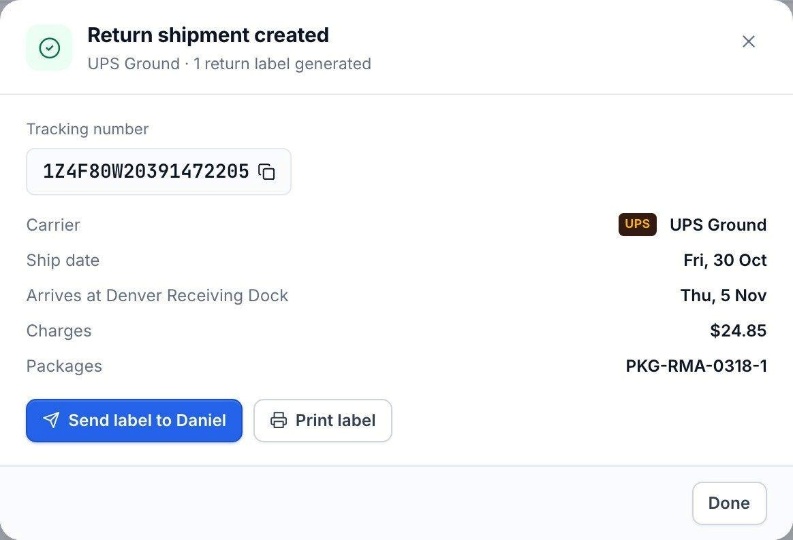
- The carrier books the shipment and generates the return label. Select Send label to the contact, Print label, or Done.
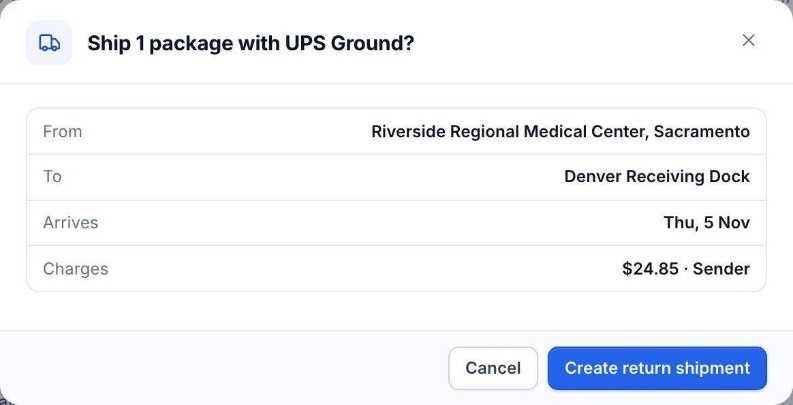
- Click the Create return shipment button to create a return shipment.
10.2 Track, resend or cancel
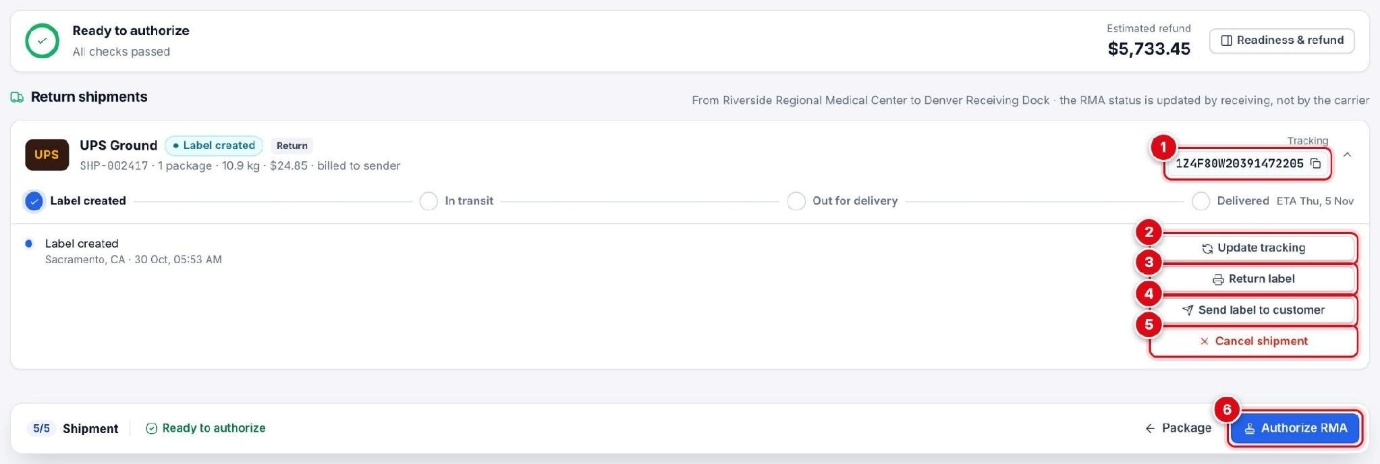
- Tracking Number – Select the copy icon to copy it.
- Update tracking – Gets the latest status from the carrier.
- Return label – Opens the carrier label to print.
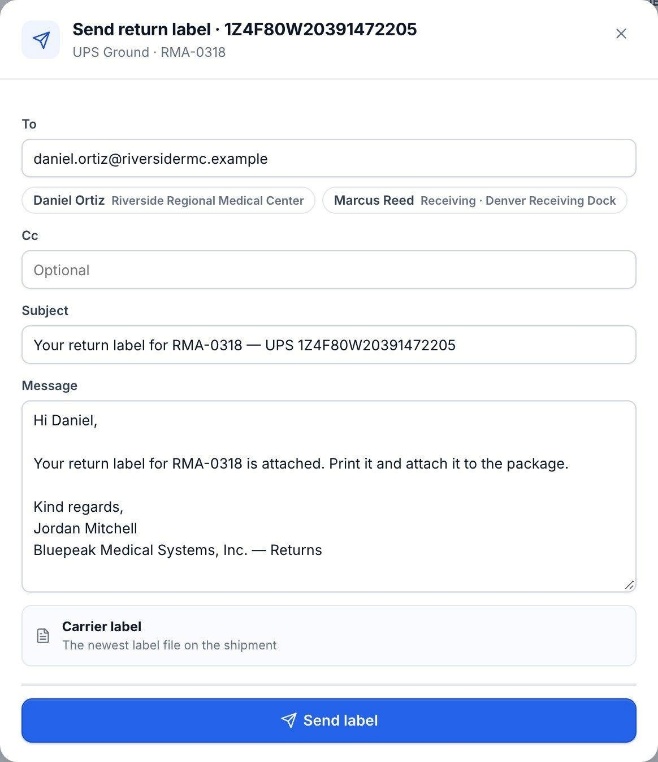
- Send label to customer – Emails the label to the customer.
- Cancel shipment – Cancels the return shipment.
- Authorize RMA – Approves the RMA.
10.3 In-house returns
With the freight type In house, the shipment uses your own transport: there are no rates or carrier label. Enter an optional charge and tracking number and create the shipment. There is no billing card and no label to send.
11. Documents
Print, download or email the RMA document, and print the package labels and the return label.
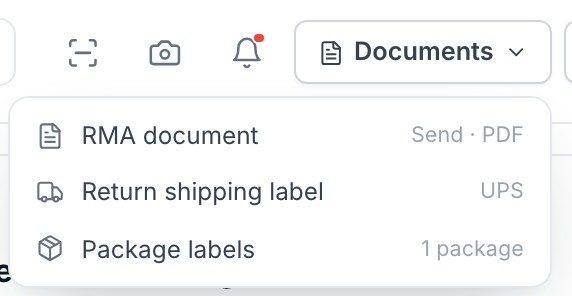
| Document | What it is |
|---|---|
| RMA document | The return authorization for the customer, laid out by your organization’s RMA document template. Before the first save you see a preview. |
| Return shipping label | The carrier label of the return shipment. |
| Package labels | One 4 × 6 in label per package, with the return address, RMA, order, weight, size and contents. |
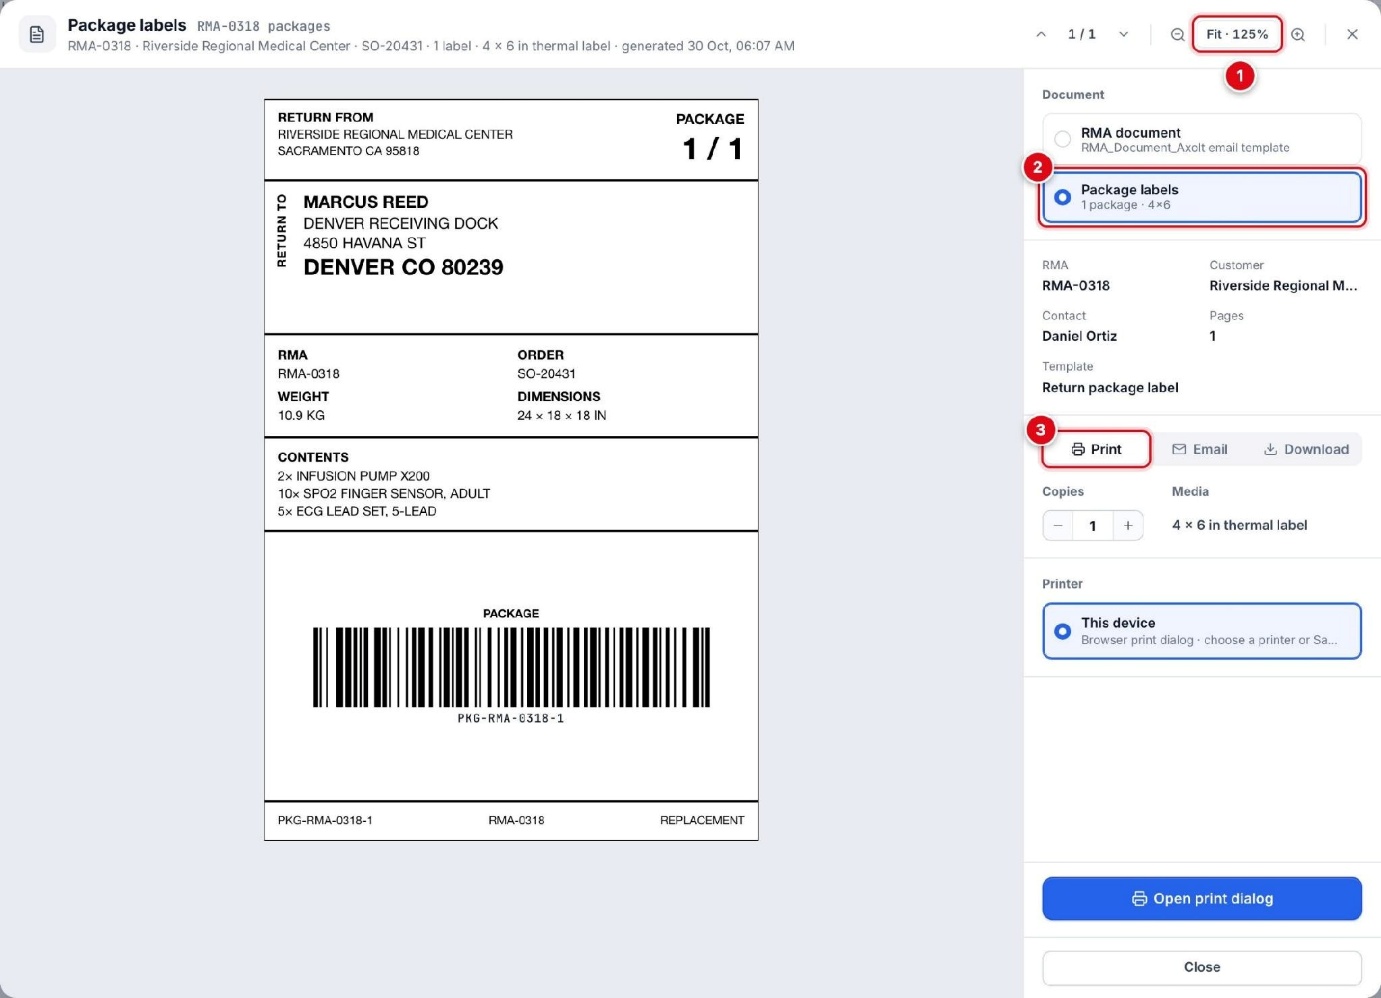
- Pages and zoom – Move between pages, zoom in or out, or fit the page.
- Document – Switch between the RMA document and the package labels.
- Print, Email, Download – Print sets the copies and opens the print dialog; Email sends the document; Download saves it.
11.1 Email the RMA document
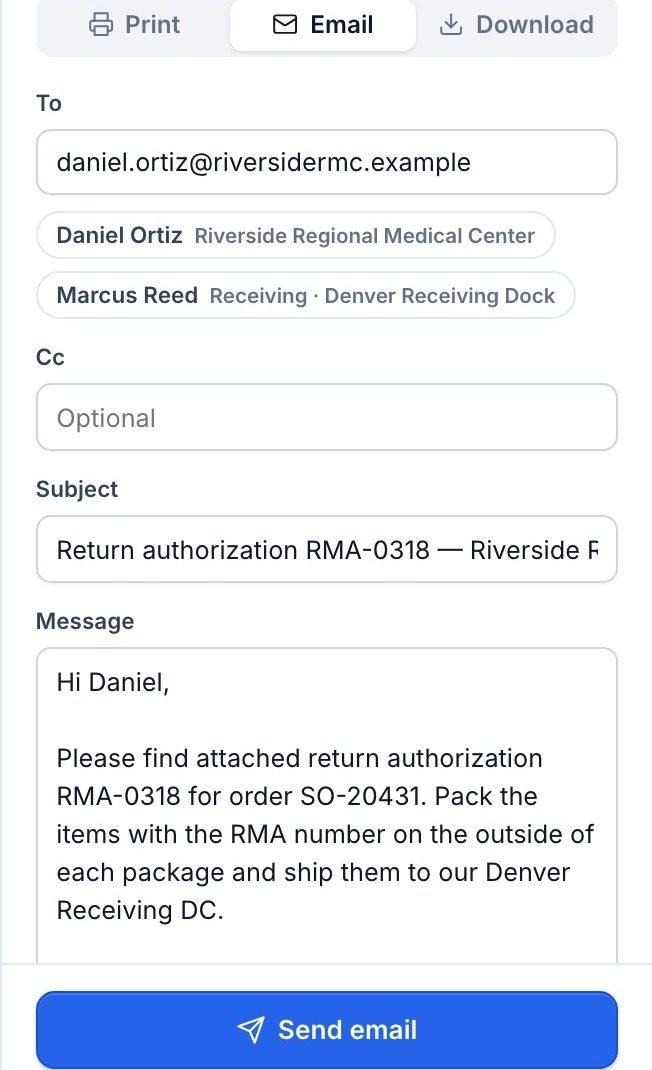
- Open Documents › RMA document and select Email.
- Check To select a suggested contact or type an address and add a Cc if needed.
- Change the Subject and Message if you want to.
- Select Send email. The RMA document is attached as a PDF.
12. Authorize, close and find RMAs
Approve the RMA, close it when the return is complete, and move between RMAs.
Authorizing approves the return once the RMA is complete and its shipment is booked. Closing marks the RMA as finished.
12.1 Authorize the RMA
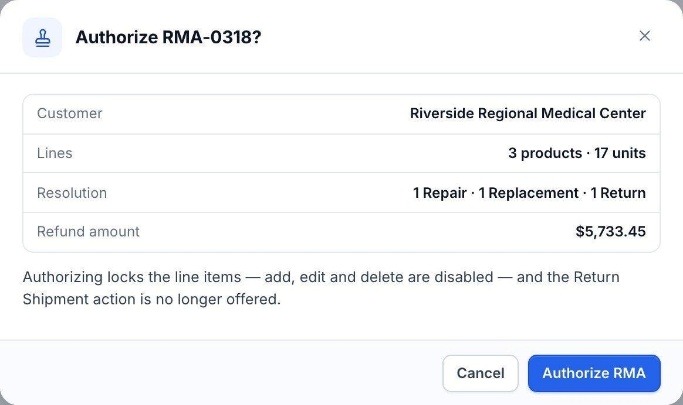
- Check that the side panel shows Ready to authorize.
- Select Authorize RMA in the footer (or in the More menu).
- Check the customer, lines, resolution and refund amount, and select Authorize RMA.
Note: After authorizing, return lines can’t be added, changed or deleted, and a new return shipment can’t be created.
Note: Authorize RMA is hidden while a saved package is still waiting for its shipment. Create the shipment first, or remove the package.
12.2 More actions
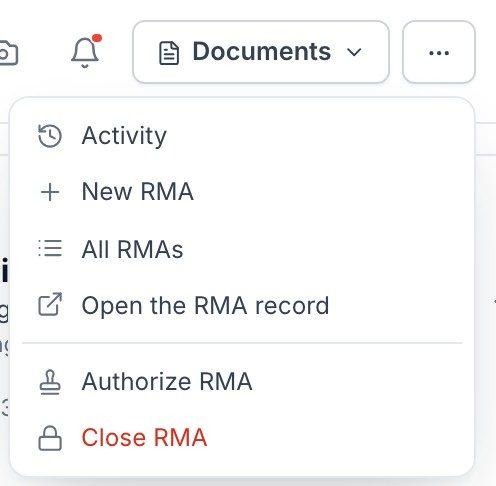
| Action | What it does |
|---|---|
| Activity | The RMA’s history: what happened, when and by whom. |
| New RMA | Starts a new return. Unsaved changes are confirmed first. |
| All RMAs | Opens the RMA list in a new browser tab. |
| Open the RMA record | Opens the RMA record in a new browser tab. |
| Authorize RMA | As described above. |
| Close RMA | Closes the RMA. You need access to the RMA’s Is Closed field. |
12.3 Open another RMA
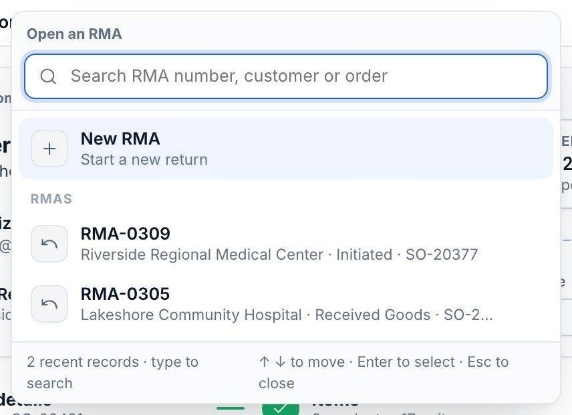
Select the RMA name at the top left to open the record menu. It lists your recent RMAs type to search for others and New RMA to start a new return. Use the arrow keys and Enter to choose, and Esc to close.
13. Search, scanning, settings and shortcuts
Work faster with the command palette, a barcode scanner and the keyboard.
13.1 Search or jump to
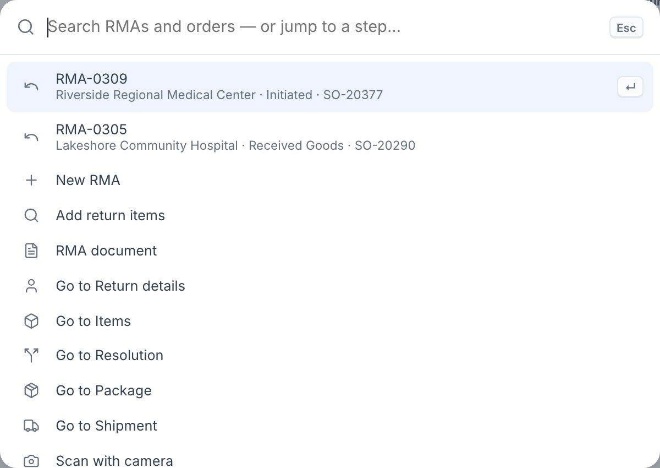
Select Search or jump to… or press ⌘ / Ctrl + K. Type to find an RMA or an order, or choose an action: go to a step, add return items, open the RMA document, scan with the camera, open all RMAs, RMA settings or keyboard shortcuts.
13.2 Scanning
- Barcode scanner scan anywhere on the screen. On the Items step the serial or product is matched against the original order; on the Package step it is packed into the package you are packing. The scanner button in the top bar takes you to the scan box.
- Camera select the camera button to scan a barcode with your device’s camera.
- Scanner sounds turn the confirmation beeps on or off in the settings menu.
13.3 Settings and shortcuts
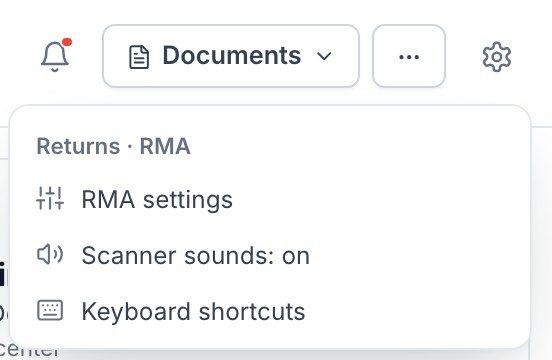
RMA settings shows, read-only, the settings your administrator controls for RMAs such as the shipment handling cost and access to close RMAs with the default receiving center, the carriers with active credentials and the number of package types.
Keyboard shortcuts lists the keys below.
| Keys | Action |
|---|---|
| ⌘ / Ctrl + K | Command palette and search |
| / | Scan a serial or find an order line |
| ⌘ / Ctrl + S | Save and go to the next step |
| 1 – 5 | Jump to a step |
| Esc | Close dialogs and panels |
13.4 Notifications
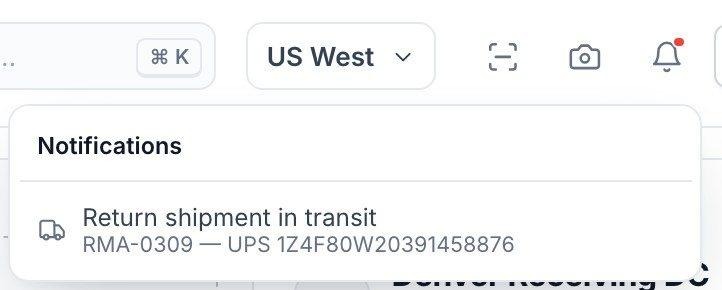
The bell shows a dot when there are updates on your RMAs, such as a return shipment in transit. Select an update to open that RMA in a new browser tab.
Part 4 · Reference
14. Quick reference
The most common tasks at a glance.
| I want to… | On the screen |
|---|---|
| Start an RMA for an order | Order › Create RMA, or RMAs › New › choose the customer and the order |
| Start from an invoice | Invoice in Original transaction, or type the invoice number |
| Add return items | Add items › tick lines › set quantity, serials, acceptance, reason › Add N items |
| Choose serial numbers | N / N serials on the line › select tiles or scan › Use N serials |
| Split a batch return | Batch button on the line › set Coming back per batch › Use N |
| Record why and how | Resolution › acceptance type, return status, reason |
| Add a restock fee | Resolution › Restock & shipping charges › ReStock |
| Save the RMA | Save & continue or ⌘ / Ctrl + S |
| Pack the return | Package › Pack everything into one package › Seal package |
Was this article helpful?