
Convert Quote to Order
On this page
1. Overview
1.1 What the Convert to Order screen does
When a customer accepts a quote, the Convert to Order screen turns that quote into a sales order in one step. It copies the customer, contact, order profile, addresses and every quote line with its price, quantity, discount and tax. You can review and adjust everything before the order is created. The quote is then linked to the order and marked as converted.
1.2 Before you start
A quote can be converted when:
- Its status is Accepted. A Rejected quote can never be converted.
- It does not already have an order. Each quote converts to one order.
- It has at least one quote line.
- It has a customer. Contact, order profile and bill-to and ship-to addresses are copied from the quote. If any are missing, you choose them on the screen.
Note: If a quote is changed after it was accepted, for example when a line is edited, its status can return to Draft. It must then be accepted again before Convert to Order can be used.
1.3 Where to open it
The same screen opens from two places:
- The quote record page – a Convert to Order button is placed in the header of the standard quote record page.
- Quote Console – an accepted quote shows Convert to order in the quote header when it has no order yet.
2. Open the Convert to Order Screen
2.1 From the quote record page
Every quote record page has a Convert to Order button in its header, next to Quote Document. This is the main way to convert a quote.
- Open the quote from the Quotes tab or from the customer’s related list.
- Check that Status shows Accepted.
- Click Convert to Order in the header. The conversion screen opens with the quote details filled in.
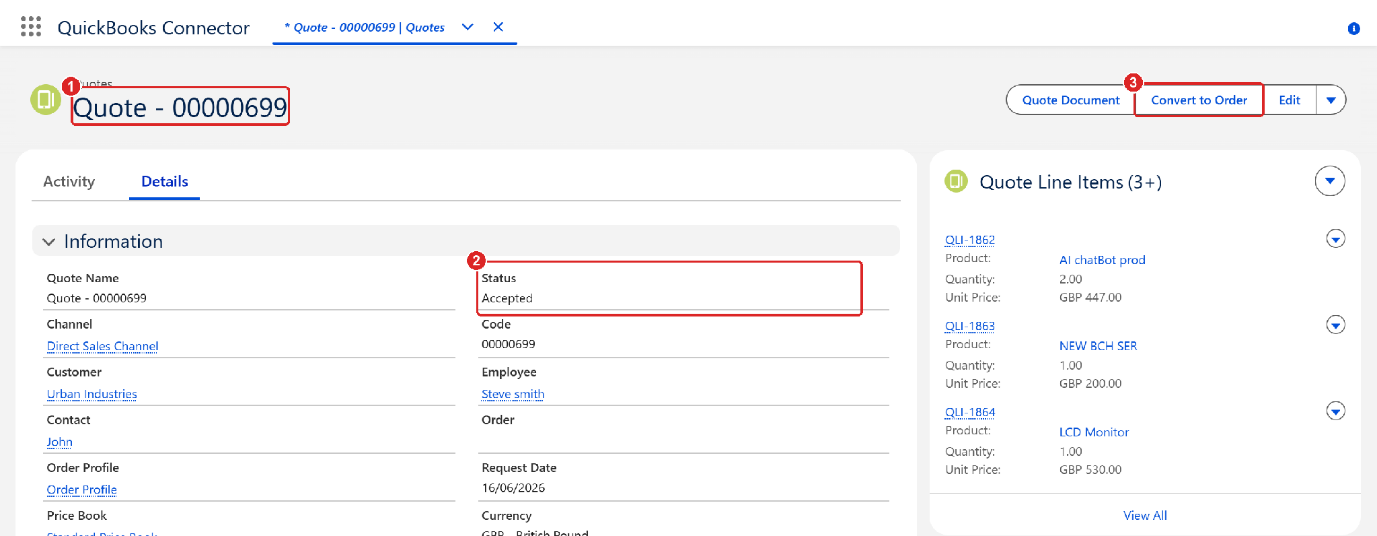
The screenshot identifies the quote to convert, confirms that its status must be Accepted and shows where to select Convert to Order.
2.2 From Quote Console
In Quote Console, open the quote from Existing quote or Recent quotes. When the saved quote is Accepted and has no order yet, Convert to order appears in the quote header. Select it to open the conversion screen inside Quote Console.
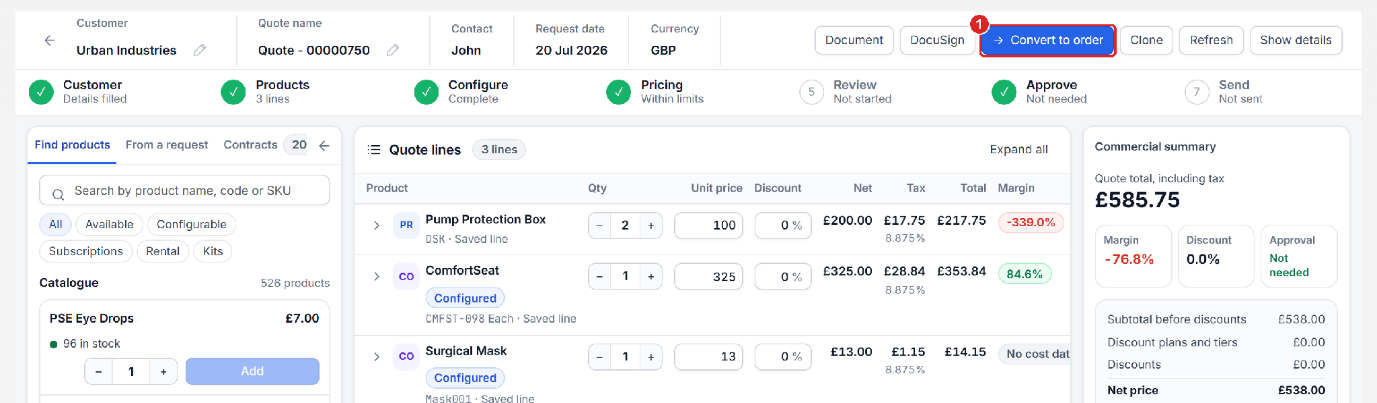
Note: The button is shown only for the saved status. If you have just changed the quote status, save the quote first.
3. The Convert to Order Screen
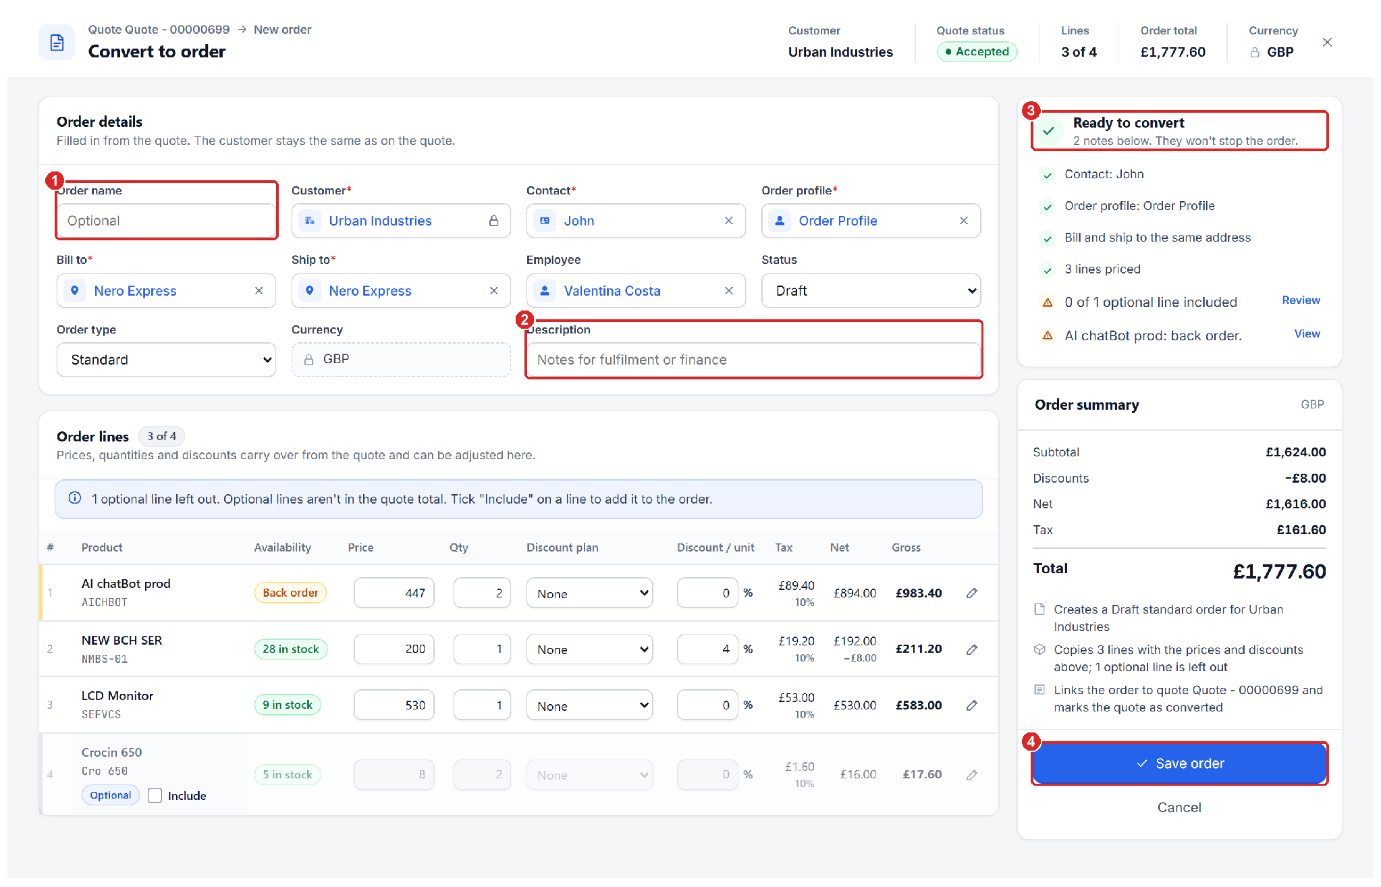
The screen has a header, order details and order lines on the left, and the readiness checklist and order summary on the right.
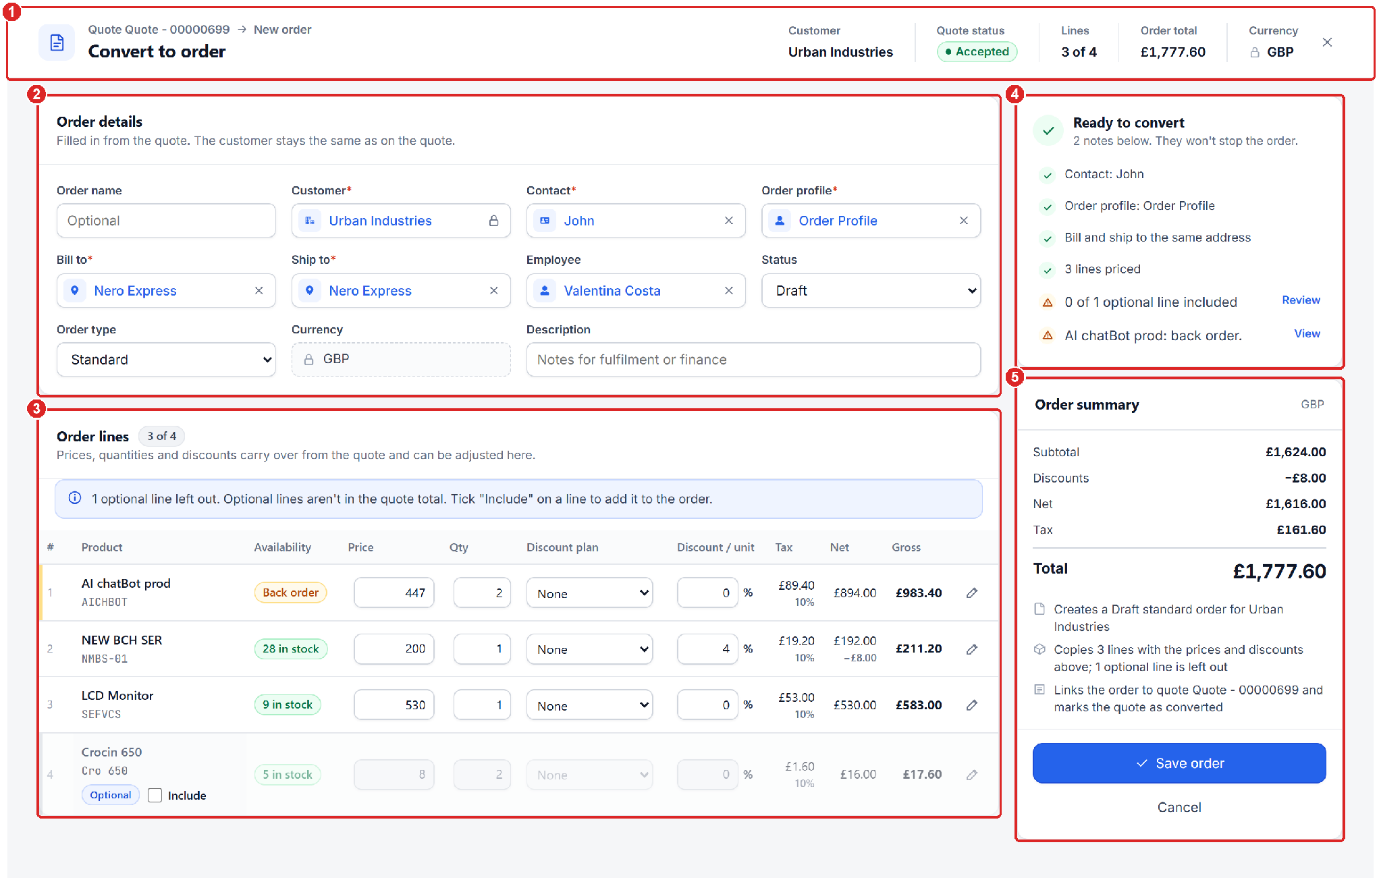
- Header – the quote you are converting, key facts about the new order and the close button.
- Order details – customer, contact, order profile, addresses, employee, status, type and notes for the new order.
- Order lines – every quote line with availability, price, quantity, discount, tax and totals.
- Readiness – a live checklist of what the order still needs. Green means done.
- Order summary – totals, what happens when you save, and the Save order and Cancel buttons.
3.1 Header

- Quote link – takes you back to the quote. Clicking it closes this screen without creating an order.
- Screen title – Convert to order.
- Customer – the customer from the quote. The order is created for this customer.
- Quote status – green when the quote is Accepted and red when it is Rejected.
- Lines – the number of lines that will go on the order. For example, 3 of 4 means one optional line is left out.
- Order total – gross total of the included lines. It updates as you edit.
- Currency – taken from the quote and locked; it cannot change during conversion.
- Close – returns to the quote without creating an order.
3.2 Order details
All fields are filled in from the quote. Fields marked with a red asterisk (*) are required.
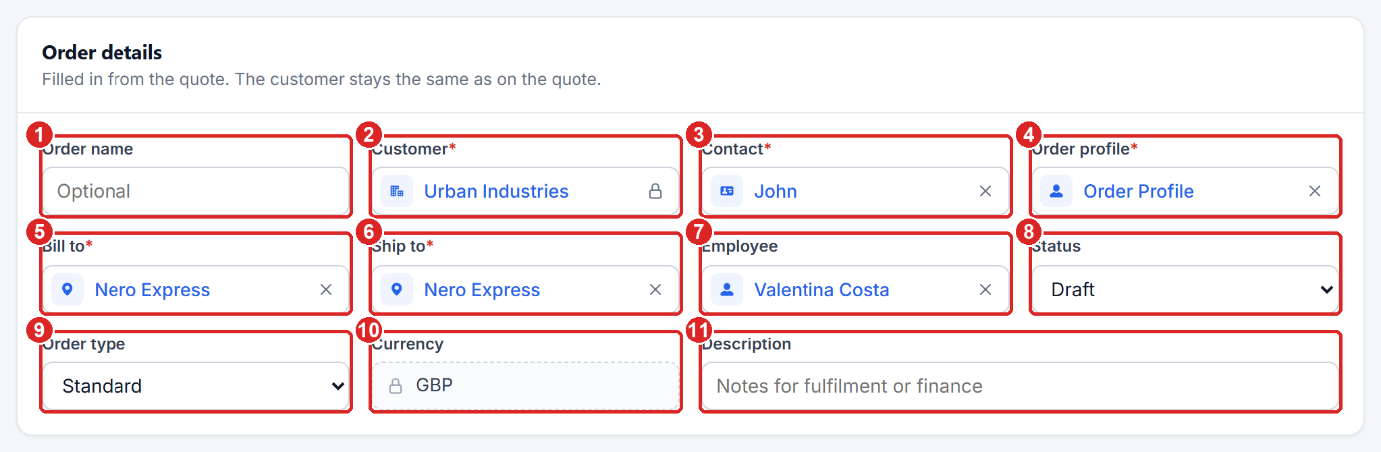
- Order name – optional. Leave it empty and the system names the order for you.
- Customer – copied from the quote and locked. The order always belongs to the quote’s customer.
- Contact – the customer contact for the order (required). Select the field to choose another contact belonging to the same customer.
- Order profile – controls numbering, pricing and discount plans (required).
- Bill to – billing address of the customer (required). Only billing addresses for this customer are offered.
- Ship to – delivery address (required). Only shipping addresses for this customer are offered.
- Employee – the sales person on the order; defaults to you. Optional.
- Status – the status the new order starts in, for example Draft.
- Order type – for example Standard.
- Currency – copied from the quote and read-only.
- Description – notes for fulfilment or finance, saved on the order.
3.3 Order lines
Every quote line is listed with its product, stock availability, price, quantity, discount and the calculated tax, net and gross amounts. Amounts are recalculated as soon as you type.
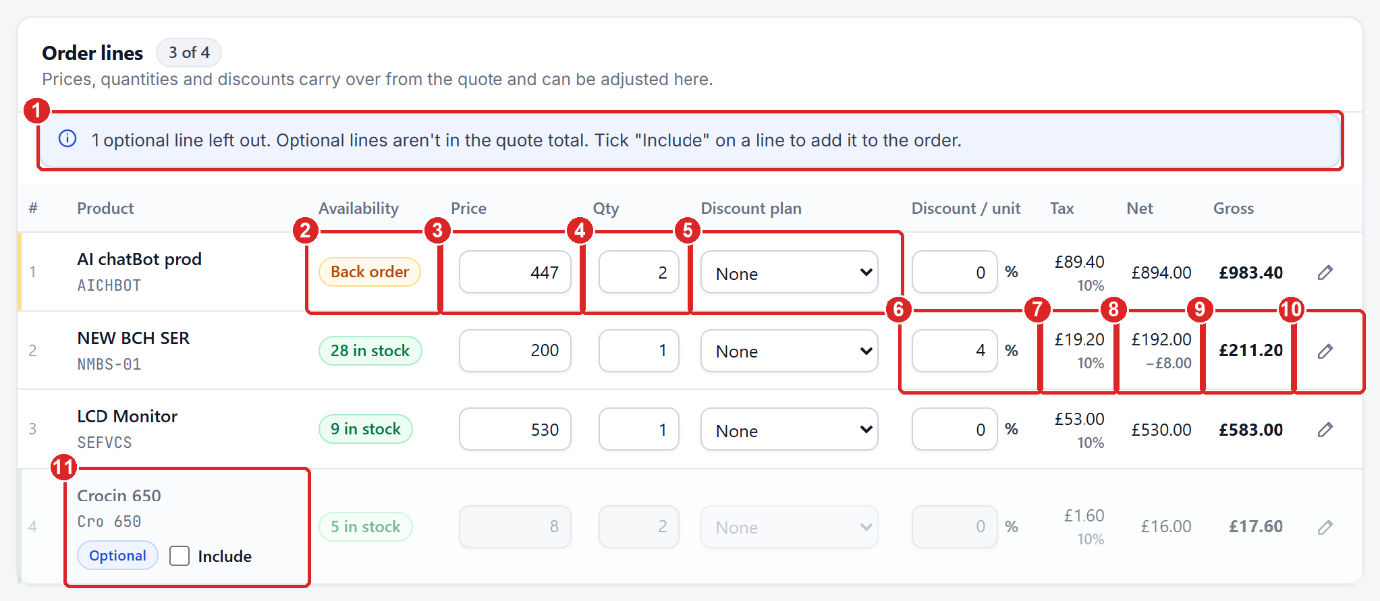
- Optional-lines note – appears when the quote has optional lines and explains how many are left out or included.
- Availability – shows stock on hand. Back order, Out of stock or short lines are flagged in amber or red and listed in the readiness panel.
- Price – unit price from the quote. You can change it; it cannot be negative.
- Quantity – copied from the quote. You can lower it, but cannot go above the quoted quantity.
- Discount plan – choose a discount plan available for this product and quantity, or None.
- Discount per unit – discount from the quote, in percentage or currency per unit. The allowed range is shown when a plan sets one.
- Tax – shows the tax amount and tax rate for the line.
- Net – line amount after discount; the discount given is shown underneath.
- Gross – net plus tax.
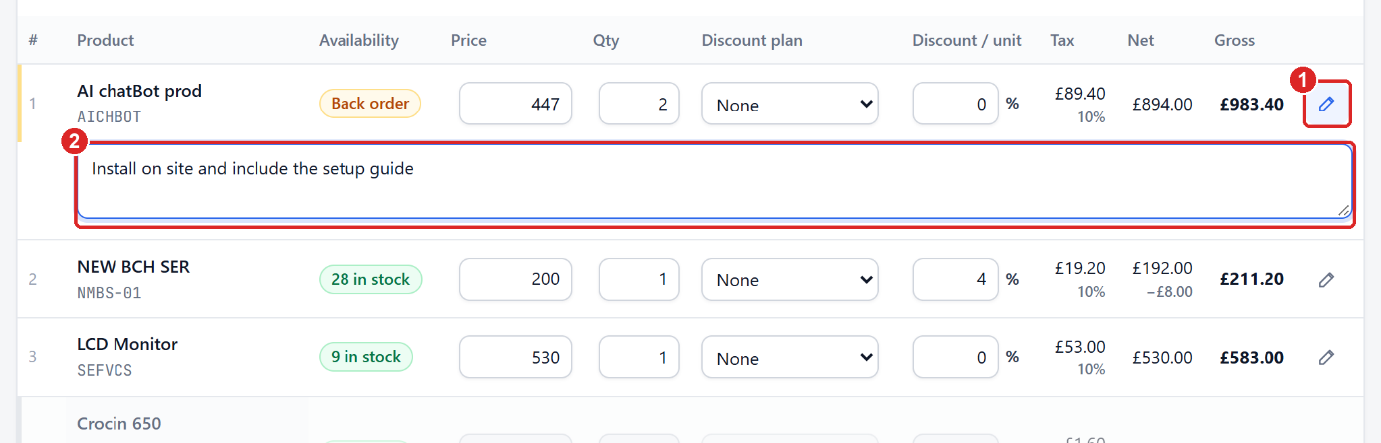
- Line description – select the pencil icon to add or edit a note saved on the order line.
- Optional line – greyed out and excluded from the order until you tick Include.
3.4 Readiness panel
The readiness panel is a live checklist. It updates as you change the screen and tells you exactly what still blocks the order.
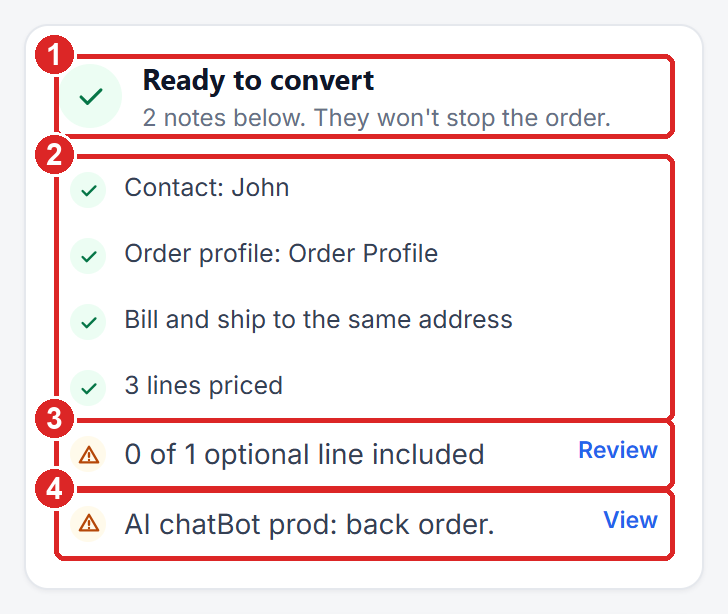
- Overall state – Ready to convert appears in green when all blocking checks pass. Otherwise, the panel shows the number of things to fix in red. Amber notes do not block the order.
- Green ticks – checks that pass, including contact, order profile, billing and shipping addresses, and priced lines.
- Optional-line note – select Review to jump to the Include checkbox.
- Stock note – select View to jump to the affected order line.
3.5 Order summary
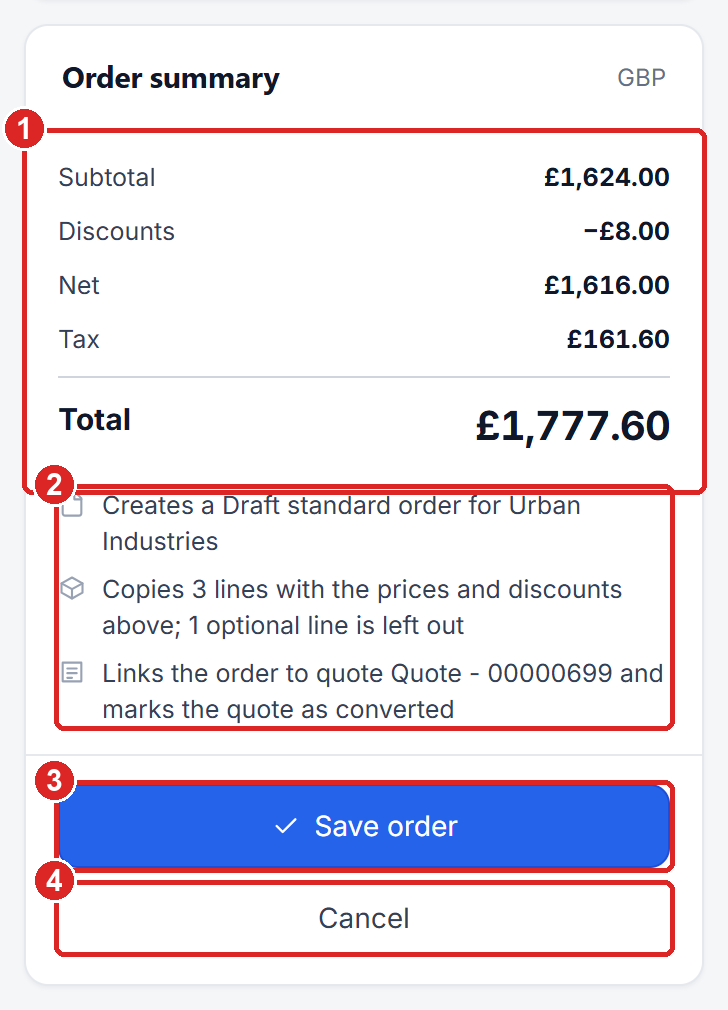
- Totals – Subtotal, Discounts, Net, Tax and Total for the lines that will go on the order.
- What happens when you save – describes the order that will be created, how many lines are copied, and how the quote is linked and marked as converted.
- Save order – creates the order. It is disabled for a rejected quote or when no line is included.
- Cancel – returns to the quote; nothing is saved.
4. Convert a Quote to an Order
4.1 Step by step
- Open the quote and click Convert to Order using either method described above.
- Check Order details. Optionally type an Order name and a Description, and choose the Status and Order type.
- Check the Order lines. Adjust price, quantity or discount if needed, and decide whether to include optional lines.
- Click the pencil at the end of a line to add a description for that order line, for example delivery or installation notes.
- Make sure the readiness panel shows Ready to convert.
- Check the Total in the Order summary.
- Click Save order.
Note: Subscription products show an extra row under the line with the start and end dates, the duration and the rate (price per month or year multiplied by the duration). The dates come from the quote and are locked.
4.2 What happens when you save
- A new order is created for the customer with the status and type you chose.
- One order product is created for each included line, with the price, quantity, discount, tax and line description from the screen.
- The order is linked to the quote, and the quote is marked as converted so it cannot be converted again.
From the quote record page, the new order record opens straight away.
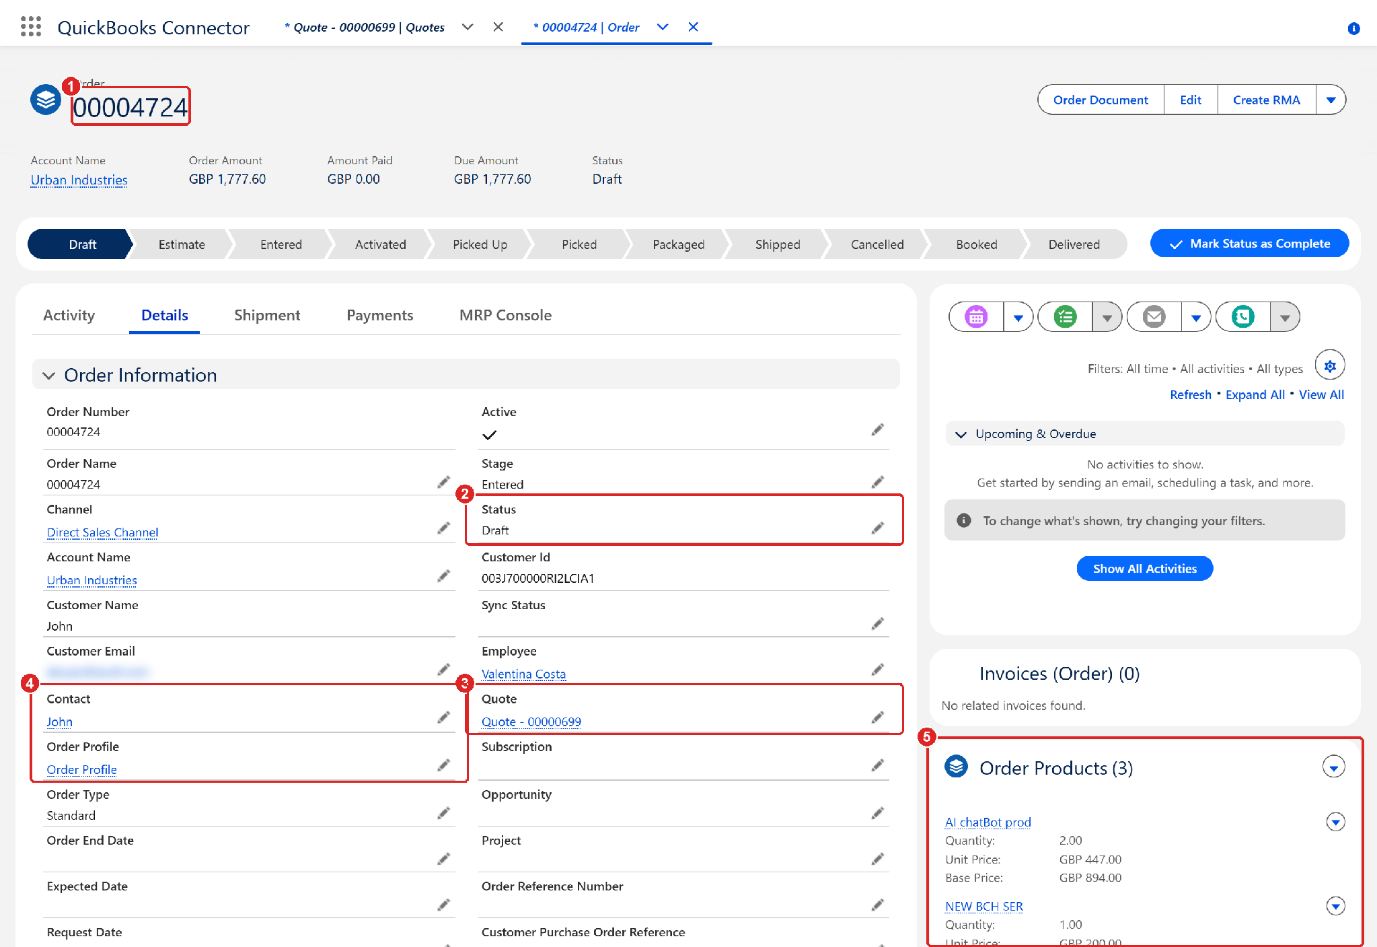
- The new order opens. Its number is generated automatically.
- Status and Order Type are the values you chose on the conversion screen.
- Quote links the order back to the quote it came from.
- Contact, Order Profile and Employee are copied from the conversion screen.
- Order Products contains one order product for each included quote line.
5. Working with Order Lines
5.1 Optional lines
Quote lines marked Optional on the quote are not part of the order total by default. On the conversion screen they are greyed out and left out of the order until you include them.
- Find the line with the blue Optional tag.
- Tick Include. The line becomes editable and the totals, line count and notes update.
- Untick Include to leave it out again.
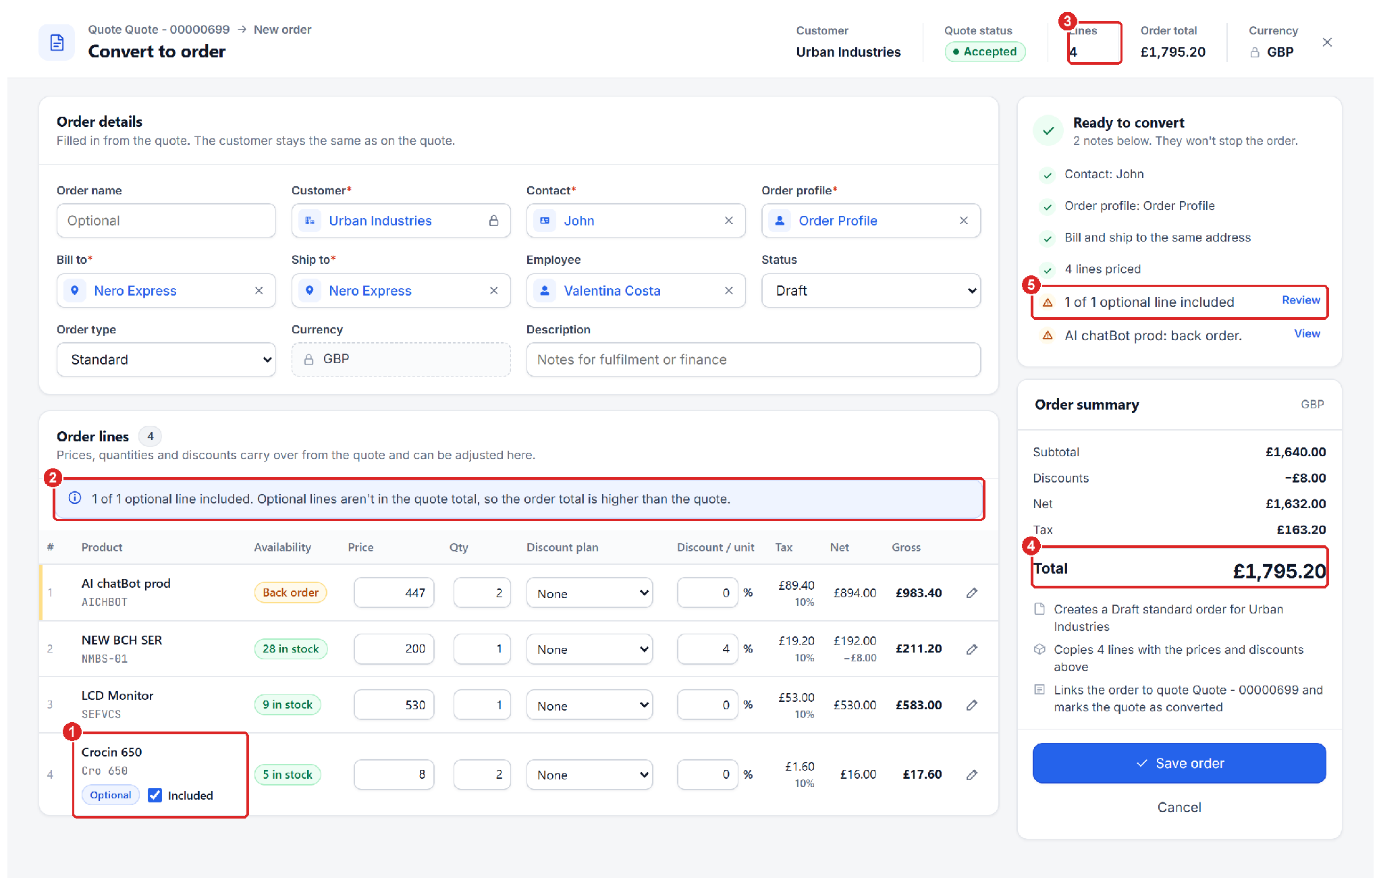
- Tick Include on the optional line. The line becomes editable and the label changes to Included.
- The note updates to show how many optional lines are included and warns that the order total is higher than the quote.
- The Lines count updates to include all lines.
- The Total includes the optional line.
- The readiness note shows how many optional lines are included.
Note: When an optional line is included, the order total is higher than the quote total. Optional lines that are left out stay on the quote.
6. Checks and Error Messages
6.1 What happens when something is missing
If you click Save order while something is missing or wrong, nothing is saved. A message appears, the fields and lines to fix are outlined in red, and the readiness panel counts the things to fix.
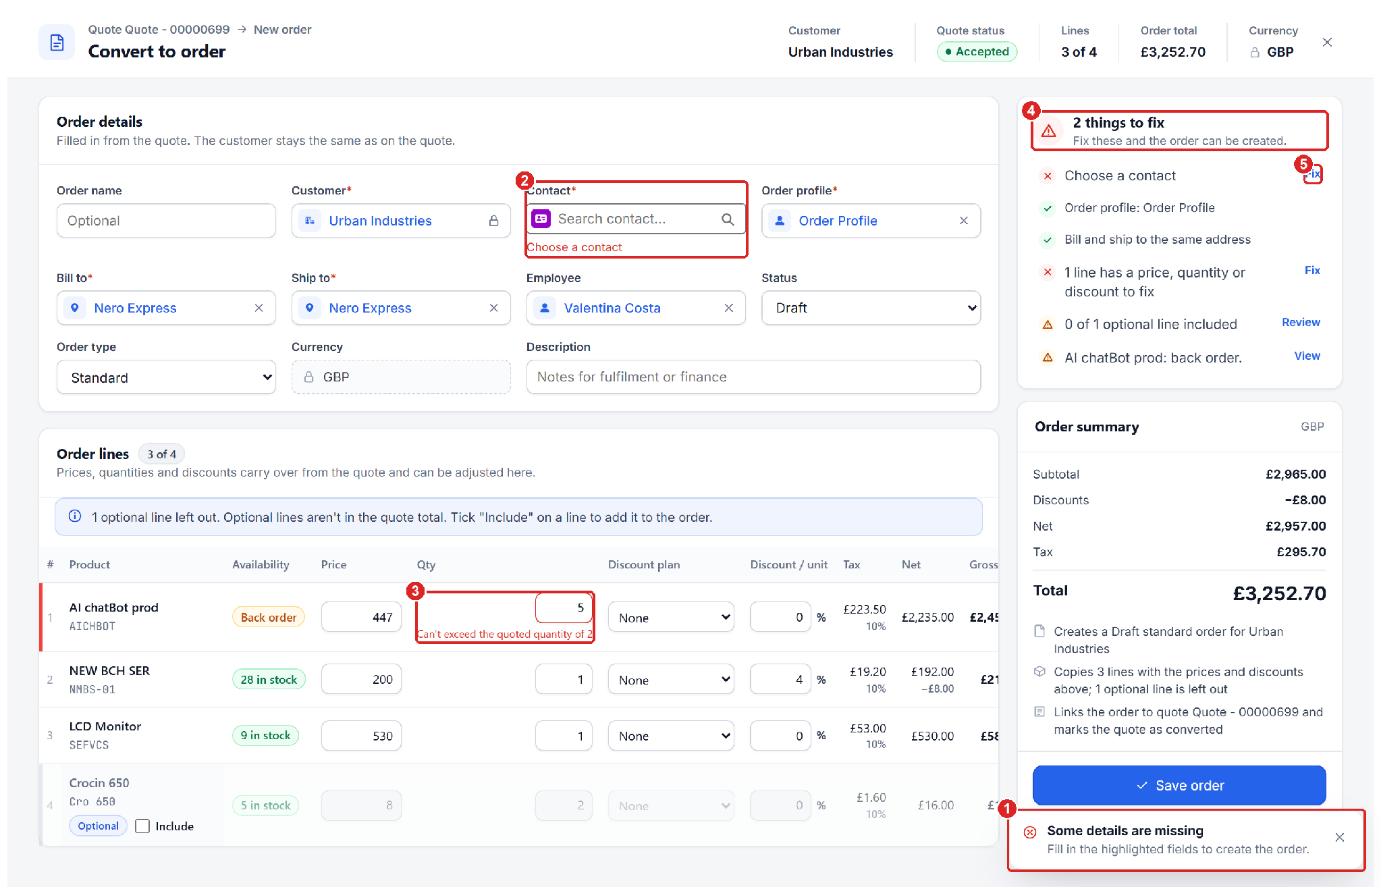
- A message tells you that details are missing.
- The missing Contact is outlined in red with Choose a contact. Search and select a contact to fix it.
- A quantity above the quote shows an error explaining that it cannot exceed the quoted quantity.
- The readiness panel turns red and counts the things to fix.
- Each red item has a Fix action. Select it to jump straight to the field or line.
7. Confirmation
When you convert from Quote Console, a confirmation shows the new order number, the customer, the number of lines and the order total.
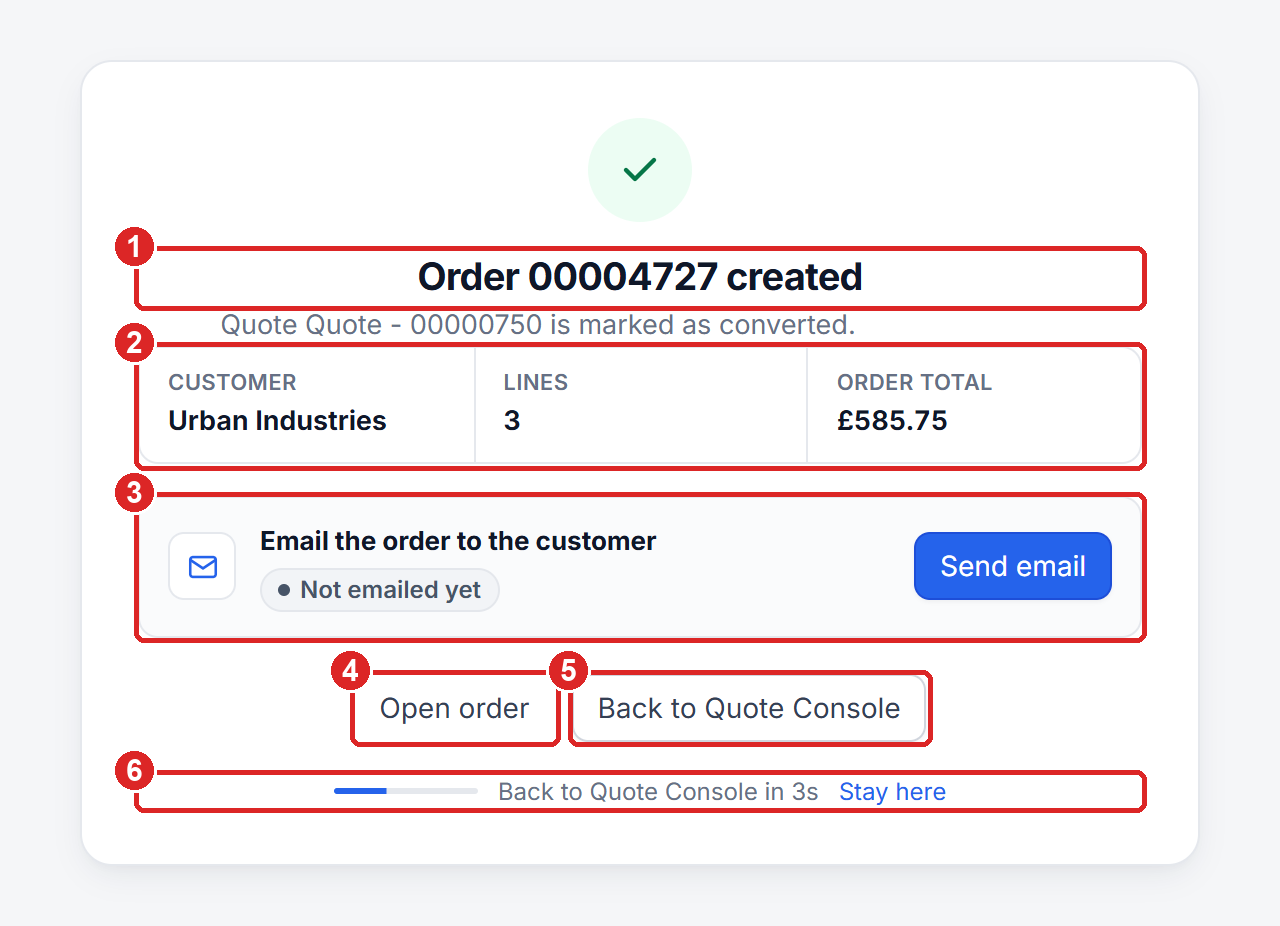
- Order created – shows the new order number. The quote is marked as converted.
- Order summary – shows the customer, number of lines and order total.
- Email the order to the customer – shows Not emailed yet until you send it. Select Send email.
- Open order – opens the new order record.
- Back to Quote Console – returns to the Quote Console start page, where the quote row is highlighted with an Order chip.
- Return countdown – Quote Console returns automatically after 10 seconds. Select Stay here to stop the countdown.
Note: The converted quote is highlighted in Recent quotes with an Order chip, and Convert to order no longer appears for it.
8. Email the order to the customer
- Click Send email on the confirmation.
- The order document window opens on the Email tab with a preview of the order PDF.
- Check To (the order contact), add Cc if needed, and review the Subject and Message.
- Click Send email. The confirmation shows Emailed to … at …, and the button changes to Send again.
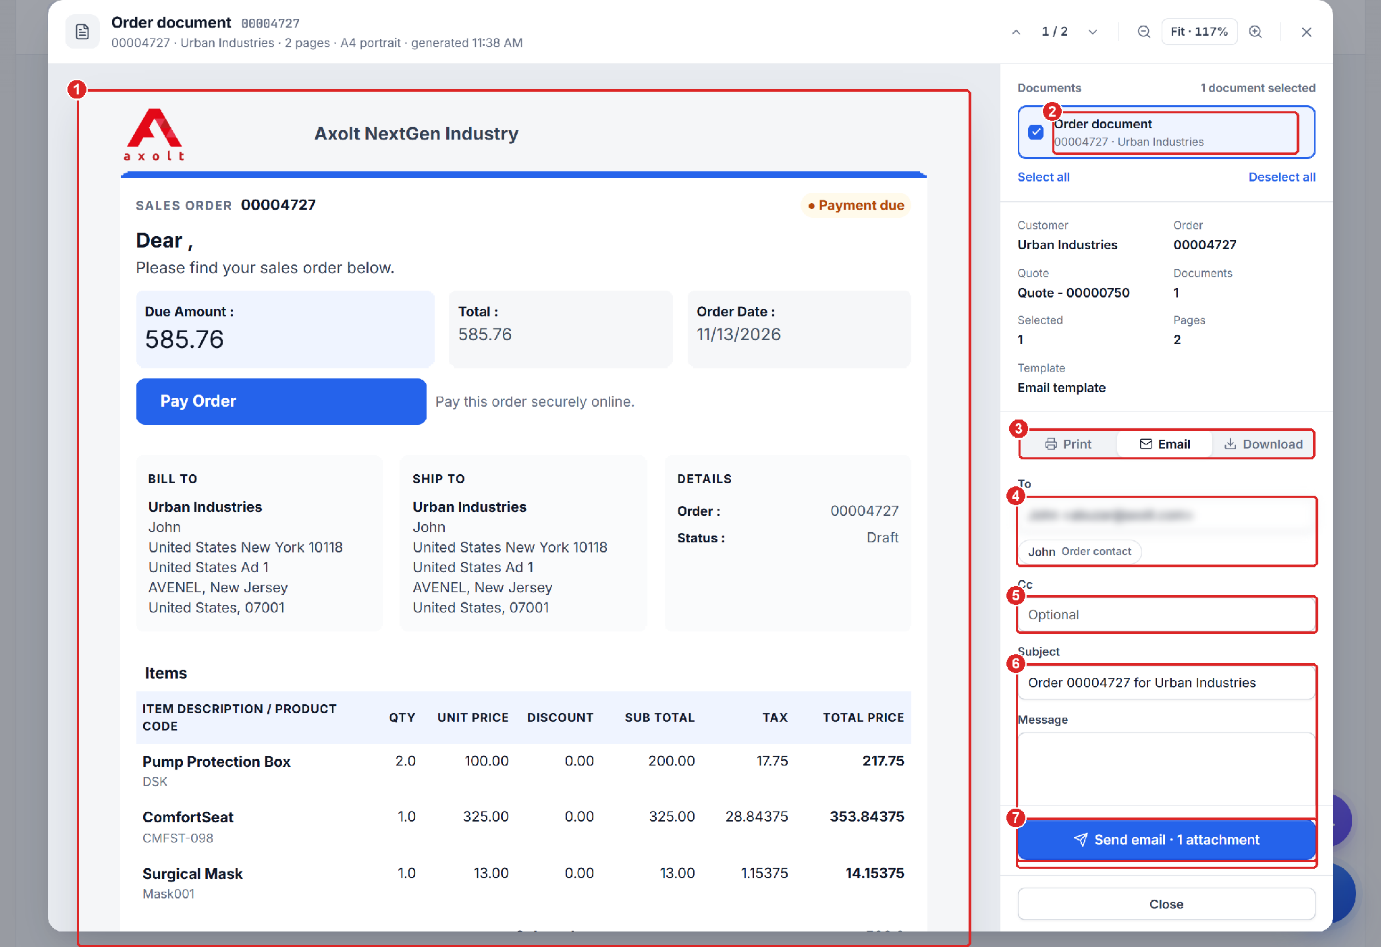
- Document preview – preview of the order document that will be attached as a PDF.
- Document selection – tick the document to include it in print, email or download.
- Print, Email and Download tabs – the window opens on Email.
- To – filled with the order contact. Select a suggested recipient to add them.
- Cc – optional extra recipients.
- Subject and Message – filled in for you and can be changed.
- Send email – sends the order document. The confirmation then shows Emailed to … at … and the button changes to Send again.
Note: Cancel, the close icon (×) and the quote link at the top all close the screen and return to the quote. Nothing is saved.
Was this article helpful?