
Quote Console
On this page
1. Overview of the Screen
1.1 Purpose of the Quote Console
The Quote Console is where sales staff build quotes for customers. In one workspace you choose the customer, add normal, configurable, subscription, rental and kit products, set prices and discounts, see margin and profit, get approval when needed, and preview, print, download or email the quote. Axo, the built-in AI assistant, reviews the quote and can read customer requests for you.
1.2 The start page
When you open the Quote Console you see the start page: the New quote panel on the left and Pick up where you left off on the right.
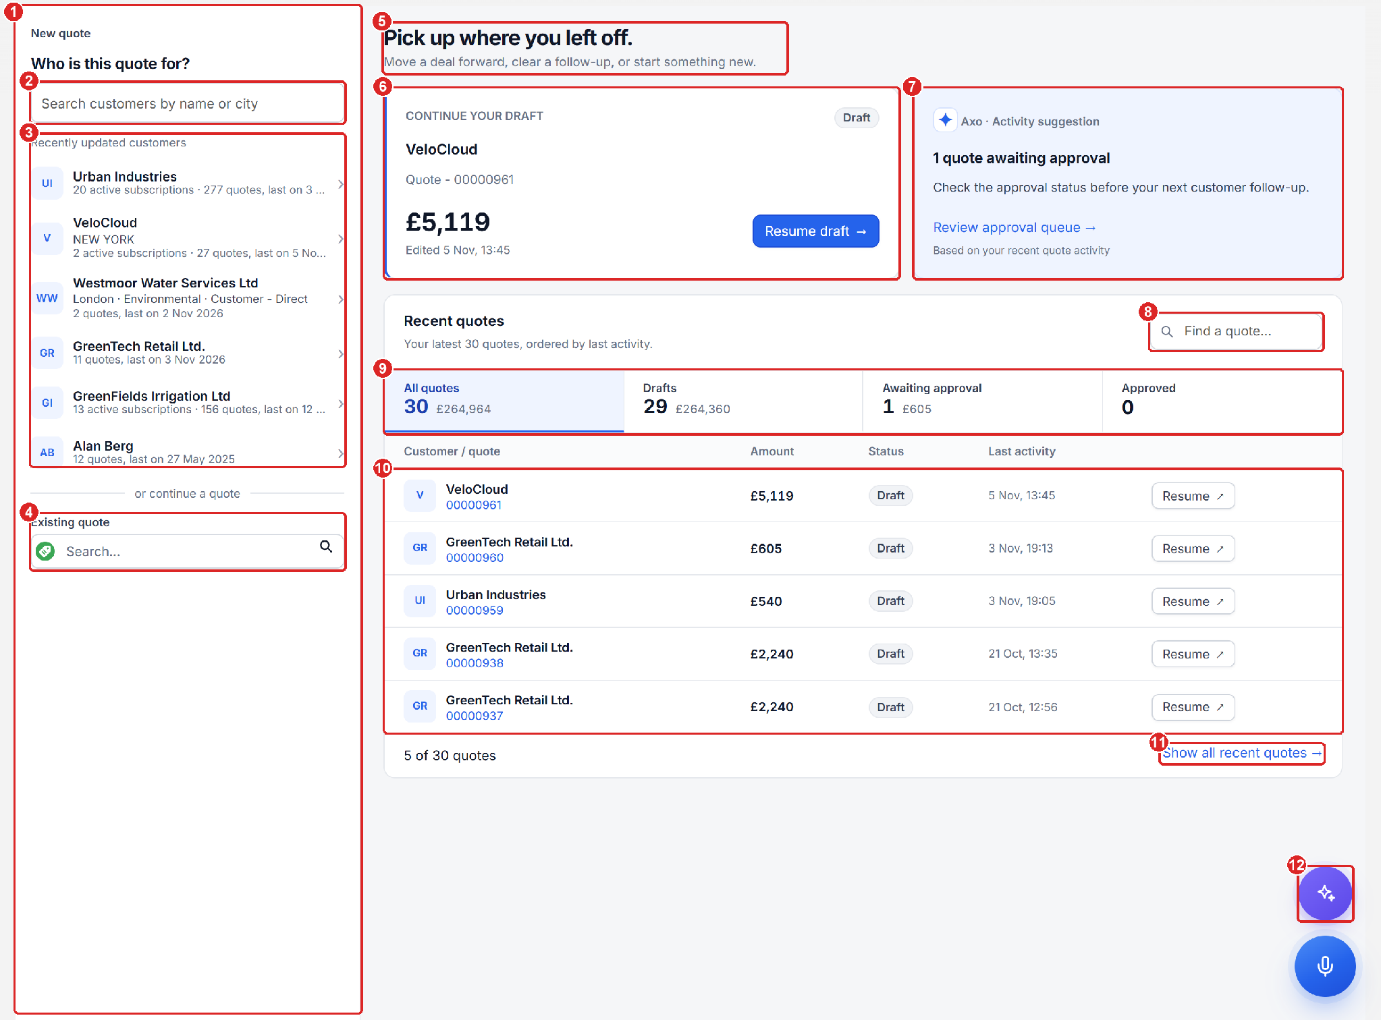
- New quote panel – Start a new quote or continue an existing one.
- Who is this quote for? – Search for customers by name or city.
- Recently updated customers – Click a customer to start a quote for them.
- Existing quote – Search for and open a saved quote.
- Pick up where you left off – The start page.
- Continue your draft – Shows your latest draft quote with its amount and a Resume draft button.
- Axo · Activity suggestion – Shows what Axo suggests you do next (for example, review the approval queue).
- Find a quote – Search the recent quotes list.
- Quote tabs – All quotes, Drafts, Awaiting approval, and Approved, each with its count and value.
- Recent quotes – Displays recently created quotes with details such as customer, quote number, amount, status, last activity, and a Resume button.
- Show all recent quotes – Shows all 30 recent quotes.
- Axo assistant – Chat (top) and voice (bottom).
2.3 The quote workspace
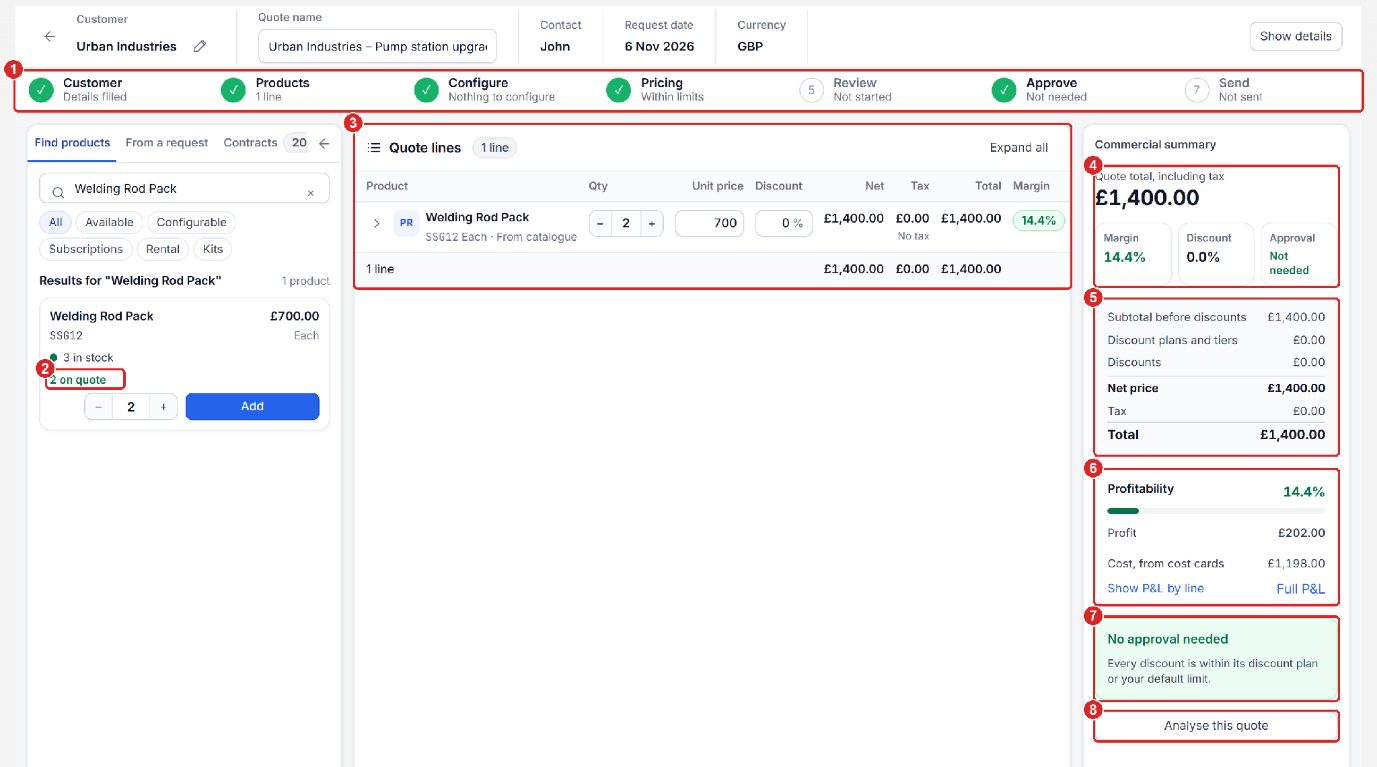
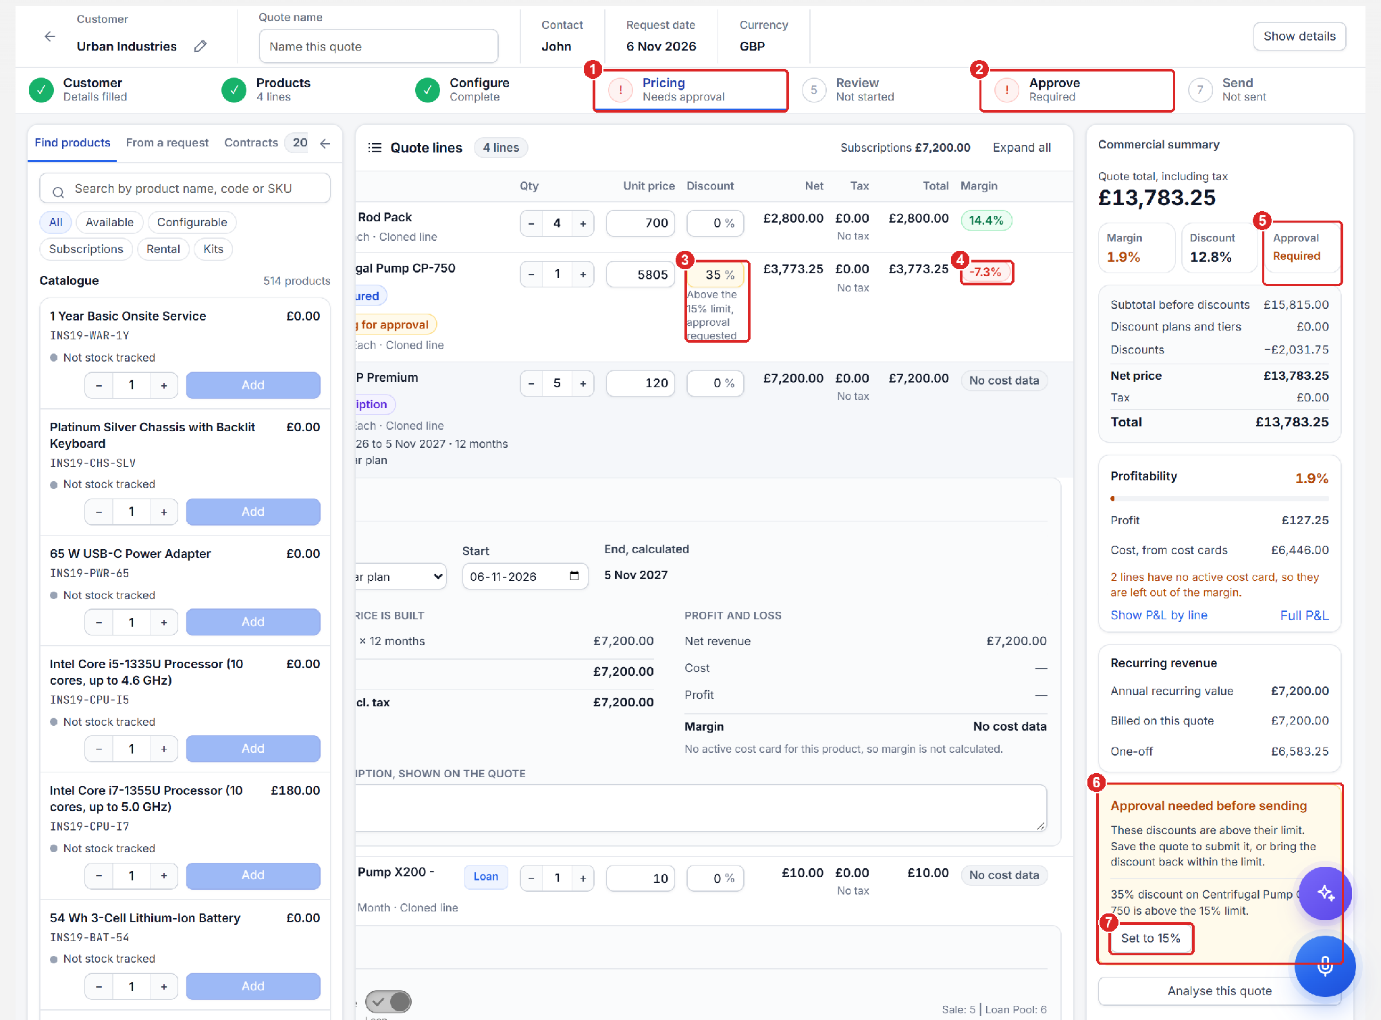
When you start or open a quote, the workspace opens. It has a header, the progress steps, the product finder on the left, the quote lines in the middle and the Commercial summary on the right.
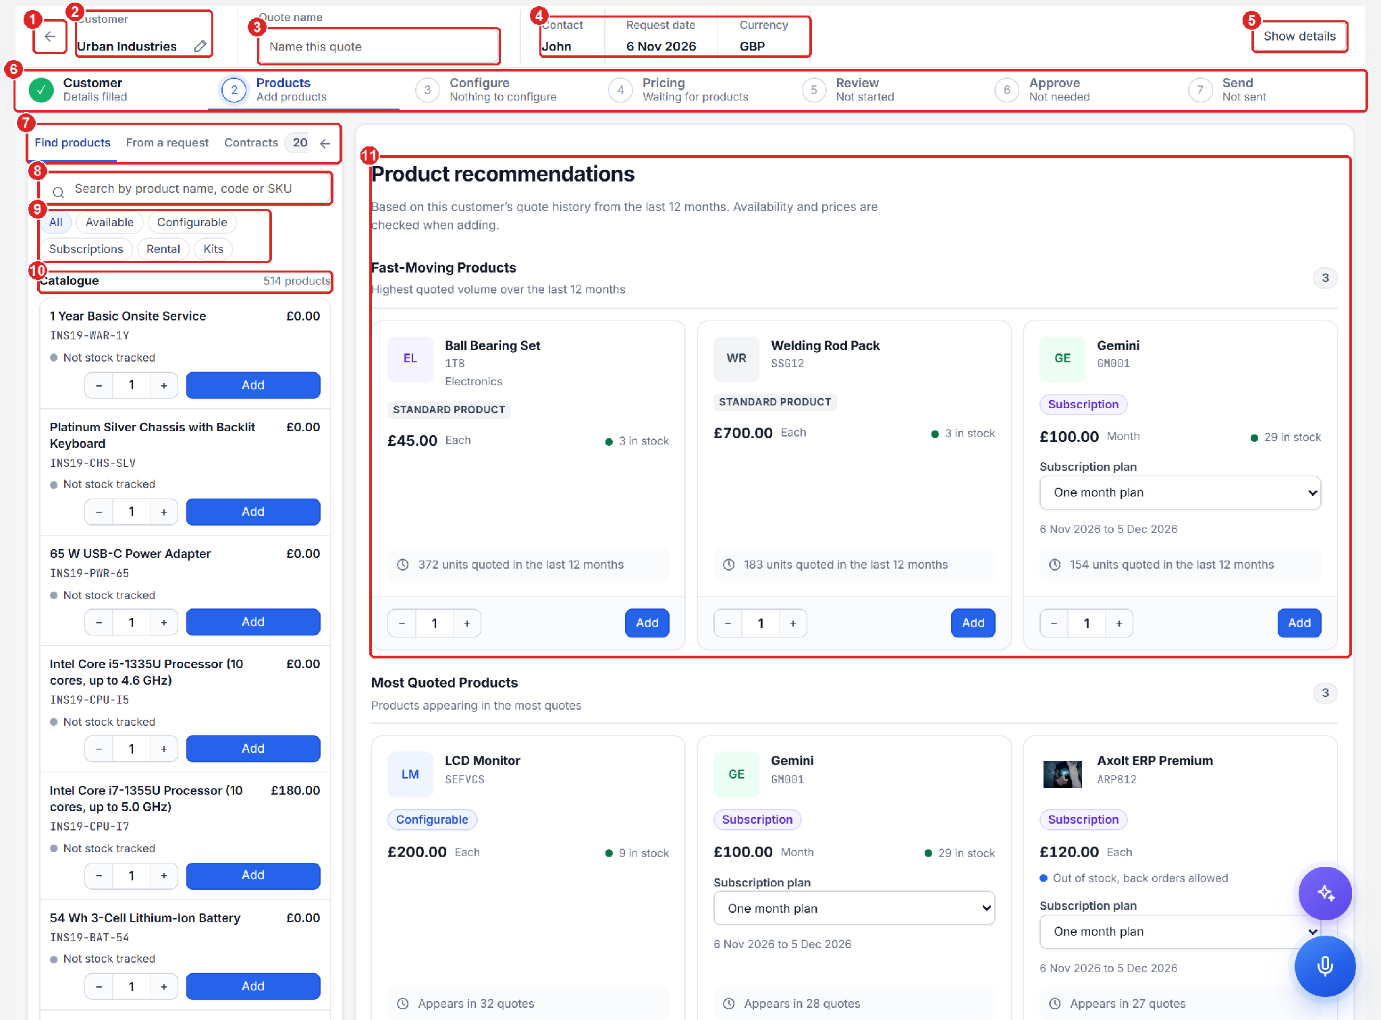
- Back to quotes – Click to return to the start page.
- Customer – Displays the customer for whom the quote will be created. Click the pencil icon to change the customer.
- Quote name – Displays the quote name once the quote is saved.
- Contact, Request date, and Currency – Shows the contact, request date, and currency of the quote.
- Show details – Click to view other quote details, such as the contact, bill-to and ship-to addresses, price book, customer profile, and quote date.
- Progress steps – Customer, Products, Configure, Pricing, Review, Approve, and Send. A green tick means the step is done.
- Product finder – Find products using Find products, From a request, or Contracts (the customer’s contracts).
- Type filters – These are the product type filters: All, Available, Configurable, Subscriptions, Rental, and Kits.
- Catalogue – Displays the total number of products in the customer’s price book (514 in this screenshot).
- Product recommendations – Shows fast-moving and most-quoted products for this customer. Click Add on a card to add the product.
Progress steps – Each step turns green when it is done:
- Customer – The customer details are filled in.
- Products – The quote has product lines.
- Configure – Every configurable product has been configured.
- Pricing – Prices and discounts are within limits (or show Needs approval).
- Review – The customer copy has been reviewed.
- Approve – Shows Not needed, Required, or Approved.
- Send – The quote has been sent.
2.4 Product finder tabs
The product finder has three tabs: Find products (Find products using the search bar or type filters), From a request and Contracts.
- Find Products Tab – Find the products using the search bar and type filters.
- From a request Tab.
- From Contracts Tab.
From a request Tab
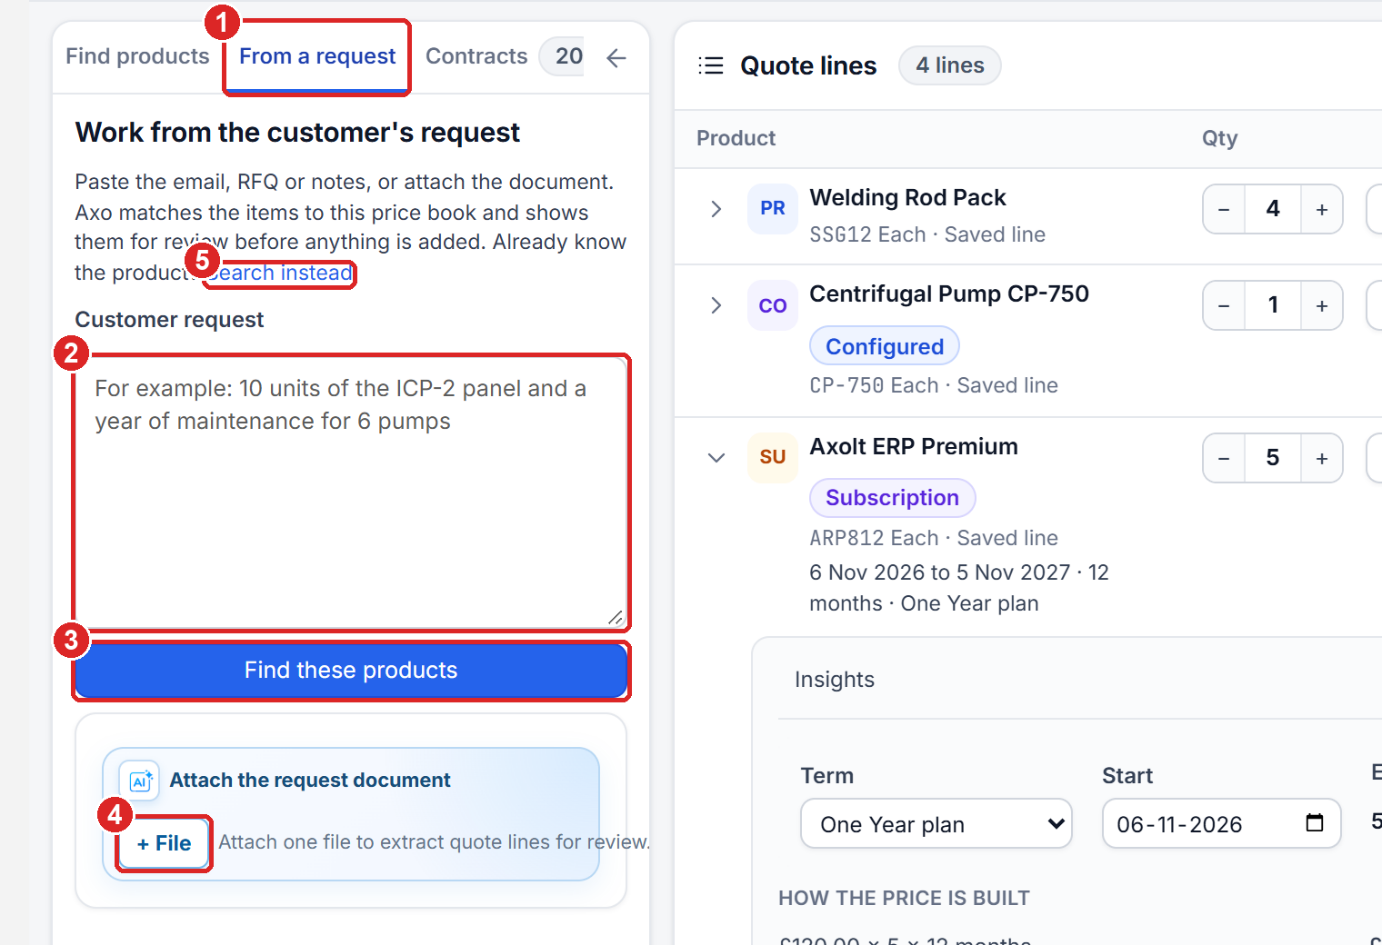
- Under the From request tab, paste the customer’s email or request text here. Once done, click the Find these products button – Axo reads the text and finds matching products for review.
- + File – attach the PO, RFQ or email instead.
- Search instead – back to normal product search.
From Contracts Tab
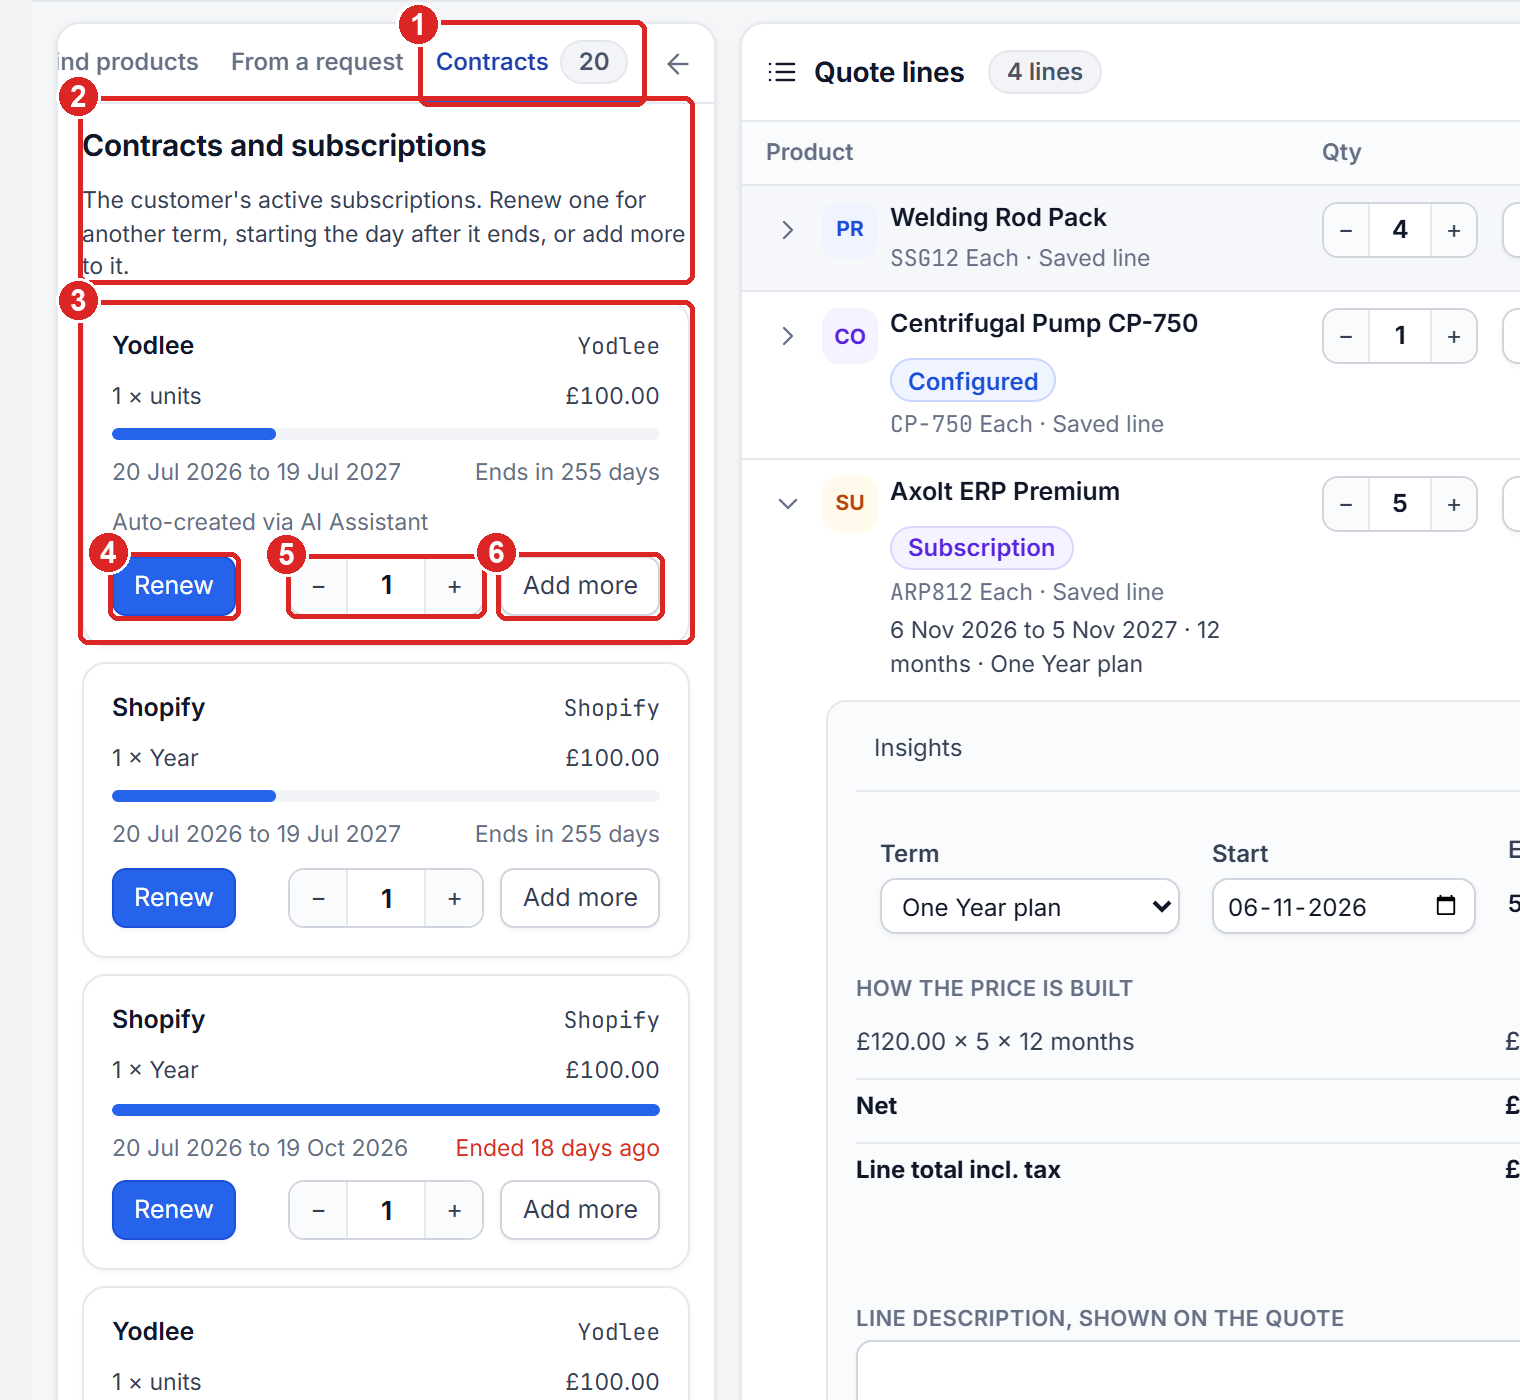
- Contracts tab – Displays the customer’s active subscriptions (20 here).
- Contract card – Displays the product, quantity, price, period, progress bar and days left.
- Renew – Adds a renewal line for the next term.
- Enter the quantity and click Add more to add extra units to the existing subscription.
2.5 Commercial summary
The right column always shows the quote total, margin, discount, approval state, price breakdown, profitability and recurring revenue.
3. Create a Quote
Follow the steps below to start a new quote.
- In Who is this quote for?, type the customer name and choose the required customer.
- Click the customer under Matching customers. The quote workspace opens with contact, addresses, price book and currency filled in.
- Clicking on Show details will display the screen below.
- It displays other details such as contact, bill-to and ship-to addresses, company, price book, etc. Click the pencil icon to change them.
- Add a Description for the customer, then click Hide details.
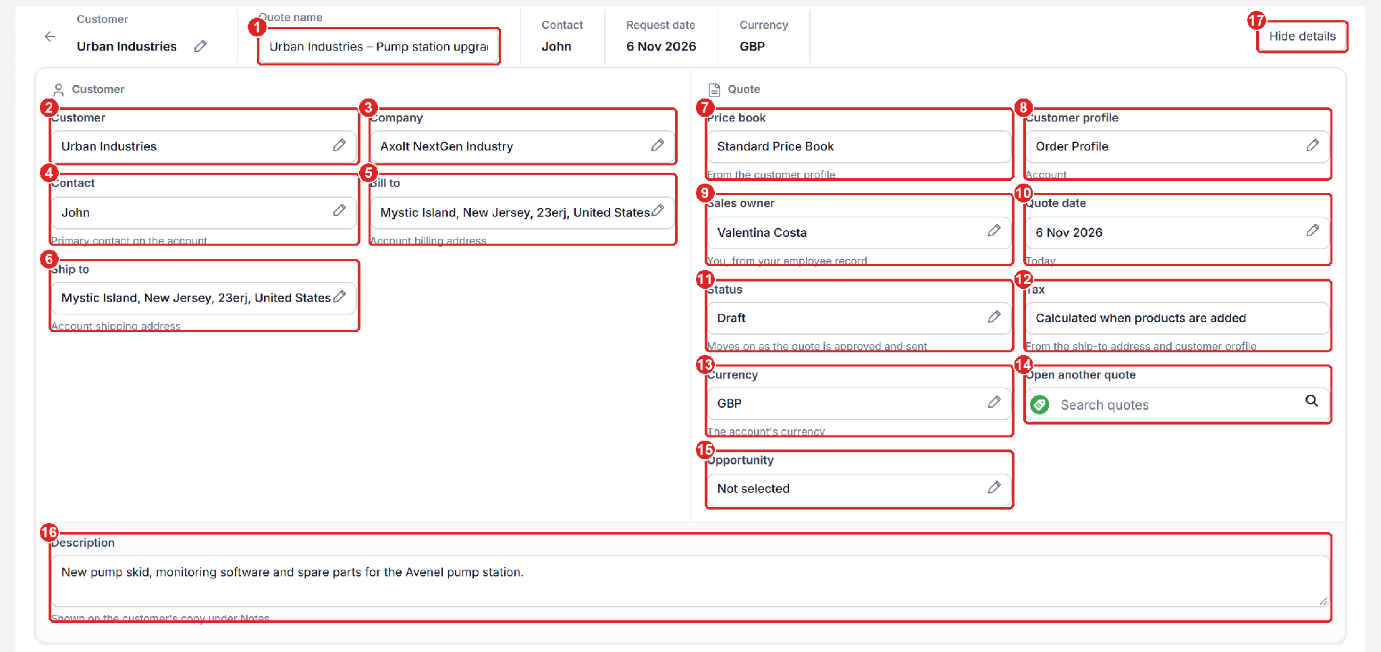
Note: Fields with a pencil icon can be changed. The price book and customer profile come from the customer’s profile, and tax is calculated once products are added.
- Once all the details are entered, add the products to the quote from the Find products section.
- Use the filters All, Available, Configurable, Subscriptions, Rental and Kits to show one product type at a time, or search by name, code or SKU. You can also click Add on a card under Product recommendations.
Adding a Normal product
- Search for the product name, code or SKU, enter the quantity and click Add.
Adding a Configurable product
- Configurable products are built from options – for example a pump with a choice of motor, impeller, seal and drive. They show Configure instead of Add.
- Search for the product or click the Configurable filter, add the desired configurable products and click the Configure button. The configurator opens.
- For every Required feature, click one option card. A blue tick shows your choice. Choose any Optional options you want.
- Watch the Live configuration panel and the Configuration total.
- When every required feature is selected, click Confirm Configuration.
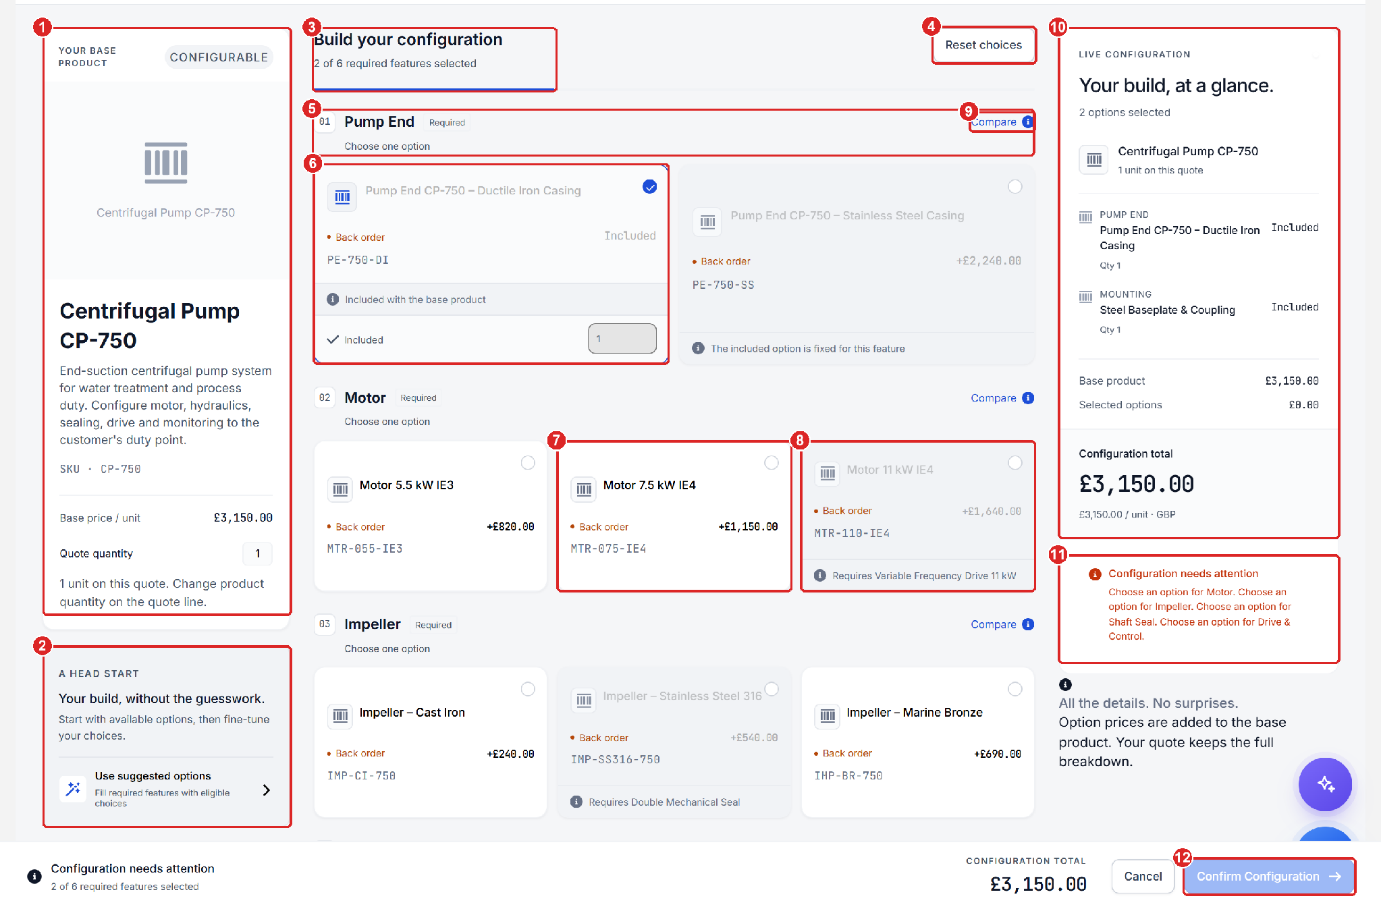
- Your base product – Displays picture, description, SKU, base price per unit and quote quantity.
- A head start – Use suggested options fills every required feature with eligible choices.
- Build your configuration – progress: how many required features are chosen (2 of 6).
- Reset choices – clicking on it clears your selections.
- Feature header – number, name, Required and “Choose one option”.
- Greyed option with a rule – it needs another option first.
- Compare – compare the options of this feature side by side.
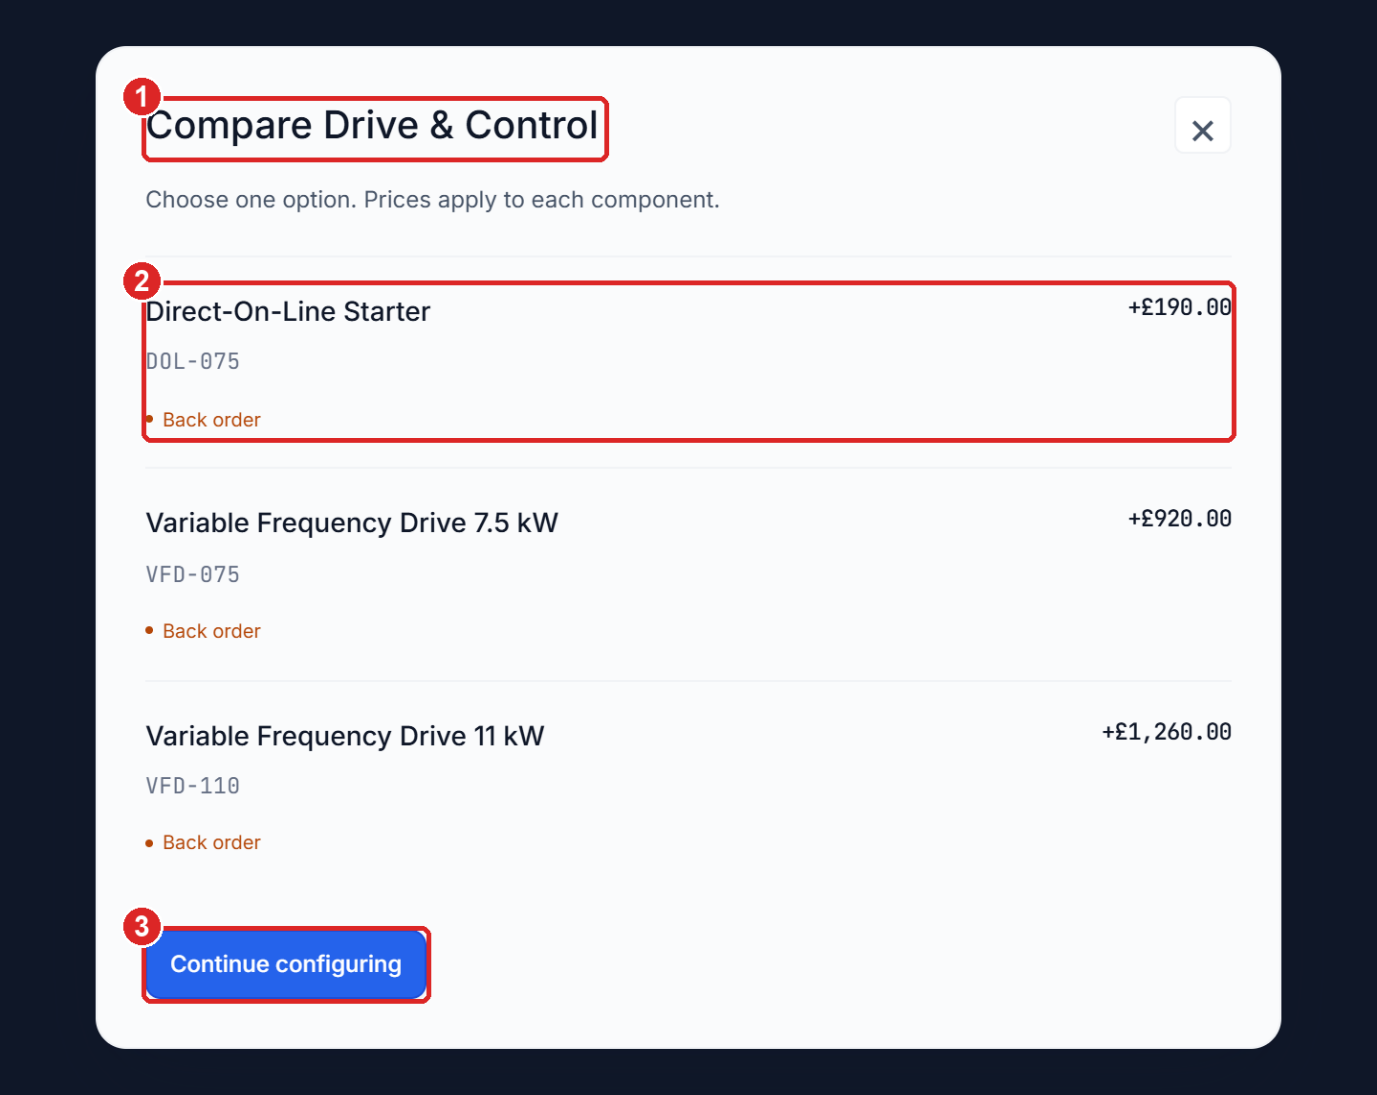
- Live configuration – your build at a glance, base product, selected options and Configuration total.
- Configuration needs attention – what is still missing.
- Confirm Configuration – becomes active when every required feature has a choice.
Note: Some options depend on others. A greyed card with a rule becomes available only after you choose the option it needs.
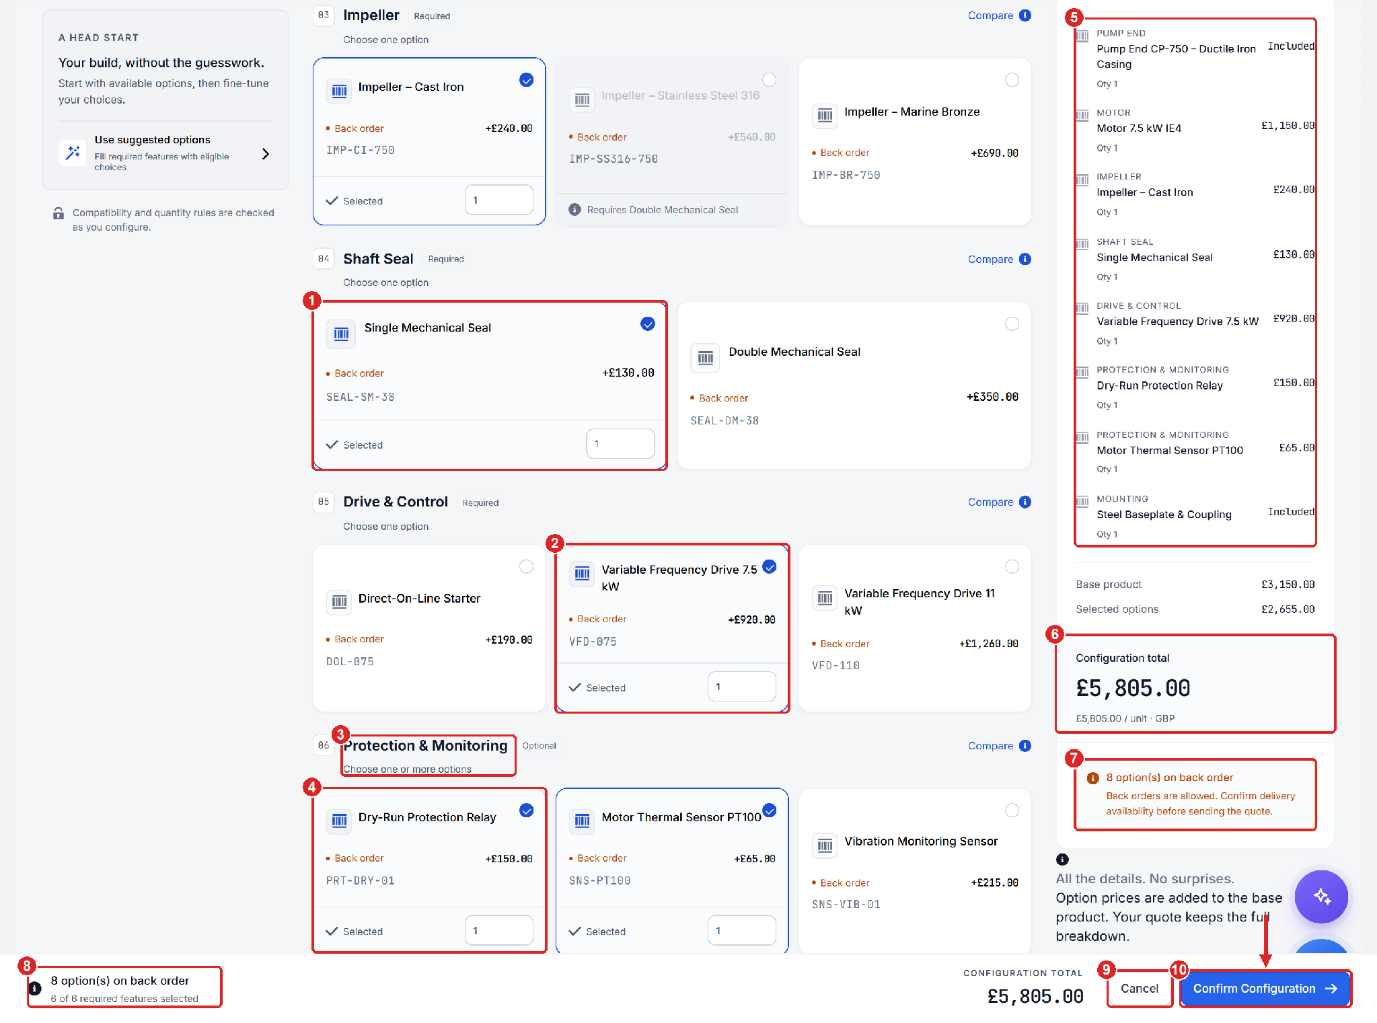
- The unit price is calculated with the base price and options of the configurable product.
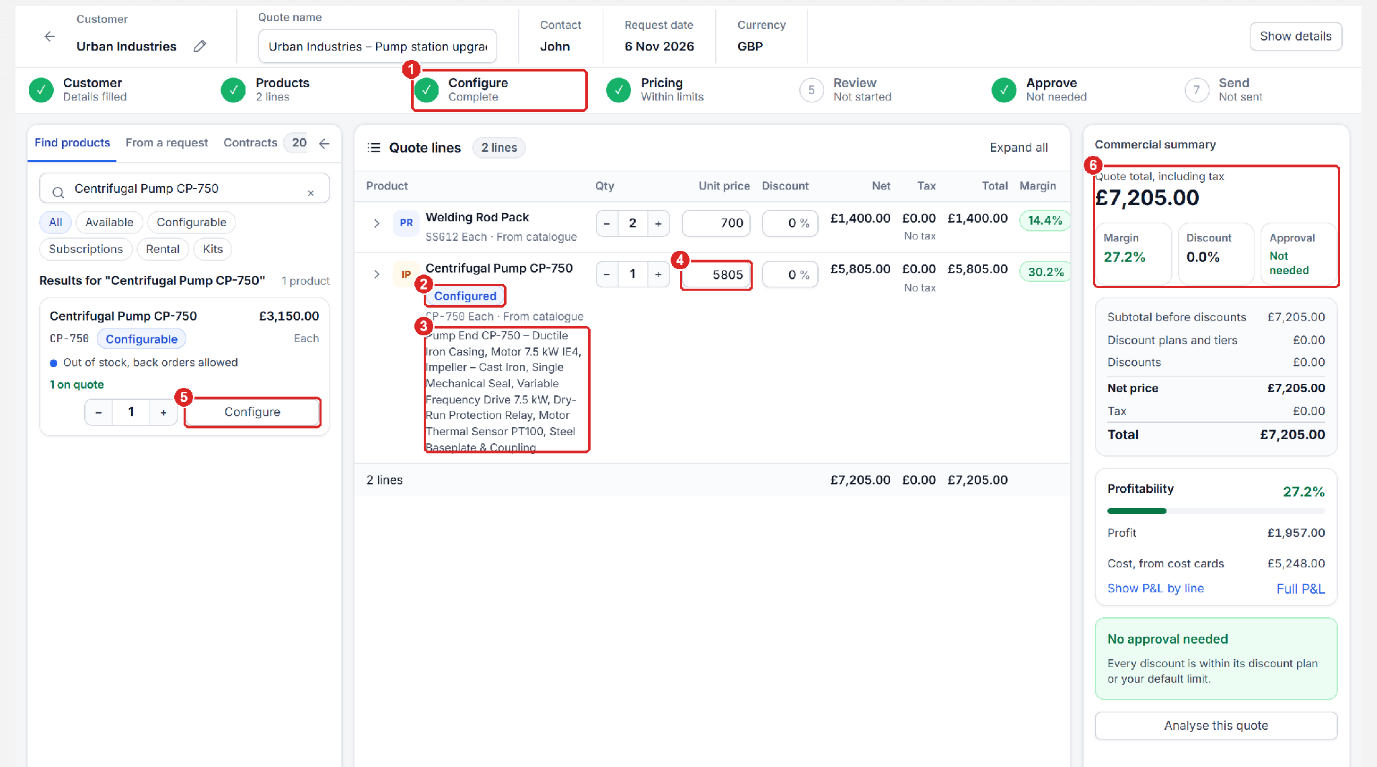
- Once the product is configured, click on Confirm Configuration. Once clicked, the configured product will be added to the quote. If you click Cancel, you leave without adding the product to the quote.
- The configured product is added as one line with the Configured badge and the chosen options listed under it.
Adding a Subscription Product
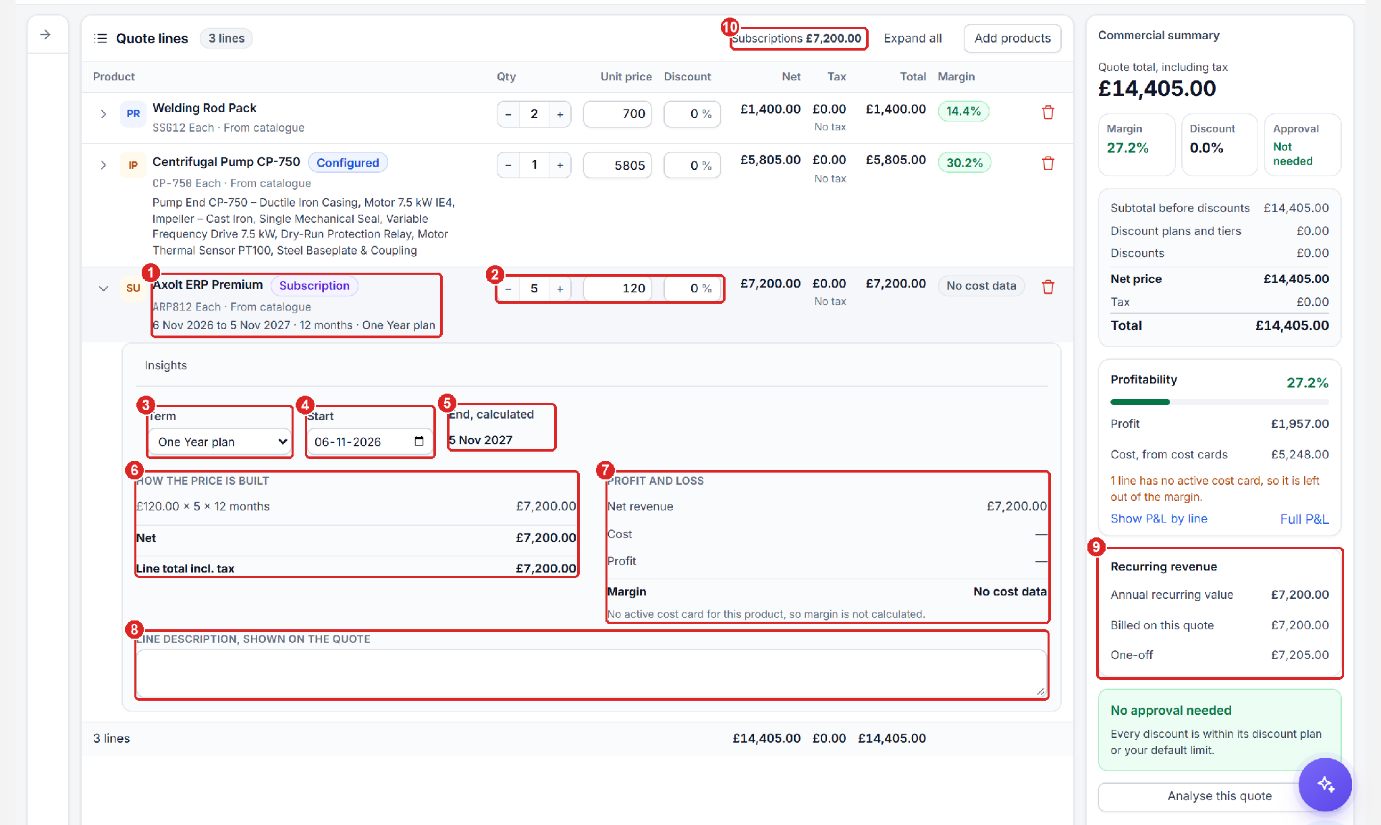
- Search for the subscription product or click on Subscriptions type filter.
- Choose the Term (plan), such as a year, a month or a custom plan. The service period appears under it.
- Set the quantity (licences) and click Add.
- Open the line (arrow) to check Term, Start and End, calculated. The price is built as monthly price × quantity × months.
Adding a Rental (loan) product
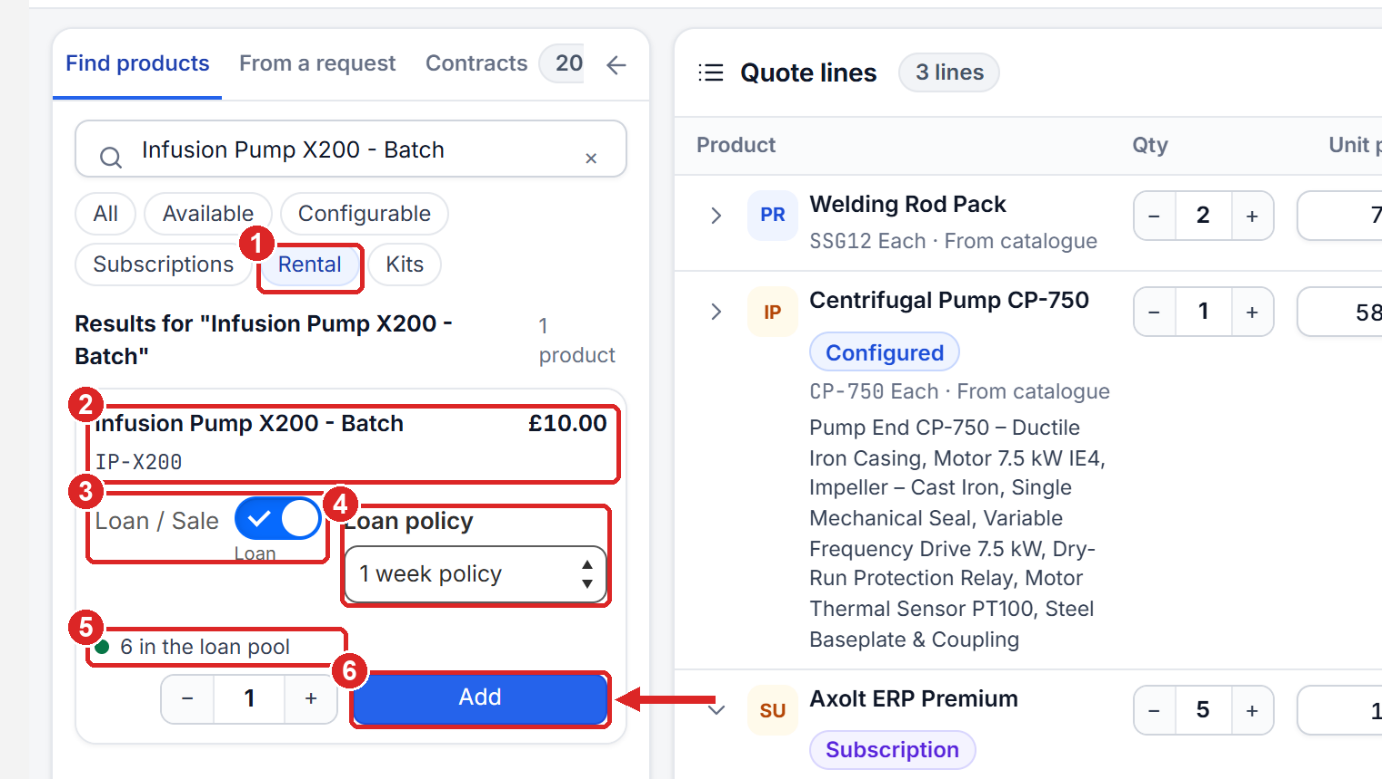
- Search for the product or click the Rental type filter and select the required product.
- Make sure Loan / Sale is enabled to create a quote for a rental product.
- Choose the Loan policy of the product and click Add. The line gets the Loan badge and its loan terms (dates, base fee, overdue charge, replacement value and deposit).
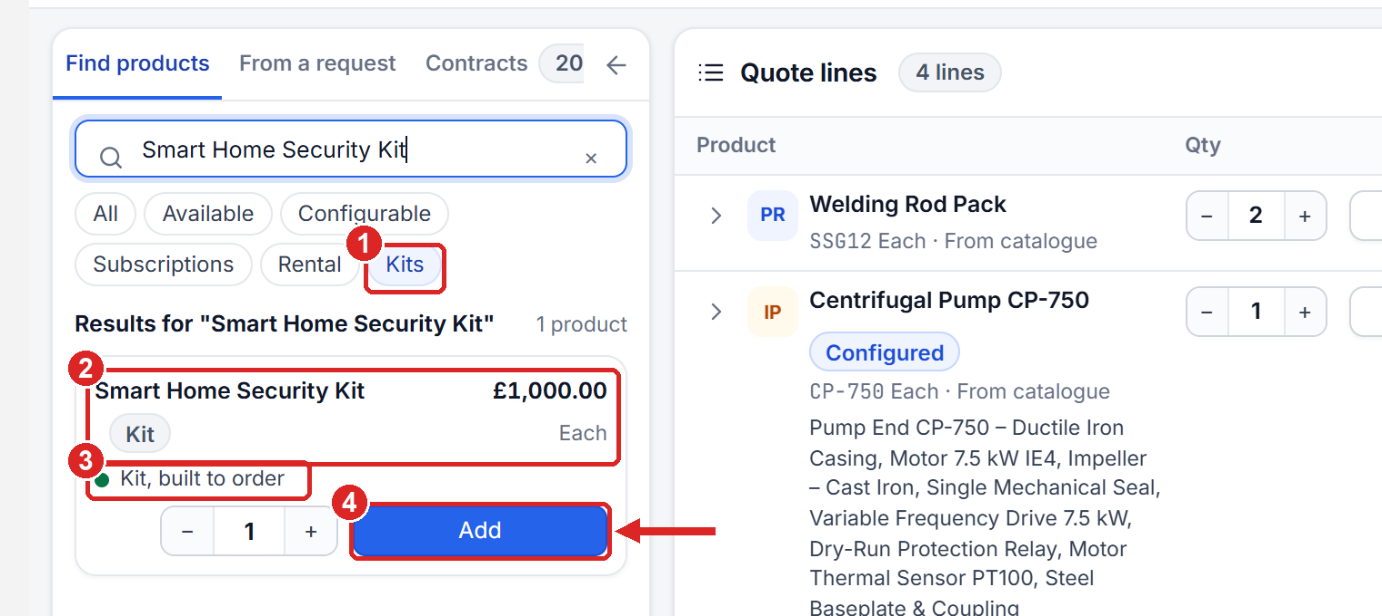
Kit product
- Search for the product or click the Kits type filter and select the required product.
- Enter the desired quantity you want to create a quote for and click Add.
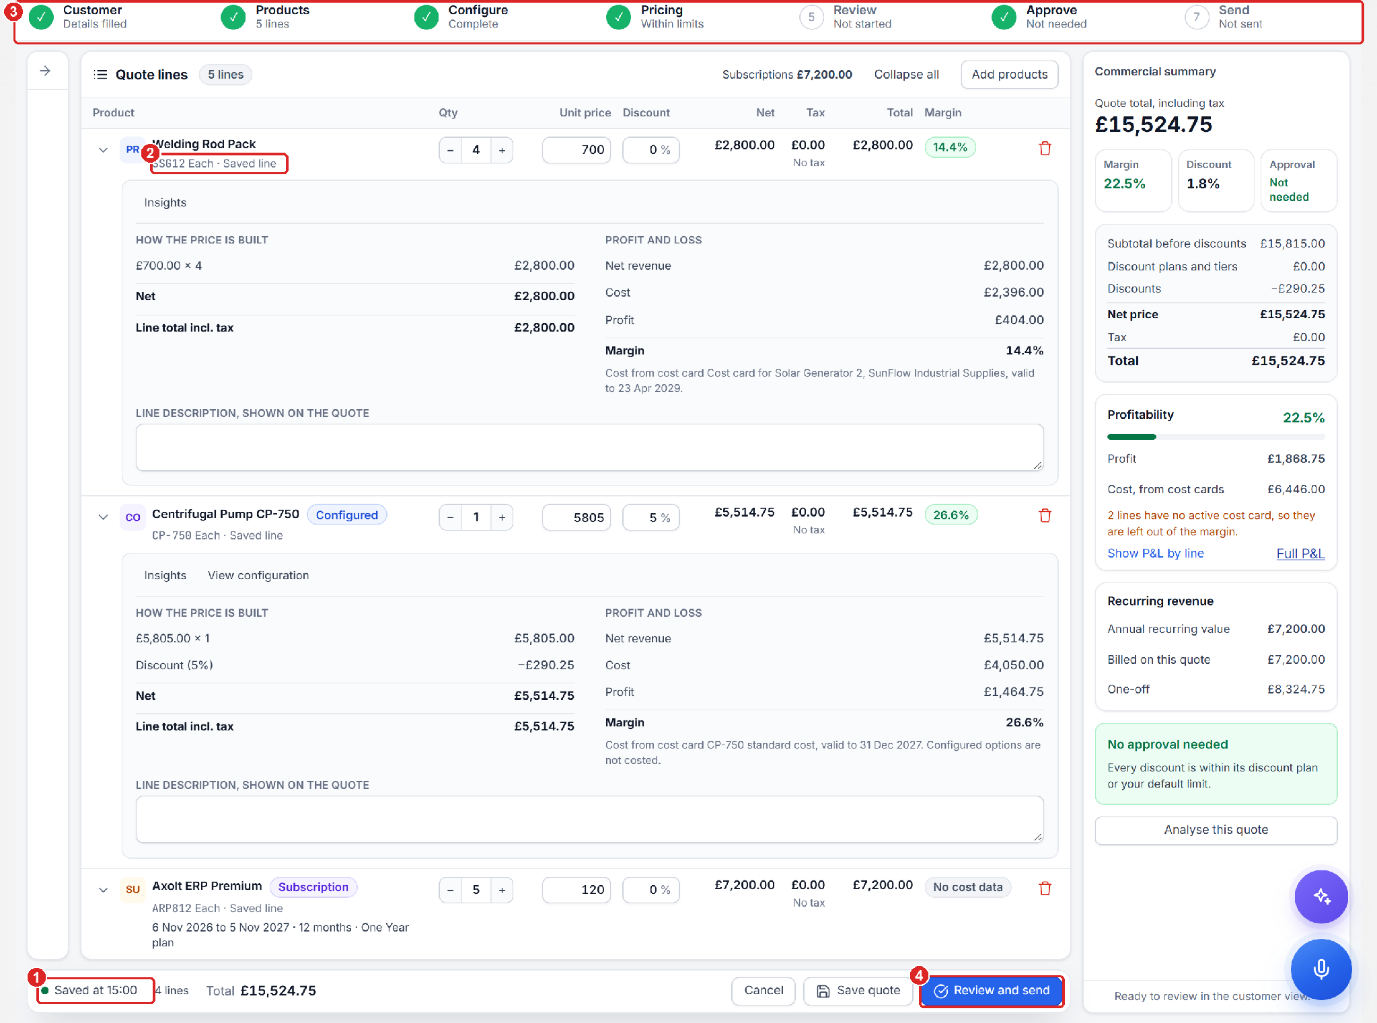
- The screenshot below displays the quote line items, including all types of products.
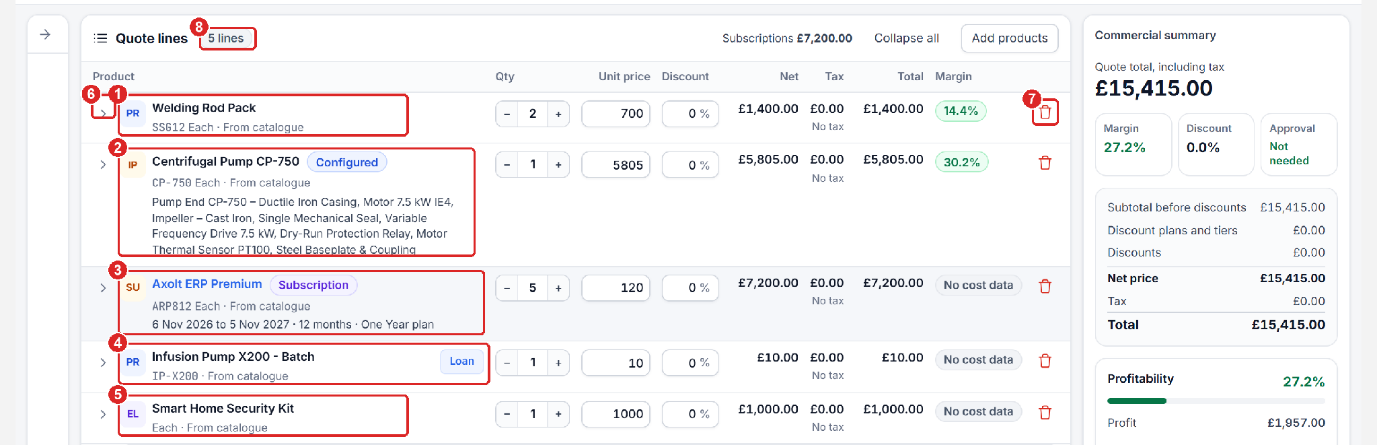
Note: You can add or remove the quantity for any product, change the unit price and also enter the discount percentage.
Note: To remove a line, click the red bin at the end of the line. A message confirms the removal and offers Undo.
- Once all the products are added to the quote, the right side of the screen displays the overall summary of the quote, including price, discount, total, profit, etc.
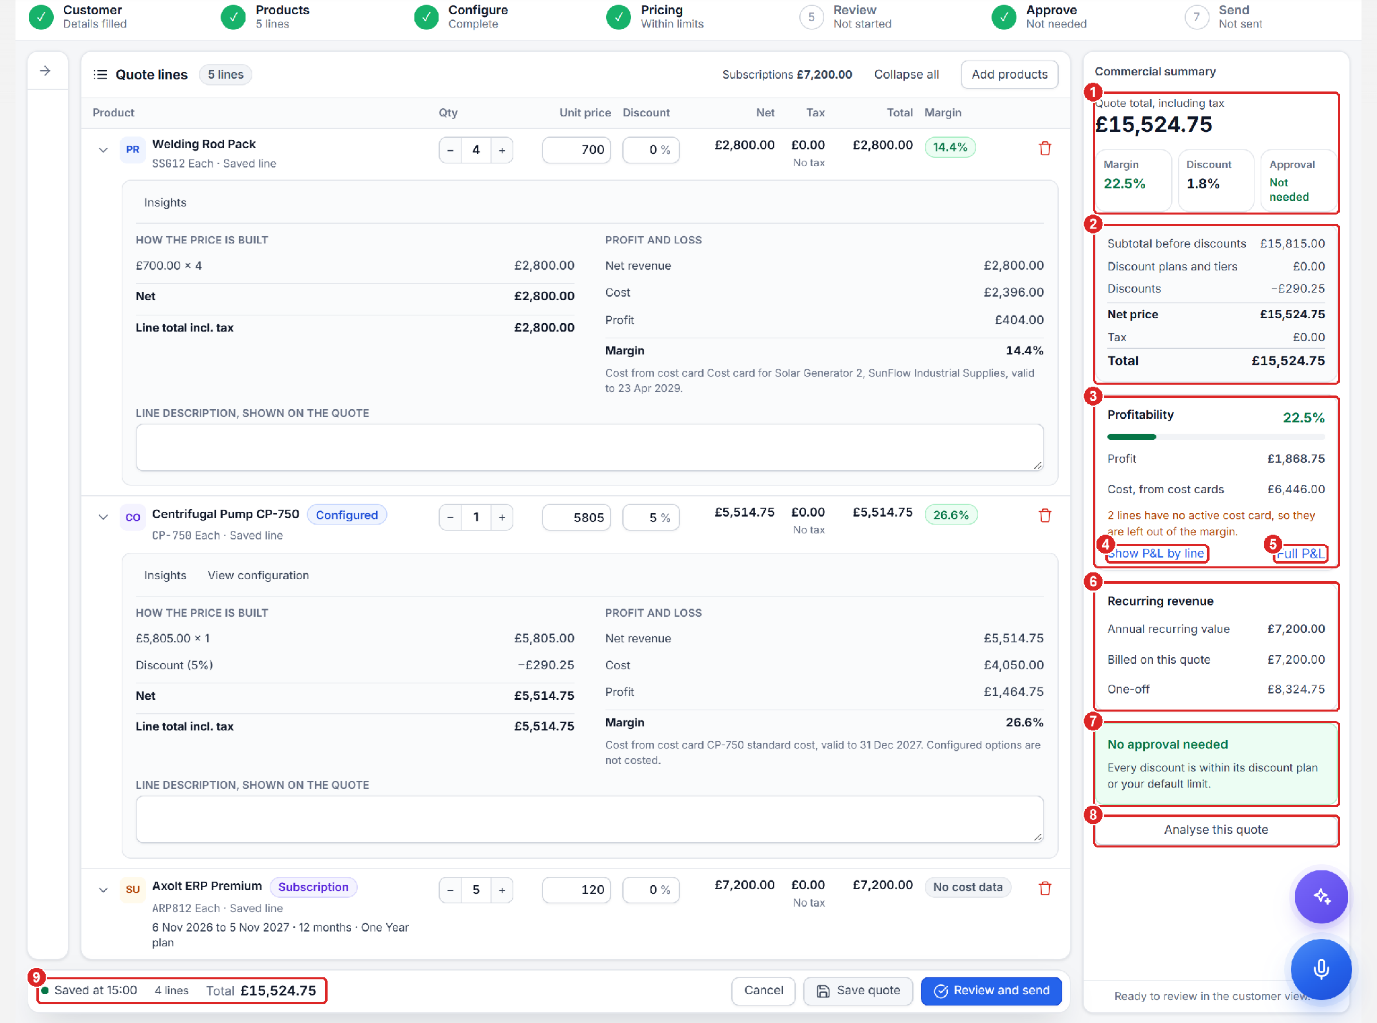
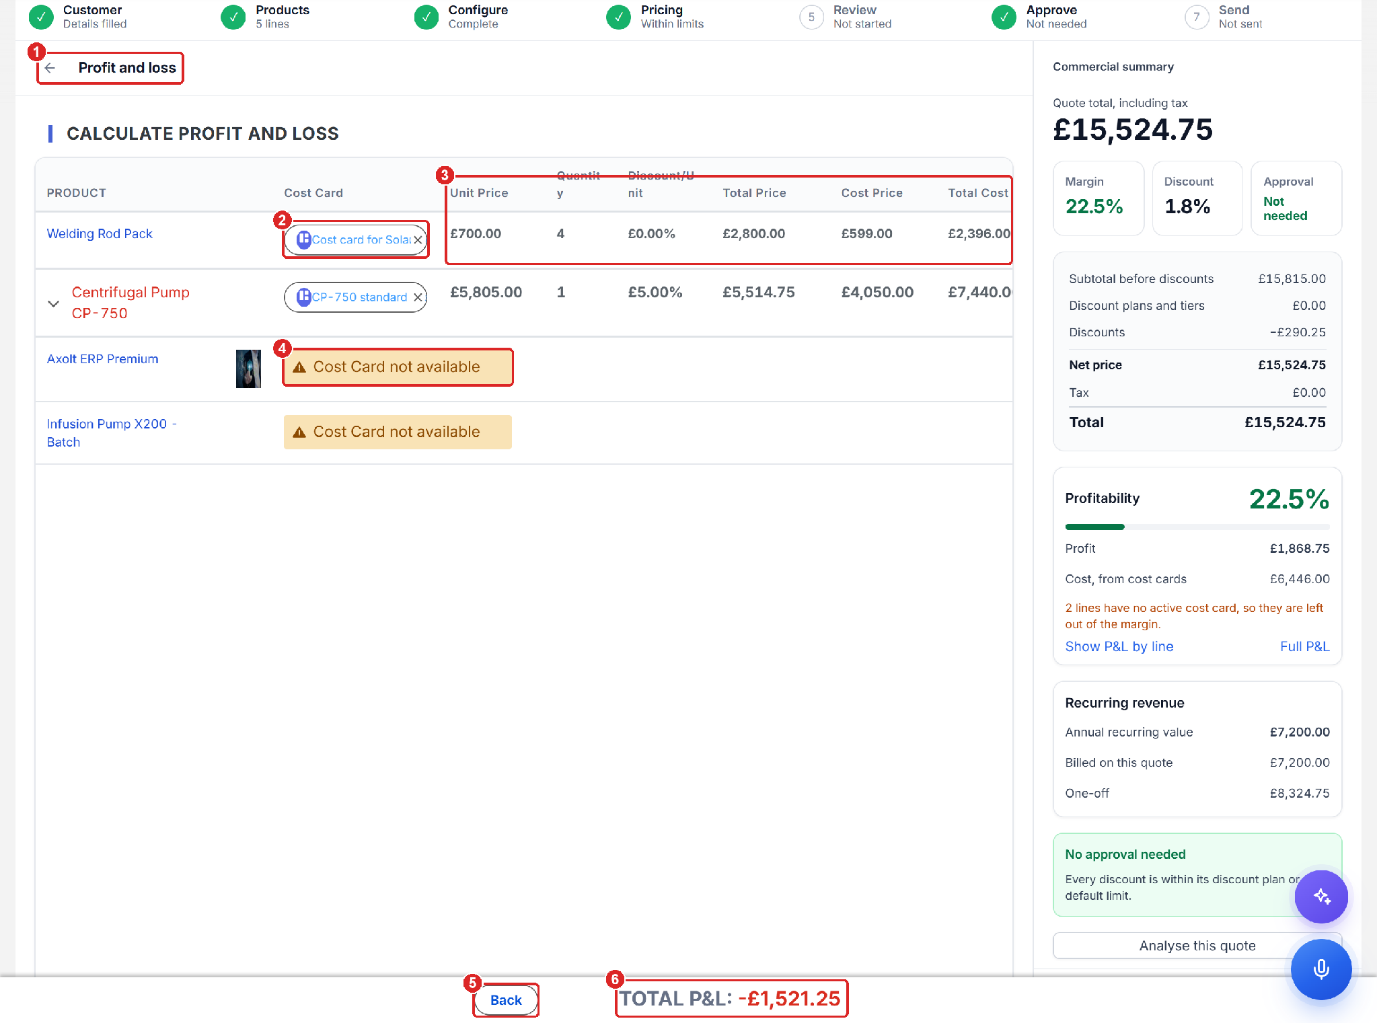
Note: Click Full P&L for the complete profit and loss by line, including the cost card used for each line.
- Once all the details are entered, click the Save quote button to save the quote, or the Review and send button to review and send the quote to the customer.
4. Other Functionalities on the Quote Console Workbench
4.1 Continue an existing quote
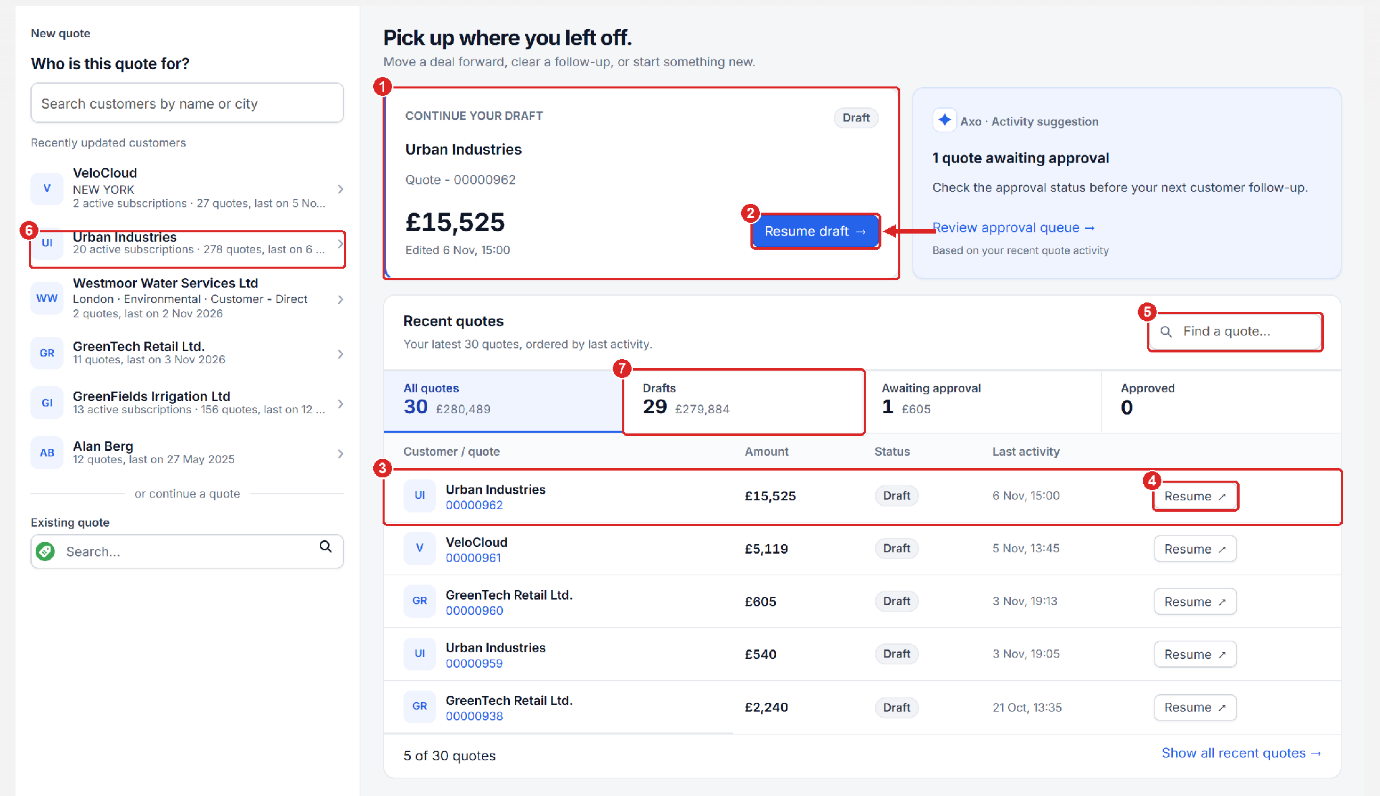
- On the start page, click Resume draft on Continue your draft, or Resume on a row in Recent quotes.
- Or search for the quote in Existing quote or Find a quote.
- The quote opens with its lines, ready to edit.
4.2 Save as draft
A quote is a Draft until it is sent. Every time you click Save quote, the draft is saved and appears under Continue your draft and in the Drafts tab. If you leave a quote with unsaved changes, the Quote Console asks you to confirm before it discards them.
4.3 Duplicate (Clone), edit and delete
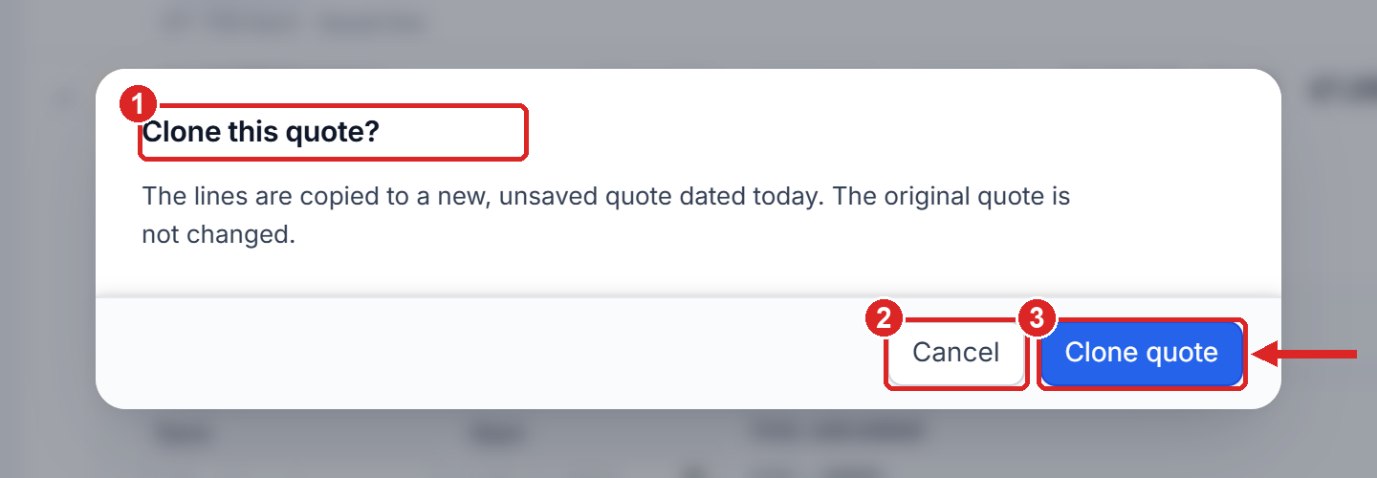
Clone makes a copy of the open quote. The copy is new and unsaved, dated today, and the original is not changed.
- Open the saved quote and click Clone in the header.
- Click Clone quote to confirm.
- Change what you need and click Save quote.
4.4 Discounts above the limit and approval
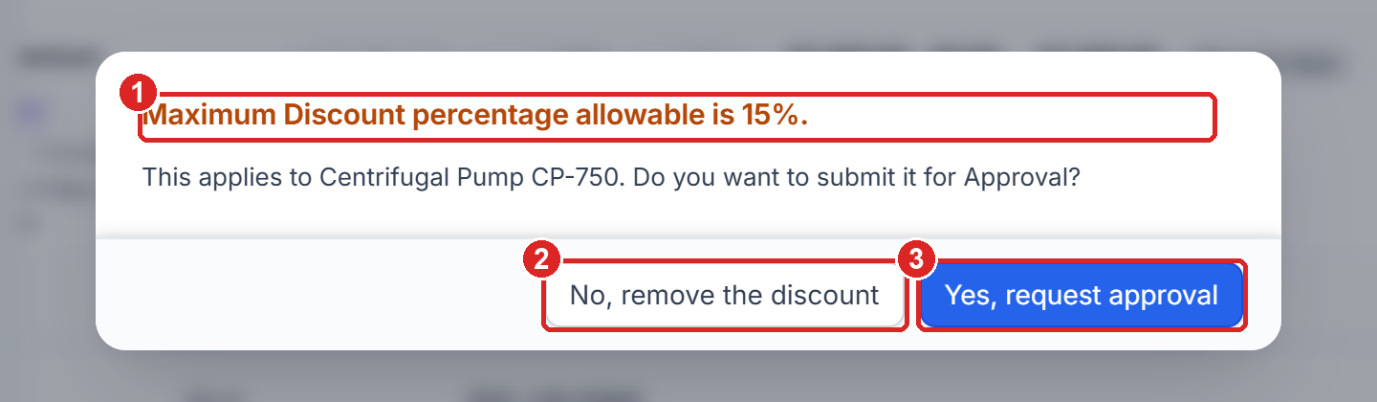
- If you enter a discount above the product’s limit, the Quote Console asks whether to request approval.
- Clicking No goes back to the allowed discount, and clicking Yes keeps the discount and marks the quote for approval.
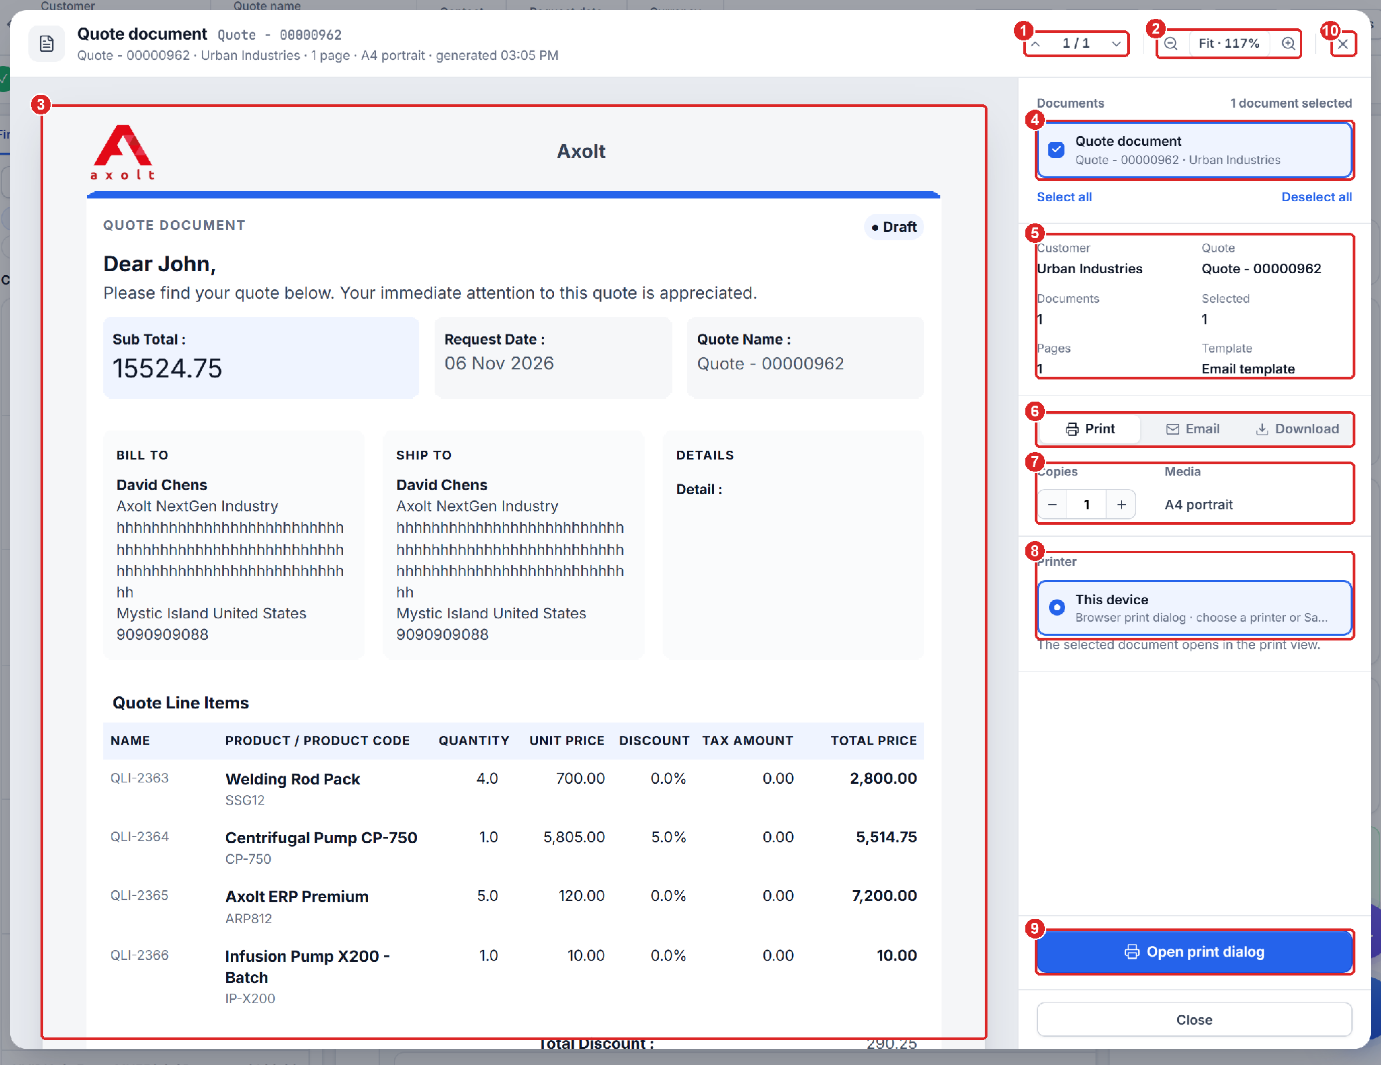
4.6 Quote document: preview, download and send email
- Open the saved quote and click Document in the header. Check the preview and tick the documents on the right. You can Print, Email or Download.
4.7 Other actions
- DocuSign – opens the e-signature page for the quote in a new browser tab so the customer can sign it.
- Refresh – fetches the latest quote data (unsaved changes are discarded after you confirm).
- Analyse this quote – Axo’s margin and customer insights.
5. Axo Assistant
Axo is the AI assistant built into the Quote Console. It can configure products, import accepted quotes, read customer documents, check discounts and margins, and help you save the quote. Axo always shows what it found before anything is added, and approvals still apply.
- Click the purple Open Axo Chat button at the bottom right of the screen.
- Click the blue microphone button (Start Axo Voice) to talk to Axo.
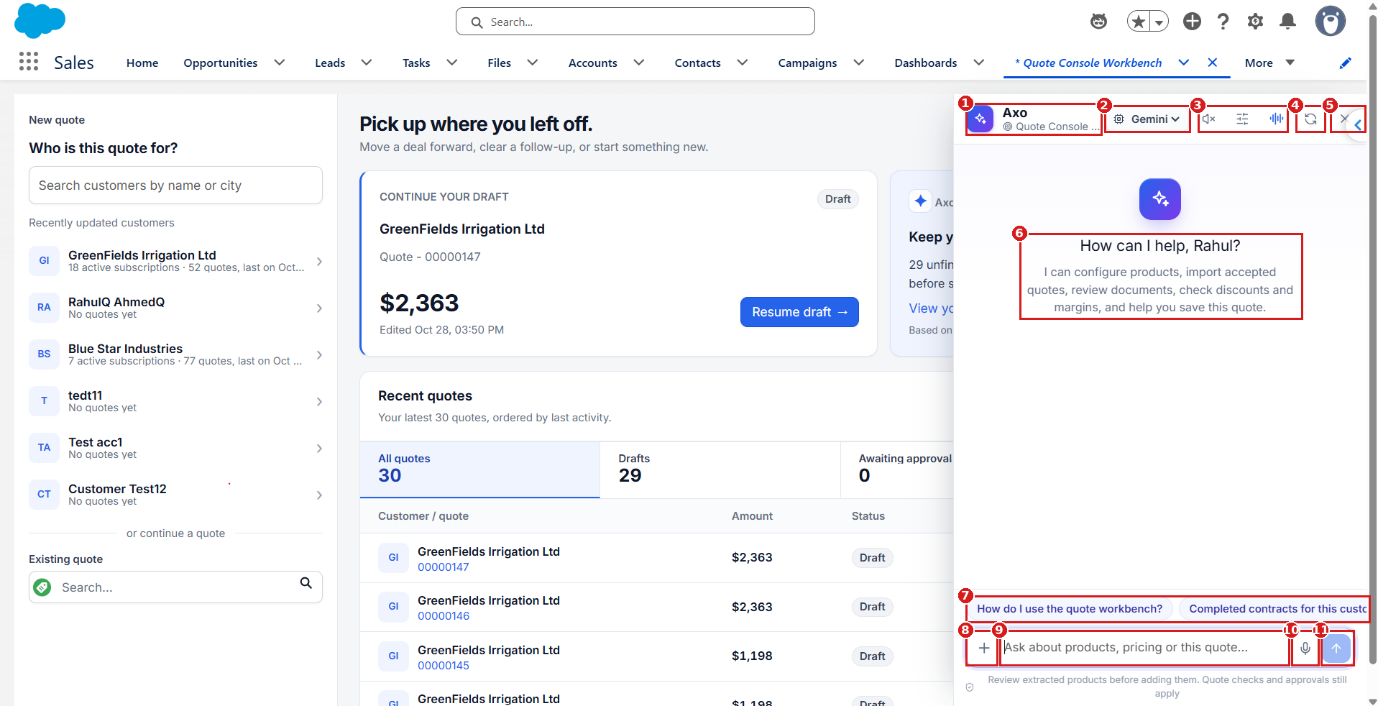
- Axo header – the quote Axo is working on.
- AI model – choose the model.
- Spoken replies, voice settings and Switch to Axo Voice.
- New chat – clears the conversation.
- Close.
- What Axo can do here: configure products, import accepted quotes, review documents, check discounts and margins, and help you save the quote.
- Suggestion chips – one-click prompts for this quote.
- + – attach a document (for example a PO) for Axo to read.
- Prompt box – type a question or instruction.
- Microphone – speak your message.
- Send (Shift + Enter).
5.2 Features and example prompts
- “How do I use the quote workbench?” – a step-by-step walkthrough.
- “Completed contracts for this customer” – earlier accepted quotes and their documents.
- “Load items from the last accepted quote” – copies lines from the customer’s last accepted quote.
- “Add 2 Ball Bearing Set” – Axo finds the product and stages it for you to confirm.
- “Analyse this quote” – margin health and customer order history.
- “Check quote readiness” (voice) – a full readiness check before sending.
Analyse this quote
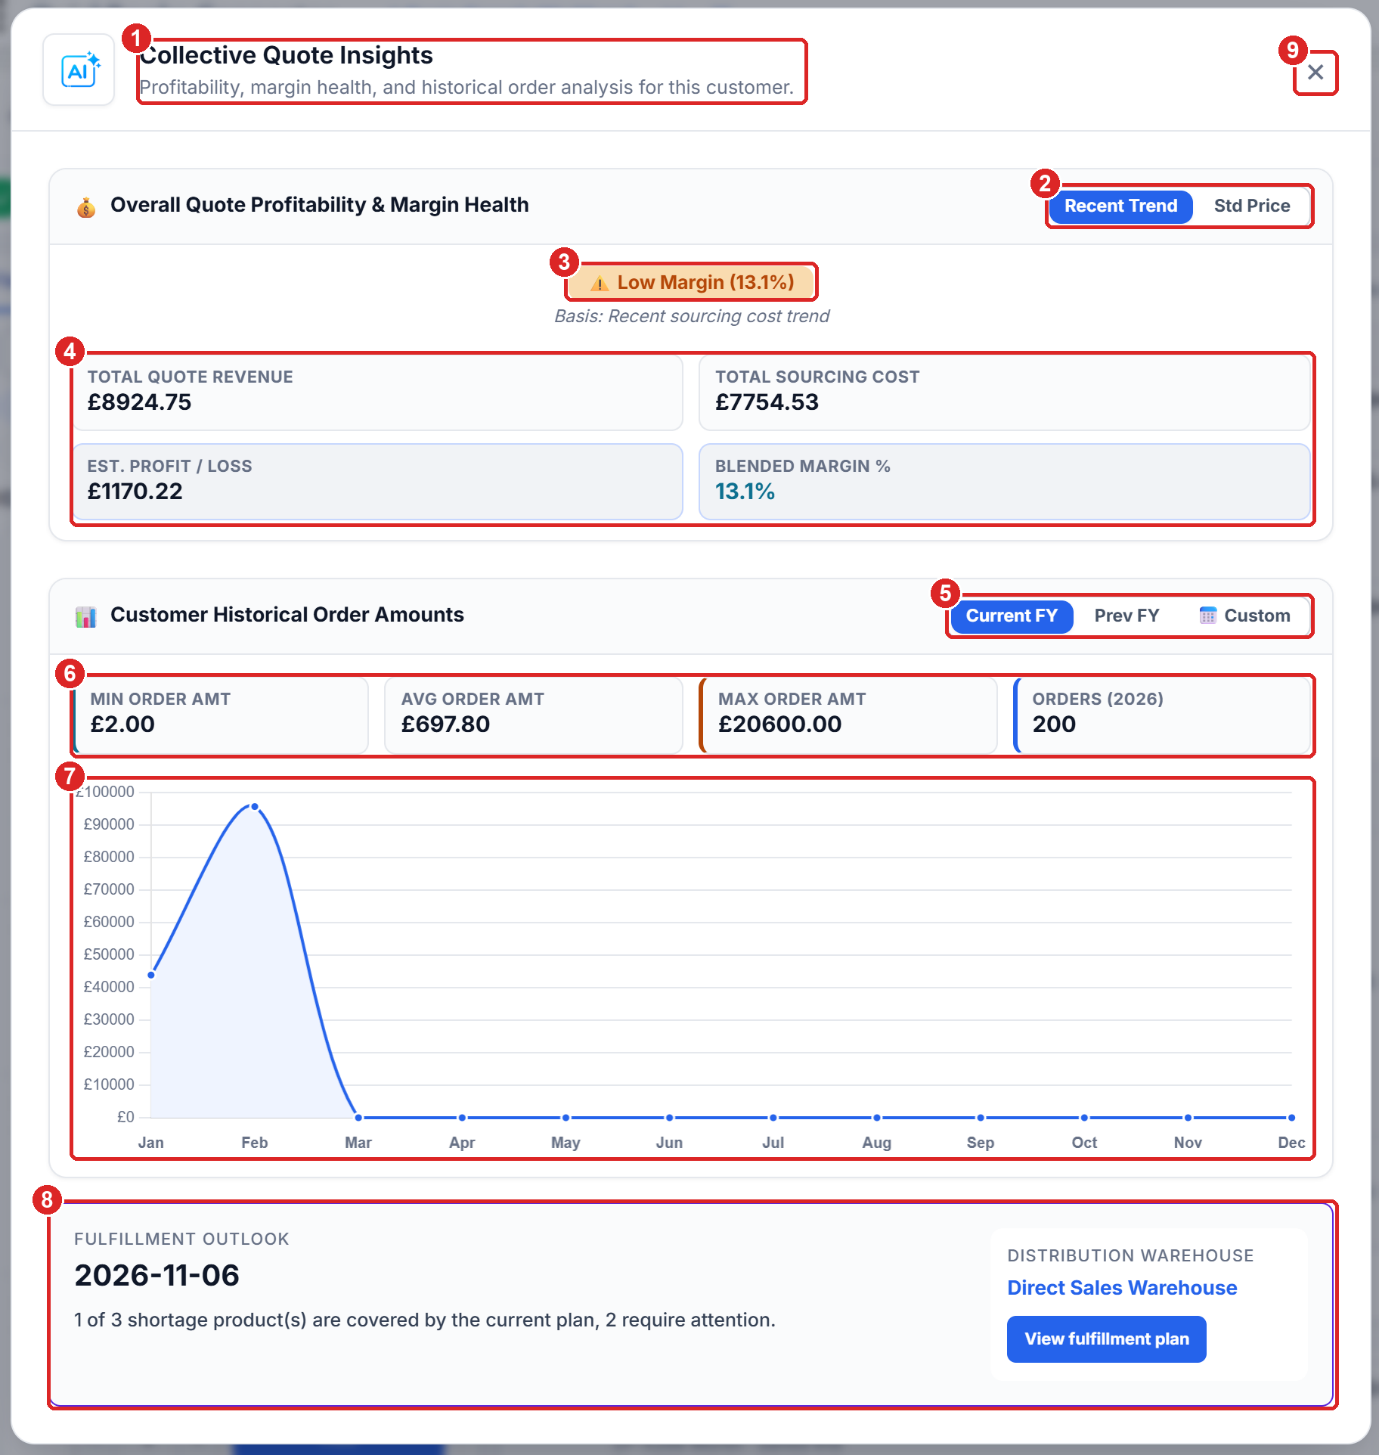
- Collective Quote Insights – opened by Analyse this quote (chip or button).
- Recent Trend / Std Price – the cost basis used for the margin.
- Margin health – here Low Margin (13.1%).
- Revenue, sourcing cost, estimated profit and blended margin.
- Current FY, Prev FY, Custom – period for the order history.
- Smallest, average and largest order amounts and number of orders.
- Chart of the customer’s order amounts by month.
- Fulfillment outlook – shortage products and the warehouse. View fulfillment plan opens the plan.
- Close (×).
How do I use the quote workbench?
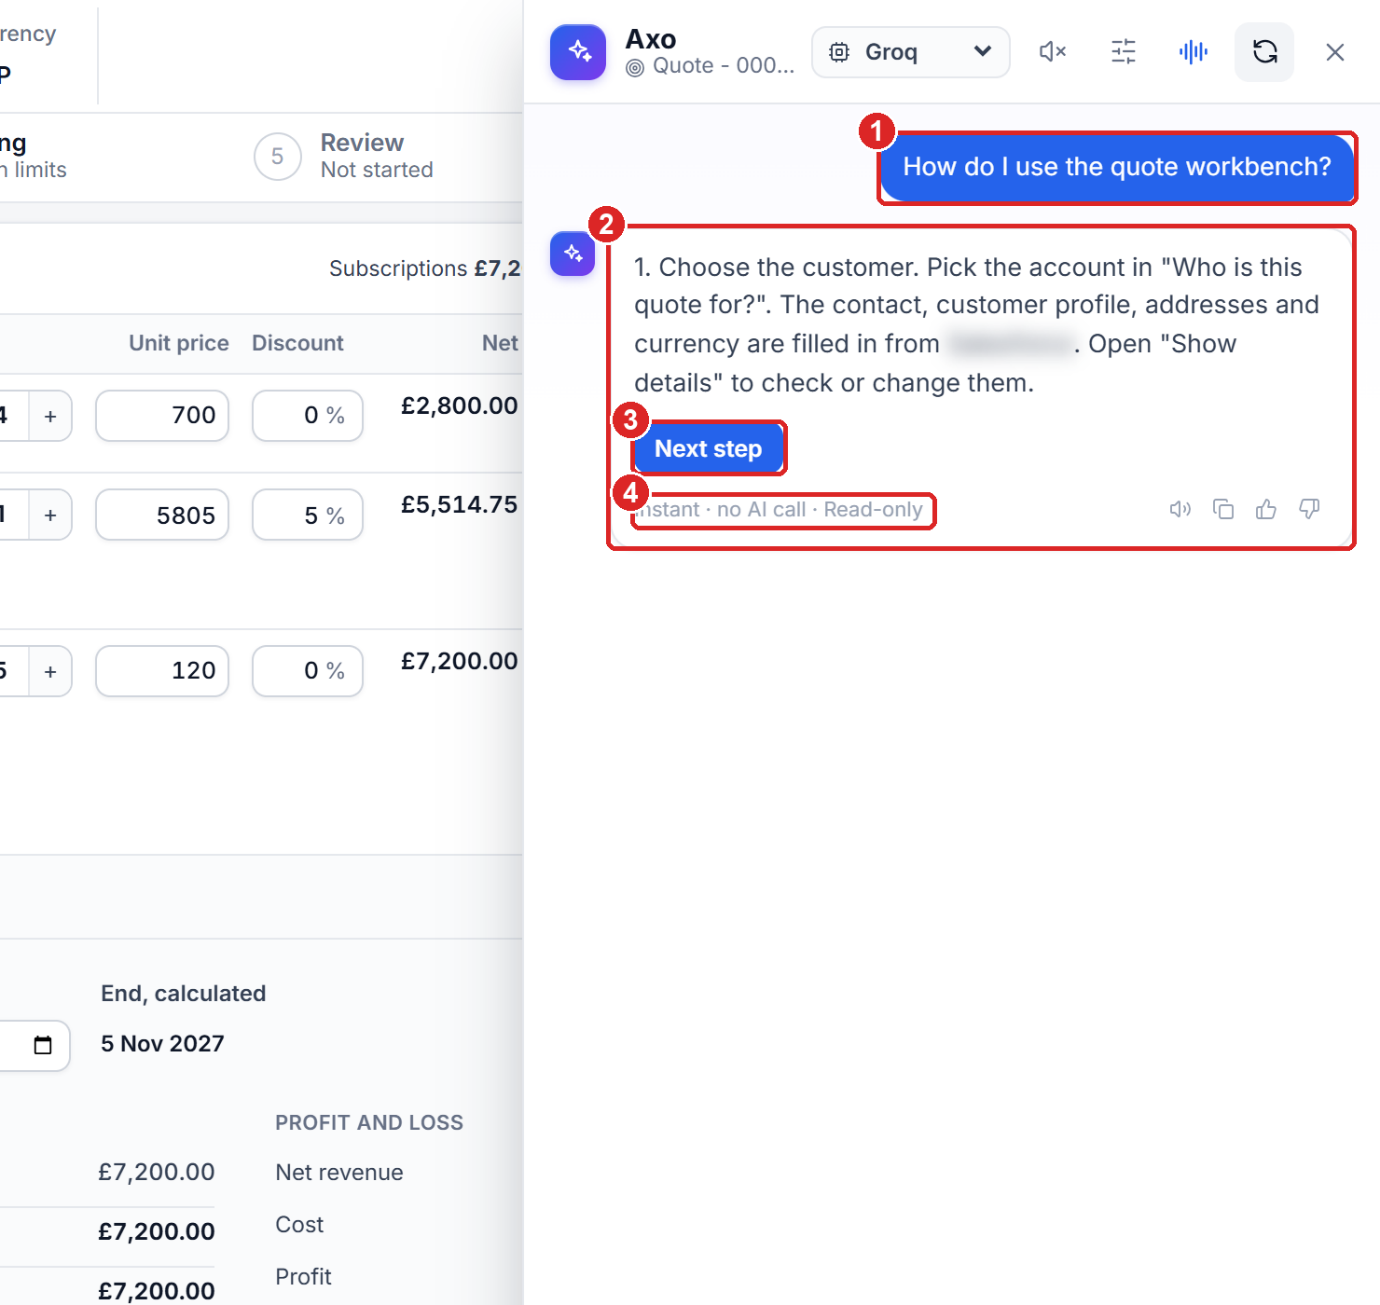
- Suggestion chip How do I use the quote workbench?
- Axo explains the quote steps one at a time.
- Next step – shows the next step of the walkthrough.
- Instant · no AI call · Read-only – built-in help, nothing is changed.
5.3 Axo Voice
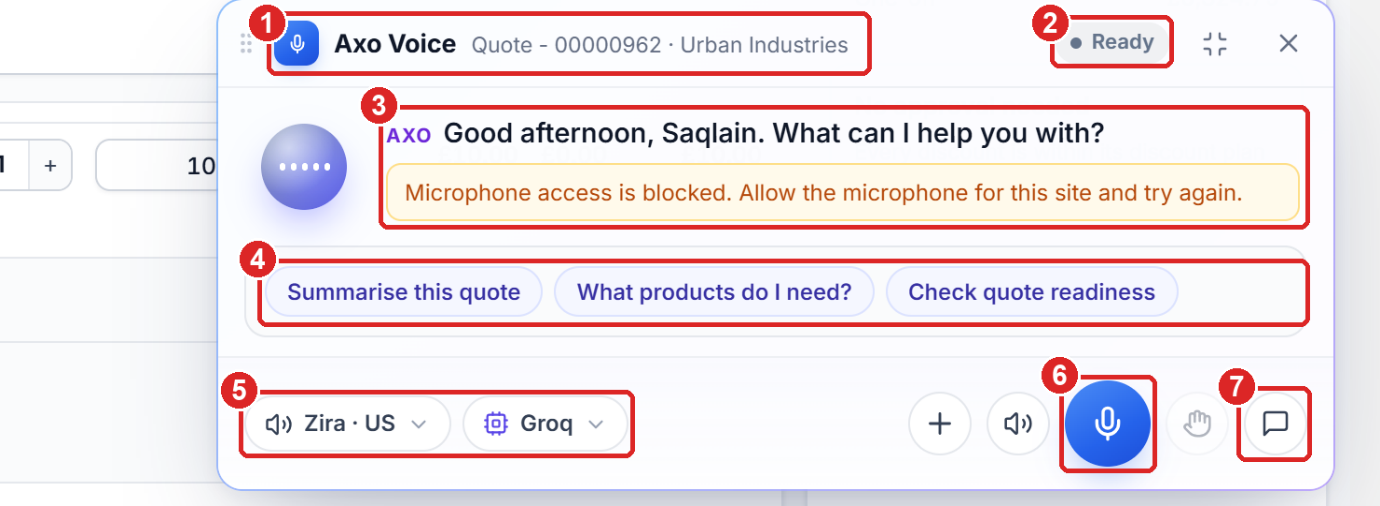
- Axo Voice – the quote it is working on.
- Status – Ready, Listening…, Speaking…
- Axo’s greeting. A yellow message appears if the browser blocks the microphone.
- Quick commands – Summarise this quote, What products do I need?, Check quote readiness.
- Voice and AI model.
- Microphone – start or stop listening.
- Open the conversation in Axo Chat.
Check quote readiness opens the full readiness review.
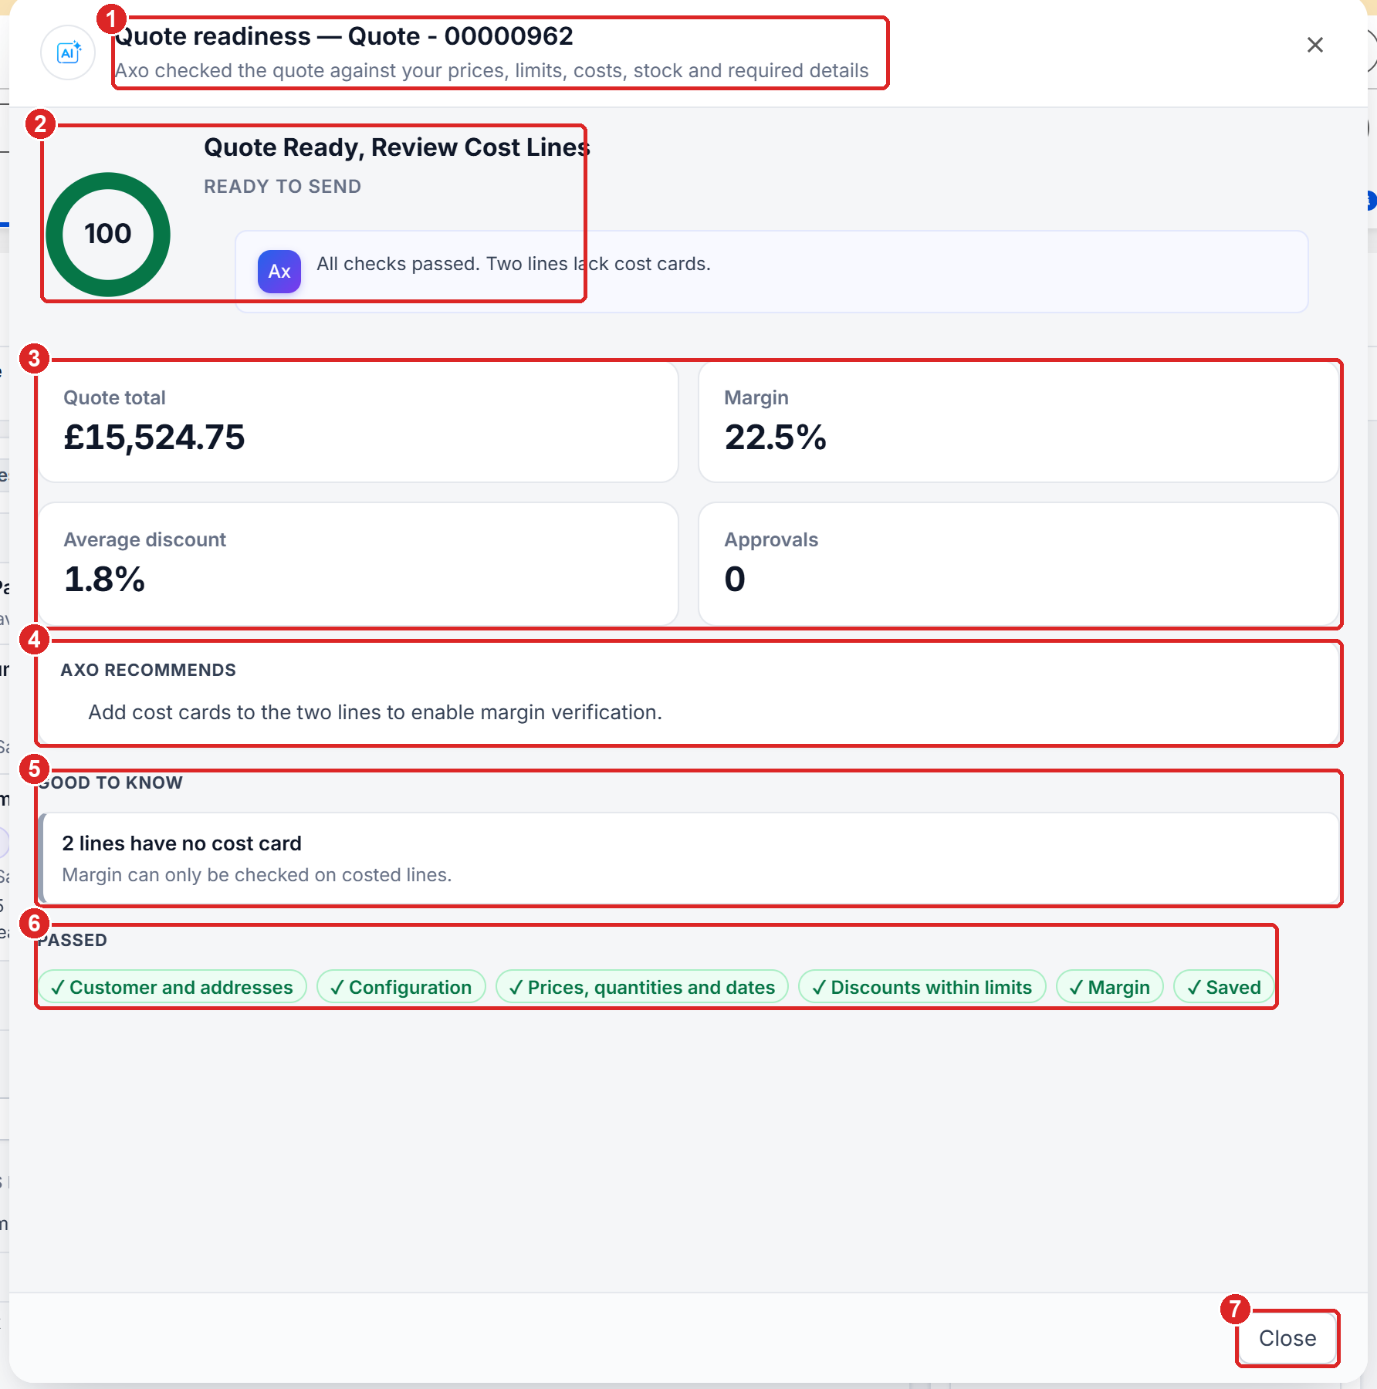
- Quote readiness – Axo checks the quote against prices, limits, costs, stock and required details.
- Readiness score (100) and result – Quote Ready, Review Cost Lines, READY TO SEND.
- Key figures – Quote total, Margin, Average discount, Approvals.
- Axo recommends – what to do next.
- Good to know – points to be aware of (two lines without a cost card).
- Passed – every check that passed.
- Close.
Note: Axo uses the AI model chosen in its header. If a model is not set up, Axo shows a connection or authentication error instead of an answer. Choose another model in the header.
Note: Your browser must allow the microphone for voice input. If it is blocked, Axo voice shows a yellow message; you can still click the quick commands.
Was this article helpful?