
Resource Dashboard
On this page
User Guide
Plan and run a technician’s day :claim jobs, track travel, handle exceptions, optimise the route and review every booking
About this guide
This guide shows field service technicians and dispatch supervisors how to run a working day from the Resource Dashboard picking up unassigned jobs, working through assigned bookings, recording travel and arrival, handling declines and no-shows, reassigning work, planning the driving route, and reviewing the full booking history.
Who this guide is for
| Role | What you use the dashboard for |
|---|---|
| Technician | See your own day, claim unassigned jobs, record travel and arrival, open the Service Workbench, decline a job you cannot take. |
| Dispatch supervisor | View any resource’s day, reassign work to an eligible colleague, review SLA risk and mark no-shows. |
Note Supervisor mode
The View Dashboard As lookup, the Reassign action and the Review eligible alternatives button appear only in supervisor mode. A technician sees their own day and the lookup is hidden.
Related screens
- Service Workbench :the guided eight-stage job screen. Opened directly from any assigned job card. See the Service Workbench User Guide.
- Service Appointment where service work orders are created and scheduled. See the Service Appointment User Guide.
- Service Parts Dispatcher allocate and dispatch stock to work orders. See the Service Parts Dispatcher User Guide.
- Service Operations Board the dispatch manager’s view across all resources. See the Service Operations Board User Guide.
- Service Configurator configure services, checklists and SLA rules. See the Service Configurator User Guide.
How to read this guide
| You see | It means |
|---|---|
| Bold text | A button, field, tab or label exactly as it appears on screen. |
| Numbered markers | Each number is explained in the table beneath the screenshot. |
| Tip, Note, Important, Axo boxes | Shortcuts, background, things to watch for, and where Axo can help. |
| Breadcrumb | The trail at the top left it tells you which of the four screens you are on. |
About the screenshots
The figures show the resource Matt Henry on 19 November 2026, with a solar panel installation and a solar panel maintenance visit around Toms River, New Jersey. Your screens show your own organization’s data.
PART 1
What the dashboard does, how to open it and how to point it at the right day.
01 What is the Resource Dashboard?
02 Opening the dashboard
03 Setting your context
CHAPTER 1
What is the Resource Dashboard?
One screen for a technician’s whole working day.
The Resource Dashboard is the technician’s home screen. It answers four questions: what am I doing today, what else could I pick up, how do I get there, and what have I done before?
It is organised as four screens, reached from the breadcrumb and the top-right buttons:
| Screen | What it is for |
|---|---|
| Daily Dispatch | The default view. Your shift, your assigned jobs for one date, and the pool of unassigned jobs you can claim. |
| Route Planning | The driving route for the date stops in visiting order, leg distances, estimated times and a map. |
| All Bookings | Every booking across a date range, searchable and filtered by status. |
| Reassign | Supervisor only. Eligible colleagues who are on shift and in range to take a job. |
Tip The dashboard is date-scoped
Daily Dispatch and Route Planning always show a single date, set by the Routing date field. All Bookings is the only screen that spans a range.
CHAPTER 2
Opening the dashboard
Reach the Resource Dashboard from the Salesforce navigation bar.
- Open the Salesforce app that contains the Resource Dashboard tab.
- Select Resources Dashboard in the navigation bar. If it is not visible, choose More, or use the App Launcher and search for “Resources Dashboard”.
- The dashboard opens on Daily Dispatch for today’s date.
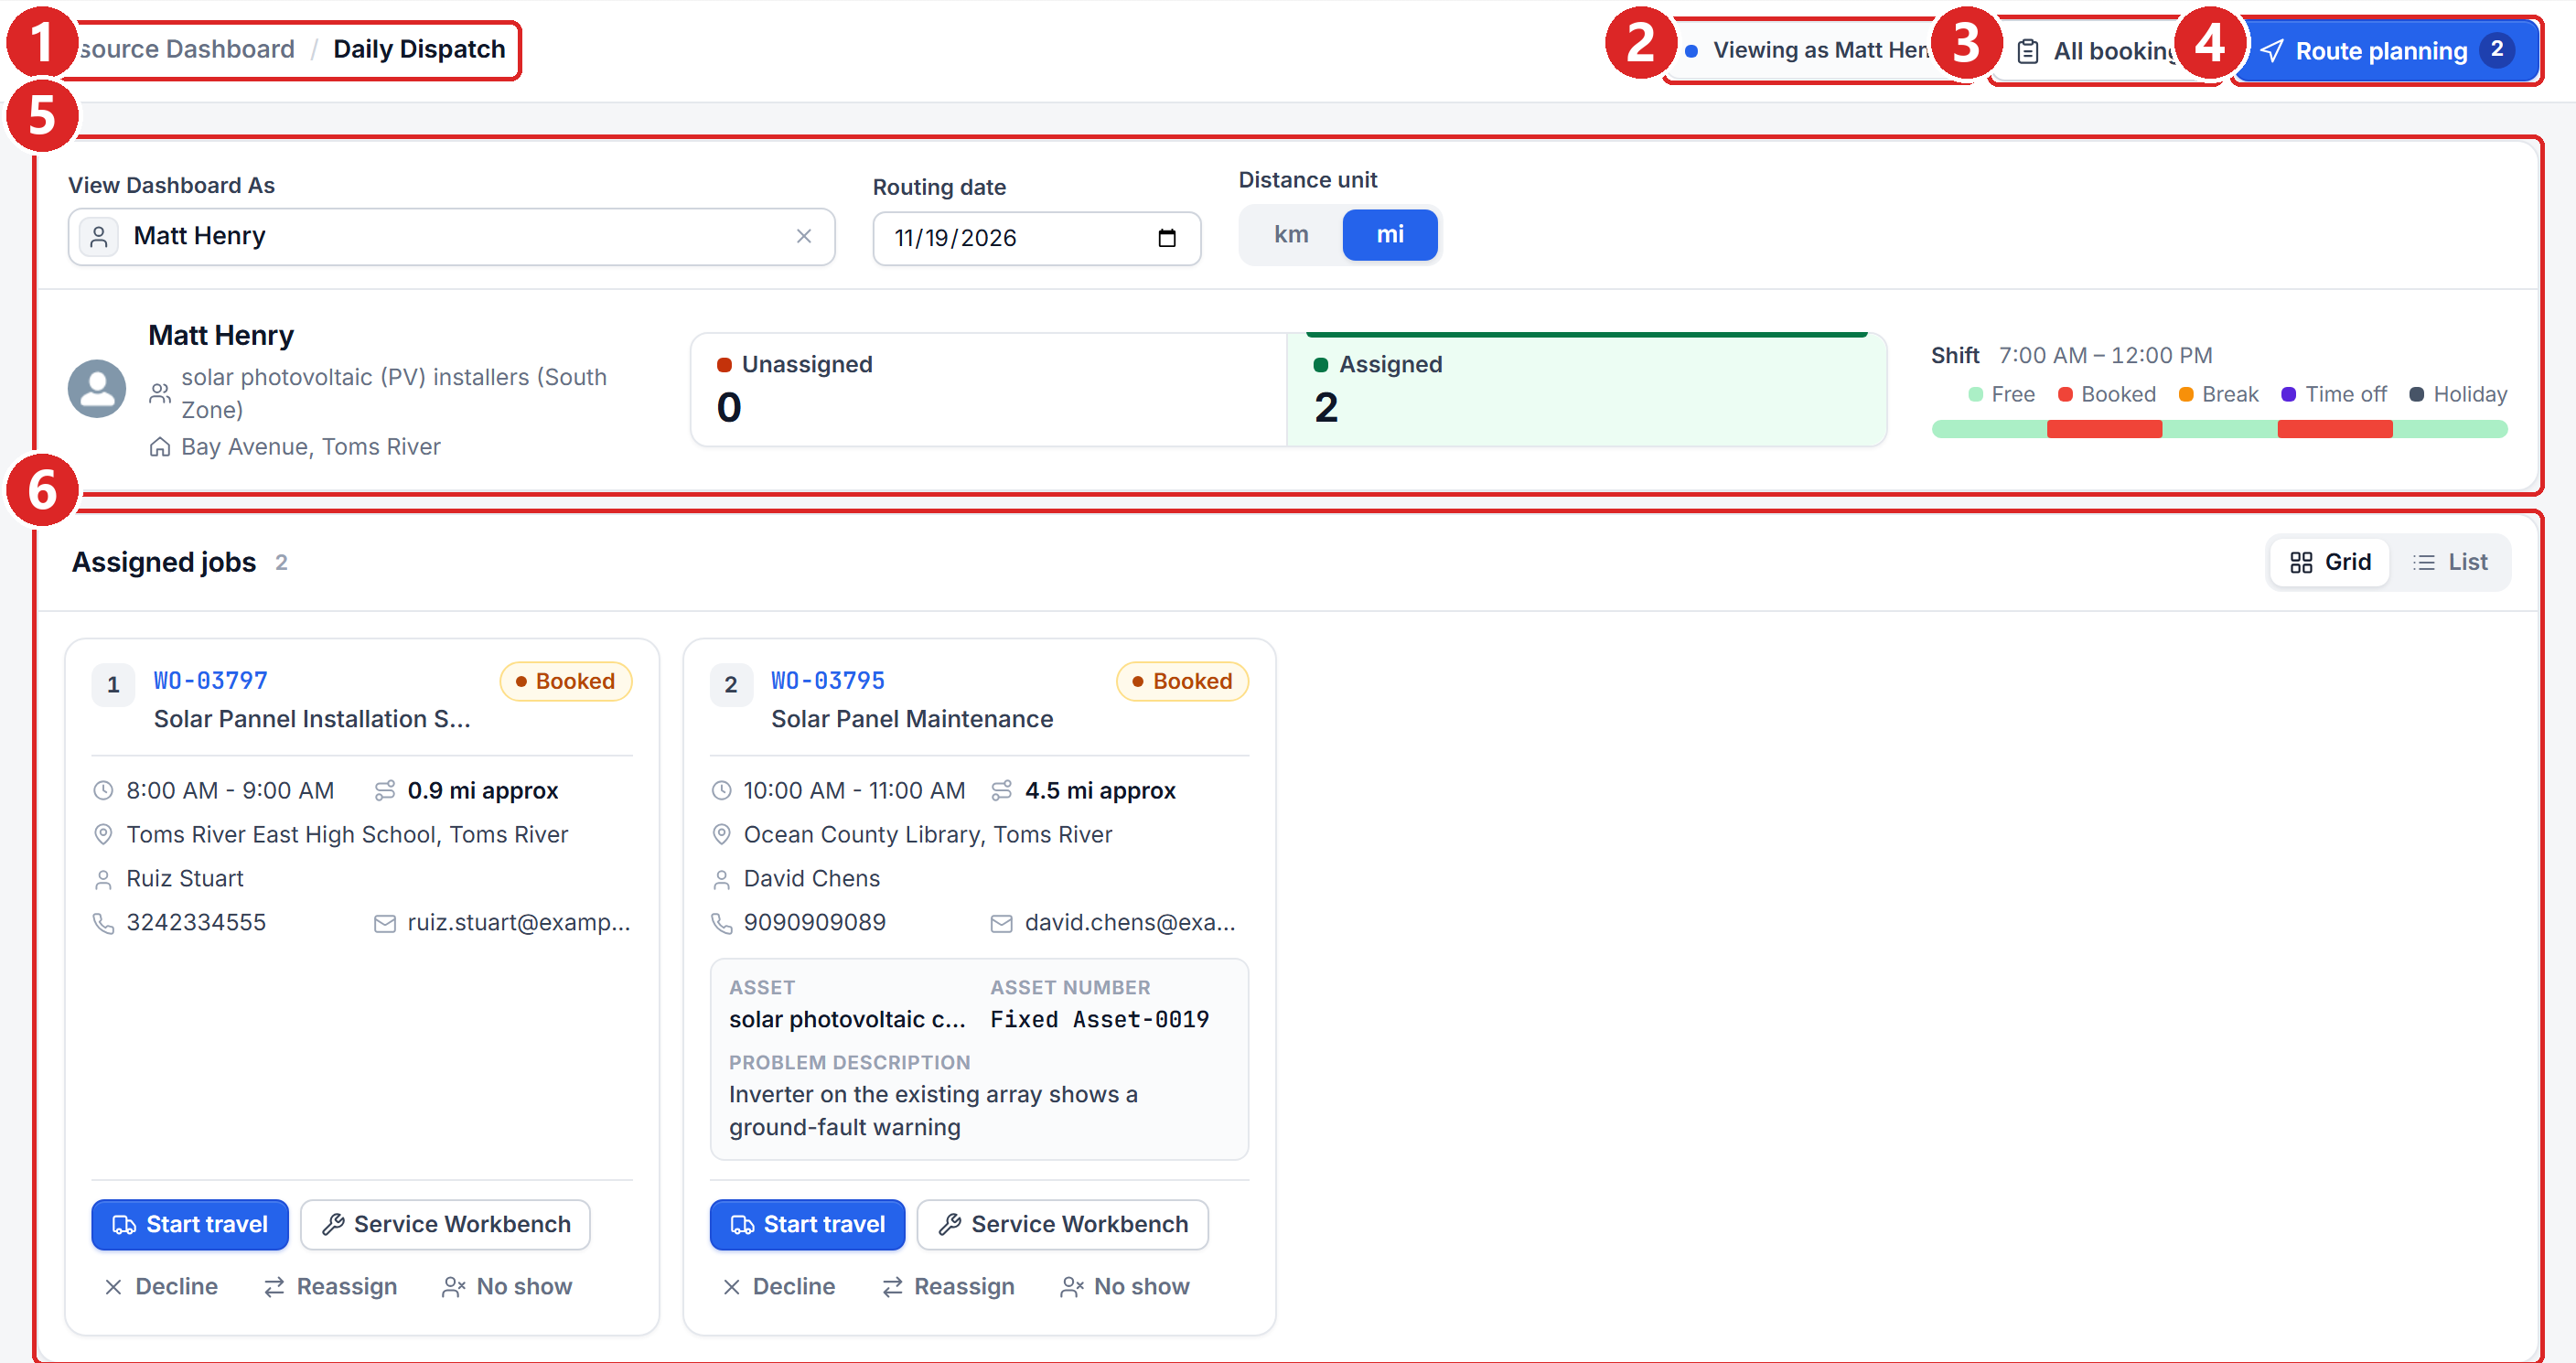
| # | Description |
|---|---|
| 1 | Breadcrumb Resource Dashboard / Daily Dispatch tells you which screen you are on. |
| 2 | Viewing as in supervisor mode, the resource whose day you are looking at. |
| 3 | All bookings opens the full booking history across a date range. |
| 4 | Route planning opens the driving route; the number is the count of assigned stops. |
| 5 | Context card resource, routing date, distance unit, shift bar and job tabs. |
| 6 | Job list the Unassigned or Assigned jobs for the selected date. |
CHAPTER 3
Setting your context
Three controls decide what the whole dashboard shows.

| # | Description |
|---|---|
| 1 | View Dashboard As supervisor only. Search and pick the resource whose day you want to see. |
| 2 | Routing date the single date that Daily Dispatch and Route Planning show. |
| 3 | Distance unit toggle between kilometres and miles. It changes every distance on the dashboard. |
| 4 | Resource identity name, resource group and home depot. |
| 5 | Job tabs Unassigned and Assigned, each with a live count. Select one to switch the list below. |
| 6 | Shift bar the booked and free blocks across the shift window. |
View Dashboard As
In supervisor mode, type part of a resource’s name and pick them from the list. The lookup only offers resources whose group is required by an on-site service, so you cannot accidentally select someone who does not do field work.
Routing date
Changing the routing date reloads the shift, both job tabs and the route plan. In the figures throughout this guide the date is set to 19 November 2026.
Distance unit
The Km / Miles switch changes the unit on job cards, on the reassign screen and throughout route planning.
Note No shift scheduled
If the resource is not rostered on the selected date, the shift bar is replaced by an amber “No shift scheduled” notice. Jobs can still be viewed, but the day has no shift window to plan against.
PART 2
Daily Dispatch
Claim work, review your bookings and read a job card.
04 Unassigned and Assigned
05 Claiming an unassigned job
06 Your assigned jobs
07 Anatomy of a job card
08 Grid and list layouts
CHAPTER 4
Unassigned and Assigned
Two tabs split the day into work you could take and work you already have.
| Tab | Shows | Main action |
|---|---|---|
| Unassigned | Bookings on the selected date that nobody has picked up yet, and that this resource is eligible for. | Assign to me |
| Assigned | Bookings already allocated to this resource for the selected date, in start-time order. | Start travel, Arrived, Service Workbench |
The number beside each tab is a live count. Selecting a tab swaps the list underneath; it does not change the route plan, which always follows the assigned jobs.
CHAPTER 5
Claiming an unassigned job
Pick up work from the shared pool.
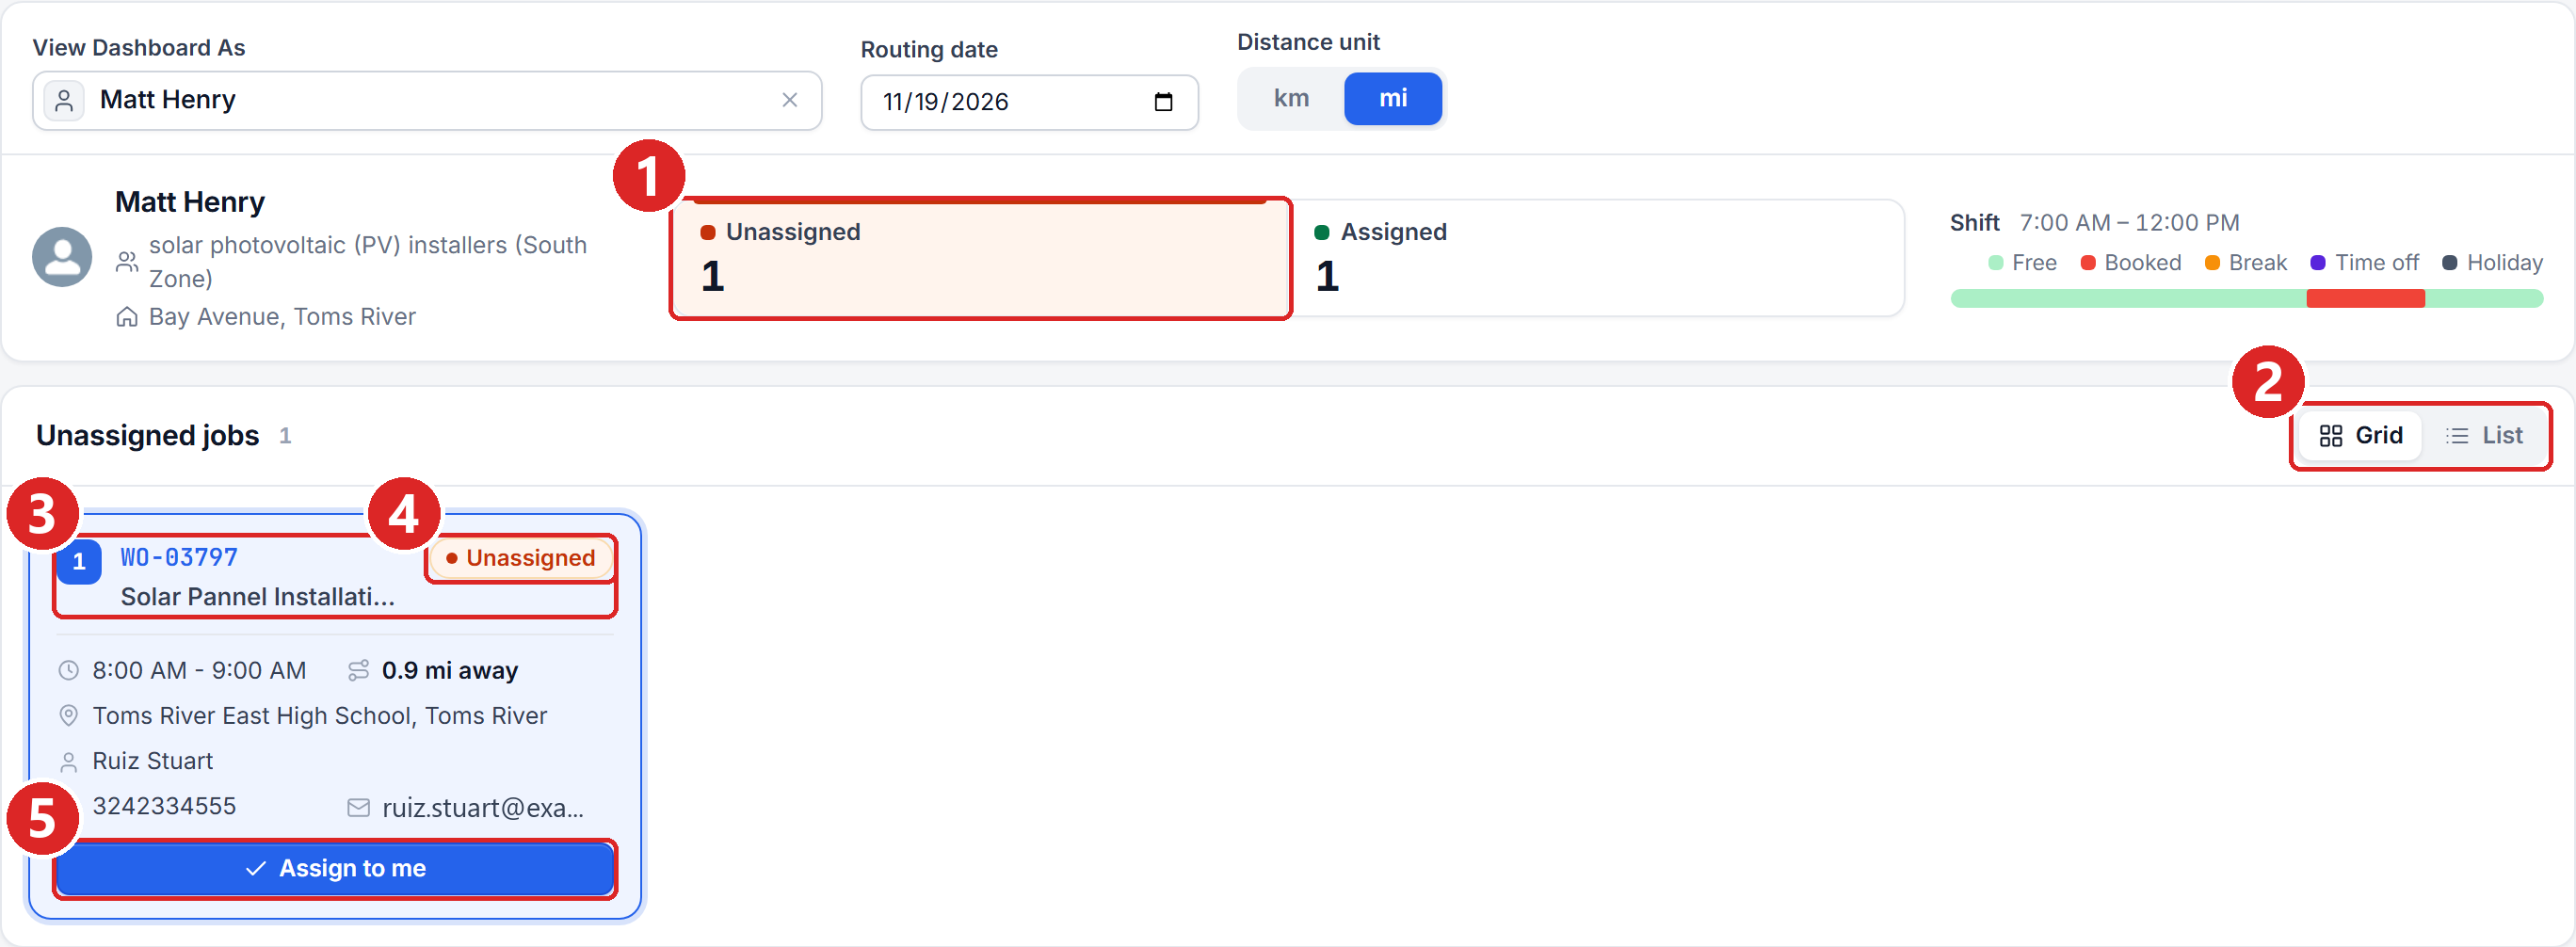
| # | Description |
|---|---|
| 1 | Unassigned tab, with the count of bookings waiting to be claimed. |
| 2 | Layout switch Grid shows cards, List shows a table. |
| 3 | Job card sequence number, job number and service. |
| 4 | Unassigned badge, in place of a booking status. |
| 5 | Assign to me appears when you select the card. |
When bookings are waiting, each appears as a card carrying the same facts as an assigned job sequence number, job number, service, time window, approximate distance, site and customer with an Unassigned badge in place of a status.
- Select the Unassigned tab.
- Select a job card. The card expands to reveal the Assign to me button.
- Select Assign to me. The booking is allocated to the resource and moves to the Assigned tab.
A job lands in the pool when nobody holds it, including a job another technician has declined. In Figure 5.1, WO-03797 has just been declined; selecting Assign to me claims it back.
Important Eligibility is enforced on the server
Assignment is validated server-side against the resource group, shift and any overlapping booking. If the job cannot be taken, the assignment is rejected and the reason is shown the card stays in the Unassigned list.
Notifications for new jobs
When a booking is made without a technician, the technicians who could take it are notified in Salesforce under the bell on the desktop, and on the Salesforce mobile app. Select the notification to open the Resource Dashboard on the job’s date, then claim the job from the Unassigned tab.
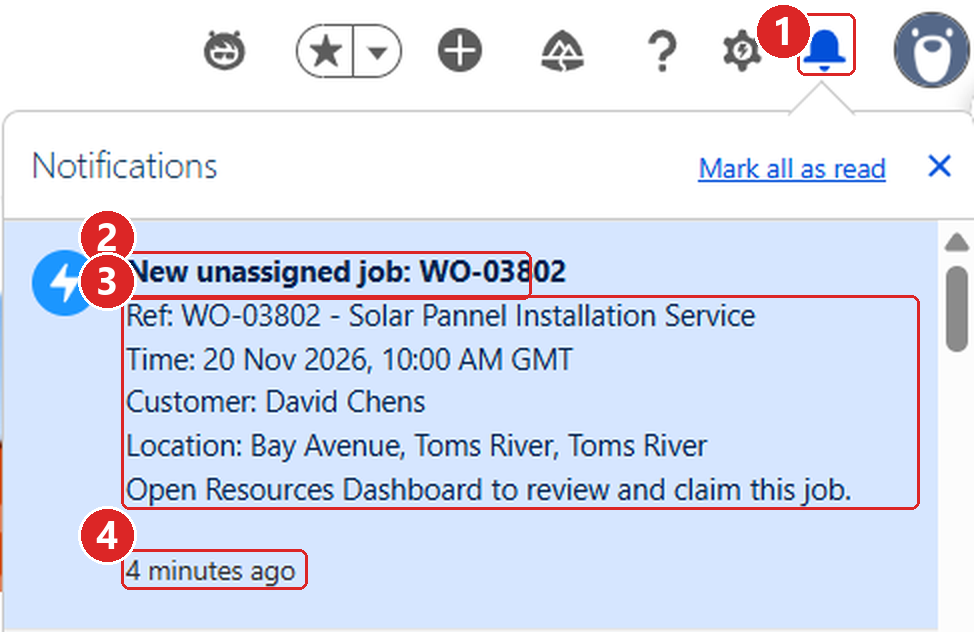
| # | Description |
|---|---|
| 1 | Notifications the bell shows new alerts. |
| 2 | Title, with the job number. |
| 3 | Service, appointment time in your own time zone, customer and location. |
| 4 | When the notification arrived. |
Note Who is notified
Technicians in the resource groups the service needs, whose depot is within the group’s service radius of the customer (50 km when no radius is set). A technician who declined the job is not notified about it again, and no one is notified about a job that is already staffed or in the past.
CHAPTER 6
Your assigned jobs
The day’s bookings, in the order you will visit them.
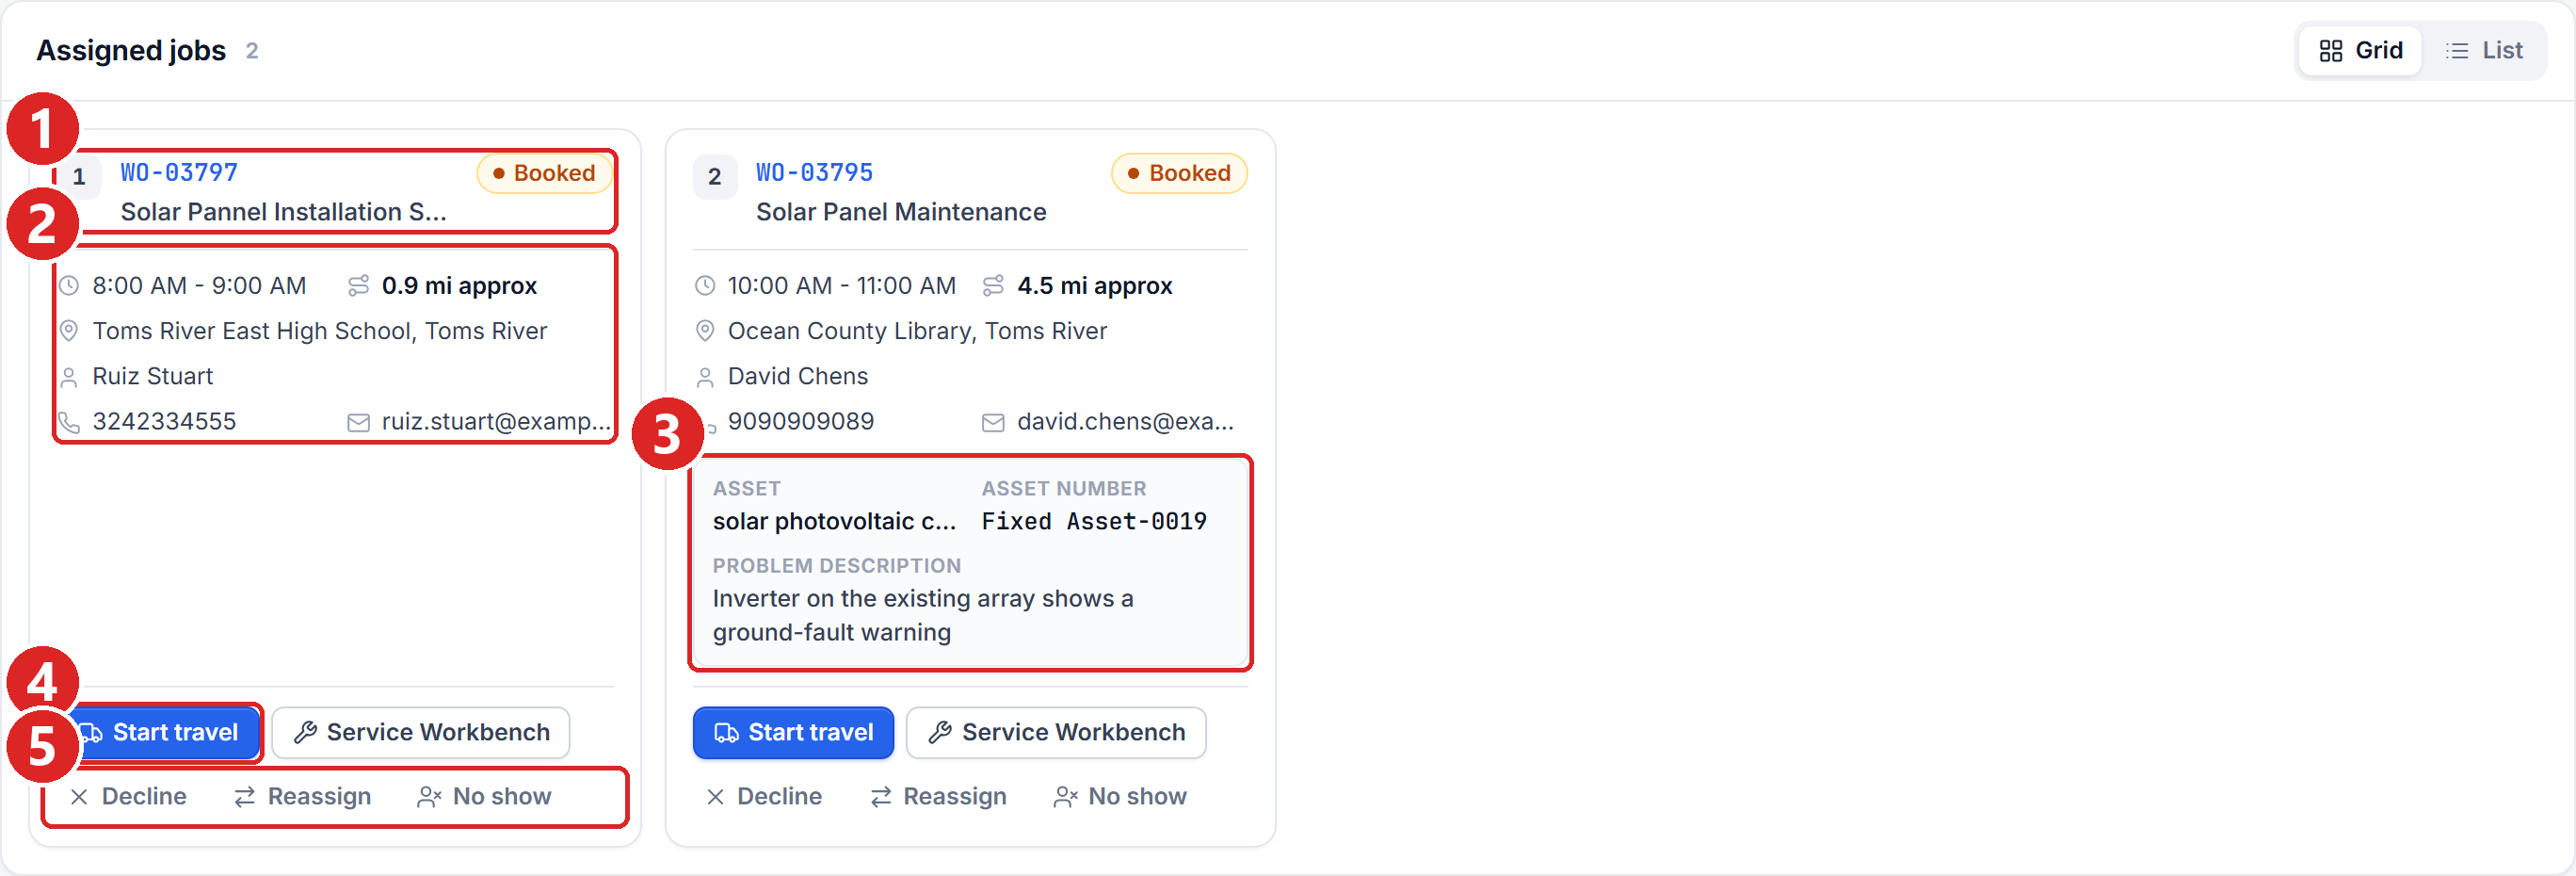
| # | Description |
|---|---|
| 1 | Sequence number, job number, service and status badge. The sequence is the visiting order, by start time; select the job number to open the work order record. |
| 2 | Job facts time window, approximate travel distance, site, customer, phone and email. |
| 3 | Job context asset, asset number and problem description, when the work order carries them. |
| 4 | Job progression Start travel, then Arrived, then Service Workbench. |
| 5 | Assignment actions Decline, Reassign (supervisor mode) and No show. |
SLA warnings
When a booked job is likely to start late, its card shows an SLA warning. In supervisor mode the card also offers Review eligible alternatives, which opens the Reassign screen for that job.
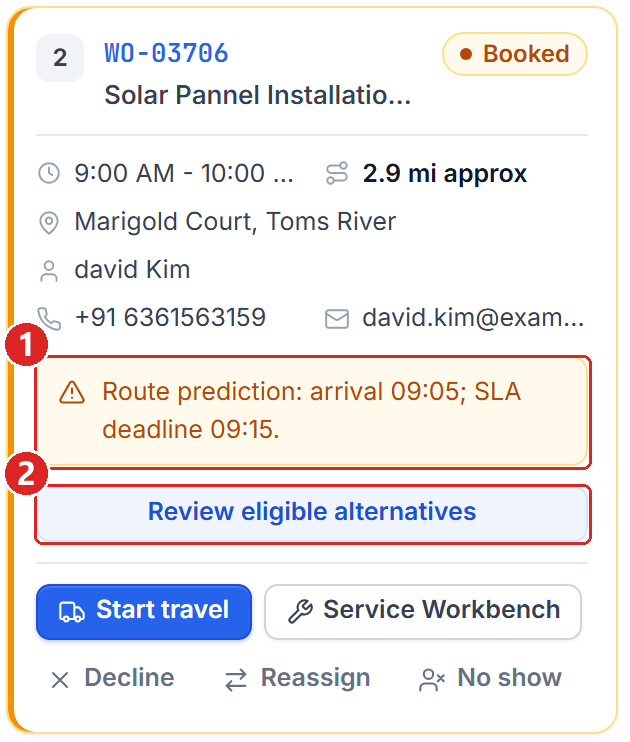
| # | Description |
|---|---|
| 1 | SLA warning the predicted arrival and the SLA deadline. |
| 2 | Review eligible alternatives supervisor shortcut to the Reassign screen. |
Note The warning is a travel-time prediction
For each booked job the dashboard takes the time the resource becomes free the start of the shift, or the end of the previous job and adds the estimated drive time to the site, about 1.5 minutes per kilometre. If that arrival is after the job’s start time the job is at risk; if it is also later than the start plus the resource group’s SLA tolerance it is breached and the card turns red. In Figure 6.2 the predicted arrival is 09:05 against a 09:15 deadline. Warnings appear when AI is enabled for service appointments.
CHAPTER 7
Anatomy of a job card
Everything the card tells you before you set off.
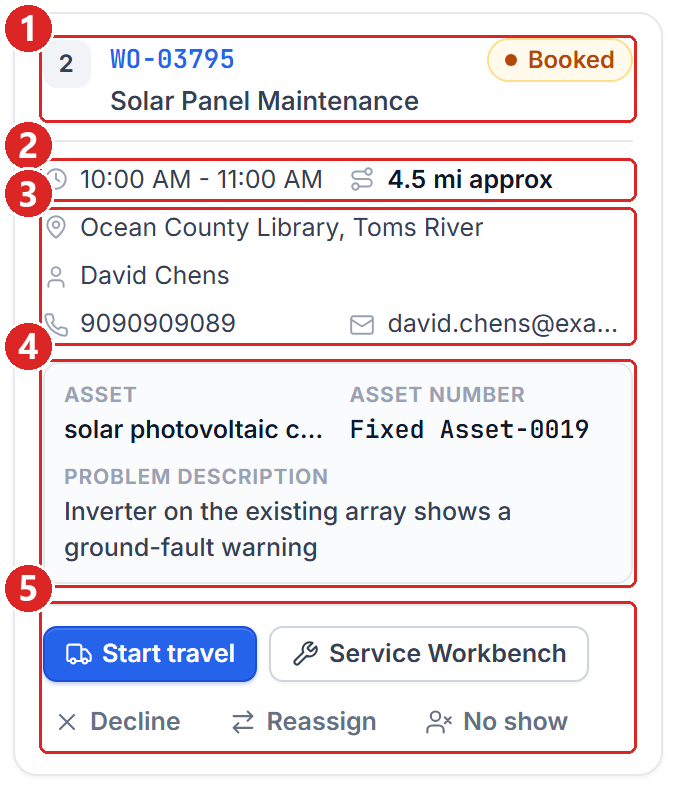
| # | Description |
|---|---|
| 1 | Sequence, job number, service name and status badge. |
| 2 | Time window and approximate travel distance from the previous stop. |
| 3 | Site and customer, with tap-to-call phone and email. |
| 4 | Asset, asset number and problem description, when the work order carries them. |
| 5 | Action row job progression first, assignment actions beneath. |
Job context
When the work order names an asset or records a reported problem, the card shows an Asset, Asset number and Problem description block. This is the same problem text the Service Workbench shows on its Job Brief stage, so you arrive already knowing what was reported.
CHAPTER 8
Grid and list layouts
Switch between cards and a dense table.

| # | Description |
|---|---|
| 1 | Layout switch Grid shows cards, List shows a table. |
| 2 | Table columns sequence, job, time, location, customer, status and actions. |
| 3 | Status column also carries the travel clock and any SLA warning. |
| 4 | Actions the same actions as on the card. |
Grid is easier to read on a phone; list fits more jobs on a laptop screen. The choice applies to both job tabs and to All Bookings.
PART 3
Running the day
Travel, arrival, the handover to the Service Workbench, and the exceptions.
09 Start travel and Arrived
10 Opening the Service Workbench
11 Declining a job
12 Marking a no show
13 Reassigning a job
CHAPTER 9
Start travel and Arrived
Record the journey so dispatch can see where you are.
| Button | What it records | What appears next |
|---|---|---|
| Start travel | Marks the moment you set off for this job. | A live travel clock on the card, and the Navigate and Arrived buttons. |
| Navigate | Opens the site address in the device map application. | The card is unchanged; this is a convenience link. |
| Arrived | Marks the moment you reached the site. | The travel clock stops and the Service Workbench button becomes the next step. |
While you travel, the card shows a live Travel time clock. After Arrived it changes to an On site clock and also shows how long the journey took. Both appear on the card in grid layout and in the status column in list layout.
Note: Travel does not move the SLA warning
SLA warnings are worked out from the schedule and the drive time between sites, not from live travel. Start travel and Arrived record what actually happened for dispatch; they do not change the predicted arrival.
CHAPTER 10
Opening the Service Workbench
Hand over from planning the job to doing it.
Select Service Workbench on an assigned job card to open the guided job screen for that work order. The dashboard passes the work order, its name, the work centre and the selected date straight through, so the Workbench opens on the Job Brief stage with the job already loaded.
The Workbench then takes you through safety checks, diagnosis, tasks, parts, evidence, notes and sign-off. See the Service Workbench User Guide for the full eight-stage flow.
Note Returning to the dashboard
The Workbench remembers that it was opened from the Resource Dashboard and offers a route back, so you can finish a job and pick up the next one without navigating from scratch.
CHAPTER 11
Declining a job
Hand a booking back when you cannot take it.
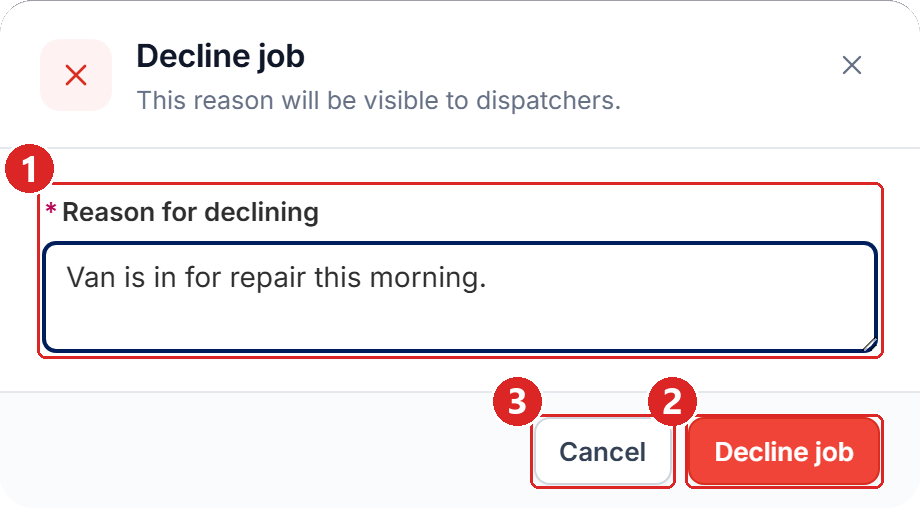
| # | Description |
|---|---|
| 1 | Reason for declining required, up to 255 characters. |
| 2 | Decline job releases the assignment and records the reason. |
| 3 | Cancel closes the dialog and changes nothing. |
- Select Decline on the job card.
- Enter the reason for example lacking required equipment, or a vehicle breakdown.
- Select Decline job. The booking is released and the reason is visible to dispatchers.
Important Declines are visible and permanent
The reason you type is shown to dispatch and appears against the booking in All Bookings under the Declined filter. Declining releases the assignment so somebody else can pick the job up.
CHAPTER 12
Marking a no show
Close a booking where the customer could not be served.
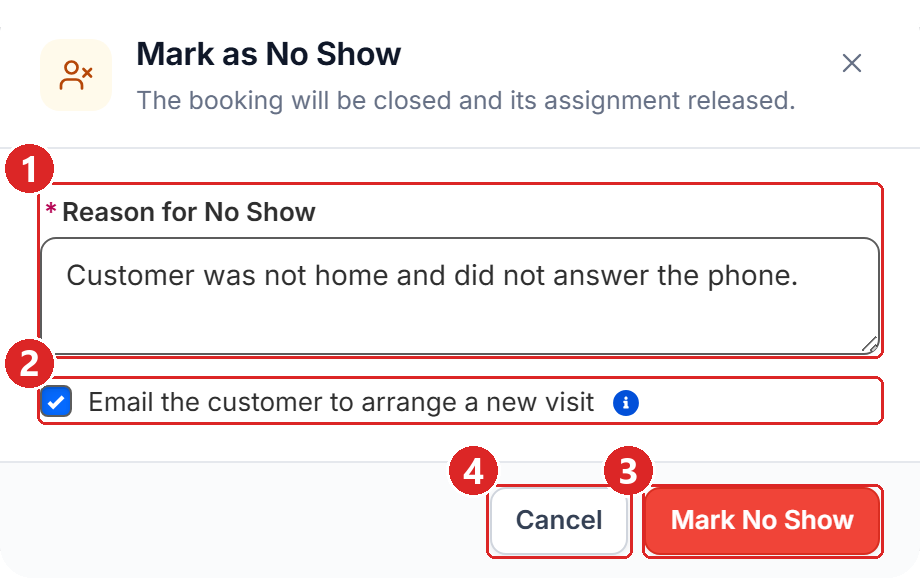
| # | Description |
|---|---|
| 1 | Reason for No Show required, up to 255 characters. |
| 2 | Email the customer to arrange a new visit sends the no-show email, with this reason. |
| 3 | Mark No Show closes the booking and releases the assignment. |
| 4 | Cancel closes the dialog and changes nothing. |
Use a no show when you attended but could not carry out the work the customer was not home, there was no access to the property, or the address was wrong. The booking is closed and its assignment released.
Note No show versus Decline
Decline means “I cannot take this job” and is usually recorded before you travel. No show means “I attended and could not do the work”. They end up under different status filters in All Bookings.
Emailing the customer
Tick Email the customer to arrange a new visit to send the no-show email in the same step. It tells the customer the technician called but could not meet them, includes the reason you entered, and asks them to get in touch to arrange another visit.
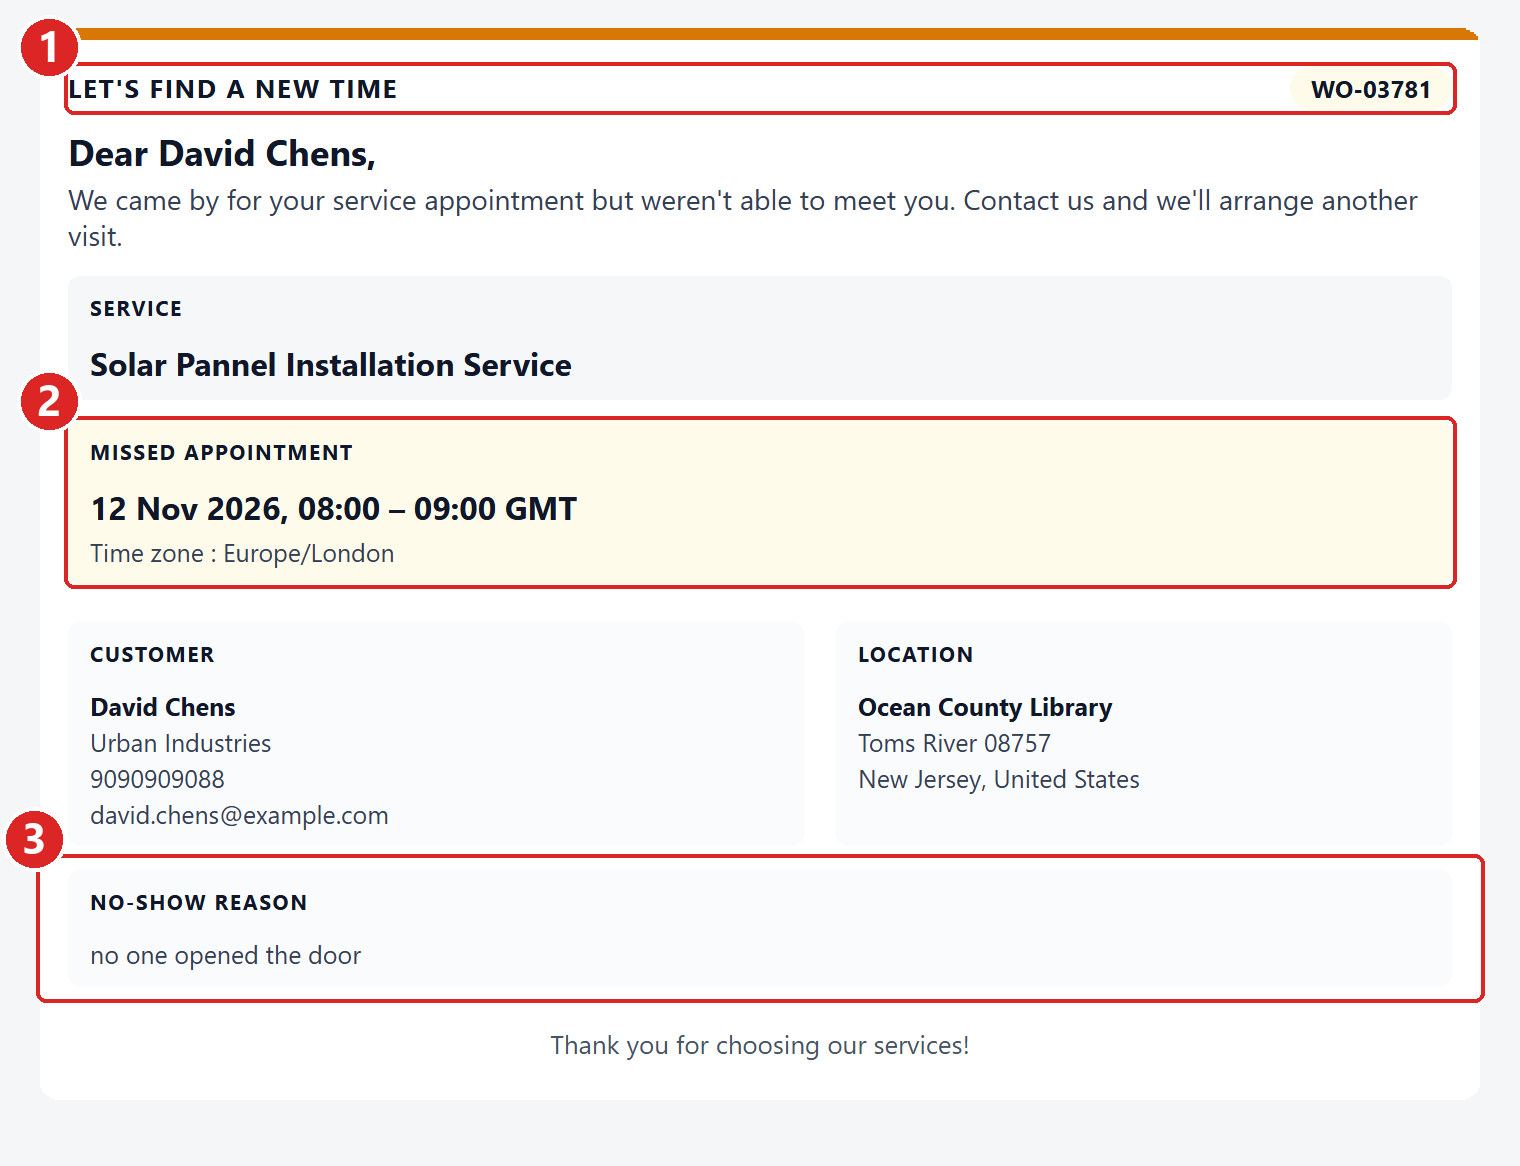
| # | Description |
|---|---|
| 1 | Heading and work order number. |
| 2 | The missed appointment, in the service time zone. |
| 3 | The reason entered in the Mark as No Show dialog. |
Note Opted-in customers are emailed automatically
A customer who opted in to booking emails receives this email automatically, ticked or not, and never twice. The booking is marked No Show first; if the email cannot be sent, a warning says so and the No Show still stands.
CHAPTER 13
Reassigning a job
Supervisor only move a booking to a colleague who can take it.
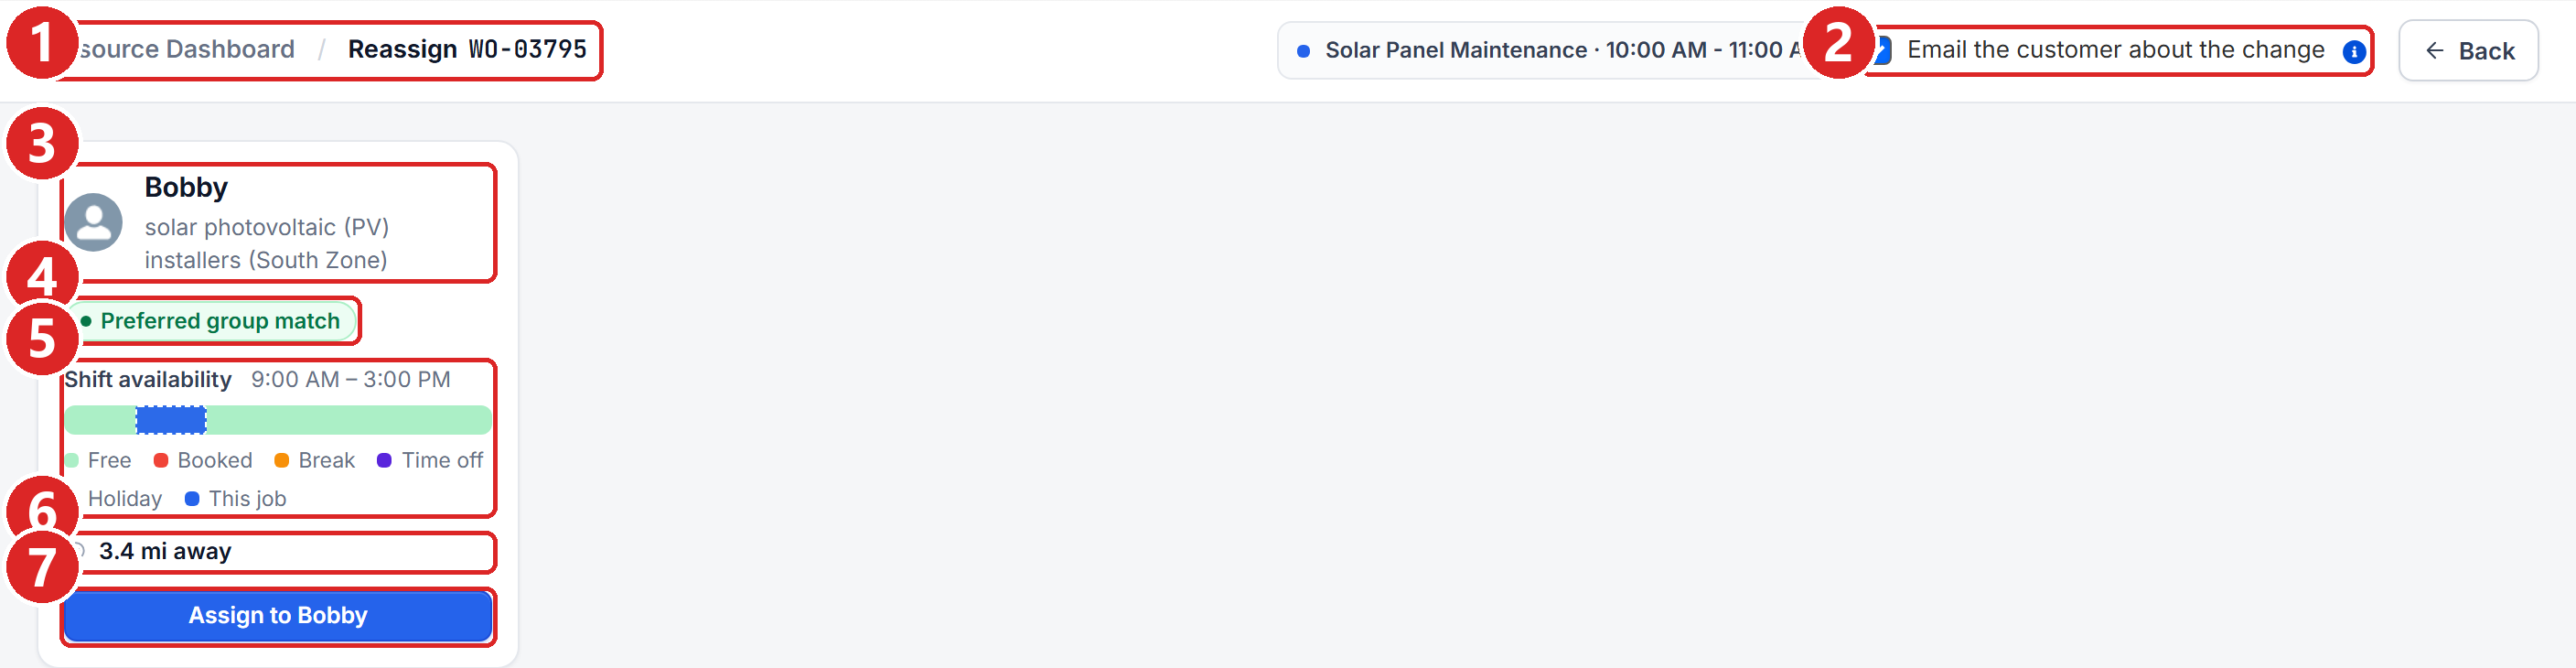
| # | Description |
|---|---|
| 1 | Breadcrumb shows which job number is being reassigned. |
| 2 | Email the customer about the change sends the Service Team Updated email with the new technician. |
| 3 | Resource card name, resource group and photo. |
| 4 | Preferred group match flags a resource in the group the service asks for. |
| 5 | Shift availability free and booked blocks, with this job overlaid so you can see whether it fits. |
| 6 | Distance how far this resource is from the job site, in the selected unit. |
| 7 | Assign to moves the booking to that resource. |
Reach this screen either from Reassign on a job card, or from Review eligible alternatives on a job that is at risk of breaching its SLA. The list only contains resources who are on shift and within range on the selected date.
Note When nobody is eligible
If no colleague is on shift and within radius, the screen shows “No available resources” instead of cards. The job stays where it is.
Telling the customer
Tick Email the customer about the change at the top of the Reassign screen before you select Assign to. The customer then receives the Service Team Updated email, naming the technician who will now attend. The appointment date and time do not change.
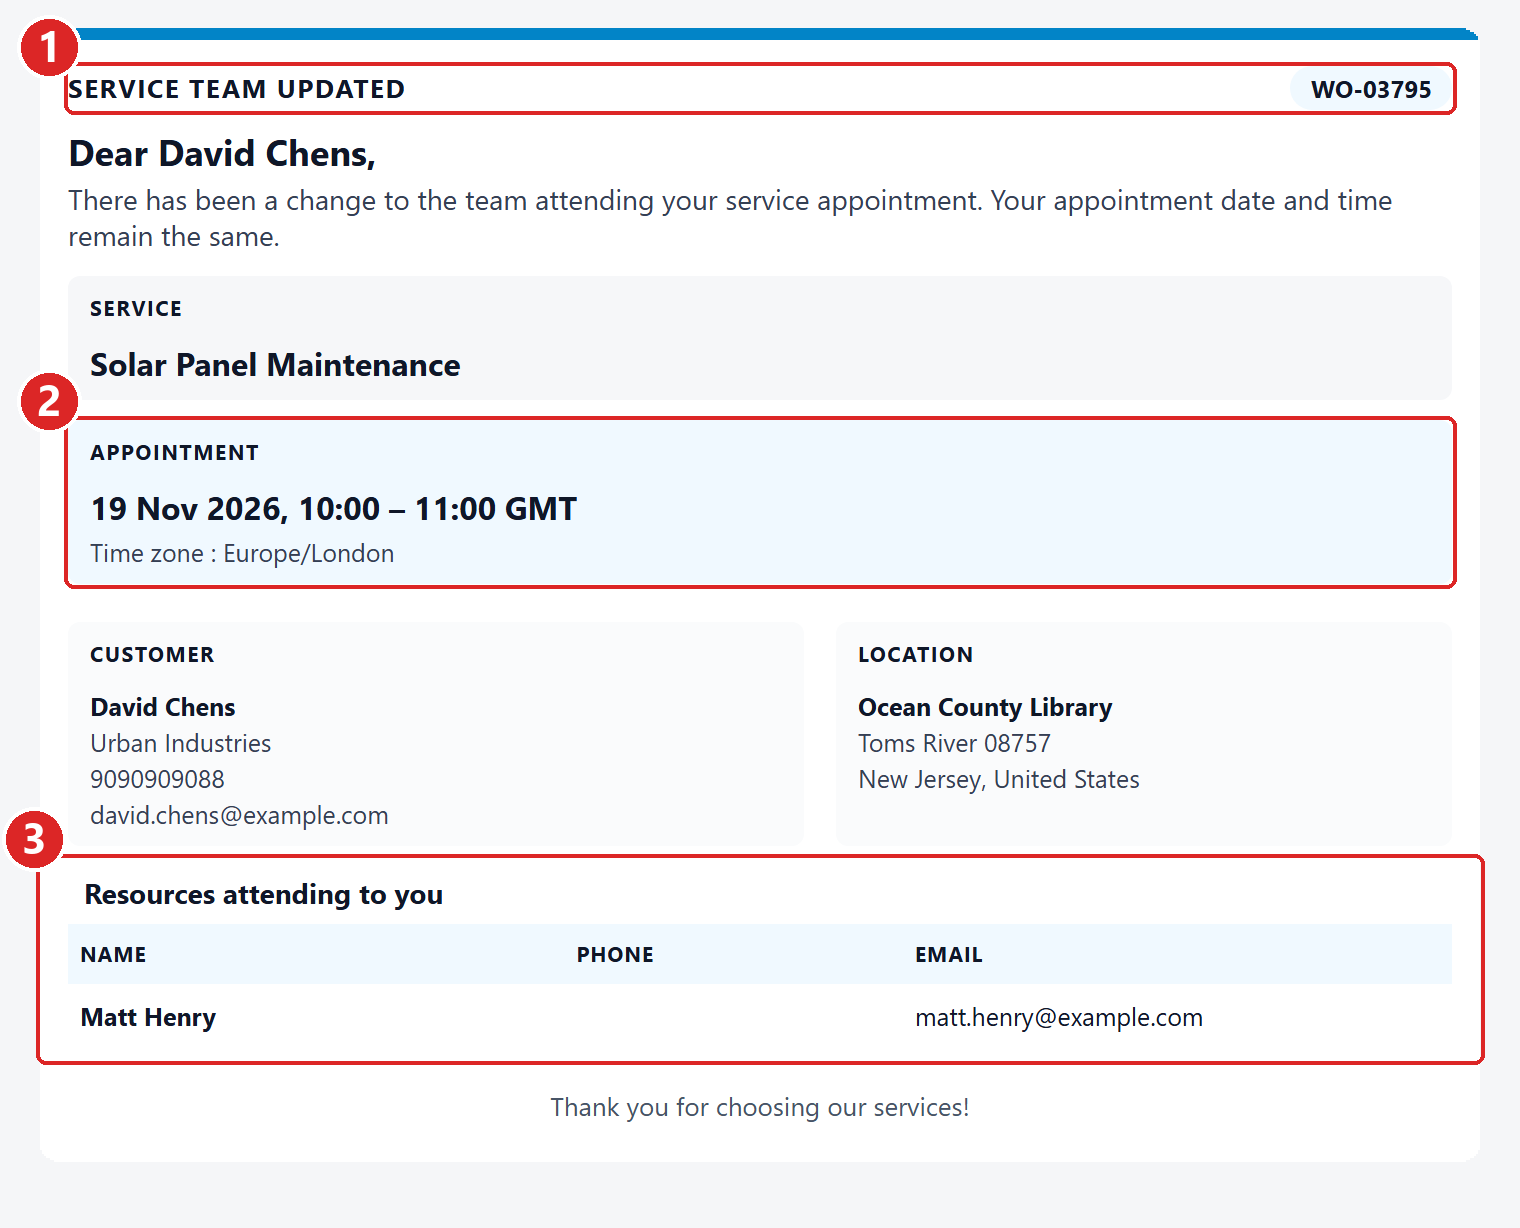
| # | Description |
|---|---|
| 1 | Heading and work order number. |
| 2 | The appointment unchanged by the reassignment. |
| 3 | The technician now attending, with their contact details. |
Note: Opted-in customers are told automatically
Customers who opted in to booking emails receive this email automatically when a booked job changes technician. The reassignment is saved first; if the email cannot be sent, a warning says so and the new assignment stands.
PART 4
Route planning
Turn the day’s bookings into a driving route.
14 The route summary
15 Route preview and map
CHAPTER 14
The route summary
Four numbers that describe the whole day.

| # | Description |
|---|---|
| 1 | Stops bookings assigned for this date. |
| 2 | Completed stops already completed or marked no show. |
| 3 | Remaining stops still to visit. |
| 4 | Total distance depot out, round every stop, and back to the depot. |
CHAPTER 15
Route preview and map
Stops in visiting order, with leg distances and a map.
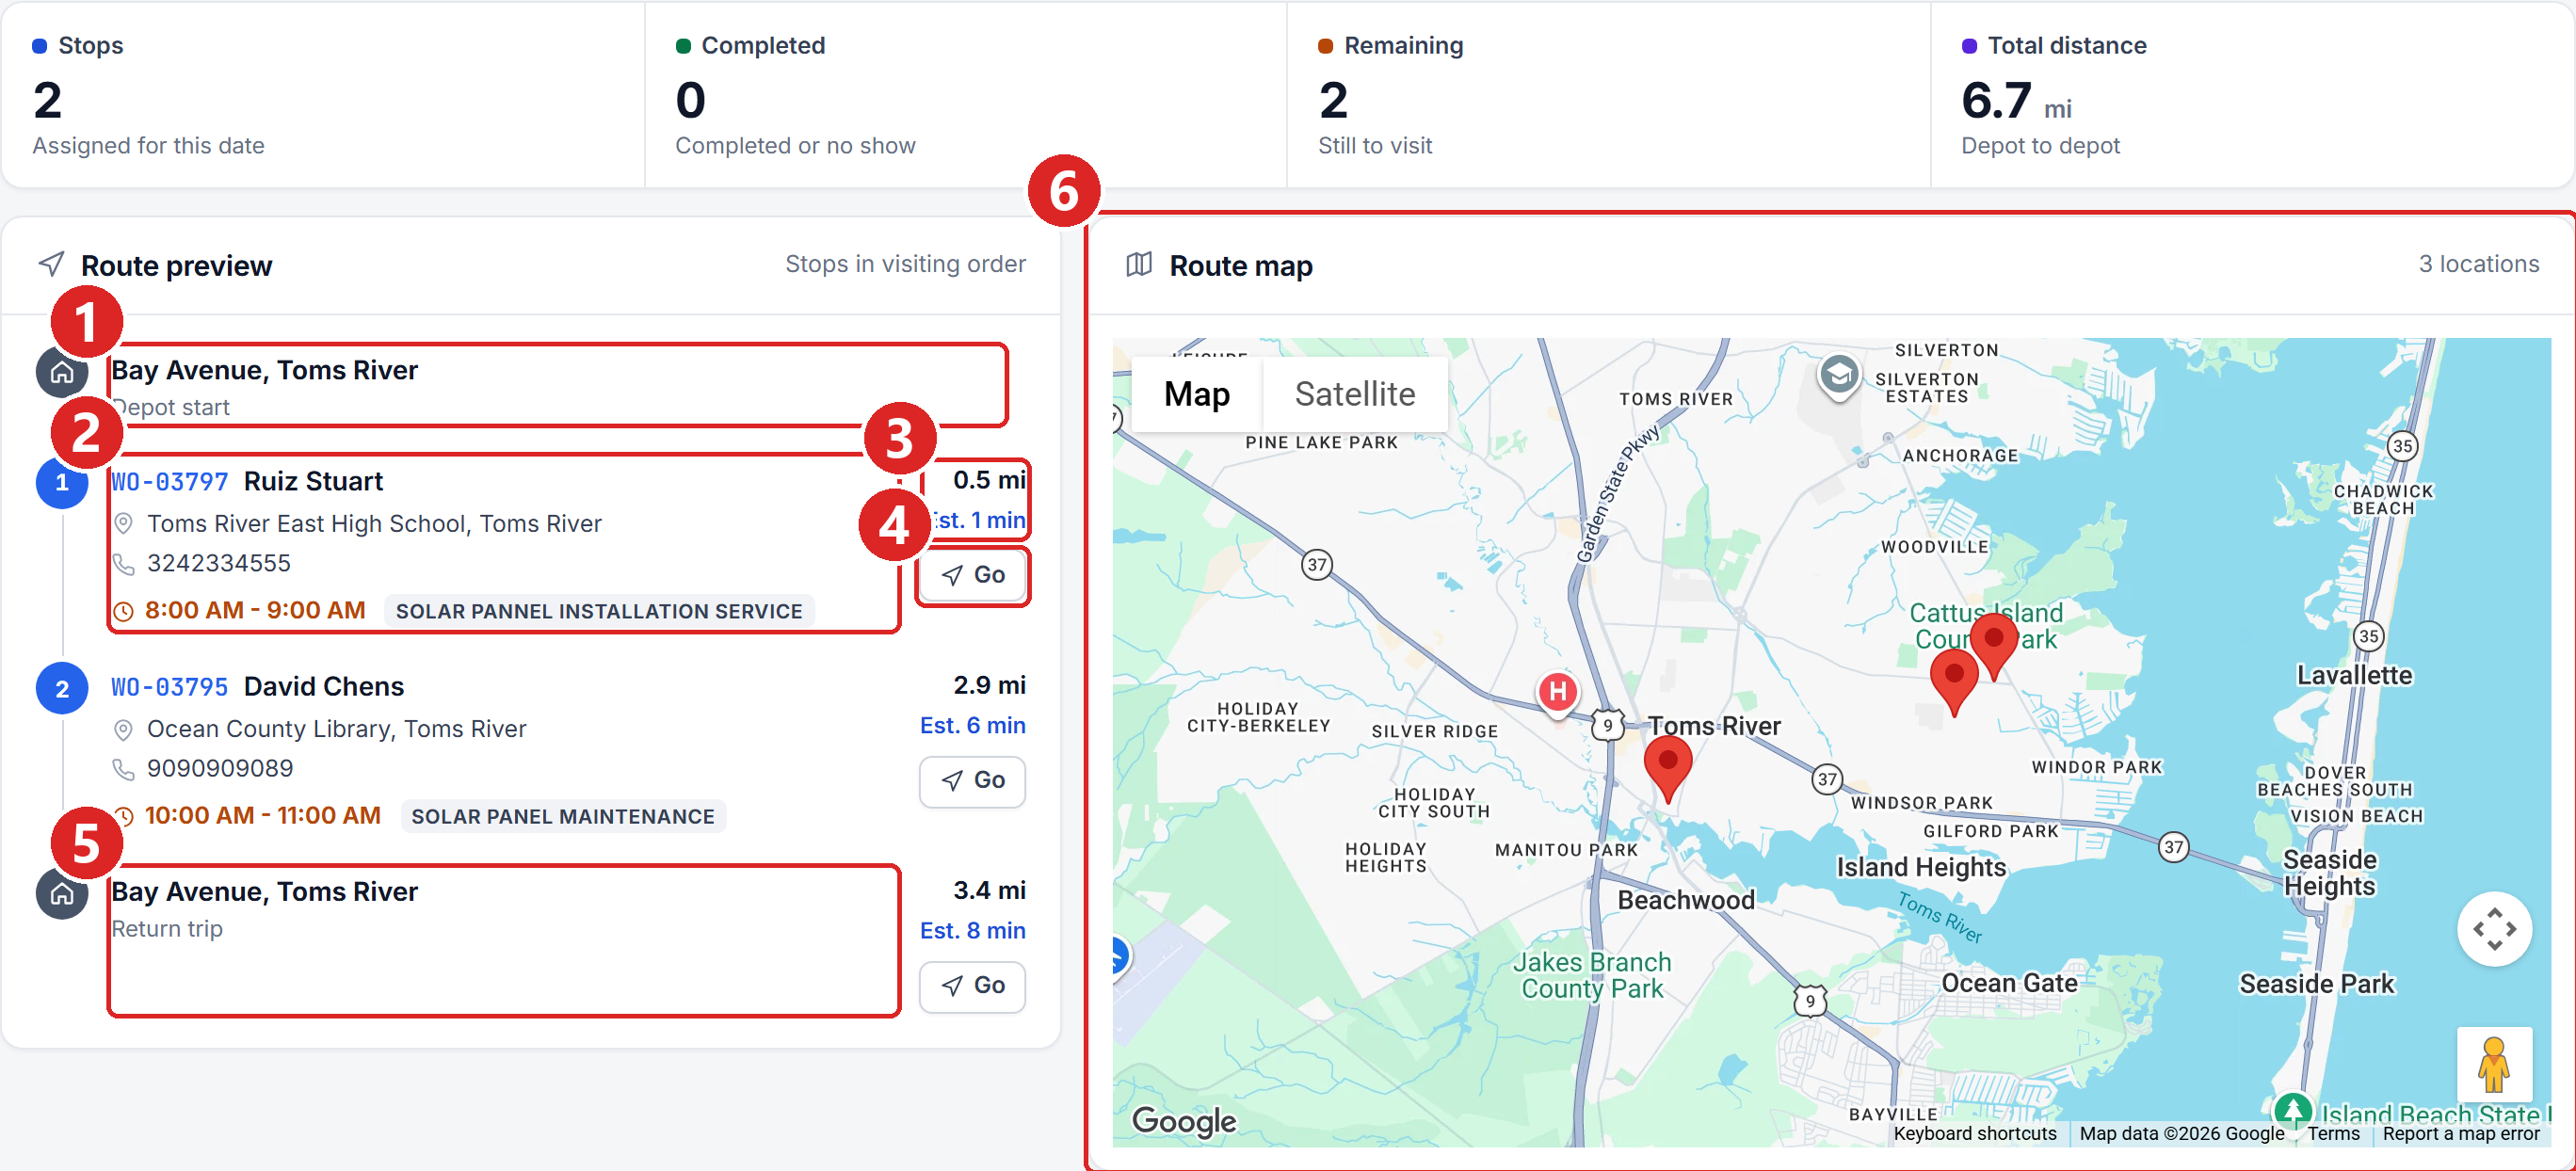
| # | Description |
|---|---|
| 1 | Depot start the resource’s home depot, where the route begins. |
| 2 | Stop sequence number, job number, customer, address, phone and time window. |
| 3 | Leg distance and estimated travel time to reach that stop. |
| 4 | Go opens that leg in the device map application. |
| 5 | Return trip the leg back to the depot, included in the total distance. |
| 6 | Route map every stop plus the depot as pins. |
Completed stops show their status instead of a time window, so a glance down the preview tells you how much of the day is left. The map lists the depot and every stop; selecting Go on a leg opens turn-by-turn directions for that hop rather than the whole route.
Tip Check the route before you leave the depot
The total distance is depot-to-depot, so it already includes the drive home. If the number looks wrong, check the routing date and that every booking has a valid site address.
PART 5
All bookings and reference
Search the full history, work with Axo, and keep a quick reference to hand.
16 All bookings
17 Axo on the dashboard
18 Quick reference
CHAPTER 16
All bookings
Every booking for the resource, across a date range.
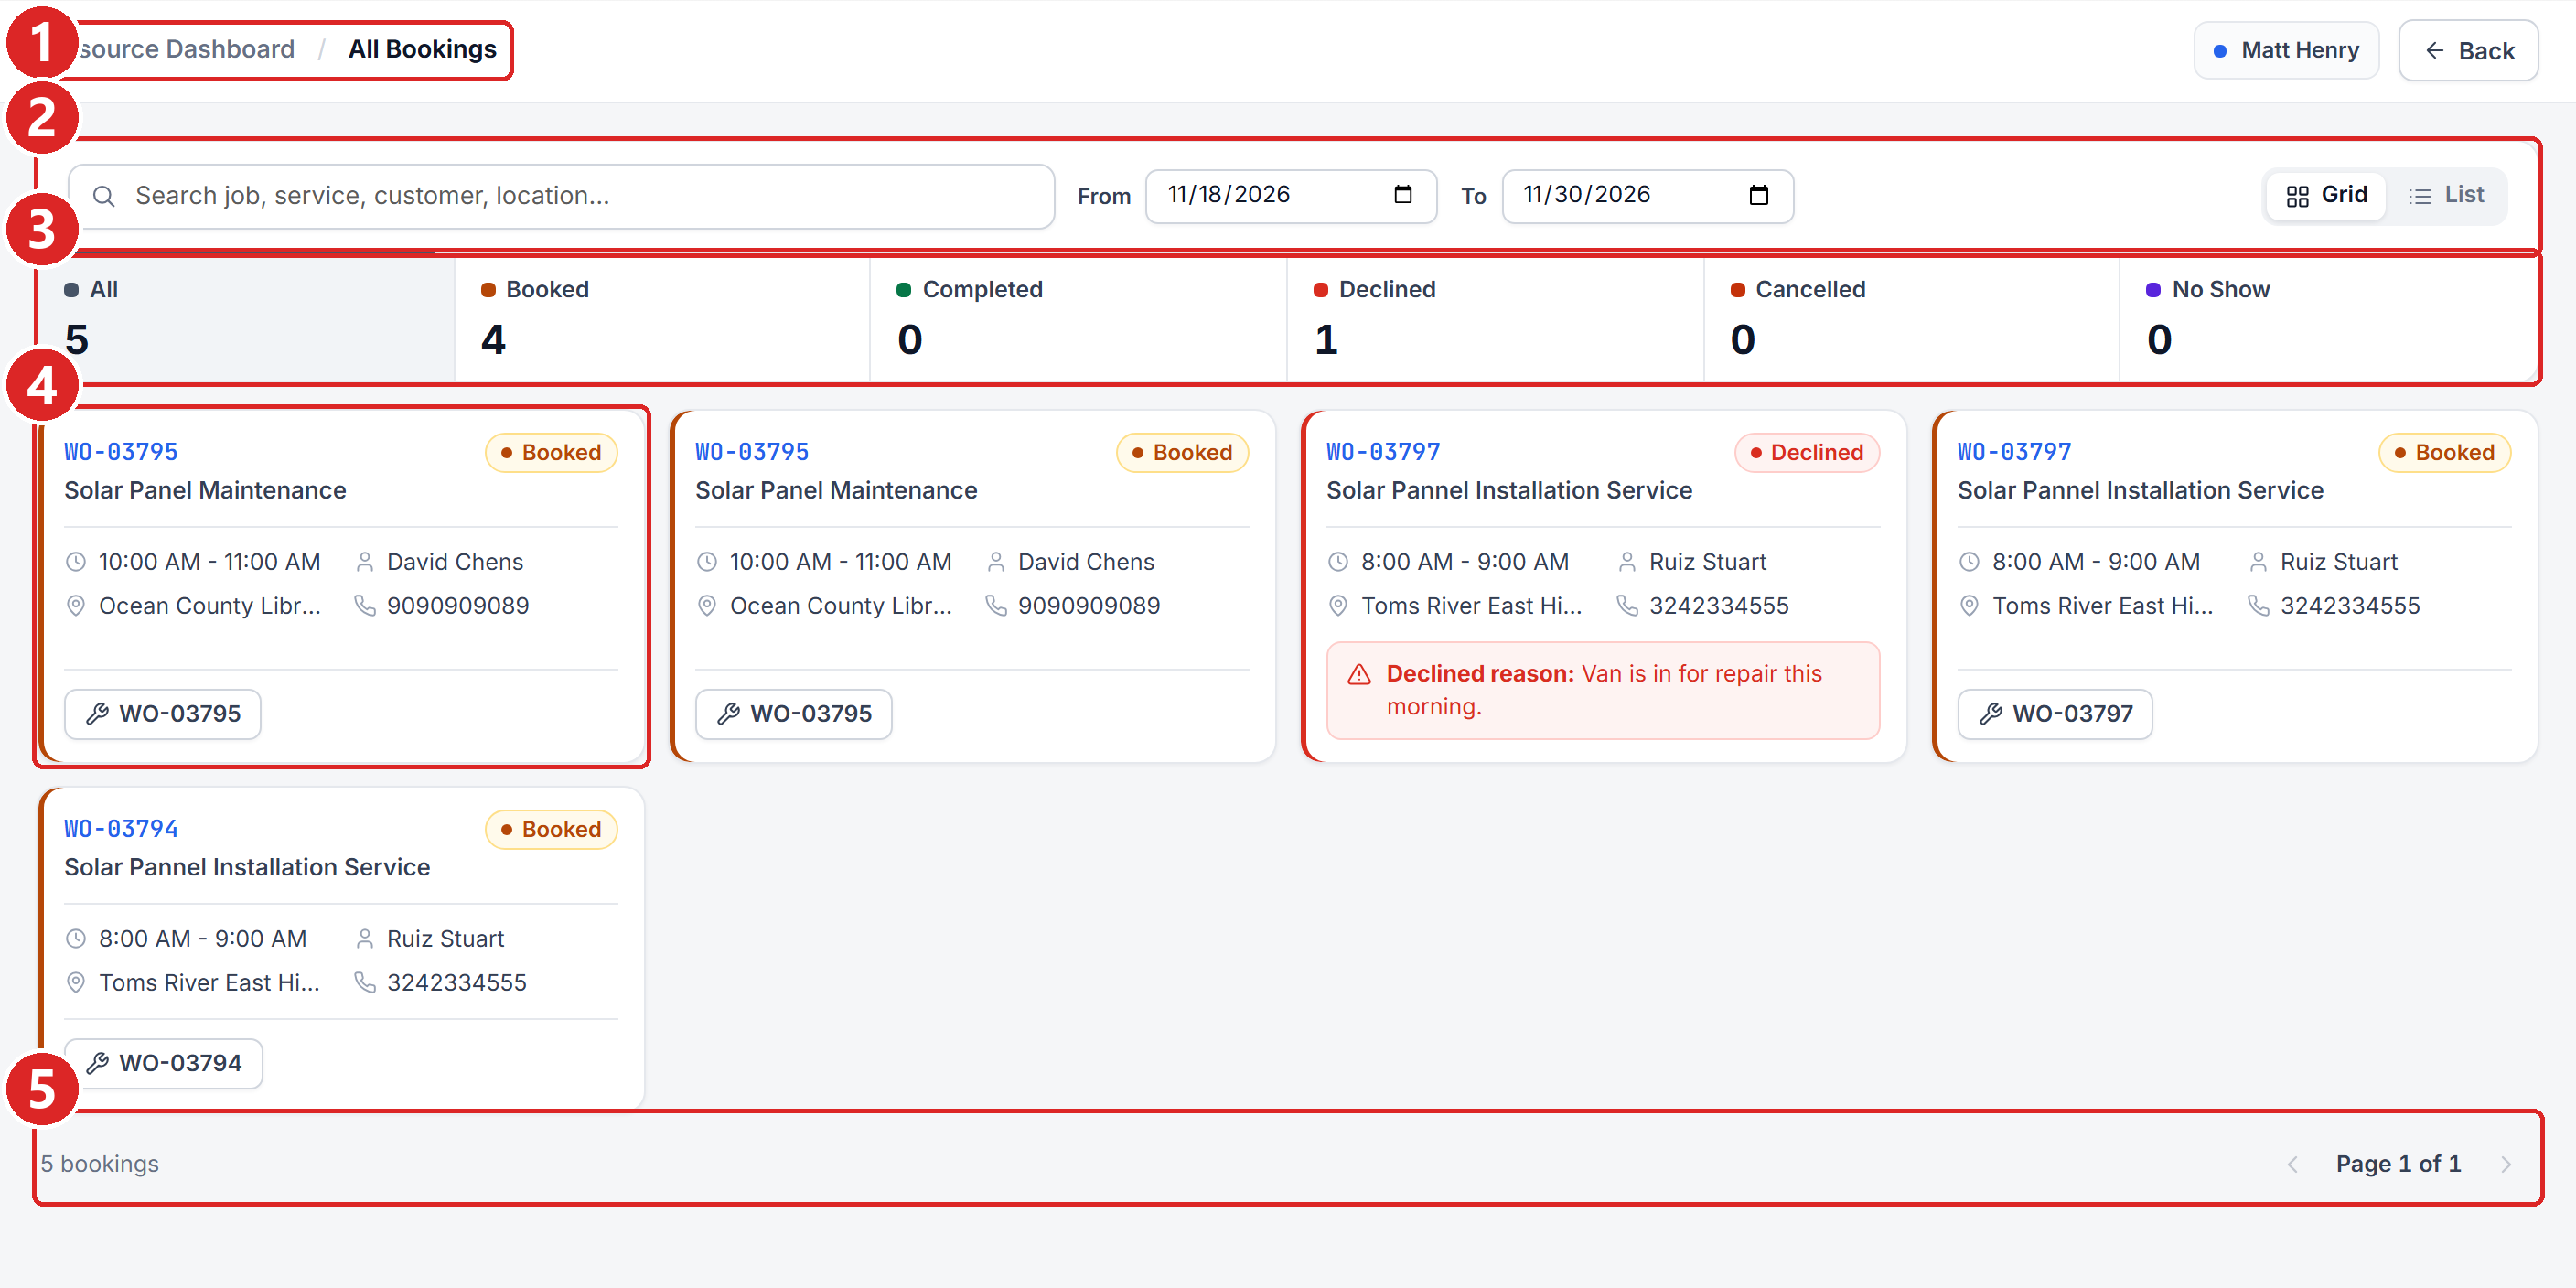
| # | Description |
|---|---|
| 1 | Breadcrumb Resource Dashboard / All Bookings. |
| 2 | Search, date range and layout switch. |
| 3 | Status filter cards select one to narrow the list. |
| 4 | Booking cards, with the Service Workbench link where the booking has a work order. |
| 5 | Pager the total count and page navigation. |

| # | Description |
|---|---|
| 1 | Search matches job number, service, customer and location. |
| 2 | From and To the date range. Unlike Daily Dispatch, this screen spans a range. |
| 3 | Status cards each shows a live count for that status. |
Status filters
| Filter | Includes |
|---|---|
| All | Every booking in the date range. |
| Booked | Bookings that are Booked or Work in Progress and not declined by this resource. |
| Completed | Bookings closed as Completed. |
| Declined | Bookings this resource declined, with the reason shown on the card. |
| Cancelled | Bookings cancelled by the business or the customer. |
| No Show | Bookings closed because the customer could not be served. |
CHAPTER 17
Axo on the dashboard
Ask about your day in plain language.
Axo is available on the Resource Dashboard when your administrator has enabled AI. Open it from the Axo button in the lower right corner and choose the AI model from the list at the top of the panel. Name a work order number to tell Axo which job you mean.
| Ask Axo to | Example |
|---|---|
| Brief your day | “Brief me on my day” |
| Prepare a handover | “Prepare a handover for WO-03795” |
| Find a replacement (supervisor) | “Find eligible replacements for WO-03795” |
| Open the route | “Open route planning” |
| Get directions | “Navigate to my next job” |
| Update travel | “Start travel to WO-03797” Axo asks you to confirm |
| Explain SLA warnings | “Explain my SLA warnings” |
Axo Every change needs your confirmation
Axo reads what is loaded on screen. Travel updates require confirmation before they are recorded, and assigning a replacement always goes through the Reassign screen rather than happening silently.
Briefing and handover
Axo answers from the data loaded on screen and links each job it mentions, so you can open the work order from the answer.
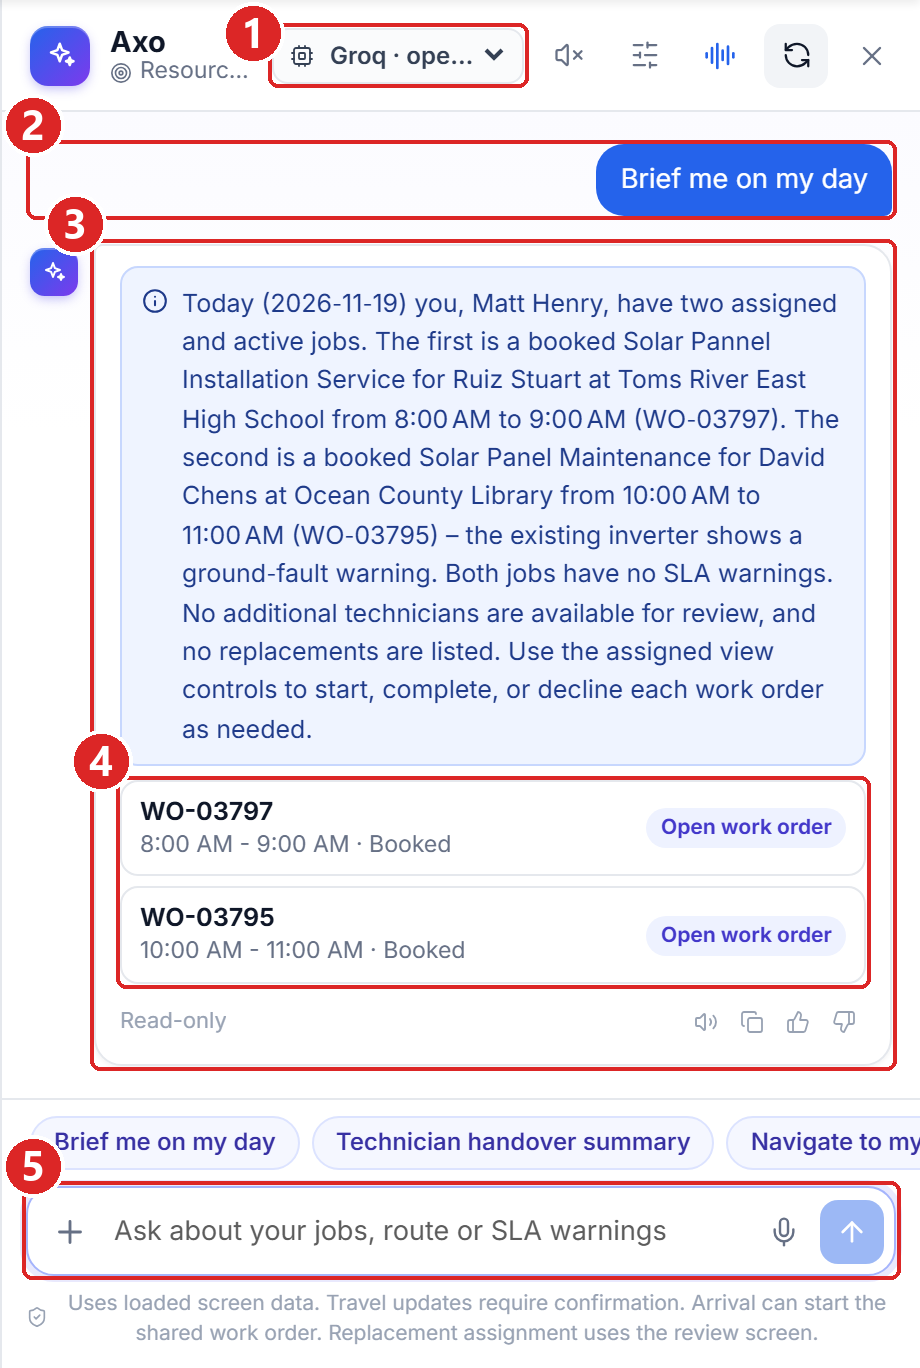
| # | Description |
|---|---|
| 1 | AI model choose which configured model answers. |
| 2 | Your question, or a suggestion you selected. |
| 3 | Axo’s answer, based on the data loaded on screen. |
| 4 | Links that open each work order. |
| 5 | Ask a follow-up, or pick one of the suggestions above the box. |
A handover gathers what the next person needs: service, customer, appointment, location, status, asset, the reported issue, travel and any SLA warning. Checklists, parts and notes stay in the Service Workbench.
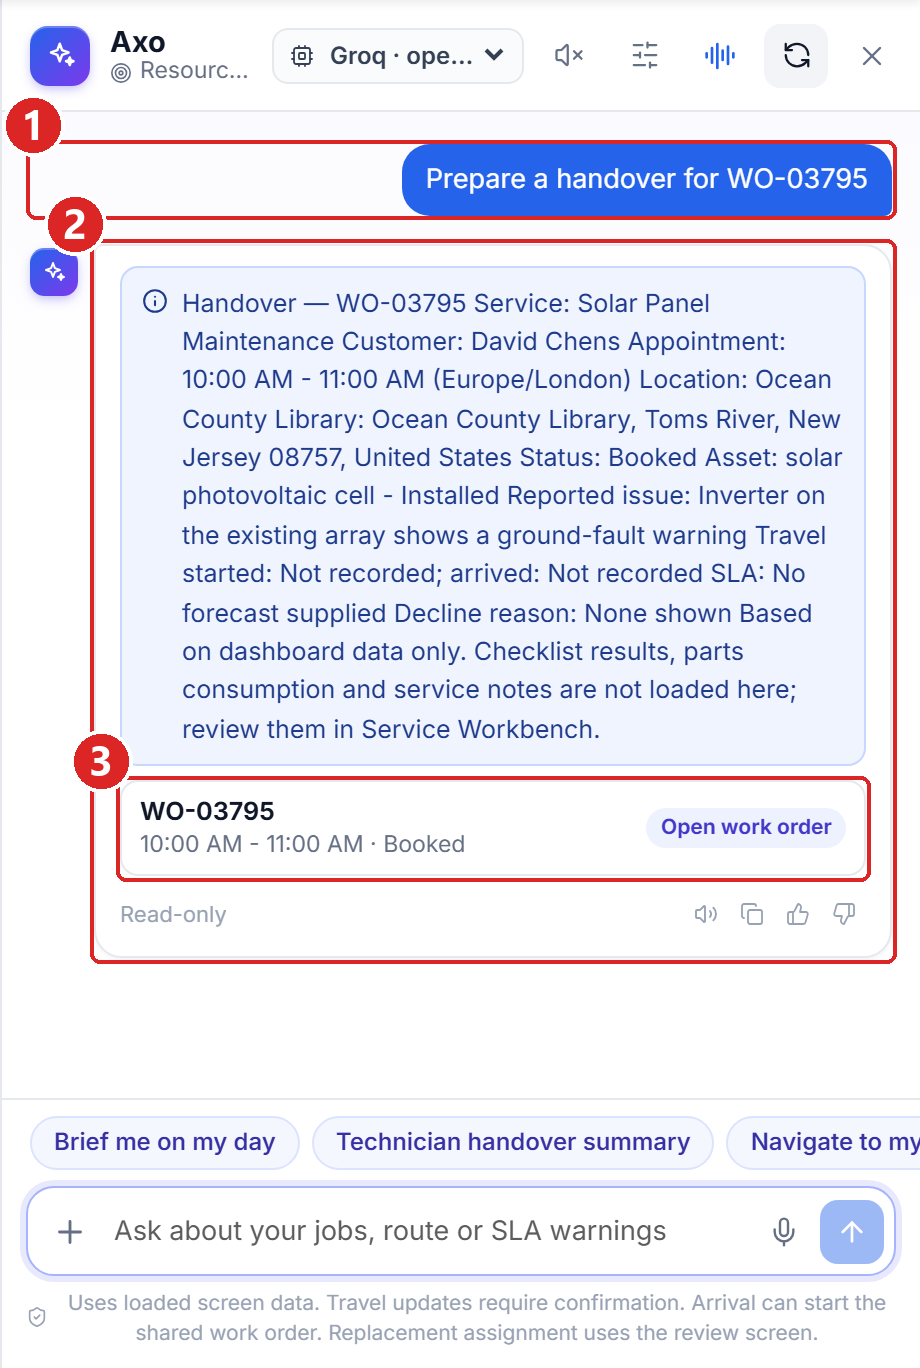
| # | Description |
|---|---|
| 1 | A request that names the work order. |
| 2 | The handover, built from the job on screen. |
| 3 | Open work order opens the record. |
CHAPTER 18
Quick reference
At-a-glance tables for daily use.
The four screens
| Screen | How to get there | Scope |
|---|---|---|
| Daily Dispatch | The default view, or the Resource Dashboard breadcrumb. | One date |
| Route Planning | Route planning button, top right. | One date |
| All Bookings | All bookings button, top right. | A date range |
| Reassign | Reassign on a job card, or Review eligible alternatives. | One job |
Job card actions
| Action | Available when | Result |
|---|---|---|
| Assign to me | The job is unassigned and you are eligible. | The booking moves to your Assigned tab. |
| Start travel | The job is assigned and travel has not started. | Records departure and starts the travel clock. |
| Navigate | Travel has started. | Opens the site address in your map application. |
| Arrived | Travel has started. | Records arrival and stops the travel clock. |
| Service Workbench | The booking has a work order. | Opens the guided job screen for that work order. |
| Decline | The job is assigned and not completed. | Releases the assignment with a reason. |
| Reassign | Supervisor mode, job not completed. | Opens the eligible-resources screen; can email the customer the new technician. |
| No show | The job is assigned and not completed. | Closes the booking and releases the assignment; can email the customer. |
Booking statuses
| Status | Meaning |
|---|---|
| Unassigned | In the shared pool, nobody has claimed it. |
| Booked | Assigned to a resource, work has not started. |
| Work in Progress | The job has been started in the Service Workbench. |
| Completed | The work order has been closed. |
| Cancelled | Called off by the business or the customer. |
| No Show | Attended, but the customer could not be served. |
Related screens
| Screen | Purpose | Guide |
|---|---|---|
| Service Workbench | The guided eight-stage job screen, opened from a job card. | Service Workbench User Guide |
| Service Appointment | Create and schedule service work orders. | Service Appointment User Guide |
| Service Parts Dispatcher | Allocate and dispatch stock to work orders. | Service Parts Dispatcher User Guide |
| Service Operations Board | Dispatch manager’s view across all resources. | Service Operations Board User Guide |
| Service Configurator | Configure services, checklists and SLA rules. | Service Configurator User Guide |
Was this article helpful?