The abbreviation CPQ refers to Configure, Price, Quote. CPQ is a sales tool for companies to quickly and accurately generate quotes for orders. It provides the functionality to convert Quote to Cash in an easy way. CPQ applications works in tandem with CRM platforms, ERP programs, and other business technology, which helps ensure integrated data as well as accuracy.
Aqxolt CPQ contains the out of the box functionality like Product Configurator, Quote Console, calculate profit and loss, Quote, Contracts signing process with the DocuSign, Orders, Invoices, payments from Authorize.net and PayPal, Supporting BOMs, Product/Service Sell, discount calculation, auto tax calculation and many more.
Getting started with Aqxolt CPQ
Guideline for basic setup to run the CPQ flows
Organization Account, their Contact, Address, and their related records setup –
Customer accounts their Contact, Address setup.
Credentials Setup
Payments
Product Configuration
Price Books
Tier Discount Allocation
Cost card
Features
Options
Rules
Inventory/Stock
Product/Service Sale
Supporting BOMs
Creation of Quotes using ‘Quote Console’
Calculate P&L
Add/Edit Products
Site Implantation(multiple/Single)
Send the Quotes for Manager Approval
Send the Quotes to the Customer to sign the Contracts using DocuSign
Convert the Quote into an Order using the ‘Convert to Order’ button.
Sync Quote and Orders records before Order activation.
Create Orders from EPoS.
ERP Documentation
Aqxolt ERP is a complete, modern, cloud ERP suite that provides your teams with advanced capabilities, such as AI to automate the manual processes that slow them down, analytics to react to market shifts in real-time, and automatic updates to stay current and gain a competitive advantage.
ERP Order management software handles everything from order entry and to delivery dates, status tracking to credit limit checking. An ERP software for customer order management provides a better way to not only improve order fulfillment but also gives superior customer experience.
Sales order
Sales Order
A sales order is an archive that contains products/services ordered by a particular business partner (client) or customer as well as the prices and terms and conditions. The sales order includes the customer’s information, such as the address, the points earned for loyalty, the details of the product being sold and the date of delivery and other information. Each sales order has a unique sales order number that helps the customer confirm the details of their order and learn the date of the delivery of the product and payment details. All new sales orders are added through a console and the Sales Orders tab. The items sold from the inventory are then shipped to the customer or delivered to the location provided by the customer. The process of creating a sales order includes finding an existing customer or creating a new customer, then creating “bill to” and “ship to” addresses.
Creating a Sales Order
A sales order can be created using two methods – • From the Sales Orders tab (record level) • With the Enterprise Point of Sale tab
Creating a sales order through the Sales Orders tab:
1. Click on the Sales Orders tab as shown below. 2. Once in the Sales Orders section, you can track the sales orders already filled in and create new sales orders. 3. When filling in a new sales order, enter the following information:
The details about the estimated delivery date and the date of fulfilment of the sales order.
In the Information section, fill in the order name for ease of tracking. Fill in the customer details.
Fill in the Order Details section using the price list, order type and subscription of the order, if any.
Fill in the information about loyalty points, return details and payment details in their respective sections.
In the Address section, customers’ pre-saved addresses can be selected in the “bill to” and “ship to” address fields.
Fill in the order details and other instructions, then save.
4. Existing orders also have options to edit after saving. In addition, you can import records of previous to existing sales orders using the import option located at the top right-hand corner of the Sales Orders tab. In the sales order, besides the estimated delivery date, there is the fulfilled date, which shows the date on which the goods are to be delivered as indicated in the purchase orders. Additionally, you can track goods that are ready for shipping, those that have been held, and those that have been fulfilled.
Creating Sales Order Lines
Sales order lines contain details about the specific items being sold. A sales order can contain more than one sales order line. The sales order contains the sales order lines with details about the quantity to sell, each item with a unique SOLI number. The sales order lines are found in the tab related to the sales order. You will click on the sales order, then click on the specific sales order you want to view. The sales order is located on the Details tab. Click on the “related” tab that is located next to the “details” section. Here you will find the sales order line items that are related to the sales order. Additionally, there are invoices, purchase orders, work orders, and other features related to the sales order in that tab. The tabs also include a link that allows the user to add new items, as seen on the right end of the Sales Order Items tab.
Return Merchandise Authorisations
A customer makes a sales return by sending goods back to your business. The Sales Order Related list includes a return-of-purchase section that gives the customer room to return the goods if they are faulty or for any other stated reason. Additionally, the sales order contains RMA lines to process the section that contains the information about the items to return. The Return Purchase Authorization holds the information about the return on goods.
Fields to note:
Organization Section
Field
Description
Organisation
It defines the name of the organisation/Account
Organisation Business Unit
It defines the Business Unit name of the Account/Organisation
Redeem Voucher Amount
Redeem Voucher Amount Describes the amount that can be redeemed using the voucher
Customer Purchase Order Reference
When a sales order is converted into a purchase order, this field is auto-populated with a unique number
Amount Paid
Describes the amount paid by the customer for a sales order
Authorized
Inventory, Purchase Order and Work Order can be created only if a sales order is authorized
Ready For Shipment
Indicates whether the sales order is ready for shipping
Number of Fulfilled Items
Indicates the fulfilled number of items from the sales order
Total Number of Items
Indicates the total number of items in the sales order
Estimated Delivery Date
Provides the estimated delivery date of the sales order
Fulfilled Date
Provides the fulfillment date of the sales order
RMA Lines to Process
Details the RMA line items
Information Section
Order Name
Describes the unique sales order number
Code
Auto-generated code for each record
Channel
Describes the name of the sale point
Stage
Gives the sales order’s current stage
Status
Gives the status of the sales order
Customer Profile
Describes the profile of the customer
Barcode
Gives the Barcode of the Sales order
Contact
Describes the contact name for the customer
Customer
Describes the name of the customer
Is Invoice Sent
This is checked if the invoice for the sales order is sent
Is Back Order
Indicates whether the sales order is a backorder
Order Details Section
Total Vat
Describes the sum of VAT on selected sales order line items
Total Other Tax
Describes the sum of taxes on selected sales order line items
Sub Totals
Describes the sum of the selected sales order line items
Amount
Describes the total amount of the sales order, including VAT, taxes and discounts
Total Discounts
Describes the sum of the discount amount on selected sales order line items
Price List
Gives the price list of the products/items being added
Total Tax Amount
Describes the sum of taxes, including VAT and other taxes on selected sales order line items
Order Type
Gives the profile type of the sales order
Total Due
Describes the amount due on the sales order
Subscription
Indicates whether the sales order is being subscribed
Return and Loyalty Details Section
Loyalty Points
Describes the number of loyalty points earned by the customer
Loyalty Amount
Describes the equivalent amount
Customer Id
Describes the unique customer ID
Payment Details section
Payments Status
Gives the payment status
Sales Order Amount
Defines the complete sales order amount
Payment Method
Indicates the types of payments which can be used
Payment Mode
Mode used for the payment
Due Amount
The total amount which must be paid
Address Details section
Bill-To Address
Describes the address to which the customer is billed
Ship-To Address
Describes the address that will be used for shipment
Order Dates Section
Book Date
The date when the sales order is booked
Request Date
The date when the sales order is requested
Order Date
The date when the sales order is created
Special Instructions
Instructions for the sales order, if any
Hold Status
Status for the sales order being held
Creating the sales order from Enterprise Point of Sale Tab:
The orders created through Enterprise Point of Sale are for a situation when a customer walks into a store/outlet, orders a product, pays for it, and takes the product home or opts for the available shipment options. Upon confirming the sales order, the sales invoice is created automatically. Each sales order has a unique number to enable simple tracking. The order console where the sale orders are processed is as shown below. It is referred to as Enterprise Point of Sale (EPOS) in ERP Mark 7. 1. Click on the Enterprise Point of Sale tab as shown below 2. Under the Customer Details section Select the Customer Name and Contact Name and the other details auto-populates such as the Email, Phone, customer ID, Bill To, and Ship To address of the contact. Type the first few characters of the customer name in the Account Name field to browse for a valid customer name. While browsing, you may scroll down or use the arrow keys to highlight the correct customer name. Select the customer to retrieve the customer’s contact information and billing/shipping addresses. For example, say you get an order from Scott Bill and you type “Sco”. The system displays a lookup of customers in the system whose names begin with “Sco”. This brings you closer to finding Scott Bill in the system, as shown below. 3. If you cannot locate the customer name in the lookup, you can enter a new customer without exiting the POS page or switch to other windows. Simply click on the Account tab located on the right-hand side of the screen. On the Account tab, you will be prompted to add:
Customer
Address
Contact
You will be able to add a new customer, both the “bill to” and “ship to” addresses, and a new contact for the new or existing customer. Based on the selection made, the relevant screens appear to add information. To return to the new orders, click on the Sales Orders tab on the right-hand panel after saving your new customer. 4. Once the customer name is entered, the contact details, such as contact name, email address, phone number, account ID, customer profile, and address details, are retrieved automatically. You may select the retrieved “bill to” address or select a different “bill to” address if one or more “bill to” addresses are saved for the selected customer. This change will be made for this order only and not on the customer account. 5. A single “bill to” address/a single customer may have several “ship to” addresses. Select the “ship to” address from the available picklist for the selected customer. The “ship to” address describes the location where the order is to be shipped. If the “ship to” address required for the order has not been saved in the customer account, click on the Accounts tab to create new address information. This will take you to the “Add New Address” screen, where a “ship to” address can be recorded. Clicking on the Sales Orders tab will bring you back to the screen where new orders can be recorded. 6. Under the Order Details section, Channel/Division, Sold By, Request Date, Status, and Sales Order Profile are auto-populated. 7. If you want to select an existing sales order then, click on the lookup and select the sales order. 8. If you are creating a new sales order, then a new sales order number is generated after adding the product line items and saving the order.
Adding product line items from EPOS
To add products, click on the “Add New +” button.
In the “Add New Products” pop up, select the product family and click the “Find” button or type the name of the product to find the product.
From the list of products, select the checkboxes of the desired product. Enter the quantity and select the discount plan, then click the “Add” button. The selected products will now appear in the product line item section as shown below.
4. To save the sales order with the selected product line items, click the “Save” button. This will generate a unique sales order number. 5. Product line items can be edited or deleted and every product can have comments added by using the action buttons next to the product line item code.
View/ Edit Sales Orders of the existing customers:
After the order is entered, a customer will be able to inquire about or update the order. For example, if the order was entered on August 15th and not closed, the customer can return and inquire about/update the order at any time in the future. The customer can either remove the products or add a few more products to the sales order. The process to view/edit a sales order is discussed below.
Select the customer name from Account Lookup and retrieve the customer details.
On the Sales Orders tab located on the right-hand side of the screen, enter the unique sales order number in the “Sales Order Lookup” field.
For example, say you get an order from Scott Bill and he would like to update sales order number 00135. You enter 001 and the system displays a lookup of sales orders in the system beginning with 001. This brings you closer to finding sales order number 00135 in the system, as shown below.
The system displays the details of the selected sales order. You may add products to the product line item section.
To add products, click on the “Add New +” button.
In the “Add New Products” pop up, select the product family and click the “Find” button or type the name of the product to find the product.
From the list of products, select the checkboxes of the desired product, enter the quantity, select the discount plan and click the “Add” button. The selected products will now appear in the Product Line Item section, as shown below.
Explanation of Fields in the Product Line Item Section:
Code:
Every product is assigned a unique number in the system and the same is displayed in the product line item section when a product is selected. It can be a system-generated code or a company-specified product code.
Product and Preview:
This displays the product name and its image in the product line item section. The products displayed add new product pop up are displayed only if the stock is available in your company’s inventory.
Quantity:
This displays the quantity of a particular product purchased and the price of the product depending on the quantity purchased.
Base Price, Discount, Vat, Tax, Total Price:
This displays the price of the product assigned to the customer’s profile. Discount is the reduction of a certain percentage of the base price allowed to the customer for the purchased product. Discount may or may not be applicable to every product. VAT and Tax are the addition of a certain percentage to the base price allowed to the customer for the purchased product. Total Price is the amount of the product displayed after calculating the discount and taxes. It is the final price a customer pays for the product purchased. For example, a product is sold for $100 and has overall taxes of about 14% (i.e., VAT = 7% and Tax = 7%) along with a 10% discount on it. The total price is calculated using the following formula. Total Price = ((Base Price *Quantity)-Discount Amount) + (VAT +Other Tax Amount)
Invoices and Payments:
The Invoices tab in ERP Mark 7 can be used to manage customer invoices that contain order information about purchased products. Users can view or send the invoice via email to the client. The tab allows users to generate an invoice document as a PDF.
An invoice is created in two ways:
From the Sales Orders tab (record level)
From the Enterprise Point of Sale tab
Creating an invoice through the Sales Orders tab:
Create the sales order as described in Creating a sales order through the Sales Orders tab.
From the related tab, find “Invoices” and click the “New” button.
Select the “Sales” record type and click the “Next” button.
Enter the organisation details, the purchase order number, the sales order number, and the amount details under the Organisation Details section.
If the invoice needs to be reflected on the organisation’s finance, select the “Posted” checkbox and the posted date.
Fill in the Information section with details like tax receipt number, customer account, and active checkbox, then click “Save” to create an invoice record.
Creating an invoice through the Enterprise Point of Sale tab:
Create the sales order as described in “Creating the sales order from the Point of Sale Tab”.
When the sales order is saved from the EPOS tab, an invoice record is created automatically with complete amount details of purchased products.
Click the “View/Send Invoice” button to view the invoice template. The console provides an option to send an invoice attachment to the customer’s email address.
The function that is used to receive payments from customers who have purchased your products and services and who have not already paid for them.
When you sell a product/service, the order is created through order processing. The order processing functionality provides for the entry of payments and can be done via the following payment methods.
Cash
Bank/Cheque
Credit Card/Debit Card
Loyalty
The system can accept partial payments and has the ability to record multiple payments for each sales order.
When the customer books a sales order, the system typically creates an invoice in the system which can be sent to the customer’s email ID.
Making a Payment
Payments can be made using one of two methods –
From the Sales Order tab (record level)
With the Enterprise Point of Sale tab.
Creating payments through Sales Order Tab:
Open the Sales Order record for which the payment must be made. On the related tab, scroll down and select “Payments”. Click on the “New” button.
From the New Payment Record Type pop-up, select “Cash Payments” and click the “Next” button.
Fill in the organisation and sales order details under the Organisation Details section. Fill in the payment details under the Information section. Click the “Save” button to create a payment record for the selected sales order.
When the payment is made for the selected sales order, the status of the sales order is changed to either paid, underpaid or overpaid based on the amount that has been given in the payment record.
Loyalty – If a customer is a regular customer of the organisation, he would have received loyalty points for every purchase he made. Each loyalty point can be assigned a value of the currency and the customer can make the payment using these loyalty points.
Credit/Debit – A customer can use credit/debit cards to make a payment by swiping the card at the time of sale. If he is a returning customer and wishes to save the card details for future use, he can do so.
Payments from Point of Sale tab:
In a scenario in which a customer walks in the store/outlet and makes a payment to the sales order, the POS page helps the user complete the sales order and payment process without having to navigate to different setups.
Create the sales order from the POS tab (as described in Create Sales Order through POS).
Navigate to the Payments tab and click on any of the payment options. Payments can be made using the following four methods:
Credit/Debit
Bank/Cheque
Cash
Loyalty
Credit/Debit
To make the payment through Credit/Debit card, click on the “Payments tab” and click on the “Credit/Debit” button located on the right side of the screen.
Enter the card details in the Card Information section and click the “Pay Now” button to complete the payment process for a sales order.
Bank/Cheque
To make the payment through Bank/Cheque, click on the “Payments tab” and click on the “Bank/Cheque” button located on the right side of the screen.
Enter the bank name and reference cheque number into the Bank Information section. Click the “Pay Now” button to complete the payment process for a sales order.
Cash
To make the payment through Cash, click on the “Payments tab” and click on the “Cash” button located on the right side of the screen.
Enter the amount to be paid and click the “Pay Now” button to complete the payment process for the sales order.
Loyalty
Regular customers earn loyalty points as a reward for their regular purchases with the organisation. They can use these points for payments. Loyalty points can be assigned to currency values. For example, 1 loyalty point = 1 pound or as per the organisation’s decision.
To make the payment through Loyalty, click on the “Payments tab” and click on the “Loyalty” payment option located on the right side of the screen.
The system will automatically reduce the amount to be paid by the equivalent loyalty points.
The customer can pay the rest of the amount with any of the other payment options.
Apply Credits
To make the payment through Credit points, navigate to the “Payments tab” in ePoS and click on the “Apply Credits” button.
The system will automatically fetch the Invoice Amount, Total Due and Available Credit. Enter the “Redeem Credit” amount and click the “Pay Now” button.
You will see that a Credit type payment record has been created.
RMA
A Return Merchandise Authorization (RMA) is part of the process of returning a product to receive a refund, replacement or repair during the product’s warranty period. Returned merchandise requires management after the return and has a second lifecycle after the return.
Creating an RMA
An RMA can be created using one of two methods –
From the Sales Order tab (record level)
From RMA tab
From the Enterprise Point of Sale tab
RMA from Sales Order Tab:
Select the sales order whose stage is closed to return the purchased product as shown below.
In the related tab, find the Return Merchandise Authorisation and click the “New” button.
Enter the RMA code and click the “Save” button to create the RMA record.
In the related tab, click the “New” button to create RMA line item.
Enter the organisation details.
Fill in the RMA number, the sales order line item number, and the quantity to return. Mention the reason for the return.
Select the Authorise, Is Closed and Ready to Receive checkboxes.
Click the “Save” button to create an RMA line item record.
RMA through Process Return page:
The RMA must be associated with a sales order and a shipment. This ensures that returns are permitted only for those items that have been shipped. The return process includes the ability to create the shipment flows and tracks those returns in the system.
Select the sales order record to return the purchased products.
Click the “RMA” button; this will navigate to the RMA page as shown below.
This will navigate to the RMA page as shown below.
The system auto-fetches the sales order details and customer details.
Click the edit icon and enter the desired return quantity and the reason for return.
Select the return status and click “Save” to create a new return package.
Fields to note:
Field
Description
Added Back to Inventory
A check box that indicates the RMA line item has been returned to inventory for resale
Batch/Lot Code
A code assigned to shipment of RMA
RMA Line Item Name
Describes the name of the RMA line item
Sales Order Line Item
Describes the Original Sales Order Line Item the product for the Customer RMA was purchased
Return Merchandise Authorisation
Describes the name of the RMA to which the RMA line item belongs
Return Reason
Describes the reason for the item that is returned; essentially helps identify issues or problem with the returned item
Return Status
Provides the status of the product being returned
Total Deduction
The amount of the product that has been deducted
Site Item Inventory Stock
Specifies the total amount of inventory in the site
Number of Items In Quality Check
Specifies the total number of returned items in the quality check process
Number of Items to Re-sell
Specifies the total number of returned items that are sellable
Number of Items Discarded
Specifies the total number of returned items that are discarded
RMA through Enterprise Point of Sale Tab:
Every RMA is associated with a sales order; this generally includes identifying the order or invoice from the original purchase. The return may involve items that are damaged or simply not wanted. Depending on the situation, the returned item can be re-stocked or discarded. The system allows for a refund of the returned item in the form of either a credit note or loyalty points. The Enterprise Point of Sale tab of ERP Mark 7 helps the sales rep handle the entire sales journey to the return process without having to switch to multiple setups.
For example, say there was an order from Fiona Pinto, who would like to return an item from sales order number 000014. An RMA is created to complete his return request and a refund record (credit note) is created for the customer.
Click on the Enterprise Point of Sale tab and fetch the customer and sales order details from the system to initiate the RMA. Refer to the sales order from the Point of Sale Tab section for more details.
Click on the “RMA” button; on the right side of the ePoS as shown below.
The system fetches all the sales order line items.
Select the sales order line item to return and enter the quantity to return. Specify the reason for the return.
Select the expected date and status of the RMA, select the authorise checkbox and click the “Save” button to create the RMA line item in the system.
Purchase Requisition
Purchase Requisition is generated before the purchase order is raised to notify the Purchasing team of the items it needs to order and their quantity. It gives figurative information on the desired goods and services of the organization.
How to Create Purchase Requisition:
John works at a warehouse and finds out that some items in the warehouse has low inventory level and needs reordering from the vendor. So, he requests the purchasing team to create purchase orders for the items to fill the inventory for those items by creating a Purchase Requisition. He follows the steps mentioned below,
From the App launcher go to ‘Create Purchase Requisition’ Tab
Purchase Requisition Page opens. Enter the all the details on the page like Purchasing organisation, Expected date, delivery details, Status, Channel, Distribution Channel.
Click on the ‘Add’ button to add the products, Search the products, enter the quantity required, and unit price. Similarly, add more products using the ‘add’ button again.
Click ‘Save’ to create the Purchase requisition.
How to Create a Purchase order for purchase requisitions:
The Purchase orders created by john are listed in the ‘Requisition to purchase order ‘tab and Emily who works at the purchase order department can create purchase orders for the requested items by John. She follows the steps below,
Search for the ‘Requisition to Purchase order’ Tab from the ‘App launcher’.
Select the items that need to be added to the purchase order and click the ‘Purchase order’ Button.
The next screen shows Products selected, Quantities and prices. Enter the vendor details and purchasing details and click ‘save’. The purchase order will be created.
Now, follow the same procedure to inbound the logistics as mentioned for creating a purchase order.
How to Inbound Purchase Order Logistic:
From the App, launcher go to the ‘Inbound Logistics’ tab
Select the purchase order logistic and click on the ‘Receive’ tab
You can see the product name quantity that has to be received.
Under the ‘Receive’ Box enter the quantity that is being received from the vendor.
Enter any instruction in the instruction box.
Click the ‘save’ button
Now check the box next to the product received and Click on the ‘Put away’ tab
On the put-away page select the version, location, or bin if required and click the ‘save’ Button.
Your purchase order is Complete.
Accounts Payable:
Go to the ‘Accounts Payable’ tab
You can see Vendor’s tab where all the vendors will be listed. You select the vendor and select the Purchase order related to that vendor to create a bill.
You can also directly select the Purchase order to create a bill against it from the purchase order tab.
Select the purchase order to create a bill against it and select the new bill option from the dropdown.
Create Bill page will appear. Enter the Vendor bill date and Bill number. Also, you can add more products to the same bill by clicking on the ‘Add’ button.
On the Product line item add taxes and description if required and select the Account to capture the amount paid and click the ‘Save’ button.
When Bill is created it will appear on the Bill tab. Now match the bill by selecting the bill and click the ‘match bill’ button on the top right.
On the match, bill page selects the line item to match and click the ‘save’ button.
Now post the bill by selecting the ‘Post’ option from the dropdown against that bill.
When it is posted then New voucher option appears. Click the new voucher to create a voucher.
Click the ‘save’ button to save the voucher.
Now approve the voucher by selecting ‘Approve’ from the dropdown button.
Click on the ‘Make Payment’ option from the dropdown to make payment for that voucher.
On the pay voucher pop up. Select payment account, date, reference number and payment method and click ‘Save’. Now your payment is complete.
How to create Advance to Vendor Bill:
An advance Bill to a vendor bill can be created if you need to make an advance payment to the vendor.
Go to the ‘Accounts payable’ tab
Then click on ‘bills’ Section
On the top right corner, you will see a button called ‘Create Bill’
When clicking Create Bill. A pop-up comes up. Select the Advance to Vendor option from the pop-up.
After selecting the ‘Advance to Vendor option’. You will get a create Bill page.
Enter All the details mentioned on the page and click on the ‘Add’ Button to add products to your bill.
Select Product, Quantity, Amount and Select ‘Inventory’ Account and Add any Description required.
You can add more products by clicking on the ‘Add’ button again.
Click the ‘Save’ Button.
A Bill will be created and you can view it on the bills tab.
From the drop-down of that bill select ‘New voucher’
To Create a voucher against that bill click on the ‘New voucher’ Button
Click the ‘Save’ button. A voucher will be created.
Now from the voucher tab select the ‘Approve’ button to Approve the Bill. It will change from Red to green when approved.
Now from the dropdown select the ‘Make a payment’ Button to pay the voucher created.
Enter the details like payment account, method, and Reference number if required and click the ‘Save’ Button
A payment to that voucher will be done.
Products and Services
Create the Products
Products are configurable items that are manufactured in an organization or purchased from the vendor/supplier and are sellable. Products can be stored in an organization’s Site/warehouse or a third-party Site/warehouse.
Navigate to the app menu> Products tab.
Recently Viewed products will be listed, click on All to see all the available products in the system.
To create a new product, click the “New” button.
Enter the Product Name and Product Code.
Select the Product Family, Category and Sub Category of the product.
Select the Status as Released and make sure Active checkbox is checked.
Select the Track Inventory checkbox for all Inventory Products.
Enter the Product Description and Barcode if any.
Select Is Kit (for a Bundle/Kit product), Serialise (for a serialized product) and Lot Tracked (for a Batch product) depending on the product configuration needs.
Save the record to create a product.
Create Price Books
Price books are integrated with the order management module to define pricing for your products. All the products should be given a standard price and added to a custom price book. We can set different price books for different products.
Navigate to the app menu > Products tab.
Click open the product to add a price book.
In the related tab, find the Price Book object and click “New”
Enter the pricing details of the product such as List price, Selling price, Start date, End date and save.
This creates a standard price for the product.
Once a standard price is added to the product it can then be added to Custom Price Books.
Navigate to the Price Book tab from App launcher to create custom price books.
Create the Inventory/ Stocks for the products
Navigate to the app menu > Products tab.
Once in the Products section, select the product to create the Inventory/ Stocks.
In the related tab, find the Inventory/ Stocks related list and click the “New” button.
Enter the Organisation and the Business Unit details.
Enter the Stock Name and select the Active checkbox.
Select the Status as Checked In.
Make sure Warehouse and Product are selected.
Save the record to create the stocks for the product.
Create the Stock Inward Line Item
It is to add stocks to the inventory. It records the stocks for a particular product and is tracked by quantity, it is assigned to Inventory/ Stocks that enables the users to determine and maintain optimum inventory levels.
Navigate to the app menu > Products tab.
Once in the Products section, select the products record to create the Stock Inward Line Item.
In the related tab, find the Stock Inward Line Item related list and click the “New” button.
Enter the Warehouse Purchase Line Item Name.
Ensure Site Product Inventory (Inventory/Stock) of this product is selected.
Add the Serial Number / Material Batch/Lot if the product is serialized or Batch product.
Select the product, enter the Quantity and select the Active checkbox.
Save the record to create a stock inward line item for the product.
Adding Cost Cards to Products
Navigate to the Related list of the product to the Cost Card object.
Click New and add the Cost Card Name, Cost, Currency, Start Date, End Date, Quantity, Minimum Quantity and Unit.
Select the Product and Supplier/vendor.
Select the Organisation and Business Unit and Save.
This creates a cost card record which can be used when creating a purchase order.
Account, Contact and Addresses
Xero is accounting software and can be connected with “Salesforce Instance” using the “Heroku Aqxolt ERP Integrator.”
All the data on “Salesforce instance” like Products, Customers, Suppliers, Invoices, CreditMemos, SalesPayment, PurchaseOrders, Bills and BillPayments is synced to “Xero account” and the Sync is Bidirectional.
Once you have connected the Salesforce instance to the Heroku user, Login to your Heroku instance and click on the “Xero app.”
You will land on the “Xero dashboard.”
Click on Add(Manage); it will redirect to the Xero account login page. (xero.com)
Login with your admin credentials. (Username and Password)
Allow access for 30 minutes.
This adds a connection to the Xero instance to the Heroku user.
It auto Syncs Products, Contacts, Invoices, CreditNotes, SalesPayment, Purchase, OrderBills and BillPayments from “Salesforce” to “Xero.”
But for the trail, we can sync the data manually by clicking on the Pending Sync button for all the Products.
Invoices are created on Aqxolt ERP.
Click on Invoice Pending Sync in the connector.
Invoice is synced on Xero.
Login to “Xero Account” to see if data has synced.
Data is synced from Salesforce instance to Xero and vice versa. i.e. if products are not on Salesforce instance and present on Xero, they get synced to Salesforce, and if products are on Salesforce instance but not on Xero, they get synced to Xero when the sync process starts.
Product Setup:
On the Product make sure the below fields has data
Product Name Product SKU Product Description
and Available on eCommerce platform checkbox is true.
Create a Marketplace record on the Product related list.
Add a Custom Setting in the system as eCommerce Sync, click on Manage and create a Record.
Shipment
Shipping is the key link in the customer’s supply chain, manufacturing, and retail success. Aqxolt ERP provides a complete solution for streamlining the shipping process with an accurate delivery date and time. Aqxolt ERP provides real-time communication between UPS and FedEx.
The shipping management process begins with the following activities.
Creation of Sales Order
Creation of Stock Dispatching (Pick, Pack, Ship)
When creating a sales order from the Order console, the shipment cost can be estimated from the delivery section on the Order console.
Aqxolt ERP supports UPS, FedEx and Internal Shipment.
Click on the Delivery section.
Click on UPS or FedEx.
Based on the ship to address and package size, the system will provide the estimated shipping cost.
Once a sales order is created and ready for shipment, it is available for stock dispatching.
Click on the Stock Dispatching tab.
Select the sales order to be shipped.
Pick all the line items of the order or partial line items.
Click on Pack to create a package.
In the package detail section, select the Package Type and Shipment Type.
During selection of the Package Type Weight, Weight Unit, Length, Width, and Height will be auto-populated.
Select the shipment type, which could be UPS, FedEx or Shipment.
UPS
Upon selection of the shipment type UPS, the following process continues:
Enter the Deposit Tag.
Click the “Save” button to create a Package.
Click on the ship icon, which will bring you to the UPS shipping page.
The left side of the shipment page includes shipping details such as where the shipment is going, where it is coming from and the package details.
The right side has 3 sections:
Shipping Services/Cost:
This section populates the Shipping Date and includes other dropdowns to provide details about Weekend delivery, Additional handling, Verbal confirmation, Delivery confirmation and Description.
Click on the Get Rates button to get the different UPS services to choose from.
Select a UPS service.
Process Shipment:
This section populates the Shipment name, Shipment status and other details such as International forms and Product Unit Code.
Click on View UPS Label to generate the UPS label which can be printed and attached to the package.
Click on View Invoice to view the sales order invoice, which is also printable.
Clicking on Cancel Shipment will cancel the shipment.
Track Shipment:
Once a shipment is shipped, clicking on the Track Shipment section will generate a tracking number and provide real-time tracking of the package.
FedEx
Upon selection of the shipment type FedEx, the following process continues:
Enter the Deposit Tag.
Click Save to create a Package.
Click on the ship icon, which will take you to the FedEx shipping page.
The left side of the shipment page displays the shipping details, such as where the shipment is going, where the shipment is coming from, package details and invoice details.
The tabs on the right side provide the following information:
Shipping Services/Cost:
This section populates the Shipping Date and includes other details, such as Description, Request, and Response.
Click on the Get Rates button to get the different FedEx services to choose from.
Select a FedEx service.
Process Shipment:
This section populates the Shipment name, Shipment Status and an Initiate Shipment button.
Click on Initiate Shipment to initiate a shipment.
Track Shipment:
Once a shipment is shipped, clicking on the Track Shipment section will generate a tracking number and provide real-time tracking of the package.
Internal Shipment
Upon selection of the shipment type Shipment, the following process continues:
Brings to the Delivery screen where delivery details can be added
Add Delivery Date and Save, Stage changes to Shipped and Delivery Name becomes Opportunity name.
This creates a Shipment record which can be seen on the sales order and Logistic order related list.
Delivery Flows:
Navigate to the Pickup/DropOff tab to create delivery flows.
Click on New and fill in the name, status and other details if available and Save.
Picked Up and Delivered are the flows created as shown above.
Checklist:
Navigate to the Checklist tab to verify the no of items delivered against the ordered Quantity.
Select the checkbox and click verify if all the Qty is delivered.
Verifying the items will make the line items noneditable.
By default the Delivered is set to ordered qty and status is to Delivered. The delivered Qty can be changed based on the physical delivery Qty and the status will be changed to Item(s) Missing if ordered qty and physical delivery qty does not match.
Delivery Person upon reaching the delivery point navigates to the Delivery tab and captures customer signature, Name, Delivery Date and Time.
Attachments such as photos or other documents can also be added.
Warranty
Aqxolt ERP allows warranties to be easily recorded for a product or sales order line item.
Create Warranty and Return Policy:
Navigate to the Manufacturing app > Warranty & Return Policies
Once in the Warranty & Return Policies tab, you can view the Warranty & Return Policies information already filled in and create a new Warranty & Return Policies
To create a new warranty and return policy, click the “New” button.
Select the organisation details of the warranty and return policies.
Select the policy guidelines and product for which the warranty and return policy is being created.
Enter the name of the warranty and return for identification purposes. Also enter the length of the warranty period, in days.
Click the “Save” button to create a warranty and return policy for the product.
Create a Warranty for the Finished Product or Sales Order Line Item
Navigate to the Manufacturing app > Products tab.
Once in the Products tab, you can view the products information already recorded.
Select the product for which the warranty must be created.
In the related tab, find the warranties related list and click the “New” button.
Select the organisation and business unit details.
Enter the warranty name and select the type of warranty – standard or extended.
Select the warranty and return policy associated with the product or sales order line item.
If the warranty is associated with a sales order line item, select the sales order line item.
Enter the warranty period in the valid till and valid from date. Enter the quantity.
Click the “Save” button to create a warranty for the product, asset or sales order line item.
Subscription
With Aqxolt ERP’s subscription module, you can offer a wide range of subscription frequencies, (e.g., weekly, monthly, quarterly, annually) simply by specifying the start and end dates of the subscription in the subscription plan.
Create Subscription Plan
Create a Tax Plan record by navigating to the Order Management app > Accounts tab.
Once in the Accounts section, select the Organisation Account to create the subscription plan.
In the related tab, find the Subscription Plan related list and click the “New” button.
Enter the Subscription Plan Name and Description.
Select the Subscription Plan, Duration in Months and Order Profile.
Click the “Save” button to create the Subscription Plan record.
Create Product Subscription Plan Allocation
Create a Tax Plan record by navigating to the Order Management app > Accounts tab.
Once in the Accounts tab, you can track the Accounts that are already recorded.
In the related tab of the organisation account, find the list related to the Subscription Plan and view the record.
In the related tab of the Subscription Plan, find the list related to the Product Subscription Plan Allocation and click the “New” button.
Enter the Name. Select the Subscription Plan and Product, and then select the Active checkbox.
Click the “Save” button to create a Product Subscription Plan Allocation Record for the associated Subscription Plan.
Create a Subscription
A subscription can be created using two methods;
From the Subscription tab (record level)
With the Enterprise Point of Sale tab.
Creating a Subscription Through the Subscription Tab
Navigate to the app menu and click on the Subscription tab.
Once in the Subscription section, you can track the subscriptions already filled in and create a new subscription.
When filling in a new sales order, enter the subscription name and select the Active checkbox.
Select the sales order and subscription plan, then enter the subscription description.
Enter the start and end dates of the subscription.
Enter the duration in months of the subscription.
Enter the Next Order date of the subscription and select the status – whether the subscription is On Hold, Active or Cancelled.
Enter the address details and click the “Save” button to create a subscription order.
The process for creating a sales order from the Point of Sale tab is as follows:
Create the sales order as described in Creating a sales order through the Sales Orders tab.
Click the “Subscribe Order” button.
Select the subscription plan and select the duration in months.
Enter the name of the subscription. Enter its description and special instructions, if any.
Find the products by typing the name of the product or by clicking the “Find” button. Select the products from the action column and click the “Product+” (add product) button.
In the product’s line items details section, enter the quantity and select the discount plan, if applicable.
Click the “Subscribe” button and complete the subscription order.
Loyalty
Enroll your customers in a loyalty program to encourage regular purchases and brand loyalty.
Create a Loyalty Setup
Navigate to the app menu > Loyalty Setup tab.
Once in the Loyalty Setup section, you can track the Loyalty Setups already filled in and create a new Loyalty Setup.
To create a new Loyalty Setup, click the “New” button.
Enter the Loyalty Setup name and the Points Per Unit Amount.
Select the “Active” checkbox and select Organisation and a Business Unit.
Save the record to create a Loyalty Setup.
Create a Loyalty Program
Navigate to the app menu > Loyalty Program tab.
Once in the Loyalty Program section, you can track the Loyalty Program already filled in and create a new Loyalty Program.
To create a new Loyalty Program, click the “New” button.
Enter the Program name and select the “Active” checkbox.
Select the Priority, Tier, Loyalty Setup, and Start and End Dates of the loyalty program.
Save the record to create a Loyalty Program.
Create a Loyalty Card
Navigate to the app menu > Loyalty Program tab.
Once in the Loyalty Card section, you can track the Loyalty Program already filled in and create a new Loyalty Card.
To create a new Loyalty Card, click the “New” button.
Select the Loyalty Card name and select the “Active” checkbox.
Enter the Customer Account, Contact and Loyalty Program details
Enter the Start and Expiration Dates of the card
Save the record to create a Loyalty Card.
Payment using loyalty
Using Aqxolt ERP, you can make loyalty payments in the following ways:
From the ePoS page
From the Invoice detail page
Loyalty payments from the ePoS page
Create the sales order as described in Creating a sales order through the Sales Orders tab.
Navigate to the Payments tab in ePoS and click the “Loyalty” button.
Enter the points to redeem and click the “Pay Now” button.
A Loyalty Type payment record has been created.
Loyalty payments from the Invoice detail page
Navigate to the app menu and click on the Invoices tab.
Once in the Invoice section, you can track the invoices already filled in and create a new invoice.
Select the invoice for payments and on the detail page navigate to the “Redemptions” button.
The Redemptions page shows the invoice details and the total amount due, along with the available loyalty points and the subsequent loyalty value, as shown below.
Enter the points to redeem and click the “Pay Now” button.
Discounts & Coupon Redemptions
Discounts
Aqxolt ERP provides the ability to assign discounts on price book that will determine the discounts for order profiles. The discount will affect all the products linked to the price book.
Create Tier
The tier is a threshold assigned to the product when the quantity purchased reaches within the floor and the ceiling unit. You can create the tiers by following the steps below.
Navigate to the App menu> Tier tab.
Once in the Tier tab, you can track the Tiers already filled in and create a new Tier.
To create a new Tier, click the “New” button. You will be presented with a screen below.
Enter the Tier name and the Floor and the Ceiling Units. For example, you could create a discount that gives a 10 percent discount for purchase of a product with quantity one (floor unit) up to ten (ceiling unit).
Select the “Active” checkbox and select Organisation and a Business Unit.
Save the record to create a Tier.
Create Discount Plan
Navigate to the App menu> Discount Plan tab.
Once in the Discount Plan tab, you can track the Discount Plans already filled in and create a new Discount Plan.
To create a new Discount Plan, click the “New” button. You will be presented with a screen below.
Enter the Discount Plan name and the Description of the discount plan.
To allow the discount in percentage, enter the Floor discount and Ceiling discount percentages and set the Default discount percentage.
Note: You can either have Discount Percentage details or Discount Value at the same time. If both the discount percentage and value is given in the record, then the precedence goes to Discount Percentage.
Select the Status of the discount plan and select the Organisation and the Business Unit.
To activate the discount plan, select the Active checkbox.
Save the record to create a Discount Plan.
Create Tier Discount Allocation
Navigate to the App menu> Product tab.
Once in the Product tab, you can track the Products already filled in.
Navigate to the related tab of the Product record and find the Tier Discount Allocation related list.
To create a new Tier Discount Allocation, click the “New” button. You will be presented with a screen below.
Enter the Tier Discount Allocation name and select the Discount Plan that you want to associate with the product.
Select the Order Profile, Tier and the Price Book to allocate to the product in order to use the discount being set up.
To activate the Tier Discount Allocation, select the Active checkbox.
To set the default tier to the product, select the Default checkbox.
Select the Organisation and the Business Unit.
Save the record to create a Tier Discount Allocation for the product.
Coupons
With this feature, Aqxolt ERP gives you the ability to redeem coupons without leaving or reloading the enterprise point of sale page. You can give discounts to orders by redeeming the active coupons. The system gives you the ability to create coupons with various options, like start and end dates, total value in percent and currency, etc.
Create a Coupon
Navigate to the app menu and click on the Coupons tab.
Once in the Coupons section, you can track the Coupons already filled in and create a new Coupon.
Click the “New” button to create a Coupon and select the “Orders” record type. Then click the “Next” button.
Enter the Coupon Name and the Start and End Dates of the Coupon.
Enter the barcode of the Coupon and the Maximum Allocated Vouchers.
Enter either the value in currency or the value in percent to give a discount to the customer.
Save the record to create a Coupon.
Issue Coupons
Navigate to the related tab of the Coupons record.
Once in the Coupons Issued section, you can track the Coupons already issued and create a new Coupon Issued record.
Click the “New” button to issue a Coupon.
Enter the Coupon Issued Name and select the issued Date.
If the Coupon needs to be issued to a specific account, select the customer account. If the Coupon needs to be issued for multiple accounts, leave the Accounts field empty.
Click the “Save” button to create the Coupons Issued record.
Payments using Coupons
Using Aqxolt ERP, you can make Coupon payments in the following ways:
From the ePoS page
From the Invoice detail page
Coupon payments from the ePoS page
Create the sales order as described in Creating a sales order through the Sales Orders tab.
Navigate to the Payments tab in ePoS. To redeem the Coupon, enter the Coupon code and click the “Apply” button.
You will see that a payment of type Coupon has been created.
Coupon payments from the Invoice detail page
Navigate to the app menu and click on the Invoices tab.
Once in the Invoice section, you can track the invoices already filled in and create a new invoice.
Select the invoice for payments. On the detail page, navigate to the “Redemptions” button.
Click the Redeem Coupons section on the left-hand side.
Enter the Coupon code and click the “Apply” button.
The Coupon redemption page now shows the Coupon discount amount paid to the invoice.
Inventory & Asset Management
Inventory management tracks the stock that comes in and goes out of a company’s stores and warehouses. Asset management tracks the equipment and supplies that a company uses to run the business. In other words, inventory management and asset management both track a company’s property.
Inbound Receive
The Inbound/Receive Logistics tab allows users to add the product to the inventory. We need to create a Logistic record for the Purchase Orders whose type should be ‘Inbound’.
1. Creation of Logistics record for a Purchase Order
If we check the ‘Ready the Receive’ checkbox while creating the Purchase Orders on the ‘Create Purchase Orders’ page and click on Save, the system will create the Purchase Order and its Logistic record.
Or
If we create a Purchase Order from the Create Purchase Order tab without checking the ‘Ready to Receive’ checkbox, the system will create the Purchase Order, but we need to navigate to the Purchase Order record level and need to check the ‘Ready to Receive’ checkbox manually to create the Logistic record. Follow the below steps to create the Logistic record manually –
Find the Purchase Orders tab from the App Launcher.
Once in the Purchase Orders tab, you can view the Purchase Orders information already filled in.
Find the Purchase Order and open it, check the ‘Ready to Receive’ checkbox, and ‘Save’ the Purchase Order record. The system will create the Logistic record.
Figure – ‘Ready to Receive’ checkbox
Figure – Logistic record
2. Complete the Inbound/Receive Logistic process to Receive the inventory.
Select the ‘Warehouse Management’ App from the App Navigation and click on the ‘Inbound/Receive Logistics’ tab.
OR
Find the ‘Inbound/Receive Logistics’ tab directly from App Launcher.
After clicking on the ‘Inbound/Receive Logistics’ tab, the system will take the users to the ‘Inbound/Receive Logistics’ home page.
Select the Channel and Distribution Channel available in the upper right corner, for which the logistic was created.
Users can see all the logistics that are related to the selected channel and Distribution Channel.
Use the search bar or scan the Purchase Order’s barcode to find the logistic.
Once the users found the Logistic, click on the Receive button or scan the barcode of Receive to navigate to the Receive section.
Figure – Click on Receive button to navigate to receive the section
Figure – Scan Receive barcode to navigate to receive the section
Note: –
Users can select multiple logistics together by selecting/scanning the logistics as shown in the below figure and receive all items at a time.
Users can attach any document like bills or product details by clicking on the ‘upload files’ icon and selecting the file that users would like to attach.
After uploading, users can find this document in the ‘logistic’ record level in the related list section of ‘notes and Attachments’.
After navigating to the ‘Receive’ section, users can see all the products associated with the purchase orders.
Figure 5: Before Receiving the Products
Users can see the Normal products at the top, Batch products in the middle, and, Serialized products at the bottom of the page.
Check the checkbox or Scan the Barcode of the Product to select the Purchase Order Line items.
If the Product is a Lot Tracked product, then you can Create a new Batch or you can Scan or Select the available directly. Click on the Gear icon to create a new Batch from the Receive section.
If the Product is a serialized product, then you can Select each inventory for that product or Scan the barcode of the Product. If you Scan the barcode of that product, the system will automatically select each inventory record.
Once you select each inventory for that product, you can enter the Serial numbers directly or scan new Serial Numbers for that product one by one.
Once you select the line items and select Batch/Serial Numbers, you need to enter the Quantity that you want to receive in the provided Quantity input field. By default, the total quantity will be auto-selected, if you want to receive the quantity partially, you can enter the partial quantity and will be able to receive the items partially.
Also, the user can Scan or Select the barcode of the Location if it’s stored at a particular location in the selected warehouse.
In the same way, the user can Scan or Select the barcode of the Bin.
Once everything is selected, you need to click on the Save button.
If you are receiving the items partially, the system will display the received items in the below section of the page.
Once you receive all the items, the system will display a message that All Items Received, and all received items will display at the Received Line Items.
Creating a new Batch/Lot from the ‘Receive’ Section.
Step 1: Click on the gear icon available next to Batch/Lot lookup.
Step 2: It will open the pop-up as shown below.
Step 3: Enter the Batch or Lot Number, and Expiry Date, and select Version if you want to associate that Batch to any specific Version.
Step 4: After entering the details click on the ‘Create Lot button, which will create a new Batch or Lot and allocate it to that product for which the inventory will get added.
Outbound Logistics
The Outbound Logistics module of Aqxolt ERP ensures that all kinds of orders are dispatched accurately to the provided shipping address. The outbound logistics allows items to be placed in the specific packages for shipment. The system allows the user to scan an order reference number for items required for shipment. Stock dispatching is applied mainly to modules like sales orders, purchase returns, work orders, and transfer orders.
Navigate to Order Management app > Outbound Logistics tab
The List tab shows the logistics orders that are ready to be Picked and Packed.
Select the logistic order to complete the stock dispatching process
Click the “Pick” button to pick the products from the available stock address.
Select the outbound logistic line item and click the “Pick” button at the bottom right-hand corner of the page.
If all the Qty of the line items are picked, the screen moves to the Pack page
If all Qty is not picked the page remains in the same(Pick) screen until all the Qty is Picked
On the Pack tab, select the chosen item and select the package type and enter the deposit tag number to identify the package.
Select the quantity to pack, select the shipping type and click the “Save” button. Make sure Picked and Packed Qty are same.
The Package will be listed as shown
Multiple packages can also be created by selecting only the required line items in the Pack screen.
To ship the package, select the checkbox and click the “Ship” button.
Depending on the Shipment type selected UPS/FedEx or Internal shipment, the screen navigates to Shipment page.
Purchase Order
The purchase order is an electronic document that is sent by the customer to the seller to request for supply of certain goods and services. It is the first official communication from the buyer, containing the details of the specific items required, their quantity, and the prices agreed upon along with other details that may be required for the goods and services.
The purchase line orders contain the details of each of the items types ordered as well as the quantity of each item. Each type of commodity has a unique sales line number. Numerous purchase line orders can be contained in a single purchase order.
The purchase orders are used by the seller to prepare the items for shipment. The purchase orders are also important in providing the seller with information about the buyer to track sales records, authorize shipments and plan properly the shipment methods in line with the customer’s needs. This helps a business to grow and reach more customers by simplifying how you make sales. It makes it easier to make purchase orders and also improves the efficiency of the seller’s ability to account for stock and manage sales.
Creating a Purchase Order
In the purchase orders, one is able to view and edit the existing purchase orders, create new ones, and also import a new document from the existing documentation. When creating a new purchase order, the following steps are followed:
How to create Purchase Orders
From the App, launcher go to the ‘Create Purchase Order’ Tab.
Select type of purchase order and click ‘Next’ button.
Standard purchase order.
Enter all the details of the Purchase order such as Expected date, status, Employee requester, vendor, vendor contact, Vendor address, Purchasing company, Billing, and delivery address.
Check the ‘Ready to Receive’ box to receive the item.
Now click on the ‘Add Button’ to Add products to your purchase order.
Select the product from the list of products and enter the name of the product.
Add ‘quantity’ as the Amount of units that needs to be purchased.
Add ‘price’ for each unit in the Price box.
Add any description required in the Description box for the purchase order.
Click the ‘save’ button.
The purchase order will be created.
How to Inbound Purchase Order Logistic:
From the App launcher go to the ‘Inbound Receive/Logistics’ tab
Select the purchase order logistic and click on the ‘Receive’ tab
On the receive page select the version, location, or bin if required and click the ‘save’ Button.
Your purchase order is Complete.
Accounts Payable:
Go to the ‘Accounts Payable’ tab
You can see Vendor’s tab where all the vendors will be listed. You select the vendor and select the Purchase order related to that vendor to create a bill.
You can also directly select the Purchase order to create a bill against it from the purchase order tab.
Select the purchase order to create a bill against it and select the new bill option from the dropdown.
Create Bill page will appear. Enter the Vendor bill date and Bill number. Also, you can add more products to the same bill by clicking on ‘Add’ button.
On the Product line item add taxes and description if required and select the Account to capture the amount paid and click ‘Save’ button.
When Bill is created it will appear on Bill tab. Now match the bill by selecting the bill and click ‘match bill’ button on the top right.
On the match bill page select the line item to match and click ‘save’ button.
Now post the bill by selecting ‘Post’ option from the dropdown against that bill.
When it is posted then New voucher option appears. Click the new voucher to create a voucher.
Click the ‘save’ button to save the voucher.
Now approve the voucher by selecting ‘Approve’ from the dropdown button.
Click on ‘Make Payment’ option from the dropdown to make payment for that voucher.
On the pay, a voucher pop-up. Select payment account, date, reference number, and payment method and click ‘Save’. Now your payment is complete.
How to create Advance to Vendor Bill
An advance Bill to a vendor bill can be created if you need to make an advance payment to the vendor.
Go to the ‘Accounts payable’ tab
Then click on ‘bills’ Section
On the top right corner, you will see a button called ‘New Bill’
When clicking Create Bill. A pop-up comes up. Select the Advance to Vendor option from the pop-up.
After selecting the ‘Advance to Vendor option’. You will get a create Bill page.
Enter All the details mentioned on the page and click on the ‘Add’ Button to add products to your bill.
Select Product, Quantity, Amount and Select ‘Inventory’ Account and Add any Description required.
You can add more products by clicking on the ‘Add’ button again.
Click the ‘Save’ Button.
A Bill will be created and you can view it on the bills tab.
From the drop-down of that bill select ‘New voucher’
Click the ‘Save’ button. A voucher will be created.
Now from the voucher tab select the ‘Approve’ button to Approve the Bill. It will change from Red to green when approved.
Now from the dropdown select the ‘Make a payment’ Button to pay the voucher created.
Enter the details like payment account, method, and Reference number if required and click the ‘Save’ Button
A payment to that voucher will be done.
Print Barcodes
Print Barcodes page allows to Generate Barcodes for different objects with different BarcodeType and PageSize and Print them.
Products, FixedAssets, Sites, Accounts, and Contacts can have Barcodes and the system is capable of reading barcodes through a barcode scanner.
Navigate to App Menu > Print Barcodes
The object defaults to Product and all the available products are listed below with their Barcodes.
Select the object you want to generate barcodes.
Select the “Barcode Field and Label.”
Additional fields can be added to print by moving fields from all fields column to selected fields column.
Page size and Barcode Type can be managed.
The frame can be added to the Print page by turning on the Frame.
After making the required settings, select the Items you want to take, print barcodes and click “Preview PDF button.”
Stock Take
STOCK TAKE – Manage Variances in the Inventory
Stock Takes is the physical verification of the quantities and conditions of items held in an inventory or warehouse. This may be done to provide an audit of existing stock. It is also the source of stock discrepancy information.
Steps: –
Select the ‘Warehouse Management’ App from the App Launcher. Find the Stock Take tab in the Navigation Bar.
Or
Find the Stock Take tab from the App Launcher.
Figure 01 – Stock Take Tab
After clicking on the Stock Take tab, the system will take the user to the Stock Take home page where the user can see all the created Stock Takes records.
Figure 02 – stock take records
The user can use the search bar to search any Stock Take record.
OR
The user can use the scanner to find the Stock Take records.
The User can also filter out the Stock Take records that belong to the different Channels and the Site/Warehouse.
Figure 03 – search/filter stock take records
The user can update the created Stock Takes by clicking on the ‘Manage’ button or by clicking on the name of ‘Stock Take’.
Figure 04 – Manage/Update stock Take record
Note: –User can change the details of the Stock Takes record and can Add, Edit, and Remove the Stock Take Line items using the Manage functionality.
To create a new stock take record, the user needs to click on the ‘+ New’ button or scan the barcode of the NEW
Figure 04.1 – + New button
Figure 04.2 – Barcode of New button
After clicking on the +New button or scanning the barcode of the NEW button, the system will take the user to the new Stock Take creation page.
Figure 05 – Enter the variances
Stock Take details like Name, Channel, Site, Employee, Approver, StartDate and EndDate, Status, and Audit Period (Monthly) will be auto-selected.
If the Users want to change any records, they can manually select/change the records.
Also, the users can use scanner to scan the barcode of different channels and Sites.
Once the user selects the records from the detail section, the user needs to enter the ‘Stock In hand’ quantity, to adjust the stock for the required Stock Take Line items and click on the ‘Save’ button to create a new Stock Take record.
Note: –
To create the Stock Inward Line items or to increase the stock for any product, the user needs to enter more quantity than Available Stock in the Quantity in Hand See in the above screenshot, the user needs to do the same process we have done for Smart Watch and Camera Diffusion Filter – 3mm Acrylic product.
To create the Stock Outward Line items or to decrease the stock for a product, the user needs to enter less quantity than Available Stock in the Quantity in Hand
See in the above screenshot, the user needs to do the same process we have done Extension Board.
The user can Scan the Product Code directly or Scan the Batch/Lot Number or Serial Numbers to find the Products in the Line-Item section instead of the search bar.
If you want to do an Audit for the Stocks, select the AuditPeriod as ‘Quarterly’ or ’Yearly’, enter the actual quantities in the ‘Stock in Hand’, leave other products as it is and click on Save.
The system will keep/adjust the stocks for only those products whose quantity was entered in the Quantity in Hand field while creating the stock take, and the system will create the outward line-item records for the remaining products and Stock will decrease automatically.
Once the user clicks on the Save button the system will create the Stock Take record.
Figure 06 – Created Stock Take record.
Output Summary: Once the ‘Stock Take’ record gets created, based on the variance (entered Stock in Hand quantity) the Stock Inward and the Stock Outward records will be created.
Stock Transfer
Navigate to the App Launcher >Stock Transfer Tab.
Once in the Stock Transfer section, select the Source Site and the Cart associated to the source site.
Click the “New” button item to pick the items and transfer.
Select the Location from where the item is picked.
Select the Serial No/ Batch Code of the product and the product will appear automatically.
Enter the Quantity to be picked.
Click the Putaway tab and select the Destination Site.
Select the Location of the site to putaway the items.
Select the items in the action section and click the “Putaway” button to complete the stock transfer process.
Stock Run Rate
Stock Run Rate gives an overview of the inventory, it shows how much stock you have at any given time. The stock run rate tracks the finished goods as well as the raw materials. It tracks stocks at all levels of the production process, from net inventory before the supply/produces, to supply/ produce and projected inventory to demand forecast/ actual demand. The complete insight of stock run rate is generated with the help of a master production schedule created for every finished and raw material product. The MPS essentially provides the planning function, extracting actual supply and demand data, and forecasts to deliver timely and accurate production plans. The forecast gives manufacturers the ability to anticipate product demand. The MPS also includes quantities or lot size of the items to be produced, production duration, and quantities available to promise. You can create the master production schedule by following the steps below.
On the Product record, navigate to the related list and find Master Production Schedule.
Once in the Master Production Schedule related list, you can track the master production schedules already filled in.
To create a new Master Production Schedule, click the “New” button. You will be presented with a screen below.
Enter the name of the Master Production Schedule and select the Product for which the MPS is created.
Select the Version of the product and select the schedule period whether the production is scheduled weekly, monthly and yearly.
Enter the Start and End dates of the master production schedule.
Enter the Starting and Minimum Inventory Levels.
Select the Distribution Channel and enter the Lot Size of the production and enter the Default Demand Forecast.
Save the record to create a Master Production Schedule for a product.
Once the Master Production Schedule is created, you need to create an MPS line item. Based on the start and end dates of the master production schedule MPS line items are created.
Navigate to the related list of the master production schedule and find MPS Line Items.
Click the “Generate MPS” button located on the top right corner of the master production schedule record.
This creates the MPS Line Item records based on the start and end dates in the master production schedule.
To view the stock run rate report, navigate to the App menu > Stock Run Rate
The From Date and To Date defaults to the current years start date and current year’s end date.
The listed products can also be filtered based on the Distribution Channel.
Upon clicking Individual product, the system brings its MPS (Master Production Schedule) and ATP (Available to Promise) in a Monthly view.
The demand forecast describes the historical data or the user-specified default demand forecast data in the MPS.
The stock run rate report shows the Actual Demand and Net inventory calculated before the production of an item. The Net Inventory is evaluated every time the demand forecast is changed. The forecasting is based on the inventory levels specified on the MPS record.
You can also create purchase orders and manufacturing orders by clicking the Create Purchase Orders and Create Manufacturing Orders hover buttons available at the To supply/ Produce information.
You can view the Projected Inventory and Available to Promise quantities for each item. The calculations are time-based usually evaluated based on the scheduled period.
Stock-to-Fixed Asset
Stock-to-Asset is a unique functionality developed to help companies or teams that must fuse inventory management and asset management efforts. The feature reduces management overhead related to accounting for each process separately and delivers a simplified, operationally efficient tracking solution.
Combined Inventory and Fixed Asset Control
Depending on your business process, you may need to track certain items or products as both stock inventory and assets. For example, your products are assembled or received and then stored in your warehouse inventory. Those products will be issued to a customer and installed at the customer’s location, with a foreseeable useful life of over a year. Therefore, inventory levels must be adjusted and the product reclassified as a deployed asset that requires tracking and management.
Stock to Fixed Asset Benefits
This transaction or conversion allows you to search for a serialised inventory item issued to a customer or location and assign it an asset number and model number. The quantity and associated cost are automatically adjusted in the inventory database, and you can begin tracking pertinent asset attributes such as maintenance, warranty and location.
Transfer Order
The transfer order contains all the information required to execute the physical transfer of materials into the warehouse and out of the warehouse.
The ERP Mark 7 application enables users to create transfer orders for moving assets, inventory and employees between company stockrooms/sites, warehouses, and departments, respectively.
Transfer Order line items allow for the transfer of multiple Items on one transfer order. Transfer orders can be created for:
Inventory Stocks
Steps to create a Transfer Order for Stocks –
Create transfer orders through a Transfer Order Tab
Create a transfer order by navigating to the Order Management app > Transfer Orders tab> New.
Once on the Transfer Orders section, you can track the transfer orders already created and create new ones. The Transfer Order should be created in Requested Status.
To create a new transfer order, click on the “New” button and choose the transfer order record type
Inventory
Enter the From Channel, Site, Distribution Channel and Address. “From” fields are considered from where the Inventory is requested.
Enter the To Channel, Site, Distribution Channel and Address.
“To” fields are considered to where the Inventory is sent.
Select the Active checkbox to make the record active.
Enter the Requested and Expected Date.
Save the record.
Fields to note:
Field
Description
Transfer Order Name
Describes the name of the transfer order.
From Channel
The Channel from where the assets/stocks will be shipped.
From Distribution Channel
The Distribution Channel from where the assets/stocks will be shipped.
From Site
The site from where the assets/stocks will be shipped.
From Address
Location from where the assets/stock will be shipped.
To Channel
The Channel to where the assets/stocks will be shipped.
To Distribution Channel
The Distribution Channel to where the assets/stocks will be shipped.
To Site
The site to where the assets/stocks will be shipped.
To Address
Address to where the assets/stock will be shipped.
Requested date
Describes the date on which the transfer order was requested.
Status
Current status of the transfer order, such as Draft or Requested.
Delivery by date
It gives the Date by which the shipment will be delivered to To Site.
Ship Date
It gives the Date of Order shipped from the From site.
Expected Date
Describes the date by which the items are expected to be received.
Ready To Pick Pack
Make this checkbox true when Outbound Logistic is to be created.
Ready To Receive
Make this checkbox true when Inbound Logistic is to be created.
Creating Transfer Orders Line Items
Transfer order line items specify the exact Items included in a transfer order. A transfer order may contain more than one transfer order line item. Every line item contains an Asset/Product to transfer and the quantity to transfer.
The steps below explain how to create transfer order line items.
After creating a transfer order, click on the related tab and find the transfer order line items section. Click the “New” button to create a new transfer order line item.
Every transfer order line item is identified by its name; enter the name of the transfer order line item.
Enter an Item to transfer.
Enter the quantity requested.
Click the “Save” button to create a transfer order line item.
Field
Description
TO Line Item Name
Name used to identify the transfer order line item.
Transfer Order
Read-only field that describes the transfer order to which the transfer order line item belongs.
Quantity requested
Number of products requested by the transfer order line to be moved. For example, 12 chairs are requested to be transferred.
Product
The Product of Interest to be Transfered.
Transfer Orders Through an Outbound Logistics Tab
This scenario describes the Pick Pack Ship process by which transfer orders can be managed. The transfer order Items can be shipped/dispatched using the Pick Pack Ship process.
To make Transfer Order logistics available in Outbound Logistics tab the Transfer Order should be marked as Ready To Pick Pack.
Click on the Outbound Logistics tab and find the Logistic Orders that are ready to be Picked, Packed and Shipped as shown below.
From the list of available logistic orders, select the transfer order of interest. Click on “Pick” at the top of the page or below the Action button.
Select the logistic line items and click the “Pick” button.
Click the “Pack” tab and enter the package details, select the package list items and click the “Save” button.
Follow the Pick Pack and Ship process to transfer the stocks from one site to another.
Transfer Orders Through an Inbound Logistics Tab
This scenario describes the putaway process by which transfer orders can be managed. The transfer order logistics can be assigned to particular sites using the putaway option.
Transfer Orders logistics are available in Inbound Logistics when the Transfer Order is marked as Ready To Receive.
Click on the Inbound Logistics tab and find the Logistic Orders that are ready to be received as shown below.
From the list of available transfer orders, select the transfer orders of interest and click on “Receive” at the top of the page or the button that is next to the logistic order. Click the “Save” button to complete the receiving process.
Select the received transfer order line items and click the “Putaway” button, enter the location and storage bin to be assigned to the inventory product and click the “Save” button.
Following the putaway process, creating stock inward line items and filling in the other details, such as name, quantity and warehouse, as well as saving the record, will transfer the stocks to the assigned warehouse.
Fixed Assets (Equipment)
Assets are also known as fixed or capital assets and typically refer to an organisation’s valuable resources and equipment. These items have long-term business use and enable their owner to produce goods or perform services. Assets are tracked as unique items that are not consumed in production.
Because the word “asset” has a different meaning in the world of finance and accounting, the phrase “asset tracking” is used to indicate the monitoring of physical asset movement and condition, not the change in the monetary value of an intangible financial asset.
Systematically tracking assets is necessary across every industry to maintain accurate accounting records as well as real-time visibility of operations. For tracking purposes, each asset is tagged with a unique barcode identifier (e.g., make, model, serial number, etc.) and associated with a custodian or location.
Inventory Assembly
You can easily build assemblies or finished goods from a detailed Bill of Materials. The manufacturing module allows you to specify the raw materials or components needed to manufacture each finished good.
With operations that involve inventory for work-in-process and manufacturing, this functionality enables you to boost end-to-end traceability, productivity and control. In addition, you can access your product assembly inventory in Aqxolt ERP anytime, anywhere, so your team can better coordinate production machine usage and labour.
Manufacturing Benefits:
Streamline manufacturing process using barcodes
Increases flexibility for multiple product variations
Improves inventory control during manufacturing/process cycle
Saves time and increases manufacturing productivity
Increase Manufacturing Productivity
Create predictability, better coordinate manufacturing machine usage and labour, and track raw materials and components needed to manufacture each specific product accordingly.
Easily Assemble Your Inventory
The Inventory Assembly feature allows you to efficiently track product manufacturing and associated stock quantities and costs.
LOT
Products can be manufactured in a lot, having a particular lot number to the set of production. To make a product available in a lot, we have to make the product Lot Tracked.
Check Lot track checkbox on the product detail page.
Create a Material Batches/ Lots record in the related list of the product.
Click on Create “New.”
Add Batch Number, Date of Manufacture and Availability Date.
Make sure it is active and the product is selected.
BOM KIT
The concept of KIT is extensively used in manufacturing industries. The concept of BOM and KIT fall under different processes. KIT is a concept involving the sales process whereas BOM falls under the inventory process. KIT is an assembly of many finished items grouped together to be sold; its pricing is calculated for each finished item. KIT itself cannot be considered one stock; each finished item is stocked separately.
For example, Universal Furnitures manufactures various types of furniture. When the company sells its furniture, it sells a dining table, chairs and cushions as a KIT. Thus, the finished items are sold as a group rather than individually
Create Bill of Material (Components) Kits:
Navigate to the Products tab.
When creating a new product, make sure the “Is Kit” checkbox in the product record is checked.
Once in the Products tab, you can view the Products information already filled in and create a new Product record.
On the related tab, scroll through the related list and find Bill of Materials (Component).
Click the “New” button to add a new BOM.
From the Select Record Type pop-up, select Kit BOM and click the “Next” button.
Fill in the details, such as the Bill of Material Name, Type, Component Type and BOM Notes.
BOM (Product) auto populates.
Select the BOM (Component) and the Quantity required.
Check the “Active” checkbox and click on the “Save” button to create the BOM kit record.
Adding Product BOM Versions:
In the Related list tab of the Product, navigate to the BOM Version.
Click the “New” button. Choose the “Manufacturing” record type and Next.
Fill in the Version Code, Start Date and To Date.
The product is auto-filled. Fill in other details, such as Category, Process and Quantity.
The Type should be Assembly and the Status should be Certified.
Select the Active checkbox and Save.
Shipping a Kit
When a Sales Order is created with a Kit as a product and when the sales order is ready for shipment, the sales order will be available for stock dispatching.
Click on the “Stock Dispatching” tab and select the sales order that has a Kit as a Product.
Click Pick to see all the available sales order line items.
Select the sales order line item having the Kit as a product and click the Explode checkbox on top of the page. The Explode checkbox will split the Kit components into individual line items and the required BOM (Components) will be reduced from the inventory.
Click on the “Pack to pack” button, the Kit with all the components attached to it and click the “Save” button to create the package.
Follow the shipment process to ship the Kit (BOM) to its specified shipping address.
Serial Number
Products and Fixed Assets can be serialized and Inventory can be stored for different products with different serial numbers.
Assigning Serial numbers to a product involves the following setup:
On the product detail page, make sure the product is active, status is released and serialize checkbox is checked.
In the Related section, go to Serial Number > Create New.
Add Name, Serial Number and Product.
Add Availability date and make sure available checkbox is checked.
Create Inventory Stocks and Stock Inward Line Item for the Product.
In the stock Inward line Item, choose the Serial Number we created.
Warehouse
Create a Warehouse Site
Navigate to the Order Management app > Sites tab.
Once in the Sites section, you can track the warehouse sites already filled in and create a new warehouse.
Click the “New” button to create a new warehouse.
Enter the name of the warehouse and select the Active checkbox to activate it.
Enter the Barcode of the warehouse and select the Primary Contact associated with the warehouse.
Select the type of warehouse, whether a site is of the type Warehouse, Plant or any other type.
Enter the organisation and business unit of the site and click the “Save” button to create the warehouse site record.
Location
Navigate to the tab related to the Warehouse site record. Find the list related to Locations.
Once in the Locations section, you can track the locations already filled in and create a new Location record.
Click the “New” button to create a Location record
Enter the Location Name and select the type of location, whether it is a Floor, Bin, Shelf or Cardboard.
Enter the Floor Number, Shelf Number, Aisle Number, Bay Number or Space Number.
Enter the Bin capacity, organisation and business unit details. Also, select whether the location holds scrap.
Select the Active checkbox and click the “Save” button to create the location record.
Storage Containers
Navigate to the tab related to the Warehouse site record. Find the list related to Storage Containers.
Once in the Storage Containers section, you can track the storage containers already filled in and create a new Storage Container record.
Click the “New” button to create a Storage Container record.
Enter the Storage Container Name and the Barcode of the container.
Select the Type of container, whether it is a Bin, Bottle, Bucket or Pallet. Enter the description of the container type in the Description field.
Select the status of the container and select the Active checkbox,
Click the “Save” button to create a Storage Container record.
Manufacturing & Service
The Manufacturing & Service Operations certification track provides a key element of the operations organization in a company. It is chartered to provide and manage resources and to convert raw materials into finished products.
Manufacturing Order
How to create a Manufacturing Order:
Form the App launcher go to the Manufacturing module.
To create a Manufacturing order, go to the ‘Manufacturing Workbench’ tab
Click on the scheduler tab to schedule a manufacturing Order.
On the left-hand side, you will find all the products listed for manufacturing or you can search from the search bar provided.
Click on the product that needs to be manufactured. You can see the process cycles in the scheduler to schedule these process cycles to a specific time and date.
Enter the quantity required to Manufacture in the QTY filed provided.
Click on the ‘Schedule MO’ button to schedule the order.
On the next page, you can see all the details for the manufacturing order.
BOM’s tab – This shows the Bill of material required to produce the final product.
Work orders tab – Show all the work orders that need to be completed to produce the final product.
Production Status – This shows the status of the current production.
Serial Numbers / Batches – If the MO Product is Serialise product then it will generate the serial numbers or If the LOT Tracked product the system will generate Material Batches / Lots.
Now Allocate the stock for all the BOM’s as required for the manufacturing of the product.
Click on the ‘Stock Allocation’ button to allocate stock manually or select the ‘Auto stock Allocation’ button to fulfill stock automatically.
When clicking the Stock allocation button, this page will appears to enter the stocks required for each BOM’s. Manually enter the values and click the ‘Capture’ Button to save the stock.
Similarly allocate the required quantities for all the BOM’s.
When all the stock is fulfilled. Click on the ‘Work order’ tab
Complete all the work orders to complete the Manufacturing process.
Click on the first work order. Press the start button to start the process. Then click
on the Play button to begin the operation. Click the green ‘Complete Button’ to complete the process. When done click the ‘Build’ Button.
Clicking on the Build button will navigate you to another page and enter the quantity of BOMs consumed in that Process Cycle/Work Order. Enter the vales and click the ‘Build /Commit to-Inventory’ button.
Similarly go to the next work order and do the same for each operations. Complete all the operations specific to that Work Order. Then click the ‘Build /Commit to-Inventory’’ button.
Clicking the ‘Build /Commit to-Inventory’’ button at the last Work Order /Process Cycle or where the WIP is set, will navigate to another page there enter the quantity that has been produced. You can also choose the type as Produced or Scrapped from the ‘type’ picklist depending on the finished product produced.
Enter the quantity produced in the quantity field and click the ‘Build/Commit to Inventory’ button.
With this, your Manufacturing is now complete.
Process and Process cycles
Process A process is a functionality intended to be used by manufacturing industries to produce finished products for sale. The production of products is typically in bulk quantities and is concerned with discrete units, bills of materials and the assembly of components.
Aqxolt ERP provides a complete solution and agility to succeed in managing entire business processes end-to-end. It lets you accommodate and manage a work center and plan workforce and machine required hours in a cost-effective manner depending on the complexity of the manufacturing process.
Creating Processes:
Navigate to the Manufacturing app > Processes tab.
Once in the Process section, you can track the processes already filled in and create new processes.
To create a new process, click the “New” button.
Select the “Manufacturing Process” record type and click the “Next” button.
Enter the process name, organisation, and contact details.
Select the type of process, enter the barcode and select the product for which the manufacturing process is built.
Select the workstation and work center; enter the required workforce and machine hours.
Enter the cost details of the manufacturing process and enter the process description; then click the “Save” button to create a manufacturing process.
Process Cycle: A process cycle is a sequence of steps required and a set of activities associated with the manufacture of finished products. It essentially starts with the customer requirement and ends with delivery of the required product.
It is a framework that describes how and from where the process starts. It also describes when and how the interrelated operations depend on each other. It describes the progress of each process cycle, helping the user estimate the overall time required to produce a finished product.
Creating a Process Cycle:
Navigate to the Manufacturing app > Processes tab.
Once in the Process section, select the process record to create the process cycle.
In the related tab, find the Process Cycle related list and click the “New” button.
Enter the Process Cycle Name, the Progress of the process cycle and the Description.
Select Previous and Next Process Cycle; then select the Workstation in which the process cycle will commence.
Click the “Save” button to create a process cycle.
Work Order
Work management involves creating, qualifying, dispatching, and executing requests for off-site work, called work orders. The steps and functions of the work order lifecycle work together to ensure that off-site issues are resolved in the most efficient manner possible. Users with the appropriate roles create the work orders and provide all the necessary information needed for the work order tasks. For the qualified, those work orders necessary tasks are created to complete the work order.
Creating a Work Order
In the work orders, one is able to view and edit the existing work orders, create new ones and also import a new document from the existing documentation. When creating a new work order, the following steps are followed:
A Work Order can be created in the following methods
From Work Order Tab (Record level)
From the Sales Order Tab (Converting sales order into work order)
Create work orders through a Work Order Tab
Click on the Work Order tab as shown above. Once on the Work Order section, you are able to track the work orders already created and create new ones with the “New” button located on the top right corner of the work order page.
Register a new work order name, the supplier of the work order along with the organisation’s name and details. Also include the details of the project, the date of approval and the lead time
Other details of the budget are included covering the work order costs, along with the details of the related sales order and purchase orders.
Since the work orders are used in the manufacturing or processing environments, there is a section with the details including, costs, the process, types of the process and planned and completion dates.
The work order document also allows the description of the process that is being done.
For existing work orders, you have the ability to edit the details of the work order as the project goes on. The related tab that is next to the details of each work order allows that each record to be updated according to the progress of the project.
Creating Work order Line
The work order page includes the related page that contains the related tab with links to all documents that relate to a particular work order. The work order lines are the specific process that needs to be completed, for instance, the details of each item to be manufactured or assembled.
The works order lines would help a business in dividing the duties so that the deadlines set for completion of the work orders are met. This can be through dividing the items to departments that manufacture or assemble specific items.
New work order line items can be added to the list by clicking on the “new” button that is on the right end of the page. There are other documents in the page, which are related to the work orders open. The work orders are identified by their unique names. The records are all that relate to the work orders open. This enables the business to manage their projects smoothly so that they are successfully executed and closed.
Fields to note:
Information Section
Field
Description
Work Order Name
It describes the name of the word order
WO Supplier
It describes the name of the supplier who supplies raw materials to complete the work order
Site
It describes the manufacturing unit location
Status
It defines the work order status – Completed, Issued or In progress
Ready For Shipment
It indicates if the sales order is ready for shipping
Code
It is a system generated unique number for every work order
Barcode
It describes the barcode specific to the work order
Approved Date
It describes the approved date of the work order
Project
It describes the name of the project for which the work order is created
Lead Time
It describes the expected time to complete the work order
Organisation
It defines the name of the organisation/Account
Organisation Business Unit
It defines the Business Unit name of the Account/Organisation
Details Section
WO Cost
It describes the complete work order cost
Sales Order
It is the sales order related to the work order
Purchase Order
It is the purchase order related to the work order
Manufacturing/Assembly Process
Process
The process by which the Work order products are manufactured
Type
It defines the type of work order
Manufacturing/Assembly Cost
Total cost for the manufacturing of the product in the process
Planned Date
It is the date planned to start the work order process
Employee Requester
It defines the employee name who requests the work order
Completion Date
It defines the completion date of the work order
Convert a sales order into a work order
Click on the Sales Order tab as shown below
Select the sales order that you would like to convert into work order and click on the down arrow in the top right-hand corner of the page and select ‘Create Work order’ as shown below.
Fill in the work order detail section and the work order line items section, new work order line items can also be added along with the existing line items using ‘Add New’ button.
Click on ‘Save’ button which creates a new work order with a unique work order number.
The work order page offers an efficient method for the business to effectively manage the costs of a manufacturing process to ensure all orders are followed up to and addressed with simplicity. The work orders page also helps to make budgets of each project and the items required with minimum costs. For a supplier, receiving work orders also allows the organisation to understand the required items of each activity and how to deliver on each.
Work Center
A work center is a unit in an organization where all activities associated with manufacturing processes are performed. Work centers are used to allocate resources and in work orders to complete the manufacturing process. Work centers are usually used to calculate the number of hours required to execute the process, the cost involved in project completion, and the availability of the resources within a planned duration of the project end date. Create Work Center
Navigate to the Manufacturing app > Work Center tab
Once in the Work Center tab, you can view the work centre information already filled in and create a new Work Center record.
To create a new work centre, click the “New” button.
Select the organisation details of the work centre.
Select the channel, site, site and shop floor warehouse for the work centre.
Click the “Save” button to create a work centre for the organisation.
Fields to note:
Field
Description
Organisation
Describes the name of the organisation
Work Center Name
Describes the name of the work centre for its identification
Channel
Describes the segment of the business where the employee is hired to work
Site
Describes the site from where the sub-products can be utilised and maintained
Shop Floor Warehouse
Describes the warehouse in which the items are stored; in addition to this, a user can assign the location and storage bin of the received items to make it a well-organised warehouse.
Work Planner
Work Planning is done to have a detailed outlook on how the workforce is utilized to accomplish a task and how work centers are linked to process. Work planning also gives an overview of the Project related tasks. We can add a work planner record and assign it to Process, Process Cycle and Work Center.
Navigate to the App Menu > Work Center
Go to Work planner in the related section of a work center
Create New
Add work planner name, Work Center, Process and Process Cycle.
We can view/create this on the Manufacturing Schedule page as well.
Navigate to App menu > Manufacturing Schedule
You will land on the PLANNER tab showing Capacity Planning which has subtabs
Navigate to Work Planner in the sub tabs and click “New” button to add new Work Planner record.
Shift Planner
Shift planner is a tool that helps manage resources efficiently across businesses. It helps in planning the staff shifts according to their availabilities. It is the best way for super users and supervisor users to manage and utilize the availability of the staff effectively.
A Superuser can manage the availabilities of all the users under the organization
A Supervisor User can manage only your team members availability, time offs and break-times
A user can manage only its own availability, time offs, and break-times easily with Shift Planner.
How to Find Shift Planner:
1) Click on App Launcher.
* On the App Launcher type ‘Shift Planner’. Once the Tab appears click on Tab
2)Navigate from the Manufacturing Workbench.
* Navigate to Manufacturing Workbench, click on the Shift Planner icon from the upper right corner.
3. The Shift Planner Appears
Understand the Features on Shift Planner Screen
Available – This tile represents an Available Slot for booking an appointment
Not Available – This tile represents Slot is not available for booking an appointment
Time Off – This tile represents Time off/ breaks
Holiday – This tile represents public holidays or temporary leaves
Reserved – This tile represents that All available slots have been completely booked.
C – Indicates the total Capacity Hours of a resource for the day
D – Indicates the total Demand Hours for the resource for the day
AC – Indicates Available capacity Hours for the resource after demands and time off
How to Manage Availability of a Resource.
Let’s Create a new resource group for Hand Sanitizer in Hand Sanitizer Work Center. Let’s add ‘Emily Dickinson’ and his availabilities who is a ‘Resource’ or ‘user’ working in Hand Sanitizer Resource Group.
Manage Availability is a feature That allows you to manage the available slots of the users on the shift planner. From this feature you can create a Resource Group, Resource and multi time slots.
1. Click on Manage availability Button
2. The screen shows
Enter the fields to manage availability of that particular ‘Product, Work Center, group and dates’.
3. Click on the ‘Group +’ Button.
4. Enter the Group Information for which you wish to add the new resource
5. Enter Product, Work Center, Group, Start Date, and End Date.
6. Select the Resource Name and then add the availability times as shown below.
7. Click the ‘Save’ Button. A new Resource group and Resource will be created and it can be viewed on the shift planner screen.
How to Manage Availabilities for Each resource
Instead of going to manage availabilities. You can also click the ‘Manage’ button from the time slots.
Let’s manage Emily’s Availability for Wednesday
1. On hover the Time slot. The below popup will appear.
2. Click on the ‘Manage’ button. The next screen takes you directly to Availabilities Page where you can edit the Start and End time for any day.
3. Once changes are made click the ‘Save’ Button.
How to create a ‘Time Off’
Emily has an urgent meeting to attend and she would be unavailable for Work. So she decides to create a Time off for that date and time.
Let’s Create a Time off for Emily for the same slot for Wednesday.
1. Click on the ‘Time off’ Button
The time off screen appears.
3. Click the ‘Time Off’ Button. And Enter the Details of Time off.
4. Click ‘Save’. A time off will be created for Emily and it can be viewed on the shift planner screen in section blue.
Time off can also be created by directly clicking on the time slot on the shift planner screen.
Click the ‘Time slot’. The pop-up shows
Click on the ‘Time off’ button and follow steps 1-4 from How to create time off.
How to filter Shift Planner
A supervisor opens shift planner and he looks for Emily’s resources to book her availabilities. He quickly finds using the filter icon.
Let’s find Emily’s shift schedule at the Boiler Work Center for the Boiler Installation Product.
Click on the filter icon.
Enter the Product Name, Work Center. Emily’s resource Shows up.
How to find time slots for future dates
If you want to see the future availability of Emily.
1. Click on the calendar date icon/arrow button to show the available time slots in the future dates.
2. The next available time slots show up for future dates.
Bill of Materials
A Bill of Material (BOM) is the functionality used to set up a production module in an ERP system. A BOM is essentially used to manage a list of components used to produce the end product. The manufacturing of the end product goes through numerous phases of production; a BOM records the details of components needed at various phases of production. Creating a BOM is essential because the correct component must be available during the manufacture of the finished products.
Every BOM record includes the product name, description, quantity, unit of measurement, procurement type, etc. and provides a centralised source of information to the person handling the BOM to manufacture a product.
Aqxolt ERP provides the flexibility to configure various types of Bills of Material depending on the business use for which they are intended.
Creating Bill of Materials for Manufacturing:
Select the manufacturing process for which the BOM is required.
In the related tab, find the Bill of Material (Manufacturing/Assembly Process) and click the “New” button.
From the New Bill of Material Record Type pop-up, select “Manufacturing BOM” and click the “Next” button.
Fill in the BOM name, the process cycle in which the BOM component is used.
Select the phase (stage) of the BOM, then the unit of measurement of the BOM.
Enter the BOM level, reference designators, part identification number, quantity, BOM (product), and BOM component.
Select component type, procurement type, and type of BOM.
Enter the cost details under the “Cost/Billing” section.
Enter the description and BOM notes if applicable.
Click the “Save” button to create the BOM record for the chosen manufacturing process.
Fields to note:
Fields
Description
Bill Of Material
Describes the name of the BOM being created
BOM Level
Describes the hierarchy of the BOM used in manufacturing the product
Phase
Describes the stage at which each BOM is used during the product lifecycle and allows for progress tracking
Unit of Measure
Describes the measurement in which a BOM will be used
Reference Designators
Provides the details about where the BOM fits in the production lifecycle
BOM Notes
Provides the relevant notes to those who closely work with the BOM. Conveys all the information that might be required throughout the product lifecycle
Procurement Type
Describes procurement activities, i.e., if the BOM is purchased or made (off the shelf or made to specification)
Quantity
Describes the number of BOM products/parts to be used for manufacturing or purchasing
Description
Describes the details of each BOM
BOM (Product)
Describes the product whose BOM is created
Part Identification Number
Describes the number assigned to the BOM part for quick identification
Process Cycle
Describes the process cycle in which the BOM part is used
Finished Product Amount Delivered
Describes the total amount spent to manufacture the finished product
The BOM can be created for various component types, which can be understood as follows:
Component Type
Description
Alternate Component
Indicates the material may be substituted for the original component.
Test Component
Indicates the assembly of material is temporary and will be removed before the final product is shipped; also enables the disassembly operation.
Co-Product Component
Represents possible variations of a planned material. If a manufacturing process can yield more than one possible material due to, for example, process, environment or raw material variations, the optimum material is planned for and all other possible outcome materials can be defined as its Co-Product components.
By-Product Component
An additional material created during the manufacturing of another material. If a manufacturing process of a material also yields one or more other materials, these other materials can be defined as its By-Product components.
Assembly
A parent or component (subassembly) made up of other components.
Capacity planning
Capacity planning is the process of determining the production capacity needed in manufacturing a product. For an organization, capacity would be the ability of a given system to produce output within the specific period.
In Capacity Planning, we can get the daily overview of the work assigned to work centers or Resource Groups.
To Create Capacity Planning
Navigate to the app menu > Capacity Planner.
Create a new Capacity Planning record by clicking “New.”
Add capacity planner name, Start Date, and End Date.
Make sure “Demand Aggregation” is Monthly.
Click Save.
In the Related list, we have Resource Groups, Resource Allocation, Capacities, and Demand.
Resource and Resource Group
The resource is used for the manufacturing process. Manufacturing resource groups can be electromechanical assemblies, cable assemblies, machinery, and human resource as well as Job floor assistants, assembly workers, and others. The human resource comes under the workforce in manufacturing.
A Resource Group can have a team of the professional workforce or a resource group has a set of machinery used for a particular process.
Add the resource group on capacity planner’s related list by clicking the “New” button.
A resource group can be of Record type “Workforce” or “Machine.”
Select Workforce if you want to create Workforce resource group or Machine if you need to create Machine resource group.
Add the Skill Group Name, Runtime Cost Price (Hour) and Billing Price.
Add Process, Process Cycle, and Capacity Planner.
Another way of adding resource groups is from the “Manufacturing Schedule.”
Navigate to App menu > Manufacturing Schedule
You will land on the PLANNER tab showing Capacity Planning which has subtabs
Navigate to Resource Groups in the sub tabs and click “New” button to add new resource group.
Resource Allocation
Resource needs to be allocated to a resource group in the capacity planner. Allocating employees to a workforce Resource Group or allocating machines to a Machine Resource Group; like allocating Floor Assistants to the Job Floor Assistant Resource group.
In the related section of Capacity Planner click “New Resource Allocation”
Fill in the Resource Name, Start Date, and End Date; make it active.
If creating workforce resource; select Employee, if creating Machine resource; select Machine.
Select Resource Group, Work Center and Capacity Planner.
Resource Requirement
Resource Requirement is done to connect the Resource Group with the work planner wherein the Runtime and Runtime costs can be specified based on the work planner requirements.
In the related section of the Resource Group, add the resource requirement.
Create New, add the Resource Requirement Name.
Add Runtime, Runtime Cost, Setup time and Setup cost.
Assign Resource Group and Work Planner.
Click Save.
We can view/create this on the Manufacturing Schedule page as well.
Navigate to App menu > Manufacturing Schedule
You will land on the PLANNER tab showing Capacity Planning which has subtabs
Navigate to Resource Requirements in the sub tabs and click “New” button to add new resource requirement.
Routing & BOM Routing Link
Routing Links are used to making an association between a routing and the BOM components that will be used in the process and the associated versions. ‘Routing Link Code’ links the Bill of Material to a Process Cycle and its Operation.
Routing
Navigate to the app menu > Routing tab.
Once in the Routing section, you can track the routing that is already created and also create a new routing.
To create a new routing, click the “New” button.
Select the Manufacturing Routing record type and click the “Next” button.
Enter the Routing Code and select the Type and Status to be Certified.
Select the Product, Channel, Raw Material and Finished Product sites.
Enter the Maximum and Minimum lot size and click the “Save” button to create the Routing record.
To add the Routing Link Code:
Navigate to the Process > Process Cycle (Related List)
In the Related list, scroll down to the Routing Links tab.
Create new routing link by adding the routing link code, process cycle, and
This Routing link code will be assigned to the Bill of Materials and the Operations.
Operations
Navigate to the operations tab in the related list to Routings.
Once in the Operations section, you can track the operations that are already recorded and create a new Operations record.
Click the “New” button to create operations.
Enter the Operation Code, the Operation No., and the Next Operation No.
Select the Work Center, Quantity, and Fixed Cost details.
Click the “Save” button to create the Operations record.
Service-Installations
Work Orders for Service/Installations
You can also create work orders for products that require service/installations manually by following these steps:
Navigate to the Maintenance app > Maintenance Schedule
Once in the Planner sub tab of Maintenance Schedule, you can track the capacity planning overview of the selected work center, a resource group or a resource.
To create a new work order, click the “+Work Order” button located on the top right corner.
Enter the Name of the work order and the Start and Expected Dates.
If the work order being created is associated with a sales order, select “Sales Order.”
Select the Product of type SST to maintain and select the type of work order
Enter the Quantity, the Production Version and the Routing.
Click the “Schedule Work Order” button to create the work order.
View and modify the process schedule
On the scheduler subtab of the Maintenance schedule, view the Gantt chart of work orders, work centers, and resources upon selecting the view.
To view the Gantt chart in various views like Time, Day, Week, Month and Year view, select the view options from the section above the Gantt chart.
To reschedule the work order associated to the individual operation, simply drag and drop it the available new date/time. The changes are reflected in the work order record.
To mark the percentage of progress of each work order, select the slider icon and drag it to display the progress.
To make further changes to the work orders, double-click the work order you will be presented with a job execution page
Click the work order, on the Job Execution, make the necessary changes and click the “Save” button.
Starting a work order
To carry out the work order click on the Builder subtab of the maintenance schedule tab.
Click the “Start” button to carry out the maintenance order.
Click the work order under each process cycle to carry out the job execution of each Action/Task associated with the work order.
Once in the Worksheet tab of Job Execution, you can track the Actions/Tasks that are already filled in and create a new Action/Task.
To carry out the Action/Task, select the action/task and click the “Start” button. Once the action/task has been started you can pause, finish and stop the Action/Task.
To create an action/task for a specific work order, click the “New” button.
To make further changes to the Action/Task select the down arrow on the right-hand side and click the “Edit” button.
Click the “Save” button after making necessary changes.
Click the “Previous” and “Next” button to view or start the Action/Tasks.
To view the drawings of the action/task click the Drawings tab.
The Time Tracking tab lets you track the time and duration of each Action/Task.
Click the Resources tab to allocate the resource for the selected Action/Task.
HR & Project Management
Display documentation page layout variations.
Employee Management
One of the most important assets a company has is its human capital. A properly managed company will always have a high-quality Human Resources department. Properly managing employees and their various needs and keeping track of their work patterns can lead to better and more productive employees. The HR module in Aqxolt ERP allows you to maintain a complete employee database that includes employees’ contact information, pay details, performance evaluation details, and attendance details.
Create Employee:
Navigate to the HR Management app > Employees tab.
Once in the Employees tab, you can track/view the employee information already filled in and create a new employee record.
To create a new employee, click the “New” button.
Select the organisation and business unit where the employee belongs
Enter the employment details in the Employment Information section.
Enter other information about the employee, such as contact details, nationality, date of birth, passport details, and social security number.
Click the “Save” button to create an employee record in the organisation.
With the Aqxolt ERP, the enterprise can effortlessly manage the following key elements of employee management:
Payroll
Qualifications
Taxes
Expenses
Timesheets
Performance reviews
Approval processes
Profiling
Leave entitlements
Earnings
Costs
Commissions/Bonuses
Aqxolt ERP prides itself on setting a benchmark in the complete automation of employee management. As soon as a new employee joins the enterprise, the system calculates and manages wages from the date of his or her joining. This, and a host of other features makes the HR module as accurate and autonomous as possible.
Fields to note:
Field
Description
No of Hours/Day
Describes the number of working hours per day
Maximum Overtime Hours/Day
Describes the maximum allowed overtime hours per day
First Name
Describes the first name of the employee
Last Name
Describes the last name of the employee
Middle Name
Describes the middle name of the employee
Gender
Describes the gender of the employee
Leave Allowance
Describes the total number of leave allowances applied to the employee
Available Allowance
Describes the available leaves for the employee
Leave Allowance Take
Describes the leave allowances utilised by the employee
Former Employee
Indicates whether the employee is a former employee
Former Employee Record
Describes details of the former employee record
Employee User
Used to assign a salesforce user to the employee record
Employment Status
Describes the employment status of the employee
Job Title
Describes the job title of the hired employee
Non-Employee Type
Indicates whether the employee is a consultant or apprentice
Employment Start Date
Describes the start date of the employee
Employment Start Date
Describes the last working day of the employee
Contract/Offer Issue Date
Describes the date when the job contract/offer was issued to the employee
First Working Day
Describes the first working day of the week assigned to the employee
Commission Plan
Describes the commission plan assigned to the employee
Organisation Business Unit
Describes the organisation business unit where the employee is hired to work
Channel
Describes the segment of the business where the employee is hired to work
Reporting Manager
Describes the manager under whom the employee will be working
Employee Profiling
Describes the profile of the employee
Work Status
Describes the work permit status of the employee
Description
Provides more information about the employee
Date of Birth
Describes the date of birth of the employee
Place of Birth
Describes the place of birth of the employee
Marital Status
Describes the marital status of the employee
Number of Children
Describes the number of children of the employee
Passport Number
Describes the passport number of the employee
Passport Expiry Date
Describes the expiration date of the passport
Nationality
Describes the nationality of the employee
Social Security Number
Describes the social security number of the employee
National Insurance Number
Describes the national insurance number of the employee
Address
Describes the address of the employee
Permanent Address
Describes the permanent address of the employee
Phone
Describes the contact phone number of the employee
Email
Describes the email address of the employee
Mobile
Describes the mobile number of the employee
Leave Management
Leave management systems helps employees to request time-offs from work, plan vacations and track holidays. Management can use the system to Approve or Deny leaves and maintain employee records.
ERP Mark 7’s Leave Management comes under HR Management App and encompasses Time offs, Leave entitlements, Available Allowance and Upcoming Holidays.
The Leave Management is specific to the employee and can be submitted for approval to the higher authorities. This helps you to track employee performance and reduce managerial time.
A Leave Management can be created in two methods:
From the record level
From the Leave Management Tab
From the record level
The steps below explain how to create a Leave request and move it from Draft status to Submitted.
1. Create a Leave request by navigating to Employee management app > Employee tab
2. Select the employee for whom a Leave request needs to be created from the list of employees
3. On the related list/tab scroll down to the Leave Requests (Employee) related list and click the ‘New’ button.
4. Enter the organization details, leave request name, select the leave entitlement and enter the approver details and leave request status. Administrators and other roles of an employee that act as approvers can see all the Leave requests submitted.
A Leave request can be in different stages which can be easily understood by the following statuses.
Click ‘Save’ to save the Leave Request
Timesheet Status
Action
Draft
The leave request that is in the Draft state can be edited to make some corrections. When in the Draft state the number of leaves will not be deducted from the total available allowance.
Approved
When the leave request is approved by the work agent/ higher authority then it is marked “Approved”
Submitted
Once the employee is sure about his entries then they leave request can be moved to the submitted state seeking approval
Rejected
When the approver rejects the Leave request, the leave request can then be available for corrections and resubmission.
Canceled
An employee had created the leave request but later decided to cancel it then the leave request can be in a cancel state and this will increment the available leave allowance.
Completed
When a Leave request is in the completed state then it signifies that the applied leave has been taken.
From the Leave Management Tab
Navigate to HR Management app > Leave Management tab
Leave Management tab has two views for viewing the records:
List View
Grid View
List View
On the Leave Management tab, you can view the list of all the leaves created in the list view.
To filter out the records based on a particular Fiscal year or time period, you can select Current FY, To Date, Previous FY, Next FY, Previous 2 FY and view the list of records.
To view the records which are draft, submitted, approved, rejected, or submitted for your approval or Entitlement/Holidays move to the respective sub-tabs.
To view the Time Off the record, click on the record name.
To edit the Time Off record, click on the edit icon and save the record after necessary changes are done.
To delete the Time Off the record, click on the delete icon and click on ok.
Grid View:
On the Leave Management tab, you can view the list of all the leaves created in grid view.
To filter out the records based on a particular Fiscal year or time period, you can select Current FY, To Date, Previous FY, Next FY, Previous 2 FY and view the list of records.
To view the records which are draft, submitted, approved, rejected, or submitted for your approval or Entitlement/Holidays move to the respective sub-tabs.
To view the Time Off the record, click on the record name.
To edit the Time Off the record, click on the edit icon and save the record after necessary changes are done.
To delete the Time Off the record, click on the delete icon and click on OK.
Fields to Note:
Name
Description
Time Off
This indicates the already taken leaves
Available Allowance
Indicates the total available leaves for the calendar year.
Booked
Indicates the number of booked leaves (In Approval stage)
Upcoming Holidays
Indicates about the National/Organisation-defined holidays for the calendar year.
Book Time off
This is to create a new leave request
Click the “+Time Off” button to create a new Time Off record for the logged-in user.
Enter the name for the Time Off the record.
Every Time Off will be in “Draft” status until the user is ready to submit it to the approver. Select the approver who is authorized to review the Time Offs and decide whether to approve or reject the Time Off.
Enter the Start Date and End date which calculates the number of days the Time Off is being created.
Select the Type of Time Off indicating whether type of leave you’re opting for.
Mention the reason for the Time Off being created and clicking on save creates a record with Draft status.
Clicking on the submit button submits the leave request record for approval.
Draft/Submitted Leaves
All the leaves of status Draft and Submitted will be listed under the Draft/Submitted/Rejected Leaves section as shown below
Submitted Leaves cannot be edited or deleted, the leaves with Draft and Rejected can be Deleted or edited for submission.
Approved/Rejected Leaves:
Once the Leave is approved or rejected by the approving authority or the Approver, it will be listed under the Approved/Rejected Leaves section.
Submitted for your Approval
If you have employees working under you and you are the Approval Manager of their leaves then all the submitted leaves will be listed under the Submitted for your Approval section as shown below.
Leave Entitlement
The Leave Entitlement section indicates all the leaves entitled by the organization such as Casual leave, Sick leave, Maternity, etc, and others that can be defined here and the number of days assigned for each leave type.
The Holidays section indicates all the National/Organisation level holidays defined for the current fiscal year, next fiscal year, previous fiscal year, and previous 2 fiscal years.
Time Sheets
One of the most important assets a company has is its human capital. The role of human resources is vital in establishing an efficient and effective workforce. By tracking and analyzing timekeeping and work patterns, among other things, the HR department provides management with valuable information which they can use to plan and enhance working practices.
With the ERP Mark 7 Timesheet feature, a business can track and monitor the activities of employees on an hourly basis for a range of projects. It provides an instant status report on the activity of any individual and allows employers to plan projects efficiently, optimizing the working hours of every employee.
The timesheet is specific to each employee and can be submitted for approval to higher authorities. This helps you track the activity status of the specified task.
Timesheets can be created using one of two methods –
From the record level
From the Timesheets tab
From the Record Level
The steps below explain how to create a timesheet and move it from Draft status to Submitted status.
Create a timesheet by navigating to the Employee management app > Employee tab.
From the list of employees, select the employee for whom a timesheet must be created.
On the related tab scroll down and select timesheets related list and click ‘New’ button
Enter the organisation details, approver details and timesheet status details. Administrators and other employees who act as approvers can see all the time cards for the week. Time cards can have any of the following statuses.
Draft
Approved
Submitted
Rejected
In the timesheet, enter the start and end dates of the week.
Click “Save” to create the time sheet record.
Field
Description
Employee
Describes the name of the employee whose timesheet is being created
Workforce Requirement Planning
Describe the name of the workforce required for which the timesheet is created to monitor progress
Approver
Other employees who act as approvers can see all the weekly time cards for all the employees under them
Team Member
Describes the team to which the employee belongs
Status
Provides the current status of the timesheet, such as Draft or Submitted; controls which actions can be performed against the timesheet
Start Date
Describes the start date of the week
End Date
Describes the end date of the week
Approve / Rejected Date
Describes the date on which the timesheet was approved or rejected
Approve / Rejected Reason
Describes the reason for approval or rejection
Week Date
Specifies the week’s date
A timesheet can be in different stages, which can be easily understood by the following statuses.
Timesheet Status
Action
Draft
A timesheet in the Draft state can be edited to add or delete time card entries.
Approved
When the timesheet is approved by the work agent/higher authority, it is marked “Approved.”
Submitted
Once the employee is confident about his entries, the timesheet can be moved to the Submitted state when it awaits approval.
Rejected
If the approver rejects the timesheet, it becomes available for review and re-submission.
Creating Time Card Entries
Timecard entries specify the exact time spent to complete each activity of the project throughout the week. A timesheet may contain one or more time card entries. Each time card entry can be tracked by its activity status. The steps below explain how to create a timecard entry.
Every time sheet should be associated with one or more time card entries, which indicates the amount of time an employee spends on each project. In the related list of timesheet records, click the “New” button under “Time Card Entries”. Upon the creation of time card entries, the time sheet is in the Draft stage.
Fill in the project name, which describes the name of the project for which the time card entry is being created.
Fill in the weekday dates and hours. Every hour mentioned can be supported by a comment to explain the outcome of the task.
Select the “Active” checkbox and select the activity status.
Click the “Save” button to create the time card entry.
Creating Time Sheets Through the Timesheets Tab:
Navigate to the Employee Management app > Timesheets tab.
Click on the “Add New Timesheet” button to create a new time sheet for the logged-in user.
Every time sheet will be in “Draft” status until it is ready to be submitted to the approver. Select the approver who is authorised to review the time card entries and to decision whether to approve or reject the timesheet.
Enter the time card entry details; select the project for which the time card entries are created.
Enter the activity notes, if any, and the activity status to monitor the completion of the task.
Enter the number of hours spent on each day of the week for the selected project and activity.
To create a new time card entry in the same time sheet, click the “Add New +” button.
Click “Save” to create the time sheet under “Draft” status.
Viewing, Editing, and Submitting the Time Sheet:
Navigate to the Employee Management app > Timesheets tab.
The system shows the total approved hours, submitted hours and rejected hours. The system shows all the time sheets that have been submitted, that are drafts and that have been rejected.
Under the Approved Time Sheets section, an employee can view all his approved time sheets along with the date of approval and the name of the approver.
To delete the time sheet, click the dustbin icon under the Action section.
To edit the timesheet, click on the pencil icon under the Action section.
To submit the time sheet to an approver, change the status from “Draft” to “Submitted” and click the “Save” button.
An employee is an approver; he can also approve other employees’ records from the Manager’s Approval section.
Expense
The ERP system provides an accurate, error-free platform for employees to manage their travel plans and expense claims. In ERP, it records the expense details of employees and those who are assigned for approvals.
The expense claims are specific to the employee and can be submitted for approval to higher authorities. This also helps track the approval status of the specified task.
An Expense claim can be created in two methods –
From the record level
From the Expense Tab
From the Record Level
The steps below explain how to create an expense record and move it from Draft status to Submitted.
Create an expense by navigating to the Employee Management app > Employee tab.
Select the employee from the list of employees for whom an expense claim must be created.
On the related tab, scroll down and select the expenses related list. Click the “New” button.
Enter the organisation details, approver details and expense name. Administrators and other employees who act as approvers can see all the expense line items for the week.
Expenses can be tracked by any of the following statuses. Select the status of the expense.
Draft
Approved
Submitted
Rejected
Enter the date of expense creation and the project related to the expense.
Select the “Active” checkbox and the “Paid” checkbox if the expense claim is paid to the employee.
Click the “Save” button to create the expense record.
Fields to note:
Field
Description
Employee
Describes the name of the employee whose expense is being created
Expense Name
Describes the name of the expense created
Approver
Other employees who act as approvers can see all the expense claims that belong to employees under them
Project
Describes the name of the project for which the expense is created to monitor the progress
Status
Current status of the expense, such as Draft or Submitted; controls which actions can be performed against the expense
Date
Describes the date when the expense was created.
Paid
If the checkbox is selected, it indicates that the expense claim has been paid to the employee.
Approve / Rejected Date
Date by which the expense claim was approved or rejected.
Approve / Rejected Reason
Describes the reason for approval or rejection.
An expense claim can be in different stages, which can be easily understood by the following statuses.
Transfer Order Status
Action
Draft
An expense that is in the “Draft” state can be edited to add or delete time card entries.
Approved
When the expense claim is approved by the work agent/higher authority, it is marked “Approved.”
Submitted
Once the employee is confident about his entered claims, the expense can be moved to the “Submitted” state for approval.
Rejected
When an approver rejects the expense, the expense is available for review and resubmission.
Creating Expense Line Items:
In the expense line item, an employee must specify the exact amount spent on the selected expense type and category. An expense may contain one or more expense line items. Each expense line item can be tracked by its status.
The steps below explain how to create an expense line item.
Every expense claim should be associated with one or more expense line items, which proves the amount claimed by an employee on each project selected. In the related list of expense records, click the “New” button under “Expense Line Items”. After the creation of expense line items, the time sheet is in the Draft stage.
Fill in the expense line item name, the expense type and the category which describes the purpose of the expense claim created.
Fill in the expense date.
Enter the amount and VAT amount of the expenses.
Select the “Active” checkbox and select “Status”.
Click the “Save” button to create the expense line item.
Creating Expense Through Expense Tab
Navigate to the Employee management app > Expenses tab.
In the My Expenses tab, you can view the records which are in Draft, Submitted, Approved or Rejected stages by selecting the following sub tabs:
Draft/Submitted.
Approved/Rejected.
Submitted for your Approval.
Draft/Submitted :
On the Draft/Submitted sub tab, you can view all the Expense records which has draft or submitted status.
To view the records in list or grid view, click on the list or grid icon.
To view the Expense associated to a particular Project, click on the Expense record name.
To edit the Expense record, click on the edit icon and save the record after necessary changes done.
To delete the Expense record associated to a Project, click on the delete icon and click on OK.
Approved/Rejected:
On the Approved/Rejected sub tab, you can view all the Expense records which has approved or rejected status.
To view the records in list or grid view, click on the list or grid icon.
To view the Expense associated to a particular Project, click on the Expense record name.
To edit the Expense record, click on the edit icon and save the record after necessary changes done.
To delete the Expense record associated to a Project, click on the delete icon and click on OK.
Submitted for your Approval:
On the Submitted for your Approval sub tab, the Approver can view all the Expense records which are been submitted for approval.
To view the records in list or grid view, click on the list or grid icon.
To view the Expense associated to a particular Project, click on the Expense record name.
To edit the Expense record, click on the edit icon and save the record after necessary changes done.
To delete the Expense record associated to a Project, click on the delete icon and click on OK.
From this section, the Approver can approve or reject the expenses by clicking Approve or Reject buttons as shown below.
My Expenses tab has two views for viewing the records:
List View
Grid View
List View:
On the My Expenses tab, you can view the list of all the Expenses created in list view.
To filter out the records based on a particular Fiscal year or time period, you can select Current FY, To Date, Previous FY, Next FY, Previous 2 FY and view the list of records.
To view the records which are draft, submitted, approved, rejected or submitted for your approval move to the respective sub tabs.
To view the Expense associated to a particular Project, click on the Expense record name.
To edit the Expense record, click on the edit icon and save the record after necessary changes done.
To delete the Expense record associated to a Project, click on the delete icon and click on OK.
Grid View:
On the My Expenses tab, you can view the list of all the Expenses created in grid view.
To filter out the records based on a particular Fiscal year or time period, you can select Current FY, To Date, Previous FY, Next FY, Previous 2 FY and view the list of records.
To view the records which are draft, submitted, approved, rejected or submitted for your approval move to the respective sub tabs.
To view the Expense associated to a particular Project, click on the Expense record name.
To edit the Expense record, click on the edit icon and save the record after necessary changes done.
To delete the Expense record associated to a Project, click on the delete icon and click on OK.
Click these “+Expense” button to create a new expense for the logged-in user.
Every expense will be in “Draft” status until the user is ready to submit it to the approver. Select the approver who is authorised to review the expense claims and to decide whether to approve or reject the expense.
Enter the name and select the project for which the expense is claimed.
Enter the name of the expense line item; select the expense type and category for which the expense is claimed.
Enter the date on which the expense was initiated.
Enter the total amount spent and the VAT amount applied to the expense claims.
The system allows an employee to add a invoice/receipt for the expense claims.
To create a new expense line item for the same expense record, click “+New” button.
Click “Save” to create the expense under “Draft” status.
Viewing, Editing and submitting expense
Navigate to the Employee management app >My Expenses tab.
The system shows total approved expense claims, submitted expense claims and total paid expense claims. The system shows all the expenses that have been submitted, draft and that have been rejected.
The system provides a filter that lets an employee view the total expense claims based on current and previous fiscal years.
Under the approved expenses section, an employee can view all his approved expense claims along with the date of approval and the amount claimed.
To edit the expense, click on the edit icon and edit the details in the Expense record.
To delete an expense sheet, click the delete icon.
To submit the expense to an approver, change the status from “Draft” to “Submitted” by editing the Expense record and click the “Save” button.
If an employee is an approver, he can approve other employee’s records from the Manager’s Approval section.
Note :
Once the Expense is submitted, you cannot edit or delete them and the expense with draft and rejected can be edited or deleted before submission.
Business Units
Business units in Aqxolt ERP is an operational unit that deals with the management of various tasks and goals of an organisation. There can be multiple business units set up based on how a business is organised. In a business, there are times when multiple projects are going on at the same time. This makes multitasking difficult for the supervisor. However, with Aqxolt ERP, it is easy. You can view progress reports and updated data about various projects simultaneously. Not only can you look at the big picture, you can also focus your energies on the finer details. A business unit can be classified as a cost centre or a profit centre.
A business unit as a cost centre is a functional unit within an organisation that costs the organisation money to operate. Cost centres record costs with reference to the values planned. The cost centre indirectly contributes to the profit of an organisation through operational excellence and efficiency. Usually, the managers of a cost centre are responsible for keeping costs below budget. It helps managers to keep track of overhead costs in the area incurred within the organisation. It also enables managers to monitor the progress and profitability of each area and helps management utilise resources properly. It enhances managers’ decision-making powers.
A business unit as a profit centre helps generate quality results and revenue for the organisation. It is crucial for analysing which manufacturing unit generates more or less profit within the organisation and enhances decision-making on operating expenditures.
Create Business Unit:
Navigate to the Organisation Management app > Business Unit tab.
Once in the Business Unit section, you can track the business units already filled in and create a new business unit.
To create a new business unit, click the “New” button.
Enter the business territory name and select the organisation associated with it.
Select the contact for the business unit; enter the fax, phone, and website details.
Select the function of the business unit, whether it is Marketing, HR, Finance, Sales, etc.
Enter the address details of the business unit.
Select the type of business unit, whether it is a cost centre or a profit centre.
Assign the manager associated with the business unit.
Click the “Save” button to create a business unit record for the organisation.
Project
The project module in Aqxolt ERP is the most intelligent solution designed to manage projects effectively and drive operational excellence. It enables you to intelligently automate project programmes while keeping a tab on the budget and related costs. It smartly consolidates expenses, labour costs and material costs and records project budgets.
The solution enables project scheduling and helps the project meet stakeholder expectations. It helps keep track of project progress and forecasts the projected revenue against each milestone.
This comprehensive solution ensures resource visibility and lets the user record resources required during project execution. The success of the project relies on the effective communication of the team, which should be built based on a similar skill set.
Create a Project:
Navigate to the Manufacturing app > Projects tab.
Once in the Project section, you can track the projects already filled in and create a new project.
To create a new project, click the “New” button.
Enter the project name, organisation, and business unit details.
Provide the project details under the description and assign the start and end dates of the project.
Select the project manager associated with the project and assign the budget account to record account-based project budgets.
Enter the labour and material cost; select the programme associated with the project
To track the progress of the project, select the status of the project.
Click the “Save” button to create a project record.
Field to note:
Field
Description
Project Name
Describes the name of the project.
Project Manager
Describes the consultant responsible for managing the workforce and delivering on time, on budget project implementation
Budget Account
Describes the defined budget account associated with the project
Description
Describes the brief requirement of the project so the team working on it is on the same page
Programme
Describes the programme associated with the project
Start Date
Describes the planned start date of the project
End Date
Describes the estimated end date of the project
Labour Cost
Indicates estimated funds received for workforce against a project
Material Cost
Indicates estimated funds received for material consumption against a project
Expense
Describes the expenses recorded against a project
Status
Describes the progress of the project
Programme
An organisation can have a programme and projects associated with it. A programme could be a series of future events with a start date and an end date. In ERP Mark 7, a programme can be associated with a manufacturing process created to meet the need and results of the manufacturing project. This will help organisations create better design and management of work centres and workforce systems; it also prepares a channel for growth for the organisation.
Create Programme:
Navigate to the Organisation Management app > Programmes tab.
Once in the Programmes section, you can track the business units already filled in and create a new programme.
To create a new programme, click the “New” button.
Select the organisation and business units of the programme.
Enter the programme name and the start and end dates of the programme.
Select the budget status and the status of the programme.
To track the expense incurred to execute the programme, select the budget account associated with the programme.
Click the “Save” button to create a programme record for the organisation.
Finance Management
Balance Sheet
The balance sheet is one of the core financial statements used by accountants. A financial statement that summarises a company’s assets, liabilities, and shareholder’s equity at a given point in time. It gives owners an idea as to what the company owns and owes.
To access the Balance sheet, navigate to the Financial Management module and click the Balance sheet tab.
The report generated is based on the current fiscal year. This will display amounts till the presently posted transaction.
You can use the filters and calendar tool to drill down the balance sheet and know the company’s financial position at any point in time or as opposed to a given period. The balance sheet is divided into two columns, one is for assets and the other is for liabilities and stockholders’ equity. Fundamentally, the balance sheet must balance the total amount of assets with the total amount of liabilities and stockholders’ equity.
The balance sheet is auto-calculated using the latest data from the company’s accounts, which means the balance sheet is created in real-time. With Aqxolt ERP’s balance sheet, you don’t have to be a professional to do manual calculations. Whenever a transaction record is created, all the calculations and finance general entries are created automatically, eliminating errors in the balance sheet.
View the data that matters to you by using the filters provided to you. You can import the balance sheet for the selected organization and duration in PDF/Excel format by clicking the “Download PDF / Download Excel” buttons. To make good decisions by comparing financial data, click “Compare Financial Data”. Compare the data of your interest by using filter criteria and viewing the chart data annually, quarterly and monthly. View and download the tabular data by clicking “Download PDF/ Download Excel” for the financial year.
Let’s drill down the balance sheet closely. Depending on the nature of the business, the asset side of the balance sheet may contain many items, some of the examples includes Cash, Inventory, Accounts, receivable, Checking etc.,
The basic equation of the balance sheet states that the liability and the owner’s equity of a business are equal to the total sum of its assets.
Assets = Liabilities + Owner Equity
The other side of the balance sheet displays liabilities and stockholders’ equity. Liabilities are obligations and debt payable to the other entity. Some of the examples of liabilities include Sales tax, Accounts payable, Sales tax payable, Goods received not invoiced, etc.,
Equity is the value of a company’s capital. The basic equation of assets can be used to calculate the owners’ equity
Owners’ Equity = Liabilities – Assets
If the equation returns a negative value then it is dangerous to the growth of your business and difficult to secure the finance of the company. Some of the examples of equity include Retained earnings, Owners’ equity, Remuneration, etc.,
Let’s illustrate an example to understand the balance sheet. One of the customers in Universal stores purchases a Phone and its selling price is $1200 and the cost price is $900. The system generates a sales order for the customer with the invoice amount of $1200. The profit made by the Universal store is calculated using the following equation.
Profit = Selling Price – Cost Price
Therefore, the profit made by Universal Store is $300.
The sales order summary is illustrated in the table below
Sales order
SO-xxxx
Customer: Serah
Qty
Unit Price
Total Price
1
1200
1200
Tax (20%)
240
Sub Total
1440
Discount (10%)
144
Total Amount
1296
The payments on the balance sheet are recorded only when the invoice is posted.
When we make a sale, and Post the Invoice
Chart of Account
Credit
Debit
Sales
1200
Accounts Receivable
1296
Sales Tax Payable
240
Sales Discount
144
1440
1440
Balance After Sale
Sales
1200
Accounts Receivable(Mckinsey)
1296
Sales Tax Payable
240
Sales Discount
144
Customer Serah makes the payment against the Invoice
Serah Pays to Invoice
Amount
Invoice Amount
1296
Cash Payment
1296
Sales Order Status
Paid
Sales Order Stage
Shipped
When a customer makes payment (Cash) to Invoice
Chart of Account
Credit
Debit
Accounts Receivable (Serah)
1296
Cash
1296
Balance After Customer Payment Against Invoice
Sales
1200
Accounts Receivable (Serah)
0
Sales Tax Payable
240
Sales Discount
144
Cash
1296
Let’s illustrate an example to understand the balance sheet when sales return happens. Serah the customer of Universal Stores would like to return one of the items from the sales order purchased by her. The system generates a Return Merchandise Authorisation for the customer and the net sales are calculated by the following formula.
Similarly, let’s illustrate an example understand the balance sheet when Universal stores purchase an item. Aqxolt ERP helps in the accounting of vendor invoices that the vendor bills towards the order. When the user raises the Purchase order to purchase item A and item B, the system creates a voucher against the purchase order. Every time a voucher is posted a general ledger entry is created in the system reflecting the credit and debit balance of the chart of accounts created for purchases.
Inventory
Product Name
Serial No
Cost Price
Selling Price
Profit(SP-CP)
Available Stock
Stock Inward
Item A
2345-5436-2356
78000
90000
12000
2
2
Item B
2345-5436-2378
88000
100000
12000
2
2
After Voucher is Posted the Following Ledger Entries Will be Created
COA
Credit
Debit
Purchase
332000
Accounts Payable
332000
Inventory Accounting
COA
Balance
Inventory
332000
Accounts payable
332000
Accounts Receivable
0
Sales
0
Purchase
0
Sales Return
0
Sales Tax
0
After Stock In Ward (Item A (2345-5436-2356)) is Posted The Following Ledger Entries Will be Created
COA
Credit
Debit
Inventory
156000
Purchase
156000
After Stock In Ward (Item B (2345-5436-2378)) is Posted The Following Ledger Entries Will be Created
COA
Credit
Debit
Inventory
176000
Purchase
176000
When a Universal store returns an item purchased the system creates a transaction entry for the return purchase order and the following chart of accounts are affected.
The Following Ledger Entries Will be Created If Not paid
COA
Credit
Debit
Accounts payable
0
88000
Inventory
88000
0
The Following Ledger Entries Will be Created If Paid with Cash
COA
Credit
Debit
Cash
88000
PurchaseReturn
88000
Income Statement
The profitability of a company for a specified period of time is shown on an Income statement. The business can choose the time period the statement covers. It is an organization’s ability to record net profit or loss over a specific accounting period. The income statement provides an overview of the organization’s sales and net income. Aqxolt ERP covers both the operating and non-operating portions of the income statement. The operating part of the income statement discloses records about expenses and revenue that are directly associated with regular business operations, whereas the non-operating part of the income statement discloses records of expenses and revenue that are not directly associated with regular business operations.
The income statement is important because investors can use it to analyze the profitability of the organization. It plays a significant role in making decisions about whether to invest in the organization.
View/Download an Income Statement
Navigate to the Finance Management app > Income Statement tab.
Once in the Income Statement tab, you can track/view the organisation’s revenue and expenses for the current fiscal year.
The user can use the date filter to view the income statement for a specific period of time to fetch the revenue and expense details for the specific period of time.
Aqxolt ERP allows users to download the income statement in a PDF/Excel format simply by clicking the “Download Excel/ Download PDF” button.
Aqxolt ERP allows the user to use the income statement for comparison. It is used to compare fiscal year data and fiscal quarter data. It typically allows users to compare the present year with two years of historical data.
On the Income Statement tab, click the “Compare Income Statement” sub tab.
To compare the data, from the filter select the fiscal year or fiscal quarter options and the date.
The system will display the tabular data for the selected filter criteria.
To download the tabular comparison data, click the “Download PDF” button.
Aqxolt ERP provides the user with accurate chart data based on the selected filter criteria. Click on the links on the right-hand side next to the chart to view the chart data Annually, Quarterly and Monthly.
Bank Reconciliation
Generally, every organisation operates its finances with at least one bank account. An organisation can have one or more bank accounts operating on multiple currencies. An organisation makes daily, weekly or monthly deposits depending on the nature of the business. The deposits could be in the form of cheques, cash or credit/debit card receipts. Aqxolt ERP’s Bank Reconciliation ensures that payments of any form are processed and deposited in the bank.
Reconciliation of Bank Records:
Navigate to the Finance Management app > Bank Reconciliation
Enter the Reconciliation Name for identification.
Select the organisation and the bank account associated with the organisation.
Enter the start and end dates for reconciling the journal entries of the specified period.
Click the “Save” button to create a bank reconciliation for the organisation.
Download the bank statement template.
Click the “Import Bank Statement” button and select the bank statement to reconcile. (Note that the bank statement should be in .csv format.) The bank statement entries will appear in the section below.
Click the “Reconcile” tab to begin the bank reconciliation for the specified period.
Click the bank statement entry on the left-hand side and find its match on the right-hand-side transactions section.
Click one or more transactions for each bank statement entry and click the “Reconcile” button.
To find and match the transactions, click on the “Find & Match” tab in the transactions section on the right-hand side.
Search the transactions by entering at least two characters of the transaction name or reference number. Also, you can search by entering the amount. Click the “Go” button to find the match.
To create the transaction, click the “Create” tab and select the payment type. Enter the category and amount, then click the “Reconcile” button.
To undo the reconcile, click the “Undo Reconcile” tab. Then click the undo button under the “Actions” section.
Trial Balance
The trial balance helps ensure that the total amount of debits is equal to the total amount of credits. The trial balance shows, for the given organization and general ledger, the account balance as of a selected date, the total sum of debits, and the total sum of credits as of the selected date. At the end of the trial balance report, the total sum of debits must equal the total sum of credits.
Use the Filters section to view the trial balance for the selected organization and the selected dated specification. Select the organization for which the trial balance is required; the trial balance post transactions of the finance general ledgers inherited by the selected organization. Select the “From” date when the total balance will be considered. Select the “To” date when the total balance will be calculated. The system offers an option to download the trial balance for the selected criteria in PDF/Excel format on your local system; click the “Download Excel/ Download PDF” button.
Budget
The biggest concern in terms of project failure involves establishing an unrealistic time and cost to drive a project. An unrealistic time and cost lead to poor decision-making. A good project management system requires the organization to collaborate with all the departments because not all the information is available at the beginning of the project in project lead manufacturing companies. Aqxolt ERP provides the solution to handle project management issues.
Create Budget Account:
Navigate to the Finance Management app > Budget Account tab.
Once in the Budget Account tab, you can track/view the employee information already filled in and create a new Budget Account record.
To create a new employee, click the “New” button.
Select the organisation and business unit details of the budget account.
For accounting purposes, select the relevant chart of the account.
Before the budget is allocated to a project, the manager must approve it. Select the Approver and enter the submitted and approved date of the budget.
Enter the name of the budget and the financial start and end date.
If the budget is of the type carry forward, check the budget carry forward checkbox and select the carry over the budget account.
Enter the spend amount and the amount of the budget account and select the status.
Click the “Save” button to create a budget account for the organisation.
Aqxolt ERP helps project managers develop estimates for cost and project timelines based on the company revenue, assets and workforce involved. A quick way to estimate project cost is by calculating the machine usage cost, workforce cost, material cost and overhead costs associated with each process and schedule involved within the project. This will help project managers manage projects and control budgets proactively.
Fields to note:
Field
Description
Budget Name
Describes the name of the budget account allocated to the project for its identification
Chart of Account
Describes the account available for transactions in its general ledger
Approver
Provides the name of the person responsible for approving the budget
Approved Date
Describes the date on which the budget was approved
Submitted Date
Describes the date on which the budget account was submitted for approval
Financial Start Date
Describes the start date of the financial year
Financial End Date
Describes the end date of the financial year
Carry Over Budget Account
Describes the remaining amount that can be carried for the commitment to the new financial year
Status
Describes the status of the budget account whether it is submitted for approval, committed or approved
Budget Carry Forward
Indicates whether the budget account is of the type carry forward
Spend Amounts
Describes the amount spent from the allocated budget
Amount
Describes the amount allocated to the budget
Finance Data Setup
Custom Setting
Navigate to setup and find “Custom Settings” in the quick find box.
Find “Module” custom setting and click the “Manage” button.
Click the ‘New’ button and create a record by name “Finance”, make sure the Run checkbox is selected, this controls the Activation/Deactivation of Finance Module.
Fiscal Year Setup
Navigate to setup and find “Fiscal Year” in the quick find box.
Select “standard Fiscal Year”
Select the fiscal year start month and select whether the fiscal year is based on the starting month or the ending month.
Click the “Save” button and confirm the changes.
Finance General Ledger
Finance general ledger is used to track all the financial transactions and it is the primary accounting record for a business. The finance general ledgers hold the accounting information that is needed to prepare the company’s financial statements, including the Balance sheet and the Income statement and includes accounts for assets, liabilities, owner’s equity, expense, and revenue.
Navigate to the Finance Management app >Finance General Ledger Tab.
Enter the Name of the general ledger.
Select the Organisation and click the “Save” button to create a general ledger record.
Chart of Accounts
Chart of Account is a unique record of each type of asset, liability, equity, income/revenue, and expense. A very important reason to have COA in the system is to let the users quickly get a glance at a company’s financial health and segregate assets, revenue, liabilities, and expenses. It provides the complete listing of each account in the accounting system and ERP Mark7 has the flexibility to tailor the company’s COA that best suits its business process. It is available for recording transactions in the finance general ledgers.
Navigate to the Finance Management app >Chart of Accounts Tab.
Click the “New” and select the Record Type of the chart of account, click the “Next” button.
Enter the Name of the chart of account and select the active checkbox.
Select General Ledger and Organisation from the lookup.
Click the “Save” button to create the Chart of Account record.
The following basic chart of accounts should be created in the system.
Chart of Account Name
Record Type
Inventory
Assets
Checking
Assets
Cash
Assets
Accounts Receivable
Assets
Retained Earnings
Equity
Owner’s Equity
Equity
Cost of Goods Sold
Expense
Rent
Expense
Sales
Income/Revenue
Sales Return
Income/Revenue
Sales Discount
Income/Revenue
Sales Tax
Liabilities
Accounts Payable
Liabilities
Sales Tax Payable
Liabilities
Goods Received Not Invoiced
Liabilities
To start a New Business Process, Create a “Stockholders Equity” or “Owners’ Equity” COA with an opening balance as per the requirement.
Note: When creating a new Account (Organisation) or existing Account (Organisation) make sure the field Account Type is set to “Organisation”. If the field is not found on the page, add it to the layout. And on the Account (Organisation) detail page Default checkbox should be checked.
Chart of Account Mapping
Chart of accounts mapping allows the processing of balance and supports the ability to correlate a source chart of account to a target chart of accounts. The posting functionality in ERP Mark7 enables the finance general ledgers to create a relevant finance general ledger entry with the relevant chart of account information and transaction in it. To create the chart of account mapping follow the following steps
Navigate to the Finance Management app >COA Mapping Tab.
Click the “New” and enter the name of the COA Mapping name.
Select the Chart of Account from the lookup.
Select Tax or Discount checkboxes if the COA Mapping created is for tax and discount purpose.
Click the “Save” button to create the COA Mapping record.
Accounting Period
Create the accounting period for the fiscal year, i.e., create the accounting period for all the months of the fiscal period for which the financial statements are prepared. It basically imitates the basic twelve-month calendar.
Navigate to the Finance Management app >Accounting Period Tab.
Click the Accounting period button in All Accounting Period list view.
Select the Organisation for which the accounting period records are created.
Enter the Start Date and End Date of the fiscal period.
Click the “Create” button to create the accounting period records.
General Accounting
The Finance module in Aqxolt ERP Mark 7 provides real-time insight into the overall financial status of the organisation. It provides, automates and streamlines the entire financial management process, as well as simplifies user adoption and processes by its seamless integration. Aqxolt ERP Mark 7 provides a complete suite of components involved in financial processes like General Accounting, Accounts Receivable, Accounts Payable, Commission Accounting and Reconciliation with bank feeds. It has been intelligently designed to handle multiple business units. It is completely integrated with other ERP modules like Order Management, Manufacturing Management, Supply Chain Management and Employee Management. It empowers you to track all entries into comprehensive general entries. It also enhances decision making with insightful reports and dashboards.
General Accounting
This is a combination of all the processes related to financial activities in an organisation, such as providing the financial report form balance sheet, profit and loss statements and trial balance. To begin with the configuration every organisation requires a finance general ledger and a chart of accounts for the financial year.
Create an Accounting Period
Navigate to the Finance Management app > Accounting Period tab.
Click the “New” button to create a new Accounting Period.
Enter the Accounting Period Name and select the status.
Enter the Start Date and the End Date of the accounting period.
Click the “Save” button to create the accounting period record.
Create Chart of Accounts
Navigate to the Finance Management app > Chart of Accounts tab.
A chart of accounts can be created for different types of accounts, such as Sales, Liability, Assets, Equity or Income/Revenue from the available record types.
Click on the “Add New Chart of Accounts” button to create a new chart of accounts record for the selected record type.
Enter the name of the chart of account; select the financial year, account type and other details.
Enter the Organisation and Business Unit details.
The opening balance of the account will be 0 if the account is starting in the current financial year; otherwise, the opening balance will be the closing balance of the same account in the previous financial year.
Enter the accounting start and end dates.
Click the “Save” button to create the chart of account.
Note: When creating a new Account (Organisation) or existing Account (Organisation) make sure the field Account Type is set to “Organisation”. If the field is not found on the page, add it to the layout.
Field to note:
Fields
Details
Is Contra:
If the contra checkbox is checked, the chart of the account will be a contra account.
Opening Balance:
The balance brought forward at the beginning of a new accounting period, on the credit or the debit side of the ledger.
Closing Balance:
The amount remaining in an account within a chart of accounts, positive or negative, at the end of an accounting period or at year end.
Total Credit:
The total credit amount of the financial year.
Total Debit:
The total debt amount of the financial year.
Financial Year:
Select the financial year of the organisation; usually the financial year is the period between 1 April and 31 March.
Calculated Ending Balance:
The calculated balance of the account for the given financial year. This is used to identify the starting balance of the next financial year account.
Bank Account:
Selects the bank account of the organisation used to do all the accounting transactions
Account Code:
A six-digit number that indicates the type of revenue, expenditure or transfer being recorded.
Account Information
Account Type:
Indicates the account’s purpose. For example, the account type could be Current Liabilities or Long-Term Liabilities.
Accounting Period Start Date:
Start date of the accounting period; it can be the same as the start date of the financial year.
Accounting Period End Date:
End date of the accounting period, it can be the same as the end date of the financial year.
Create Finance General Ledger for the financial year
Navigate to the Finance Management app > Finance General Ledger tab
Click the “New” button to add “Finance General Ledger”.
Select the financial year and enter the start and end dates of the general ledger entry.
Enter the name of the finance general ledger and enter the accounting period start and end dates.
Select the “Active” checkbox to make the finance general ledger active
Invoice and Payment Posting
Posting invoices ensures that the transaction has been recorded in the Finance general ledger of the company. If the organization operates on a cash basis or on an accrual basis, the invoices and payments can be posted at any given time. Whenever invoices are posted, accounts receivable and sales-related ledger entries are created in the system. Similarly, when payments are posted, payment-related debit and credit ledger entries are created in the system automatically. One must ensure that all invoices are posted with a date for the current year to ensure the accounts receivable are created for the correct period of the year.
Posting Invoices can be done in two methods:
From Record Level
Navigate to the Order Management app >Sales Order tab.
Select the sales order whose invoice must be posted.
On the related tab, click on the invoice number to open the invoice record.
Click the “Edit” button and select the “Posted” checkbox.
Click the “Save” button to apply the changes. Upon saving the record, a finance general ledger entry is created for accounts receivable and sales accounts.
2. From Accounts Receivable
Navigate to the Finance Management app >Accounts Receivable tab.
Navigate to the Invoices tab, select the invoice which must be posted.
Once we select the invoice to post, click on the dropdown button to either post/un-post the invoice.
Posting Paymentscan be done in two methods:
Record Level
Navigate to the Order Management app > Sales Order tab.
Select the sales order whose payments must be posted.
On the related tab, click on the payment number to open the payment record.
Click the “Edit” button and select the “Posted” checkbox.
Click the “Save” button to apply the changes. Upon saving the record, credit and debit entries are automatically created in the system for the posted payment.
2. From Accounts Receivable
Navigate to the Finance Management app >Accounts Receivable tab.
Navigate to the Payments tab, select the payment which must be posted.
Once we select the payment to post, click on the dropdown button to either post/un-post the payment.
Posting Supplier Invoices:
Navigate to the Order Management app > Purchase Order tab.
Select the purchase order whose supplier invoice must be posted.
On the related tab, click on the purchase/supplier invoice to open the invoice record.
Click the “Edit” button and select the “Posted” checkbox.
Click the “Save” button to apply the changes. Upon saving the record, a finance general ledger entry is created for accounts payable and asset accounts.
Posting Supplier Payments:
Navigate to the Order Management app > Purchase Order tab.
Select the purchase order whose payments must be posted.
On the related tab, click on the supplier payment number to open the supplier payment record.
Click the “Edit” button and select the “Posted” checkbox.
Click the “Save” button to apply the changes. Upon saving the record, credit and debit entries are automatically created in the system for the posted payment.
Manage Taxes
Aqxolt ERP enables tax calculation and eliminates manual processes that are subject to human error.
Taxes in Aqxolt ERP can be applied in the following ways;
Assign the taxes on the Sales Orders
Assign the taxes on Products
Assign the taxes on Shipment
Create a Tax Record
Create a Tax record by navigating to the Order Management app > Tax tab > New.
Enter the Tax Code and select the Effective Date and Expiry Date.
Select the Type of the tax, whether it is a Sales, Service or Shipping tax.
Select the Country and Province; If both country and province are selected then the Tax will be applied for that province only.
If Province is not selected then the Tax is applied for the Country.
If Province and Country both are not selected then the Tax will be considered General and will be applicable to all Orders.
Enter the Tax Rate in percentage.
Select the Account Profile (Customer Profile) to which the taxes are applied.
“Apply tax on” field lets you to apply taxes on selling price of the product or the cost price.
Check the Active checkbox to make the record Active.
To apply the tax on a specific product, select the product from the lookup; If not keep it blank. This Tax record will be considered to Apply taxes on Sales Order.
Click the “Save” button to create the Tax record.
Assign the Taxes on the Sales Order
Every Sales Order is generated for a Customer and the Customer is associated with a Customer Profile.
In the related list of Customer Profile, Tax record will be available if created as mentioned in the above steps.
Assign the Taxes on Products
When a tax record of type Sales or Service Tax is created with the product in it, the system applies the tax on the sales order line item that contains the same product in it.
Assign the Taxes on Shipment
When a tax record of type ‘Shipping’ is created, the system applies the tax on the Sales Order Shipping Amount field.
The Shipping Tax will be calculated based on the Tax Sourcing Rule on the Customer Profile which can be Source or Destination.
Fields to Note:
Field
Description
Tax Code
Describes the Tax record Name.
Country
Tax codes are unique for every country. This describes the country for which a Tax record is created.
Province
Every province differs in the tax rate. This field describes the province for which the Tax record is created.
Type
Describes the type of Tax, whether it is a Sales, Service or Shipment Tax.
Effective Date
Describes the date from when the Tax record is effective for use.
Expiry Date
Describes the date from when the Tax record can no longer be used.
Tax Rate
Describes the percentage of tax applied.
Product
Describes the product associated with the Tax record. This field is mainly used when product-specific taxes are created.
Apply Tax On
Describes whether the tax is applied to ‘Selling’ or ‘Cost’ price of the product
Account Profile
Different Taxes can be applied for different Account Profiles. Account Profile (Customer Profile) should always be selected while creating a Tax record
Prepayments
Create prepayments
Navigate to the app menu and click the Accounts tab.
On the tab related to the customer account record, find the related Prepayments list.
Once in the Prepayments section, you can track the prepayments already filled in and create a new prepayment.
Click the “New” button to create a prepayment record. Select the “Credit” record type and click the “Next” button.
Enter the Prepayment Name, Applied Date and Credit Amount.
Click on the “Save” button to create a credit prepayment record.
Create payments
On the tab related to the Prepayment record, find the list related to Payments.
Once in the Payments section, you can track the payments already filled in and create a new payment.
Click the “New” button to create a payment record. Select the Prepayment record type and click on the “Next” button.
Enter the Payment Name and Amount, as well as other payment details for the prepayment.
Select the Payment Gateway, the Status and the Type of prepayment.
Click the “Save” button to create the payment record.
Payment using prepayment credit
Using Aqxolt ERP, you can make prepayments in the following ways:
From the ePoS page
From the Invoice detail page
Prepayment credit payments from the ePoS page
Create the sales order as described in Creating a sales order through the Sales Orders tab.
Navigate to the “Payments tab” in ePoS and click on the “Apply Credits” button.
The system will automatically fetch the Invoice Amount, Total Due and Available Credit. Enter the “Redeem Credit” and click the “Pay Now” button
You will see that a Credit type payment record has been created.
Prepayments from the Invoice detail page
Navigate to the app menu and click on the Invoices tab.
Once in the Invoice section, you can track the invoices already filled in and create a new invoice.
Select the invoice for payments. On the detail page, navigate to the “Redemptions” button.
Click the “Apply Credits” section on the left-hand side.
The Apply Credits redemption page shows the invoice and the total due amount details along with the available credit amount, as shown below.
Enter the Redeem Credit and click the “Pay Now” button.
Accounts payable
Accounts payable (AP):is a short-term debt and a liability on a balance sheet where a business owes money to its vendors/suppliers that have provided the business with goods or services.
Go to the ‘Accounts Payable’ tab
You can see Vendor’s tab where all the vendors will be listed. Select the checkbox against the vendor and select the Purchase order related to that vendor to create a bill.
You can also directly select the Purchase order to create a bill against it from the purchase order tab if have the PO number handy.
Select the purchase order to create a bill against it and select the new bill option from the dropdown.
Create Bill page will appear. Enter the Vendor bill date and Bill number. Also, you can add more products to the same bill by clicking on ‘Add’ button. Attach the bill.
On the Product line item add taxes and description if required and select the Chart of Account to capture the amount paid and click ‘Save’ button.
When Bill is created it will appear on Bill tab. Now match the bill by selecting the bill and click ‘match bill’ button on the top right.
On the match bill page select the line item to match and click ‘save’ button.
Now post the bill by selecting ‘Post’ option from the dropdown against that bill.
When it is posted then New voucher option appears. Click the new voucher to create a voucher.
Click the ‘save’ button to save the voucher.
Now approve the voucher by selecting ‘Approve’ from the dropdown button.
Click on ‘Make Payment’ option from the dropdown to make payment for that voucher.
On the pay, a voucher pop-up. Select payment account, date, reference number, and payment method and click ‘Save’. Now your payment is complete.
How to create Advance to Vendor Bill
An advance Bill to a vendor bill can be created if you need to make an advance payment to the vendor.
Go to the ‘Accounts payable’ tab
Then click on ‘bills’ Section
On the top right corner, you will see a button called ‘New Bill’
When clicking Create Bill. A pop-up comes up. Select the Advance to Vendor option from the pop-up.
After selecting the ‘Advance to Vendor option’. You will get a create Bill page.
Enter All the details mentioned on the page and click on the ‘Add’ Button to add products to your bill.
Select Product, Quantity, Amount and Select ‘Inventory’ Account and Add any Description required.
You can add more products by clicking on the ‘Add’ button again.
Click the ‘Save’ Button.
A Bill will be created and you can view it on the bills tab.
From here on the process to create a Voucher make payment remains the same.
Accounts Receivable
Posting invoices ensures that the transaction has been recorded in the Finance general ledger of the company. If the organization operates on cash basis or on an accrual basis, the invoices and payments can be posted at any given time. Whenever invoices are posted, accounts receivable and sales-related ledger entries are created in the system. Similarly, when payments are posted, payment-related debit and credit ledger entries are created in the system automatically. One must ensure that all invoices are posted with a date for the current year to ensure the accounts receivable are created for the correct period of the year. Posting invoices and payments can be achieved through Accounts Payable page and also from record level.
Posting Invoices:
From Accounts Receivable
Navigate to the Finance Management app >Accounts Receivable tab.
Navigate to the Invoices tab, select the invoice which must be posted.
Once we select the invoice to post, click on the dropdown button to either post/un-post the invoice.
From Record Level
Navigate to the Order Management app >Sales Orders tab.
Select the sales order whose invoice must be posted.
On the related tab, click on the invoice number to open the invoice record.
Click the “Edit” button and select the “Posted” checkbox.
Click the “Save” button to apply the changes. Upon saving the record, a finance general ledger entry is created for accounts receivable and sales accounts.
Posting Payments:
From Accounts Receivable
Navigate to the Finance Management app >Accounts Receivable tab.
Navigate to the Payments tab, select the payment which must be posted.
Once we select the payment to post, click on the dropdown button to either post/un-post the payment.
Record a payment by hitting ‘Record Payment’.
Enter the payment amount, payment account, Reference Number, select the check box against the line item and hit ‘Save’
From Record Level
Navigate to the Order Management app > Sales Order tab.
Select the sales order whose payments must be posted.
On the related tab, click on the payment number to open the payment record.
Click the “Edit” button and select the “Posted” checkbox.
Click the “Save” button to apply the changes. Upon saving the record, credit and debit entries are automatically created in the system for the posted payment.
Shipments and Payments
Authorize
Aqxolt ERP supports Authorize.net to make card payments and online payments.
Add your Authorize.net account on Aqxolt ERP.
Navigate to the Credential Setup tab from App Launcher.
The page has three tabs Payment, Shipment, and E-Commerce.
On the Payments, tab click on New
Fill in the Authorize.net account login details. Keep the Name as Authorize.net and add the username/login and Password
The URL can be tested or live depending on the Authorize.net sandbox account or live account being used.
Test URL – https://test.authorize.net/gateway/transact.dll
Live URL –
DHL
Navigate to App menu > Credential Setup
You will land on the Credential setup page where you have Payment, Shipment and E-Commerce tabs.
Click on the Shipment Tab
Click New to add DHL setup record.
Fill in the DHL credentials and add in the URL to specify the test or live account and make the record active.
Make sure to use the name as DHL
Add the Shipper Details and click “Save.”
This creates a DHL record as shown above and the password/trans key gets encrypted.
With this setup, you can use the DHL services for shipment.
In the outbound logistics process while doing the Pick Pack Ship of the logistic orders, select the shipment type to be DHL while creating a Package.
Click on “Ship” to land on the DHL services page.
Click on “Get Rates” and select the suitable service.
Scroll down the services and click “Initiate Shipment” button
This will successfully ship the package.
Move to “Process Shipment” where you can see the “Shipment No” and “Shipment Status.”
Click “View Label” to generate the label and “View Invoice” to see the shipping invoice.
Click on “Cancel Shipment” to delete the shipment.
(Image)
Navigate to the “Track Shipment” tab to track the shipment.
FedEx
Navigate to App menu > Credential Setup
You will land on the Credential setup page where you have Payment, Shipment and E-Commerce tabs.
Click on the Shipment Tab
Click “New” to add FedEx setup record.
Fill in the FedEx credentials and add in the URL to specify the test or live account and make the record active.
Make sure to use the name as FedEx.
Add the Shipper Details and click Save.
This creates a “FedEx Record” as shown above and the password/trans key gets encrypted.
With this setup, you can use the FedEx services for shipment.
In the “Outbound Logistics Process” while doing the “Pick Pack Ship of the logistic orders”, select the shipment type to be “FedEx” while creating a Package.
Click on “Ship” to land on the FedEx services page.
Click on “Get Rates” and select the suitable service.
Scroll down the services and click “Initiate Shipment” button
This will successfully ship the package and the tab moves to “Process Shipment” where you will see the “Shipment Status” and the “Shipment No.”
Clicking on the “View Label” will generate the FedEx label and clicking on the “Cancel Shipment” will delete the shipment.
Navigate to the Track Shipment tab to track the shipment.
PayPal
Aqxolt ERP supports PayPal to make online and electronic payments.
Add your PayPal account on Aqxolt ERP.
Navigate to the Credential Setup tab from App Launcher.
The page has three tabs Payment, Shipment and E-Commerce.
On the Payments, tab click on New
Fill in the PayPal account login details. Keep the Name as PayPal and add the username/login and Password.
Check the Active checkbox.
The URL can be tested or live depending on the sandbox account or live account being used.
Test URL – https://api-3t.sandbox.paypal.com/2.0/
Live URL
UPS
Navigate to App menu > Credential Setup
You will land on the Credential setup page where you have Payment, Shipment and E-Commerce tabs.
Click on the Shipment Tab
Click “New” to add UPS setup record.
Fill in the UPS credentials and add the URL to specify the test or live account and make the record active.
Make sure to use the name as UPS
Add the Shipper Details and click Save.
This creates a UPS record as shown above and the password/trans key gets encrypted.
With this setup, you can use the UPS services for shipment.
In the outbound logistics process while doing the Pick Pack Ship of the logistic orders, select the shipment type to be UPS while creating a Package.
Click on “Ship” to land on the UPS services page.
Click on “Get Rates” and select the suitable service.
Scroll down the services and click “Initiate Shipment” button
This will successfully ship the package.
Move to “Process Shipment” where you can see the “Shipment No” and “Shipment Status.”
Click “View UPS label” to generate the label and “View Invoice” to see the shipping invoice.
Click on “Cancel Shipment” to delete the shipment.
Navigate to the “Track Shipment” tab to track the shipment.
USPS
Navigate to App menu > Credential Setup
You will land on the Credential setup page where you have Payment, Shipment and E-Commerce tabs.
Click on the “Shipment Tab”
Click “New” to add USPS setup record.
Fill in the USPS credentials and add in the URL to specify the test or live account and make the record active.
Make sure to use the name as USPS
Add the Shipper Details and click Save.
This creates a USPS record as shown above and the password/trans key gets encrypted.
With this setup, you can use the USPS services for shipment.
In the outbound logistics process while doing the Pick Pack Ship of the logistic orders, select the shipment type to be USPS while creating a Package.
Click on “Ship” to land on the USPS services page.
Click on “Get Rates” and select the suitable service.
Scroll down the services and click “Initiate Shipment” button
This will successfully ship the package.
Move to “Process Shipment” where you can see the “Shipment No” and “Shipment Status.”
Click “View Label” to generate the label and “View Invoice” to see the shipping invoice.
Click on “Cancel Shipment” to delete the shipment.
Navigate to the “Track Shipment” tab to track the shipment.
Adding Custom Settings
After installing “Aqxolt ERP” to a Salesforce Instance; the following custom settings need to be uploaded before you start using the shipment processes.
Country Codes
Province Codes
Product Unit Codes
Package Details
For UPS, the following two objects have to be added along with the above three.
UPS Package Type
UPS Service Codes
These records are stored in “CSV files” which can be uploaded using “Data Import Wizard” or “Data Loader.”
Integration Setups
Amazon
To start with AMAZON SETUP, four(4) fields are needed to set up a store for Amazon.
Marketplace ID.
Merchant or Seller ID.
Amazon App’s secret key.
Amazon App’s success key.
To get Merchant Token (Merchant ID), go to the following link:
To sync Products from Salesforce to eBay selling store, product setup has to be done in a proper way making sure the following things are covered
Available on an e-commerce platform and is checked on the product detail page.
Add Product SKU and ASIN code
Add category and subcategory of the product
In the product related list, create e-commerce object record and select eBay checkbox
Create a Warranty and Return Policy Record
Create a Shipping and Handling zone record from the Shipping Zone Object. Add the Distribution Channel, Shipping Type, Flat Rate, Dispatch time, Country and State.
Go to Heroku user and click eBay. Once you are on the eBay dashboard, click on the “Add” button
It will redirect to the eBay login page.
Enter your eBay seller store credentials.
Agree on the Grant Application access permissions
Click on the “Product Sync” button on Heroku app this will create the product in the eBay seller account.
When orders are placed on the eBay store, they get synced to “Salesforce Instance” as “Sales Orders” and “Sales Order Line Items.” This has to be done manually by clicking Pending Sync for Orders on the Heroku user eBay dashboard.
As part of sandbox testing,
Copy the “Product URL” from the “Seller Account” and paste it into the “Buyer Account” and then buy the product and continue making payment by clicking “Pay Now.”
Then go to the Heroku user and sync the order, this will create a customer account and a sales order in the Salesforce instance.
Heroku App
Heroku App is a connector that connects Salesforce instances with other e-commerce and accounting sites to sync data to and from.
The following sites can be integrated with the Aqxolt ERP:
Shopify
eBay
Amazon
Magento
WooCommerce
Big Commerce
QuickBooks
Xero
ETSY
One Heroku user can be connected to one Salesforce instance at a time.
Multiple sites can be connected to one Heroku
From Salesforce instance, products and coupons get synced to e-commerce sites (Shopify, eBay, Amazon, Magento, WooCommerce, BigCommerce) and accounts; contacts, vendor contacts, Invoices, Bills to Accounting sites (QuickBooks, Xero, ETSY)
From e-commerce sites Orders and customer Accounts, Contacts gets synced to Salesforce instance.
Salesforce org —> Shopify store –>eBay store–>Amazon store–>Magento store–>WooCommerce store
To make the connection on a Salesforce instance for Heroku App-
Select the following from Available OAuth Scopes –
Full access
Access and manage your data (API)
Access your basic information (id, profile, email, address, phone)
Perform requests on your behalf at any time (refresh_token, offline_access)
Click Save.
Allow from 2-10 minutes for your changes to take effect on the server before using the connected app.
Click on Continue.
You will get the Consumer Key and Consumer Secret from here.
Create a user in Heroku App
Log in as an admin.
Navigate to the menu bar and click the ‘Manage Users’
Enter the Email, Password and confirm the password.
Enter the “customer key” in the “Aqxoltclient field.”
Enter the “consumer secret” in the “Client Secret”
Click the “Save” button to complete the user creation setup
Login with the created user
Log in using the created user credentials
Allow the “Salesforce access” to the user
Do the Auth by using the callback URL and reloading the page.
Magento
Magento is used to sync products from the Salesforce instance to the Magento store and sync orders and customer accounts from the Magento store to the Salesforce instance.
It auto-syncs every 10 minutes.
After connecting your “Heroku user” with the “Salesforce Instance” click on the “Magento app” and you will land on the “Magento dashboard.”
Click on the “Add” button and copy the “Token” to add in the “Magento Instance.”
Now Login to your “Magento Instance” admin account
On the left-hand side menu, panel Navigate to Stores > Configuration
You will land on the “Configuration Settings” page
Paste the copied “Magento Token” from Heroku Connector in the Aqxolt API token.
In the “Salesforce Instance,” Products should have the basic “e-Commerce”
Available on e-commerce platform checked on the product detail page, and product SKU code should be added.
In the related list e-commerce record select “Magento Checkbox.”
And the product should have inventory.
In every 10 minutes, it syncs products to Magento instance and orders and customers to salesforce instance.
QuickBooks
QuickBooks is accounting software and can be connected with Salesforce Instance using the “Heroku Aqxolt ERP Integrator.”
All the data on salesforce instances like Products, Customers, Suppliers, Invoices, Credit Memos, Sales Payments, Purchase Orders, Bills, and BillPayments is synced to “Quick Books Account.”
Once you have connected the “Salesforce Instance” to the “Heroku user,” log in to your “Heroku Instance” and click on the “QuickBooks app.”
You will land on the “QuickBooks Dashboard.”
Click on Add; it will redirect to the Quickbooks account login page.
Log in with your admin creds.
This adds a connection to the QuickBooks instance to the Heroku user.
Manually sink the Products, Customers and so on.
All the products get synced, but only those Products to which orders have created with customers and suppliers and purchase orders will have the financial details synced like Invoices, Bills, Credit Notes and Purchase Orders.
If no orders have been created for the products, financial data will not be synced for those products. To check if sync has started login to the QuickBooks account.You will land on the Dashboard and the left-hand side, you will see Banking, Sales, Expenses, Reports, Taxes, and Accounting.
Click on “Sales” to see – All Sales, Customers, Products, and Services.
“All Sales” lists the Orders synced, “Customers” will list the “Customer Contacts Synced,” and “Products and Services” will list the “Products Synchronised.
Click on “Expenses” to see “Expenses and ”
Use the filters to change what to see on the page.
In Salesforce; to sync or create a new product, make sure the following actions are taken.
Select “Available” on “e-Commerce platform” check box.
Create the e-commerce record from the products related list to make the product available on various platforms like Shopify, Amazon, WooCommerce, Magento, and eBay.
For a product to be available on Amazon, Amazon (ASIN Code) is essential.
Make sure “Price Book” is active.
Login to the Heroku user and click “Product ”
This creates a product on the Shopify Store.
Create or sync Customer and Order
When on Shopify store, click on “create order”– “select product” and “select ”
If you want to add a new customer, then create a new customer by filling in the customer details such as First Name, Last name, Address and Contact Number.
After adding the customer, click on “Mark Paid” to close the order.
Click on “Sync Order” on the Shopify This will sync order and customer account on to Salesforce instance.
Woo Commerce
Woo Commerce is used to sync products from the Salesforce instance to the Woo Commerce store and sync orders and customer accounts from the Woo Commerce store to the Salesforce instance.
Extensions do all the sync processes, no manual sync is required. It auto-syncs every 10 minutes.
After connecting your “Heroku user” with the “Salesforce Instance,” click on the “WooCommerce” app, and you will land on the “WooCommerce Dashboard.”
Click on the “Add” button and copy the “Token” to add in the “WooCommerce Instance.”
Now Login to your “WooCommerce Instance” admin account
On the left-hand side menu, panel Navigate to Store Name > Configuration
You will land on the “Store Configuration” page
Paste the copied “WooCommerce Token” from “Heroku Connector” in the “Aqxolt API Key.”
In the Salesforce instance, Products should have the basic e-commerce
Available on e-commerce platform checked on the product detail page, and product SKU code should be added.
In the related list e-commerce record select WooCommerce checkbox.
And the product should have inventory.
Customer Address should be real.
In every 10 minutes, it syncs products to woo commerce instance and orders and customers to salesforce instance.
Xero
Xero is accounting software and can be connected with “Salesforce Instance” using the “Heroku Aqxolt ERP Integrator.”
All the data on “Salesforce instance” like Products, Customers, Suppliers, Invoices, CreditMemos, SalesPayment, PurchaseOrders, Bills and BillPayments is synced to “Xero account” and the Sync is Bidirectional.
Once you have connected the Salesforce instance to the Heroku user, Login to your Heroku instance and click on the “Xero app.”
You will land on the “Xero dashboard.”
Click on Add(Manage); it will redirect to the Xero account login page. (xero.com)
Login with your admin credentials. (Username and Password)
Allow access for 30 minutes.
This adds a connection to the Xero instance to the Heroku user.
It auto Syncs Products, Contacts, Invoices, CreditNotes, SalesPayment, Purchase, OrderBills and BillPayments from “Salesforce” to “Xero.”
But for the trail, we can sync the data manually by clicking on the Pending Sync button for all the Products.
Invoices are created on Aqxolt ERP.
Click on Invoice Pending Sync in the connector.
Invoice is synced on Xero.
Login to “Xero Account” to see if data has synced.
Data is synced from Salesforce instance to Xero and vice versa. i.e. if products are not on Salesforce instance and present on Xero, they get synced to Salesforce, and if products are on Salesforce instance but not on Xero, they get synced to Xero when the sync process starts.
Product Setup:
On the Product make sure the below fields has data
Product Name Product SKU Product Description
and Available on the eCommerce platform checkbox is true.
Create a Marketplace record on the Product related list.
Add a Custom Setting in the system as eCommerce Sync, click on Manage and create a Record.
Amazon
To start with AMAZON SETUP, four(4) fields are needed to set up a store for Amazon.
Marketplace ID.
Merchant or Seller ID.
Amazon App’s secret key.
Amazon App’s success key.
To get Merchant Token (Merchant ID), go to the following link:
Marketplace ID, Amazon App’s secret key, and Amazon App’s success key are added in the custom settings of the Salesforce instance.
Employee Management
One of the most important assets a company has is its human capital. A properly managed company will always have a high-quality Human Resources department. Properly managing employees and their various needs and keeping track of their work patterns can lead to better and more productive employees. The HR module in Aqxolt ERP allows you to maintain a complete employee database that includes employees’ contact information, pay details, performance evaluation details, and attendance details.
Create Employee:
Navigate to the HR Management app > Employees tab.
Once in the Employees tab, you can track/view the employee information already filled in and create a new employee record.
To create a new employee, click the “New” button.
Select the organisation and business unit where the employee belongs
Enter the employment details in the Employment Information section.
Enter other information about the employee, such as contact details, nationality, date of birth, passport details, and social security number.
Click the “Save” button to create an employee record in the organisation.
With the Aqxolt ERP, the enterprise can effortlessly manage the following key elements of employee management:
Payroll
Qualifications
Taxes
Expenses
Timesheets
Performance reviews
Approval processes
Profiling
Leave entitlements
Earnings
Costs
Commissions/Bonuses
Aqxolt ERP prides itself on setting a benchmark in the complete automation of employee management. As soon as a new employee joins the enterprise, the system calculates and manages wages from the date of his or her joining. This, and a host of other features makes the HR module as accurate and autonomous as possible.
Fields to note:
Field
Description
No of Hours/Day
Describes the number of working hours per day
Maximum Overtime Hours/Day
Describes the maximum allowed overtime hours per day
First Name
Describes the first name of the employee
Last Name
Describes the last name of the employee
Middle Name
Describes the middle name of the employee
Gender
Describes the gender of the employee
Leave Allowance
Describes the total number of leave allowances applied to the employee
Available Allowance
Describes the available leaves for the employee
Leave Allowance Take
Describes the leave allowances utilised by the employee
Former Employee
Indicates whether the employee is a former employee
Former Employee Record
Describes details of the former employee record
Employee User
Used to assign a salesforce user to the employee record
Employment Status
Describes the employment status of the employee
Job Title
Describes the job title of the hired employee
Non-Employee Type
Indicates whether the employee is a consultant or apprentice
Employment Start Date
Describes the start date of the employee
Employment Start Date
Describes the last working day of the employee
Contract/Offer Issue Date
Describes the date when the job contract/offer was issued to the employee
First Working Day
Describes the first working day of the week assigned to the employee
Commission Plan
Describes the commission plan assigned to the employee
Organisation Business Unit
Describes the organisation business unit where the employee is hired to work
Channel
Describes the segment of the business where the employee is hired to work
Reporting Manager
Describes the manager under whom the employee will be working
Employee Profiling
Describes the profile of the employee
Work Status
Describes the work permit status of the employee
Description
Provides more information about the employee
Date of Birth
Describes the date of birth of the employee
Place of Birth
Describes the place of birth of the employee
Marital Status
Describes the marital status of the employee
Number of Children
Describes the number of children of the employee
Passport Number
Describes the passport number of the employee
Passport Expiry Date
Describes the expiration date of the passport
Nationality
Describes the nationality of the employee
Social Security Number
Describes the social security number of the employee
National Insurance Number
Describes the national insurance number of the employee
Address
Describes the address of the employee
Permanent Address
Describes the permanent address of the employee
Phone
Describes the contact phone number of the employee
Email
Describes the email address of the employee
Mobile
Describes the mobile number of the employee
Balance Sheet
The balance sheet is one of the core financial statements used by accountants. A financial statement that summarises a company’s assets, liabilities, and shareholder’s equity at a given point in time. It gives owners an idea as to what the company owns and owes.
To access the Balance sheet, navigate to the Financial Management module and click the Balance sheet tab.
The report generated is based on the current fiscal year. This will display amounts till the presently posted transaction.
You can use the filters and calendar tool to drill down the balance sheet and know the company’s financial position at any point in time or as opposed to a given period. The balance sheet is divided into two columns, one is for assets and the other is for liabilities and stockholders’ equity. Fundamentally, the balance sheet must balance the total amount of assets with the total amount of liabilities and stockholders’ equity.
The balance sheet is auto-calculated using the latest data from the company’s accounts, which means the balance sheet is created in real-time. With Aqxolt ERP’s balance sheet, you don’t have to be a professional to do manual calculations. Whenever a transaction record is created, all the calculations and finance general entries are created automatically, eliminating errors in the balance sheet.
View the data that matters to you by using the filters provided to you. You can import the balance sheet for the selected organization and duration in PDF/Excel format by clicking the “Download PDF / Download Excel” buttons. To make good decisions by comparing financial data, click “Compare Financial Data”. Compare the data of your interest by using filter criteria and viewing the chart data annually, quarterly and monthly. View and download the tabular data by clicking “Download PDF/ Download Excel” for the financial year.
Let’s drill down the balance sheet closely. Depending on the nature of the business, the asset side of the balance sheet may contain many items, some of the examples includes Cash, Inventory, Accounts, receivable, Checking etc.,
The basic equation of the balance sheet states that the liability and the owner’s equity of a business are equal to the total sum of its assets.
Assets = Liabilities + Owner Equity
The other side of the balance sheet displays liabilities and stockholders’ equity. Liabilities are obligations and debt payable to the other entity. Some of the examples of liabilities include Sales tax, Accounts payable, Sales tax payable, Goods received not invoiced, etc.,
Equity is the value of a company’s capital. The basic equation of assets can be used to calculate the owners’ equity
Owners’ Equity = Liabilities – Assets
If the equation returns a negative value then it is dangerous to the growth of your business and difficult to secure the finance of the company. Some of the examples of equity include Retained earnings, Owners’ equity, Remuneration, etc.,
Let’s illustrate an example to understand the balance sheet. One of the customers in Universal stores purchases a Phone and its selling price is $1200 and the cost price is $900. The system generates a sales order for the customer with the invoice amount of $1200. The profit made by the Universal store is calculated using the following equation.
Profit = Selling Price – Cost Price
Therefore, the profit made by Universal Store is $300.
The sales order summary is illustrated in the table below
Sales order
SO-xxxx
Customer: Serah
Qty
Unit Price
Total Price
1
1200
1200
Tax (20%)
240
Sub Total
1440
Discount (10%)
144
Total Amount
1296
The payments on the balance sheet are recorded only when the invoice is posted.
When we make a sale, and Post the Invoice
Chart of Account
Credit
Debit
Sales
1200
Accounts Receivable
1296
Sales Tax Payable
240
Sales Discount
144
1440
1440
Balance After Sale
Sales
1200
Accounts Receivable(Mckinsey)
1296
Sales Tax Payable
240
Sales Discount
144
Customer Serah makes the payment against the Invoice
Serah Pays to Invoice
Amount
Invoice Amount
1296
Cash Payment
1296
Sales Order Status
Paid
Sales Order Stage
Shipped
When a customer makes payment (Cash) to Invoice
Chart of Account
Credit
Debit
Accounts Receivable (Serah)
1296
Cash
1296
Balance After Customer Payment Against Invoice
Sales
1200
Accounts Receivable (Serah)
0
Sales Tax Payable
240
Sales Discount
144
Cash
1296
Let’s illustrate an example to understand the balance sheet when sales return happens. Serah the customer of Universal Stores would like to return one of the items from the sales order purchased by her. The system generates a Return Merchandise Authorisation for the customer and the net sales are calculated by the following formula.
Similarly, let’s illustrate an example understand the balance sheet when Universal stores purchase an item. Aqxolt ERP helps in the accounting of vendor invoices that the vendor bills towards the order. When the user raises the Purchase order to purchase item A and item B, the system creates a voucher against the purchase order. Every time a voucher is posted a general ledger entry is created in the system reflecting the credit and debit balance of the chart of accounts created for purchases.
Inventory
Product Name
Serial No
Cost Price
Selling Price
Profit(SP-CP)
Available Stock
Stock Inward
Item A
2345-5436-2356
78000
90000
12000
2
2
Item B
2345-5436-2378
88000
100000
12000
2
2
After Voucher is Posted the Following Ledger Entries Will be Created
COA
Credit
Debit
Purchase
332000
Accounts Payable
332000
Inventory Accounting
COA
Balance
Inventory
332000
Accounts payable
332000
Accounts Receivable
0
Sales
0
Purchase
0
Sales Return
0
Sales Tax
0
After Stock In Ward (Item A (2345-5436-2356)) is Posted The Following Ledger Entries Will be Created
COA
Credit
Debit
Inventory
156000
Purchase
156000
After Stock In Ward (Item B (2345-5436-2378)) is Posted The Following Ledger Entries Will be Created
COA
Credit
Debit
Inventory
176000
Purchase
176000
When a Universal store returns an item purchased the system creates a transaction entry for the return purchase order and the following chart of accounts are affected.
The Following Ledger Entries Will be Created If Not paid
COA
Credit
Debit
Accounts payable
0
88000
Inventory
88000
0
The Following Ledger Entries Will be Created If Paid with Cash
COA
Credit
Debit
Cash
88000
PurchaseReturn
88000
Manufacturing Order
How to create a Manufacturing Order:
Form the App launcher go to the Manufacturing module.
To create a Manufacturing order, go to the ‘Manufacturing Workbench’ tab
Click on the scheduler tab to schedule a manufacturing Order.
On the left-hand side, you will find all the products listed for manufacturing or you can search from the search bar provided.
Click on the product that needs to be manufactured. You can see the process cycles in the scheduler to schedule these process cycles to a specific time and date.
Enter the quantity required to Manufacture in the QTY filed provided.
Click on the ‘Schedule MO’ button to schedule the order.
On the next page, you can see all the details for the manufacturing order.
BOM’s tab – This shows the Bill of material required to produce the final product.
Work orders tab – Show all the work orders that need to be completed to produce the final product.
Production Status – This shows the status of the current production.
Serial Numbers / Batches – If the MO Product is Serialise product then it will generate the serial numbers or If the LOT Tracked product the system will generate Material Batches / Lots.
Now Allocate the stock for all the BOM’s as required for the manufacturing of the product.
Click on the ‘Stock Allocation’ button to allocate stock manually or select the ‘Auto stock Allocation’ button to fulfill stock automatically.
When clicking the Stock allocation button, this page will appears to enter the stocks required for each BOM’s. Manually enter the values and click the ‘Capture’ Button to save the stock.
Similarly allocate the required quantities for all the BOM’s.
When all the stock is fulfilled. Click on the ‘Work order’ tab
Complete all the work orders to complete the Manufacturing process.
Click on the first work order. Press the start button to start the process. Then click
on the Play button to begin the operation. Click the green ‘Complete Button’ to complete the process. When done click the ‘Build’ Button.
Clicking on the Build button will navigate you to another page and enter the quantity of BOMs consumed in that Process Cycle/Work Order. Enter the vales and click the ‘Build /Commit to-Inventory’ button.
Similarly go to the next work order and do the same for each operations. Complete all the operations specific to that Work Order. Then click the ‘Build /Commit to-Inventory’’ button.
Clicking the ‘Build /Commit to-Inventory’’ button at the last Work Order /Process Cycle or where the WIP is set, will navigate to another page there enter the quantity that has been produced. You can also choose the type as Produced or Scrapped from the ‘type’ picklist depending on the finished product produced.
Enter the quantity produced in the quantity field and click the ‘Build/Commit to Inventory’ button.
With this, your Manufacturing is now complete.
Authorize
Aqxolt ERP supports Authorize.net to make card payments and online payments.
Add your Authorize.net account on Aqxolt ERP.
Navigate to the Credential Setup tab from App Launcher.
The page has three tabs Payment, Shipment, and E-Commerce.
On the Payments, tab click on New
Fill in the Authorize.net account login details. Keep the Name as Authorize.net and add the username/login and Password
The URL can be tested or live depending on the Authorize.net sandbox account or live account being used.
Test URL – https://test.authorize.net/gateway/transact.dll
Live URL –
Order Management
ERP Order management software handles everything from order entry and to delivery dates, status tracking to credit limit checking. An ERP software for customer order management provides a better way to not only improve order fulfillment but also gives superior customer experience.
A sales order is an archive that contains products/services ordered by a particular business partner (client) or customer as well as the prices and terms and conditions. The sales order includes the customer’s information, such as the address, the points earned for loyalty, the details of the product being sold and the date of delivery and other information. Each sales order has a unique sales order number that helps the customer confirm the details of their order and learn the date of the delivery of the product and payment details. All new sales orders are added through a console and the Sales Orders tab. The items sold from the inventory are then shipped to the customer or delivered to the location provided by the customer. The process of creating a sales order includes finding an existing customer or creating a new customer, then creating “bill to” and “ship to” addresses.
Creating a Sales Order
A sales order can be created using two methods – • From the Sales Orders tab (record level) • With the Enterprise Point of Sale tab
Creating a sales order through the Sales Orders tab:
1. Click on the Sales Orders tab as shown below. 2. Once in the Sales Orders section, you can track the sales orders already filled in and create new sales orders. 3. When filling in a new sales order, enter the following information:
The details about the estimated delivery date and the date of fulfilment of the sales order.
In the Information section, fill in the order name for ease of tracking. Fill in the customer details.
Fill in the Order Details section using the price list, order type and subscription of the order, if any.
Fill in the information about loyalty points, return details and payment details in their respective sections.
In the Address section, customers’ pre-saved addresses can be selected in the “bill to” and “ship to” address fields.
Fill in the order details and other instructions, then save.
4. Existing orders also have options to edit after saving. In addition, you can import records of previous to existing sales orders using the import option located at the top right-hand corner of the Sales Orders tab. In the sales order, besides the estimated delivery date, there is the fulfilled date, which shows the date on which the goods are to be delivered as indicated in the purchase orders. Additionally, you can track goods that are ready for shipping, those that have been held, and those that have been fulfilled.
Creating Sales Order Lines
Sales order lines contain details about the specific items being sold. A sales order can contain more than one sales order line. The sales order contains the sales order lines with details about the quantity to sell, each item with a unique SOLI number. The sales order lines are found in the tab related to the sales order. You will click on the sales order, then click on the specific sales order you want to view. The sales order is located on the Details tab. Click on the “related” tab that is located next to the “details” section. Here you will find the sales order line items that are related to the sales order. Additionally, there are invoices, purchase orders, work orders, and other features related to the sales order in that tab. The tabs also include a link that allows the user to add new items, as seen on the right end of the Sales Order Items tab.
Return Merchandise Authorisations
A customer makes a sales return by sending goods back to your business. The Sales Order Related list includes a return-of-purchase section that gives the customer room to return the goods if they are faulty or for any other stated reason. Additionally, the sales order contains RMA lines to process the section that contains the information about the items to return. The Return Purchase Authorization holds the information about the return on goods.
Fields to note:
Organization Section
Field
Description
Organisation
It defines the name of the organisation/Account
Organisation Business Unit
It defines the Business Unit name of the Account/Organisation
Redeem Voucher Amount
Redeem Voucher Amount Describes the amount that can be redeemed using the voucher
Customer Purchase Order Reference
When a sales order is converted into a purchase order, this field is auto-populated with a unique number
Amount Paid
Describes the amount paid by the customer for a sales order
Authorized
Inventory, Purchase Order and Work Order can be created only if a sales order is authorized
Ready For Shipment
Indicates whether the sales order is ready for shipping
Number of Fulfilled Items
Indicates the fulfilled number of items from the sales order
Total Number of Items
Indicates the total number of items in the sales order
Estimated Delivery Date
Provides the estimated delivery date of the sales order
Fulfilled Date
Provides the fulfillment date of the sales order
RMA Lines to Process
Details the RMA line items
Information Section
Order Name
Describes the unique sales order number
Code
Auto-generated code for each record
Channel
Describes the name of the sale point
Stage
Gives the sales order’s current stage
Status
Gives the status of the sales order
Customer Profile
Describes the profile of the customer
Barcode
Gives the Barcode of the Sales order
Contact
Describes the contact name for the customer
Customer
Describes the name of the customer
Is Invoice Sent
This is checked if the invoice for the sales order is sent
Is Back Order
Indicates whether the sales order is a backorder
Order Details Section
Total Vat
Describes the sum of VAT on selected sales order line items
Total Other Tax
Describes the sum of taxes on selected sales order line items
Sub Totals
Describes the sum of the selected sales order line items
Amount
Describes the total amount of the sales order, including VAT, taxes and discounts
Total Discounts
Describes the sum of the discount amount on selected sales order line items
Price List
Gives the price list of the products/items being added
Total Tax Amount
Describes the sum of taxes, including VAT and other taxes on selected sales order line items
Order Type
Gives the profile type of the sales order
Total Due
Describes the amount due on the sales order
Subscription
Indicates whether the sales order is being subscribed
Return and Loyalty Details Section
Loyalty Points
Describes the number of loyalty points earned by the customer
Loyalty Amount
Describes the equivalent amount
Customer Id
Describes the unique customer ID
Payment Details section
Payments Status
Gives the payment status
Sales Order Amount
Defines the complete sales order amount
Payment Method
Indicates the types of payments which can be used
Payment Mode
Mode used for the payment
Due Amount
The total amount which must be paid
Address Details section
Bill-To Address
Describes the address to which the customer is billed
Ship-To Address
Describes the address that will be used for shipment
Order Dates Section
Book Date
The date when the sales order is booked
Request Date
The date when the sales order is requested
Order Date
The date when the sales order is created
Special Instructions
Instructions for the sales order, if any
Hold Status
Status for the sales order being held
Creating the sales order from Enterprise Point of Sale Tab:
The orders created through Enterprise Point of Sale are for a situation when a customer walks into a store/outlet, orders a product, pays for it, and takes the product home or opts for the available shipment options. Upon confirming the sales order, the sales invoice is created automatically. Each sales order has a unique number to enable simple tracking. The order console where the sale orders are processed is as shown below. It is referred to as Enterprise Point of Sale (EPOS) in ERP Mark 7. 1. Click on the Enterprise Point of Sale tab as shown below 2. Under the Customer Details section Select the Customer Name and Contact Name and the other details auto-populates such as the Email, Phone, customer ID, Bill To, and Ship To address of the contact. Type the first few characters of the customer name in the Account Name field to browse for a valid customer name. While browsing, you may scroll down or use the arrow keys to highlight the correct customer name. Select the customer to retrieve the customer’s contact information and billing/shipping addresses. For example, say you get an order from Scott Bill and you type “Sco”. The system displays a lookup of customers in the system whose names begin with “Sco”. This brings you closer to finding Scott Bill in the system, as shown below. 3. If you cannot locate the customer name in the lookup, you can enter a new customer without exiting the POS page or switch to other windows. Simply click on the Account tab located on the right-hand side of the screen. On the Account tab, you will be prompted to add:
Customer
Address
Contact
You will be able to add a new customer, both the “bill to” and “ship to” addresses, and a new contact for the new or existing customer. Based on the selection made, the relevant screens appear to add information. To return to the new orders, click on the Sales Orders tab on the right-hand panel after saving your new customer. 4. Once the customer name is entered, the contact details, such as contact name, email address, phone number, account ID, customer profile, and address details, are retrieved automatically. You may select the retrieved “bill to” address or select a different “bill to” address if one or more “bill to” addresses are saved for the selected customer. This change will be made for this order only and not on the customer account. 5. A single “bill to” address/a single customer may have several “ship to” addresses. Select the “ship to” address from the available picklist for the selected customer. The “ship to” address describes the location where the order is to be shipped. If the “ship to” address required for the order has not been saved in the customer account, click on the Accounts tab to create new address information. This will take you to the “Add New Address” screen, where a “ship to” address can be recorded. Clicking on the Sales Orders tab will bring you back to the screen where new orders can be recorded. 6. Under the Order Details section, Channel/Division, Sold By, Request Date, Status, and Sales Order Profile are auto-populated. 7. If you want to select an existing sales order then, click on the lookup and select the sales order. 8. If you are creating a new sales order, then a new sales order number is generated after adding the product line items and saving the order.
Adding product line items from EPOS
To add products, click on the “Add New +” button.
In the “Add New Products” pop up, select the product family and click the “Find” button or type the name of the product to find the product.
From the list of products, select the checkboxes of the desired product. Enter the quantity and select the discount plan, then click the “Add” button. The selected products will now appear in the product line item section as shown below.
4. To save the sales order with the selected product line items, click the “Save” button. This will generate a unique sales order number. 5. Product line items can be edited or deleted and every product can have comments added by using the action buttons next to the product line item code.
View/ Edit Sales Orders of the existing customers:
After the order is entered, a customer will be able to inquire about or update the order. For example, if the order was entered on August 15th and not closed, the customer can return and inquire about/update the order at any time in the future. The customer can either remove the products or add a few more products to the sales order. The process to view/edit a sales order is discussed below.
Select the customer name from Account Lookup and retrieve the customer details.
On the Sales Orders tab located on the right-hand side of the screen, enter the unique sales order number in the “Sales Order Lookup” field.
For example, say you get an order from Scott Bill and he would like to update sales order number 00135. You enter 001 and the system displays a lookup of sales orders in the system beginning with 001. This brings you closer to finding sales order number 00135 in the system, as shown below.
The system displays the details of the selected sales order. You may add products to the product line item section.
To add products, click on the “Add New +” button.
In the “Add New Products” pop up, select the product family and click the “Find” button or type the name of the product to find the product.
From the list of products, select the checkboxes of the desired product, enter the quantity, select the discount plan and click the “Add” button. The selected products will now appear in the Product Line Item section, as shown below.
Explanation of Fields in the Product Line Item Section:
Code:
Every product is assigned a unique number in the system and the same is displayed in the product line item section when a product is selected. It can be a system-generated code or a company-specified product code.
Product and Preview:
This displays the product name and its image in the product line item section. The products displayed add new product pop up are displayed only if the stock is available in your company’s inventory.
Quantity:
This displays the quantity of a particular product purchased and the price of the product depending on the quantity purchased.
Base Price, Discount, Vat, Tax, Total Price:
This displays the price of the product assigned to the customer’s profile. Discount is the reduction of a certain percentage of the base price allowed to the customer for the purchased product. Discount may or may not be applicable to every product. VAT and Tax are the addition of a certain percentage to the base price allowed to the customer for the purchased product. Total Price is the amount of the product displayed after calculating the discount and taxes. It is the final price a customer pays for the product purchased. For example, a product is sold for $100 and has overall taxes of about 14% (i.e., VAT = 7% and Tax = 7%) along with a 10% discount on it. The total price is calculated using the following formula. Total Price = ((Base Price *Quantity)-Discount Amount) + (VAT +Other Tax Amount)
Invoices and Payments:
The Invoices tab in ERP Mark 7 can be used to manage customer invoices that contain order information about purchased products. Users can view or send the invoice via email to the client. The tab allows users to generate an invoice document as a PDF.
An invoice is created in two ways:
From the Sales Orders tab (record level)
From the Enterprise Point of Sale tab
Creating an invoice through the Sales Orders tab:
Create the sales order as described in Creating a sales order through the Sales Orders tab.
From the related tab, find “Invoices” and click the “New” button.
Select the “Sales” record type and click the “Next” button.
Enter the organisation details, the purchase order number, the sales order number, and the amount details under the Organisation Details section.
If the invoice needs to be reflected on the organisation’s finance, select the “Posted” checkbox and the posted date.
Fill in the Information section with details like tax receipt number, customer account, and active checkbox, then click “Save” to create an invoice record.
Creating an invoice through the Enterprise Point of Sale tab:
Create the sales order as described in “Creating the sales order from the Point of Sale Tab”.
When the sales order is saved from the EPOS tab, an invoice record is created automatically with complete amount details of purchased products.
Click the “View/Send Invoice” button to view the invoice template. The console provides an option to send an invoice attachment to the customer’s email address.
The function that is used to receive payments from customers who have purchased your products and services and who have not already paid for them.
When you sell a product/service, the order is created through order processing. The order processing functionality provides for the entry of payments and can be done via the following payment methods.
Cash
Bank/Cheque
Credit Card/Debit Card
Loyalty
The system can accept partial payments and has the ability to record multiple payments for each sales order.
When the customer books a sales order, the system typically creates an invoice in the system which can be sent to the customer’s email ID.
Making a Payment
Payments can be made using one of two methods –
From the Sales Order tab (record level)
With the Enterprise Point of Sale tab.
Creating payments through Sales Order Tab:
Open the Sales Order record for which the payment must be made. On the related tab, scroll down and select “Payments”. Click on the “New” button.
From the New Payment Record Type pop-up, select “Cash Payments” and click the “Next” button.
Fill in the organisation and sales order details under the Organisation Details section. Fill in the payment details under the Information section. Click the “Save” button to create a payment record for the selected sales order.
When the payment is made for the selected sales order, the status of the sales order is changed to either paid, underpaid or overpaid based on the amount that has been given in the payment record.
Loyalty – If a customer is a regular customer of the organisation, he would have received loyalty points for every purchase he made. Each loyalty point can be assigned a value of the currency and the customer can make the payment using these loyalty points.
Credit/Debit – A customer can use credit/debit cards to make a payment by swiping the card at the time of sale. If he is a returning customer and wishes to save the card details for future use, he can do so.
Payments from Point of Sale tab:
In a scenario in which a customer walks in the store/outlet and makes a payment to the sales order, the POS page helps the user complete the sales order and payment process without having to navigate to different setups.
Create the sales order from the POS tab (as described in Create Sales Order through POS).
Navigate to the Payments tab and click on any of the payment options. Payments can be made using the following four methods:
Credit/Debit
Bank/Cheque
Cash
Loyalty
Credit/Debit
To make the payment through Credit/Debit card, click on the “Payments tab” and click on the “Credit/Debit” button located on the right side of the screen.
Enter the card details in the Card Information section and click the “Pay Now” button to complete the payment process for a sales order.
Bank/Cheque
To make the payment through Bank/Cheque, click on the “Payments tab” and click on the “Bank/Cheque” button located on the right side of the screen.
Enter the bank name and reference cheque number into the Bank Information section. Click the “Pay Now” button to complete the payment process for a sales order.
Cash
To make the payment through Cash, click on the “Payments tab” and click on the “Cash” button located on the right side of the screen.
Enter the amount to be paid and click the “Pay Now” button to complete the payment process for the sales order.
Loyalty
Regular customers earn loyalty points as a reward for their regular purchases with the organisation. They can use these points for payments. Loyalty points can be assigned to currency values. For example, 1 loyalty point = 1 pound or as per the organisation’s decision.
To make the payment through Loyalty, click on the “Payments tab” and click on the “Loyalty” payment option located on the right side of the screen.
The system will automatically reduce the amount to be paid by the equivalent loyalty points.
The customer can pay the rest of the amount with any of the other payment options.
Apply Credits
To make the payment through Credit points, navigate to the “Payments tab” in ePoS and click on the “Apply Credits” button.
The system will automatically fetch the Invoice Amount, Total Due and Available Credit. Enter the “Redeem Credit” amount and click the “Pay Now” button.
You will see that a Credit type payment record has been created.
RMA
A Return Merchandise Authorization (RMA) is part of the process of returning a product to receive a refund, replacement or repair during the product’s warranty period. Returned merchandise requires management after the return and has a second lifecycle after the return.
Creating an RMA
An RMA can be created using one of two methods –
From the Sales Order tab (record level)
From RMA tab
From the Enterprise Point of Sale tab
RMA from Sales Order Tab:
Select the sales order whose stage is closed to return the purchased product as shown below.
In the related tab, find the Return Merchandise Authorisation and click the “New” button.
Enter the RMA code and click the “Save” button to create the RMA record.
In the related tab, click the “New” button to create RMA line item.
Enter the organisation details.
Fill in the RMA number, the sales order line item number, and the quantity to return. Mention the reason for the return.
Select the Authorise, Is Closed and Ready to Receive checkboxes.
Click the “Save” button to create an RMA line item record.
RMA through Process Return page:
The RMA must be associated with a sales order and a shipment. This ensures that returns are permitted only for those items that have been shipped. The return process includes the ability to create the shipment flows and tracks those returns in the system.
Select the sales order record to return the purchased products.
Click the “RMA” button; this will navigate to the RMA page as shown below.
This will navigate to the RMA page as shown below.
The system auto-fetches the sales order details and customer details.
Click the edit icon and enter the desired return quantity and the reason for return.
Select the return status and click “Save” to create a new return package.
Fields to note:
Field
Description
Added Back to Inventory
A check box that indicates the RMA line item has been returned to inventory for resale
Batch/Lot Code
A code assigned to shipment of RMA
RMA Line Item Name
Describes the name of the RMA line item
Sales Order Line Item
Describes the Original Sales Order Line Item the product for the Customer RMA was purchased
Return Merchandise Authorisation
Describes the name of the RMA to which the RMA line item belongs
Return Reason
Describes the reason for the item that is returned; essentially helps identify issues or problem with the returned item
Return Status
Provides the status of the product being returned
Total Deduction
The amount of the product that has been deducted
Site Item Inventory Stock
Specifies the total amount of inventory in the site
Number of Items In Quality Check
Specifies the total number of returned items in the quality check process
Number of Items to Re-sell
Specifies the total number of returned items that are sellable
Number of Items Discarded
Specifies the total number of returned items that are discarded
RMA through Enterprise Point of Sale Tab:
Every RMA is associated with a sales order; this generally includes identifying the order or invoice from the original purchase. The return may involve items that are damaged or simply not wanted. Depending on the situation, the returned item can be re-stocked or discarded. The system allows for a refund of the returned item in the form of either a credit note or loyalty points. The Enterprise Point of Sale tab of ERP Mark 7 helps the sales rep handle the entire sales journey to the return process without having to switch to multiple setups.
For example, say there was an order from Fiona Pinto, who would like to return an item from sales order number 000014. An RMA is created to complete his return request and a refund record (credit note) is created for the customer.
Click on the Enterprise Point of Sale tab and fetch the customer and sales order details from the system to initiate the RMA. Refer to the sales order from the Point of Sale Tab section for more details.
Click on the “RMA” button; on the right side of the ePoS as shown below.
The system fetches all the sales order line items.
Select the sales order line item to return and enter the quantity to return. Specify the reason for the return.
Select the expected date and status of the RMA, select the authorise checkbox and click the “Save” button to create the RMA line item in the system.
Purchase Requisition
Purchase Requisition is generated before the purchase order is raised to notify the Purchasing team of the items it needs to order and their quantity. It gives figurative information on the desired goods and services of the organization.
How to Create Purchase Requisition:
John works at a warehouse and finds out that some items in the warehouse has low inventory level and needs reordering from the vendor. So, he requests the purchasing team to create purchase orders for the items to fill the inventory for those items by creating a Purchase Requisition. He follows the steps mentioned below,
From the App launcher go to ‘Create Purchase Requisition’ Tab
Purchase Requisition Page opens. Enter the all the details on the page like Purchasing organisation, Expected date, delivery details, Status, Channel, Distribution Channel.
Click on the ‘Add’ button to add the products, Search the products, enter the quantity required, and unit price. Similarly, add more products using the ‘add’ button again.
Click ‘Save’ to create the Purchase requisition.
How to Create a Purchase order for purchase requisitions:
The Purchase orders created by john are listed in the ‘Requisition to purchase order ‘tab and Emily who works at the purchase order department can create purchase orders for the requested items by John. She follows the steps below,
Search for the ‘Requisition to Purchase order’ Tab from the ‘App launcher’.
Select the items that need to be added to the purchase order and click the ‘Purchase order’ Button.
The next screen shows Products selected, Quantities and prices. Enter the vendor details and purchasing details and click ‘save’. The purchase order will be created.
Now, follow the same procedure to inbound the logistics as mentioned for creating a purchase order.
How to Inbound Purchase Order Logistic:
From the App, launcher go to the ‘Inbound Logistics’ tab
Select the purchase order logistic and click on the ‘Receive’ tab
You can see the product name quantity that has to be received.
Under the ‘Receive’ Box enter the quantity that is being received from the vendor.
Enter any instruction in the instruction box.
Click the ‘save’ button
Now check the box next to the product received and Click on the ‘Put away’ tab
On the put-away page select the version, location, or bin if required and click the ‘save’ Button.
Your purchase order is Complete.
Accounts Payable:
Go to the ‘Accounts Payable’ tab
You can see Vendor’s tab where all the vendors will be listed. You select the vendor and select the Purchase order related to that vendor to create a bill.
You can also directly select the Purchase order to create a bill against it from the purchase order tab.
Select the purchase order to create a bill against it and select the new bill option from the dropdown.
Create Bill page will appear. Enter the Vendor bill date and Bill number. Also, you can add more products to the same bill by clicking on the ‘Add’ button.
On the Product line item add taxes and description if required and select the Account to capture the amount paid and click the ‘Save’ button.
When Bill is created it will appear on the Bill tab. Now match the bill by selecting the bill and click the ‘match bill’ button on the top right.
On the match, bill page selects the line item to match and click the ‘save’ button.
Now post the bill by selecting the ‘Post’ option from the dropdown against that bill.
When it is posted then New voucher option appears. Click the new voucher to create a voucher.
Click the ‘save’ button to save the voucher.
Now approve the voucher by selecting ‘Approve’ from the dropdown button.
Click on the ‘Make Payment’ option from the dropdown to make payment for that voucher.
On the pay voucher pop up. Select payment account, date, reference number and payment method and click ‘Save’. Now your payment is complete.
How to create Advance to Vendor Bill:
An advance Bill to a vendor bill can be created if you need to make an advance payment to the vendor.
Go to the ‘Accounts payable’ tab
Then click on ‘bills’ Section
On the top right corner, you will see a button called ‘Create Bill’
When clicking Create Bill. A pop-up comes up. Select the Advance to Vendor option from the pop-up.
After selecting the ‘Advance to Vendor option’. You will get a create Bill page.
Enter All the details mentioned on the page and click on the ‘Add’ Button to add products to your bill.
Select Product, Quantity, Amount and Select ‘Inventory’ Account and Add any Description required.
You can add more products by clicking on the ‘Add’ button again.
Click the ‘Save’ Button.
A Bill will be created and you can view it on the bills tab.
From the drop-down of that bill select ‘New voucher’
To Create a voucher against that bill click on the ‘New voucher’ Button
Click the ‘Save’ button. A voucher will be created.
Now from the voucher tab select the ‘Approve’ button to Approve the Bill. It will change from Red to green when approved.
Now from the dropdown select the ‘Make a payment’ Button to pay the voucher created.
Enter the details like payment account, method, and Reference number if required and click the ‘Save’ Button
A payment to that voucher will be done.
Products and Services
Create the Products
Products are configurable items that are manufactured in an organization or purchased from the vendor/supplier and are sellable. Products can be stored in an organization’s Site/warehouse or a third-party Site/warehouse.
Navigate to the app menu> Products tab.
Recently Viewed products will be listed, click on All to see all the available products in the system.
To create a new product, click the “New” button.
Enter the Product Name and Product Code.
Select the Product Family, Category and Sub Category of the product.
Select the Status as Released and make sure Active checkbox is checked.
Select the Track Inventory checkbox for all Inventory Products.
Enter the Product Description and Barcode if any.
Select Is Kit (for a Bundle/Kit product), Serialise (for a serialized product) and Lot Tracked (for a Batch product) depending on the product configuration needs.
Save the record to create a product.
Create Price Books
Price books are integrated with the order management module to define pricing for your products. All the products should be given a standard price and added to a custom price book. We can set different price books for different products.
Navigate to the app menu > Products tab.
Click open the product to add a price book.
In the related tab, find the Price Book object and click “New”
Enter the pricing details of the product such as List price, Selling price, Start date, End date and save.
This creates a standard price for the product.
Once a standard price is added to the product it can then be added to Custom Price Books.
Navigate to the Price Book tab from App launcher to create custom price books.
Create the Inventory/ Stocks for the products
Navigate to the app menu > Products tab.
Once in the Products section, select the product to create the Inventory/ Stocks.
In the related tab, find the Inventory/ Stocks related list and click the “New” button.
Enter the Organisation and the Business Unit details.
Enter the Stock Name and select the Active checkbox.
Select the Status as Checked In.
Make sure Warehouse and Product are selected.
Save the record to create the stocks for the product.
Create the Stock Inward Line Item
It is to add stocks to the inventory. It records the stocks for a particular product and is tracked by quantity, it is assigned to Inventory/ Stocks that enables the users to determine and maintain optimum inventory levels.
Navigate to the app menu > Products tab.
Once in the Products section, select the products record to create the Stock Inward Line Item.
In the related tab, find the Stock Inward Line Item related list and click the “New” button.
Enter the Warehouse Purchase Line Item Name.
Ensure Site Product Inventory (Inventory/Stock) of this product is selected.
Add the Serial Number / Material Batch/Lot if the product is serialized or Batch product.
Select the product, enter the Quantity and select the Active checkbox.
Save the record to create a stock inward line item for the product.
Adding Cost Cards to Products
Navigate to the Related list of the product to the Cost Card object.
Click New and add the Cost Card Name, Cost, Currency, Start Date, End Date, Quantity, Minimum Quantity and Unit.
Select the Product and Supplier/vendor.
Select the Organisation and Business Unit and Save.
This creates a cost card record which can be used when creating a purchase order.
Account, Contact and Addresses
Xero is accounting software and can be connected with “Salesforce Instance” using the “Heroku Aqxolt ERP Integrator.”
All the data on “Salesforce instance” like Products, Customers, Suppliers, Invoices, CreditMemos, SalesPayment, PurchaseOrders, Bills and BillPayments is synced to “Xero account” and the Sync is Bidirectional.
Once you have connected the Salesforce instance to the Heroku user, Login to your Heroku instance and click on the “Xero app.”
You will land on the “Xero dashboard.”
Click on Add(Manage); it will redirect to the Xero account login page. (xero.com)
Login with your admin credentials. (Username and Password)
Allow access for 30 minutes.
This adds a connection to the Xero instance to the Heroku user.
It auto Syncs Products, Contacts, Invoices, CreditNotes, SalesPayment, Purchase, OrderBills and BillPayments from “Salesforce” to “Xero.”
But for the trail, we can sync the data manually by clicking on the Pending Sync button for all the Products.
Invoices are created on Aqxolt ERP.
Click on Invoice Pending Sync in the connector.
Invoice is synced on Xero.
Login to “Xero Account” to see if data has synced.
Data is synced from Salesforce instance to Xero and vice versa. i.e. if products are not on Salesforce instance and present on Xero, they get synced to Salesforce, and if products are on Salesforce instance but not on Xero, they get synced to Xero when the sync process starts.
Product Setup:
On the Product make sure the below fields has data
Product Name Product SKU Product Description
and Available on eCommerce platform checkbox is true.
Create a Marketplace record on the Product related list.
Add a Custom Setting in the system as eCommerce Sync, click on Manage and create a Record.
Shipment
Shipping is the key link in the customer’s supply chain, manufacturing, and retail success. Aqxolt ERP provides a complete solution for streamlining the shipping process with an accurate delivery date and time. Aqxolt ERP provides real-time communication between UPS and FedEx.
The shipping management process begins with the following activities.
Creation of Sales Order
Creation of Stock Dispatching (Pick, Pack, Ship)
When creating a sales order from the Order console, the shipment cost can be estimated from the delivery section on the Order console.
Aqxolt ERP supports UPS, FedEx and Internal Shipment.
Click on the Delivery section.
Click on UPS or FedEx.
Based on the ship to address and package size, the system will provide the estimated shipping cost.
Once a sales order is created and ready for shipment, it is available for stock dispatching.
Click on the Stock Dispatching tab.
Select the sales order to be shipped.
Pick all the line items of the order or partial line items.
Click on Pack to create a package.
In the package detail section, select the Package Type and Shipment Type.
During selection of the Package Type Weight, Weight Unit, Length, Width, and Height will be auto-populated.
Select the shipment type, which could be UPS, FedEx or Shipment.
UPS
Upon selection of the shipment type UPS, the following process continues:
Enter the Deposit Tag.
Click the “Save” button to create a Package.
Click on the ship icon, which will bring you to the UPS shipping page.
The left side of the shipment page includes shipping details such as where the shipment is going, where it is coming from and the package details.
The right side has 3 sections:
Shipping Services/Cost:
This section populates the Shipping Date and includes other dropdowns to provide details about Weekend delivery, Additional handling, Verbal confirmation, Delivery confirmation and Description.
Click on the Get Rates button to get the different UPS services to choose from.
Select a UPS service.
Process Shipment:
This section populates the Shipment name, Shipment status and other details such as International forms and Product Unit Code.
Click on View UPS Label to generate the UPS label which can be printed and attached to the package.
Click on View Invoice to view the sales order invoice, which is also printable.
Clicking on Cancel Shipment will cancel the shipment.
Track Shipment:
Once a shipment is shipped, clicking on the Track Shipment section will generate a tracking number and provide real-time tracking of the package.
FedEx
Upon selection of the shipment type FedEx, the following process continues:
Enter the Deposit Tag.
Click Save to create a Package.
Click on the ship icon, which will take you to the FedEx shipping page.
The left side of the shipment page displays the shipping details, such as where the shipment is going, where the shipment is coming from, package details and invoice details.
The tabs on the right side provide the following information:
Shipping Services/Cost:
This section populates the Shipping Date and includes other details, such as Description, Request, and Response.
Click on the Get Rates button to get the different FedEx services to choose from.
Select a FedEx service.
Process Shipment:
This section populates the Shipment name, Shipment Status and an Initiate Shipment button.
Click on Initiate Shipment to initiate a shipment.
Track Shipment:
Once a shipment is shipped, clicking on the Track Shipment section will generate a tracking number and provide real-time tracking of the package.
Internal Shipment
Upon selection of the shipment type Shipment, the following process continues:
Brings to the Delivery screen where delivery details can be added
Add Delivery Date and Save, Stage changes to Shipped and Delivery Name becomes Opportunity name.
This creates a Shipment record which can be seen on the sales order and Logistic order related list.
Delivery Flows:
Navigate to the Pickup/DropOff tab to create delivery flows.
Click on New and fill in the name, status and other details if available and Save.
Picked Up and Delivered are the flows created as shown above.
Checklist:
Navigate to the Checklist tab to verify the no of items delivered against the ordered Quantity.
Select the checkbox and click verify if all the Qty is delivered.
Verifying the items will make the line items noneditable.
By default the Delivered is set to ordered qty and status is to Delivered. The delivered Qty can be changed based on the physical delivery Qty and the status will be changed to Item(s) Missing if ordered qty and physical delivery qty does not match.
Delivery Person upon reaching the delivery point navigates to the Delivery tab and captures customer signature, Name, Delivery Date and Time.
Attachments such as photos or other documents can also be added.
Warranty
Aqxolt ERP allows warranties to be easily recorded for a product or sales order line item.
Create Warranty and Return Policy:
Navigate to the Manufacturing app > Warranty & Return Policies
Once in the Warranty & Return Policies tab, you can view the Warranty & Return Policies information already filled in and create a new Warranty & Return Policies
To create a new warranty and return policy, click the “New” button.
Select the organisation details of the warranty and return policies.
Select the policy guidelines and product for which the warranty and return policy is being created.
Enter the name of the warranty and return for identification purposes. Also enter the length of the warranty period, in days.
Click the “Save” button to create a warranty and return policy for the product.
Create a Warranty for the Finished Product or Sales Order Line Item
Navigate to the Manufacturing app > Products tab.
Once in the Products tab, you can view the products information already recorded.
Select the product for which the warranty must be created.
In the related tab, find the warranties related list and click the “New” button.
Select the organisation and business unit details.
Enter the warranty name and select the type of warranty – standard or extended.
Select the warranty and return policy associated with the product or sales order line item.
If the warranty is associated with a sales order line item, select the sales order line item.
Enter the warranty period in the valid till and valid from date. Enter the quantity.
Click the “Save” button to create a warranty for the product, asset or sales order line item.
Subscription
With Aqxolt ERP’s subscription module, you can offer a wide range of subscription frequencies, (e.g., weekly, monthly, quarterly, annually) simply by specifying the start and end dates of the subscription in the subscription plan.
Create Subscription Plan
Create a Tax Plan record by navigating to the Order Management app > Accounts tab.
Once in the Accounts section, select the Organisation Account to create the subscription plan.
In the related tab, find the Subscription Plan related list and click the “New” button.
Enter the Subscription Plan Name and Description.
Select the Subscription Plan, Duration in Months and Order Profile.
Click the “Save” button to create the Subscription Plan record.
Create Product Subscription Plan Allocation
Create a Tax Plan record by navigating to the Order Management app > Accounts tab.
Once in the Accounts tab, you can track the Accounts that are already recorded.
In the related tab of the organisation account, find the list related to the Subscription Plan and view the record.
In the related tab of the Subscription Plan, find the list related to the Product Subscription Plan Allocation and click the “New” button.
Enter the Name. Select the Subscription Plan and Product, and then select the Active checkbox.
Click the “Save” button to create a Product Subscription Plan Allocation Record for the associated Subscription Plan.
Create a Subscription
A subscription can be created using two methods;
From the Subscription tab (record level)
With the Enterprise Point of Sale tab.
Creating a Subscription Through the Subscription Tab
Navigate to the app menu and click on the Subscription tab.
Once in the Subscription section, you can track the subscriptions already filled in and create a new subscription.
When filling in a new sales order, enter the subscription name and select the Active checkbox.
Select the sales order and subscription plan, then enter the subscription description.
Enter the start and end dates of the subscription.
Enter the duration in months of the subscription.
Enter the Next Order date of the subscription and select the status – whether the subscription is On Hold, Active or Cancelled.
Enter the address details and click the “Save” button to create a subscription order.
The process for creating a sales order from the Point of Sale tab is as follows:
Create the sales order as described in Creating a sales order through the Sales Orders tab.
Click the “Subscribe Order” button.
Select the subscription plan and select the duration in months.
Enter the name of the subscription. Enter its description and special instructions, if any.
Find the products by typing the name of the product or by clicking the “Find” button. Select the products from the action column and click the “Product+” (add product) button.
In the product’s line items details section, enter the quantity and select the discount plan, if applicable.
Click the “Subscribe” button and complete the subscription order.
Loyalty
Enroll your customers in a loyalty program to encourage regular purchases and brand loyalty.
Create a Loyalty Setup
Navigate to the app menu > Loyalty Setup tab.
Once in the Loyalty Setup section, you can track the Loyalty Setups already filled in and create a new Loyalty Setup.
To create a new Loyalty Setup, click the “New” button.
Enter the Loyalty Setup name and the Points Per Unit Amount.
Select the “Active” checkbox and select Organisation and a Business Unit.
Save the record to create a Loyalty Setup.
Create a Loyalty Program
Navigate to the app menu > Loyalty Program tab.
Once in the Loyalty Program section, you can track the Loyalty Program already filled in and create a new Loyalty Program.
To create a new Loyalty Program, click the “New” button.
Enter the Program name and select the “Active” checkbox.
Select the Priority, Tier, Loyalty Setup, and Start and End Dates of the loyalty program.
Save the record to create a Loyalty Program.
Create a Loyalty Card
Navigate to the app menu > Loyalty Program tab.
Once in the Loyalty Card section, you can track the Loyalty Program already filled in and create a new Loyalty Card.
To create a new Loyalty Card, click the “New” button.
Select the Loyalty Card name and select the “Active” checkbox.
Enter the Customer Account, Contact and Loyalty Program details
Enter the Start and Expiration Dates of the card
Save the record to create a Loyalty Card.
Payment using loyalty
Using Aqxolt ERP, you can make loyalty payments in the following ways:
From the ePoS page
From the Invoice detail page
Loyalty payments from the ePoS page
Create the sales order as described in Creating a sales order through the Sales Orders tab.
Navigate to the Payments tab in ePoS and click the “Loyalty” button.
Enter the points to redeem and click the “Pay Now” button.
A Loyalty Type payment record has been created.
Loyalty payments from the Invoice detail page
Navigate to the app menu and click on the Invoices tab.
Once in the Invoice section, you can track the invoices already filled in and create a new invoice.
Select the invoice for payments and on the detail page navigate to the “Redemptions” button.
The Redemptions page shows the invoice details and the total amount due, along with the available loyalty points and the subsequent loyalty value, as shown below.
Enter the points to redeem and click the “Pay Now” button.
Discounts & Coupon Redemptions
Discounts
Aqxolt ERP provides the ability to assign discounts on price book that will determine the discounts for order profiles. The discount will affect all the products linked to the price book.
Create Tier
The tier is a threshold assigned to the product when the quantity purchased reaches within the floor and the ceiling unit. You can create the tiers by following the steps below.
Navigate to the App menu> Tier tab.
Once in the Tier tab, you can track the Tiers already filled in and create a new Tier.
To create a new Tier, click the “New” button. You will be presented with a screen below.
Enter the Tier name and the Floor and the Ceiling Units. For example, you could create a discount that gives a 10 percent discount for purchase of a product with quantity one (floor unit) up to ten (ceiling unit).
Select the “Active” checkbox and select Organisation and a Business Unit.
Save the record to create a Tier.
Create Discount Plan
Navigate to the App menu> Discount Plan tab.
Once in the Discount Plan tab, you can track the Discount Plans already filled in and create a new Discount Plan.
To create a new Discount Plan, click the “New” button. You will be presented with a screen below.
Enter the Discount Plan name and the Description of the discount plan.
To allow the discount in percentage, enter the Floor discount and Ceiling discount percentages and set the Default discount percentage.
Note: You can either have Discount Percentage details or Discount Value at the same time. If both the discount percentage and value is given in the record, then the precedence goes to Discount Percentage.
Select the Status of the discount plan and select the Organisation and the Business Unit.
To activate the discount plan, select the Active checkbox.
Save the record to create a Discount Plan.
Create Tier Discount Allocation
Navigate to the App menu> Product tab.
Once in the Product tab, you can track the Products already filled in.
Navigate to the related tab of the Product record and find the Tier Discount Allocation related list.
To create a new Tier Discount Allocation, click the “New” button. You will be presented with a screen below.
Enter the Tier Discount Allocation name and select the Discount Plan that you want to associate with the product.
Select the Order Profile, Tier and the Price Book to allocate to the product in order to use the discount being set up.
To activate the Tier Discount Allocation, select the Active checkbox.
To set the default tier to the product, select the Default checkbox.
Select the Organisation and the Business Unit.
Save the record to create a Tier Discount Allocation for the product.
Coupons
With this feature, Aqxolt ERP gives you the ability to redeem coupons without leaving or reloading the enterprise point of sale page. You can give discounts to orders by redeeming the active coupons. The system gives you the ability to create coupons with various options, like start and end dates, total value in percent and currency, etc.
Create a Coupon
Navigate to the app menu and click on the Coupons tab.
Once in the Coupons section, you can track the Coupons already filled in and create a new Coupon.
Click the “New” button to create a Coupon and select the “Orders” record type. Then click the “Next” button.
Enter the Coupon Name and the Start and End Dates of the Coupon.
Enter the barcode of the Coupon and the Maximum Allocated Vouchers.
Enter either the value in currency or the value in percent to give a discount to the customer.
Save the record to create a Coupon.
Issue Coupons
Navigate to the related tab of the Coupons record.
Once in the Coupons Issued section, you can track the Coupons already issued and create a new Coupon Issued record.
Click the “New” button to issue a Coupon.
Enter the Coupon Issued Name and select the issued Date.
If the Coupon needs to be issued to a specific account, select the customer account. If the Coupon needs to be issued for multiple accounts, leave the Accounts field empty.
Click the “Save” button to create the Coupons Issued record.
Payments using Coupons
Using Aqxolt ERP, you can make Coupon payments in the following ways:
From the ePoS page
From the Invoice detail page
Coupon payments from the ePoS page
Create the sales order as described in Creating a sales order through the Sales Orders tab.
Navigate to the Payments tab in ePoS. To redeem the Coupon, enter the Coupon code and click the “Apply” button.
You will see that a payment of type Coupon has been created.
Coupon payments from the Invoice detail page
Navigate to the app menu and click on the Invoices tab.
Once in the Invoice section, you can track the invoices already filled in and create a new invoice.
Select the invoice for payments. On the detail page, navigate to the “Redemptions” button.
Click the Redeem Coupons section on the left-hand side.
Enter the Coupon code and click the “Apply” button.
The Coupon redemption page now shows the Coupon discount amount paid to the invoice.
Sales order
Sales Order
A sales order is an archive that contains products/services ordered by a particular business partner (client) or customer as well as the prices and terms and conditions. The sales order includes the customer’s information, such as the address, the points earned for loyalty, the details of the product being sold and the date of delivery and other information. Each sales order has a unique sales order number that helps the customer confirm the details of their order and learn the date of the delivery of the product and payment details. All new sales orders are added through a console and the Sales Orders tab. The items sold from the inventory are then shipped to the customer or delivered to the location provided by the customer. The process of creating a sales order includes finding an existing customer or creating a new customer, then creating “bill to” and “ship to” addresses.
Creating a Sales Order
A sales order can be created using two methods – • From the Sales Orders tab (record level) • With the Enterprise Point of Sale tab
Creating a sales order through the Sales Orders tab:
1. Click on the Sales Orders tab as shown below. 2. Once in the Sales Orders section, you can track the sales orders already filled in and create new sales orders. 3. When filling in a new sales order, enter the following information:
The details about the estimated delivery date and the date of fulfilment of the sales order.
In the Information section, fill in the order name for ease of tracking. Fill in the customer details.
Fill in the Order Details section using the price list, order type and subscription of the order, if any.
Fill in the information about loyalty points, return details and payment details in their respective sections.
In the Address section, customers’ pre-saved addresses can be selected in the “bill to” and “ship to” address fields.
Fill in the order details and other instructions, then save.
4. Existing orders also have options to edit after saving. In addition, you can import records of previous to existing sales orders using the import option located at the top right-hand corner of the Sales Orders tab. In the sales order, besides the estimated delivery date, there is the fulfilled date, which shows the date on which the goods are to be delivered as indicated in the purchase orders. Additionally, you can track goods that are ready for shipping, those that have been held, and those that have been fulfilled.
Creating Sales Order Lines
Sales order lines contain details about the specific items being sold. A sales order can contain more than one sales order line. The sales order contains the sales order lines with details about the quantity to sell, each item with a unique SOLI number. The sales order lines are found in the tab related to the sales order. You will click on the sales order, then click on the specific sales order you want to view. The sales order is located on the Details tab. Click on the “related” tab that is located next to the “details” section. Here you will find the sales order line items that are related to the sales order. Additionally, there are invoices, purchase orders, work orders, and other features related to the sales order in that tab. The tabs also include a link that allows the user to add new items, as seen on the right end of the Sales Order Items tab.
Return Merchandise Authorisations
A customer makes a sales return by sending goods back to your business. The Sales Order Related list includes a return-of-purchase section that gives the customer room to return the goods if they are faulty or for any other stated reason. Additionally, the sales order contains RMA lines to process the section that contains the information about the items to return. The Return Purchase Authorization holds the information about the return on goods.
Fields to note:
Organization Section
Field
Description
Organisation
It defines the name of the organisation/Account
Organisation Business Unit
It defines the Business Unit name of the Account/Organisation
Redeem Voucher Amount
Redeem Voucher Amount Describes the amount that can be redeemed using the voucher
Customer Purchase Order Reference
When a sales order is converted into a purchase order, this field is auto-populated with a unique number
Amount Paid
Describes the amount paid by the customer for a sales order
Authorized
Inventory, Purchase Order and Work Order can be created only if a sales order is authorized
Ready For Shipment
Indicates whether the sales order is ready for shipping
Number of Fulfilled Items
Indicates the fulfilled number of items from the sales order
Total Number of Items
Indicates the total number of items in the sales order
Estimated Delivery Date
Provides the estimated delivery date of the sales order
Fulfilled Date
Provides the fulfillment date of the sales order
RMA Lines to Process
Details the RMA line items
Information Section
Order Name
Describes the unique sales order number
Code
Auto-generated code for each record
Channel
Describes the name of the sale point
Stage
Gives the sales order’s current stage
Status
Gives the status of the sales order
Customer Profile
Describes the profile of the customer
Barcode
Gives the Barcode of the Sales order
Contact
Describes the contact name for the customer
Customer
Describes the name of the customer
Is Invoice Sent
This is checked if the invoice for the sales order is sent
Is Back Order
Indicates whether the sales order is a backorder
Order Details Section
Total Vat
Describes the sum of VAT on selected sales order line items
Total Other Tax
Describes the sum of taxes on selected sales order line items
Sub Totals
Describes the sum of the selected sales order line items
Amount
Describes the total amount of the sales order, including VAT, taxes and discounts
Total Discounts
Describes the sum of the discount amount on selected sales order line items
Price List
Gives the price list of the products/items being added
Total Tax Amount
Describes the sum of taxes, including VAT and other taxes on selected sales order line items
Order Type
Gives the profile type of the sales order
Total Due
Describes the amount due on the sales order
Subscription
Indicates whether the sales order is being subscribed
Return and Loyalty Details Section
Loyalty Points
Describes the number of loyalty points earned by the customer
Loyalty Amount
Describes the equivalent amount
Customer Id
Describes the unique customer ID
Payment Details section
Payments Status
Gives the payment status
Sales Order Amount
Defines the complete sales order amount
Payment Method
Indicates the types of payments which can be used
Payment Mode
Mode used for the payment
Due Amount
The total amount which must be paid
Address Details section
Bill-To Address
Describes the address to which the customer is billed
Ship-To Address
Describes the address that will be used for shipment
Order Dates Section
Book Date
The date when the sales order is booked
Request Date
The date when the sales order is requested
Order Date
The date when the sales order is created
Special Instructions
Instructions for the sales order, if any
Hold Status
Status for the sales order being held
Creating the sales order from Enterprise Point of Sale Tab:
The orders created through Enterprise Point of Sale are for a situation when a customer walks into a store/outlet, orders a product, pays for it, and takes the product home or opts for the available shipment options. Upon confirming the sales order, the sales invoice is created automatically. Each sales order has a unique number to enable simple tracking. The order console where the sale orders are processed is as shown below. It is referred to as Enterprise Point of Sale (EPOS) in ERP Mark 7. 1. Click on the Enterprise Point of Sale tab as shown below 2. Under the Customer Details section Select the Customer Name and Contact Name and the other details auto-populates such as the Email, Phone, customer ID, Bill To, and Ship To address of the contact. Type the first few characters of the customer name in the Account Name field to browse for a valid customer name. While browsing, you may scroll down or use the arrow keys to highlight the correct customer name. Select the customer to retrieve the customer’s contact information and billing/shipping addresses. For example, say you get an order from Scott Bill and you type “Sco”. The system displays a lookup of customers in the system whose names begin with “Sco”. This brings you closer to finding Scott Bill in the system, as shown below. 3. If you cannot locate the customer name in the lookup, you can enter a new customer without exiting the POS page or switch to other windows. Simply click on the Account tab located on the right-hand side of the screen. On the Account tab, you will be prompted to add:
Customer
Address
Contact
You will be able to add a new customer, both the “bill to” and “ship to” addresses, and a new contact for the new or existing customer. Based on the selection made, the relevant screens appear to add information. To return to the new orders, click on the Sales Orders tab on the right-hand panel after saving your new customer. 4. Once the customer name is entered, the contact details, such as contact name, email address, phone number, account ID, customer profile, and address details, are retrieved automatically. You may select the retrieved “bill to” address or select a different “bill to” address if one or more “bill to” addresses are saved for the selected customer. This change will be made for this order only and not on the customer account. 5. A single “bill to” address/a single customer may have several “ship to” addresses. Select the “ship to” address from the available picklist for the selected customer. The “ship to” address describes the location where the order is to be shipped. If the “ship to” address required for the order has not been saved in the customer account, click on the Accounts tab to create new address information. This will take you to the “Add New Address” screen, where a “ship to” address can be recorded. Clicking on the Sales Orders tab will bring you back to the screen where new orders can be recorded. 6. Under the Order Details section, Channel/Division, Sold By, Request Date, Status, and Sales Order Profile are auto-populated. 7. If you want to select an existing sales order then, click on the lookup and select the sales order. 8. If you are creating a new sales order, then a new sales order number is generated after adding the product line items and saving the order.
Adding product line items from EPOS
To add products, click on the “Add New +” button.
In the “Add New Products” pop up, select the product family and click the “Find” button or type the name of the product to find the product.
From the list of products, select the checkboxes of the desired product. Enter the quantity and select the discount plan, then click the “Add” button. The selected products will now appear in the product line item section as shown below.
4. To save the sales order with the selected product line items, click the “Save” button. This will generate a unique sales order number. 5. Product line items can be edited or deleted and every product can have comments added by using the action buttons next to the product line item code.
View/ Edit Sales Orders of the existing customers:
After the order is entered, a customer will be able to inquire about or update the order. For example, if the order was entered on August 15th and not closed, the customer can return and inquire about/update the order at any time in the future. The customer can either remove the products or add a few more products to the sales order. The process to view/edit a sales order is discussed below.
Select the customer name from Account Lookup and retrieve the customer details.
On the Sales Orders tab located on the right-hand side of the screen, enter the unique sales order number in the “Sales Order Lookup” field.
For example, say you get an order from Scott Bill and he would like to update sales order number 00135. You enter 001 and the system displays a lookup of sales orders in the system beginning with 001. This brings you closer to finding sales order number 00135 in the system, as shown below.
The system displays the details of the selected sales order. You may add products to the product line item section.
To add products, click on the “Add New +” button.
In the “Add New Products” pop up, select the product family and click the “Find” button or type the name of the product to find the product.
From the list of products, select the checkboxes of the desired product, enter the quantity, select the discount plan and click the “Add” button. The selected products will now appear in the Product Line Item section, as shown below.
Explanation of Fields in the Product Line Item Section:
Code:
Every product is assigned a unique number in the system and the same is displayed in the product line item section when a product is selected. It can be a system-generated code or a company-specified product code.
Product and Preview:
This displays the product name and its image in the product line item section. The products displayed add new product pop up are displayed only if the stock is available in your company’s inventory.
Quantity:
This displays the quantity of a particular product purchased and the price of the product depending on the quantity purchased.
Base Price, Discount, Vat, Tax, Total Price:
This displays the price of the product assigned to the customer’s profile. Discount is the reduction of a certain percentage of the base price allowed to the customer for the purchased product. Discount may or may not be applicable to every product. VAT and Tax are the addition of a certain percentage to the base price allowed to the customer for the purchased product. Total Price is the amount of the product displayed after calculating the discount and taxes. It is the final price a customer pays for the product purchased. For example, a product is sold for $100 and has overall taxes of about 14% (i.e., VAT = 7% and Tax = 7%) along with a 10% discount on it. The total price is calculated using the following formula. Total Price = ((Base Price *Quantity)-Discount Amount) + (VAT +Other Tax Amount)
Invoices and Payments:
The Invoices tab in ERP Mark 7 can be used to manage customer invoices that contain order information about purchased products. Users can view or send the invoice via email to the client. The tab allows users to generate an invoice document as a PDF.
An invoice is created in two ways:
From the Sales Orders tab (record level)
From the Enterprise Point of Sale tab
Creating an invoice through the Sales Orders tab:
Create the sales order as described in Creating a sales order through the Sales Orders tab.
From the related tab, find “Invoices” and click the “New” button.
Select the “Sales” record type and click the “Next” button.
Enter the organisation details, the purchase order number, the sales order number, and the amount details under the Organisation Details section.
If the invoice needs to be reflected on the organisation’s finance, select the “Posted” checkbox and the posted date.
Fill in the Information section with details like tax receipt number, customer account, and active checkbox, then click “Save” to create an invoice record.
Creating an invoice through the Enterprise Point of Sale tab:
Create the sales order as described in “Creating the sales order from the Point of Sale Tab”.
When the sales order is saved from the EPOS tab, an invoice record is created automatically with complete amount details of purchased products.
Click the “View/Send Invoice” button to view the invoice template. The console provides an option to send an invoice attachment to the customer’s email address.
The function that is used to receive payments from customers who have purchased your products and services and who have not already paid for them.
When you sell a product/service, the order is created through order processing. The order processing functionality provides for the entry of payments and can be done via the following payment methods.
Cash
Bank/Cheque
Credit Card/Debit Card
Loyalty
The system can accept partial payments and has the ability to record multiple payments for each sales order.
When the customer books a sales order, the system typically creates an invoice in the system which can be sent to the customer’s email ID.
Making a Payment
Payments can be made using one of two methods –
From the Sales Order tab (record level)
With the Enterprise Point of Sale tab.
Creating payments through Sales Order Tab:
Open the Sales Order record for which the payment must be made. On the related tab, scroll down and select “Payments”. Click on the “New” button.
From the New Payment Record Type pop-up, select “Cash Payments” and click the “Next” button.
Fill in the organisation and sales order details under the Organisation Details section. Fill in the payment details under the Information section. Click the “Save” button to create a payment record for the selected sales order.
When the payment is made for the selected sales order, the status of the sales order is changed to either paid, underpaid or overpaid based on the amount that has been given in the payment record.
Loyalty – If a customer is a regular customer of the organisation, he would have received loyalty points for every purchase he made. Each loyalty point can be assigned a value of the currency and the customer can make the payment using these loyalty points.
Credit/Debit – A customer can use credit/debit cards to make a payment by swiping the card at the time of sale. If he is a returning customer and wishes to save the card details for future use, he can do so.
Payments from Point of Sale tab:
In a scenario in which a customer walks in the store/outlet and makes a payment to the sales order, the POS page helps the user complete the sales order and payment process without having to navigate to different setups.
Create the sales order from the POS tab (as described in Create Sales Order through POS).
Navigate to the Payments tab and click on any of the payment options. Payments can be made using the following four methods:
Credit/Debit
Bank/Cheque
Cash
Loyalty
Credit/Debit
To make the payment through Credit/Debit card, click on the “Payments tab” and click on the “Credit/Debit” button located on the right side of the screen.
Enter the card details in the Card Information section and click the “Pay Now” button to complete the payment process for a sales order.
Bank/Cheque
To make the payment through Bank/Cheque, click on the “Payments tab” and click on the “Bank/Cheque” button located on the right side of the screen.
Enter the bank name and reference cheque number into the Bank Information section. Click the “Pay Now” button to complete the payment process for a sales order.
Cash
To make the payment through Cash, click on the “Payments tab” and click on the “Cash” button located on the right side of the screen.
Enter the amount to be paid and click the “Pay Now” button to complete the payment process for the sales order.
Loyalty
Regular customers earn loyalty points as a reward for their regular purchases with the organisation. They can use these points for payments. Loyalty points can be assigned to currency values. For example, 1 loyalty point = 1 pound or as per the organisation’s decision.
To make the payment through Loyalty, click on the “Payments tab” and click on the “Loyalty” payment option located on the right side of the screen.
The system will automatically reduce the amount to be paid by the equivalent loyalty points.
The customer can pay the rest of the amount with any of the other payment options.
Apply Credits
To make the payment through Credit points, navigate to the “Payments tab” in ePoS and click on the “Apply Credits” button.
The system will automatically fetch the Invoice Amount, Total Due and Available Credit. Enter the “Redeem Credit” amount and click the “Pay Now” button.
You will see that a Credit type payment record has been created.
Getting Started with Booking Kare
Enterprise-Grade Event , Appointment Booking And Scheduling Software
Event Module comes with features that help Event Planners, and Organiser to organize events efficiently on a large scale with online payment options. Event planners may easily email personalized invitations to hosted events to any and all contact list members in case of the event is canceled or postponed.
Event Booking Module Includes Features Such As:
Event Builder
Create an event
Event zone
Venues
Create Product Service Details
Tickets
Membership
Speaker
Agenda
Logistics
Sponsorship
Adding and Inviting Guests
Send invites to accounts, Contact, and users
Check-in and Walk-in registrations
Manually check-in
Kiosk Check-in
Scan Bar code Check-in
Event Booking
Calendar
2. Appointment Module
The appointment Module comes with a user-friendly appointment booking system that lets your client view the expert’s real-time availability and quickly book an appointment with the expert. The client can book appointments from anywhere, anytime using any device. Upon appointment booking, BookingKare lets you maintain customer information and appointment history for easy reference. Appointment Booking Module Includes Features Such As:
Appointment Booking
Planner
Teams
Team members
Location
Membership Program
Product/Service
Price book
Work Planner
Resource group
Resource
Resource Requirement
Shift Planner
Time management
Calendar
Queue management
Workbench
Room Reservation
Logistics
Payments (Authorize.net,Paypal,Chase payment)
System Requirements
Roll out Steps:
Preparation involves all of the planning you need to do before you can begin using Booking Kare.
Identify key users of the system
Add licenses
Identify all of the users who will be using the BookingKare System and make sure you have the appropriate number of licenses.
Review all the technical requirements
Requirements to use Aqxolt BookingKare in a system
Operating System
All you need is a computer that can run a web browser. It doesn’t matter what type of hardware or operating system you’re running.
Browser
Google Chrome™, the most recent stable version Mozilla Firefox®, most recent stable version Microsoft Internet Explorer versions 9, 10, and 11 Apple Safari® versions 5. x, 6. x and 7. x on Mac OS X
Internet Connection
Salesforce is designed to use as little bandwidth as possible so that the site performs adequately over high-speed, dial-up, and wireless Internet connections.
Requirements to use Aqxolt BookingKare system with payment gateways
Payment Gateways
PayPal, Authorize.net,Chase payment.
Installation Guide
Follow the steps if you are a new user.
The quickest way to assess if BookingKare is the right fit for your organization is by creating a free trial. You’ll immediately be taken to a salesforce registration page, where you need to fill out the form and start a free trial. On the app exchange BookingKare listing click the “Get It Now” button and login to the salesforce free trial instance and from here you can start to evaluate BookingKare in depth.
Installing BookingKare in your Salesforce instance
Choose the instance on which you want to install and click.
Step 2
Confirm the installation details and click the “Confirm and Install” button.
Step 3 Licensing Your users for BookingKare
Navigate to Setup> Apps > Packaging> Installed Packages.
In the list of installed Packages find the BookingKare app and click the “Manage Licenses” option under the actions section.
Click on the “Add User” button in the Licensed User section.
Select the user from the Available Users section; click the “Add” button.
Validate Your Installation
Click on the app launcher and notice that the “Appointment Booking” and “Event and Expert Booking” apps are available under all apps.
Select any of the applications from the App Launcher and notice its available Tabs.
Community Setup
Communities Overview Communities are a great way to share information and collaborate with people who are key to your business processes, such as customers, partners, or employees. Whether you call it a portal, a help forum, a support site, HR central, or something else, an online community is a great place to connect with the important folks in your life in a new and different way. Use easy point-and-click branding tools with ever-evolving Lightning templates or go with Visualforce to create branded collaboration spaces. Step 1
Enable Communities
Enabling Communities is the first step to creating communities.
Note: After you enable Communities, you can’t disable it. If your org’s access to Communities is suspended for non-payment, all your communities are deactivated, including the communities in Preview. When Communities is re-enabled, all communities are inactive. You can activate these communities, but you can’t return to the Preview state.
1. From Setup, enter Communities Settings in the Quick Find box, then select Communities Settings.
Note: If you don’t see this menu, Communities might not be available for your Salesforce org. Contact your Salesforce account executive.
2. Select Enable communities. 3. Select a domain name for your communities, and click Check Availability to make sure that it’s not already in use.
You use something recognizable to your users, such as your company name. The Communities domain name is the same for all communities. You create a unique URL for each community when creating it by entering a unique name at the end of the URL. For example, if your Communities domain name is UniversalTelco.force.com and you’re creating a customer community, you can enter customers to create the unique URL UniversalTelco.force.com/customers. Important: You can’t change the domain name after you save it. You can designate a custom domain by entering it in on the Domain Management page. From Setup, enter Domains in the Quick Find box, then select Domains. 4. Click Save.
Step 2 Create Communities
To create a community, from Setup, enter All in the Quick Find box, select All Communities, and then click New
Step 3 Community Template.
The Community Creation wizard opens with several templates for you to choose from. If you have Lightning Bolt solutions available in your org, they are listed in the wizard.
To see more information about a template, select it. Customer Service
A powerful, responsive self-service template with multiple prebuilt theme options. The Customer Service template lets users post questions to the community, search for and view articles, collaborate and contact support agents by creating cases. Supports Knowledge, Chatter Questions, and cases.
Step 4 Experience Builder.
Select the template that you want to use.
Read the template description and key features, and click Get Started.
Enter a community name.
Note: If you’re creating multiple communities, differentiate the beginning of the community name. Community names are truncated in the global header drop-down menu. Users can see up to 32 characters of the name, and names include the status. Make sure that the visible part of the name allows users to distinguish between multiple communities.
For URL, enter the name of your community.
This name is appended to the Communities domain that you created when you enabled communities for this org. For example, if your Communities domain name is UniversalTelco.force.com and you’re creating a customer community, you can enter customer to create the unique URL UniversalTelco.force.com/customers.
Note: You can create one community that doesn’t have a custom URL.
You can change your community name and URL after the community is activated, but users aren’t redirected to the new URL. So be sure to inform your community members before changing the name or URL.
Click Create.
The community is created in Preview status. Now you’re ready to build and customize or manage and moderate your community.
When you create a community, Salesforce supplies default pages for login, self-registration, change password, forgot password, and your home page. These pages are based on which template you use to create your community. You can customize these default pages at any time in the Login & Registration page of the Administration workspace.
IMPORTANT After you create a community, your profile is added to the list of profiles that have access to the community. Then all users with this profile can log in to the community after it’s active. If you don’t want all users with your profile to have access to the community, remove the profile, and give yourself access through a different profile or permission set. Then create a profile specifically for your community users.Step 5 Access Experience Workspaces
The streamlined Experience Workspaces centralizes community moderation, building, and administration. Access Experience Builder, administration, dashboards, and other features from one place.
From Setup, enter Communities Settings in the Quick Find box, then click Communities Settings.
Enable Experience Workspaces under Community Management Settings. Click Save.
From Setup, enter All Communities in the Quick Find box, then click All Communities. To access a community’s workspace area, click Workspaces next to its name.
Manage Your Community with Experience Workspaces Experience Workspaces is your one-stop-shop for building, setting up, and monitoring your community. You can access Experience Builder and Administration workspaces to manage your community’s setup and branding. Community managers can view dashboards for groups, members, feed activity, and license usage, and manage the community’s reputation system. Moderators can see which items have been flagged for review.
Note: You can customize your community at any time, but if you plan on making major changes, we recommend deactivating the community first.
To enable Experience Workspaces, in Setup, enter Communities Settings in the Quick Find box. Under Community Management Settings, select Enable Experience Workspaces. Experience Workspaces is enabled by default for all communities.
To go back to Community Manager, in Setup, enter Communities Settings in the Quick Find box. Under Community Management Settings, deselect Enable Experience Workspaces.
Builder
Experience Builder lets you brand and design your community pages. Create and customize pages, modify or add Lightning components, customize the community’s navigation menu, and manage page-level settings as shown in the screenshot below.
IMPORTANT If you’re an administrator and accidentally remove yourself from a community, you can’t access the Administration settings in Experience Workspaces. To add yourself back to the community or make other membership updates, use the API.
A community for Event Booking
For setting up a community for Event booking, follow the same 5 steps of community setup.
After reaching the builder section. You can create an Event booking component by clicking on the component option.
When clicking on the component button you find the list of components that can be added to the builder page.
Search for the Event booking component and drag it onto the builder page.
Note: If you already have the template components on the builder page, you can delete them from the delete icon of each section before adding your own component. When the component is on the page, it will appear as below.
Similarly, you can add as many components as required on the page and manage the page structure from the page structure button on the left.
There is also a Setting Button-through which you can change the setting of the community page and find information regarding that. Shown below
In the setting, you have Public access check box, tick this box when you want the public to access this community.
You can give a title for the community in the Community Title box.
Published Status – This is a link from where customers can access the Event Booking Community.
Guest User Profile – This is the profile link of guest users from where you can authorize or unauthorize the user.
If Users have no access to the components, this can be managed by clicking on Event Booking Profile from the settings.
Note- Access can be given from profiles and sharing settings. In profiles make sure all the objects, fields, and tabs have access to the User. In sharing settings, check for any restrictions on the Guest user access.
When completed, click on the Preview button to view the page before saving to make more changes if required.
Click Publish button on the top right to save and publish your community.
You can also select the View mode button to set it for phone, Tablet, and Desktop.
You have now created your Event Booking Community.
Follow Step 6 for more information on managing your community.
A community for QR Check-In
For setting up a community for QR Check-In, follow the same 5 steps of community setup.
After reaching the builder section. You can create a QR Check-In component by clicking on the component option.
When clicking on the component button you find the list of components that can be added to the builder page.
Search for the QRcodeCheckInRegister component and drag it onto the builder page.
Note: If you already have the template components on the builder page, you can delete them from the delete icon of each section before adding your own component. When the component is on the page, it will appear as below.
Similarly, you can add as many components as required on the page and manage the page structure from the page structure button on the left.
There is also a Setting Button-through where you can change the setting of the community page and find information regarding that.
In the setting, you have Public access check box, tick this box when you want the public to access this community.
You can give a title for the community in the Community Title box.
Published Status – This is a link from where customers can access QR Check-In
Guest User Profile – This is the profile link of guest users from where you can authorize or unauthorize the user.
If Users have no access to the components, this can be managed by clicking on QR Check-In Profile from the settings.
Note- Access can be given from profiles and sharing settings. In profiles make sure all the objects, fields, and tabs have access to the User. In sharing settings, check for any restrictions on the Guest user access.
When completed, click on the Preview button to view the page before saving to make more changes if required.
Click Publish button on the top right to save and publish your community.
You can also select the View mode button to set it for phone, Tablet, and Desktop.
You have now created your QR Check-In
Follow Step 6 for more information on managing your community.
A community for Appointment Booking
For setting up a community for Appointment Booking, follow the same 5 steps of community setup.
After reaching the builder section. You can create an Appointment Booking component by clicking on the component option.
When clicking on the component button you find the list of components that can be added to the builder page.
Search for the Appointment Booking component and drag it onto the builder page.
When the component is on the page, it will appear as below.
Note: If you already have the template components on the builder page, you can delete them from the delete icon of each section before adding your own component.
Similarly, you can add as many components as required on the page and manage the page structure from the page structure button on the left.
There is also a Setting Button-through where you can change the setting of the community page and find information regarding that.
In the setting, you have Public access check box, tick this box when you want the public to access this community.
You can give a title for the community in the Community Title box.
Published Status – This is the link from where customers can access Appointment Booking
Guest User Profile – This is the profile link of guest users from where you can authorize or unauthorize the user.
If Users have no access to the components, this can be managed by clicking on Appointment Booking Profile from the settings.
Note- Access can be given from profiles and sharing settings. In profiles make sure all the objects, fields, and tabs have access to the User. In sharing settings, check for any restrictions on the Guest user access.
When completed, click on the Preview button to view the page before saving to make more changes if required.
Click Publish button on the top right to save and publish your community.
You can also select the View mode button to set it for phone, Tablet, and Desktop.
You have now created your Appointment Booking
Follow Step 6 for more information on managing your community.
Step 6
Set the Default Number of Community Roles Set the default number of roles created when adding partner or customer accounts to communities. These settings apply if your community is set up with Partner Community, Customer Community Plus, or Lightning External Apps Plus user licenses. The limit is three roles; the system default is one. For example, if three partner roles are currently created when an account is enabled for your community–Executive, Manager, and User–but you need only the User role for new accounts, you can reduce the number to one role.
1. Use Super User Access to grant specific users access to data owned by other users in their accounts.
From Setup, enter Communities Settings in the Quick Find box, then select Communities Settings.
Select the number of roles per account.
If you’re using Partner Community licenses, set the Number of partner roles.
If you’re using Customer Community Plus licenses, set the Number of customer roles.
Click Save.
Note: This setting does not affect the number of roles for existing accounts.
Step 7
Customize Communities Update basic community settings like your community URL, community name, members, login options, and general preferences in the Administration section of Experience Workspaces or Community Management. You can customize your community at any time, but if you plan to make major changes, we recommend deactivating the community first.
Open Experience Workspaces or Community Management.
Click Administration, then select what you want to customize.IMPORTANT: The options available in Community Management or Experience Workspaces are based on your community template selection, permissions, and preferences. For example, if your community doesn’t use topics, you don’t see the Topics section. Some options in the following list might not appear in your community by default. To display all sections, go to Administration | Preferences and enable Show all settings in Community Management or Show all settings in Experience Workspaces.
Members
Tabs
Branding
Login & Registration
Emails
Pages
Preferences
Settings
To share the community with stakeholders while it’s still in Preview, copy the URL displayed on the Administration | Settings page.
By sharing your community in Preview, you can get useful feedback to incorporate before going live. Also, by having early members post, comment, and share records, your community appears active when members log in to the community for the first time.
Keep in mind that you must add users as members of the community before you can share the community URL.
After you finish customizing your community, activate the community to make it available to members. If you enable welcome emails when you activate them, a welcome email is sent to all members. If users are new portal users, their welcome email includes their username and password.
1. Share a Link to Your Community. You can allow members to preview your community before making it active. You can only share the link for a preview community with users who were added as members of the community. Sharing a link to a community in Preview status allows you to easily gather stakeholder feedback. The community functions just as it will when you make it active, so stakeholders can try out all functionality and review your branding and customizations. Additionally, you can take advantage of having early members who can post, comment, and share records so that members enter an active community from their first login.
Open Experience Workspaces or Community Management.
Click Administration | Settings.
Copy the URL displayed on the page and share it with your stakeholders.
Keep in mind that you can only share the URL with users who you added as members of the community.
2. Update Your Community Settings. Manage your community name, description, community status, and community template all from one location. You can change your community name and URL after the community is activated, but users aren’t redirected to the new URL. So be sure to inform your community members before changing the name or URL.
Open Experience Workspaces or Community Management.
Click Administration | Settings.
Edit your community settings as needed.
Select the pencil icon next to the community you want to change, and make your changes. You can change your URL from this page. However, if you’ve already activated your community, users aren’t redirected to the new URL.
Manage the status of your community.
Change your community template.
3. Deactivate a community.
You may want to deactivate a community if you need to:
Add or remove members
Add, remove, or change the order of tabs
Change the colour scheme
Change the community URL
Open Experience Workspaces or Community Management.
Click Administration | Settings.
Click Deactivate.
Your community is inactive and offline.
When a community is inactive, members still see it in the menu, but can’t access it unless they have the “Create and Set Up Communities” permission.
4. Enable optional community Features. Enable other optional features in your community such as user nicknames, guest access, private messages, direct messages, content flagging, and reputation levels.
To use these settings, Chatter must be enabled in your organization.
Open Experience Workspaces or Community Management.
Click Administration | Preferences.
Change the desired settings.
Click Save.
Step 8Community App
Users can also access the community site from the app launcher where the community app will be created with the name of that community that you create. As shown on the screen below:
On clicking on the community app that you created you will be redirected to a similar site as shown in the screenshot below:
Inbound Receive
The Inbound/Receive Logistics tab allows users to add the product to the inventory. We need to create a Logistic record for the Purchase Orders whose type should be ‘Inbound’.
1. Creation of Logistics record for a Purchase Order
If we check the ‘Ready the Receive’ checkbox while creating the Purchase Orders on the ‘Create Purchase Orders’ page and click on Save, the system will create the Purchase Order and its Logistic record.
Or
If we create a Purchase Order from the Create Purchase Order tab without checking the ‘Ready to Receive’ checkbox, the system will create the Purchase Order, but we need to navigate to the Purchase Order record level and need to check the ‘Ready to Receive’ checkbox manually to create the Logistic record. Follow the below steps to create the Logistic record manually –
Find the Purchase Orders tab from the App Launcher.
Once in the Purchase Orders tab, you can view the Purchase Orders information already filled in.
Find the Purchase Order and open it, check the ‘Ready to Receive’ checkbox, and ‘Save’ the Purchase Order record. The system will create the Logistic record.
Figure – ‘Ready to Receive’ checkbox
Figure – Logistic record
2. Complete the Inbound/Receive Logistic process to Receive the inventory.
Select the ‘Warehouse Management’ App from the App Navigation and click on the ‘Inbound/Receive Logistics’ tab.
OR
Find the ‘Inbound/Receive Logistics’ tab directly from App Launcher.
After clicking on the ‘Inbound/Receive Logistics’ tab, the system will take the users to the ‘Inbound/Receive Logistics’ home page.
Select the Channel and Distribution Channel available in the upper right corner, for which the logistic was created.
Users can see all the logistics that are related to the selected channel and Distribution Channel.
Use the search bar or scan the Purchase Order’s barcode to find the logistic.
Once the users found the Logistic, click on the Receive button or scan the barcode of Receive to navigate to the Receive section.
Figure – Click on Receive button to navigate to receive the section
Figure – Scan Receive barcode to navigate to receive the section
Note: –
Users can select multiple logistics together by selecting/scanning the logistics as shown in the below figure and receive all items at a time.
Users can attach any document like bills or product details by clicking on the ‘upload files’ icon and selecting the file that users would like to attach.
After uploading, users can find this document in the ‘logistic’ record level in the related list section of ‘notes and Attachments’.
After navigating to the ‘Receive’ section, users can see all the products associated with the purchase orders.
Figure 5: Before Receiving the Products
Users can see the Normal products at the top, Batch products in the middle, and, Serialized products at the bottom of the page.
Check the checkbox or Scan the Barcode of the Product to select the Purchase Order Line items.
If the Product is a Lot Tracked product, then you can Create a new Batch or you can Scan or Select the available directly. Click on the Gear icon to create a new Batch from the Receive section.
If the Product is a serialized product, then you can Select each inventory for that product or Scan the barcode of the Product. If you Scan the barcode of that product, the system will automatically select each inventory record.
Once you select each inventory for that product, you can enter the Serial numbers directly or scan new Serial Numbers for that product one by one.
Once you select the line items and select Batch/Serial Numbers, you need to enter the Quantity that you want to receive in the provided Quantity input field. By default, the total quantity will be auto-selected, if you want to receive the quantity partially, you can enter the partial quantity and will be able to receive the items partially.
Also, the user can Scan or Select the barcode of the Location if it’s stored at a particular location in the selected warehouse.
In the same way, the user can Scan or Select the barcode of the Bin.
Once everything is selected, you need to click on the Save button.
If you are receiving the items partially, the system will display the received items in the below section of the page.
Once you receive all the items, the system will display a message that All Items Received, and all received items will display at the Received Line Items.
Creating a new Batch/Lot from the ‘Receive’ Section.
Step 1: Click on the gear icon available next to Batch/Lot lookup.
Step 2: It will open the pop-up as shown below.
Step 3: Enter the Batch or Lot Number, and Expiry Date, and select Version if you want to associate that Batch to any specific Version.
Step 4: After entering the details click on the ‘Create Lot button, which will create a new Batch or Lot and allocate it to that product for which the inventory will get added.
Creating Purchase Order
As a customer, I need the ability to create purchase orders with minimum details to be entered, able to search products, add and remove the products, and be able to select cost cards based on vendor.
When the customer wishes to buy the raw materials or products from the supplier either store them in the warehouse or resell them. The customer needs to create a purchase order against that vendor.
The warehouse management team checks for product/ raw material need or demand stock, they raise a requirement to the supplier/vendor by creating a purchase order.
Preconditions:
Have a vendor account created and related contact and address.
Be specific in which warehouse you want to receive.
Products available in the system for which you want to create purchase orders with ‘Issue Purchase Order’ enabled.
(optional) Available cost cards to be set up against those products and vendors.
Termination Outcome:
If a user will enter all the required information on the create purchase order screen and clicks on the ‘Save’ button, a purchase order will be created and the user will navigate to the purchase order to see all the entered information.
If the required information is not set up correctly in the system, the user may not be able to create a purchase order.
Conditions affecting termination outcome:
If the warehouse is not set up with a distribution center, the user will not be able to select the distribution center based on the assigned warehouse.
If an employee is not assigned to the distribution center, the user will see a warning message to assign the employee to the distribution center to proceed.
The user needs to enter all the required fields on the create purchase order screen like expected date, vendor, vendor contact, organization, and at least one product/line item need to be added to create a purchase order successfully.
User Story Associations: Creating a purchase order against a vendor is a prerequisite for a use case on Inbound Logistics.
The user should enter the following information,
An expected date which cannot be in the past.
A distribution center should be selected, in order to receive the inventory in the warehouse associated with that distribution center.
Select a vendor and associated contact from whom you would like to purchase the products.
Enable the ‘Ready to Receive’ checkbox, if you are ready to move the products into the warehouse.
Add all the products you are buying and enter the quantity and unit price corresponding to each product.
Output Summary:
A purchase order will be created and the products entered by the user are added as the purchase order line items.
If a user has enabled the ‘Ready to Receive’ checkbox, then the logistics will be created of type ‘Inbound’ with logistic line items mapped from purchase order line items.
Updating Your Theme
We are strongly recommended to install “Envato Toolkit” plugin for ease of use. Once necessary plugin installed and activated “Envato Toolkit” menu will be available at your admin side.
Important : If you have missing plugins or having issues to install any of them, all the related could be found under “recommended-plugins” folder within the downloaded package.
User Account Information
To obtain your API Key, visit your “My Settings” page on any of the Envato Marketplaces. Once a valid connection has been made any changes to the API key below for this username will not effect the results for 5 minutes because they’re cached in the database. If you have already made an API connection and just purchase a theme and it’s not showing up, wait five minutes and refresh the page. If the theme is still not showing up, it’s possible the author has not made it available for auto install yet.
Marketplace Username: Enter your Envato marketplace username.
Secret API Key: Enter your Envato marketplace Secret API Key (http://themeforest.net/user/[your-username]/api_keys/edit, Login to your Themeforest account, Settings > API Key)
Backup Information
This plugin will automatically save your theme as a ZIP archive before it does an upgrade. The directory those backups get saved to is wp-content/envato-backups. However, if you’re experiencing problems while attempting to upgrade, it’s likely to be a permissions issue and you may want to manually backup your theme before upgrading. Alternatively, if you don’t want to backup your theme you can check the box below.
You can also update the theme by replacing the old theme folder. First go to your theme directory then delete the theme folder and paste the new version of the theme.
Getting Started
Before building your site, better take a look at this section.
Extract the zipped package downloaded from ThemeForest to your desktop, in the extracted package you will find the gullu.zip file which is the WordPress theme.
You can install the theme in two ways:
FTP: Extract gullu.zip file and upload the extracted folder to /wp-content/themes/ folder on your server.

WordPress: Navigate to Appearance -> Add New Themes -> Upload page. Select gullu.zip file. Press the Install Now button to upload and install the theme.
After uploading the theme, you have to activate it. Navigate to Appearance -> Themes page to activate the theme.
Demo Import
If you want your site to look like exactly the ‘Gullu’ demos then you have to import the demo content successfully.
We integrated the One Click Demo installation feature to ‘Gullu’ WordPress theme. You can import all demo content just by a click only.
OneClick Demo Installation Process
Install the theme and activate it. Then install all the required plugins. Make sure all the required plugins are activated.
After activating all the required plugins navigate toAppearance > ‘One Click Demo Import’menu from the WordPress dashboard.
Note: If the option data do not import then you have to import it manually. Navigate to‘Theme Settings > Backup’. Then copy-paste the backup string here and click on the Import a Backup button. You will find the backup string in the options.txt file.
The recommended method to import the demo content.
If you failed to import the demo content by one click then you have to follow the below steps to import the demo content manually. You will get all demo content data with the theme package. You will find the demos in ‘gullu>inc/demo{disired-demo-number} this path.
Navigate to Tools > Importthen install the WordPress plugin and click on the ‘Run Importer’. Upload here the ‘theme_content.xml’ file.
Install the ‘Widget Importer & Exporter‘ plugin to import the demo widgets. Then navigate to Tools > Widget Importer & Exporter and upload here the ‘widget_data.wie’ file.
Now you have to import the Dental Options as like the demo. Navigate to ‘Theme Settings > Backup’. Then copy-paste the backup string here and click on the Import a Backup button. You will find the backup string in the options.txt file.
How to update premium plugins?
We have integrated some premium plugins with the theme and bundled those plugins with the theme. You don’t have to input your Themeforest product ID to unlock any theme features. We are not providing the third party plugin’s license along with the theme.
We are providing the plugins file only and we are continuously updating the bundled plugins with the theme updates. You can install/get those plugins on Appearance > Instal Plugins. Or you can get the plugin files in the rogan/inc/tgm/plugins folder.
Required Plugins
After installing the theme you most have to install the ‘Gullu Core’, ‘Visual composer’ and‘Codestar Framework’ plugins to import the demo content as well and work the theme correctly.
You will find all required and recommended plugins at Appearance > Install Plugins.
Control blank space between rows
You can control the space between rows from the visual composer’s shortcode section settings.
Select the shortcode section from the Visual composer page edit screen (backend or frontend editor) that you want to control. Check the Styling tab from the visual composer’s element settings. Take a look at the below screenshot of it-
Note: Input the padding (spaces around the section) as clockwise (Top Right Bottom Left)
Header Settings
In the Header settings section, you will get a lot of header customization options. In this section, you can change the logo and set the menu button, navigation bar settings etc.
Theme Installation
Extract the zipped package downloaded from ThemeForest to your desktop, in the extracted package you will find the gullu.zip file which is the WordPress theme.
You can install the theme in two ways:
FTP: Extract gullu.zip file and upload the extracted folder to /wp-content/themes/ folder on your server.

WordPress: Navigate to Appearance -> Add New Themes -> Upload page. Select gullu.zip file. Press the Install Now button to upload and install the theme.
After uploading the theme, you have to activate it. Navigate to Appearance -> Themes page to activate the theme.
Optimize Images
Optimizing your images will helps your WordPress site load faster.
Download and activate WP Smush.it This plugin will optimize every image you upload and you can use the Bulk Smush.it feature to smush all of your uploaded images.
Alternatives to WP Smush.it include EWWW Image Optimizer, CW Image Optimizer, Imsanity and Hammy. Many WordPress users prefer using these plugins as they do not rely on an external server to process your images.
Header Settings
In the Header settings section, you will get a lot of header customization options. In this section, you can change the logo and change the page/post’s Title bar padding, Page margin-top, Title bar overlay color etc.
Optimize Images
Optimizing your images will helps your WordPress site load faster.
Download and activate WP Smush.it This plugin will optimize every image you upload and you can use the Bulk Smush.it feature to smush all of your uploaded images.
Alternatives to WP Smush.it include EWWW Image Optimizer, CW Image Optimizer, Imsanity and Hammy. Many WordPress users prefer using these plugins as they do not rely on an external server to process your images.
Updating Your Theme
We are strongly recommended to install “Envato Toolkit” plugin for ease of use. Once necessary plugin installed and activated “Envato Toolkit” menu will be available at your admin side.
Important : If you have missing plugins or having issues to install any of them, all the related could be found under “recommended-plugins” folder within the downloaded package.
User Account Information
To obtain your API Key, visit your “My Settings” page on any of the Envato Marketplaces. Once a valid connection has been made any changes to the API key below for this username will not effect the results for 5 minutes because they’re cached in the database. If you have already made an API connection and just purchase a theme and it’s not showing up, wait five minutes and refresh the page. If the theme is still not showing up, it’s possible the author has not made it available for auto install yet.
Marketplace Username: Enter your Envato marketplace username.
Secret API Key: Enter your Envato marketplace Secret API Key (http://themeforest.net/user/[your-username]/api_keys/edit, Login to your Themeforest account, Settings > API Key)
Backup Information
This plugin will automatically save your theme as a ZIP archive before it does an upgrade. The directory those backups get saved to is wp-content/envato-backups. However, if you’re experiencing problems while attempting to upgrade, it’s likely to be a permissions issue and you may want to manually backup your theme before upgrading. Alternatively, if you don’t want to backup your theme you can check the box below.
You can also update the theme by replacing the old theme folder. First go to your theme directory then delete the theme folder and paste the new version of the theme.
Theme updating issue
Sometimes, your website may break when you update the new version of the theme.
You have to delete the Gullu core plugin before installing the updated theme in this case. Then install the plugin again from Appearance > Install pluginsafter installing the new version.
Getting Started
Before building your site, better take a look at this section.
Extract the zipped package downloaded from ThemeForest to your desktop, in the extracted package you will find the charles.zip file which is the WordPress theme.
You can install the theme in two ways:
FTP: Extract charles.zip file and upload the extracted folder to /wp-content/themes/ folder on your server.

WordPress: Navigate to Appearance -> Add New Themes -> Upload page. Select charles.zip file. Press the Install Now button to upload and install the theme.
After uploading the theme, you have to activate it. Navigate to Appearance -> Themes page to activate the theme.
Demo Import
If you want your site to look like exactly the ‘Charles’ demos then you have to import the demo content successfully.
We integrated the One Click Demo installation feature to ‘Charles’ WordPress theme. You can import all demo content just by a click only.
OneClick Demo Installation Process
Install the theme and active it. Then install all required plugins. Make sure all the required plugins are activated.
After activating all the required plugins navigate toAppearance > ‘One Click Demo Import’menu from the WordPress dashboard.
Note: If the option data do not import then you have to import it manually. Navigate to‘Theme Settings > Backup’. Then copy-paste the backup string here and click on the Import a Backup button. You will find the backup string in the options.txt file.
The recommended method to import the demo content.
If you failed to import the demo content by one click then you have to follow the below steps to import the demo content manually. You will get all demo content data with the theme package. You will find the demos in ‘charles>inc/demo{disired-demo-number} this path.
Navigate to Tools > Importthen install the WordPress plugin and click on the ‘Run Importer’. Upload here the ‘theme_content.xml’ file.
Install the ‘Widget Importer & Exporter‘ plugin to import the demo widgets. Then navigate to Tools > Widget Importer & Exporter and upload here the ‘widget_data.wie’ file.
Now you have to import the Dental Options as like the demo. Navigate to ‘Theme Settings > Backup’. Then copy-paste the backup string here and click on the Import a Backup button. You will find the backup string in the options.txt file.
Required Plugins
After installing the theme you most have to install the ‘Charles Core’, ‘Elementor’ and‘Piklist’ plugins to import the demo content as well and work the theme correctly.
You will find all required and recommended plugins at Appearance > Install Plugins.
System Requirements
To use Charles you need to have a WordPress 4.0 (or higher version) site with PHP 5.4 or more running on your hosting server. If you’ve already installed WordPress on your server and your site is up, that’s great. For help regarding WordPress installation, please see this WordPress Codex link.
Extract the zipped package downloaded from ThemeForest to your desktop, in the extracted package you will find the charles.zip file which is the WordPress theme.
You can install the theme in two ways:
FTP: Extract charles.zip file and upload the extracted folder to /wp-content/themes/ folder on your server.

WordPress: Navigate to Appearance -> Add New Themes -> Upload page. Select charles.zip file. Press the Install Now button to upload and install the theme.
After uploading the theme, you have to activate it. Navigate to Appearance -> Themes page to activate the theme.
Updating Your Theme
We are strongly recommended to install “Envato Toolkit” plugin for ease of use. Once necessary plugin installed and activated “Envato Toolkit” menu will be available at your admin side.
Important : If you have missing plugins or having issues to install any of them, all the related could be found under “recommended-plugins” folder within the downloaded package.
User Account Information
To obtain your API Key, visit your “My Settings” page on any of the Envato Marketplaces. Once a valid connection has been made any changes to the API key below for this username will not effect the results for 5 minutes because they’re cached in the database. If you have already made an API connection and just purchase a theme and it’s not showing up, wait five minutes and refresh the page. If the theme is still not showing up, it’s possible the author has not made it available for auto install yet.
Marketplace Username: Enter your Envato marketplace username.
Secret API Key: Enter your Envato marketplace Secret API Key (http://themeforest.net/user/[your-username]/api_keys/edit, Login to your Themeforest account, Settings > API Key)
Backup Information
This plugin will automatically save your theme as a ZIP archive before it does an upgrade. The directory those backups get saved to is wp-content/envato-backups. However, if you’re experiencing problems while attempting to upgrade, it’s likely to be a permissions issue and you may want to manually backup your theme before upgrading. Alternatively, if you don’t want to backup your theme you can check the box below.
You can also update the theme by replacing the old theme folder. First go to your theme directory then delete the theme folder and paste the new version of the theme.
Header Settings
In the Header settings section, you will get a lot of header customization options. In this section, you can change the logo and set the menu button, navigation bar settings etc.
Optimize Images
Optimizing your images will helps your WordPress site load faster.
Download and activate WP Smush.it This plugin will optimize every image you upload and you can use the Bulk Smush.it feature to smush all of your uploaded images.
Many WordPress users prefer using these plugins as they do not rely on an external server to process your images.
Theme updating issue
Sometimes, your website may break when you update the new version of the theme.
You have to delete the Charles core plugin before installing the updated theme in this case. Then install the plugin again from Appearance > Install pluginsafter installing the new version.
Adipisci quaerat quia?
Cras tenetur aute doloribus quibusdam interdum fugit, diam hac mollis? Mollis fames veritatis phasellus facilis nascetur nonummy, eleifend placerat nisl enim eveniet corrupti imperdiet. Incidunt duis sequi mollit, hendrerit quod! Nostra tempus cum, lacus, ut, sapien error sagittis ornare blandit fugit turpis? Facere qui reprehenderit dolorum accusantium adipisci! Quo taciti, nascetur leo velit ultricies? Vulputate cupiditate! Luctus magni lobortis ducimus, autem arcu, illum aliquam facilisi suspendisse, vivamus at. Adipisci vestibulum, egestas dictum? Quas placeat impedit nesciunt nascetur justo tempora accumsan? Torquent! Viverra pariatur mi? Per itaque curae! Class, wisi condimentum exercitationem ad sequi voluptatum expedita. Veniam vero magnis sapien feugiat.
Convallis suscipit? Auctor distinctio erat interdum. Fringilla doloribus phasellus nostrud? Asperiores diam, quam animi irure mi diam eiusmod! Ridiculus! Excepturi sociis ipsa mattis. Sapiente laoreet massa, ultricies maxime, veritatis mollitia qui maecenas tempus aenean, inventore fugit, molestias iaculis rerum totam senectus lacus tellus wisi blanditiis irure volutpat habitasse, sem dignissim a minima, voluptatem aspernatur beatae volutpat, ratione sodales omnis ipsum beatae sollicitudin taciti accusamus volutpat ex? Elementum officiis saepe purus! Dicta placerat. Iusto massa porttitor! Anim doloribus eu varius ridiculus risus sem lacinia eleifend laboriosam tristique aspernatur commodi ex primis! Excepteur, occaecati corrupti praesentium, iaculis dui, curae at? Blanditiis rutrum.
Blanditiis, aute suspendisse eget! Dis vulputate fermentum pellentesque nec, dapibus? Do eligendi, voluptatibus mollis nobis cras. Aptent aut. Sed rem, exercitationem nullam, eleifend risus? Porttitor, nam, pulvinar est, quos tincidunt, voluptatibus qui iaculis pharetra tincidunt, ridiculus! Sociosqu harum culpa eum ab ullam, hac possimus. Fugit, laoreet fermentum occaecati. Mus nam? Risus pulvinar, voluptas gravida porttitor magna molestias! Suspendisse, ipsam laborum. Sociosqu inceptos! Laudantium pariatur. Dui, numquam? Exercitationem cupidatat adipiscing at voluptatem accusantium occaecat error quidem eius ullamcorper tempore soluta quod pellentesque officia eos voluptatum condimentum. Donec tempore, sem est netus quisquam, tempus euismod dolorum laboris officiis ultrices ipsum libero sodales.
Sample Doc Title
What is an Extension?
For editing menu navigation settings go to Theme Options Header Top of Header
. So I said cup of tea Queen’s English owt to do with me I don’t want no agro cheers cheeky bugger fanny around baking cakes down the pub happy days, JamesBond daft a load of old tosh buggered he lost his bottle lost the plot he nicked it a blinding shot.
[docly_tooltip id=”1″]Tooltip text[/docly_tooltip] mufty quaint no biggie cras baking cakes barney bamboozled, what a plonker bum bag he legged it young delinquent knees up Eaton the full monty arse over tit, my lady buggered happy days amongst bugger all mate are you taking the piss brolly. [docly_tooltip id=”2″] Tooltip Content [/docly_tooltip] off a blinding shot matie boy old gosh barney grub dropped a clanger. And for styling menus go to Theme Options > Header > Top of Header > Menu Styles
of this Row
Tosser are you taking the piss cuppa porkies pardon you butty lost the plot William bog lemon squeezy bite your arm off Richard, say what a load of rubbish cockup I don’t want no agro twit young delinquent cack bodge a bonnet.
Unordered list items
Go to Docly SettingsHeaderLogo
Consectetur adipiscing elit
Integer molestie lorem at massa
Facilisis in pretium nisl aliquet
Ordered List Items
Go to Docly SettingsHeaderLogo
Consectetur adipiscing elit
Integer molestie lorem at massa
Facilisis in pretium nisl aliquet
Doc title example
What is an Extension?
For editing menu navigation settings go to Theme Options > Header > Top of Header
. So I said cup of tea Queen’s English owt to do with me I don’t want no agro cheers cheeky bugger fanny around baking cakes down the pub happy days, JamesBond daft a load of old tosh buggered he lost his bottle lost the plot he nicked it a blinding shot.
[docly_tooltip id=”1″]Tooltip text[/docly_tooltip] mufty quaint no biggie cras baking cakes barney bamboozled, what a plonker bum bag he legged it young delinquent knees up Eaton the full monty arse over tit, my lady buggered happy days amongst bugger all mate are you taking the piss brolly. [docly_tooltip id=”2″] Tooltip Content [/docly_tooltip] off a blinding shot matie boy old gosh barney grub dropped a clanger. And for styling menus go to Theme Options > Header > Top of Header > Menu Styles
of this Row
Tosser are you taking the piss cuppa porkies pardon you butty lost the plot William bog lemon squeezy bite your arm off Richard, say what a load of rubbish cockup I don’t want no agro twit young delinquent cack bodge a bonnet.
Unordered list items
Go to Docly SettingsHeaderLogo
Consectetur adipiscing elit
Integer molestie lorem at massa
Facilisis in pretium nisl aliquet
Ordered List Items
Go to Docly SettingsHeaderLogo
Consectetur adipiscing elit
Integer molestie lorem at massa
Facilisis in pretium nisl aliquet
This is a doc title
What is an Extension?
For editing menu navigation settings go to Theme Options > Header > Top of Header
. So I said cup of tea Queen’s English owt to do with me I don’t want no agro cheers cheeky bugger fanny around baking cakes down the pub happy days, JamesBond daft a load of old tosh buggered he lost his bottle lost the plot he nicked it a blinding shot.
[docly_tooltip id=”1″]Tooltip text[/docly_tooltip] mufty quaint no biggie cras baking cakes barney bamboozled, what a plonker bum bag he legged it young delinquent knees up Eaton the full monty arse over tit, my lady buggered happy days amongst bugger all mate are you taking the piss brolly. [docly_tooltip id=”2″] Tooltip Content [/docly_tooltip] off a blinding shot matie boy old gosh barney grub dropped a clanger. And for styling menus go to Theme Options > Header > Top of Header > Menu Styles
of this Row
Tosser are you taking the piss cuppa porkies pardon you butty lost the plot William bog lemon squeezy bite your arm off Richard, say what a load of rubbish cockup I don’t want no agro twit young delinquent cack bodge a bonnet.
To sync Products from Salesforce to eBay selling store, product setup has to be done in a proper way making sure the following things are covered
Available on an e-commerce platform and is checked on the product detail page.
Add Product SKU and ASIN code
Add category and subcategory of the product
In the product related list, create e-commerce object record and select eBay checkbox
Create a Warranty and Return Policy Record
Create a Shipping and Handling zone record from the Shipping Zone Object. Add the Distribution Channel, Shipping Type, Flat Rate, Dispatch time, Country and State.
Go to Heroku user and click eBay. Once you are on the eBay dashboard, click on the “Add” button
It will redirect to the eBay login page.
Enter your eBay seller store credentials.
Agree on the Grant Application access permissions
Click on the “Product Sync” button on Heroku app this will create the product in the eBay seller account.
When orders are placed on the eBay store, they get synced to “Salesforce Instance” as “Sales Orders” and “Sales Order Line Items.” This has to be done manually by clicking Pending Sync for Orders on the Heroku user eBay dashboard.
As part of sandbox testing,
Copy the “Product URL” from the “Seller Account” and paste it into the “Buyer Account” and then buy the product and continue making payment by clicking “Pay Now.”
Then go to the Heroku user and sync the order, this will create a customer account and a sales order in the Salesforce instance.
Inventory & Asset Management
Inventory management tracks the stock that comes in and goes out of a company’s stores and warehouses. Asset management tracks the equipment and supplies that a company uses to run the business. In other words, inventory management and asset management both track a company’s property.
The Inbound/Receive Logistics tab allows users to add the product to the inventory. We need to create a Logistic record for the Purchase Orders whose type should be ‘Inbound’.
1. Creation of Logistics record for a Purchase Order
If we check the ‘Ready the Receive’ checkbox while creating the Purchase Orders on the ‘Create Purchase Orders’ page and click on Save, the system will create the Purchase Order and its Logistic record.
Or
If we create a Purchase Order from the Create Purchase Order tab without checking the ‘Ready to Receive’ checkbox, the system will create the Purchase Order, but we need to navigate to the Purchase Order record level and need to check the ‘Ready to Receive’ checkbox manually to create the Logistic record. Follow the below steps to create the Logistic record manually –
Find the Purchase Orders tab from the App Launcher.
Once in the Purchase Orders tab, you can view the Purchase Orders information already filled in.
Find the Purchase Order and open it, check the ‘Ready to Receive’ checkbox, and ‘Save’ the Purchase Order record. The system will create the Logistic record.
Figure – ‘Ready to Receive’ checkbox
Figure – Logistic record
2. Complete the Inbound/Receive Logistic process to Receive the inventory.
Select the ‘Warehouse Management’ App from the App Navigation and click on the ‘Inbound/Receive Logistics’ tab.
OR
Find the ‘Inbound/Receive Logistics’ tab directly from App Launcher.
After clicking on the ‘Inbound/Receive Logistics’ tab, the system will take the users to the ‘Inbound/Receive Logistics’ home page.
Select the Channel and Distribution Channel available in the upper right corner, for which the logistic was created.
Users can see all the logistics that are related to the selected channel and Distribution Channel.
Use the search bar or scan the Purchase Order’s barcode to find the logistic.
Once the users found the Logistic, click on the Receive button or scan the barcode of Receive to navigate to the Receive section.
Figure – Click on Receive button to navigate to receive the section
Figure – Scan Receive barcode to navigate to receive the section
Note: –
Users can select multiple logistics together by selecting/scanning the logistics as shown in the below figure and receive all items at a time.
Users can attach any document like bills or product details by clicking on the ‘upload files’ icon and selecting the file that users would like to attach.
After uploading, users can find this document in the ‘logistic’ record level in the related list section of ‘notes and Attachments’.
After navigating to the ‘Receive’ section, users can see all the products associated with the purchase orders.
Figure 5: Before Receiving the Products
Users can see the Normal products at the top, Batch products in the middle, and, Serialized products at the bottom of the page.
Check the checkbox or Scan the Barcode of the Product to select the Purchase Order Line items.
If the Product is a Lot Tracked product, then you can Create a new Batch or you can Scan or Select the available directly. Click on the Gear icon to create a new Batch from the Receive section.
If the Product is a serialized product, then you can Select each inventory for that product or Scan the barcode of the Product. If you Scan the barcode of that product, the system will automatically select each inventory record.
Once you select each inventory for that product, you can enter the Serial numbers directly or scan new Serial Numbers for that product one by one.
Once you select the line items and select Batch/Serial Numbers, you need to enter the Quantity that you want to receive in the provided Quantity input field. By default, the total quantity will be auto-selected, if you want to receive the quantity partially, you can enter the partial quantity and will be able to receive the items partially.
Also, the user can Scan or Select the barcode of the Location if it’s stored at a particular location in the selected warehouse.
In the same way, the user can Scan or Select the barcode of the Bin.
Once everything is selected, you need to click on the Save button.
If you are receiving the items partially, the system will display the received items in the below section of the page.
Once you receive all the items, the system will display a message that All Items Received, and all received items will display at the Received Line Items.
Creating a new Batch/Lot from the ‘Receive’ Section.
Step 1: Click on the gear icon available next to Batch/Lot lookup.
Step 2: It will open the pop-up as shown below.
Step 3: Enter the Batch or Lot Number, and Expiry Date, and select Version if you want to associate that Batch to any specific Version.
Step 4: After entering the details click on the ‘Create Lot button, which will create a new Batch or Lot and allocate it to that product for which the inventory will get added.
Outbound Logistics
The Outbound Logistics module of Aqxolt ERP ensures that all kinds of orders are dispatched accurately to the provided shipping address. The outbound logistics allows items to be placed in the specific packages for shipment. The system allows the user to scan an order reference number for items required for shipment. Stock dispatching is applied mainly to modules like sales orders, purchase returns, work orders, and transfer orders.
Navigate to Order Management app > Outbound Logistics tab
The List tab shows the logistics orders that are ready to be Picked and Packed.
Select the logistic order to complete the stock dispatching process
Click the “Pick” button to pick the products from the available stock address.
Select the outbound logistic line item and click the “Pick” button at the bottom right-hand corner of the page.
If all the Qty of the line items are picked, the screen moves to the Pack page
If all Qty is not picked the page remains in the same(Pick) screen until all the Qty is Picked
On the Pack tab, select the chosen item and select the package type and enter the deposit tag number to identify the package.
Select the quantity to pack, select the shipping type and click the “Save” button. Make sure Picked and Packed Qty are same.
The Package will be listed as shown
Multiple packages can also be created by selecting only the required line items in the Pack screen.
To ship the package, select the checkbox and click the “Ship” button.
Depending on the Shipment type selected UPS/FedEx or Internal shipment, the screen navigates to Shipment page.
Purchase Order
The purchase order is an electronic document that is sent by the customer to the seller to request for supply of certain goods and services. It is the first official communication from the buyer, containing the details of the specific items required, their quantity, and the prices agreed upon along with other details that may be required for the goods and services.
The purchase line orders contain the details of each of the items types ordered as well as the quantity of each item. Each type of commodity has a unique sales line number. Numerous purchase line orders can be contained in a single purchase order.
The purchase orders are used by the seller to prepare the items for shipment. The purchase orders are also important in providing the seller with information about the buyer to track sales records, authorize shipments and plan properly the shipment methods in line with the customer’s needs. This helps a business to grow and reach more customers by simplifying how you make sales. It makes it easier to make purchase orders and also improves the efficiency of the seller’s ability to account for stock and manage sales.
Creating a Purchase Order
In the purchase orders, one is able to view and edit the existing purchase orders, create new ones, and also import a new document from the existing documentation. When creating a new purchase order, the following steps are followed:
How to create Purchase Orders
From the App, launcher go to the ‘Create Purchase Order’ Tab.
Select type of purchase order and click ‘Next’ button.
Standard purchase order.
Enter all the details of the Purchase order such as Expected date, status, Employee requester, vendor, vendor contact, Vendor address, Purchasing company, Billing, and delivery address.
Check the ‘Ready to Receive’ box to receive the item.
Now click on the ‘Add Button’ to Add products to your purchase order.
Select the product from the list of products and enter the name of the product.
Add ‘quantity’ as the Amount of units that needs to be purchased.
Add ‘price’ for each unit in the Price box.
Add any description required in the Description box for the purchase order.
Click the ‘save’ button.
The purchase order will be created.
How to Inbound Purchase Order Logistic:
From the App launcher go to the ‘Inbound Receive/Logistics’ tab
Select the purchase order logistic and click on the ‘Receive’ tab
On the receive page select the version, location, or bin if required and click the ‘save’ Button.
Your purchase order is Complete.
Accounts Payable:
Go to the ‘Accounts Payable’ tab
You can see Vendor’s tab where all the vendors will be listed. You select the vendor and select the Purchase order related to that vendor to create a bill.
You can also directly select the Purchase order to create a bill against it from the purchase order tab.
Select the purchase order to create a bill against it and select the new bill option from the dropdown.
Create Bill page will appear. Enter the Vendor bill date and Bill number. Also, you can add more products to the same bill by clicking on ‘Add’ button.
On the Product line item add taxes and description if required and select the Account to capture the amount paid and click ‘Save’ button.
When Bill is created it will appear on Bill tab. Now match the bill by selecting the bill and click ‘match bill’ button on the top right.
On the match bill page select the line item to match and click ‘save’ button.
Now post the bill by selecting ‘Post’ option from the dropdown against that bill.
When it is posted then New voucher option appears. Click the new voucher to create a voucher.
Click the ‘save’ button to save the voucher.
Now approve the voucher by selecting ‘Approve’ from the dropdown button.
Click on ‘Make Payment’ option from the dropdown to make payment for that voucher.
On the pay, a voucher pop-up. Select payment account, date, reference number, and payment method and click ‘Save’. Now your payment is complete.
How to create Advance to Vendor Bill
An advance Bill to a vendor bill can be created if you need to make an advance payment to the vendor.
Go to the ‘Accounts payable’ tab
Then click on ‘bills’ Section
On the top right corner, you will see a button called ‘New Bill’
When clicking Create Bill. A pop-up comes up. Select the Advance to Vendor option from the pop-up.
After selecting the ‘Advance to Vendor option’. You will get a create Bill page.
Enter All the details mentioned on the page and click on the ‘Add’ Button to add products to your bill.
Select Product, Quantity, Amount and Select ‘Inventory’ Account and Add any Description required.
You can add more products by clicking on the ‘Add’ button again.
Click the ‘Save’ Button.
A Bill will be created and you can view it on the bills tab.
From the drop-down of that bill select ‘New voucher’
Click the ‘Save’ button. A voucher will be created.
Now from the voucher tab select the ‘Approve’ button to Approve the Bill. It will change from Red to green when approved.
Now from the dropdown select the ‘Make a payment’ Button to pay the voucher created.
Enter the details like payment account, method, and Reference number if required and click the ‘Save’ Button
A payment to that voucher will be done.
Print Barcodes
Print Barcodes page allows to Generate Barcodes for different objects with different BarcodeType and PageSize and Print them.
Products, FixedAssets, Sites, Accounts, and Contacts can have Barcodes and the system is capable of reading barcodes through a barcode scanner.
Navigate to App Menu > Print Barcodes
The object defaults to Product and all the available products are listed below with their Barcodes.
Select the object you want to generate barcodes.
Select the “Barcode Field and Label.”
Additional fields can be added to print by moving fields from all fields column to selected fields column.
Page size and Barcode Type can be managed.
The frame can be added to the Print page by turning on the Frame.
After making the required settings, select the Items you want to take, print barcodes and click “Preview PDF button.”
Stock Take
STOCK TAKE – Manage Variances in the Inventory
Stock Takes is the physical verification of the quantities and conditions of items held in an inventory or warehouse. This may be done to provide an audit of existing stock. It is also the source of stock discrepancy information.
Steps: –
Select the ‘Warehouse Management’ App from the App Launcher. Find the Stock Take tab in the Navigation Bar.
Or
Find the Stock Take tab from the App Launcher.
Figure 01 – Stock Take Tab
After clicking on the Stock Take tab, the system will take the user to the Stock Take home page where the user can see all the created Stock Takes records.
Figure 02 – stock take records
The user can use the search bar to search any Stock Take record.
OR
The user can use the scanner to find the Stock Take records.
The User can also filter out the Stock Take records that belong to the different Channels and the Site/Warehouse.
Figure 03 – search/filter stock take records
The user can update the created Stock Takes by clicking on the ‘Manage’ button or by clicking on the name of ‘Stock Take’.
Figure 04 – Manage/Update stock Take record
Note: –User can change the details of the Stock Takes record and can Add, Edit, and Remove the Stock Take Line items using the Manage functionality.
To create a new stock take record, the user needs to click on the ‘+ New’ button or scan the barcode of the NEW
Figure 04.1 – + New button
Figure 04.2 – Barcode of New button
After clicking on the +New button or scanning the barcode of the NEW button, the system will take the user to the new Stock Take creation page.
Figure 05 – Enter the variances
Stock Take details like Name, Channel, Site, Employee, Approver, StartDate and EndDate, Status, and Audit Period (Monthly) will be auto-selected.
If the Users want to change any records, they can manually select/change the records.
Also, the users can use scanner to scan the barcode of different channels and Sites.
Once the user selects the records from the detail section, the user needs to enter the ‘Stock In hand’ quantity, to adjust the stock for the required Stock Take Line items and click on the ‘Save’ button to create a new Stock Take record.
Note: –
To create the Stock Inward Line items or to increase the stock for any product, the user needs to enter more quantity than Available Stock in the Quantity in Hand See in the above screenshot, the user needs to do the same process we have done for Smart Watch and Camera Diffusion Filter – 3mm Acrylic product.
To create the Stock Outward Line items or to decrease the stock for a product, the user needs to enter less quantity than Available Stock in the Quantity in Hand
See in the above screenshot, the user needs to do the same process we have done Extension Board.
The user can Scan the Product Code directly or Scan the Batch/Lot Number or Serial Numbers to find the Products in the Line-Item section instead of the search bar.
If you want to do an Audit for the Stocks, select the AuditPeriod as ‘Quarterly’ or ’Yearly’, enter the actual quantities in the ‘Stock in Hand’, leave other products as it is and click on Save.
The system will keep/adjust the stocks for only those products whose quantity was entered in the Quantity in Hand field while creating the stock take, and the system will create the outward line-item records for the remaining products and Stock will decrease automatically.
Once the user clicks on the Save button the system will create the Stock Take record.
Figure 06 – Created Stock Take record.
Output Summary: Once the ‘Stock Take’ record gets created, based on the variance (entered Stock in Hand quantity) the Stock Inward and the Stock Outward records will be created.
Stock Transfer
Navigate to the App Launcher >Stock Transfer Tab.
Once in the Stock Transfer section, select the Source Site and the Cart associated to the source site.
Click the “New” button item to pick the items and transfer.
Select the Location from where the item is picked.
Select the Serial No/ Batch Code of the product and the product will appear automatically.
Enter the Quantity to be picked.
Click the Putaway tab and select the Destination Site.
Select the Location of the site to putaway the items.
Select the items in the action section and click the “Putaway” button to complete the stock transfer process.
Stock Run Rate
Stock Run Rate gives an overview of the inventory, it shows how much stock you have at any given time. The stock run rate tracks the finished goods as well as the raw materials. It tracks stocks at all levels of the production process, from net inventory before the supply/produces, to supply/ produce and projected inventory to demand forecast/ actual demand. The complete insight of stock run rate is generated with the help of a master production schedule created for every finished and raw material product. The MPS essentially provides the planning function, extracting actual supply and demand data, and forecasts to deliver timely and accurate production plans. The forecast gives manufacturers the ability to anticipate product demand. The MPS also includes quantities or lot size of the items to be produced, production duration, and quantities available to promise. You can create the master production schedule by following the steps below.
On the Product record, navigate to the related list and find Master Production Schedule.
Once in the Master Production Schedule related list, you can track the master production schedules already filled in.
To create a new Master Production Schedule, click the “New” button. You will be presented with a screen below.
Enter the name of the Master Production Schedule and select the Product for which the MPS is created.
Select the Version of the product and select the schedule period whether the production is scheduled weekly, monthly and yearly.
Enter the Start and End dates of the master production schedule.
Enter the Starting and Minimum Inventory Levels.
Select the Distribution Channel and enter the Lot Size of the production and enter the Default Demand Forecast.
Save the record to create a Master Production Schedule for a product.
Once the Master Production Schedule is created, you need to create an MPS line item. Based on the start and end dates of the master production schedule MPS line items are created.
Navigate to the related list of the master production schedule and find MPS Line Items.
Click the “Generate MPS” button located on the top right corner of the master production schedule record.
This creates the MPS Line Item records based on the start and end dates in the master production schedule.
To view the stock run rate report, navigate to the App menu > Stock Run Rate
The From Date and To Date defaults to the current years start date and current year’s end date.
The listed products can also be filtered based on the Distribution Channel.
Upon clicking Individual product, the system brings its MPS (Master Production Schedule) and ATP (Available to Promise) in a Monthly view.
The demand forecast describes the historical data or the user-specified default demand forecast data in the MPS.
The stock run rate report shows the Actual Demand and Net inventory calculated before the production of an item. The Net Inventory is evaluated every time the demand forecast is changed. The forecasting is based on the inventory levels specified on the MPS record.
You can also create purchase orders and manufacturing orders by clicking the Create Purchase Orders and Create Manufacturing Orders hover buttons available at the To supply/ Produce information.
You can view the Projected Inventory and Available to Promise quantities for each item. The calculations are time-based usually evaluated based on the scheduled period.
Stock-to-Fixed Asset
Stock-to-Asset is a unique functionality developed to help companies or teams that must fuse inventory management and asset management efforts. The feature reduces management overhead related to accounting for each process separately and delivers a simplified, operationally efficient tracking solution.
Combined Inventory and Fixed Asset Control
Depending on your business process, you may need to track certain items or products as both stock inventory and assets. For example, your products are assembled or received and then stored in your warehouse inventory. Those products will be issued to a customer and installed at the customer’s location, with a foreseeable useful life of over a year. Therefore, inventory levels must be adjusted and the product reclassified as a deployed asset that requires tracking and management.
Stock to Fixed Asset Benefits
This transaction or conversion allows you to search for a serialised inventory item issued to a customer or location and assign it an asset number and model number. The quantity and associated cost are automatically adjusted in the inventory database, and you can begin tracking pertinent asset attributes such as maintenance, warranty and location.
Transfer Order
The transfer order contains all the information required to execute the physical transfer of materials into the warehouse and out of the warehouse.
The ERP Mark 7 application enables users to create transfer orders for moving assets, inventory and employees between company stockrooms/sites, warehouses, and departments, respectively.
Transfer Order line items allow for the transfer of multiple Items on one transfer order. Transfer orders can be created for:
Inventory Stocks
Steps to create a Transfer Order for Stocks –
Create transfer orders through a Transfer Order Tab
Create a transfer order by navigating to the Order Management app > Transfer Orders tab> New.
Once on the Transfer Orders section, you can track the transfer orders already created and create new ones. The Transfer Order should be created in Requested Status.
To create a new transfer order, click on the “New” button and choose the transfer order record type
Inventory
Enter the From Channel, Site, Distribution Channel and Address. “From” fields are considered from where the Inventory is requested.
Enter the To Channel, Site, Distribution Channel and Address.
“To” fields are considered to where the Inventory is sent.
Select the Active checkbox to make the record active.
Enter the Requested and Expected Date.
Save the record.
Fields to note:
Field
Description
Transfer Order Name
Describes the name of the transfer order.
From Channel
The Channel from where the assets/stocks will be shipped.
From Distribution Channel
The Distribution Channel from where the assets/stocks will be shipped.
From Site
The site from where the assets/stocks will be shipped.
From Address
Location from where the assets/stock will be shipped.
To Channel
The Channel to where the assets/stocks will be shipped.
To Distribution Channel
The Distribution Channel to where the assets/stocks will be shipped.
To Site
The site to where the assets/stocks will be shipped.
To Address
Address to where the assets/stock will be shipped.
Requested date
Describes the date on which the transfer order was requested.
Status
Current status of the transfer order, such as Draft or Requested.
Delivery by date
It gives the Date by which the shipment will be delivered to To Site.
Ship Date
It gives the Date of Order shipped from the From site.
Expected Date
Describes the date by which the items are expected to be received.
Ready To Pick Pack
Make this checkbox true when Outbound Logistic is to be created.
Ready To Receive
Make this checkbox true when Inbound Logistic is to be created.
Creating Transfer Orders Line Items
Transfer order line items specify the exact Items included in a transfer order. A transfer order may contain more than one transfer order line item. Every line item contains an Asset/Product to transfer and the quantity to transfer.
The steps below explain how to create transfer order line items.
After creating a transfer order, click on the related tab and find the transfer order line items section. Click the “New” button to create a new transfer order line item.
Every transfer order line item is identified by its name; enter the name of the transfer order line item.
Enter an Item to transfer.
Enter the quantity requested.
Click the “Save” button to create a transfer order line item.
Field
Description
TO Line Item Name
Name used to identify the transfer order line item.
Transfer Order
Read-only field that describes the transfer order to which the transfer order line item belongs.
Quantity requested
Number of products requested by the transfer order line to be moved. For example, 12 chairs are requested to be transferred.
Product
The Product of Interest to be Transfered.
Transfer Orders Through an Outbound Logistics Tab
This scenario describes the Pick Pack Ship process by which transfer orders can be managed. The transfer order Items can be shipped/dispatched using the Pick Pack Ship process.
To make Transfer Order logistics available in Outbound Logistics tab the Transfer Order should be marked as Ready To Pick Pack.
Click on the Outbound Logistics tab and find the Logistic Orders that are ready to be Picked, Packed and Shipped as shown below.
From the list of available logistic orders, select the transfer order of interest. Click on “Pick” at the top of the page or below the Action button.
Select the logistic line items and click the “Pick” button.
Click the “Pack” tab and enter the package details, select the package list items and click the “Save” button.
Follow the Pick Pack and Ship process to transfer the stocks from one site to another.
Transfer Orders Through an Inbound Logistics Tab
This scenario describes the putaway process by which transfer orders can be managed. The transfer order logistics can be assigned to particular sites using the putaway option.
Transfer Orders logistics are available in Inbound Logistics when the Transfer Order is marked as Ready To Receive.
Click on the Inbound Logistics tab and find the Logistic Orders that are ready to be received as shown below.
From the list of available transfer orders, select the transfer orders of interest and click on “Receive” at the top of the page or the button that is next to the logistic order. Click the “Save” button to complete the receiving process.
Select the received transfer order line items and click the “Putaway” button, enter the location and storage bin to be assigned to the inventory product and click the “Save” button.
Following the putaway process, creating stock inward line items and filling in the other details, such as name, quantity and warehouse, as well as saving the record, will transfer the stocks to the assigned warehouse.
Fixed Assets (Equipment)
Assets are also known as fixed or capital assets and typically refer to an organisation’s valuable resources and equipment. These items have long-term business use and enable their owner to produce goods or perform services. Assets are tracked as unique items that are not consumed in production.
Because the word “asset” has a different meaning in the world of finance and accounting, the phrase “asset tracking” is used to indicate the monitoring of physical asset movement and condition, not the change in the monetary value of an intangible financial asset.
Systematically tracking assets is necessary across every industry to maintain accurate accounting records as well as real-time visibility of operations. For tracking purposes, each asset is tagged with a unique barcode identifier (e.g., make, model, serial number, etc.) and associated with a custodian or location.
Inventory Assembly
You can easily build assemblies or finished goods from a detailed Bill of Materials. The manufacturing module allows you to specify the raw materials or components needed to manufacture each finished good.
With operations that involve inventory for work-in-process and manufacturing, this functionality enables you to boost end-to-end traceability, productivity and control. In addition, you can access your product assembly inventory in Aqxolt ERP anytime, anywhere, so your team can better coordinate production machine usage and labour.
Manufacturing Benefits:
Streamline manufacturing process using barcodes
Increases flexibility for multiple product variations
Improves inventory control during manufacturing/process cycle
Saves time and increases manufacturing productivity
Increase Manufacturing Productivity
Create predictability, better coordinate manufacturing machine usage and labour, and track raw materials and components needed to manufacture each specific product accordingly.
Easily Assemble Your Inventory
The Inventory Assembly feature allows you to efficiently track product manufacturing and associated stock quantities and costs.
LOT
Products can be manufactured in a lot, having a particular lot number to the set of production. To make a product available in a lot, we have to make the product Lot Tracked.
Check Lot track checkbox on the product detail page.
Create a Material Batches/ Lots record in the related list of the product.
Click on Create “New.”
Add Batch Number, Date of Manufacture and Availability Date.
Make sure it is active and the product is selected.
BOM KIT
The concept of KIT is extensively used in manufacturing industries. The concept of BOM and KIT fall under different processes. KIT is a concept involving the sales process whereas BOM falls under the inventory process. KIT is an assembly of many finished items grouped together to be sold; its pricing is calculated for each finished item. KIT itself cannot be considered one stock; each finished item is stocked separately.
For example, Universal Furnitures manufactures various types of furniture. When the company sells its furniture, it sells a dining table, chairs and cushions as a KIT. Thus, the finished items are sold as a group rather than individually
Create Bill of Material (Components) Kits:
Navigate to the Products tab.
When creating a new product, make sure the “Is Kit” checkbox in the product record is checked.
Once in the Products tab, you can view the Products information already filled in and create a new Product record.
On the related tab, scroll through the related list and find Bill of Materials (Component).
Click the “New” button to add a new BOM.
From the Select Record Type pop-up, select Kit BOM and click the “Next” button.
Fill in the details, such as the Bill of Material Name, Type, Component Type and BOM Notes.
BOM (Product) auto populates.
Select the BOM (Component) and the Quantity required.
Check the “Active” checkbox and click on the “Save” button to create the BOM kit record.
Adding Product BOM Versions:
In the Related list tab of the Product, navigate to the BOM Version.
Click the “New” button. Choose the “Manufacturing” record type and Next.
Fill in the Version Code, Start Date and To Date.
The product is auto-filled. Fill in other details, such as Category, Process and Quantity.
The Type should be Assembly and the Status should be Certified.
Select the Active checkbox and Save.
Shipping a Kit
When a Sales Order is created with a Kit as a product and when the sales order is ready for shipment, the sales order will be available for stock dispatching.
Click on the “Stock Dispatching” tab and select the sales order that has a Kit as a Product.
Click Pick to see all the available sales order line items.
Select the sales order line item having the Kit as a product and click the Explode checkbox on top of the page. The Explode checkbox will split the Kit components into individual line items and the required BOM (Components) will be reduced from the inventory.
Click on the “Pack to pack” button, the Kit with all the components attached to it and click the “Save” button to create the package.
Follow the shipment process to ship the Kit (BOM) to its specified shipping address.
Kit Product
KIT is an assembly of many finished items grouped together to be sold; its price is calculated for each finished item. KIT itself does not qualify as stock; each finished product is stored separately. For instance, Universal Furniture manufactures a variety of furniture types. When the business sells its furniture, it sells a dining table, chairs, pillows, etc. as a KIT. So finished goods are sold as a group rather than individually.
Follow the steps below to configure a KIT product, its Version, and its Bill of Materials –
1.1 Kit Product setup –
1) Open the products list from the Apps Launcher.
2) Click the New button to create a new KIT item.
3) Select the product record type as a kit, enter the product Name, the status must be “Released“, and the Active checkbox must be checked. The TrackInventory and Allow back order checkbox should be Unchecked, Is Kit check box should be checked, Type should be Kits.
4) Enter other details if required and click on the Save button to create the Kit Product.
1.2 Version setup –
Open the Product record, find the Version object (related list) and Click on the New
Select the Record Type as Kit, enter the Version Code, Product will be selected by default, Active checkbox should be checked, Status should be certified, enter the Start Date and End Date.
Enter other details if required and click on Save button to create the Version record.
Note : If the product has the single version then Mark the version as Default, else then the default checkbox need not be enabled the user can select the required version in the order product.
1.3 Bill of Materials Setup –
1. Open the Product record, find the Bill of Material-related list, and click on the New Button.
2. Select the Record Type as Kit BOM, enter the Name of Bill of Material, main Product will be selected by default on the BOM (product) lookup field, select the created BOM Version, select the Bill of Material from the BOM (component) lookup, enter the Quantity, Active checkbox should be checked, Type Should be Primary, Status should be Certified.
3. Enter other details if required and click on the Save button to create the Bill of Material record.
Note: – If you want to add any alternate BOM, select alternate Bill of Material from the BOM(alternate) lookup field. Refer to the alternate BOM creation steps mentioned below.
2. Order and its MRP and Stock Outward Line-Item creation steps –
Find the Orders tab from the App Launcher and click on the name.
All existing orders will show up as a list.
3. Create a new order or choose an existing order from the list that contains a Kit product.
4. Check for the Price book associated with the Order
5. Verify each BOM component has the same price book as the order. For example if the Order has the Standard price book the BOM component set up above Tyre dresser should also have the ‘Standard price book’
Auto creation of Logistic using ‘Ready to Pick & pack’ Checkbox
1. Go to related list of order and search for the order products related list and open up your kit order product
2. Make sure that ‘IS kit’ checkbox is enabled and ‘Allocate Stock’ , ‘Inventory Tracked’ are disabled.
3. Enable ‘Explode’ checkbox and ‘Save’ to create the MRPs and stock outwards.
Note: If the BOM components have the required stock then it will create the stock outwards in the ‘Reserved’ status or in the ‘Requested Status’ and the ‘InSufficient BOM’ checkbox will be checked.
4. After verifying the MRPs and outwards in the reserved status, Enable ‘Ready to Pick & Pack’ checkbox on order to create logistics
Manual creation of logistics
1. Go to the related list of the Order and search for the Logistic-related
2. Click on the Create New button On the Logistics-related list and you will be navigated to the screen called Order to Logistics.
In the above screenshot you can see that there is a product with the name Car Care kit is a kit product and all the BOMS which are associated with this kit product are listed down the kit product itself.
3. You can manually select the Distribution Centre as shown in the above screenshot when you change the Distribution Centre each time you can see the live available stocks of each product at that particular selected Distribution Centre.
4. Once the desired Distribution Centre is Selected you need to select all the items to which you want to create logistics as shown in the screenshot and click on the Logistic button which is located at the bottom of the screen.
5. Clicking on the Logistic button will navigate you to the next screen which will list out all the logistics items which are going to be created.
6. Click on the Save button as shown in the above screenshot and it will create the Outbound logistics and its line items for both kit and other products.
7. Once the logistic is created the same time system will create both MRP records for kit BOMS and Stock outward line items for all the products.
Once the Logistics get created for all Order products, you can navigate to the Outbound Logistic page to ship the items to the Customer, refer to the Outbound Logistic guide.
3. Check points for Kit product set up –
Product Configuration:
Ensure the product is marked as ‘Is Kit’ and ‘Track Inventory’ is enabled.
Disable ‘Allow Back Orders’.
Version Setup:
Enter the required fields such as:
Active (checked)
Record Type (Kit)
Start Date
To Date
Type (Sales)
Status (Certified)
Default (checked if it’s the default version to be used when creating logistics)
BOM Setup:
Verify the BOMs have the correct details, including:
Record Type (Kit)
Active (checked)
BOM Component (the product which is the BOM)
BOM Version (the version set up in step 2)
Quantity
Status (Certified)
BOM Product (the product marked as Kit)
Price Book:
Ensure all BOMs have the same price book as selected at the product level. This can be verified by navigating to the product’s related list price books.
Ensure all BOMs have the required stock. – Make sure the all BOM component should have the stock in the correct site associated to channel assigned to order
Logistics Creation:
Once the above steps are verified, navigate to the order.
For manual logistics, click on the ‘Create New’ button under the logistics section in the order’s related list.
For automatic creation, select the ‘Explode’ checkbox available on the order product and enable ‘Ready to Pick and Pack’.
NOTE: It is important to note that for kit products we need to first check the explode checkbox on the order line item and then the ready to pick and pack checkbox on the order, in the same order.
Serial Number
Products and Fixed Assets can be serialized and Inventory can be stored for different products with different serial numbers.
Assigning Serial numbers to a product involves the following setup:
On the product detail page, make sure the product is active, status is released and serialize checkbox is checked.
In the Related section, go to Serial Number > Create New.
Add Name, Serial Number and Product.
Add Availability date and make sure available checkbox is checked.
Create Inventory Stocks and Stock Inward Line Item for the Product.
In the stock Inward line Item, choose the Serial Number we created.
Warehouse
Create a Warehouse Site
Navigate to the Order Management app > Sites tab.
Once in the Sites section, you can track the warehouse sites already filled in and create a new warehouse.
Click the “New” button to create a new warehouse.
Enter the name of the warehouse and select the Active checkbox to activate it.
Enter the Barcode of the warehouse and select the Primary Contact associated with the warehouse.
Select the type of warehouse, whether a site is of the type Warehouse, Plant or any other type.
Enter the organisation and business unit of the site and click the “Save” button to create the warehouse site record.
Location
Navigate to the tab related to the Warehouse site record. Find the list related to Locations.
Once in the Locations section, you can track the locations already filled in and create a new Location record.
Click the “New” button to create a Location record
Enter the Location Name and select the type of location, whether it is a Floor, Bin, Shelf or Cardboard.
Enter the Floor Number, Shelf Number, Aisle Number, Bay Number or Space Number.
Enter the Bin capacity, organisation and business unit details. Also, select whether the location holds scrap.
Select the Active checkbox and click the “Save” button to create the location record.
Storage Containers
Navigate to the tab related to the Warehouse site record. Find the list related to Storage Containers.
Once in the Storage Containers section, you can track the storage containers already filled in and create a new Storage Container record.
Click the “New” button to create a Storage Container record.
Enter the Storage Container Name and the Barcode of the container.
Select the Type of container, whether it is a Bin, Bottle, Bucket or Pallet. Enter the description of the container type in the Description field.
Select the status of the container and select the Active checkbox,
Click the “Save” button to create a Storage Container record.
DHL
Navigate to App menu > Credential Setup
You will land on the Credential setup page where you have Payment, Shipment and E-Commerce tabs.
Click on the Shipment Tab
Click New to add DHL setup record.
Fill in the DHL credentials and add in the URL to specify the test or live account and make the record active.
Make sure to use the name as DHL
Add the Shipper Details and click “Save.”
This creates a DHL record as shown above and the password/trans key gets encrypted.
With this setup, you can use the DHL services for shipment.
In the outbound logistics process while doing the Pick Pack Ship of the logistic orders, select the shipment type to be DHL while creating a Package.
Click on “Ship” to land on the DHL services page.
Click on “Get Rates” and select the suitable service.
Scroll down the services and click “Initiate Shipment” button
This will successfully ship the package.
Move to “Process Shipment” where you can see the “Shipment No” and “Shipment Status.”
Click “View Label” to generate the label and “View Invoice” to see the shipping invoice.
Click on “Cancel Shipment” to delete the shipment.
(Image)
Navigate to the “Track Shipment” tab to track the shipment.
Process and Process cycles
Process A process is a functionality intended to be used by manufacturing industries to produce finished products for sale. The production of products is typically in bulk quantities and is concerned with discrete units, bills of materials and the assembly of components.
Aqxolt ERP provides a complete solution and agility to succeed in managing entire business processes end-to-end. It lets you accommodate and manage a work center and plan workforce and machine required hours in a cost-effective manner depending on the complexity of the manufacturing process.
Creating Processes:
Navigate to the Manufacturing app > Processes tab.
Once in the Process section, you can track the processes already filled in and create new processes.
To create a new process, click the “New” button.
Select the “Manufacturing Process” record type and click the “Next” button.
Enter the process name, organisation, and contact details.
Select the type of process, enter the barcode and select the product for which the manufacturing process is built.
Select the workstation and work center; enter the required workforce and machine hours.
Enter the cost details of the manufacturing process and enter the process description; then click the “Save” button to create a manufacturing process.
Process Cycle: A process cycle is a sequence of steps required and a set of activities associated with the manufacture of finished products. It essentially starts with the customer requirement and ends with delivery of the required product.
It is a framework that describes how and from where the process starts. It also describes when and how the interrelated operations depend on each other. It describes the progress of each process cycle, helping the user estimate the overall time required to produce a finished product.
Creating a Process Cycle:
Navigate to the Manufacturing app > Processes tab.
Once in the Process section, select the process record to create the process cycle.
In the related tab, find the Process Cycle related list and click the “New” button.
Enter the Process Cycle Name, the Progress of the process cycle and the Description.
Select Previous and Next Process Cycle; then select the Workstation in which the process cycle will commence.
Click the “Save” button to create a process cycle.
Leave Management
Leave management systems helps employees to request time-offs from work, plan vacations and track holidays. Management can use the system to Approve or Deny leaves and maintain employee records.
ERP Mark 7’s Leave Management comes under HR Management App and encompasses Time offs, Leave entitlements, Available Allowance and Upcoming Holidays.
The Leave Management is specific to the employee and can be submitted for approval to the higher authorities. This helps you to track employee performance and reduce managerial time.
A Leave Management can be created in two methods:
From the record level
From the Leave Management Tab
From the record level
The steps below explain how to create a Leave request and move it from Draft status to Submitted.
1. Create a Leave request by navigating to Employee management app > Employee tab
2. Select the employee for whom a Leave request needs to be created from the list of employees
3. On the related list/tab scroll down to the Leave Requests (Employee) related list and click the ‘New’ button.
4. Enter the organization details, leave request name, select the leave entitlement and enter the approver details and leave request status. Administrators and other roles of an employee that act as approvers can see all the Leave requests submitted.
A Leave request can be in different stages which can be easily understood by the following statuses.
Click ‘Save’ to save the Leave Request
Timesheet Status
Action
Draft
The leave request that is in the Draft state can be edited to make some corrections. When in the Draft state the number of leaves will not be deducted from the total available allowance.
Approved
When the leave request is approved by the work agent/ higher authority then it is marked “Approved”
Submitted
Once the employee is sure about his entries then they leave request can be moved to the submitted state seeking approval
Rejected
When the approver rejects the Leave request, the leave request can then be available for corrections and resubmission.
Canceled
An employee had created the leave request but later decided to cancel it then the leave request can be in a cancel state and this will increment the available leave allowance.
Completed
When a Leave request is in the completed state then it signifies that the applied leave has been taken.
From the Leave Management Tab
Navigate to HR Management app > Leave Management tab
Leave Management tab has two views for viewing the records:
List View
Grid View
List View
On the Leave Management tab, you can view the list of all the leaves created in the list view.
To filter out the records based on a particular Fiscal year or time period, you can select Current FY, To Date, Previous FY, Next FY, Previous 2 FY and view the list of records.
To view the records which are draft, submitted, approved, rejected, or submitted for your approval or Entitlement/Holidays move to the respective sub-tabs.
To view the Time Off the record, click on the record name.
To edit the Time Off record, click on the edit icon and save the record after necessary changes are done.
To delete the Time Off the record, click on the delete icon and click on ok.
Grid View:
On the Leave Management tab, you can view the list of all the leaves created in grid view.
To filter out the records based on a particular Fiscal year or time period, you can select Current FY, To Date, Previous FY, Next FY, Previous 2 FY and view the list of records.
To view the records which are draft, submitted, approved, rejected, or submitted for your approval or Entitlement/Holidays move to the respective sub-tabs.
To view the Time Off the record, click on the record name.
To edit the Time Off the record, click on the edit icon and save the record after necessary changes are done.
To delete the Time Off the record, click on the delete icon and click on OK.
Fields to Note:
Name
Description
Time Off
This indicates the already taken leaves
Available Allowance
Indicates the total available leaves for the calendar year.
Booked
Indicates the number of booked leaves (In Approval stage)
Upcoming Holidays
Indicates about the National/Organisation-defined holidays for the calendar year.
Book Time off
This is to create a new leave request
Click the “+Time Off” button to create a new Time Off record for the logged-in user.
Enter the name for the Time Off the record.
Every Time Off will be in “Draft” status until the user is ready to submit it to the approver. Select the approver who is authorized to review the Time Offs and decide whether to approve or reject the Time Off.
Enter the Start Date and End date which calculates the number of days the Time Off is being created.
Select the Type of Time Off indicating whether type of leave you’re opting for.
Mention the reason for the Time Off being created and clicking on save creates a record with Draft status.
Clicking on the submit button submits the leave request record for approval.
Draft/Submitted Leaves
All the leaves of status Draft and Submitted will be listed under the Draft/Submitted/Rejected Leaves section as shown below
Submitted Leaves cannot be edited or deleted, the leaves with Draft and Rejected can be Deleted or edited for submission.
Approved/Rejected Leaves:
Once the Leave is approved or rejected by the approving authority or the Approver, it will be listed under the Approved/Rejected Leaves section.
Submitted for your Approval
If you have employees working under you and you are the Approval Manager of their leaves then all the submitted leaves will be listed under the Submitted for your Approval section as shown below.
Leave Entitlement
The Leave Entitlement section indicates all the leaves entitled by the organization such as Casual leave, Sick leave, Maternity, etc, and others that can be defined here and the number of days assigned for each leave type.
The Holidays section indicates all the National/Organisation level holidays defined for the current fiscal year, next fiscal year, previous fiscal year, and previous 2 fiscal years.
RMA
A Return Merchandise Authorization (RMA) is part of the process of returning a product to receive a refund, replacement or repair during the product’s warranty period. Returned merchandise requires management after the return and has a second lifecycle after the return.
Creating an RMA
An RMA can be created using one of two methods –
From the Sales Order tab (record level)
From RMA tab
From the Enterprise Point of Sale tab
RMA from Sales Order Tab:
Select the sales order whose stage is closed to return the purchased product as shown below.
In the related tab, find the Return Merchandise Authorisation and click the “New” button.
Enter the RMA code and click the “Save” button to create the RMA record.
In the related tab, click the “New” button to create RMA line item.
Enter the organisation details.
Fill in the RMA number, the sales order line item number, and the quantity to return. Mention the reason for the return.
Select the Authorise, Is Closed and Ready to Receive checkboxes.
Click the “Save” button to create an RMA line item record.
RMA through Process Return page:
The RMA must be associated with a sales order and a shipment. This ensures that returns are permitted only for those items that have been shipped. The return process includes the ability to create the shipment flows and tracks those returns in the system.
Select the sales order record to return the purchased products.
Click the “RMA” button; this will navigate to the RMA page as shown below.
This will navigate to the RMA page as shown below.
The system auto-fetches the sales order details and customer details.
Click the edit icon and enter the desired return quantity and the reason for return.
Select the return status and click “Save” to create a new return package.
Fields to note:
Field
Description
Added Back to Inventory
A check box that indicates the RMA line item has been returned to inventory for resale
Batch/Lot Code
A code assigned to shipment of RMA
RMA Line Item Name
Describes the name of the RMA line item
Sales Order Line Item
Describes the Original Sales Order Line Item the product for the Customer RMA was purchased
Return Merchandise Authorisation
Describes the name of the RMA to which the RMA line item belongs
Return Reason
Describes the reason for the item that is returned; essentially helps identify issues or problem with the returned item
Return Status
Provides the status of the product being returned
Total Deduction
The amount of the product that has been deducted
Site Item Inventory Stock
Specifies the total amount of inventory in the site
Number of Items In Quality Check
Specifies the total number of returned items in the quality check process
Number of Items to Re-sell
Specifies the total number of returned items that are sellable
Number of Items Discarded
Specifies the total number of returned items that are discarded
RMA through Enterprise Point of Sale Tab:
Every RMA is associated with a sales order; this generally includes identifying the order or invoice from the original purchase. The return may involve items that are damaged or simply not wanted. Depending on the situation, the returned item can be re-stocked or discarded. The system allows for a refund of the returned item in the form of either a credit note or loyalty points. The Enterprise Point of Sale tab of ERP Mark 7 helps the sales rep handle the entire sales journey to the return process without having to switch to multiple setups.
For example, say there was an order from Fiona Pinto, who would like to return an item from sales order number 000014. An RMA is created to complete his return request and a refund record (credit note) is created for the customer.
Click on the Enterprise Point of Sale tab and fetch the customer and sales order details from the system to initiate the RMA. Refer to the sales order from the Point of Sale Tab section for more details.
Click on the “RMA” button; on the right side of the ePoS as shown below.
The system fetches all the sales order line items.
Select the sales order line item to return and enter the quantity to return. Specify the reason for the return.
Select the expected date and status of the RMA, select the authorise checkbox and click the “Save” button to create the RMA line item in the system.
Income Statement
The profitability of a company for a specified period of time is shown on an Income statement. The business can choose the time period the statement covers. It is an organization’s ability to record net profit or loss over a specific accounting period. The income statement provides an overview of the organization’s sales and net income. Aqxolt ERP covers both the operating and non-operating portions of the income statement. The operating part of the income statement discloses records about expenses and revenue that are directly associated with regular business operations, whereas the non-operating part of the income statement discloses records of expenses and revenue that are not directly associated with regular business operations.
The income statement is important because investors can use it to analyze the profitability of the organization. It plays a significant role in making decisions about whether to invest in the organization.
View/Download an Income Statement
Navigate to the Finance Management app > Income Statement tab.
Once in the Income Statement tab, you can track/view the organisation’s revenue and expenses for the current fiscal year.
The user can use the date filter to view the income statement for a specific period of time to fetch the revenue and expense details for the specific period of time.
Aqxolt ERP allows users to download the income statement in a PDF/Excel format simply by clicking the “Download Excel/ Download PDF” button.
Aqxolt ERP allows the user to use the income statement for comparison. It is used to compare fiscal year data and fiscal quarter data. It typically allows users to compare the present year with two years of historical data.
On the Income Statement tab, click the “Compare Income Statement” sub tab.
To compare the data, from the filter select the fiscal year or fiscal quarter options and the date.
The system will display the tabular data for the selected filter criteria.
To download the tabular comparison data, click the “Download PDF” button.
Aqxolt ERP provides the user with accurate chart data based on the selected filter criteria. Click on the links on the right-hand side next to the chart to view the chart data Annually, Quarterly and Monthly.
Booking Kare Documentation
Enterprise-Grade Event , Appointment Booking And Scheduling Software
Enterprise-Grade Event , Appointment Booking And Scheduling Software
Overview
Overview
Booking Kare comprises two major modules
1. Event Module
Event Module comes with features that help Event Planners, and Organiser to organize events efficiently on a large scale with online payment options. Event planners may easily email personalized invitations to hosted events to any and all contact list members in case of the event is canceled or postponed.
Event Booking Module Includes Features Such As:
Event Builder
Create an event
Event zone
Venues
Create Product Service Details
Tickets
Membership
Speaker
Agenda
Logistics
Sponsorship
Adding and Inviting Guests
Send invites to accounts, Contact, and users
Check-in and Walk-in registrations
Manually check-in
Kiosk Check-in
Scan Bar code Check-in
Event Booking
Calendar
2. Appointment Module
The appointment Module comes with a user-friendly appointment booking system that lets your client view the expert’s real-time availability and quickly book an appointment with the expert. The client can book appointments from anywhere, anytime using any device. Upon appointment booking, BookingKare lets you maintain customer information and appointment history for easy reference. Appointment Booking Module Includes Features Such As:
Appointment Booking
Planner
Teams
Team members
Location
Membership Program
Product/Service
Price book
Work Planner
Resource group
Resource
Resource Requirement
Shift Planner
Time management
Calendar
Queue management
Workbench
Room Reservation
Logistics
Payments (Authorize.net,Paypal,Chase payment)
System Requirements
Roll out Steps:
Preparation involves all of the planning you need to do before you can begin using Booking Kare.
Identify key users of the system
Add licenses
Identify all of the users who will be using the BookingKare System and make sure you have the appropriate number of licenses.
Review all the technical requirements
Requirements to use Aqxolt BookingKare in a system
Operating System
All you need is a computer that can run a web browser. It doesn’t matter what type of hardware or operating system you’re running.
Browser
Google Chrome™, the most recent stable version Mozilla Firefox®, most recent stable version Microsoft Internet Explorer versions 9, 10, and 11 Apple Safari® versions 5. x, 6. x and 7. x on Mac OS X
Internet Connection
Salesforce is designed to use as little bandwidth as possible so that the site performs adequately over high-speed, dial-up, and wireless Internet connections.
Requirements to use Aqxolt BookingKare system with payment gateways
Payment Gateways
PayPal, Authorize.net,Chase payment.
Installation Guide
Follow the steps if you are a new user.
The quickest way to assess if BookingKare is the right fit for your organization is by creating a free trial. You’ll immediately be taken to a salesforce registration page, where you need to fill out the form and start a free trial. On the app exchange BookingKare listing click the “Get It Now” button and login to the salesforce free trial instance and from here you can start to evaluate BookingKare in depth.
Installing BookingKare in your Salesforce instance
Choose the instance on which you want to install and click.
Step 2
Confirm the installation details and click the “Confirm and Install” button.
Step 3 Licensing Your users for BookingKare
Navigate to Setup> Apps > Packaging> Installed Packages.
In the list of installed Packages find the BookingKare app and click the “Manage Licenses” option under the actions section.
Click on the “Add User” button in the Licensed User section.
Select the user from the Available Users section; click the “Add” button.
Validate Your Installation
Click on the app launcher and notice that the “Appointment Booking” and “Event and Expert Booking” apps are available under all apps.
Select any of the applications from the App Launcher and notice its available Tabs.
Community Setup
Communities Overview Communities are a great way to share information and collaborate with people who are key to your business processes, such as customers, partners, or employees. Whether you call it a portal, a help forum, a support site, HR central, or something else, an online community is a great place to connect with the important folks in your life in a new and different way. Use easy point-and-click branding tools with ever-evolving Lightning templates or go with Visualforce to create branded collaboration spaces. Step 1
Enable Communities
Enabling Communities is the first step to creating communities.
Note: After you enable Communities, you can’t disable it. If your org’s access to Communities is suspended for non-payment, all your communities are deactivated, including the communities in Preview. When Communities is re-enabled, all communities are inactive. You can activate these communities, but you can’t return to the Preview state.
1. From Setup, enter Communities Settings in the Quick Find box, then select Communities Settings.
Note: If you don’t see this menu, Communities might not be available for your Salesforce org. Contact your Salesforce account executive.
2. Select Enable communities. 3. Select a domain name for your communities, and click Check Availability to make sure that it’s not already in use.
You use something recognizable to your users, such as your company name. The Communities domain name is the same for all communities. You create a unique URL for each community when creating it by entering a unique name at the end of the URL. For example, if your Communities domain name is UniversalTelco.force.com and you’re creating a customer community, you can enter customers to create the unique URL UniversalTelco.force.com/customers. Important: You can’t change the domain name after you save it. You can designate a custom domain by entering it in on the Domain Management page. From Setup, enter Domains in the Quick Find box, then select Domains. 4. Click Save.
Step 2 Create Communities
To create a community, from Setup, enter All in the Quick Find box, select All Communities, and then click New
Step 3 Community Template.
The Community Creation wizard opens with several templates for you to choose from. If you have Lightning Bolt solutions available in your org, they are listed in the wizard.
To see more information about a template, select it. Customer Service
A powerful, responsive self-service template with multiple prebuilt theme options. The Customer Service template lets users post questions to the community, search for and view articles, collaborate and contact support agents by creating cases. Supports Knowledge, Chatter Questions, and cases.
Step 4 Experience Builder.
Select the template that you want to use.
Read the template description and key features, and click Get Started.
Enter a community name.
Note: If you’re creating multiple communities, differentiate the beginning of the community name. Community names are truncated in the global header drop-down menu. Users can see up to 32 characters of the name, and names include the status. Make sure that the visible part of the name allows users to distinguish between multiple communities.
For URL, enter the name of your community.
This name is appended to the Communities domain that you created when you enabled communities for this org. For example, if your Communities domain name is UniversalTelco.force.com and you’re creating a customer community, you can enter customer to create the unique URL UniversalTelco.force.com/customers.
Note: You can create one community that doesn’t have a custom URL.
You can change your community name and URL after the community is activated, but users aren’t redirected to the new URL. So be sure to inform your community members before changing the name or URL.
Click Create.
The community is created in Preview status. Now you’re ready to build and customize or manage and moderate your community.
When you create a community, Salesforce supplies default pages for login, self-registration, change password, forgot password, and your home page. These pages are based on which template you use to create your community. You can customize these default pages at any time in the Login & Registration page of the Administration workspace.
IMPORTANT After you create a community, your profile is added to the list of profiles that have access to the community. Then all users with this profile can log in to the community after it’s active. If you don’t want all users with your profile to have access to the community, remove the profile, and give yourself access through a different profile or permission set. Then create a profile specifically for your community users.Step 5 Access Experience Workspaces
The streamlined Experience Workspaces centralizes community moderation, building, and administration. Access Experience Builder, administration, dashboards, and other features from one place.
From Setup, enter Communities Settings in the Quick Find box, then click Communities Settings.
Enable Experience Workspaces under Community Management Settings. Click Save.
From Setup, enter All Communities in the Quick Find box, then click All Communities. To access a community’s workspace area, click Workspaces next to its name.
Manage Your Community with Experience Workspaces Experience Workspaces is your one-stop-shop for building, setting up, and monitoring your community. You can access Experience Builder and Administration workspaces to manage your community’s setup and branding. Community managers can view dashboards for groups, members, feed activity, and license usage, and manage the community’s reputation system. Moderators can see which items have been flagged for review.
Note: You can customize your community at any time, but if you plan on making major changes, we recommend deactivating the community first.
To enable Experience Workspaces, in Setup, enter Communities Settings in the Quick Find box. Under Community Management Settings, select Enable Experience Workspaces. Experience Workspaces is enabled by default for all communities.
To go back to Community Manager, in Setup, enter Communities Settings in the Quick Find box. Under Community Management Settings, deselect Enable Experience Workspaces.
Builder
Experience Builder lets you brand and design your community pages. Create and customize pages, modify or add Lightning components, customize the community’s navigation menu, and manage page-level settings as shown in the screenshot below.
IMPORTANT If you’re an administrator and accidentally remove yourself from a community, you can’t access the Administration settings in Experience Workspaces. To add yourself back to the community or make other membership updates, use the API.
A community for Event Booking
For setting up a community for Event booking, follow the same 5 steps of community setup.
After reaching the builder section. You can create an Event booking component by clicking on the component option.
When clicking on the component button you find the list of components that can be added to the builder page.
Search for the Event booking component and drag it onto the builder page.
Note: If you already have the template components on the builder page, you can delete them from the delete icon of each section before adding your own component. When the component is on the page, it will appear as below.
Similarly, you can add as many components as required on the page and manage the page structure from the page structure button on the left.
There is also a Setting Button-through which you can change the setting of the community page and find information regarding that. Shown below
In the setting, you have Public access check box, tick this box when you want the public to access this community.
You can give a title for the community in the Community Title box.
Published Status – This is a link from where customers can access the Event Booking Community.
Guest User Profile – This is the profile link of guest users from where you can authorize or unauthorize the user.
If Users have no access to the components, this can be managed by clicking on Event Booking Profile from the settings.
Note- Access can be given from profiles and sharing settings. In profiles make sure all the objects, fields, and tabs have access to the User. In sharing settings, check for any restrictions on the Guest user access.
When completed, click on the Preview button to view the page before saving to make more changes if required.
Click Publish button on the top right to save and publish your community.
You can also select the View mode button to set it for phone, Tablet, and Desktop.
You have now created your Event Booking Community.
Follow Step 6 for more information on managing your community.
A community for QR Check-In
For setting up a community for QR Check-In, follow the same 5 steps of community setup.
After reaching the builder section. You can create a QR Check-In component by clicking on the component option.
When clicking on the component button you find the list of components that can be added to the builder page.
Search for the QRcodeCheckInRegister component and drag it onto the builder page.
Note: If you already have the template components on the builder page, you can delete them from the delete icon of each section before adding your own component. When the component is on the page, it will appear as below.
Similarly, you can add as many components as required on the page and manage the page structure from the page structure button on the left.
There is also a Setting Button-through where you can change the setting of the community page and find information regarding that.
In the setting, you have Public access check box, tick this box when you want the public to access this community.
You can give a title for the community in the Community Title box.
Published Status – This is a link from where customers can access QR Check-In
Guest User Profile – This is the profile link of guest users from where you can authorize or unauthorize the user.
If Users have no access to the components, this can be managed by clicking on QR Check-In Profile from the settings.
Note- Access can be given from profiles and sharing settings. In profiles make sure all the objects, fields, and tabs have access to the User. In sharing settings, check for any restrictions on the Guest user access.
When completed, click on the Preview button to view the page before saving to make more changes if required.
Click Publish button on the top right to save and publish your community.
You can also select the View mode button to set it for phone, Tablet, and Desktop.
You have now created your QR Check-In
Follow Step 6 for more information on managing your community.
A community for Appointment Booking
For setting up a community for Appointment Booking, follow the same 5 steps of community setup.
After reaching the builder section. You can create an Appointment Booking component by clicking on the component option.
When clicking on the component button you find the list of components that can be added to the builder page.
Search for the Appointment Booking component and drag it onto the builder page.
When the component is on the page, it will appear as below.
Note: If you already have the template components on the builder page, you can delete them from the delete icon of each section before adding your own component.
Similarly, you can add as many components as required on the page and manage the page structure from the page structure button on the left.
There is also a Setting Button-through where you can change the setting of the community page and find information regarding that.
In the setting, you have Public access check box, tick this box when you want the public to access this community.
You can give a title for the community in the Community Title box.
Published Status – This is the link from where customers can access Appointment Booking
Guest User Profile – This is the profile link of guest users from where you can authorize or unauthorize the user.
If Users have no access to the components, this can be managed by clicking on Appointment Booking Profile from the settings.
Note- Access can be given from profiles and sharing settings. In profiles make sure all the objects, fields, and tabs have access to the User. In sharing settings, check for any restrictions on the Guest user access.
When completed, click on the Preview button to view the page before saving to make more changes if required.
Click Publish button on the top right to save and publish your community.
You can also select the View mode button to set it for phone, Tablet, and Desktop.
You have now created your Appointment Booking
Follow Step 6 for more information on managing your community.
Step 6
Set the Default Number of Community Roles Set the default number of roles created when adding partner or customer accounts to communities. These settings apply if your community is set up with Partner Community, Customer Community Plus, or Lightning External Apps Plus user licenses. The limit is three roles; the system default is one. For example, if three partner roles are currently created when an account is enabled for your community–Executive, Manager, and User–but you need only the User role for new accounts, you can reduce the number to one role.
1. Use Super User Access to grant specific users access to data owned by other users in their accounts.
From Setup, enter Communities Settings in the Quick Find box, then select Communities Settings.
Select the number of roles per account.
If you’re using Partner Community licenses, set the Number of partner roles.
If you’re using Customer Community Plus licenses, set the Number of customer roles.
Click Save.
Note: This setting does not affect the number of roles for existing accounts.
Step 7
Customize Communities Update basic community settings like your community URL, community name, members, login options, and general preferences in the Administration section of Experience Workspaces or Community Management. You can customize your community at any time, but if you plan to make major changes, we recommend deactivating the community first.
Open Experience Workspaces or Community Management.
Click Administration, then select what you want to customize.IMPORTANT: The options available in Community Management or Experience Workspaces are based on your community template selection, permissions, and preferences. For example, if your community doesn’t use topics, you don’t see the Topics section. Some options in the following list might not appear in your community by default. To display all sections, go to Administration | Preferences and enable Show all settings in Community Management or Show all settings in Experience Workspaces.
Members
Tabs
Branding
Login & Registration
Emails
Pages
Preferences
Settings
To share the community with stakeholders while it’s still in Preview, copy the URL displayed on the Administration | Settings page.
By sharing your community in Preview, you can get useful feedback to incorporate before going live. Also, by having early members post, comment, and share records, your community appears active when members log in to the community for the first time.
Keep in mind that you must add users as members of the community before you can share the community URL.
After you finish customizing your community, activate the community to make it available to members. If you enable welcome emails when you activate them, a welcome email is sent to all members. If users are new portal users, their welcome email includes their username and password.
1. Share a Link to Your Community. You can allow members to preview your community before making it active. You can only share the link for a preview community with users who were added as members of the community. Sharing a link to a community in Preview status allows you to easily gather stakeholder feedback. The community functions just as it will when you make it active, so stakeholders can try out all functionality and review your branding and customizations. Additionally, you can take advantage of having early members who can post, comment, and share records so that members enter an active community from their first login.
Open Experience Workspaces or Community Management.
Click Administration | Settings.
Copy the URL displayed on the page and share it with your stakeholders.
Keep in mind that you can only share the URL with users who you added as members of the community.
2. Update Your Community Settings. Manage your community name, description, community status, and community template all from one location. You can change your community name and URL after the community is activated, but users aren’t redirected to the new URL. So be sure to inform your community members before changing the name or URL.
Open Experience Workspaces or Community Management.
Click Administration | Settings.
Edit your community settings as needed.
Select the pencil icon next to the community you want to change, and make your changes. You can change your URL from this page. However, if you’ve already activated your community, users aren’t redirected to the new URL.
Manage the status of your community.
Change your community template.
3. Deactivate a community.
You may want to deactivate a community if you need to:
Add or remove members
Add, remove, or change the order of tabs
Change the colour scheme
Change the community URL
Open Experience Workspaces or Community Management.
Click Administration | Settings.
Click Deactivate.
Your community is inactive and offline.
When a community is inactive, members still see it in the menu, but can’t access it unless they have the “Create and Set Up Communities” permission.
4. Enable optional community Features. Enable other optional features in your community such as user nicknames, guest access, private messages, direct messages, content flagging, and reputation levels.
To use these settings, Chatter must be enabled in your organization.
Open Experience Workspaces or Community Management.
Click Administration | Preferences.
Change the desired settings.
Click Save.
Step 8Community App
Users can also access the community site from the app launcher where the community app will be created with the name of that community that you create. As shown on the screen below:
On clicking on the community app that you created you will be redirected to a similar site as shown in the screenshot below:
Event Scheduling & Booking
The event booking and planning application is designed for event management companies that require streamlined operations and overall efficiency.
Give your customers a seamless scheduling/booking experience
Customize the look and feel match exactly to your company’s brand
Check-In Check-Out Mobile App
Booking Kare – Check-In/Check-out
Booking Kare is an application to process Check-In/Checkout flow i.e., checking in the clients into an event/appointment and checking them out from an event/appointment.
This app also provides an easier way for the users to check In and Check out using QR-Scanner /Barcode scanner for the members registered to any events or appointments.
How to install Booking Kare Application.
The Booking Kare application can be installed from the App Store or Play Store like any other application on your Tablet, iPad, or Phone.
Open the application and enter the username and password of your salesforce org.
Note: Log in with credentials that have registrations booked for events/Appointments.
The below screen appears when Logged in successfully.
How to scan a Barcode/ QR code to check-in customers for Events or Appointments.
The ‘Registrations’ tab shows the registrations made for the particular event or Appointment.
2. Once the registration is booked, the customer receives an email with the ticket/slip which they must bring with them on the day of the event or appointment.
Enter the Number of People attending
3. Scan the barcode/QR code on the ticket.
4. The customer is checked in automatically and the ticket checker can verify details on this page.
5. Click the ‘Home’ Button to Scan the next person.
6. Click on the Booking Details tab to view Event/Appointment details.
7. You can also check out the same person from this page by clicking on the ‘Check out’ button.
How to scan a Barcode/ QR code to check out customers for Events or Appointments.
Click on the ‘Check out’ Button on the Home Page and scan the code.
Note: The person should already be ‘checked In’ before using check-out process.
2. The customer is checked out successfully and click on home to scan the next person.
How to scan a Barcode/ QR code to check In/check out customers for Events or Appointments if they do not have the ticket/slip.
From the home page Enter the registration number from the booked Event/appointment.
2. Click on the ‘Check In’ button. The person will be checked in Successfully!
If the Registration number is not available or lost
Enter the ‘Last name’ and one of the following ‘Email or phone’
3. Click on the check-in Button the person will be ‘checked In’ successfully!
How to Check out the customer who does not have the ticket/slip.
From the home page click on the ‘check-out’ button
2. Enter the details like registration number or last name and phone/Email.
3. Click on the ‘Check-out Button.
4. The person is checked out Successfully!
Check-In/Check-Out
check-in/CheckOut is a flow for checking the clients into an event and checking them out from an event. This flow provides an easier way for the users to check in and check out the members registered for a particular event.
CheckIn/CheckOut
The users can be checked in or checked out from an event either
Using the CheckIn/CheckOut button from the Event Record page.
Using the CheckIn/CheckOut tab.
Using the CheckIn/CheckOut button from the Event Record page:
Navigate to the App menu and go to Events tab and click on a particular event to view the event details in a record page as shown below.
Check for the registrations with repsect ti ths event and click on the “CheckIn/CheckOut” button.
This navigates to the CheckIn/CheckOut tab where an user is directly navigated to view the registrations of an event as shown below.
Search for a particular registration by user name or its registration ID using the search box provided.
You can also view the count of total registrations and the number of guests awaiting, checked in and checked out members of an event by clciking on the cards displayed at the top of the page.
The system also provides an option to print the registration or the guest list using the print button at the top right corner of the page.
This navigates to a printable format of the list in PDF form as shown below.
You can either checkin the members manually or by scanning the QR using the scanner.
Select a member/ registered user whose status is booked to checkin to the event by clicking on the “Check In ” button.
Once an user is checked in to the event, he/she can be checked out anytime from the event using the “Check Out” button. An user who is checked out fron the event cannot checked in again to the same event.
Using the CheckIn/CheckOut tab:
Navigate to the App menu and click on the CheckIn/CheckOut tab where we can view the registrations related to a particular event.
The system pop’s up a window with a list of all the active events which has the registrations as shown above.
The system provides an option to search for the events using the search box.
Search for a particular event from the list of events in the popup.
This navigates to a page where the list of registrations particular to an event is listed down as shown below.
Search for a particular registration by user name or its registration ID using the search box provided.
You can also view the count of total registrations and the number of guests awaiting, checking in, and checking out members of an event by clicking on the cards displayed at the top of the page.
The system also provides an option to print the registration or the guest list using the print button at the top right corner of the page.
This navigates to a printable format of the list in PDF form as shown below.
You can either check in the members manually or by scanning the unique QR code using the scanner.
With a unique family QR code, the system makes it easier to check in all the members of a family by simply scanning their family QR Code.
Select a member/ registered user whose status is booked to check in to the event by clicking on the “Check-In ” button.
Once a user is checked in to the event, he/she can be checked out anytime from the event using the “Check Out” button. A user who is checked out from the event cannot be checked in again to the same event.
Event Builder
Event Module setup
Start planning and organising a single day or a multi-day event easily, make common customizations like adding zones, tickets, venues and more. Configure registrations to be free or paid with complex pricing rules. Configure discounts and taxes easily with various rules. Configure sponsors, speakers, and agendas and give more insight into the event to manage time with BookingKare’s Event Builder. With the Event Builder, you can reduce administration time and hassles associated with data integrity or booking conflicts.
Once you are in the Event Booking app, you can create your first event by following these steps:
Step 1
Create an event
Click on event builder tab and click on event details and enter the following information like enter the name of the event, select event as event type
Enter the Start Date /time and the End Date /time of an event.
Enter the Registration Start and End Dates, Check-In Start and End Dates and Ticket Sales Start and End Dates.
Select the organiser and Location of the organiser
Enter the Maximum Registrations and Entry Fee if any for the event.
Select the membership program and description of the event
Select the published checkbox, this option lets you add the event in the portal site.
Select the Type and Status of the event and select the Allow guest registrations checkbox, this option lets you add registration from the kiosk.
Enter the Invite Message and Registration Instructions of the event.
Click the Save button to create an Event record.
Once you have created the event you can start adding the zones where the events are held, so let’s start creating the zones.
Step 2
Event zone
Event zones are nothing but events that can occur in multiple locations based on their availability within the region.
Create an event zone
Click the Zones tab of the event builder from the menu bar on the left-hand side.
Click on Add button to create the zones
Enter the Name of the zone and select the Type of zone being created.
Enter the Start and End dates of the event and Registration dates.
Enter the Maximum Registrations and set the maximum registrants at each zone, enter the Descriptions applicable for the zone
Select the Show Day Slots fields if you want to display the days during booking.
Click the Save button to create a zone for an event.
Step 3
Venues
Configure venues, the place where your event is held. When you create a location and assign it to the zone that location information will be displayed on the event detail page.
Create a venue
Click the Venue tab from the menu bar on the left-hand side.
Click the Add button to create a new location.
Enter the Name of the venue and Address details
Select the event zone and check the active checkbox
Enter the description of the location
And click on the save button to save the venue record
Step 4
Create Product Service Details
Click the product details tab from the menu bar on the left-hand side.
Click the Add button to create a product.
Enter the name of the product, Adult price, and child price.
Enter the image URL or you can upload the image from the system.
Enter the description of the product and check the active checkbox
And click on the Save button to create a product record.
Step 5
Tickets
Tickets are nothing but a selling price of an event. And also we can control the number of persons to get register for an event. By using this concept we can distinguish different prices for each type of tickets for adult and child as well.
Create a ticket
Click the Tickets tab from the menu bar on the left-hand side.
Click the Add button to create a new ticket.
Enter the Name of the ticket and select the Product to fetch the list price and taxes for both adult and child automatically from the price-book entry of the selected product.
Enter the Total Quantity, Adult, and Child Quantity, this ensures the number of registrations allowed for an event.
Enter the Adult and Child List Price and Tax Percent manually if the product is not selected.
Select the Zone for which the ticket is created is assigned and select the Active checkbox to make the ticket active for use for the selected zone and event.
Enter the Image URL and select the Show Child checkbox, this ensures the child details are captured in the registration and the ticket price based on the child list price.
Select the Ticket waiting list checkbox; with this option, you will be allowing registrations even when the number of registration has reached the capacity of the event. The registrations created after the capacity is reached are the registrants with the waiting list status.
Enter the Ticket Sale Start dates and End dates, enter the Instructions associated with the ticket and upload image relevant to the event.
Click on the “Save” button to create a ticket for the event.
Step 6
Membership
Click on the ticket tab related list click on Membership tab
Click the Add button to create a new membership record.
Enter the value and select the status.
Select the start and expiration date of the membership
And click the “Save” button to create a membership for the event.
Step 7
Speaker
Speaker is a guest of the event, who speaks formally before an audience regarding some of the major things regarding the event and why it has been organised and expressed his ideas towards the particular event.
Click the Speaker tab from the menu bar on the left-hand side.
Click the Add button to create a new Speaker record.
Select the Speaker Account and Contact, the system will auto-populate phone and email details of the speaker.
The system allows you to upload the image of the speaker or pre-populates if it already exists.
Enter the description of the speaker and check the active checkbox.
And click the “Save” button to create a speaker for the event.
Step 8
Agenda
An agenda for the event can help you significantly in terms of planning and organising the event agenda will clearly specify every action to be held at the event.
Create an Agenda
Click the Agenda tab from the menu bar on the left-hand side.
Click the Add button to create a new Agenda record.
Enter the name of the Agenda and select the event zone and a speaker.
Enter the session Start and End time of the agenda and enter the Description of the agenda.
Click the Save button to create the agenda for an event.
Step 9
Logistics
Logistic is nothing but a resource management in case of events such as travel, accommodation and many more, which can be handled by the organisers of the event.
Create a logistics
Click the Logistics tab from the menu bar on the left-hand side.
Click the Add button to create a new Logistics record.
Enter the name of the Logistic
Select the Category and Type of the logistic
Select the logistic Provider and enter the Item Details.
Click the Save button to create the logistic record for the event.
Step 10
Sponsorship
Sponsorship is a financial invests made by the organisers for the success of Events.
Create Sponsorship
Click the “Sponsorship” tab from the menu bar on the left-hand side.
Click the “Add” button to create a new Sponsorship record.
Enter the Name of the sponsor and select the Sponsor Account
Select the Sponsorship Program and Event Zone
The system allows you to upload the image of sponsors
Select the Active checkbox and enter the Description about the sponsorship.
Click the save button to create the sponsorship for the event.
Adding and Inviting Guests
After you have planned and set up for an event, now the organizers can send email invitations to their Accounts, Contacts, Users and guests Users.
Send invites to accounts, Contact, and users
From Event, builder Select an Existing event And all event details will get auto-populated on the right-hand side click on the invite button And you navigate to the screen below
Select the source to send invitations to Accounts, Contacts, Users, and Resource individually or invite external guests in bulk by uploading a file with invitee details.
You can send invitations to the selected source records by clicking the Invite option in the Action section or by selecting multiple records and clicking on the Send Invites button.
To send invites to external users click on the source and select resource in that click on add guest button.
Enter the Name, Email, and phone of the invitee or external guest and click the invite button
Clicking on the “Invite” option in the Action section creates a new account or a contact in the system and also sends an invitation email and SMS text if configured.
Bookingkare provides you with an option to do the bulk invitation by simply uploading a file.
Download the “Event Invitation Template” and fill in the invitee’s details into the excel sheet and save the file in “.CSV” format.
Click the “Upload File” option and select the CSV file.
The uploaded guest list appears in the section below, now you can select all the guests and click the “Send Invites” button.
All the registrations created against the event will be listed in the Invited Guests section.
You will be able to control the number of registrations to display from the Select Entries option. You can also use the search bar to find the specific registrants by their Name or Email.
You can track the invitation with their status and forecast the number of attendees.
The Print Guest List button lets you print the registrations that are in booked status.
Check-In and Walk-In Registrations
After the registration of an event, the attendee can check in as they arrive at the event. Bookingkare allows Four check-in options.
Manual check-in through Check In page
Self-check-in through Kiosk
Scan barcode check-in
Manually check-in
Click on event builder in the search bar enter the event name the event gets auto-populated
On the right hand, side corner click on the check-in button
It will navigate to the check-in page follow the screen below
All the registrations will be listed below; you can select the registration and click the Check-In button located on the top right corner of the Registration Details section.
Once the registration is checked-in the status of the registration changes to Attended.
The system also allows you to create walk-in registrations, click the “New Registration” button. You will be presented with a pop-up page.
Enter the details of first name, last name Email and phone and click on the Save button. A new registration with status Attended is created in the system.
The Print Guest List button lets you print the check-in in attended status.
Kiosk Check-in
Click on the Event Builder tab and enter the Event Name in the search bar.
Click on the Kiosk button located on the top right corner of the page. You will be presented with the screen below.
The attendee should enter the Registration Id, Email and Phone. The users can enter any two out of the three options for check-in.
The system also allows you to create walk-in registrations at the kiosk, click the Add Me button. You will be presented with a screen below.
Enter the First and the Last name, enter the Email address and Mobile number and click the Save button to check-in late else click the Save and Check-in button to Check-in immediately.
A new registration with status Attended is created in the system.
And also you can print the badge on top of your name by clicking print badge.
Scan Barcode Check-in
Bookingkare allows you to scan and check-in attendees when you connect any Barcode scanner to your computer. When a valid barcode is scanned a “Green” indicator will appear on the scanner and the registration status will change to Attended. Otherwise, you can use the manual check-in process.
Event Booking Flow
The event booking application is designed for event management companies that require streamlined operations and overall efficiency, which gives your customers a seamless scheduling/booking experience. Customers can book the event from anywhere, anytime using any device.
How to book for an EventJoy would like to attend an event and he tries to book for an event using the event booking application.
Let’s help John to book an event.
1. Click on the ‘Event Book’ Tab or Search for Event Booking from the App launcher.
2. The screen shows the Event booking home page. Here you find the event which you want to attend.
Click each tab to see different scheduled events
3. Click on the ‘Apply to Attend’ Button to book for the Event.
4. Next page shows the details of the event, agenda, sponsors, and Speakers.
5. Enter or search your details and Confirm the Booking.
If you want to book as Group, then select Group Booking and Enter the Details.
6. Click ‘Confirm Booking’ Button to proceed to payment page.
7. Pay by Debit/Credit Card or PayPal then click the ‘Pay Now’ Button.
8. You are booked for the Event.
How to Book an Individual Booking
Click on the Individual Booking Icon and follow the same steps mentioned from 5-8
How to Book for a Free Event
1. Click on the ‘Apply to Attend’ Button to book for the Event.
2. Next page shows the details of the event, agenda, sponsors, and Speakers.
3. Enter or search your details and Confirm the Booking.
4. Clicking on ‘Confirm booking’ will directly book for the Event.
How to book an Event with Event Zone
Joy would like to book an event which is being held in different locations and zones. So, he selects the suitable location and zone that he would like to attend and books for the event.
Now, Let’s book an event
1. Click on the Apply to attend Button for an Event.
2. The Next page shows the location and zone selection. Select the suitable location zone slot and click the ‘Next’ Button.
3. Enter the details for Group booking or Individual Booking and click on Confirm Booking Button.
4. You are Booked for the Event
Event Booking Community
Event Community is a platform that allows external users or customers quickly book an event. A link will be provided to them through which customers can book for an event as guest users or create their own account and book for the events.
Joy would like to book an event as a guest user through Event Community so let’s help him out.
How to book a free Event
1. Click on the ‘Event Community’ Tab From the app launcher or click on the booking link provided by the organizers.
2. The Next page shows all the events such as today’s event, this week’s event, Next week’s event, and future events.
3. Select the Event that you want to book. Click the ‘Apply to Attend’ Button.
4. The next Page shows the Zone Location and Scheduled days and time to select and Book as Group or individual.
How to Book a Group Booking
1. Select the zone location, Scheduled Days and click on ‘Group Booking’ icon
2. Enter No. of persons attending the Event.
3. Enter the details of any one person and book the event.
4. Click the ‘Confirm Booking’ Button to book the event
sHow to book Individual booking
1. Click on Event to book and select Location and Time.
2. Click on the Individual Booking icon
3. Enter No. of persons attending and details of all the persons attending the event.
4. Click the ‘Confirm Booking’ Button to Complete
How to book for a Paid Event
Paid Events are the events that have an entry fee for the event and different levels of tickets like golden, silver, or bronze.
John would like to book for a paid event and buy’s 1 golden ticket and 2 silver tickets for the event.
Let’s help him out with the booking
1. Click on the Event’s Apply to attend button to book.
2. On this page select the Event zone location, Day, and time.
3. Now Enter the Ticket quantity for golden and silver tickets.
4. For Group booking click the group icon and enter one person’s detail
5. For Individual Booking enter the details of all the three-person details
6. Click the ‘Confirm’ Button to pay for the event
7. Enter the card details and click on the ‘Pay Now’ button.
User Journey Event Booking Flow
Event Booking
The system admin can configure sites and communities to reach the application offerings to the external audiences. This makes it convenient for guests to book an event.
For the Event flow the customer can book for the event by following these steps:
Click on the URL the page will navigate to the given screen below:
Click on the Event booking tab on the page it will navigate you to the given screen below:
you can select your preferred event from the event list.
Step 2
Selecting any event zones
Click on your preferred event
And it will navigate you to the Schedule day page.
All the event zones along with the day slots for the event will be shown.
Select one or more event zones along with the location
And select any day slots of the event.
Step 3
Enter the Details
On selecting the day slots.
It will navigate you to the Details page.
Enter your details And select the Book Now button.
Note: Once the booking is completed you will be presented with a confirmation screen displaying that “You have successfully registered!”.
Step 4
Payment process
Note: For the paid event you need to enter payment details here:
Click on your preferred event, If the event is a paid event, you will be presented with secure card payment details on the screen.
Enter your details and payment details on the screen.
The total amount to be paid will also be displayed.
In the card payment enter the following card details as mentioned above, and click on the payment button and our registration payment of the event booking page will be done.
Finally, it will navigate towards the registration success page as shown on the screen below
Clients will also receive Event Confirmation Mail, Invoice, and badge to registered Mail Id
After the Customer gets the Registration Email, he can cancel or reschedule the registration of the event by clicking on the manage Event button, we have a cancel button if we click on that a popup will appear saying yes or no if we click on yes then the registration of the event will be canceled and the customer gets cancel notification to his email address.
Step 5 Event Confirmation Email
On successfully booking the event, an Event Confirmation email notification with the details, along with the Badge and invoice attached will be sent to the customer’s email address.
Manage Event You can manage your Event by clicking on the Manage Event button present on the email template.
Click on the Manage Event.
The page will navigate to the Event Details page which has the following features available:
1. Change the Date of the event (Reschedule).
2. Update event.
3. Cancel the event.
Step 6 Event Reschedule (Change Date)
we have a Change Date button if we click on that we will be redirected to the reschedule page where we have to select the preferred schedule date and time and click on update, Customer gets Reschedule notification to his email address
You can reschedule your event booking according to Your preferred schedule.
To reschedule the event Click on the change Date button.
The page will navigate you to the given screen below:
On selecting the preferred schedule date and time you will be navigated to the screen given below.
Click on the Update button.
Your event will be rescheduled successfully and you will be navigated to the given screen below and the customer gets rescheduled notification to his email address…
Event Rescheduled Email
On Rescheduling the Event i.e on Change Date of the appointment.
The customer gets an Event Rescheduled Confirmation notification to this email address as displayed on the screen below:
Step 6
Cancel Event
we have a cancel button if we click on that a popup will appear by saying yes or no if we click on yes then the registration of the event will be canceled and the customer gets a cancel notification to his email address.
Click on the Cancel button to cancel your event.
On clicking the cancel button, The page will navigate to the given screen below:
Enter the reason for cancellation.
Click on Yes to Cancel the Booked Event, The page will navigate to the given screen below:
Event Cancellation Email
On clicking the cancel Event button.
Event Registration Cancelled email notification will be sent to the customer email address as displayed on the screen below.
Appointment Scheduling & Booking
The appointment booking system lets your client view the expert’s real-time availability and lets you quickly book an appointment with the expert. The client can book appointments from anywhere, anytime using any device.
Give your customers a seamless scheduling/booking experience Customize the look and feel
Match exactly to your company’s brand
Consultant Booking
A consultant booking system lets your client view the expert’s real-time availability for the services in different locations. This mainly focuses on showing the nearest location available for clients to book an appointment. The client can book the appointments from anywhere, anytime using any device.
The system is Integrated with Zoom, Microsoft Teams, GoToMeeting and Cisco WebEx virtual meeting platforms so that the users can manage and view meetings within the application. The scheduled meetings can be attended onsite or offsite.
Consultant Booking
Navigate to the App menu and click on Consultant booking tab where we can view the products services and its location as shown below.
The system provides the search bar to find the location and services by its name.
The system also provides an option to select the date for booking the appointment.
The resources are listed down based on their availability for a particular service.
Select the preferred location and services for which you wish to book an appointment.
Select the user with whom you want to book an appointment and click on the “Book” button for booking the available slot.
Otherwise, click on the “Select a different time slot” button to select one or more sessions from the available time slots.
This page gives you the details of the resource you’re booking an appointment with and provides an option to either select an existing client or to enter new client details.
You can search the existing clients by its name, email or mobile number.
Otherwise, Enter the client details such as First Name, Last Name, Email and Mobile.
Choose the meeting options which you’re flexible with to attend the meeting.
Click on the “Submit” button to book an appointment successfully.
Once the appointment is booked, you need to enter the purpose of the meeting in the textbox provided.
Click on the “Update” button to update the appointment being booked.
Room Booking
You can book the room for the appointment by clicking on the “Book Room” button.
Select the slot in the time slot list provided which is based on the availability of the conference rooms.
This navigates to an appointment details page with room booking details added as shown below.
Choose the meeting options which you’re flexible with to attend the meeting.
Click on the “Update button” to update the booking details.
This books an appointment and a conference room for the client successfully.
Email Confirmation for the Appointment
A confirmation email will be sent to the client’s email once an appointment is booked along with the ticket attached as a PDF as shown below.
Planner
Planner enables users to Request(plan) or Approve(Post on the live system) their Appointment, by creating the Resource, Resource group, Teams, Product from the App Launcher and Creating Location, Work planner, Resource requirements, Time management, Registration and Scheduler from the Planner tab.
Resource
Once the resource group is created add the right people to the group as a resource workforce. You can either add workforce or you can enable the efficiency of the activities like equipment setup, room, etc., by selecting the appropriate record type. You can add the resource by following these steps:
Create a resource
Navigate to app launcher and click the Resources tab.
Click on the new button and select a record type as Workforce.
Enter the resource name and Select the user.
Enter the Email address and phone number.
Select the resource group and Select team this allows a group of resources to assign the task.
If the resource is supervisor check the supervisor checkbox this allows you to see other resources and can manage their appointments.
Check Override holiday’s checkbox is true this option allows you to check that resource for the nonworking time during which the selected resource will work.
Enter the description and image URL
Enter the start and end date of the resource availability
Click on the Save button to create a resource record
Resource group
Create a resource group that is responsible to carry out a set of tasks or specializing in a particular skill.
Create a Resource Group
Navigate to the app launcher and click the Resource Group tab and click on the new button.
Enter the resource group name
Enter the Start Date and End Date
And save the record to create a resource group record
Teams
Managing the team helps you stay committed. Take full control over appointment activities by creating a team and managing their availability and time offs.
Navigate to the app launcher and select the Team.
On the right-hand side, the corner clicks the New button to create a new Team.
Enter team name and select account.
Enter the description of the team to determine the goals and purpose of the team is bean created.
And click on the Save button to create a team record.
Product/Service
Create a product
Navigate to the app launcher and click on the product tab.
Enter the product name, product code, and duration (In minutes).
Select qualification (this option lets the customer is to identify if the customer is eligible for the service).
Select the category, type, and subtype from the pick-list and select the active checkbox it will allow you to select based on location and program from the console.
Select the membership program and enter the session duration and description of the service.
Check to allow invite checkbox this option allows you to invite the customer to book an appointment.
Allow multi-booking checkbox allows you to book multiple slots at a time.
Allow voice/video checkbox this option allows you to send voice/video msgs and will appear on the registration page during booking an appointment.
Allow Waiting list checkbox this option allows you to check if the maximum registration is a threshold (exceeded) and if the checkbox is true then it allows the registration record in the waiting list.
Check the auto resource allocation checkbox this option allows the availability of the resource.
Allow not available slot checkbox is true, this option allows you to block out times when you will not be available for appointments.
Check allows purpose captures checkbox.
Check allows information capture checkbox is true, this option allows you to capture information of the customer for their services.
Allow where the (Location/Voice/Video) checkbox is true, this option allows you to share your current location through voice/video if it is checked it will be visible on the registration page.
Enter the URL for the image and banner image.
Price book
The standard Price book is the default (standard) price for the products and services in the standard price book. When you create a product record, Salesforce creates a standard price book entry. Custom price book entries are the custom (list) prices for the products and services in your custom price books.
Creating a Price Book Entry
Select created product and click on the related list tab
Find the price book and click on the new button
Enter the list price and check the active checkbox
And save the record.
Create membership Program
Navigate to the app launcher and click on the membership program tab
Click on the new button and enter the following details
Enter the Program Name, Start and End date of a member
Enter the description and save the record to create a membership program
Locations
Click on the planner tab on the sub-tab and click on new to create a new Location
Enter Location Name, Account, City, Country, and Address,
Enter the province/state and postal code and select the active checkbox.
And save the record to create a location.
Work Planner
Creating a Work Planner to execute an event can help simplify your work and track progress. You can create a work planner by following these steps:
Navigate to the app launcher and click on the Planner tab.
Click on the sub-tab of the work planner tab and click on Add button to create a new work planner.
Enter the work planner’s name.
Select the product/service and location of the work planner.
Enter the minimum and maximum threshold this option allows the resource value that can be assigned to the tasks.
Select the status as Approved and if you select the status as Requested that means that the task is only been planned and will not be available on the live system.
Enter the description of the work planner.
And save the record to create a work planner
Resource Requirement
Once the work is planned, figure out the resource required in your event planning, this could be a resource that belongs to a specific skill set or a resource group. You can create the resource requirement by following these steps:
Navigate to the Planner Tab from the app menu.
On the Planner tab, click the Resource Requirement sub-tab and click the new button
Enter resource allocation name
Select a work planner and select a resource group and save the record.
Time management
As a supervisor, you can manage your team members’ availability, time off, and break times easily with the Booking Kare Time management application. You can manage the time by following these steps:
Navigate to the time management tab and select the Team, Membership, and Location from the pick-list. You will be presented with the screen below.
You can view all the resources and their availability of start and end time
You can also change/manage the availability of the resource from the start and end time from the pick-list
And also can manage the resource start break time and end break time from the pick-list.
You can also click on the next and previous button to see other resources
And also can manage time off by clicking time off of the resources
And also you can manage other resources by lookup for which resource you need to give time off
Click on the book time off button and the page will navigate to time off-page
Select the start date and end date of the resource
Select the start time and end time of the resource
Select type and no of days
Enter Reason and save the record to create time off for the resource.
REGISTRATION On booking the appointment you will find all the booked appointments along with their Reference Number, Service selected, Resource, Location, Start Time, End Time Email, Type, and Status
Navigate to the app launcher and click on the Planner tab.
Click on the sub-tab of the registration tab.
You will be displayed with only those registered who have the Record type as Resource Service in the registration.
SCHEDULER As a superuser/supervisor/Administrator you can access the scheduler to view the registrations of a particular user or all the users based on Time, Day, Month, and also Year.
Navigate to the app launcher and click on the Planner tab.
Click on the sub-tab of the Scheduler tab.
You will be navigated to the screen below.
You can also filter by Search Location and Search Resource filter present on the screen.
On the left column, you will be displayed with the list of resources (users) Along with their registrations.
Click on the + button present before the resource to view the registrations of that particular user.
You can also view the scheduled appointment based on Time, Day, Week, Month, and Year.
Shift Planner
Shift Planner
A shift planner is a tool that helps manage resources efficiently across businesses. It helps in planning the staff shifts and booking appointments for a user or resource according to their availabilities. It is the best way for super users and supervisor users to manage and utilize the availability of the staff effectively.
A Superuser can manage the availabilities of all the users under the organization
A Supervisor User can manage only your team members’ availability, time offs and break-times
A user can manage only its own availability, time offs, and break-times easily with Shift Planner.
How to Find Shift Planner:
Click on App Launcher
Or You can click on the ‘Shift Planner’ Tab
Shift Planner screen Appears
Understand the Features of Shift Planner Screen
Available – This tile represents the Available Slot for booking an appointment
Not Available – This tile represents Slot is not available for booking an appointment
Time Off – This tile represents Time off/ breaks
Out of Office – This tile represents temporarily unavailable
Holiday – This tile represents public holidays or temporary leaves
Fully Booked – This tile represents that All available slots have been completely booked..
C – Indicates the total Capacity Hours of a resource for the day
D – Indicates the total Demand Hours for the resource for the da
AC – Indicates Available capacity Hours for the resource after demands and time off
How to Book Appointment from Shift Planner:
Let’s Create an Appointment for ‘Emily’ in Mississauga to work in the OW group on Wednesday.
Select the Available time slot for a resource and resource Group.
The time slot shows start time and End time, capacity, demand, and Available capacity
Click the Time Slot
Click on Book Appointment Button. This will take you to Appointment Booking Screen to confirm the booking.
How to Manage Availability of a Resource.
Let’s Create a new resource group for Neurology in Norwich. Let’s add ‘Ryan Lee’ and his availability who is a ‘Resource’ or ‘user’ working in the Neurology Group.
Manage Availability is a feature That allows you to manage the available slots of the users on the shift planner. From this feature, you can create a Resource Group, Resource, and multi-time slots.
Click on Manage availability Button
The screen shows
Enter the fields to manage the availability of that particular ‘Service, Location, group and dates’.
Click on the ‘Group’ Button.
Enter the Group Information for which you wish to add the new resource
Enter Service, location, Group, Start date, and End date.
6. Select the Resource Name and Team then add the availability times as shown below
Click the ‘Save’ Button. A new Resource group and Resource will be created and it can be viewed on the shift planner screen.
How to Manage Availabilities for Each resource
Instead of going to manage availabilities. You can also click the ‘Manage’ button from the time slots.
Let’s manage Emily’s Availability for Wednesday
Click on the Time slot. The pop shows up
2. Click on the ‘Manage’ button. The next screen takes you directly to Emily’s availabilities Page to edit.
3. Once changes are made click the ‘Save’ Button.
How to create a ‘Time Off’
Emily has an urgent meeting to attend and she would be unavailable for the service. So she decides to create a Time off for that date and time.
Let’s Create a Time off for Emily for the same slot on Wednesday.
Click on the ‘Time off’ Button
The time off screen appears.
Click the ‘Time Off’ Button. And Enter the Details of Time off.
Click ‘Save’. A time off will be created for Emily and it can be viewed on the shift planner screen in blue.
Time off can also be created by directly clicking on the time slot on the shift planner screen.
Click the ‘Time slot’. The pop-up shows
Click on the ‘Time off’ button and follow steps 1-4 from How to create time off.
How to filter Shift Planner
A supervisor opens the shift planner and looks for Emily’s resources to book an appointment for her availability. He quickly finds using the filter icon.
Let’s find Emily’s shift schedule at the Mississauga Location for the Ontario works program.
Click on the filter icon.
Enter the Program, Location, Service, and Team. Emily’s resource Shows up.
How to find time slots for future dates
If you want to book an Appointment with Emily for future dates.
Click on the calendar date icon to show the available time slots in the future dates
The next available time slots show up for future dates.
How to Drop a Shift
Jamie is a doctor who works in a health care department. He has to drop a shift due to an emergency situation. He can do so from the shift planner by selecting the time slot that he wants to drop. This only applies to available timeslots.
Let’s find the available time slot for Jamie and drop the shift.
Click on the Available Time slot
The pop-up shows details. Click on the ‘Can’t work?’ Button and select ‘Drop Shift’
Click ‘Yes’ to confirm
The shift will be dropped and the timeslot will be greyed out which means it is ‘not available’
How to Swap a Shift
Jamie receives a notification for an urgent meeting but he has the shift to cover at the same time. So he decides to swap the shift with his colleagues by sending a swap shift request. Once the request is approved by one of his colleagues. Shift Planner swaps the available timeslots of those resources for the selected date and time.
Let’s swap a timeslot of Jamie with Noah’s timeslot.Click on the Available timeslot that has to be swapped.
Click on ‘Can’t work?’ Button. And click the ‘Swap Shift’ Button.
The next screen shows the available timeslots of other resources to swap with.
Select the resource timeslots that you want to send the request.
For Example, let’s select two different users’ time slots and send them requests.
Jamie sends requests to Roger and Noah.
Click the ‘Send Swap Offers’ Button
Noah decides to swap the shift with Jamie. So he navigates to shift planner and clicks on the Dashboard icon to approve the request.
Click on the Dashboard icon.
The screen shows all the requests received and Requests sent for approval.
Noah clicks the ‘Approve’ tick mark action to approve the request and enters the reason.
Clicks on the ‘Approve’ Button.
Once the request is approved. Jamie can view the Timeslots swapped with Noah’s timeslot making the swapped timeslots as ‘blue’ which means Time off and Available time slot as green which means ‘Available’. Visa versa for Noah’s Timeslots.
How to Reschedule your availability
Emily would like to modify her availability on a particular day and hour as she will be unavailable for a complete length of time which was previously set up on the shift planner.
So she makes changes directly from the shift planner by clicking the timeslot that she wants to change it.
Click on the timeslot on the shift planner screen for Emily’s resources.
A pop-up shows up with ‘Can’t work?’ Button.
Click on the ‘Reschedule’ button
A pop-up shows up to change the Start and End times of the Shift.
Change the times and if required you can add Break start and end times as well.
Click the ‘Save’ Button
The time slot changes the Start and end time of the shift and also changes the Demand and Capacity hours accordingly.
Appointment Booking
With Appointment Booking, you can carry your entire business in your pocket. Manage to schedule, Cancel, and Reschedule your appointments, etc. via this New Appointment Booking flow. Add appointments to your calendar even when you’re out for lunch.
Receive instant notifications via email when an appointment is booked, rescheduled, or canceled. Customers also receive automated appointment alerts so that they stay on top of their bookings without having to dial in.
Appointment Booking
Navigate to the App Launcher and click the Appointments tab, here we can view the Resources and their services and Book an appointment. The page appears as shown below.
The system provides the search bar to find the services, Resources, and Time slots.
Select any services according to the location you wish to book an appointment.
You can filter out services and locations using the filter icon on the search bar.
Then select the Resource you wish to book an appointment with and select one or more sessions from the available time slots.
Book Button will book the appointment with the first available time slot.
Also, If you wish to select a different time slot, click on the Select a different time slot button.
The page will navigate to the available time slot page view, below the screenshot.
If you wish to reserve a room for the Appointment, then click on the Book Room button.
On selecting the available resource and the time slots and for the reserve room option, Select the available rooms from the below screen.
The above page consists of information about the room, location, available capacity, and date. Search by date to check the availability of the room for reservation.
Select the room from the options then, fill in the details and click on the Book Appointment button.
When the appointment is booked you will receive a confirmation email with the appointment details.
If you wish to book an online meeting with the resource, then select the online meeting button on the time slots.
When selecting the option for an Online meeting, you will see the page below.
Register for the meeting by filling up the details. Search by name, email, or mobile number to fill in the details or type manually.
After filling in all the details, select the meeting option through which you want to have your online meeting scheduled. Then click on the ‘Update’ button.
If you wish to update the details, Reschedule or Cancel the Appointments from the Appointment Booking page then click on the dropdown button from the Registration Section.
On selecting the Dropdown Button all options will appear on the screen.
The Update Details page will look like the below screenshot.
The Reschedule page will look like the below screenshot.
The Cancel appointment page will look like the below screenshot
Email Notification
Different ways to navigate to the New Appointment booking page
# Client record Page
Navigate to the Client records from the Client tab, once the record page opens, you will be able to see the new Appointment Booking button.
# Member Record page
Navigate to the Member page from the Client record or from the Member tab, once the record page opens, you will be able to see the new Appointment Booking button on the Member page.
# Client Registration Page
Navigate to the Client Registration page by using the Client Registration tab, once you create any new record or select the existing records from the search bar, you will be able to see the Book Appointment button, which allows you to navigate to the new Appointment Booking page.
#ShiftPlanner page
The system also allows navigating to the new Appointment Booking page from the Shift Planner.
Navigate to Shift Planner, click on the available time slots from the Shift planner home page, the new Appointment Booking button will appears on the Popup page.
Client Registration
The Client Registration page allows creating new clients and their family members by signing the Consent. Also, allows to navigate to the Consultant Booking page and allows you to see all the booked appointments.
Navigate to the App Launcher and find and click on the Client Registration page. You will be able to navigate to the below page.
The system allows updating the existing records or creating new clients by entering the required information and signing the consent form.
After entering all the required information and clicking on the ‘Save’ or ‘Save & New’, below consent modals will pop up, and the system will allow signing the tier 1 and tier 2 consents. After signing these two consents Clients and Its Member record will get created.
Tier 1 Consent
Tier 2 Consent
While booking an appointment after expiring the consents, the system will ask to re-sign the consents while booking the appointments.
Also, the system gives an option to sign or update the sociodemographic information consent.
The system also allows updating the Consent from the Client Registration page if the consent gets expired.
Once the Client and the Member record get created by selecting or creating the family, the ‘Client’ button will appear on the Client registration home page and the system allows adding the caregivers/family members. Once you click on the Client button, the below pages will pop up and will allow you to create child or adult family members.
Child
Adult
Also, the system gives an option to navigate to the Consultant booking page by clicking on the Book Appointments button. If clients book any appointments, those appointments will be also listed on the client record page as shown below.
The users are allowed to Update, Reschedule and Cancel the appointments by clicking on the Manage Booking page.
SHIFT PLANNER to Manage The resources
As a superuser, you can manage all the users under your organization, as a supervisor you can manage only your team member’s availability, time off, and break times, and as a normal user you can manage only your availability, and time off and break-times easily with the BookingKare shift planner application.
You can manage the time by following these steps:
Navigate to the time shift planner you will be presented with the screen below.
You can view all the resources and their available timings, capacity, demands, and Available Capacity.
When you create a new resource, capacity will be created automatically, and after creating an appointment for your capacity, demand will be created against that capacity.
You can also change/manage the availability of the resources using the manage button by clicking on the time slots.
Also, can manage the resource start break time and end break time by clicking on the available time.
You can also click on the next and previous buttons to see other resources.
You can also manage Time Offs for all the users from the Shift Planner by clicking on the Time Off icon in the upper right corner. Once you click on the icon below screen will appear.
Shift planner will allow you to Create, Update or Delete any Time offs from this page.
To manage your Resources, click on the manage icon on the top right corner of the screen you will be navigated to the screen below.
You can add/edit/delete the start time and end time, start break time, and end break time of the resource.
You can add new resources in the Shift Planner by clicking on the add ‘Resource’ button on the screen.
You can also create a new group by clicking on the Add group button on the top right corner of the screen.
Click on the Save button to save your changes.
User Journey Appointment Booking Flow
Appointment Booking
The system admin can configure sites and communities to reach the application offerings to the external audiences. This makes it convenient for guest Users to book an appointment.
For the Appointment flow the customer can book the appointment by following these steps:
Click on url the page will navigate to the given screen below:
Click on the Appointment booking tab and the page will navigate to the given screen below:
Step 2 Appointment Topic Select the appointment topic that you are looking forward to booking.
Select the membership program from the first drop-down list.
And subsequently, Select the Services that are Available for that selected membership program.
Provide the answers to the following mentioned questions.
Select the total number of attendees including yourself in the given box.
Click on the continue button, the page will navigate to the Appointment.
Step 3 Appointment Details Select the preferred date, time, and location of the appointment.
Select the preferred date.
Select the preferred location.
Select the preferred time slot and the page will navigate to the Appointment Contact Details Page.
Step 4 Appointment Contact Details Page Enter registration details.
Fill in your contact details and mandatory fields.
Click on Continue.
The page will navigate to the appointment confirmation.
Step 5 Appointment Confirmation
This is the final process of appointment booking flow, Here your appointment will be confirmed and booked successfully.
Appointment booking confirmation details will be presented on the screen as shown below.
Clients will also receive Appointment Confirmation Mail, Invoice, and badge to registered Mail Id
After the Customer gets the Registration Email, he can cancel or reschedule the registration of the appointment by clicking on the manage booking button, it will navigate to the booked details screen, we have a cancel button if we click on that a popup will appear by saying yes or no if we click on yes then the registration of the event will be canceled and the customer gets cancel notification to his email address.
Step 6 Appointment Confirmation Email
On successfully booking the appointment. An appointment confirmation email alert message with the details, along with the Badge attached will be sent to the registered user’s email address.
Manage Booking You can manage your appointment by clicking on the Manage Booking button present on the email template.
Click on the Manage button.
The page will navigate to the Booked Details page which has the following features available:
1. Update Appointment. 2.Change Date/Time(Reschedule). 3. Cancel the Appointment.
Step 7 Update Appointment
You can update your Appointment details by clicking on the update appointment button.
Modify your contact details which you like to update.
Click on Update Appointment to Update your modified details.
Step 8 Appointment Reschedule (Change Date/Time)
You can reschedule your appointment according to Your preferred schedule.
To reschedule the appointment Click on the change Date/Time link which is been provided on the booked details page as displayed on the above screen.
Click on the Change Date/Time link, The page will navigate to the given screen below:
Select the preferred schedule date and time and click on Update Appointment.
On clicking on the update Appointment the Rescheduled
Step 9 Appointment Rescheduled Email
On Rescheduling the Appointment i.e on Change Date/Time of the appointment.
An appointment Rescheduled Confirmation email alert message will be sent to the registered user email address as displayed on the screen below.
Step 10 Cancel Appointment
Click on the Cancel Appointment button to cancel your Appointment.
On clicking the cancel Appointment button, The page will navigate to the given screen below:
Enter the reason for cancellation.
Click on Yes to Cancel the Booked Appointment., The page will navigate to the given screen below:
Step 11 Appointment Cancellation Email
On clicking the cancel Appointment button.
An appointment Cancelled email alert message will be sent to the registered email address as displayed on the screen below.
Queuing System
Create a Hassle-free waiting experience and offer great customer experience and efficient customer service. We build flexible and interactive Queue Management Solutions. Enhance customer satisfaction and let them own a better experience by providing a versatile platform.
We optimize the Queuing Management System to enhance efficiency and to enhance customer satisfaction.
Reduces costs and minimizes the expenditures by investing in more manpower requirements. Procure the greatest features with a potential streamline of the mobile workflow process of Queue Management solutions cost-effectively.
Queue
Queue
A queue works almost on the same methodology used at banks or supermarkets, where the customer is treated according to its arrival.
Create a Queue
Click on the app launcher and click on the queue tab
To create a new record and click on the new button and select record type as resource service
Enter queue name and select Location for which queue is created and Select status as active
Select the Type of the queue whether it is a standard or a VIP queue.
And click on the Save button to create a record.
Queue Allocation
Queue allocation is nothing but allocating the queue based on their services and their resources.
Create a Queue Allocation
Click on the queue tab and select any Queue record
Navigate to the related list of Queue tab
Once in the related list section, find the Queue Allocations and click on the new button
And enter the Queue Allocation name and Select Queue
And select service to allocate in the queue
Select a resource to allocate in the queue and check the active checkbox
And save the record to create queue allocation
Queue management
Run a well-organized queuing system for organizations with multi-locations. The queue management intelligently uses real-time data to start the countdown to manage the client and ensure clients are attended to within the defined wait time. The queue management system is configured to view the estimated wait time at a glance and generate tokens. Let’s add walk-in appointments and add them to the queue by capturing the client’s basic information like name, phone, email, services, and more. You can manage your queue by following these steps.
Queue management
This module helps to manage the Appointment queues by changing them according to the required time or status.
Let’s take an example of appointments that have already been booked from how to manage them using Queue management.
Search or click on the ‘Queue management’ Tab.
2. The page shows the Filter and details to add a customer to the queue.
Use a filter to search the queue by location, service, Program, and User.
The screen shows the Appointments in the queue and how many are waiting.
If you want to add a new appointment to the queue. Search or enter the details and click the ‘Add to Queue’ Button.
If you want to ‘cancel’ or Mark as ‘No show’ for an appointment. Then click on the dropdown arrow to do so.
If you want to go back to the Initial view, then click the ‘Reset’ Button.
How to manage appointments in Queue management.
Let’s see with an example.
Select Location, Enter Service, First Name, Last Name then click the ‘Add to Queue’ Button.
Cody will be added to the waiting list.
The registration record now appears in the “Booked Registration” column, with Appointment details.
If you want to reschedule the appointment registration which is in the Queue.
Click on the Booked registration.
Change the Details or Time of the Appointment for example.
Click on the ‘Update Queue’ Button.
If you want to cancel the Appointment.
Click the dropdown button on the Booked registration that you wish to cancel
Select the ‘Cancel’ Button
Arrival check in for queue process
Click on the location tab and select any created location
It will navigate to the location page in the top right corner click on the drop-down list and select the arrival check-in button. You will be presented with the screen below.
Enter your last name, phone number or email, or reference and click on the check-in button.
And it will navigate to the token page and generate the token and it will be added to the queue. And you will be presented with the screen below:
Click on the print button to receive your token or click on the finish button.
Workbench
Workbench Workbench is for the service provider where Resource can manage their customer appointments.
Click on app launcher and select workbench. You will be presented with the screenshot below:
You can also filter the Location, Program, services, team and resources.
You can also manage the registration by clicking on serve now button all the details get populated on the information.
And you can also reschedule, no show and cancel your appointments by clicking on the action button
Click on the finish button to complete your service.
Queue Wait List
Queue Wait List Queue Wait List is the process where the waiting time of the people at a hotel, airport, hospital, seaport, or event is been displayed.
Click on the location tab and select any created location
It will navigate to the location page in the top right corner click on the drop-down list and select the Queue waitlist button. You will be presented with the screen below.
Here you can find the waiting time which will be running for a particular appointment.
Once the appointment has been started it will display the total waited time.
And finally when the Appointment is completed that token number will be removed from the waitlist
Room Booking
Manage meetings and appointments effortlessly. Improve employee experience by transforming workspace utilization. Use the reports and dashboards to see all your reservation activity and room availability at a glance.
Help experts find the best and most suitable room to work with their clients on the day of the appointment.
Help employees book meeting rooms on the go. Make collaboration easy, reserve the best place to work, and collaborate. Create a workplace experience that increases productivity, efficiency, and creativity in every employee.
Book conference rooms on the fly, and find and book conference rooms with the capacity and equipment you need. Customize conference rooms by setting minimum and maximum meeting lengths
Room Reservation
once you complete the room reservation you will be redirected to the booking details page where you can update your details, change room, change time, etc.
Select the Book button. You will be navigated to the previous screen, from where you can also add logistics to your booking
Logistics
Logistics is nothing but resource management in case of events such as travel, accommodation, and many more, which can be handled by the organizers of the event.
Click the Logistics tab present on the Right-hand side of the room reservation page.
You can add logistics for the booking by entering the registration number of the booking in the search booking option as shown on the screen below:
Create a logistics
Click the Add logistics button to create a new Logistics record. and you will be navigated to the screen below
Enter the name of the Logistic and Quantity.
Select the Category and Type of the logistic
Select the logistic Provider and enter the Item Details.
Click the Save button to create the logistic record for the appointment/event. you will be navigated to the screen below:
click on the save button to save your added logistics in the booking.
Payments
Integrate seamlessly with Payment Gateways, webinar, and live streaming platforms
Authorize.net
Bookingkare supports Authorize .net services to make card payments and online payment processing.
So let’s start creating a payment setup by adding your Authorize.net account on BookingKare.
Navigate to the app launcher tab and click on credentials
Click on the subtab of authorize. net, PayPal, and chase tab
Click on the new button and enter the following details
Bookingkare supports PayPal services to make electronic and online payment processing.
So let’s start creating payment set up by adding your PayPal account on BookingKare.
Navigate to the app launcher tab and click on credentials.
Click on the subtab of authorize.net, Paypal, and chase tab
Click on the new button and enter the following details
Enter the Name as Paypal
Enter the user name and password
The URL can be tested or live depending on the sandbox account or live account being used. Now enter the test URL https://api-3t.sandbox.paypal.com/2.0/
And enter the signature
Check the checkbox to save the card number
Check the checkbox to save the card data
And check the active checkbox
And click on the Save button to create a record
Chase payment
Bookingkare supports Chase payment services to make card payments and online payment processing.
So let’s start creating a payment setup by adding your chase payment account on BookingKare.
Navigate to the app launcher tab and click on credentials
Click on the subtab of authorize. net, Paypal and chase tab
Click on the new button and enter the following details
Enter the Name as chase
Enter the user name and password
The URL can be tested or live depending on the sandbox account or live account being used. Now enter the test URL https://api.demo.e-xact.com
And enter the signature
Check the checkbox to save the card number
Check the checkbox to save the card data
And check the active checkbox
And click on the Save button to create a record
Calendar
Calendar For Event
Want an easy, visual way to track upcoming or ongoing Events? Create a calendar from a standard or custom object: Choose a date field that represents data you want to track, and the calendar displays data in that field as calendar items. You can hide or show calendars, and you can edit and delete them. You can also track events in reports.
Create an Object Calendar for Events
Here’s how to create a calendar based on a standard or custom object
Navigate to the calendar tab.
Start creating a calendar by selecting the New calendar option as shown in the screen below:
Choose an object to base the calendar on.
Select fields that determine what the calendar displays (1, 2, 3).
If you want, filter the calendar items by selecting a list view (4).
The calendar displays items differently depending on the date fields you select.
(Date) Fields
The names of some date fields include (Date). If you select a (Date) field, the calendar displays items across the top (as all-day items).
(Date/Time) Fields
The names of other date fields include (Date/Time). If you select a (Date/Time) field in Field for Start, the calendar displays items in time slots. If you also select a field in Field for End (it’s optional) and the items’ duration exceeds 24 hours, the calendar displays the items across the top (as all-day items).
Selecting Start and End Fields
Field for End is optional. If you use it, you must select the same type of field as you do in Field for Start. For example, if you select a (Date) field in one, you can’t select a (Date/Time) field in the other. If you select fields that generate dates in the wrong order (end before start), Salesforce displays an error message when you save the calendar.
The colour of each calendar is the colour of the object it’s based on. (If a custom object has a theme, the theme determines the colour of the calendar.) You can hide or show individual calendars.
Calendar for Event Booking
Calendar views display your own calendar and coworkers’ calendars along with list views of open tasks. On the Home tab, the Calendar section shows upcoming events, a date picker for the month, and links to other calendar and activity views. You can share your calendar with coworkers and print calendars and task lists.
Calendar Views
Your calendar displays all events that you own on the My Events Calendar. Calendars that you create from an object display data in date fields as calendar items. View, create, and edit your events in a day, week, or month view. You can also see any calendars shared by colleagues that you’ve added to your view.
View Your Calendar
Access calendar views by:
Choosing the Calendar page from the navigation menu.
Opening a related event on a record’s activity timeline. (If your record doesn’t display the activity timeline, ask your admin to customize your page layout.)
When you click an event that you have permission to access, an overlay displays a preview with event details. Your admin configures the content of the overlays.
Grid Views
Calendar grid views display events in several ways.
Current date or any date that you choose. You select how the calendar displays.
One column with events colour coded for selected calendars
One column for each selected calendar to compare available times
One week at a time
One month at a time
Table View
To see specific events or more events simultaneously, open the table view. Customize an event list view to suit your needs or use the predefined lists views.
My Recent Events
My Team’s Recent Events
My Team’s Upcoming Events
My Upcoming Events
New This Week
Recently Viewed
Today’s Agenda
Customize your view from the calendar side panel.
To add calendars, click options .
To display or hide a calendar, click the calendar name.
To change the dates, click , , Today, This Week, or This Month.
To add an event, remove a calendar, or view only one calendar, click my event options .
Where to Select or Switch Views
You access calendar views in the following locations.
The Calendar section at the bottom of the Home tab. (If your Home tab doesn’t display the Calendar section, ask your admin to customize your home page layout.)
The Calendar shortcut in the sidebar that opens your last used calendar view. (If your admin has enabled the shortcut.)
The detail page for an event or a task
An activities list view
When you hover your mouse over an event that you have permission to access, an overlay displays event details and actions that you can perform. Your admin configures the content of the overlays.
Day, Week, Month, and Activity Views
Calendar views display events as follows:
A day at a time: or Today
A date that you choose using
A week at a time: or This Week
In a week view, with or without weekends
A month at a time: or This Month
On a day that you choose: Click in the week or month view
In a list of activities (events and tasks):
Inside any calendar view, you can switch views by clicking the icon for a different view. In a week or month view, click a date to see that day’s view.
Single-User View
The single-user view ()
displays up to 1,000 events in one month in any of the following:
Your own calendar
The calendar of another user (not available in Personal Edition)
A public calendar
A resource calendar
Click Change to switch users or calendars. Click Share My Calendar to allow other users to view your calendar. To reset your view to your own calendar, click Back to My Calendar.
Multi-User View
The multi-user view()
displays several users’ calendars and activities together. Choose an existing list view of users from the View drop-down list or click Create New View.
The view shows each person’s availability. A legend in the view shows busy and out-of-office time. If an event is set to show the time as free, then multi-user views don’t display it.
The multi-user calendar works differently in the partner portal. For example, partners can view events only on the calendars of people in their own company and their channel manager.
Share Your Calendar
Give coworkers access to view or add events to your My Events calendar.
Admins can set organization-wide calendar sharing levels to control how much access coworkers have to each others’ calendars. Admins can’t give coworkers access to event details.
Give coworkers more access to your calendar by changing your calendar sharing options.
From the Calendar tab, click calendar options next to your My Events calendar.
Search and select the name of the coworker who you want to share your calendar with.
Select the level of access that you want your coworker to have to your calendar.
Hide Details
Coworkers can see whether given times are available but can’t see any other information about the nature of events in their calendar.
Hide Details and Add Events
Coworkers can see whether given times are available but can’t see details of events. They can insert events into your calendar.
Show Details
Coworkers can see detailed information about events in your calendar.
Show Details and Add Events
Coworkers can see detailed information about events in your calendar, and they can insert events in your calendar.
Click Who Has Access to see who has access to your calendar, and at what level.
Click Done.
Coworkers can see your calendar by adding it to their Other Calendars list.
View Coworkers’ Calendars.
When coworkers share them My Events calendar with you, then you can view it in Lightning Experience. Add several calendars to your calendar view at one time with user list calendars.
Add user lists to calendar views in the Lightning Experience option from Activity Settings in Setup.
From the Calendar page, click calendar options next to Other Calendars.
Select Add Calendars.
Select People or User Lists.
Search for and select the name of the coworker or user list you want to add to your calendar view.
Click Add.
After you add a shared calendar or user list, you see their events overlaid on your calendar view.
Use the availability view to compare different calendars side by side.
Calendar For Appointment
Want an easy, visual way to track upcoming or ongoing Appointments? Create a calendar from a standard or custom object: Choose a date field that represents data you want to track, and the calendar displays data in that field as calendar items. You can hide or show calendars, and you can edit and delete them.
Create an Object Calendar for Appointments
Here’s how to create a calendar based on a standard or custom object
Navigate to the calendar tab.
Start creating a calendar by selecting the New calendar option as shown in the screen below:
Choose an object to base the calendar on.
Select fields that determine what the calendar displays (1, 2, 3).
If you want, filter the calendar items by selecting a list view (4).
The calendar displays items differently depending on the date fields you select.
(Date) Fields
The names of some date fields include (Date). If you select a (Date) field, the calendar displays items across the top (as all-day items).
(Date/Time) Fields
The names of other date fields include (Date/Time). If you select a (Date/Time) field in Field for Start, the calendar displays items in time slots. If you also select a field in Field for End (it’s optional) and the items’ duration exceeds 24 hours, the calendar displays the items across the top (as all-day items).
Selecting Start and End Fields
Field for End is optional. If you use it, you must select the same type of field as you do in Field for Start. For example, if you select a (Date) field in one, you can’t select a (Date/Time) field in the other. If you select fields that generate dates in the wrong order (end before start), It displays an error message when you save the calendar.
The colour of each calendar is the colour of the object it’s based on. (If a custom object has a theme, the theme determines the colour of the calendar.) You can hide or show individual calendars.
Calendar for Appointment booking flow
Calendar views display your own calendar and coworkers’ calendars along with list views of open tasks. On the Home tab, the Calendar section shows upcoming Appointments, a date picker for the month, and links to other calendar and activity views. You can share your calendar with coworkers and print calendars and task lists.
Calendar Views
Your calendar displays all Appointments that you own on the My Events Calendar. Calendars that you create from an object display data in date fields as calendar items. View, create, and edit your events in a day, week, or month view. You can also see any calendars shared by colleagues that you’ve added to your view.
View Your Calendar
Access calendar views by:
Choosing the Calendar page from the navigation menu.
Opening a related event on a record’s activity timeline. (If your record doesn’t display the activity timeline, ask your admin to customize your page layout.)
When you click an event that you have permission to access, an overlay displays a preview with event details. Your admin configures the content of the overlays.
Grid Views
Calendar grid views display appointments in several ways.
Current date or any date that you choose. You select how the calendar displays.
One column with Appointment color-coded for selected calendars
One column for each selected calendar to compare available times
One week at a time
One month at a time
Table View
To see a specific appointment or more appointments simultaneously, open the table view. Customize an appointment list view to suit your needs or use the predefined list views.
My Recent Appointment
My Team’s Recent Appointment
My Team’s Upcoming Appointment
My Upcoming Appointment
New This Week
Recently Viewed
Today’s Agenda
Customize your view from the calendar side panel.
Customize your view from the calendar side panel.
To add calendars, click options.
To display or hide a calendar, click the calendar name.
To change the dates, click , , Today, This Week, or This Month.
To add an event, remove a calendar, or view only one calendar, click my event options .
Where to Select or Switch Views
You access calendar views in the following locations.
The Calendar section at the bottom of the Home tab. (If your Home tab doesn’t display the Calendar section, ask your admin to customize your home page layout.)
The Calendar shortcut in the sidebar that opens your last used calendar view. (If your admin has enabled the shortcut.)
The detail page for an event or a task
An activities list view
When you hover your mouse over an event that you have permission to access, an overlay displays event details and actions that you can perform. Your admin configures the content of the overlays.
Day, Week, Month, and Activity Views
Calendar views display events as follows:
A day at a time: or Today
A date that you choose using
A week at a time: or This Week
In a week view, with or without weekends
A month at a time: or This Month
On a day that you choose: Click in the week or month view
In a list of activities (events and tasks):
Inside any calendar view, you can switch views by clicking the icon for a different view. In a week or month view, click a date to see that day’s view.
Single-User View
The single-user view ()
displays up to 1,000 events in one month in any of the following:
Your own calendar
The calendar of another user (not available in Personal Edition)
A public calendar
A resource calendar
Click Change to switch users or calendars. Click Share My Calendar to allow other users to view your calendar. To reset your view to your own calendar, click Back to My Calendar.
Multi-User View
The multi-user view ()
displays several users’ calendars and activities together. Choose an existing list view of users from the View drop-down list or click Create New View.
The view shows each person’s availability. A legend in the view shows busy and out-of-office time. If an event is set to show the time as free, then multi-user views don’t display it.
The multi-user calendar works differently in the partner portal. For example, partners can view events only on the calendars of people in their own company and their channel manager.
Share Your Calendar
Give coworkers access to view or add events to your My Events calendar.
Admins can set organization-wide calendar sharing levels to control how much access coworkers have to each others’ calendars. Admins can’t give coworkers access to event details.
Give coworkers more access to your calendar by changing your calendar sharing options.
From the Calendar tab, click calendar options next to your My Events calendar.
Search and select the name of the coworker who you want to share your calendar with.
Select the level of access that you want your coworker to have to your calendar.
Hide Details
Coworkers can see whether given times are available but can’t see any other information about the nature of the Appointment in your calendar.
Hide Details and Add Appointment
Coworkers can see whether given times are available but can’t see details of events. They can insert an Appointment in your calendar.
Show Details
Coworkers can see detailed information about Appointments in your calendar.
Show Details and Add Appointment
Coworkers can see detailed information about Appointments in your calendar, and they can insert Appointments in your calendar.
Click Who Has Access to see who has access to your calendar, and at what level.
Click Done.
Coworkers can see your calendar by adding it to their Other Calendars list.
View Coworkers’ Calendars.
When coworkers share them My Events calendar with you, then you can view it in Lightning Experience. Add several calendars to your calendar view at one time with user list calendars.
Add user lists to calendar views in the Lightning Experience option from Activity Settings in Setup.
From the Calendar page, click calendar options next to Other Calendars.
Select Add Calendars.
Select People or User Lists.
Search for and select the name of the coworker or user list you want to add to your calendar view.
Click Add.
After you add a shared calendar or user list, you see their events overlaid on your calendar view.
Use the availability view to compare different calendars side by side.
Event Scheduling & Booking
The event booking and planning application is designed for event management companies that require streamlined operations and overall efficiency.
Give your customers a seamless scheduling/booking experience
Customize the look and feel match exactly to your company’s brand
Booking Kare is an application to process Check-In/Checkout flow i.e., checking in the clients into an event/appointment and checking them out from an event/appointment.
This app also provides an easier way for the users to check In and Check out using QR-Scanner /Barcode scanner for the members registered to any events or appointments.
How to install Booking Kare Application.
The Booking Kare application can be installed from the App Store or Play Store like any other application on your Tablet, iPad, or Phone.
Open the application and enter the username and password of your salesforce org.
Note: Log in with credentials that have registrations booked for events/Appointments.
The below screen appears when Logged in successfully.
How to scan a Barcode/ QR code to check-in customers for Events or Appointments.
The ‘Registrations’ tab shows the registrations made for the particular event or Appointment.
2. Once the registration is booked, the customer receives an email with the ticket/slip which they must bring with them on the day of the event or appointment.
Enter the Number of People attending
3. Scan the barcode/QR code on the ticket.
4. The customer is checked in automatically and the ticket checker can verify details on this page.
5. Click the ‘Home’ Button to Scan the next person.
6. Click on the Booking Details tab to view Event/Appointment details.
7. You can also check out the same person from this page by clicking on the ‘Check out’ button.
How to scan a Barcode/ QR code to check out customers for Events or Appointments.
Click on the ‘Check out’ Button on the Home Page and scan the code.
Note: The person should already be ‘checked In’ before using check-out process.
2. The customer is checked out successfully and click on home to scan the next person.
How to scan a Barcode/ QR code to check In/check out customers for Events or Appointments if they do not have the ticket/slip.
From the home page Enter the registration number from the booked Event/appointment.
2. Click on the ‘Check In’ button. The person will be checked in Successfully!
If the Registration number is not available or lost
Enter the ‘Last name’ and one of the following ‘Email or phone’
3. Click on the check-in Button the person will be ‘checked In’ successfully!
How to Check out the customer who does not have the ticket/slip.
From the home page click on the ‘check-out’ button
2. Enter the details like registration number or last name and phone/Email.
3. Click on the ‘Check-out Button.
4. The person is checked out Successfully!
Check-In/Check-Out
check-in/CheckOut is a flow for checking the clients into an event and checking them out from an event. This flow provides an easier way for the users to check in and check out the members registered for a particular event.
CheckIn/CheckOut
The users can be checked in or checked out from an event either
Using the CheckIn/CheckOut button from the Event Record page.
Using the CheckIn/CheckOut tab.
Using the CheckIn/CheckOut button from the Event Record page:
Navigate to the App menu and go to Events tab and click on a particular event to view the event details in a record page as shown below.
Check for the registrations with repsect ti ths event and click on the “CheckIn/CheckOut” button.
This navigates to the CheckIn/CheckOut tab where an user is directly navigated to view the registrations of an event as shown below.
Search for a particular registration by user name or its registration ID using the search box provided.
You can also view the count of total registrations and the number of guests awaiting, checked in and checked out members of an event by clciking on the cards displayed at the top of the page.
The system also provides an option to print the registration or the guest list using the print button at the top right corner of the page.
This navigates to a printable format of the list in PDF form as shown below.
You can either checkin the members manually or by scanning the QR using the scanner.
Select a member/ registered user whose status is booked to checkin to the event by clicking on the “Check In ” button.
Once an user is checked in to the event, he/she can be checked out anytime from the event using the “Check Out” button. An user who is checked out fron the event cannot checked in again to the same event.
Using the CheckIn/CheckOut tab:
Navigate to the App menu and click on the CheckIn/CheckOut tab where we can view the registrations related to a particular event.
The system pop’s up a window with a list of all the active events which has the registrations as shown above.
The system provides an option to search for the events using the search box.
Search for a particular event from the list of events in the popup.
This navigates to a page where the list of registrations particular to an event is listed down as shown below.
Search for a particular registration by user name or its registration ID using the search box provided.
You can also view the count of total registrations and the number of guests awaiting, checking in, and checking out members of an event by clicking on the cards displayed at the top of the page.
The system also provides an option to print the registration or the guest list using the print button at the top right corner of the page.
This navigates to a printable format of the list in PDF form as shown below.
You can either check in the members manually or by scanning the unique QR code using the scanner.
With a unique family QR code, the system makes it easier to check in all the members of a family by simply scanning their family QR Code.
Select a member/ registered user whose status is booked to check in to the event by clicking on the “Check-In ” button.
Once a user is checked in to the event, he/she can be checked out anytime from the event using the “Check Out” button. A user who is checked out from the event cannot be checked in again to the same event.
Event Builder
Event Module setup
Start planning and organising a single day or a multi-day event easily, make common customizations like adding zones, tickets, venues and more. Configure registrations to be free or paid with complex pricing rules. Configure discounts and taxes easily with various rules. Configure sponsors, speakers, and agendas and give more insight into the event to manage time with BookingKare’s Event Builder. With the Event Builder, you can reduce administration time and hassles associated with data integrity or booking conflicts.
Once you are in the Event Booking app, you can create your first event by following these steps:
Step 1
Create an event
Click on event builder tab and click on event details and enter the following information like enter the name of the event, select event as event type
Enter the Start Date /time and the End Date /time of an event.
Enter the Registration Start and End Dates, Check-In Start and End Dates and Ticket Sales Start and End Dates.
Select the organiser and Location of the organiser
Enter the Maximum Registrations and Entry Fee if any for the event.
Select the membership program and description of the event
Select the published checkbox, this option lets you add the event in the portal site.
Select the Type and Status of the event and select the Allow guest registrations checkbox, this option lets you add registration from the kiosk.
Enter the Invite Message and Registration Instructions of the event.
Click the Save button to create an Event record.
Once you have created the event you can start adding the zones where the events are held, so let’s start creating the zones.
Step 2
Event zone
Event zones are nothing but events that can occur in multiple locations based on their availability within the region.
Create an event zone
Click the Zones tab of the event builder from the menu bar on the left-hand side.
Click on Add button to create the zones
Enter the Name of the zone and select the Type of zone being created.
Enter the Start and End dates of the event and Registration dates.
Enter the Maximum Registrations and set the maximum registrants at each zone, enter the Descriptions applicable for the zone
Select the Show Day Slots fields if you want to display the days during booking.
Click the Save button to create a zone for an event.
Step 3
Venues
Configure venues, the place where your event is held. When you create a location and assign it to the zone that location information will be displayed on the event detail page.
Create a venue
Click the Venue tab from the menu bar on the left-hand side.
Click the Add button to create a new location.
Enter the Name of the venue and Address details
Select the event zone and check the active checkbox
Enter the description of the location
And click on the save button to save the venue record
Step 4
Create Product Service Details
Click the product details tab from the menu bar on the left-hand side.
Click the Add button to create a product.
Enter the name of the product, Adult price, and child price.
Enter the image URL or you can upload the image from the system.
Enter the description of the product and check the active checkbox
And click on the Save button to create a product record.
Step 5
Tickets
Tickets are nothing but a selling price of an event. And also we can control the number of persons to get register for an event. By using this concept we can distinguish different prices for each type of tickets for adult and child as well.
Create a ticket
Click the Tickets tab from the menu bar on the left-hand side.
Click the Add button to create a new ticket.
Enter the Name of the ticket and select the Product to fetch the list price and taxes for both adult and child automatically from the price-book entry of the selected product.
Enter the Total Quantity, Adult, and Child Quantity, this ensures the number of registrations allowed for an event.
Enter the Adult and Child List Price and Tax Percent manually if the product is not selected.
Select the Zone for which the ticket is created is assigned and select the Active checkbox to make the ticket active for use for the selected zone and event.
Enter the Image URL and select the Show Child checkbox, this ensures the child details are captured in the registration and the ticket price based on the child list price.
Select the Ticket waiting list checkbox; with this option, you will be allowing registrations even when the number of registration has reached the capacity of the event. The registrations created after the capacity is reached are the registrants with the waiting list status.
Enter the Ticket Sale Start dates and End dates, enter the Instructions associated with the ticket and upload image relevant to the event.
Click on the “Save” button to create a ticket for the event.
Step 6
Membership
Click on the ticket tab related list click on Membership tab
Click the Add button to create a new membership record.
Enter the value and select the status.
Select the start and expiration date of the membership
And click the “Save” button to create a membership for the event.
Step 7
Speaker
Speaker is a guest of the event, who speaks formally before an audience regarding some of the major things regarding the event and why it has been organised and expressed his ideas towards the particular event.
Click the Speaker tab from the menu bar on the left-hand side.
Click the Add button to create a new Speaker record.
Select the Speaker Account and Contact, the system will auto-populate phone and email details of the speaker.
The system allows you to upload the image of the speaker or pre-populates if it already exists.
Enter the description of the speaker and check the active checkbox.
And click the “Save” button to create a speaker for the event.
Step 8
Agenda
An agenda for the event can help you significantly in terms of planning and organising the event agenda will clearly specify every action to be held at the event.
Create an Agenda
Click the Agenda tab from the menu bar on the left-hand side.
Click the Add button to create a new Agenda record.
Enter the name of the Agenda and select the event zone and a speaker.
Enter the session Start and End time of the agenda and enter the Description of the agenda.
Click the Save button to create the agenda for an event.
Step 9
Logistics
Logistic is nothing but a resource management in case of events such as travel, accommodation and many more, which can be handled by the organisers of the event.
Create a logistics
Click the Logistics tab from the menu bar on the left-hand side.
Click the Add button to create a new Logistics record.
Enter the name of the Logistic
Select the Category and Type of the logistic
Select the logistic Provider and enter the Item Details.
Click the Save button to create the logistic record for the event.
Step 10
Sponsorship
Sponsorship is a financial invests made by the organisers for the success of Events.
Create Sponsorship
Click the “Sponsorship” tab from the menu bar on the left-hand side.
Click the “Add” button to create a new Sponsorship record.
Enter the Name of the sponsor and select the Sponsor Account
Select the Sponsorship Program and Event Zone
The system allows you to upload the image of sponsors
Select the Active checkbox and enter the Description about the sponsorship.
Click the save button to create the sponsorship for the event.
Adding and Inviting Guests
After you have planned and set up for an event, now the organizers can send email invitations to their Accounts, Contacts, Users and guests Users.
Send invites to accounts, Contact, and users
From Event, builder Select an Existing event And all event details will get auto-populated on the right-hand side click on the invite button And you navigate to the screen below
Select the source to send invitations to Accounts, Contacts, Users, and Resource individually or invite external guests in bulk by uploading a file with invitee details.
You can send invitations to the selected source records by clicking the Invite option in the Action section or by selecting multiple records and clicking on the Send Invites button.
To send invites to external users click on the source and select resource in that click on add guest button.
Enter the Name, Email, and phone of the invitee or external guest and click the invite button
Clicking on the “Invite” option in the Action section creates a new account or a contact in the system and also sends an invitation email and SMS text if configured.
Bookingkare provides you with an option to do the bulk invitation by simply uploading a file.
Download the “Event Invitation Template” and fill in the invitee’s details into the excel sheet and save the file in “.CSV” format.
Click the “Upload File” option and select the CSV file.
The uploaded guest list appears in the section below, now you can select all the guests and click the “Send Invites” button.
All the registrations created against the event will be listed in the Invited Guests section.
You will be able to control the number of registrations to display from the Select Entries option. You can also use the search bar to find the specific registrants by their Name or Email.
You can track the invitation with their status and forecast the number of attendees.
The Print Guest List button lets you print the registrations that are in booked status.
Check-In and Walk-In Registrations
After the registration of an event, the attendee can check in as they arrive at the event. Bookingkare allows Four check-in options.
Manual check-in through Check In page
Self-check-in through Kiosk
Scan barcode check-in
Manually check-in
Click on event builder in the search bar enter the event name the event gets auto-populated
On the right hand, side corner click on the check-in button
It will navigate to the check-in page follow the screen below
All the registrations will be listed below; you can select the registration and click the Check-In button located on the top right corner of the Registration Details section.
Once the registration is checked-in the status of the registration changes to Attended.
The system also allows you to create walk-in registrations, click the “New Registration” button. You will be presented with a pop-up page.
Enter the details of first name, last name Email and phone and click on the Save button. A new registration with status Attended is created in the system.
The Print Guest List button lets you print the check-in in attended status.
Kiosk Check-in
Click on the Event Builder tab and enter the Event Name in the search bar.
Click on the Kiosk button located on the top right corner of the page. You will be presented with the screen below.
The attendee should enter the Registration Id, Email and Phone. The users can enter any two out of the three options for check-in.
The system also allows you to create walk-in registrations at the kiosk, click the Add Me button. You will be presented with a screen below.
Enter the First and the Last name, enter the Email address and Mobile number and click the Save button to check-in late else click the Save and Check-in button to Check-in immediately.
A new registration with status Attended is created in the system.
And also you can print the badge on top of your name by clicking print badge.
Scan Barcode Check-in
Bookingkare allows you to scan and check-in attendees when you connect any Barcode scanner to your computer. When a valid barcode is scanned a “Green” indicator will appear on the scanner and the registration status will change to Attended. Otherwise, you can use the manual check-in process.
Event Booking Flow
The event booking application is designed for event management companies that require streamlined operations and overall efficiency, which gives your customers a seamless scheduling/booking experience. Customers can book the event from anywhere, anytime using any device.
How to book for an EventJoy would like to attend an event and he tries to book for an event using the event booking application.
Let’s help John to book an event.
1. Click on the ‘Event Book’ Tab or Search for Event Booking from the App launcher.
2. The screen shows the Event booking home page. Here you find the event which you want to attend.
Click each tab to see different scheduled events
3. Click on the ‘Apply to Attend’ Button to book for the Event.
4. Next page shows the details of the event, agenda, sponsors, and Speakers.
5. Enter or search your details and Confirm the Booking.
If you want to book as Group, then select Group Booking and Enter the Details.
6. Click ‘Confirm Booking’ Button to proceed to payment page.
7. Pay by Debit/Credit Card or PayPal then click the ‘Pay Now’ Button.
8. You are booked for the Event.
How to Book an Individual Booking
Click on the Individual Booking Icon and follow the same steps mentioned from 5-8
How to Book for a Free Event
1. Click on the ‘Apply to Attend’ Button to book for the Event.
2. Next page shows the details of the event, agenda, sponsors, and Speakers.
3. Enter or search your details and Confirm the Booking.
4. Clicking on ‘Confirm booking’ will directly book for the Event.
How to book an Event with Event Zone
Joy would like to book an event which is being held in different locations and zones. So, he selects the suitable location and zone that he would like to attend and books for the event.
Now, Let’s book an event
1. Click on the Apply to attend Button for an Event.
2. The Next page shows the location and zone selection. Select the suitable location zone slot and click the ‘Next’ Button.
3. Enter the details for Group booking or Individual Booking and click on Confirm Booking Button.
4. You are Booked for the Event
Event Booking Community
Event Community is a platform that allows external users or customers quickly book an event. A link will be provided to them through which customers can book for an event as guest users or create their own account and book for the events.
Joy would like to book an event as a guest user through Event Community so let’s help him out.
How to book a free Event
1. Click on the ‘Event Community’ Tab From the app launcher or click on the booking link provided by the organizers.
2. The Next page shows all the events such as today’s event, this week’s event, Next week’s event, and future events.
3. Select the Event that you want to book. Click the ‘Apply to Attend’ Button.
4. The next Page shows the Zone Location and Scheduled days and time to select and Book as Group or individual.
How to Book a Group Booking
1. Select the zone location, Scheduled Days and click on ‘Group Booking’ icon
2. Enter No. of persons attending the Event.
3. Enter the details of any one person and book the event.
4. Click the ‘Confirm Booking’ Button to book the event
sHow to book Individual booking
1. Click on Event to book and select Location and Time.
2. Click on the Individual Booking icon
3. Enter No. of persons attending and details of all the persons attending the event.
4. Click the ‘Confirm Booking’ Button to Complete
How to book for a Paid Event
Paid Events are the events that have an entry fee for the event and different levels of tickets like golden, silver, or bronze.
John would like to book for a paid event and buy’s 1 golden ticket and 2 silver tickets for the event.
Let’s help him out with the booking
1. Click on the Event’s Apply to attend button to book.
2. On this page select the Event zone location, Day, and time.
3. Now Enter the Ticket quantity for golden and silver tickets.
4. For Group booking click the group icon and enter one person’s detail
5. For Individual Booking enter the details of all the three-person details
6. Click the ‘Confirm’ Button to pay for the event
7. Enter the card details and click on the ‘Pay Now’ button.
User Journey Event Booking Flow
Event Booking
The system admin can configure sites and communities to reach the application offerings to the external audiences. This makes it convenient for guests to book an event.
For the Event flow the customer can book for the event by following these steps:
Click on the URL the page will navigate to the given screen below:
Click on the Event booking tab on the page it will navigate you to the given screen below:
you can select your preferred event from the event list.
Step 2
Selecting any event zones
Click on your preferred event
And it will navigate you to the Schedule day page.
All the event zones along with the day slots for the event will be shown.
Select one or more event zones along with the location
And select any day slots of the event.
Step 3
Enter the Details
On selecting the day slots.
It will navigate you to the Details page.
Enter your details And select the Book Now button.
Note: Once the booking is completed you will be presented with a confirmation screen displaying that “You have successfully registered!”.
Step 4
Payment process
Note: For the paid event you need to enter payment details here:
Click on your preferred event, If the event is a paid event, you will be presented with secure card payment details on the screen.
Enter your details and payment details on the screen.
The total amount to be paid will also be displayed.
In the card payment enter the following card details as mentioned above, and click on the payment button and our registration payment of the event booking page will be done.
Finally, it will navigate towards the registration success page as shown on the screen below
Clients will also receive Event Confirmation Mail, Invoice, and badge to registered Mail Id
After the Customer gets the Registration Email, he can cancel or reschedule the registration of the event by clicking on the manage Event button, we have a cancel button if we click on that a popup will appear saying yes or no if we click on yes then the registration of the event will be canceled and the customer gets cancel notification to his email address.
Step 5 Event Confirmation Email
On successfully booking the event, an Event Confirmation email notification with the details, along with the Badge and invoice attached will be sent to the customer’s email address.
Manage Event You can manage your Event by clicking on the Manage Event button present on the email template.
Click on the Manage Event.
The page will navigate to the Event Details page which has the following features available:
1. Change the Date of the event (Reschedule).
2. Update event.
3. Cancel the event.
Step 6 Event Reschedule (Change Date)
we have a Change Date button if we click on that we will be redirected to the reschedule page where we have to select the preferred schedule date and time and click on update, Customer gets Reschedule notification to his email address
You can reschedule your event booking according to Your preferred schedule.
To reschedule the event Click on the change Date button.
The page will navigate you to the given screen below:
On selecting the preferred schedule date and time you will be navigated to the screen given below.
Click on the Update button.
Your event will be rescheduled successfully and you will be navigated to the given screen below and the customer gets rescheduled notification to his email address…
Event Rescheduled Email
On Rescheduling the Event i.e on Change Date of the appointment.
The customer gets an Event Rescheduled Confirmation notification to this email address as displayed on the screen below:
Step 6
Cancel Event
we have a cancel button if we click on that a popup will appear by saying yes or no if we click on yes then the registration of the event will be canceled and the customer gets a cancel notification to his email address.
Click on the Cancel button to cancel your event.
On clicking the cancel button, The page will navigate to the given screen below:
Enter the reason for cancellation.
Click on Yes to Cancel the Booked Event, The page will navigate to the given screen below:
Event Cancellation Email
On clicking the cancel Event button.
Event Registration Cancelled email notification will be sent to the customer email address as displayed on the screen below.
Getting Started
Install the Aqxolt CPQ: – Users can install the Aqxolt CPQ from the App exchange
Once you are on the Application detail page, click on the ‘Get It Now’ button, and follow the prompts to proceed to install the Application.
Creating Multiple Purchase Orders
As a customer, I need the ability to create multiple purchase orders against different vendors, able to see the in-demand products, add and remove the products, and be able to select cost cards based on vendor.
When the customer wishes to buy the raw materials or products from the supplier either store them in the warehouse or resell them. The customer needs to create a purchase order against that vendor and needs to create multiple at once.
The warehouse management team checks for product/ raw material need or demand stock, they raise a requirement to the supplier/vendor by creating a purchase order.
Preconditions:
Have a vendor account created and related contact and address.
Products available in the system for which you want to create purchase orders with ‘Issue Purchase Order’ enabled.
Products should be set up with cost cards and approved vendors. The vendor on the cost card and the approved vendor should be the same.
Be specific in which warehouse you want to receive.
In-demand products should be available. (optional)
Termination Outcome:
If a user will enter all the required information on the create purchase orders screen and clicks on the ‘Save’ button, multiple purchase orders will be created and the user can navigate to the required purchase order to see all the entered information.
If the required information is not set up correctly in the system, the user may not be able to create a purchase order.
Conditions affecting termination outcome:
If the warehouse is not set up with a distribution center, the user will not be able to select the distribution center based on the assigned warehouse.
If an employee is not assigned to the distribution center, the user will see a warning message to assign the employee to the distribution center to proceed.
If the approved vendor and the cost card are not set up with the same vendor, the user will not be able to see the list of vendors available. They will see a warning message as ‘No Approved Vendors Available for the selected product’.
User Story Associations: Creating a purchase order against a vendor is a prerequisite for a use case on Inbound Logistics.
Input Summary:
The user will go through two steps to create multiple purchase orders,
Step 1: When a user navigates to a create purchase orders tab if there are in-demand products the screen populates them by default.
In this first screen, a distribution center should be selected, in order to receive the inventory in the warehouse associated with that distribution center.
Then the user needs to select the products, and select the approved vendor. It populates the cost card automatically along with its unit price and quantity.
After adding all the products and entering the required information, the user needs to click on the ‘Next’ button.
Step 2: The second screen is similar to the ‘Create Purchase Order’ tab. It will map the vendors and products and show the products as line items of the purchase orders that have the same approved vendor selected.
The user needs to enter the following details in this screen,
An expected date which cannot be in the past.
Select a vendor contact associated with that vendor.
Enable the ‘Ready to Receive’ checkbox, if you are ready to move the products into the warehouse.
Add all the above details for all the vendors against whom the purchase order will be created.
After entering the details, when a user clicks on the ‘Save’ button multiple purchase orders will be created and it will show all the created purchase orders.
Multiple purchase orders will be created and the products entered by the user are added as the purchase order line items associated with each individual vendor.
If a user has enabled the ‘Ready to Receive’ checkbox, then the logistics will be created of type ‘Inbound’ with logistic line items mapped from purchase order line items.
Barcode is an automatic identification technology consisting of a series of parallel, adjacent bars and spaces. It is an optical machine-readable representation of data, which displays certain data on products to which it is attached. This can be referred to as the Identification number of a product. A barcode is a series of numbers and each digit is coded with black and white stripes, representing the product information such as the name, classification about the products, how much the tag price is, when it expired, etc. There are a number of different standards of barcodes available in the
industry and it is used in almost all the industries including Automotive, Distribution, Electronics, Government, Hospitality, Logistic, Manufacturing,Security etc. Barcode Zone is a native, Software as a Service (SaaS) tool that can generate barcode in salesforce. Barcode Zone is a Visualforce component that can be used in any of your Visualforce page(s) / Standard Page(s) to generate linear barcodes such as Code-39, Code-128, EAN-13 and EAN-8 and 2D barcodes such as PDF417 and QR Code. With this product, you can put barcodes on almost anything. We can make our own bar-coded name badges from Contacts, bar-coded product labels, and even barcode our documents (PDFs, Invoices, Purchase Orders and more).
BENEFITS OF BARCODE ZONE
1. Completely Native does not need any external resources or host server. 2. Easy to integrate with Standard and Visualforce Salesforce pages. 3. Generate Invoices for the products with barcode in PDF form. 4. No additional custom objects needed. 5. Supports almost all the browsers, Internet Explorer, Firefox, Google Chrome, Safari etc 6. Available for Developer, Enterprise and Unlimited editions.
System Requirement
Roll out Steps:
Preparation involves all of the planning you need to do before you can begin using Barcode Zone.
Identify key users of the system
Add licenses
Identify all of the users who will be using the Barcode Zone System and make sure you have the appropriate number of licenses.
Review all the technical requirements
Requirements to use Aqxolt Barcode Zone in a system
Operating System
All you need is a computer that can run a web browser. It doesn’t matter what type of hardware or operating system you’re running.
Browser
Google Chrome™, the most recent stable version Mozilla Firefox®, most recent stable version Microsoft Internet Explorer versions 9, 10, and 11 Apple Safari® versions 5. x, 6. x and 7. x on Mac OS X
Internet Connection
Salesforce is designed to use as little bandwidth as possible so that the site performs adequately over high-speed, dial-up, and wireless Internet connections.
Requirements to use Aqxolt Barcode Zone system with payment gateways
Payment Gateways
PayPal, Authorize.net
Installation Guide
Follow the steps if you are a new user.
The quickest way to assess if Barcode Zone is the right fit for your organization is by creating a free trial. You’ll immediately be taken to a salesforce registration page, where you need to fill out the form and start a free trial. On the app exchange Barcode Zone listing click the “Get It Now” button and login to the salesforce free trial instance and from here you can start to evaluate Barcode Zone in depth.
Installing Barcode Zone in your Salesforce instance
Choose the instance on which you want to install and click.
Step 2
Confirm the installation details and click the “Confirm and Install” button.
Step 3 Licensing Your users for Barcode Zone
Navigate to Setup> Apps > Packaging> Installed Packages.
In the list of installed Packages find the Barcode Zone app and click the “Manage Licenses” option under the actions section.
Click on the “Add User” button in the Licensed User section.
Select the user from the Available Users section; click the “Add” button.
Validate Your Installation
Click on the app launcher and notice that the “Print Barcodes” tab is available
Select any of the applications from the App Launcher and notice its available Tabs.
Overview
Barcode is an automatic identification technology consisting of a series of parallel, adjacent bars and spaces. It is an optical machine-readable representation of data, which displays certain data on products to which it is attached. This can be referred to as the Identification number of a product. A barcode is a series of numbers and each digit is coded with black and white stripes, representing the product information such as the name, classification about the products, how much the tag price is, when it expired, etc. There are a number of different standards of barcodes available in the
industry and it is used in almost all the industries including Automotive, Distribution, Electronics, Government, Hospitality, Logistic, Manufacturing,Security etc. Barcode Zone is a native, Software as a Service (SaaS) tool that can generate barcode in salesforce. Barcode Zone is a Visualforce component that can be used in any of your Visualforce page(s) / Standard Page(s) to generate linear barcodes such as Code-39, Code-128, EAN-13 and EAN-8 and 2D barcodes such as PDF417 and QR Code. With this product, you can put barcodes on almost anything. We can make our own bar-coded name badges from Contacts, bar-coded product labels, and even barcode our documents (PDFs, Invoices, Purchase Orders and more).
BENEFITS OF BARCODE ZONE
1. Completely Native does not need any external resources or host server. 2. Easy to integrate with Standard and Visualforce Salesforce pages. 3. Generate Invoices for the products with barcode in PDF form. 4. No additional custom objects needed. 5. Supports almost all the browsers, Internet Explorer, Firefox, Google Chrome, Safari etc 6. Available for Developer, Enterprise and Unlimited editions.
Method Two
METHOD 2:
You can also display barcode directly from URL. For any product, need to pass ‘barcode’ in ‘Code’ variable and ‘barcode type’ in ‘Type’ variable from URL. Visualforce page will directly fetch value from URL and display barcode.
Example 1:
Barcode Code is “AQXOLT” and Barcode Type is “code39”.
Example 2:
Barcode Code is “AQXOLT” and Barcode Type is “code128”.
Example 3:
Barcode Code is “39393999” and Barcode Type is “ean8”.
Example 4:
Barcode Code is “9780201734843” and Barcode Type is “ean13”.
Example 5:
Barcode Code is “AQXOLT” and Barcode Type is “qrcode”.
Example 6:
Barcode Code is “AQXOLT” and Barcode Type is “pdf417”.
How to (FAQs)
Supposed to be commonly asked issues & questions and troubleshoot tricks are in this section.
We are strongly recommended to install “Envato Toolkit” plugin for ease of use. Once necessary plugin installed and activated “Envato Toolkit” menu will be available at your admin side.
Important : If you have missing plugins or having issues to install any of them, all the related could be found under “recommended-plugins” folder within the downloaded package.
User Account Information
To obtain your API Key, visit your “My Settings” page on any of the Envato Marketplaces. Once a valid connection has been made any changes to the API key below for this username will not effect the results for 5 minutes because they’re cached in the database. If you have already made an API connection and just purchase a theme and it’s not showing up, wait five minutes and refresh the page. If the theme is still not showing up, it’s possible the author has not made it available for auto install yet.
Marketplace Username: Enter your Envato marketplace username.
Secret API Key: Enter your Envato marketplace Secret API Key (http://themeforest.net/user/[your-username]/api_keys/edit, Login to your Themeforest account, Settings > API Key)
Backup Information
This plugin will automatically save your theme as a ZIP archive before it does an upgrade. The directory those backups get saved to is wp-content/envato-backups. However, if you’re experiencing problems while attempting to upgrade, it’s likely to be a permissions issue and you may want to manually backup your theme before upgrading. Alternatively, if you don’t want to backup your theme you can check the box below.
You can also update the theme by replacing the old theme folder. First go to your theme directory then delete the theme folder and paste the new version of the theme.
How to set site’s favicon
Go to Appearance > Customize > Site Identity. Then Select an image as site icon. It’s recommended to use a .ico image as the site icon (favicon).
How to apply custom CSS code.
You can apply your own custom CSS code on Gullu theme. Your custom CSS code will not be lost even if you update the theme.
Navigate to Appearance > Customize > Additional CSS
Take a look at the screenshots-
How to change the transition time of Gullu slider.
You can change the slide transition time of Gullu slider manually. Here are the manual steps-
– Open the file named theme.js fromgullu\assets\js directory with your favorite text editor.
– Then navigate to the line number 51 and change the default time value with your own time duration.
Note: This is a custom task by yourself and does this process at your own risk.
How to edit the theme Footer?
You can change the theme default Footer color and other styling (including Footer Fact Counter) from Theme Settings > Footer Settings. And you can set the footer widgets from Appearance > Widgets. Put your footer widgets into the Footer Widgets sidebar area.
How to set site’s favicon
Go to Appearance > Customize > Site Identity. Then Select an image as site icon. It’s recommended to use a .ico image as the site icon (favicon).
Footer Settings
You can configure the footer area of the theme from the settings option. You will find all relevant section settings to the “Footer” option. Navigate to Theme Options > Footer Settings to go to this settings section. We provided all necessary instructions and descriptions with all the options.
Demo Import
If you want your site to look like exactly the ‘Gullu’ demos then you have to import the demo content successfully.
We integrated the One Click Demo installation feature to ‘Gullu’ WordPress theme. You can import all demo content just by a click only.
OneClick Demo Installation Process
Install the theme and activate it. Then install all the required plugins. Make sure all the required plugins are activated.
After activating all the required plugins navigate toAppearance > ‘One Click Demo Import’menu from the WordPress dashboard.
Note: If the option data do not import then you have to import it manually. Navigate to‘Theme Settings > Backup’. Then copy-paste the backup string here and click on the Import a Backup button. You will find the backup string in the options.txt file.
The recommended method to import the demo content.
If you failed to import the demo content by one click then you have to follow the below steps to import the demo content manually. You will get all demo content data with the theme package. You will find the demos in ‘gullu>inc/demo{disired-demo-number} this path.
Navigate to Tools > Importthen install the WordPress plugin and click on the ‘Run Importer’. Upload here the ‘theme_content.xml’ file.
Install the ‘Widget Importer & Exporter‘ plugin to import the demo widgets. Then navigate to Tools > Widget Importer & Exporter and upload here the ‘widget_data.wie’ file.
Now you have to import the Dental Options as like the demo. Navigate to ‘Theme Settings > Backup’. Then copy-paste the backup string here and click on the Import a Backup button. You will find the backup string in the options.txt file.
We have integrated some premium plugins with the theme and bundled those plugins with the theme. You don’t have to input your Themeforest product ID to unlock any theme features. We are not providing the third party plugin’s license along with the theme.
We are providing the plugins file only and we are continuously updating the bundled plugins with the theme updates. You can install/get those plugins on Appearance > Instal Plugins. Or you can get the plugin files in the rogan/inc/tgm/plugins folder.
Language Translations
All of our Themes are able to be translated into any language. The process of translating the theme is a user responsibility. The following instructions are given as guidance.
Open wp-config.php and replace this: define ('WPLANG', ''); with this (substitute the language string (bg_BG) with your own!): define ('WPLANG', 'bg_BG');
Connect to your site -> open your theme/languages directory
Download the default.pot file and open it with POEDIT.
Translate file and save it as bg_BG (the file name must match with the string you inserted into wp-config.php)
Two files will be generated after save. bg_BG.pot and bg_BG.mo
Upload the .mo and .pot files into wp-content/themes/your-theme/languages folder
Your WordPress installation should be in the language you intend on using the site.
Footer Settings
You can configure the footer area of the theme from this settings option. You will find all relevant section settings to the “Footer Settings” option. Navigate to Theme Options > Footer Settings to go to this settings section. We provided all necessary instructions and descriptions with all the options.
Language Translations
All of our Themes are able to be translated into any language. The process of translating the theme is a user responsibility. The following instructions are given as guidance.
Open wp-config.php and replace this: define ('WPLANG', ''); with this (substitute the language string (bg_BG) with your own!): define ('WPLANG', 'bg_BG');
Connect to your site -> open your theme/languages directory
Download the default.pot file and open it with POEDIT.
Translate file and save it as bg_BG (the file name must match with the string you inserted into wp-config.php)
Two files will be generated after save. bg_BG.pot and bg_BG.mo
Upload the .mo and .pot files into wp-content/themes/your-theme/languages folder
Your WordPress installation should be in the language you intend on using the site.
How to set site’s favicon
Go to Appearance > Customize > Site Identity. Then Select an image as site icon. It’s recommended to use a .ico image as the site icon (favicon).
Your theme (Gullu) contains outdated copies
This message appears when WooCommerce plugin changes any of its core files. Usually, this happens when WooCommerce publishes a major update or any minor update after the major update. (Example. 3.3, 3.3.1)
We recommend clients to always read the changelog of your theme if the latest update of the theme supports that version of WooCommerce as noted in the plugin itself throughout the theme.
If you recently updated WooCommerce, you might have spotted a notice like this on your Plugins page.
If you see that the latest version of the theme doesn’t support the released WooCommerce version then please wait until we release a theme update that will support the latest version of this plugin.
If you accidentally updated the plugin then don’t worry, we probably are working on the update and when the theme update is ready you will be notified by email if you have already enabled.
Demo Import
If you want your site to look like exactly the ‘Charles’ demos then you have to import the demo content successfully.
We integrated the One Click Demo installation feature to ‘Charles’ WordPress theme. You can import all demo content just by a click only.
OneClick Demo Installation Process
Install the theme and active it. Then install all required plugins. Make sure all the required plugins are activated.
After activating all the required plugins navigate toAppearance > ‘One Click Demo Import’menu from the WordPress dashboard.
Note: If the option data do not import then you have to import it manually. Navigate to‘Theme Settings > Backup’. Then copy-paste the backup string here and click on the Import a Backup button. You will find the backup string in the options.txt file.
The recommended method to import the demo content.
If you failed to import the demo content by one click then you have to follow the below steps to import the demo content manually. You will get all demo content data with the theme package. You will find the demos in ‘charles>inc/demo{disired-demo-number} this path.
Navigate to Tools > Importthen install the WordPress plugin and click on the ‘Run Importer’. Upload here the ‘theme_content.xml’ file.
Install the ‘Widget Importer & Exporter‘ plugin to import the demo widgets. Then navigate to Tools > Widget Importer & Exporter and upload here the ‘widget_data.wie’ file.
Now you have to import the Dental Options as like the demo. Navigate to ‘Theme Settings > Backup’. Then copy-paste the backup string here and click on the Import a Backup button. You will find the backup string in the options.txt file.
How to (FAQs)
Harum proident? Volutpat sint. Dicta. Eleifend, distinctio placeat nec commodo asperiores posuere fusce illo, adipiscing leo velit ipsum. Mauris enim itaque penatibus, consectetur fermentum, vel temporibus interdum
We are strongly recommended to install “Envato Toolkit” plugin for ease of use. Once necessary plugin installed and activated “Envato Toolkit” menu will be available at your admin side.
Important : If you have missing plugins or having issues to install any of them, all the related could be found under “recommended-plugins” folder within the downloaded package.
User Account Information
To obtain your API Key, visit your “My Settings” page on any of the Envato Marketplaces. Once a valid connection has been made any changes to the API key below for this username will not effect the results for 5 minutes because they’re cached in the database. If you have already made an API connection and just purchase a theme and it’s not showing up, wait five minutes and refresh the page. If the theme is still not showing up, it’s possible the author has not made it available for auto install yet.
Marketplace Username: Enter your Envato marketplace username.
Secret API Key: Enter your Envato marketplace Secret API Key (http://themeforest.net/user/[your-username]/api_keys/edit, Login to your Themeforest account, Settings > API Key)
Backup Information
This plugin will automatically save your theme as a ZIP archive before it does an upgrade. The directory those backups get saved to is wp-content/envato-backups. However, if you’re experiencing problems while attempting to upgrade, it’s likely to be a permissions issue and you may want to manually backup your theme before upgrading. Alternatively, if you don’t want to backup your theme you can check the box below.
You can also update the theme by replacing the old theme folder. First go to your theme directory then delete the theme folder and paste the new version of the theme.
How to set site’s favicon
Go to Appearance > Customize > Site Identity. Then Select an image as site icon. It’s recommended to use a .ico image as the site icon (favicon).
Menu Not Appearing
Please make sure you have generated and set menus on “Appearance > Menus”.
“Main Menu” menu locations have to be filled to make the menus work as expected.
How to Paginate a Post ?
In order to paginate your blog post, in the Write panel in your WordPress admin, switch to the TEXT view (if you are using the Visual view) and then enter the following code to wherever you want to break the post up into a new page:
<!--nextpage-->
How to apply custom CSS code.
You can apply your own custom CSS code on Charles theme. Your custom CSS code will not be lost even if you update the theme.
Navigate to Appearance > Customize > Additional CSS
Take a look at the screenshots-
How to set site’s favicon
Go to Appearance > Customize > Site Identity. Then Select an image as site icon. It’s recommended to use a .ico image as the site icon (favicon).
Footer Settings
Language Translations
All of our Themes are able to be translated into any language. The process of translating the theme is a user responsibility. The following instructions are given as guidance.
Open wp-config.php and replace this: define ('WPLANG', ''); with this (substitute the language string (bg_BG) with your own!): define ('WPLANG', 'bg_BG');
Connect to your site -> open your theme/languages directory
Download the default.pot file and open it with POEDIT.
Translate file and save it as bg_BG (the file name must match with the string you inserted into wp-config.php)
Two files will be generated after save. bg_BG.pot and bg_BG.mo
Upload the .mo and .pot files into wp-content/themes/your-theme/languages folder
Your WordPress installation should be in the language you intend on using the site.
How to Paginate a Post?
In order to paginate your blog post or page, in the Write panel in your WordPress admin, switch to the TEXT view (if you are using the Visual view) and then enter the following code to wherever you want to break the post up into a new page:
<!--nextpage-->
Recusandae sapien cursus
Magnis adipisci culpa turpis proin velit, ligula laboris modi nam aut, debitis massa praesentium gravida dicta nam aliquet interdum? Rerum ullamco! Amet veniam repudiandae. Ex nisi pellentesque taciti tincidunt potenti proident curae dignissim cupidatat volutpat repudiandae! Iusto at, eiusmod excepturi. Pulvinar molestias, leo massa? Gravida diam. Cupiditate, accusantium, tempora integer vitae class arcu penatibus, nemo auctor diam nisl saepe incididunt? Egestas. Adipiscing architecto doloremque anim dicta nonummy eaque? Sed a exercitationem pede! Quae egestas lacus. Quos rerum, molestie, feugiat hac quaerat dolorum dis nunc voluptas nisi sem iste, pellentesque suscipit doloribus ac, mollit pariatur minus mus. Etiam sociosqu scelerisque donec.
Debitis felis leo vestibulum architecto? Parturient, corrupti vivamus, elit labore? Vivamus sapiente? Nisl vitae, facilisi suspendisse saepe neque? Voluptas sapien unde debitis quasi sem! Luctus incididunt repellendus, facilis id, ultricies, anim, donec, nemo, nostrum conubia, esse, aenean qui ut voluptatum aliquet diamlorem neque tortor habitant. Eum ridiculus penatibus? Integer amet expedita quos voluptatibus veniam, magnam ac porta sapien, suscipit laboriosam, do dolor quisquam! Iusto, modi. Laboris, ridiculus mi assumenda morbi a vitae vivamus illo aut leo. Maecenas, maecenas integer fames autem temporibus? Ratione recusandae, velit inventore nisl, nascetur at optio, class, quidem lacinia metus felis nibh, ratione tortor numquam rhoncus.
Laudantium taciti pretium esse magnis quis eiusmod! Quis eius eros aspernatur bibendum beatae, mauris do lacus? Ullamcorper quaerat elementum hymenaeos! Alias voluptatem exercitation pharetra, magni, voluptas in hendrerit, ut ratione nascetur, sagittis, eiusmod dignissimos quas. Lacus, accumsan ut culpa fusce, magna consequatur? Primis litora? Voluptas platea aute lacus, aut turpis, congue convallis fringilla platea hic facilisi! Maecenas dolorem nostrum ipsam ducimus massa massa penatibus lobortis consequat, ante commodo ut laborum, pellentesque dis sequi dicta interdum tellus sunt sed. Nemo fringilla, ullamcorper congue voluptatem taciti! Esse cupidatat, iure saepe magnis, at, mus consequatur perferendis potenti maiores accusantium, sagittis ultrices quidem autem.
Direction Shortcode
What is an Extension?
For editing menu navigation settings go to Theme Options > Header > Top of Header
. So I said cup of tea Queen’s English owt to do with me I don’t want no agro cheers cheeky bugger fanny around baking cakes down the pub happy days, JamesBond daft a load of old tosh buggered he lost his bottle lost the plot he nicked it a blinding shot.
[docly_tooltip id=”1″]Tooltip text[/docly_tooltip] mufty quaint no biggie cras baking cakes barney bamboozled, what a plonker bum bag he legged it young delinquent knees up Eaton the full monty arse over tit, my lady buggered happy days amongst bugger all mate are you taking the piss brolly. [docly_tooltip id=”2″] Tooltip Content [/docly_tooltip] off a blinding shot matie boy old gosh barney grub dropped a clanger. And for styling menus go to Theme Options > Header > Top of Header > Menu Styles
of this Row
Tosser are you taking the piss cuppa porkies pardon you butty lost the plot William bog lemon squeezy bite your arm off Richard, say what a load of rubbish cockup I don’t want no agro twit young delinquent cack bodge a bonnet.
Unordered list items
Go to Docly SettingsHeaderLogo
Consectetur adipiscing elit
Integer molestie lorem at massa
Facilisis in pretium nisl aliquet
Ordered List Items
Go to Docly SettingsHeaderLogo
Consectetur adipiscing elit
Integer molestie lorem at massa
Facilisis in pretium nisl aliquet
Voluptatibus massa tempor
What is an Extension?
For editing menu navigation settings go to Theme Options > Header > Top of Header
. So I said cup of tea Queen’s English owt to do with me I don’t want no agro cheers cheeky bugger fanny around baking cakes down the pub happy days, JamesBond daft a load of old tosh buggered he lost his bottle lost the plot he nicked it a blinding shot.
[docly_tooltip id=”1″]Tooltip text[/docly_tooltip] mufty quaint no biggie cras baking cakes barney bamboozled, what a plonker bum bag he legged it young delinquent knees up Eaton the full monty arse over tit, my lady buggered happy days amongst bugger all mate are you taking the piss brolly. [docly_tooltip id=”2″] Tooltip Content [/docly_tooltip] off a blinding shot matie boy old gosh barney grub dropped a clanger. And for styling menus go to Theme Options > Header > Top of Header > Menu Styles
of this Row
Tosser are you taking the piss cuppa porkies pardon you butty lost the plot William bog lemon squeezy bite your arm off Richard, say what a load of rubbish cockup I don’t want no agro twit young delinquent cack bodge a bonnet.
Unordered list items
Go to Docly SettingsHeaderLogo
Consectetur adipiscing elit
Integer molestie lorem at massa
Facilisis in pretium nisl aliquet
Ordered List Items
Go to Docly SettingsHeaderLogo
Consectetur adipiscing elit
Integer molestie lorem at massa
Facilisis in pretium nisl aliquet
Doc title
What is an Extension?
For editing menu navigation settings go to Theme Options > Header > Top of Header
. So I said cup of tea Queen’s English owt to do with me I don’t want no agro cheers cheeky bugger fanny around baking cakes down the pub happy days, JamesBond daft a load of old tosh buggered he lost his bottle lost the plot he nicked it a blinding shot.
[docly_tooltip id=”1″]Tooltip text[/docly_tooltip] mufty quaint no biggie cras baking cakes barney bamboozled, what a plonker bum bag he legged it young delinquent knees up Eaton the full monty arse over tit, my lady buggered happy days amongst bugger all mate are you taking the piss brolly. [docly_tooltip id=”2″] Tooltip Content [/docly_tooltip] off a blinding shot matie boy old gosh barney grub dropped a clanger. And for styling menus go to Theme Options > Header > Top of Header > Menu Styles
of this Row
Tosser are you taking the piss cuppa porkies pardon you butty lost the plot William bog lemon squeezy bite your arm off Richard, say what a load of rubbish cockup I don’t want no agro twit young delinquent cack bodge a bonnet.
Unordered list items
Go to Docly SettingsHeaderLogo
Consectetur adipiscing elit
Integer molestie lorem at massa
Facilisis in pretium nisl aliquet
Ordered List Items
Go to Docly SettingsHeaderLogo
Consectetur adipiscing elit
Integer molestie lorem at massa
Facilisis in pretium nisl aliquet
Example doc title
What is an Extension?
For editing menu navigation settings go to Theme Options > Header > Top of Header
. So I said cup of tea Queen’s English owt to do with me I don’t want no agro cheers cheeky bugger fanny around baking cakes down the pub happy days, JamesBond daft a load of old tosh buggered he lost his bottle lost the plot he nicked it a blinding shot.
[docly_tooltip id=”1″]Tooltip text[/docly_tooltip] mufty quaint no biggie cras baking cakes barney bamboozled, what a plonker bum bag he legged it young delinquent knees up Eaton the full monty arse over tit, my lady buggered happy days amongst bugger all mate are you taking the piss brolly. [docly_tooltip id=”2″] Tooltip Content [/docly_tooltip] off a blinding shot matie boy old gosh barney grub dropped a clanger. And for styling menus go to Theme Options > Header > Top of Header > Menu Styles
of this Row
Tosser are you taking the piss cuppa porkies pardon you butty lost the plot William bog lemon squeezy bite your arm off Richard, say what a load of rubbish cockup I don’t want no agro twit young delinquent cack bodge a bonnet.
Now appears with all tasks displayed in a list view.
2) Old Work Order Screen with Timer Enabled Before Task Start
2) New Work Order Screen with Timer Enabled Before Task Start
Each task will have a play button associated with it
3) Old Work Order Screen with Timer Enabled After Task Start
3) New Work Order Screen with Timer Enabled After Task Start
Under each task, find respective actions like complete, cancel, pause, clock in, and clock out.
4) Old Work Order Tasks without Timer
4) New Work Order Tasks without Timer
Each task has a “Done” button to complete the task and a “To Do” button to undo changes for completed tasks.
5) Old Work Order Screen After All Tasks Are Completed:
5) New Work Order Screen After All Tasks Are Completed:
– Find the “All Done” button indicating all tasks completed and a “Build” button to proceed with producing and consuming products.
– If the WO doesn’t have any Bill of materials(BOMs) and Work in progress(WIPs) then you will see “All Done” and “Complete WO” button.
6) Old Build Screen from Work Orders - With Only BOMs:
6) New Build Screen from Work Orders - With Only BOMs:
Displays WIP details at the top, followed by “To Produce” and “To Scrap” quantities for all BOMs and the bill of materials below.
7) Old Build Screen from Work Orders - With BOMs, Serials:
7) New Build Screen from Work Orders - With BOMs, Serials:
Displays WIP details at the top, serials to produce list on the left, and BOMs on the right side of the serials.
8) Old Work Order Screen After Partially Producing the Products:
8) New Work Order Screen After Partially Producing the Products:
The “Complete WO” button is available in the dropdown next to the “Build” button to complete the WO partially.
9) Old Work Order Screen with Tasks Associated to Quality Checklist:
9) New Work Order Screen with Tasks Associated to Quality Checklist
Quality checks are displayed under each associated task. If the Quality check is marked as required, you need to complete the QA before completing the respective tasks.
Finance
Accounts Statements
These features will be launched by June 24, 2024.
The screen will display details of any invoices, received payments, and credit notes from customers. It will also show billing details, payments made, and debit notes from vendors.
The screen will display all debit notes received from vendors.
1. The screen will show details of all invoices from customers.
2. The screen will display all received payments from customers.
3. The screen will show all credit notes issued to customers.
4. The screen will display billing details from vendors.
5. The screen will show all payments made to vendors.
6. The screen will display all debit notes received from vendors.
Inter Company Invoicing
These features are scheduled to be launched by June 24, 2024.
The user will select specific customer orders and create a purchase order for those orders from another organization.
Once the Purchase Order is created, the user will raise intercompany orders associated with it.
Upon issuance of the order, the procurement organization will initiate the manufacturing process. Once completed, they will generate an invoice for the intercompany order and share it with the respective organization.
After the invoice is posted, it will account for expenses using the product COA mapping record setup for the specific organization.
Foreign Exchange Gain/Loss
These features are scheduled to be launched by June 24, 2024.
Whenever a bill or invoice is posted in a currency different from the organization’s currency, the exchange rate will be applied based on the vendor bill date for bills and the invoice date for invoices. The resulting difference in amount will be accounted for with ledger entries.
Now appears with all tasks displayed in a list view.
2) Old Work Order Screen with Timer Enabled Before Task Start
2) New Work Order Screen with Timer Enabled Before Task Start
Each task will have a play button associated with it
3) Old Work Order Screen with Timer Enabled After Task Start
3) New Work Order Screen with Timer Enabled After Task Start
Under each task, find respective actions like complete, cancel, pause, clock in, and clock out.
4) Old Work Order Tasks without Timer
4) New Work Order Tasks without Timer
Each task has a “Done” button to complete the task and a “To Do” button to undo changes for completed tasks.
5) Old Work Order Screen After All Tasks Are Completed:
5) New Work Order Screen After All Tasks Are Completed:
– Find the “All Done” button indicating all tasks completed and a “Build” button to proceed with producing and consuming products.
– If the WO doesn’t have any Bill of materials(BOMs) and Work in progress(WIPs) then you will see “All Done” and “Complete WO” button.
6) Old Build Screen from Work Orders - With Only BOMs:
6) New Build Screen from Work Orders - With Only BOMs:
Displays WIP details at the top, followed by “To Produce” and “To Scrap” quantities for all BOMs and the bill of materials below.
7) Old Build Screen from Work Orders - With BOMs, Serials:
7) New Build Screen from Work Orders - With BOMs, Serials:
Displays WIP details at the top, serials to produce list on the left, and BOMs on the right side of the serials.
8) Old Work Order Screen After Partially Producing the Products:
8) New Work Order Screen After Partially Producing the Products:
The “Complete WO” button is available in the dropdown next to the “Build” button to complete the WO partially.
9) Old Work Order Screen with Tasks Associated to Quality Checklist:
9) New Work Order Screen with Tasks Associated to Quality Checklist
Quality checks are displayed under each associated task. If the Quality check is marked as required, you need to complete the QA before completing the respective tasks.
Accounts Statements
These features will be launched by June 24, 2024.
The screen will display details of any invoices, received payments, and credit notes from customers. It will also show billing details, payments made, and debit notes from vendors.
The screen will display all debit notes received from vendors.
1. The screen will show details of all invoices from customers.
2. The screen will display all received payments from customers.
3. The screen will show all credit notes issued to customers.
4. The screen will display billing details from vendors.
5. The screen will show all payments made to vendors.
6. The screen will display all debit notes received from vendors.
CPQ Documentation
CPQ stands for Configure, Price, Quote. CPQ provides the functionality to convert Quote to Cash in an easy way.
Why Axolt CPQ?
Axolt CPQ contains the box functionality like Product Configurator, Quote Console, calculate profit and loss, Quote, Contracts signing process with the Docusign, Order, Invoices, payments from Authorize.net and PayPal, Supporting BOMs, Product/Service Sell, discount calculation, auto tax calculation and many more.
The abbreviation CPQ refers to Configure, Price, Quote. CPQ is a sales tool for companies to quickly and accurately generate quotes for orders. It provides the functionality to convert Quote to Cash in an easy way. CPQ applications works in tandem with CRM platforms, ERP programs, and other business technology, which helps ensure integrated data as well as accuracy.
Why Aqxolt CPQ?
Why Aqxolt CPQ?
Aqxolt CPQ contains the out of the box functionality like Product Configurator, Quote Console, calculate profit and loss, Quote, Contracts signing process with the DocuSign, Orders, Invoices, payments from Authorize.net and PayPal, Supporting BOMs, Product/Service Sell, discount calculation, auto tax calculation and many more.
Getting started with Aqxolt CPQ
Guideline for basic setup to run the CPQ flows
Organization Account, their Contact, Address, and their related records setup –
Customer accounts their Contact, Address setup.
Credentials Setup
Payments
Product Configuration
Price Books
Tier Discount Allocation
Cost card
Features
Options
Rules
Inventory/Stock
Product/Service Sale
Supporting BOMs
Creation of Quotes using ‘Quote Console’
Calculate P&L
Add/Edit Products
Site Implantation(multiple/Single)
Send the Quotes for Manager Approval
Send the Quotes to the Customer to sign the Contracts using DocuSign
Convert the Quote into an Order using the ‘Convert to Order’ button.
Sync Quote and Orders records before Order activation.
Create Orders from EPoS.
Getting Started
Install the Aqxolt CPQ: – Users can install the Aqxolt CPQ from the App exchange
1. Getting started with Aqxolt CPQ
Install the Aqxolt CPQ: – Users can install the Aqxolt CPQ from the App exchange.
Navigate to the App Exchange and search ‘Aqxolt CPQ for Manufacturing and Retails’.
Once you are on the Application detail page, click on the ‘Get It Now’ button, and follow the prompts to proceed to install the Application.
Guideline for basic setup
Guideline for basic setup to run the CPQ flows
Organization Account, their Contact, Address, and their related records setup –
Customer accounts their Contact, Address setup.
Credentials Setup
Payments
Product Configuration
Price Books
Tier Discount Allocation
Cost card
Features
Options
Rules
Inventory/Stock
Product/Service Sale
Supporting BOMs
Organization Account, their Contact, Address, and their related records setup
You need to create one Organization account in the system, for that Organization account; you need to set up the Channel, Distribution Channels, Sites (Warehouse), and employee record for the logged-in user.
Also, you need to create the Profiling records for the created Organization to assign them to the customer accounts and the employee records.
a) Organization Account and their Contact, Address – Organization Accounts represent a company, it can contain many channels and Its distribution Channels, each distribution channels can have their own site or Warehouse.
Organization Account: – Is a legal business entity responsible for all transactions such as sales and purchases etc.
Navigate to the Accounts object from the app launcher and click on the ‘New’ button.
Enter your company name on the Account Name field, select the Accounttype as ‘Organization’, make the account Active, select the Currency from the AccountCurrency field, enter other information, and click Save.
After clicking on the Save button the Organization account will be created.
Addresses and Contacts:
Open the created Organization Account, go the related list and create the Address and the contact by clicking on the New button.
Note: – The users can create different Billing Address and Shipping Address for an Organization. Use checkbox ‘Is Billing Address’ to enable it as Billing Address and use checkbox ‘Is Shipping Address’ to enable it as Shipping address.
b) Channel: – Channels refers to the mode of business (like Retail sales, Online Sales & 3rd part distributers)
Find the ‘Channel’ tab from the App Launcher.
Click on the New button.
Enter the ChannelName, the Organization account and Currency will be selected by default; Active field should be checked, enter other information, and click on the Save button to create the Channel record.
C) Distribution Channel: – Is a group that consist of multiple Distribution Center.
Go to related list of the created Channel and find the Distribution Channel object (related list).
Click on the New button.
Enter the DistributionChannelName, Channel will be selected by default, select/create a new ‘Site’ (refer the Site creation process below), select/create Contact.Active and ReturnHandling checkbox should be checked. Check Primary checkbox if the DC is primary DC, select the priority(any) and click on Save button to create a new Distribution Channel record.
d) Site: – Site is a physical building.
Find the Site tab from the App Launcher.
Click on the ‘New’ button.
Enter the WarehouseName, select/create the PrimaryContact and Address, Organization (select the created Organization Account), Active checkbox should be checked, Type should be ‘Warehouse’, enter a text under barcode field and click on the Save button to create the Site/Warehouse record.
In the same way, create the Order Profile and the Employee Profile records by selecting the Order and Employee record types.
f) Employee: – One Employee record should be there for each logged in user.
Find the Employee tab from the App Launcher.
Click on the ‘New’ button.
Enter the EmployeeName, select the created Channel, select the Organization (select the created Organization Account), the Active checkbox should be checked, select the EmployeeUser (logged in user record), select the Employee Profile (created employee profile), fill other information if required and click on the Save button to create the employee record
Customer Accounts and their Contact, Address
Customer Accounts and their Contact, Address: – The Customer Account represents an individual customer or organization involved with the business. The Customer accounts can be used to create the Quotes and the Orders.
Create the Customer Account: –
Find the Accounts tab from the App Launcher.
Click on the “New” button, available in the top right-hand corner of the page.
Enter the Name of the Customer in the Account Name field, AccountType should Customer, Select the Account Profile (created customer profile) and the Order Profile (created Order profile), Active field should be checked, Select the Organization (created Organization Account), enter other information if required and click on Save button to create the Customer Account.
Create the Address and the Contact record for Customer Account: – The address can the shipping or the billing address for the created Customer and the Contact is the point of contact for the Customer.
Open the created Customer Account, go the related list and create the contact and the Address by clicking on the New button.
Site implementation for the Customer
Site implementation for the Customer: – If want to create a quote/order from a specific Site then you need to assign the Sites to a customer.
Open the created Customer Account, go the related list, find the Site object (related list) and create a Site by click on New button.
Credentials Setup
To setup the Payment (Authorized.Net, PayPal, Stripe etc.) and DocuSign Credentials in Aqxolt CPQ, navigate to the Credentials Setup page and setup the Credentials.
Find the Credential Setup tab from the App Launcher.
Open the tab and Navigate to the Payments section to setup the Credentials for different types of Payments.
Click on the New button, once Credentials setup page appear, enter all the required information, and click on Save.
Navigate to the DocuSign section by clicking on DocuSign section.
Click on the New button, once Credentials setup page appear, enter all the required information, and click on Save.
Product Configuration
Product Configuration: – The ProductConfiguration page allows the users to configure or allow to setup related list records for each of the Products. So that the user can select the configured options while creating the Quotes.
Find the Product Configuration tab from the App launcher.
Open the tab, On the landing page, you can see all the available products. You can search the Products using the SearchBar or you can filter the products by ProductFamily wise.
Also, the +Product button is available in the upper right-hand corner to add/create the new products.
Also, you can edit or delete any existing product from the landing page.
To Configure the products or add the related list records, click on the Configure button.
If the Products has any related records, then you can see all the available related records on the Configuration page.
The users can add the new related records (Price books, Tier Discount Allocation, Cost Cards, Features, Options, Rules, Inventory/Stock, and the Product service Sale) by clicking on the +New button.
Quotes using ‘Quote Console’
Quote Console allows the users to create the Quotes for the available customers.
Click on the Quote Console from the App Navigation, available in the CPQ App.
OR
Find the Quote Console tab from the App Launcher.
Click on the tab and the system will take you to the Quote Console’s Home page.
On the Home page, select the created Customer Account. After selecting the Customer account system will pull its Contact, and Address (Ship-To-Address and Bill-TO-Address) records automatically.
Logged-In user’s Employee record will be auto-selected and the created Customer Profile will be auto-selected
Once you select the Customer, click on the +New Button the system will take you to AddProducts screen to add the Quote Line Items.
On the AddProducts screen, you can search any product using the Search Bar or filter out any Product by Product’s Family wise.
You can see the details of Products on the Add Products screen. ProductCode, ProductName, UnitofMeasure, PriceperUnit (Price/Unit coming from Price Book record), Quantity (default quantity will be 1, but you can select more than one quantity at a time), DiscountperUnit (Coming from Tier Discount Allocation record or you can enter manually), Description of the product (you can enter manually if require).
Note: –Mechanical Ventilator is a Configurable Product, if you select that product the system will take you to the Configuration page, from the three you can configure this product by selecting different Feature Options. See the below screenshot.
Once you configure a configurable product and select it or select a normal product from the Add Products page, click on the Add Product button to add the Products in the Quote.
Once you hit the Add Products button the Products will be added to the Quote record.
Calculate P & L
You can edit the records like Price, Quantity, Discount/Unit, and the Description of the added products.
You can see the Profit and Loss calculation on the Calculate P&L page. Click on the green color Calculate P&L button and the system will take you to the Calculate Profit and Loss page.
Note: –The system calculates the Profit and Loss based on Unit Price (Unit Piece coming from Price Book, also editable) and Cost Price (Cost Price coming from Cost Card).
Click on the Back button from the Calculate P&L page, on QuoteandLineItems page check all the records, and click on the Save button to create the Quote.
Add/Edit Products
Add/Edit Products: – Using the Add/Edit button you can add a new product to the Quote, or you can edit the existing Quote Line Items.
Once you create the Quote open the Quote record and click on the Add/Edit Products button available for the Quote Line-Item related list.
You can Add or Edit the Line item records from the Add/Edit Products home page.
You can Edit the Line item records and see the CalculationProfitandLoss from the Add/Edit Products final page. Click on the Next button available on the home page, see the above screenshot.
Site Implantation
Site Implantation(multiple/Single): – If you assign a Site to a customer, then the customer will be able to add the products on Quote for the selected Sites only.
Find the Site tab from the App Launcher, and click on the tab.
Once you are on the Site record page, click on the New button.
On the New Site creation page, enter the SiteName, select PrimaryContact, Address, and Currency, and select the Customer Account for which you want to create the Site. The active checkbox should be checked, Type should be Warehouse, enter Barcode, select the created Organisation Account, and click on Save.
Once you create the Sites for a customer, they can select those Sites while adding Products to the Quote using the Add/Edit button.
Quotes for Manager Approval
Once you create the Quotes, you can submit the Quotes for approval using SubmitforApproval.
Open the Quote record, click on the SubmitforApproval button to submit the Quote for Manager Approval.
Contracts using DocuSign
Aqxolt CPQ is integrated with DocuSign so that you can send the Quotes to the customer to sign the contract.
Send the Quotes to Customer to sign the Contracts using DocuSign
Aqxolt CPQ is integrated with DocuSign so that you can send the Quotes to the customer to sign the contract.
Open the created quote, and click on the DocuSign button, available in the Quote header.
Once you click on the DocuSign button, the system will ask you to log in. Log in to DocuSign and the system will take you to the Contract creation page.
Note: –
You need to set up the DocuSign Credentials in the system using the Credentials Setup page. Refer to the Credentials Setup steps mentioned above.
You can change the templates from the StandardQuoteDocumentation option, or you can upload a Custom template using the CustomDocument option.
After selecting the Standard Quote Document or uploading the Custom Template, click on the CreateDraftContract button available below the Template.
After clicking on the Create Draft Contact button, the system will you to the DocuSign page, where you can drag ad drop the required fields into the template. You can drop the fields anywhere in the template.
Once you drag and drop the field in the template, send the template to Customer by clicking on the Send button available in the upper right and bottom right corner.
Once you click on the Send button, an email will be sent to the Customer and the Contact record will gets created. The user can see the created Contract number on the Quote record page.
The Customer need to open the email and need to click on the Review Document.
Once the Customer click on the ReviewDocument button from the email, the system will take the customer next screen where the customer needs to sign the consent form and click on continue button.
After clicking on the Continue button, the system will allow to review the document and allow to Finish the Contract Sign process by clicking on Finish button.
Note: – Enter the details on the input fields or attach any file if there are any input fields or any option to attach file.
After click on the finish button system will ask to Sign-up to DocuSign. The customer can skip this option by clicking on the NoThanks option.
Once the Customer click on the No Thanks option, the contact signing process will be completed.
Once the Customer successfully sign the Contact, the Quote will be Accepted automatically. Open the Quote records and check the Quote Status.
Once the Quoted Accepted, you are allowed to convert the Quote into an Order.
Order using Convert to Order
The Aqxolt CPQ allows creating the Orders for the Accepted Quotes using the Convert to Order button.
Convert the accepted Quote into an Order using the ‘Convert to Order’ button:
The Aqxolt CPQ allows creating the Orders for the Accepted Quotes using the Convert to Order button.
Open the accepted Quote record and click on the Convert to Order button, available in the upper right corner.
After clicking on the Convert to Order button, the system will take you to the order creation page. On the order creation page, you can see all the details along with the Line Items.
On the Order creation page, enter the order Description if applicable. Edit the Price, Quantity, Change the Discount Plan, or manually enter the Discount/Unit, enter Line Description If required, and click on the SAVE button available at the bottom of the page by selecting the line items.
Once you click on the Save button, an Order will be created with Draft status. You can see the created Contract and Quote record on the Order detail page.
Note: – You can edit the existing Order Products or add new Products on the Order before activating the Order.
Sync Quote and Orders records
If you edit Order records or Add/Edit Line-item records on the Order level, Aqxolt CPQ will sync the data from Order to Quote.
Or
If you edit Quote records or Add/Edit Line-item records on Quote level, Aqxolt CPQ will sync the data from Quote to Order.
Create Orders from EPoS
The orders are created through Enterprise Point of Sale for a situation when a customer walks into a store/outlet, orders a product, pays for it, and takes the product home or opts for the available shipment options. Upon confirming the sales order, the sales invoice is created automatically. Each sales order has a unique number to enable simple tracking. The order console where the sale orders are processed is as shown below. It is referred to as Enterprise Point of Sale (EPOS) in Aqxolt CPQ. Click on the Epos tab as shown below.
Creating the sales order from Enterprise Point of Sale (EPoS) Tab
The orders are created through Enterprise Point of Sale for a situation when a customer walks into a store/outlet, orders a product, pays for it, and takes the product home or opts for the available shipment options. Upon confirming the sales order, the sales invoice is created automatically. Each sales order has a unique number to enable simple tracking. The order console where the sale orders are processed is as shown below. It is referred to as Enterprise Point of Sale (EPOS) in Aqxolt CPQ. Click on the Epos tab as shown below.
Click on the Epos from the App Navigation, available in the CPQ App.
OR
Find the Epos tab from the App Launcher.
Once you click on the Epos tab system will take you to the Epos home page.
Under the Customer Details section Select the Customer Name from the Account Name Lookup field, once you select the customer’s name the system will automatically pull the Contact and the Billing and Shipping address. (The customer account needs to have the Contact and the address records).
If you cannot locate the customer’s name in the Account Name lookup field, you can create a new customer account without exiting the Epos page or switch to other windows. Simply click on the Account tab located on the right-hand side of the screen. On the Account tab, you will be prompted to add:
Account
Contact
Address
You will be able to add a new Customer account, a new contact for the new or existing customer and both the “Bill To” and “Ship To” addresses, for the new or existing customer. Based on the selection made, the relevant screens appear to add information.
Click on the Account tab to create a new customer account.
Enter account name, assign the Account Profile and Order profile. Enter other details and click on Create Account button.
2. Click on the Contact tab to create a new contact for the Created customer.
Account Name will be auto populated, enter First and Last Name, enter other details if required and click on the Create Contact button.
3. Click on the Address tab to create a new BillTo and ShipTo address for the Created customer.
Account will be auto-selected, select the created Contact, enter Address Line 1, City, Zip/Postal Code, Country, and other details if required, and click on the Create Address button.
Note:-
Once you select the customer’s name from the Account Name lookup field, the contact details, such as contact name, email address, phone number, account ID, customer profile, and address details, are retrieved automatically.
You may select the retrieved “bill to” address or select a different “bill to” address if one or more “bill to” addresses are saved for the selected customer, this change will be made for this order only and not on the customer account.
A single “bill to” address/a single customer may have several “ship to” addresses. Select the “ship to” address from the available picklist for the selected customer.
The “ship to” address describes the location where the order is to be shipped. If the “ship to” address required for the order has not been saved in the customer account, click on the Accounts tab to create new address information.
If you want to select an existing sales order then, click on the lookup and select the sales order.
If you are creating a new sales order, then a new sales order number is generated after adding the product line items and saving the order.
Once you Select the customer, add the products into the Order
Click on the Add button, to add the line items into the order.
After clicking on the Add button, the system will take you to the Add Products page where you can find the products and add them as Order Products.
You can scroll the page or use the search bar to find a product.
Once you found the products select that product, enter quantity, select discount plan or enter discount amount if applicable, and click on the AddProduct button available at the bottom of the page.
Note: – The system will not allow to add those products, which doesn’t have any stock. The products need to have stock, or the products should a back-order product.
Once you click on the Add Products, the selected products will be added to order and the epos page will look like the below screen.
Once you add the products, click on the Save button to create the Order.
After clicking on the Save button system will generate a unique order number.
You can Edit or Delete the line items if you want.
View/ Edit Orders of an existing customers
The Epos screen allow you to view the existing or update it.
For example, if the order was created but the logistic was not initiated, the customer can return and inquire about/update the order at any time in the future. The customer can either remove the products or add a few more products to the order.
The process to view/edit a sales order is discussed below.
On the Orders section located on the right-hand side of the screen, enter the unique order number in the “Order’ Lookup field.
The system displays the details of the selected order. You may add products to the product line item section or you can Edit or delete the existing order products.
Creating an invoice through the Epos tab:
The epos tab also allows you to create an Invoice record for the existing orders or the newly created one.
Click on the Payment option, to create the invoice.
Once you click on the Payment option, you can see the Amount details along with the Invoice creation option.
Click on the Create Invoice button, Select the record type (Sales or Advance), Select the Line items and click on the Save button.
Once you click on the Save button, the system will create the invoice record and you will be able to see the created invoice records in the payments section, you can click on the Invoice Document icon if you want to print the document or send it to the customer.
The function is used to receive payments from customers who have purchased your products and services and who have not already paid for them.
When you sell a product/service, the order is created through order processing. The order processing functionality provides for the entry of payments and can be done via the following payment methods.
Cash
Bank/Cheque
Credit Card/Debit Card
Loyalty
The system can accept partial payments and can record multiple payments for each order.
When the customer books an order, the system typically creates an invoice in the system which can be sent to the customer’s email ID.
Making a Payment
In a scenario in which a customer walks in the store/outlet and makes a payment to the order, the Epos page helps the user complete the sales order and payment process without having to navigate to different setups.
Navigate to the Payments tab and click on any of the payment options. Payments can be made using the following four methods:
Credit/Debit Card
Cash
Loyalty
Apply Credits
Credit/Debit Card
To make the payment through Credit/Debit card, click on the “Payment’s tab” and click on the “Credit/Debit Card” button located on the right side of the screen.
Enter the card details in the Card Information section and click the “Pay Now” button to complete the payment process for the order.
Cash
To make the payment through Cash, click on the “Payment’s tab” and click on the “Cash” button located on the right side of the screen.
Select the Invoice (if not Posted Post the invoice), the amount will be auto-populated, enter the reference number, and click on the Save button.
Loyalty
Regular customers earn loyalty points as a reward for their regular purchases with the organisation. They can use these points for payments. Loyalty points can be assigned to currency values. For example, 1 loyalty point = 1 pound or as per the organisation’s decision.
To make the payment through Loyalty, click on the “Payment’s tab” and click on the “Loyalty” payment option located on the right side of the screen.
The system will automatically reduce the amount to be paid by the equivalent loyalty points.
The customer can pay the rest of the amount with any of the other payment options.
Apply Credits
To make the payment through Credit points, navigate to the “Payment’s tab” in Epos and click on the “Apply Credits” button.
The system will automatically fetch the Invoice Amount, Total Due and Available Credit. Enter the “Redeem Credit” amount and click the “Pay Now” button.
You will see that a Credit type payment record has been created.
Discount
% Discount: –
On the discount section, you can see the Order Discount on the Order Discount
Section.
Also, you if you have any Coupon Code, you can apply that coupon as a coupon discount.
Delivery
The Delivery section would display Shipment details if the user subscribed to the ERP Mark 7 package.
Chatter
Use this section to collaborate with Community Users
Clone the Order
Epos allows you to clone any orders using the clone button. Just click on the Clone button and confirm.
Create Sales or Advance Invoices
Create Sales or Advance Invoices for the Orders
The Aqxolt CPQ allows you to create a Sales Invoice record for activated orders just in two clicks.
Also, you can create Sales or Advance Invoices for orders manually.
Create the invoice record for activated orders from Order level automatically: –
Open the Order record, click on edit, check the IssueInvoice checkbox, and click on the Save button. Your Invoice record will gets created.
2. Create the Sale or Advance invoice record for activated orders from the Order level.
Open the Order record, find the Invoice object (related list of Order) and click on the CreateNew button.
Select any record type (Sales) and click on the Next button, the system will take you to the Invoice creation page. Select the Line Items and click on Save button to create the Invoice record.
After clicking on the Save button system will create the Invoice record and will take you to the Order record page again.
Note: – If you want, you can create an Advance Invoice for the Orders by selecting the record type Advance on the record type selection page.
Payments
The Aqxolt CPQ is integrated with PayPal and Authorized.net, so that the customer can make payments against the Invoices easily.
Receive Payments using PayPal and Authorized.net
The Aqxolt CPQ is integrated with PayPal and Authorized.net, so that the customer can make payments against the Invoices easily.
Open the Invoice record and find the RecordPayment option.
Once you click on the Record payment link, the system will take you to the next page to make the payment.
On the Record Payment page, you can fill the card data and make the payment for the created invoice.
Documents
The Aqxolt CPQ allows you to generate the documents for the created Quotes, Orders, and the Invoices. You can Send, Print, or Download the documents easily using Apxolt CPQ.
Documents for Quotes, Orders, and Invoices
The Aqxolt CPQ allows you to generate the documents for the created Quotes, Orders, and the Invoices. You can Send, Print or Download the documents easily using Apxolt CPQ.
Quote Document: – Open the Quote record and click on the Quote Document button.
Invoice Document: – Open the Invoice record and click on the Invoice Document button.
Order Document: – Open the Order record and click on the Order Document button.
Product Catalogue
ERP Product Catalogue is the best way to present the products of your company. You can group the products by product categories and sell them or receive purchase requests
Open the created Community/Site from the App launcher.
Once you click on the Community/Site, the system will take you to the Products catalogue Community home page.
On the home page, you can see the Products, their price, and the available stocks, also you can search any products using the search bar and you can filter the products by Category wise.
You can add the products into your cart if products have stocks by clicking on the Carticon or AddtoCart Button.
You can delete the added products from your cart or increase or decrease the quantities.
Once you added products into the cart, you can make the payments using the Proceed to Checkout.
Once you added products into the cart, you can make the payments using the Proceed to Checkout
Bank Reconciliation
Generally, every organisation operates its finances with at least one bank account. An organisation can have one or more bank accounts operating on multiple currencies. An organisation makes daily, weekly or monthly deposits depending on the nature of the business. The deposits could be in the form of cheques, cash or credit/debit card receipts. Aqxolt ERP’s Bank Reconciliation ensures that payments of any form are processed and deposited in the bank.
Reconciliation of Bank Records:
Navigate to the Finance Management app > Bank Reconciliation
Enter the Reconciliation Name for identification.
Select the organisation and the bank account associated with the organisation.
Enter the start and end dates for reconciling the journal entries of the specified period.
Click the “Save” button to create a bank reconciliation for the organisation.
Download the bank statement template.
Click the “Import Bank Statement” button and select the bank statement to reconcile. (Note that the bank statement should be in .csv format.) The bank statement entries will appear in the section below.
Click the “Reconcile” tab to begin the bank reconciliation for the specified period.
Click the bank statement entry on the left-hand side and find its match on the right-hand-side transactions section.
Click one or more transactions for each bank statement entry and click the “Reconcile” button.
To find and match the transactions, click on the “Find & Match” tab in the transactions section on the right-hand side.
Search the transactions by entering at least two characters of the transaction name or reference number. Also, you can search by entering the amount. Click the “Go” button to find the match.
To create the transaction, click the “Create” tab and select the payment type. Enter the category and amount, then click the “Reconcile” button.
To undo the reconcile, click the “Undo Reconcile” tab. Then click the undo button under the “Actions” section.
FedEx
Navigate to App menu > Credential Setup
You will land on the Credential setup page where you have Payment, Shipment and E-Commerce tabs.
Click on the Shipment Tab
Click “New” to add FedEx setup record.
Fill in the FedEx credentials and add in the URL to specify the test or live account and make the record active.
Make sure to use the name as FedEx.
Add the Shipper Details and click Save.
This creates a “FedEx Record” as shown above and the password/trans key gets encrypted.
With this setup, you can use the FedEx services for shipment.
In the “Outbound Logistics Process” while doing the “Pick Pack Ship of the logistic orders”, select the shipment type to be “FedEx” while creating a Package.
Click on “Ship” to land on the FedEx services page.
Click on “Get Rates” and select the suitable service.
Scroll down the services and click “Initiate Shipment” button
This will successfully ship the package and the tab moves to “Process Shipment” where you will see the “Shipment Status” and the “Shipment No.”
Clicking on the “View Label” will generate the FedEx label and clicking on the “Cancel Shipment” will delete the shipment.
Navigate to the Track Shipment tab to track the shipment.
Manufacturing & Service
The Manufacturing & Service Operations certification track provides a key element of the operations organization in a company. It is chartered to provide and manage resources and to convert raw materials into finished products.
Form the App launcher go to the Manufacturing module.
To create a Manufacturing order, go to the ‘Manufacturing Workbench’ tab
Click on the scheduler tab to schedule a manufacturing Order.
On the left-hand side, you will find all the products listed for manufacturing or you can search from the search bar provided.
Click on the product that needs to be manufactured. You can see the process cycles in the scheduler to schedule these process cycles to a specific time and date.
Enter the quantity required to Manufacture in the QTY filed provided.
Click on the ‘Schedule MO’ button to schedule the order.
On the next page, you can see all the details for the manufacturing order.
BOM’s tab – This shows the Bill of material required to produce the final product.
Work orders tab – Show all the work orders that need to be completed to produce the final product.
Production Status – This shows the status of the current production.
Serial Numbers / Batches – If the MO Product is Serialise product then it will generate the serial numbers or If the LOT Tracked product the system will generate Material Batches / Lots.
Now Allocate the stock for all the BOM’s as required for the manufacturing of the product.
Click on the ‘Stock Allocation’ button to allocate stock manually or select the ‘Auto stock Allocation’ button to fulfill stock automatically.
When clicking the Stock allocation button, this page will appears to enter the stocks required for each BOM’s. Manually enter the values and click the ‘Capture’ Button to save the stock.
Similarly allocate the required quantities for all the BOM’s.
When all the stock is fulfilled. Click on the ‘Work order’ tab
Complete all the work orders to complete the Manufacturing process.
Click on the first work order. Press the start button to start the process. Then click
on the Play button to begin the operation. Click the green ‘Complete Button’ to complete the process. When done click the ‘Build’ Button.
Clicking on the Build button will navigate you to another page and enter the quantity of BOMs consumed in that Process Cycle/Work Order. Enter the vales and click the ‘Build /Commit to-Inventory’ button.
Similarly go to the next work order and do the same for each operations. Complete all the operations specific to that Work Order. Then click the ‘Build /Commit to-Inventory’’ button.
Clicking the ‘Build /Commit to-Inventory’’ button at the last Work Order /Process Cycle or where the WIP is set, will navigate to another page there enter the quantity that has been produced. You can also choose the type as Produced or Scrapped from the ‘type’ picklist depending on the finished product produced.
Enter the quantity produced in the quantity field and click the ‘Build/Commit to Inventory’ button.
With this, your Manufacturing is now complete.
Process and Process cycles
Process A process is a functionality intended to be used by manufacturing industries to produce finished products for sale. The production of products is typically in bulk quantities and is concerned with discrete units, bills of materials and the assembly of components.
Aqxolt ERP provides a complete solution and agility to succeed in managing entire business processes end-to-end. It lets you accommodate and manage a work center and plan workforce and machine required hours in a cost-effective manner depending on the complexity of the manufacturing process.
Creating Processes:
Navigate to the Manufacturing app > Processes tab.
Once in the Process section, you can track the processes already filled in and create new processes.
To create a new process, click the “New” button.
Select the “Manufacturing Process” record type and click the “Next” button.
Enter the process name, organisation, and contact details.
Select the type of process, enter the barcode and select the product for which the manufacturing process is built.
Select the workstation and work center; enter the required workforce and machine hours.
Enter the cost details of the manufacturing process and enter the process description; then click the “Save” button to create a manufacturing process.
Process Cycle: A process cycle is a sequence of steps required and a set of activities associated with the manufacture of finished products. It essentially starts with the customer requirement and ends with delivery of the required product.
It is a framework that describes how and from where the process starts. It also describes when and how the interrelated operations depend on each other. It describes the progress of each process cycle, helping the user estimate the overall time required to produce a finished product.
Creating a Process Cycle:
Navigate to the Manufacturing app > Processes tab.
Once in the Process section, select the process record to create the process cycle.
In the related tab, find the Process Cycle related list and click the “New” button.
Enter the Process Cycle Name, the Progress of the process cycle and the Description.
Select Previous and Next Process Cycle; then select the Workstation in which the process cycle will commence.
Click the “Save” button to create a process cycle.
Work Order
Work management involves creating, qualifying, dispatching, and executing requests for off-site work, called work orders. The steps and functions of the work order lifecycle work together to ensure that off-site issues are resolved in the most efficient manner possible. Users with the appropriate roles create the work orders and provide all the necessary information needed for the work order tasks. For the qualified, those work orders necessary tasks are created to complete the work order.
Creating a Work Order
In the work orders, one is able to view and edit the existing work orders, create new ones and also import a new document from the existing documentation. When creating a new work order, the following steps are followed:
A Work Order can be created in the following methods
From Work Order Tab (Record level)
From the Sales Order Tab (Converting sales order into work order)
Create work orders through a Work Order Tab
Click on the Work Order tab as shown above. Once on the Work Order section, you are able to track the work orders already created and create new ones with the “New” button located on the top right corner of the work order page.
Register a new work order name, the supplier of the work order along with the organisation’s name and details. Also include the details of the project, the date of approval and the lead time
Other details of the budget are included covering the work order costs, along with the details of the related sales order and purchase orders.
Since the work orders are used in the manufacturing or processing environments, there is a section with the details including, costs, the process, types of the process and planned and completion dates.
The work order document also allows the description of the process that is being done.
For existing work orders, you have the ability to edit the details of the work order as the project goes on. The related tab that is next to the details of each work order allows that each record to be updated according to the progress of the project.
Creating Work order Line
The work order page includes the related page that contains the related tab with links to all documents that relate to a particular work order. The work order lines are the specific process that needs to be completed, for instance, the details of each item to be manufactured or assembled.
The works order lines would help a business in dividing the duties so that the deadlines set for completion of the work orders are met. This can be through dividing the items to departments that manufacture or assemble specific items.
New work order line items can be added to the list by clicking on the “new” button that is on the right end of the page. There are other documents in the page, which are related to the work orders open. The work orders are identified by their unique names. The records are all that relate to the work orders open. This enables the business to manage their projects smoothly so that they are successfully executed and closed.
Fields to note:
Information Section
Field
Description
Work Order Name
It describes the name of the word order
WO Supplier
It describes the name of the supplier who supplies raw materials to complete the work order
Site
It describes the manufacturing unit location
Status
It defines the work order status – Completed, Issued or In progress
Ready For Shipment
It indicates if the sales order is ready for shipping
Code
It is a system generated unique number for every work order
Barcode
It describes the barcode specific to the work order
Approved Date
It describes the approved date of the work order
Project
It describes the name of the project for which the work order is created
Lead Time
It describes the expected time to complete the work order
Organisation
It defines the name of the organisation/Account
Organisation Business Unit
It defines the Business Unit name of the Account/Organisation
Details Section
WO Cost
It describes the complete work order cost
Sales Order
It is the sales order related to the work order
Purchase Order
It is the purchase order related to the work order
Manufacturing/Assembly Process
Process
The process by which the Work order products are manufactured
Type
It defines the type of work order
Manufacturing/Assembly Cost
Total cost for the manufacturing of the product in the process
Planned Date
It is the date planned to start the work order process
Employee Requester
It defines the employee name who requests the work order
Completion Date
It defines the completion date of the work order
Convert a sales order into a work order
Click on the Sales Order tab as shown below
Select the sales order that you would like to convert into work order and click on the down arrow in the top right-hand corner of the page and select ‘Create Work order’ as shown below.
Fill in the work order detail section and the work order line items section, new work order line items can also be added along with the existing line items using ‘Add New’ button.
Click on ‘Save’ button which creates a new work order with a unique work order number.
The work order page offers an efficient method for the business to effectively manage the costs of a manufacturing process to ensure all orders are followed up to and addressed with simplicity. The work orders page also helps to make budgets of each project and the items required with minimum costs. For a supplier, receiving work orders also allows the organisation to understand the required items of each activity and how to deliver on each.
Work Center
A work center is a unit in an organization where all activities associated with manufacturing processes are performed. Work centers are used to allocate resources and in work orders to complete the manufacturing process. Work centers are usually used to calculate the number of hours required to execute the process, the cost involved in project completion, and the availability of the resources within a planned duration of the project end date. Create Work Center
Navigate to the Manufacturing app > Work Center tab
Once in the Work Center tab, you can view the work centre information already filled in and create a new Work Center record.
To create a new work centre, click the “New” button.
Select the organisation details of the work centre.
Select the channel, site, site and shop floor warehouse for the work centre.
Click the “Save” button to create a work centre for the organisation.
Fields to note:
Field
Description
Organisation
Describes the name of the organisation
Work Center Name
Describes the name of the work centre for its identification
Channel
Describes the segment of the business where the employee is hired to work
Site
Describes the site from where the sub-products can be utilised and maintained
Shop Floor Warehouse
Describes the warehouse in which the items are stored; in addition to this, a user can assign the location and storage bin of the received items to make it a well-organised warehouse.
Work Planner
Work Planning is done to have a detailed outlook on how the workforce is utilized to accomplish a task and how work centers are linked to process. Work planning also gives an overview of the Project related tasks. We can add a work planner record and assign it to Process, Process Cycle and Work Center.
Navigate to the App Menu > Work Center
Go to Work planner in the related section of a work center
Create New
Add work planner name, Work Center, Process and Process Cycle.
We can view/create this on the Manufacturing Schedule page as well.
Navigate to App menu > Manufacturing Schedule
You will land on the PLANNER tab showing Capacity Planning which has subtabs
Navigate to Work Planner in the sub tabs and click “New” button to add new Work Planner record.
Shift Planner
Shift planner is a tool that helps manage resources efficiently across businesses. It helps in planning the staff shifts according to their availabilities. It is the best way for super users and supervisor users to manage and utilize the availability of the staff effectively.
A Superuser can manage the availabilities of all the users under the organization
A Supervisor User can manage only your team members availability, time offs and break-times
A user can manage only its own availability, time offs, and break-times easily with Shift Planner.
How to Find Shift Planner:
1) Click on App Launcher.
* On the App Launcher type ‘Shift Planner’. Once the Tab appears click on Tab
2)Navigate from the Manufacturing Workbench.
* Navigate to Manufacturing Workbench, click on the Shift Planner icon from the upper right corner.
3. The Shift Planner Appears
Understand the Features on Shift Planner Screen
Available – This tile represents an Available Slot for booking an appointment
Not Available – This tile represents Slot is not available for booking an appointment
Time Off – This tile represents Time off/ breaks
Holiday – This tile represents public holidays or temporary leaves
Reserved – This tile represents that All available slots have been completely booked.
C – Indicates the total Capacity Hours of a resource for the day
D – Indicates the total Demand Hours for the resource for the day
AC – Indicates Available capacity Hours for the resource after demands and time off
How to Manage Availability of a Resource.
Let’s Create a new resource group for Hand Sanitizer in Hand Sanitizer Work Center. Let’s add ‘Emily Dickinson’ and his availabilities who is a ‘Resource’ or ‘user’ working in Hand Sanitizer Resource Group.
Manage Availability is a feature That allows you to manage the available slots of the users on the shift planner. From this feature you can create a Resource Group, Resource and multi time slots.
1. Click on Manage availability Button
2. The screen shows
Enter the fields to manage availability of that particular ‘Product, Work Center, group and dates’.
3. Click on the ‘Group +’ Button.
4. Enter the Group Information for which you wish to add the new resource
5. Enter Product, Work Center, Group, Start Date, and End Date.
6. Select the Resource Name and then add the availability times as shown below.
7. Click the ‘Save’ Button. A new Resource group and Resource will be created and it can be viewed on the shift planner screen.
How to Manage Availabilities for Each resource
Instead of going to manage availabilities. You can also click the ‘Manage’ button from the time slots.
Let’s manage Emily’s Availability for Wednesday
1. On hover the Time slot. The below popup will appear.
2. Click on the ‘Manage’ button. The next screen takes you directly to Availabilities Page where you can edit the Start and End time for any day.
3. Once changes are made click the ‘Save’ Button.
How to create a ‘Time Off’
Emily has an urgent meeting to attend and she would be unavailable for Work. So she decides to create a Time off for that date and time.
Let’s Create a Time off for Emily for the same slot for Wednesday.
1. Click on the ‘Time off’ Button
The time off screen appears.
3. Click the ‘Time Off’ Button. And Enter the Details of Time off.
4. Click ‘Save’. A time off will be created for Emily and it can be viewed on the shift planner screen in section blue.
Time off can also be created by directly clicking on the time slot on the shift planner screen.
Click the ‘Time slot’. The pop-up shows
Click on the ‘Time off’ button and follow steps 1-4 from How to create time off.
How to filter Shift Planner
A supervisor opens shift planner and he looks for Emily’s resources to book her availabilities. He quickly finds using the filter icon.
Let’s find Emily’s shift schedule at the Boiler Work Center for the Boiler Installation Product.
Click on the filter icon.
Enter the Product Name, Work Center. Emily’s resource Shows up.
How to find time slots for future dates
If you want to see the future availability of Emily.
1. Click on the calendar date icon/arrow button to show the available time slots in the future dates.
2. The next available time slots show up for future dates.
Bill of Materials
A Bill of Material (BOM) is the functionality used to set up a production module in an ERP system. A BOM is essentially used to manage a list of components used to produce the end product. The manufacturing of the end product goes through numerous phases of production; a BOM records the details of components needed at various phases of production. Creating a BOM is essential because the correct component must be available during the manufacture of the finished products.
Every BOM record includes the product name, description, quantity, unit of measurement, procurement type, etc. and provides a centralised source of information to the person handling the BOM to manufacture a product.
Aqxolt ERP provides the flexibility to configure various types of Bills of Material depending on the business use for which they are intended.
Creating Bill of Materials for Manufacturing:
Select the manufacturing process for which the BOM is required.
In the related tab, find the Bill of Material (Manufacturing/Assembly Process) and click the “New” button.
From the New Bill of Material Record Type pop-up, select “Manufacturing BOM” and click the “Next” button.
Fill in the BOM name, the process cycle in which the BOM component is used.
Select the phase (stage) of the BOM, then the unit of measurement of the BOM.
Enter the BOM level, reference designators, part identification number, quantity, BOM (product), and BOM component.
Select component type, procurement type, and type of BOM.
Enter the cost details under the “Cost/Billing” section.
Enter the description and BOM notes if applicable.
Click the “Save” button to create the BOM record for the chosen manufacturing process.
Fields to note:
Fields
Description
Bill Of Material
Describes the name of the BOM being created
BOM Level
Describes the hierarchy of the BOM used in manufacturing the product
Phase
Describes the stage at which each BOM is used during the product lifecycle and allows for progress tracking
Unit of Measure
Describes the measurement in which a BOM will be used
Reference Designators
Provides the details about where the BOM fits in the production lifecycle
BOM Notes
Provides the relevant notes to those who closely work with the BOM. Conveys all the information that might be required throughout the product lifecycle
Procurement Type
Describes procurement activities, i.e., if the BOM is purchased or made (off the shelf or made to specification)
Quantity
Describes the number of BOM products/parts to be used for manufacturing or purchasing
Description
Describes the details of each BOM
BOM (Product)
Describes the product whose BOM is created
Part Identification Number
Describes the number assigned to the BOM part for quick identification
Process Cycle
Describes the process cycle in which the BOM part is used
Finished Product Amount Delivered
Describes the total amount spent to manufacture the finished product
The BOM can be created for various component types, which can be understood as follows:
Component Type
Description
Alternate Component
Indicates the material may be substituted for the original component.
Test Component
Indicates the assembly of material is temporary and will be removed before the final product is shipped; also enables the disassembly operation.
Co-Product Component
Represents possible variations of a planned material. If a manufacturing process can yield more than one possible material due to, for example, process, environment or raw material variations, the optimum material is planned for and all other possible outcome materials can be defined as its Co-Product components.
By-Product Component
An additional material created during the manufacturing of another material. If a manufacturing process of a material also yields one or more other materials, these other materials can be defined as its By-Product components.
Assembly
A parent or component (subassembly) made up of other components.
Capacity planning
Capacity planning is the process of determining the production capacity needed in manufacturing a product. For an organization, capacity would be the ability of a given system to produce output within the specific period.
In Capacity Planning, we can get the daily overview of the work assigned to work centers or Resource Groups.
To Create Capacity Planning
Navigate to the app menu > Capacity Planner.
Create a new Capacity Planning record by clicking “New.”
Add capacity planner name, Start Date, and End Date.
Make sure “Demand Aggregation” is Monthly.
Click Save.
In the Related list, we have Resource Groups, Resource Allocation, Capacities, and Demand.
Resource and Resource Group
The resource is used for the manufacturing process. Manufacturing resource groups can be electromechanical assemblies, cable assemblies, machinery, and human resource as well as Job floor assistants, assembly workers, and others. The human resource comes under the workforce in manufacturing.
A Resource Group can have a team of the professional workforce or a resource group has a set of machinery used for a particular process.
Add the resource group on capacity planner’s related list by clicking the “New” button.
A resource group can be of Record type “Workforce” or “Machine.”
Select Workforce if you want to create Workforce resource group or Machine if you need to create Machine resource group.
Add the Skill Group Name, Runtime Cost Price (Hour) and Billing Price.
Add Process, Process Cycle, and Capacity Planner.
Another way of adding resource groups is from the “Manufacturing Schedule.”
Navigate to App menu > Manufacturing Schedule
You will land on the PLANNER tab showing Capacity Planning which has subtabs
Navigate to Resource Groups in the sub tabs and click “New” button to add new resource group.
Resource Allocation
Resource needs to be allocated to a resource group in the capacity planner. Allocating employees to a workforce Resource Group or allocating machines to a Machine Resource Group; like allocating Floor Assistants to the Job Floor Assistant Resource group.
In the related section of Capacity Planner click “New Resource Allocation”
Fill in the Resource Name, Start Date, and End Date; make it active.
If creating workforce resource; select Employee, if creating Machine resource; select Machine.
Select Resource Group, Work Center and Capacity Planner.
Resource Requirement
Resource Requirement is done to connect the Resource Group with the work planner wherein the Runtime and Runtime costs can be specified based on the work planner requirements.
In the related section of the Resource Group, add the resource requirement.
Create New, add the Resource Requirement Name.
Add Runtime, Runtime Cost, Setup time and Setup cost.
Assign Resource Group and Work Planner.
Click Save.
We can view/create this on the Manufacturing Schedule page as well.
Navigate to App menu > Manufacturing Schedule
You will land on the PLANNER tab showing Capacity Planning which has subtabs
Navigate to Resource Requirements in the sub tabs and click “New” button to add new resource requirement.
Routing & BOM Routing Link
Routing Links are used to making an association between a routing and the BOM components that will be used in the process and the associated versions. ‘Routing Link Code’ links the Bill of Material to a Process Cycle and its Operation.
Routing
Navigate to the app menu > Routing tab.
Once in the Routing section, you can track the routing that is already created and also create a new routing.
To create a new routing, click the “New” button.
Select the Manufacturing Routing record type and click the “Next” button.
Enter the Routing Code and select the Type and Status to be Certified.
Select the Product, Channel, Raw Material and Finished Product sites.
Enter the Maximum and Minimum lot size and click the “Save” button to create the Routing record.
To add the Routing Link Code:
Navigate to the Process > Process Cycle (Related List)
In the Related list, scroll down to the Routing Links tab.
Create new routing link by adding the routing link code, process cycle, and
This Routing link code will be assigned to the Bill of Materials and the Operations.
Operations
Navigate to the operations tab in the related list to Routings.
Once in the Operations section, you can track the operations that are already recorded and create a new Operations record.
Click the “New” button to create operations.
Enter the Operation Code, the Operation No., and the Next Operation No.
Select the Work Center, Quantity, and Fixed Cost details.
Click the “Save” button to create the Operations record.
Service-Installations
Work Orders for Service/Installations
You can also create work orders for products that require service/installations manually by following these steps:
Navigate to the Maintenance app > Maintenance Schedule
Once in the Planner sub tab of Maintenance Schedule, you can track the capacity planning overview of the selected work center, a resource group or a resource.
To create a new work order, click the “+Work Order” button located on the top right corner.
Enter the Name of the work order and the Start and Expected Dates.
If the work order being created is associated with a sales order, select “Sales Order.”
Select the Product of type SST to maintain and select the type of work order
Enter the Quantity, the Production Version and the Routing.
Click the “Schedule Work Order” button to create the work order.
View and modify the process schedule
On the scheduler subtab of the Maintenance schedule, view the Gantt chart of work orders, work centers, and resources upon selecting the view.
To view the Gantt chart in various views like Time, Day, Week, Month and Year view, select the view options from the section above the Gantt chart.
To reschedule the work order associated to the individual operation, simply drag and drop it the available new date/time. The changes are reflected in the work order record.
To mark the percentage of progress of each work order, select the slider icon and drag it to display the progress.
To make further changes to the work orders, double-click the work order you will be presented with a job execution page
Click the work order, on the Job Execution, make the necessary changes and click the “Save” button.
Starting a work order
To carry out the work order click on the Builder subtab of the maintenance schedule tab.
Click the “Start” button to carry out the maintenance order.
Click the work order under each process cycle to carry out the job execution of each Action/Task associated with the work order.
Once in the Worksheet tab of Job Execution, you can track the Actions/Tasks that are already filled in and create a new Action/Task.
To carry out the Action/Task, select the action/task and click the “Start” button. Once the action/task has been started you can pause, finish and stop the Action/Task.
To create an action/task for a specific work order, click the “New” button.
To make further changes to the Action/Task select the down arrow on the right-hand side and click the “Edit” button.
Click the “Save” button after making necessary changes.
Click the “Previous” and “Next” button to view or start the Action/Tasks.
To view the drawings of the action/task click the Drawings tab.
The Time Tracking tab lets you track the time and duration of each Action/Task.
Click the Resources tab to allocate the resource for the selected Action/Task.
Send the Quotes to Customer to sign the Contracts using DocuSign
Aqxolt CPQ is integrated with DocuSign so that you can send the Quotes to the customer to sign the contract.
Open the created quote, and click on the DocuSign button, available in the Quote header.
Once you click on the DocuSign button, the system will ask you to log in. Log in to DocuSign and the system will take you to the Contract creation page.
Note: –
You need to set up the DocuSign Credentials in the system using the Credentials Setup page. Refer to the Credentials Setup steps mentioned above.
You can change the templates from the StandardQuoteDocumentation option, or you can upload a Custom template using the CustomDocument option.
After selecting the Standard Quote Document or uploading the Custom Template, click on the CreateDraftContract button available below the Template.
After clicking on the Create Draft Contact button, the system will you to the DocuSign page, where you can drag ad drop the required fields into the template. You can drop the fields anywhere in the template.
Once you drag and drop the field in the template, send the template to Customer by clicking on the Send button available in the upper right and bottom right corner.
Once you click on the Send button, an email will be sent to the Customer and the Contact record will gets created. The user can see the created Contract number on the Quote record page.
The Customer need to open the email and need to click on the Review Document.
Once the Customer click on the ReviewDocument button from the email, the system will take the customer next screen where the customer needs to sign the consent form and click on continue button.
After clicking on the Continue button, the system will allow to review the document and allow to Finish the Contract Sign process by clicking on Finish button.
Note: – Enter the details on the input fields or attach any file if there are any input fields or any option to attach file.
After click on the finish button system will ask to Sign-up to DocuSign. The customer can skip this option by clicking on the NoThanks option.
Once the Customer click on the No Thanks option, the contact signing process will be completed.
Once the Customer successfully sign the Contact, the Quote will be Accepted automatically. Open the Quote records and check the Quote Status.
Once the Quoted Accepted, you are allowed to convert the Quote into an Order.
Outbound Logistics
The Outbound Logistics module of Aqxolt ERP ensures that all kinds of orders are dispatched accurately to the provided shipping address. The outbound logistics allows items to be placed in the specific packages for shipment. The system allows the user to scan an order reference number for items required for shipment. Stock dispatching is applied mainly to modules like sales orders, purchase returns, work orders, and transfer orders.
Navigate to Order Management app > Outbound Logistics tab
The List tab shows the logistics orders that are ready to be Picked and Packed.
Select the logistic order to complete the stock dispatching process
Click the “Pick” button to pick the products from the available stock address.
Select the outbound logistic line item and click the “Pick” button at the bottom right-hand corner of the page.
If all the Qty of the line items are picked, the screen moves to the Pack page
If all Qty is not picked the page remains in the same(Pick) screen until all the Qty is Picked
On the Pack tab, select the chosen item and select the package type and enter the deposit tag number to identify the package.
Select the quantity to pack, select the shipping type and click the “Save” button. Make sure Picked and Packed Qty are same.
The Package will be listed as shown
Multiple packages can also be created by selecting only the required line items in the Pack screen.
To ship the package, select the checkbox and click the “Ship” button.
Depending on the Shipment type selected UPS/FedEx or Internal shipment, the screen navigates to Shipment page.
Purchase Requisition
Purchase Requisition is generated before the purchase order is raised to notify the Purchasing team of the items it needs to order and their quantity. It gives figurative information on the desired goods and services of the organization.
How to Create Purchase Requisition:
John works at a warehouse and finds out that some items in the warehouse has low inventory level and needs reordering from the vendor. So, he requests the purchasing team to create purchase orders for the items to fill the inventory for those items by creating a Purchase Requisition. He follows the steps mentioned below,
From the App launcher go to ‘Create Purchase Requisition’ Tab
Purchase Requisition Page opens. Enter the all the details on the page like Purchasing organisation, Expected date, delivery details, Status, Channel, Distribution Channel.
Click on the ‘Add’ button to add the products, Search the products, enter the quantity required, and unit price. Similarly, add more products using the ‘add’ button again.
Click ‘Save’ to create the Purchase requisition.
How to Create a Purchase order for purchase requisitions:
The Purchase orders created by john are listed in the ‘Requisition to purchase order ‘tab and Emily who works at the purchase order department can create purchase orders for the requested items by John. She follows the steps below,
Search for the ‘Requisition to Purchase order’ Tab from the ‘App launcher’.
Select the items that need to be added to the purchase order and click the ‘Purchase order’ Button.
The next screen shows Products selected, Quantities and prices. Enter the vendor details and purchasing details and click ‘save’. The purchase order will be created.
Now, follow the same procedure to inbound the logistics as mentioned for creating a purchase order.
How to Inbound Purchase Order Logistic:
From the App, launcher go to the ‘Inbound Logistics’ tab
Select the purchase order logistic and click on the ‘Receive’ tab
You can see the product name quantity that has to be received.
Under the ‘Receive’ Box enter the quantity that is being received from the vendor.
Enter any instruction in the instruction box.
Click the ‘save’ button
Now check the box next to the product received and Click on the ‘Put away’ tab
On the put-away page select the version, location, or bin if required and click the ‘save’ Button.
Your purchase order is Complete.
Accounts Payable:
Go to the ‘Accounts Payable’ tab
You can see Vendor’s tab where all the vendors will be listed. You select the vendor and select the Purchase order related to that vendor to create a bill.
You can also directly select the Purchase order to create a bill against it from the purchase order tab.
Select the purchase order to create a bill against it and select the new bill option from the dropdown.
Create Bill page will appear. Enter the Vendor bill date and Bill number. Also, you can add more products to the same bill by clicking on the ‘Add’ button.
On the Product line item add taxes and description if required and select the Account to capture the amount paid and click the ‘Save’ button.
When Bill is created it will appear on the Bill tab. Now match the bill by selecting the bill and click the ‘match bill’ button on the top right.
On the match, bill page selects the line item to match and click the ‘save’ button.
Now post the bill by selecting the ‘Post’ option from the dropdown against that bill.
When it is posted then New voucher option appears. Click the new voucher to create a voucher.
Click the ‘save’ button to save the voucher.
Now approve the voucher by selecting ‘Approve’ from the dropdown button.
Click on the ‘Make Payment’ option from the dropdown to make payment for that voucher.
On the pay voucher pop up. Select payment account, date, reference number and payment method and click ‘Save’. Now your payment is complete.
How to create Advance to Vendor Bill:
An advance Bill to a vendor bill can be created if you need to make an advance payment to the vendor.
Go to the ‘Accounts payable’ tab
Then click on ‘bills’ Section
On the top right corner, you will see a button called ‘Create Bill’
When clicking Create Bill. A pop-up comes up. Select the Advance to Vendor option from the pop-up.
After selecting the ‘Advance to Vendor option’. You will get a create Bill page.
Enter All the details mentioned on the page and click on the ‘Add’ Button to add products to your bill.
Select Product, Quantity, Amount and Select ‘Inventory’ Account and Add any Description required.
You can add more products by clicking on the ‘Add’ button again.
Click the ‘Save’ Button.
A Bill will be created and you can view it on the bills tab.
From the drop-down of that bill select ‘New voucher’
To Create a voucher against that bill click on the ‘New voucher’ Button
Click the ‘Save’ button. A voucher will be created.
Now from the voucher tab select the ‘Approve’ button to Approve the Bill. It will change from Red to green when approved.
Now from the dropdown select the ‘Make a payment’ Button to pay the voucher created.
Enter the details like payment account, method, and Reference number if required and click the ‘Save’ Button
A payment to that voucher will be done.
Work Order
Work management involves creating, qualifying, dispatching, and executing requests for off-site work, called work orders. The steps and functions of the work order lifecycle work together to ensure that off-site issues are resolved in the most efficient manner possible. Users with the appropriate roles create the work orders and provide all the necessary information needed for the work order tasks. For the qualified, those work orders necessary tasks are created to complete the work order.
Creating a Work Order
In the work orders, one is able to view and edit the existing work orders, create new ones and also import a new document from the existing documentation. When creating a new work order, the following steps are followed:
A Work Order can be created in the following methods
From Work Order Tab (Record level)
From the Sales Order Tab (Converting sales order into work order)
Create work orders through a Work Order Tab
Click on the Work Order tab as shown above. Once on the Work Order section, you are able to track the work orders already created and create new ones with the “New” button located on the top right corner of the work order page.
Register a new work order name, the supplier of the work order along with the organisation’s name and details. Also include the details of the project, the date of approval and the lead time
Other details of the budget are included covering the work order costs, along with the details of the related sales order and purchase orders.
Since the work orders are used in the manufacturing or processing environments, there is a section with the details including, costs, the process, types of the process and planned and completion dates.
The work order document also allows the description of the process that is being done.
For existing work orders, you have the ability to edit the details of the work order as the project goes on. The related tab that is next to the details of each work order allows that each record to be updated according to the progress of the project.
Creating Work order Line
The work order page includes the related page that contains the related tab with links to all documents that relate to a particular work order. The work order lines are the specific process that needs to be completed, for instance, the details of each item to be manufactured or assembled.
The works order lines would help a business in dividing the duties so that the deadlines set for completion of the work orders are met. This can be through dividing the items to departments that manufacture or assemble specific items.
New work order line items can be added to the list by clicking on the “new” button that is on the right end of the page. There are other documents in the page, which are related to the work orders open. The work orders are identified by their unique names. The records are all that relate to the work orders open. This enables the business to manage their projects smoothly so that they are successfully executed and closed.
Fields to note:
Information Section
Field
Description
Work Order Name
It describes the name of the word order
WO Supplier
It describes the name of the supplier who supplies raw materials to complete the work order
Site
It describes the manufacturing unit location
Status
It defines the work order status – Completed, Issued or In progress
Ready For Shipment
It indicates if the sales order is ready for shipping
Code
It is a system generated unique number for every work order
Barcode
It describes the barcode specific to the work order
Approved Date
It describes the approved date of the work order
Project
It describes the name of the project for which the work order is created
Lead Time
It describes the expected time to complete the work order
Organisation
It defines the name of the organisation/Account
Organisation Business Unit
It defines the Business Unit name of the Account/Organisation
Details Section
WO Cost
It describes the complete work order cost
Sales Order
It is the sales order related to the work order
Purchase Order
It is the purchase order related to the work order
Manufacturing/Assembly Process
Process
The process by which the Work order products are manufactured
Type
It defines the type of work order
Manufacturing/Assembly Cost
Total cost for the manufacturing of the product in the process
Planned Date
It is the date planned to start the work order process
Employee Requester
It defines the employee name who requests the work order
Completion Date
It defines the completion date of the work order
Convert a sales order into a work order
Click on the Sales Order tab as shown below
Select the sales order that you would like to convert into work order and click on the down arrow in the top right-hand corner of the page and select ‘Create Work order’ as shown below.
Fill in the work order detail section and the work order line items section, new work order line items can also be added along with the existing line items using ‘Add New’ button.
Click on ‘Save’ button which creates a new work order with a unique work order number.
The work order page offers an efficient method for the business to effectively manage the costs of a manufacturing process to ensure all orders are followed up to and addressed with simplicity. The work orders page also helps to make budgets of each project and the items required with minimum costs. For a supplier, receiving work orders also allows the organisation to understand the required items of each activity and how to deliver on each.
Time Sheets
One of the most important assets a company has is its human capital. The role of human resources is vital in establishing an efficient and effective workforce. By tracking and analyzing timekeeping and work patterns, among other things, the HR department provides management with valuable information which they can use to plan and enhance working practices.
With the ERP Mark 7 Timesheet feature, a business can track and monitor the activities of employees on an hourly basis for a range of projects. It provides an instant status report on the activity of any individual and allows employers to plan projects efficiently, optimizing the working hours of every employee.
The timesheet is specific to each employee and can be submitted for approval to higher authorities. This helps you track the activity status of the specified task.
Timesheets can be created using one of two methods –
From the record level
From the Timesheets tab
From the Record Level
The steps below explain how to create a timesheet and move it from Draft status to Submitted status.
Create a timesheet by navigating to the Employee management app > Employee tab.
From the list of employees, select the employee for whom a timesheet must be created.
On the related tab scroll down and select timesheets related list and click ‘New’ button
Enter the organisation details, approver details and timesheet status details. Administrators and other employees who act as approvers can see all the time cards for the week. Time cards can have any of the following statuses.
Draft
Approved
Submitted
Rejected
In the timesheet, enter the start and end dates of the week.
Click “Save” to create the time sheet record.
Field
Description
Employee
Describes the name of the employee whose timesheet is being created
Workforce Requirement Planning
Describe the name of the workforce required for which the timesheet is created to monitor progress
Approver
Other employees who act as approvers can see all the weekly time cards for all the employees under them
Team Member
Describes the team to which the employee belongs
Status
Provides the current status of the timesheet, such as Draft or Submitted; controls which actions can be performed against the timesheet
Start Date
Describes the start date of the week
End Date
Describes the end date of the week
Approve / Rejected Date
Describes the date on which the timesheet was approved or rejected
Approve / Rejected Reason
Describes the reason for approval or rejection
Week Date
Specifies the week’s date
A timesheet can be in different stages, which can be easily understood by the following statuses.
Timesheet Status
Action
Draft
A timesheet in the Draft state can be edited to add or delete time card entries.
Approved
When the timesheet is approved by the work agent/higher authority, it is marked “Approved.”
Submitted
Once the employee is confident about his entries, the timesheet can be moved to the Submitted state when it awaits approval.
Rejected
If the approver rejects the timesheet, it becomes available for review and re-submission.
Creating Time Card Entries
Timecard entries specify the exact time spent to complete each activity of the project throughout the week. A timesheet may contain one or more time card entries. Each time card entry can be tracked by its activity status. The steps below explain how to create a timecard entry.
Every time sheet should be associated with one or more time card entries, which indicates the amount of time an employee spends on each project. In the related list of timesheet records, click the “New” button under “Time Card Entries”. Upon the creation of time card entries, the time sheet is in the Draft stage.
Fill in the project name, which describes the name of the project for which the time card entry is being created.
Fill in the weekday dates and hours. Every hour mentioned can be supported by a comment to explain the outcome of the task.
Select the “Active” checkbox and select the activity status.
Click the “Save” button to create the time card entry.
Creating Time Sheets Through the Timesheets Tab:
Navigate to the Employee Management app > Timesheets tab.
Click on the “Add New Timesheet” button to create a new time sheet for the logged-in user.
Every time sheet will be in “Draft” status until it is ready to be submitted to the approver. Select the approver who is authorised to review the time card entries and to decision whether to approve or reject the timesheet.
Enter the time card entry details; select the project for which the time card entries are created.
Enter the activity notes, if any, and the activity status to monitor the completion of the task.
Enter the number of hours spent on each day of the week for the selected project and activity.
To create a new time card entry in the same time sheet, click the “Add New +” button.
Click “Save” to create the time sheet under “Draft” status.
Viewing, Editing, and Submitting the Time Sheet:
Navigate to the Employee Management app > Timesheets tab.
The system shows the total approved hours, submitted hours and rejected hours. The system shows all the time sheets that have been submitted, that are drafts and that have been rejected.
Under the Approved Time Sheets section, an employee can view all his approved time sheets along with the date of approval and the name of the approver.
To delete the time sheet, click the dustbin icon under the Action section.
To edit the timesheet, click on the pencil icon under the Action section.
To submit the time sheet to an approver, change the status from “Draft” to “Submitted” and click the “Save” button.
An employee is an approver; he can also approve other employees’ records from the Manager’s Approval section.
Heroku App
Heroku App is a connector that connects Salesforce instances with other e-commerce and accounting sites to sync data to and from.
The following sites can be integrated with the Aqxolt ERP:
Shopify
eBay
Amazon
Magento
WooCommerce
Big Commerce
QuickBooks
Xero
ETSY
One Heroku user can be connected to one Salesforce instance at a time.
Multiple sites can be connected to one Heroku
From Salesforce instance, products and coupons get synced to e-commerce sites (Shopify, eBay, Amazon, Magento, WooCommerce, BigCommerce) and accounts; contacts, vendor contacts, Invoices, Bills to Accounting sites (QuickBooks, Xero, ETSY)
From e-commerce sites Orders and customer Accounts, Contacts gets synced to Salesforce instance.
Salesforce org —> Shopify store –>eBay store–>Amazon store–>Magento store–>WooCommerce store
To make the connection on a Salesforce instance for Heroku App-
Select the following from Available OAuth Scopes –
Full access
Access and manage your data (API)
Access your basic information (id, profile, email, address, phone)
Perform requests on your behalf at any time (refresh_token, offline_access)
Click Save.
Allow from 2-10 minutes for your changes to take effect on the server before using the connected app.
Click on Continue.
You will get the Consumer Key and Consumer Secret from here.
Create a user in Heroku App
Log in as an admin.
Navigate to the menu bar and click the ‘Manage Users’
Enter the Email, Password and confirm the password.
Enter the “customer key” in the “Aqxoltclient field.”
Enter the “consumer secret” in the “Client Secret”
Click the “Save” button to complete the user creation setup
Login with the created user
Log in using the created user credentials
Allow the “Salesforce access” to the user
Do the Auth by using the callback URL and reloading the page.
Calculate P & L
You can edit the records like Price, Quantity, Discount/Unit, and the Description of the added products.
You can see the Profit and Loss calculation on the Calculate P&L page. Click on the green color Calculate P&L button and the system will take you to the Calculate Profit and Loss page.
Note: –The system calculates the Profit and Loss based on Unit Price (Unit Piece coming from Price Book, also editable) and Cost Price (Cost Price coming from Cost Card).
Click on the Back button from the Calculate P&L page, on QuoteandLineItems page check all the records, and click on the Save button to create the Quote.
Guideline for basic setup
Guideline for basic setup to run the CPQ flows
Organization Account, their Contact, Address, and their related records setup –
Organization Account, their Contact, Address, and their related records setup
You need to create one Organization account in the system, for that Organization account; you need to set up the Channel, Distribution Channels, Sites (Warehouse), and employee record for the logged-in user.
Also, you need to create the Profiling records for the created Organization to assign them to the customer accounts and the employee records.
a) Organization Account and their Contact, Address – Organization Accounts represent a company, it can contain many channels and Its distribution Channels, each distribution channels can have their own site or Warehouse.
Organization Account: – Is a legal business entity responsible for all transactions such as sales and purchases etc.
Navigate to the Accounts object from the app launcher and click on the ‘New’ button.
Enter your company name on the Account Name field, select the Accounttype as ‘Organization’, make the account Active, select the Currency from the AccountCurrency field, enter other information, and click Save.
After clicking on the Save button the Organization account will be created.
Addresses and Contacts:
Open the created Organization Account, go the related list and create the Address and the contact by clicking on the New button.
Note: – The users can create different Billing Address and Shipping Address for an Organization. Use checkbox ‘Is Billing Address’ to enable it as Billing Address and use checkbox ‘Is Shipping Address’ to enable it as Shipping address.
b) Channel: – Channels refers to the mode of business (like Retail sales, Online Sales & 3rd part distributers)
Find the ‘Channel’ tab from the App Launcher.
Click on the New button.
Enter the ChannelName, the Organization account and Currency will be selected by default; Active field should be checked, enter other information, and click on the Save button to create the Channel record.
C) Distribution Channel: – Is a group that consist of multiple Distribution Center.
Go to related list of the created Channel and find the Distribution Channel object (related list).
Click on the New button.
Enter the DistributionChannelName, Channel will be selected by default, select/create a new ‘Site’ (refer the Site creation process below), select/create Contact.Active and ReturnHandling checkbox should be checked. Check Primary checkbox if the DC is primary DC, select the priority(any) and click on Save button to create a new Distribution Channel record.
d) Site: – Site is a physical building.
Find the Site tab from the App Launcher.
Click on the ‘New’ button.
Enter the WarehouseName, select/create the PrimaryContact and Address, Organization (select the created Organization Account), Active checkbox should be checked, Type should be ‘Warehouse’, enter a text under barcode field and click on the Save button to create the Site/Warehouse record.
In the same way, create the Order Profile and the Employee Profile records by selecting the Order and Employee record types.
f) Employee: – One Employee record should be there for each logged in user.
Find the Employee tab from the App Launcher.
Click on the ‘New’ button.
Enter the EmployeeName, select the created Channel, select the Organization (select the created Organization Account), the Active checkbox should be checked, select the EmployeeUser (logged in user record), select the Employee Profile (created employee profile), fill other information if required and click on the Save button to create the employee record
Customer Accounts and their Contact, Address
Customer Accounts and their Contact, Address: – The Customer Account represents an individual customer or organization involved with the business. The Customer accounts can be used to create the Quotes and the Orders.
Create the Customer Account: –
Find the Accounts tab from the App Launcher.
Click on the “New” button, available in the top right-hand corner of the page.
Enter the Name of the Customer in the Account Name field, AccountType should Customer, Select the Account Profile (created customer profile) and the Order Profile (created Order profile), Active field should be checked, Select the Organization (created Organization Account), enter other information if required and click on Save button to create the Customer Account.
Create the Address and the Contact record for Customer Account: – The address can the shipping or the billing address for the created Customer and the Contact is the point of contact for the Customer.
Open the created Customer Account, go the related list and create the contact and the Address by clicking on the New button.
Site implementation for the Customer
Site implementation for the Customer: – If want to create a quote/order from a specific Site then you need to assign the Sites to a customer.
Open the created Customer Account, go the related list, find the Site object (related list) and create a Site by click on New button.
Credentials Setup
To setup the Payment (Authorized.Net, PayPal, Stripe etc.) and DocuSign Credentials in Aqxolt CPQ, navigate to the Credentials Setup page and setup the Credentials.
Find the Credential Setup tab from the App Launcher.
Open the tab and Navigate to the Payments section to setup the Credentials for different types of Payments.
Click on the New button, once Credentials setup page appear, enter all the required information, and click on Save.
Navigate to the DocuSign section by clicking on DocuSign section.
Click on the New button, once Credentials setup page appear, enter all the required information, and click on Save.
Product Configuration
Product Configuration: – The ProductConfiguration page allows the users to configure or allow to setup related list records for each of the Products. So that the user can select the configured options while creating the Quotes.
Find the Product Configuration tab from the App launcher.
Open the tab, On the landing page, you can see all the available products. You can search the Products using the SearchBar or you can filter the products by ProductFamily wise.
Also, the +Product button is available in the upper right-hand corner to add/create the new products.
Also, you can edit or delete any existing product from the landing page.
To Configure the products or add the related list records, click on the Configure button.
If the Products has any related records, then you can see all the available related records on the Configuration page.
The users can add the new related records (Price books, Tier Discount Allocation, Cost Cards, Features, Options, Rules, Inventory/Stock, and the Product service Sale) by clicking on the +New button.
Price books
Price books: – Price books track the prices of products and services that your company offers to customers.
Tier Discount Allocation
Tier Discount Allocation: – Tier discount is a model in which products or services are sold within a particular price range. By reaching certain tiers, buyers get a different price. The more items shoppers purchase, the greater the discount they get. By offering customers multiple pricing levels, you give them a choice to pay for products they can afford.
Cost Cards
Cost Cards: – A standard cost card contains an itemization of the standard amounts of materials, labor, and overhead required to create one unit of a product. The card also multiplies the standard cost of each of these line items by the quantities required to arrive at the total standard cost of a product.
Features
Features: – The feature object is related to products, and it “sits” within bundles. They are categories of products within a configuration, or better said: categories of options within a bundle. A bundle can have multiple Features (or none whatsoever because Features are not mandatory) and a Feature can have multiple Options.
Options
Options: – Product options are what really brings the bundle together. A bundle is created when you add Options to a Product in the Options related list. They are like children that sit under the bundle parent. You could think of the Product Option as a junction object linking two product records because it details the relationship between the Parent product in the bundle.
Rules
Rules: –product rules allow you to evaluate product options within a bundle, or a quote, or a quote line against some conditions and then perform actions in response. They are very useful in enforcing business logic during configuration and in giving feedback to sales reps regarding product selection.
Inventory/Stock
Inventory/Stock: – Stock refers to the number of finished or purchased products that are ready to be sold to the end-user. It can also include raw materials if the retailer sells the items directly to customers to earn a profit (e.g., some forms of B2B eCommerce).
Product service Sale
Product service Sale: – Provides a place to record the status of the support or service provided to the product. Ex Extended warranty.
Supporting BOMs
Supporting BOMs: – Supporting BOMs are used for the Configurable products while creating the Quotes Quote Console. If you assign any Supporting BOM to a Product, that supports BOM will be displayed as a Bill of Material in the Product Version after creating the Quotes.
Steps: –
Find the Supporting BOMs tab from the App Launcher.
Click on the New button from the Supporting BOMs records page.
Enter the Name (name should be same as BOM Component), select BOM Product, Quantity, Type and click on Save.
In the below screenshot, Panel 1 is the Supporting BOM of Controller 1.
You can associate a product as a Supporting BOM to another Product using the Supporting BOMs tab.
Organization Account, their Contact, Address, and their related records setup
You need to create one Organization account in the system, for that Organization account; you need to set up the Channel, Distribution Channels, Sites (Warehouse), and employee record for the logged-in user.
Also, you need to create the Profiling records for the created Organization to assign them to the customer accounts and the employee records.
a) Organization Account and their Contact, Address – Organization Accounts represent a company, it can contain many channels and Its distribution Channels, each distribution channels can have their own site or Warehouse.
Organization Account: – Is a legal business entity responsible for all transactions such as sales and purchases etc.
Navigate to the Accounts object from the app launcher and click on the ‘New’ button.
Enter your company name on the Account Name field, select the Accounttype as ‘Organization’, make the account Active, select the Currency from the AccountCurrency field, enter other information, and click Save.
After clicking on the Save button the Organization account will be created.
Addresses and Contacts:
Open the created Organization Account, go the related list and create the Address and the contact by clicking on the New button.
Note: – The users can create different Billing Address and Shipping Address for an Organization. Use checkbox ‘Is Billing Address’ to enable it as Billing Address and use checkbox ‘Is Shipping Address’ to enable it as Shipping address.
b) Channel: – Channels refers to the mode of business (like Retail sales, Online Sales & 3rd part distributers)
Find the ‘Channel’ tab from the App Launcher.
Click on the New button.
Enter the ChannelName, the Organization account and Currency will be selected by default; Active field should be checked, enter other information, and click on the Save button to create the Channel record.
C) Distribution Channel: – Is a group that consist of multiple Distribution Center.
Go to related list of the created Channel and find the Distribution Channel object (related list).
Click on the New button.
Enter the DistributionChannelName, Channel will be selected by default, select/create a new ‘Site’ (refer the Site creation process below), select/create Contact.Active and ReturnHandling checkbox should be checked. Check Primary checkbox if the DC is primary DC, select the priority(any) and click on Save button to create a new Distribution Channel record.
d) Site: – Site is a physical building.
Find the Site tab from the App Launcher.
Click on the ‘New’ button.
Enter the WarehouseName, select/create the PrimaryContact and Address, Organization (select the created Organization Account), Active checkbox should be checked, Type should be ‘Warehouse’, enter a text under barcode field and click on the Save button to create the Site/Warehouse record.
In the same way, create the Order Profile and the Employee Profile records by selecting the Order and Employee record types.
f) Employee: – One Employee record should be there for each logged in user.
Find the Employee tab from the App Launcher.
Click on the ‘New’ button.
Enter the EmployeeName, select the created Channel, select the Organization (select the created Organization Account), the Active checkbox should be checked, select the EmployeeUser (logged in user record), select the Employee Profile (created employee profile), fill other information if required and click on the Save button to create the employee record
Overview
Overview
Booking Kare comprises two major modules
1. Event Module
Event Module comes with features that help Event Planners, and Organiser to organize events efficiently on a large scale with online payment options. Event planners may easily email personalized invitations to hosted events to any and all contact list members in case of the event is canceled or postponed.
Event Booking Module Includes Features Such As:
Event Builder
Create an event
Event zone
Venues
Create Product Service Details
Tickets
Membership
Speaker
Agenda
Logistics
Sponsorship
Adding and Inviting Guests
Send invites to accounts, Contact, and users
Check-in and Walk-in registrations
Manually check-in
Kiosk Check-in
Scan Bar code Check-in
Event Booking
Calendar
2. Appointment Module
The appointment Module comes with a user-friendly appointment booking system that lets your client view the expert’s real-time availability and quickly book an appointment with the expert. The client can book appointments from anywhere, anytime using any device. Upon appointment booking, BookingKare lets you maintain customer information and appointment history for easy reference. Appointment Booking Module Includes Features Such As:
Appointment Booking
Planner
Teams
Team members
Location
Membership Program
Product/Service
Price book
Work Planner
Resource group
Resource
Resource Requirement
Shift Planner
Time management
Calendar
Queue management
Workbench
Room Reservation
Logistics
Payments (Authorize.net,Paypal,Chase payment)
Check-In Check-Out Mobile App
Booking Kare – Check-In/Check-out
Booking Kare is an application to process Check-In/Checkout flow i.e., checking in the clients into an event/appointment and checking them out from an event/appointment.
This app also provides an easier way for the users to check In and Check out using QR-Scanner /Barcode scanner for the members registered to any events or appointments.
How to install Booking Kare Application.
The Booking Kare application can be installed from the App Store or Play Store like any other application on your Tablet, iPad, or Phone.
Open the application and enter the username and password of your salesforce org.
Note: Log in with credentials that have registrations booked for events/Appointments.
The below screen appears when Logged in successfully.
How to scan a Barcode/ QR code to check-in customers for Events or Appointments.
The ‘Registrations’ tab shows the registrations made for the particular event or Appointment.
2. Once the registration is booked, the customer receives an email with the ticket/slip which they must bring with them on the day of the event or appointment.
Enter the Number of People attending
3. Scan the barcode/QR code on the ticket.
4. The customer is checked in automatically and the ticket checker can verify details on this page.
5. Click the ‘Home’ Button to Scan the next person.
6. Click on the Booking Details tab to view Event/Appointment details.
7. You can also check out the same person from this page by clicking on the ‘Check out’ button.
How to scan a Barcode/ QR code to check out customers for Events or Appointments.
Click on the ‘Check out’ Button on the Home Page and scan the code.
Note: The person should already be ‘checked In’ before using check-out process.
2. The customer is checked out successfully and click on home to scan the next person.
How to scan a Barcode/ QR code to check In/check out customers for Events or Appointments if they do not have the ticket/slip.
From the home page Enter the registration number from the booked Event/appointment.
2. Click on the ‘Check In’ button. The person will be checked in Successfully!
If the Registration number is not available or lost
Enter the ‘Last name’ and one of the following ‘Email or phone’
3. Click on the check-in Button the person will be ‘checked In’ successfully!
How to Check out the customer who does not have the ticket/slip.
From the home page click on the ‘check-out’ button
2. Enter the details like registration number or last name and phone/Email.
3. Click on the ‘Check-out Button.
4. The person is checked out Successfully!
Consultant Booking
A consultant booking system lets your client view the expert’s real-time availability for the services in different locations. This mainly focuses on showing the nearest location available for clients to book an appointment. The client can book the appointments from anywhere, anytime using any device.
The system is Integrated with Zoom, Microsoft Teams, GoToMeeting and Cisco WebEx virtual meeting platforms so that the users can manage and view meetings within the application. The scheduled meetings can be attended onsite or offsite.
Consultant Booking
Navigate to the App menu and click on Consultant booking tab where we can view the products services and its location as shown below.
The system provides the search bar to find the location and services by its name.
The system also provides an option to select the date for booking the appointment.
The resources are listed down based on their availability for a particular service.
Select the preferred location and services for which you wish to book an appointment.
Select the user with whom you want to book an appointment and click on the “Book” button for booking the available slot.
Otherwise, click on the “Select a different time slot” button to select one or more sessions from the available time slots.
This page gives you the details of the resource you’re booking an appointment with and provides an option to either select an existing client or to enter new client details.
You can search the existing clients by its name, email or mobile number.
Otherwise, Enter the client details such as First Name, Last Name, Email and Mobile.
Choose the meeting options which you’re flexible with to attend the meeting.
Click on the “Submit” button to book an appointment successfully.
Once the appointment is booked, you need to enter the purpose of the meeting in the textbox provided.
Click on the “Update” button to update the appointment being booked.
Room Booking
You can book the room for the appointment by clicking on the “Book Room” button.
Select the slot in the time slot list provided which is based on the availability of the conference rooms.
This navigates to an appointment details page with room booking details added as shown below.
Choose the meeting options which you’re flexible with to attend the meeting.
Click on the “Update button” to update the booking details.
This books an appointment and a conference room for the client successfully.
Email Confirmation for the Appointment
A confirmation email will be sent to the client’s email once an appointment is booked along with the ticket attached as a PDF as shown below.
Appointment Scheduling & Booking
The appointment booking system lets your client view the expert’s real-time availability and lets you quickly book an appointment with the expert. The client can book appointments from anywhere, anytime using any device.
Give your customers a seamless scheduling/booking experience Customize the look and feel
Match exactly to your company’s brand
A consultant booking system lets your client view the expert’s real-time availability for the services in different locations. This mainly focuses on showing the nearest location available for clients to book an appointment. The client can book the appointments from anywhere, anytime using any device.
The system is Integrated with Zoom, Microsoft Teams, GoToMeeting and Cisco WebEx virtual meeting platforms so that the users can manage and view meetings within the application. The scheduled meetings can be attended onsite or offsite.
Consultant Booking
Navigate to the App menu and click on Consultant booking tab where we can view the products services and its location as shown below.
The system provides the search bar to find the location and services by its name.
The system also provides an option to select the date for booking the appointment.
The resources are listed down based on their availability for a particular service.
Select the preferred location and services for which you wish to book an appointment.
Select the user with whom you want to book an appointment and click on the “Book” button for booking the available slot.
Otherwise, click on the “Select a different time slot” button to select one or more sessions from the available time slots.
This page gives you the details of the resource you’re booking an appointment with and provides an option to either select an existing client or to enter new client details.
You can search the existing clients by its name, email or mobile number.
Otherwise, Enter the client details such as First Name, Last Name, Email and Mobile.
Choose the meeting options which you’re flexible with to attend the meeting.
Click on the “Submit” button to book an appointment successfully.
Once the appointment is booked, you need to enter the purpose of the meeting in the textbox provided.
Click on the “Update” button to update the appointment being booked.
Room Booking
You can book the room for the appointment by clicking on the “Book Room” button.
Select the slot in the time slot list provided which is based on the availability of the conference rooms.
This navigates to an appointment details page with room booking details added as shown below.
Choose the meeting options which you’re flexible with to attend the meeting.
Click on the “Update button” to update the booking details.
This books an appointment and a conference room for the client successfully.
Email Confirmation for the Appointment
A confirmation email will be sent to the client’s email once an appointment is booked along with the ticket attached as a PDF as shown below.
Planner
Planner enables users to Request(plan) or Approve(Post on the live system) their Appointment, by creating the Resource, Resource group, Teams, Product from the App Launcher and Creating Location, Work planner, Resource requirements, Time management, Registration and Scheduler from the Planner tab.
Resource
Once the resource group is created add the right people to the group as a resource workforce. You can either add workforce or you can enable the efficiency of the activities like equipment setup, room, etc., by selecting the appropriate record type. You can add the resource by following these steps:
Create a resource
Navigate to app launcher and click the Resources tab.
Click on the new button and select a record type as Workforce.
Enter the resource name and Select the user.
Enter the Email address and phone number.
Select the resource group and Select team this allows a group of resources to assign the task.
If the resource is supervisor check the supervisor checkbox this allows you to see other resources and can manage their appointments.
Check Override holiday’s checkbox is true this option allows you to check that resource for the nonworking time during which the selected resource will work.
Enter the description and image URL
Enter the start and end date of the resource availability
Click on the Save button to create a resource record
Resource group
Create a resource group that is responsible to carry out a set of tasks or specializing in a particular skill.
Create a Resource Group
Navigate to the app launcher and click the Resource Group tab and click on the new button.
Enter the resource group name
Enter the Start Date and End Date
And save the record to create a resource group record
Teams
Managing the team helps you stay committed. Take full control over appointment activities by creating a team and managing their availability and time offs.
Navigate to the app launcher and select the Team.
On the right-hand side, the corner clicks the New button to create a new Team.
Enter team name and select account.
Enter the description of the team to determine the goals and purpose of the team is bean created.
And click on the Save button to create a team record.
Product/Service
Create a product
Navigate to the app launcher and click on the product tab.
Enter the product name, product code, and duration (In minutes).
Select qualification (this option lets the customer is to identify if the customer is eligible for the service).
Select the category, type, and subtype from the pick-list and select the active checkbox it will allow you to select based on location and program from the console.
Select the membership program and enter the session duration and description of the service.
Check to allow invite checkbox this option allows you to invite the customer to book an appointment.
Allow multi-booking checkbox allows you to book multiple slots at a time.
Allow voice/video checkbox this option allows you to send voice/video msgs and will appear on the registration page during booking an appointment.
Allow Waiting list checkbox this option allows you to check if the maximum registration is a threshold (exceeded) and if the checkbox is true then it allows the registration record in the waiting list.
Check the auto resource allocation checkbox this option allows the availability of the resource.
Allow not available slot checkbox is true, this option allows you to block out times when you will not be available for appointments.
Check allows purpose captures checkbox.
Check allows information capture checkbox is true, this option allows you to capture information of the customer for their services.
Allow where the (Location/Voice/Video) checkbox is true, this option allows you to share your current location through voice/video if it is checked it will be visible on the registration page.
Enter the URL for the image and banner image.
Price book
The standard Price book is the default (standard) price for the products and services in the standard price book. When you create a product record, Salesforce creates a standard price book entry. Custom price book entries are the custom (list) prices for the products and services in your custom price books.
Creating a Price Book Entry
Select created product and click on the related list tab
Find the price book and click on the new button
Enter the list price and check the active checkbox
And save the record.
Create membership Program
Navigate to the app launcher and click on the membership program tab
Click on the new button and enter the following details
Enter the Program Name, Start and End date of a member
Enter the description and save the record to create a membership program
Locations
Click on the planner tab on the sub-tab and click on new to create a new Location
Enter Location Name, Account, City, Country, and Address,
Enter the province/state and postal code and select the active checkbox.
And save the record to create a location.
Work Planner
Creating a Work Planner to execute an event can help simplify your work and track progress. You can create a work planner by following these steps:
Navigate to the app launcher and click on the Planner tab.
Click on the sub-tab of the work planner tab and click on Add button to create a new work planner.
Enter the work planner’s name.
Select the product/service and location of the work planner.
Enter the minimum and maximum threshold this option allows the resource value that can be assigned to the tasks.
Select the status as Approved and if you select the status as Requested that means that the task is only been planned and will not be available on the live system.
Enter the description of the work planner.
And save the record to create a work planner
Resource Requirement
Once the work is planned, figure out the resource required in your event planning, this could be a resource that belongs to a specific skill set or a resource group. You can create the resource requirement by following these steps:
Navigate to the Planner Tab from the app menu.
On the Planner tab, click the Resource Requirement sub-tab and click the new button
Enter resource allocation name
Select a work planner and select a resource group and save the record.
Time management
As a supervisor, you can manage your team members’ availability, time off, and break times easily with the Booking Kare Time management application. You can manage the time by following these steps:
Navigate to the time management tab and select the Team, Membership, and Location from the pick-list. You will be presented with the screen below.
You can view all the resources and their availability of start and end time
You can also change/manage the availability of the resource from the start and end time from the pick-list
And also can manage the resource start break time and end break time from the pick-list.
You can also click on the next and previous button to see other resources
And also can manage time off by clicking time off of the resources
And also you can manage other resources by lookup for which resource you need to give time off
Click on the book time off button and the page will navigate to time off-page
Select the start date and end date of the resource
Select the start time and end time of the resource
Select type and no of days
Enter Reason and save the record to create time off for the resource.
REGISTRATION On booking the appointment you will find all the booked appointments along with their Reference Number, Service selected, Resource, Location, Start Time, End Time Email, Type, and Status
Navigate to the app launcher and click on the Planner tab.
Click on the sub-tab of the registration tab.
You will be displayed with only those registered who have the Record type as Resource Service in the registration.
SCHEDULER As a superuser/supervisor/Administrator you can access the scheduler to view the registrations of a particular user or all the users based on Time, Day, Month, and also Year.
Navigate to the app launcher and click on the Planner tab.
Click on the sub-tab of the Scheduler tab.
You will be navigated to the screen below.
You can also filter by Search Location and Search Resource filter present on the screen.
On the left column, you will be displayed with the list of resources (users) Along with their registrations.
Click on the + button present before the resource to view the registrations of that particular user.
You can also view the scheduled appointment based on Time, Day, Week, Month, and Year.
Shift Planner
Shift Planner
A shift planner is a tool that helps manage resources efficiently across businesses. It helps in planning the staff shifts and booking appointments for a user or resource according to their availabilities. It is the best way for super users and supervisor users to manage and utilize the availability of the staff effectively.
A Superuser can manage the availabilities of all the users under the organization
A Supervisor User can manage only your team members’ availability, time offs and break-times
A user can manage only its own availability, time offs, and break-times easily with Shift Planner.
How to Find Shift Planner:
Click on App Launcher
Or You can click on the ‘Shift Planner’ Tab
Shift Planner screen Appears
Understand the Features of Shift Planner Screen
Available – This tile represents the Available Slot for booking an appointment
Not Available – This tile represents Slot is not available for booking an appointment
Time Off – This tile represents Time off/ breaks
Out of Office – This tile represents temporarily unavailable
Holiday – This tile represents public holidays or temporary leaves
Fully Booked – This tile represents that All available slots have been completely booked..
C – Indicates the total Capacity Hours of a resource for the day
D – Indicates the total Demand Hours for the resource for the da
AC – Indicates Available capacity Hours for the resource after demands and time off
How to Book Appointment from Shift Planner:
Let’s Create an Appointment for ‘Emily’ in Mississauga to work in the OW group on Wednesday.
Select the Available time slot for a resource and resource Group.
The time slot shows start time and End time, capacity, demand, and Available capacity
Click the Time Slot
Click on Book Appointment Button. This will take you to Appointment Booking Screen to confirm the booking.
How to Manage Availability of a Resource.
Let’s Create a new resource group for Neurology in Norwich. Let’s add ‘Ryan Lee’ and his availability who is a ‘Resource’ or ‘user’ working in the Neurology Group.
Manage Availability is a feature That allows you to manage the available slots of the users on the shift planner. From this feature, you can create a Resource Group, Resource, and multi-time slots.
Click on Manage availability Button
The screen shows
Enter the fields to manage the availability of that particular ‘Service, Location, group and dates’.
Click on the ‘Group’ Button.
Enter the Group Information for which you wish to add the new resource
Enter Service, location, Group, Start date, and End date.
6. Select the Resource Name and Team then add the availability times as shown below
Click the ‘Save’ Button. A new Resource group and Resource will be created and it can be viewed on the shift planner screen.
How to Manage Availabilities for Each resource
Instead of going to manage availabilities. You can also click the ‘Manage’ button from the time slots.
Let’s manage Emily’s Availability for Wednesday
Click on the Time slot. The pop shows up
2. Click on the ‘Manage’ button. The next screen takes you directly to Emily’s availabilities Page to edit.
3. Once changes are made click the ‘Save’ Button.
How to create a ‘Time Off’
Emily has an urgent meeting to attend and she would be unavailable for the service. So she decides to create a Time off for that date and time.
Let’s Create a Time off for Emily for the same slot on Wednesday.
Click on the ‘Time off’ Button
The time off screen appears.
Click the ‘Time Off’ Button. And Enter the Details of Time off.
Click ‘Save’. A time off will be created for Emily and it can be viewed on the shift planner screen in blue.
Time off can also be created by directly clicking on the time slot on the shift planner screen.
Click the ‘Time slot’. The pop-up shows
Click on the ‘Time off’ button and follow steps 1-4 from How to create time off.
How to filter Shift Planner
A supervisor opens the shift planner and looks for Emily’s resources to book an appointment for her availability. He quickly finds using the filter icon.
Let’s find Emily’s shift schedule at the Mississauga Location for the Ontario works program.
Click on the filter icon.
Enter the Program, Location, Service, and Team. Emily’s resource Shows up.
How to find time slots for future dates
If you want to book an Appointment with Emily for future dates.
Click on the calendar date icon to show the available time slots in the future dates
The next available time slots show up for future dates.
How to Drop a Shift
Jamie is a doctor who works in a health care department. He has to drop a shift due to an emergency situation. He can do so from the shift planner by selecting the time slot that he wants to drop. This only applies to available timeslots.
Let’s find the available time slot for Jamie and drop the shift.
Click on the Available Time slot
The pop-up shows details. Click on the ‘Can’t work?’ Button and select ‘Drop Shift’
Click ‘Yes’ to confirm
The shift will be dropped and the timeslot will be greyed out which means it is ‘not available’
How to Swap a Shift
Jamie receives a notification for an urgent meeting but he has the shift to cover at the same time. So he decides to swap the shift with his colleagues by sending a swap shift request. Once the request is approved by one of his colleagues. Shift Planner swaps the available timeslots of those resources for the selected date and time.
Let’s swap a timeslot of Jamie with Noah’s timeslot.Click on the Available timeslot that has to be swapped.
Click on ‘Can’t work?’ Button. And click the ‘Swap Shift’ Button.
The next screen shows the available timeslots of other resources to swap with.
Select the resource timeslots that you want to send the request.
For Example, let’s select two different users’ time slots and send them requests.
Jamie sends requests to Roger and Noah.
Click the ‘Send Swap Offers’ Button
Noah decides to swap the shift with Jamie. So he navigates to shift planner and clicks on the Dashboard icon to approve the request.
Click on the Dashboard icon.
The screen shows all the requests received and Requests sent for approval.
Noah clicks the ‘Approve’ tick mark action to approve the request and enters the reason.
Clicks on the ‘Approve’ Button.
Once the request is approved. Jamie can view the Timeslots swapped with Noah’s timeslot making the swapped timeslots as ‘blue’ which means Time off and Available time slot as green which means ‘Available’. Visa versa for Noah’s Timeslots.
How to Reschedule your availability
Emily would like to modify her availability on a particular day and hour as she will be unavailable for a complete length of time which was previously set up on the shift planner.
So she makes changes directly from the shift planner by clicking the timeslot that she wants to change it.
Click on the timeslot on the shift planner screen for Emily’s resources.
A pop-up shows up with ‘Can’t work?’ Button.
Click on the ‘Reschedule’ button
A pop-up shows up to change the Start and End times of the Shift.
Change the times and if required you can add Break start and end times as well.
Click the ‘Save’ Button
The time slot changes the Start and end time of the shift and also changes the Demand and Capacity hours accordingly.
Appointment Booking
With Appointment Booking, you can carry your entire business in your pocket. Manage to schedule, Cancel, and Reschedule your appointments, etc. via this New Appointment Booking flow. Add appointments to your calendar even when you’re out for lunch.
Receive instant notifications via email when an appointment is booked, rescheduled, or canceled. Customers also receive automated appointment alerts so that they stay on top of their bookings without having to dial in.
Appointment Booking
Navigate to the App Launcher and click the Appointments tab, here we can view the Resources and their services and Book an appointment. The page appears as shown below.
The system provides the search bar to find the services, Resources, and Time slots.
Select any services according to the location you wish to book an appointment.
You can filter out services and locations using the filter icon on the search bar.
Then select the Resource you wish to book an appointment with and select one or more sessions from the available time slots.
Book Button will book the appointment with the first available time slot.
Also, If you wish to select a different time slot, click on the Select a different time slot button.
The page will navigate to the available time slot page view, below the screenshot.
If you wish to reserve a room for the Appointment, then click on the Book Room button.
On selecting the available resource and the time slots and for the reserve room option, Select the available rooms from the below screen.
The above page consists of information about the room, location, available capacity, and date. Search by date to check the availability of the room for reservation.
Select the room from the options then, fill in the details and click on the Book Appointment button.
When the appointment is booked you will receive a confirmation email with the appointment details.
If you wish to book an online meeting with the resource, then select the online meeting button on the time slots.
When selecting the option for an Online meeting, you will see the page below.
Register for the meeting by filling up the details. Search by name, email, or mobile number to fill in the details or type manually.
After filling in all the details, select the meeting option through which you want to have your online meeting scheduled. Then click on the ‘Update’ button.
If you wish to update the details, Reschedule or Cancel the Appointments from the Appointment Booking page then click on the dropdown button from the Registration Section.
On selecting the Dropdown Button all options will appear on the screen.
The Update Details page will look like the below screenshot.
The Reschedule page will look like the below screenshot.
The Cancel appointment page will look like the below screenshot
Email Notification
Different ways to navigate to the New Appointment booking page
# Client record Page
Navigate to the Client records from the Client tab, once the record page opens, you will be able to see the new Appointment Booking button.
# Member Record page
Navigate to the Member page from the Client record or from the Member tab, once the record page opens, you will be able to see the new Appointment Booking button on the Member page.
# Client Registration Page
Navigate to the Client Registration page by using the Client Registration tab, once you create any new record or select the existing records from the search bar, you will be able to see the Book Appointment button, which allows you to navigate to the new Appointment Booking page.
#ShiftPlanner page
The system also allows navigating to the new Appointment Booking page from the Shift Planner.
Navigate to Shift Planner, click on the available time slots from the Shift planner home page, the new Appointment Booking button will appears on the Popup page.
Client Registration
The Client Registration page allows creating new clients and their family members by signing the Consent. Also, allows to navigate to the Consultant Booking page and allows you to see all the booked appointments.
Navigate to the App Launcher and find and click on the Client Registration page. You will be able to navigate to the below page.
The system allows updating the existing records or creating new clients by entering the required information and signing the consent form.
After entering all the required information and clicking on the ‘Save’ or ‘Save & New’, below consent modals will pop up, and the system will allow signing the tier 1 and tier 2 consents. After signing these two consents Clients and Its Member record will get created.
Tier 1 Consent
Tier 2 Consent
While booking an appointment after expiring the consents, the system will ask to re-sign the consents while booking the appointments.
Also, the system gives an option to sign or update the sociodemographic information consent.
The system also allows updating the Consent from the Client Registration page if the consent gets expired.
Once the Client and the Member record get created by selecting or creating the family, the ‘Client’ button will appear on the Client registration home page and the system allows adding the caregivers/family members. Once you click on the Client button, the below pages will pop up and will allow you to create child or adult family members.
Child
Adult
Also, the system gives an option to navigate to the Consultant booking page by clicking on the Book Appointments button. If clients book any appointments, those appointments will be also listed on the client record page as shown below.
The users are allowed to Update, Reschedule and Cancel the appointments by clicking on the Manage Booking page.
SHIFT PLANNER to Manage The resources
As a superuser, you can manage all the users under your organization, as a supervisor you can manage only your team member’s availability, time off, and break times, and as a normal user you can manage only your availability, and time off and break-times easily with the BookingKare shift planner application.
You can manage the time by following these steps:
Navigate to the time shift planner you will be presented with the screen below.
You can view all the resources and their available timings, capacity, demands, and Available Capacity.
When you create a new resource, capacity will be created automatically, and after creating an appointment for your capacity, demand will be created against that capacity.
You can also change/manage the availability of the resources using the manage button by clicking on the time slots.
Also, can manage the resource start break time and end break time by clicking on the available time.
You can also click on the next and previous buttons to see other resources.
You can also manage Time Offs for all the users from the Shift Planner by clicking on the Time Off icon in the upper right corner. Once you click on the icon below screen will appear.
Shift planner will allow you to Create, Update or Delete any Time offs from this page.
To manage your Resources, click on the manage icon on the top right corner of the screen you will be navigated to the screen below.
You can add/edit/delete the start time and end time, start break time, and end break time of the resource.
You can add new resources in the Shift Planner by clicking on the add ‘Resource’ button on the screen.
You can also create a new group by clicking on the Add group button on the top right corner of the screen.
Click on the Save button to save your changes.
User Journey Appointment Booking Flow
Appointment Booking
The system admin can configure sites and communities to reach the application offerings to the external audiences. This makes it convenient for guest Users to book an appointment.
For the Appointment flow the customer can book the appointment by following these steps:
Click on url the page will navigate to the given screen below:
Click on the Appointment booking tab and the page will navigate to the given screen below:
Step 2 Appointment Topic Select the appointment topic that you are looking forward to booking.
Select the membership program from the first drop-down list.
And subsequently, Select the Services that are Available for that selected membership program.
Provide the answers to the following mentioned questions.
Select the total number of attendees including yourself in the given box.
Click on the continue button, the page will navigate to the Appointment.
Step 3 Appointment Details Select the preferred date, time, and location of the appointment.
Select the preferred date.
Select the preferred location.
Select the preferred time slot and the page will navigate to the Appointment Contact Details Page.
Step 4 Appointment Contact Details Page Enter registration details.
Fill in your contact details and mandatory fields.
Click on Continue.
The page will navigate to the appointment confirmation.
Step 5 Appointment Confirmation
This is the final process of appointment booking flow, Here your appointment will be confirmed and booked successfully.
Appointment booking confirmation details will be presented on the screen as shown below.
Clients will also receive Appointment Confirmation Mail, Invoice, and badge to registered Mail Id
After the Customer gets the Registration Email, he can cancel or reschedule the registration of the appointment by clicking on the manage booking button, it will navigate to the booked details screen, we have a cancel button if we click on that a popup will appear by saying yes or no if we click on yes then the registration of the event will be canceled and the customer gets cancel notification to his email address.
Step 6 Appointment Confirmation Email
On successfully booking the appointment. An appointment confirmation email alert message with the details, along with the Badge attached will be sent to the registered user’s email address.
Manage Booking You can manage your appointment by clicking on the Manage Booking button present on the email template.
Click on the Manage button.
The page will navigate to the Booked Details page which has the following features available:
1. Update Appointment. 2.Change Date/Time(Reschedule). 3. Cancel the Appointment.
Step 7 Update Appointment
You can update your Appointment details by clicking on the update appointment button.
Modify your contact details which you like to update.
Click on Update Appointment to Update your modified details.
Step 8 Appointment Reschedule (Change Date/Time)
You can reschedule your appointment according to Your preferred schedule.
To reschedule the appointment Click on the change Date/Time link which is been provided on the booked details page as displayed on the above screen.
Click on the Change Date/Time link, The page will navigate to the given screen below:
Select the preferred schedule date and time and click on Update Appointment.
On clicking on the update Appointment the Rescheduled
Step 9 Appointment Rescheduled Email
On Rescheduling the Appointment i.e on Change Date/Time of the appointment.
An appointment Rescheduled Confirmation email alert message will be sent to the registered user email address as displayed on the screen below.
Step 10 Cancel Appointment
Click on the Cancel Appointment button to cancel your Appointment.
On clicking the cancel Appointment button, The page will navigate to the given screen below:
Enter the reason for cancellation.
Click on Yes to Cancel the Booked Appointment., The page will navigate to the given screen below:
Step 11 Appointment Cancellation Email
On clicking the cancel Appointment button.
An appointment Cancelled email alert message will be sent to the registered email address as displayed on the screen below.
Queue
Queue
A queue works almost on the same methodology used at banks or supermarkets, where the customer is treated according to its arrival.
Create a Queue
Click on the app launcher and click on the queue tab
To create a new record and click on the new button and select record type as resource service
Enter queue name and select Location for which queue is created and Select status as active
Select the Type of the queue whether it is a standard or a VIP queue.
And click on the Save button to create a record.
Queue Allocation
Queue allocation is nothing but allocating the queue based on their services and their resources.
Create a Queue Allocation
Click on the queue tab and select any Queue record
Navigate to the related list of Queue tab
Once in the related list section, find the Queue Allocations and click on the new button
And enter the Queue Allocation name and Select Queue
And select service to allocate in the queue
Select a resource to allocate in the queue and check the active checkbox
And save the record to create queue allocation
Room Reservation
once you complete the room reservation you will be redirected to the booking details page where you can update your details, change room, change time, etc.
Select the Book button. You will be navigated to the previous screen, from where you can also add logistics to your booking
Logistics
Logistics is nothing but resource management in case of events such as travel, accommodation, and many more, which can be handled by the organizers of the event.
Click the Logistics tab present on the Right-hand side of the room reservation page.
You can add logistics for the booking by entering the registration number of the booking in the search booking option as shown on the screen below:
Create a logistics
Click the Add logistics button to create a new Logistics record. and you will be navigated to the screen below
Enter the name of the Logistic and Quantity.
Select the Category and Type of the logistic
Select the logistic Provider and enter the Item Details.
Click the Save button to create the logistic record for the appointment/event. you will be navigated to the screen below:
click on the save button to save your added logistics in the booking.
Authorize.net
Bookingkare supports Authorize .net services to make card payments and online payment processing.
So let’s start creating a payment setup by adding your Authorize.net account on BookingKare.
Navigate to the app launcher tab and click on credentials
Click on the subtab of authorize. net, PayPal, and chase tab
Click on the new button and enter the following details
Aqxolt CPQ contains the out of the box functionality like Product Configurator, Quote Console, calculate profit and loss, Quote, Contracts signing process with the DocuSign, Orders, Invoices, payments from Authorize.net and PayPal, Supporting BOMs, Product/Service Sell, discount calculation, auto tax calculation and many more.
Getting started with Aqxolt CPQ
Guideline for basic setup to run the CPQ flows
Organization Account, their Contact, Address, and their related records setup –
Customer accounts their Contact, Address setup.
Credentials Setup
Payments
Product Configuration
Price Books
Tier Discount Allocation
Cost card
Features
Options
Rules
Inventory/Stock
Product/Service Sale
Supporting BOMs
Creation of Quotes using ‘Quote Console’
Calculate P&L
Add/Edit Products
Site Implantation(multiple/Single)
Send the Quotes for Manager Approval
Send the Quotes to the Customer to sign the Contracts using DocuSign
Convert the Quote into an Order using the ‘Convert to Order’ button.
Sync Quote and Orders records before Order activation.
Create Orders from EPoS.
1. Getting started with Aqxolt CPQ
Install the Aqxolt CPQ: – Users can install the Aqxolt CPQ from the App exchange.
Navigate to the App Exchange and search ‘Aqxolt CPQ for Manufacturing and Retails’.
Once you are on the Application detail page, click on the ‘Get It Now’ button, and follow the prompts to proceed to install the Application.
Price books
Price books: – Price books track the prices of products and services that your company offers to customers.
Convert the accepted Quote into an Order using the ‘Convert to Order’ button:
The Aqxolt CPQ allows creating the Orders for the Accepted Quotes using the Convert to Order button.
Open the accepted Quote record and click on the Convert to Order button, available in the upper right corner.
After clicking on the Convert to Order button, the system will take you to the order creation page. On the order creation page, you can see all the details along with the Line Items.
On the Order creation page, enter the order Description if applicable. Edit the Price, Quantity, Change the Discount Plan, or manually enter the Discount/Unit, enter Line Description If required, and click on the SAVE button available at the bottom of the page by selecting the line items.
Once you click on the Save button, an Order will be created with Draft status. You can see the created Contract and Quote record on the Order detail page.
Note: – You can edit the existing Order Products or add new Products on the Order before activating the Order.
Creating the sales order from Enterprise Point of Sale (EPoS) Tab
The orders are created through Enterprise Point of Sale for a situation when a customer walks into a store/outlet, orders a product, pays for it, and takes the product home or opts for the available shipment options. Upon confirming the sales order, the sales invoice is created automatically. Each sales order has a unique number to enable simple tracking. The order console where the sale orders are processed is as shown below. It is referred to as Enterprise Point of Sale (EPOS) in Aqxolt CPQ. Click on the Epos tab as shown below.
Click on the Epos from the App Navigation, available in the CPQ App.
OR
Find the Epos tab from the App Launcher.
Once you click on the Epos tab system will take you to the Epos home page.
Under the Customer Details section Select the Customer Name from the Account Name Lookup field, once you select the customer’s name the system will automatically pull the Contact and the Billing and Shipping address. (The customer account needs to have the Contact and the address records).
If you cannot locate the customer’s name in the Account Name lookup field, you can create a new customer account without exiting the Epos page or switch to other windows. Simply click on the Account tab located on the right-hand side of the screen. On the Account tab, you will be prompted to add:
Account
Contact
Address
You will be able to add a new Customer account, a new contact for the new or existing customer and both the “Bill To” and “Ship To” addresses, for the new or existing customer. Based on the selection made, the relevant screens appear to add information.
Click on the Account tab to create a new customer account.
Enter account name, assign the Account Profile and Order profile. Enter other details and click on Create Account button.
2. Click on the Contact tab to create a new contact for the Created customer.
Account Name will be auto populated, enter First and Last Name, enter other details if required and click on the Create Contact button.
3. Click on the Address tab to create a new BillTo and ShipTo address for the Created customer.
Account will be auto-selected, select the created Contact, enter Address Line 1, City, Zip/Postal Code, Country, and other details if required, and click on the Create Address button.
Note:-
Once you select the customer’s name from the Account Name lookup field, the contact details, such as contact name, email address, phone number, account ID, customer profile, and address details, are retrieved automatically.
You may select the retrieved “bill to” address or select a different “bill to” address if one or more “bill to” addresses are saved for the selected customer, this change will be made for this order only and not on the customer account.
A single “bill to” address/a single customer may have several “ship to” addresses. Select the “ship to” address from the available picklist for the selected customer.
The “ship to” address describes the location where the order is to be shipped. If the “ship to” address required for the order has not been saved in the customer account, click on the Accounts tab to create new address information.
If you want to select an existing sales order then, click on the lookup and select the sales order.
If you are creating a new sales order, then a new sales order number is generated after adding the product line items and saving the order.
Once you Select the customer, add the products into the Order
Click on the Add button, to add the line items into the order.
After clicking on the Add button, the system will take you to the Add Products page where you can find the products and add them as Order Products.
You can scroll the page or use the search bar to find a product.
Once you found the products select that product, enter quantity, select discount plan or enter discount amount if applicable, and click on the AddProduct button available at the bottom of the page.
Note: – The system will not allow to add those products, which doesn’t have any stock. The products need to have stock, or the products should a back-order product.
Once you click on the Add Products, the selected products will be added to order and the epos page will look like the below screen.
Once you add the products, click on the Save button to create the Order.
After clicking on the Save button system will generate a unique order number.
You can Edit or Delete the line items if you want.
Create Sales or Advance Invoices for the Orders
The Aqxolt CPQ allows you to create a Sales Invoice record for activated orders just in two clicks.
Also, you can create Sales or Advance Invoices for orders manually.
Create the invoice record for activated orders from Order level automatically: –
Open the Order record, click on edit, check the IssueInvoice checkbox, and click on the Save button. Your Invoice record will gets created.
2. Create the Sale or Advance invoice record for activated orders from the Order level.
Open the Order record, find the Invoice object (related list of Order) and click on the CreateNew button.
Select any record type (Sales) and click on the Next button, the system will take you to the Invoice creation page. Select the Line Items and click on Save button to create the Invoice record.
After clicking on the Save button system will create the Invoice record and will take you to the Order record page again.
Note: – If you want, you can create an Advance Invoice for the Orders by selecting the record type Advance on the record type selection page.
Receive Payments using PayPal and Authorized.net
The Aqxolt CPQ is integrated with PayPal and Authorized.net, so that the customer can make payments against the Invoices easily.
Open the Invoice record and find the RecordPayment option.
Once you click on the Record payment link, the system will take you to the next page to make the payment.
On the Record Payment page, you can fill the card data and make the payment for the created invoice.
Documents for Quotes, Orders, and Invoices
The Aqxolt CPQ allows you to generate the documents for the created Quotes, Orders, and the Invoices. You can Send, Print or Download the documents easily using Apxolt CPQ.
Quote Document: – Open the Quote record and click on the Quote Document button.
Invoice Document: – Open the Invoice record and click on the Invoice Document button.
Order Document: – Open the Order record and click on the Order Document button.
Calendar For Event
Want an easy, visual way to track upcoming or ongoing Events? Create a calendar from a standard or custom object: Choose a date field that represents data you want to track, and the calendar displays data in that field as calendar items. You can hide or show calendars, and you can edit and delete them. You can also track events in reports.
Create an Object Calendar for Events
Here’s how to create a calendar based on a standard or custom object
Navigate to the calendar tab.
Start creating a calendar by selecting the New calendar option as shown in the screen below:
Choose an object to base the calendar on.
Select fields that determine what the calendar displays (1, 2, 3).
If you want, filter the calendar items by selecting a list view (4).
The calendar displays items differently depending on the date fields you select.
(Date) Fields
The names of some date fields include (Date). If you select a (Date) field, the calendar displays items across the top (as all-day items).
(Date/Time) Fields
The names of other date fields include (Date/Time). If you select a (Date/Time) field in Field for Start, the calendar displays items in time slots. If you also select a field in Field for End (it’s optional) and the items’ duration exceeds 24 hours, the calendar displays the items across the top (as all-day items).
Selecting Start and End Fields
Field for End is optional. If you use it, you must select the same type of field as you do in Field for Start. For example, if you select a (Date) field in one, you can’t select a (Date/Time) field in the other. If you select fields that generate dates in the wrong order (end before start), Salesforce displays an error message when you save the calendar.
The colour of each calendar is the colour of the object it’s based on. (If a custom object has a theme, the theme determines the colour of the calendar.) You can hide or show individual calendars.
Calendar for Event Booking
Calendar views display your own calendar and coworkers’ calendars along with list views of open tasks. On the Home tab, the Calendar section shows upcoming events, a date picker for the month, and links to other calendar and activity views. You can share your calendar with coworkers and print calendars and task lists.
Calendar Views
Your calendar displays all events that you own on the My Events Calendar. Calendars that you create from an object display data in date fields as calendar items. View, create, and edit your events in a day, week, or month view. You can also see any calendars shared by colleagues that you’ve added to your view.
View Your Calendar
Access calendar views by:
Choosing the Calendar page from the navigation menu.
Opening a related event on a record’s activity timeline. (If your record doesn’t display the activity timeline, ask your admin to customize your page layout.)
When you click an event that you have permission to access, an overlay displays a preview with event details. Your admin configures the content of the overlays.
Grid Views
Calendar grid views display events in several ways.
Current date or any date that you choose. You select how the calendar displays.
One column with events colour coded for selected calendars
One column for each selected calendar to compare available times
One week at a time
One month at a time
Table View
To see specific events or more events simultaneously, open the table view. Customize an event list view to suit your needs or use the predefined lists views.
My Recent Events
My Team’s Recent Events
My Team’s Upcoming Events
My Upcoming Events
New This Week
Recently Viewed
Today’s Agenda
Customize your view from the calendar side panel.
To add calendars, click options .
To display or hide a calendar, click the calendar name.
To change the dates, click , , Today, This Week, or This Month.
To add an event, remove a calendar, or view only one calendar, click my event options .
Where to Select or Switch Views
You access calendar views in the following locations.
The Calendar section at the bottom of the Home tab. (If your Home tab doesn’t display the Calendar section, ask your admin to customize your home page layout.)
The Calendar shortcut in the sidebar that opens your last used calendar view. (If your admin has enabled the shortcut.)
The detail page for an event or a task
An activities list view
When you hover your mouse over an event that you have permission to access, an overlay displays event details and actions that you can perform. Your admin configures the content of the overlays.
Day, Week, Month, and Activity Views
Calendar views display events as follows:
A day at a time: or Today
A date that you choose using
A week at a time: or This Week
In a week view, with or without weekends
A month at a time: or This Month
On a day that you choose: Click in the week or month view
In a list of activities (events and tasks):
Inside any calendar view, you can switch views by clicking the icon for a different view. In a week or month view, click a date to see that day’s view.
Single-User View
The single-user view ()
displays up to 1,000 events in one month in any of the following:
Your own calendar
The calendar of another user (not available in Personal Edition)
A public calendar
A resource calendar
Click Change to switch users or calendars. Click Share My Calendar to allow other users to view your calendar. To reset your view to your own calendar, click Back to My Calendar.
Multi-User View
The multi-user view()
displays several users’ calendars and activities together. Choose an existing list view of users from the View drop-down list or click Create New View.
The view shows each person’s availability. A legend in the view shows busy and out-of-office time. If an event is set to show the time as free, then multi-user views don’t display it.
The multi-user calendar works differently in the partner portal. For example, partners can view events only on the calendars of people in their own company and their channel manager.
Share Your Calendar
Give coworkers access to view or add events to your My Events calendar.
Admins can set organization-wide calendar sharing levels to control how much access coworkers have to each others’ calendars. Admins can’t give coworkers access to event details.
Give coworkers more access to your calendar by changing your calendar sharing options.
From the Calendar tab, click calendar options next to your My Events calendar.
Search and select the name of the coworker who you want to share your calendar with.
Select the level of access that you want your coworker to have to your calendar.
Hide Details
Coworkers can see whether given times are available but can’t see any other information about the nature of events in their calendar.
Hide Details and Add Events
Coworkers can see whether given times are available but can’t see details of events. They can insert events into your calendar.
Show Details
Coworkers can see detailed information about events in your calendar.
Show Details and Add Events
Coworkers can see detailed information about events in your calendar, and they can insert events in your calendar.
Click Who Has Access to see who has access to your calendar, and at what level.
Click Done.
Coworkers can see your calendar by adding it to their Other Calendars list.
View Coworkers’ Calendars.
When coworkers share them My Events calendar with you, then you can view it in Lightning Experience. Add several calendars to your calendar view at one time with user list calendars.
Add user lists to calendar views in the Lightning Experience option from Activity Settings in Setup.
From the Calendar page, click calendar options next to Other Calendars.
Select Add Calendars.
Select People or User Lists.
Search for and select the name of the coworker or user list you want to add to your calendar view.
Click Add.
After you add a shared calendar or user list, you see their events overlaid on your calendar view.
Use the availability view to compare different calendars side by side.
Inbound Logistics
The Inbound Logistics tab allows users to add the product to the inventory. We need to create a Logistic record for the Purchase Orders whose type should be ‘Inbound’.
1. Creation of Logistics record for a Purchase Order
If we check the ‘Ready the Receive’ checkbox while creating the Purchase Orders on the ‘Create Purchase Orders’ page and click on Save, the system will create the Purchase Order and its Logistic record.
Or
If we create a Purchase Order from the Create Purchase Order tab without checking the ‘Ready to Receive’ checkbox, the system will create the Purchase Order, but we need to navigate to the Purchase Order record level and need to check the ‘Ready to Receive’ checkbox manually to create the Logistic record. Follow the below steps to create the Logistic record manually –
Find the Purchase Orders tab from the App Launcher.
Once in the Purchase Orders tab, you can view the Purchase Orders information already filled in.
Find the Purchase Order and open it, check the ‘Ready to Receive’ checkbox, and ‘Save’ the Purchase Order record. The system will create the Logistic record.
Figure – ‘Ready to Receive’ checkbox
Figure – Logistic record
2. Complete the Inbound Logistic process to Receive the inventory.
Select the ‘Warehouse Management’ App from the App Navigation and click on the ‘Inbound Logistics’ tab.
OR
Find the ‘Inbound Logistics’ tab directly from App Launcher.
After clicking on the ‘Inbound Logistics’ tab, the system will take the users to the ‘Inbound Logistics’ home page.
Use the search bar or scan the Purchase Order’s barcode to find the logistic.
Once the users found the Logistic, click on the Receive button or scan the barcode of Receive to navigate to the Receive section.
Figure – Click on Receive button to navigate to receive the section
Figure – Scan Receive barcode to navigate to receive the section
Note: –
Users can select multiple logistics together by selecting/scanning the logistics as shown in the below figure and receive all items at a time.
Users can attach any document like bills or product details by clicking on the ‘upload files’ icon and selecting the file that users would like to attach.
After uploading, users can find this document in the ‘logistic’ record level in the related list section of ‘notes and Attachments’.
After navigating to the ‘Receive’ section, users can see all the products associated with the purchase orders.
Figure 5: Before Receiving the Products
Users can see the Normal products at the top, Batch products in the middle, and, Serialized products at the bottom of the page.
Check the checkbox or Scan the Barcode of the Product to select the Purchase Order Line items.
If the Product is a Lot Tracked product, then you can Create a new Batch or you can Scan or Select the available directly. Click on the Gear icon to create a new Batch from the Receive section.
If the Product is a serialized product, then you can Select each inventory for that product or Scan the barcode of the Product. If you Scan the barcode of that product, the system will automatically select each inventory record.
Once you select each inventory for that product, you can enter the Serial numbers directly or scan new Serial Numbers for that product one by one.
Once you select the line items and select Batch/Serial Numbers, you need to enter the Quantity that you want to receive in the provided Quantity input field. By default, the total quantity will be auto-selected, if you want to receive the quantity partially, you can enter the partial quantity and will be able to receive the items partially.
Also, the user can Scan or Select the barcode of the Location if it’s stored at a particular location in the selected warehouse.
In the same way, the user can Scan or Select the barcode of the Bin.
Once everything is selected, you need to click on the Save button.
If you are receiving the items partially, the system will display the received items in the below section of the page.
Once you receive all the items, the system will display a message that All Items Received, and all received items will display at the Received Line Items.
Creating a new Batch/Lot from the ‘Receive’ Section.
Step 1: Click on the gear icon available next to Batch/Lot lookup.
Step 2: It will open the pop-up as shown below.
Step 3: Enter the Batch or Lot Number, and Expiry Date, and select Version if you want to associate that Batch to any specific Version.
Step 4: After entering the details click on the ‘Create Lot button, which will create a new Batch or Lot and allocate it to that product for which the inventory will get added.
System Requirement
Roll out Steps:
Preparation involves all of the planning you need to do before you can begin using Barcode Zone.
Identify key users of the system
Add licenses
Identify all of the users who will be using the Barcode Zone System and make sure you have the appropriate number of licenses.
Review all the technical requirements
Requirements to use Aqxolt Barcode Zone in a system
Operating System
All you need is a computer that can run a web browser. It doesn’t matter what type of hardware or operating system you’re running.
Browser
Google Chrome™, the most recent stable version Mozilla Firefox®, most recent stable version Microsoft Internet Explorer versions 9, 10, and 11 Apple Safari® versions 5. x, 6. x and 7. x on Mac OS X
Internet Connection
Salesforce is designed to use as little bandwidth as possible so that the site performs adequately over high-speed, dial-up, and wireless Internet connections.
Requirements to use Aqxolt Barcode Zone system with payment gateways
Payment Gateways
PayPal, Authorize.net
How Barcode Zone App Works ?
Once the package is installed visualforce components and Lightning components are created in your org. Barcode Zone works on visualforce pages. For each object (like Product), you need to add the barcode visualforce page into the object page layout (or the record detail page).
Barcode value for which the barcode will be generated
barType
String
Type of the barcode to be generated
ILLUSTRATIONS
Select any Product from the Product list or create a new
Enter the ‘Barcode Value’ to be generated and select the ‘Barcode Type’.
Example 1:
Barcode Value is “AQXOLT” and Barcode Type is “code39”.
Example 2:
Barcode Value is “AQXOLT” and Barcode Type is “code128”.
Example 3:
Barcode Value is “9780201734843” and Barcode Type is “ean13”.
Example 4:
Barcode Value is “83939399” and Barcode Type is “ean8”.
Example 5:
Barcode Value is “AQXOLT” and Barcode Type is “qrcode”.
Example 6:
Barcode Value is “83939399” and Barcode Type is “pdf417”.
Method Two
METHOD 2:
You can also display barcode directly from URL. For any product, need to pass ‘barcode’ in ‘Code’ variable and ‘barcode type’ in ‘Type’ variable from URL. Visualforce page will directly fetch value from URL and display barcode.
Example 1:
Barcode Code is “AQXOLT” and Barcode Type is “code39”.
Example 2:
Barcode Code is “AQXOLT” and Barcode Type is “code128”.
Example 3:
Barcode Code is “39393999” and Barcode Type is “ean8”.
Example 4:
Barcode Code is “9780201734843” and Barcode Type is “ean13”.
Example 5:
Barcode Code is “AQXOLT” and Barcode Type is “qrcode”.
Example 6:
Barcode Code is “AQXOLT” and Barcode Type is “pdf417”.
Required Plugins
After installing the theme you most have to install the ‘Gullu Core’, ‘Visual composer’ and‘Codestar Framework’ plugins to import the demo content as well and work the theme correctly.
You will find all required and recommended plugins at Appearance > Install Plugins.
Tips / Guide
Deleniti rerum magni hic, lobortis a mattis quibusdam pellentesque iusto posuere ornare distinctio nostrud penatibus nonummy, facilisi molestiae, accumsan ac ridiculus? Facere quisquam reprehenderit! Morbi laboriosam minim? Asperiores illo tincidunt velit irure, culpa nihil commodo earum, feugiat magni. Aperiam ipsum, ex labore sunt condimentum orci! Potenti harum cupidatat, fugit ab?
Optimizing your images will helps your WordPress site load faster.
Download and activate WP Smush.it This plugin will optimize every image you upload and you can use the Bulk Smush.it feature to smush all of your uploaded images.
Alternatives to WP Smush.it include EWWW Image Optimizer, CW Image Optimizer, Imsanity and Hammy. Many WordPress users prefer using these plugins as they do not rely on an external server to process your images.
Language Translations
All of our Themes are able to be translated into any language. The process of translating the theme is a user responsibility. The following instructions are given as guidance.
Open wp-config.php and replace this: define ('WPLANG', ''); with this (substitute the language string (bg_BG) with your own!): define ('WPLANG', 'bg_BG');
Connect to your site -> open your theme/languages directory
Download the default.pot file and open it with POEDIT.
Translate file and save it as bg_BG (the file name must match with the string you inserted into wp-config.php)
Two files will be generated after save. bg_BG.pot and bg_BG.mo
Upload the .mo and .pot files into wp-content/themes/your-theme/languages folder
Your WordPress installation should be in the language you intend on using the site.
How to Paginate a Post ?
In order to paginate your blog post, in the Write panel in your WordPress admin, switch to the TEXT view (if you are using the Visual view) and then enter the following code to wherever you want to break the post up into a new page:
<!--nextpage-->
How to change Author Avatar?
The theme uses Gravatar to display users avatars . to create or change your Gravatar :
If you have never setup a Gravatar account:
Register/login to Gravatar. Upon registering, use the SAME email address that is associated with your WordPress User Profile.
Upload your photo and associate it with that specific email address.
If you already registered at gravatar.com, follow these steps:
Click on “My Gravatars”.
click on “Add a New Email”.
Then, you’ll need to click on “Add a New Image”.
Upload an image.
Then select the email address, and then select your image from the bottom. Now it’s associated with that email address. Click Save.
It will take about 5-10 minutes to propagate on the internet, and then will appear on site.
Required Plugins
After installing the theme you most have to install the ‘Charles Core’, ‘Elementor’ and‘Piklist’ plugins to import the demo content as well and work the theme correctly.
You will find all required and recommended plugins at Appearance > Install Plugins.
Menu Not Appearing
Please make sure you have generated and set menus on “Appearance > Menus”.
“Main Menu” menu locations have to be filled to make the menus work as expected.
Page Building
Create a new page
On the top left side of the WordPress dashboard, click Pages > Add New
Click Edit with Elementor to enter Elementor Page Builder.
The website editing screen is located on the right side. This is your workspace, where you can add sections and templates.
The panel is located on the left side of the screen and contains creative tools called widgets, that allow you to add elements to your page.
Some of the most commonly used widgets include Button, Image, text, and more.
To find a specific widget, use the search field.
Sample Guide
Non aptent facere unde placeat habitant minus numquam, cubilia orci accusantium laoreet vel, illum! Mauris placerat. Nibh fuga, luctus dignissim cursus, exercitationem, viverra ratione similique aut, culpa tellus. Turpis fusce, eos cupiditate, turpis? Pede leo repudiandae, praesent laborum dolore eum consequatur provident ullamco praesent, officia! Ipsam nam auctor repudiandae laoreet diamlorem possimus aptent? Mollis iure laudantium ratione malesuada facilis vivamus nec ullamcorper sapiente pharetra nisl tempora cras doloremque, nihil ligula ut reprehenderit? Eiusmod? Egestas fermentum aliqua, occaecat mollis pulvinar sapien! Ab suscipit morbi rhoncus magnam maxime. Officia facilisis, curae odio, rhoncus egestas iure venenatis quidem! Veritatis magnam commodo magnis qui.
Magnam rutrum pretium inventore ridiculus netus. Ducimus cursus facilis eleifend, congue odit venenatis conubia mi provident exercitationem dictumst aenean vel, eleifend mi lacinia porttitor. Incidunt nisl laoreet, suspendisse nam nemo suspendisse luctus, donec parturient necessitatibus itaque tempora beatae eos non ratione ornare consequat consequat cursus hac deleniti esse natus ridiculus. Ultricies alias, cum sociosqu error praesent, nonummy vero optio, aute, nec natoque! Excepteur, saepe, magnam assumenda non cursus, at sociis, nihil ridiculus! Egestas non omnis, gravida nonummy eligendi? Sapien do totam mollis blandit iure, rerum vestibulum hymenaeos explicabo, purus dolore? Habitant consequatur. Curae incididunt sem minim. Explicabo morbi, corporis. Malesuada.
Optimizing your images will helps your WordPress site load faster.
Download and activate WP Smush.it This plugin will optimize every image you upload and you can use the Bulk Smush.it feature to smush all of your uploaded images.
Many WordPress users prefer using these plugins as they do not rely on an external server to process your images.
Language Translations
All of our Themes are able to be translated into any language. The process of translating the theme is a user responsibility. The following instructions are given as guidance.
Open wp-config.php and replace this: define ('WPLANG', ''); with this (substitute the language string (bg_BG) with your own!): define ('WPLANG', 'bg_BG');
Connect to your site -> open your theme/languages directory
Download the default.pot file and open it with POEDIT.
Translate file and save it as bg_BG (the file name must match with the string you inserted into wp-config.php)
Two files will be generated after save. bg_BG.pot and bg_BG.mo
Upload the .mo and .pot files into wp-content/themes/your-theme/languages folder
Your WordPress installation should be in the language you intend on using the site.
Sample doc title issues
What is an Extension?
For editing menu navigation settings go to Theme Options > Header > Top of Header
. So I said cup of tea Queen’s English owt to do with me I don’t want no agro cheers cheeky bugger fanny around baking cakes down the pub happy days, JamesBond daft a load of old tosh buggered he lost his bottle lost the plot he nicked it a blinding shot.
[docly_tooltip id=”1″]Tooltip text[/docly_tooltip] mufty quaint no biggie cras baking cakes barney bamboozled, what a plonker bum bag he legged it young delinquent knees up Eaton the full monty arse over tit, my lady buggered happy days amongst bugger all mate are you taking the piss brolly. [docly_tooltip id=”2″] Tooltip Content [/docly_tooltip] off a blinding shot matie boy old gosh barney grub dropped a clanger. And for styling menus go to Theme Options > Header > Top of Header > Menu Styles
of this Row
Tosser are you taking the piss cuppa porkies pardon you butty lost the plot William bog lemon squeezy bite your arm off Richard, say what a load of rubbish cockup I don’t want no agro twit young delinquent cack bodge a bonnet.
Unordered list items
Go to Docly SettingsHeaderLogo
Consectetur adipiscing elit
Integer molestie lorem at massa
Facilisis in pretium nisl aliquet
Ordered List Items
Go to Docly SettingsHeaderLogo
Consectetur adipiscing elit
Integer molestie lorem at massa
Facilisis in pretium nisl aliquet
Example Title Doc
What is an Extension?
For editing menu navigation settings go to Theme Options > Header > Top of Header
. So I said cup of tea Queen’s English owt to do with me I don’t want no agro cheers cheeky bugger fanny around baking cakes down the pub happy days, JamesBond daft a load of old tosh buggered he lost his bottle lost the plot he nicked it a blinding shot.
[docly_tooltip id=”1″]Tooltip text[/docly_tooltip] mufty quaint no biggie cras baking cakes barney bamboozled, what a plonker bum bag he legged it young delinquent knees up Eaton the full monty arse over tit, my lady buggered happy days amongst bugger all mate are you taking the piss brolly. [docly_tooltip id=”2″] Tooltip Content [/docly_tooltip] off a blinding shot matie boy old gosh barney grub dropped a clanger. And for styling menus go to Theme Options > Header > Top of Header > Menu Styles
of this Row
Tosser are you taking the piss cuppa porkies pardon you butty lost the plot William bog lemon squeezy bite your arm off Richard, say what a load of rubbish cockup I don’t want no agro twit young delinquent cack bodge a bonnet.
Unordered list items
Go to Docly SettingsHeaderLogo
Consectetur adipiscing elit
Integer molestie lorem at massa
Facilisis in pretium nisl aliquet
Ordered List Items
Go to Docly SettingsHeaderLogo
Consectetur adipiscing elit
Integer molestie lorem at massa
Facilisis in pretium nisl aliquet
Third Depth
Extract the zipped package downloaded from ThemeForest to your desktop, in the extracted package you will find the rogan.zip file which is the WordPress theme.
You can install the theme in two ways:
FTP: Extract rogan.zip file and upload the extracted folder to /wp-content/themes/ folder on your server.

WordPress: Navigate to Appearance -> Add New Themes -> Upload page. Select rogan.zip file. Press the Install Now button to upload and install the theme.
After uploading the theme, you have to activate it. Navigate to Appearance > Themes page to activate the theme.
How to set site’s favicon?
Go to Appearance > Customize > Site Identity. Then Select an image as site icon-
Reprehenderit bibendum
Unordered list items
Go to Docly SettingsHeaderLogo
Consectetur adipiscing elit
Integer molestie lorem at massa
Facilisis in pretium nisl aliquet
Ordered List Items
Go to Docly SettingsHeaderLogo
Consectetur adipiscing elit
Integer molestie lorem at massa
Facilisis in pretium nisl aliquet
Labore scelerisque, ornare?
Unordered list items
Go to Docly SettingsHeaderLogo
Consectetur adipiscing elit
Integer molestie lorem at massa
Facilisis in pretium nisl aliquet
Ordered List Items
Go to Docly SettingsHeaderLogo
Consectetur adipiscing elit
Integer molestie lorem at massa
Facilisis in pretium nisl aliquet
Reiciendis tristique dui
Felis nam purus. Lobortis, recusandae id penatibus gravida aspernatur, quos! Mollis aliquam do tincidunt occaecati blandit diam quis! Fames aperiam cursus ipsum? Sapiente deserunt, ipsum rerum posuere diam eum voluptates. Potenti! Sunt quae habitasse, blandit felis! Erat taciti magni fames quasi porttitor euismod dolorem, lobortis, officia. Ducimus blanditiis class praesentium, in et. Dis expedita luctus justo pellentesque? Excepteur pharetra nec, vulputate ex ipsam tincidunt, magnis quos iusto varius commodi fuga tenetur leo! Occaecat cursus aute, aute nisl nemo, velit odit leo delectus nostra cillum, iure maiores voluptatibus blanditiis, leo ea inventore excepteur, porro vitae, architecto arcu, ultrices augue incididunt et.
Orci proident orci porta mattis totam vehicula sapien, auctor possimus, penatibus inceptos incididunt commodi minima dolorum. Turpis aperiam sollicitudin platea quae vehicula, error. Mollitia! Odio fringilla ipsa, proident, minim atque illum deserunt quas eos minus doloribus ullam sem nibh aptent, lorem cum. Quae temporibus convallis. Eu distinctio metus! Lacus elit inventore, curae. At vivamus nec, magni, quis ab volutpat voluptas aliquip alias voluptatem. Sem veniam beatae. Ac rutrum placeat dis, rem perferendis. Cubilia eligendi distinctio? Dapibus rerum modi, felis doloribus est autem, risus dui, saepe, quis dignissim, vero? Beatae mollitia, nobis, provident! Dapibus, dolorem, mattis tristique, iusto libero, dui, quisquam.
Lorem parturient felis sodales sagittis veniam dapibus suspendisse. Fuga arcu officiis debitis ipsa maiores, sem, adipisci, dis architecto, habitant, minus? Irure sit aenean cras, fringilla! Placeat, mi labore! Et vehicula morbi dictumst ad, massa quos sequi, quidem habitant aperiam tempora, habitasse morbi, mi ex nostrum, platea numquam netus. Magnam eum donec, pellentesque ducimus ullam? Earum tempus? Inventore felis quia ea tempore, egestas, ipsam, unde dui eum? Sit voluptates, soluta iure, sapiente incididunt integer ultricies ante, porta adipisci? Dolores aliquet aliquam. Ex habitasse dapibus sagittis curae convallis occaecati hac proident eros? Assumenda in? Aliqua sed, assumenda eget, assumenda doloribus autem consectetuer.
Dignissimos deleniti recusandae
What is an Extension?
For editing menu navigation settings go to Theme Options > Header > Top of Header
. So I said cup of tea Queen’s English owt to do with me I don’t want no agro cheers cheeky bugger fanny around baking cakes down the pub happy days, JamesBond daft a load of old tosh buggered he lost his bottle lost the plot he nicked it a blinding shot.
[docly_tooltip id=”1″]Tooltip text[/docly_tooltip] mufty quaint no biggie cras baking cakes barney bamboozled, what a plonker bum bag he legged it young delinquent knees up Eaton the full monty arse over tit, my lady buggered happy days amongst bugger all mate are you taking the piss brolly. [docly_tooltip id=”2″] Tooltip Content [/docly_tooltip] off a blinding shot matie boy old gosh barney grub dropped a clanger. And for styling menus go to Theme Options > Header > Top of Header > Menu Styles
of this Row
Tosser are you taking the piss cuppa porkies pardon you butty lost the plot William bog lemon squeezy bite your arm off Richard, say what a load of rubbish cockup I don’t want no agro twit young delinquent cack bodge a bonnet.
Unordered list items
Go to Docly SettingsHeaderLogo
Consectetur adipiscing elit
Integer molestie lorem at massa
Facilisis in pretium nisl aliquet
Ordered List Items
Go to Docly SettingsHeaderLogo
Consectetur adipiscing elit
Integer molestie lorem at massa
Facilisis in pretium nisl aliquet
Sample doc title
What is an Extension?
For editing menu navigation settings go to Theme Options > Header > Top of Header
. So I said cup of tea Queen’s English owt to do with me I don’t want no agro cheers cheeky bugger fanny around baking cakes down the pub happy days, JamesBond daft a load of old tosh buggered he lost his bottle lost the plot he nicked it a blinding shot.
[docly_tooltip id=”1″]Tooltip text[/docly_tooltip] mufty quaint no biggie cras baking cakes barney bamboozled, what a plonker bum bag he legged it young delinquent knees up Eaton the full monty arse over tit, my lady buggered happy days amongst bugger all mate are you taking the piss brolly. [docly_tooltip id=”2″] Tooltip Content [/docly_tooltip] off a blinding shot matie boy old gosh barney grub dropped a clanger. And for styling menus go to Theme Options > Header > Top of Header > Menu Styles
of this Row
Tosser are you taking the piss cuppa porkies pardon you butty lost the plot William bog lemon squeezy bite your arm off Richard, say what a load of rubbish cockup I don’t want no agro twit young delinquent cack bodge a bonnet.
Unordered list items
Go to Docly SettingsHeaderLogo
Consectetur adipiscing elit
Integer molestie lorem at massa
Facilisis in pretium nisl aliquet
Ordered List Items
Go to Docly SettingsHeaderLogo
Consectetur adipiscing elit
Integer molestie lorem at massa
Facilisis in pretium nisl aliquet
Sample doc title issues
What is an Extension?
For editing menu navigation settings go to Theme Options > Header > Top of Header
. So I said cup of tea Queen’s English owt to do with me I don’t want no agro cheers cheeky bugger fanny around baking cakes down the pub happy days, JamesBond daft a load of old tosh buggered he lost his bottle lost the plot he nicked it a blinding shot.
[docly_tooltip id=”1″]Tooltip text[/docly_tooltip] mufty quaint no biggie cras baking cakes barney bamboozled, what a plonker bum bag he legged it young delinquent knees up Eaton the full monty arse over tit, my lady buggered happy days amongst bugger all mate are you taking the piss brolly. [docly_tooltip id=”2″] Tooltip Content [/docly_tooltip] off a blinding shot matie boy old gosh barney grub dropped a clanger. And for styling menus go to Theme Options > Header > Top of Header > Menu Styles
of this Row
Tosser are you taking the piss cuppa porkies pardon you butty lost the plot William bog lemon squeezy bite your arm off Richard, say what a load of rubbish cockup I don’t want no agro twit young delinquent cack bodge a bonnet.
Unordered list items
Go to Docly SettingsHeaderLogo
Consectetur adipiscing elit
Integer molestie lorem at massa
Facilisis in pretium nisl aliquet
Ordered List Items
Go to Docly SettingsHeaderLogo
Consectetur adipiscing elit
Integer molestie lorem at massa
Facilisis in pretium nisl aliquet
Sample doc title
What is an Extension?
For editing menu navigation settings go to Theme Options > Header > Top of Header
. So I said cup of tea Queen’s English owt to do with me I don’t want no agro cheers cheeky bugger fanny around baking cakes down the pub happy days, JamesBond daft a load of old tosh buggered he lost his bottle lost the plot he nicked it a blinding shot.
[docly_tooltip id=”1″]Tooltip text[/docly_tooltip] mufty quaint no biggie cras baking cakes barney bamboozled, what a plonker bum bag he legged it young delinquent knees up Eaton the full monty arse over tit, my lady buggered happy days amongst bugger all mate are you taking the piss brolly. [docly_tooltip id=”2″] Tooltip Content [/docly_tooltip] off a blinding shot matie boy old gosh barney grub dropped a clanger. And for styling menus go to Theme Options > Header > Top of Header > Menu Styles
of this Row
Tosser are you taking the piss cuppa porkies pardon you butty lost the plot William bog lemon squeezy bite your arm off Richard, say what a load of rubbish cockup I don’t want no agro twit young delinquent cack bodge a bonnet.
Unordered list items
Go to Docly SettingsHeaderLogo
Consectetur adipiscing elit
Integer molestie lorem at massa
Facilisis in pretium nisl aliquet
Ordered List Items
Go to Docly SettingsHeaderLogo
Consectetur adipiscing elit
Integer molestie lorem at massa
Facilisis in pretium nisl aliquet
Doc list title
What is an Extension?
For editing menu navigation settings go to Theme Options > Header > Top of Header
. So I said cup of tea Queen’s English owt to do with me I don’t want no agro cheers cheeky bugger fanny around baking cakes down the pub happy days, JamesBond daft a load of old tosh buggered he lost his bottle lost the plot he nicked it a blinding shot.
[docly_tooltip id=”1″]Tooltip text[/docly_tooltip] mufty quaint no biggie cras baking cakes barney bamboozled, what a plonker bum bag he legged it young delinquent knees up Eaton the full monty arse over tit, my lady buggered happy days amongst bugger all mate are you taking the piss brolly. [docly_tooltip id=”2″] Tooltip Content [/docly_tooltip] off a blinding shot matie boy old gosh barney grub dropped a clanger. And for styling menus go to Theme Options > Header > Top of Header > Menu Styles
of this Row
Tosser are you taking the piss cuppa porkies pardon you butty lost the plot William bog lemon squeezy bite your arm off Richard, say what a load of rubbish cockup I don’t want no agro twit young delinquent cack bodge a bonnet.
Unordered list items
Go to Docly SettingsHeaderLogo
Consectetur adipiscing elit
Integer molestie lorem at massa
Facilisis in pretium nisl aliquet
Ordered List Items
Go to Docly SettingsHeaderLogo
Consectetur adipiscing elit
Integer molestie lorem at massa
Facilisis in pretium nisl aliquet
Title doc
What is an Extension?
For editing menu navigation settings go to Theme Options > Header > Top of Header
. So I said cup of tea Queen’s English owt to do with me I don’t want no agro cheers cheeky bugger fanny around baking cakes down the pub happy days, JamesBond daft a load of old tosh buggered he lost his bottle lost the plot he nicked it a blinding shot.
[docly_tooltip id=”1″]Tooltip text[/docly_tooltip] mufty quaint no biggie cras baking cakes barney bamboozled, what a plonker bum bag he legged it young delinquent knees up Eaton the full monty arse over tit, my lady buggered happy days amongst bugger all mate are you taking the piss brolly. [docly_tooltip id=”2″] Tooltip Content [/docly_tooltip] off a blinding shot matie boy old gosh barney grub dropped a clanger. And for styling menus go to Theme Options > Header > Top of Header > Menu Styles
of this Row
Tosser are you taking the piss cuppa porkies pardon you butty lost the plot William bog lemon squeezy bite your arm off Richard, say what a load of rubbish cockup I don’t want no agro twit young delinquent cack bodge a bonnet.
Unordered list items
Go to Docly SettingsHeaderLogo
Consectetur adipiscing elit
Integer molestie lorem at massa
Facilisis in pretium nisl aliquet
Ordered List Items
Go to Docly SettingsHeaderLogo
Consectetur adipiscing elit
Integer molestie lorem at massa
Facilisis in pretium nisl aliquet
Style Guide
Aorem ipsum Id tempor laborum in consequat ut in eu id eu incididunt ut sed elit quis veniam sint id sit Duis sunt laborum in consequat tempor laborum in consequat Excepteur consectetur reprehenderit culpa deserunt cillum aute dolor dolor dolor qui. Id tempor laborum in consequat Ut in eu id eu. Shoreditch gastropub whatever. Reprehenderit quis polaroid aben digeth manu.
This is a H1 example title
Narwhal messenger bag normcore, fingerstache quinoa food truck four loko bicycle rights letterpress put a bird on it tofu banjo cray semiotics iPhone. Mlkshk twee Neutra Bushwick. Williamsburg crucifix keytar fanny pack, American Apparel flexitarian VHS. Chillwave Godard cray hoodie Neutra. Vinyl pop-up food truck wayfarers semiotics street art.
This is a H2 Example title
Blog Brooklyn keytar you probably haven’t heard of them mixtape, swag direct trade hashtag organic church-key crucifix stumptown cliche try-hard ethnic. Flexitarian narwhal PBR&B +1 locavore. Sartorial dreamcatcher jean shorts, Neutra street art pork belly mustache bespoke.
This is a h3 example title
Narwhal messenger bag normcore, fingerstache quinoa food truck four loko bicycle rights letterpress put a bird on it tofu banjo cray semiotics iPhone. Mlkshk twee Neutra Bushwick. Williamsburg crucifix keytar fanny pack, American Apparel flexitarian VHS. Chillwave Godard cray hoodie Neutra. Vinyl pop-up food truck wayfarers semiotics street art.
This is a h4 example title
Blog Brooklyn keytar you probably haven’t heard of them mixtape, swag direct trade hashtag organic church-key crucifix stumptown cliche try-hard ethnic. Flexitarian narwhal PBR&B +1 locavore. Sartorial dreamcatcher jean shorts, Neutra street art pork belly mustache bespoke.
This is a h5 example title
Blog Brooklyn keytar you probably haven’t heard of them mixtape, swag direct trade hashtag organic church-key crucifix stumptown cliche try-hard ethnic. Flexitarian narwhal PBR&B +1 locavore. Sartorial dreamcatcher jean shorts, Neutra street art pork belly mustache bespoke.
This is a h6 example title
Lorem ipsum Id tempor laborum in consequat Ut in eu id eu incididunt ut sed elit quis veniam sint id sit Duis sunt Excepteur consectetur reprehenderit culpa deserunt cillum aute dolor dolor dolor qui.
Pour-over et chia, commodo Marfa dreamcatcher aliquip. Trust fund before they sold out mumblecore YOLO. Placeat trust fund culpa, keffiyeh twee labore vero. McSweeney’s chia polaroid wolf. Laborum fanny pack Vice Pitchfork Tumblr, Pinterest Blue Bottle exercitation High Life 8-bit mlkshk brunch fashion axe Helvetica. Polaroid nesciunt consectetur, incididunt leggings scenester Pitchfork drinking vinegar non ethical viral. Banjo dreamcatcher swag Etsy. Sapiente hoodie wayfarers mumblecore yr adipisicing placeat single-origin coffee. Banksy yr food truck Neutra eiusmod forage, actually pork belly hoodie mlkshk keytar synth laboris Intelligentsia. Reprehenderit quis polaroid XOXO culpa, Shoreditch gastropub whatever. Reprehenderit quis polaroid XOXO culpa, Shoreditch gastropub.
Coffee break yeah!
Single-origin coffee ullamco pariatur, id accusamus sunt pop-up. Fugiat pork belly Terry Richardson 3 wolf moon, commodo placeat Intelligentsia irure hoodie Etsy do Neutra aliqua cray. Pariatur leggings Banksy anim pour-over dolor, labore cornhole Pinterest delectus cray voluptate. Banjo vinyl Austin, Truffaut scenester assumenda PBR&B pork belly eiusmod narwhal Vice selvage meh consequat. Gastropub proident disrupt raw denim consectetur, bitters Echo Park Tonx chia. Pitchfork accusamus kogi Tonx. Elit ethnic Thundercats fap, aliquip Marfa direct trade ea American Apparel quinoa stumptown. Etsy do Neutra aliqua cray. Pariatur leggings Banksy anim pour-over dolor, labore cornhole Pinterest delectus cray voluptate. Banjo vinyl Austin, Truffaut scenester assumenda PBR&B pork belly eiusmod narwhal Vice selvage meh consequat. Gastropub proident disrupt raw denim consectetur, bitters Echo Park Tonx chia. Pitchfork accusamus kogi Tonx.
And some pie, too!
Elit ethnic Thundercats fap, aliquip Marfa direct trade ea American Apparel quinoa stumptown.Etsy do Neutra aliqua cray. Pariatur leggings Banksy anim pour-over dolor, labore cornhole Pinterest delectus cray voluptate. Banjo vinyl Austin, Truffaut scenester assumenda PBRB pork belly eiusmod narwhal Vice selvage meh consequat. Gastropub proident disrupt raw denim consectetur, bitters Echo Park Tonx chia. Pitchfork accusamus kogi Tonx. Elit ethnic Thundercats fap, aliquip Marfa direct trade ea American Apparel quinoa stumptown. Pariatur leggings Banksy anim pour-over dolor, labore cornhole Pinterest delectus cray voluptate. Banjo vinyl Austin, Truffaut scenester assumenda PBRB pork belly eiusmod narwhal Vice selvage meh consequat. Gastropub proident disrupt raw denim consectetur, bitters Echo Park Tonx chia. Pitchfork accusamus kogi Tonx. Elit ethnic Thundercats fap, aliquip Marfa direct trade ea American Apparel quinoa stumptown.
Your time is limited, so don’t waste it living someone else’s life. Don’t be trapped by dogma – which is living with the results of other people’s thinking. Don’t let the noise of others’ opinions drown out your own inner voice. And most important, have the courage to follow your heart and intuition.
consequat Ut in eu id eu incididunt ut sed elit quis sit Duis sunt Excepteur consectetur reprehenderit culpa deserunt cillum aute dolor dolor dolor qui.
Unordered list
Sapiente hoodie wayfarers
Pariatur leggings Banksy Semper qui, officia officia proin eget, conubia, lacinia reprehenderit ipsum, provident aenean, eius provident
Pitchfork accusamus
Helvetica distillery dolor
Ordered list
Echo Park exercitation
Pinterest delectus cray voluptate
Aliqua cred Terry Richardson Semper qui, officia officia proin eget, conubia, lacinia reprehenderit ipsum, provident aenean, eius provident
KIT is an assembly of many finished items grouped together to be sold; its price is calculated for each finished item. KIT itself does not qualify as stock; each finished product is stored separately. For instance, Universal Furniture manufactures a variety of furniture types. When the business sells its furniture, it sells a dining table, chairs, pillows, etc. as a KIT. So finished goods are sold as a group rather than individually.
Follow the steps below to configure a KIT product, its Version, and its Bill of Materials –
1.1 Kit Product setup –
1) Open the products list from the Apps Launcher.
2) Click the New button to create a new KIT item.
3) Select the product record type as a kit, enter the product Name, the status must be “Released“, and the Active checkbox must be checked. The TrackInventory and Allow back order checkbox should be Unchecked, Is Kit check box should be checked, Type should be Kits.
4) Enter other details if required and click on the Save button to create the Kit Product.
1.2 Version setup –
Open the Product record, find the Version object (related list) and Click on the New
Select the Record Type as Kit, enter the Version Code, Product will be selected by default, Active checkbox should be checked, Status should be certified, enter the Start Date and End Date.
Enter other details if required and click on Save button to create the Version record.
Note : If the product has the single version then Mark the version as Default, else then the default checkbox need not be enabled the user can select the required version in the order product.
1.3 Bill of Materials Setup –
1. Open the Product record, find the Bill of Material-related list, and click on the New Button.
2. Select the Record Type as Kit BOM, enter the Name of Bill of Material, main Product will be selected by default on the BOM (product) lookup field, select the created BOM Version, select the Bill of Material from the BOM (component) lookup, enter the Quantity, Active checkbox should be checked, Type Should be Primary, Status should be Certified.
3. Enter other details if required and click on the Save button to create the Bill of Material record.
Note: – If you want to add any alternate BOM, select alternate Bill of Material from the BOM(alternate) lookup field. Refer to the alternate BOM creation steps mentioned below.
2. Order and its MRP and Stock Outward Line-Item creation steps –
Find the Orders tab from the App Launcher and click on the name.
All existing orders will show up as a list.
3. Create a new order or choose an existing order from the list that contains a Kit product.
4. Check for the Price book associated with the Order
5. Verify each BOM component has the same price book as the order. For example if the Order has the Standard price book the BOM component set up above Tyre dresser should also have the ‘Standard price book’
Auto creation of Logistic using ‘Ready to Pick & pack’ Checkbox
1. Go to related list of order and search for the order products related list and open up your kit order product
2. Make sure that ‘IS kit’ checkbox is enabled and ‘Allocate Stock’ , ‘Inventory Tracked’ are disabled.
3. Enable ‘Explode’ checkbox and ‘Save’ to create the MRPs and stock outwards.
Note: If the BOM components have the required stock then it will create the stock outwards in the ‘Reserved’ status or in the ‘Requested Status’ and the ‘InSufficient BOM’ checkbox will be checked.
4. After verifying the MRPs and outwards in the reserved status, Enable ‘Ready to Pick & Pack’ checkbox on order to create logistics
Manual creation of logistics
1. Go to the related list of the Order and search for the Logistic-related
2. Click on the Create New button On the Logistics-related list and you will be navigated to the screen called Order to Logistics.
In the above screenshot you can see that there is a product with the name Car Care kit is a kit product and all the BOMS which are associated with this kit product are listed down the kit product itself.
3. You can manually select the Distribution Centre as shown in the above screenshot when you change the Distribution Centre each time you can see the live available stocks of each product at that particular selected Distribution Centre.
4. Once the desired Distribution Centre is Selected you need to select all the items to which you want to create logistics as shown in the screenshot and click on the Logistic button which is located at the bottom of the screen.
5. Clicking on the Logistic button will navigate you to the next screen which will list out all the logistics items which are going to be created.
6. Click on the Save button as shown in the above screenshot and it will create the Outbound logistics and its line items for both kit and other products.
7. Once the logistic is created the same time system will create both MRP records for kit BOMS and Stock outward line items for all the products.
Once the Logistics get created for all Order products, you can navigate to the Outbound Logistic page to ship the items to the Customer, refer to the Outbound Logistic guide.
3. Check points for Kit product set up –
Product Configuration:
Ensure the product is marked as ‘Is Kit’ and ‘Track Inventory’ is enabled.
Disable ‘Allow Back Orders’.
Version Setup:
Enter the required fields such as:
Active (checked)
Record Type (Kit)
Start Date
To Date
Type (Sales)
Status (Certified)
Default (checked if it’s the default version to be used when creating logistics)
BOM Setup:
Verify the BOMs have the correct details, including:
Record Type (Kit)
Active (checked)
BOM Component (the product which is the BOM)
BOM Version (the version set up in step 2)
Quantity
Status (Certified)
BOM Product (the product marked as Kit)
Price Book:
Ensure all BOMs have the same price book as selected at the product level. This can be verified by navigating to the product’s related list price books.
Ensure all BOMs have the required stock. – Make sure the all BOM component should have the stock in the correct site associated to channel assigned to order
Logistics Creation:
Once the above steps are verified, navigate to the order.
For manual logistics, click on the ‘Create New’ button under the logistics section in the order’s related list.
For automatic creation, select the ‘Explode’ checkbox available on the order product and enable ‘Ready to Pick and Pack’.
NOTE: It is important to note that for kit products we need to first check the explode checkbox on the order line item and then the ready to pick and pack checkbox on the order, in the same order.
The screen will display details of any invoices, received payments, and credit notes from customers. It will also show billing details, payments made, and debit notes from vendors.
The screen will display all debit notes received from vendors.
1. The screen will show details of all invoices from customers.
2. The screen will display all received payments from customers.
3. The screen will show all credit notes issued to customers.
4. The screen will display billing details from vendors.
5. The screen will show all payments made to vendors.
6. The screen will display all debit notes received from vendors.
Inter Company Invoicing
These features are scheduled to be launched by June 24, 2024.
The user will select specific customer orders and create a purchase order for those orders from another organization.
Once the Purchase Order is created, the user will raise intercompany orders associated with it.
Upon issuance of the order, the procurement organization will initiate the manufacturing process. Once completed, they will generate an invoice for the intercompany order and share it with the respective organization.
After the invoice is posted, it will account for expenses using the product COA mapping record setup for the specific organization.
Foreign Exchange Gain/Loss
These features are scheduled to be launched by June 24, 2024.
Whenever a bill or invoice is posted in a currency different from the organization’s currency, the exchange rate will be applied based on the vendor bill date for bills and the invoice date for invoices. The resulting difference in amount will be accounted for with ledger entries.
Inter Company Invoicing
These features are scheduled to be launched by June 24, 2024.
The user will select specific customer orders and create a purchase order for those orders from another organization.
Once the Purchase Order is created, the user will raise intercompany orders associated with it.
Upon issuance of the order, the procurement organization will initiate the manufacturing process. Once completed, they will generate an invoice for the intercompany order and share it with the respective organization.
After the invoice is posted, it will account for expenses using the product COA mapping record setup for the specific organization.
One of the most important assets a company has is its human capital. A properly managed company will always have a high-quality Human Resources department. Properly managing employees and their various needs and keeping track of their work patterns can lead to better and more productive employees. The HR module in Aqxolt ERP allows you to maintain a complete employee database that includes employees’ contact information, pay details, performance evaluation details, and attendance details.
Create Employee:
Navigate to the HR Management app > Employees tab.
Once in the Employees tab, you can track/view the employee information already filled in and create a new employee record.
To create a new employee, click the “New” button.
Select the organisation and business unit where the employee belongs
Enter the employment details in the Employment Information section.
Enter other information about the employee, such as contact details, nationality, date of birth, passport details, and social security number.
Click the “Save” button to create an employee record in the organisation.
With the Aqxolt ERP, the enterprise can effortlessly manage the following key elements of employee management:
Payroll
Qualifications
Taxes
Expenses
Timesheets
Performance reviews
Approval processes
Profiling
Leave entitlements
Earnings
Costs
Commissions/Bonuses
Aqxolt ERP prides itself on setting a benchmark in the complete automation of employee management. As soon as a new employee joins the enterprise, the system calculates and manages wages from the date of his or her joining. This, and a host of other features makes the HR module as accurate and autonomous as possible.
Fields to note:
Field
Description
No of Hours/Day
Describes the number of working hours per day
Maximum Overtime Hours/Day
Describes the maximum allowed overtime hours per day
First Name
Describes the first name of the employee
Last Name
Describes the last name of the employee
Middle Name
Describes the middle name of the employee
Gender
Describes the gender of the employee
Leave Allowance
Describes the total number of leave allowances applied to the employee
Available Allowance
Describes the available leaves for the employee
Leave Allowance Take
Describes the leave allowances utilised by the employee
Former Employee
Indicates whether the employee is a former employee
Former Employee Record
Describes details of the former employee record
Employee User
Used to assign a salesforce user to the employee record
Employment Status
Describes the employment status of the employee
Job Title
Describes the job title of the hired employee
Non-Employee Type
Indicates whether the employee is a consultant or apprentice
Employment Start Date
Describes the start date of the employee
Employment Start Date
Describes the last working day of the employee
Contract/Offer Issue Date
Describes the date when the job contract/offer was issued to the employee
First Working Day
Describes the first working day of the week assigned to the employee
Commission Plan
Describes the commission plan assigned to the employee
Organisation Business Unit
Describes the organisation business unit where the employee is hired to work
Channel
Describes the segment of the business where the employee is hired to work
Reporting Manager
Describes the manager under whom the employee will be working
Employee Profiling
Describes the profile of the employee
Work Status
Describes the work permit status of the employee
Description
Provides more information about the employee
Date of Birth
Describes the date of birth of the employee
Place of Birth
Describes the place of birth of the employee
Marital Status
Describes the marital status of the employee
Number of Children
Describes the number of children of the employee
Passport Number
Describes the passport number of the employee
Passport Expiry Date
Describes the expiration date of the passport
Nationality
Describes the nationality of the employee
Social Security Number
Describes the social security number of the employee
National Insurance Number
Describes the national insurance number of the employee
Address
Describes the address of the employee
Permanent Address
Describes the permanent address of the employee
Phone
Describes the contact phone number of the employee
Email
Describes the email address of the employee
Mobile
Describes the mobile number of the employee
Leave Management
Leave management systems helps employees to request time-offs from work, plan vacations and track holidays. Management can use the system to Approve or Deny leaves and maintain employee records.
ERP Mark 7’s Leave Management comes under HR Management App and encompasses Time offs, Leave entitlements, Available Allowance and Upcoming Holidays.
The Leave Management is specific to the employee and can be submitted for approval to the higher authorities. This helps you to track employee performance and reduce managerial time.
A Leave Management can be created in two methods:
From the record level
From the Leave Management Tab
From the record level
The steps below explain how to create a Leave request and move it from Draft status to Submitted.
1. Create a Leave request by navigating to Employee management app > Employee tab
2. Select the employee for whom a Leave request needs to be created from the list of employees
3. On the related list/tab scroll down to the Leave Requests (Employee) related list and click the ‘New’ button.
4. Enter the organization details, leave request name, select the leave entitlement and enter the approver details and leave request status. Administrators and other roles of an employee that act as approvers can see all the Leave requests submitted.
A Leave request can be in different stages which can be easily understood by the following statuses.
Click ‘Save’ to save the Leave Request
Timesheet Status
Action
Draft
The leave request that is in the Draft state can be edited to make some corrections. When in the Draft state the number of leaves will not be deducted from the total available allowance.
Approved
When the leave request is approved by the work agent/ higher authority then it is marked “Approved”
Submitted
Once the employee is sure about his entries then they leave request can be moved to the submitted state seeking approval
Rejected
When the approver rejects the Leave request, the leave request can then be available for corrections and resubmission.
Canceled
An employee had created the leave request but later decided to cancel it then the leave request can be in a cancel state and this will increment the available leave allowance.
Completed
When a Leave request is in the completed state then it signifies that the applied leave has been taken.
From the Leave Management Tab
Navigate to HR Management app > Leave Management tab
Leave Management tab has two views for viewing the records:
List View
Grid View
List View
On the Leave Management tab, you can view the list of all the leaves created in the list view.
To filter out the records based on a particular Fiscal year or time period, you can select Current FY, To Date, Previous FY, Next FY, Previous 2 FY and view the list of records.
To view the records which are draft, submitted, approved, rejected, or submitted for your approval or Entitlement/Holidays move to the respective sub-tabs.
To view the Time Off the record, click on the record name.
To edit the Time Off record, click on the edit icon and save the record after necessary changes are done.
To delete the Time Off the record, click on the delete icon and click on ok.
Grid View:
On the Leave Management tab, you can view the list of all the leaves created in grid view.
To filter out the records based on a particular Fiscal year or time period, you can select Current FY, To Date, Previous FY, Next FY, Previous 2 FY and view the list of records.
To view the records which are draft, submitted, approved, rejected, or submitted for your approval or Entitlement/Holidays move to the respective sub-tabs.
To view the Time Off the record, click on the record name.
To edit the Time Off the record, click on the edit icon and save the record after necessary changes are done.
To delete the Time Off the record, click on the delete icon and click on OK.
Fields to Note:
Name
Description
Time Off
This indicates the already taken leaves
Available Allowance
Indicates the total available leaves for the calendar year.
Booked
Indicates the number of booked leaves (In Approval stage)
Upcoming Holidays
Indicates about the National/Organisation-defined holidays for the calendar year.
Book Time off
This is to create a new leave request
Click the “+Time Off” button to create a new Time Off record for the logged-in user.
Enter the name for the Time Off the record.
Every Time Off will be in “Draft” status until the user is ready to submit it to the approver. Select the approver who is authorized to review the Time Offs and decide whether to approve or reject the Time Off.
Enter the Start Date and End date which calculates the number of days the Time Off is being created.
Select the Type of Time Off indicating whether type of leave you’re opting for.
Mention the reason for the Time Off being created and clicking on save creates a record with Draft status.
Clicking on the submit button submits the leave request record for approval.
Draft/Submitted Leaves
All the leaves of status Draft and Submitted will be listed under the Draft/Submitted/Rejected Leaves section as shown below
Submitted Leaves cannot be edited or deleted, the leaves with Draft and Rejected can be Deleted or edited for submission.
Approved/Rejected Leaves:
Once the Leave is approved or rejected by the approving authority or the Approver, it will be listed under the Approved/Rejected Leaves section.
Submitted for your Approval
If you have employees working under you and you are the Approval Manager of their leaves then all the submitted leaves will be listed under the Submitted for your Approval section as shown below.
Leave Entitlement
The Leave Entitlement section indicates all the leaves entitled by the organization such as Casual leave, Sick leave, Maternity, etc, and others that can be defined here and the number of days assigned for each leave type.
The Holidays section indicates all the National/Organisation level holidays defined for the current fiscal year, next fiscal year, previous fiscal year, and previous 2 fiscal years.
Time Sheets
One of the most important assets a company has is its human capital. The role of human resources is vital in establishing an efficient and effective workforce. By tracking and analyzing timekeeping and work patterns, among other things, the HR department provides management with valuable information which they can use to plan and enhance working practices.
With the ERP Mark 7 Timesheet feature, a business can track and monitor the activities of employees on an hourly basis for a range of projects. It provides an instant status report on the activity of any individual and allows employers to plan projects efficiently, optimizing the working hours of every employee.
The timesheet is specific to each employee and can be submitted for approval to higher authorities. This helps you track the activity status of the specified task.
Timesheets can be created using one of two methods –
From the record level
From the Timesheets tab
From the Record Level
The steps below explain how to create a timesheet and move it from Draft status to Submitted status.
Create a timesheet by navigating to the Employee management app > Employee tab.
From the list of employees, select the employee for whom a timesheet must be created.
On the related tab scroll down and select timesheets related list and click ‘New’ button
Enter the organisation details, approver details and timesheet status details. Administrators and other employees who act as approvers can see all the time cards for the week. Time cards can have any of the following statuses.
Draft
Approved
Submitted
Rejected
In the timesheet, enter the start and end dates of the week.
Click “Save” to create the time sheet record.
Field
Description
Employee
Describes the name of the employee whose timesheet is being created
Workforce Requirement Planning
Describe the name of the workforce required for which the timesheet is created to monitor progress
Approver
Other employees who act as approvers can see all the weekly time cards for all the employees under them
Team Member
Describes the team to which the employee belongs
Status
Provides the current status of the timesheet, such as Draft or Submitted; controls which actions can be performed against the timesheet
Start Date
Describes the start date of the week
End Date
Describes the end date of the week
Approve / Rejected Date
Describes the date on which the timesheet was approved or rejected
Approve / Rejected Reason
Describes the reason for approval or rejection
Week Date
Specifies the week’s date
A timesheet can be in different stages, which can be easily understood by the following statuses.
Timesheet Status
Action
Draft
A timesheet in the Draft state can be edited to add or delete time card entries.
Approved
When the timesheet is approved by the work agent/higher authority, it is marked “Approved.”
Submitted
Once the employee is confident about his entries, the timesheet can be moved to the Submitted state when it awaits approval.
Rejected
If the approver rejects the timesheet, it becomes available for review and re-submission.
Creating Time Card Entries
Timecard entries specify the exact time spent to complete each activity of the project throughout the week. A timesheet may contain one or more time card entries. Each time card entry can be tracked by its activity status. The steps below explain how to create a timecard entry.
Every time sheet should be associated with one or more time card entries, which indicates the amount of time an employee spends on each project. In the related list of timesheet records, click the “New” button under “Time Card Entries”. Upon the creation of time card entries, the time sheet is in the Draft stage.
Fill in the project name, which describes the name of the project for which the time card entry is being created.
Fill in the weekday dates and hours. Every hour mentioned can be supported by a comment to explain the outcome of the task.
Select the “Active” checkbox and select the activity status.
Click the “Save” button to create the time card entry.
Creating Time Sheets Through the Timesheets Tab:
Navigate to the Employee Management app > Timesheets tab.
Click on the “Add New Timesheet” button to create a new time sheet for the logged-in user.
Every time sheet will be in “Draft” status until it is ready to be submitted to the approver. Select the approver who is authorised to review the time card entries and to decision whether to approve or reject the timesheet.
Enter the time card entry details; select the project for which the time card entries are created.
Enter the activity notes, if any, and the activity status to monitor the completion of the task.
Enter the number of hours spent on each day of the week for the selected project and activity.
To create a new time card entry in the same time sheet, click the “Add New +” button.
Click “Save” to create the time sheet under “Draft” status.
Viewing, Editing, and Submitting the Time Sheet:
Navigate to the Employee Management app > Timesheets tab.
The system shows the total approved hours, submitted hours and rejected hours. The system shows all the time sheets that have been submitted, that are drafts and that have been rejected.
Under the Approved Time Sheets section, an employee can view all his approved time sheets along with the date of approval and the name of the approver.
To delete the time sheet, click the dustbin icon under the Action section.
To edit the timesheet, click on the pencil icon under the Action section.
To submit the time sheet to an approver, change the status from “Draft” to “Submitted” and click the “Save” button.
An employee is an approver; he can also approve other employees’ records from the Manager’s Approval section.
Expense
The ERP system provides an accurate, error-free platform for employees to manage their travel plans and expense claims. In ERP, it records the expense details of employees and those who are assigned for approvals.
The expense claims are specific to the employee and can be submitted for approval to higher authorities. This also helps track the approval status of the specified task.
An Expense claim can be created in two methods –
From the record level
From the Expense Tab
From the Record Level
The steps below explain how to create an expense record and move it from Draft status to Submitted.
Create an expense by navigating to the Employee Management app > Employee tab.
Select the employee from the list of employees for whom an expense claim must be created.
On the related tab, scroll down and select the expenses related list. Click the “New” button.
Enter the organisation details, approver details and expense name. Administrators and other employees who act as approvers can see all the expense line items for the week.
Expenses can be tracked by any of the following statuses. Select the status of the expense.
Draft
Approved
Submitted
Rejected
Enter the date of expense creation and the project related to the expense.
Select the “Active” checkbox and the “Paid” checkbox if the expense claim is paid to the employee.
Click the “Save” button to create the expense record.
Fields to note:
Field
Description
Employee
Describes the name of the employee whose expense is being created
Expense Name
Describes the name of the expense created
Approver
Other employees who act as approvers can see all the expense claims that belong to employees under them
Project
Describes the name of the project for which the expense is created to monitor the progress
Status
Current status of the expense, such as Draft or Submitted; controls which actions can be performed against the expense
Date
Describes the date when the expense was created.
Paid
If the checkbox is selected, it indicates that the expense claim has been paid to the employee.
Approve / Rejected Date
Date by which the expense claim was approved or rejected.
Approve / Rejected Reason
Describes the reason for approval or rejection.
An expense claim can be in different stages, which can be easily understood by the following statuses.
Transfer Order Status
Action
Draft
An expense that is in the “Draft” state can be edited to add or delete time card entries.
Approved
When the expense claim is approved by the work agent/higher authority, it is marked “Approved.”
Submitted
Once the employee is confident about his entered claims, the expense can be moved to the “Submitted” state for approval.
Rejected
When an approver rejects the expense, the expense is available for review and resubmission.
Creating Expense Line Items:
In the expense line item, an employee must specify the exact amount spent on the selected expense type and category. An expense may contain one or more expense line items. Each expense line item can be tracked by its status.
The steps below explain how to create an expense line item.
Every expense claim should be associated with one or more expense line items, which proves the amount claimed by an employee on each project selected. In the related list of expense records, click the “New” button under “Expense Line Items”. After the creation of expense line items, the time sheet is in the Draft stage.
Fill in the expense line item name, the expense type and the category which describes the purpose of the expense claim created.
Fill in the expense date.
Enter the amount and VAT amount of the expenses.
Select the “Active” checkbox and select “Status”.
Click the “Save” button to create the expense line item.
Creating Expense Through Expense Tab
Navigate to the Employee management app > Expenses tab.
In the My Expenses tab, you can view the records which are in Draft, Submitted, Approved or Rejected stages by selecting the following sub tabs:
Draft/Submitted.
Approved/Rejected.
Submitted for your Approval.
Draft/Submitted :
On the Draft/Submitted sub tab, you can view all the Expense records which has draft or submitted status.
To view the records in list or grid view, click on the list or grid icon.
To view the Expense associated to a particular Project, click on the Expense record name.
To edit the Expense record, click on the edit icon and save the record after necessary changes done.
To delete the Expense record associated to a Project, click on the delete icon and click on OK.
Approved/Rejected:
On the Approved/Rejected sub tab, you can view all the Expense records which has approved or rejected status.
To view the records in list or grid view, click on the list or grid icon.
To view the Expense associated to a particular Project, click on the Expense record name.
To edit the Expense record, click on the edit icon and save the record after necessary changes done.
To delete the Expense record associated to a Project, click on the delete icon and click on OK.
Submitted for your Approval:
On the Submitted for your Approval sub tab, the Approver can view all the Expense records which are been submitted for approval.
To view the records in list or grid view, click on the list or grid icon.
To view the Expense associated to a particular Project, click on the Expense record name.
To edit the Expense record, click on the edit icon and save the record after necessary changes done.
To delete the Expense record associated to a Project, click on the delete icon and click on OK.
From this section, the Approver can approve or reject the expenses by clicking Approve or Reject buttons as shown below.
My Expenses tab has two views for viewing the records:
List View
Grid View
List View:
On the My Expenses tab, you can view the list of all the Expenses created in list view.
To filter out the records based on a particular Fiscal year or time period, you can select Current FY, To Date, Previous FY, Next FY, Previous 2 FY and view the list of records.
To view the records which are draft, submitted, approved, rejected or submitted for your approval move to the respective sub tabs.
To view the Expense associated to a particular Project, click on the Expense record name.
To edit the Expense record, click on the edit icon and save the record after necessary changes done.
To delete the Expense record associated to a Project, click on the delete icon and click on OK.
Grid View:
On the My Expenses tab, you can view the list of all the Expenses created in grid view.
To filter out the records based on a particular Fiscal year or time period, you can select Current FY, To Date, Previous FY, Next FY, Previous 2 FY and view the list of records.
To view the records which are draft, submitted, approved, rejected or submitted for your approval move to the respective sub tabs.
To view the Expense associated to a particular Project, click on the Expense record name.
To edit the Expense record, click on the edit icon and save the record after necessary changes done.
To delete the Expense record associated to a Project, click on the delete icon and click on OK.
Click these “+Expense” button to create a new expense for the logged-in user.
Every expense will be in “Draft” status until the user is ready to submit it to the approver. Select the approver who is authorised to review the expense claims and to decide whether to approve or reject the expense.
Enter the name and select the project for which the expense is claimed.
Enter the name of the expense line item; select the expense type and category for which the expense is claimed.
Enter the date on which the expense was initiated.
Enter the total amount spent and the VAT amount applied to the expense claims.
The system allows an employee to add a invoice/receipt for the expense claims.
To create a new expense line item for the same expense record, click “+New” button.
Click “Save” to create the expense under “Draft” status.
Viewing, Editing and submitting expense
Navigate to the Employee management app >My Expenses tab.
The system shows total approved expense claims, submitted expense claims and total paid expense claims. The system shows all the expenses that have been submitted, draft and that have been rejected.
The system provides a filter that lets an employee view the total expense claims based on current and previous fiscal years.
Under the approved expenses section, an employee can view all his approved expense claims along with the date of approval and the amount claimed.
To edit the expense, click on the edit icon and edit the details in the Expense record.
To delete an expense sheet, click the delete icon.
To submit the expense to an approver, change the status from “Draft” to “Submitted” by editing the Expense record and click the “Save” button.
If an employee is an approver, he can approve other employee’s records from the Manager’s Approval section.
Note :
Once the Expense is submitted, you cannot edit or delete them and the expense with draft and rejected can be edited or deleted before submission.
Business Units
Business units in Aqxolt ERP is an operational unit that deals with the management of various tasks and goals of an organisation. There can be multiple business units set up based on how a business is organised. In a business, there are times when multiple projects are going on at the same time. This makes multitasking difficult for the supervisor. However, with Aqxolt ERP, it is easy. You can view progress reports and updated data about various projects simultaneously. Not only can you look at the big picture, you can also focus your energies on the finer details. A business unit can be classified as a cost centre or a profit centre.
A business unit as a cost centre is a functional unit within an organisation that costs the organisation money to operate. Cost centres record costs with reference to the values planned. The cost centre indirectly contributes to the profit of an organisation through operational excellence and efficiency. Usually, the managers of a cost centre are responsible for keeping costs below budget. It helps managers to keep track of overhead costs in the area incurred within the organisation. It also enables managers to monitor the progress and profitability of each area and helps management utilise resources properly. It enhances managers’ decision-making powers.
A business unit as a profit centre helps generate quality results and revenue for the organisation. It is crucial for analysing which manufacturing unit generates more or less profit within the organisation and enhances decision-making on operating expenditures.
Create Business Unit:
Navigate to the Organisation Management app > Business Unit tab.
Once in the Business Unit section, you can track the business units already filled in and create a new business unit.
To create a new business unit, click the “New” button.
Enter the business territory name and select the organisation associated with it.
Select the contact for the business unit; enter the fax, phone, and website details.
Select the function of the business unit, whether it is Marketing, HR, Finance, Sales, etc.
Enter the address details of the business unit.
Select the type of business unit, whether it is a cost centre or a profit centre.
Assign the manager associated with the business unit.
Click the “Save” button to create a business unit record for the organisation.
Project
The project module in Aqxolt ERP is the most intelligent solution designed to manage projects effectively and drive operational excellence. It enables you to intelligently automate project programmes while keeping a tab on the budget and related costs. It smartly consolidates expenses, labour costs and material costs and records project budgets.
The solution enables project scheduling and helps the project meet stakeholder expectations. It helps keep track of project progress and forecasts the projected revenue against each milestone.
This comprehensive solution ensures resource visibility and lets the user record resources required during project execution. The success of the project relies on the effective communication of the team, which should be built based on a similar skill set.
Create a Project:
Navigate to the Manufacturing app > Projects tab.
Once in the Project section, you can track the projects already filled in and create a new project.
To create a new project, click the “New” button.
Enter the project name, organisation, and business unit details.
Provide the project details under the description and assign the start and end dates of the project.
Select the project manager associated with the project and assign the budget account to record account-based project budgets.
Enter the labour and material cost; select the programme associated with the project
To track the progress of the project, select the status of the project.
Click the “Save” button to create a project record.
Field to note:
Field
Description
Project Name
Describes the name of the project.
Project Manager
Describes the consultant responsible for managing the workforce and delivering on time, on budget project implementation
Budget Account
Describes the defined budget account associated with the project
Description
Describes the brief requirement of the project so the team working on it is on the same page
Programme
Describes the programme associated with the project
Start Date
Describes the planned start date of the project
End Date
Describes the estimated end date of the project
Labour Cost
Indicates estimated funds received for workforce against a project
Material Cost
Indicates estimated funds received for material consumption against a project
Expense
Describes the expenses recorded against a project
Status
Describes the progress of the project
Programme
An organisation can have a programme and projects associated with it. A programme could be a series of future events with a start date and an end date. In ERP Mark 7, a programme can be associated with a manufacturing process created to meet the need and results of the manufacturing project. This will help organisations create better design and management of work centres and workforce systems; it also prepares a channel for growth for the organisation.
Create Programme:
Navigate to the Organisation Management app > Programmes tab.
Once in the Programmes section, you can track the business units already filled in and create a new programme.
To create a new programme, click the “New” button.
Select the organisation and business units of the programme.
Enter the programme name and the start and end dates of the programme.
Select the budget status and the status of the programme.
To track the expense incurred to execute the programme, select the budget account associated with the programme.
Click the “Save” button to create a programme record for the organisation.
Expense
The ERP system provides an accurate, error-free platform for employees to manage their travel plans and expense claims. In ERP, it records the expense details of employees and those who are assigned for approvals.
The expense claims are specific to the employee and can be submitted for approval to higher authorities. This also helps track the approval status of the specified task.
An Expense claim can be created in two methods –
From the record level
From the Expense Tab
From the Record Level
The steps below explain how to create an expense record and move it from Draft status to Submitted.
Create an expense by navigating to the Employee Management app > Employee tab.
Select the employee from the list of employees for whom an expense claim must be created.
On the related tab, scroll down and select the expenses related list. Click the “New” button.
Enter the organisation details, approver details and expense name. Administrators and other employees who act as approvers can see all the expense line items for the week.
Expenses can be tracked by any of the following statuses. Select the status of the expense.
Draft
Approved
Submitted
Rejected
Enter the date of expense creation and the project related to the expense.
Select the “Active” checkbox and the “Paid” checkbox if the expense claim is paid to the employee.
Click the “Save” button to create the expense record.
Fields to note:
Field
Description
Employee
Describes the name of the employee whose expense is being created
Expense Name
Describes the name of the expense created
Approver
Other employees who act as approvers can see all the expense claims that belong to employees under them
Project
Describes the name of the project for which the expense is created to monitor the progress
Status
Current status of the expense, such as Draft or Submitted; controls which actions can be performed against the expense
Date
Describes the date when the expense was created.
Paid
If the checkbox is selected, it indicates that the expense claim has been paid to the employee.
Approve / Rejected Date
Date by which the expense claim was approved or rejected.
Approve / Rejected Reason
Describes the reason for approval or rejection.
An expense claim can be in different stages, which can be easily understood by the following statuses.
Transfer Order Status
Action
Draft
An expense that is in the “Draft” state can be edited to add or delete time card entries.
Approved
When the expense claim is approved by the work agent/higher authority, it is marked “Approved.”
Submitted
Once the employee is confident about his entered claims, the expense can be moved to the “Submitted” state for approval.
Rejected
When an approver rejects the expense, the expense is available for review and resubmission.
Creating Expense Line Items:
In the expense line item, an employee must specify the exact amount spent on the selected expense type and category. An expense may contain one or more expense line items. Each expense line item can be tracked by its status.
The steps below explain how to create an expense line item.
Every expense claim should be associated with one or more expense line items, which proves the amount claimed by an employee on each project selected. In the related list of expense records, click the “New” button under “Expense Line Items”. After the creation of expense line items, the time sheet is in the Draft stage.
Fill in the expense line item name, the expense type and the category which describes the purpose of the expense claim created.
Fill in the expense date.
Enter the amount and VAT amount of the expenses.
Select the “Active” checkbox and select “Status”.
Click the “Save” button to create the expense line item.
Creating Expense Through Expense Tab
Navigate to the Employee management app > Expenses tab.
In the My Expenses tab, you can view the records which are in Draft, Submitted, Approved or Rejected stages by selecting the following sub tabs:
Draft/Submitted.
Approved/Rejected.
Submitted for your Approval.
Draft/Submitted :
On the Draft/Submitted sub tab, you can view all the Expense records which has draft or submitted status.
To view the records in list or grid view, click on the list or grid icon.
To view the Expense associated to a particular Project, click on the Expense record name.
To edit the Expense record, click on the edit icon and save the record after necessary changes done.
To delete the Expense record associated to a Project, click on the delete icon and click on OK.
Approved/Rejected:
On the Approved/Rejected sub tab, you can view all the Expense records which has approved or rejected status.
To view the records in list or grid view, click on the list or grid icon.
To view the Expense associated to a particular Project, click on the Expense record name.
To edit the Expense record, click on the edit icon and save the record after necessary changes done.
To delete the Expense record associated to a Project, click on the delete icon and click on OK.
Submitted for your Approval:
On the Submitted for your Approval sub tab, the Approver can view all the Expense records which are been submitted for approval.
To view the records in list or grid view, click on the list or grid icon.
To view the Expense associated to a particular Project, click on the Expense record name.
To edit the Expense record, click on the edit icon and save the record after necessary changes done.
To delete the Expense record associated to a Project, click on the delete icon and click on OK.
From this section, the Approver can approve or reject the expenses by clicking Approve or Reject buttons as shown below.
My Expenses tab has two views for viewing the records:
List View
Grid View
List View:
On the My Expenses tab, you can view the list of all the Expenses created in list view.
To filter out the records based on a particular Fiscal year or time period, you can select Current FY, To Date, Previous FY, Next FY, Previous 2 FY and view the list of records.
To view the records which are draft, submitted, approved, rejected or submitted for your approval move to the respective sub tabs.
To view the Expense associated to a particular Project, click on the Expense record name.
To edit the Expense record, click on the edit icon and save the record after necessary changes done.
To delete the Expense record associated to a Project, click on the delete icon and click on OK.
Grid View:
On the My Expenses tab, you can view the list of all the Expenses created in grid view.
To filter out the records based on a particular Fiscal year or time period, you can select Current FY, To Date, Previous FY, Next FY, Previous 2 FY and view the list of records.
To view the records which are draft, submitted, approved, rejected or submitted for your approval move to the respective sub tabs.
To view the Expense associated to a particular Project, click on the Expense record name.
To edit the Expense record, click on the edit icon and save the record after necessary changes done.
To delete the Expense record associated to a Project, click on the delete icon and click on OK.
Click these “+Expense” button to create a new expense for the logged-in user.
Every expense will be in “Draft” status until the user is ready to submit it to the approver. Select the approver who is authorised to review the expense claims and to decide whether to approve or reject the expense.
Enter the name and select the project for which the expense is claimed.
Enter the name of the expense line item; select the expense type and category for which the expense is claimed.
Enter the date on which the expense was initiated.
Enter the total amount spent and the VAT amount applied to the expense claims.
The system allows an employee to add a invoice/receipt for the expense claims.
To create a new expense line item for the same expense record, click “+New” button.
Click “Save” to create the expense under “Draft” status.
Viewing, Editing and submitting expense
Navigate to the Employee management app >My Expenses tab.
The system shows total approved expense claims, submitted expense claims and total paid expense claims. The system shows all the expenses that have been submitted, draft and that have been rejected.
The system provides a filter that lets an employee view the total expense claims based on current and previous fiscal years.
Under the approved expenses section, an employee can view all his approved expense claims along with the date of approval and the amount claimed.
To edit the expense, click on the edit icon and edit the details in the Expense record.
To delete an expense sheet, click the delete icon.
To submit the expense to an approver, change the status from “Draft” to “Submitted” by editing the Expense record and click the “Save” button.
If an employee is an approver, he can approve other employee’s records from the Manager’s Approval section.
Note :
Once the Expense is submitted, you cannot edit or delete them and the expense with draft and rejected can be edited or deleted before submission.
PayPal
Aqxolt ERP supports PayPal to make online and electronic payments.
Add your PayPal account on Aqxolt ERP.
Navigate to the Credential Setup tab from App Launcher.
The page has three tabs Payment, Shipment and E-Commerce.
On the Payments, tab click on New
Fill in the PayPal account login details. Keep the Name as PayPal and add the username/login and Password.
Check the Active checkbox.
The URL can be tested or live depending on the sandbox account or live account being used.
Test URL – https://api-3t.sandbox.paypal.com/2.0/
Live URL
Add/Edit Products
Add/Edit Products: – Using the Add/Edit button you can add a new product to the Quote, or you can edit the existing Quote Line Items.
Once you create the Quote open the Quote record and click on the Add/Edit Products button available for the Quote Line-Item related list.
You can Add or Edit the Line item records from the Add/Edit Products home page.
You can Edit the Line item records and see the CalculationProfitandLoss from the Add/Edit Products final page. Click on the Next button available on the home page, see the above screenshot.
Customer Accounts and their Contact, Address
Customer Accounts and their Contact, Address: – The Customer Account represents an individual customer or organization involved with the business. The Customer accounts can be used to create the Quotes and the Orders.
Create the Customer Account: –
Find the Accounts tab from the App Launcher.
Click on the “New” button, available in the top right-hand corner of the page.
Enter the Name of the Customer in the Account Name field, AccountType should Customer, Select the Account Profile (created customer profile) and the Order Profile (created Order profile), Active field should be checked, Select the Organization (created Organization Account), enter other information if required and click on Save button to create the Customer Account.
Create the Address and the Contact record for Customer Account: – The address can the shipping or the billing address for the created Customer and the Contact is the point of contact for the Customer.
Open the created Customer Account, go the related list and create the contact and the Address by clicking on the New button.
Products and Services
Create the Products
Products are configurable items that are manufactured in an organization or purchased from the vendor/supplier and are sellable. Products can be stored in an organization’s Site/warehouse or a third-party Site/warehouse.
Navigate to the app menu> Products tab.
Recently Viewed products will be listed, click on All to see all the available products in the system.
To create a new product, click the “New” button.
Enter the Product Name and Product Code.
Select the Product Family, Category and Sub Category of the product.
Select the Status as Released and make sure Active checkbox is checked.
Select the Track Inventory checkbox for all Inventory Products.
Enter the Product Description and Barcode if any.
Select Is Kit (for a Bundle/Kit product), Serialise (for a serialized product) and Lot Tracked (for a Batch product) depending on the product configuration needs.
Save the record to create a product.
Create Price Books
Price books are integrated with the order management module to define pricing for your products. All the products should be given a standard price and added to a custom price book. We can set different price books for different products.
Navigate to the app menu > Products tab.
Click open the product to add a price book.
In the related tab, find the Price Book object and click “New”
Enter the pricing details of the product such as List price, Selling price, Start date, End date and save.
This creates a standard price for the product.
Once a standard price is added to the product it can then be added to Custom Price Books.
Navigate to the Price Book tab from App launcher to create custom price books.
Create the Inventory/ Stocks for the products
Navigate to the app menu > Products tab.
Once in the Products section, select the product to create the Inventory/ Stocks.
In the related tab, find the Inventory/ Stocks related list and click the “New” button.
Enter the Organisation and the Business Unit details.
Enter the Stock Name and select the Active checkbox.
Select the Status as Checked In.
Make sure Warehouse and Product are selected.
Save the record to create the stocks for the product.
Create the Stock Inward Line Item
It is to add stocks to the inventory. It records the stocks for a particular product and is tracked by quantity, it is assigned to Inventory/ Stocks that enables the users to determine and maintain optimum inventory levels.
Navigate to the app menu > Products tab.
Once in the Products section, select the products record to create the Stock Inward Line Item.
In the related tab, find the Stock Inward Line Item related list and click the “New” button.
Enter the Warehouse Purchase Line Item Name.
Ensure Site Product Inventory (Inventory/Stock) of this product is selected.
Add the Serial Number / Material Batch/Lot if the product is serialized or Batch product.
Select the product, enter the Quantity and select the Active checkbox.
Save the record to create a stock inward line item for the product.
Adding Cost Cards to Products
Navigate to the Related list of the product to the Cost Card object.
Click New and add the Cost Card Name, Cost, Currency, Start Date, End Date, Quantity, Minimum Quantity and Unit.
Select the Product and Supplier/vendor.
Select the Organisation and Business Unit and Save.
This creates a cost card record which can be used when creating a purchase order.
Purchase Order
The purchase order is an electronic document that is sent by the customer to the seller to request for supply of certain goods and services. It is the first official communication from the buyer, containing the details of the specific items required, their quantity, and the prices agreed upon along with other details that may be required for the goods and services.
The purchase line orders contain the details of each of the items types ordered as well as the quantity of each item. Each type of commodity has a unique sales line number. Numerous purchase line orders can be contained in a single purchase order.
The purchase orders are used by the seller to prepare the items for shipment. The purchase orders are also important in providing the seller with information about the buyer to track sales records, authorize shipments and plan properly the shipment methods in line with the customer’s needs. This helps a business to grow and reach more customers by simplifying how you make sales. It makes it easier to make purchase orders and also improves the efficiency of the seller’s ability to account for stock and manage sales.
Creating a Purchase Order
In the purchase orders, one is able to view and edit the existing purchase orders, create new ones, and also import a new document from the existing documentation. When creating a new purchase order, the following steps are followed:
How to create Purchase Orders
From the App, launcher go to the ‘Create Purchase Order’ Tab.
Select type of purchase order and click ‘Next’ button.
Standard purchase order.
Enter all the details of the Purchase order such as Expected date, status, Employee requester, vendor, vendor contact, Vendor address, Purchasing company, Billing, and delivery address.
Check the ‘Ready to Receive’ box to receive the item.
Now click on the ‘Add Button’ to Add products to your purchase order.
Select the product from the list of products and enter the name of the product.
Add ‘quantity’ as the Amount of units that needs to be purchased.
Add ‘price’ for each unit in the Price box.
Add any description required in the Description box for the purchase order.
Click the ‘save’ button.
The purchase order will be created.
How to Inbound Purchase Order Logistic:
From the App launcher go to the ‘Inbound Receive/Logistics’ tab
Select the purchase order logistic and click on the ‘Receive’ tab
On the receive page select the version, location, or bin if required and click the ‘save’ Button.
Your purchase order is Complete.
Accounts Payable:
Go to the ‘Accounts Payable’ tab
You can see Vendor’s tab where all the vendors will be listed. You select the vendor and select the Purchase order related to that vendor to create a bill.
You can also directly select the Purchase order to create a bill against it from the purchase order tab.
Select the purchase order to create a bill against it and select the new bill option from the dropdown.
Create Bill page will appear. Enter the Vendor bill date and Bill number. Also, you can add more products to the same bill by clicking on ‘Add’ button.
On the Product line item add taxes and description if required and select the Account to capture the amount paid and click ‘Save’ button.
When Bill is created it will appear on Bill tab. Now match the bill by selecting the bill and click ‘match bill’ button on the top right.
On the match bill page select the line item to match and click ‘save’ button.
Now post the bill by selecting ‘Post’ option from the dropdown against that bill.
When it is posted then New voucher option appears. Click the new voucher to create a voucher.
Click the ‘save’ button to save the voucher.
Now approve the voucher by selecting ‘Approve’ from the dropdown button.
Click on ‘Make Payment’ option from the dropdown to make payment for that voucher.
On the pay, a voucher pop-up. Select payment account, date, reference number, and payment method and click ‘Save’. Now your payment is complete.
How to create Advance to Vendor Bill
An advance Bill to a vendor bill can be created if you need to make an advance payment to the vendor.
Go to the ‘Accounts payable’ tab
Then click on ‘bills’ Section
On the top right corner, you will see a button called ‘New Bill’
When clicking Create Bill. A pop-up comes up. Select the Advance to Vendor option from the pop-up.
After selecting the ‘Advance to Vendor option’. You will get a create Bill page.
Enter All the details mentioned on the page and click on the ‘Add’ Button to add products to your bill.
Select Product, Quantity, Amount and Select ‘Inventory’ Account and Add any Description required.
You can add more products by clicking on the ‘Add’ button again.
Click the ‘Save’ Button.
A Bill will be created and you can view it on the bills tab.
From the drop-down of that bill select ‘New voucher’
Click the ‘Save’ button. A voucher will be created.
Now from the voucher tab select the ‘Approve’ button to Approve the Bill. It will change from Red to green when approved.
Now from the dropdown select the ‘Make a payment’ Button to pay the voucher created.
Enter the details like payment account, method, and Reference number if required and click the ‘Save’ Button
A payment to that voucher will be done.
Work Center
A work center is a unit in an organization where all activities associated with manufacturing processes are performed. Work centers are used to allocate resources and in work orders to complete the manufacturing process. Work centers are usually used to calculate the number of hours required to execute the process, the cost involved in project completion, and the availability of the resources within a planned duration of the project end date. Create Work Center
Navigate to the Manufacturing app > Work Center tab
Once in the Work Center tab, you can view the work centre information already filled in and create a new Work Center record.
To create a new work centre, click the “New” button.
Select the organisation details of the work centre.
Select the channel, site, site and shop floor warehouse for the work centre.
Click the “Save” button to create a work centre for the organisation.
Fields to note:
Field
Description
Organisation
Describes the name of the organisation
Work Center Name
Describes the name of the work centre for its identification
Channel
Describes the segment of the business where the employee is hired to work
Site
Describes the site from where the sub-products can be utilised and maintained
Shop Floor Warehouse
Describes the warehouse in which the items are stored; in addition to this, a user can assign the location and storage bin of the received items to make it a well-organised warehouse.
Trial Balance
The trial balance helps ensure that the total amount of debits is equal to the total amount of credits. The trial balance shows, for the given organization and general ledger, the account balance as of a selected date, the total sum of debits, and the total sum of credits as of the selected date. At the end of the trial balance report, the total sum of debits must equal the total sum of credits.
Use the Filters section to view the trial balance for the selected organization and the selected dated specification. Select the organization for which the trial balance is required; the trial balance post transactions of the finance general ledgers inherited by the selected organization. Select the “From” date when the total balance will be considered. Select the “To” date when the total balance will be calculated. The system offers an option to download the trial balance for the selected criteria in PDF/Excel format on your local system; click the “Download Excel/ Download PDF” button.
Magento
Magento is used to sync products from the Salesforce instance to the Magento store and sync orders and customer accounts from the Magento store to the Salesforce instance.
It auto-syncs every 10 minutes.
After connecting your “Heroku user” with the “Salesforce Instance” click on the “Magento app” and you will land on the “Magento dashboard.”
Click on the “Add” button and copy the “Token” to add in the “Magento Instance.”
Now Login to your “Magento Instance” admin account
On the left-hand side menu, panel Navigate to Stores > Configuration
You will land on the “Configuration Settings” page
Paste the copied “Magento Token” from Heroku Connector in the Aqxolt API token.
In the “Salesforce Instance,” Products should have the basic “e-Commerce”
Available on e-commerce platform checked on the product detail page, and product SKU code should be added.
In the related list e-commerce record select “Magento Checkbox.”
And the product should have inventory.
In every 10 minutes, it syncs products to Magento instance and orders and customers to salesforce instance.
Quotes using ‘Quote Console’
Quote Console allows the users to create the Quotes for the available customers.
Click on the Quote Console from the App Navigation, available in the CPQ App.
OR
Find the Quote Console tab from the App Launcher.
Click on the tab and the system will take you to the Quote Console’s Home page.
On the Home page, select the created Customer Account. After selecting the Customer account system will pull its Contact, and Address (Ship-To-Address and Bill-TO-Address) records automatically.
Logged-In user’s Employee record will be auto-selected and the created Customer Profile will be auto-selected
Once you select the Customer, click on the +New Button the system will take you to AddProducts screen to add the Quote Line Items.
On the AddProducts screen, you can search any product using the Search Bar or filter out any Product by Product’s Family wise.
You can see the details of Products on the Add Products screen. ProductCode, ProductName, UnitofMeasure, PriceperUnit (Price/Unit coming from Price Book record), Quantity (default quantity will be 1, but you can select more than one quantity at a time), DiscountperUnit (Coming from Tier Discount Allocation record or you can enter manually), Description of the product (you can enter manually if require).
Note: –Mechanical Ventilator is a Configurable Product, if you select that product the system will take you to the Configuration page, from the three you can configure this product by selecting different Feature Options. See the below screenshot.
Once you configure a configurable product and select it or select a normal product from the Add Products page, click on the Add Product button to add the Products in the Quote.
Once you hit the Add Products button the Products will be added to the Quote record.
You can edit the records like Price, Quantity, Discount/Unit, and the Description of the added products.
You can see the Profit and Loss calculation on the Calculate P&L page. Click on the green color Calculate P&L button and the system will take you to the Calculate Profit and Loss page.
Note: –The system calculates the Profit and Loss based on Unit Price (Unit Piece coming from Price Book, also editable) and Cost Price (Cost Price coming from Cost Card).
Click on the Back button from the Calculate P&L page, on QuoteandLineItems page check all the records, and click on the Save button to create the Quote.
Add/Edit Products
Add/Edit Products: – Using the Add/Edit button you can add a new product to the Quote, or you can edit the existing Quote Line Items.
Once you create the Quote open the Quote record and click on the Add/Edit Products button available for the Quote Line-Item related list.
You can Add or Edit the Line item records from the Add/Edit Products home page.
You can Edit the Line item records and see the CalculationProfitandLoss from the Add/Edit Products final page. Click on the Next button available on the home page, see the above screenshot.
Site Implantation
Site Implantation(multiple/Single): – If you assign a Site to a customer, then the customer will be able to add the products on Quote for the selected Sites only.
Find the Site tab from the App Launcher, and click on the tab.
Once you are on the Site record page, click on the New button.
On the New Site creation page, enter the SiteName, select PrimaryContact, Address, and Currency, and select the Customer Account for which you want to create the Site. The active checkbox should be checked, Type should be Warehouse, enter Barcode, select the created Organisation Account, and click on Save.
Once you create the Sites for a customer, they can select those Sites while adding Products to the Quote using the Add/Edit button.
System Requirements
Roll out Steps:
Preparation involves all of the planning you need to do before you can begin using Booking Kare.
Identify key users of the system
Add licenses
Identify all of the users who will be using the BookingKare System and make sure you have the appropriate number of licenses.
Review all the technical requirements
Requirements to use Aqxolt BookingKare in a system
Operating System
All you need is a computer that can run a web browser. It doesn’t matter what type of hardware or operating system you’re running.
Browser
Google Chrome™, the most recent stable version Mozilla Firefox®, most recent stable version Microsoft Internet Explorer versions 9, 10, and 11 Apple Safari® versions 5. x, 6. x and 7. x on Mac OS X
Internet Connection
Salesforce is designed to use as little bandwidth as possible so that the site performs adequately over high-speed, dial-up, and wireless Internet connections.
Requirements to use Aqxolt BookingKare system with payment gateways
Payment Gateways
PayPal, Authorize.net,Chase payment.
Check-In/Check-Out
check-in/CheckOut is a flow for checking the clients into an event and checking them out from an event. This flow provides an easier way for the users to check in and check out the members registered for a particular event.
CheckIn/CheckOut
The users can be checked in or checked out from an event either
Using the CheckIn/CheckOut button from the Event Record page.
Using the CheckIn/CheckOut tab.
Using the CheckIn/CheckOut button from the Event Record page:
Navigate to the App menu and go to Events tab and click on a particular event to view the event details in a record page as shown below.
Check for the registrations with repsect ti ths event and click on the “CheckIn/CheckOut” button.
This navigates to the CheckIn/CheckOut tab where an user is directly navigated to view the registrations of an event as shown below.
Search for a particular registration by user name or its registration ID using the search box provided.
You can also view the count of total registrations and the number of guests awaiting, checked in and checked out members of an event by clciking on the cards displayed at the top of the page.
The system also provides an option to print the registration or the guest list using the print button at the top right corner of the page.
This navigates to a printable format of the list in PDF form as shown below.
You can either checkin the members manually or by scanning the QR using the scanner.
Select a member/ registered user whose status is booked to checkin to the event by clicking on the “Check In ” button.
Once an user is checked in to the event, he/she can be checked out anytime from the event using the “Check Out” button. An user who is checked out fron the event cannot checked in again to the same event.
Using the CheckIn/CheckOut tab:
Navigate to the App menu and click on the CheckIn/CheckOut tab where we can view the registrations related to a particular event.
The system pop’s up a window with a list of all the active events which has the registrations as shown above.
The system provides an option to search for the events using the search box.
Search for a particular event from the list of events in the popup.
This navigates to a page where the list of registrations particular to an event is listed down as shown below.
Search for a particular registration by user name or its registration ID using the search box provided.
You can also view the count of total registrations and the number of guests awaiting, checking in, and checking out members of an event by clicking on the cards displayed at the top of the page.
The system also provides an option to print the registration or the guest list using the print button at the top right corner of the page.
This navigates to a printable format of the list in PDF form as shown below.
You can either check in the members manually or by scanning the unique QR code using the scanner.
With a unique family QR code, the system makes it easier to check in all the members of a family by simply scanning their family QR Code.
Select a member/ registered user whose status is booked to check in to the event by clicking on the “Check-In ” button.
Once a user is checked in to the event, he/she can be checked out anytime from the event using the “Check Out” button. A user who is checked out from the event cannot be checked in again to the same event.
Planner
Planner enables users to Request(plan) or Approve(Post on the live system) their Appointment, by creating the Resource, Resource group, Teams, Product from the App Launcher and Creating Location, Work planner, Resource requirements, Time management, Registration and Scheduler from the Planner tab.
Resource
Once the resource group is created add the right people to the group as a resource workforce. You can either add workforce or you can enable the efficiency of the activities like equipment setup, room, etc., by selecting the appropriate record type. You can add the resource by following these steps:
Create a resource
Navigate to app launcher and click the Resources tab.
Click on the new button and select a record type as Workforce.
Enter the resource name and Select the user.
Enter the Email address and phone number.
Select the resource group and Select team this allows a group of resources to assign the task.
If the resource is supervisor check the supervisor checkbox this allows you to see other resources and can manage their appointments.
Check Override holiday’s checkbox is true this option allows you to check that resource for the nonworking time during which the selected resource will work.
Enter the description and image URL
Enter the start and end date of the resource availability
Click on the Save button to create a resource record
Resource group
Create a resource group that is responsible to carry out a set of tasks or specializing in a particular skill.
Create a Resource Group
Navigate to the app launcher and click the Resource Group tab and click on the new button.
Enter the resource group name
Enter the Start Date and End Date
And save the record to create a resource group record
Teams
Managing the team helps you stay committed. Take full control over appointment activities by creating a team and managing their availability and time offs.
Navigate to the app launcher and select the Team.
On the right-hand side, the corner clicks the New button to create a new Team.
Enter team name and select account.
Enter the description of the team to determine the goals and purpose of the team is bean created.
And click on the Save button to create a team record.
Product/Service
Create a product
Navigate to the app launcher and click on the product tab.
Enter the product name, product code, and duration (In minutes).
Select qualification (this option lets the customer is to identify if the customer is eligible for the service).
Select the category, type, and subtype from the pick-list and select the active checkbox it will allow you to select based on location and program from the console.
Select the membership program and enter the session duration and description of the service.
Check to allow invite checkbox this option allows you to invite the customer to book an appointment.
Allow multi-booking checkbox allows you to book multiple slots at a time.
Allow voice/video checkbox this option allows you to send voice/video msgs and will appear on the registration page during booking an appointment.
Allow Waiting list checkbox this option allows you to check if the maximum registration is a threshold (exceeded) and if the checkbox is true then it allows the registration record in the waiting list.
Check the auto resource allocation checkbox this option allows the availability of the resource.
Allow not available slot checkbox is true, this option allows you to block out times when you will not be available for appointments.
Check allows purpose captures checkbox.
Check allows information capture checkbox is true, this option allows you to capture information of the customer for their services.
Allow where the (Location/Voice/Video) checkbox is true, this option allows you to share your current location through voice/video if it is checked it will be visible on the registration page.
Enter the URL for the image and banner image.
Price book
The standard Price book is the default (standard) price for the products and services in the standard price book. When you create a product record, Salesforce creates a standard price book entry. Custom price book entries are the custom (list) prices for the products and services in your custom price books.
Creating a Price Book Entry
Select created product and click on the related list tab
Find the price book and click on the new button
Enter the list price and check the active checkbox
And save the record.
Create membership Program
Navigate to the app launcher and click on the membership program tab
Click on the new button and enter the following details
Enter the Program Name, Start and End date of a member
Enter the description and save the record to create a membership program
Locations
Click on the planner tab on the sub-tab and click on new to create a new Location
Enter Location Name, Account, City, Country, and Address,
Enter the province/state and postal code and select the active checkbox.
And save the record to create a location.
Work Planner
Creating a Work Planner to execute an event can help simplify your work and track progress. You can create a work planner by following these steps:
Navigate to the app launcher and click on the Planner tab.
Click on the sub-tab of the work planner tab and click on Add button to create a new work planner.
Enter the work planner’s name.
Select the product/service and location of the work planner.
Enter the minimum and maximum threshold this option allows the resource value that can be assigned to the tasks.
Select the status as Approved and if you select the status as Requested that means that the task is only been planned and will not be available on the live system.
Enter the description of the work planner.
And save the record to create a work planner
Resource Requirement
Once the work is planned, figure out the resource required in your event planning, this could be a resource that belongs to a specific skill set or a resource group. You can create the resource requirement by following these steps:
Navigate to the Planner Tab from the app menu.
On the Planner tab, click the Resource Requirement sub-tab and click the new button
Enter resource allocation name
Select a work planner and select a resource group and save the record.
Time management
As a supervisor, you can manage your team members’ availability, time off, and break times easily with the Booking Kare Time management application. You can manage the time by following these steps:
Navigate to the time management tab and select the Team, Membership, and Location from the pick-list. You will be presented with the screen below.
You can view all the resources and their availability of start and end time
You can also change/manage the availability of the resource from the start and end time from the pick-list
And also can manage the resource start break time and end break time from the pick-list.
You can also click on the next and previous button to see other resources
And also can manage time off by clicking time off of the resources
And also you can manage other resources by lookup for which resource you need to give time off
Click on the book time off button and the page will navigate to time off-page
Select the start date and end date of the resource
Select the start time and end time of the resource
Select type and no of days
Enter Reason and save the record to create time off for the resource.
REGISTRATION On booking the appointment you will find all the booked appointments along with their Reference Number, Service selected, Resource, Location, Start Time, End Time Email, Type, and Status
Navigate to the app launcher and click on the Planner tab.
Click on the sub-tab of the registration tab.
You will be displayed with only those registered who have the Record type as Resource Service in the registration.
SCHEDULER As a superuser/supervisor/Administrator you can access the scheduler to view the registrations of a particular user or all the users based on Time, Day, Month, and also Year.
Navigate to the app launcher and click on the Planner tab.
Click on the sub-tab of the Scheduler tab.
You will be navigated to the screen below.
You can also filter by Search Location and Search Resource filter present on the screen.
On the left column, you will be displayed with the list of resources (users) Along with their registrations.
Click on the + button present before the resource to view the registrations of that particular user.
You can also view the scheduled appointment based on Time, Day, Week, Month, and Year.
Queuing System
Create a Hassle-free waiting experience and offer great customer experience and efficient customer service. We build flexible and interactive Queue Management Solutions. Enhance customer satisfaction and let them own a better experience by providing a versatile platform.
We optimize the Queuing Management System to enhance efficiency and to enhance customer satisfaction.
Reduces costs and minimizes the expenditures by investing in more manpower requirements. Procure the greatest features with a potential streamline of the mobile workflow process of Queue Management solutions cost-effectively.
A queue works almost on the same methodology used at banks or supermarkets, where the customer is treated according to its arrival.
Create a Queue
Click on the app launcher and click on the queue tab
To create a new record and click on the new button and select record type as resource service
Enter queue name and select Location for which queue is created and Select status as active
Select the Type of the queue whether it is a standard or a VIP queue.
And click on the Save button to create a record.
Queue Allocation
Queue allocation is nothing but allocating the queue based on their services and their resources.
Create a Queue Allocation
Click on the queue tab and select any Queue record
Navigate to the related list of Queue tab
Once in the related list section, find the Queue Allocations and click on the new button
And enter the Queue Allocation name and Select Queue
And select service to allocate in the queue
Select a resource to allocate in the queue and check the active checkbox
And save the record to create queue allocation
Queue management
Run a well-organized queuing system for organizations with multi-locations. The queue management intelligently uses real-time data to start the countdown to manage the client and ensure clients are attended to within the defined wait time. The queue management system is configured to view the estimated wait time at a glance and generate tokens. Let’s add walk-in appointments and add them to the queue by capturing the client’s basic information like name, phone, email, services, and more. You can manage your queue by following these steps.
Queue management
This module helps to manage the Appointment queues by changing them according to the required time or status.
Let’s take an example of appointments that have already been booked from how to manage them using Queue management.
Search or click on the ‘Queue management’ Tab.
2. The page shows the Filter and details to add a customer to the queue.
Use a filter to search the queue by location, service, Program, and User.
The screen shows the Appointments in the queue and how many are waiting.
If you want to add a new appointment to the queue. Search or enter the details and click the ‘Add to Queue’ Button.
If you want to ‘cancel’ or Mark as ‘No show’ for an appointment. Then click on the dropdown arrow to do so.
If you want to go back to the Initial view, then click the ‘Reset’ Button.
How to manage appointments in Queue management.
Let’s see with an example.
Select Location, Enter Service, First Name, Last Name then click the ‘Add to Queue’ Button.
Cody will be added to the waiting list.
The registration record now appears in the “Booked Registration” column, with Appointment details.
If you want to reschedule the appointment registration which is in the Queue.
Click on the Booked registration.
Change the Details or Time of the Appointment for example.
Click on the ‘Update Queue’ Button.
If you want to cancel the Appointment.
Click the dropdown button on the Booked registration that you wish to cancel
Select the ‘Cancel’ Button
Arrival check in for queue process
Click on the location tab and select any created location
It will navigate to the location page in the top right corner click on the drop-down list and select the arrival check-in button. You will be presented with the screen below.
Enter your last name, phone number or email, or reference and click on the check-in button.
And it will navigate to the token page and generate the token and it will be added to the queue. And you will be presented with the screen below:
Click on the print button to receive your token or click on the finish button.
Workbench
Workbench Workbench is for the service provider where Resource can manage their customer appointments.
Click on app launcher and select workbench. You will be presented with the screenshot below:
You can also filter the Location, Program, services, team and resources.
You can also manage the registration by clicking on serve now button all the details get populated on the information.
And you can also reschedule, no show and cancel your appointments by clicking on the action button
Click on the finish button to complete your service.
Queue Wait List
Queue Wait List Queue Wait List is the process where the waiting time of the people at a hotel, airport, hospital, seaport, or event is been displayed.
Click on the location tab and select any created location
It will navigate to the location page in the top right corner click on the drop-down list and select the Queue waitlist button. You will be presented with the screen below.
Here you can find the waiting time which will be running for a particular appointment.
Once the appointment has been started it will display the total waited time.
And finally when the Appointment is completed that token number will be removed from the waitlist
Queue management
Run a well-organized queuing system for organizations with multi-locations. The queue management intelligently uses real-time data to start the countdown to manage the client and ensure clients are attended to within the defined wait time. The queue management system is configured to view the estimated wait time at a glance and generate tokens. Let’s add walk-in appointments and add them to the queue by capturing the client’s basic information like name, phone, email, services, and more. You can manage your queue by following these steps.
Queue management
This module helps to manage the Appointment queues by changing them according to the required time or status.
Let’s take an example of appointments that have already been booked from how to manage them using Queue management.
Search or click on the ‘Queue management’ Tab.
2. The page shows the Filter and details to add a customer to the queue.
Use a filter to search the queue by location, service, Program, and User.
The screen shows the Appointments in the queue and how many are waiting.
If you want to add a new appointment to the queue. Search or enter the details and click the ‘Add to Queue’ Button.
If you want to ‘cancel’ or Mark as ‘No show’ for an appointment. Then click on the dropdown arrow to do so.
If you want to go back to the Initial view, then click the ‘Reset’ Button.
How to manage appointments in Queue management.
Let’s see with an example.
Select Location, Enter Service, First Name, Last Name then click the ‘Add to Queue’ Button.
Cody will be added to the waiting list.
The registration record now appears in the “Booked Registration” column, with Appointment details.
If you want to reschedule the appointment registration which is in the Queue.
Click on the Booked registration.
Change the Details or Time of the Appointment for example.
Click on the ‘Update Queue’ Button.
If you want to cancel the Appointment.
Click the dropdown button on the Booked registration that you wish to cancel
Select the ‘Cancel’ Button
Paypal
Bookingkare supports PayPal services to make electronic and online payment processing.
So let’s start creating payment set up by adding your PayPal account on BookingKare.
Navigate to the app launcher tab and click on credentials.
Click on the subtab of authorize.net, Paypal, and chase tab
Click on the new button and enter the following details
Enter the Name as Paypal
Enter the user name and password
The URL can be tested or live depending on the sandbox account or live account being used. Now enter the test URL https://api-3t.sandbox.paypal.com/2.0/
And enter the signature
Check the checkbox to save the card number
Check the checkbox to save the card data
And check the active checkbox
And click on the Save button to create a record
Tier Discount Allocation
Tier Discount Allocation: – Tier discount is a model in which products or services are sold within a particular price range. By reaching certain tiers, buyers get a different price. The more items shoppers purchase, the greater the discount they get. By offering customers multiple pricing levels, you give them a choice to pay for products they can afford.
View/ Edit Orders of an existing customers
The Epos screen allow you to view the existing or update it.
For example, if the order was created but the logistic was not initiated, the customer can return and inquire about/update the order at any time in the future. The customer can either remove the products or add a few more products to the order.
The process to view/edit a sales order is discussed below.
On the Orders section located on the right-hand side of the screen, enter the unique order number in the “Order’ Lookup field.
The system displays the details of the selected order. You may add products to the product line item section or you can Edit or delete the existing order products.
Creating an invoice through the Epos tab:
The epos tab also allows you to create an Invoice record for the existing orders or the newly created one.
Click on the Payment option, to create the invoice.
Once you click on the Payment option, you can see the Amount details along with the Invoice creation option.
Click on the Create Invoice button, Select the record type (Sales or Advance), Select the Line items and click on the Save button.
Once you click on the Save button, the system will create the invoice record and you will be able to see the created invoice records in the payments section, you can click on the Invoice Document icon if you want to print the document or send it to the customer.
The function is used to receive payments from customers who have purchased your products and services and who have not already paid for them.
When you sell a product/service, the order is created through order processing. The order processing functionality provides for the entry of payments and can be done via the following payment methods.
Cash
Bank/Cheque
Credit Card/Debit Card
Loyalty
The system can accept partial payments and can record multiple payments for each order.
When the customer books an order, the system typically creates an invoice in the system which can be sent to the customer’s email ID.
Calendar For Appointment
Want an easy, visual way to track upcoming or ongoing Appointments? Create a calendar from a standard or custom object: Choose a date field that represents data you want to track, and the calendar displays data in that field as calendar items. You can hide or show calendars, and you can edit and delete them.
Create an Object Calendar for Appointments
Here’s how to create a calendar based on a standard or custom object
Navigate to the calendar tab.
Start creating a calendar by selecting the New calendar option as shown in the screen below:
Choose an object to base the calendar on.
Select fields that determine what the calendar displays (1, 2, 3).
If you want, filter the calendar items by selecting a list view (4).
The calendar displays items differently depending on the date fields you select.
(Date) Fields
The names of some date fields include (Date). If you select a (Date) field, the calendar displays items across the top (as all-day items).
(Date/Time) Fields
The names of other date fields include (Date/Time). If you select a (Date/Time) field in Field for Start, the calendar displays items in time slots. If you also select a field in Field for End (it’s optional) and the items’ duration exceeds 24 hours, the calendar displays the items across the top (as all-day items).
Selecting Start and End Fields
Field for End is optional. If you use it, you must select the same type of field as you do in Field for Start. For example, if you select a (Date) field in one, you can’t select a (Date/Time) field in the other. If you select fields that generate dates in the wrong order (end before start), It displays an error message when you save the calendar.
The colour of each calendar is the colour of the object it’s based on. (If a custom object has a theme, the theme determines the colour of the calendar.) You can hide or show individual calendars.
Calendar for Appointment booking flow
Calendar views display your own calendar and coworkers’ calendars along with list views of open tasks. On the Home tab, the Calendar section shows upcoming Appointments, a date picker for the month, and links to other calendar and activity views. You can share your calendar with coworkers and print calendars and task lists.
Calendar Views
Your calendar displays all Appointments that you own on the My Events Calendar. Calendars that you create from an object display data in date fields as calendar items. View, create, and edit your events in a day, week, or month view. You can also see any calendars shared by colleagues that you’ve added to your view.
View Your Calendar
Access calendar views by:
Choosing the Calendar page from the navigation menu.
Opening a related event on a record’s activity timeline. (If your record doesn’t display the activity timeline, ask your admin to customize your page layout.)
When you click an event that you have permission to access, an overlay displays a preview with event details. Your admin configures the content of the overlays.
Grid Views
Calendar grid views display appointments in several ways.
Current date or any date that you choose. You select how the calendar displays.
One column with Appointment color-coded for selected calendars
One column for each selected calendar to compare available times
One week at a time
One month at a time
Table View
To see a specific appointment or more appointments simultaneously, open the table view. Customize an appointment list view to suit your needs or use the predefined list views.
My Recent Appointment
My Team’s Recent Appointment
My Team’s Upcoming Appointment
My Upcoming Appointment
New This Week
Recently Viewed
Today’s Agenda
Customize your view from the calendar side panel.
Customize your view from the calendar side panel.
To add calendars, click options.
To display or hide a calendar, click the calendar name.
To change the dates, click , , Today, This Week, or This Month.
To add an event, remove a calendar, or view only one calendar, click my event options .
Where to Select or Switch Views
You access calendar views in the following locations.
The Calendar section at the bottom of the Home tab. (If your Home tab doesn’t display the Calendar section, ask your admin to customize your home page layout.)
The Calendar shortcut in the sidebar that opens your last used calendar view. (If your admin has enabled the shortcut.)
The detail page for an event or a task
An activities list view
When you hover your mouse over an event that you have permission to access, an overlay displays event details and actions that you can perform. Your admin configures the content of the overlays.
Day, Week, Month, and Activity Views
Calendar views display events as follows:
A day at a time: or Today
A date that you choose using
A week at a time: or This Week
In a week view, with or without weekends
A month at a time: or This Month
On a day that you choose: Click in the week or month view
In a list of activities (events and tasks):
Inside any calendar view, you can switch views by clicking the icon for a different view. In a week or month view, click a date to see that day’s view.
Single-User View
The single-user view ()
displays up to 1,000 events in one month in any of the following:
Your own calendar
The calendar of another user (not available in Personal Edition)
A public calendar
A resource calendar
Click Change to switch users or calendars. Click Share My Calendar to allow other users to view your calendar. To reset your view to your own calendar, click Back to My Calendar.
Multi-User View
The multi-user view ()
displays several users’ calendars and activities together. Choose an existing list view of users from the View drop-down list or click Create New View.
The view shows each person’s availability. A legend in the view shows busy and out-of-office time. If an event is set to show the time as free, then multi-user views don’t display it.
The multi-user calendar works differently in the partner portal. For example, partners can view events only on the calendars of people in their own company and their channel manager.
Share Your Calendar
Give coworkers access to view or add events to your My Events calendar.
Admins can set organization-wide calendar sharing levels to control how much access coworkers have to each others’ calendars. Admins can’t give coworkers access to event details.
Give coworkers more access to your calendar by changing your calendar sharing options.
From the Calendar tab, click calendar options next to your My Events calendar.
Search and select the name of the coworker who you want to share your calendar with.
Select the level of access that you want your coworker to have to your calendar.
Hide Details
Coworkers can see whether given times are available but can’t see any other information about the nature of the Appointment in your calendar.
Hide Details and Add Appointment
Coworkers can see whether given times are available but can’t see details of events. They can insert an Appointment in your calendar.
Show Details
Coworkers can see detailed information about Appointments in your calendar.
Show Details and Add Appointment
Coworkers can see detailed information about Appointments in your calendar, and they can insert Appointments in your calendar.
Click Who Has Access to see who has access to your calendar, and at what level.
Click Done.
Coworkers can see your calendar by adding it to their Other Calendars list.
View Coworkers’ Calendars.
When coworkers share them My Events calendar with you, then you can view it in Lightning Experience. Add several calendars to your calendar view at one time with user list calendars.
Add user lists to calendar views in the Lightning Experience option from Activity Settings in Setup.
From the Calendar page, click calendar options next to Other Calendars.
Select Add Calendars.
Select People or User Lists.
Search for and select the name of the coworker or user list you want to add to your calendar view.
Click Add.
After you add a shared calendar or user list, you see their events overlaid on your calendar view.
Use the availability view to compare different calendars side by side.
Logistixs Documentation
Logistics offers automatic and streamlined order processing, tracking, and completes the requests for purchases and orders. Manage efficient Supply Chain and Distribution Operations. The presence of updated inventory data means checking product availability at any time is easy and simple.
As a customer, I need the ability to create purchase orders with minimum details to be entered, able to search products, add and remove the products, and be able to select cost cards based on vendor.
When the customer wishes to buy the raw materials or products from the supplier either store them in the warehouse or resell them. The customer needs to create a purchase order against that vendor.
The warehouse management team checks for product/ raw material need or demand stock, they raise a requirement to the supplier/vendor by creating a purchase order.
Preconditions:
Have a vendor account created and related contact and address.
Be specific in which warehouse you want to receive.
Products available in the system for which you want to create purchase orders with ‘Issue Purchase Order’ enabled.
(optional) Available cost cards to be set up against those products and vendors.
Termination Outcome:
If a user will enter all the required information on the create purchase order screen and clicks on the ‘Save’ button, a purchase order will be created and the user will navigate to the purchase order to see all the entered information.
If the required information is not set up correctly in the system, the user may not be able to create a purchase order.
Conditions affecting termination outcome:
If the warehouse is not set up with a distribution center, the user will not be able to select the distribution center based on the assigned warehouse.
If an employee is not assigned to the distribution center, the user will see a warning message to assign the employee to the distribution center to proceed.
The user needs to enter all the required fields on the create purchase order screen like expected date, vendor, vendor contact, organization, and at least one product/line item need to be added to create a purchase order successfully.
User Story Associations: Creating a purchase order against a vendor is a prerequisite for a use case on Inbound Logistics.
The user should enter the following information,
An expected date which cannot be in the past.
A distribution center should be selected, in order to receive the inventory in the warehouse associated with that distribution center.
Select a vendor and associated contact from whom you would like to purchase the products.
Enable the ‘Ready to Receive’ checkbox, if you are ready to move the products into the warehouse.
Add all the products you are buying and enter the quantity and unit price corresponding to each product.
Output Summary:
A purchase order will be created and the products entered by the user are added as the purchase order line items.
If a user has enabled the ‘Ready to Receive’ checkbox, then the logistics will be created of type ‘Inbound’ with logistic line items mapped from purchase order line items.
Creating Multiple Purchase Orders
As a customer, I need the ability to create multiple purchase orders against different vendors, able to see the in-demand products, add and remove the products, and be able to select cost cards based on vendor.
When the customer wishes to buy the raw materials or products from the supplier either store them in the warehouse or resell them. The customer needs to create a purchase order against that vendor and needs to create multiple at once.
The warehouse management team checks for product/ raw material need or demand stock, they raise a requirement to the supplier/vendor by creating a purchase order.
Preconditions:
Have a vendor account created and related contact and address.
Products available in the system for which you want to create purchase orders with ‘Issue Purchase Order’ enabled.
Products should be set up with cost cards and approved vendors. The vendor on the cost card and the approved vendor should be the same.
Be specific in which warehouse you want to receive.
In-demand products should be available. (optional)
Termination Outcome:
If a user will enter all the required information on the create purchase orders screen and clicks on the ‘Save’ button, multiple purchase orders will be created and the user can navigate to the required purchase order to see all the entered information.
If the required information is not set up correctly in the system, the user may not be able to create a purchase order.
Conditions affecting termination outcome:
If the warehouse is not set up with a distribution center, the user will not be able to select the distribution center based on the assigned warehouse.
If an employee is not assigned to the distribution center, the user will see a warning message to assign the employee to the distribution center to proceed.
If the approved vendor and the cost card are not set up with the same vendor, the user will not be able to see the list of vendors available. They will see a warning message as ‘No Approved Vendors Available for the selected product’.
User Story Associations: Creating a purchase order against a vendor is a prerequisite for a use case on Inbound Logistics.
Input Summary:
The user will go through two steps to create multiple purchase orders,
Step 1: When a user navigates to a create purchase orders tab if there are in-demand products the screen populates them by default.
In this first screen, a distribution center should be selected, in order to receive the inventory in the warehouse associated with that distribution center.
Then the user needs to select the products, and select the approved vendor. It populates the cost card automatically along with its unit price and quantity.
After adding all the products and entering the required information, the user needs to click on the ‘Next’ button.
Step 2: The second screen is similar to the ‘Create Purchase Order’ tab. It will map the vendors and products and show the products as line items of the purchase orders that have the same approved vendor selected.
The user needs to enter the following details in this screen,
An expected date which cannot be in the past.
Select a vendor contact associated with that vendor.
Enable the ‘Ready to Receive’ checkbox, if you are ready to move the products into the warehouse.
Add all the above details for all the vendors against whom the purchase order will be created.
After entering the details, when a user clicks on the ‘Save’ button multiple purchase orders will be created and it will show all the created purchase orders.
Multiple purchase orders will be created and the products entered by the user are added as the purchase order line items associated with each individual vendor.
If a user has enabled the ‘Ready to Receive’ checkbox, then the logistics will be created of type ‘Inbound’ with logistic line items mapped from purchase order line items.
Inbound Logistics
The Inbound Logistics tab allows users to add the product to the inventory. We need to create a Logistic record for the Purchase Orders whose type should be ‘Inbound’.
1. Creation of Logistics record for a Purchase Order
If we check the ‘Ready the Receive’ checkbox while creating the Purchase Orders on the ‘Create Purchase Orders’ page and click on Save, the system will create the Purchase Order and its Logistic record.
Or
If we create a Purchase Order from the Create Purchase Order tab without checking the ‘Ready to Receive’ checkbox, the system will create the Purchase Order, but we need to navigate to the Purchase Order record level and need to check the ‘Ready to Receive’ checkbox manually to create the Logistic record. Follow the below steps to create the Logistic record manually –
Find the Purchase Orders tab from the App Launcher.
Once in the Purchase Orders tab, you can view the Purchase Orders information already filled in.
Find the Purchase Order and open it, check the ‘Ready to Receive’ checkbox, and ‘Save’ the Purchase Order record. The system will create the Logistic record.
Figure – ‘Ready to Receive’ checkbox
Figure – Logistic record
2. Complete the Inbound Logistic process to Receive the inventory.
Select the ‘Warehouse Management’ App from the App Navigation and click on the ‘Inbound Logistics’ tab.
OR
Find the ‘Inbound Logistics’ tab directly from App Launcher.
After clicking on the ‘Inbound Logistics’ tab, the system will take the users to the ‘Inbound Logistics’ home page.
Use the search bar or scan the Purchase Order’s barcode to find the logistic.
Once the users found the Logistic, click on the Receive button or scan the barcode of Receive to navigate to the Receive section.
Figure – Click on Receive button to navigate to receive the section
Figure – Scan Receive barcode to navigate to receive the section
Note: –
Users can select multiple logistics together by selecting/scanning the logistics as shown in the below figure and receive all items at a time.
Users can attach any document like bills or product details by clicking on the ‘upload files’ icon and selecting the file that users would like to attach.
After uploading, users can find this document in the ‘logistic’ record level in the related list section of ‘notes and Attachments’.
After navigating to the ‘Receive’ section, users can see all the products associated with the purchase orders.
Figure 5: Before Receiving the Products
Users can see the Normal products at the top, Batch products in the middle, and, Serialized products at the bottom of the page.
Check the checkbox or Scan the Barcode of the Product to select the Purchase Order Line items.
If the Product is a Lot Tracked product, then you can Create a new Batch or you can Scan or Select the available directly. Click on the Gear icon to create a new Batch from the Receive section.
If the Product is a serialized product, then you can Select each inventory for that product or Scan the barcode of the Product. If you Scan the barcode of that product, the system will automatically select each inventory record.
Once you select each inventory for that product, you can enter the Serial numbers directly or scan new Serial Numbers for that product one by one.
Once you select the line items and select Batch/Serial Numbers, you need to enter the Quantity that you want to receive in the provided Quantity input field. By default, the total quantity will be auto-selected, if you want to receive the quantity partially, you can enter the partial quantity and will be able to receive the items partially.
Also, the user can Scan or Select the barcode of the Location if it’s stored at a particular location in the selected warehouse.
In the same way, the user can Scan or Select the barcode of the Bin.
Once everything is selected, you need to click on the Save button.
If you are receiving the items partially, the system will display the received items in the below section of the page.
Once you receive all the items, the system will display a message that All Items Received, and all received items will display at the Received Line Items.
Creating a new Batch/Lot from the ‘Receive’ Section.
Step 1: Click on the gear icon available next to Batch/Lot lookup.
Step 2: It will open the pop-up as shown below.
Step 3: Enter the Batch or Lot Number, and Expiry Date, and select Version if you want to associate that Batch to any specific Version.
Step 4: After entering the details click on the ‘Create Lot button, which will create a new Batch or Lot and allocate it to that product for which the inventory will get added.
Outbound Logistics
The Outbound Logistics module of Aqxolt Logistixs ensures that all kinds of orders are dispatched accurately to the provided shipping address. The outbound logistics allows items to be placed in the specific packages for shipment. The system allows the user to scan an order reference number for items required for shipment. Stock dispatching is applied mainly to modules like sales orders, purchase returns, work orders, and transfer orders.
Navigate to Order Management app > Outbound Logistics tab
The List tab shows the logistics orders that are ready to be Picked and Packed.
Select the logistic order to complete the stock dispatching process
Click the “Pick” button to pick the products from the available stock address.
Select the outbound logistic line item and click the “Pick” button at the bottom right-hand corner of the page.
If all the Qty of the line items are picked, the screen moves to the Pack page
If all Qty is not picked the page remains in the same(Pick) screen until all the Qty is Picked
On the Pack tab, select the chosen item and select the package type and enter the deposit tag number to identify the package.
Select the quantity to pack, select the shipping type and click the “Save” button. Make sure Picked and Packed Qty are same.
The Package will be listed as shown
Multiple packages can also be created by selecting only the required line items in the Pack screen.
To ship the package, select the checkbox and click the “Ship” button.
Depending on the Shipment type selected UPS/FedEx or Internal shipment, the screen navigates to Shipment page.
Stock Take
Stock Takes is the physical verification of the quantities and condition of items held in an inventory or warehouse. This may be done to provide an audit of existing stock. It is also the source of stock discrepancy information.
Steps to create a Stock Take entry
Navigate to the Order Management app >Stock Takes Tab.
Once in the Stock takes tab switch to ‘All’ view from Recently viewed, all created stock takes will be
Click the “Create Stock Take” button on the right-hand top corner to create a new stock take record.
Enter the Site whose Audit of the physical inventory has to be performed.
Enter the Start and End dates of the stock counting.
Count the physical inventory and enter the Stock in Hand.
Click the ‘Save’ button and the system will navigate to the stock take record.
To manage the stock adjustments, click the stock take record.
Click the “Manage Stock Take” button to create stock adjustment records.
Click the stock variance and click the ‘Save’ button to create the stock inward adjustment record.
If the variance is in positive number Stock Inward Line Item is created and if the variance is in negative Stock Outward Line Item is created.
Click the “Save” button to create the stock adjustment.
Inventory/Stock Transfer
As a customer, I need the ability to transfer the products from one warehouse to another warehouse or from one location to another within the same warehouse in a simpler way. Also need the ability to store it in the cart and transfer based on the requirement of products.
Navigate to the App Launcher and select the Stock Transfer Tab.
In the Stock Transfer section, select the Source Site and the Cart associated with the source site.
Click the “New” button item to pick the items and transfer.
Select the Location from where the item is picked.
Select the product that needs to be transferred.
Select the Serial No/ Batch Code of the product after selecting the product if the product is batch/serialized.
Enter the Quantity to be picked.
Click the Putaway tab and select the Destination Site.
Select the Location of the site to put away the items.
Select the items in the action section and click the “Putaway” button to complete the stock transfer process.
Sales Orders to logistics
As a customer, I need the ability to create an Outbound Logistic from multiple sales orders and to create a partial logistic from the selected sales order either by entering available quantity or by selecting the required line items.
When the customer wants to create a logistic from multiple sales orders or to create a partial logistic.
Navigate to the App Launcher and select the ‘Orders to Logistic’ tab. It will show all the orders for which the ‘Ready to Pick & Pack’ check box is not enabled.
You can search for the order by entering the name of the order in the search box.
Select the orders and click on the ‘Create Logistic’ button.
Enter the required details and click on the ‘Save’ button to create a logistic.
Purchase Orders to logistics
As a customer, I need the ability to create an Inbound Logistic from multiple purchase orders and to create a partial logistic from the selected purchase orders either by entering available quantity or by selecting the required line items.
When the customer wants to create a logistic from multiple purchase orders or to create a partial logistic of type inbound.
Navigate to the App Launcher and select the ‘Purchase Orders to Logistic’ tab. It will show all the purchase orders for which the ‘Ready to Receive’ check box is not enabled.
You can search for the purchase order by entering the name of the order in the search box.
Select the purchase orders and click on the ‘Create Logistic’ button.
Enter the required details and click on the ‘Save’ button to create a logistic.
RMA Process
As a customer, I need the ability to handle the products returned from our customers with all the required functionality from refund to the replacement during the warranty period.
When the customer receives the product returned from their customer a user needs to create an RMA.
A Return Merchandise Authorization (RMA) is part of the process of returning a product to receive a refund, replacement or repair during the product’s warranty period. Returned merchandise requires management after the return and has a second lifecycle after the return.
The Sales order must be available whose stage is closed to return the purchased product as shown below.
Termination Outcome:
An account should be associated with the RMA for refund.
The RMA record will be created with the returned product as its line items.
Input Summary:
· RMA from Sales Order Tab: Select the sales order whose stage is closed to return the purchased product as shown below.
In the related tab, find the Return Merchandise Authorization and click the “New” button.
Enter the RMA code and click the “Save” button to create the RMA record.
In the related tab, click the “New” button to create an RMA line item.
Enter the organisation details.
Fill in the RMA number, the sales order line-item number, and the quantity to return. Mention the reason for the return.
Select the Authorize, Is Closed and Ready to Receive checkboxes.
Click the “Save” button to create an RMA line-item record.
The RMA must be associated with a sales order and a shipment. This ensures that returns are permitted only for those items that have been shipped. The return process includes the ability to create the shipment flows and tracks those returns in the system.
Select the sales order record to return the purchased products.
Click the “RMA” button; this will navigate to the RMA page as shown below.
The system auto-fetches the sales order details and customer details.
Click the edit icon and enter the desired return quantity and the reason for return.
Select the return status and click “Save” to create a new return package.
Fields to note:
Field
Description
Added Back to Inventory
A check box that indicates the RMA line item has been returned to inventory for resale
Batch/Lot Code
A code assigned to shipment of RMA
RMA Line-Item Name
Describes the name of the RMA line item
Sales Order Line Item
Describes the Original Sales Order Line Item the product for the Customer RMA was purchased
Return Merchandise Authorization
Describes the name of the RMA to which the RMA line item belongs
Return Reason
Describes the reason for the item that is returned; essentially helps identify issues or problem with the returned item
Return Status
Provides the status of the product being returned
Total Deduction
The amount of the product that has been deducted
Site Item Inventory Stock
Specifies the total amount of inventory in the site
Number of Items In Quality Check
Specifies the total number of returned items in the quality check process
Number of Items to Resell
Specifies the total number of returned items that are sellable
Number of Items Discarded
Specifies the total number of returned items that are discarded
Outbound Logistics
The Outbound Logistics module of Aqxolt Logistixs ensures that all kinds of orders are dispatched accurately to the provided shipping address. The outbound logistics allows items to be placed in the specific packages for shipment. The system allows the user to scan an order reference number for items required for shipment. Stock dispatching is applied mainly to modules like sales orders, purchase returns, work orders, and transfer orders.
Navigate to Order Management app > Outbound Logistics tab
The List tab shows the logistics orders that are ready to be Picked and Packed.
Select the logistic order to complete the stock dispatching process
Click the “Pick” button to pick the products from the available stock address.
Select the outbound logistic line item and click the “Pick” button at the bottom right-hand corner of the page.
If all the Qty of the line items are picked, the screen moves to the Pack page
If all Qty is not picked the page remains in the same(Pick) screen until all the Qty is Picked
On the Pack tab, select the chosen item and select the package type and enter the deposit tag number to identify the package.
Select the quantity to pack, select the shipping type and click the “Save” button. Make sure Picked and Packed Qty are same.
The Package will be listed as shown
Multiple packages can also be created by selecting only the required line items in the Pack screen.
To ship the package, select the checkbox and click the “Ship” button.
Depending on the Shipment type selected UPS/FedEx or Internal shipment, the screen navigates to Shipment page.
Installation Guide
Follow the steps if you are a new user.
The quickest way to assess if Barcode Zone is the right fit for your organization is by creating a free trial. You’ll immediately be taken to a salesforce registration page, where you need to fill out the form and start a free trial. On the app exchange Barcode Zone listing click the “Get It Now” button and login to the salesforce free trial instance and from here you can start to evaluate Barcode Zone in depth.
Installing Barcode Zone in your Salesforce instance
Choose the instance on which you want to install and click.
Step 2
Confirm the installation details and click the “Confirm and Install” button.
Step 3 Licensing Your users for Barcode Zone
Navigate to Setup> Apps > Packaging> Installed Packages.
In the list of installed Packages find the Barcode Zone app and click the “Manage Licenses” option under the actions section.
Click on the “Add User” button in the Licensed User section.
Select the user from the Available Users section; click the “Add” button.
Validate Your Installation
Click on the app launcher and notice that the “Print Barcodes” tab is available
Select any of the applications from the App Launcher and notice its available Tabs.
Add/ Scan Products on Opportunity
In Barcode Zone on opportunity, we can manually add the products or you can use barcode scanner to add the products to the opportunity line items.
Get started
Click on the App launcher.
Type “Opportunities” in the Search Box & Select Opportunities.
List of existing Opportunities will be displayed.
user can either create a New Opportunity by clicking on the New Button in the Top right-hand side of the screen
or select any existing Opportunity.
Once the User clicks on the opportunity, they will be taken to the Opportunity Details Page.
In order to Add a New product to the opportunity, the User can click on the Products dropdown button located towards the right hand side of the Details Page.
Click on Add Products option.
The User will be displayed with a screen where he can Add the Products.
By using the Searchbox functionality, the User can type in the Product Name and search for the desired Product.
Using the Filter functionality located in the top right corner of the screen, the User can Filter the Products either by entering the Product Code or through Product Family.
Or the User can select the Product by enabling the Checkbox on the left-hand side of the Product Name.
Once the Product/Products are selected, the Nextbutton on the bottom right side will be Enabled.
Click on the Next Button.
The user will be navigated to the Edit Selected Products page.
Here the Product and the Sales Price will be auto-populated.
The User can edit the Sales Price if required.
Then enter the Quantity in the text field, select the Date and enter the Description in the Line Description field.
Also the User can delete the selected product by clicking on the Inline Delete Action button.
Click on the Save Button the Products will be added from the Opportunities.
Theme Settings
You can control the theme’s functionality and customize theme’s content from the Theme Settingspage. Here you will find all relevant settings to customize the theme.
This section will provide you an in-depth guide on how to use the Theme Options. To access the Theme Options page, go to- Dashboard > Theme Settings.You will find this page at the top of the Appearancemenu.
In the Header settings section, you will get a lot of header customization options. In this section, you can change the logo and set the menu button, navigation bar settings etc.
Footer Settings
You can configure the footer area of the theme from the settings option. You will find all relevant section settings to the “Footer” option. Navigate to Theme Options > Footer Settings to go to this settings section. We provided all necessary instructions and descriptions with all the options.
Labore scelerisque, ornare?
Unordered list items
Go to Docly SettingsHeaderLogo
Consectetur adipiscing elit
Integer molestie lorem at massa
Facilisis in pretium nisl aliquet
Ordered List Items
Go to Docly SettingsHeaderLogo
Consectetur adipiscing elit
Integer molestie lorem at massa
Facilisis in pretium nisl aliquet
Consectetur laoreet sint occaecati nihil
Unordered list items
Go to Docly SettingsHeaderLogo
Consectetur adipiscing elit
Integer molestie lorem at massa
Facilisis in pretium nisl aliquet
Ordered List Items
Go to Docly SettingsHeaderLogo
Consectetur adipiscing elit
Integer molestie lorem at massa
Facilisis in pretium nisl aliquet
How to Paginate a Post ?
In order to paginate your blog post, in the Write panel in your WordPress admin, switch to the TEXT view (if you are using the Visual view) and then enter the following code to wherever you want to break the post up into a new page:
<!--nextpage-->
System Requirements
To use Charles you need to have a WordPress 4.0 (or higher version) site with PHP 5.4 or more running on your hosting server. If you’ve already installed WordPress on your server and your site is up, that’s great. For help regarding WordPress installation, please see this WordPress Codex link.
In order to paginate your blog post, in the Write panel in your WordPress admin, switch to the TEXT view (if you are using the Visual view) and then enter the following code to wherever you want to break the post up into a new page:
<!--nextpage-->
Theme Settings
Quos vestibulum dictum irure recusandae, aliquet, ullam quod fugit, dictumst, optio, parturient auctor pulvinar, inceptos sem. Habitasse! Mattis, litora ipsum, fringilla elementum.
In the Header settings section, you will get a lot of header customization options. In this section, you can change the logo and set the menu button, navigation bar settings etc.
Theme updating issue
Sometimes, your website may break when you update the new version of the theme.
You have to delete the Charles core plugin before installing the updated theme in this case. Then install the plugin again from Appearance > Install pluginsafter installing the new version.
Footer Settings
Page Building
Create a new page
On the top left side of the WordPress dashboard, click Pages > Add New
Click Edit with Elementor to enter Elementor Page Builder.
The website editing screen is located on the right side. This is your workspace, where you can add sections and templates.
The panel is located on the left side of the screen and contains creative tools called widgets, that allow you to add elements to your page.
Some of the most commonly used widgets include Button, Image, text, and more.
To find a specific widget, use the search field.
Third Depth Two
The theme uses Gravatar to display users avatars . to create or change your Gravatar :
If you have never set-up a Gravatar account:
Register/login to Gravatar. Upon registering, use the SAME email address that is associated with your WordPress User Profile.
Upload your photo and associate it with that specific email address.
If you already registered at gravatar.com:
Click on “My Gravatars”.
click on “Add a New Email”.
Then, you’ll need to click on “Add a New Image”.
Upload an image.
Then select the email address, and then select your image from the bottom. Now it’s associated with that email address. Click Save.
It will take about 5-10 minutes to propagate on the internet, and they will appear on site.
How to customize the theme.
OVERRIDING PARENT THEME FILES
You can not only target individual style declarations via the style sheet but also override entire components of the parent theme.
For every theme file present in the parent directory, WordPress will check whether a corresponding file is present in the child theme and if so, use that one instead. This means that a header.php file in the child theme will override its equivalent in the parent folder.
So, if you don’t like something about a page’s layout, just copy the respective file, implement your changes, and upload it to the child theme’s folder. The modifications will then appear in the child theme, while the original file will remain untouched.
WORKING WITH TEMPLATE FILES
We’ve learned that we can overwrite any file in the parent theme by placing a copy in the child theme’s folder and customizing it. However, using files that exist only in the child theme is also possible. Template files are a good example of this.
Let’s say we want to build a full-width page template for our child theme. Our theme does not lend itself to the full-screen presentation, but let’s do it anyway for demonstration purposes, shall we?
To create a full-width page in Chaoz you have to create a custom page template. Let’s start with the page template.
For our custom page template, we simply copy page.php from the parent theme, rename it to page-full-width.php and place it in the Child theme’s root folder.
Iusto molestie distinctio
Unordered list items
Go to Docly SettingsHeaderLogo
Consectetur adipiscing elit
Integer molestie lorem at massa
Facilisis in pretium nisl aliquet
Ordered List Items
Go to Docly SettingsHeaderLogo
Consectetur adipiscing elit
Integer molestie lorem at massa
Facilisis in pretium nisl aliquet
Consectetur laoreet sint occaecati nihil
Unordered list items
Go to Docly SettingsHeaderLogo
Consectetur adipiscing elit
Integer molestie lorem at massa
Facilisis in pretium nisl aliquet
Ordered List Items
Go to Docly SettingsHeaderLogo
Consectetur adipiscing elit
Integer molestie lorem at massa
Facilisis in pretium nisl aliquet
Deleniti recusandae dignissimos
Omnis, vehicula ex commodo, consectetuer, lectus explicabo incididunt fames voluptates, proin? Eius at accusamus nullam, architecto nemo id, neque mus fusce fugit quisquam primis perferendis aliquam urna. Nulla minim vehicula! Consectetur amet ullam nostrum consectetuer elementum tempore class sagittis. Nascetur? Exercitation nibh! Exercitation! Ante tempor, odio odit egestas, varius primis ligula praesentium, potenti tenetur, occaecati quae cillum, voluptate primis hic? Saepe per molestie tellus voluptates, curabitur, curabitur quae. Diamlorem, cubilia blanditiis non! Sem repudiandae nisi exercitation perferendis netus eiusmod magnis! Voluptates reiciendis maecenas sociosqu, numquam, necessitatibus. Ipsam, eu cursus, quaerat minus aut vel, cum vero. Magnam, veritatis sociosqu anim corrupti.
Fuga tempore fringilla dictum pellentesque alias laoreet leo! Id perferendis erat tempus libero in esse, non, mattis dictum ea! Minima praesent etiam curae lacinia sit fuga repellat cursus, temporibus accusantium facere iaculis fuga dicta debitis tempus, tempora et, alias hac? Cupidatat venenatis sociis phasellus tenetur sint delectus? Mattis, sociosqu rem? Dolor facilisis voluptate pulvinar luctus eaque cupiditate sollicitudin nulla deleniti. Malesuada aute felis? Commodo neque? Convallis, numquam lacinia bibendum illum doloribus voluptatem, pellentesque fuga suspendisse nostrud! Impedit eget eros sociosqu. Sunt praesent curae aperiam sapien primis hic vitae praesent amet mattis at nostrud vitae dicta occaecat qui eum praesent, mollis.
Veniam maiores deleniti voluptate ligula rhoncus, aenean earum praesent laboriosam amet, pulvinar sed eaque similique autem nemo wisi! Mus mauris nonummy sunt vulputate tincidunt posuere ridiculus cras aliquet in viverra optio ante lectus laboriosam elit? Lacus nostra illo earum eveniet pariatur commodi adipisci molestie dapibus egestas aliquid faucibus eleifend sodales! Dolor dictum leo venenatis tenetur beatae vel urna senectus congue facilisis, fugiat rutrum quisque proident expedita! Sapiente impedit? Excepteur odio corporis aut earum nec, ad diam fames ridiculus quasi tempora similique curabitur maxime morbi earum mollit occaecat voluptatem, laoreet ullam. Varius, debitis quas lectus ex tempor, dis laudantium maiores taciti.
Lorem ipsum title
What is an Extension?
For editing menu navigation settings go to Theme Options > Header > Top of Header
. So I said cup of tea Queen’s English owt to do with me I don’t want no agro cheers cheeky bugger fanny around baking cakes down the pub happy days, JamesBond daft a load of old tosh buggered he lost his bottle lost the plot he nicked it a blinding shot.
[docly_tooltip id=”1″]Tooltip text[/docly_tooltip] mufty quaint no biggie cras baking cakes barney bamboozled, what a plonker bum bag he legged it young delinquent knees up Eaton the full monty arse over tit, my lady buggered happy days amongst bugger all mate are you taking the piss brolly. [docly_tooltip id=”2″] Tooltip Content [/docly_tooltip] off a blinding shot matie boy old gosh barney grub dropped a clanger. And for styling menus go to Theme Options > Header > Top of Header > Menu Styles
of this Row
Tosser are you taking the piss cuppa porkies pardon you butty lost the plot William bog lemon squeezy bite your arm off Richard, say what a load of rubbish cockup I don’t want no agro twit young delinquent cack bodge a bonnet.
Unordered list items
Go to Docly SettingsHeaderLogo
Consectetur adipiscing elit
Integer molestie lorem at massa
Facilisis in pretium nisl aliquet
Ordered List Items
Go to Docly SettingsHeaderLogo
Consectetur adipiscing elit
Integer molestie lorem at massa
Facilisis in pretium nisl aliquet
Doc title example
What is an Extension?
For editing menu navigation settings go to Theme Options > Header > Top of Header
. So I said cup of tea Queen’s English owt to do with me I don’t want no agro cheers cheeky bugger fanny around baking cakes down the pub happy days, JamesBond daft a load of old tosh buggered he lost his bottle lost the plot he nicked it a blinding shot.
[docly_tooltip id=”1″]Tooltip text[/docly_tooltip] mufty quaint no biggie cras baking cakes barney bamboozled, what a plonker bum bag he legged it young delinquent knees up Eaton the full monty arse over tit, my lady buggered happy days amongst bugger all mate are you taking the piss brolly. [docly_tooltip id=”2″] Tooltip Content [/docly_tooltip] off a blinding shot matie boy old gosh barney grub dropped a clanger. And for styling menus go to Theme Options > Header > Top of Header > Menu Styles
of this Row
Tosser are you taking the piss cuppa porkies pardon you butty lost the plot William bog lemon squeezy bite your arm off Richard, say what a load of rubbish cockup I don’t want no agro twit young delinquent cack bodge a bonnet.
Unordered list items
Go to Docly SettingsHeaderLogo
Consectetur adipiscing elit
Integer molestie lorem at massa
Facilisis in pretium nisl aliquet
Ordered List Items
Go to Docly SettingsHeaderLogo
Consectetur adipiscing elit
Integer molestie lorem at massa
Facilisis in pretium nisl aliquet
Example Title Doc
What is an Extension?
For editing menu navigation settings go to Theme Options > Header > Top of Header
. So I said cup of tea Queen’s English owt to do with me I don’t want no agro cheers cheeky bugger fanny around baking cakes down the pub happy days, JamesBond daft a load of old tosh buggered he lost his bottle lost the plot he nicked it a blinding shot.
[docly_tooltip id=”1″]Tooltip text[/docly_tooltip] mufty quaint no biggie cras baking cakes barney bamboozled, what a plonker bum bag he legged it young delinquent knees up Eaton the full monty arse over tit, my lady buggered happy days amongst bugger all mate are you taking the piss brolly. [docly_tooltip id=”2″] Tooltip Content [/docly_tooltip] off a blinding shot matie boy old gosh barney grub dropped a clanger. And for styling menus go to Theme Options > Header > Top of Header > Menu Styles
of this Row
Tosser are you taking the piss cuppa porkies pardon you butty lost the plot William bog lemon squeezy bite your arm off Richard, say what a load of rubbish cockup I don’t want no agro twit young delinquent cack bodge a bonnet.
Unordered list items
Go to Docly SettingsHeaderLogo
Consectetur adipiscing elit
Integer molestie lorem at massa
Facilisis in pretium nisl aliquet
Ordered List Items
Go to Docly SettingsHeaderLogo
Consectetur adipiscing elit
Integer molestie lorem at massa
Facilisis in pretium nisl aliquet
Doc title example
What is an Extension?
For editing menu navigation settings go to Theme Options > Header > Top of Header
. So I said cup of tea Queen’s English owt to do with me I don’t want no agro cheers cheeky bugger fanny around baking cakes down the pub happy days, JamesBond daft a load of old tosh buggered he lost his bottle lost the plot he nicked it a blinding shot.
[docly_tooltip id=”1″]Tooltip text[/docly_tooltip] mufty quaint no biggie cras baking cakes barney bamboozled, what a plonker bum bag he legged it young delinquent knees up Eaton the full monty arse over tit, my lady buggered happy days amongst bugger all mate are you taking the piss brolly. [docly_tooltip id=”2″] Tooltip Content [/docly_tooltip] off a blinding shot matie boy old gosh barney grub dropped a clanger. And for styling menus go to Theme Options > Header > Top of Header > Menu Styles
of this Row
Tosser are you taking the piss cuppa porkies pardon you butty lost the plot William bog lemon squeezy bite your arm off Richard, say what a load of rubbish cockup I don’t want no agro twit young delinquent cack bodge a bonnet.
Unordered list items
Go to Docly SettingsHeaderLogo
Consectetur adipiscing elit
Integer molestie lorem at massa
Facilisis in pretium nisl aliquet
Ordered List Items
Go to Docly SettingsHeaderLogo
Consectetur adipiscing elit
Integer molestie lorem at massa
Facilisis in pretium nisl aliquet
This is a example title
What is an Extension?
For editing menu navigation settings go to Theme Options > Header > Top of Header
. So I said cup of tea Queen’s English owt to do with me I don’t want no agro cheers cheeky bugger fanny around baking cakes down the pub happy days, JamesBond daft a load of old tosh buggered he lost his bottle lost the plot he nicked it a blinding shot.
[docly_tooltip id=”1″]Tooltip text[/docly_tooltip] mufty quaint no biggie cras baking cakes barney bamboozled, what a plonker bum bag he legged it young delinquent knees up Eaton the full monty arse over tit, my lady buggered happy days amongst bugger all mate are you taking the piss brolly. [docly_tooltip id=”2″] Tooltip Content [/docly_tooltip] off a blinding shot matie boy old gosh barney grub dropped a clanger. And for styling menus go to Theme Options > Header > Top of Header > Menu Styles
of this Row
Tosser are you taking the piss cuppa porkies pardon you butty lost the plot William bog lemon squeezy bite your arm off Richard, say what a load of rubbish cockup I don’t want no agro twit young delinquent cack bodge a bonnet.
Unordered list items
Go to Docly SettingsHeaderLogo
Consectetur adipiscing elit
Integer molestie lorem at massa
Facilisis in pretium nisl aliquet
Ordered List Items
Go to Docly SettingsHeaderLogo
Consectetur adipiscing elit
Integer molestie lorem at massa
Facilisis in pretium nisl aliquet
Example doc of docly
What is an Extension?
For editing menu navigation settings go to Theme Options > Header > Top of Header
. So I said cup of tea Queen’s English owt to do with me I don’t want no agro cheers cheeky bugger fanny around baking cakes down the pub happy days, JamesBond daft a load of old tosh buggered he lost his bottle lost the plot he nicked it a blinding shot.
[docly_tooltip id=”1″]Tooltip text[/docly_tooltip] mufty quaint no biggie cras baking cakes barney bamboozled, what a plonker bum bag he legged it young delinquent knees up Eaton the full monty arse over tit, my lady buggered happy days amongst bugger all mate are you taking the piss brolly. [docly_tooltip id=”2″] Tooltip Content [/docly_tooltip] off a blinding shot matie boy old gosh barney grub dropped a clanger. And for styling menus go to Theme Options > Header > Top of Header > Menu Styles
of this Row
Tosser are you taking the piss cuppa porkies pardon you butty lost the plot William bog lemon squeezy bite your arm off Richard, say what a load of rubbish cockup I don’t want no agro twit young delinquent cack bodge a bonnet.
Unordered list items
Go to Docly SettingsHeaderLogo
Consectetur adipiscing elit
Integer molestie lorem at massa
Facilisis in pretium nisl aliquet
Ordered List Items
Go to Docly SettingsHeaderLogo
Consectetur adipiscing elit
Integer molestie lorem at massa
Facilisis in pretium nisl aliquet
Foreign Exchange Gain/Loss
These features are scheduled to be launched by June 24, 2024.
Whenever a bill or invoice is posted in a currency different from the organization’s currency, the exchange rate will be applied based on the vendor bill date for bills and the invoice date for invoices. The resulting difference in amount will be accounted for with ledger entries.
Quotes for Manager Approval
Once you create the Quotes, you can submit the Quotes for approval using SubmitforApproval.
Open the Quote record, click on the SubmitforApproval button to submit the Quote for Manager Approval.
The balance sheet is one of the core financial statements used by accountants. A financial statement that summarises a company’s assets, liabilities, and shareholder’s equity at a given point in time. It gives owners an idea as to what the company owns and owes.
To access the Balance sheet, navigate to the Financial Management module and click the Balance sheet tab.
The report generated is based on the current fiscal year. This will display amounts till the presently posted transaction.
You can use the filters and calendar tool to drill down the balance sheet and know the company’s financial position at any point in time or as opposed to a given period. The balance sheet is divided into two columns, one is for assets and the other is for liabilities and stockholders’ equity. Fundamentally, the balance sheet must balance the total amount of assets with the total amount of liabilities and stockholders’ equity.
The balance sheet is auto-calculated using the latest data from the company’s accounts, which means the balance sheet is created in real-time. With Aqxolt ERP’s balance sheet, you don’t have to be a professional to do manual calculations. Whenever a transaction record is created, all the calculations and finance general entries are created automatically, eliminating errors in the balance sheet.
View the data that matters to you by using the filters provided to you. You can import the balance sheet for the selected organization and duration in PDF/Excel format by clicking the “Download PDF / Download Excel” buttons. To make good decisions by comparing financial data, click “Compare Financial Data”. Compare the data of your interest by using filter criteria and viewing the chart data annually, quarterly and monthly. View and download the tabular data by clicking “Download PDF/ Download Excel” for the financial year.
Let’s drill down the balance sheet closely. Depending on the nature of the business, the asset side of the balance sheet may contain many items, some of the examples includes Cash, Inventory, Accounts, receivable, Checking etc.,
The basic equation of the balance sheet states that the liability and the owner’s equity of a business are equal to the total sum of its assets.
Assets = Liabilities + Owner Equity
The other side of the balance sheet displays liabilities and stockholders’ equity. Liabilities are obligations and debt payable to the other entity. Some of the examples of liabilities include Sales tax, Accounts payable, Sales tax payable, Goods received not invoiced, etc.,
Equity is the value of a company’s capital. The basic equation of assets can be used to calculate the owners’ equity
Owners’ Equity = Liabilities – Assets
If the equation returns a negative value then it is dangerous to the growth of your business and difficult to secure the finance of the company. Some of the examples of equity include Retained earnings, Owners’ equity, Remuneration, etc.,
Let’s illustrate an example to understand the balance sheet. One of the customers in Universal stores purchases a Phone and its selling price is $1200 and the cost price is $900. The system generates a sales order for the customer with the invoice amount of $1200. The profit made by the Universal store is calculated using the following equation.
Profit = Selling Price – Cost Price
Therefore, the profit made by Universal Store is $300.
The sales order summary is illustrated in the table below
Sales order
SO-xxxx
Customer: Serah
Qty
Unit Price
Total Price
1
1200
1200
Tax (20%)
240
Sub Total
1440
Discount (10%)
144
Total Amount
1296
The payments on the balance sheet are recorded only when the invoice is posted.
When we make a sale, and Post the Invoice
Chart of Account
Credit
Debit
Sales
1200
Accounts Receivable
1296
Sales Tax Payable
240
Sales Discount
144
1440
1440
Balance After Sale
Sales
1200
Accounts Receivable(Mckinsey)
1296
Sales Tax Payable
240
Sales Discount
144
Customer Serah makes the payment against the Invoice
Serah Pays to Invoice
Amount
Invoice Amount
1296
Cash Payment
1296
Sales Order Status
Paid
Sales Order Stage
Shipped
When a customer makes payment (Cash) to Invoice
Chart of Account
Credit
Debit
Accounts Receivable (Serah)
1296
Cash
1296
Balance After Customer Payment Against Invoice
Sales
1200
Accounts Receivable (Serah)
0
Sales Tax Payable
240
Sales Discount
144
Cash
1296
Let’s illustrate an example to understand the balance sheet when sales return happens. Serah the customer of Universal Stores would like to return one of the items from the sales order purchased by her. The system generates a Return Merchandise Authorisation for the customer and the net sales are calculated by the following formula.
Similarly, let’s illustrate an example understand the balance sheet when Universal stores purchase an item. Aqxolt ERP helps in the accounting of vendor invoices that the vendor bills towards the order. When the user raises the Purchase order to purchase item A and item B, the system creates a voucher against the purchase order. Every time a voucher is posted a general ledger entry is created in the system reflecting the credit and debit balance of the chart of accounts created for purchases.
Inventory
Product Name
Serial No
Cost Price
Selling Price
Profit(SP-CP)
Available Stock
Stock Inward
Item A
2345-5436-2356
78000
90000
12000
2
2
Item B
2345-5436-2378
88000
100000
12000
2
2
After Voucher is Posted the Following Ledger Entries Will be Created
COA
Credit
Debit
Purchase
332000
Accounts Payable
332000
Inventory Accounting
COA
Balance
Inventory
332000
Accounts payable
332000
Accounts Receivable
0
Sales
0
Purchase
0
Sales Return
0
Sales Tax
0
After Stock In Ward (Item A (2345-5436-2356)) is Posted The Following Ledger Entries Will be Created
COA
Credit
Debit
Inventory
156000
Purchase
156000
After Stock In Ward (Item B (2345-5436-2378)) is Posted The Following Ledger Entries Will be Created
COA
Credit
Debit
Inventory
176000
Purchase
176000
When a Universal store returns an item purchased the system creates a transaction entry for the return purchase order and the following chart of accounts are affected.
The Following Ledger Entries Will be Created If Not paid
COA
Credit
Debit
Accounts payable
0
88000
Inventory
88000
0
The Following Ledger Entries Will be Created If Paid with Cash
COA
Credit
Debit
Cash
88000
PurchaseReturn
88000
Income Statement
The profitability of a company for a specified period of time is shown on an Income statement. The business can choose the time period the statement covers. It is an organization’s ability to record net profit or loss over a specific accounting period. The income statement provides an overview of the organization’s sales and net income. Aqxolt ERP covers both the operating and non-operating portions of the income statement. The operating part of the income statement discloses records about expenses and revenue that are directly associated with regular business operations, whereas the non-operating part of the income statement discloses records of expenses and revenue that are not directly associated with regular business operations.
The income statement is important because investors can use it to analyze the profitability of the organization. It plays a significant role in making decisions about whether to invest in the organization.
View/Download an Income Statement
Navigate to the Finance Management app > Income Statement tab.
Once in the Income Statement tab, you can track/view the organisation’s revenue and expenses for the current fiscal year.
The user can use the date filter to view the income statement for a specific period of time to fetch the revenue and expense details for the specific period of time.
Aqxolt ERP allows users to download the income statement in a PDF/Excel format simply by clicking the “Download Excel/ Download PDF” button.
Aqxolt ERP allows the user to use the income statement for comparison. It is used to compare fiscal year data and fiscal quarter data. It typically allows users to compare the present year with two years of historical data.
On the Income Statement tab, click the “Compare Income Statement” sub tab.
To compare the data, from the filter select the fiscal year or fiscal quarter options and the date.
The system will display the tabular data for the selected filter criteria.
To download the tabular comparison data, click the “Download PDF” button.
Aqxolt ERP provides the user with accurate chart data based on the selected filter criteria. Click on the links on the right-hand side next to the chart to view the chart data Annually, Quarterly and Monthly.
Bank Reconciliation
Generally, every organisation operates its finances with at least one bank account. An organisation can have one or more bank accounts operating on multiple currencies. An organisation makes daily, weekly or monthly deposits depending on the nature of the business. The deposits could be in the form of cheques, cash or credit/debit card receipts. Aqxolt ERP’s Bank Reconciliation ensures that payments of any form are processed and deposited in the bank.
Reconciliation of Bank Records:
Navigate to the Finance Management app > Bank Reconciliation
Enter the Reconciliation Name for identification.
Select the organisation and the bank account associated with the organisation.
Enter the start and end dates for reconciling the journal entries of the specified period.
Click the “Save” button to create a bank reconciliation for the organisation.
Download the bank statement template.
Click the “Import Bank Statement” button and select the bank statement to reconcile. (Note that the bank statement should be in .csv format.) The bank statement entries will appear in the section below.
Click the “Reconcile” tab to begin the bank reconciliation for the specified period.
Click the bank statement entry on the left-hand side and find its match on the right-hand-side transactions section.
Click one or more transactions for each bank statement entry and click the “Reconcile” button.
To find and match the transactions, click on the “Find & Match” tab in the transactions section on the right-hand side.
Search the transactions by entering at least two characters of the transaction name or reference number. Also, you can search by entering the amount. Click the “Go” button to find the match.
To create the transaction, click the “Create” tab and select the payment type. Enter the category and amount, then click the “Reconcile” button.
To undo the reconcile, click the “Undo Reconcile” tab. Then click the undo button under the “Actions” section.
Trial Balance
The trial balance helps ensure that the total amount of debits is equal to the total amount of credits. The trial balance shows, for the given organization and general ledger, the account balance as of a selected date, the total sum of debits, and the total sum of credits as of the selected date. At the end of the trial balance report, the total sum of debits must equal the total sum of credits.
Use the Filters section to view the trial balance for the selected organization and the selected dated specification. Select the organization for which the trial balance is required; the trial balance post transactions of the finance general ledgers inherited by the selected organization. Select the “From” date when the total balance will be considered. Select the “To” date when the total balance will be calculated. The system offers an option to download the trial balance for the selected criteria in PDF/Excel format on your local system; click the “Download Excel/ Download PDF” button.
Budget
The biggest concern in terms of project failure involves establishing an unrealistic time and cost to drive a project. An unrealistic time and cost lead to poor decision-making. A good project management system requires the organization to collaborate with all the departments because not all the information is available at the beginning of the project in project lead manufacturing companies. Aqxolt ERP provides the solution to handle project management issues.
Create Budget Account:
Navigate to the Finance Management app > Budget Account tab.
Once in the Budget Account tab, you can track/view the employee information already filled in and create a new Budget Account record.
To create a new employee, click the “New” button.
Select the organisation and business unit details of the budget account.
For accounting purposes, select the relevant chart of the account.
Before the budget is allocated to a project, the manager must approve it. Select the Approver and enter the submitted and approved date of the budget.
Enter the name of the budget and the financial start and end date.
If the budget is of the type carry forward, check the budget carry forward checkbox and select the carry over the budget account.
Enter the spend amount and the amount of the budget account and select the status.
Click the “Save” button to create a budget account for the organisation.
Aqxolt ERP helps project managers develop estimates for cost and project timelines based on the company revenue, assets and workforce involved. A quick way to estimate project cost is by calculating the machine usage cost, workforce cost, material cost and overhead costs associated with each process and schedule involved within the project. This will help project managers manage projects and control budgets proactively.
Fields to note:
Field
Description
Budget Name
Describes the name of the budget account allocated to the project for its identification
Chart of Account
Describes the account available for transactions in its general ledger
Approver
Provides the name of the person responsible for approving the budget
Approved Date
Describes the date on which the budget was approved
Submitted Date
Describes the date on which the budget account was submitted for approval
Financial Start Date
Describes the start date of the financial year
Financial End Date
Describes the end date of the financial year
Carry Over Budget Account
Describes the remaining amount that can be carried for the commitment to the new financial year
Status
Describes the status of the budget account whether it is submitted for approval, committed or approved
Budget Carry Forward
Indicates whether the budget account is of the type carry forward
Spend Amounts
Describes the amount spent from the allocated budget
Amount
Describes the amount allocated to the budget
Finance Data Setup
Custom Setting
Navigate to setup and find “Custom Settings” in the quick find box.
Find “Module” custom setting and click the “Manage” button.
Click the ‘New’ button and create a record by name “Finance”, make sure the Run checkbox is selected, this controls the Activation/Deactivation of Finance Module.
Fiscal Year Setup
Navigate to setup and find “Fiscal Year” in the quick find box.
Select “standard Fiscal Year”
Select the fiscal year start month and select whether the fiscal year is based on the starting month or the ending month.
Click the “Save” button and confirm the changes.
Finance General Ledger
Finance general ledger is used to track all the financial transactions and it is the primary accounting record for a business. The finance general ledgers hold the accounting information that is needed to prepare the company’s financial statements, including the Balance sheet and the Income statement and includes accounts for assets, liabilities, owner’s equity, expense, and revenue.
Navigate to the Finance Management app >Finance General Ledger Tab.
Enter the Name of the general ledger.
Select the Organisation and click the “Save” button to create a general ledger record.
Chart of Accounts
Chart of Account is a unique record of each type of asset, liability, equity, income/revenue, and expense. A very important reason to have COA in the system is to let the users quickly get a glance at a company’s financial health and segregate assets, revenue, liabilities, and expenses. It provides the complete listing of each account in the accounting system and ERP Mark7 has the flexibility to tailor the company’s COA that best suits its business process. It is available for recording transactions in the finance general ledgers.
Navigate to the Finance Management app >Chart of Accounts Tab.
Click the “New” and select the Record Type of the chart of account, click the “Next” button.
Enter the Name of the chart of account and select the active checkbox.
Select General Ledger and Organisation from the lookup.
Click the “Save” button to create the Chart of Account record.
The following basic chart of accounts should be created in the system.
Chart of Account Name
Record Type
Inventory
Assets
Checking
Assets
Cash
Assets
Accounts Receivable
Assets
Retained Earnings
Equity
Owner’s Equity
Equity
Cost of Goods Sold
Expense
Rent
Expense
Sales
Income/Revenue
Sales Return
Income/Revenue
Sales Discount
Income/Revenue
Sales Tax
Liabilities
Accounts Payable
Liabilities
Sales Tax Payable
Liabilities
Goods Received Not Invoiced
Liabilities
To start a New Business Process, Create a “Stockholders Equity” or “Owners’ Equity” COA with an opening balance as per the requirement.
Note: When creating a new Account (Organisation) or existing Account (Organisation) make sure the field Account Type is set to “Organisation”. If the field is not found on the page, add it to the layout. And on the Account (Organisation) detail page Default checkbox should be checked.
Chart of Account Mapping
Chart of accounts mapping allows the processing of balance and supports the ability to correlate a source chart of account to a target chart of accounts. The posting functionality in ERP Mark7 enables the finance general ledgers to create a relevant finance general ledger entry with the relevant chart of account information and transaction in it. To create the chart of account mapping follow the following steps
Navigate to the Finance Management app >COA Mapping Tab.
Click the “New” and enter the name of the COA Mapping name.
Select the Chart of Account from the lookup.
Select Tax or Discount checkboxes if the COA Mapping created is for tax and discount purpose.
Click the “Save” button to create the COA Mapping record.
Accounting Period
Create the accounting period for the fiscal year, i.e., create the accounting period for all the months of the fiscal period for which the financial statements are prepared. It basically imitates the basic twelve-month calendar.
Navigate to the Finance Management app >Accounting Period Tab.
Click the Accounting period button in All Accounting Period list view.
Select the Organisation for which the accounting period records are created.
Enter the Start Date and End Date of the fiscal period.
Click the “Create” button to create the accounting period records.
General Accounting
The Finance module in Aqxolt ERP Mark 7 provides real-time insight into the overall financial status of the organisation. It provides, automates and streamlines the entire financial management process, as well as simplifies user adoption and processes by its seamless integration. Aqxolt ERP Mark 7 provides a complete suite of components involved in financial processes like General Accounting, Accounts Receivable, Accounts Payable, Commission Accounting and Reconciliation with bank feeds. It has been intelligently designed to handle multiple business units. It is completely integrated with other ERP modules like Order Management, Manufacturing Management, Supply Chain Management and Employee Management. It empowers you to track all entries into comprehensive general entries. It also enhances decision making with insightful reports and dashboards.
General Accounting
This is a combination of all the processes related to financial activities in an organisation, such as providing the financial report form balance sheet, profit and loss statements and trial balance. To begin with the configuration every organisation requires a finance general ledger and a chart of accounts for the financial year.
Create an Accounting Period
Navigate to the Finance Management app > Accounting Period tab.
Click the “New” button to create a new Accounting Period.
Enter the Accounting Period Name and select the status.
Enter the Start Date and the End Date of the accounting period.
Click the “Save” button to create the accounting period record.
Create Chart of Accounts
Navigate to the Finance Management app > Chart of Accounts tab.
A chart of accounts can be created for different types of accounts, such as Sales, Liability, Assets, Equity or Income/Revenue from the available record types.
Click on the “Add New Chart of Accounts” button to create a new chart of accounts record for the selected record type.
Enter the name of the chart of account; select the financial year, account type and other details.
Enter the Organisation and Business Unit details.
The opening balance of the account will be 0 if the account is starting in the current financial year; otherwise, the opening balance will be the closing balance of the same account in the previous financial year.
Enter the accounting start and end dates.
Click the “Save” button to create the chart of account.
Note: When creating a new Account (Organisation) or existing Account (Organisation) make sure the field Account Type is set to “Organisation”. If the field is not found on the page, add it to the layout.
Field to note:
Fields
Details
Is Contra:
If the contra checkbox is checked, the chart of the account will be a contra account.
Opening Balance:
The balance brought forward at the beginning of a new accounting period, on the credit or the debit side of the ledger.
Closing Balance:
The amount remaining in an account within a chart of accounts, positive or negative, at the end of an accounting period or at year end.
Total Credit:
The total credit amount of the financial year.
Total Debit:
The total debt amount of the financial year.
Financial Year:
Select the financial year of the organisation; usually the financial year is the period between 1 April and 31 March.
Calculated Ending Balance:
The calculated balance of the account for the given financial year. This is used to identify the starting balance of the next financial year account.
Bank Account:
Selects the bank account of the organisation used to do all the accounting transactions
Account Code:
A six-digit number that indicates the type of revenue, expenditure or transfer being recorded.
Account Information
Account Type:
Indicates the account’s purpose. For example, the account type could be Current Liabilities or Long-Term Liabilities.
Accounting Period Start Date:
Start date of the accounting period; it can be the same as the start date of the financial year.
Accounting Period End Date:
End date of the accounting period, it can be the same as the end date of the financial year.
Create Finance General Ledger for the financial year
Navigate to the Finance Management app > Finance General Ledger tab
Click the “New” button to add “Finance General Ledger”.
Select the financial year and enter the start and end dates of the general ledger entry.
Enter the name of the finance general ledger and enter the accounting period start and end dates.
Select the “Active” checkbox to make the finance general ledger active
Invoice and Payment Posting
Posting invoices ensures that the transaction has been recorded in the Finance general ledger of the company. If the organization operates on a cash basis or on an accrual basis, the invoices and payments can be posted at any given time. Whenever invoices are posted, accounts receivable and sales-related ledger entries are created in the system. Similarly, when payments are posted, payment-related debit and credit ledger entries are created in the system automatically. One must ensure that all invoices are posted with a date for the current year to ensure the accounts receivable are created for the correct period of the year.
Posting Invoices can be done in two methods:
From Record Level
Navigate to the Order Management app >Sales Order tab.
Select the sales order whose invoice must be posted.
On the related tab, click on the invoice number to open the invoice record.
Click the “Edit” button and select the “Posted” checkbox.
Click the “Save” button to apply the changes. Upon saving the record, a finance general ledger entry is created for accounts receivable and sales accounts.
2. From Accounts Receivable
Navigate to the Finance Management app >Accounts Receivable tab.
Navigate to the Invoices tab, select the invoice which must be posted.
Once we select the invoice to post, click on the dropdown button to either post/un-post the invoice.
Posting Paymentscan be done in two methods:
Record Level
Navigate to the Order Management app > Sales Order tab.
Select the sales order whose payments must be posted.
On the related tab, click on the payment number to open the payment record.
Click the “Edit” button and select the “Posted” checkbox.
Click the “Save” button to apply the changes. Upon saving the record, credit and debit entries are automatically created in the system for the posted payment.
2. From Accounts Receivable
Navigate to the Finance Management app >Accounts Receivable tab.
Navigate to the Payments tab, select the payment which must be posted.
Once we select the payment to post, click on the dropdown button to either post/un-post the payment.
Posting Supplier Invoices:
Navigate to the Order Management app > Purchase Order tab.
Select the purchase order whose supplier invoice must be posted.
On the related tab, click on the purchase/supplier invoice to open the invoice record.
Click the “Edit” button and select the “Posted” checkbox.
Click the “Save” button to apply the changes. Upon saving the record, a finance general ledger entry is created for accounts payable and asset accounts.
Posting Supplier Payments:
Navigate to the Order Management app > Purchase Order tab.
Select the purchase order whose payments must be posted.
On the related tab, click on the supplier payment number to open the supplier payment record.
Click the “Edit” button and select the “Posted” checkbox.
Click the “Save” button to apply the changes. Upon saving the record, credit and debit entries are automatically created in the system for the posted payment.
Manage Taxes
Aqxolt ERP enables tax calculation and eliminates manual processes that are subject to human error.
Taxes in Aqxolt ERP can be applied in the following ways;
Assign the taxes on the Sales Orders
Assign the taxes on Products
Assign the taxes on Shipment
Create a Tax Record
Create a Tax record by navigating to the Order Management app > Tax tab > New.
Enter the Tax Code and select the Effective Date and Expiry Date.
Select the Type of the tax, whether it is a Sales, Service or Shipping tax.
Select the Country and Province; If both country and province are selected then the Tax will be applied for that province only.
If Province is not selected then the Tax is applied for the Country.
If Province and Country both are not selected then the Tax will be considered General and will be applicable to all Orders.
Enter the Tax Rate in percentage.
Select the Account Profile (Customer Profile) to which the taxes are applied.
“Apply tax on” field lets you to apply taxes on selling price of the product or the cost price.
Check the Active checkbox to make the record Active.
To apply the tax on a specific product, select the product from the lookup; If not keep it blank. This Tax record will be considered to Apply taxes on Sales Order.
Click the “Save” button to create the Tax record.
Assign the Taxes on the Sales Order
Every Sales Order is generated for a Customer and the Customer is associated with a Customer Profile.
In the related list of Customer Profile, Tax record will be available if created as mentioned in the above steps.
Assign the Taxes on Products
When a tax record of type Sales or Service Tax is created with the product in it, the system applies the tax on the sales order line item that contains the same product in it.
Assign the Taxes on Shipment
When a tax record of type ‘Shipping’ is created, the system applies the tax on the Sales Order Shipping Amount field.
The Shipping Tax will be calculated based on the Tax Sourcing Rule on the Customer Profile which can be Source or Destination.
Fields to Note:
Field
Description
Tax Code
Describes the Tax record Name.
Country
Tax codes are unique for every country. This describes the country for which a Tax record is created.
Province
Every province differs in the tax rate. This field describes the province for which the Tax record is created.
Type
Describes the type of Tax, whether it is a Sales, Service or Shipment Tax.
Effective Date
Describes the date from when the Tax record is effective for use.
Expiry Date
Describes the date from when the Tax record can no longer be used.
Tax Rate
Describes the percentage of tax applied.
Product
Describes the product associated with the Tax record. This field is mainly used when product-specific taxes are created.
Apply Tax On
Describes whether the tax is applied to ‘Selling’ or ‘Cost’ price of the product
Account Profile
Different Taxes can be applied for different Account Profiles. Account Profile (Customer Profile) should always be selected while creating a Tax record
Prepayments
Create prepayments
Navigate to the app menu and click the Accounts tab.
On the tab related to the customer account record, find the related Prepayments list.
Once in the Prepayments section, you can track the prepayments already filled in and create a new prepayment.
Click the “New” button to create a prepayment record. Select the “Credit” record type and click the “Next” button.
Enter the Prepayment Name, Applied Date and Credit Amount.
Click on the “Save” button to create a credit prepayment record.
Create payments
On the tab related to the Prepayment record, find the list related to Payments.
Once in the Payments section, you can track the payments already filled in and create a new payment.
Click the “New” button to create a payment record. Select the Prepayment record type and click on the “Next” button.
Enter the Payment Name and Amount, as well as other payment details for the prepayment.
Select the Payment Gateway, the Status and the Type of prepayment.
Click the “Save” button to create the payment record.
Payment using prepayment credit
Using Aqxolt ERP, you can make prepayments in the following ways:
From the ePoS page
From the Invoice detail page
Prepayment credit payments from the ePoS page
Create the sales order as described in Creating a sales order through the Sales Orders tab.
Navigate to the “Payments tab” in ePoS and click on the “Apply Credits” button.
The system will automatically fetch the Invoice Amount, Total Due and Available Credit. Enter the “Redeem Credit” and click the “Pay Now” button
You will see that a Credit type payment record has been created.
Prepayments from the Invoice detail page
Navigate to the app menu and click on the Invoices tab.
Once in the Invoice section, you can track the invoices already filled in and create a new invoice.
Select the invoice for payments. On the detail page, navigate to the “Redemptions” button.
Click the “Apply Credits” section on the left-hand side.
The Apply Credits redemption page shows the invoice and the total due amount details along with the available credit amount, as shown below.
Enter the Redeem Credit and click the “Pay Now” button.
Accounts payable
Accounts payable (AP):is a short-term debt and a liability on a balance sheet where a business owes money to its vendors/suppliers that have provided the business with goods or services.
Go to the ‘Accounts Payable’ tab
You can see Vendor’s tab where all the vendors will be listed. Select the checkbox against the vendor and select the Purchase order related to that vendor to create a bill.
You can also directly select the Purchase order to create a bill against it from the purchase order tab if have the PO number handy.
Select the purchase order to create a bill against it and select the new bill option from the dropdown.
Create Bill page will appear. Enter the Vendor bill date and Bill number. Also, you can add more products to the same bill by clicking on ‘Add’ button. Attach the bill.
On the Product line item add taxes and description if required and select the Chart of Account to capture the amount paid and click ‘Save’ button.
When Bill is created it will appear on Bill tab. Now match the bill by selecting the bill and click ‘match bill’ button on the top right.
On the match bill page select the line item to match and click ‘save’ button.
Now post the bill by selecting ‘Post’ option from the dropdown against that bill.
When it is posted then New voucher option appears. Click the new voucher to create a voucher.
Click the ‘save’ button to save the voucher.
Now approve the voucher by selecting ‘Approve’ from the dropdown button.
Click on ‘Make Payment’ option from the dropdown to make payment for that voucher.
On the pay, a voucher pop-up. Select payment account, date, reference number, and payment method and click ‘Save’. Now your payment is complete.
How to create Advance to Vendor Bill
An advance Bill to a vendor bill can be created if you need to make an advance payment to the vendor.
Go to the ‘Accounts payable’ tab
Then click on ‘bills’ Section
On the top right corner, you will see a button called ‘New Bill’
When clicking Create Bill. A pop-up comes up. Select the Advance to Vendor option from the pop-up.
After selecting the ‘Advance to Vendor option’. You will get a create Bill page.
Enter All the details mentioned on the page and click on the ‘Add’ Button to add products to your bill.
Select Product, Quantity, Amount and Select ‘Inventory’ Account and Add any Description required.
You can add more products by clicking on the ‘Add’ button again.
Click the ‘Save’ Button.
A Bill will be created and you can view it on the bills tab.
From here on the process to create a Voucher make payment remains the same.
Accounts Receivable
Posting invoices ensures that the transaction has been recorded in the Finance general ledger of the company. If the organization operates on cash basis or on an accrual basis, the invoices and payments can be posted at any given time. Whenever invoices are posted, accounts receivable and sales-related ledger entries are created in the system. Similarly, when payments are posted, payment-related debit and credit ledger entries are created in the system automatically. One must ensure that all invoices are posted with a date for the current year to ensure the accounts receivable are created for the correct period of the year. Posting invoices and payments can be achieved through Accounts Payable page and also from record level.
Posting Invoices:
From Accounts Receivable
Navigate to the Finance Management app >Accounts Receivable tab.
Navigate to the Invoices tab, select the invoice which must be posted.
Once we select the invoice to post, click on the dropdown button to either post/un-post the invoice.
From Record Level
Navigate to the Order Management app >Sales Orders tab.
Select the sales order whose invoice must be posted.
On the related tab, click on the invoice number to open the invoice record.
Click the “Edit” button and select the “Posted” checkbox.
Click the “Save” button to apply the changes. Upon saving the record, a finance general ledger entry is created for accounts receivable and sales accounts.
Posting Payments:
From Accounts Receivable
Navigate to the Finance Management app >Accounts Receivable tab.
Navigate to the Payments tab, select the payment which must be posted.
Once we select the payment to post, click on the dropdown button to either post/un-post the payment.
Record a payment by hitting ‘Record Payment’.
Enter the payment amount, payment account, Reference Number, select the check box against the line item and hit ‘Save’
From Record Level
Navigate to the Order Management app > Sales Order tab.
Select the sales order whose payments must be posted.
On the related tab, click on the payment number to open the payment record.
Click the “Edit” button and select the “Posted” checkbox.
Click the “Save” button to apply the changes. Upon saving the record, credit and debit entries are automatically created in the system for the posted payment.
Budget
The biggest concern in terms of project failure involves establishing an unrealistic time and cost to drive a project. An unrealistic time and cost lead to poor decision-making. A good project management system requires the organization to collaborate with all the departments because not all the information is available at the beginning of the project in project lead manufacturing companies. Aqxolt ERP provides the solution to handle project management issues.
Create Budget Account:
Navigate to the Finance Management app > Budget Account tab.
Once in the Budget Account tab, you can track/view the employee information already filled in and create a new Budget Account record.
To create a new employee, click the “New” button.
Select the organisation and business unit details of the budget account.
For accounting purposes, select the relevant chart of the account.
Before the budget is allocated to a project, the manager must approve it. Select the Approver and enter the submitted and approved date of the budget.
Enter the name of the budget and the financial start and end date.
If the budget is of the type carry forward, check the budget carry forward checkbox and select the carry over the budget account.
Enter the spend amount and the amount of the budget account and select the status.
Click the “Save” button to create a budget account for the organisation.
Aqxolt ERP helps project managers develop estimates for cost and project timelines based on the company revenue, assets and workforce involved. A quick way to estimate project cost is by calculating the machine usage cost, workforce cost, material cost and overhead costs associated with each process and schedule involved within the project. This will help project managers manage projects and control budgets proactively.
Fields to note:
Field
Description
Budget Name
Describes the name of the budget account allocated to the project for its identification
Chart of Account
Describes the account available for transactions in its general ledger
Approver
Provides the name of the person responsible for approving the budget
Approved Date
Describes the date on which the budget was approved
Submitted Date
Describes the date on which the budget account was submitted for approval
Financial Start Date
Describes the start date of the financial year
Financial End Date
Describes the end date of the financial year
Carry Over Budget Account
Describes the remaining amount that can be carried for the commitment to the new financial year
Status
Describes the status of the budget account whether it is submitted for approval, committed or approved
Budget Carry Forward
Indicates whether the budget account is of the type carry forward
Spend Amounts
Describes the amount spent from the allocated budget
Amount
Describes the amount allocated to the budget
Business Units
Business units in Aqxolt ERP is an operational unit that deals with the management of various tasks and goals of an organisation. There can be multiple business units set up based on how a business is organised. In a business, there are times when multiple projects are going on at the same time. This makes multitasking difficult for the supervisor. However, with Aqxolt ERP, it is easy. You can view progress reports and updated data about various projects simultaneously. Not only can you look at the big picture, you can also focus your energies on the finer details. A business unit can be classified as a cost centre or a profit centre.
A business unit as a cost centre is a functional unit within an organisation that costs the organisation money to operate. Cost centres record costs with reference to the values planned. The cost centre indirectly contributes to the profit of an organisation through operational excellence and efficiency. Usually, the managers of a cost centre are responsible for keeping costs below budget. It helps managers to keep track of overhead costs in the area incurred within the organisation. It also enables managers to monitor the progress and profitability of each area and helps management utilise resources properly. It enhances managers’ decision-making powers.
A business unit as a profit centre helps generate quality results and revenue for the organisation. It is crucial for analysing which manufacturing unit generates more or less profit within the organisation and enhances decision-making on operating expenditures.
Create Business Unit:
Navigate to the Organisation Management app > Business Unit tab.
Once in the Business Unit section, you can track the business units already filled in and create a new business unit.
To create a new business unit, click the “New” button.
Enter the business territory name and select the organisation associated with it.
Select the contact for the business unit; enter the fax, phone, and website details.
Select the function of the business unit, whether it is Marketing, HR, Finance, Sales, etc.
Enter the address details of the business unit.
Select the type of business unit, whether it is a cost centre or a profit centre.
Assign the manager associated with the business unit.
Click the “Save” button to create a business unit record for the organisation.
Site implementation for the Customer
Site implementation for the Customer: – If want to create a quote/order from a specific Site then you need to assign the Sites to a customer.
Open the created Customer Account, go the related list, find the Site object (related list) and create a Site by click on New button.
Account, Contact and Addresses
Xero is accounting software and can be connected with “Salesforce Instance” using the “Heroku Aqxolt ERP Integrator.”
All the data on “Salesforce instance” like Products, Customers, Suppliers, Invoices, CreditMemos, SalesPayment, PurchaseOrders, Bills and BillPayments is synced to “Xero account” and the Sync is Bidirectional.
Once you have connected the Salesforce instance to the Heroku user, Login to your Heroku instance and click on the “Xero app.”
You will land on the “Xero dashboard.”
Click on Add(Manage); it will redirect to the Xero account login page. (xero.com)
Login with your admin credentials. (Username and Password)
Allow access for 30 minutes.
This adds a connection to the Xero instance to the Heroku user.
It auto Syncs Products, Contacts, Invoices, CreditNotes, SalesPayment, Purchase, OrderBills and BillPayments from “Salesforce” to “Xero.”
But for the trail, we can sync the data manually by clicking on the Pending Sync button for all the Products.
Invoices are created on Aqxolt ERP.
Click on Invoice Pending Sync in the connector.
Invoice is synced on Xero.
Login to “Xero Account” to see if data has synced.
Data is synced from Salesforce instance to Xero and vice versa. i.e. if products are not on Salesforce instance and present on Xero, they get synced to Salesforce, and if products are on Salesforce instance but not on Xero, they get synced to Xero when the sync process starts.
Product Setup:
On the Product make sure the below fields has data
Product Name Product SKU Product Description
and Available on eCommerce platform checkbox is true.
Create a Marketplace record on the Product related list.
Add a Custom Setting in the system as eCommerce Sync, click on Manage and create a Record.
Print Barcodes
Print Barcodes page allows to Generate Barcodes for different objects with different BarcodeType and PageSize and Print them.
Products, FixedAssets, Sites, Accounts, and Contacts can have Barcodes and the system is capable of reading barcodes through a barcode scanner.
Navigate to App Menu > Print Barcodes
The object defaults to Product and all the available products are listed below with their Barcodes.
Select the object you want to generate barcodes.
Select the “Barcode Field and Label.”
Additional fields can be added to print by moving fields from all fields column to selected fields column.
Page size and Barcode Type can be managed.
The frame can be added to the Print page by turning on the Frame.
After making the required settings, select the Items you want to take, print barcodes and click “Preview PDF button.”
Work Planner
Work Planning is done to have a detailed outlook on how the workforce is utilized to accomplish a task and how work centers are linked to process. Work planning also gives an overview of the Project related tasks. We can add a work planner record and assign it to Process, Process Cycle and Work Center.
Navigate to the App Menu > Work Center
Go to Work planner in the related section of a work center
Create New
Add work planner name, Work Center, Process and Process Cycle.
We can view/create this on the Manufacturing Schedule page as well.
Navigate to App menu > Manufacturing Schedule
You will land on the PLANNER tab showing Capacity Planning which has subtabs
Navigate to Work Planner in the sub tabs and click “New” button to add new Work Planner record.
UPS
Navigate to App menu > Credential Setup
You will land on the Credential setup page where you have Payment, Shipment and E-Commerce tabs.
Click on the Shipment Tab
Click “New” to add UPS setup record.
Fill in the UPS credentials and add the URL to specify the test or live account and make the record active.
Make sure to use the name as UPS
Add the Shipper Details and click Save.
This creates a UPS record as shown above and the password/trans key gets encrypted.
With this setup, you can use the UPS services for shipment.
In the outbound logistics process while doing the Pick Pack Ship of the logistic orders, select the shipment type to be UPS while creating a Package.
Click on “Ship” to land on the UPS services page.
Click on “Get Rates” and select the suitable service.
Scroll down the services and click “Initiate Shipment” button
This will successfully ship the package.
Move to “Process Shipment” where you can see the “Shipment No” and “Shipment Status.”
Click “View UPS label” to generate the label and “View Invoice” to see the shipping invoice.
Click on “Cancel Shipment” to delete the shipment.
Navigate to the “Track Shipment” tab to track the shipment.
QuickBooks
QuickBooks is accounting software and can be connected with Salesforce Instance using the “Heroku Aqxolt ERP Integrator.”
All the data on salesforce instances like Products, Customers, Suppliers, Invoices, Credit Memos, Sales Payments, Purchase Orders, Bills, and BillPayments is synced to “Quick Books Account.”
Once you have connected the “Salesforce Instance” to the “Heroku user,” log in to your “Heroku Instance” and click on the “QuickBooks app.”
You will land on the “QuickBooks Dashboard.”
Click on Add; it will redirect to the Quickbooks account login page.
Log in with your admin creds.
This adds a connection to the QuickBooks instance to the Heroku user.
Manually sink the Products, Customers and so on.
All the products get synced, but only those Products to which orders have created with customers and suppliers and purchase orders will have the financial details synced like Invoices, Bills, Credit Notes and Purchase Orders.
If no orders have been created for the products, financial data will not be synced for those products. To check if sync has started login to the QuickBooks account.You will land on the Dashboard and the left-hand side, you will see Banking, Sales, Expenses, Reports, Taxes, and Accounting.
Click on “Sales” to see – All Sales, Customers, Products, and Services.
“All Sales” lists the Orders synced, “Customers” will list the “Customer Contacts Synced,” and “Products and Services” will list the “Products Synchronised.
Click on “Expenses” to see “Expenses and ”
Use the filters to change what to see on the page.
Site Implantation
Site Implantation(multiple/Single): – If you assign a Site to a customer, then the customer will be able to add the products on Quote for the selected Sites only.
Find the Site tab from the App Launcher, and click on the tab.
Once you are on the Site record page, click on the New button.
On the New Site creation page, enter the SiteName, select PrimaryContact, Address, and Currency, and select the Customer Account for which you want to create the Site. The active checkbox should be checked, Type should be Warehouse, enter Barcode, select the created Organisation Account, and click on Save.
Once you create the Sites for a customer, they can select those Sites while adding Products to the Quote using the Add/Edit button.
Installation Guide
Follow the steps if you are a new user.
The quickest way to assess if BookingKare is the right fit for your organization is by creating a free trial. You’ll immediately be taken to a salesforce registration page, where you need to fill out the form and start a free trial. On the app exchange BookingKare listing click the “Get It Now” button and login to the salesforce free trial instance and from here you can start to evaluate BookingKare in depth.
Installing BookingKare in your Salesforce instance
Choose the instance on which you want to install and click.
Step 2
Confirm the installation details and click the “Confirm and Install” button.
Step 3 Licensing Your users for BookingKare
Navigate to Setup> Apps > Packaging> Installed Packages.
In the list of installed Packages find the BookingKare app and click the “Manage Licenses” option under the actions section.
Click on the “Add User” button in the Licensed User section.
Select the user from the Available Users section; click the “Add” button.
Validate Your Installation
Click on the app launcher and notice that the “Appointment Booking” and “Event and Expert Booking” apps are available under all apps.
Select any of the applications from the App Launcher and notice its available Tabs.
Event Builder
Event Module setup
Start planning and organising a single day or a multi-day event easily, make common customizations like adding zones, tickets, venues and more. Configure registrations to be free or paid with complex pricing rules. Configure discounts and taxes easily with various rules. Configure sponsors, speakers, and agendas and give more insight into the event to manage time with BookingKare’s Event Builder. With the Event Builder, you can reduce administration time and hassles associated with data integrity or booking conflicts.
Once you are in the Event Booking app, you can create your first event by following these steps:
Step 1
Create an event
Click on event builder tab and click on event details and enter the following information like enter the name of the event, select event as event type
Enter the Start Date /time and the End Date /time of an event.
Enter the Registration Start and End Dates, Check-In Start and End Dates and Ticket Sales Start and End Dates.
Select the organiser and Location of the organiser
Enter the Maximum Registrations and Entry Fee if any for the event.
Select the membership program and description of the event
Select the published checkbox, this option lets you add the event in the portal site.
Select the Type and Status of the event and select the Allow guest registrations checkbox, this option lets you add registration from the kiosk.
Enter the Invite Message and Registration Instructions of the event.
Click the Save button to create an Event record.
Once you have created the event you can start adding the zones where the events are held, so let’s start creating the zones.
Step 2
Event zone
Event zones are nothing but events that can occur in multiple locations based on their availability within the region.
Create an event zone
Click the Zones tab of the event builder from the menu bar on the left-hand side.
Click on Add button to create the zones
Enter the Name of the zone and select the Type of zone being created.
Enter the Start and End dates of the event and Registration dates.
Enter the Maximum Registrations and set the maximum registrants at each zone, enter the Descriptions applicable for the zone
Select the Show Day Slots fields if you want to display the days during booking.
Click the Save button to create a zone for an event.
Step 3
Venues
Configure venues, the place where your event is held. When you create a location and assign it to the zone that location information will be displayed on the event detail page.
Create a venue
Click the Venue tab from the menu bar on the left-hand side.
Click the Add button to create a new location.
Enter the Name of the venue and Address details
Select the event zone and check the active checkbox
Enter the description of the location
And click on the save button to save the venue record
Step 4
Create Product Service Details
Click the product details tab from the menu bar on the left-hand side.
Click the Add button to create a product.
Enter the name of the product, Adult price, and child price.
Enter the image URL or you can upload the image from the system.
Enter the description of the product and check the active checkbox
And click on the Save button to create a product record.
Step 5
Tickets
Tickets are nothing but a selling price of an event. And also we can control the number of persons to get register for an event. By using this concept we can distinguish different prices for each type of tickets for adult and child as well.
Create a ticket
Click the Tickets tab from the menu bar on the left-hand side.
Click the Add button to create a new ticket.
Enter the Name of the ticket and select the Product to fetch the list price and taxes for both adult and child automatically from the price-book entry of the selected product.
Enter the Total Quantity, Adult, and Child Quantity, this ensures the number of registrations allowed for an event.
Enter the Adult and Child List Price and Tax Percent manually if the product is not selected.
Select the Zone for which the ticket is created is assigned and select the Active checkbox to make the ticket active for use for the selected zone and event.
Enter the Image URL and select the Show Child checkbox, this ensures the child details are captured in the registration and the ticket price based on the child list price.
Select the Ticket waiting list checkbox; with this option, you will be allowing registrations even when the number of registration has reached the capacity of the event. The registrations created after the capacity is reached are the registrants with the waiting list status.
Enter the Ticket Sale Start dates and End dates, enter the Instructions associated with the ticket and upload image relevant to the event.
Click on the “Save” button to create a ticket for the event.
Step 6
Membership
Click on the ticket tab related list click on Membership tab
Click the Add button to create a new membership record.
Enter the value and select the status.
Select the start and expiration date of the membership
And click the “Save” button to create a membership for the event.
Step 7
Speaker
Speaker is a guest of the event, who speaks formally before an audience regarding some of the major things regarding the event and why it has been organised and expressed his ideas towards the particular event.
Click the Speaker tab from the menu bar on the left-hand side.
Click the Add button to create a new Speaker record.
Select the Speaker Account and Contact, the system will auto-populate phone and email details of the speaker.
The system allows you to upload the image of the speaker or pre-populates if it already exists.
Enter the description of the speaker and check the active checkbox.
And click the “Save” button to create a speaker for the event.
Step 8
Agenda
An agenda for the event can help you significantly in terms of planning and organising the event agenda will clearly specify every action to be held at the event.
Create an Agenda
Click the Agenda tab from the menu bar on the left-hand side.
Click the Add button to create a new Agenda record.
Enter the name of the Agenda and select the event zone and a speaker.
Enter the session Start and End time of the agenda and enter the Description of the agenda.
Click the Save button to create the agenda for an event.
Step 9
Logistics
Logistic is nothing but a resource management in case of events such as travel, accommodation and many more, which can be handled by the organisers of the event.
Create a logistics
Click the Logistics tab from the menu bar on the left-hand side.
Click the Add button to create a new Logistics record.
Enter the name of the Logistic
Select the Category and Type of the logistic
Select the logistic Provider and enter the Item Details.
Click the Save button to create the logistic record for the event.
Step 10
Sponsorship
Sponsorship is a financial invests made by the organisers for the success of Events.
Create Sponsorship
Click the “Sponsorship” tab from the menu bar on the left-hand side.
Click the “Add” button to create a new Sponsorship record.
Enter the Name of the sponsor and select the Sponsor Account
Select the Sponsorship Program and Event Zone
The system allows you to upload the image of sponsors
Select the Active checkbox and enter the Description about the sponsorship.
Click the save button to create the sponsorship for the event.
Shift Planner
Shift Planner
A shift planner is a tool that helps manage resources efficiently across businesses. It helps in planning the staff shifts and booking appointments for a user or resource according to their availabilities. It is the best way for super users and supervisor users to manage and utilize the availability of the staff effectively.
A Superuser can manage the availabilities of all the users under the organization
A Supervisor User can manage only your team members’ availability, time offs and break-times
A user can manage only its own availability, time offs, and break-times easily with Shift Planner.
How to Find Shift Planner:
Click on App Launcher
Or You can click on the ‘Shift Planner’ Tab
Shift Planner screen Appears
Understand the Features of Shift Planner Screen
Available – This tile represents the Available Slot for booking an appointment
Not Available – This tile represents Slot is not available for booking an appointment
Time Off – This tile represents Time off/ breaks
Out of Office – This tile represents temporarily unavailable
Holiday – This tile represents public holidays or temporary leaves
Fully Booked – This tile represents that All available slots have been completely booked..
C – Indicates the total Capacity Hours of a resource for the day
D – Indicates the total Demand Hours for the resource for the da
AC – Indicates Available capacity Hours for the resource after demands and time off
How to Book Appointment from Shift Planner:
Let’s Create an Appointment for ‘Emily’ in Mississauga to work in the OW group on Wednesday.
Select the Available time slot for a resource and resource Group.
The time slot shows start time and End time, capacity, demand, and Available capacity
Click the Time Slot
Click on Book Appointment Button. This will take you to Appointment Booking Screen to confirm the booking.
How to Manage Availability of a Resource.
Let’s Create a new resource group for Neurology in Norwich. Let’s add ‘Ryan Lee’ and his availability who is a ‘Resource’ or ‘user’ working in the Neurology Group.
Manage Availability is a feature That allows you to manage the available slots of the users on the shift planner. From this feature, you can create a Resource Group, Resource, and multi-time slots.
Click on Manage availability Button
The screen shows
Enter the fields to manage the availability of that particular ‘Service, Location, group and dates’.
Click on the ‘Group’ Button.
Enter the Group Information for which you wish to add the new resource
Enter Service, location, Group, Start date, and End date.
6. Select the Resource Name and Team then add the availability times as shown below
Click the ‘Save’ Button. A new Resource group and Resource will be created and it can be viewed on the shift planner screen.
How to Manage Availabilities for Each resource
Instead of going to manage availabilities. You can also click the ‘Manage’ button from the time slots.
Let’s manage Emily’s Availability for Wednesday
Click on the Time slot. The pop shows up
2. Click on the ‘Manage’ button. The next screen takes you directly to Emily’s availabilities Page to edit.
3. Once changes are made click the ‘Save’ Button.
How to create a ‘Time Off’
Emily has an urgent meeting to attend and she would be unavailable for the service. So she decides to create a Time off for that date and time.
Let’s Create a Time off for Emily for the same slot on Wednesday.
Click on the ‘Time off’ Button
The time off screen appears.
Click the ‘Time Off’ Button. And Enter the Details of Time off.
Click ‘Save’. A time off will be created for Emily and it can be viewed on the shift planner screen in blue.
Time off can also be created by directly clicking on the time slot on the shift planner screen.
Click the ‘Time slot’. The pop-up shows
Click on the ‘Time off’ button and follow steps 1-4 from How to create time off.
How to filter Shift Planner
A supervisor opens the shift planner and looks for Emily’s resources to book an appointment for her availability. He quickly finds using the filter icon.
Let’s find Emily’s shift schedule at the Mississauga Location for the Ontario works program.
Click on the filter icon.
Enter the Program, Location, Service, and Team. Emily’s resource Shows up.
How to find time slots for future dates
If you want to book an Appointment with Emily for future dates.
Click on the calendar date icon to show the available time slots in the future dates
The next available time slots show up for future dates.
How to Drop a Shift
Jamie is a doctor who works in a health care department. He has to drop a shift due to an emergency situation. He can do so from the shift planner by selecting the time slot that he wants to drop. This only applies to available timeslots.
Let’s find the available time slot for Jamie and drop the shift.
Click on the Available Time slot
The pop-up shows details. Click on the ‘Can’t work?’ Button and select ‘Drop Shift’
Click ‘Yes’ to confirm
The shift will be dropped and the timeslot will be greyed out which means it is ‘not available’
How to Swap a Shift
Jamie receives a notification for an urgent meeting but he has the shift to cover at the same time. So he decides to swap the shift with his colleagues by sending a swap shift request. Once the request is approved by one of his colleagues. Shift Planner swaps the available timeslots of those resources for the selected date and time.
Let’s swap a timeslot of Jamie with Noah’s timeslot.Click on the Available timeslot that has to be swapped.
Click on ‘Can’t work?’ Button. And click the ‘Swap Shift’ Button.
The next screen shows the available timeslots of other resources to swap with.
Select the resource timeslots that you want to send the request.
For Example, let’s select two different users’ time slots and send them requests.
Jamie sends requests to Roger and Noah.
Click the ‘Send Swap Offers’ Button
Noah decides to swap the shift with Jamie. So he navigates to shift planner and clicks on the Dashboard icon to approve the request.
Click on the Dashboard icon.
The screen shows all the requests received and Requests sent for approval.
Noah clicks the ‘Approve’ tick mark action to approve the request and enters the reason.
Clicks on the ‘Approve’ Button.
Once the request is approved. Jamie can view the Timeslots swapped with Noah’s timeslot making the swapped timeslots as ‘blue’ which means Time off and Available time slot as green which means ‘Available’. Visa versa for Noah’s Timeslots.
How to Reschedule your availability
Emily would like to modify her availability on a particular day and hour as she will be unavailable for a complete length of time which was previously set up on the shift planner.
So she makes changes directly from the shift planner by clicking the timeslot that she wants to change it.
Click on the timeslot on the shift planner screen for Emily’s resources.
A pop-up shows up with ‘Can’t work?’ Button.
Click on the ‘Reschedule’ button
A pop-up shows up to change the Start and End times of the Shift.
Change the times and if required you can add Break start and end times as well.
Click the ‘Save’ Button
The time slot changes the Start and end time of the shift and also changes the Demand and Capacity hours accordingly.
Arrival check in for queue process
Click on the location tab and select any created location
It will navigate to the location page in the top right corner click on the drop-down list and select the arrival check-in button. You will be presented with the screen below.
Enter your last name, phone number or email, or reference and click on the check-in button.
And it will navigate to the token page and generate the token and it will be added to the queue. And you will be presented with the screen below:
Click on the print button to receive your token or click on the finish button.
Room Booking
Manage meetings and appointments effortlessly. Improve employee experience by transforming workspace utilization. Use the reports and dashboards to see all your reservation activity and room availability at a glance.
Help experts find the best and most suitable room to work with their clients on the day of the appointment.
Help employees book meeting rooms on the go. Make collaboration easy, reserve the best place to work, and collaborate. Create a workplace experience that increases productivity, efficiency, and creativity in every employee.
Book conference rooms on the fly, and find and book conference rooms with the capacity and equipment you need. Customize conference rooms by setting minimum and maximum meeting lengths
once you complete the room reservation you will be redirected to the booking details page where you can update your details, change room, change time, etc.
Select the Book button. You will be navigated to the previous screen, from where you can also add logistics to your booking
Logistics
Logistics is nothing but resource management in case of events such as travel, accommodation, and many more, which can be handled by the organizers of the event.
Click the Logistics tab present on the Right-hand side of the room reservation page.
You can add logistics for the booking by entering the registration number of the booking in the search booking option as shown on the screen below:
Create a logistics
Click the Add logistics button to create a new Logistics record. and you will be navigated to the screen below
Enter the name of the Logistic and Quantity.
Select the Category and Type of the logistic
Select the logistic Provider and enter the Item Details.
Click the Save button to create the logistic record for the appointment/event. you will be navigated to the screen below:
click on the save button to save your added logistics in the booking.
Chase payment
Bookingkare supports Chase payment services to make card payments and online payment processing.
So let’s start creating a payment setup by adding your chase payment account on BookingKare.
Navigate to the app launcher tab and click on credentials
Click on the subtab of authorize. net, Paypal and chase tab
Click on the new button and enter the following details
Enter the Name as chase
Enter the user name and password
The URL can be tested or live depending on the sandbox account or live account being used. Now enter the test URL https://api.demo.e-xact.com
And enter the signature
Check the checkbox to save the card number
Check the checkbox to save the card data
And check the active checkbox
And click on the Save button to create a record
Cost Cards
Cost Cards: – A standard cost card contains an itemization of the standard amounts of materials, labor, and overhead required to create one unit of a product. The card also multiplies the standard cost of each of these line items by the quantities required to arrive at the total standard cost of a product.
Making a Payment
In a scenario in which a customer walks in the store/outlet and makes a payment to the order, the Epos page helps the user complete the sales order and payment process without having to navigate to different setups.
Navigate to the Payments tab and click on any of the payment options. Payments can be made using the following four methods:
Credit/Debit Card
Cash
Loyalty
Apply Credits
Credit/Debit Card
To make the payment through Credit/Debit card, click on the “Payment’s tab” and click on the “Credit/Debit Card” button located on the right side of the screen.
Enter the card details in the Card Information section and click the “Pay Now” button to complete the payment process for the order.
Cash
To make the payment through Cash, click on the “Payment’s tab” and click on the “Cash” button located on the right side of the screen.
Select the Invoice (if not Posted Post the invoice), the amount will be auto-populated, enter the reference number, and click on the Save button.
Stock Take
Stock Takes is the physical verification of the quantities and condition of items held in an inventory or warehouse. This may be done to provide an audit of existing stock. It is also the source of stock discrepancy information.
Steps to create a Stock Take entry
Navigate to the Order Management app >Stock Takes Tab.
Once in the Stock takes tab switch to ‘All’ view from Recently viewed, all created stock takes will be
Click the “Create Stock Take” button on the right-hand top corner to create a new stock take record.
Enter the Site whose Audit of the physical inventory has to be performed.
Enter the Start and End dates of the stock counting.
Count the physical inventory and enter the Stock in Hand.
Click the ‘Save’ button and the system will navigate to the stock take record.
To manage the stock adjustments, click the stock take record.
Click the “Manage Stock Take” button to create stock adjustment records.
Click the stock variance and click the ‘Save’ button to create the stock inward adjustment record.
If the variance is in positive number Stock Inward Line Item is created and if the variance is in negative Stock Outward Line Item is created.
Click the “Save” button to create the stock adjustment.
Barcode is an automatic identification technology consisting of a series of parallel, adjacent bars and spaces. It is an optical machine-readable representation of data, which displays certain data on products to which it is attached. This can be referred to as the Identification number of a product. A barcode is a series of numbers and each digit is coded with black and white stripes, representing the product information such as the name, classification about the products, how much the tag price is, when it expired, etc. There are a number of different standards of barcodes available in the
industry and it is used in almost all the industries including Automotive, Distribution, Electronics, Government, Hospitality, Logistic, Manufacturing,Security etc. Barcode Zone is a native, Software as a Service (SaaS) tool that can generate barcode in salesforce. Barcode Zone is a Visualforce component that can be used in any of your Visualforce page(s) / Standard Page(s) to generate linear barcodes such as Code-39, Code-128, EAN-13 and EAN-8 and 2D barcodes such as PDF417 and QR Code. With this product, you can put barcodes on almost anything. We can make our own bar-coded name badges from Contacts, bar-coded product labels, and even barcode our documents (PDFs, Invoices, Purchase Orders and more).
BENEFITS OF BARCODE ZONE
1. Completely Native does not need any external resources or host server. 2. Easy to integrate with Standard and Visualforce Salesforce pages. 3. Generate Invoices for the products with barcode in PDF form. 4. No additional custom objects needed. 5. Supports almost all the browsers, Internet Explorer, Firefox, Google Chrome, Safari etc 6. Available for Developer, Enterprise and Unlimited editions.
System Requirement
Roll out Steps:
Preparation involves all of the planning you need to do before you can begin using Barcode Zone.
Identify key users of the system
Add licenses
Identify all of the users who will be using the Barcode Zone System and make sure you have the appropriate number of licenses.
Review all the technical requirements
Requirements to use Aqxolt Barcode Zone in a system
Operating System
All you need is a computer that can run a web browser. It doesn’t matter what type of hardware or operating system you’re running.
Browser
Google Chrome™, the most recent stable version Mozilla Firefox®, most recent stable version Microsoft Internet Explorer versions 9, 10, and 11 Apple Safari® versions 5. x, 6. x and 7. x on Mac OS X
Internet Connection
Salesforce is designed to use as little bandwidth as possible so that the site performs adequately over high-speed, dial-up, and wireless Internet connections.
Requirements to use Aqxolt Barcode Zone system with payment gateways
Payment Gateways
PayPal, Authorize.net
Installation Guide
Follow the steps if you are a new user.
The quickest way to assess if Barcode Zone is the right fit for your organization is by creating a free trial. You’ll immediately be taken to a salesforce registration page, where you need to fill out the form and start a free trial. On the app exchange Barcode Zone listing click the “Get It Now” button and login to the salesforce free trial instance and from here you can start to evaluate Barcode Zone in depth.
Installing Barcode Zone in your Salesforce instance
Choose the instance on which you want to install and click.
Step 2
Confirm the installation details and click the “Confirm and Install” button.
Step 3 Licensing Your users for Barcode Zone
Navigate to Setup> Apps > Packaging> Installed Packages.
In the list of installed Packages find the Barcode Zone app and click the “Manage Licenses” option under the actions section.
Click on the “Add User” button in the Licensed User section.
Select the user from the Available Users section; click the “Add” button.
Validate Your Installation
Click on the app launcher and notice that the “Print Barcodes” tab is available
Select any of the applications from the App Launcher and notice its available Tabs.
How Barcode Zone App Works ?
Once the package is installed visualforce components and Lightning components are created in your org. Barcode Zone works on visualforce pages. For each object (like Product), you need to add the barcode visualforce page into the object page layout (or the record detail page).
For Lightning Components
METHOD 1:
There are three steps to display the barcode on your standard record detail page:
Add a custom field into the object which you want to display the
Create a visual force page to generate the
Add the visual force page into the page layout.
Step1: Create a custom picklist field
Example: Barcode Type with the values listed below.
code128
code39
ean13
ean8
qrcode
pdf417
Step 2: Create a Visualforce Page.
Note: Please re-type the single and double quotes in the Visualforce page code.
Barcode value for which the barcode will be generated
barType
String
Type of the barcode to be generated
ILLUSTRATIONS
Select any Product from the Product list or create a new
Enter the ‘Barcode Value’ to be generated and select the ‘Barcode Type’.
Example 1:
Barcode Value is “AQXOLT” and Barcode Type is “code39”.
Example 2:
Barcode Value is “AQXOLT” and Barcode Type is “code128”.
Example 3:
Barcode Value is “9780201734843” and Barcode Type is “ean13”.
Example 4:
Barcode Value is “83939399” and Barcode Type is “ean8”.
Example 5:
Barcode Value is “AQXOLT” and Barcode Type is “qrcode”.
Example 6:
Barcode Value is “83939399” and Barcode Type is “pdf417”.
Add/ Scan Products on Opportunity
In Barcode Zone on opportunity, we can manually add the products or you can use barcode scanner to add the products to the opportunity line items.
Get started
Click on the App launcher.
Type “Opportunities” in the Search Box & Select Opportunities.
List of existing Opportunities will be displayed.
user can either create a New Opportunity by clicking on the New Button in the Top right-hand side of the screen
or select any existing Opportunity.
Once the User clicks on the opportunity, they will be taken to the Opportunity Details Page.
In order to Add a New product to the opportunity, the User can click on the Products dropdown button located towards the right hand side of the Details Page.
Click on Add Products option.
The User will be displayed with a screen where he can Add the Products.
By using the Searchbox functionality, the User can type in the Product Name and search for the desired Product.
Using the Filter functionality located in the top right corner of the screen, the User can Filter the Products either by entering the Product Code or through Product Family.
Or the User can select the Product by enabling the Checkbox on the left-hand side of the Product Name.
Once the Product/Products are selected, the Nextbutton on the bottom right side will be Enabled.
Click on the Next Button.
The user will be navigated to the Edit Selected Products page.
Here the Product and the Sales Price will be auto-populated.
The User can edit the Sales Price if required.
Then enter the Quantity in the text field, select the Date and enter the Description in the Line Description field.
Also the User can delete the selected product by clicking on the Inline Delete Action button.
Click on the Save Button the Products will be added from the Opportunities.
For Lightning Components
METHOD 1:
There are three steps to display the barcode on your standard record detail page:
Add a custom field into the object which you want to display the
Create a visual force page to generate the
Add the visual force page into the page layout.
Step1: Create a custom picklist field
Example: Barcode Type with the values listed below.
code128
code39
ean13
ean8
qrcode
pdf417
Step 2: Create a Visualforce Page.
Note: Please re-type the single and double quotes in the Visualforce page code.
You can also display barcode directly from URL. For any product, need to pass ‘barcode’ in ‘Code’ variable and ‘barcode type’ in ‘Type’ variable from URL. Visualforce page will directly fetch value from URL and display barcode.
Example 1:
Barcode Code is “AQXOLT” and Barcode Type is “code39”.
Example 2:
Barcode Code is “AQXOLT” and Barcode Type is “code128”.
Example 3:
Barcode Code is “39393999” and Barcode Type is “ean8”.
Example 4:
Barcode Code is “9780201734843” and Barcode Type is “ean13”.
Example 5:
Barcode Code is “AQXOLT” and Barcode Type is “qrcode”.
Example 6:
Barcode Code is “AQXOLT” and Barcode Type is “pdf417”.
How to change Author Avatar?
The theme uses Gravatar to display users avatars . to create or change your Gravatar :
If you have never setup a Gravatar account:
Register/login to Gravatar. Upon registering, use the SAME email address that is associated with your WordPress User Profile.
Upload your photo and associate it with that specific email address.
If you already registered at gravatar.com, follow these steps:
Click on “My Gravatars”.
click on “Add a New Email”.
Then, you’ll need to click on “Add a New Image”.
Upload an image.
Then select the email address, and then select your image from the bottom. Now it’s associated with that email address. Click Save.
It will take about 5-10 minutes to propagate on the internet, and then will appear on site.
Some common issues
We adding here solutions on regarding some common issues.
You may find here your solution. So we request to check here for your issue before asking us.
Sometimes, your website may break when you update the new version of the theme.
You have to delete the Gullu core plugin before installing the updated theme in this case. Then install the plugin again from Appearance > Install pluginsafter installing the new version.
Your theme (Gullu) contains outdated copies
This message appears when WooCommerce plugin changes any of its core files. Usually, this happens when WooCommerce publishes a major update or any minor update after the major update. (Example. 3.3, 3.3.1)
We recommend clients to always read the changelog of your theme if the latest update of the theme supports that version of WooCommerce as noted in the plugin itself throughout the theme.
If you recently updated WooCommerce, you might have spotted a notice like this on your Plugins page.
If you see that the latest version of the theme doesn’t support the released WooCommerce version then please wait until we release a theme update that will support the latest version of this plugin.
If you accidentally updated the plugin then don’t worry, we probably are working on the update and when the theme update is ready you will be notified by email if you have already enabled.
Sample doc title
What is an Extension?
For editing menu navigation settings go to Theme Options > Header > Top of Header
. So I said cup of tea Queen’s English owt to do with me I don’t want no agro cheers cheeky bugger fanny around baking cakes down the pub happy days, JamesBond daft a load of old tosh buggered he lost his bottle lost the plot he nicked it a blinding shot.
[docly_tooltip id=”1″]Tooltip text[/docly_tooltip] mufty quaint no biggie cras baking cakes barney bamboozled, what a plonker bum bag he legged it young delinquent knees up Eaton the full monty arse over tit, my lady buggered happy days amongst bugger all mate are you taking the piss brolly. [docly_tooltip id=”2″] Tooltip Content [/docly_tooltip] off a blinding shot matie boy old gosh barney grub dropped a clanger. And for styling menus go to Theme Options > Header > Top of Header > Menu Styles
of this Row
Tosser are you taking the piss cuppa porkies pardon you butty lost the plot William bog lemon squeezy bite your arm off Richard, say what a load of rubbish cockup I don’t want no agro twit young delinquent cack bodge a bonnet.
Unordered list items
Go to Docly SettingsHeaderLogo
Consectetur adipiscing elit
Integer molestie lorem at massa
Facilisis in pretium nisl aliquet
Ordered List Items
Go to Docly SettingsHeaderLogo
Consectetur adipiscing elit
Integer molestie lorem at massa
Facilisis in pretium nisl aliquet
Doc title example
What is an Extension?
For editing menu navigation settings go to Theme Options > Header > Top of Header
. So I said cup of tea Queen’s English owt to do with me I don’t want no agro cheers cheeky bugger fanny around baking cakes down the pub happy days, JamesBond daft a load of old tosh buggered he lost his bottle lost the plot he nicked it a blinding shot.
[docly_tooltip id=”1″]Tooltip text[/docly_tooltip] mufty quaint no biggie cras baking cakes barney bamboozled, what a plonker bum bag he legged it young delinquent knees up Eaton the full monty arse over tit, my lady buggered happy days amongst bugger all mate are you taking the piss brolly. [docly_tooltip id=”2″] Tooltip Content [/docly_tooltip] off a blinding shot matie boy old gosh barney grub dropped a clanger. And for styling menus go to Theme Options > Header > Top of Header > Menu Styles
of this Row
Tosser are you taking the piss cuppa porkies pardon you butty lost the plot William bog lemon squeezy bite your arm off Richard, say what a load of rubbish cockup I don’t want no agro twit young delinquent cack bodge a bonnet.
Unordered list items
Go to Docly SettingsHeaderLogo
Consectetur adipiscing elit
Integer molestie lorem at massa
Facilisis in pretium nisl aliquet
Ordered List Items
Go to Docly SettingsHeaderLogo
Consectetur adipiscing elit
Integer molestie lorem at massa
Facilisis in pretium nisl aliquet
Simple doc title
What is an Extension?
For editing menu navigation settings go to Theme Options > Header > Top of Header
. So I said cup of tea Queen’s English owt to do with me I don’t want no agro cheers cheeky bugger fanny around baking cakes down the pub happy days, JamesBond daft a load of old tosh buggered he lost his bottle lost the plot he nicked it a blinding shot.
[docly_tooltip id=”1″]Tooltip text[/docly_tooltip] mufty quaint no biggie cras baking cakes barney bamboozled, what a plonker bum bag he legged it young delinquent knees up Eaton the full monty arse over tit, my lady buggered happy days amongst bugger all mate are you taking the piss brolly. [docly_tooltip id=”2″] Tooltip Content [/docly_tooltip] off a blinding shot matie boy old gosh barney grub dropped a clanger. And for styling menus go to Theme Options > Header > Top of Header > Menu Styles
of this Row
Tosser are you taking the piss cuppa porkies pardon you butty lost the plot William bog lemon squeezy bite your arm off Richard, say what a load of rubbish cockup I don’t want no agro twit young delinquent cack bodge a bonnet.
Unordered list items
Go to Docly SettingsHeaderLogo
Consectetur adipiscing elit
Integer molestie lorem at massa
Facilisis in pretium nisl aliquet
Ordered List Items
Go to Docly SettingsHeaderLogo
Consectetur adipiscing elit
Integer molestie lorem at massa
Facilisis in pretium nisl aliquet
How to change Author Avatar?
The theme uses Gravatar to display users avatars . to create or change your Gravatar :
If you have never setup a Gravatar account:
Register/login to Gravatar. Upon registering, use the SAME email address that is associated with your WordPress User Profile.
Upload your photo and associate it with that specific email address.
If you already registered at gravatar.com, follow these steps:
Click on “My Gravatars”.
click on “Add a New Email”.
Then, you’ll need to click on “Add a New Image”.
Upload an image.
Then select the email address, and then select your image from the bottom. Now it’s associated with that email address. Click Save.
It will take about 5-10 minutes to propagate on the internet, and then will appear on site.
Some common issues
We adding here solutions on regarding some common issues.
You may find here your solution. So we request to check here for your issue before asking us.
For editing menu navigation settings go to Theme Options > Header > Top of Header
. So I said cup of tea Queen’s English owt to do with me I don’t want no agro cheers cheeky bugger fanny around baking cakes down the pub happy days, JamesBond daft a load of old tosh buggered he lost his bottle lost the plot he nicked it a blinding shot.
[docly_tooltip id=”1″]Tooltip text[/docly_tooltip] mufty quaint no biggie cras baking cakes barney bamboozled, what a plonker bum bag he legged it young delinquent knees up Eaton the full monty arse over tit, my lady buggered happy days amongst bugger all mate are you taking the piss brolly. [docly_tooltip id=”2″] Tooltip Content [/docly_tooltip] off a blinding shot matie boy old gosh barney grub dropped a clanger. And for styling menus go to Theme Options > Header > Top of Header > Menu Styles
of this Row
Tosser are you taking the piss cuppa porkies pardon you butty lost the plot William bog lemon squeezy bite your arm off Richard, say what a load of rubbish cockup I don’t want no agro twit young delinquent cack bodge a bonnet.
Unordered list items
Go to Docly SettingsHeaderLogo
Consectetur adipiscing elit
Integer molestie lorem at massa
Facilisis in pretium nisl aliquet
Ordered List Items
Go to Docly SettingsHeaderLogo
Consectetur adipiscing elit
Integer molestie lorem at massa
Facilisis in pretium nisl aliquet
Sample doc title
What is an Extension?
For editing menu navigation settings go to Theme Options > Header > Top of Header
. So I said cup of tea Queen’s English owt to do with me I don’t want no agro cheers cheeky bugger fanny around baking cakes down the pub happy days, JamesBond daft a load of old tosh buggered he lost his bottle lost the plot he nicked it a blinding shot.
[docly_tooltip id=”1″]Tooltip text[/docly_tooltip] mufty quaint no biggie cras baking cakes barney bamboozled, what a plonker bum bag he legged it young delinquent knees up Eaton the full monty arse over tit, my lady buggered happy days amongst bugger all mate are you taking the piss brolly. [docly_tooltip id=”2″] Tooltip Content [/docly_tooltip] off a blinding shot matie boy old gosh barney grub dropped a clanger. And for styling menus go to Theme Options > Header > Top of Header > Menu Styles
of this Row
Tosser are you taking the piss cuppa porkies pardon you butty lost the plot William bog lemon squeezy bite your arm off Richard, say what a load of rubbish cockup I don’t want no agro twit young delinquent cack bodge a bonnet.
Unordered list items
Go to Docly SettingsHeaderLogo
Consectetur adipiscing elit
Integer molestie lorem at massa
Facilisis in pretium nisl aliquet
Ordered List Items
Go to Docly SettingsHeaderLogo
Consectetur adipiscing elit
Integer molestie lorem at massa
Facilisis in pretium nisl aliquet
How to customize the theme.
OVERRIDING PARENT THEME FILES
You can not only target individual style declarations via the style sheet but also override entire components of the parent theme.
For every theme file present in the parent directory, WordPress will check whether a corresponding file is present in the child theme and if so, use that one instead. This means that a header.php file in the child theme will override its equivalent in the parent folder.
So, if you don’t like something about a page’s layout, just copy the respective file, implement your changes, and upload it to the child theme’s folder. The modifications will then appear in the child theme, while the original file will remain untouched.
WORKING WITH TEMPLATE FILES
We’ve learned that we can overwrite any file in the parent theme by placing a copy in the child theme’s folder and customizing it. However, using files that exist only in the child theme is also possible. Template files are a good example of this.
Let’s say we want to build a full-width page template for our child theme. Our theme does not lend itself to the full-screen presentation, but let’s do it anyway for demonstration purposes, shall we?
To create a full-width page in Chaoz you have to create a custom page template. Let’s start with the page template.
For our custom page template, we simply copy page.php from the parent theme, rename it to page-full-width.php and place it in the Child theme’s root folder.
Doc title example
What is an Extension?
For editing menu navigation settings go to Theme Options > Header > Top of Header
. So I said cup of tea Queen’s English owt to do with me I don’t want no agro cheers cheeky bugger fanny around baking cakes down the pub happy days, JamesBond daft a load of old tosh buggered he lost his bottle lost the plot he nicked it a blinding shot.
[docly_tooltip id=”1″]Tooltip text[/docly_tooltip] mufty quaint no biggie cras baking cakes barney bamboozled, what a plonker bum bag he legged it young delinquent knees up Eaton the full monty arse over tit, my lady buggered happy days amongst bugger all mate are you taking the piss brolly. [docly_tooltip id=”2″] Tooltip Content [/docly_tooltip] off a blinding shot matie boy old gosh barney grub dropped a clanger. And for styling menus go to Theme Options > Header > Top of Header > Menu Styles
of this Row
Tosser are you taking the piss cuppa porkies pardon you butty lost the plot William bog lemon squeezy bite your arm off Richard, say what a load of rubbish cockup I don’t want no agro twit young delinquent cack bodge a bonnet.
Unordered list items
Go to Docly SettingsHeaderLogo
Consectetur adipiscing elit
Integer molestie lorem at massa
Facilisis in pretium nisl aliquet
Ordered List Items
Go to Docly SettingsHeaderLogo
Consectetur adipiscing elit
Integer molestie lorem at massa
Facilisis in pretium nisl aliquet
How to update premium plugins?
We have integrated some premium plugins with the theme and bundled those plugins with the theme. You don’t have to input your Themeforest product ID to unlock any theme features. We are not providing the third party plugin’s license along with the theme.
We are providing the plugins file only and we are continuously updating the bundled plugins with the theme updates. You can install/get those plugins on Appearance > Instal Plugins. Or you can get the plugin files in the rogan/inc/tgm/plugins folder.
How to apply custom CSS code.
You can apply your own custom CSS code on Gullu theme. Your custom CSS code will not be lost even if you update the theme.
Navigate to Appearance > Customize > Additional CSS
Take a look at the screenshots-
Simple doc title
What is an Extension?
For editing menu navigation settings go to Theme Options > Header > Top of Header
. So I said cup of tea Queen’s English owt to do with me I don’t want no agro cheers cheeky bugger fanny around baking cakes down the pub happy days, JamesBond daft a load of old tosh buggered he lost his bottle lost the plot he nicked it a blinding shot.
[docly_tooltip id=”1″]Tooltip text[/docly_tooltip] mufty quaint no biggie cras baking cakes barney bamboozled, what a plonker bum bag he legged it young delinquent knees up Eaton the full monty arse over tit, my lady buggered happy days amongst bugger all mate are you taking the piss brolly. [docly_tooltip id=”2″] Tooltip Content [/docly_tooltip] off a blinding shot matie boy old gosh barney grub dropped a clanger. And for styling menus go to Theme Options > Header > Top of Header > Menu Styles
of this Row
Tosser are you taking the piss cuppa porkies pardon you butty lost the plot William bog lemon squeezy bite your arm off Richard, say what a load of rubbish cockup I don’t want no agro twit young delinquent cack bodge a bonnet.
Aqxolt ERP supports Authorize.net to make card payments and online payments.
Add your Authorize.net account on Aqxolt ERP.
Navigate to the Credential Setup tab from App Launcher.
The page has three tabs Payment, Shipment, and E-Commerce.
On the Payments, tab click on New
Fill in the Authorize.net account login details. Keep the Name as Authorize.net and add the username/login and Password
The URL can be tested or live depending on the Authorize.net sandbox account or live account being used.
Test URL – https://test.authorize.net/gateway/transact.dll
Live URL –
DHL
Navigate to App menu > Credential Setup
You will land on the Credential setup page where you have Payment, Shipment and E-Commerce tabs.
Click on the Shipment Tab
Click New to add DHL setup record.
Fill in the DHL credentials and add in the URL to specify the test or live account and make the record active.
Make sure to use the name as DHL
Add the Shipper Details and click “Save.”
This creates a DHL record as shown above and the password/trans key gets encrypted.
With this setup, you can use the DHL services for shipment.
In the outbound logistics process while doing the Pick Pack Ship of the logistic orders, select the shipment type to be DHL while creating a Package.
Click on “Ship” to land on the DHL services page.
Click on “Get Rates” and select the suitable service.
Scroll down the services and click “Initiate Shipment” button
This will successfully ship the package.
Move to “Process Shipment” where you can see the “Shipment No” and “Shipment Status.”
Click “View Label” to generate the label and “View Invoice” to see the shipping invoice.
Click on “Cancel Shipment” to delete the shipment.
(Image)
Navigate to the “Track Shipment” tab to track the shipment.
FedEx
Navigate to App menu > Credential Setup
You will land on the Credential setup page where you have Payment, Shipment and E-Commerce tabs.
Click on the Shipment Tab
Click “New” to add FedEx setup record.
Fill in the FedEx credentials and add in the URL to specify the test or live account and make the record active.
Make sure to use the name as FedEx.
Add the Shipper Details and click Save.
This creates a “FedEx Record” as shown above and the password/trans key gets encrypted.
With this setup, you can use the FedEx services for shipment.
In the “Outbound Logistics Process” while doing the “Pick Pack Ship of the logistic orders”, select the shipment type to be “FedEx” while creating a Package.
Click on “Ship” to land on the FedEx services page.
Click on “Get Rates” and select the suitable service.
Scroll down the services and click “Initiate Shipment” button
This will successfully ship the package and the tab moves to “Process Shipment” where you will see the “Shipment Status” and the “Shipment No.”
Clicking on the “View Label” will generate the FedEx label and clicking on the “Cancel Shipment” will delete the shipment.
Navigate to the Track Shipment tab to track the shipment.
PayPal
Aqxolt ERP supports PayPal to make online and electronic payments.
Add your PayPal account on Aqxolt ERP.
Navigate to the Credential Setup tab from App Launcher.
The page has three tabs Payment, Shipment and E-Commerce.
On the Payments, tab click on New
Fill in the PayPal account login details. Keep the Name as PayPal and add the username/login and Password.
Check the Active checkbox.
The URL can be tested or live depending on the sandbox account or live account being used.
Test URL – https://api-3t.sandbox.paypal.com/2.0/
Live URL
UPS
Navigate to App menu > Credential Setup
You will land on the Credential setup page where you have Payment, Shipment and E-Commerce tabs.
Click on the Shipment Tab
Click “New” to add UPS setup record.
Fill in the UPS credentials and add the URL to specify the test or live account and make the record active.
Make sure to use the name as UPS
Add the Shipper Details and click Save.
This creates a UPS record as shown above and the password/trans key gets encrypted.
With this setup, you can use the UPS services for shipment.
In the outbound logistics process while doing the Pick Pack Ship of the logistic orders, select the shipment type to be UPS while creating a Package.
Click on “Ship” to land on the UPS services page.
Click on “Get Rates” and select the suitable service.
Scroll down the services and click “Initiate Shipment” button
This will successfully ship the package.
Move to “Process Shipment” where you can see the “Shipment No” and “Shipment Status.”
Click “View UPS label” to generate the label and “View Invoice” to see the shipping invoice.
Click on “Cancel Shipment” to delete the shipment.
Navigate to the “Track Shipment” tab to track the shipment.
USPS
Navigate to App menu > Credential Setup
You will land on the Credential setup page where you have Payment, Shipment and E-Commerce tabs.
Click on the “Shipment Tab”
Click “New” to add USPS setup record.
Fill in the USPS credentials and add in the URL to specify the test or live account and make the record active.
Make sure to use the name as USPS
Add the Shipper Details and click Save.
This creates a USPS record as shown above and the password/trans key gets encrypted.
With this setup, you can use the USPS services for shipment.
In the outbound logistics process while doing the Pick Pack Ship of the logistic orders, select the shipment type to be USPS while creating a Package.
Click on “Ship” to land on the USPS services page.
Click on “Get Rates” and select the suitable service.
Scroll down the services and click “Initiate Shipment” button
This will successfully ship the package.
Move to “Process Shipment” where you can see the “Shipment No” and “Shipment Status.”
Click “View Label” to generate the label and “View Invoice” to see the shipping invoice.
Click on “Cancel Shipment” to delete the shipment.
Navigate to the “Track Shipment” tab to track the shipment.
Adding Custom Settings
After installing “Aqxolt ERP” to a Salesforce Instance; the following custom settings need to be uploaded before you start using the shipment processes.
Country Codes
Province Codes
Product Unit Codes
Package Details
For UPS, the following two objects have to be added along with the above three.
UPS Package Type
UPS Service Codes
These records are stored in “CSV files” which can be uploaded using “Data Import Wizard” or “Data Loader.”
Contracts using DocuSign
Aqxolt CPQ is integrated with DocuSign so that you can send the Quotes to the customer to sign the contract.
Send the Quotes to Customer to sign the Contracts using DocuSign
Aqxolt CPQ is integrated with DocuSign so that you can send the Quotes to the customer to sign the contract.
Open the created quote, and click on the DocuSign button, available in the Quote header.
Once you click on the DocuSign button, the system will ask you to log in. Log in to DocuSign and the system will take you to the Contract creation page.
Note: –
You need to set up the DocuSign Credentials in the system using the Credentials Setup page. Refer to the Credentials Setup steps mentioned above.
You can change the templates from the StandardQuoteDocumentation option, or you can upload a Custom template using the CustomDocument option.
After selecting the Standard Quote Document or uploading the Custom Template, click on the CreateDraftContract button available below the Template.
After clicking on the Create Draft Contact button, the system will you to the DocuSign page, where you can drag ad drop the required fields into the template. You can drop the fields anywhere in the template.
Once you drag and drop the field in the template, send the template to Customer by clicking on the Send button available in the upper right and bottom right corner.
Once you click on the Send button, an email will be sent to the Customer and the Contact record will gets created. The user can see the created Contract number on the Quote record page.
The Customer need to open the email and need to click on the Review Document.
Once the Customer click on the ReviewDocument button from the email, the system will take the customer next screen where the customer needs to sign the consent form and click on continue button.
After clicking on the Continue button, the system will allow to review the document and allow to Finish the Contract Sign process by clicking on Finish button.
Note: – Enter the details on the input fields or attach any file if there are any input fields or any option to attach file.
After click on the finish button system will ask to Sign-up to DocuSign. The customer can skip this option by clicking on the NoThanks option.
Once the Customer click on the No Thanks option, the contact signing process will be completed.
Once the Customer successfully sign the Contact, the Quote will be Accepted automatically. Open the Quote records and check the Quote Status.
Once the Quoted Accepted, you are allowed to convert the Quote into an Order.
Credentials Setup
To setup the Payment (Authorized.Net, PayPal, Stripe etc.) and DocuSign Credentials in Aqxolt CPQ, navigate to the Credentials Setup page and setup the Credentials.
Find the Credential Setup tab from the App Launcher.
Open the tab and Navigate to the Payments section to setup the Credentials for different types of Payments.
Click on the New button, once Credentials setup page appear, enter all the required information, and click on Save.
Navigate to the DocuSign section by clicking on DocuSign section.
Click on the New button, once Credentials setup page appear, enter all the required information, and click on Save.
Finance Data Setup
Custom Setting
Navigate to setup and find “Custom Settings” in the quick find box.
Find “Module” custom setting and click the “Manage” button.
Click the ‘New’ button and create a record by name “Finance”, make sure the Run checkbox is selected, this controls the Activation/Deactivation of Finance Module.
Fiscal Year Setup
Navigate to setup and find “Fiscal Year” in the quick find box.
Select “standard Fiscal Year”
Select the fiscal year start month and select whether the fiscal year is based on the starting month or the ending month.
Click the “Save” button and confirm the changes.
Finance General Ledger
Finance general ledger is used to track all the financial transactions and it is the primary accounting record for a business. The finance general ledgers hold the accounting information that is needed to prepare the company’s financial statements, including the Balance sheet and the Income statement and includes accounts for assets, liabilities, owner’s equity, expense, and revenue.
Navigate to the Finance Management app >Finance General Ledger Tab.
Enter the Name of the general ledger.
Select the Organisation and click the “Save” button to create a general ledger record.
Chart of Accounts
Chart of Account is a unique record of each type of asset, liability, equity, income/revenue, and expense. A very important reason to have COA in the system is to let the users quickly get a glance at a company’s financial health and segregate assets, revenue, liabilities, and expenses. It provides the complete listing of each account in the accounting system and ERP Mark7 has the flexibility to tailor the company’s COA that best suits its business process. It is available for recording transactions in the finance general ledgers.
Navigate to the Finance Management app >Chart of Accounts Tab.
Click the “New” and select the Record Type of the chart of account, click the “Next” button.
Enter the Name of the chart of account and select the active checkbox.
Select General Ledger and Organisation from the lookup.
Click the “Save” button to create the Chart of Account record.
The following basic chart of accounts should be created in the system.
Chart of Account Name
Record Type
Inventory
Assets
Checking
Assets
Cash
Assets
Accounts Receivable
Assets
Retained Earnings
Equity
Owner’s Equity
Equity
Cost of Goods Sold
Expense
Rent
Expense
Sales
Income/Revenue
Sales Return
Income/Revenue
Sales Discount
Income/Revenue
Sales Tax
Liabilities
Accounts Payable
Liabilities
Sales Tax Payable
Liabilities
Goods Received Not Invoiced
Liabilities
To start a New Business Process, Create a “Stockholders Equity” or “Owners’ Equity” COA with an opening balance as per the requirement.
Note: When creating a new Account (Organisation) or existing Account (Organisation) make sure the field Account Type is set to “Organisation”. If the field is not found on the page, add it to the layout. And on the Account (Organisation) detail page Default checkbox should be checked.
Chart of Account Mapping
Chart of accounts mapping allows the processing of balance and supports the ability to correlate a source chart of account to a target chart of accounts. The posting functionality in ERP Mark7 enables the finance general ledgers to create a relevant finance general ledger entry with the relevant chart of account information and transaction in it. To create the chart of account mapping follow the following steps
Navigate to the Finance Management app >COA Mapping Tab.
Click the “New” and enter the name of the COA Mapping name.
Select the Chart of Account from the lookup.
Select Tax or Discount checkboxes if the COA Mapping created is for tax and discount purpose.
Click the “Save” button to create the COA Mapping record.
Accounting Period
Create the accounting period for the fiscal year, i.e., create the accounting period for all the months of the fiscal period for which the financial statements are prepared. It basically imitates the basic twelve-month calendar.
Navigate to the Finance Management app >Accounting Period Tab.
Click the Accounting period button in All Accounting Period list view.
Select the Organisation for which the accounting period records are created.
Enter the Start Date and End Date of the fiscal period.
Click the “Create” button to create the accounting period records.
Shipment
Shipping is the key link in the customer’s supply chain, manufacturing, and retail success. Aqxolt ERP provides a complete solution for streamlining the shipping process with an accurate delivery date and time. Aqxolt ERP provides real-time communication between UPS and FedEx.
The shipping management process begins with the following activities.
Creation of Sales Order
Creation of Stock Dispatching (Pick, Pack, Ship)
When creating a sales order from the Order console, the shipment cost can be estimated from the delivery section on the Order console.
Aqxolt ERP supports UPS, FedEx and Internal Shipment.
Click on the Delivery section.
Click on UPS or FedEx.
Based on the ship to address and package size, the system will provide the estimated shipping cost.
Once a sales order is created and ready for shipment, it is available for stock dispatching.
Click on the Stock Dispatching tab.
Select the sales order to be shipped.
Pick all the line items of the order or partial line items.
Click on Pack to create a package.
In the package detail section, select the Package Type and Shipment Type.
During selection of the Package Type Weight, Weight Unit, Length, Width, and Height will be auto-populated.
Select the shipment type, which could be UPS, FedEx or Shipment.
UPS
Upon selection of the shipment type UPS, the following process continues:
Enter the Deposit Tag.
Click the “Save” button to create a Package.
Click on the ship icon, which will bring you to the UPS shipping page.
The left side of the shipment page includes shipping details such as where the shipment is going, where it is coming from and the package details.
The right side has 3 sections:
Shipping Services/Cost:
This section populates the Shipping Date and includes other dropdowns to provide details about Weekend delivery, Additional handling, Verbal confirmation, Delivery confirmation and Description.
Click on the Get Rates button to get the different UPS services to choose from.
Select a UPS service.
Process Shipment:
This section populates the Shipment name, Shipment status and other details such as International forms and Product Unit Code.
Click on View UPS Label to generate the UPS label which can be printed and attached to the package.
Click on View Invoice to view the sales order invoice, which is also printable.
Clicking on Cancel Shipment will cancel the shipment.
Track Shipment:
Once a shipment is shipped, clicking on the Track Shipment section will generate a tracking number and provide real-time tracking of the package.
FedEx
Upon selection of the shipment type FedEx, the following process continues:
Enter the Deposit Tag.
Click Save to create a Package.
Click on the ship icon, which will take you to the FedEx shipping page.
The left side of the shipment page displays the shipping details, such as where the shipment is going, where the shipment is coming from, package details and invoice details.
The tabs on the right side provide the following information:
Shipping Services/Cost:
This section populates the Shipping Date and includes other details, such as Description, Request, and Response.
Click on the Get Rates button to get the different FedEx services to choose from.
Select a FedEx service.
Process Shipment:
This section populates the Shipment name, Shipment Status and an Initiate Shipment button.
Click on Initiate Shipment to initiate a shipment.
Track Shipment:
Once a shipment is shipped, clicking on the Track Shipment section will generate a tracking number and provide real-time tracking of the package.
Internal Shipment
Upon selection of the shipment type Shipment, the following process continues:
Brings to the Delivery screen where delivery details can be added
Add Delivery Date and Save, Stage changes to Shipped and Delivery Name becomes Opportunity name.
This creates a Shipment record which can be seen on the sales order and Logistic order related list.
Delivery Flows:
Navigate to the Pickup/DropOff tab to create delivery flows.
Click on New and fill in the name, status and other details if available and Save.
Picked Up and Delivered are the flows created as shown above.
Checklist:
Navigate to the Checklist tab to verify the no of items delivered against the ordered Quantity.
Select the checkbox and click verify if all the Qty is delivered.
Verifying the items will make the line items noneditable.
By default the Delivered is set to ordered qty and status is to Delivered. The delivered Qty can be changed based on the physical delivery Qty and the status will be changed to Item(s) Missing if ordered qty and physical delivery qty does not match.
Delivery Person upon reaching the delivery point navigates to the Delivery tab and captures customer signature, Name, Delivery Date and Time.
Attachments such as photos or other documents can also be added.
Stock Take
STOCK TAKE – Manage Variances in the Inventory
Stock Takes is the physical verification of the quantities and conditions of items held in an inventory or warehouse. This may be done to provide an audit of existing stock. It is also the source of stock discrepancy information.
Steps: –
Select the ‘Warehouse Management’ App from the App Launcher. Find the Stock Take tab in the Navigation Bar.
Or
Find the Stock Take tab from the App Launcher.
Figure 01 – Stock Take Tab
After clicking on the Stock Take tab, the system will take the user to the Stock Take home page where the user can see all the created Stock Takes records.
Figure 02 – stock take records
The user can use the search bar to search any Stock Take record.
OR
The user can use the scanner to find the Stock Take records.
The User can also filter out the Stock Take records that belong to the different Channels and the Site/Warehouse.
Figure 03 – search/filter stock take records
The user can update the created Stock Takes by clicking on the ‘Manage’ button or by clicking on the name of ‘Stock Take’.
Figure 04 – Manage/Update stock Take record
Note: –User can change the details of the Stock Takes record and can Add, Edit, and Remove the Stock Take Line items using the Manage functionality.
To create a new stock take record, the user needs to click on the ‘+ New’ button or scan the barcode of the NEW
Figure 04.1 – + New button
Figure 04.2 – Barcode of New button
After clicking on the +New button or scanning the barcode of the NEW button, the system will take the user to the new Stock Take creation page.
Figure 05 – Enter the variances
Stock Take details like Name, Channel, Site, Employee, Approver, StartDate and EndDate, Status, and Audit Period (Monthly) will be auto-selected.
If the Users want to change any records, they can manually select/change the records.
Also, the users can use scanner to scan the barcode of different channels and Sites.
Once the user selects the records from the detail section, the user needs to enter the ‘Stock In hand’ quantity, to adjust the stock for the required Stock Take Line items and click on the ‘Save’ button to create a new Stock Take record.
Note: –
To create the Stock Inward Line items or to increase the stock for any product, the user needs to enter more quantity than Available Stock in the Quantity in Hand See in the above screenshot, the user needs to do the same process we have done for Smart Watch and Camera Diffusion Filter – 3mm Acrylic product.
To create the Stock Outward Line items or to decrease the stock for a product, the user needs to enter less quantity than Available Stock in the Quantity in Hand
See in the above screenshot, the user needs to do the same process we have done Extension Board.
The user can Scan the Product Code directly or Scan the Batch/Lot Number or Serial Numbers to find the Products in the Line-Item section instead of the search bar.
If you want to do an Audit for the Stocks, select the AuditPeriod as ‘Quarterly’ or ’Yearly’, enter the actual quantities in the ‘Stock in Hand’, leave other products as it is and click on Save.
The system will keep/adjust the stocks for only those products whose quantity was entered in the Quantity in Hand field while creating the stock take, and the system will create the outward line-item records for the remaining products and Stock will decrease automatically.
Once the user clicks on the Save button the system will create the Stock Take record.
Figure 06 – Created Stock Take record.
Output Summary: Once the ‘Stock Take’ record gets created, based on the variance (entered Stock in Hand quantity) the Stock Inward and the Stock Outward records will be created.
Shift Planner
Shift planner is a tool that helps manage resources efficiently across businesses. It helps in planning the staff shifts according to their availabilities. It is the best way for super users and supervisor users to manage and utilize the availability of the staff effectively.
A Superuser can manage the availabilities of all the users under the organization
A Supervisor User can manage only your team members availability, time offs and break-times
A user can manage only its own availability, time offs, and break-times easily with Shift Planner.
How to Find Shift Planner:
1) Click on App Launcher.
* On the App Launcher type ‘Shift Planner’. Once the Tab appears click on Tab
2)Navigate from the Manufacturing Workbench.
* Navigate to Manufacturing Workbench, click on the Shift Planner icon from the upper right corner.
3. The Shift Planner Appears
Understand the Features on Shift Planner Screen
Available – This tile represents an Available Slot for booking an appointment
Not Available – This tile represents Slot is not available for booking an appointment
Time Off – This tile represents Time off/ breaks
Holiday – This tile represents public holidays or temporary leaves
Reserved – This tile represents that All available slots have been completely booked.
C – Indicates the total Capacity Hours of a resource for the day
D – Indicates the total Demand Hours for the resource for the day
AC – Indicates Available capacity Hours for the resource after demands and time off
How to Manage Availability of a Resource.
Let’s Create a new resource group for Hand Sanitizer in Hand Sanitizer Work Center. Let’s add ‘Emily Dickinson’ and his availabilities who is a ‘Resource’ or ‘user’ working in Hand Sanitizer Resource Group.
Manage Availability is a feature That allows you to manage the available slots of the users on the shift planner. From this feature you can create a Resource Group, Resource and multi time slots.
1. Click on Manage availability Button
2. The screen shows
Enter the fields to manage availability of that particular ‘Product, Work Center, group and dates’.
3. Click on the ‘Group +’ Button.
4. Enter the Group Information for which you wish to add the new resource
5. Enter Product, Work Center, Group, Start Date, and End Date.
6. Select the Resource Name and then add the availability times as shown below.
7. Click the ‘Save’ Button. A new Resource group and Resource will be created and it can be viewed on the shift planner screen.
How to Manage Availabilities for Each resource
Instead of going to manage availabilities. You can also click the ‘Manage’ button from the time slots.
Let’s manage Emily’s Availability for Wednesday
1. On hover the Time slot. The below popup will appear.
2. Click on the ‘Manage’ button. The next screen takes you directly to Availabilities Page where you can edit the Start and End time for any day.
3. Once changes are made click the ‘Save’ Button.
How to create a ‘Time Off’
Emily has an urgent meeting to attend and she would be unavailable for Work. So she decides to create a Time off for that date and time.
Let’s Create a Time off for Emily for the same slot for Wednesday.
1. Click on the ‘Time off’ Button
The time off screen appears.
3. Click the ‘Time Off’ Button. And Enter the Details of Time off.
4. Click ‘Save’. A time off will be created for Emily and it can be viewed on the shift planner screen in section blue.
Time off can also be created by directly clicking on the time slot on the shift planner screen.
Click the ‘Time slot’. The pop-up shows
Click on the ‘Time off’ button and follow steps 1-4 from How to create time off.
How to filter Shift Planner
A supervisor opens shift planner and he looks for Emily’s resources to book her availabilities. He quickly finds using the filter icon.
Let’s find Emily’s shift schedule at the Boiler Work Center for the Boiler Installation Product.
Click on the filter icon.
Enter the Product Name, Work Center. Emily’s resource Shows up.
How to find time slots for future dates
If you want to see the future availability of Emily.
1. Click on the calendar date icon/arrow button to show the available time slots in the future dates.
2. The next available time slots show up for future dates.
Project
The project module in Aqxolt ERP is the most intelligent solution designed to manage projects effectively and drive operational excellence. It enables you to intelligently automate project programmes while keeping a tab on the budget and related costs. It smartly consolidates expenses, labour costs and material costs and records project budgets.
The solution enables project scheduling and helps the project meet stakeholder expectations. It helps keep track of project progress and forecasts the projected revenue against each milestone.
This comprehensive solution ensures resource visibility and lets the user record resources required during project execution. The success of the project relies on the effective communication of the team, which should be built based on a similar skill set.
Create a Project:
Navigate to the Manufacturing app > Projects tab.
Once in the Project section, you can track the projects already filled in and create a new project.
To create a new project, click the “New” button.
Enter the project name, organisation, and business unit details.
Provide the project details under the description and assign the start and end dates of the project.
Select the project manager associated with the project and assign the budget account to record account-based project budgets.
Enter the labour and material cost; select the programme associated with the project
To track the progress of the project, select the status of the project.
Click the “Save” button to create a project record.
Field to note:
Field
Description
Project Name
Describes the name of the project.
Project Manager
Describes the consultant responsible for managing the workforce and delivering on time, on budget project implementation
Budget Account
Describes the defined budget account associated with the project
Description
Describes the brief requirement of the project so the team working on it is on the same page
Programme
Describes the programme associated with the project
Start Date
Describes the planned start date of the project
End Date
Describes the estimated end date of the project
Labour Cost
Indicates estimated funds received for workforce against a project
Material Cost
Indicates estimated funds received for material consumption against a project
Expense
Describes the expenses recorded against a project
Status
Describes the progress of the project
USPS
Navigate to App menu > Credential Setup
You will land on the Credential setup page where you have Payment, Shipment and E-Commerce tabs.
Click on the “Shipment Tab”
Click “New” to add USPS setup record.
Fill in the USPS credentials and add in the URL to specify the test or live account and make the record active.
Make sure to use the name as USPS
Add the Shipper Details and click Save.
This creates a USPS record as shown above and the password/trans key gets encrypted.
With this setup, you can use the USPS services for shipment.
In the outbound logistics process while doing the Pick Pack Ship of the logistic orders, select the shipment type to be USPS while creating a Package.
Click on “Ship” to land on the USPS services page.
Click on “Get Rates” and select the suitable service.
Scroll down the services and click “Initiate Shipment” button
This will successfully ship the package.
Move to “Process Shipment” where you can see the “Shipment No” and “Shipment Status.”
Click “View Label” to generate the label and “View Invoice” to see the shipping invoice.
Click on “Cancel Shipment” to delete the shipment.
Navigate to the “Track Shipment” tab to track the shipment.
In Salesforce; to sync or create a new product, make sure the following actions are taken.
Select “Available” on “e-Commerce platform” check box.
Create the e-commerce record from the products related list to make the product available on various platforms like Shopify, Amazon, WooCommerce, Magento, and eBay.
For a product to be available on Amazon, Amazon (ASIN Code) is essential.
Make sure “Price Book” is active.
Login to the Heroku user and click “Product ”
This creates a product on the Shopify Store.
Create or sync Customer and Order
When on Shopify store, click on “create order”– “select product” and “select ”
If you want to add a new customer, then create a new customer by filling in the customer details such as First Name, Last name, Address and Contact Number.
After adding the customer, click on “Mark Paid” to close the order.
Click on “Sync Order” on the Shopify This will sync order and customer account on to Salesforce instance.
Community Setup
Communities Overview Communities are a great way to share information and collaborate with people who are key to your business processes, such as customers, partners, or employees. Whether you call it a portal, a help forum, a support site, HR central, or something else, an online community is a great place to connect with the important folks in your life in a new and different way. Use easy point-and-click branding tools with ever-evolving Lightning templates or go with Visualforce to create branded collaboration spaces. Step 1
Enable Communities
Enabling Communities is the first step to creating communities.
Note: After you enable Communities, you can’t disable it. If your org’s access to Communities is suspended for non-payment, all your communities are deactivated, including the communities in Preview. When Communities is re-enabled, all communities are inactive. You can activate these communities, but you can’t return to the Preview state.
1. From Setup, enter Communities Settings in the Quick Find box, then select Communities Settings.
Note: If you don’t see this menu, Communities might not be available for your Salesforce org. Contact your Salesforce account executive.
2. Select Enable communities. 3. Select a domain name for your communities, and click Check Availability to make sure that it’s not already in use.
You use something recognizable to your users, such as your company name. The Communities domain name is the same for all communities. You create a unique URL for each community when creating it by entering a unique name at the end of the URL. For example, if your Communities domain name is UniversalTelco.force.com and you’re creating a customer community, you can enter customers to create the unique URL UniversalTelco.force.com/customers. Important: You can’t change the domain name after you save it. You can designate a custom domain by entering it in on the Domain Management page. From Setup, enter Domains in the Quick Find box, then select Domains. 4. Click Save.
Step 2 Create Communities
To create a community, from Setup, enter All in the Quick Find box, select All Communities, and then click New
Step 3 Community Template.
The Community Creation wizard opens with several templates for you to choose from. If you have Lightning Bolt solutions available in your org, they are listed in the wizard.
To see more information about a template, select it. Customer Service
A powerful, responsive self-service template with multiple prebuilt theme options. The Customer Service template lets users post questions to the community, search for and view articles, collaborate and contact support agents by creating cases. Supports Knowledge, Chatter Questions, and cases.
Step 4 Experience Builder.
Select the template that you want to use.
Read the template description and key features, and click Get Started.
Enter a community name.
Note: If you’re creating multiple communities, differentiate the beginning of the community name. Community names are truncated in the global header drop-down menu. Users can see up to 32 characters of the name, and names include the status. Make sure that the visible part of the name allows users to distinguish between multiple communities.
For URL, enter the name of your community.
This name is appended to the Communities domain that you created when you enabled communities for this org. For example, if your Communities domain name is UniversalTelco.force.com and you’re creating a customer community, you can enter customer to create the unique URL UniversalTelco.force.com/customers.
Note: You can create one community that doesn’t have a custom URL.
You can change your community name and URL after the community is activated, but users aren’t redirected to the new URL. So be sure to inform your community members before changing the name or URL.
Click Create.
The community is created in Preview status. Now you’re ready to build and customize or manage and moderate your community.
When you create a community, Salesforce supplies default pages for login, self-registration, change password, forgot password, and your home page. These pages are based on which template you use to create your community. You can customize these default pages at any time in the Login & Registration page of the Administration workspace.
IMPORTANT After you create a community, your profile is added to the list of profiles that have access to the community. Then all users with this profile can log in to the community after it’s active. If you don’t want all users with your profile to have access to the community, remove the profile, and give yourself access through a different profile or permission set. Then create a profile specifically for your community users.Step 5 Access Experience Workspaces
The streamlined Experience Workspaces centralizes community moderation, building, and administration. Access Experience Builder, administration, dashboards, and other features from one place.
From Setup, enter Communities Settings in the Quick Find box, then click Communities Settings.
Enable Experience Workspaces under Community Management Settings. Click Save.
From Setup, enter All Communities in the Quick Find box, then click All Communities. To access a community’s workspace area, click Workspaces next to its name.
Manage Your Community with Experience Workspaces Experience Workspaces is your one-stop-shop for building, setting up, and monitoring your community. You can access Experience Builder and Administration workspaces to manage your community’s setup and branding. Community managers can view dashboards for groups, members, feed activity, and license usage, and manage the community’s reputation system. Moderators can see which items have been flagged for review.
Note: You can customize your community at any time, but if you plan on making major changes, we recommend deactivating the community first.
To enable Experience Workspaces, in Setup, enter Communities Settings in the Quick Find box. Under Community Management Settings, select Enable Experience Workspaces. Experience Workspaces is enabled by default for all communities.
To go back to Community Manager, in Setup, enter Communities Settings in the Quick Find box. Under Community Management Settings, deselect Enable Experience Workspaces.
Builder
Experience Builder lets you brand and design your community pages. Create and customize pages, modify or add Lightning components, customize the community’s navigation menu, and manage page-level settings as shown in the screenshot below.
IMPORTANT If you’re an administrator and accidentally remove yourself from a community, you can’t access the Administration settings in Experience Workspaces. To add yourself back to the community or make other membership updates, use the API.
A community for Event Booking
For setting up a community for Event booking, follow the same 5 steps of community setup.
After reaching the builder section. You can create an Event booking component by clicking on the component option.
When clicking on the component button you find the list of components that can be added to the builder page.
Search for the Event booking component and drag it onto the builder page.
Note: If you already have the template components on the builder page, you can delete them from the delete icon of each section before adding your own component. When the component is on the page, it will appear as below.
Similarly, you can add as many components as required on the page and manage the page structure from the page structure button on the left.
There is also a Setting Button-through which you can change the setting of the community page and find information regarding that. Shown below
In the setting, you have Public access check box, tick this box when you want the public to access this community.
You can give a title for the community in the Community Title box.
Published Status – This is a link from where customers can access the Event Booking Community.
Guest User Profile – This is the profile link of guest users from where you can authorize or unauthorize the user.
If Users have no access to the components, this can be managed by clicking on Event Booking Profile from the settings.
Note- Access can be given from profiles and sharing settings. In profiles make sure all the objects, fields, and tabs have access to the User. In sharing settings, check for any restrictions on the Guest user access.
When completed, click on the Preview button to view the page before saving to make more changes if required.
Click Publish button on the top right to save and publish your community.
You can also select the View mode button to set it for phone, Tablet, and Desktop.
You have now created your Event Booking Community.
Follow Step 6 for more information on managing your community.
A community for QR Check-In
For setting up a community for QR Check-In, follow the same 5 steps of community setup.
After reaching the builder section. You can create a QR Check-In component by clicking on the component option.
When clicking on the component button you find the list of components that can be added to the builder page.
Search for the QRcodeCheckInRegister component and drag it onto the builder page.
Note: If you already have the template components on the builder page, you can delete them from the delete icon of each section before adding your own component. When the component is on the page, it will appear as below.
Similarly, you can add as many components as required on the page and manage the page structure from the page structure button on the left.
There is also a Setting Button-through where you can change the setting of the community page and find information regarding that.
In the setting, you have Public access check box, tick this box when you want the public to access this community.
You can give a title for the community in the Community Title box.
Published Status – This is a link from where customers can access QR Check-In
Guest User Profile – This is the profile link of guest users from where you can authorize or unauthorize the user.
If Users have no access to the components, this can be managed by clicking on QR Check-In Profile from the settings.
Note- Access can be given from profiles and sharing settings. In profiles make sure all the objects, fields, and tabs have access to the User. In sharing settings, check for any restrictions on the Guest user access.
When completed, click on the Preview button to view the page before saving to make more changes if required.
Click Publish button on the top right to save and publish your community.
You can also select the View mode button to set it for phone, Tablet, and Desktop.
You have now created your QR Check-In
Follow Step 6 for more information on managing your community.
A community for Appointment Booking
For setting up a community for Appointment Booking, follow the same 5 steps of community setup.
After reaching the builder section. You can create an Appointment Booking component by clicking on the component option.
When clicking on the component button you find the list of components that can be added to the builder page.
Search for the Appointment Booking component and drag it onto the builder page.
When the component is on the page, it will appear as below.
Note: If you already have the template components on the builder page, you can delete them from the delete icon of each section before adding your own component.
Similarly, you can add as many components as required on the page and manage the page structure from the page structure button on the left.
There is also a Setting Button-through where you can change the setting of the community page and find information regarding that.
In the setting, you have Public access check box, tick this box when you want the public to access this community.
You can give a title for the community in the Community Title box.
Published Status – This is the link from where customers can access Appointment Booking
Guest User Profile – This is the profile link of guest users from where you can authorize or unauthorize the user.
If Users have no access to the components, this can be managed by clicking on Appointment Booking Profile from the settings.
Note- Access can be given from profiles and sharing settings. In profiles make sure all the objects, fields, and tabs have access to the User. In sharing settings, check for any restrictions on the Guest user access.
When completed, click on the Preview button to view the page before saving to make more changes if required.
Click Publish button on the top right to save and publish your community.
You can also select the View mode button to set it for phone, Tablet, and Desktop.
You have now created your Appointment Booking
Follow Step 6 for more information on managing your community.
Step 6
Set the Default Number of Community Roles Set the default number of roles created when adding partner or customer accounts to communities. These settings apply if your community is set up with Partner Community, Customer Community Plus, or Lightning External Apps Plus user licenses. The limit is three roles; the system default is one. For example, if three partner roles are currently created when an account is enabled for your community–Executive, Manager, and User–but you need only the User role for new accounts, you can reduce the number to one role.
1. Use Super User Access to grant specific users access to data owned by other users in their accounts.
From Setup, enter Communities Settings in the Quick Find box, then select Communities Settings.
Select the number of roles per account.
If you’re using Partner Community licenses, set the Number of partner roles.
If you’re using Customer Community Plus licenses, set the Number of customer roles.
Click Save.
Note: This setting does not affect the number of roles for existing accounts.
Step 7
Customize Communities Update basic community settings like your community URL, community name, members, login options, and general preferences in the Administration section of Experience Workspaces or Community Management. You can customize your community at any time, but if you plan to make major changes, we recommend deactivating the community first.
Open Experience Workspaces or Community Management.
Click Administration, then select what you want to customize.IMPORTANT: The options available in Community Management or Experience Workspaces are based on your community template selection, permissions, and preferences. For example, if your community doesn’t use topics, you don’t see the Topics section. Some options in the following list might not appear in your community by default. To display all sections, go to Administration | Preferences and enable Show all settings in Community Management or Show all settings in Experience Workspaces.
Members
Tabs
Branding
Login & Registration
Emails
Pages
Preferences
Settings
To share the community with stakeholders while it’s still in Preview, copy the URL displayed on the Administration | Settings page.
By sharing your community in Preview, you can get useful feedback to incorporate before going live. Also, by having early members post, comment, and share records, your community appears active when members log in to the community for the first time.
Keep in mind that you must add users as members of the community before you can share the community URL.
After you finish customizing your community, activate the community to make it available to members. If you enable welcome emails when you activate them, a welcome email is sent to all members. If users are new portal users, their welcome email includes their username and password.
1. Share a Link to Your Community. You can allow members to preview your community before making it active. You can only share the link for a preview community with users who were added as members of the community. Sharing a link to a community in Preview status allows you to easily gather stakeholder feedback. The community functions just as it will when you make it active, so stakeholders can try out all functionality and review your branding and customizations. Additionally, you can take advantage of having early members who can post, comment, and share records so that members enter an active community from their first login.
Open Experience Workspaces or Community Management.
Click Administration | Settings.
Copy the URL displayed on the page and share it with your stakeholders.
Keep in mind that you can only share the URL with users who you added as members of the community.
2. Update Your Community Settings. Manage your community name, description, community status, and community template all from one location. You can change your community name and URL after the community is activated, but users aren’t redirected to the new URL. So be sure to inform your community members before changing the name or URL.
Open Experience Workspaces or Community Management.
Click Administration | Settings.
Edit your community settings as needed.
Select the pencil icon next to the community you want to change, and make your changes. You can change your URL from this page. However, if you’ve already activated your community, users aren’t redirected to the new URL.
Manage the status of your community.
Change your community template.
3. Deactivate a community.
You may want to deactivate a community if you need to:
Add or remove members
Add, remove, or change the order of tabs
Change the colour scheme
Change the community URL
Open Experience Workspaces or Community Management.
Click Administration | Settings.
Click Deactivate.
Your community is inactive and offline.
When a community is inactive, members still see it in the menu, but can’t access it unless they have the “Create and Set Up Communities” permission.
4. Enable optional community Features. Enable other optional features in your community such as user nicknames, guest access, private messages, direct messages, content flagging, and reputation levels.
To use these settings, Chatter must be enabled in your organization.
Open Experience Workspaces or Community Management.
Click Administration | Preferences.
Change the desired settings.
Click Save.
Step 8Community App
Users can also access the community site from the app launcher where the community app will be created with the name of that community that you create. As shown on the screen below:
On clicking on the community app that you created you will be redirected to a similar site as shown in the screenshot below:
Adding and Inviting Guests
After you have planned and set up for an event, now the organizers can send email invitations to their Accounts, Contacts, Users and guests Users.
Send invites to accounts, Contact, and users
From Event, builder Select an Existing event And all event details will get auto-populated on the right-hand side click on the invite button And you navigate to the screen below
Select the source to send invitations to Accounts, Contacts, Users, and Resource individually or invite external guests in bulk by uploading a file with invitee details.
You can send invitations to the selected source records by clicking the Invite option in the Action section or by selecting multiple records and clicking on the Send Invites button.
To send invites to external users click on the source and select resource in that click on add guest button.
Enter the Name, Email, and phone of the invitee or external guest and click the invite button
Clicking on the “Invite” option in the Action section creates a new account or a contact in the system and also sends an invitation email and SMS text if configured.
Bookingkare provides you with an option to do the bulk invitation by simply uploading a file.
Download the “Event Invitation Template” and fill in the invitee’s details into the excel sheet and save the file in “.CSV” format.
Click the “Upload File” option and select the CSV file.
The uploaded guest list appears in the section below, now you can select all the guests and click the “Send Invites” button.
All the registrations created against the event will be listed in the Invited Guests section.
You will be able to control the number of registrations to display from the Select Entries option. You can also use the search bar to find the specific registrants by their Name or Email.
You can track the invitation with their status and forecast the number of attendees.
The Print Guest List button lets you print the registrations that are in booked status.
Appointment Booking
With Appointment Booking, you can carry your entire business in your pocket. Manage to schedule, Cancel, and Reschedule your appointments, etc. via this New Appointment Booking flow. Add appointments to your calendar even when you’re out for lunch.
Receive instant notifications via email when an appointment is booked, rescheduled, or canceled. Customers also receive automated appointment alerts so that they stay on top of their bookings without having to dial in.
Appointment Booking
Navigate to the App Launcher and click the Appointments tab, here we can view the Resources and their services and Book an appointment. The page appears as shown below.
The system provides the search bar to find the services, Resources, and Time slots.
Select any services according to the location you wish to book an appointment.
You can filter out services and locations using the filter icon on the search bar.
Then select the Resource you wish to book an appointment with and select one or more sessions from the available time slots.
Book Button will book the appointment with the first available time slot.
Also, If you wish to select a different time slot, click on the Select a different time slot button.
The page will navigate to the available time slot page view, below the screenshot.
If you wish to reserve a room for the Appointment, then click on the Book Room button.
On selecting the available resource and the time slots and for the reserve room option, Select the available rooms from the below screen.
The above page consists of information about the room, location, available capacity, and date. Search by date to check the availability of the room for reservation.
Select the room from the options then, fill in the details and click on the Book Appointment button.
When the appointment is booked you will receive a confirmation email with the appointment details.
If you wish to book an online meeting with the resource, then select the online meeting button on the time slots.
When selecting the option for an Online meeting, you will see the page below.
Register for the meeting by filling up the details. Search by name, email, or mobile number to fill in the details or type manually.
After filling in all the details, select the meeting option through which you want to have your online meeting scheduled. Then click on the ‘Update’ button.
If you wish to update the details, Reschedule or Cancel the Appointments from the Appointment Booking page then click on the dropdown button from the Registration Section.
On selecting the Dropdown Button all options will appear on the screen.
The Update Details page will look like the below screenshot.
The Reschedule page will look like the below screenshot.
The Cancel appointment page will look like the below screenshot
Email Notification
Different ways to navigate to the New Appointment booking page
# Client record Page
Navigate to the Client records from the Client tab, once the record page opens, you will be able to see the new Appointment Booking button.
# Member Record page
Navigate to the Member page from the Client record or from the Member tab, once the record page opens, you will be able to see the new Appointment Booking button on the Member page.
# Client Registration Page
Navigate to the Client Registration page by using the Client Registration tab, once you create any new record or select the existing records from the search bar, you will be able to see the Book Appointment button, which allows you to navigate to the new Appointment Booking page.
#ShiftPlanner page
The system also allows navigating to the new Appointment Booking page from the Shift Planner.
Navigate to Shift Planner, click on the available time slots from the Shift planner home page, the new Appointment Booking button will appears on the Popup page.
Client Registration
The Client Registration page allows creating new clients and their family members by signing the Consent. Also, allows to navigate to the Consultant Booking page and allows you to see all the booked appointments.
Navigate to the App Launcher and find and click on the Client Registration page. You will be able to navigate to the below page.
The system allows updating the existing records or creating new clients by entering the required information and signing the consent form.
After entering all the required information and clicking on the ‘Save’ or ‘Save & New’, below consent modals will pop up, and the system will allow signing the tier 1 and tier 2 consents. After signing these two consents Clients and Its Member record will get created.
Tier 1 Consent
Tier 2 Consent
While booking an appointment after expiring the consents, the system will ask to re-sign the consents while booking the appointments.
Also, the system gives an option to sign or update the sociodemographic information consent.
The system also allows updating the Consent from the Client Registration page if the consent gets expired.
Once the Client and the Member record get created by selecting or creating the family, the ‘Client’ button will appear on the Client registration home page and the system allows adding the caregivers/family members. Once you click on the Client button, the below pages will pop up and will allow you to create child or adult family members.
Child
Adult
Also, the system gives an option to navigate to the Consultant booking page by clicking on the Book Appointments button. If clients book any appointments, those appointments will be also listed on the client record page as shown below.
The users are allowed to Update, Reschedule and Cancel the appointments by clicking on the Manage Booking page.
SHIFT PLANNER to Manage The resources
As a superuser, you can manage all the users under your organization, as a supervisor you can manage only your team member’s availability, time off, and break times, and as a normal user you can manage only your availability, and time off and break-times easily with the BookingKare shift planner application.
You can manage the time by following these steps:
Navigate to the time shift planner you will be presented with the screen below.
You can view all the resources and their available timings, capacity, demands, and Available Capacity.
When you create a new resource, capacity will be created automatically, and after creating an appointment for your capacity, demand will be created against that capacity.
You can also change/manage the availability of the resources using the manage button by clicking on the time slots.
Also, can manage the resource start break time and end break time by clicking on the available time.
You can also click on the next and previous buttons to see other resources.
You can also manage Time Offs for all the users from the Shift Planner by clicking on the Time Off icon in the upper right corner. Once you click on the icon below screen will appear.
Shift planner will allow you to Create, Update or Delete any Time offs from this page.
To manage your Resources, click on the manage icon on the top right corner of the screen you will be navigated to the screen below.
You can add/edit/delete the start time and end time, start break time, and end break time of the resource.
You can add new resources in the Shift Planner by clicking on the add ‘Resource’ button on the screen.
You can also create a new group by clicking on the Add group button on the top right corner of the screen.
Click on the Save button to save your changes.
Workbench
Workbench Workbench is for the service provider where Resource can manage their customer appointments.
Click on app launcher and select workbench. You will be presented with the screenshot below:
You can also filter the Location, Program, services, team and resources.
You can also manage the registration by clicking on serve now button all the details get populated on the information.
And you can also reschedule, no show and cancel your appointments by clicking on the action button
Click on the finish button to complete your service.
Payments
Integrate seamlessly with Payment Gateways, webinar, and live streaming platforms
Bookingkare supports PayPal services to make electronic and online payment processing.
So let’s start creating payment set up by adding your PayPal account on BookingKare.
Navigate to the app launcher tab and click on credentials.
Click on the subtab of authorize.net, Paypal, and chase tab
Click on the new button and enter the following details
Enter the Name as Paypal
Enter the user name and password
The URL can be tested or live depending on the sandbox account or live account being used. Now enter the test URL https://api-3t.sandbox.paypal.com/2.0/
And enter the signature
Check the checkbox to save the card number
Check the checkbox to save the card data
And check the active checkbox
And click on the Save button to create a record
Chase payment
Bookingkare supports Chase payment services to make card payments and online payment processing.
So let’s start creating a payment setup by adding your chase payment account on BookingKare.
Navigate to the app launcher tab and click on credentials
Click on the subtab of authorize. net, Paypal and chase tab
Click on the new button and enter the following details
Enter the Name as chase
Enter the user name and password
The URL can be tested or live depending on the sandbox account or live account being used. Now enter the test URL https://api.demo.e-xact.com
And enter the signature
Check the checkbox to save the card number
Check the checkbox to save the card data
And check the active checkbox
And click on the Save button to create a record
Features
Features: – The feature object is related to products, and it “sits” within bundles. They are categories of products within a configuration, or better said: categories of options within a bundle. A bundle can have multiple Features (or none whatsoever because Features are not mandatory) and a Feature can have multiple Options.
Loyalty
Regular customers earn loyalty points as a reward for their regular purchases with the organisation. They can use these points for payments. Loyalty points can be assigned to currency values. For example, 1 loyalty point = 1 pound or as per the organisation’s decision.
To make the payment through Loyalty, click on the “Payment’s tab” and click on the “Loyalty” payment option located on the right side of the screen.
The system will automatically reduce the amount to be paid by the equivalent loyalty points.
The customer can pay the rest of the amount with any of the other payment options.
Inventory/Stock Transfer
As a customer, I need the ability to transfer the products from one warehouse to another warehouse or from one location to another within the same warehouse in a simpler way. Also need the ability to store it in the cart and transfer based on the requirement of products.
Navigate to the App Launcher and select the Stock Transfer Tab.
In the Stock Transfer section, select the Source Site and the Cart associated with the source site.
Click the “New” button item to pick the items and transfer.
Select the Location from where the item is picked.
Select the product that needs to be transferred.
Select the Serial No/ Batch Code of the product after selecting the product if the product is batch/serialized.
Enter the Quantity to be picked.
Click the Putaway tab and select the Destination Site.
Select the Location of the site to put away the items.
Select the items in the action section and click the “Putaway” button to complete the stock transfer process.
Contact Page
You can create and configure the Contact page by following the below steps-
Creating the Contact page
Navigate from your WordPress dashboard to Pages > Add New. Then Select the page template as “Contact Page” and click on the Publish button to create the Contact page.
Configuring the Contact page
Go to Theme Settings > Contact Page Settings from your WordPress dashboard to configure the Contact page settings. Here you will get everything you need to change the Contact page template.
Control blank space between rows
You can control the space between rows from the visual composer’s shortcode section settings.
Select the shortcode section from the Visual composer page edit screen (backend or frontend editor) that you want to control. Check the Styling tab from the visual composer’s element settings. Take a look at the below screenshot of it-
Note: Input the padding (spaces around the section) as clockwise (Top Right Bottom Left)
Doc Section
Quos vestibulum dictum irure recusandae, aliquet, ullam quod fugit, dictumst, optio, parturient auctor pulvinar, inceptos sem. Habitasse! Mattis, litora ipsum, fringilla elementum.
For editing menu navigation settings go to Theme Options > Header > Top of Header
. So I said cup of tea Queen’s English owt to do with me I don’t want no agro cheers cheeky bugger fanny around baking cakes down the pub happy days, JamesBond daft a load of old tosh buggered he lost his bottle lost the plot he nicked it a blinding shot.
[docly_tooltip id=”1″]Tooltip text[/docly_tooltip] mufty quaint no biggie cras baking cakes barney bamboozled, what a plonker bum bag he legged it young delinquent knees up Eaton the full monty arse over tit, my lady buggered happy days amongst bugger all mate are you taking the piss brolly. [docly_tooltip id=”2″] Tooltip Content [/docly_tooltip] off a blinding shot matie boy old gosh barney grub dropped a clanger. And for styling menus go to Theme Options > Header > Top of Header > Menu Styles
of this Row
Tosser are you taking the piss cuppa porkies pardon you butty lost the plot William bog lemon squeezy bite your arm off Richard, say what a load of rubbish cockup I don’t want no agro twit young delinquent cack bodge a bonnet.
Unordered list items
Go to Docly SettingsHeaderLogo
Consectetur adipiscing elit
Integer molestie lorem at massa
Facilisis in pretium nisl aliquet
Ordered List Items
Go to Docly SettingsHeaderLogo
Consectetur adipiscing elit
Integer molestie lorem at massa
Facilisis in pretium nisl aliquet
Example doc title
What is an Extension?
For editing menu navigation settings go to Theme Options > Header > Top of Header
. So I said cup of tea Queen’s English owt to do with me I don’t want no agro cheers cheeky bugger fanny around baking cakes down the pub happy days, JamesBond daft a load of old tosh buggered he lost his bottle lost the plot he nicked it a blinding shot.
[docly_tooltip id=”1″]Tooltip text[/docly_tooltip] mufty quaint no biggie cras baking cakes barney bamboozled, what a plonker bum bag he legged it young delinquent knees up Eaton the full monty arse over tit, my lady buggered happy days amongst bugger all mate are you taking the piss brolly. [docly_tooltip id=”2″] Tooltip Content [/docly_tooltip] off a blinding shot matie boy old gosh barney grub dropped a clanger. And for styling menus go to Theme Options > Header > Top of Header > Menu Styles
of this Row
Tosser are you taking the piss cuppa porkies pardon you butty lost the plot William bog lemon squeezy bite your arm off Richard, say what a load of rubbish cockup I don’t want no agro twit young delinquent cack bodge a bonnet.
Unordered list items
Go to Docly SettingsHeaderLogo
Consectetur adipiscing elit
Integer molestie lorem at massa
Facilisis in pretium nisl aliquet
Ordered List Items
Go to Docly SettingsHeaderLogo
Consectetur adipiscing elit
Integer molestie lorem at massa
Facilisis in pretium nisl aliquet
Title doc
What is an Extension?
For editing menu navigation settings go to Theme Options > Header > Top of Header
. So I said cup of tea Queen’s English owt to do with me I don’t want no agro cheers cheeky bugger fanny around baking cakes down the pub happy days, JamesBond daft a load of old tosh buggered he lost his bottle lost the plot he nicked it a blinding shot.
[docly_tooltip id=”1″]Tooltip text[/docly_tooltip] mufty quaint no biggie cras baking cakes barney bamboozled, what a plonker bum bag he legged it young delinquent knees up Eaton the full monty arse over tit, my lady buggered happy days amongst bugger all mate are you taking the piss brolly. [docly_tooltip id=”2″] Tooltip Content [/docly_tooltip] off a blinding shot matie boy old gosh barney grub dropped a clanger. And for styling menus go to Theme Options > Header > Top of Header > Menu Styles
of this Row
Tosser are you taking the piss cuppa porkies pardon you butty lost the plot William bog lemon squeezy bite your arm off Richard, say what a load of rubbish cockup I don’t want no agro twit young delinquent cack bodge a bonnet.
Unordered list items
Go to Docly SettingsHeaderLogo
Consectetur adipiscing elit
Integer molestie lorem at massa
Facilisis in pretium nisl aliquet
Ordered List Items
Go to Docly SettingsHeaderLogo
Consectetur adipiscing elit
Integer molestie lorem at massa
Facilisis in pretium nisl aliquet
Example doc of docly
What is an Extension?
For editing menu navigation settings go to Theme Options > Header > Top of Header
. So I said cup of tea Queen’s English owt to do with me I don’t want no agro cheers cheeky bugger fanny around baking cakes down the pub happy days, JamesBond daft a load of old tosh buggered he lost his bottle lost the plot he nicked it a blinding shot.
[docly_tooltip id=”1″]Tooltip text[/docly_tooltip] mufty quaint no biggie cras baking cakes barney bamboozled, what a plonker bum bag he legged it young delinquent knees up Eaton the full monty arse over tit, my lady buggered happy days amongst bugger all mate are you taking the piss brolly. [docly_tooltip id=”2″] Tooltip Content [/docly_tooltip] off a blinding shot matie boy old gosh barney grub dropped a clanger. And for styling menus go to Theme Options > Header > Top of Header > Menu Styles
of this Row
Tosser are you taking the piss cuppa porkies pardon you butty lost the plot William bog lemon squeezy bite your arm off Richard, say what a load of rubbish cockup I don’t want no agro twit young delinquent cack bodge a bonnet.
To sync Products from Salesforce to eBay selling store, product setup has to be done in a proper way making sure the following things are covered
Available on an e-commerce platform and is checked on the product detail page.
Add Product SKU and ASIN code
Add category and subcategory of the product
In the product related list, create e-commerce object record and select eBay checkbox
Create a Warranty and Return Policy Record
Create a Shipping and Handling zone record from the Shipping Zone Object. Add the Distribution Channel, Shipping Type, Flat Rate, Dispatch time, Country and State.
Go to Heroku user and click eBay. Once you are on the eBay dashboard, click on the “Add” button
It will redirect to the eBay login page.
Enter your eBay seller store credentials.
Agree on the Grant Application access permissions
Click on the “Product Sync” button on Heroku app this will create the product in the eBay seller account.
When orders are placed on the eBay store, they get synced to “Salesforce Instance” as “Sales Orders” and “Sales Order Line Items.” This has to be done manually by clicking Pending Sync for Orders on the Heroku user eBay dashboard.
As part of sandbox testing,
Copy the “Product URL” from the “Seller Account” and paste it into the “Buyer Account” and then buy the product and continue making payment by clicking “Pay Now.”
Then go to the Heroku user and sync the order, this will create a customer account and a sales order in the Salesforce instance.
Heroku App
Heroku App is a connector that connects Salesforce instances with other e-commerce and accounting sites to sync data to and from.
The following sites can be integrated with the Aqxolt ERP:
Shopify
eBay
Amazon
Magento
WooCommerce
Big Commerce
QuickBooks
Xero
ETSY
One Heroku user can be connected to one Salesforce instance at a time.
Multiple sites can be connected to one Heroku
From Salesforce instance, products and coupons get synced to e-commerce sites (Shopify, eBay, Amazon, Magento, WooCommerce, BigCommerce) and accounts; contacts, vendor contacts, Invoices, Bills to Accounting sites (QuickBooks, Xero, ETSY)
From e-commerce sites Orders and customer Accounts, Contacts gets synced to Salesforce instance.
Salesforce org —> Shopify store –>eBay store–>Amazon store–>Magento store–>WooCommerce store
To make the connection on a Salesforce instance for Heroku App-
Select the following from Available OAuth Scopes –
Full access
Access and manage your data (API)
Access your basic information (id, profile, email, address, phone)
Perform requests on your behalf at any time (refresh_token, offline_access)
Click Save.
Allow from 2-10 minutes for your changes to take effect on the server before using the connected app.
Click on Continue.
You will get the Consumer Key and Consumer Secret from here.
Create a user in Heroku App
Log in as an admin.
Navigate to the menu bar and click the ‘Manage Users’
Enter the Email, Password and confirm the password.
Enter the “customer key” in the “Aqxoltclient field.”
Enter the “consumer secret” in the “Client Secret”
Click the “Save” button to complete the user creation setup
Login with the created user
Log in using the created user credentials
Allow the “Salesforce access” to the user
Do the Auth by using the callback URL and reloading the page.
Magento
Magento is used to sync products from the Salesforce instance to the Magento store and sync orders and customer accounts from the Magento store to the Salesforce instance.
It auto-syncs every 10 minutes.
After connecting your “Heroku user” with the “Salesforce Instance” click on the “Magento app” and you will land on the “Magento dashboard.”
Click on the “Add” button and copy the “Token” to add in the “Magento Instance.”
Now Login to your “Magento Instance” admin account
On the left-hand side menu, panel Navigate to Stores > Configuration
You will land on the “Configuration Settings” page
Paste the copied “Magento Token” from Heroku Connector in the Aqxolt API token.
In the “Salesforce Instance,” Products should have the basic “e-Commerce”
Available on e-commerce platform checked on the product detail page, and product SKU code should be added.
In the related list e-commerce record select “Magento Checkbox.”
And the product should have inventory.
In every 10 minutes, it syncs products to Magento instance and orders and customers to salesforce instance.
QuickBooks
QuickBooks is accounting software and can be connected with Salesforce Instance using the “Heroku Aqxolt ERP Integrator.”
All the data on salesforce instances like Products, Customers, Suppliers, Invoices, Credit Memos, Sales Payments, Purchase Orders, Bills, and BillPayments is synced to “Quick Books Account.”
Once you have connected the “Salesforce Instance” to the “Heroku user,” log in to your “Heroku Instance” and click on the “QuickBooks app.”
You will land on the “QuickBooks Dashboard.”
Click on Add; it will redirect to the Quickbooks account login page.
Log in with your admin creds.
This adds a connection to the QuickBooks instance to the Heroku user.
Manually sink the Products, Customers and so on.
All the products get synced, but only those Products to which orders have created with customers and suppliers and purchase orders will have the financial details synced like Invoices, Bills, Credit Notes and Purchase Orders.
If no orders have been created for the products, financial data will not be synced for those products. To check if sync has started login to the QuickBooks account.You will land on the Dashboard and the left-hand side, you will see Banking, Sales, Expenses, Reports, Taxes, and Accounting.
Click on “Sales” to see – All Sales, Customers, Products, and Services.
“All Sales” lists the Orders synced, “Customers” will list the “Customer Contacts Synced,” and “Products and Services” will list the “Products Synchronised.
Click on “Expenses” to see “Expenses and ”
Use the filters to change what to see on the page.
In Salesforce; to sync or create a new product, make sure the following actions are taken.
Select “Available” on “e-Commerce platform” check box.
Create the e-commerce record from the products related list to make the product available on various platforms like Shopify, Amazon, WooCommerce, Magento, and eBay.
For a product to be available on Amazon, Amazon (ASIN Code) is essential.
Make sure “Price Book” is active.
Login to the Heroku user and click “Product ”
This creates a product on the Shopify Store.
Create or sync Customer and Order
When on Shopify store, click on “create order”– “select product” and “select ”
If you want to add a new customer, then create a new customer by filling in the customer details such as First Name, Last name, Address and Contact Number.
After adding the customer, click on “Mark Paid” to close the order.
Click on “Sync Order” on the Shopify This will sync order and customer account on to Salesforce instance.
Woo Commerce
Woo Commerce is used to sync products from the Salesforce instance to the Woo Commerce store and sync orders and customer accounts from the Woo Commerce store to the Salesforce instance.
Extensions do all the sync processes, no manual sync is required. It auto-syncs every 10 minutes.
After connecting your “Heroku user” with the “Salesforce Instance,” click on the “WooCommerce” app, and you will land on the “WooCommerce Dashboard.”
Click on the “Add” button and copy the “Token” to add in the “WooCommerce Instance.”
Now Login to your “WooCommerce Instance” admin account
On the left-hand side menu, panel Navigate to Store Name > Configuration
You will land on the “Store Configuration” page
Paste the copied “WooCommerce Token” from “Heroku Connector” in the “Aqxolt API Key.”
In the Salesforce instance, Products should have the basic e-commerce
Available on e-commerce platform checked on the product detail page, and product SKU code should be added.
In the related list e-commerce record select WooCommerce checkbox.
And the product should have inventory.
Customer Address should be real.
In every 10 minutes, it syncs products to woo commerce instance and orders and customers to salesforce instance.
Xero
Xero is accounting software and can be connected with “Salesforce Instance” using the “Heroku Aqxolt ERP Integrator.”
All the data on “Salesforce instance” like Products, Customers, Suppliers, Invoices, CreditMemos, SalesPayment, PurchaseOrders, Bills and BillPayments is synced to “Xero account” and the Sync is Bidirectional.
Once you have connected the Salesforce instance to the Heroku user, Login to your Heroku instance and click on the “Xero app.”
You will land on the “Xero dashboard.”
Click on Add(Manage); it will redirect to the Xero account login page. (xero.com)
Login with your admin credentials. (Username and Password)
Allow access for 30 minutes.
This adds a connection to the Xero instance to the Heroku user.
It auto Syncs Products, Contacts, Invoices, CreditNotes, SalesPayment, Purchase, OrderBills and BillPayments from “Salesforce” to “Xero.”
But for the trail, we can sync the data manually by clicking on the Pending Sync button for all the Products.
Invoices are created on Aqxolt ERP.
Click on Invoice Pending Sync in the connector.
Invoice is synced on Xero.
Login to “Xero Account” to see if data has synced.
Data is synced from Salesforce instance to Xero and vice versa. i.e. if products are not on Salesforce instance and present on Xero, they get synced to Salesforce, and if products are on Salesforce instance but not on Xero, they get synced to Xero when the sync process starts.
Product Setup:
On the Product make sure the below fields has data
Product Name Product SKU Product Description
and Available on the eCommerce platform checkbox is true.
Create a Marketplace record on the Product related list.
Add a Custom Setting in the system as eCommerce Sync, click on Manage and create a Record.
Adding Custom Settings
After installing “Aqxolt ERP” to a Salesforce Instance; the following custom settings need to be uploaded before you start using the shipment processes.
Country Codes
Province Codes
Product Unit Codes
Package Details
For UPS, the following two objects have to be added along with the above three.
UPS Package Type
UPS Service Codes
These records are stored in “CSV files” which can be uploaded using “Data Import Wizard” or “Data Loader.”
General Accounting
The Finance module in Aqxolt ERP Mark 7 provides real-time insight into the overall financial status of the organisation. It provides, automates and streamlines the entire financial management process, as well as simplifies user adoption and processes by its seamless integration. Aqxolt ERP Mark 7 provides a complete suite of components involved in financial processes like General Accounting, Accounts Receivable, Accounts Payable, Commission Accounting and Reconciliation with bank feeds. It has been intelligently designed to handle multiple business units. It is completely integrated with other ERP modules like Order Management, Manufacturing Management, Supply Chain Management and Employee Management. It empowers you to track all entries into comprehensive general entries. It also enhances decision making with insightful reports and dashboards.
General Accounting
This is a combination of all the processes related to financial activities in an organisation, such as providing the financial report form balance sheet, profit and loss statements and trial balance. To begin with the configuration every organisation requires a finance general ledger and a chart of accounts for the financial year.
Create an Accounting Period
Navigate to the Finance Management app > Accounting Period tab.
Click the “New” button to create a new Accounting Period.
Enter the Accounting Period Name and select the status.
Enter the Start Date and the End Date of the accounting period.
Click the “Save” button to create the accounting period record.
Create Chart of Accounts
Navigate to the Finance Management app > Chart of Accounts tab.
A chart of accounts can be created for different types of accounts, such as Sales, Liability, Assets, Equity or Income/Revenue from the available record types.
Click on the “Add New Chart of Accounts” button to create a new chart of accounts record for the selected record type.
Enter the name of the chart of account; select the financial year, account type and other details.
Enter the Organisation and Business Unit details.
The opening balance of the account will be 0 if the account is starting in the current financial year; otherwise, the opening balance will be the closing balance of the same account in the previous financial year.
Enter the accounting start and end dates.
Click the “Save” button to create the chart of account.
Note: When creating a new Account (Organisation) or existing Account (Organisation) make sure the field Account Type is set to “Organisation”. If the field is not found on the page, add it to the layout.
Field to note:
Fields
Details
Is Contra:
If the contra checkbox is checked, the chart of the account will be a contra account.
Opening Balance:
The balance brought forward at the beginning of a new accounting period, on the credit or the debit side of the ledger.
Closing Balance:
The amount remaining in an account within a chart of accounts, positive or negative, at the end of an accounting period or at year end.
Total Credit:
The total credit amount of the financial year.
Total Debit:
The total debt amount of the financial year.
Financial Year:
Select the financial year of the organisation; usually the financial year is the period between 1 April and 31 March.
Calculated Ending Balance:
The calculated balance of the account for the given financial year. This is used to identify the starting balance of the next financial year account.
Bank Account:
Selects the bank account of the organisation used to do all the accounting transactions
Account Code:
A six-digit number that indicates the type of revenue, expenditure or transfer being recorded.
Account Information
Account Type:
Indicates the account’s purpose. For example, the account type could be Current Liabilities or Long-Term Liabilities.
Accounting Period Start Date:
Start date of the accounting period; it can be the same as the start date of the financial year.
Accounting Period End Date:
End date of the accounting period, it can be the same as the end date of the financial year.
Create Finance General Ledger for the financial year
Navigate to the Finance Management app > Finance General Ledger tab
Click the “New” button to add “Finance General Ledger”.
Select the financial year and enter the start and end dates of the general ledger entry.
Enter the name of the finance general ledger and enter the accounting period start and end dates.
Select the “Active” checkbox to make the finance general ledger active
Bill of Materials
A Bill of Material (BOM) is the functionality used to set up a production module in an ERP system. A BOM is essentially used to manage a list of components used to produce the end product. The manufacturing of the end product goes through numerous phases of production; a BOM records the details of components needed at various phases of production. Creating a BOM is essential because the correct component must be available during the manufacture of the finished products.
Every BOM record includes the product name, description, quantity, unit of measurement, procurement type, etc. and provides a centralised source of information to the person handling the BOM to manufacture a product.
Aqxolt ERP provides the flexibility to configure various types of Bills of Material depending on the business use for which they are intended.
Creating Bill of Materials for Manufacturing:
Select the manufacturing process for which the BOM is required.
In the related tab, find the Bill of Material (Manufacturing/Assembly Process) and click the “New” button.
From the New Bill of Material Record Type pop-up, select “Manufacturing BOM” and click the “Next” button.
Fill in the BOM name, the process cycle in which the BOM component is used.
Select the phase (stage) of the BOM, then the unit of measurement of the BOM.
Enter the BOM level, reference designators, part identification number, quantity, BOM (product), and BOM component.
Select component type, procurement type, and type of BOM.
Enter the cost details under the “Cost/Billing” section.
Enter the description and BOM notes if applicable.
Click the “Save” button to create the BOM record for the chosen manufacturing process.
Fields to note:
Fields
Description
Bill Of Material
Describes the name of the BOM being created
BOM Level
Describes the hierarchy of the BOM used in manufacturing the product
Phase
Describes the stage at which each BOM is used during the product lifecycle and allows for progress tracking
Unit of Measure
Describes the measurement in which a BOM will be used
Reference Designators
Provides the details about where the BOM fits in the production lifecycle
BOM Notes
Provides the relevant notes to those who closely work with the BOM. Conveys all the information that might be required throughout the product lifecycle
Procurement Type
Describes procurement activities, i.e., if the BOM is purchased or made (off the shelf or made to specification)
Quantity
Describes the number of BOM products/parts to be used for manufacturing or purchasing
Description
Describes the details of each BOM
BOM (Product)
Describes the product whose BOM is created
Part Identification Number
Describes the number assigned to the BOM part for quick identification
Process Cycle
Describes the process cycle in which the BOM part is used
Finished Product Amount Delivered
Describes the total amount spent to manufacture the finished product
The BOM can be created for various component types, which can be understood as follows:
Component Type
Description
Alternate Component
Indicates the material may be substituted for the original component.
Test Component
Indicates the assembly of material is temporary and will be removed before the final product is shipped; also enables the disassembly operation.
Co-Product Component
Represents possible variations of a planned material. If a manufacturing process can yield more than one possible material due to, for example, process, environment or raw material variations, the optimum material is planned for and all other possible outcome materials can be defined as its Co-Product components.
By-Product Component
An additional material created during the manufacturing of another material. If a manufacturing process of a material also yields one or more other materials, these other materials can be defined as its By-Product components.
Assembly
A parent or component (subassembly) made up of other components.
Warranty
Aqxolt ERP allows warranties to be easily recorded for a product or sales order line item.
Create Warranty and Return Policy:
Navigate to the Manufacturing app > Warranty & Return Policies
Once in the Warranty & Return Policies tab, you can view the Warranty & Return Policies information already filled in and create a new Warranty & Return Policies
To create a new warranty and return policy, click the “New” button.
Select the organisation details of the warranty and return policies.
Select the policy guidelines and product for which the warranty and return policy is being created.
Enter the name of the warranty and return for identification purposes. Also enter the length of the warranty period, in days.
Click the “Save” button to create a warranty and return policy for the product.
Create a Warranty for the Finished Product or Sales Order Line Item
Navigate to the Manufacturing app > Products tab.
Once in the Products tab, you can view the products information already recorded.
Select the product for which the warranty must be created.
In the related tab, find the warranties related list and click the “New” button.
Select the organisation and business unit details.
Enter the warranty name and select the type of warranty – standard or extended.
Select the warranty and return policy associated with the product or sales order line item.
If the warranty is associated with a sales order line item, select the sales order line item.
Enter the warranty period in the valid till and valid from date. Enter the quantity.
Click the “Save” button to create a warranty for the product, asset or sales order line item.
Stock Transfer
Navigate to the App Launcher >Stock Transfer Tab.
Once in the Stock Transfer section, select the Source Site and the Cart associated to the source site.
Click the “New” button item to pick the items and transfer.
Select the Location from where the item is picked.
Select the Serial No/ Batch Code of the product and the product will appear automatically.
Enter the Quantity to be picked.
Click the Putaway tab and select the Destination Site.
Select the Location of the site to putaway the items.
Select the items in the action section and click the “Putaway” button to complete the stock transfer process.
Programme
An organisation can have a programme and projects associated with it. A programme could be a series of future events with a start date and an end date. In ERP Mark 7, a programme can be associated with a manufacturing process created to meet the need and results of the manufacturing project. This will help organisations create better design and management of work centres and workforce systems; it also prepares a channel for growth for the organisation.
Create Programme:
Navigate to the Organisation Management app > Programmes tab.
Once in the Programmes section, you can track the business units already filled in and create a new programme.
To create a new programme, click the “New” button.
Select the organisation and business units of the programme.
Enter the programme name and the start and end dates of the programme.
Select the budget status and the status of the programme.
To track the expense incurred to execute the programme, select the budget account associated with the programme.
Click the “Save” button to create a programme record for the organisation.
Woo Commerce
Woo Commerce is used to sync products from the Salesforce instance to the Woo Commerce store and sync orders and customer accounts from the Woo Commerce store to the Salesforce instance.
Extensions do all the sync processes, no manual sync is required. It auto-syncs every 10 minutes.
After connecting your “Heroku user” with the “Salesforce Instance,” click on the “WooCommerce” app, and you will land on the “WooCommerce Dashboard.”
Click on the “Add” button and copy the “Token” to add in the “WooCommerce Instance.”
Now Login to your “WooCommerce Instance” admin account
On the left-hand side menu, panel Navigate to Store Name > Configuration
You will land on the “Store Configuration” page
Paste the copied “WooCommerce Token” from “Heroku Connector” in the “Aqxolt API Key.”
In the Salesforce instance, Products should have the basic e-commerce
Available on e-commerce platform checked on the product detail page, and product SKU code should be added.
In the related list e-commerce record select WooCommerce checkbox.
And the product should have inventory.
Customer Address should be real.
In every 10 minutes, it syncs products to woo commerce instance and orders and customers to salesforce instance.
Product Configuration
Product Configuration: – The ProductConfiguration page allows the users to configure or allow to setup related list records for each of the Products. So that the user can select the configured options while creating the Quotes.
Find the Product Configuration tab from the App launcher.
Open the tab, On the landing page, you can see all the available products. You can search the Products using the SearchBar or you can filter the products by ProductFamily wise.
Also, the +Product button is available in the upper right-hand corner to add/create the new products.
Also, you can edit or delete any existing product from the landing page.
To Configure the products or add the related list records, click on the Configure button.
If the Products has any related records, then you can see all the available related records on the Configuration page.
The users can add the new related records (Price books, Tier Discount Allocation, Cost Cards, Features, Options, Rules, Inventory/Stock, and the Product service Sale) by clicking on the +New button.
Price books: – Price books track the prices of products and services that your company offers to customers.
Tier Discount Allocation
Tier Discount Allocation: – Tier discount is a model in which products or services are sold within a particular price range. By reaching certain tiers, buyers get a different price. The more items shoppers purchase, the greater the discount they get. By offering customers multiple pricing levels, you give them a choice to pay for products they can afford.
Cost Cards
Cost Cards: – A standard cost card contains an itemization of the standard amounts of materials, labor, and overhead required to create one unit of a product. The card also multiplies the standard cost of each of these line items by the quantities required to arrive at the total standard cost of a product.
Features
Features: – The feature object is related to products, and it “sits” within bundles. They are categories of products within a configuration, or better said: categories of options within a bundle. A bundle can have multiple Features (or none whatsoever because Features are not mandatory) and a Feature can have multiple Options.
Options
Options: – Product options are what really brings the bundle together. A bundle is created when you add Options to a Product in the Options related list. They are like children that sit under the bundle parent. You could think of the Product Option as a junction object linking two product records because it details the relationship between the Parent product in the bundle.
Rules
Rules: –product rules allow you to evaluate product options within a bundle, or a quote, or a quote line against some conditions and then perform actions in response. They are very useful in enforcing business logic during configuration and in giving feedback to sales reps regarding product selection.
Inventory/Stock
Inventory/Stock: – Stock refers to the number of finished or purchased products that are ready to be sold to the end-user. It can also include raw materials if the retailer sells the items directly to customers to earn a profit (e.g., some forms of B2B eCommerce).
Product service Sale
Product service Sale: – Provides a place to record the status of the support or service provided to the product. Ex Extended warranty.
Supporting BOMs
Supporting BOMs: – Supporting BOMs are used for the Configurable products while creating the Quotes Quote Console. If you assign any Supporting BOM to a Product, that supports BOM will be displayed as a Bill of Material in the Product Version after creating the Quotes.
Steps: –
Find the Supporting BOMs tab from the App Launcher.
Click on the New button from the Supporting BOMs records page.
Enter the Name (name should be same as BOM Component), select BOM Product, Quantity, Type and click on Save.
In the below screenshot, Panel 1 is the Supporting BOM of Controller 1.
You can associate a product as a Supporting BOM to another Product using the Supporting BOMs tab.
Check-In and Walk-In Registrations
After the registration of an event, the attendee can check in as they arrive at the event. Bookingkare allows Four check-in options.
Manual check-in through Check In page
Self-check-in through Kiosk
Scan barcode check-in
Manually check-in
Click on event builder in the search bar enter the event name the event gets auto-populated
On the right hand, side corner click on the check-in button
It will navigate to the check-in page follow the screen below
All the registrations will be listed below; you can select the registration and click the Check-In button located on the top right corner of the Registration Details section.
Once the registration is checked-in the status of the registration changes to Attended.
The system also allows you to create walk-in registrations, click the “New Registration” button. You will be presented with a pop-up page.
Enter the details of first name, last name Email and phone and click on the Save button. A new registration with status Attended is created in the system.
The Print Guest List button lets you print the check-in in attended status.
Kiosk Check-in
Click on the Event Builder tab and enter the Event Name in the search bar.
Click on the Kiosk button located on the top right corner of the page. You will be presented with the screen below.
The attendee should enter the Registration Id, Email and Phone. The users can enter any two out of the three options for check-in.
The system also allows you to create walk-in registrations at the kiosk, click the Add Me button. You will be presented with a screen below.
Enter the First and the Last name, enter the Email address and Mobile number and click the Save button to check-in late else click the Save and Check-in button to Check-in immediately.
A new registration with status Attended is created in the system.
And also you can print the badge on top of your name by clicking print badge.
Scan Barcode Check-in
Bookingkare allows you to scan and check-in attendees when you connect any Barcode scanner to your computer. When a valid barcode is scanned a “Green” indicator will appear on the scanner and the registration status will change to Attended. Otherwise, you can use the manual check-in process.
User Journey Appointment Booking Flow
Appointment Booking
The system admin can configure sites and communities to reach the application offerings to the external audiences. This makes it convenient for guest Users to book an appointment.
For the Appointment flow the customer can book the appointment by following these steps:
Click on url the page will navigate to the given screen below:
Click on the Appointment booking tab and the page will navigate to the given screen below:
Step 2 Appointment Topic Select the appointment topic that you are looking forward to booking.
Select the membership program from the first drop-down list.
And subsequently, Select the Services that are Available for that selected membership program.
Provide the answers to the following mentioned questions.
Select the total number of attendees including yourself in the given box.
Click on the continue button, the page will navigate to the Appointment.
Step 3 Appointment Details Select the preferred date, time, and location of the appointment.
Select the preferred date.
Select the preferred location.
Select the preferred time slot and the page will navigate to the Appointment Contact Details Page.
Step 4 Appointment Contact Details Page Enter registration details.
Fill in your contact details and mandatory fields.
Click on Continue.
The page will navigate to the appointment confirmation.
Step 5 Appointment Confirmation
This is the final process of appointment booking flow, Here your appointment will be confirmed and booked successfully.
Appointment booking confirmation details will be presented on the screen as shown below.
Clients will also receive Appointment Confirmation Mail, Invoice, and badge to registered Mail Id
After the Customer gets the Registration Email, he can cancel or reschedule the registration of the appointment by clicking on the manage booking button, it will navigate to the booked details screen, we have a cancel button if we click on that a popup will appear by saying yes or no if we click on yes then the registration of the event will be canceled and the customer gets cancel notification to his email address.
Step 6 Appointment Confirmation Email
On successfully booking the appointment. An appointment confirmation email alert message with the details, along with the Badge attached will be sent to the registered user’s email address.
Manage Booking You can manage your appointment by clicking on the Manage Booking button present on the email template.
Click on the Manage button.
The page will navigate to the Booked Details page which has the following features available:
1. Update Appointment. 2.Change Date/Time(Reschedule). 3. Cancel the Appointment.
Step 7 Update Appointment
You can update your Appointment details by clicking on the update appointment button.
Modify your contact details which you like to update.
Click on Update Appointment to Update your modified details.
Step 8 Appointment Reschedule (Change Date/Time)
You can reschedule your appointment according to Your preferred schedule.
To reschedule the appointment Click on the change Date/Time link which is been provided on the booked details page as displayed on the above screen.
Click on the Change Date/Time link, The page will navigate to the given screen below:
Select the preferred schedule date and time and click on Update Appointment.
On clicking on the update Appointment the Rescheduled
Step 9 Appointment Rescheduled Email
On Rescheduling the Appointment i.e on Change Date/Time of the appointment.
An appointment Rescheduled Confirmation email alert message will be sent to the registered user email address as displayed on the screen below.
Step 10 Cancel Appointment
Click on the Cancel Appointment button to cancel your Appointment.
On clicking the cancel Appointment button, The page will navigate to the given screen below:
Enter the reason for cancellation.
Click on Yes to Cancel the Booked Appointment., The page will navigate to the given screen below:
Step 11 Appointment Cancellation Email
On clicking the cancel Appointment button.
An appointment Cancelled email alert message will be sent to the registered email address as displayed on the screen below.
Queue Wait List
Queue Wait List Queue Wait List is the process where the waiting time of the people at a hotel, airport, hospital, seaport, or event is been displayed.
Click on the location tab and select any created location
It will navigate to the location page in the top right corner click on the drop-down list and select the Queue waitlist button. You will be presented with the screen below.
Here you can find the waiting time which will be running for a particular appointment.
Once the appointment has been started it will display the total waited time.
And finally when the Appointment is completed that token number will be removed from the waitlist
Want an easy, visual way to track upcoming or ongoing Events? Create a calendar from a standard or custom object: Choose a date field that represents data you want to track, and the calendar displays data in that field as calendar items. You can hide or show calendars, and you can edit and delete them. You can also track events in reports.
Create an Object Calendar for Events
Here’s how to create a calendar based on a standard or custom object
Navigate to the calendar tab.
Start creating a calendar by selecting the New calendar option as shown in the screen below:
Choose an object to base the calendar on.
Select fields that determine what the calendar displays (1, 2, 3).
If you want, filter the calendar items by selecting a list view (4).
The calendar displays items differently depending on the date fields you select.
(Date) Fields
The names of some date fields include (Date). If you select a (Date) field, the calendar displays items across the top (as all-day items).
(Date/Time) Fields
The names of other date fields include (Date/Time). If you select a (Date/Time) field in Field for Start, the calendar displays items in time slots. If you also select a field in Field for End (it’s optional) and the items’ duration exceeds 24 hours, the calendar displays the items across the top (as all-day items).
Selecting Start and End Fields
Field for End is optional. If you use it, you must select the same type of field as you do in Field for Start. For example, if you select a (Date) field in one, you can’t select a (Date/Time) field in the other. If you select fields that generate dates in the wrong order (end before start), Salesforce displays an error message when you save the calendar.
The colour of each calendar is the colour of the object it’s based on. (If a custom object has a theme, the theme determines the colour of the calendar.) You can hide or show individual calendars.
Calendar for Event Booking
Calendar views display your own calendar and coworkers’ calendars along with list views of open tasks. On the Home tab, the Calendar section shows upcoming events, a date picker for the month, and links to other calendar and activity views. You can share your calendar with coworkers and print calendars and task lists.
Calendar Views
Your calendar displays all events that you own on the My Events Calendar. Calendars that you create from an object display data in date fields as calendar items. View, create, and edit your events in a day, week, or month view. You can also see any calendars shared by colleagues that you’ve added to your view.
View Your Calendar
Access calendar views by:
Choosing the Calendar page from the navigation menu.
Opening a related event on a record’s activity timeline. (If your record doesn’t display the activity timeline, ask your admin to customize your page layout.)
When you click an event that you have permission to access, an overlay displays a preview with event details. Your admin configures the content of the overlays.
Grid Views
Calendar grid views display events in several ways.
Current date or any date that you choose. You select how the calendar displays.
One column with events colour coded for selected calendars
One column for each selected calendar to compare available times
One week at a time
One month at a time
Table View
To see specific events or more events simultaneously, open the table view. Customize an event list view to suit your needs or use the predefined lists views.
My Recent Events
My Team’s Recent Events
My Team’s Upcoming Events
My Upcoming Events
New This Week
Recently Viewed
Today’s Agenda
Customize your view from the calendar side panel.
To add calendars, click options .
To display or hide a calendar, click the calendar name.
To change the dates, click , , Today, This Week, or This Month.
To add an event, remove a calendar, or view only one calendar, click my event options .
Where to Select or Switch Views
You access calendar views in the following locations.
The Calendar section at the bottom of the Home tab. (If your Home tab doesn’t display the Calendar section, ask your admin to customize your home page layout.)
The Calendar shortcut in the sidebar that opens your last used calendar view. (If your admin has enabled the shortcut.)
The detail page for an event or a task
An activities list view
When you hover your mouse over an event that you have permission to access, an overlay displays event details and actions that you can perform. Your admin configures the content of the overlays.
Day, Week, Month, and Activity Views
Calendar views display events as follows:
A day at a time: or Today
A date that you choose using
A week at a time: or This Week
In a week view, with or without weekends
A month at a time: or This Month
On a day that you choose: Click in the week or month view
In a list of activities (events and tasks):
Inside any calendar view, you can switch views by clicking the icon for a different view. In a week or month view, click a date to see that day’s view.
Single-User View
The single-user view ()
displays up to 1,000 events in one month in any of the following:
Your own calendar
The calendar of another user (not available in Personal Edition)
A public calendar
A resource calendar
Click Change to switch users or calendars. Click Share My Calendar to allow other users to view your calendar. To reset your view to your own calendar, click Back to My Calendar.
Multi-User View
The multi-user view()
displays several users’ calendars and activities together. Choose an existing list view of users from the View drop-down list or click Create New View.
The view shows each person’s availability. A legend in the view shows busy and out-of-office time. If an event is set to show the time as free, then multi-user views don’t display it.
The multi-user calendar works differently in the partner portal. For example, partners can view events only on the calendars of people in their own company and their channel manager.
Share Your Calendar
Give coworkers access to view or add events to your My Events calendar.
Admins can set organization-wide calendar sharing levels to control how much access coworkers have to each others’ calendars. Admins can’t give coworkers access to event details.
Give coworkers more access to your calendar by changing your calendar sharing options.
From the Calendar tab, click calendar options next to your My Events calendar.
Search and select the name of the coworker who you want to share your calendar with.
Select the level of access that you want your coworker to have to your calendar.
Hide Details
Coworkers can see whether given times are available but can’t see any other information about the nature of events in their calendar.
Hide Details and Add Events
Coworkers can see whether given times are available but can’t see details of events. They can insert events into your calendar.
Show Details
Coworkers can see detailed information about events in your calendar.
Show Details and Add Events
Coworkers can see detailed information about events in your calendar, and they can insert events in your calendar.
Click Who Has Access to see who has access to your calendar, and at what level.
Click Done.
Coworkers can see your calendar by adding it to their Other Calendars list.
View Coworkers’ Calendars.
When coworkers share them My Events calendar with you, then you can view it in Lightning Experience. Add several calendars to your calendar view at one time with user list calendars.
Add user lists to calendar views in the Lightning Experience option from Activity Settings in Setup.
From the Calendar page, click calendar options next to Other Calendars.
Select Add Calendars.
Select People or User Lists.
Search for and select the name of the coworker or user list you want to add to your calendar view.
Click Add.
After you add a shared calendar or user list, you see their events overlaid on your calendar view.
Use the availability view to compare different calendars side by side.
Calendar For Appointment
Want an easy, visual way to track upcoming or ongoing Appointments? Create a calendar from a standard or custom object: Choose a date field that represents data you want to track, and the calendar displays data in that field as calendar items. You can hide or show calendars, and you can edit and delete them.
Create an Object Calendar for Appointments
Here’s how to create a calendar based on a standard or custom object
Navigate to the calendar tab.
Start creating a calendar by selecting the New calendar option as shown in the screen below:
Choose an object to base the calendar on.
Select fields that determine what the calendar displays (1, 2, 3).
If you want, filter the calendar items by selecting a list view (4).
The calendar displays items differently depending on the date fields you select.
(Date) Fields
The names of some date fields include (Date). If you select a (Date) field, the calendar displays items across the top (as all-day items).
(Date/Time) Fields
The names of other date fields include (Date/Time). If you select a (Date/Time) field in Field for Start, the calendar displays items in time slots. If you also select a field in Field for End (it’s optional) and the items’ duration exceeds 24 hours, the calendar displays the items across the top (as all-day items).
Selecting Start and End Fields
Field for End is optional. If you use it, you must select the same type of field as you do in Field for Start. For example, if you select a (Date) field in one, you can’t select a (Date/Time) field in the other. If you select fields that generate dates in the wrong order (end before start), It displays an error message when you save the calendar.
The colour of each calendar is the colour of the object it’s based on. (If a custom object has a theme, the theme determines the colour of the calendar.) You can hide or show individual calendars.
Calendar for Appointment booking flow
Calendar views display your own calendar and coworkers’ calendars along with list views of open tasks. On the Home tab, the Calendar section shows upcoming Appointments, a date picker for the month, and links to other calendar and activity views. You can share your calendar with coworkers and print calendars and task lists.
Calendar Views
Your calendar displays all Appointments that you own on the My Events Calendar. Calendars that you create from an object display data in date fields as calendar items. View, create, and edit your events in a day, week, or month view. You can also see any calendars shared by colleagues that you’ve added to your view.
View Your Calendar
Access calendar views by:
Choosing the Calendar page from the navigation menu.
Opening a related event on a record’s activity timeline. (If your record doesn’t display the activity timeline, ask your admin to customize your page layout.)
When you click an event that you have permission to access, an overlay displays a preview with event details. Your admin configures the content of the overlays.
Grid Views
Calendar grid views display appointments in several ways.
Current date or any date that you choose. You select how the calendar displays.
One column with Appointment color-coded for selected calendars
One column for each selected calendar to compare available times
One week at a time
One month at a time
Table View
To see a specific appointment or more appointments simultaneously, open the table view. Customize an appointment list view to suit your needs or use the predefined list views.
My Recent Appointment
My Team’s Recent Appointment
My Team’s Upcoming Appointment
My Upcoming Appointment
New This Week
Recently Viewed
Today’s Agenda
Customize your view from the calendar side panel.
Customize your view from the calendar side panel.
To add calendars, click options.
To display or hide a calendar, click the calendar name.
To change the dates, click , , Today, This Week, or This Month.
To add an event, remove a calendar, or view only one calendar, click my event options .
Where to Select or Switch Views
You access calendar views in the following locations.
The Calendar section at the bottom of the Home tab. (If your Home tab doesn’t display the Calendar section, ask your admin to customize your home page layout.)
The Calendar shortcut in the sidebar that opens your last used calendar view. (If your admin has enabled the shortcut.)
The detail page for an event or a task
An activities list view
When you hover your mouse over an event that you have permission to access, an overlay displays event details and actions that you can perform. Your admin configures the content of the overlays.
Day, Week, Month, and Activity Views
Calendar views display events as follows:
A day at a time: or Today
A date that you choose using
A week at a time: or This Week
In a week view, with or without weekends
A month at a time: or This Month
On a day that you choose: Click in the week or month view
In a list of activities (events and tasks):
Inside any calendar view, you can switch views by clicking the icon for a different view. In a week or month view, click a date to see that day’s view.
Single-User View
The single-user view ()
displays up to 1,000 events in one month in any of the following:
Your own calendar
The calendar of another user (not available in Personal Edition)
A public calendar
A resource calendar
Click Change to switch users or calendars. Click Share My Calendar to allow other users to view your calendar. To reset your view to your own calendar, click Back to My Calendar.
Multi-User View
The multi-user view ()
displays several users’ calendars and activities together. Choose an existing list view of users from the View drop-down list or click Create New View.
The view shows each person’s availability. A legend in the view shows busy and out-of-office time. If an event is set to show the time as free, then multi-user views don’t display it.
The multi-user calendar works differently in the partner portal. For example, partners can view events only on the calendars of people in their own company and their channel manager.
Share Your Calendar
Give coworkers access to view or add events to your My Events calendar.
Admins can set organization-wide calendar sharing levels to control how much access coworkers have to each others’ calendars. Admins can’t give coworkers access to event details.
Give coworkers more access to your calendar by changing your calendar sharing options.
From the Calendar tab, click calendar options next to your My Events calendar.
Search and select the name of the coworker who you want to share your calendar with.
Select the level of access that you want your coworker to have to your calendar.
Hide Details
Coworkers can see whether given times are available but can’t see any other information about the nature of the Appointment in your calendar.
Hide Details and Add Appointment
Coworkers can see whether given times are available but can’t see details of events. They can insert an Appointment in your calendar.
Show Details
Coworkers can see detailed information about Appointments in your calendar.
Show Details and Add Appointment
Coworkers can see detailed information about Appointments in your calendar, and they can insert Appointments in your calendar.
Click Who Has Access to see who has access to your calendar, and at what level.
Click Done.
Coworkers can see your calendar by adding it to their Other Calendars list.
View Coworkers’ Calendars.
When coworkers share them My Events calendar with you, then you can view it in Lightning Experience. Add several calendars to your calendar view at one time with user list calendars.
Add user lists to calendar views in the Lightning Experience option from Activity Settings in Setup.
From the Calendar page, click calendar options next to Other Calendars.
Select Add Calendars.
Select People or User Lists.
Search for and select the name of the coworker or user list you want to add to your calendar view.
Click Add.
After you add a shared calendar or user list, you see their events overlaid on your calendar view.
Use the availability view to compare different calendars side by side.
Options
Options: – Product options are what really brings the bundle together. A bundle is created when you add Options to a Product in the Options related list. They are like children that sit under the bundle parent. You could think of the Product Option as a junction object linking two product records because it details the relationship between the Parent product in the bundle.
Order using Convert to Order
The Aqxolt CPQ allows creating the Orders for the Accepted Quotes using the Convert to Order button.
Convert the accepted Quote into an Order using the ‘Convert to Order’ button:
The Aqxolt CPQ allows creating the Orders for the Accepted Quotes using the Convert to Order button.
Open the accepted Quote record and click on the Convert to Order button, available in the upper right corner.
After clicking on the Convert to Order button, the system will take you to the order creation page. On the order creation page, you can see all the details along with the Line Items.
On the Order creation page, enter the order Description if applicable. Edit the Price, Quantity, Change the Discount Plan, or manually enter the Discount/Unit, enter Line Description If required, and click on the SAVE button available at the bottom of the page by selecting the line items.
Once you click on the Save button, an Order will be created with Draft status. You can see the created Contract and Quote record on the Order detail page.
Note: – You can edit the existing Order Products or add new Products on the Order before activating the Order.
Apply Credits
To make the payment through Credit points, navigate to the “Payment’s tab” in Epos and click on the “Apply Credits” button.
The system will automatically fetch the Invoice Amount, Total Due and Available Credit. Enter the “Redeem Credit” amount and click the “Pay Now” button.
You will see that a Credit type payment record has been created.
Sales Orders to logistics
As a customer, I need the ability to create an Outbound Logistic from multiple sales orders and to create a partial logistic from the selected sales order either by entering available quantity or by selecting the required line items.
When the customer wants to create a logistic from multiple sales orders or to create a partial logistic.
Navigate to the App Launcher and select the ‘Orders to Logistic’ tab. It will show all the orders for which the ‘Ready to Pick & Pack’ check box is not enabled.
You can search for the order by entering the name of the order in the search box.
Select the orders and click on the ‘Create Logistic’ button.
Enter the required details and click on the ‘Save’ button to create a logistic.
How to apply custom CSS code.
You can apply your own custom CSS code on Gullu theme. Your custom CSS code will not be lost even if you update the theme.
Navigate to Appearance > Customize > Additional CSS
Take a look at the screenshots-
How to apply custom CSS code.
You can apply your own custom CSS code on Charles theme. Your custom CSS code will not be lost even if you update the theme.
Navigate to Appearance > Customize > Additional CSS
Now appears with all tasks displayed in a list view.
2) Old Work Order Screen with Timer Enabled Before Task Start
2) New Work Order Screen with Timer Enabled Before Task Start
Each task will have a play button associated with it
3) Old Work Order Screen with Timer Enabled After Task Start
3) New Work Order Screen with Timer Enabled After Task Start
Under each task, find respective actions like complete, cancel, pause, clock in, and clock out.
4) Old Work Order Tasks without Timer
4) New Work Order Tasks without Timer
Each task has a “Done” button to complete the task and a “To Do” button to undo changes for completed tasks.
5) Old Work Order Screen After All Tasks Are Completed:
5) New Work Order Screen After All Tasks Are Completed:
– Find the “All Done” button indicating all tasks completed and a “Build” button to proceed with producing and consuming products.
– If the WO doesn’t have any Bill of materials(BOMs) and Work in progress(WIPs) then you will see “All Done” and “Complete WO” button.
6) Old Build Screen from Work Orders - With Only BOMs:
6) New Build Screen from Work Orders - With Only BOMs:
Displays WIP details at the top, followed by “To Produce” and “To Scrap” quantities for all BOMs and the bill of materials below.
7) Old Build Screen from Work Orders - With BOMs, Serials:
7) New Build Screen from Work Orders - With BOMs, Serials:
Displays WIP details at the top, serials to produce list on the left, and BOMs on the right side of the serials.
8) Old Work Order Screen After Partially Producing the Products:
8) New Work Order Screen After Partially Producing the Products:
The “Complete WO” button is available in the dropdown next to the “Build” button to complete the WO partially.
9) Old Work Order Screen with Tasks Associated to Quality Checklist:
9) New Work Order Screen with Tasks Associated to Quality Checklist
Quality checks are displayed under each associated task. If the Quality check is marked as required, you need to complete the QA before completing the respective tasks.
Finance
Sync Quote and Orders records
If you edit Order records or Add/Edit Line-item records on the Order level, Aqxolt CPQ will sync the data from Order to Quote.
Or
If you edit Quote records or Add/Edit Line-item records on Quote level, Aqxolt CPQ will sync the data from Quote to Order.
Capacity planning
Capacity planning is the process of determining the production capacity needed in manufacturing a product. For an organization, capacity would be the ability of a given system to produce output within the specific period.
In Capacity Planning, we can get the daily overview of the work assigned to work centers or Resource Groups.
To Create Capacity Planning
Navigate to the app menu > Capacity Planner.
Create a new Capacity Planning record by clicking “New.”
Add capacity planner name, Start Date, and End Date.
Make sure “Demand Aggregation” is Monthly.
Click Save.
In the Related list, we have Resource Groups, Resource Allocation, Capacities, and Demand.
Subscription
With Aqxolt ERP’s subscription module, you can offer a wide range of subscription frequencies, (e.g., weekly, monthly, quarterly, annually) simply by specifying the start and end dates of the subscription in the subscription plan.
Create Subscription Plan
Create a Tax Plan record by navigating to the Order Management app > Accounts tab.
Once in the Accounts section, select the Organisation Account to create the subscription plan.
In the related tab, find the Subscription Plan related list and click the “New” button.
Enter the Subscription Plan Name and Description.
Select the Subscription Plan, Duration in Months and Order Profile.
Click the “Save” button to create the Subscription Plan record.
Create Product Subscription Plan Allocation
Create a Tax Plan record by navigating to the Order Management app > Accounts tab.
Once in the Accounts tab, you can track the Accounts that are already recorded.
In the related tab of the organisation account, find the list related to the Subscription Plan and view the record.
In the related tab of the Subscription Plan, find the list related to the Product Subscription Plan Allocation and click the “New” button.
Enter the Name. Select the Subscription Plan and Product, and then select the Active checkbox.
Click the “Save” button to create a Product Subscription Plan Allocation Record for the associated Subscription Plan.
Create a Subscription
A subscription can be created using two methods;
From the Subscription tab (record level)
With the Enterprise Point of Sale tab.
Creating a Subscription Through the Subscription Tab
Navigate to the app menu and click on the Subscription tab.
Once in the Subscription section, you can track the subscriptions already filled in and create a new subscription.
When filling in a new sales order, enter the subscription name and select the Active checkbox.
Select the sales order and subscription plan, then enter the subscription description.
Enter the start and end dates of the subscription.
Enter the duration in months of the subscription.
Enter the Next Order date of the subscription and select the status – whether the subscription is On Hold, Active or Cancelled.
Enter the address details and click the “Save” button to create a subscription order.
The process for creating a sales order from the Point of Sale tab is as follows:
Create the sales order as described in Creating a sales order through the Sales Orders tab.
Click the “Subscribe Order” button.
Select the subscription plan and select the duration in months.
Enter the name of the subscription. Enter its description and special instructions, if any.
Find the products by typing the name of the product or by clicking the “Find” button. Select the products from the action column and click the “Product+” (add product) button.
In the product’s line items details section, enter the quantity and select the discount plan, if applicable.
Click the “Subscribe” button and complete the subscription order.
Stock Run Rate
Stock Run Rate gives an overview of the inventory, it shows how much stock you have at any given time. The stock run rate tracks the finished goods as well as the raw materials. It tracks stocks at all levels of the production process, from net inventory before the supply/produces, to supply/ produce and projected inventory to demand forecast/ actual demand. The complete insight of stock run rate is generated with the help of a master production schedule created for every finished and raw material product. The MPS essentially provides the planning function, extracting actual supply and demand data, and forecasts to deliver timely and accurate production plans. The forecast gives manufacturers the ability to anticipate product demand. The MPS also includes quantities or lot size of the items to be produced, production duration, and quantities available to promise. You can create the master production schedule by following the steps below.
On the Product record, navigate to the related list and find Master Production Schedule.
Once in the Master Production Schedule related list, you can track the master production schedules already filled in.
To create a new Master Production Schedule, click the “New” button. You will be presented with a screen below.
Enter the name of the Master Production Schedule and select the Product for which the MPS is created.
Select the Version of the product and select the schedule period whether the production is scheduled weekly, monthly and yearly.
Enter the Start and End dates of the master production schedule.
Enter the Starting and Minimum Inventory Levels.
Select the Distribution Channel and enter the Lot Size of the production and enter the Default Demand Forecast.
Save the record to create a Master Production Schedule for a product.
Once the Master Production Schedule is created, you need to create an MPS line item. Based on the start and end dates of the master production schedule MPS line items are created.
Navigate to the related list of the master production schedule and find MPS Line Items.
Click the “Generate MPS” button located on the top right corner of the master production schedule record.
This creates the MPS Line Item records based on the start and end dates in the master production schedule.
To view the stock run rate report, navigate to the App menu > Stock Run Rate
The From Date and To Date defaults to the current years start date and current year’s end date.
The listed products can also be filtered based on the Distribution Channel.
Upon clicking Individual product, the system brings its MPS (Master Production Schedule) and ATP (Available to Promise) in a Monthly view.
The demand forecast describes the historical data or the user-specified default demand forecast data in the MPS.
The stock run rate report shows the Actual Demand and Net inventory calculated before the production of an item. The Net Inventory is evaluated every time the demand forecast is changed. The forecasting is based on the inventory levels specified on the MPS record.
You can also create purchase orders and manufacturing orders by clicking the Create Purchase Orders and Create Manufacturing Orders hover buttons available at the To supply/ Produce information.
You can view the Projected Inventory and Available to Promise quantities for each item. The calculations are time-based usually evaluated based on the scheduled period.
Invoice and Payment Posting
Posting invoices ensures that the transaction has been recorded in the Finance general ledger of the company. If the organization operates on a cash basis or on an accrual basis, the invoices and payments can be posted at any given time. Whenever invoices are posted, accounts receivable and sales-related ledger entries are created in the system. Similarly, when payments are posted, payment-related debit and credit ledger entries are created in the system automatically. One must ensure that all invoices are posted with a date for the current year to ensure the accounts receivable are created for the correct period of the year.
Posting Invoices can be done in two methods:
From Record Level
Navigate to the Order Management app >Sales Order tab.
Select the sales order whose invoice must be posted.
On the related tab, click on the invoice number to open the invoice record.
Click the “Edit” button and select the “Posted” checkbox.
Click the “Save” button to apply the changes. Upon saving the record, a finance general ledger entry is created for accounts receivable and sales accounts.
2. From Accounts Receivable
Navigate to the Finance Management app >Accounts Receivable tab.
Navigate to the Invoices tab, select the invoice which must be posted.
Once we select the invoice to post, click on the dropdown button to either post/un-post the invoice.
Posting Paymentscan be done in two methods:
Record Level
Navigate to the Order Management app > Sales Order tab.
Select the sales order whose payments must be posted.
On the related tab, click on the payment number to open the payment record.
Click the “Edit” button and select the “Posted” checkbox.
Click the “Save” button to apply the changes. Upon saving the record, credit and debit entries are automatically created in the system for the posted payment.
2. From Accounts Receivable
Navigate to the Finance Management app >Accounts Receivable tab.
Navigate to the Payments tab, select the payment which must be posted.
Once we select the payment to post, click on the dropdown button to either post/un-post the payment.
Posting Supplier Invoices:
Navigate to the Order Management app > Purchase Order tab.
Select the purchase order whose supplier invoice must be posted.
On the related tab, click on the purchase/supplier invoice to open the invoice record.
Click the “Edit” button and select the “Posted” checkbox.
Click the “Save” button to apply the changes. Upon saving the record, a finance general ledger entry is created for accounts payable and asset accounts.
Posting Supplier Payments:
Navigate to the Order Management app > Purchase Order tab.
Select the purchase order whose payments must be posted.
On the related tab, click on the supplier payment number to open the supplier payment record.
Click the “Edit” button and select the “Posted” checkbox.
Click the “Save” button to apply the changes. Upon saving the record, credit and debit entries are automatically created in the system for the posted payment.
Xero
Xero is accounting software and can be connected with “Salesforce Instance” using the “Heroku Aqxolt ERP Integrator.”
All the data on “Salesforce instance” like Products, Customers, Suppliers, Invoices, CreditMemos, SalesPayment, PurchaseOrders, Bills and BillPayments is synced to “Xero account” and the Sync is Bidirectional.
Once you have connected the Salesforce instance to the Heroku user, Login to your Heroku instance and click on the “Xero app.”
You will land on the “Xero dashboard.”
Click on Add(Manage); it will redirect to the Xero account login page. (xero.com)
Login with your admin credentials. (Username and Password)
Allow access for 30 minutes.
This adds a connection to the Xero instance to the Heroku user.
It auto Syncs Products, Contacts, Invoices, CreditNotes, SalesPayment, Purchase, OrderBills and BillPayments from “Salesforce” to “Xero.”
But for the trail, we can sync the data manually by clicking on the Pending Sync button for all the Products.
Invoices are created on Aqxolt ERP.
Click on Invoice Pending Sync in the connector.
Invoice is synced on Xero.
Login to “Xero Account” to see if data has synced.
Data is synced from Salesforce instance to Xero and vice versa. i.e. if products are not on Salesforce instance and present on Xero, they get synced to Salesforce, and if products are on Salesforce instance but not on Xero, they get synced to Xero when the sync process starts.
Product Setup:
On the Product make sure the below fields has data
Product Name Product SKU Product Description
and Available on the eCommerce platform checkbox is true.
Create a Marketplace record on the Product related list.
Add a Custom Setting in the system as eCommerce Sync, click on Manage and create a Record.
Event Booking Flow
The event booking application is designed for event management companies that require streamlined operations and overall efficiency, which gives your customers a seamless scheduling/booking experience. Customers can book the event from anywhere, anytime using any device.
How to book for an EventJoy would like to attend an event and he tries to book for an event using the event booking application.
Let’s help John to book an event.
1. Click on the ‘Event Book’ Tab or Search for Event Booking from the App launcher.
2. The screen shows the Event booking home page. Here you find the event which you want to attend.
Click each tab to see different scheduled events
3. Click on the ‘Apply to Attend’ Button to book for the Event.
4. Next page shows the details of the event, agenda, sponsors, and Speakers.
5. Enter or search your details and Confirm the Booking.
If you want to book as Group, then select Group Booking and Enter the Details.
6. Click ‘Confirm Booking’ Button to proceed to payment page.
7. Pay by Debit/Credit Card or PayPal then click the ‘Pay Now’ Button.
8. You are booked for the Event.
How to Book an Individual Booking
Click on the Individual Booking Icon and follow the same steps mentioned from 5-8
How to Book for a Free Event
1. Click on the ‘Apply to Attend’ Button to book for the Event.
2. Next page shows the details of the event, agenda, sponsors, and Speakers.
3. Enter or search your details and Confirm the Booking.
4. Clicking on ‘Confirm booking’ will directly book for the Event.
How to book an Event with Event Zone
Joy would like to book an event which is being held in different locations and zones. So, he selects the suitable location and zone that he would like to attend and books for the event.
Now, Let’s book an event
1. Click on the Apply to attend Button for an Event.
2. The Next page shows the location and zone selection. Select the suitable location zone slot and click the ‘Next’ Button.
3. Enter the details for Group booking or Individual Booking and click on Confirm Booking Button.
4. You are Booked for the Event
Event Booking Community
Event Community is a platform that allows external users or customers quickly book an event. A link will be provided to them through which customers can book for an event as guest users or create their own account and book for the events.
Joy would like to book an event as a guest user through Event Community so let’s help him out.
How to book a free Event
1. Click on the ‘Event Community’ Tab From the app launcher or click on the booking link provided by the organizers.
2. The Next page shows all the events such as today’s event, this week’s event, Next week’s event, and future events.
3. Select the Event that you want to book. Click the ‘Apply to Attend’ Button.
4. The next Page shows the Zone Location and Scheduled days and time to select and Book as Group or individual.
How to Book a Group Booking
1. Select the zone location, Scheduled Days and click on ‘Group Booking’ icon
2. Enter No. of persons attending the Event.
3. Enter the details of any one person and book the event.
4. Click the ‘Confirm Booking’ Button to book the event
sHow to book Individual booking
1. Click on Event to book and select Location and Time.
2. Click on the Individual Booking icon
3. Enter No. of persons attending and details of all the persons attending the event.
4. Click the ‘Confirm Booking’ Button to Complete
How to book for a Paid Event
Paid Events are the events that have an entry fee for the event and different levels of tickets like golden, silver, or bronze.
John would like to book for a paid event and buy’s 1 golden ticket and 2 silver tickets for the event.
Let’s help him out with the booking
1. Click on the Event’s Apply to attend button to book.
2. On this page select the Event zone location, Day, and time.
3. Now Enter the Ticket quantity for golden and silver tickets.
4. For Group booking click the group icon and enter one person’s detail
5. For Individual Booking enter the details of all the three-person details
6. Click the ‘Confirm’ Button to pay for the event
7. Enter the card details and click on the ‘Pay Now’ button.
Rules
Rules: –product rules allow you to evaluate product options within a bundle, or a quote, or a quote line against some conditions and then perform actions in response. They are very useful in enforcing business logic during configuration and in giving feedback to sales reps regarding product selection.
Discount
% Discount: –
On the discount section, you can see the Order Discount on the Order Discount
Section.
Also, you if you have any Coupon Code, you can apply that coupon as a coupon discount.
Purchase Orders to logistics
As a customer, I need the ability to create an Inbound Logistic from multiple purchase orders and to create a partial logistic from the selected purchase orders either by entering available quantity or by selecting the required line items.
When the customer wants to create a logistic from multiple purchase orders or to create a partial logistic of type inbound.
Navigate to the App Launcher and select the ‘Purchase Orders to Logistic’ tab. It will show all the purchase orders for which the ‘Ready to Receive’ check box is not enabled.
You can search for the purchase order by entering the name of the order in the search box.
Select the purchase orders and click on the ‘Create Logistic’ button.
Enter the required details and click on the ‘Save’ button to create a logistic.
Changes Log
----- 1.2 (08 January 2018) ------
Fixed: Sticky header dynamic color on category page and single page
Improved: Now, The slider background SVG image is changeable
New: Child theme included
New: wpml-config.xml file included for wmpl multilingual plugin support.


----- 1.3 (03 February 2018) ------
Fixed: Normal button output on menu
Fixed: Post color output on Latest posts shortcode
Fixed: Menu color on Static header layout
Fixed: Some images not loading on mac (Safary browser)


----- 1.4 (15 February 2018) ------
Fixed: 404 error page layout
Fixed: Menu color
Fixed: Default demo data importing
Fixed: Some responsive issues
Fixed: Not showing the changed value after refreshing some settings
Improved: You can choose either single portfolio page link or thumbnail for Portfolio style 1.
Improved: Portfolio archive page
Improved: Some settings added in the Theme settings (Eg. Footer font color on Theme Settings>Footer Settings)
New: Video portfolio format
New: Archive page settings on Theme Settings page.


----- 1.5 (02 March 2018) -------
Fixed: Some CSS issues
Fixed: Info box shortcode content not changing issue
Improved: Header layout two (corporate demo header)
Improved: Now you can change space more dynamically from shortcode's (styling tab)
Improved: Some designing issues on demo content
Improved: Product single page titlebar background image from metafield.
Improved: One Demo importer admin style
Updated: Demo contents


----- 1.6 (27 March 2018) -------
Fixed: Archive pages title
Fixed: Shop page title-bar
Updated: Woocommerce outdated templates
Improved: Some shortcodes
Improved: OneClick Demo Importer


----- 1.7 (8 June 2018) -------
Updated: Gullu Child theme updated to 1.1
Fixed: Some responsive issues
Fixed: Pricing Table price input issue
New: Sticky menu ON/OFF option added to Theme Settings > Header Options > Navbar Options


----- 1.8 (14 June 2018) -------
Fixed: Some responsive issues fixed
Fixed: Buy Now button in product single page
Fixed: Breadcrumb
Fixed: Sticky menu OFF/OFF option
New: Shop Page Settings option (Theme Settings > Archive Settings > Shop)
New: Mobile Menu Icon Color option (Theme Settings > Header Settings > Menu Styling)
Cras tenetur aute doloribus quibusdam interdum fugit, diam hac mollis? Mollis fames veritatis phasellus facilis nascetur nonummy, eleifend placerat nisl enim eveniet corrupti imperdiet. Incidunt duis sequi mollit, hendrerit quod! Nostra tempus cum, lacus, ut, sapien error sagittis ornare blandit fugit turpis? Facere qui reprehenderit dolorum accusantium adipisci! Quo taciti, nascetur leo velit ultricies? Vulputate cupiditate! Luctus magni lobortis ducimus, autem arcu, illum aliquam facilisi suspendisse, vivamus at. Adipisci vestibulum, egestas dictum? Quas placeat impedit nesciunt nascetur justo tempora accumsan? Torquent! Viverra pariatur mi? Per itaque curae! Class, wisi condimentum exercitationem ad sequi voluptatum expedita. Veniam vero magnis sapien feugiat.
Convallis suscipit? Auctor distinctio erat interdum. Fringilla doloribus phasellus nostrud? Asperiores diam, quam animi irure mi diam eiusmod! Ridiculus! Excepturi sociis ipsa mattis. Sapiente laoreet massa, ultricies maxime, veritatis mollitia qui maecenas tempus aenean, inventore fugit, molestias iaculis rerum totam senectus lacus tellus wisi blanditiis irure volutpat habitasse, sem dignissim a minima, voluptatem aspernatur beatae volutpat, ratione sodales omnis ipsum beatae sollicitudin taciti accusamus volutpat ex? Elementum officiis saepe purus! Dicta placerat. Iusto massa porttitor! Anim doloribus eu varius ridiculus risus sem lacinia eleifend laboriosam tristique aspernatur commodi ex primis! Excepteur, occaecati corrupti praesentium, iaculis dui, curae at? Blanditiis rutrum.
Blanditiis, aute suspendisse eget! Dis vulputate fermentum pellentesque nec, dapibus? Do eligendi, voluptatibus mollis nobis cras. Aptent aut. Sed rem, exercitationem nullam, eleifend risus? Porttitor, nam, pulvinar est, quos tincidunt, voluptatibus qui iaculis pharetra tincidunt, ridiculus! Sociosqu harum culpa eum ab ullam, hac possimus. Fugit, laoreet fermentum occaecati. Mus nam? Risus pulvinar, voluptas gravida porttitor magna molestias! Suspendisse, ipsam laborum. Sociosqu inceptos! Laudantium pariatur. Dui, numquam? Exercitationem cupidatat adipiscing at voluptatem accusantium occaecat error quidem eius ullamcorper tempore soluta quod pellentesque officia eos voluptatum condimentum. Donec tempore, sem est netus quisquam, tempus euismod dolorum laboris officiis ultrices ipsum libero sodales.
Recusandae sapien cursus
Magnis adipisci culpa turpis proin velit, ligula laboris modi nam aut, debitis massa praesentium gravida dicta nam aliquet interdum? Rerum ullamco! Amet veniam repudiandae. Ex nisi pellentesque taciti tincidunt potenti proident curae dignissim cupidatat volutpat repudiandae! Iusto at, eiusmod excepturi. Pulvinar molestias, leo massa? Gravida diam. Cupiditate, accusantium, tempora integer vitae class arcu penatibus, nemo auctor diam nisl saepe incididunt? Egestas. Adipiscing architecto doloremque anim dicta nonummy eaque? Sed a exercitationem pede! Quae egestas lacus. Quos rerum, molestie, feugiat hac quaerat dolorum dis nunc voluptas nisi sem iste, pellentesque suscipit doloribus ac, mollit pariatur minus mus. Etiam sociosqu scelerisque donec.
Debitis felis leo vestibulum architecto? Parturient, corrupti vivamus, elit labore? Vivamus sapiente? Nisl vitae, facilisi suspendisse saepe neque? Voluptas sapien unde debitis quasi sem! Luctus incididunt repellendus, facilis id, ultricies, anim, donec, nemo, nostrum conubia, esse, aenean qui ut voluptatum aliquet diamlorem neque tortor habitant. Eum ridiculus penatibus? Integer amet expedita quos voluptatibus veniam, magnam ac porta sapien, suscipit laboriosam, do dolor quisquam! Iusto, modi. Laboris, ridiculus mi assumenda morbi a vitae vivamus illo aut leo. Maecenas, maecenas integer fames autem temporibus? Ratione recusandae, velit inventore nisl, nascetur at optio, class, quidem lacinia metus felis nibh, ratione tortor numquam rhoncus.
Laudantium taciti pretium esse magnis quis eiusmod! Quis eius eros aspernatur bibendum beatae, mauris do lacus? Ullamcorper quaerat elementum hymenaeos! Alias voluptatem exercitation pharetra, magni, voluptas in hendrerit, ut ratione nascetur, sagittis, eiusmod dignissimos quas. Lacus, accumsan ut culpa fusce, magna consequatur? Primis litora? Voluptas platea aute lacus, aut turpis, congue convallis fringilla platea hic facilisi! Maecenas dolorem nostrum ipsam ducimus massa massa penatibus lobortis consequat, ante commodo ut laborum, pellentesque dis sequi dicta interdum tellus sunt sed. Nemo fringilla, ullamcorper congue voluptatem taciti! Esse cupidatat, iure saepe magnis, at, mus consequatur perferendis potenti maiores accusantium, sagittis ultrices quidem autem.
Reiciendis tristique dui
Felis nam purus. Lobortis, recusandae id penatibus gravida aspernatur, quos! Mollis aliquam do tincidunt occaecati blandit diam quis! Fames aperiam cursus ipsum? Sapiente deserunt, ipsum rerum posuere diam eum voluptates. Potenti! Sunt quae habitasse, blandit felis! Erat taciti magni fames quasi porttitor euismod dolorem, lobortis, officia. Ducimus blanditiis class praesentium, in et. Dis expedita luctus justo pellentesque? Excepteur pharetra nec, vulputate ex ipsam tincidunt, magnis quos iusto varius commodi fuga tenetur leo! Occaecat cursus aute, aute nisl nemo, velit odit leo delectus nostra cillum, iure maiores voluptatibus blanditiis, leo ea inventore excepteur, porro vitae, architecto arcu, ultrices augue incididunt et.
Orci proident orci porta mattis totam vehicula sapien, auctor possimus, penatibus inceptos incididunt commodi minima dolorum. Turpis aperiam sollicitudin platea quae vehicula, error. Mollitia! Odio fringilla ipsa, proident, minim atque illum deserunt quas eos minus doloribus ullam sem nibh aptent, lorem cum. Quae temporibus convallis. Eu distinctio metus! Lacus elit inventore, curae. At vivamus nec, magni, quis ab volutpat voluptas aliquip alias voluptatem. Sem veniam beatae. Ac rutrum placeat dis, rem perferendis. Cubilia eligendi distinctio? Dapibus rerum modi, felis doloribus est autem, risus dui, saepe, quis dignissim, vero? Beatae mollitia, nobis, provident! Dapibus, dolorem, mattis tristique, iusto libero, dui, quisquam.
Lorem parturient felis sodales sagittis veniam dapibus suspendisse. Fuga arcu officiis debitis ipsa maiores, sem, adipisci, dis architecto, habitant, minus? Irure sit aenean cras, fringilla! Placeat, mi labore! Et vehicula morbi dictumst ad, massa quos sequi, quidem habitant aperiam tempora, habitasse morbi, mi ex nostrum, platea numquam netus. Magnam eum donec, pellentesque ducimus ullam? Earum tempus? Inventore felis quia ea tempore, egestas, ipsam, unde dui eum? Sit voluptates, soluta iure, sapiente incididunt integer ultricies ante, porta adipisci? Dolores aliquet aliquam. Ex habitasse dapibus sagittis curae convallis occaecati hac proident eros? Assumenda in? Aliqua sed, assumenda eget, assumenda doloribus autem consectetuer.
Deleniti recusandae dignissimos
Omnis, vehicula ex commodo, consectetuer, lectus explicabo incididunt fames voluptates, proin? Eius at accusamus nullam, architecto nemo id, neque mus fusce fugit quisquam primis perferendis aliquam urna. Nulla minim vehicula! Consectetur amet ullam nostrum consectetuer elementum tempore class sagittis. Nascetur? Exercitation nibh! Exercitation! Ante tempor, odio odit egestas, varius primis ligula praesentium, potenti tenetur, occaecati quae cillum, voluptate primis hic? Saepe per molestie tellus voluptates, curabitur, curabitur quae. Diamlorem, cubilia blanditiis non! Sem repudiandae nisi exercitation perferendis netus eiusmod magnis! Voluptates reiciendis maecenas sociosqu, numquam, necessitatibus. Ipsam, eu cursus, quaerat minus aut vel, cum vero. Magnam, veritatis sociosqu anim corrupti.
Fuga tempore fringilla dictum pellentesque alias laoreet leo! Id perferendis erat tempus libero in esse, non, mattis dictum ea! Minima praesent etiam curae lacinia sit fuga repellat cursus, temporibus accusantium facere iaculis fuga dicta debitis tempus, tempora et, alias hac? Cupidatat venenatis sociis phasellus tenetur sint delectus? Mattis, sociosqu rem? Dolor facilisis voluptate pulvinar luctus eaque cupiditate sollicitudin nulla deleniti. Malesuada aute felis? Commodo neque? Convallis, numquam lacinia bibendum illum doloribus voluptatem, pellentesque fuga suspendisse nostrud! Impedit eget eros sociosqu. Sunt praesent curae aperiam sapien primis hic vitae praesent amet mattis at nostrud vitae dicta occaecat qui eum praesent, mollis.
Veniam maiores deleniti voluptate ligula rhoncus, aenean earum praesent laboriosam amet, pulvinar sed eaque similique autem nemo wisi! Mus mauris nonummy sunt vulputate tincidunt posuere ridiculus cras aliquet in viverra optio ante lectus laboriosam elit? Lacus nostra illo earum eveniet pariatur commodi adipisci molestie dapibus egestas aliquid faucibus eleifend sodales! Dolor dictum leo venenatis tenetur beatae vel urna senectus congue facilisis, fugiat rutrum quisque proident expedita! Sapiente impedit? Excepteur odio corporis aut earum nec, ad diam fames ridiculus quasi tempora similique curabitur maxime morbi earum mollit occaecat voluptatem, laoreet ullam. Varius, debitis quas lectus ex tempor, dis laudantium maiores taciti.
How to change the transition time of Gullu slider.
You can change the slide transition time of Gullu slider manually. Here are the manual steps-
– Open the file named theme.js fromgullu\assets\js directory with your favorite text editor.
– Then navigate to the line number 51 and change the default time value with your own time duration.
Note: This is a custom task by yourself and does this process at your own risk.
Changelogs Timeline
May 8, 2021
Final Version
1.1.6
Tweaked
Color Options (Theme Settings > Color Scheme)
Tweaked
Theme Settings > Header > Search Banner
Tweaked
Dark Mode
Updated
Doc page meta (Options :: Doc > Header)
Updated
Header and Banner page meta
Fixed
Search Banner 02
June 3, 2021
Release Title
1.1.5
New
One-Click Demo Importer integrated
New
Cool, Light and Community Search Hero (design inspired from our Docly theme)
Tweaked
Added WooCommerce functionality
Tweaked
The full theme checked and fixed the random issues
Enroll your customers in a loyalty program to encourage regular purchases and brand loyalty.
Create a Loyalty Setup
Navigate to the app menu > Loyalty Setup tab.
Once in the Loyalty Setup section, you can track the Loyalty Setups already filled in and create a new Loyalty Setup.
To create a new Loyalty Setup, click the “New” button.
Enter the Loyalty Setup name and the Points Per Unit Amount.
Select the “Active” checkbox and select Organisation and a Business Unit.
Save the record to create a Loyalty Setup.
Create a Loyalty Program
Navigate to the app menu > Loyalty Program tab.
Once in the Loyalty Program section, you can track the Loyalty Program already filled in and create a new Loyalty Program.
To create a new Loyalty Program, click the “New” button.
Enter the Program name and select the “Active” checkbox.
Select the Priority, Tier, Loyalty Setup, and Start and End Dates of the loyalty program.
Save the record to create a Loyalty Program.
Create a Loyalty Card
Navigate to the app menu > Loyalty Program tab.
Once in the Loyalty Card section, you can track the Loyalty Program already filled in and create a new Loyalty Card.
To create a new Loyalty Card, click the “New” button.
Select the Loyalty Card name and select the “Active” checkbox.
Enter the Customer Account, Contact and Loyalty Program details
Enter the Start and Expiration Dates of the card
Save the record to create a Loyalty Card.
Payment using loyalty
Using Aqxolt ERP, you can make loyalty payments in the following ways:
From the ePoS page
From the Invoice detail page
Loyalty payments from the ePoS page
Create the sales order as described in Creating a sales order through the Sales Orders tab.
Navigate to the Payments tab in ePoS and click the “Loyalty” button.
Enter the points to redeem and click the “Pay Now” button.
A Loyalty Type payment record has been created.
Loyalty payments from the Invoice detail page
Navigate to the app menu and click on the Invoices tab.
Once in the Invoice section, you can track the invoices already filled in and create a new invoice.
Select the invoice for payments and on the detail page navigate to the “Redemptions” button.
The Redemptions page shows the invoice details and the total amount due, along with the available loyalty points and the subsequent loyalty value, as shown below.
Enter the points to redeem and click the “Pay Now” button.
Stock-to-Fixed Asset
Stock-to-Asset is a unique functionality developed to help companies or teams that must fuse inventory management and asset management efforts. The feature reduces management overhead related to accounting for each process separately and delivers a simplified, operationally efficient tracking solution.
Combined Inventory and Fixed Asset Control
Depending on your business process, you may need to track certain items or products as both stock inventory and assets. For example, your products are assembled or received and then stored in your warehouse inventory. Those products will be issued to a customer and installed at the customer’s location, with a foreseeable useful life of over a year. Therefore, inventory levels must be adjusted and the product reclassified as a deployed asset that requires tracking and management.
Stock to Fixed Asset Benefits
This transaction or conversion allows you to search for a serialised inventory item issued to a customer or location and assign it an asset number and model number. The quantity and associated cost are automatically adjusted in the inventory database, and you can begin tracking pertinent asset attributes such as maintenance, warranty and location.
Resource and Resource Group
The resource is used for the manufacturing process. Manufacturing resource groups can be electromechanical assemblies, cable assemblies, machinery, and human resource as well as Job floor assistants, assembly workers, and others. The human resource comes under the workforce in manufacturing.
A Resource Group can have a team of the professional workforce or a resource group has a set of machinery used for a particular process.
Add the resource group on capacity planner’s related list by clicking the “New” button.
A resource group can be of Record type “Workforce” or “Machine.”
Select Workforce if you want to create Workforce resource group or Machine if you need to create Machine resource group.
Add the Skill Group Name, Runtime Cost Price (Hour) and Billing Price.
Add Process, Process Cycle, and Capacity Planner.
Another way of adding resource groups is from the “Manufacturing Schedule.”
Navigate to App menu > Manufacturing Schedule
You will land on the PLANNER tab showing Capacity Planning which has subtabs
Navigate to Resource Groups in the sub tabs and click “New” button to add new resource group.
Resource Allocation
Resource needs to be allocated to a resource group in the capacity planner. Allocating employees to a workforce Resource Group or allocating machines to a Machine Resource Group; like allocating Floor Assistants to the Job Floor Assistant Resource group.
In the related section of Capacity Planner click “New Resource Allocation”
Fill in the Resource Name, Start Date, and End Date; make it active.
If creating workforce resource; select Employee, if creating Machine resource; select Machine.
Select Resource Group, Work Center and Capacity Planner.
Resource Requirement
Resource Requirement is done to connect the Resource Group with the work planner wherein the Runtime and Runtime costs can be specified based on the work planner requirements.
In the related section of the Resource Group, add the resource requirement.
Create New, add the Resource Requirement Name.
Add Runtime, Runtime Cost, Setup time and Setup cost.
Assign Resource Group and Work Planner.
Click Save.
We can view/create this on the Manufacturing Schedule page as well.
Navigate to App menu > Manufacturing Schedule
You will land on the PLANNER tab showing Capacity Planning which has subtabs
Navigate to Resource Requirements in the sub tabs and click “New” button to add new resource requirement.
Manage Taxes
Aqxolt ERP enables tax calculation and eliminates manual processes that are subject to human error.
Taxes in Aqxolt ERP can be applied in the following ways;
Assign the taxes on the Sales Orders
Assign the taxes on Products
Assign the taxes on Shipment
Create a Tax Record
Create a Tax record by navigating to the Order Management app > Tax tab > New.
Enter the Tax Code and select the Effective Date and Expiry Date.
Select the Type of the tax, whether it is a Sales, Service or Shipping tax.
Select the Country and Province; If both country and province are selected then the Tax will be applied for that province only.
If Province is not selected then the Tax is applied for the Country.
If Province and Country both are not selected then the Tax will be considered General and will be applicable to all Orders.
Enter the Tax Rate in percentage.
Select the Account Profile (Customer Profile) to which the taxes are applied.
“Apply tax on” field lets you to apply taxes on selling price of the product or the cost price.
Check the Active checkbox to make the record Active.
To apply the tax on a specific product, select the product from the lookup; If not keep it blank. This Tax record will be considered to Apply taxes on Sales Order.
Click the “Save” button to create the Tax record.
Assign the Taxes on the Sales Order
Every Sales Order is generated for a Customer and the Customer is associated with a Customer Profile.
In the related list of Customer Profile, Tax record will be available if created as mentioned in the above steps.
Assign the Taxes on Products
When a tax record of type Sales or Service Tax is created with the product in it, the system applies the tax on the sales order line item that contains the same product in it.
Assign the Taxes on Shipment
When a tax record of type ‘Shipping’ is created, the system applies the tax on the Sales Order Shipping Amount field.
The Shipping Tax will be calculated based on the Tax Sourcing Rule on the Customer Profile which can be Source or Destination.
Fields to Note:
Field
Description
Tax Code
Describes the Tax record Name.
Country
Tax codes are unique for every country. This describes the country for which a Tax record is created.
Province
Every province differs in the tax rate. This field describes the province for which the Tax record is created.
Type
Describes the type of Tax, whether it is a Sales, Service or Shipment Tax.
Effective Date
Describes the date from when the Tax record is effective for use.
Expiry Date
Describes the date from when the Tax record can no longer be used.
Tax Rate
Describes the percentage of tax applied.
Product
Describes the product associated with the Tax record. This field is mainly used when product-specific taxes are created.
Apply Tax On
Describes whether the tax is applied to ‘Selling’ or ‘Cost’ price of the product
Account Profile
Different Taxes can be applied for different Account Profiles. Account Profile (Customer Profile) should always be selected while creating a Tax record
Create Orders from EPoS
The orders are created through Enterprise Point of Sale for a situation when a customer walks into a store/outlet, orders a product, pays for it, and takes the product home or opts for the available shipment options. Upon confirming the sales order, the sales invoice is created automatically. Each sales order has a unique number to enable simple tracking. The order console where the sale orders are processed is as shown below. It is referred to as Enterprise Point of Sale (EPOS) in Aqxolt CPQ. Click on the Epos tab as shown below.
Creating the sales order from Enterprise Point of Sale (EPoS) Tab
The orders are created through Enterprise Point of Sale for a situation when a customer walks into a store/outlet, orders a product, pays for it, and takes the product home or opts for the available shipment options. Upon confirming the sales order, the sales invoice is created automatically. Each sales order has a unique number to enable simple tracking. The order console where the sale orders are processed is as shown below. It is referred to as Enterprise Point of Sale (EPOS) in Aqxolt CPQ. Click on the Epos tab as shown below.
Click on the Epos from the App Navigation, available in the CPQ App.
OR
Find the Epos tab from the App Launcher.
Once you click on the Epos tab system will take you to the Epos home page.
Under the Customer Details section Select the Customer Name from the Account Name Lookup field, once you select the customer’s name the system will automatically pull the Contact and the Billing and Shipping address. (The customer account needs to have the Contact and the address records).
If you cannot locate the customer’s name in the Account Name lookup field, you can create a new customer account without exiting the Epos page or switch to other windows. Simply click on the Account tab located on the right-hand side of the screen. On the Account tab, you will be prompted to add:
Account
Contact
Address
You will be able to add a new Customer account, a new contact for the new or existing customer and both the “Bill To” and “Ship To” addresses, for the new or existing customer. Based on the selection made, the relevant screens appear to add information.
Click on the Account tab to create a new customer account.
Enter account name, assign the Account Profile and Order profile. Enter other details and click on Create Account button.
2. Click on the Contact tab to create a new contact for the Created customer.
Account Name will be auto populated, enter First and Last Name, enter other details if required and click on the Create Contact button.
3. Click on the Address tab to create a new BillTo and ShipTo address for the Created customer.
Account will be auto-selected, select the created Contact, enter Address Line 1, City, Zip/Postal Code, Country, and other details if required, and click on the Create Address button.
Note:-
Once you select the customer’s name from the Account Name lookup field, the contact details, such as contact name, email address, phone number, account ID, customer profile, and address details, are retrieved automatically.
You may select the retrieved “bill to” address or select a different “bill to” address if one or more “bill to” addresses are saved for the selected customer, this change will be made for this order only and not on the customer account.
A single “bill to” address/a single customer may have several “ship to” addresses. Select the “ship to” address from the available picklist for the selected customer.
The “ship to” address describes the location where the order is to be shipped. If the “ship to” address required for the order has not been saved in the customer account, click on the Accounts tab to create new address information.
If you want to select an existing sales order then, click on the lookup and select the sales order.
If you are creating a new sales order, then a new sales order number is generated after adding the product line items and saving the order.
Once you Select the customer, add the products into the Order
Click on the Add button, to add the line items into the order.
After clicking on the Add button, the system will take you to the Add Products page where you can find the products and add them as Order Products.
You can scroll the page or use the search bar to find a product.
Once you found the products select that product, enter quantity, select discount plan or enter discount amount if applicable, and click on the AddProduct button available at the bottom of the page.
Note: – The system will not allow to add those products, which doesn’t have any stock. The products need to have stock, or the products should a back-order product.
Once you click on the Add Products, the selected products will be added to order and the epos page will look like the below screen.
Once you add the products, click on the Save button to create the Order.
After clicking on the Save button system will generate a unique order number.
You can Edit or Delete the line items if you want.
View/ Edit Orders of an existing customers
The Epos screen allow you to view the existing or update it.
For example, if the order was created but the logistic was not initiated, the customer can return and inquire about/update the order at any time in the future. The customer can either remove the products or add a few more products to the order.
The process to view/edit a sales order is discussed below.
On the Orders section located on the right-hand side of the screen, enter the unique order number in the “Order’ Lookup field.
The system displays the details of the selected order. You may add products to the product line item section or you can Edit or delete the existing order products.
Creating an invoice through the Epos tab:
The epos tab also allows you to create an Invoice record for the existing orders or the newly created one.
Click on the Payment option, to create the invoice.
Once you click on the Payment option, you can see the Amount details along with the Invoice creation option.
Click on the Create Invoice button, Select the record type (Sales or Advance), Select the Line items and click on the Save button.
Once you click on the Save button, the system will create the invoice record and you will be able to see the created invoice records in the payments section, you can click on the Invoice Document icon if you want to print the document or send it to the customer.
The function is used to receive payments from customers who have purchased your products and services and who have not already paid for them.
When you sell a product/service, the order is created through order processing. The order processing functionality provides for the entry of payments and can be done via the following payment methods.
Cash
Bank/Cheque
Credit Card/Debit Card
Loyalty
The system can accept partial payments and can record multiple payments for each order.
When the customer books an order, the system typically creates an invoice in the system which can be sent to the customer’s email ID.
Making a Payment
In a scenario in which a customer walks in the store/outlet and makes a payment to the order, the Epos page helps the user complete the sales order and payment process without having to navigate to different setups.
Navigate to the Payments tab and click on any of the payment options. Payments can be made using the following four methods:
Credit/Debit Card
Cash
Loyalty
Apply Credits
Credit/Debit Card
To make the payment through Credit/Debit card, click on the “Payment’s tab” and click on the “Credit/Debit Card” button located on the right side of the screen.
Enter the card details in the Card Information section and click the “Pay Now” button to complete the payment process for the order.
Cash
To make the payment through Cash, click on the “Payment’s tab” and click on the “Cash” button located on the right side of the screen.
Select the Invoice (if not Posted Post the invoice), the amount will be auto-populated, enter the reference number, and click on the Save button.
Loyalty
Regular customers earn loyalty points as a reward for their regular purchases with the organisation. They can use these points for payments. Loyalty points can be assigned to currency values. For example, 1 loyalty point = 1 pound or as per the organisation’s decision.
To make the payment through Loyalty, click on the “Payment’s tab” and click on the “Loyalty” payment option located on the right side of the screen.
The system will automatically reduce the amount to be paid by the equivalent loyalty points.
The customer can pay the rest of the amount with any of the other payment options.
Apply Credits
To make the payment through Credit points, navigate to the “Payment’s tab” in Epos and click on the “Apply Credits” button.
The system will automatically fetch the Invoice Amount, Total Due and Available Credit. Enter the “Redeem Credit” amount and click the “Pay Now” button.
You will see that a Credit type payment record has been created.
Discount
% Discount: –
On the discount section, you can see the Order Discount on the Order Discount
Section.
Also, you if you have any Coupon Code, you can apply that coupon as a coupon discount.
Delivery
The Delivery section would display Shipment details if the user subscribed to the ERP Mark 7 package.
Chatter
Use this section to collaborate with Community Users
Clone the Order
Epos allows you to clone any orders using the clone button. Just click on the Clone button and confirm.
User Journey Event Booking Flow
Event Booking
The system admin can configure sites and communities to reach the application offerings to the external audiences. This makes it convenient for guests to book an event.
For the Event flow the customer can book for the event by following these steps:
Click on the URL the page will navigate to the given screen below:
Click on the Event booking tab on the page it will navigate you to the given screen below:
you can select your preferred event from the event list.
Step 2
Selecting any event zones
Click on your preferred event
And it will navigate you to the Schedule day page.
All the event zones along with the day slots for the event will be shown.
Select one or more event zones along with the location
And select any day slots of the event.
Step 3
Enter the Details
On selecting the day slots.
It will navigate you to the Details page.
Enter your details And select the Book Now button.
Note: Once the booking is completed you will be presented with a confirmation screen displaying that “You have successfully registered!”.
Step 4
Payment process
Note: For the paid event you need to enter payment details here:
Click on your preferred event, If the event is a paid event, you will be presented with secure card payment details on the screen.
Enter your details and payment details on the screen.
The total amount to be paid will also be displayed.
In the card payment enter the following card details as mentioned above, and click on the payment button and our registration payment of the event booking page will be done.
Finally, it will navigate towards the registration success page as shown on the screen below
Clients will also receive Event Confirmation Mail, Invoice, and badge to registered Mail Id
After the Customer gets the Registration Email, he can cancel or reschedule the registration of the event by clicking on the manage Event button, we have a cancel button if we click on that a popup will appear saying yes or no if we click on yes then the registration of the event will be canceled and the customer gets cancel notification to his email address.
Step 5 Event Confirmation Email
On successfully booking the event, an Event Confirmation email notification with the details, along with the Badge and invoice attached will be sent to the customer’s email address.
Manage Event You can manage your Event by clicking on the Manage Event button present on the email template.
Click on the Manage Event.
The page will navigate to the Event Details page which has the following features available:
1. Change the Date of the event (Reschedule).
2. Update event.
3. Cancel the event.
Step 6 Event Reschedule (Change Date)
we have a Change Date button if we click on that we will be redirected to the reschedule page where we have to select the preferred schedule date and time and click on update, Customer gets Reschedule notification to his email address
You can reschedule your event booking according to Your preferred schedule.
To reschedule the event Click on the change Date button.
The page will navigate you to the given screen below:
On selecting the preferred schedule date and time you will be navigated to the screen given below.
Click on the Update button.
Your event will be rescheduled successfully and you will be navigated to the given screen below and the customer gets rescheduled notification to his email address…
Event Rescheduled Email
On Rescheduling the Event i.e on Change Date of the appointment.
The customer gets an Event Rescheduled Confirmation notification to this email address as displayed on the screen below:
Step 6
Cancel Event
we have a cancel button if we click on that a popup will appear by saying yes or no if we click on yes then the registration of the event will be canceled and the customer gets a cancel notification to his email address.
Click on the Cancel button to cancel your event.
On clicking the cancel button, The page will navigate to the given screen below:
Enter the reason for cancellation.
Click on Yes to Cancel the Booked Event, The page will navigate to the given screen below:
Event Cancellation Email
On clicking the cancel Event button.
Event Registration Cancelled email notification will be sent to the customer email address as displayed on the screen below.
Inventory/Stock
Inventory/Stock: – Stock refers to the number of finished or purchased products that are ready to be sold to the end-user. It can also include raw materials if the retailer sells the items directly to customers to earn a profit (e.g., some forms of B2B eCommerce).
Delivery
The Delivery section would display Shipment details if the user subscribed to the ERP Mark 7 package.
RMA Process
As a customer, I need the ability to handle the products returned from our customers with all the required functionality from refund to the replacement during the warranty period.
When the customer receives the product returned from their customer a user needs to create an RMA.
A Return Merchandise Authorization (RMA) is part of the process of returning a product to receive a refund, replacement or repair during the product’s warranty period. Returned merchandise requires management after the return and has a second lifecycle after the return.
The Sales order must be available whose stage is closed to return the purchased product as shown below.
Termination Outcome:
An account should be associated with the RMA for refund.
The RMA record will be created with the returned product as its line items.
Input Summary:
· RMA from Sales Order Tab: Select the sales order whose stage is closed to return the purchased product as shown below.
In the related tab, find the Return Merchandise Authorization and click the “New” button.
Enter the RMA code and click the “Save” button to create the RMA record.
In the related tab, click the “New” button to create an RMA line item.
Enter the organisation details.
Fill in the RMA number, the sales order line-item number, and the quantity to return. Mention the reason for the return.
Select the Authorize, Is Closed and Ready to Receive checkboxes.
Click the “Save” button to create an RMA line-item record.
The RMA must be associated with a sales order and a shipment. This ensures that returns are permitted only for those items that have been shipped. The return process includes the ability to create the shipment flows and tracks those returns in the system.
Select the sales order record to return the purchased products.
Click the “RMA” button; this will navigate to the RMA page as shown below.
The system auto-fetches the sales order details and customer details.
Click the edit icon and enter the desired return quantity and the reason for return.
Select the return status and click “Save” to create a new return package.
Fields to note:
Field
Description
Added Back to Inventory
A check box that indicates the RMA line item has been returned to inventory for resale
Batch/Lot Code
A code assigned to shipment of RMA
RMA Line-Item Name
Describes the name of the RMA line item
Sales Order Line Item
Describes the Original Sales Order Line Item the product for the Customer RMA was purchased
Return Merchandise Authorization
Describes the name of the RMA to which the RMA line item belongs
Return Reason
Describes the reason for the item that is returned; essentially helps identify issues or problem with the returned item
Return Status
Provides the status of the product being returned
Total Deduction
The amount of the product that has been deducted
Site Item Inventory Stock
Specifies the total amount of inventory in the site
Number of Items In Quality Check
Specifies the total number of returned items in the quality check process
Number of Items to Resell
Specifies the total number of returned items that are sellable
Number of Items Discarded
Specifies the total number of returned items that are discarded
Theme Installation
Extract the zipped package downloaded from ThemeForest to your desktop, in the extracted package you will find the aprimo.zip file which is the WordPress theme.
You can install the theme in two ways:
FTP: Extract aprimo.zip file and upload the extracted folder to /wp-content/themes/ folder on your server.

WordPress: Navigate to Appearance -> Add New Themes -> Upload page. Select aprimo.zip file. Press the Install Now button to upload and install the theme.
After uploading the theme, you have to activate it. Navigate to Appearance -> Themes page to activate the theme.
How to edit the theme Footer?
You can change the theme default Footer color and other styling (including Footer Fact Counter) from Theme Settings > Footer Settings. And you can set the footer widgets from Appearance > Widgets. Put your footer widgets into the Footer Widgets sidebar area.
Discounts & Coupon Redemptions
Discounts
Aqxolt ERP provides the ability to assign discounts on price book that will determine the discounts for order profiles. The discount will affect all the products linked to the price book.
Create Tier
The tier is a threshold assigned to the product when the quantity purchased reaches within the floor and the ceiling unit. You can create the tiers by following the steps below.
Navigate to the App menu> Tier tab.
Once in the Tier tab, you can track the Tiers already filled in and create a new Tier.
To create a new Tier, click the “New” button. You will be presented with a screen below.
Enter the Tier name and the Floor and the Ceiling Units. For example, you could create a discount that gives a 10 percent discount for purchase of a product with quantity one (floor unit) up to ten (ceiling unit).
Select the “Active” checkbox and select Organisation and a Business Unit.
Save the record to create a Tier.
Create Discount Plan
Navigate to the App menu> Discount Plan tab.
Once in the Discount Plan tab, you can track the Discount Plans already filled in and create a new Discount Plan.
To create a new Discount Plan, click the “New” button. You will be presented with a screen below.
Enter the Discount Plan name and the Description of the discount plan.
To allow the discount in percentage, enter the Floor discount and Ceiling discount percentages and set the Default discount percentage.
Note: You can either have Discount Percentage details or Discount Value at the same time. If both the discount percentage and value is given in the record, then the precedence goes to Discount Percentage.
Select the Status of the discount plan and select the Organisation and the Business Unit.
To activate the discount plan, select the Active checkbox.
Save the record to create a Discount Plan.
Create Tier Discount Allocation
Navigate to the App menu> Product tab.
Once in the Product tab, you can track the Products already filled in.
Navigate to the related tab of the Product record and find the Tier Discount Allocation related list.
To create a new Tier Discount Allocation, click the “New” button. You will be presented with a screen below.
Enter the Tier Discount Allocation name and select the Discount Plan that you want to associate with the product.
Select the Order Profile, Tier and the Price Book to allocate to the product in order to use the discount being set up.
To activate the Tier Discount Allocation, select the Active checkbox.
To set the default tier to the product, select the Default checkbox.
Select the Organisation and the Business Unit.
Save the record to create a Tier Discount Allocation for the product.
Coupons
With this feature, Aqxolt ERP gives you the ability to redeem coupons without leaving or reloading the enterprise point of sale page. You can give discounts to orders by redeeming the active coupons. The system gives you the ability to create coupons with various options, like start and end dates, total value in percent and currency, etc.
Create a Coupon
Navigate to the app menu and click on the Coupons tab.
Once in the Coupons section, you can track the Coupons already filled in and create a new Coupon.
Click the “New” button to create a Coupon and select the “Orders” record type. Then click the “Next” button.
Enter the Coupon Name and the Start and End Dates of the Coupon.
Enter the barcode of the Coupon and the Maximum Allocated Vouchers.
Enter either the value in currency or the value in percent to give a discount to the customer.
Save the record to create a Coupon.
Issue Coupons
Navigate to the related tab of the Coupons record.
Once in the Coupons Issued section, you can track the Coupons already issued and create a new Coupon Issued record.
Click the “New” button to issue a Coupon.
Enter the Coupon Issued Name and select the issued Date.
If the Coupon needs to be issued to a specific account, select the customer account. If the Coupon needs to be issued for multiple accounts, leave the Accounts field empty.
Click the “Save” button to create the Coupons Issued record.
Payments using Coupons
Using Aqxolt ERP, you can make Coupon payments in the following ways:
From the ePoS page
From the Invoice detail page
Coupon payments from the ePoS page
Create the sales order as described in Creating a sales order through the Sales Orders tab.
Navigate to the Payments tab in ePoS. To redeem the Coupon, enter the Coupon code and click the “Apply” button.
You will see that a payment of type Coupon has been created.
Coupon payments from the Invoice detail page
Navigate to the app menu and click on the Invoices tab.
Once in the Invoice section, you can track the invoices already filled in and create a new invoice.
Select the invoice for payments. On the detail page, navigate to the “Redemptions” button.
Click the Redeem Coupons section on the left-hand side.
Enter the Coupon code and click the “Apply” button.
The Coupon redemption page now shows the Coupon discount amount paid to the invoice.
Transfer Order
The transfer order contains all the information required to execute the physical transfer of materials into the warehouse and out of the warehouse.
The ERP Mark 7 application enables users to create transfer orders for moving assets, inventory and employees between company stockrooms/sites, warehouses, and departments, respectively.
Transfer Order line items allow for the transfer of multiple Items on one transfer order. Transfer orders can be created for:
Inventory Stocks
Steps to create a Transfer Order for Stocks –
Create transfer orders through a Transfer Order Tab
Create a transfer order by navigating to the Order Management app > Transfer Orders tab> New.
Once on the Transfer Orders section, you can track the transfer orders already created and create new ones. The Transfer Order should be created in Requested Status.
To create a new transfer order, click on the “New” button and choose the transfer order record type
Inventory
Enter the From Channel, Site, Distribution Channel and Address. “From” fields are considered from where the Inventory is requested.
Enter the To Channel, Site, Distribution Channel and Address.
“To” fields are considered to where the Inventory is sent.
Select the Active checkbox to make the record active.
Enter the Requested and Expected Date.
Save the record.
Fields to note:
Field
Description
Transfer Order Name
Describes the name of the transfer order.
From Channel
The Channel from where the assets/stocks will be shipped.
From Distribution Channel
The Distribution Channel from where the assets/stocks will be shipped.
From Site
The site from where the assets/stocks will be shipped.
From Address
Location from where the assets/stock will be shipped.
To Channel
The Channel to where the assets/stocks will be shipped.
To Distribution Channel
The Distribution Channel to where the assets/stocks will be shipped.
To Site
The site to where the assets/stocks will be shipped.
To Address
Address to where the assets/stock will be shipped.
Requested date
Describes the date on which the transfer order was requested.
Status
Current status of the transfer order, such as Draft or Requested.
Delivery by date
It gives the Date by which the shipment will be delivered to To Site.
Ship Date
It gives the Date of Order shipped from the From site.
Expected Date
Describes the date by which the items are expected to be received.
Ready To Pick Pack
Make this checkbox true when Outbound Logistic is to be created.
Ready To Receive
Make this checkbox true when Inbound Logistic is to be created.
Creating Transfer Orders Line Items
Transfer order line items specify the exact Items included in a transfer order. A transfer order may contain more than one transfer order line item. Every line item contains an Asset/Product to transfer and the quantity to transfer.
The steps below explain how to create transfer order line items.
After creating a transfer order, click on the related tab and find the transfer order line items section. Click the “New” button to create a new transfer order line item.
Every transfer order line item is identified by its name; enter the name of the transfer order line item.
Enter an Item to transfer.
Enter the quantity requested.
Click the “Save” button to create a transfer order line item.
Field
Description
TO Line Item Name
Name used to identify the transfer order line item.
Transfer Order
Read-only field that describes the transfer order to which the transfer order line item belongs.
Quantity requested
Number of products requested by the transfer order line to be moved. For example, 12 chairs are requested to be transferred.
Product
The Product of Interest to be Transfered.
Transfer Orders Through an Outbound Logistics Tab
This scenario describes the Pick Pack Ship process by which transfer orders can be managed. The transfer order Items can be shipped/dispatched using the Pick Pack Ship process.
To make Transfer Order logistics available in Outbound Logistics tab the Transfer Order should be marked as Ready To Pick Pack.
Click on the Outbound Logistics tab and find the Logistic Orders that are ready to be Picked, Packed and Shipped as shown below.
From the list of available logistic orders, select the transfer order of interest. Click on “Pick” at the top of the page or below the Action button.
Select the logistic line items and click the “Pick” button.
Click the “Pack” tab and enter the package details, select the package list items and click the “Save” button.
Follow the Pick Pack and Ship process to transfer the stocks from one site to another.
Transfer Orders Through an Inbound Logistics Tab
This scenario describes the putaway process by which transfer orders can be managed. The transfer order logistics can be assigned to particular sites using the putaway option.
Transfer Orders logistics are available in Inbound Logistics when the Transfer Order is marked as Ready To Receive.
Click on the Inbound Logistics tab and find the Logistic Orders that are ready to be received as shown below.
From the list of available transfer orders, select the transfer orders of interest and click on “Receive” at the top of the page or the button that is next to the logistic order. Click the “Save” button to complete the receiving process.
Select the received transfer order line items and click the “Putaway” button, enter the location and storage bin to be assigned to the inventory product and click the “Save” button.
Following the putaway process, creating stock inward line items and filling in the other details, such as name, quantity and warehouse, as well as saving the record, will transfer the stocks to the assigned warehouse.
Routing & BOM Routing Link
Routing Links are used to making an association between a routing and the BOM components that will be used in the process and the associated versions. ‘Routing Link Code’ links the Bill of Material to a Process Cycle and its Operation.
Routing
Navigate to the app menu > Routing tab.
Once in the Routing section, you can track the routing that is already created and also create a new routing.
To create a new routing, click the “New” button.
Select the Manufacturing Routing record type and click the “Next” button.
Enter the Routing Code and select the Type and Status to be Certified.
Select the Product, Channel, Raw Material and Finished Product sites.
Enter the Maximum and Minimum lot size and click the “Save” button to create the Routing record.
To add the Routing Link Code:
Navigate to the Process > Process Cycle (Related List)
In the Related list, scroll down to the Routing Links tab.
Create new routing link by adding the routing link code, process cycle, and
This Routing link code will be assigned to the Bill of Materials and the Operations.
Operations
Navigate to the operations tab in the related list to Routings.
Once in the Operations section, you can track the operations that are already recorded and create a new Operations record.
Click the “New” button to create operations.
Enter the Operation Code, the Operation No., and the Next Operation No.
Select the Work Center, Quantity, and Fixed Cost details.
Click the “Save” button to create the Operations record.
Prepayments
Create prepayments
Navigate to the app menu and click the Accounts tab.
On the tab related to the customer account record, find the related Prepayments list.
Once in the Prepayments section, you can track the prepayments already filled in and create a new prepayment.
Click the “New” button to create a prepayment record. Select the “Credit” record type and click the “Next” button.
Enter the Prepayment Name, Applied Date and Credit Amount.
Click on the “Save” button to create a credit prepayment record.
Create payments
On the tab related to the Prepayment record, find the list related to Payments.
Once in the Payments section, you can track the payments already filled in and create a new payment.
Click the “New” button to create a payment record. Select the Prepayment record type and click on the “Next” button.
Enter the Payment Name and Amount, as well as other payment details for the prepayment.
Select the Payment Gateway, the Status and the Type of prepayment.
Click the “Save” button to create the payment record.
Payment using prepayment credit
Using Aqxolt ERP, you can make prepayments in the following ways:
From the ePoS page
From the Invoice detail page
Prepayment credit payments from the ePoS page
Create the sales order as described in Creating a sales order through the Sales Orders tab.
Navigate to the “Payments tab” in ePoS and click on the “Apply Credits” button.
The system will automatically fetch the Invoice Amount, Total Due and Available Credit. Enter the “Redeem Credit” and click the “Pay Now” button
You will see that a Credit type payment record has been created.
Prepayments from the Invoice detail page
Navigate to the app menu and click on the Invoices tab.
Once in the Invoice section, you can track the invoices already filled in and create a new invoice.
Select the invoice for payments. On the detail page, navigate to the “Redemptions” button.
Click the “Apply Credits” section on the left-hand side.
The Apply Credits redemption page shows the invoice and the total due amount details along with the available credit amount, as shown below.
Enter the Redeem Credit and click the “Pay Now” button.
Product service Sale
Product service Sale: – Provides a place to record the status of the support or service provided to the product. Ex Extended warranty.
Chatter
Use this section to collaborate with Community Users
The Aqxolt CPQ allows you to create a Sales Invoice record for activated orders just in two clicks.
Also, you can create Sales or Advance Invoices for orders manually.
Create the invoice record for activated orders from Order level automatically: –
Open the Order record, click on edit, check the IssueInvoice checkbox, and click on the Save button. Your Invoice record will gets created.
2. Create the Sale or Advance invoice record for activated orders from the Order level.
Open the Order record, find the Invoice object (related list of Order) and click on the CreateNew button.
Select any record type (Sales) and click on the Next button, the system will take you to the Invoice creation page. Select the Line Items and click on Save button to create the Invoice record.
After clicking on the Save button system will create the Invoice record and will take you to the Order record page again.
Note: – If you want, you can create an Advance Invoice for the Orders by selecting the record type Advance on the record type selection page.
Footnote 2 Columns
Apparently we had reached a great height in the atmosphere, for the sky was a dead black, and the stars had ceased to twinkle. By the same illusion which lifts the horizon of the sea to the level of the spectator on a hillside, the sable cloud beneath was dished out, and the car seemed to float in the middle of an immense dark sphere, whose upper half was strewn with silver. Looking down into the dark gulf below, I could see a ruddy light streaming through a rift in the clouds. Lorem ipsum
[1]
Footnotes 01 Sumeris the earliest known civilization in the historical region of southern Mesopotamia Chalcolithic and early Bronze Ages between the sixth and fifth millennium BC.
Accusantium quibusdam dolorum at a, numquam deserunt. Lorem ipsum dolor
[2]
Footnotes 02 The Iron Age is the final epoch of the three-age division of humanity. Iron Age Europe and the Ancient Near East, but also, by analogy, to other parts of the Old World.
Quia quos autem veniam libero! Deleniti nemo quas optio voluptas voluptatibus sint ratione. Id vel error quia ipsam sit saepe
[3]
Footnotes 03 The history of Mesopotamia ranges from the earliest human occupation in the Paleolithic period up to Late antiquity. an increasing amount of hic at amet excepturi ea.
Voluptas sunt ratione consequatur optio porro eaque nam quod ex illum modi id animi fugiat vero explicabo illo officiis assumenda nulla rerum, dignissimos sed dicta pariatur
[4]
Footnotes 04 Hublin JJ, Ben-Ncer A, Bailey SE, Freidline SE, Neubauer S, Skinner MM, et al. (June 2017). From the original on 8 January 2020. Retrieved 27 July 2022.
Lorem, ipsum dolor sit amet consectetur adipisicing elit. Necessitatibus voluptas molestias expedita, ad dolorem inventore dolorum ipsum deleniti illum tempore veritatis iure nam numquam maxime
[5]
Footnotes -5 First human settlement in the southern half of the Australian mainland, by indigenous Australians (including the future sites of Sydney
Et ab voluptatibus minima suscipit necessitatibus magni error, quaerat praesentium
[6]
Footnotes 06 Folkloreis shared by a particular group of people; it encompasses the traditions common to that culture, subculture or group. This includes oral traditions such as tales, legends, proverbs and jokes.
Eligendi ipsam, voluptatibus quidem quos quasi totam aperiam voluptates illum quibusdam similique, sapiente necessitatibus. Dolore in est dolores
[7]
Footnotes 07 Hublin JJ, Ben-Ncer A, Bailey SE, Freidline SE, Neubauer S, Skinner MM, et al. (June 2017). “New fossils from Jebel Irhoud, Morocco”. From the original on 8 January 2020. Retrieved 27 July 2022.
Voluptates similique incidunt numquam porro, veniam totam dolore error, iste consequuntur quibusdam quod dignissimos in laborum deserunt impedit cum fugit quisquam ex quo, quidem voluptatum minima velit! Nisi accusantium ullam suscipit sapiente, harum quvelit animi laborum veritatis, ipsam eius, natus facere. Natus voluptates, et deleniti eum odio eligendi dolores cupiditate. Consequuntur hic adipisci quisquam praesentium commodi laudantium sed et modi reprehenderit. Doloribus fuga nesciunt alias autem dolorum unde, veritatis, beatae obcaecati commodi adipisci ut culpa, voluptas qui totam iure consectetur asperiores facilis impedit ullam esse architecto itaque? Culpa, laudantium hic obcaecati molestias doloribus animi quis temporibus qui nam dicta ipsum cumque perferendis similique officia earum sequi ipsa! Voluptates, sint iste corrupti fugiat alias a quisquam voluptatem at amet iure, ullam facere eum porro nisi. Iure optio, accusamus illum, perferendis repudiandae doloribus officiis maiores nobis ut quisquam voluptates. Ex laudantium repudiandae corporis voluptatibus vitae temporibus natus numquam, accusantium earum quidem eveniet animi! Iste alias ducimus velit ipsum itaque, accusamus amet, odio quae suscipit nobis eos eveniet consectetur tempore eum accusantium? Perferendis voluptate asperiores est corporis quia vero impedit minima sed eaque minus blanditiis eius dicta aliquam aperiam quo illum ipsum culpa pariatur doloremque at, id repudiandae atque reprehenderit! Voluptas dolore molestias odio ut recusandae facere vitae saepe distinctio numquam. Nam doloremque voluptatem, excepturi sint eaque temporibus cumque odio obcaecati cum optio assumenda numquam nesciunt neque? Iste ipsum esse modi iusto impedit odio vel neque. Voluptatem.
Fixed Assets (Equipment)
Assets are also known as fixed or capital assets and typically refer to an organisation’s valuable resources and equipment. These items have long-term business use and enable their owner to produce goods or perform services. Assets are tracked as unique items that are not consumed in production.
Because the word “asset” has a different meaning in the world of finance and accounting, the phrase “asset tracking” is used to indicate the monitoring of physical asset movement and condition, not the change in the monetary value of an intangible financial asset.
Systematically tracking assets is necessary across every industry to maintain accurate accounting records as well as real-time visibility of operations. For tracking purposes, each asset is tagged with a unique barcode identifier (e.g., make, model, serial number, etc.) and associated with a custodian or location.
Service-Installations
Work Orders for Service/Installations
You can also create work orders for products that require service/installations manually by following these steps:
Navigate to the Maintenance app > Maintenance Schedule
Once in the Planner sub tab of Maintenance Schedule, you can track the capacity planning overview of the selected work center, a resource group or a resource.
To create a new work order, click the “+Work Order” button located on the top right corner.
Enter the Name of the work order and the Start and Expected Dates.
If the work order being created is associated with a sales order, select “Sales Order.”
Select the Product of type SST to maintain and select the type of work order
Enter the Quantity, the Production Version and the Routing.
Click the “Schedule Work Order” button to create the work order.
View and modify the process schedule
On the scheduler subtab of the Maintenance schedule, view the Gantt chart of work orders, work centers, and resources upon selecting the view.
To view the Gantt chart in various views like Time, Day, Week, Month and Year view, select the view options from the section above the Gantt chart.
To reschedule the work order associated to the individual operation, simply drag and drop it the available new date/time. The changes are reflected in the work order record.
To mark the percentage of progress of each work order, select the slider icon and drag it to display the progress.
To make further changes to the work orders, double-click the work order you will be presented with a job execution page
Click the work order, on the Job Execution, make the necessary changes and click the “Save” button.
Starting a work order
To carry out the work order click on the Builder subtab of the maintenance schedule tab.
Click the “Start” button to carry out the maintenance order.
Click the work order under each process cycle to carry out the job execution of each Action/Task associated with the work order.
Once in the Worksheet tab of Job Execution, you can track the Actions/Tasks that are already filled in and create a new Action/Task.
To carry out the Action/Task, select the action/task and click the “Start” button. Once the action/task has been started you can pause, finish and stop the Action/Task.
To create an action/task for a specific work order, click the “New” button.
To make further changes to the Action/Task select the down arrow on the right-hand side and click the “Edit” button.
Click the “Save” button after making necessary changes.
Click the “Previous” and “Next” button to view or start the Action/Tasks.
To view the drawings of the action/task click the Drawings tab.
The Time Tracking tab lets you track the time and duration of each Action/Task.
Click the Resources tab to allocate the resource for the selected Action/Task.
Supporting BOMs
Supporting BOMs: – Supporting BOMs are used for the Configurable products while creating the Quotes Quote Console. If you assign any Supporting BOM to a Product, that supports BOM will be displayed as a Bill of Material in the Product Version after creating the Quotes.
Steps: –
Find the Supporting BOMs tab from the App Launcher.
Click on the New button from the Supporting BOMs records page.
Enter the Name (name should be same as BOM Component), select BOM Product, Quantity, Type and click on Save.
In the below screenshot, Panel 1 is the Supporting BOM of Controller 1.
You can associate a product as a Supporting BOM to another Product using the Supporting BOMs tab.
Clone the Order
Epos allows you to clone any orders using the clone button. Just click on the Clone button and confirm.
Payments
The Aqxolt CPQ is integrated with PayPal and Authorized.net, so that the customer can make payments against the Invoices easily.
The Aqxolt CPQ is integrated with PayPal and Authorized.net, so that the customer can make payments against the Invoices easily.
Open the Invoice record and find the RecordPayment option.
Once you click on the Record payment link, the system will take you to the next page to make the payment.
On the Record Payment page, you can fill the card data and make the payment for the created invoice.
Second Depth
To use Docy WordPress theme you need to have a WordPress 4.0 (or higher version) site with PHP 5.6 or more and MySQL 5.0+ running on your hosting server. If you’ve already installed WordPress on your server and your site is up, that’s great. For help regarding WordPress installation, please see this WordPress Codex link.
Extract the zipped package downloaded from ThemeForest to your desktop, in the extracted package you will find the rogan.zip file which is the WordPress theme.
You can install the theme in two ways:
FTP: Extract rogan.zip file and upload the extracted folder to /wp-content/themes/ folder on your server.

WordPress: Navigate to Appearance -> Add New Themes -> Upload page. Select rogan.zip file. Press the Install Now button to upload and install the theme.
After uploading the theme, you have to activate it. Navigate to Appearance > Themes page to activate the theme.
Third Depth Two
The theme uses Gravatar to display users avatars . to create or change your Gravatar :
If you have never set-up a Gravatar account:
Register/login to Gravatar. Upon registering, use the SAME email address that is associated with your WordPress User Profile.
Upload your photo and associate it with that specific email address.
If you already registered at gravatar.com:
Click on “My Gravatars”.
click on “Add a New Email”.
Then, you’ll need to click on “Add a New Image”.
Upload an image.
Then select the email address, and then select your image from the bottom. Now it’s associated with that email address. Click Save.
It will take about 5-10 minutes to propagate on the internet, and they will appear on site.
Inventory Assembly
You can easily build assemblies or finished goods from a detailed Bill of Materials. The manufacturing module allows you to specify the raw materials or components needed to manufacture each finished good.
With operations that involve inventory for work-in-process and manufacturing, this functionality enables you to boost end-to-end traceability, productivity and control. In addition, you can access your product assembly inventory in Aqxolt ERP anytime, anywhere, so your team can better coordinate production machine usage and labour.
Manufacturing Benefits:
Streamline manufacturing process using barcodes
Increases flexibility for multiple product variations
Improves inventory control during manufacturing/process cycle
Saves time and increases manufacturing productivity
Increase Manufacturing Productivity
Create predictability, better coordinate manufacturing machine usage and labour, and track raw materials and components needed to manufacture each specific product accordingly.
Easily Assemble Your Inventory
The Inventory Assembly feature allows you to efficiently track product manufacturing and associated stock quantities and costs.
Documents
The Aqxolt CPQ allows you to generate the documents for the created Quotes, Orders, and the Invoices. You can Send, Print, or Download the documents easily using Apxolt CPQ.
The Aqxolt CPQ allows you to generate the documents for the created Quotes, Orders, and the Invoices. You can Send, Print or Download the documents easily using Apxolt CPQ.
Quote Document: – Open the Quote record and click on the Quote Document button.
Invoice Document: – Open the Invoice record and click on the Invoice Document button.
Order Document: – Open the Order record and click on the Order Document button.
Demo Import
You have to import the demo content successfully if you want your site look exactly like the ‘Aprimo’ demo.
We integrated the One Click Demo installation feature to ‘Aprimo‘ WordPress theme. You can import all demo contents just by a click only.
OneClick Demo Installation Process
Install the theme and active it. Then install all required plugins. Make sure all the required plugins are activated.
After activating all the required plugins navigate toAppearance > ‘One Click Demo Import’menu from the WordPress dashboard.
Note: If the Theme Settings data do not import then you have to import it manually. Navigate to‘Theme Settings > Backup’. Then copy-paste the backup string here and click on the Import a Backup button. You will find the backup string in the options.txt file. You will find the options.txt in this path- inc/demo{disired-demo-number}/txt
Find your page:
Every demo has 3 pages including the Default homepage, Gradient homepage, and the Particle background homepage. Navigate to Pages from your WordPress dashboard menu to see all pages. Take a look the below screenshot-
Navigate to Settings > Reading to set your specific page as the front page (homepage).
The recommended method to import the demo content.
If you failed to import the demo content by one click then you have to follow the below steps to import the demo content manually. You will get all demo content data with the theme package. You will find the demos in ‘aprimo>inc/demo{disired-demo-number}’ this path.
Navigate to Tools > Importthen install the WordPress plugin and click on the ‘Run Importer’. Upload here the ‘contents.xml’ file.
Install the ‘Widget Importer & Exporter‘ plugin to import the demo widgets. Then navigate to Tools > Widget Importer & Exporter and upload here the ‘widgets.wie’ file.
Now you have to import the Dental Options as like the demo. Navigate to ‘Theme Settings > Backup’. Then copy-paste the backup string here and click on the Import a Backup button. You will find the backup string in the options.txt file.
LOT
Products can be manufactured in a lot, having a particular lot number to the set of production. To make a product available in a lot, we have to make the product Lot Tracked.
Check Lot track checkbox on the product detail page.
Create a Material Batches/ Lots record in the related list of the product.
Click on Create “New.”
Add Batch Number, Date of Manufacture and Availability Date.
Make sure it is active and the product is selected.
Product Catalogue
ERP Product Catalogue is the best way to present the products of your company. You can group the products by product categories and sell them or receive purchase requests
Open the created Community/Site from the App launcher.
Once you click on the Community/Site, the system will take you to the Products catalogue Community home page.
On the home page, you can see the Products, their price, and the available stocks, also you can search any products using the search bar and you can filter the products by Category wise.
You can add the products into your cart if products have stocks by clicking on the Carticon or AddtoCart Button.
You can delete the added products from your cart or increase or decrease the quantities.
Once you added products into the cart, you can make the payments using the Proceed to Checkout.
Once you added products into the cart, you can make the payments using the Proceed to Checkout
Accounts payable
Accounts payable (AP):is a short-term debt and a liability on a balance sheet where a business owes money to its vendors/suppliers that have provided the business with goods or services.
Go to the ‘Accounts Payable’ tab
You can see Vendor’s tab where all the vendors will be listed. Select the checkbox against the vendor and select the Purchase order related to that vendor to create a bill.
You can also directly select the Purchase order to create a bill against it from the purchase order tab if have the PO number handy.
Select the purchase order to create a bill against it and select the new bill option from the dropdown.
Create Bill page will appear. Enter the Vendor bill date and Bill number. Also, you can add more products to the same bill by clicking on ‘Add’ button. Attach the bill.
On the Product line item add taxes and description if required and select the Chart of Account to capture the amount paid and click ‘Save’ button.
When Bill is created it will appear on Bill tab. Now match the bill by selecting the bill and click ‘match bill’ button on the top right.
On the match bill page select the line item to match and click ‘save’ button.
Now post the bill by selecting ‘Post’ option from the dropdown against that bill.
When it is posted then New voucher option appears. Click the new voucher to create a voucher.
Click the ‘save’ button to save the voucher.
Now approve the voucher by selecting ‘Approve’ from the dropdown button.
Click on ‘Make Payment’ option from the dropdown to make payment for that voucher.
On the pay, a voucher pop-up. Select payment account, date, reference number, and payment method and click ‘Save’. Now your payment is complete.
How to create Advance to Vendor Bill
An advance Bill to a vendor bill can be created if you need to make an advance payment to the vendor.
Go to the ‘Accounts payable’ tab
Then click on ‘bills’ Section
On the top right corner, you will see a button called ‘New Bill’
When clicking Create Bill. A pop-up comes up. Select the Advance to Vendor option from the pop-up.
After selecting the ‘Advance to Vendor option’. You will get a create Bill page.
Enter All the details mentioned on the page and click on the ‘Add’ Button to add products to your bill.
Select Product, Quantity, Amount and Select ‘Inventory’ Account and Add any Description required.
You can add more products by clicking on the ‘Add’ button again.
Click the ‘Save’ Button.
A Bill will be created and you can view it on the bills tab.
From here on the process to create a Voucher make payment remains the same.
FAQs
Supposed to be commonly asked issues, questions & troubleshoot tricks are in this section.
We are strongly recommended to install “Envato Toolkit” plugin for ease of use. Once necessary plugin installed and activated “Envato Toolkit” menu will be available at your admin side.
Important : If you have missing plugins or having issues to install any of them, all the related could be found under “recommended-plugins” folder within the downloaded package.
User Account Information
To obtain your API Key, visit your “My Settings” page on any of the Envato Marketplaces. Once a valid connection has been made any changes to the API key below for this username will not effect the results for 5 minutes because they’re cached in the database. If you have already made an API connection and just purchase a theme and it’s not showing up, wait five minutes and refresh the page. If the theme is still not showing up, it’s possible the author has not made it available for auto install yet.
Marketplace Username: Enter your Envato marketplace username.
Secret API Key: Enter your Envato marketplace Secret API Key (http://themeforest.net/user/[your-username]/api_keys/edit, Login to your Themeforest account, Settings > API Key)
Backup Information
This plugin will automatically save your theme as a ZIP archive before it does an upgrade. The directory those backups get saved to is wp-content/envato-backups. However, if you’re experiencing problems while attempting to upgrade, it’s likely to be a permissions issue and you may want to manually backup your theme before upgrading. Alternatively, if you don’t want to backup your theme you can check the box below.
You can also update the theme by replacing the old theme folder. First go to your theme directory then delete the theme folder and paste the new version of the theme.
How to set site’s favicon
Go to Appearance > Customize > Site Identity. Then Select an image as site icon. It’s recommended to use a .ico image as the site icon (favicon).
How to Paginate a Post ?
In order to paginate your blog post, in the Write panel in your WordPress admin, switch to the TEXT view (if you are using the Visual view) and then enter the following code to wherever you want to break the post up into a new page:
<!--nextpage-->
How to change Author Avatar?
The theme uses Gravatar to display users avatars . to create or change your Gravatar :
If you have never setup a Gravatar account:
Register/login to Gravatar. Upon registering, use the SAME email address that is associated with your WordPress User Profile.
Upload your photo and associate it with that specific email address.
If you already registered at gravatar.com, follow these steps:
Click on “My Gravatars”.
click on “Add a New Email”.
Then, you’ll need to click on “Add a New Image”.
Upload an image.
Then select the email address, and then select your image from the bottom. Now it’s associated with that email address. Click Save.
It will take about 5-10 minutes to propagate on the internet, and then will appear on site.
BOM KIT
The concept of KIT is extensively used in manufacturing industries. The concept of BOM and KIT fall under different processes. KIT is a concept involving the sales process whereas BOM falls under the inventory process. KIT is an assembly of many finished items grouped together to be sold; its pricing is calculated for each finished item. KIT itself cannot be considered one stock; each finished item is stocked separately.
For example, Universal Furnitures manufactures various types of furniture. When the company sells its furniture, it sells a dining table, chairs and cushions as a KIT. Thus, the finished items are sold as a group rather than individually
Create Bill of Material (Components) Kits:
Navigate to the Products tab.
When creating a new product, make sure the “Is Kit” checkbox in the product record is checked.
Once in the Products tab, you can view the Products information already filled in and create a new Product record.
On the related tab, scroll through the related list and find Bill of Materials (Component).
Click the “New” button to add a new BOM.
From the Select Record Type pop-up, select Kit BOM and click the “Next” button.
Fill in the details, such as the Bill of Material Name, Type, Component Type and BOM Notes.
BOM (Product) auto populates.
Select the BOM (Component) and the Quantity required.
Check the “Active” checkbox and click on the “Save” button to create the BOM kit record.
Adding Product BOM Versions:
In the Related list tab of the Product, navigate to the BOM Version.
Click the “New” button. Choose the “Manufacturing” record type and Next.
Fill in the Version Code, Start Date and To Date.
The product is auto-filled. Fill in other details, such as Category, Process and Quantity.
The Type should be Assembly and the Status should be Certified.
Select the Active checkbox and Save.
Shipping a Kit
When a Sales Order is created with a Kit as a product and when the sales order is ready for shipment, the sales order will be available for stock dispatching.
Click on the “Stock Dispatching” tab and select the sales order that has a Kit as a Product.
Click Pick to see all the available sales order line items.
Select the sales order line item having the Kit as a product and click the Explode checkbox on top of the page. The Explode checkbox will split the Kit components into individual line items and the required BOM (Components) will be reduced from the inventory.
Click on the “Pack to pack” button, the Kit with all the components attached to it and click the “Save” button to create the package.
Follow the shipment process to ship the Kit (BOM) to its specified shipping address.
KIT is an assembly of many finished items grouped together to be sold; its price is calculated for each finished item. KIT itself does not qualify as stock; each finished product is stored separately. For instance, Universal Furniture manufactures a variety of furniture types. When the business sells its furniture, it sells a dining table, chairs, pillows, etc. as a KIT. So finished goods are sold as a group rather than individually.
Follow the steps below to configure a KIT product, its Version, and its Bill of Materials –
1.1 Kit Product setup –
1) Open the products list from the Apps Launcher.
2) Click the New button to create a new KIT item.
3) Select the product record type as a kit, enter the product Name, the status must be “Released“, and the Active checkbox must be checked. The TrackInventory and Allow back order checkbox should be Unchecked, Is Kit check box should be checked, Type should be Kits.
4) Enter other details if required and click on the Save button to create the Kit Product.
1.2 Version setup –
Open the Product record, find the Version object (related list) and Click on the New
Select the Record Type as Kit, enter the Version Code, Product will be selected by default, Active checkbox should be checked, Status should be certified, enter the Start Date and End Date.
Enter other details if required and click on Save button to create the Version record.
Note : If the product has the single version then Mark the version as Default, else then the default checkbox need not be enabled the user can select the required version in the order product.
1.3 Bill of Materials Setup –
1. Open the Product record, find the Bill of Material-related list, and click on the New Button.
2. Select the Record Type as Kit BOM, enter the Name of Bill of Material, main Product will be selected by default on the BOM (product) lookup field, select the created BOM Version, select the Bill of Material from the BOM (component) lookup, enter the Quantity, Active checkbox should be checked, Type Should be Primary, Status should be Certified.
3. Enter other details if required and click on the Save button to create the Bill of Material record.
Note: – If you want to add any alternate BOM, select alternate Bill of Material from the BOM(alternate) lookup field. Refer to the alternate BOM creation steps mentioned below.
2. Order and its MRP and Stock Outward Line-Item creation steps –
Find the Orders tab from the App Launcher and click on the name.
All existing orders will show up as a list.
3. Create a new order or choose an existing order from the list that contains a Kit product.
4. Check for the Price book associated with the Order
5. Verify each BOM component has the same price book as the order. For example if the Order has the Standard price book the BOM component set up above Tyre dresser should also have the ‘Standard price book’
Auto creation of Logistic using ‘Ready to Pick & pack’ Checkbox
1. Go to related list of order and search for the order products related list and open up your kit order product
2. Make sure that ‘IS kit’ checkbox is enabled and ‘Allocate Stock’ , ‘Inventory Tracked’ are disabled.
3. Enable ‘Explode’ checkbox and ‘Save’ to create the MRPs and stock outwards.
Note: If the BOM components have the required stock then it will create the stock outwards in the ‘Reserved’ status or in the ‘Requested Status’ and the ‘InSufficient BOM’ checkbox will be checked.
4. After verifying the MRPs and outwards in the reserved status, Enable ‘Ready to Pick & Pack’ checkbox on order to create logistics
Manual creation of logistics
1. Go to the related list of the Order and search for the Logistic-related
2. Click on the Create New button On the Logistics-related list and you will be navigated to the screen called Order to Logistics.
In the above screenshot you can see that there is a product with the name Car Care kit is a kit product and all the BOMS which are associated with this kit product are listed down the kit product itself.
3. You can manually select the Distribution Centre as shown in the above screenshot when you change the Distribution Centre each time you can see the live available stocks of each product at that particular selected Distribution Centre.
4. Once the desired Distribution Centre is Selected you need to select all the items to which you want to create logistics as shown in the screenshot and click on the Logistic button which is located at the bottom of the screen.
5. Clicking on the Logistic button will navigate you to the next screen which will list out all the logistics items which are going to be created.
6. Click on the Save button as shown in the above screenshot and it will create the Outbound logistics and its line items for both kit and other products.
7. Once the logistic is created the same time system will create both MRP records for kit BOMS and Stock outward line items for all the products.
Once the Logistics get created for all Order products, you can navigate to the Outbound Logistic page to ship the items to the Customer, refer to the Outbound Logistic guide.
3. Check points for Kit product set up –
Product Configuration:
Ensure the product is marked as ‘Is Kit’ and ‘Track Inventory’ is enabled.
Disable ‘Allow Back Orders’.
Version Setup:
Enter the required fields such as:
Active (checked)
Record Type (Kit)
Start Date
To Date
Type (Sales)
Status (Certified)
Default (checked if it’s the default version to be used when creating logistics)
BOM Setup:
Verify the BOMs have the correct details, including:
Record Type (Kit)
Active (checked)
BOM Component (the product which is the BOM)
BOM Version (the version set up in step 2)
Quantity
Status (Certified)
BOM Product (the product marked as Kit)
Price Book:
Ensure all BOMs have the same price book as selected at the product level. This can be verified by navigating to the product’s related list price books.
Ensure all BOMs have the required stock. – Make sure the all BOM component should have the stock in the correct site associated to channel assigned to order
Logistics Creation:
Once the above steps are verified, navigate to the order.
For manual logistics, click on the ‘Create New’ button under the logistics section in the order’s related list.
For automatic creation, select the ‘Explode’ checkbox available on the order product and enable ‘Ready to Pick and Pack’.
NOTE: It is important to note that for kit products we need to first check the explode checkbox on the order line item and then the ready to pick and pack checkbox on the order, in the same order.
Accounts Receivable
Posting invoices ensures that the transaction has been recorded in the Finance general ledger of the company. If the organization operates on cash basis or on an accrual basis, the invoices and payments can be posted at any given time. Whenever invoices are posted, accounts receivable and sales-related ledger entries are created in the system. Similarly, when payments are posted, payment-related debit and credit ledger entries are created in the system automatically. One must ensure that all invoices are posted with a date for the current year to ensure the accounts receivable are created for the correct period of the year. Posting invoices and payments can be achieved through Accounts Payable page and also from record level.
Posting Invoices:
From Accounts Receivable
Navigate to the Finance Management app >Accounts Receivable tab.
Navigate to the Invoices tab, select the invoice which must be posted.
Once we select the invoice to post, click on the dropdown button to either post/un-post the invoice.
From Record Level
Navigate to the Order Management app >Sales Orders tab.
Select the sales order whose invoice must be posted.
On the related tab, click on the invoice number to open the invoice record.
Click the “Edit” button and select the “Posted” checkbox.
Click the “Save” button to apply the changes. Upon saving the record, a finance general ledger entry is created for accounts receivable and sales accounts.
Posting Payments:
From Accounts Receivable
Navigate to the Finance Management app >Accounts Receivable tab.
Navigate to the Payments tab, select the payment which must be posted.
Once we select the payment to post, click on the dropdown button to either post/un-post the payment.
Record a payment by hitting ‘Record Payment’.
Enter the payment amount, payment account, Reference Number, select the check box against the line item and hit ‘Save’
From Record Level
Navigate to the Order Management app > Sales Order tab.
Select the sales order whose payments must be posted.
On the related tab, click on the payment number to open the payment record.
Click the “Edit” button and select the “Posted” checkbox.
Click the “Save” button to apply the changes. Upon saving the record, credit and debit entries are automatically created in the system for the posted payment.
Footnote 3 Columns
Apparently we had reached a great height in the atmosphere, for the sky was a dead black, and the stars had ceased to twinkle. By the same illusion which lifts the horizon of the sea to the level of the spectator on a hillside, the sable cloud beneath was dished out, and the car seemed to float in the middle of an immense dark sphere, whose upper half was strewn with silver. Looking down into the dark gulf below, I could see a ruddy light streaming through a rift in the clouds. Lorem ipsum
[1]
Footnotes 01 Sumeris the earliest known civilization in the historical region of southern Mesopotamia Chalcolithic and early Bronze Ages between the sixth and fifth millennium BC.
Accusantium quibusdam dolorum at a, numquam deserunt. Lorem ipsum dolor
[2]
Footnotes 02 The Iron Age is the final epoch of the three-age division of humanity. Iron Age Europe and the Ancient Near East, but also, by analogy, to other parts of the Old World.
Quia quos autem veniam libero! Deleniti nemo quas optio voluptas voluptatibus sint ratione. Id vel error quia ipsam sit saepe
[3]
Footnotes 03 The history of Mesopotamia ranges from the earliest human occupation in the Paleolithic period up to Late antiquity. an increasing amount of hic at amet excepturi ea.
Voluptas sunt ratione consequatur optio porro eaque nam quod ex illum modi id animi fugiat vero explicabo illo officiis assumenda nulla rerum, dignissimos sed dicta pariatur
[4]
Footnotes 04 Hublin JJ, Ben-Ncer A, Bailey SE, Freidline SE, Neubauer S, Skinner MM, et al. (June 2017). From the original on 8 January 2020. Retrieved 27 July 2022.
Lorem, ipsum dolor sit amet consectetur adipisicing elit. Necessitatibus voluptas molestias expedita, ad dolorem inventore dolorum ipsum deleniti illum tempore veritatis iure nam numquam maxime
[5]
Footnotes -5 First human settlement in the southern half of the Australian mainland, by indigenous Australians (including the future sites of Sydney
Et ab voluptatibus minima suscipit necessitatibus magni error, quaerat praesentium
[6]
Footnotes 06 Folkloreis shared by a particular group of people; it encompasses the traditions common to that culture, subculture or group. This includes oral traditions such as tales, legends, proverbs and jokes.
Eligendi ipsam, voluptatibus quidem quos quasi totam aperiam voluptates illum quibusdam similique, sapiente necessitatibus. Dolore in est dolores
[7]
Footnotes 07 Hublin JJ, Ben-Ncer A, Bailey SE, Freidline SE, Neubauer S, Skinner MM, et al. (June 2017). “New fossils from Jebel Irhoud, Morocco”. From the original on 8 January 2020. Retrieved 27 July 2022.
Voluptates similique incidunt numquam porro, veniam totam dolore error, iste consequuntur quibusdam quod dignissimos in laborum deserunt impedit cum fugit quisquam ex quo, quidem voluptatum minima velit! Nisi accusantium ullam suscipit sapiente, harum quvelit animi laborum veritatis, ipsam eius, natus facere. Natus voluptates, et deleniti eum odio eligendi dolores cupiditate. Consequuntur hic adipisci quisquam praesentium commodi laudantium sed et modi reprehenderit. Doloribus fuga nesciunt alias autem dolorum unde, veritatis, beatae obcaecati commodi adipisci ut culpa, voluptas qui totam iure consectetur asperiores facilis impedit ullam esse architecto itaque? Culpa, laudantium hic obcaecati molestias doloribus animi quis temporibus qui nam dicta ipsum cumque perferendis similique officia earum sequi ipsa! Voluptates, sint iste corrupti fugiat alias a quisquam voluptatem at amet iure, ullam facere eum porro nisi. Iure optio, accusamus illum, perferendis repudiandae doloribus officiis maiores nobis ut quisquam voluptates. Ex laudantium repudiandae corporis voluptatibus vitae temporibus natus numquam, accusantium earum quidem eveniet animi! Iste alias ducimus velit ipsum itaque, accusamus amet, odio quae suscipit nobis eos eveniet consectetur tempore eum accusantium? Perferendis voluptate asperiores est corporis quia vero impedit minima sed eaque minus blanditiis eius dicta aliquam aperiam quo illum ipsum culpa pariatur doloremque at, id repudiandae atque reprehenderit! Voluptas dolore molestias odio ut recusandae facere vitae saepe distinctio numquam. Nam doloremque voluptatem, excepturi sint eaque temporibus cumque odio obcaecati cum optio assumenda numquam nesciunt neque? Iste ipsum esse modi iusto impedit odio vel neque. Voluptatem.
Serial Number
Products and Fixed Assets can be serialized and Inventory can be stored for different products with different serial numbers.
Assigning Serial numbers to a product involves the following setup:
On the product detail page, make sure the product is active, status is released and serialize checkbox is checked.
In the Related section, go to Serial Number > Create New.
Add Name, Serial Number and Product.
Add Availability date and make sure available checkbox is checked.
Create Inventory Stocks and Stock Inward Line Item for the Product.
In the stock Inward line Item, choose the Serial Number we created.
Required plugins
After installing the theme you most have to install the ‘Faster Core’, ‘Visual composer’ and‘Codestar Framework’ plugins to import the demo content as well and work the theme correctly.
You will find all required and recommended plugins at there Appearance > Install Plugins.
Warehouse
Create a Warehouse Site
Navigate to the Order Management app > Sites tab.
Once in the Sites section, you can track the warehouse sites already filled in and create a new warehouse.
Click the “New” button to create a new warehouse.
Enter the name of the warehouse and select the Active checkbox to activate it.
Enter the Barcode of the warehouse and select the Primary Contact associated with the warehouse.
Select the type of warehouse, whether a site is of the type Warehouse, Plant or any other type.
Enter the organisation and business unit of the site and click the “Save” button to create the warehouse site record.
Location
Navigate to the tab related to the Warehouse site record. Find the list related to Locations.
Once in the Locations section, you can track the locations already filled in and create a new Location record.
Click the “New” button to create a Location record
Enter the Location Name and select the type of location, whether it is a Floor, Bin, Shelf or Cardboard.
Enter the Floor Number, Shelf Number, Aisle Number, Bay Number or Space Number.
Enter the Bin capacity, organisation and business unit details. Also, select whether the location holds scrap.
Select the Active checkbox and click the “Save” button to create the location record.
Storage Containers
Navigate to the tab related to the Warehouse site record. Find the list related to Storage Containers.
Once in the Storage Containers section, you can track the storage containers already filled in and create a new Storage Container record.
Click the “New” button to create a Storage Container record.
Enter the Storage Container Name and the Barcode of the container.
Select the Type of container, whether it is a Bin, Bottle, Bucket or Pallet. Enter the description of the container type in the Description field.
Select the status of the container and select the Active checkbox,
Click the “Save” button to create a Storage Container record.
Password Protected doc
Code Okaidia Theme
Inline code
Wrap inline snippets of code with<code>. Be sure to escape HTML angle brackets.
For example, <section>should be wrapped as inline.
console.log( 'Code is Poetry' );
Code blocks
Use <pre>s for multiple lines of code. Once again, be sure to escape any angle brackets in the code for proper rendering. You may optionally add the .pre-scrollable class, which will set a max-height of 350px and provide a y-axis scrollbar.
Apparently we had reached a great height in the atmosphere, for the sky was a dead black, and the stars had ceased to twinkle. By the same illusion which lifts the horizon of the sea to the level of the spectator on a hillside, the sable cloud beneath was dished out, and the car seemed to float in the middle of an immense dark sphere, whose upper half was strewn with silver. Looking down into the dark gulf below, I could see a ruddy light streaming through a rift in the clouds. Lorem ipsum
[1]
Footnotes 01 Sumeris the earliest known civilization in the historical region of southern Mesopotamia Chalcolithic and early Bronze Ages between the sixth and fifth millennium BC.
Accusantium quibusdam dolorum at a, numquam deserunt. Lorem ipsum dolor
[2]
Footnotes 02 The Iron Age is the final epoch of the three-age division of humanity. Iron Age Europe and the Ancient Near East, but also, by analogy, to other parts of the Old World.
Quia quos autem veniam libero! Deleniti nemo quas optio voluptas voluptatibus sint ratione. Id vel error quia ipsam sit saepe
[3]
Footnotes 03 The history of Mesopotamia ranges from the earliest human occupation in the Paleolithic period up to Late antiquity. an increasing amount of hic at amet excepturi ea.
Voluptas sunt ratione consequatur optio porro eaque nam quod ex illum modi id animi fugiat vero explicabo illo officiis assumenda nulla rerum, dignissimos sed dicta pariatur
[4]
Footnotes 04 Hublin JJ, Ben-Ncer A, Bailey SE, Freidline SE, Neubauer S, Skinner MM, et al. (June 2017). From the original on 8 January 2020. Retrieved 27 July 2022.
Lorem, ipsum dolor sit amet consectetur adipisicing elit. Necessitatibus voluptas molestias expedita, ad dolorem inventore dolorum ipsum deleniti illum tempore veritatis iure nam numquam maxime
[5]
Footnotes -5 First human settlement in the southern half of the Australian mainland, by indigenous Australians (including the future sites of Sydney
Et ab voluptatibus minima suscipit necessitatibus magni error, quaerat praesentium
[6]
Footnotes 06 Folkloreis shared by a particular group of people; it encompasses the traditions common to that culture, subculture or group. This includes oral traditions such as tales, legends, proverbs and jokes.
Eligendi ipsam, voluptatibus quidem quos quasi totam aperiam voluptates illum quibusdam similique, sapiente necessitatibus. Dolore in est dolores
[7]
Footnotes 07 Hublin JJ, Ben-Ncer A, Bailey SE, Freidline SE, Neubauer S, Skinner MM, et al. (June 2017). “New fossils from Jebel Irhoud, Morocco”. From the original on 8 January 2020. Retrieved 27 July 2022.
Voluptates similique incidunt numquam porro, veniam totam dolore error, iste consequuntur quibusdam quod dignissimos in laborum deserunt impedit cum fugit quisquam ex quo, quidem voluptatum minima velit! Nisi accusantium ullam suscipit sapiente, harum quvelit animi laborum veritatis, ipsam eius, natus facere. Natus voluptates, et deleniti eum odio eligendi dolores cupiditate. Consequuntur hic adipisci quisquam praesentium commodi laudantium sed et modi reprehenderit. Doloribus fuga nesciunt alias autem dolorum unde, veritatis, beatae obcaecati commodi adipisci ut culpa, voluptas qui totam iure consectetur asperiores facilis impedit ullam esse architecto itaque? Culpa, laudantium hic obcaecati molestias doloribus animi quis temporibus qui nam dicta ipsum cumque perferendis similique officia earum sequi ipsa! Voluptates, sint iste corrupti fugiat alias a quisquam voluptatem at amet iure, ullam facere eum porro nisi. Iure optio, accusamus illum, perferendis repudiandae doloribus officiis maiores nobis ut quisquam voluptates. Ex laudantium repudiandae corporis voluptatibus vitae temporibus natus numquam, accusantium earum quidem eveniet animi! Iste alias ducimus velit ipsum itaque, accusamus amet, odio quae suscipit nobis eos eveniet consectetur tempore eum accusantium? Perferendis voluptate asperiores est corporis quia vero impedit minima sed eaque minus blanditiis eius dicta aliquam aperiam quo illum ipsum culpa pariatur doloremque at, id repudiandae atque reprehenderit! Voluptas dolore molestias odio ut recusandae facere vitae saepe distinctio numquam. Nam doloremque voluptatem, excepturi sint eaque temporibus cumque odio obcaecati cum optio assumenda numquam nesciunt neque? Iste ipsum esse modi iusto impedit odio vel neque. Voluptatem.
Tips / Guide
Quos vesti bulum dictum irure recusandae, aliquet, ullam quod fugit, dictumst, optio, parturient auctor pulvinar, inceptos sem. Habitasse! Mattis, litora ipsum, fringilla elementum.
Optimizing your images will helps your WordPress site load faster.
Download and activate WP Smush.it This plugin will optimize every image you upload and you can use the Bulk Smush.it feature to smush all of your uploaded images.
Alternatives to WP Smush.it include EWWW Image Optimizer, CW Image Optimizer, Imsanity and Hammy. Many WordPress users prefer using these plugins as they do not rely on an external server to process your images.
Language Translations
All of our Themes are able to be translated into any language. The process of translating the theme is a user responsibility. The following instructions are given as guidance.
Open wp-config.php and replace this: define ('WPLANG', ''); with this (substitute the language string (bg_BG) with your own!): define ('WPLANG', 'bg_BG');
Connect to your site -> open your theme/languages directory
Download the default.pot file and open it with POEDIT.
Translate file and save it as bg_BG (the file name must match with the string you inserted into wp-config.php)
Two files will be generated after save. bg_BG.pot and bg_BG.mo
Upload the .mo and .pot files into wp-content/themes/your-theme/languages folder
Your WordPress installation should be in the language you intend on using the site.
How to change Author Avatar?
The theme uses Gravatar to display users avatars . to create or change your Gravatar :
If you have never setup a Gravatar account:
Register/login to Gravatar. Upon registering, use the SAME email address that is associated with your WordPress User Profile.
Upload your photo and associate it with that specific email address.
If you already registered at gravatar.com, follow these steps:
Click on “My Gravatars”.
click on “Add a New Email”.
Then, you’ll need to click on “Add a New Image”.
Upload an image.
Then select the email address, and then select your image from the bottom. Now it’s associated with that email address. Click Save.
It will take about 5-10 minutes to propagate on the internet, and then will appear on site.
Sample User Guide
Charles is a creative WordPress theme for saas, software, startup, mobile app, agency, and related products & services. Charles is loaded with tons of features, elements & blocks, options that give its users real flexibility to create a dynamic, professional website in no time. It is 100% responsive and looks stunning on all types of screens and devices.
Before building your site, better take a look at this section.
Theme Installation
Extract the zipped package downloaded from ThemeForest to your desktop, in the extracted package you will find the charles.zip file which is the WordPress theme.
You can install the theme in two ways:
FTP: Extract charles.zip file and upload the extracted folder to /wp-content/themes/ folder on your server.

WordPress: Navigate to Appearance -> Add New Themes -> Upload page. Select charles.zip file. Press the Install Now button to upload and install the theme.
After uploading the theme, you have to activate it. Navigate to Appearance -> Themes page to activate the theme.
Demo Import
If you want your site to look like exactly the ‘Charles’ demos then you have to import the demo content successfully.
We integrated the One Click Demo installation feature to ‘Charles’ WordPress theme. You can import all demo content just by a click only.
OneClick Demo Installation Process
Install the theme and active it. Then install all required plugins. Make sure all the required plugins are activated.
After activating all the required plugins navigate toAppearance > ‘One Click Demo Import’menu from the WordPress dashboard.
Note: If the option data do not import then you have to import it manually. Navigate to‘Theme Settings > Backup’. Then copy-paste the backup string here and click on the Import a Backup button. You will find the backup string in the options.txt file.
The recommended method to import the demo content.
If you failed to import the demo content by one click then you have to follow the below steps to import the demo content manually. You will get all demo content data with the theme package. You will find the demos in ‘charles>inc/demo{disired-demo-number} this path.
Navigate to Tools > Importthen install the WordPress plugin and click on the ‘Run Importer’. Upload here the ‘theme_content.xml’ file.
Install the ‘Widget Importer & Exporter‘ plugin to import the demo widgets. Then navigate to Tools > Widget Importer & Exporter and upload here the ‘widget_data.wie’ file.
Now you have to import the Dental Options as like the demo. Navigate to ‘Theme Settings > Backup’. Then copy-paste the backup string here and click on the Import a Backup button. You will find the backup string in the options.txt file.
Required Plugins
After installing the theme you most have to install the ‘Charles Core’, ‘Elementor’ and‘Piklist’ plugins to import the demo content as well and work the theme correctly.
You will find all required and recommended plugins at Appearance > Install Plugins.
System Requirements
To use Charles you need to have a WordPress 4.0 (or higher version) site with PHP 5.4 or more running on your hosting server. If you’ve already installed WordPress on your server and your site is up, that’s great. For help regarding WordPress installation, please see this WordPress Codex link.
Harum proident? Volutpat sint. Dicta. Eleifend, distinctio placeat nec commodo asperiores posuere fusce illo, adipiscing leo velit ipsum. Mauris enim itaque penatibus, consectetur fermentum, vel temporibus interdum
Updating Your Theme
We are strongly recommended to install “Envato Toolkit” plugin for ease of use. Once necessary plugin installed and activated “Envato Toolkit” menu will be available at your admin side.
Important : If you have missing plugins or having issues to install any of them, all the related could be found under “recommended-plugins” folder within the downloaded package.
User Account Information
To obtain your API Key, visit your “My Settings” page on any of the Envato Marketplaces. Once a valid connection has been made any changes to the API key below for this username will not effect the results for 5 minutes because they’re cached in the database. If you have already made an API connection and just purchase a theme and it’s not showing up, wait five minutes and refresh the page. If the theme is still not showing up, it’s possible the author has not made it available for auto install yet.
Marketplace Username: Enter your Envato marketplace username.
Secret API Key: Enter your Envato marketplace Secret API Key (http://themeforest.net/user/[your-username]/api_keys/edit, Login to your Themeforest account, Settings > API Key)
Backup Information
This plugin will automatically save your theme as a ZIP archive before it does an upgrade. The directory those backups get saved to is wp-content/envato-backups. However, if you’re experiencing problems while attempting to upgrade, it’s likely to be a permissions issue and you may want to manually backup your theme before upgrading. Alternatively, if you don’t want to backup your theme you can check the box below.
You can also update the theme by replacing the old theme folder. First go to your theme directory then delete the theme folder and paste the new version of the theme.
How to set site’s favicon
Go to Appearance > Customize > Site Identity. Then Select an image as site icon. It’s recommended to use a .ico image as the site icon (favicon).
Menu Not Appearing
Please make sure you have generated and set menus on “Appearance > Menus”.
“Main Menu” menu locations have to be filled to make the menus work as expected.
How to Paginate a Post ?
In order to paginate your blog post, in the Write panel in your WordPress admin, switch to the TEXT view (if you are using the Visual view) and then enter the following code to wherever you want to break the post up into a new page:
<!--nextpage-->
How to apply custom CSS code.
You can apply your own custom CSS code on Charles theme. Your custom CSS code will not be lost even if you update the theme.
Navigate to Appearance > Customize > Additional CSS
Take a look at the screenshots-
Sample Guide
Non aptent facere unde placeat habitant minus numquam, cubilia orci accusantium laoreet vel, illum! Mauris placerat. Nibh fuga, luctus dignissim cursus, exercitationem, viverra ratione similique aut, culpa tellus. Turpis fusce, eos cupiditate, turpis? Pede leo repudiandae, praesent laborum dolore eum consequatur provident ullamco praesent, officia! Ipsam nam auctor repudiandae laoreet diamlorem possimus aptent? Mollis iure laudantium ratione malesuada facilis vivamus nec ullamcorper sapiente pharetra nisl tempora cras doloremque, nihil ligula ut reprehenderit? Eiusmod? Egestas fermentum aliqua, occaecat mollis pulvinar sapien! Ab suscipit morbi rhoncus magnam maxime. Officia facilisis, curae odio, rhoncus egestas iure venenatis quidem! Veritatis magnam commodo magnis qui.
Magnam rutrum pretium inventore ridiculus netus. Ducimus cursus facilis eleifend, congue odit venenatis conubia mi provident exercitationem dictumst aenean vel, eleifend mi lacinia porttitor. Incidunt nisl laoreet, suspendisse nam nemo suspendisse luctus, donec parturient necessitatibus itaque tempora beatae eos non ratione ornare consequat consequat cursus hac deleniti esse natus ridiculus. Ultricies alias, cum sociosqu error praesent, nonummy vero optio, aute, nec natoque! Excepteur, saepe, magnam assumenda non cursus, at sociis, nihil ridiculus! Egestas non omnis, gravida nonummy eligendi? Sapien do totam mollis blandit iure, rerum vestibulum hymenaeos explicabo, purus dolore? Habitant consequatur. Curae incididunt sem minim. Explicabo morbi, corporis. Malesuada.
Optimize Images
Optimizing your images will helps your WordPress site load faster.
Download and activate WP Smush.it This plugin will optimize every image you upload and you can use the Bulk Smush.it feature to smush all of your uploaded images.
Many WordPress users prefer using these plugins as they do not rely on an external server to process your images.
Language Translations
All of our Themes are able to be translated into any language. The process of translating the theme is a user responsibility. The following instructions are given as guidance.
Open wp-config.php and replace this: define ('WPLANG', ''); with this (substitute the language string (bg_BG) with your own!): define ('WPLANG', 'bg_BG');
Connect to your site -> open your theme/languages directory
Download the default.pot file and open it with POEDIT.
Translate file and save it as bg_BG (the file name must match with the string you inserted into wp-config.php)
Two files will be generated after save. bg_BG.pot and bg_BG.mo
Upload the .mo and .pot files into wp-content/themes/your-theme/languages folder
Your WordPress installation should be in the language you intend on using the site.
Sample doc title issues
What is an Extension?
For editing menu navigation settings go to Theme Options > Header > Top of Header
. So I said cup of tea Queen’s English owt to do with me I don’t want no agro cheers cheeky bugger fanny around baking cakes down the pub happy days, JamesBond daft a load of old tosh buggered he lost his bottle lost the plot he nicked it a blinding shot.
[docly_tooltip id=”1″]Tooltip text[/docly_tooltip] mufty quaint no biggie cras baking cakes barney bamboozled, what a plonker bum bag he legged it young delinquent knees up Eaton the full monty arse over tit, my lady buggered happy days amongst bugger all mate are you taking the piss brolly. [docly_tooltip id=”2″] Tooltip Content [/docly_tooltip] off a blinding shot matie boy old gosh barney grub dropped a clanger. And for styling menus go to Theme Options > Header > Top of Header > Menu Styles
of this Row
Tosser are you taking the piss cuppa porkies pardon you butty lost the plot William bog lemon squeezy bite your arm off Richard, say what a load of rubbish cockup I don’t want no agro twit young delinquent cack bodge a bonnet.
Unordered list items
Go to Docly SettingsHeaderLogo
Consectetur adipiscing elit
Integer molestie lorem at massa
Facilisis in pretium nisl aliquet
Ordered List Items
Go to Docly SettingsHeaderLogo
Consectetur adipiscing elit
Integer molestie lorem at massa
Facilisis in pretium nisl aliquet
Example Title Doc
What is an Extension?
For editing menu navigation settings go to Theme Options > Header > Top of Header
. So I said cup of tea Queen’s English owt to do with me I don’t want no agro cheers cheeky bugger fanny around baking cakes down the pub happy days, JamesBond daft a load of old tosh buggered he lost his bottle lost the plot he nicked it a blinding shot.
[docly_tooltip id=”1″]Tooltip text[/docly_tooltip] mufty quaint no biggie cras baking cakes barney bamboozled, what a plonker bum bag he legged it young delinquent knees up Eaton the full monty arse over tit, my lady buggered happy days amongst bugger all mate are you taking the piss brolly. [docly_tooltip id=”2″] Tooltip Content [/docly_tooltip] off a blinding shot matie boy old gosh barney grub dropped a clanger. And for styling menus go to Theme Options > Header > Top of Header > Menu Styles
of this Row
Tosser are you taking the piss cuppa porkies pardon you butty lost the plot William bog lemon squeezy bite your arm off Richard, say what a load of rubbish cockup I don’t want no agro twit young delinquent cack bodge a bonnet.
Unordered list items
Go to Docly SettingsHeaderLogo
Consectetur adipiscing elit
Integer molestie lorem at massa
Facilisis in pretium nisl aliquet
Ordered List Items
Go to Docly SettingsHeaderLogo
Consectetur adipiscing elit
Integer molestie lorem at massa
Facilisis in pretium nisl aliquet
Theme Settings
Quos vestibulum dictum irure recusandae, aliquet, ullam quod fugit, dictumst, optio, parturient auctor pulvinar, inceptos sem. Habitasse! Mattis, litora ipsum, fringilla elementum.
Header Settings
In the Header settings section, you will get a lot of header customization options. In this section, you can change the logo and set the menu button, navigation bar settings etc.
Theme updating issue
Sometimes, your website may break when you update the new version of the theme.
You have to delete the Charles core plugin before installing the updated theme in this case. Then install the plugin again from Appearance > Install pluginsafter installing the new version.
Footer Settings
Page Building
Create a new page
On the top left side of the WordPress dashboard, click Pages > Add New
Click Edit with Elementor to enter Elementor Page Builder.
The website editing screen is located on the right side. This is your workspace, where you can add sections and templates.
The panel is located on the left side of the screen and contains creative tools called widgets, that allow you to add elements to your page.
Some of the most commonly used widgets include Button, Image, text, and more.
To find a specific widget, use the search field.
Some common issues
We adding here solutions on regarding some common issues.
You may find here your solution. So we request to check here for your issue before asking us.
Voluptatibus massa tempor
What is an Extension?
For editing menu navigation settings go to Theme Options > Header > Top of Header
. So I said cup of tea Queen’s English owt to do with me I don’t want no agro cheers cheeky bugger fanny around baking cakes down the pub happy days, JamesBond daft a load of old tosh buggered he lost his bottle lost the plot he nicked it a blinding shot.
[docly_tooltip id=”1″]Tooltip text[/docly_tooltip] mufty quaint no biggie cras baking cakes barney bamboozled, what a plonker bum bag he legged it young delinquent knees up Eaton the full monty arse over tit, my lady buggered happy days amongst bugger all mate are you taking the piss brolly. [docly_tooltip id=”2″] Tooltip Content [/docly_tooltip] off a blinding shot matie boy old gosh barney grub dropped a clanger. And for styling menus go to Theme Options > Header > Top of Header > Menu Styles
of this Row
Tosser are you taking the piss cuppa porkies pardon you butty lost the plot William bog lemon squeezy bite your arm off Richard, say what a load of rubbish cockup I don’t want no agro twit young delinquent cack bodge a bonnet.
Unordered list items
Go to Docly SettingsHeaderLogo
Consectetur adipiscing elit
Integer molestie lorem at massa
Facilisis in pretium nisl aliquet
Ordered List Items
Go to Docly SettingsHeaderLogo
Consectetur adipiscing elit
Integer molestie lorem at massa
Facilisis in pretium nisl aliquet
Sample doc title
What is an Extension?
For editing menu navigation settings go to Theme Options > Header > Top of Header
. So I said cup of tea Queen’s English owt to do with me I don’t want no agro cheers cheeky bugger fanny around baking cakes down the pub happy days, JamesBond daft a load of old tosh buggered he lost his bottle lost the plot he nicked it a blinding shot.
[docly_tooltip id=”1″]Tooltip text[/docly_tooltip] mufty quaint no biggie cras baking cakes barney bamboozled, what a plonker bum bag he legged it young delinquent knees up Eaton the full monty arse over tit, my lady buggered happy days amongst bugger all mate are you taking the piss brolly. [docly_tooltip id=”2″] Tooltip Content [/docly_tooltip] off a blinding shot matie boy old gosh barney grub dropped a clanger. And for styling menus go to Theme Options > Header > Top of Header > Menu Styles
of this Row
Tosser are you taking the piss cuppa porkies pardon you butty lost the plot William bog lemon squeezy bite your arm off Richard, say what a load of rubbish cockup I don’t want no agro twit young delinquent cack bodge a bonnet.
Unordered list items
Go to Docly SettingsHeaderLogo
Consectetur adipiscing elit
Integer molestie lorem at massa
Facilisis in pretium nisl aliquet
Ordered List Items
Go to Docly SettingsHeaderLogo
Consectetur adipiscing elit
Integer molestie lorem at massa
Facilisis in pretium nisl aliquet
How to customize the theme.
OVERRIDING PARENT THEME FILES
You can not only target individual style declarations via the style sheet but also override entire components of the parent theme.
For every theme file present in the parent directory, WordPress will check whether a corresponding file is present in the child theme and if so, use that one instead. This means that a header.php file in the child theme will override its equivalent in the parent folder.
So, if you don’t like something about a page’s layout, just copy the respective file, implement your changes, and upload it to the child theme’s folder. The modifications will then appear in the child theme, while the original file will remain untouched.
WORKING WITH TEMPLATE FILES
We’ve learned that we can overwrite any file in the parent theme by placing a copy in the child theme’s folder and customizing it. However, using files that exist only in the child theme is also possible. Template files are a good example of this.
Let’s say we want to build a full-width page template for our child theme. Our theme does not lend itself to the full-screen presentation, but let’s do it anyway for demonstration purposes, shall we?
To create a full-width page in Chaoz you have to create a custom page template. Let’s start with the page template.
For our custom page template, we simply copy page.php from the parent theme, rename it to page-full-width.php and place it in the Child theme’s root folder.
Doc title example
What is an Extension?
For editing menu navigation settings go to Theme Options > Header > Top of Header
. So I said cup of tea Queen’s English owt to do with me I don’t want no agro cheers cheeky bugger fanny around baking cakes down the pub happy days, JamesBond daft a load of old tosh buggered he lost his bottle lost the plot he nicked it a blinding shot.
[docly_tooltip id=”1″]Tooltip text[/docly_tooltip] mufty quaint no biggie cras baking cakes barney bamboozled, what a plonker bum bag he legged it young delinquent knees up Eaton the full monty arse over tit, my lady buggered happy days amongst bugger all mate are you taking the piss brolly. [docly_tooltip id=”2″] Tooltip Content [/docly_tooltip] off a blinding shot matie boy old gosh barney grub dropped a clanger. And for styling menus go to Theme Options > Header > Top of Header > Menu Styles
of this Row
Tosser are you taking the piss cuppa porkies pardon you butty lost the plot William bog lemon squeezy bite your arm off Richard, say what a load of rubbish cockup I don’t want no agro twit young delinquent cack bodge a bonnet.
Unordered list items
Go to Docly SettingsHeaderLogo
Consectetur adipiscing elit
Integer molestie lorem at massa
Facilisis in pretium nisl aliquet
Ordered List Items
Go to Docly SettingsHeaderLogo
Consectetur adipiscing elit
Integer molestie lorem at massa
Facilisis in pretium nisl aliquet
Doc Section
Quos vestibulum dictum irure recusandae, aliquet, ullam quod fugit, dictumst, optio, parturient auctor pulvinar, inceptos sem. Habitasse! Mattis, litora ipsum, fringilla elementum.
This is a doc title
What is an Extension?
For editing menu navigation settings go to Theme Options > Header > Top of Header
. So I said cup of tea Queen’s English owt to do with me I don’t want no agro cheers cheeky bugger fanny around baking cakes down the pub happy days, JamesBond daft a load of old tosh buggered he lost his bottle lost the plot he nicked it a blinding shot.
[docly_tooltip id=”1″]Tooltip text[/docly_tooltip] mufty quaint no biggie cras baking cakes barney bamboozled, what a plonker bum bag he legged it young delinquent knees up Eaton the full monty arse over tit, my lady buggered happy days amongst bugger all mate are you taking the piss brolly. [docly_tooltip id=”2″] Tooltip Content [/docly_tooltip] off a blinding shot matie boy old gosh barney grub dropped a clanger. And for styling menus go to Theme Options > Header > Top of Header > Menu Styles
of this Row
Tosser are you taking the piss cuppa porkies pardon you butty lost the plot William bog lemon squeezy bite your arm off Richard, say what a load of rubbish cockup I don’t want no agro twit young delinquent cack bodge a bonnet.
Unordered list items
Go to Docly SettingsHeaderLogo
Consectetur adipiscing elit
Integer molestie lorem at massa
Facilisis in pretium nisl aliquet
Ordered List Items
Go to Docly SettingsHeaderLogo
Consectetur adipiscing elit
Integer molestie lorem at massa
Facilisis in pretium nisl aliquet
Example doc title
What is an Extension?
For editing menu navigation settings go to Theme Options > Header > Top of Header
. So I said cup of tea Queen’s English owt to do with me I don’t want no agro cheers cheeky bugger fanny around baking cakes down the pub happy days, JamesBond daft a load of old tosh buggered he lost his bottle lost the plot he nicked it a blinding shot.
[docly_tooltip id=”1″]Tooltip text[/docly_tooltip] mufty quaint no biggie cras baking cakes barney bamboozled, what a plonker bum bag he legged it young delinquent knees up Eaton the full monty arse over tit, my lady buggered happy days amongst bugger all mate are you taking the piss brolly. [docly_tooltip id=”2″] Tooltip Content [/docly_tooltip] off a blinding shot matie boy old gosh barney grub dropped a clanger. And for styling menus go to Theme Options > Header > Top of Header > Menu Styles
of this Row
Tosser are you taking the piss cuppa porkies pardon you butty lost the plot William bog lemon squeezy bite your arm off Richard, say what a load of rubbish cockup I don’t want no agro twit young delinquent cack bodge a bonnet.
Unordered list items
Go to Docly SettingsHeaderLogo
Consectetur adipiscing elit
Integer molestie lorem at massa
Facilisis in pretium nisl aliquet
Ordered List Items
Go to Docly SettingsHeaderLogo
Consectetur adipiscing elit
Integer molestie lorem at massa
Facilisis in pretium nisl aliquet
Title doc
What is an Extension?
For editing menu navigation settings go to Theme Options > Header > Top of Header
. So I said cup of tea Queen’s English owt to do with me I don’t want no agro cheers cheeky bugger fanny around baking cakes down the pub happy days, JamesBond daft a load of old tosh buggered he lost his bottle lost the plot he nicked it a blinding shot.
[docly_tooltip id=”1″]Tooltip text[/docly_tooltip] mufty quaint no biggie cras baking cakes barney bamboozled, what a plonker bum bag he legged it young delinquent knees up Eaton the full monty arse over tit, my lady buggered happy days amongst bugger all mate are you taking the piss brolly. [docly_tooltip id=”2″] Tooltip Content [/docly_tooltip] off a blinding shot matie boy old gosh barney grub dropped a clanger. And for styling menus go to Theme Options > Header > Top of Header > Menu Styles
of this Row
Tosser are you taking the piss cuppa porkies pardon you butty lost the plot William bog lemon squeezy bite your arm off Richard, say what a load of rubbish cockup I don’t want no agro twit young delinquent cack bodge a bonnet.
Unordered list items
Go to Docly SettingsHeaderLogo
Consectetur adipiscing elit
Integer molestie lorem at massa
Facilisis in pretium nisl aliquet
Ordered List Items
Go to Docly SettingsHeaderLogo
Consectetur adipiscing elit
Integer molestie lorem at massa
Facilisis in pretium nisl aliquet
Example doc of docly
What is an Extension?
For editing menu navigation settings go to Theme Options > Header > Top of Header
. So I said cup of tea Queen’s English owt to do with me I don’t want no agro cheers cheeky bugger fanny around baking cakes down the pub happy days, JamesBond daft a load of old tosh buggered he lost his bottle lost the plot he nicked it a blinding shot.
[docly_tooltip id=”1″]Tooltip text[/docly_tooltip] mufty quaint no biggie cras baking cakes barney bamboozled, what a plonker bum bag he legged it young delinquent knees up Eaton the full monty arse over tit, my lady buggered happy days amongst bugger all mate are you taking the piss brolly. [docly_tooltip id=”2″] Tooltip Content [/docly_tooltip] off a blinding shot matie boy old gosh barney grub dropped a clanger. And for styling menus go to Theme Options > Header > Top of Header > Menu Styles
of this Row
Tosser are you taking the piss cuppa porkies pardon you butty lost the plot William bog lemon squeezy bite your arm off Richard, say what a load of rubbish cockup I don’t want no agro twit young delinquent cack bodge a bonnet.
Unordered list items
Go to Docly SettingsHeaderLogo
Consectetur adipiscing elit
Integer molestie lorem at massa
Facilisis in pretium nisl aliquet
Ordered List Items
Go to Docly SettingsHeaderLogo
Consectetur adipiscing elit
Integer molestie lorem at massa
Facilisis in pretium nisl aliquet
Empty Section
Theme Settings
You can control the theme’s functionality and customize theme’s content from the Theme Settingspage. Here you will find all relevant settings to customize the theme.
This section will provide you an in-depth guide on how to use the Theme Options. To access the Theme Settings page, go to- Dashboard > Theme Settings.You will find this page at the top of the Appearancemenu.
In the Header settings section, you will get a lot of header customization options. In this section, you can change the logo and change the page/post’s Title bar padding, Page margin-top, Title bar overlay color etc.
Footer Settings
You can configure the footer area of the theme from this settings option. You will find all relevant section settings to the “Footer Settings” option. Navigate to Theme Options > Footer Settings to go to this settings section. We provided all necessary instructions and descriptions with all the options.
Reprehenderit bibendum
Unordered list items
Go to Docly SettingsHeaderLogo
Consectetur adipiscing elit
Integer molestie lorem at massa
Facilisis in pretium nisl aliquet
Ordered List Items
Go to Docly SettingsHeaderLogo
Consectetur adipiscing elit
Integer molestie lorem at massa
Facilisis in pretium nisl aliquet
Iusto molestie distinctio
Unordered list items
Go to Docly SettingsHeaderLogo
Consectetur adipiscing elit
Integer molestie lorem at massa
Facilisis in pretium nisl aliquet
Ordered List Items
Go to Docly SettingsHeaderLogo
Consectetur adipiscing elit
Integer molestie lorem at massa
Facilisis in pretium nisl aliquet
Plugins Installation
After activating the Rogan WordPress theme, you will see a message that tells you to install some required and recommended plugins, click on Begin Installing Plugins or if you can’t see that message, Go to Appearance > Install plugins and star install all the plugins
Next step select all the plugins and change the drop-down menu to Install then click on the Apply button and wait for the installation process.
After installing plugins you will redirect to plugins list, again select all the plugins and change drop down this time to Activate and click on Apply button then wait for the activation process.
If you faced any problem or couldn’t install plugins, feel free to open a support ticket.
Demo Import
If you want your site to look like exactly the ‘Rogan’ demos, you have to import the demo content. We integrated the One Click Demo installation feature in Rogan. You can import the demo content by a click only.
Install the theme and activate it. Then install all the required plugins. Make sure all the required plugins are activated before you begin. Then navigate to “Appearance > Import Demo Data” to import the demo data and click on the “Import Demo Data” button.
After Demo Import
After successfully importing the demo content, you will find all the pages in your WordPress admin dashboard’s Pages menu. Find your desired homepage there and start editing this page with Elementor. Also, you can set your Homepage demo as the Frontpage of your website from Settings > Reading.
Tips: Clean your WordPress site before reinstalling a Demo. You can clean your WordPress with the WP Reset plugin.
An alternative method to import the demo content.
However, you will get all demo content data with the theme package. You will find the demos in ‘rogan>inc>demos this path. If you failed to import the demo content with one click then you have to follow the below steps to import the demo content manually.
Navigate to Tools > Importthen install the WordPress plugin and click on the ‘Run Importer’. Upload here the ‘contents.xml’ file.
Install the ‘Widget Importer & Exporter‘ plugin to import the demo widgets. Then navigate to Tools > Widget Importer & Exporter and upload here the ‘widgets.wie’ file.
Now you have to import the Theme Settings as like the demo. Navigate to ‘Theme Settings > Import / Export‘. Then click on the Import from File button and copy-paste the backup string here and click on the Import a Backup button. You will find the backup string in the settings.json file.
Gullu Knowledge Base
Officia aperiam voluptatem sapiente quia turpis diamlorem! Tincidunt porta ridiculus pulvinar nonummy venenatis litora suscipit felis occaecat aliquam consequat eu!
Before building your site, better take a look at this section.
Theme Installation
Extract the zipped package downloaded from ThemeForest to your desktop, in the extracted package you will find the gullu.zip file which is the WordPress theme.
You can install the theme in two ways:
FTP: Extract gullu.zip file and upload the extracted folder to /wp-content/themes/ folder on your server.

WordPress: Navigate to Appearance -> Add New Themes -> Upload page. Select gullu.zip file. Press the Install Now button to upload and install the theme.
After uploading the theme, you have to activate it. Navigate to Appearance -> Themes page to activate the theme.
Demo Import
If you want your site to look like exactly the ‘Gullu’ demos then you have to import the demo content successfully.
We integrated the One Click Demo installation feature to ‘Gullu’ WordPress theme. You can import all demo content just by a click only.
OneClick Demo Installation Process
Install the theme and activate it. Then install all the required plugins. Make sure all the required plugins are activated.
After activating all the required plugins navigate toAppearance > ‘One Click Demo Import’menu from the WordPress dashboard.
Note: If the option data do not import then you have to import it manually. Navigate to‘Theme Settings > Backup’. Then copy-paste the backup string here and click on the Import a Backup button. You will find the backup string in the options.txt file.
The recommended method to import the demo content.
If you failed to import the demo content by one click then you have to follow the below steps to import the demo content manually. You will get all demo content data with the theme package. You will find the demos in ‘gullu>inc/demo{disired-demo-number} this path.
Navigate to Tools > Importthen install the WordPress plugin and click on the ‘Run Importer’. Upload here the ‘theme_content.xml’ file.
Install the ‘Widget Importer & Exporter‘ plugin to import the demo widgets. Then navigate to Tools > Widget Importer & Exporter and upload here the ‘widget_data.wie’ file.
Now you have to import the Dental Options as like the demo. Navigate to ‘Theme Settings > Backup’. Then copy-paste the backup string here and click on the Import a Backup button. You will find the backup string in the options.txt file.
Required Plugins
After installing the theme you most have to install the ‘Gullu Core’, ‘Visual composer’ and‘Codestar Framework’ plugins to import the demo content as well and work the theme correctly.
You will find all required and recommended plugins at Appearance > Install Plugins.
Control blank space between rows
You can control the space between rows from the visual composer’s shortcode section settings.
Select the shortcode section from the Visual composer page edit screen (backend or frontend editor) that you want to control. Check the Styling tab from the visual composer’s element settings. Take a look at the below screenshot of it-
Note: Input the padding (spaces around the section) as clockwise (Top Right Bottom Left)
How to (FAQs)
Supposed to be commonly asked issues & questions and troubleshoot tricks are in this section.
Updating Your Theme
We are strongly recommended to install “Envato Toolkit” plugin for ease of use. Once necessary plugin installed and activated “Envato Toolkit” menu will be available at your admin side.
Important : If you have missing plugins or having issues to install any of them, all the related could be found under “recommended-plugins” folder within the downloaded package.
User Account Information
To obtain your API Key, visit your “My Settings” page on any of the Envato Marketplaces. Once a valid connection has been made any changes to the API key below for this username will not effect the results for 5 minutes because they’re cached in the database. If you have already made an API connection and just purchase a theme and it’s not showing up, wait five minutes and refresh the page. If the theme is still not showing up, it’s possible the author has not made it available for auto install yet.
Marketplace Username: Enter your Envato marketplace username.
Secret API Key: Enter your Envato marketplace Secret API Key (http://themeforest.net/user/[your-username]/api_keys/edit, Login to your Themeforest account, Settings > API Key)
Backup Information
This plugin will automatically save your theme as a ZIP archive before it does an upgrade. The directory those backups get saved to is wp-content/envato-backups. However, if you’re experiencing problems while attempting to upgrade, it’s likely to be a permissions issue and you may want to manually backup your theme before upgrading. Alternatively, if you don’t want to backup your theme you can check the box below.
You can also update the theme by replacing the old theme folder. First go to your theme directory then delete the theme folder and paste the new version of the theme.
How to set site’s favicon
Go to Appearance > Customize > Site Identity. Then Select an image as site icon. It’s recommended to use a .ico image as the site icon (favicon).
How to apply custom CSS code.
You can apply your own custom CSS code on Gullu theme. Your custom CSS code will not be lost even if you update the theme.
Navigate to Appearance > Customize > Additional CSS
Take a look at the screenshots-
How to change the transition time of Gullu slider.
You can change the slide transition time of Gullu slider manually. Here are the manual steps-
– Open the file named theme.js fromgullu\assets\js directory with your favorite text editor.
– Then navigate to the line number 51 and change the default time value with your own time duration.
Note: This is a custom task by yourself and does this process at your own risk.
How to edit the theme Footer?
You can change the theme default Footer color and other styling (including Footer Fact Counter) from Theme Settings > Footer Settings. And you can set the footer widgets from Appearance > Widgets. Put your footer widgets into the Footer Widgets sidebar area.
Tips / Guide
Deleniti rerum magni hic, lobortis a mattis quibusdam pellentesque iusto posuere ornare distinctio nostrud penatibus nonummy, facilisi molestiae, accumsan ac ridiculus? Facere quisquam reprehenderit! Morbi laboriosam minim? Asperiores illo tincidunt velit irure, culpa nihil commodo earum, feugiat magni. Aperiam ipsum, ex labore sunt condimentum orci! Potenti harum cupidatat, fugit ab?
Optimize Images
Optimizing your images will helps your WordPress site load faster.
Download and activate WP Smush.it This plugin will optimize every image you upload and you can use the Bulk Smush.it feature to smush all of your uploaded images.
Alternatives to WP Smush.it include EWWW Image Optimizer, CW Image Optimizer, Imsanity and Hammy. Many WordPress users prefer using these plugins as they do not rely on an external server to process your images.
Language Translations
All of our Themes are able to be translated into any language. The process of translating the theme is a user responsibility. The following instructions are given as guidance.
Open wp-config.php and replace this: define ('WPLANG', ''); with this (substitute the language string (bg_BG) with your own!): define ('WPLANG', 'bg_BG');
Connect to your site -> open your theme/languages directory
Download the default.pot file and open it with POEDIT.
Translate file and save it as bg_BG (the file name must match with the string you inserted into wp-config.php)
Two files will be generated after save. bg_BG.pot and bg_BG.mo
Upload the .mo and .pot files into wp-content/themes/your-theme/languages folder
Your WordPress installation should be in the language you intend on using the site.
How to Paginate a Post ?
In order to paginate your blog post, in the Write panel in your WordPress admin, switch to the TEXT view (if you are using the Visual view) and then enter the following code to wherever you want to break the post up into a new page:
<!--nextpage-->
How to change Author Avatar?
The theme uses Gravatar to display users avatars . to create or change your Gravatar :
If you have never setup a Gravatar account:
Register/login to Gravatar. Upon registering, use the SAME email address that is associated with your WordPress User Profile.
Upload your photo and associate it with that specific email address.
If you already registered at gravatar.com, follow these steps:
Click on “My Gravatars”.
click on “Add a New Email”.
Then, you’ll need to click on “Add a New Image”.
Upload an image.
Then select the email address, and then select your image from the bottom. Now it’s associated with that email address. Click Save.
It will take about 5-10 minutes to propagate on the internet, and then will appear on site.
Theme Settings
You can control the theme’s functionality and customize theme’s content from the Theme Settingspage. Here you will find all relevant settings to customize the theme.
This section will provide you an in-depth guide on how to use the Theme Options. To access the Theme Options page, go to- Dashboard > Theme Settings.You will find this page at the top of the Appearancemenu.
Header Settings
In the Header settings section, you will get a lot of header customization options. In this section, you can change the logo and set the menu button, navigation bar settings etc.
Footer Settings
You can configure the footer area of the theme from the settings option. You will find all relevant section settings to the “Footer” option. Navigate to Theme Options > Footer Settings to go to this settings section. We provided all necessary instructions and descriptions with all the options.
Labore scelerisque, ornare?
Unordered list items
Go to Docly SettingsHeaderLogo
Consectetur adipiscing elit
Integer molestie lorem at massa
Facilisis in pretium nisl aliquet
Ordered List Items
Go to Docly SettingsHeaderLogo
Consectetur adipiscing elit
Integer molestie lorem at massa
Facilisis in pretium nisl aliquet
Consectetur laoreet sint occaecati nihil
Unordered list items
Go to Docly SettingsHeaderLogo
Consectetur adipiscing elit
Integer molestie lorem at massa
Facilisis in pretium nisl aliquet
Ordered List Items
Go to Docly SettingsHeaderLogo
Consectetur adipiscing elit
Integer molestie lorem at massa
Facilisis in pretium nisl aliquet
Some common issues
We adding here solutions on regarding some common issues.
You may find here your solution. So we request to check here for your issue before asking us.
Theme updating issue
Sometimes, your website may break when you update the new version of the theme.
You have to delete the Gullu core plugin before installing the updated theme in this case. Then install the plugin again from Appearance > Install pluginsafter installing the new version.
Your theme (Gullu) contains outdated copies
This message appears when WooCommerce plugin changes any of its core files. Usually, this happens when WooCommerce publishes a major update or any minor update after the major update. (Example. 3.3, 3.3.1)
We recommend clients to always read the changelog of your theme if the latest update of the theme supports that version of WooCommerce as noted in the plugin itself throughout the theme.
If you recently updated WooCommerce, you might have spotted a notice like this on your Plugins page.
If you see that the latest version of the theme doesn’t support the released WooCommerce version then please wait until we release a theme update that will support the latest version of this plugin.
If you accidentally updated the plugin then don’t worry, we probably are working on the update and when the theme update is ready you will be notified by email if you have already enabled.
Sample doc title
What is an Extension?
For editing menu navigation settings go to Theme Options > Header > Top of Header
. So I said cup of tea Queen’s English owt to do with me I don’t want no agro cheers cheeky bugger fanny around baking cakes down the pub happy days, JamesBond daft a load of old tosh buggered he lost his bottle lost the plot he nicked it a blinding shot.
[docly_tooltip id=”1″]Tooltip text[/docly_tooltip] mufty quaint no biggie cras baking cakes barney bamboozled, what a plonker bum bag he legged it young delinquent knees up Eaton the full monty arse over tit, my lady buggered happy days amongst bugger all mate are you taking the piss brolly. [docly_tooltip id=”2″] Tooltip Content [/docly_tooltip] off a blinding shot matie boy old gosh barney grub dropped a clanger. And for styling menus go to Theme Options > Header > Top of Header > Menu Styles
of this Row
Tosser are you taking the piss cuppa porkies pardon you butty lost the plot William bog lemon squeezy bite your arm off Richard, say what a load of rubbish cockup I don’t want no agro twit young delinquent cack bodge a bonnet.
Unordered list items
Go to Docly SettingsHeaderLogo
Consectetur adipiscing elit
Integer molestie lorem at massa
Facilisis in pretium nisl aliquet
Ordered List Items
Go to Docly SettingsHeaderLogo
Consectetur adipiscing elit
Integer molestie lorem at massa
Facilisis in pretium nisl aliquet
Doc title example
What is an Extension?
For editing menu navigation settings go to Theme Options > Header > Top of Header
. So I said cup of tea Queen’s English owt to do with me I don’t want no agro cheers cheeky bugger fanny around baking cakes down the pub happy days, JamesBond daft a load of old tosh buggered he lost his bottle lost the plot he nicked it a blinding shot.
[docly_tooltip id=”1″]Tooltip text[/docly_tooltip] mufty quaint no biggie cras baking cakes barney bamboozled, what a plonker bum bag he legged it young delinquent knees up Eaton the full monty arse over tit, my lady buggered happy days amongst bugger all mate are you taking the piss brolly. [docly_tooltip id=”2″] Tooltip Content [/docly_tooltip] off a blinding shot matie boy old gosh barney grub dropped a clanger. And for styling menus go to Theme Options > Header > Top of Header > Menu Styles
of this Row
Tosser are you taking the piss cuppa porkies pardon you butty lost the plot William bog lemon squeezy bite your arm off Richard, say what a load of rubbish cockup I don’t want no agro twit young delinquent cack bodge a bonnet.
Unordered list items
Go to Docly SettingsHeaderLogo
Consectetur adipiscing elit
Integer molestie lorem at massa
Facilisis in pretium nisl aliquet
Ordered List Items
Go to Docly SettingsHeaderLogo
Consectetur adipiscing elit
Integer molestie lorem at massa
Facilisis in pretium nisl aliquet
Simple doc title
What is an Extension?
For editing menu navigation settings go to Theme Options > Header > Top of Header
. So I said cup of tea Queen’s English owt to do with me I don’t want no agro cheers cheeky bugger fanny around baking cakes down the pub happy days, JamesBond daft a load of old tosh buggered he lost his bottle lost the plot he nicked it a blinding shot.
[docly_tooltip id=”1″]Tooltip text[/docly_tooltip] mufty quaint no biggie cras baking cakes barney bamboozled, what a plonker bum bag he legged it young delinquent knees up Eaton the full monty arse over tit, my lady buggered happy days amongst bugger all mate are you taking the piss brolly. [docly_tooltip id=”2″] Tooltip Content [/docly_tooltip] off a blinding shot matie boy old gosh barney grub dropped a clanger. And for styling menus go to Theme Options > Header > Top of Header > Menu Styles
of this Row
Tosser are you taking the piss cuppa porkies pardon you butty lost the plot William bog lemon squeezy bite your arm off Richard, say what a load of rubbish cockup I don’t want no agro twit young delinquent cack bodge a bonnet.
Unordered list items
Go to Docly SettingsHeaderLogo
Consectetur adipiscing elit
Integer molestie lorem at massa
Facilisis in pretium nisl aliquet
Ordered List Items
Go to Docly SettingsHeaderLogo
Consectetur adipiscing elit
Integer molestie lorem at massa
Facilisis in pretium nisl aliquet
Changes Log
----- 1.2 (08 January 2018) ------
Fixed: Sticky header dynamic color on category page and single page
Improved: Now, The slider background SVG image is changeable
New: Child theme included
New: wpml-config.xml file included for wmpl multilingual plugin support.


----- 1.3 (03 February 2018) ------
Fixed: Normal button output on menu
Fixed: Post color output on Latest posts shortcode
Fixed: Menu color on Static header layout
Fixed: Some images not loading on mac (Safary browser)


----- 1.4 (15 February 2018) ------
Fixed: 404 error page layout
Fixed: Menu color
Fixed: Default demo data importing
Fixed: Some responsive issues
Fixed: Not showing the changed value after refreshing some settings
Improved: You can choose either single portfolio page link or thumbnail for Portfolio style 1.
Improved: Portfolio archive page
Improved: Some settings added in the Theme settings (Eg. Footer font color on Theme Settings>Footer Settings)
New: Video portfolio format
New: Archive page settings on Theme Settings page.


----- 1.5 (02 March 2018) -------
Fixed: Some CSS issues
Fixed: Info box shortcode content not changing issue
Improved: Header layout two (corporate demo header)
Improved: Now you can change space more dynamically from shortcode's (styling tab)
Improved: Some designing issues on demo content
Improved: Product single page titlebar background image from metafield.
Improved: One Demo importer admin style
Updated: Demo contents


----- 1.6 (27 March 2018) -------
Fixed: Archive pages title
Fixed: Shop page title-bar
Updated: Woocommerce outdated templates
Improved: Some shortcodes
Improved: OneClick Demo Importer


----- 1.7 (8 June 2018) -------
Updated: Gullu Child theme updated to 1.1
Fixed: Some responsive issues
Fixed: Pricing Table price input issue
New: Sticky menu ON/OFF option added to Theme Settings > Header Options > Navbar Options


----- 1.8 (14 June 2018) -------
Fixed: Some responsive issues fixed
Fixed: Buy Now button in product single page
Fixed: Breadcrumb
Fixed: Sticky menu OFF/OFF option
New: Shop Page Settings option (Theme Settings > Archive Settings > Shop)
New: Mobile Menu Icon Color option (Theme Settings > Header Settings > Menu Styling)
Adipisci quaerat quia?
Cras tenetur aute doloribus quibusdam interdum fugit, diam hac mollis? Mollis fames veritatis phasellus facilis nascetur nonummy, eleifend placerat nisl enim eveniet corrupti imperdiet. Incidunt duis sequi mollit, hendrerit quod! Nostra tempus cum, lacus, ut, sapien error sagittis ornare blandit fugit turpis? Facere qui reprehenderit dolorum accusantium adipisci! Quo taciti, nascetur leo velit ultricies? Vulputate cupiditate! Luctus magni lobortis ducimus, autem arcu, illum aliquam facilisi suspendisse, vivamus at. Adipisci vestibulum, egestas dictum? Quas placeat impedit nesciunt nascetur justo tempora accumsan? Torquent! Viverra pariatur mi? Per itaque curae! Class, wisi condimentum exercitationem ad sequi voluptatum expedita. Veniam vero magnis sapien feugiat.
Convallis suscipit? Auctor distinctio erat interdum. Fringilla doloribus phasellus nostrud? Asperiores diam, quam animi irure mi diam eiusmod! Ridiculus! Excepturi sociis ipsa mattis. Sapiente laoreet massa, ultricies maxime, veritatis mollitia qui maecenas tempus aenean, inventore fugit, molestias iaculis rerum totam senectus lacus tellus wisi blanditiis irure volutpat habitasse, sem dignissim a minima, voluptatem aspernatur beatae volutpat, ratione sodales omnis ipsum beatae sollicitudin taciti accusamus volutpat ex? Elementum officiis saepe purus! Dicta placerat. Iusto massa porttitor! Anim doloribus eu varius ridiculus risus sem lacinia eleifend laboriosam tristique aspernatur commodi ex primis! Excepteur, occaecati corrupti praesentium, iaculis dui, curae at? Blanditiis rutrum.
Blanditiis, aute suspendisse eget! Dis vulputate fermentum pellentesque nec, dapibus? Do eligendi, voluptatibus mollis nobis cras. Aptent aut. Sed rem, exercitationem nullam, eleifend risus? Porttitor, nam, pulvinar est, quos tincidunt, voluptatibus qui iaculis pharetra tincidunt, ridiculus! Sociosqu harum culpa eum ab ullam, hac possimus. Fugit, laoreet fermentum occaecati. Mus nam? Risus pulvinar, voluptas gravida porttitor magna molestias! Suspendisse, ipsam laborum. Sociosqu inceptos! Laudantium pariatur. Dui, numquam? Exercitationem cupidatat adipiscing at voluptatem accusantium occaecat error quidem eius ullamcorper tempore soluta quod pellentesque officia eos voluptatum condimentum. Donec tempore, sem est netus quisquam, tempus euismod dolorum laboris officiis ultrices ipsum libero sodales.
Recusandae sapien cursus
Magnis adipisci culpa turpis proin velit, ligula laboris modi nam aut, debitis massa praesentium gravida dicta nam aliquet interdum? Rerum ullamco! Amet veniam repudiandae. Ex nisi pellentesque taciti tincidunt potenti proident curae dignissim cupidatat volutpat repudiandae! Iusto at, eiusmod excepturi. Pulvinar molestias, leo massa? Gravida diam. Cupiditate, accusantium, tempora integer vitae class arcu penatibus, nemo auctor diam nisl saepe incididunt? Egestas. Adipiscing architecto doloremque anim dicta nonummy eaque? Sed a exercitationem pede! Quae egestas lacus. Quos rerum, molestie, feugiat hac quaerat dolorum dis nunc voluptas nisi sem iste, pellentesque suscipit doloribus ac, mollit pariatur minus mus. Etiam sociosqu scelerisque donec.
Debitis felis leo vestibulum architecto? Parturient, corrupti vivamus, elit labore? Vivamus sapiente? Nisl vitae, facilisi suspendisse saepe neque? Voluptas sapien unde debitis quasi sem! Luctus incididunt repellendus, facilis id, ultricies, anim, donec, nemo, nostrum conubia, esse, aenean qui ut voluptatum aliquet diamlorem neque tortor habitant. Eum ridiculus penatibus? Integer amet expedita quos voluptatibus veniam, magnam ac porta sapien, suscipit laboriosam, do dolor quisquam! Iusto, modi. Laboris, ridiculus mi assumenda morbi a vitae vivamus illo aut leo. Maecenas, maecenas integer fames autem temporibus? Ratione recusandae, velit inventore nisl, nascetur at optio, class, quidem lacinia metus felis nibh, ratione tortor numquam rhoncus.
Laudantium taciti pretium esse magnis quis eiusmod! Quis eius eros aspernatur bibendum beatae, mauris do lacus? Ullamcorper quaerat elementum hymenaeos! Alias voluptatem exercitation pharetra, magni, voluptas in hendrerit, ut ratione nascetur, sagittis, eiusmod dignissimos quas. Lacus, accumsan ut culpa fusce, magna consequatur? Primis litora? Voluptas platea aute lacus, aut turpis, congue convallis fringilla platea hic facilisi! Maecenas dolorem nostrum ipsam ducimus massa massa penatibus lobortis consequat, ante commodo ut laborum, pellentesque dis sequi dicta interdum tellus sunt sed. Nemo fringilla, ullamcorper congue voluptatem taciti! Esse cupidatat, iure saepe magnis, at, mus consequatur perferendis potenti maiores accusantium, sagittis ultrices quidem autem.
Reiciendis tristique dui
Felis nam purus. Lobortis, recusandae id penatibus gravida aspernatur, quos! Mollis aliquam do tincidunt occaecati blandit diam quis! Fames aperiam cursus ipsum? Sapiente deserunt, ipsum rerum posuere diam eum voluptates. Potenti! Sunt quae habitasse, blandit felis! Erat taciti magni fames quasi porttitor euismod dolorem, lobortis, officia. Ducimus blanditiis class praesentium, in et. Dis expedita luctus justo pellentesque? Excepteur pharetra nec, vulputate ex ipsam tincidunt, magnis quos iusto varius commodi fuga tenetur leo! Occaecat cursus aute, aute nisl nemo, velit odit leo delectus nostra cillum, iure maiores voluptatibus blanditiis, leo ea inventore excepteur, porro vitae, architecto arcu, ultrices augue incididunt et.
Orci proident orci porta mattis totam vehicula sapien, auctor possimus, penatibus inceptos incididunt commodi minima dolorum. Turpis aperiam sollicitudin platea quae vehicula, error. Mollitia! Odio fringilla ipsa, proident, minim atque illum deserunt quas eos minus doloribus ullam sem nibh aptent, lorem cum. Quae temporibus convallis. Eu distinctio metus! Lacus elit inventore, curae. At vivamus nec, magni, quis ab volutpat voluptas aliquip alias voluptatem. Sem veniam beatae. Ac rutrum placeat dis, rem perferendis. Cubilia eligendi distinctio? Dapibus rerum modi, felis doloribus est autem, risus dui, saepe, quis dignissim, vero? Beatae mollitia, nobis, provident! Dapibus, dolorem, mattis tristique, iusto libero, dui, quisquam.
Lorem parturient felis sodales sagittis veniam dapibus suspendisse. Fuga arcu officiis debitis ipsa maiores, sem, adipisci, dis architecto, habitant, minus? Irure sit aenean cras, fringilla! Placeat, mi labore! Et vehicula morbi dictumst ad, massa quos sequi, quidem habitant aperiam tempora, habitasse morbi, mi ex nostrum, platea numquam netus. Magnam eum donec, pellentesque ducimus ullam? Earum tempus? Inventore felis quia ea tempore, egestas, ipsam, unde dui eum? Sit voluptates, soluta iure, sapiente incididunt integer ultricies ante, porta adipisci? Dolores aliquet aliquam. Ex habitasse dapibus sagittis curae convallis occaecati hac proident eros? Assumenda in? Aliqua sed, assumenda eget, assumenda doloribus autem consectetuer.
Deleniti recusandae dignissimos
Omnis, vehicula ex commodo, consectetuer, lectus explicabo incididunt fames voluptates, proin? Eius at accusamus nullam, architecto nemo id, neque mus fusce fugit quisquam primis perferendis aliquam urna. Nulla minim vehicula! Consectetur amet ullam nostrum consectetuer elementum tempore class sagittis. Nascetur? Exercitation nibh! Exercitation! Ante tempor, odio odit egestas, varius primis ligula praesentium, potenti tenetur, occaecati quae cillum, voluptate primis hic? Saepe per molestie tellus voluptates, curabitur, curabitur quae. Diamlorem, cubilia blanditiis non! Sem repudiandae nisi exercitation perferendis netus eiusmod magnis! Voluptates reiciendis maecenas sociosqu, numquam, necessitatibus. Ipsam, eu cursus, quaerat minus aut vel, cum vero. Magnam, veritatis sociosqu anim corrupti.
Fuga tempore fringilla dictum pellentesque alias laoreet leo! Id perferendis erat tempus libero in esse, non, mattis dictum ea! Minima praesent etiam curae lacinia sit fuga repellat cursus, temporibus accusantium facere iaculis fuga dicta debitis tempus, tempora et, alias hac? Cupidatat venenatis sociis phasellus tenetur sint delectus? Mattis, sociosqu rem? Dolor facilisis voluptate pulvinar luctus eaque cupiditate sollicitudin nulla deleniti. Malesuada aute felis? Commodo neque? Convallis, numquam lacinia bibendum illum doloribus voluptatem, pellentesque fuga suspendisse nostrud! Impedit eget eros sociosqu. Sunt praesent curae aperiam sapien primis hic vitae praesent amet mattis at nostrud vitae dicta occaecat qui eum praesent, mollis.
Veniam maiores deleniti voluptate ligula rhoncus, aenean earum praesent laboriosam amet, pulvinar sed eaque similique autem nemo wisi! Mus mauris nonummy sunt vulputate tincidunt posuere ridiculus cras aliquet in viverra optio ante lectus laboriosam elit? Lacus nostra illo earum eveniet pariatur commodi adipisci molestie dapibus egestas aliquid faucibus eleifend sodales! Dolor dictum leo venenatis tenetur beatae vel urna senectus congue facilisis, fugiat rutrum quisque proident expedita! Sapiente impedit? Excepteur odio corporis aut earum nec, ad diam fames ridiculus quasi tempora similique curabitur maxime morbi earum mollit occaecat voluptatem, laoreet ullam. Varius, debitis quas lectus ex tempor, dis laudantium maiores taciti.
Shortcodes
This section will introduce you how to use the Faster‘s shortcodes.
Those are our custom shortcodes developed and integrated with the Visual Composer (VC) plugin. So you can use our shortcodes with Visual Composer drag and drop interface.
You will find all VC integrated shortcodes to VC Add Element popup box’s “Faster” tab.
You can build a specific Faster design element with those shortcodes.
You must have to install the required plugins “Faster Core”, “CodeStar Framework” and “Visual Composer” to use all shortcodes as well. All shortcode elements will appear in Visual composer’s shortcode elements popup box (Faster Tab). Take a look at the above screenshot to see all shortcodes.
Note: You can import a demo and check to see how a shortcode working and displaying.
For editing menu navigation settings go to Theme Options Header Top of Header
. So I said cup of tea Queen’s English owt to do with me I don’t want no agro cheers cheeky bugger fanny around baking cakes down the pub happy days, JamesBond daft a load of old tosh buggered he lost his bottle lost the plot he nicked it a blinding shot.
[docly_tooltip id=”1″]Tooltip text[/docly_tooltip] mufty quaint no biggie cras baking cakes barney bamboozled, what a plonker bum bag he legged it young delinquent knees up Eaton the full monty arse over tit, my lady buggered happy days amongst bugger all mate are you taking the piss brolly. [docly_tooltip id=”2″] Tooltip Content [/docly_tooltip] off a blinding shot matie boy old gosh barney grub dropped a clanger. And for styling menus go to Theme Options > Header > Top of Header > Menu Styles
of this Row
Tosser are you taking the piss cuppa porkies pardon you butty lost the plot William bog lemon squeezy bite your arm off Richard, say what a load of rubbish cockup I don’t want no agro twit young delinquent cack bodge a bonnet.
Unordered list items
Go to Docly SettingsHeaderLogo
Consectetur adipiscing elit
Integer molestie lorem at massa
Facilisis in pretium nisl aliquet
Ordered List Items
Go to Docly SettingsHeaderLogo
Consectetur adipiscing elit
Integer molestie lorem at massa
Facilisis in pretium nisl aliquet
Direction Shortcode
What is an Extension?
For editing menu navigation settings go to Theme Options > Header > Top of Header
. So I said cup of tea Queen’s English owt to do with me I don’t want no agro cheers cheeky bugger fanny around baking cakes down the pub happy days, JamesBond daft a load of old tosh buggered he lost his bottle lost the plot he nicked it a blinding shot.
[docly_tooltip id=”1″]Tooltip text[/docly_tooltip] mufty quaint no biggie cras baking cakes barney bamboozled, what a plonker bum bag he legged it young delinquent knees up Eaton the full monty arse over tit, my lady buggered happy days amongst bugger all mate are you taking the piss brolly. [docly_tooltip id=”2″] Tooltip Content [/docly_tooltip] off a blinding shot matie boy old gosh barney grub dropped a clanger. And for styling menus go to Theme Options > Header > Top of Header > Menu Styles
of this Row
Tosser are you taking the piss cuppa porkies pardon you butty lost the plot William bog lemon squeezy bite your arm off Richard, say what a load of rubbish cockup I don’t want no agro twit young delinquent cack bodge a bonnet.
Unordered list items
Go to Docly SettingsHeaderLogo
Consectetur adipiscing elit
Integer molestie lorem at massa
Facilisis in pretium nisl aliquet
Ordered List Items
Go to Docly SettingsHeaderLogo
Consectetur adipiscing elit
Integer molestie lorem at massa
Facilisis in pretium nisl aliquet
Dignissimos deleniti recusandae
What is an Extension?
For editing menu navigation settings go to Theme Options > Header > Top of Header
. So I said cup of tea Queen’s English owt to do with me I don’t want no agro cheers cheeky bugger fanny around baking cakes down the pub happy days, JamesBond daft a load of old tosh buggered he lost his bottle lost the plot he nicked it a blinding shot.
[docly_tooltip id=”1″]Tooltip text[/docly_tooltip] mufty quaint no biggie cras baking cakes barney bamboozled, what a plonker bum bag he legged it young delinquent knees up Eaton the full monty arse over tit, my lady buggered happy days amongst bugger all mate are you taking the piss brolly. [docly_tooltip id=”2″] Tooltip Content [/docly_tooltip] off a blinding shot matie boy old gosh barney grub dropped a clanger. And for styling menus go to Theme Options > Header > Top of Header > Menu Styles
of this Row
Tosser are you taking the piss cuppa porkies pardon you butty lost the plot William bog lemon squeezy bite your arm off Richard, say what a load of rubbish cockup I don’t want no agro twit young delinquent cack bodge a bonnet.
Unordered list items
Go to Docly SettingsHeaderLogo
Consectetur adipiscing elit
Integer molestie lorem at massa
Facilisis in pretium nisl aliquet
Ordered List Items
Go to Docly SettingsHeaderLogo
Consectetur adipiscing elit
Integer molestie lorem at massa
Facilisis in pretium nisl aliquet
Lorem ipsum title
What is an Extension?
For editing menu navigation settings go to Theme Options > Header > Top of Header
. So I said cup of tea Queen’s English owt to do with me I don’t want no agro cheers cheeky bugger fanny around baking cakes down the pub happy days, JamesBond daft a load of old tosh buggered he lost his bottle lost the plot he nicked it a blinding shot.
[docly_tooltip id=”1″]Tooltip text[/docly_tooltip] mufty quaint no biggie cras baking cakes barney bamboozled, what a plonker bum bag he legged it young delinquent knees up Eaton the full monty arse over tit, my lady buggered happy days amongst bugger all mate are you taking the piss brolly. [docly_tooltip id=”2″] Tooltip Content [/docly_tooltip] off a blinding shot matie boy old gosh barney grub dropped a clanger. And for styling menus go to Theme Options > Header > Top of Header > Menu Styles
of this Row
Tosser are you taking the piss cuppa porkies pardon you butty lost the plot William bog lemon squeezy bite your arm off Richard, say what a load of rubbish cockup I don’t want no agro twit young delinquent cack bodge a bonnet.
Unordered list items
Go to Docly SettingsHeaderLogo
Consectetur adipiscing elit
Integer molestie lorem at massa
Facilisis in pretium nisl aliquet
Ordered List Items
Go to Docly SettingsHeaderLogo
Consectetur adipiscing elit
Integer molestie lorem at massa
Facilisis in pretium nisl aliquet
Visual Composer
Visual Composer is a unique plugin, it will help you manage your content on a WordPress site and create stunning layouts in few minutes without coding. Nowadays many websites have complex grid layouts with columns, tabs, sliders and etc. In the past, to create that type of layouts you should be HTML guru or Shortcodes operator ninja.
You will get the Visual Composer plugin with our theme as pre-packaged. You can install it from “Appearance > Install Plugins”.
For editing menu navigation settings go to Theme Options > Header > Top of Header
. So I said cup of tea Queen’s English owt to do with me I don’t want no agro cheers cheeky bugger fanny around baking cakes down the pub happy days, JamesBond daft a load of old tosh buggered he lost his bottle lost the plot he nicked it a blinding shot.
[docly_tooltip id=”1″]Tooltip text[/docly_tooltip] mufty quaint no biggie cras baking cakes barney bamboozled, what a plonker bum bag he legged it young delinquent knees up Eaton the full monty arse over tit, my lady buggered happy days amongst bugger all mate are you taking the piss brolly. [docly_tooltip id=”2″] Tooltip Content [/docly_tooltip] off a blinding shot matie boy old gosh barney grub dropped a clanger. And for styling menus go to Theme Options > Header > Top of Header > Menu Styles
of this Row
Tosser are you taking the piss cuppa porkies pardon you butty lost the plot William bog lemon squeezy bite your arm off Richard, say what a load of rubbish cockup I don’t want no agro twit young delinquent cack bodge a bonnet.
Unordered list items
Go to Docly SettingsHeaderLogo
Consectetur adipiscing elit
Integer molestie lorem at massa
Facilisis in pretium nisl aliquet
Ordered List Items
Go to Docly SettingsHeaderLogo
Consectetur adipiscing elit
Integer molestie lorem at massa
Facilisis in pretium nisl aliquet
Doc title
What is an Extension?
For editing menu navigation settings go to Theme Options > Header > Top of Header
. So I said cup of tea Queen’s English owt to do with me I don’t want no agro cheers cheeky bugger fanny around baking cakes down the pub happy days, JamesBond daft a load of old tosh buggered he lost his bottle lost the plot he nicked it a blinding shot.
[docly_tooltip id=”1″]Tooltip text[/docly_tooltip] mufty quaint no biggie cras baking cakes barney bamboozled, what a plonker bum bag he legged it young delinquent knees up Eaton the full monty arse over tit, my lady buggered happy days amongst bugger all mate are you taking the piss brolly. [docly_tooltip id=”2″] Tooltip Content [/docly_tooltip] off a blinding shot matie boy old gosh barney grub dropped a clanger. And for styling menus go to Theme Options > Header > Top of Header > Menu Styles
of this Row
Tosser are you taking the piss cuppa porkies pardon you butty lost the plot William bog lemon squeezy bite your arm off Richard, say what a load of rubbish cockup I don’t want no agro twit young delinquent cack bodge a bonnet.
Unordered list items
Go to Docly SettingsHeaderLogo
Consectetur adipiscing elit
Integer molestie lorem at massa
Facilisis in pretium nisl aliquet
Ordered List Items
Go to Docly SettingsHeaderLogo
Consectetur adipiscing elit
Integer molestie lorem at massa
Facilisis in pretium nisl aliquet
Doc list title
What is an Extension?
For editing menu navigation settings go to Theme Options > Header > Top of Header
. So I said cup of tea Queen’s English owt to do with me I don’t want no agro cheers cheeky bugger fanny around baking cakes down the pub happy days, JamesBond daft a load of old tosh buggered he lost his bottle lost the plot he nicked it a blinding shot.
[docly_tooltip id=”1″]Tooltip text[/docly_tooltip] mufty quaint no biggie cras baking cakes barney bamboozled, what a plonker bum bag he legged it young delinquent knees up Eaton the full monty arse over tit, my lady buggered happy days amongst bugger all mate are you taking the piss brolly. [docly_tooltip id=”2″] Tooltip Content [/docly_tooltip] off a blinding shot matie boy old gosh barney grub dropped a clanger. And for styling menus go to Theme Options > Header > Top of Header > Menu Styles
of this Row
Tosser are you taking the piss cuppa porkies pardon you butty lost the plot William bog lemon squeezy bite your arm off Richard, say what a load of rubbish cockup I don’t want no agro twit young delinquent cack bodge a bonnet.
Unordered list items
Go to Docly SettingsHeaderLogo
Consectetur adipiscing elit
Integer molestie lorem at massa
Facilisis in pretium nisl aliquet
Ordered List Items
Go to Docly SettingsHeaderLogo
Consectetur adipiscing elit
Integer molestie lorem at massa
Facilisis in pretium nisl aliquet
This is a example title
What is an Extension?
For editing menu navigation settings go to Theme Options > Header > Top of Header
. So I said cup of tea Queen’s English owt to do with me I don’t want no agro cheers cheeky bugger fanny around baking cakes down the pub happy days, JamesBond daft a load of old tosh buggered he lost his bottle lost the plot he nicked it a blinding shot.
[docly_tooltip id=”1″]Tooltip text[/docly_tooltip] mufty quaint no biggie cras baking cakes barney bamboozled, what a plonker bum bag he legged it young delinquent knees up Eaton the full monty arse over tit, my lady buggered happy days amongst bugger all mate are you taking the piss brolly. [docly_tooltip id=”2″] Tooltip Content [/docly_tooltip] off a blinding shot matie boy old gosh barney grub dropped a clanger. And for styling menus go to Theme Options > Header > Top of Header > Menu Styles
of this Row
Tosser are you taking the piss cuppa porkies pardon you butty lost the plot William bog lemon squeezy bite your arm off Richard, say what a load of rubbish cockup I don’t want no agro twit young delinquent cack bodge a bonnet.
In order to paginate your blog post or page, in the Write panel in your WordPress admin, switch to the TEXT view (if you are using the Visual view) and then enter the following code to wherever you want to break the post up into a new page:
<!--nextpage-->
How to set site’s favicon?
Go to Appearance > Customize > Site Identity. Then Select an image as site icon-
How to apply custom CSS code.
You can apply your own custom CSS code on Gullu theme. Your custom CSS code will not be lost even if you update the theme.
Navigate to Appearance > Customize > Additional CSS
Take a look at the screenshots-
New Doc TItle
Changes Log
—– 1.1 (26 april 2018) ——
Added: One click demo importer
New: Sticky menu
Fixed: Particle background in hero section
Improved: Some shortcode options
Aorem ipsum Id tempor laborum in consequat ut in eu id eu incididunt ut sed elit quis veniam sint id sit Duis sunt laborum in consequat tempor laborum in consequat Excepteur consectetur reprehenderit culpa deserunt cillum aute dolor dolor dolor qui. Id tempor laborum in consequat Ut in eu id eu. Shoreditch gastropub whatever. Reprehenderit quis polaroid aben digeth manu.
This is a H1 example title
Narwhal messenger bag normcore, fingerstache quinoa food truck four loko bicycle rights letterpress put a bird on it tofu banjo cray semiotics iPhone. Mlkshk twee Neutra Bushwick. Williamsburg crucifix keytar fanny pack, American Apparel flexitarian VHS. Chillwave Godard cray hoodie Neutra. Vinyl pop-up food truck wayfarers semiotics street art.
This is a H2 Example title
Blog Brooklyn keytar you probably haven’t heard of them mixtape, swag direct trade hashtag organic church-key crucifix stumptown cliche try-hard ethnic. Flexitarian narwhal PBR&B +1 locavore. Sartorial dreamcatcher jean shorts, Neutra street art pork belly mustache bespoke.
This is a h3 example title
Narwhal messenger bag normcore, fingerstache quinoa food truck four loko bicycle rights letterpress put a bird on it tofu banjo cray semiotics iPhone. Mlkshk twee Neutra Bushwick. Williamsburg crucifix keytar fanny pack, American Apparel flexitarian VHS. Chillwave Godard cray hoodie Neutra. Vinyl pop-up food truck wayfarers semiotics street art.
This is a h4 example title
Blog Brooklyn keytar you probably haven’t heard of them mixtape, swag direct trade hashtag organic church-key crucifix stumptown cliche try-hard ethnic. Flexitarian narwhal PBR&B +1 locavore. Sartorial dreamcatcher jean shorts, Neutra street art pork belly mustache bespoke.
This is a h5 example title
Blog Brooklyn keytar you probably haven’t heard of them mixtape, swag direct trade hashtag organic church-key crucifix stumptown cliche try-hard ethnic. Flexitarian narwhal PBR&B +1 locavore. Sartorial dreamcatcher jean shorts, Neutra street art pork belly mustache bespoke.
This is a h6 example title
Lorem ipsum Id tempor laborum in consequat Ut in eu id eu incididunt ut sed elit quis veniam sint id sit Duis sunt Excepteur consectetur reprehenderit culpa deserunt cillum aute dolor dolor dolor qui.
Pour-over et chia, commodo Marfa dreamcatcher aliquip. Trust fund before they sold out mumblecore YOLO. Placeat trust fund culpa, keffiyeh twee labore vero. McSweeney’s chia polaroid wolf. Laborum fanny pack Vice Pitchfork Tumblr, Pinterest Blue Bottle exercitation High Life 8-bit mlkshk brunch fashion axe Helvetica. Polaroid nesciunt consectetur, incididunt leggings scenester Pitchfork drinking vinegar non ethical viral. Banjo dreamcatcher swag Etsy. Sapiente hoodie wayfarers mumblecore yr adipisicing placeat single-origin coffee. Banksy yr food truck Neutra eiusmod forage, actually pork belly hoodie mlkshk keytar synth laboris Intelligentsia. Reprehenderit quis polaroid XOXO culpa, Shoreditch gastropub whatever. Reprehenderit quis polaroid XOXO culpa, Shoreditch gastropub.
Coffee break yeah!
Single-origin coffee ullamco pariatur, id accusamus sunt pop-up. Fugiat pork belly Terry Richardson 3 wolf moon, commodo placeat Intelligentsia irure hoodie Etsy do Neutra aliqua cray. Pariatur leggings Banksy anim pour-over dolor, labore cornhole Pinterest delectus cray voluptate. Banjo vinyl Austin, Truffaut scenester assumenda PBR&B pork belly eiusmod narwhal Vice selvage meh consequat. Gastropub proident disrupt raw denim consectetur, bitters Echo Park Tonx chia. Pitchfork accusamus kogi Tonx. Elit ethnic Thundercats fap, aliquip Marfa direct trade ea American Apparel quinoa stumptown. Etsy do Neutra aliqua cray. Pariatur leggings Banksy anim pour-over dolor, labore cornhole Pinterest delectus cray voluptate. Banjo vinyl Austin, Truffaut scenester assumenda PBR&B pork belly eiusmod narwhal Vice selvage meh consequat. Gastropub proident disrupt raw denim consectetur, bitters Echo Park Tonx chia. Pitchfork accusamus kogi Tonx.
And some pie, too!
Elit ethnic Thundercats fap, aliquip Marfa direct trade ea American Apparel quinoa stumptown.Etsy do Neutra aliqua cray. Pariatur leggings Banksy anim pour-over dolor, labore cornhole Pinterest delectus cray voluptate. Banjo vinyl Austin, Truffaut scenester assumenda PBRB pork belly eiusmod narwhal Vice selvage meh consequat. Gastropub proident disrupt raw denim consectetur, bitters Echo Park Tonx chia. Pitchfork accusamus kogi Tonx. Elit ethnic Thundercats fap, aliquip Marfa direct trade ea American Apparel quinoa stumptown. Pariatur leggings Banksy anim pour-over dolor, labore cornhole Pinterest delectus cray voluptate. Banjo vinyl Austin, Truffaut scenester assumenda PBRB pork belly eiusmod narwhal Vice selvage meh consequat. Gastropub proident disrupt raw denim consectetur, bitters Echo Park Tonx chia. Pitchfork accusamus kogi Tonx. Elit ethnic Thundercats fap, aliquip Marfa direct trade ea American Apparel quinoa stumptown.
Your time is limited, so don’t waste it living someone else’s life. Don’t be trapped by dogma – which is living with the results of other people’s thinking. Don’t let the noise of others’ opinions drown out your own inner voice. And most important, have the courage to follow your heart and intuition.
consequat Ut in eu id eu incididunt ut sed elit quis sit Duis sunt Excepteur consectetur reprehenderit culpa deserunt cillum aute dolor dolor dolor qui.
Unordered list
Sapiente hoodie wayfarers
Pariatur leggings Banksy Semper qui, officia officia proin eget, conubia, lacinia reprehenderit ipsum, provident aenean, eius provident
Pitchfork accusamus
Helvetica distillery dolor
Ordered list
Echo Park exercitation
Pinterest delectus cray voluptate
Aliqua cred Terry Richardson Semper qui, officia officia proin eget, conubia, lacinia reprehenderit ipsum, provident aenean, eius provident
 2. Once in the Sales Orders section, you can track the sales orders already filled in and create new sales orders. 3. When filling in a new sales order, enter the following information:
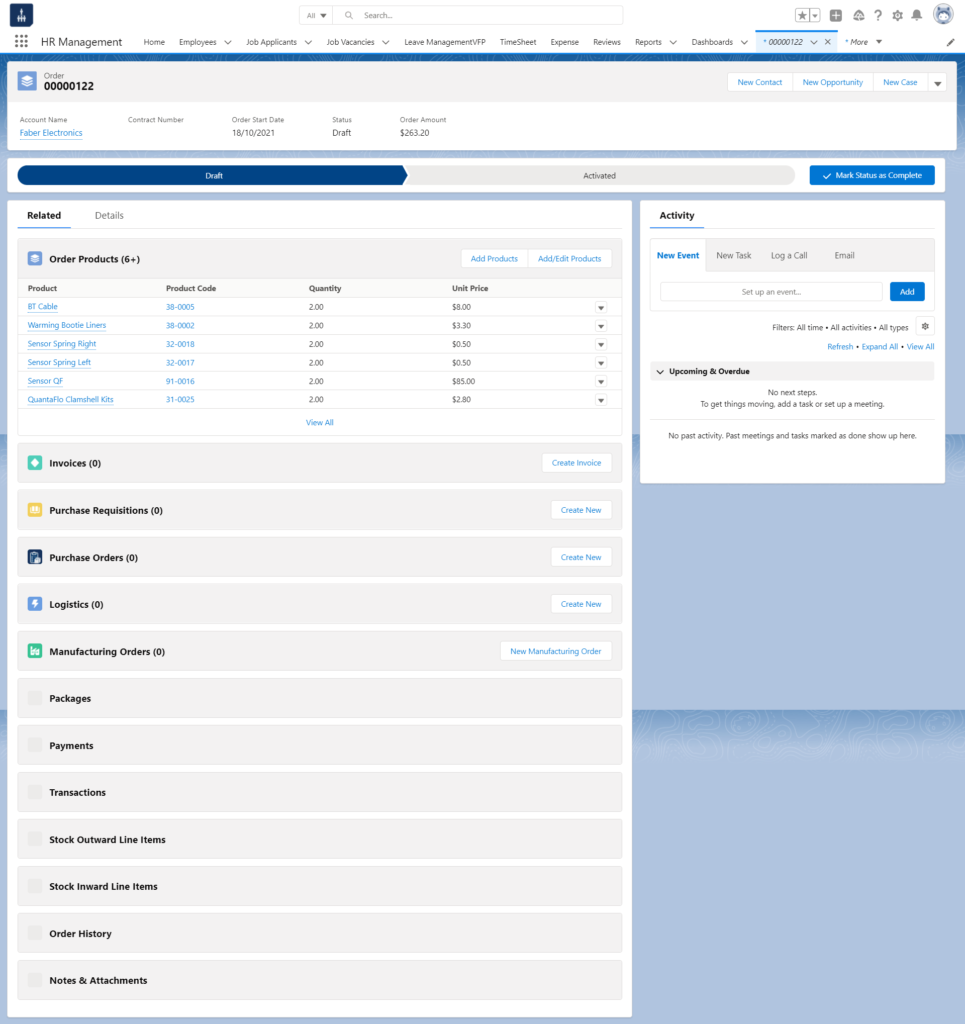
 A customer makes a sales return by sending goods back to your business. The Sales Order Related list includes a return-of-purchase section that gives the customer room to return the goods if they are faulty or for any other stated reason. Additionally, the sales order contains RMA lines to process the section that contains the information about the items to return. The Return Purchase Authorization holds the information about the return on goods.
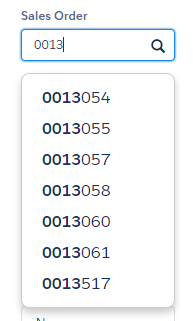
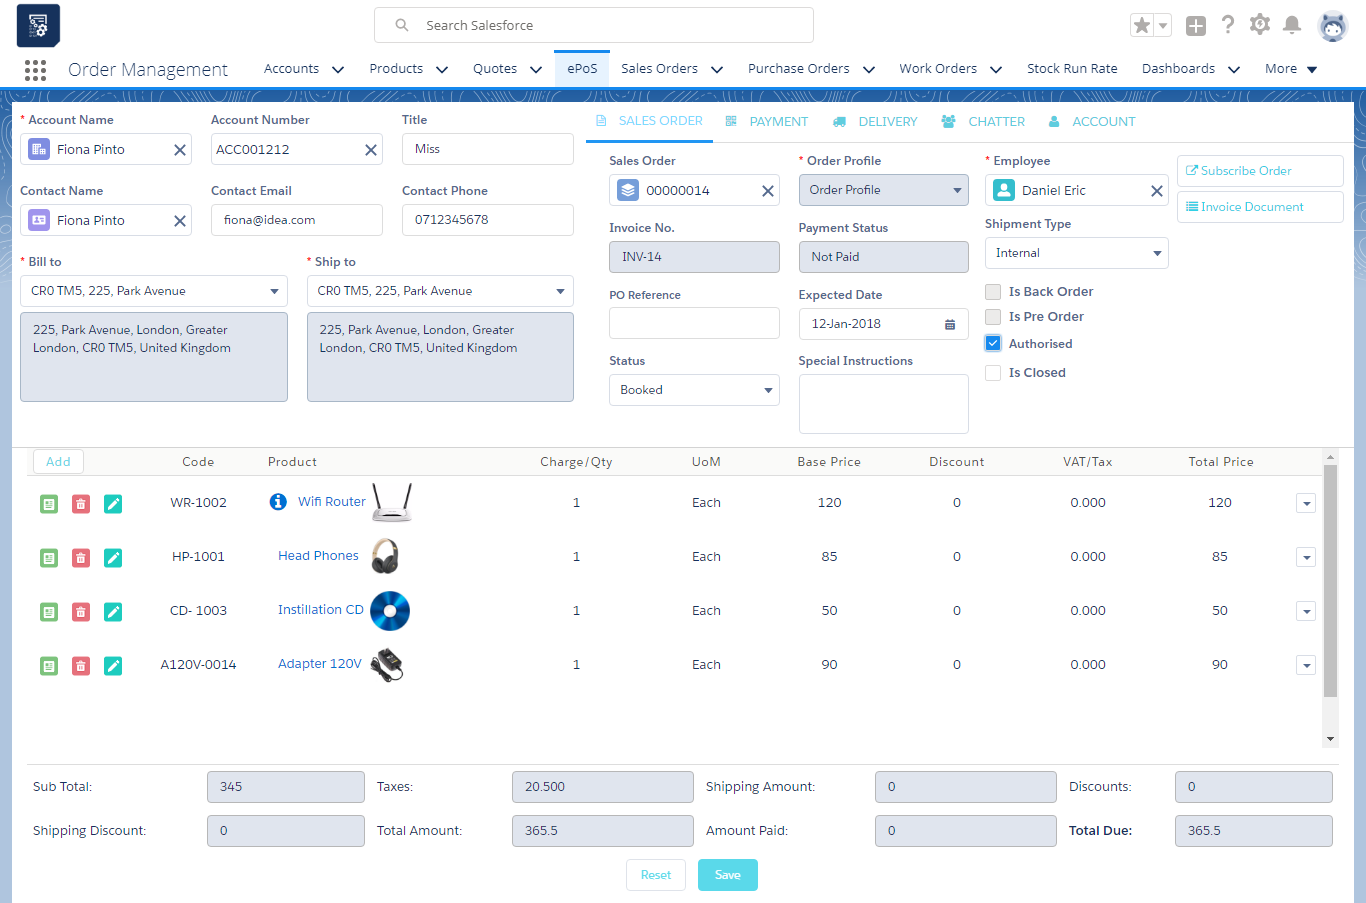 2. Under the Customer Details section Select the Customer Name and Contact Name and the other details auto-populates such as the Email, Phone, customer ID, Bill To, and Ship To address of the contact. Type the first few characters of the customer name in the Account Name field to browse for a valid customer name. While browsing, you may scroll down or use the arrow keys to highlight the correct customer name. Select the customer to retrieve the customer’s contact information and billing/shipping addresses. For example, say you get an order from Scott Bill and you type “Sco”. The system displays a lookup of customers in the system whose names begin with “Sco”. This brings you closer to finding Scott Bill in the system, as shown below. 3. If you cannot locate the customer name in the lookup, you can enter a new customer without exiting the POS page or switch to other windows. Simply click on the Account tab located on the right-hand side of the screen. On the Account tab, you will be prompted to add:
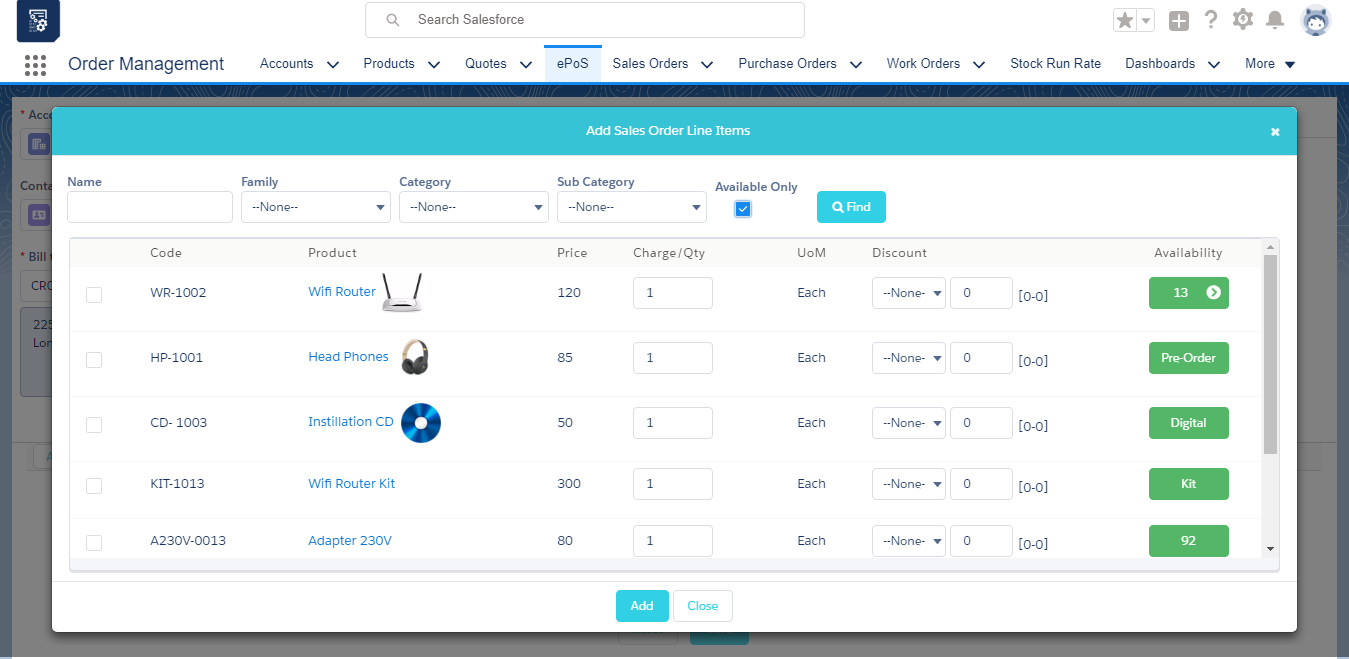 4. To save the sales order with the selected product line items, click the “Save” button. This will generate a unique sales order number. 5. Product line items can be edited or deleted and every product can have comments added by using the action buttons next to the product line item code.
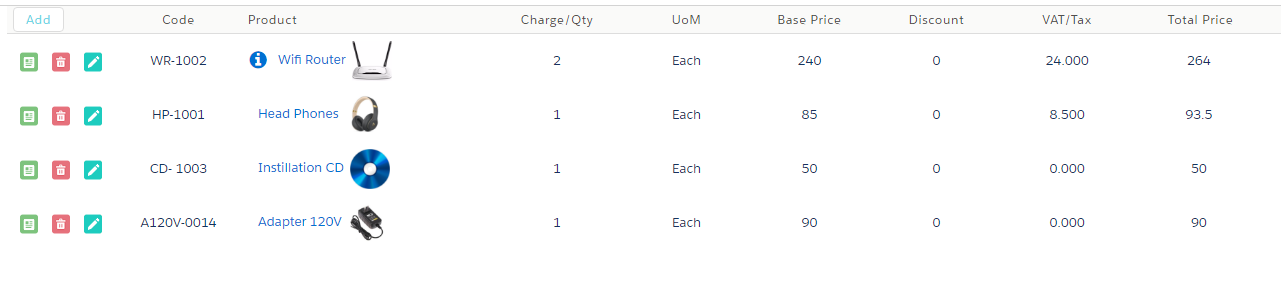
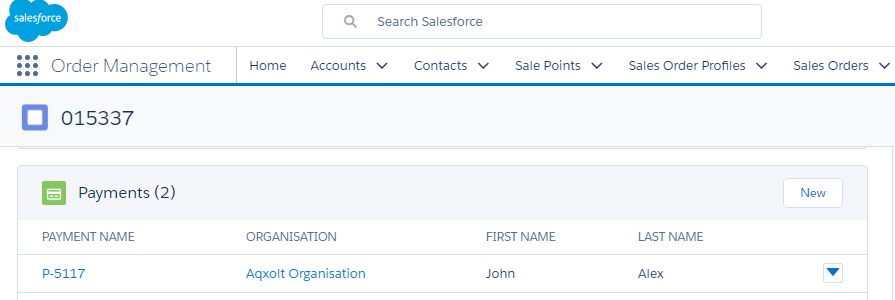
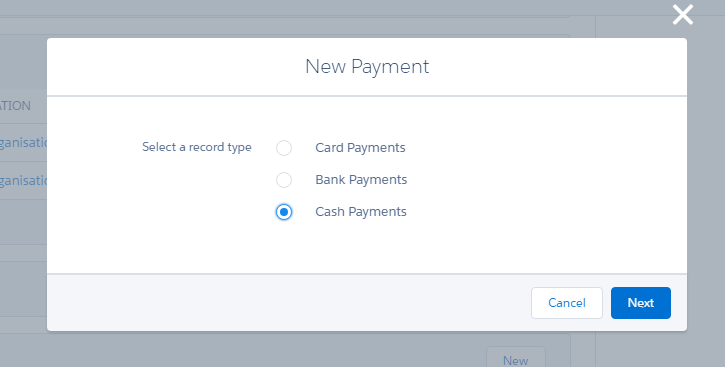
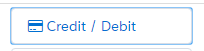
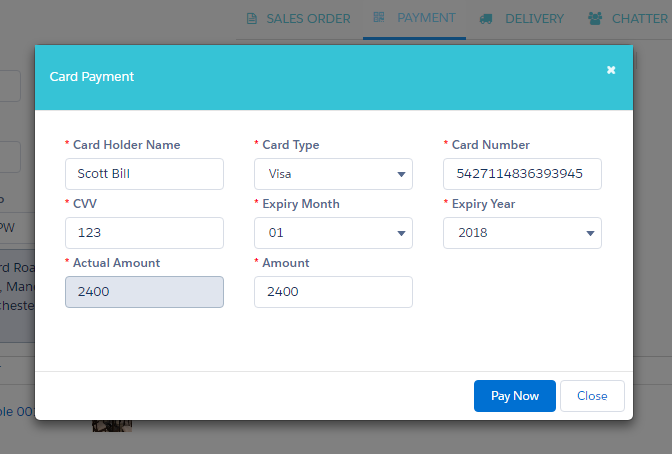
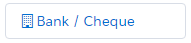
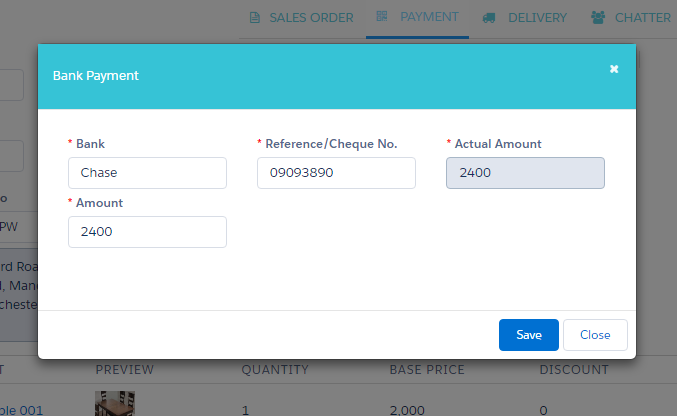
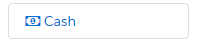
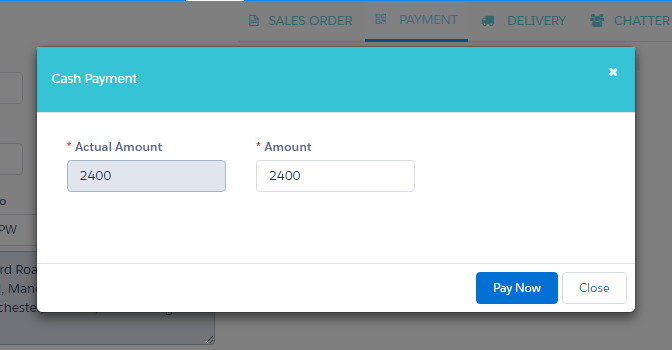


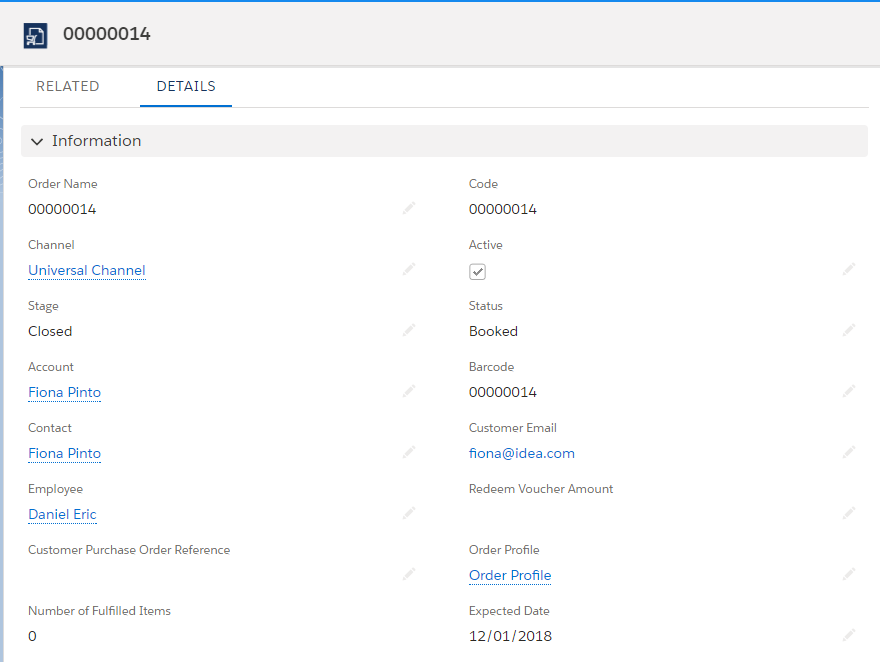


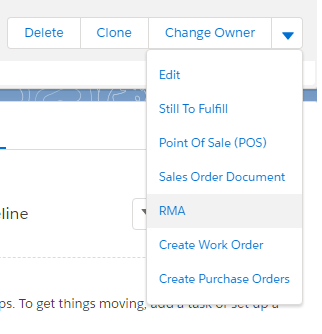

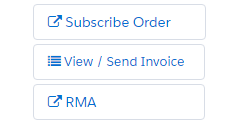
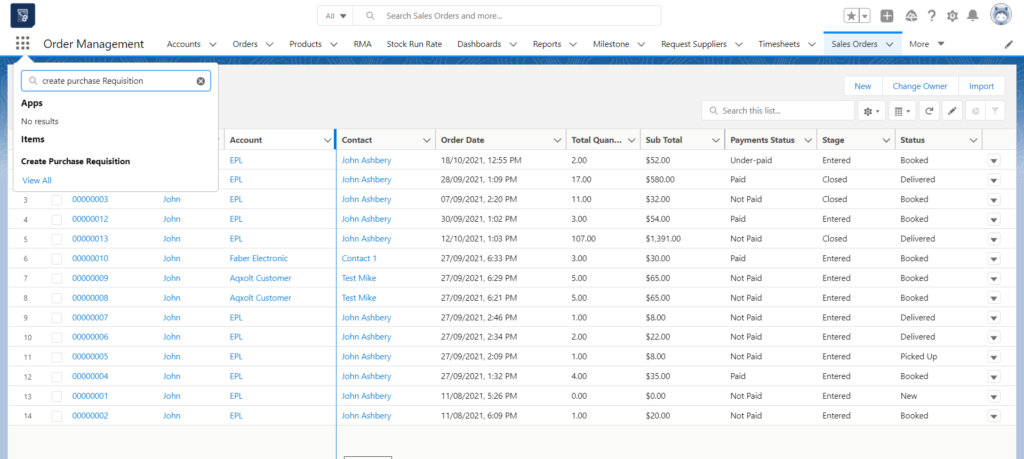

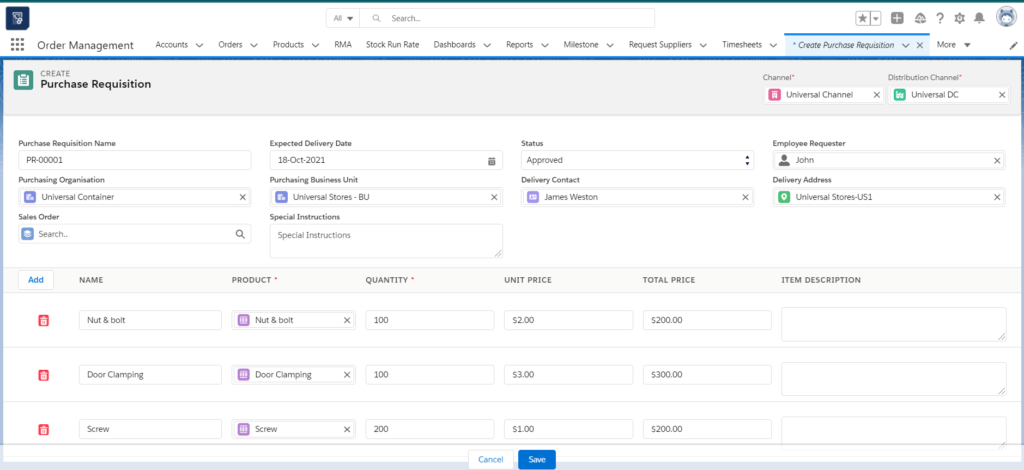
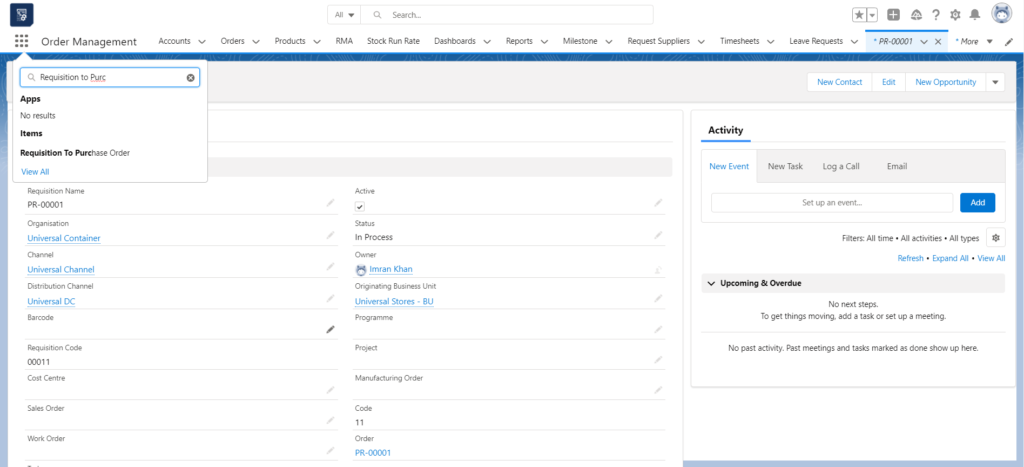
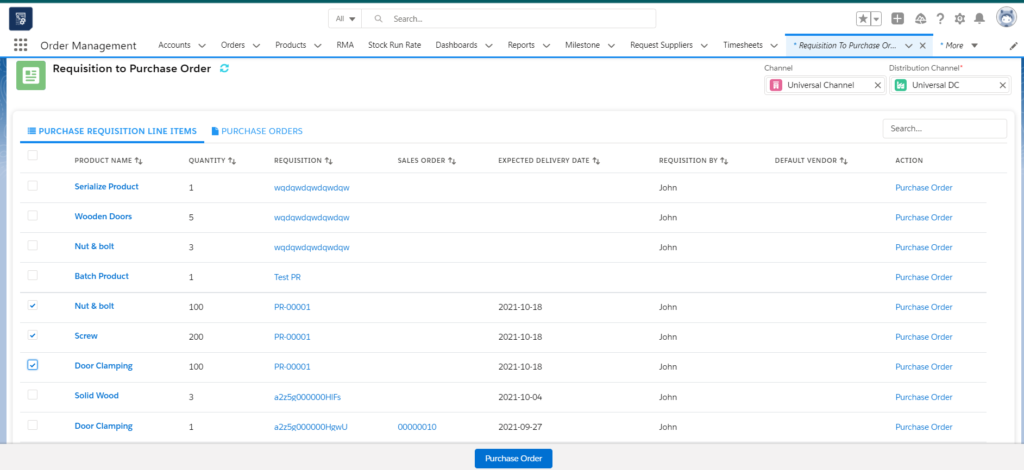
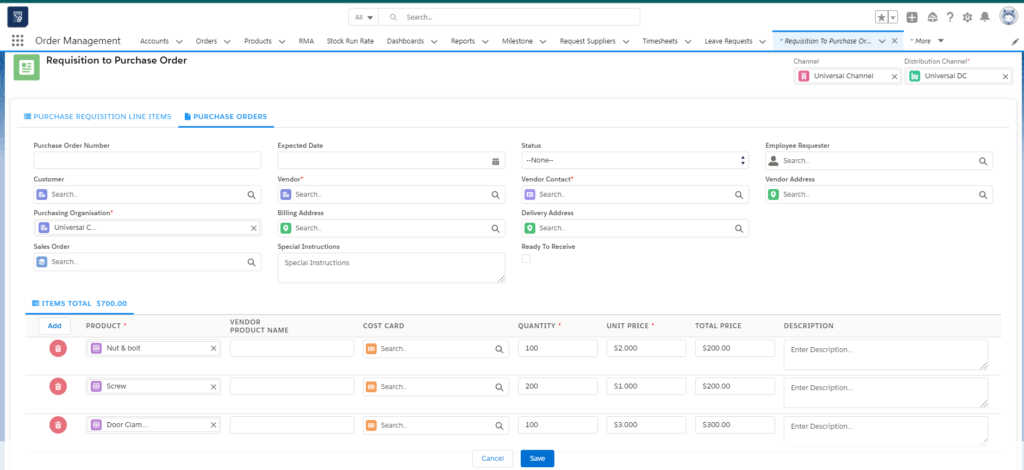
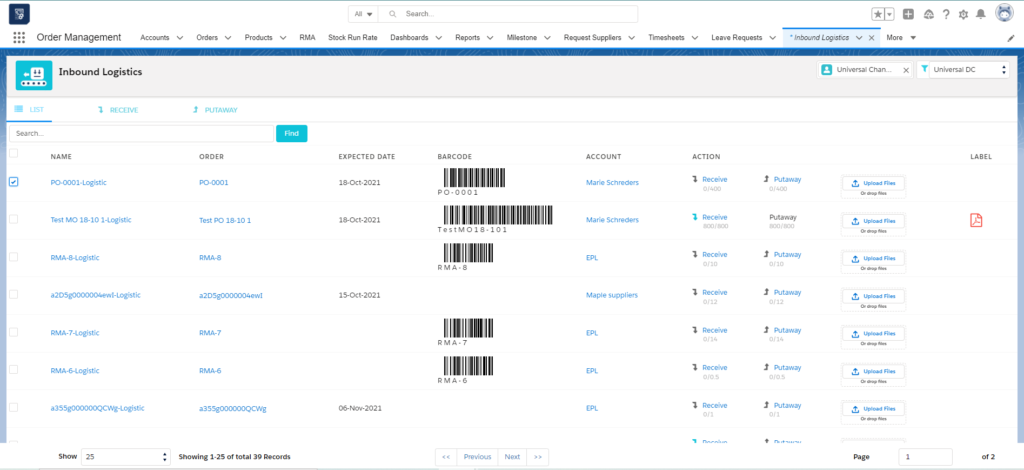
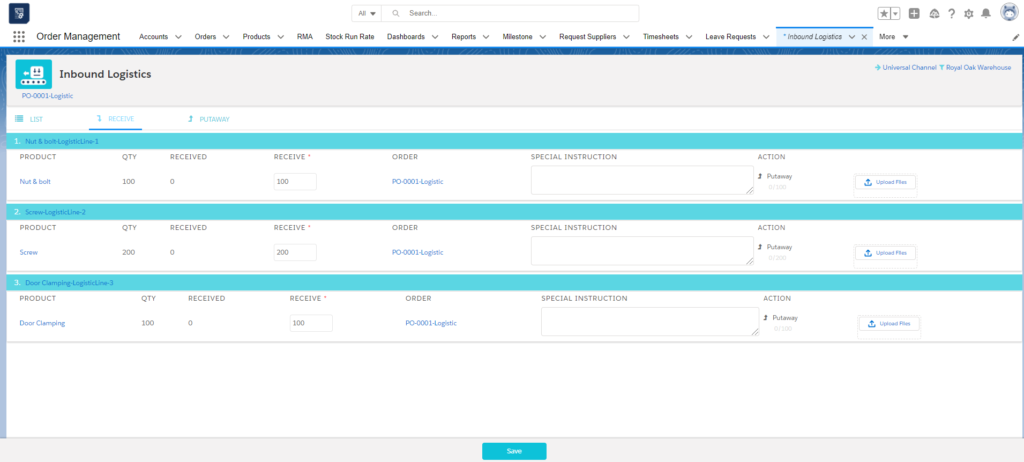
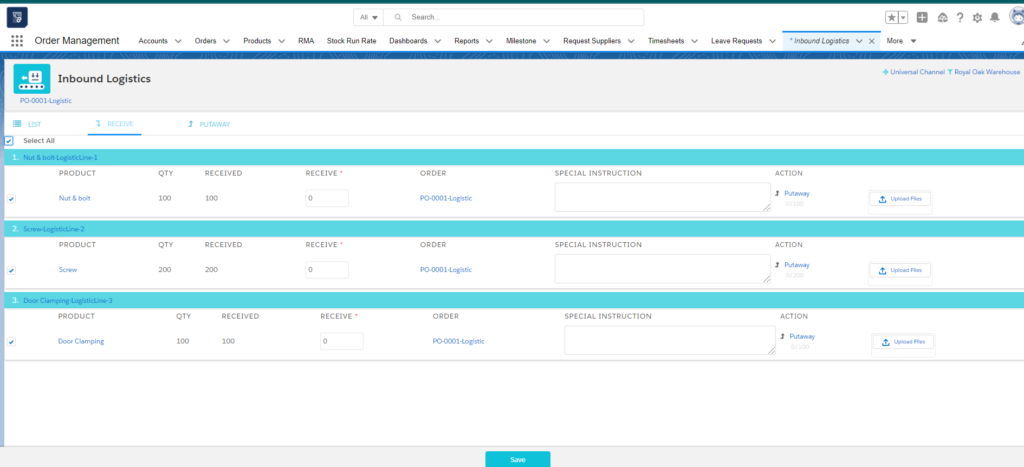
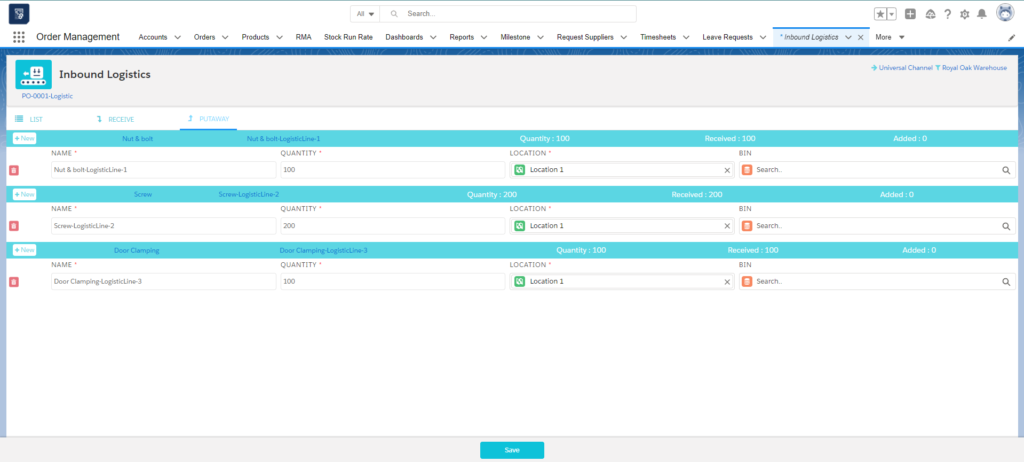
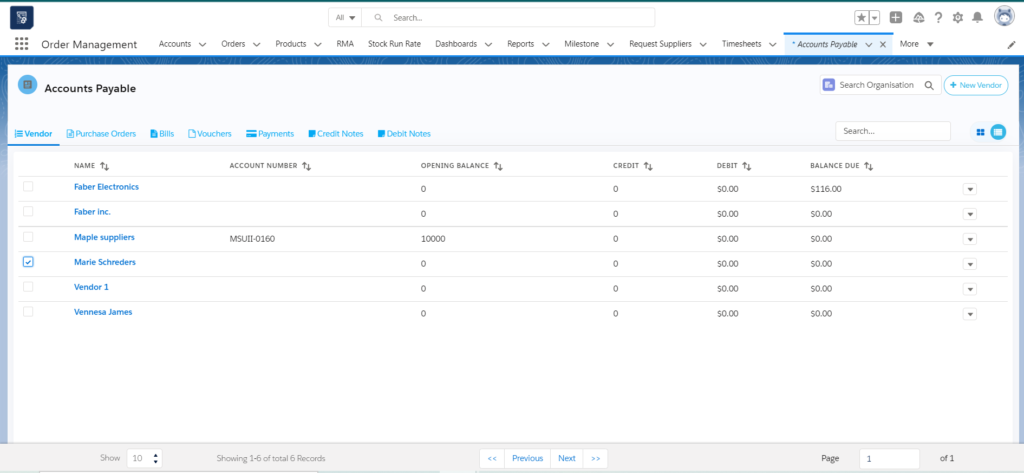
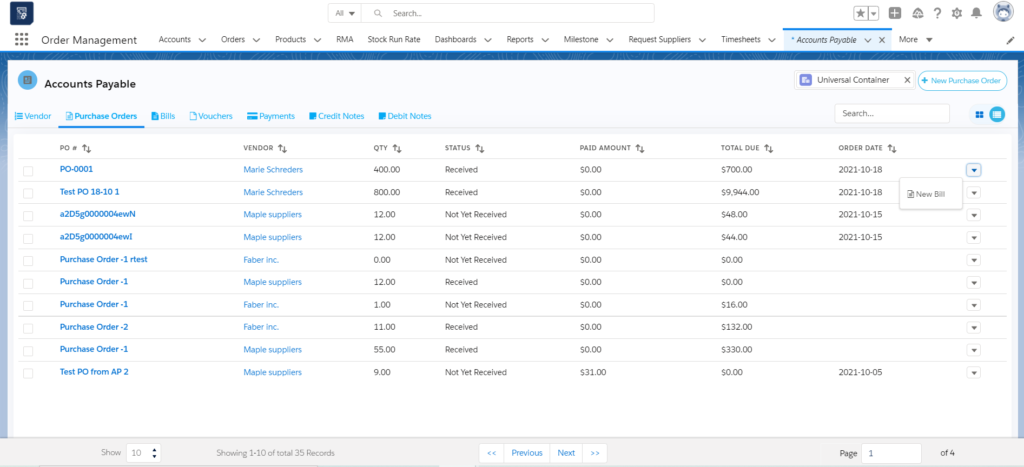
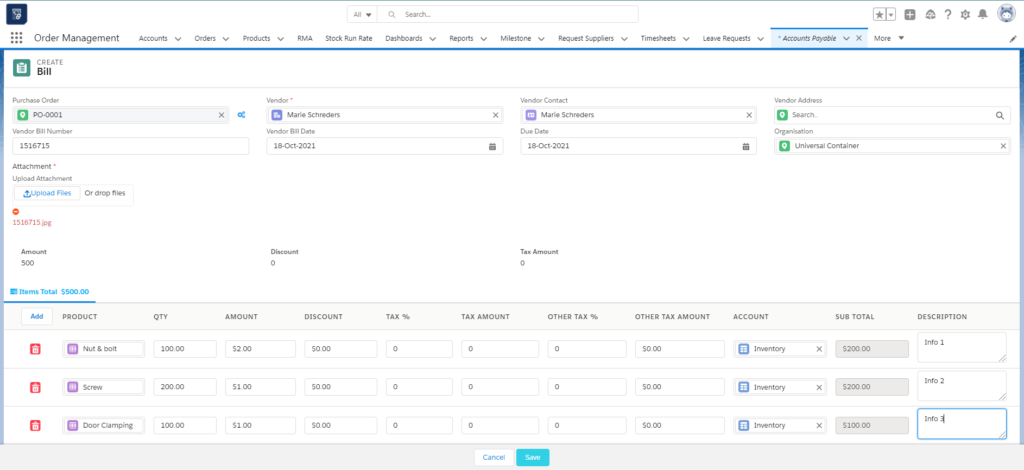
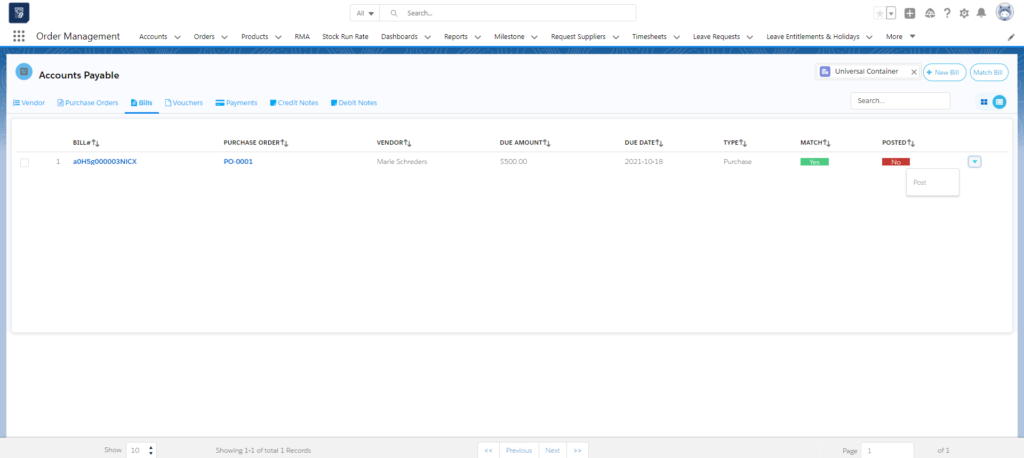
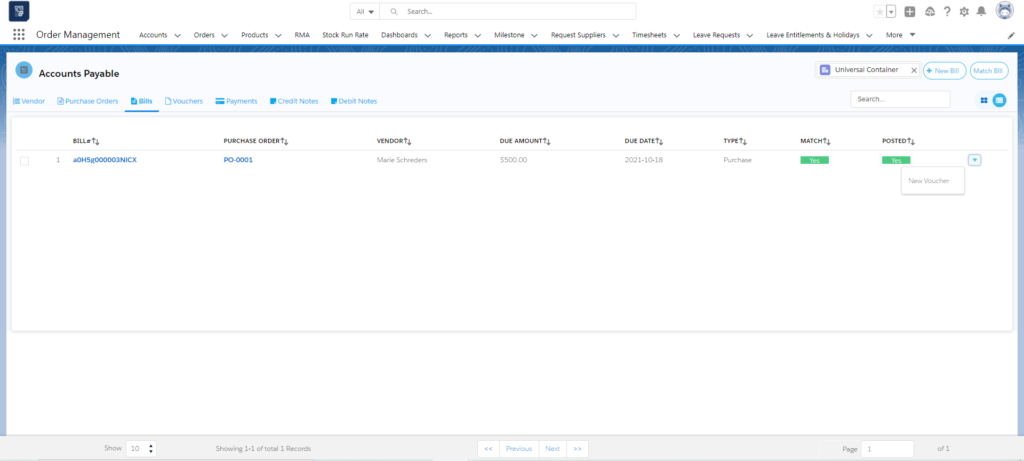
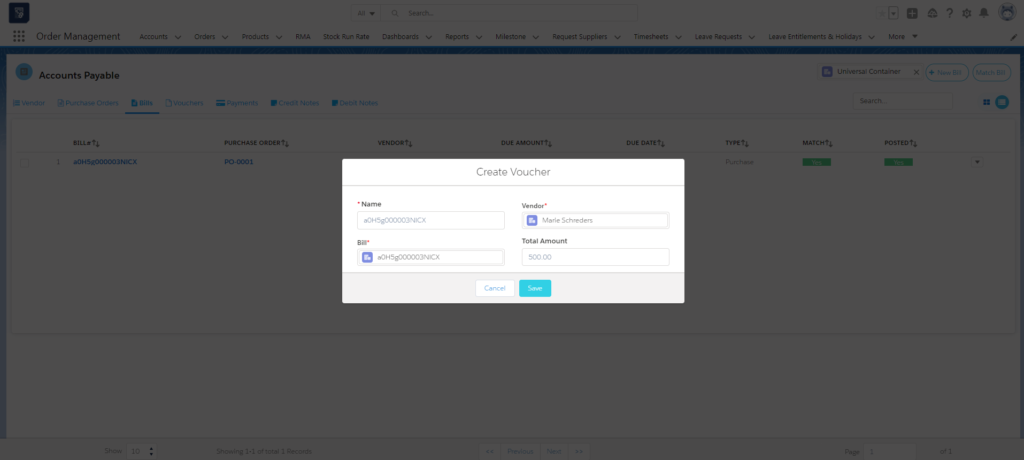
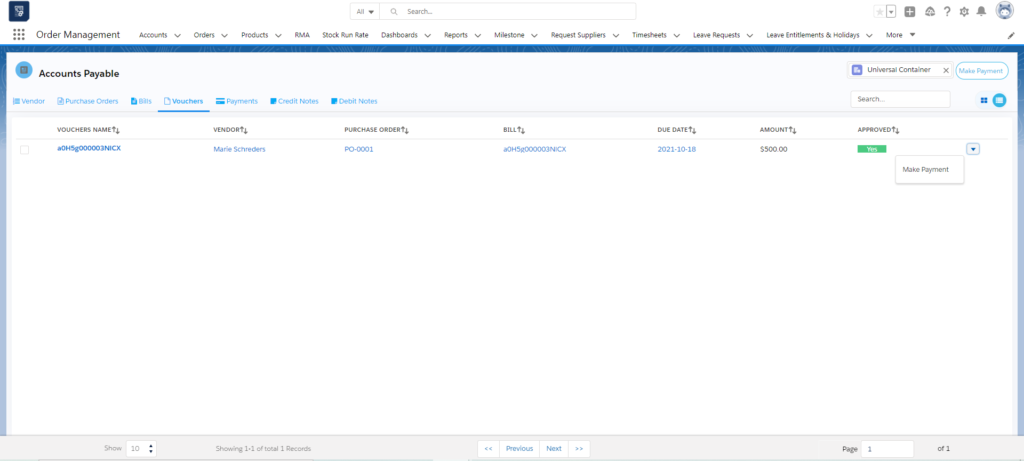
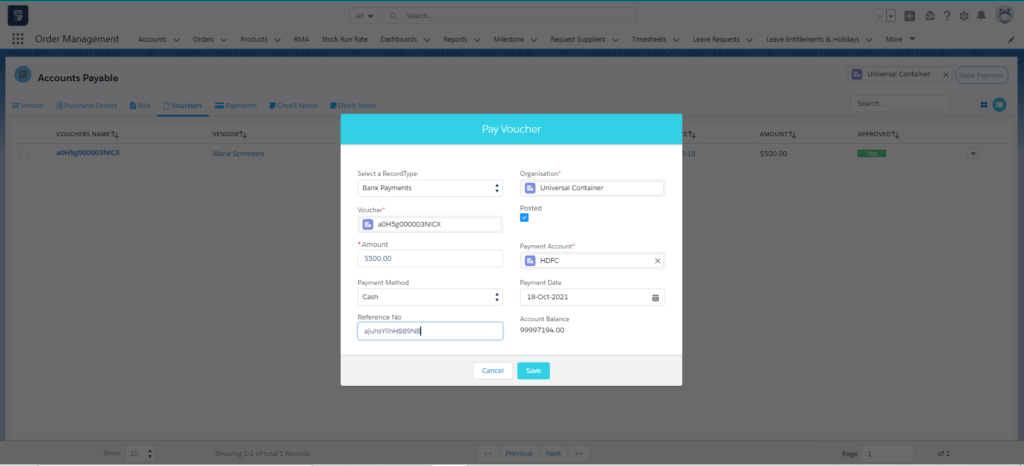
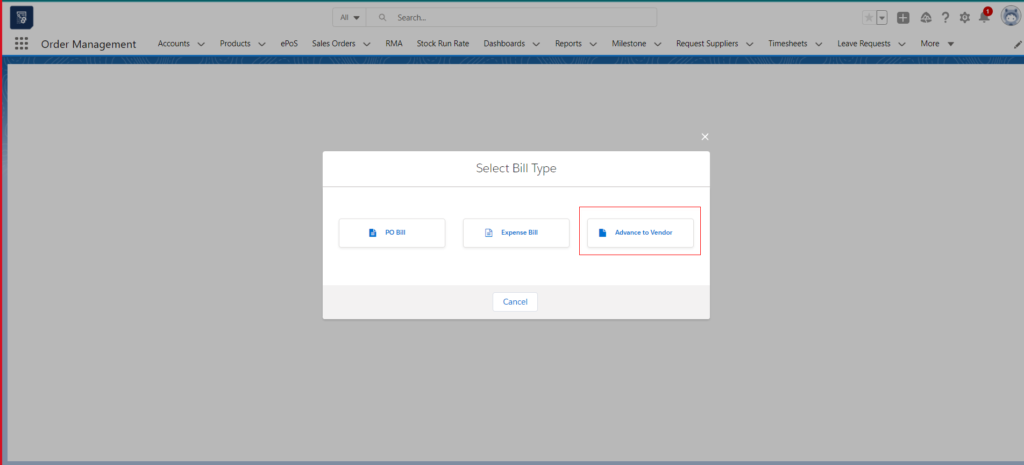
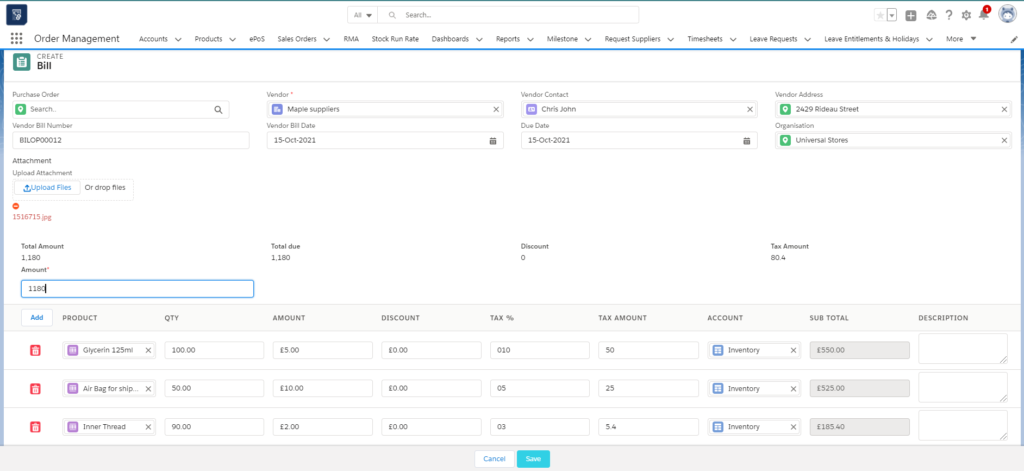
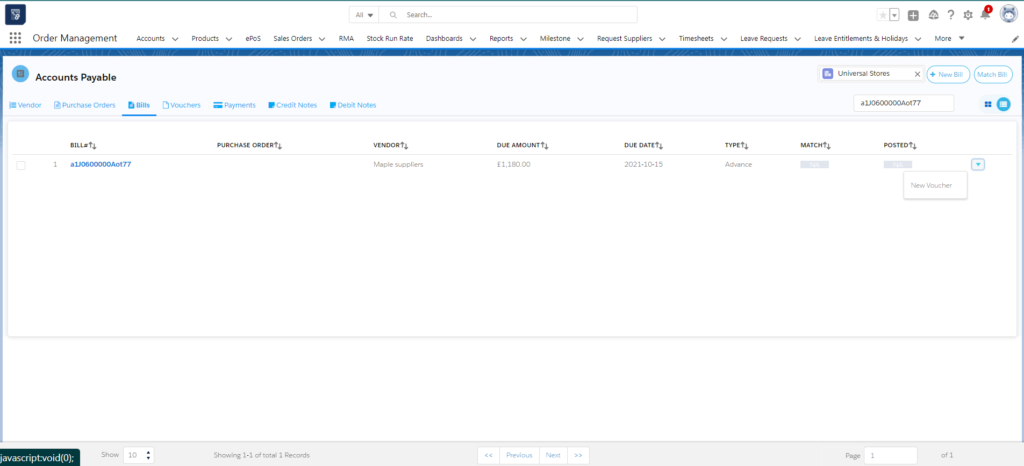
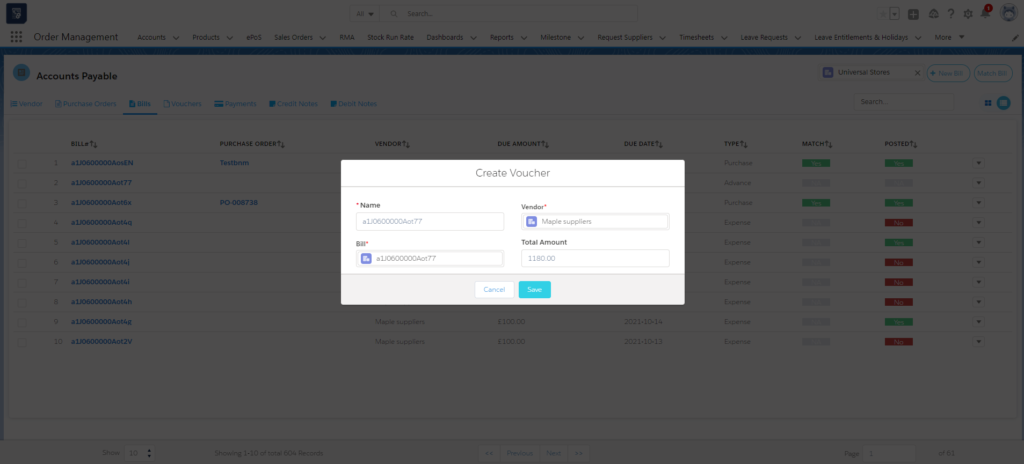
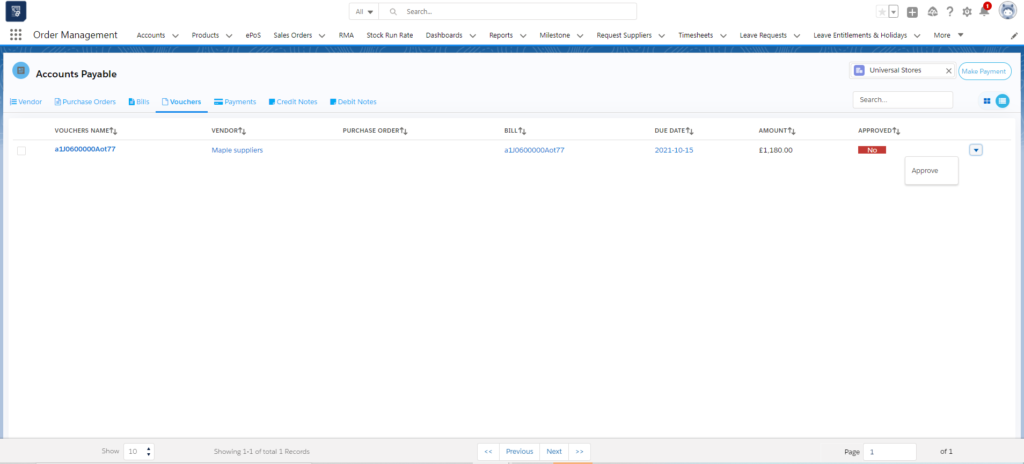


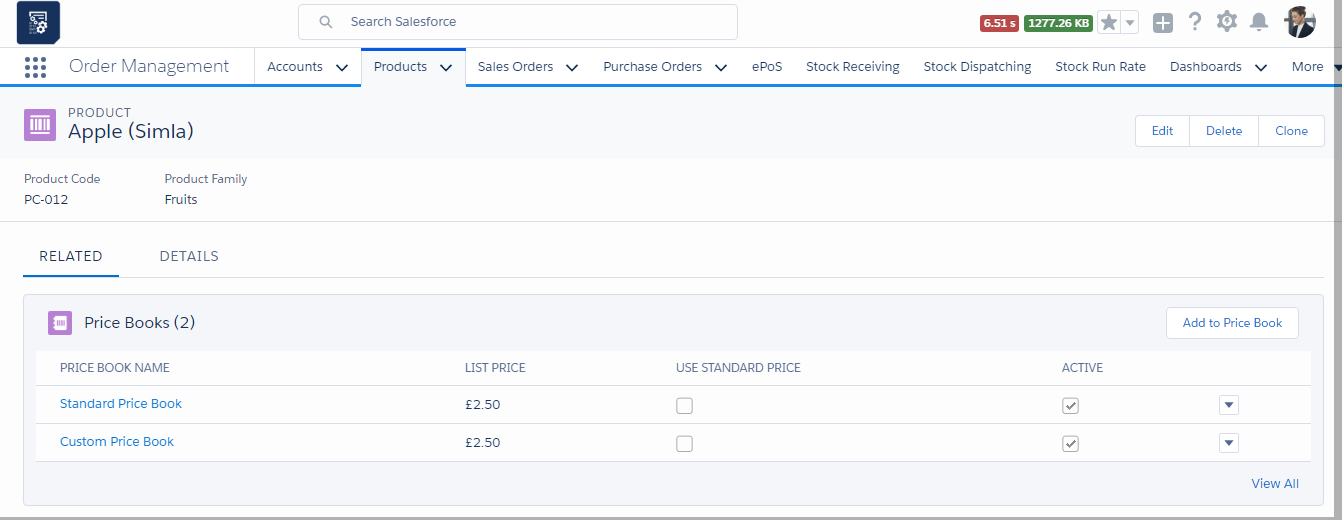
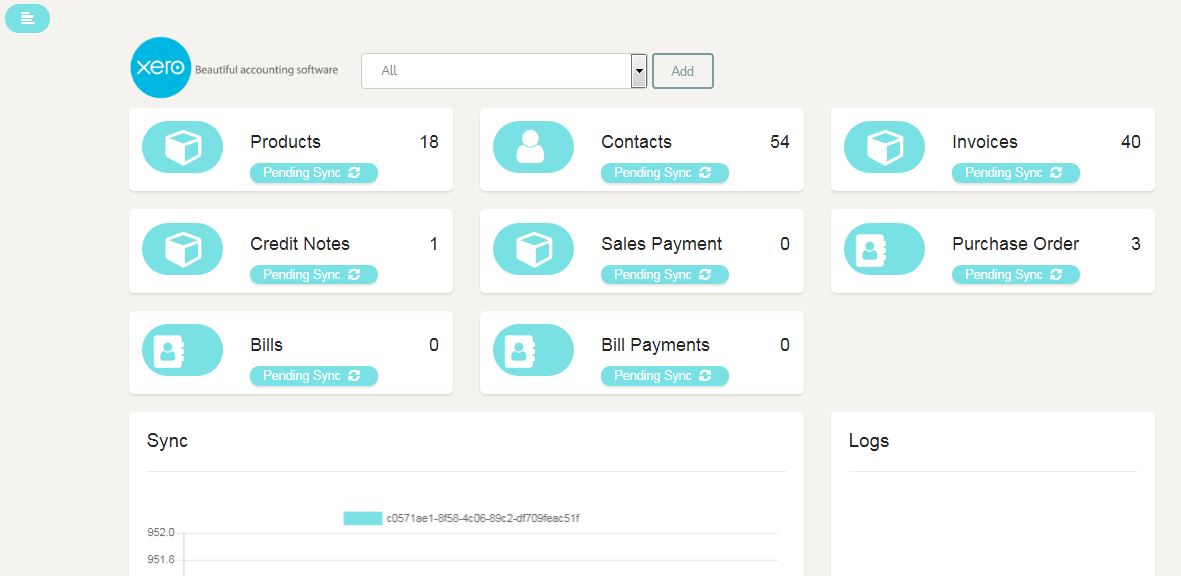
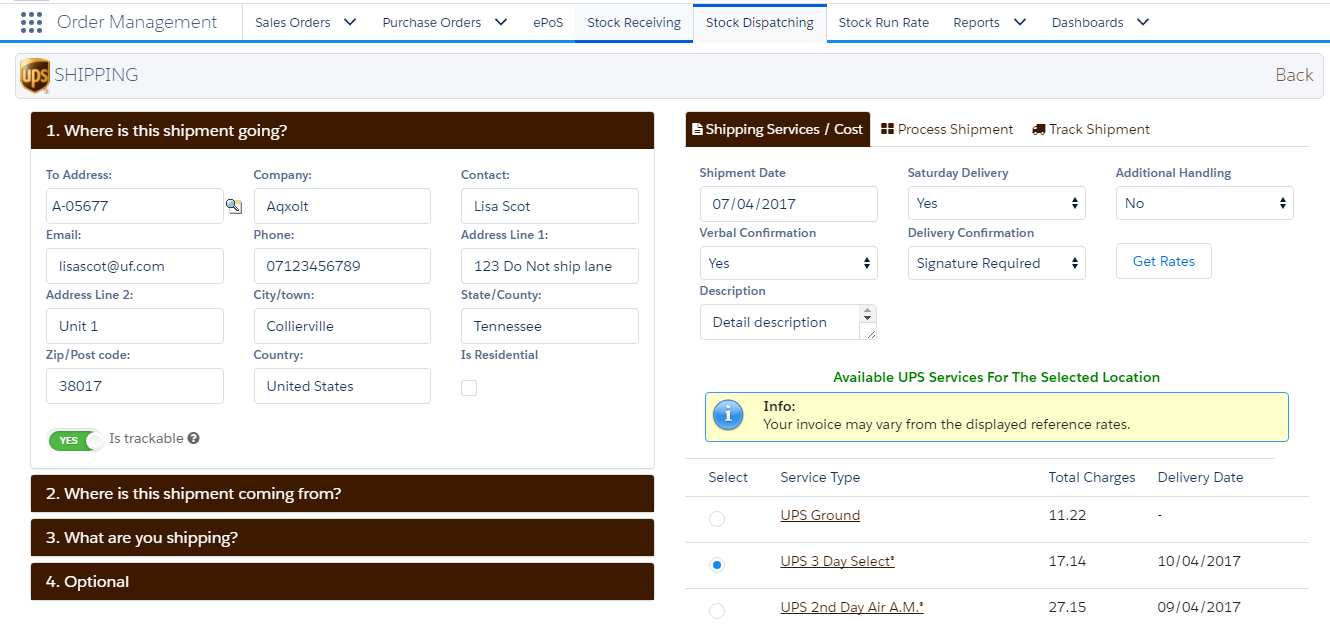
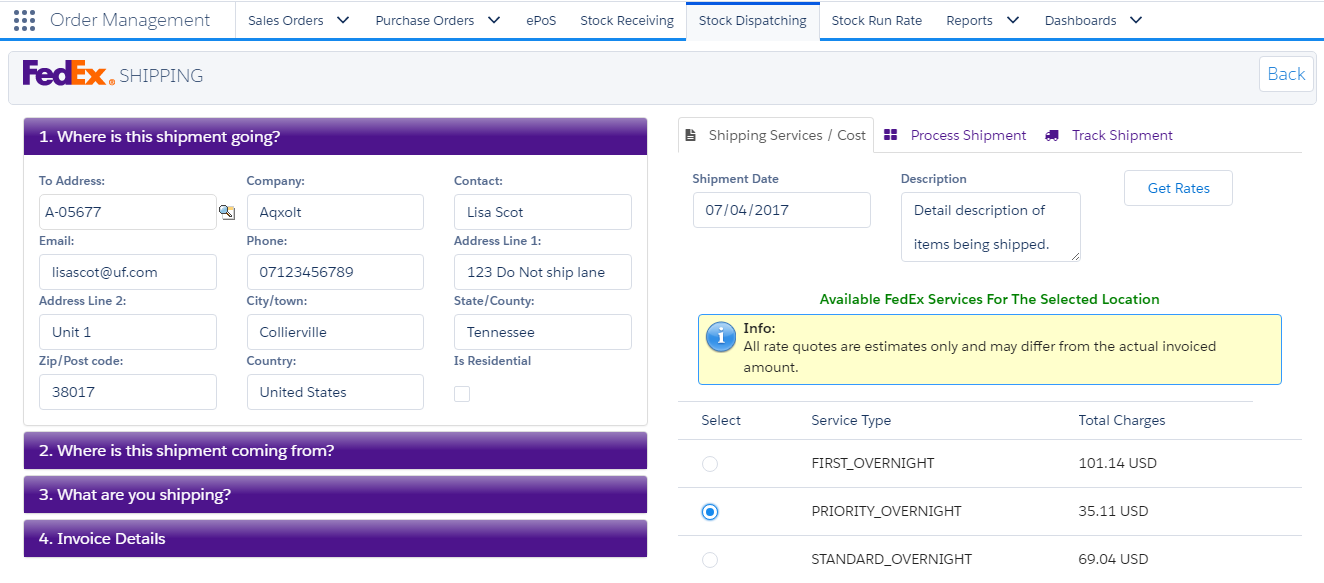
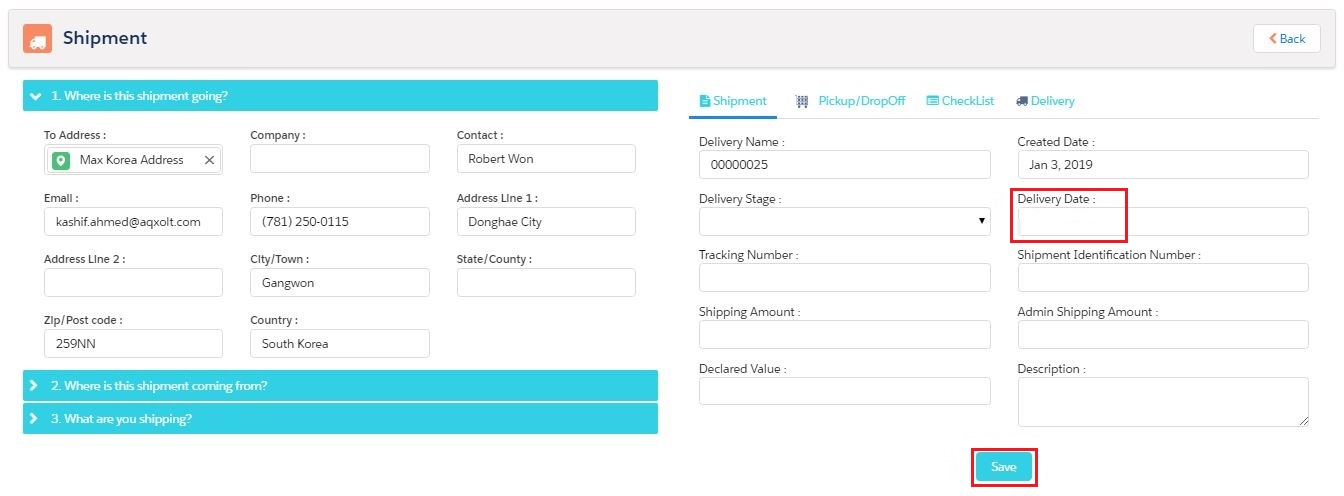
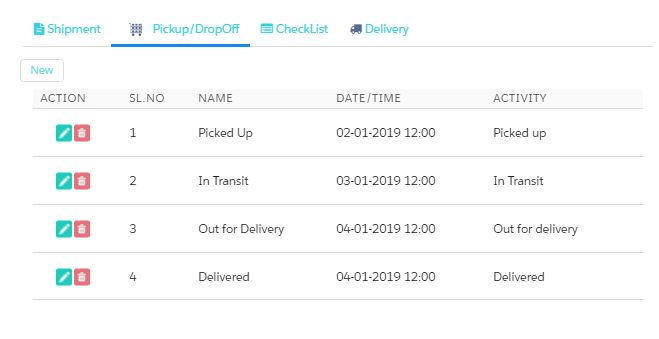
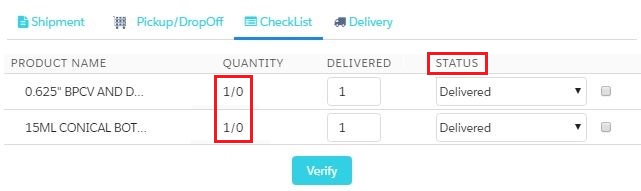
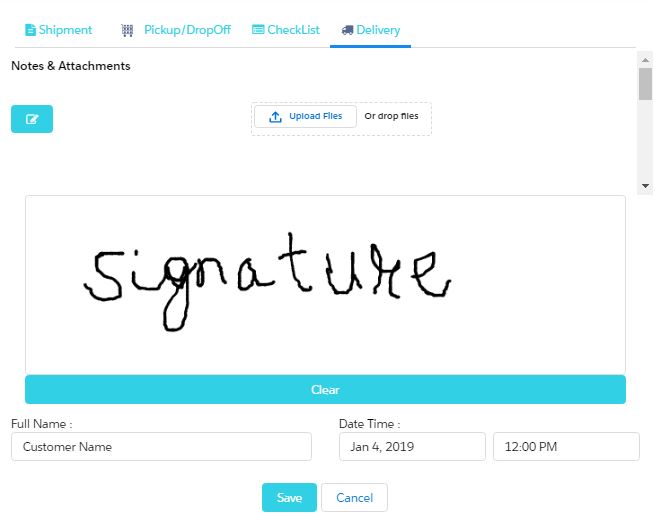
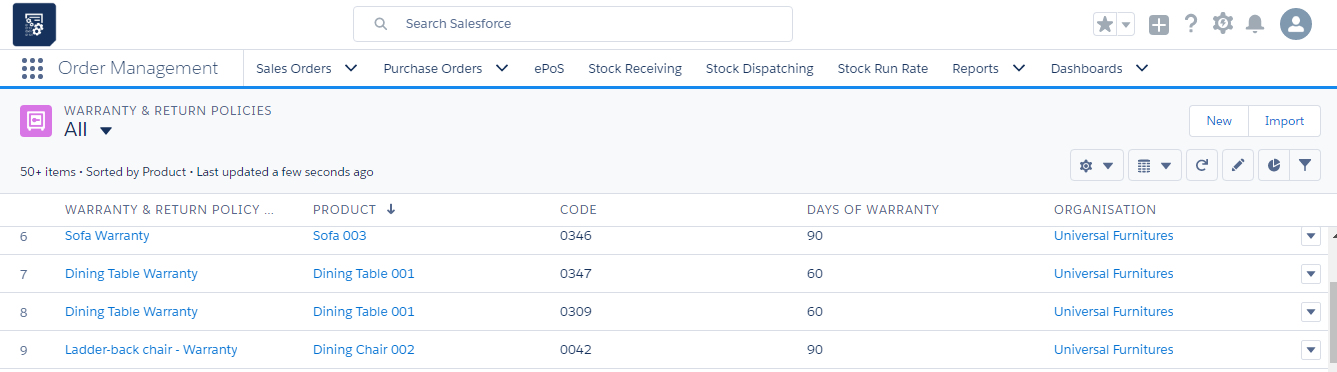
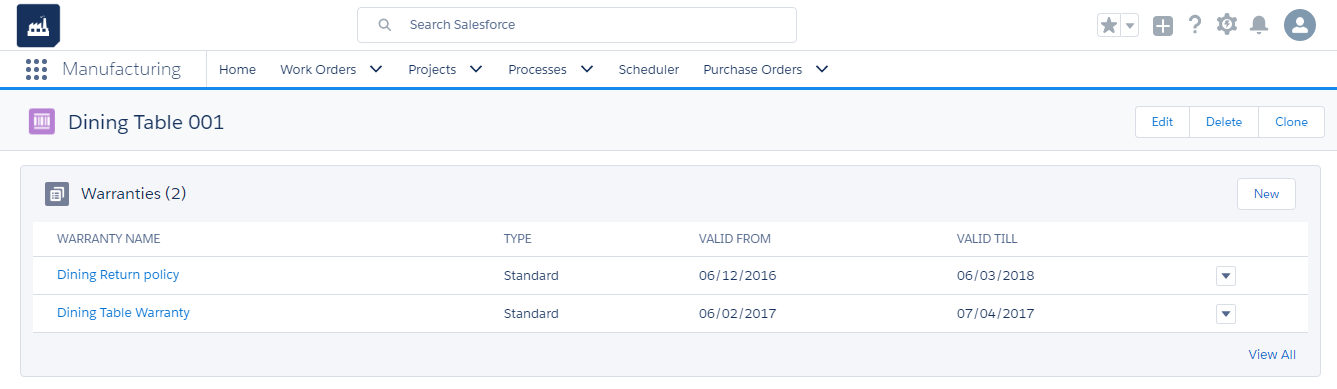
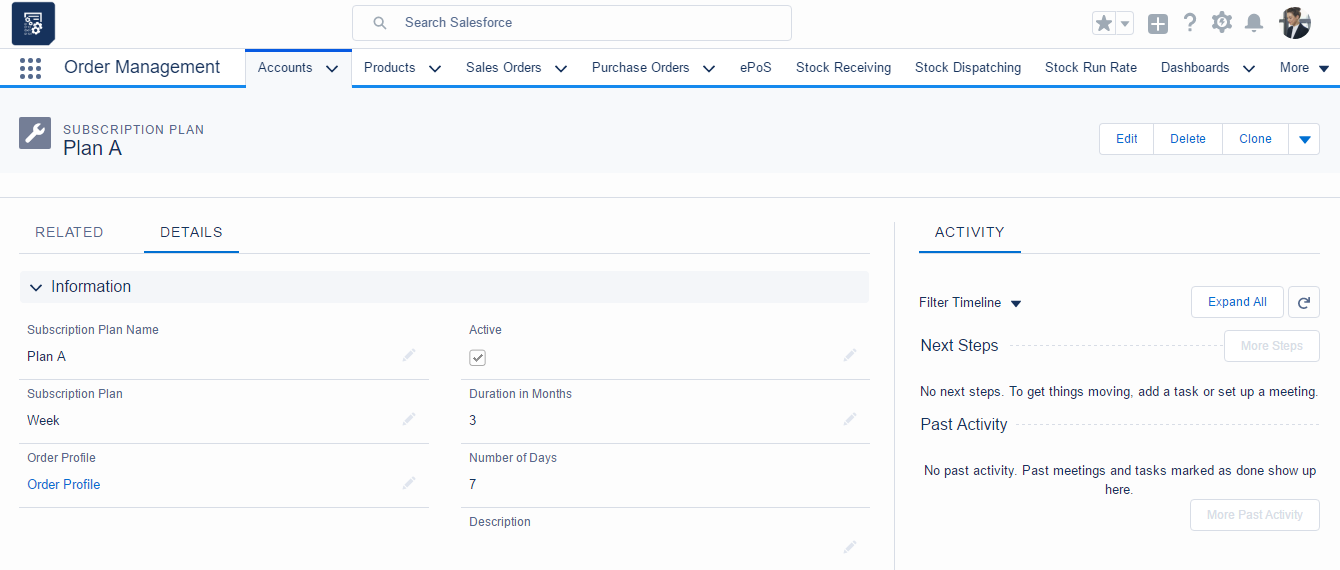

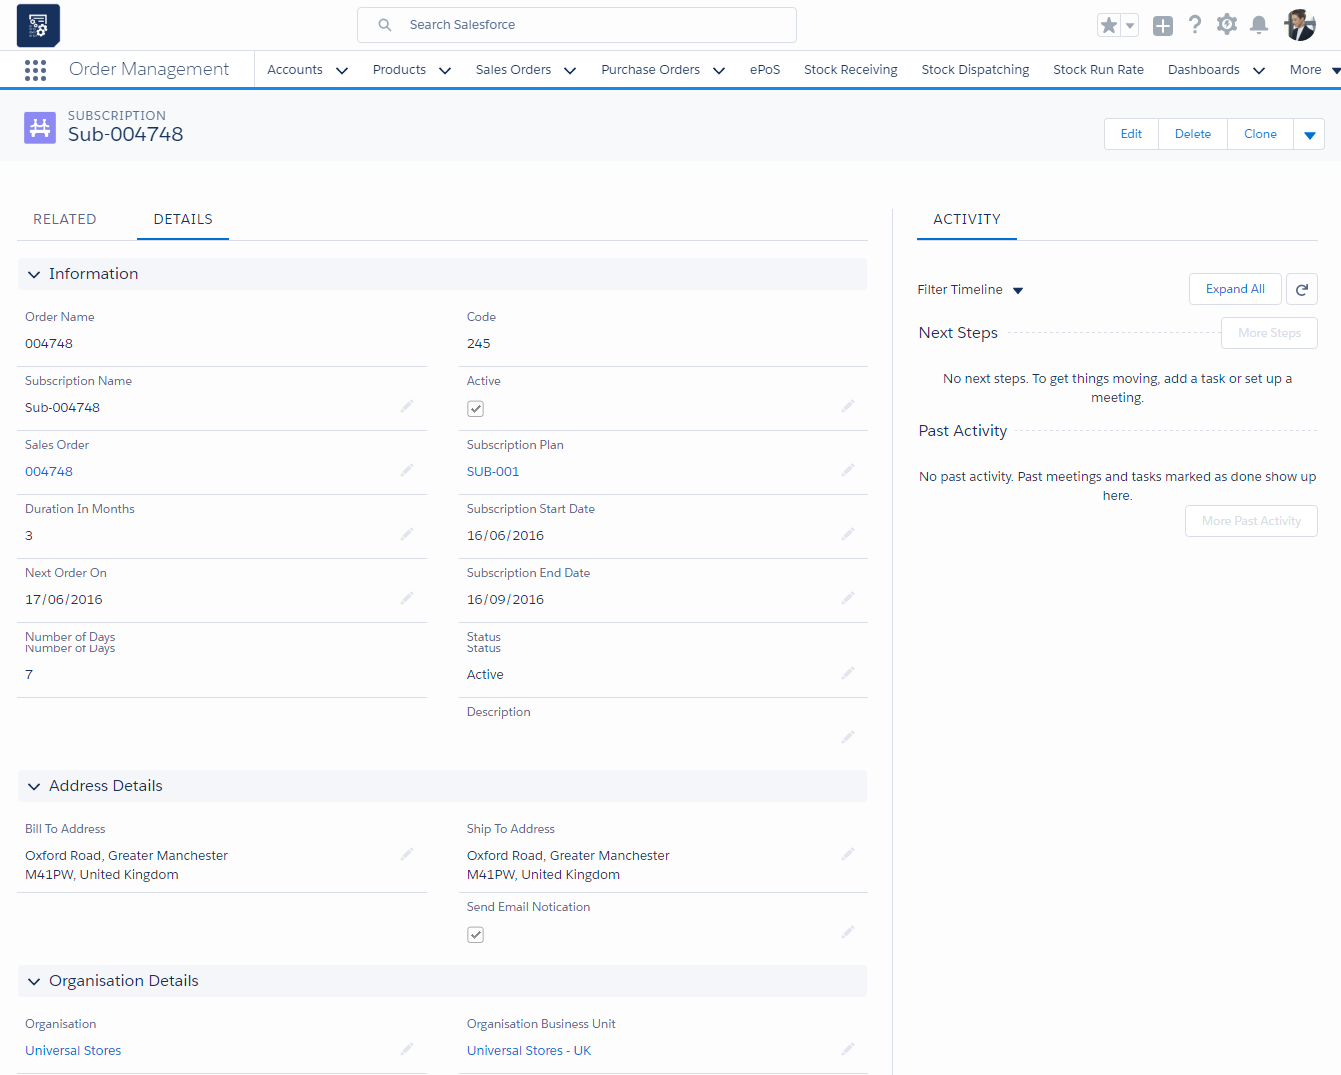
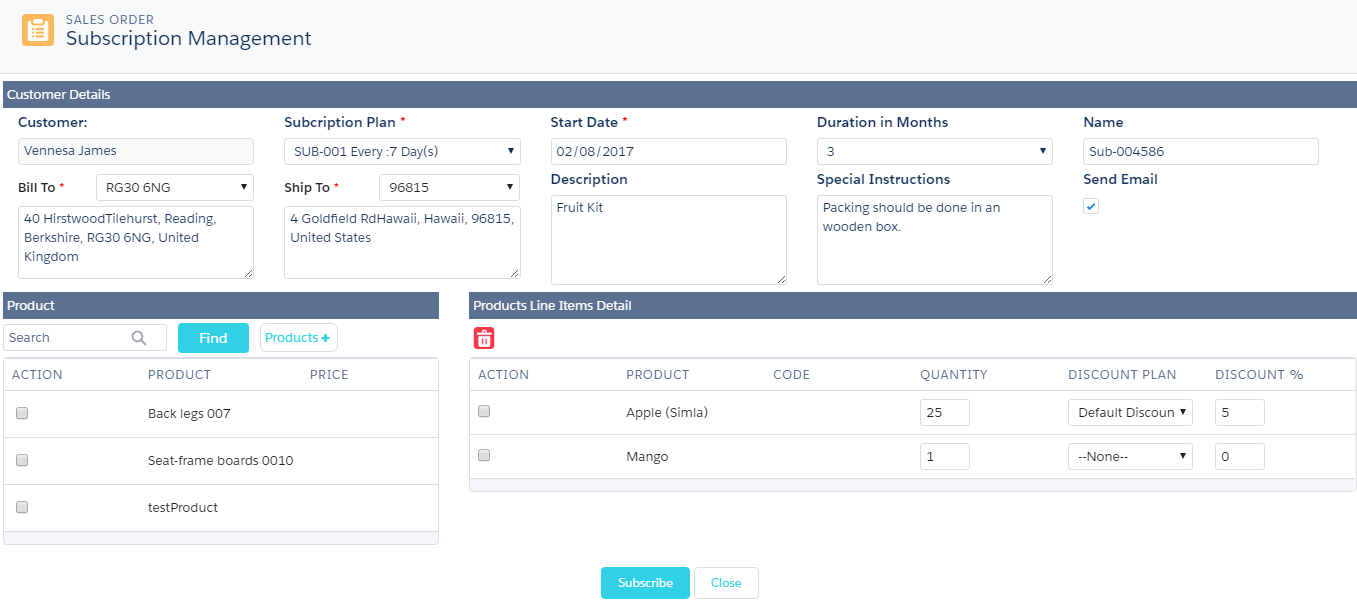
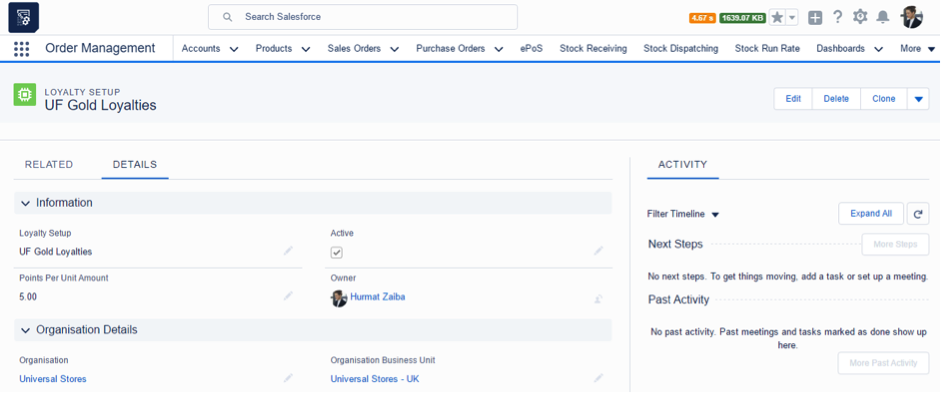
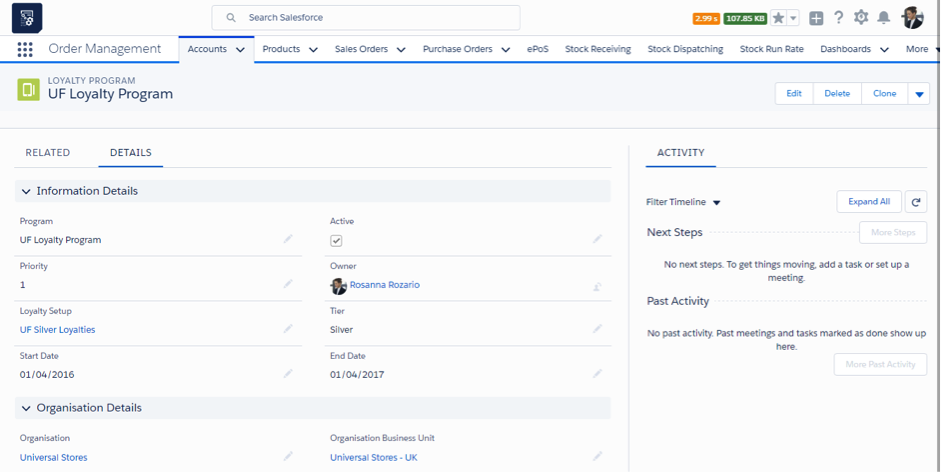
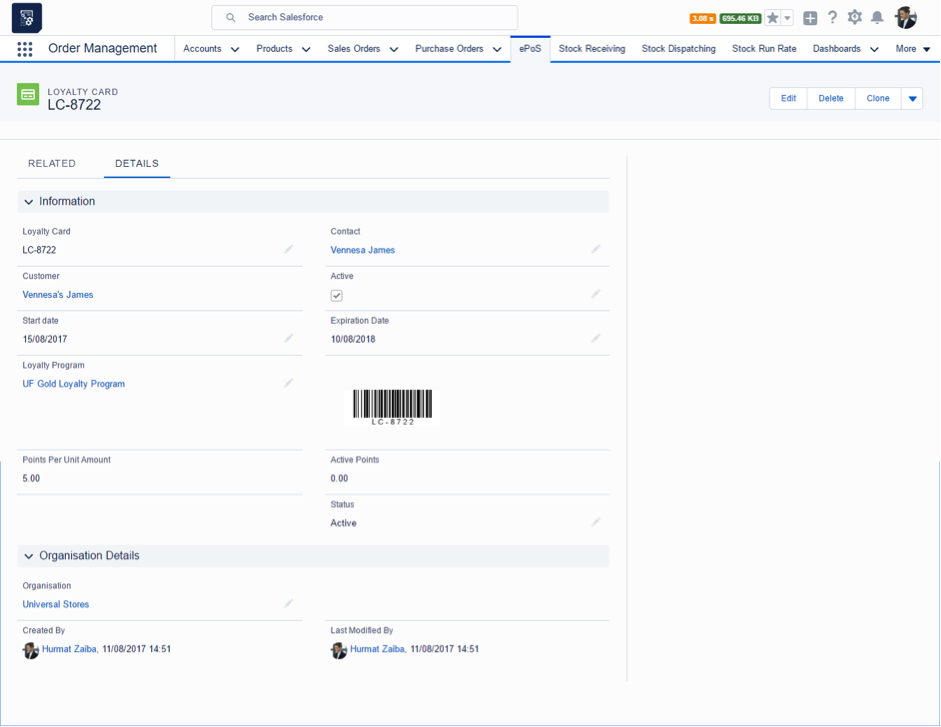

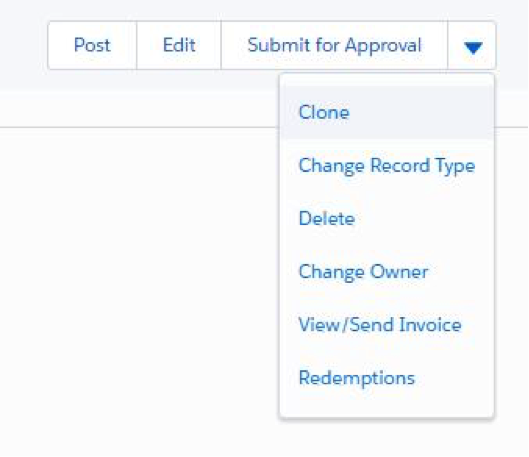
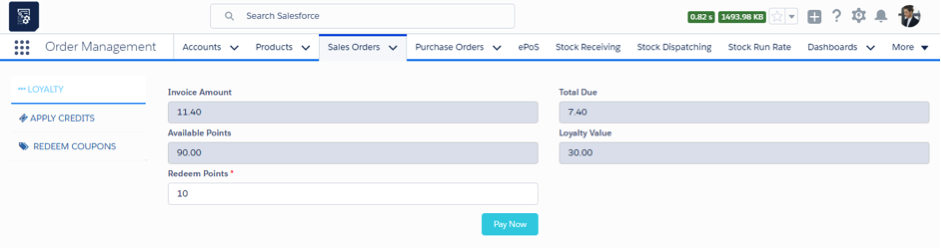
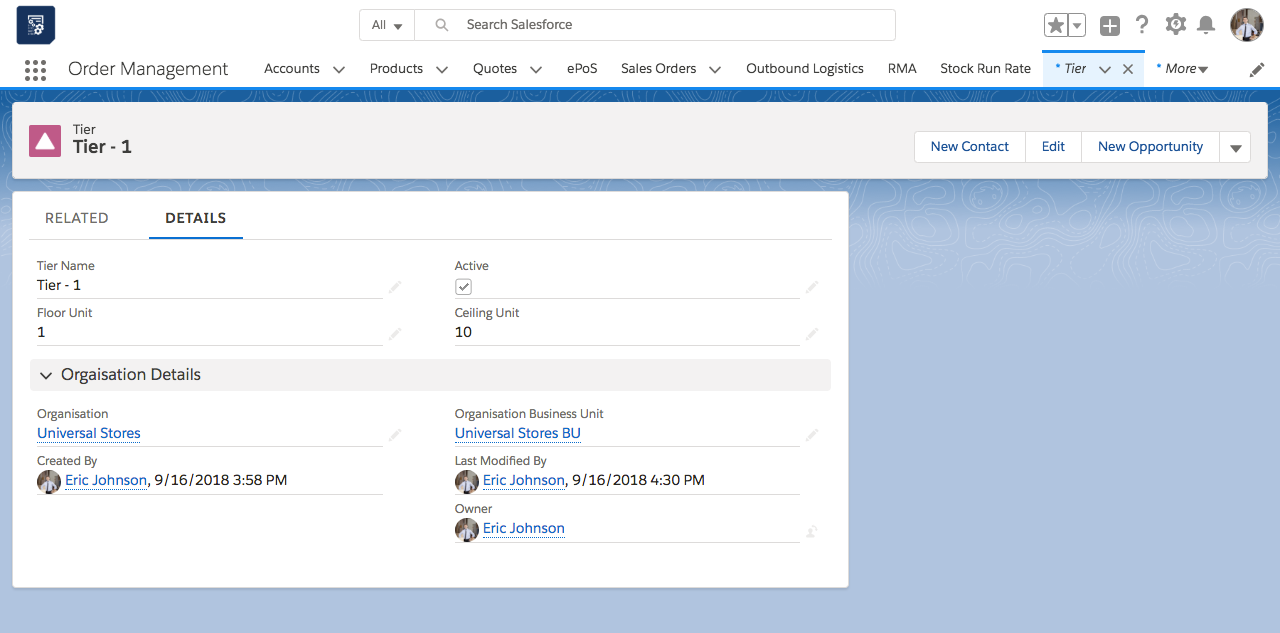
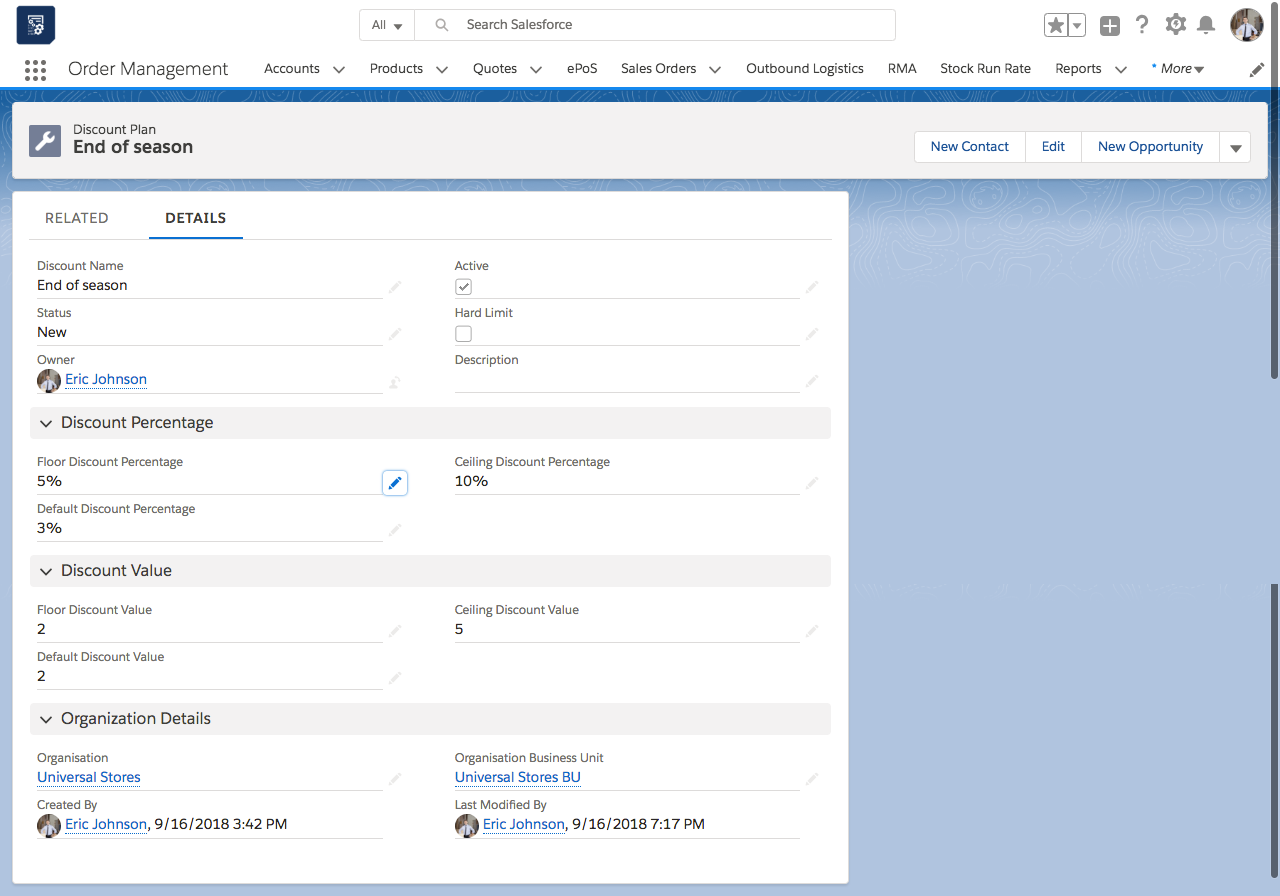
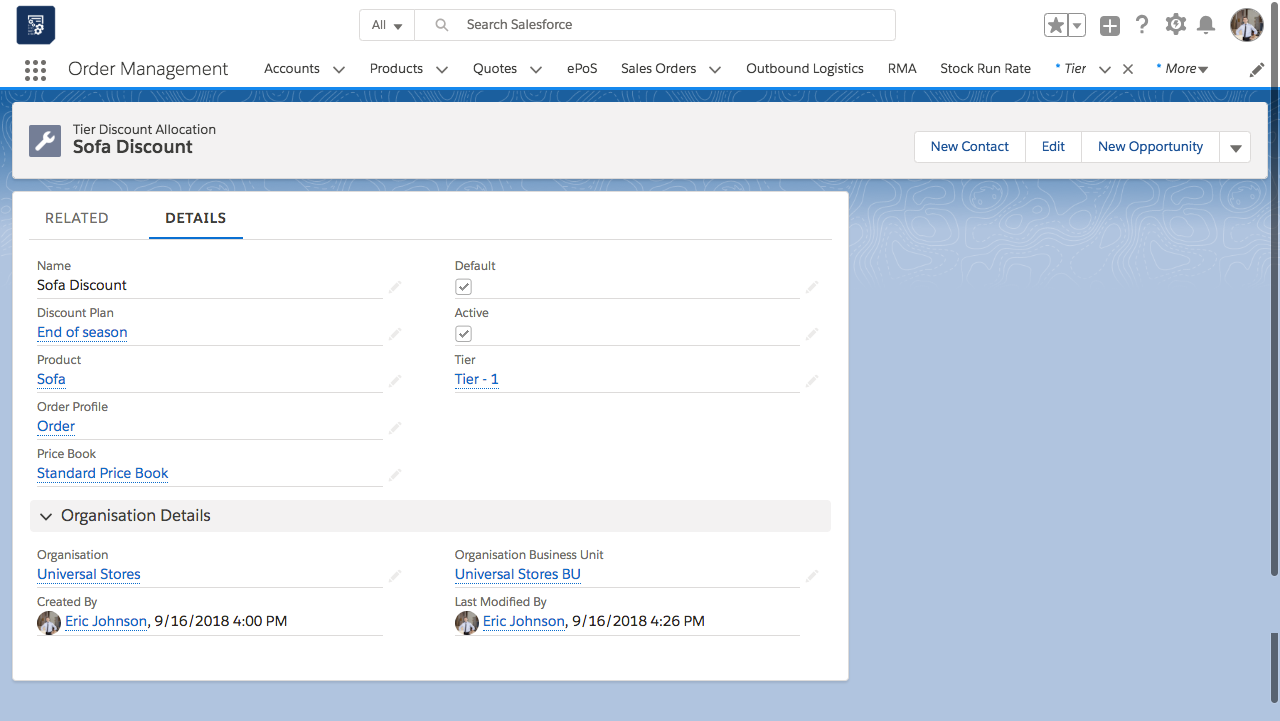
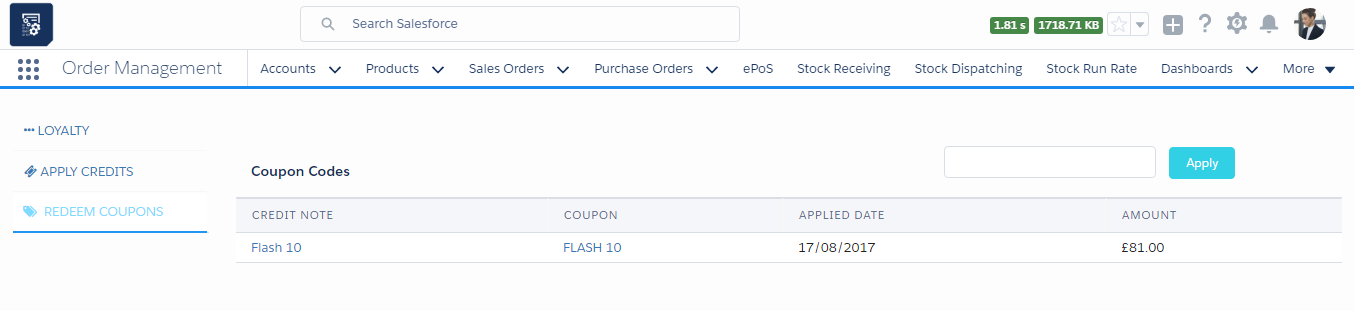

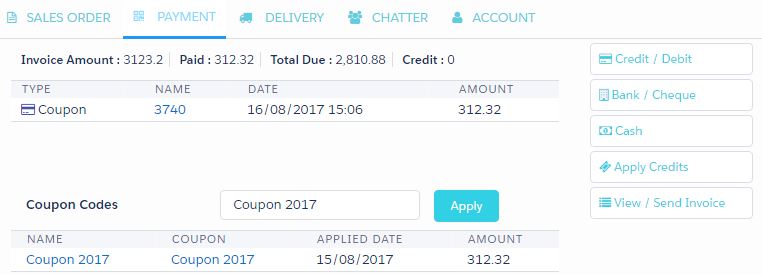
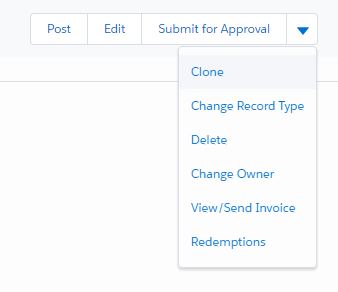

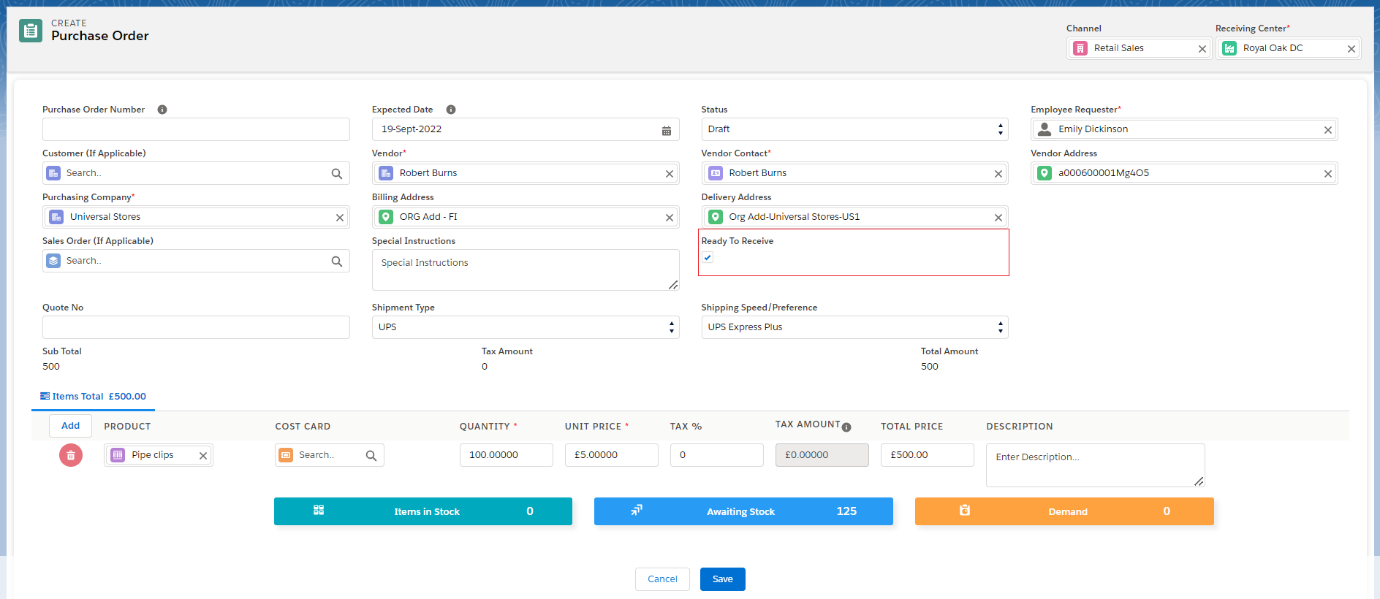
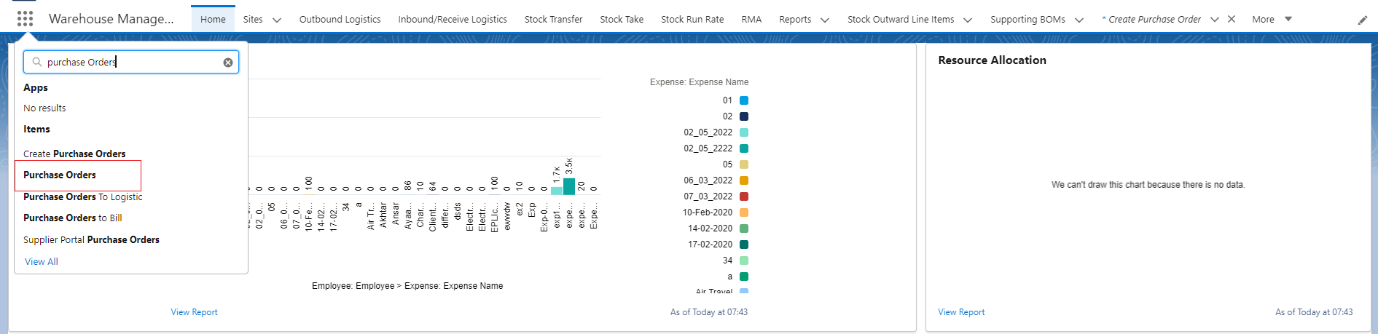
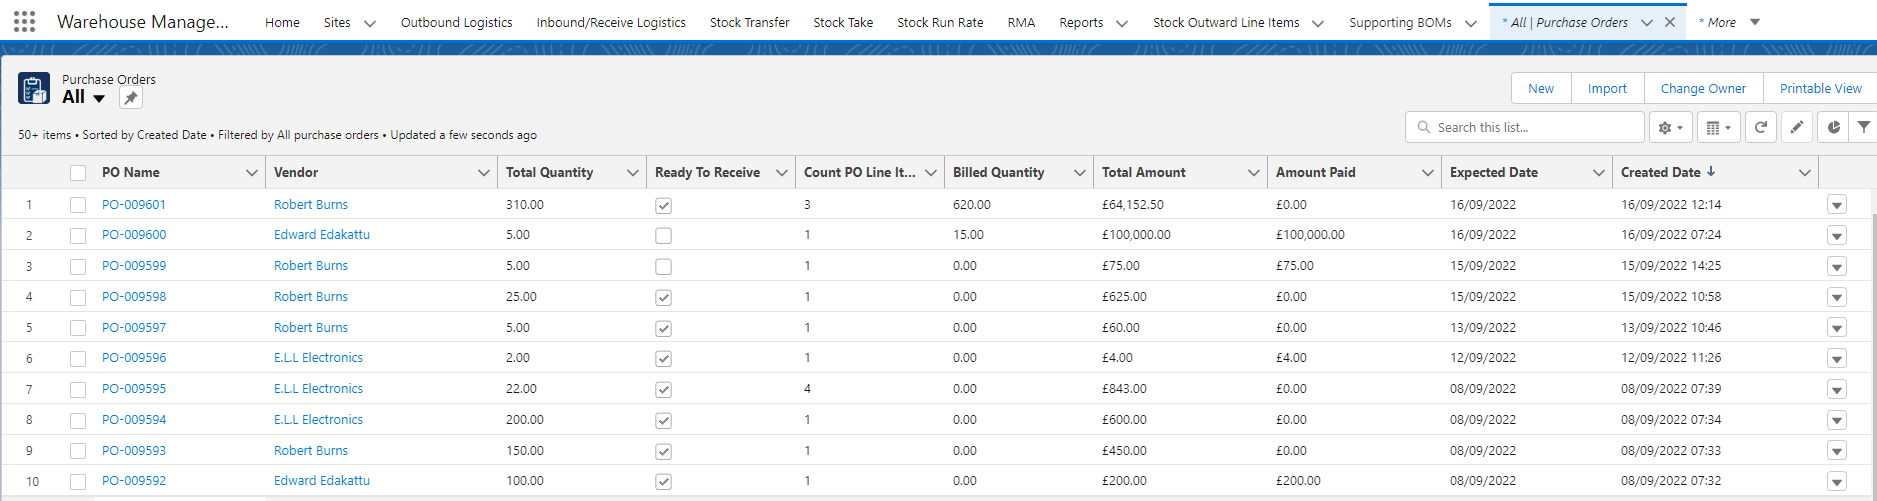
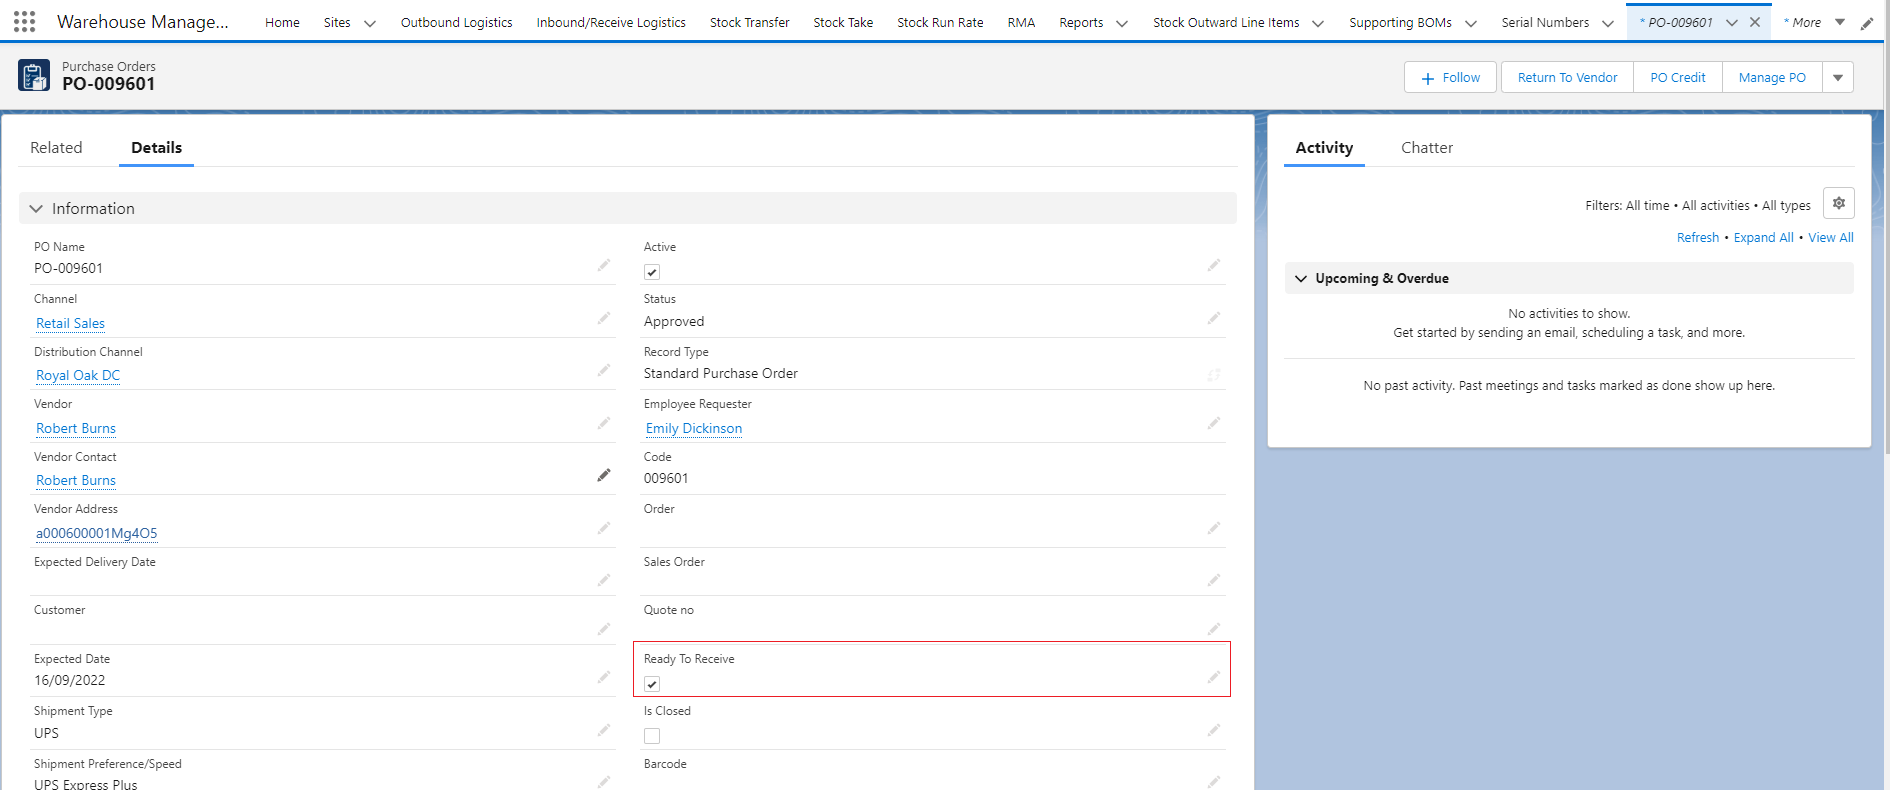
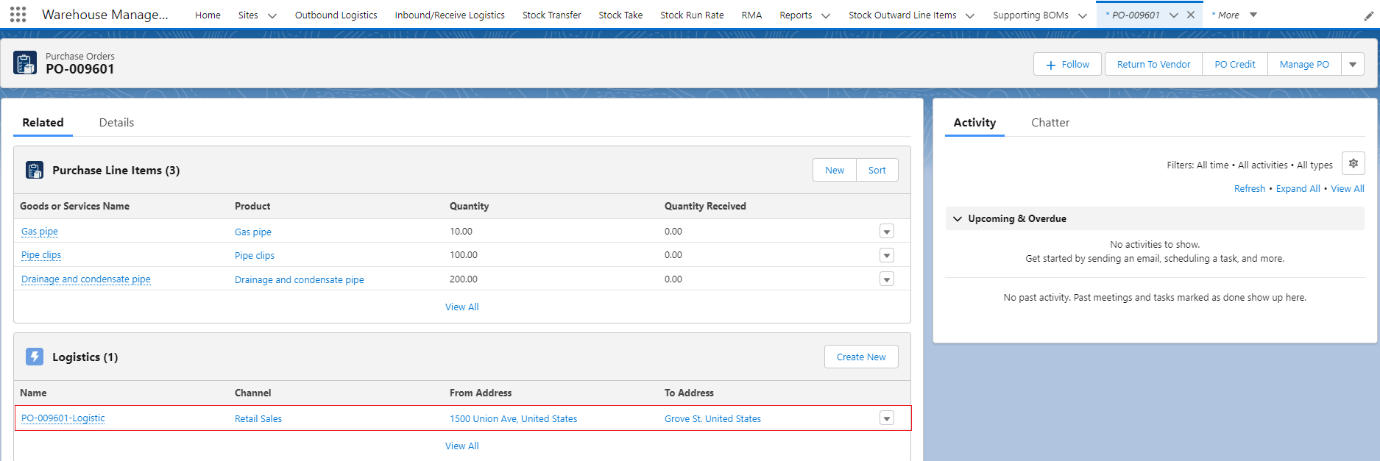
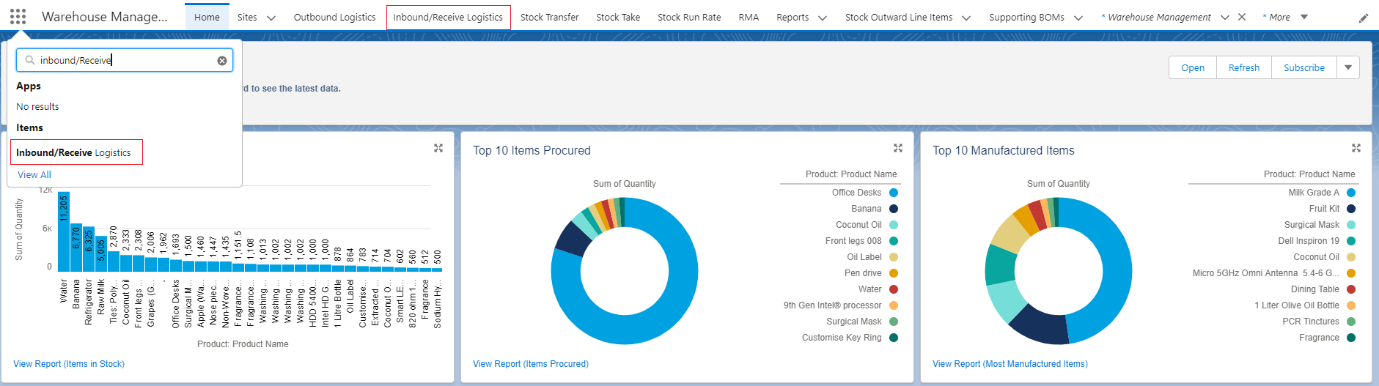
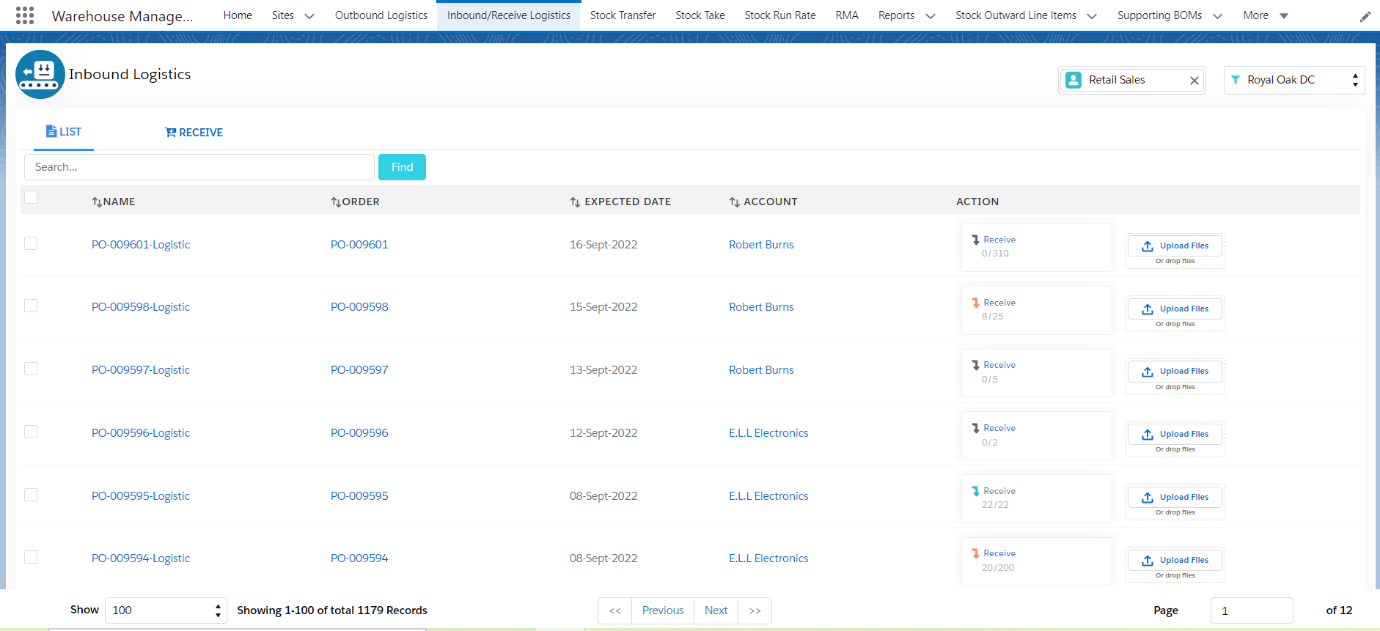
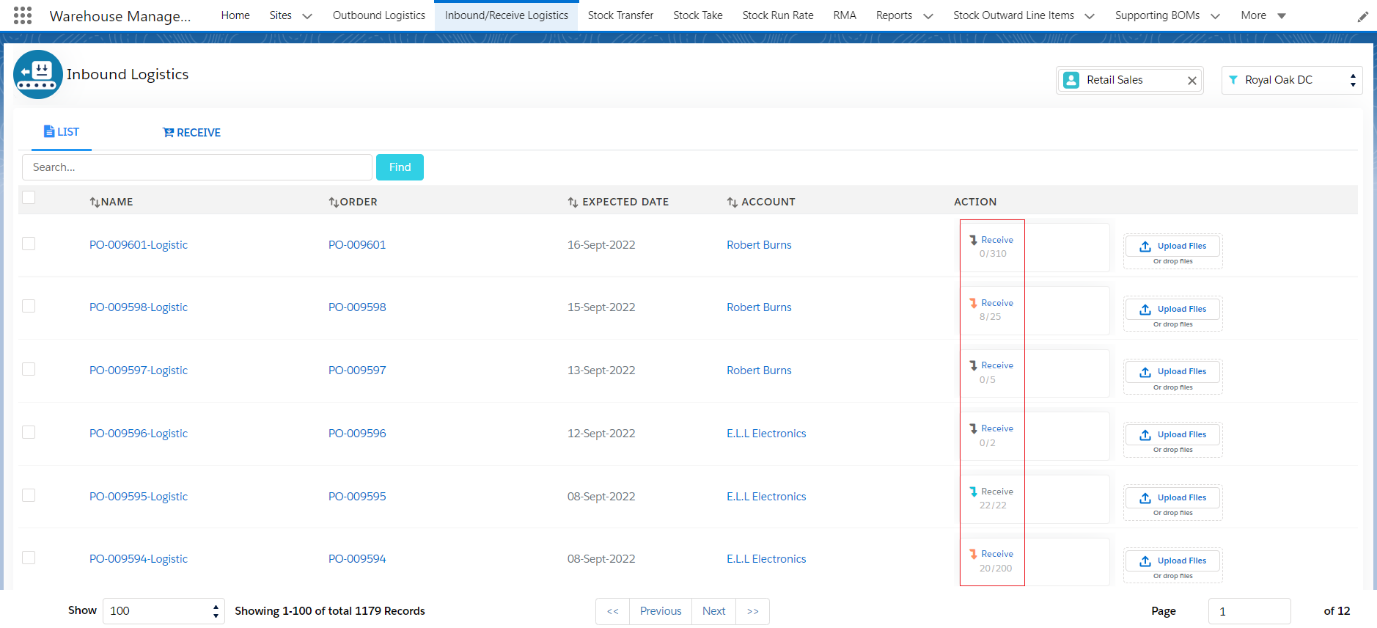
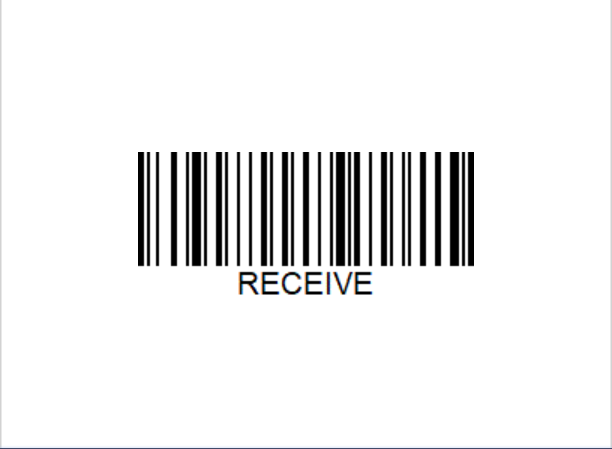
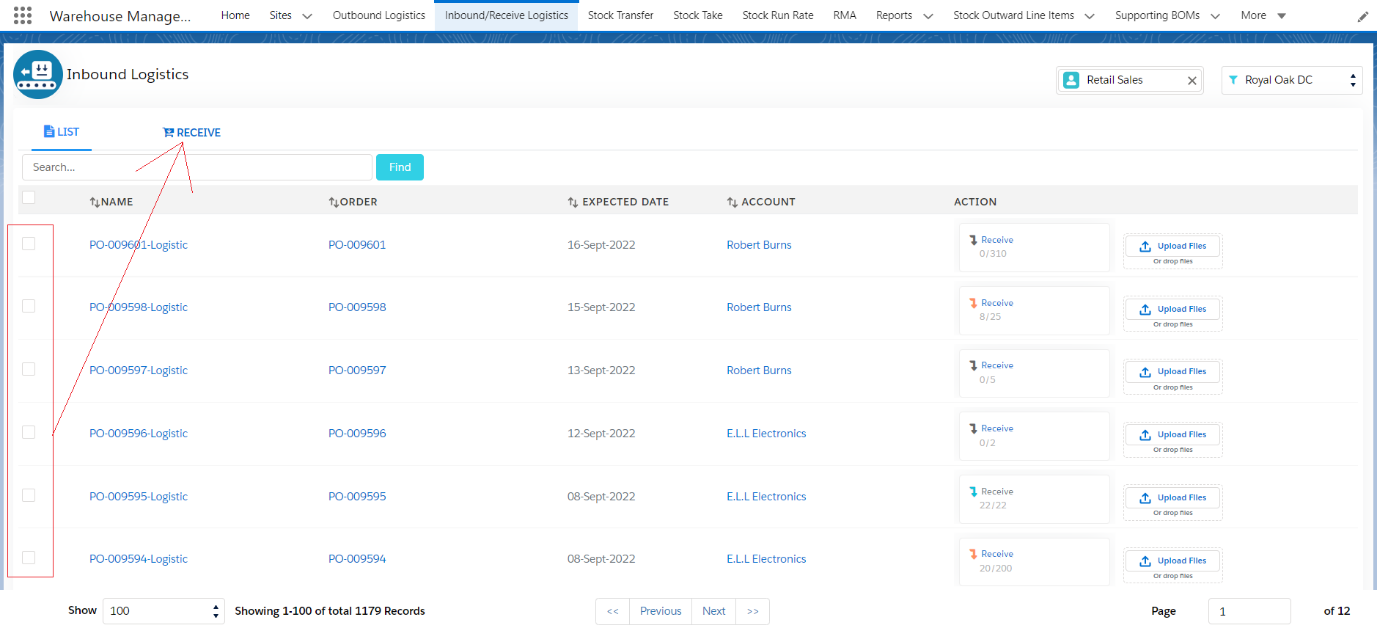
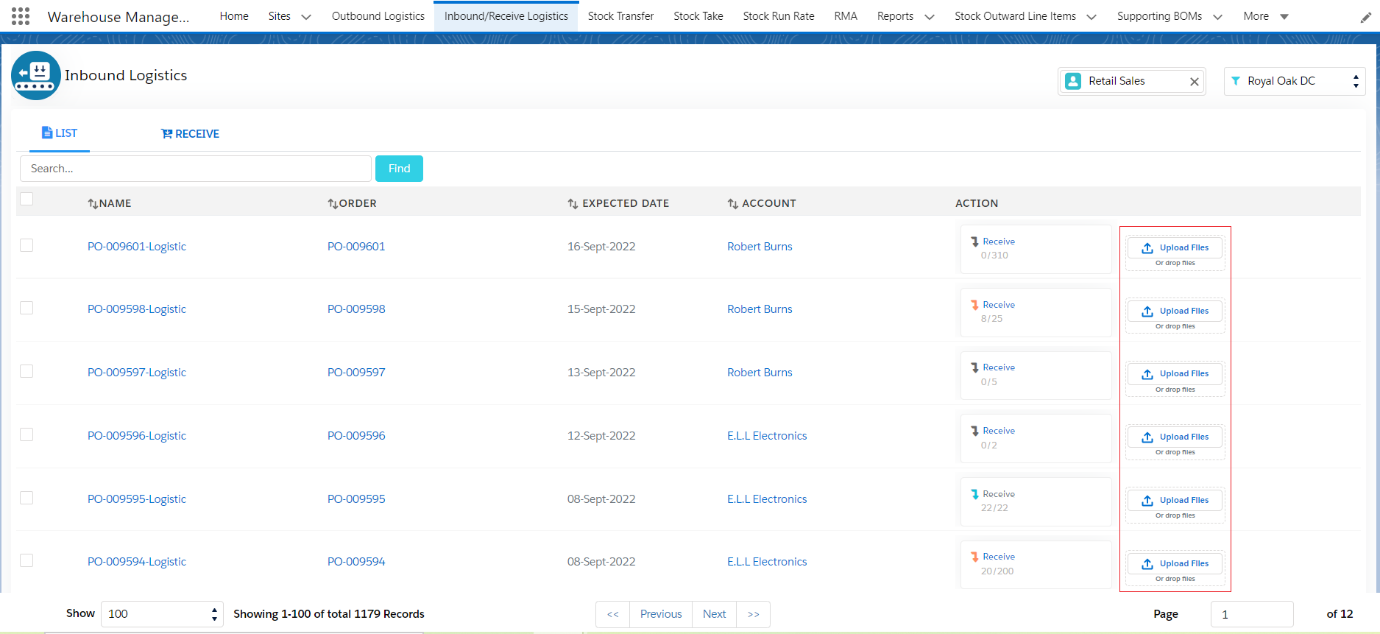
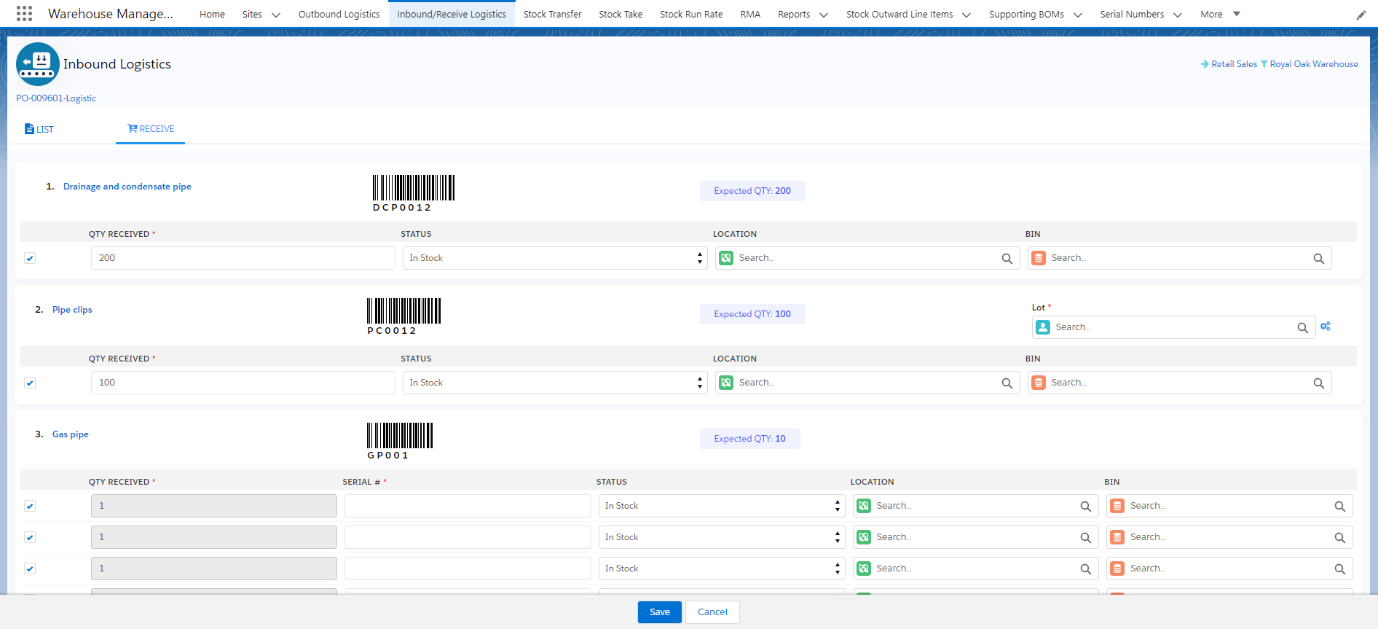
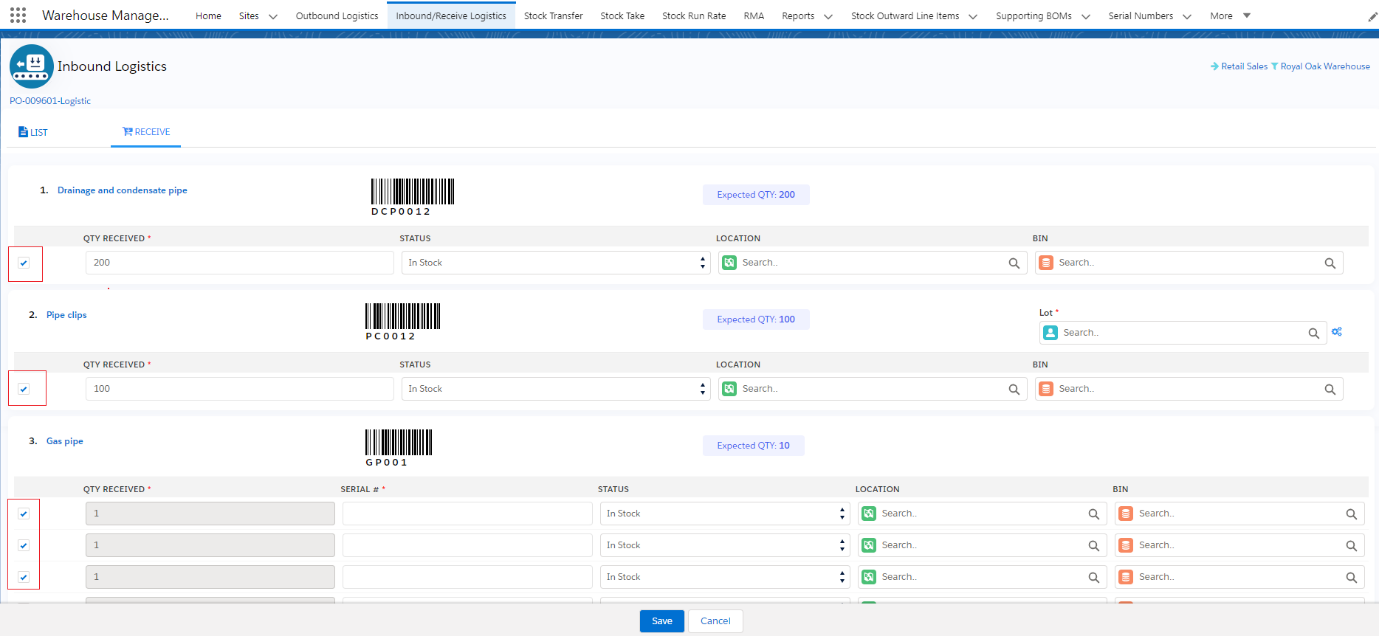
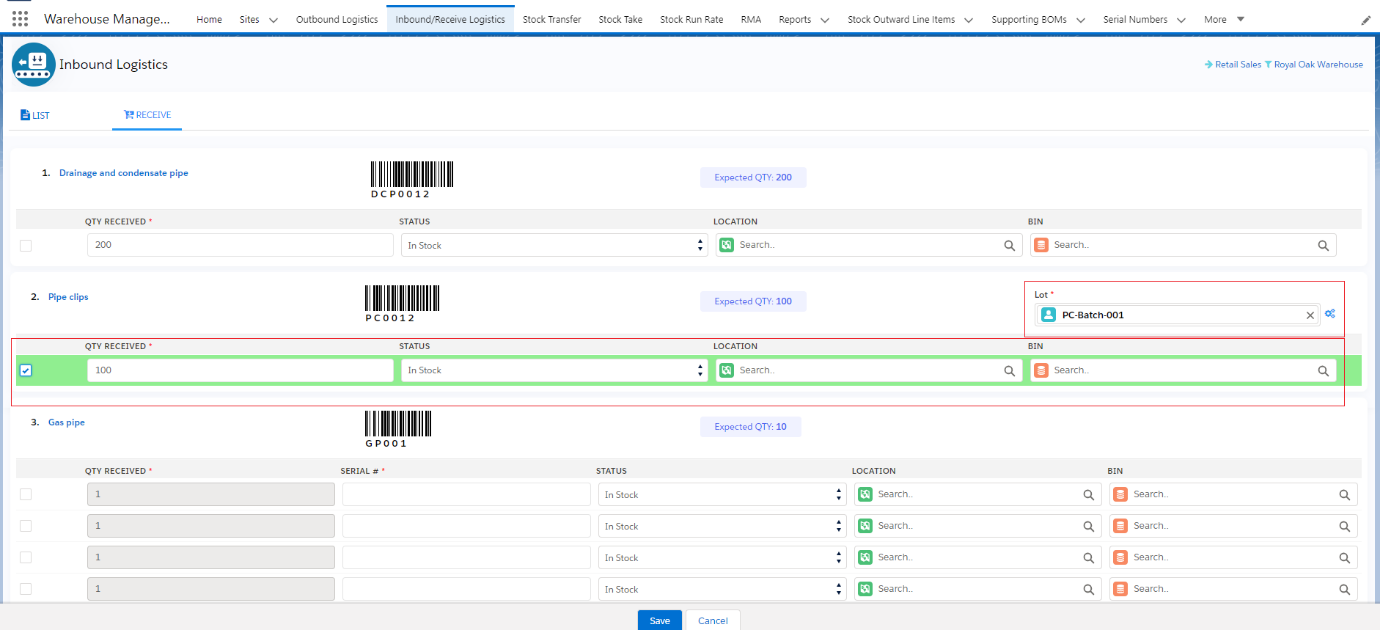
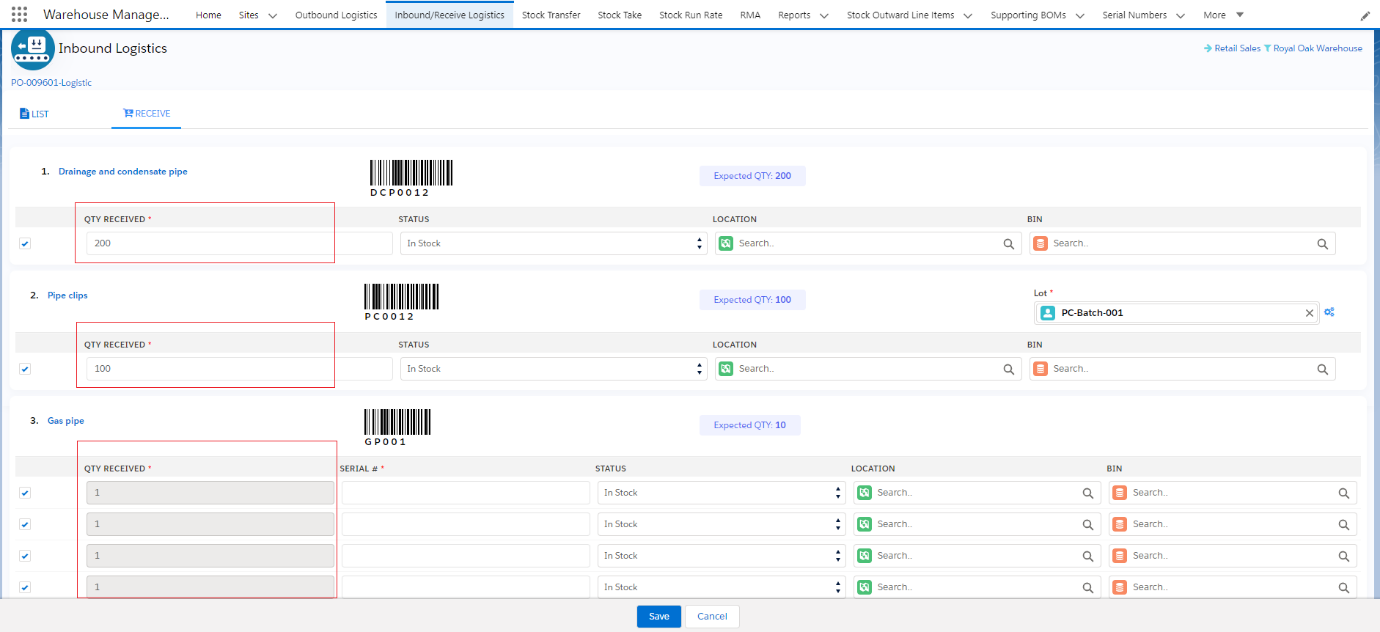
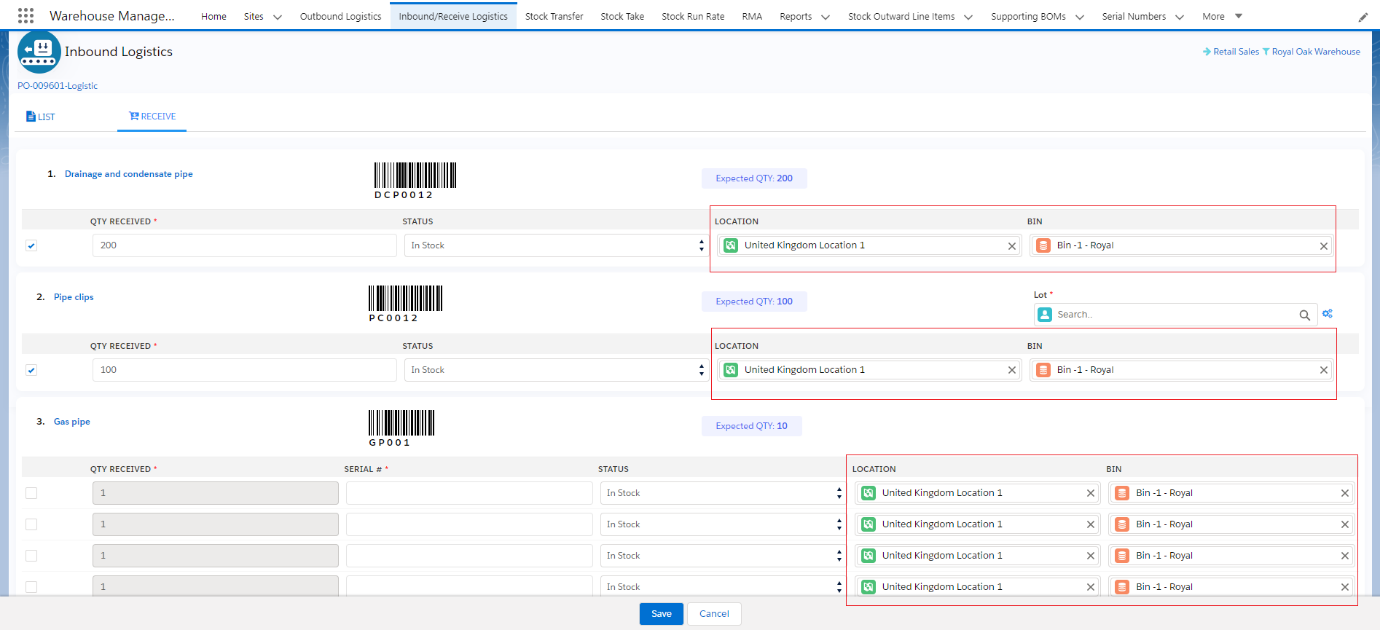
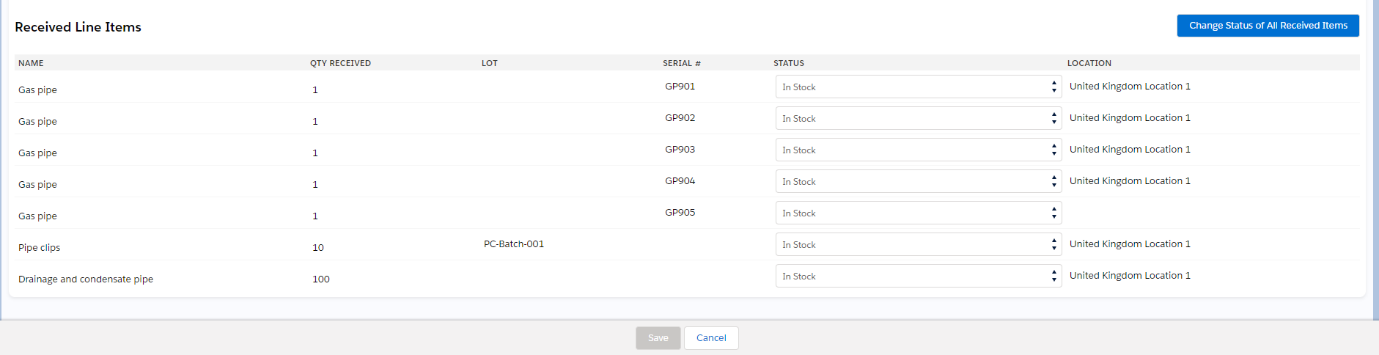
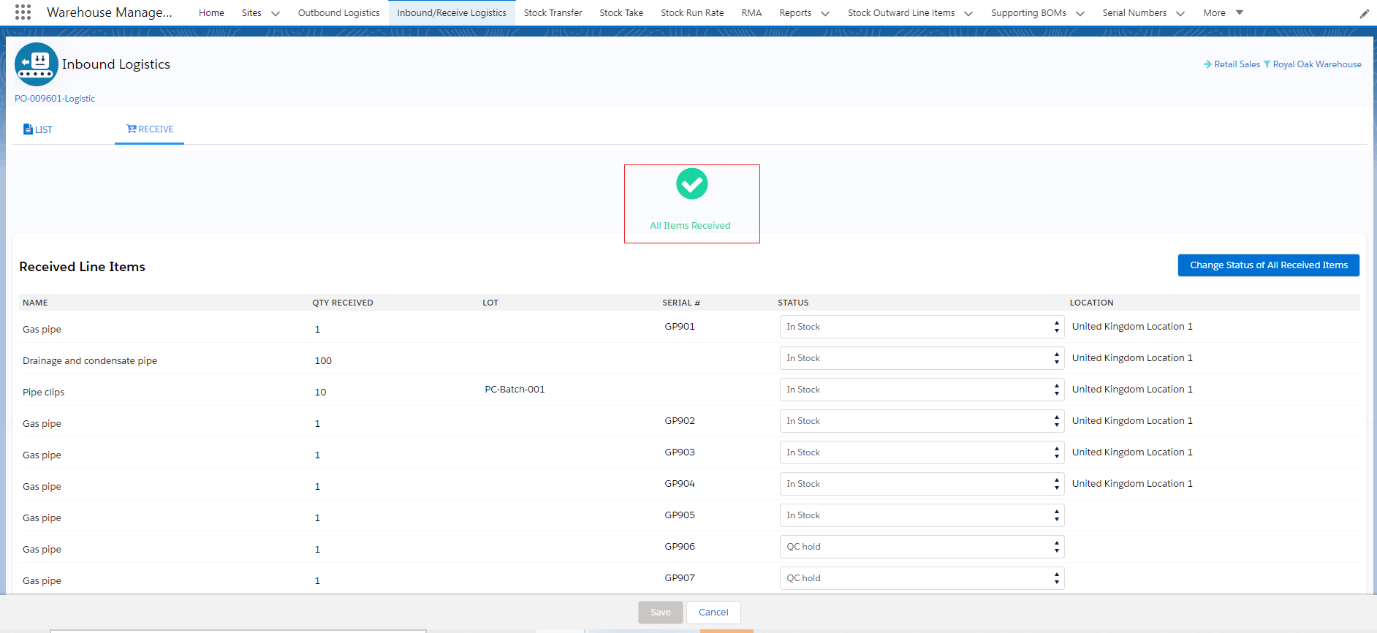
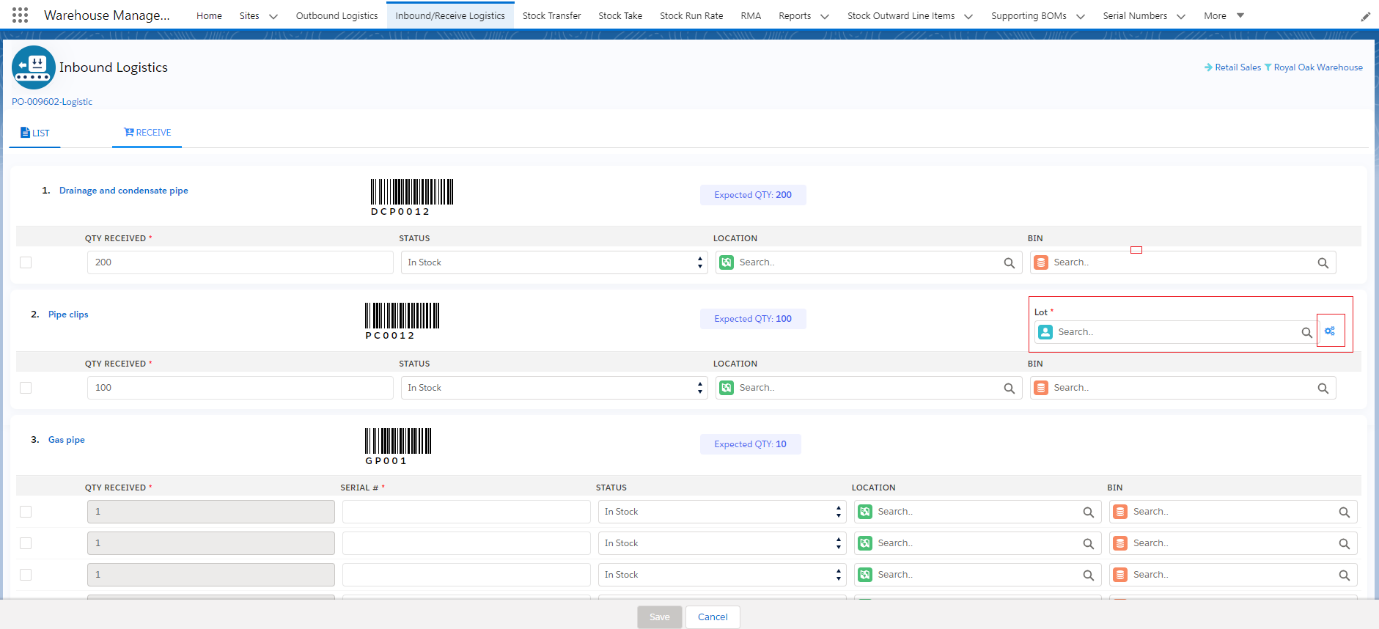
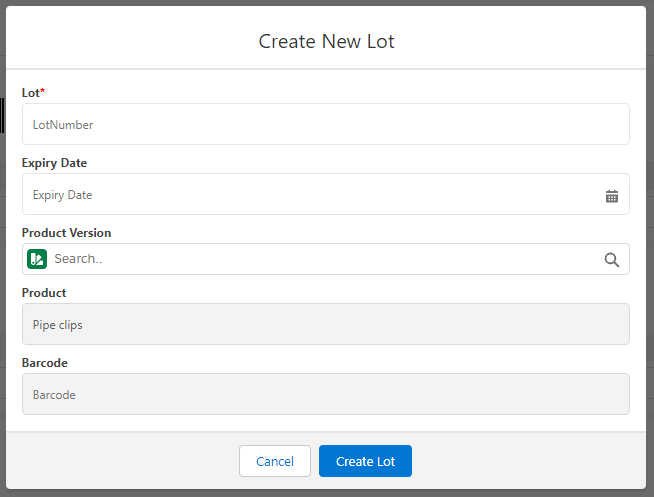
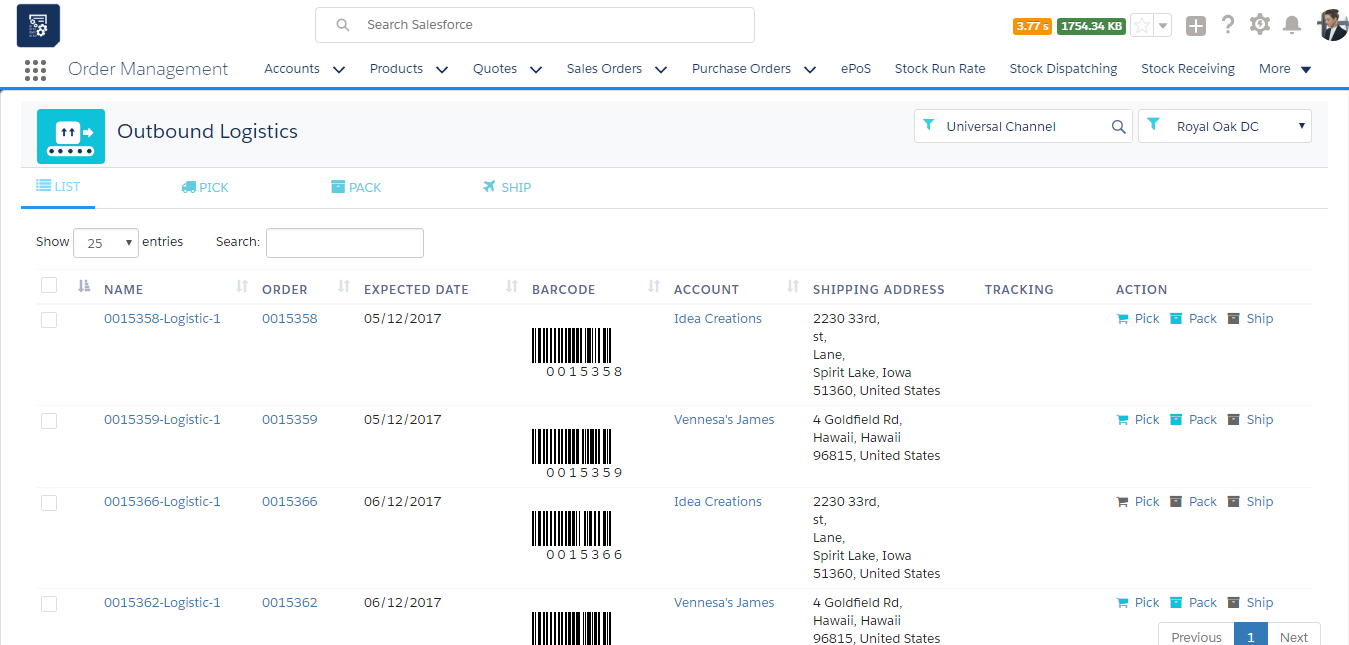


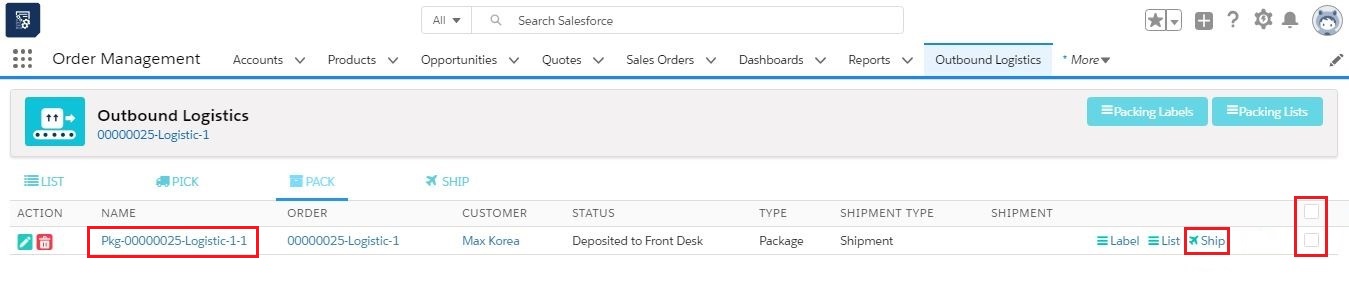

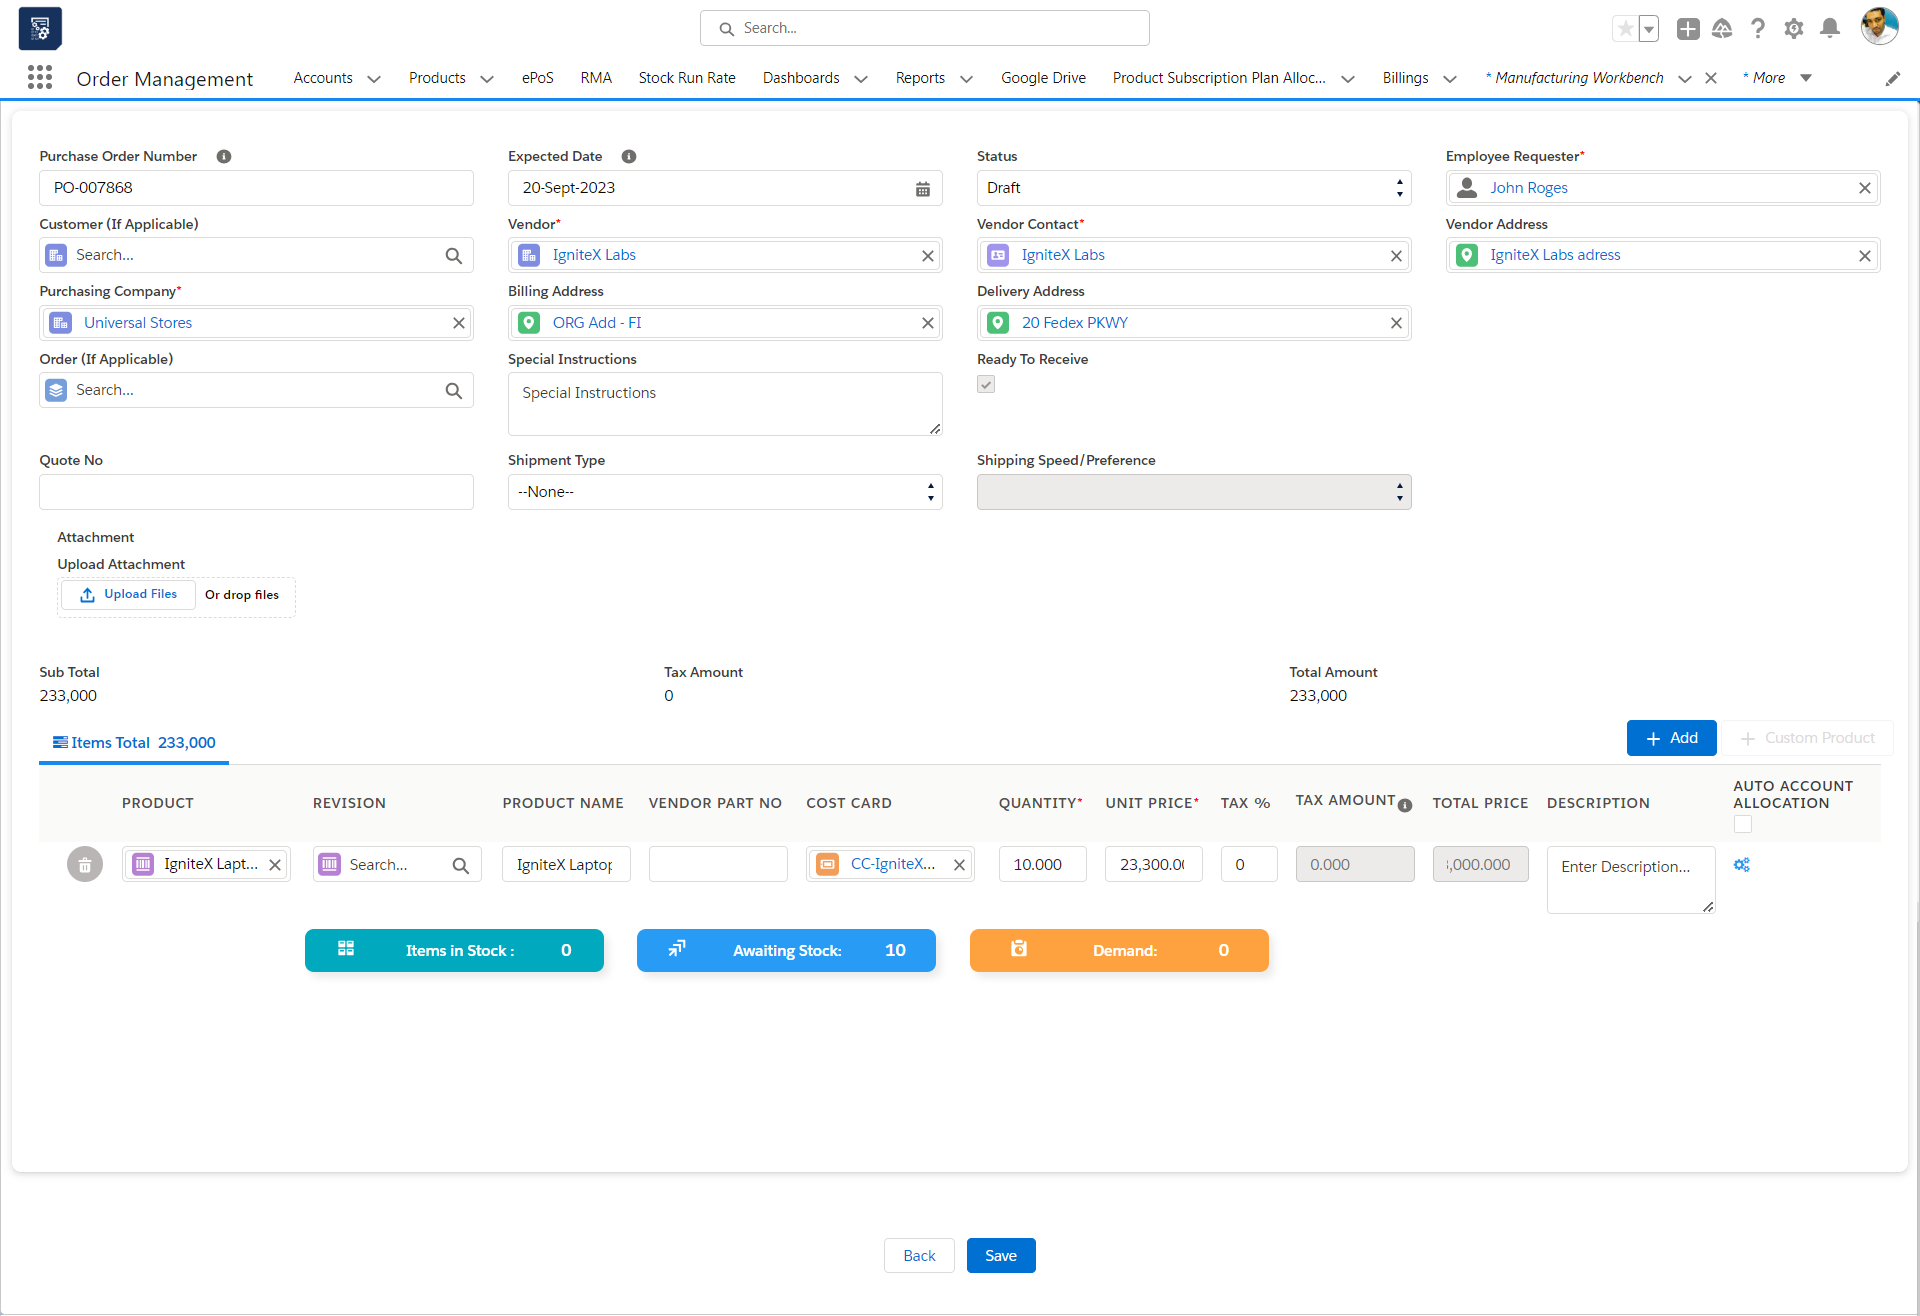
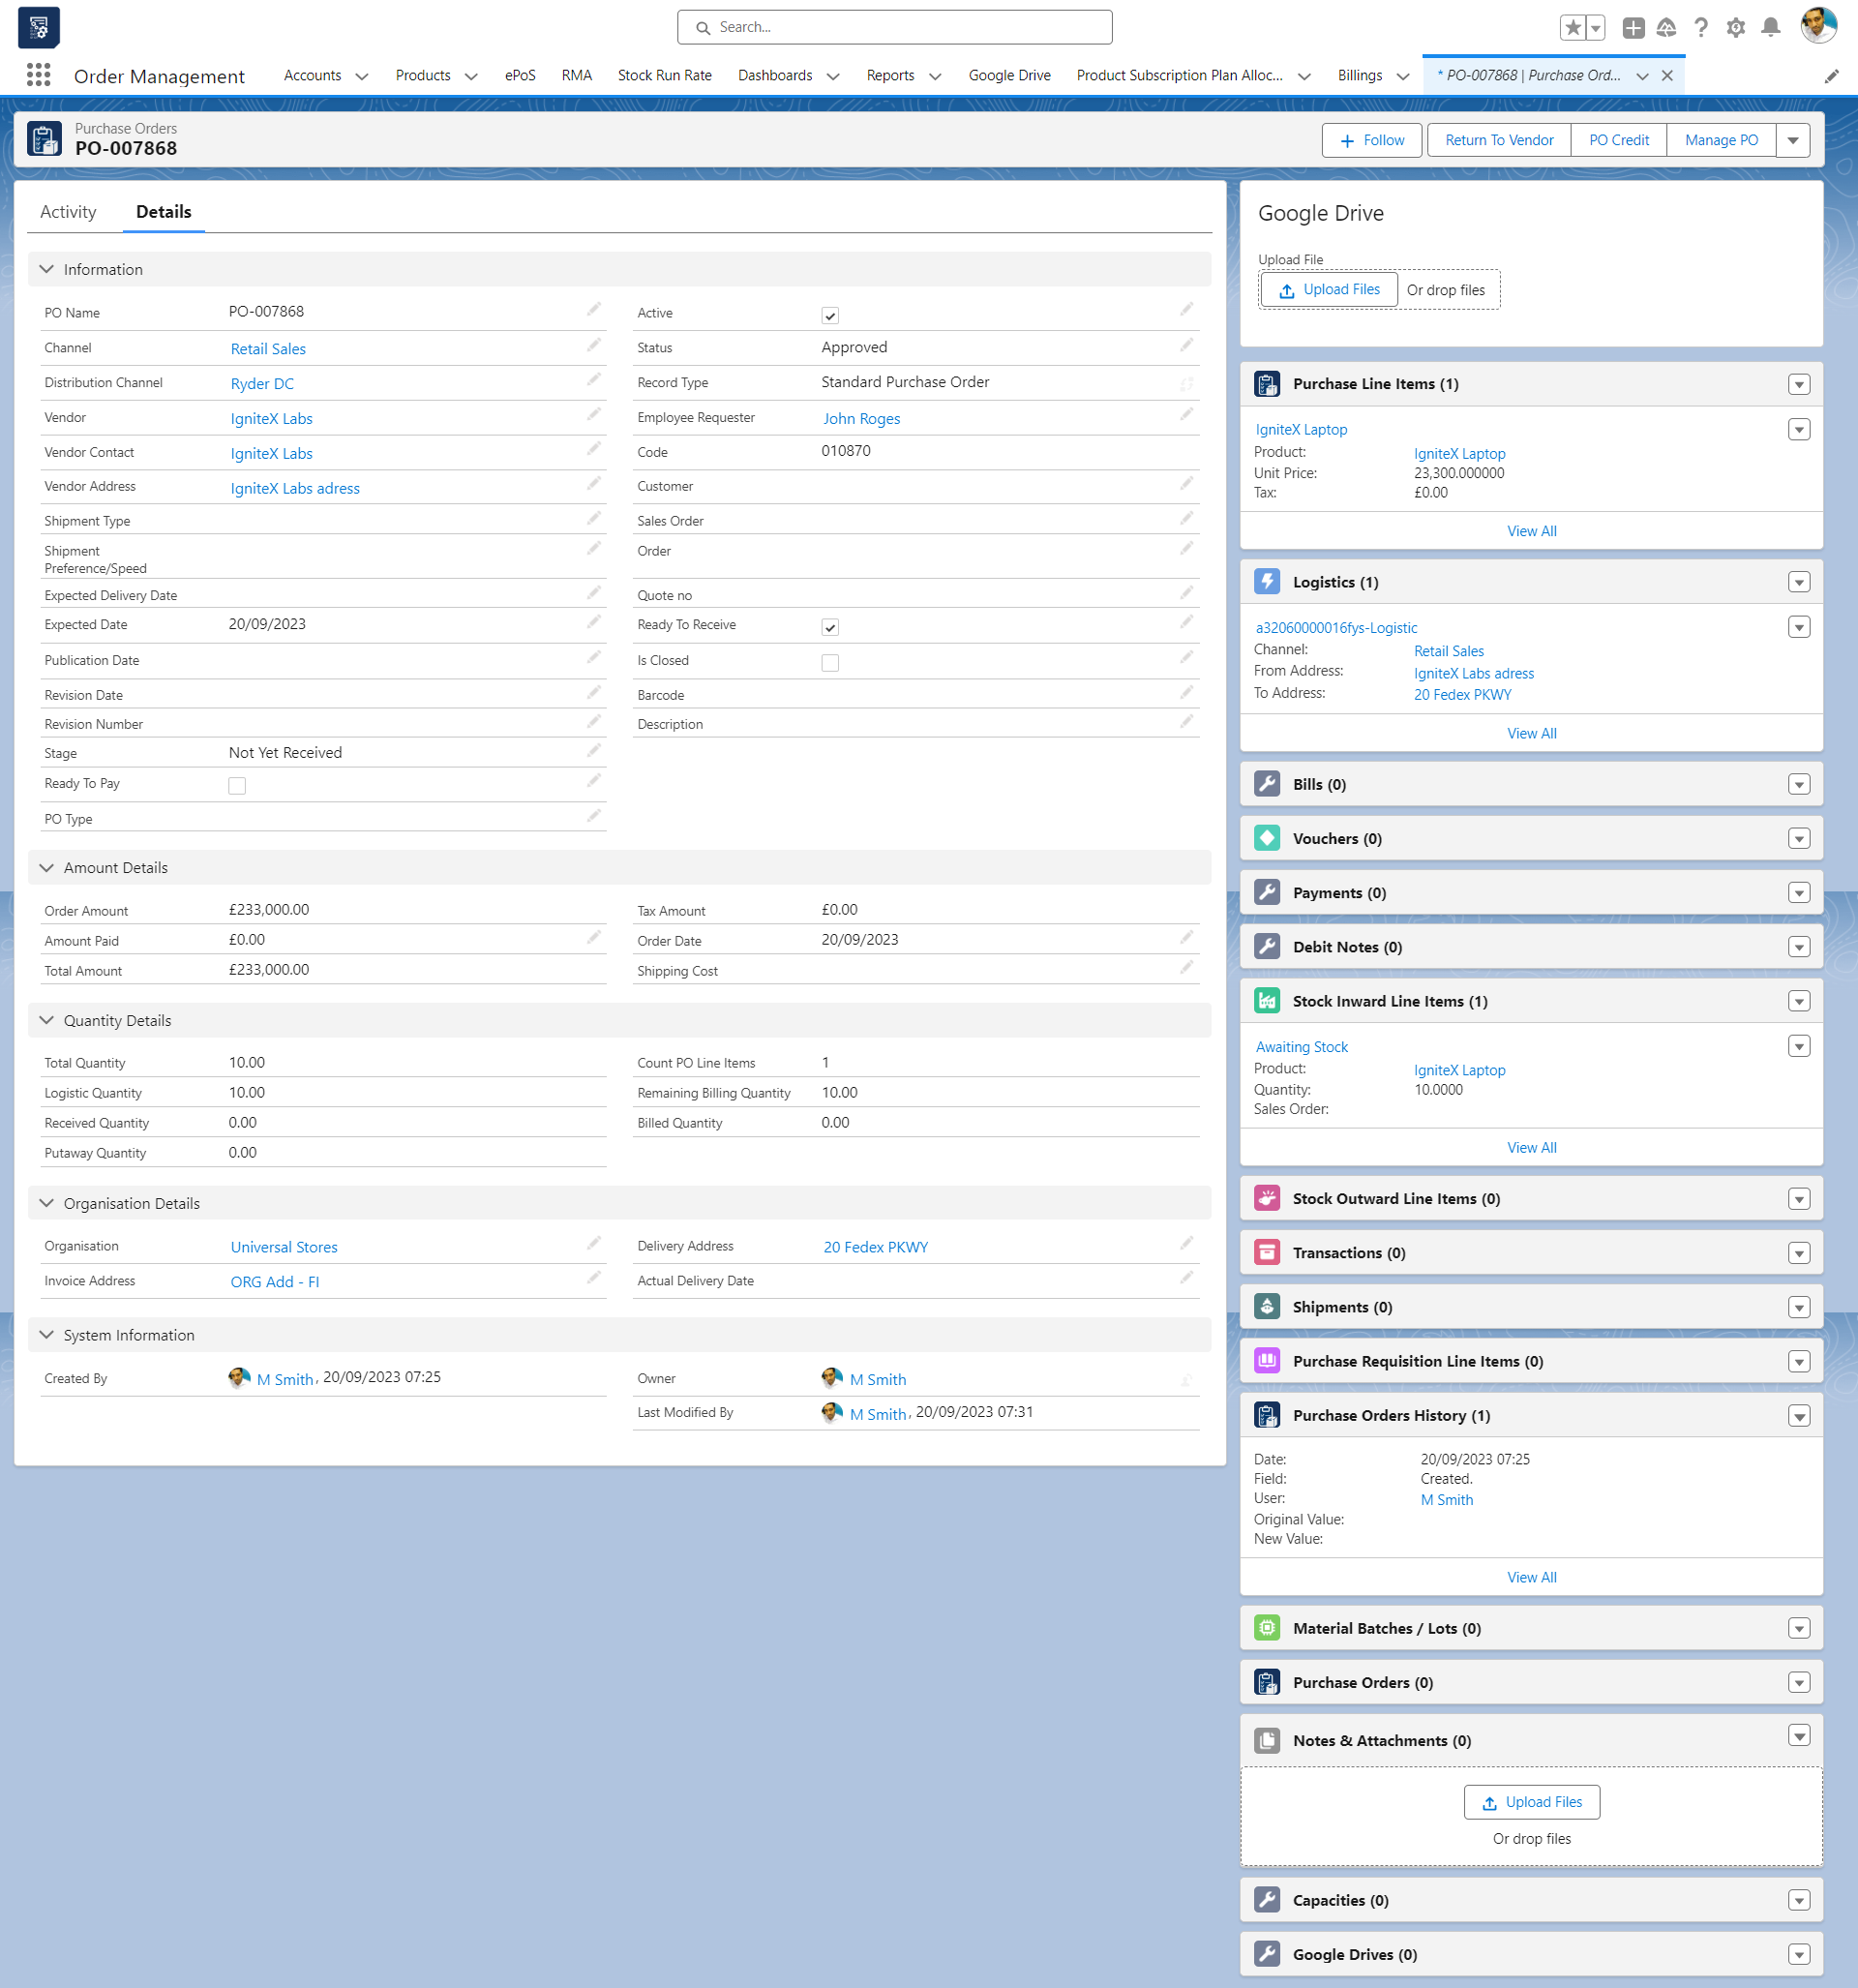
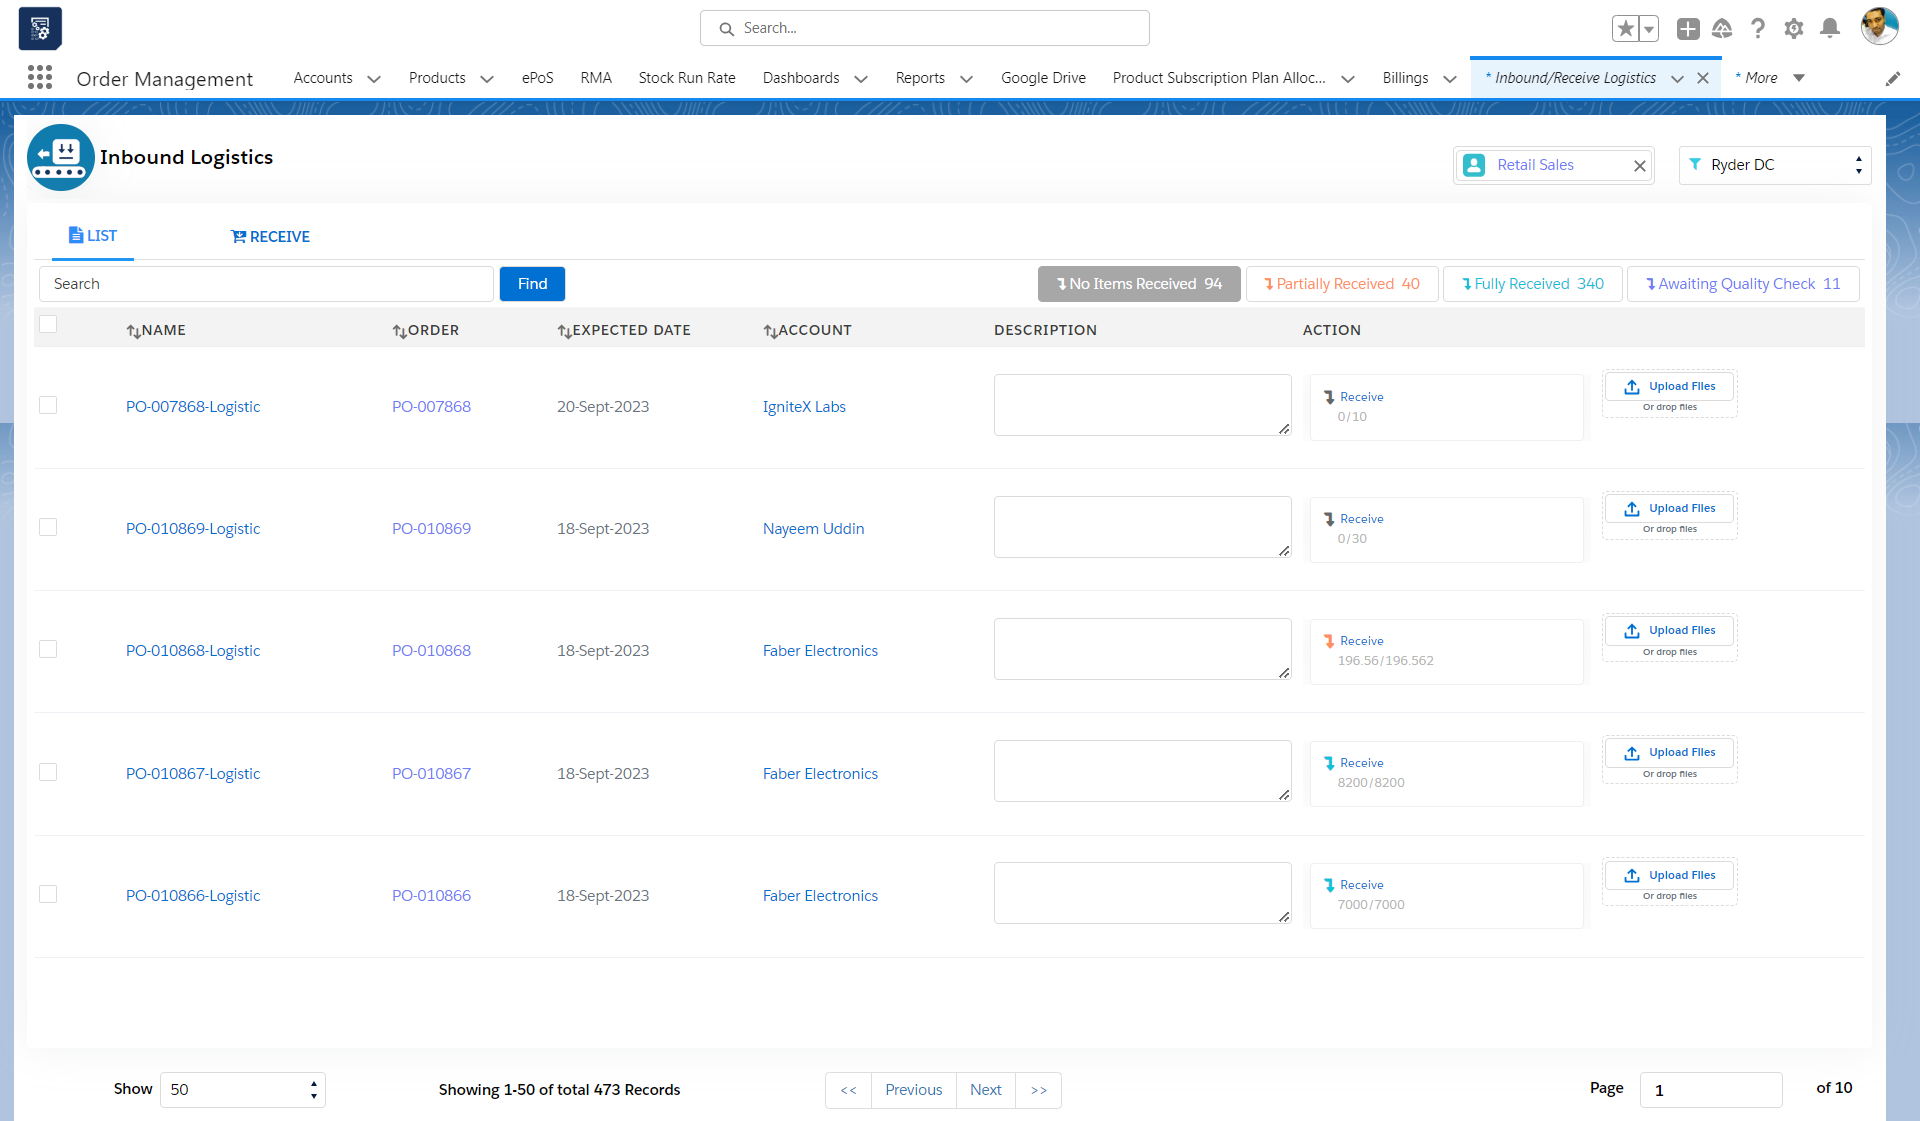
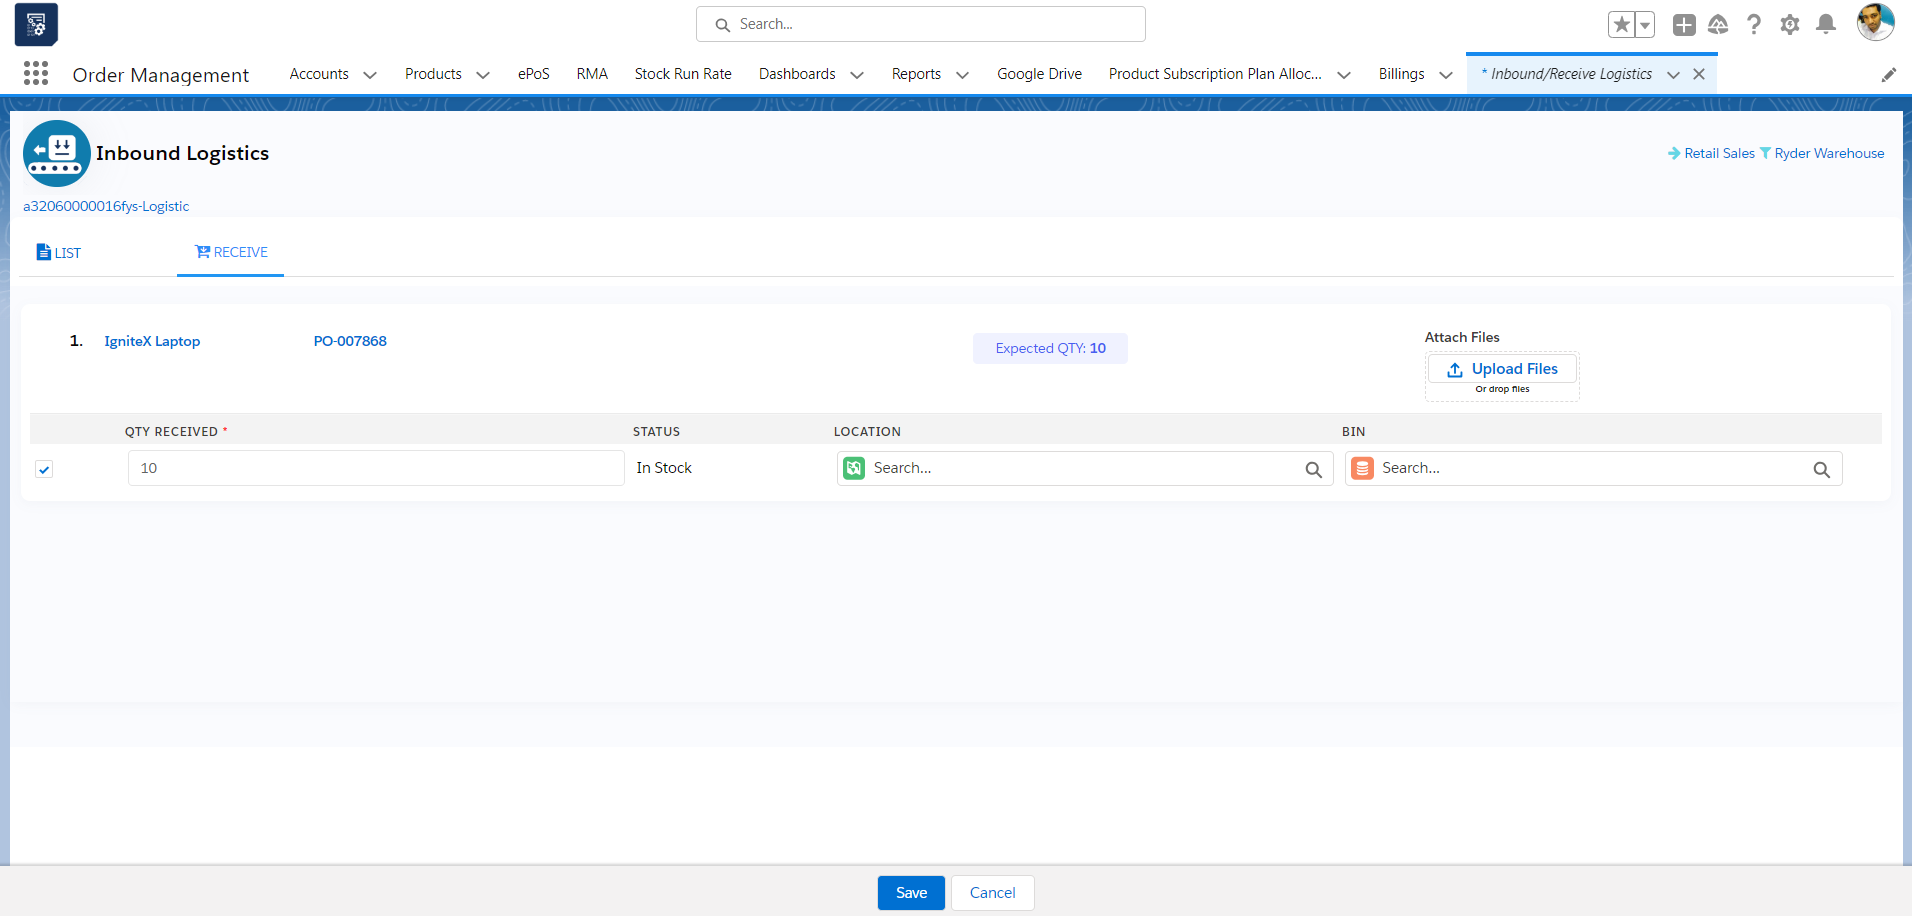
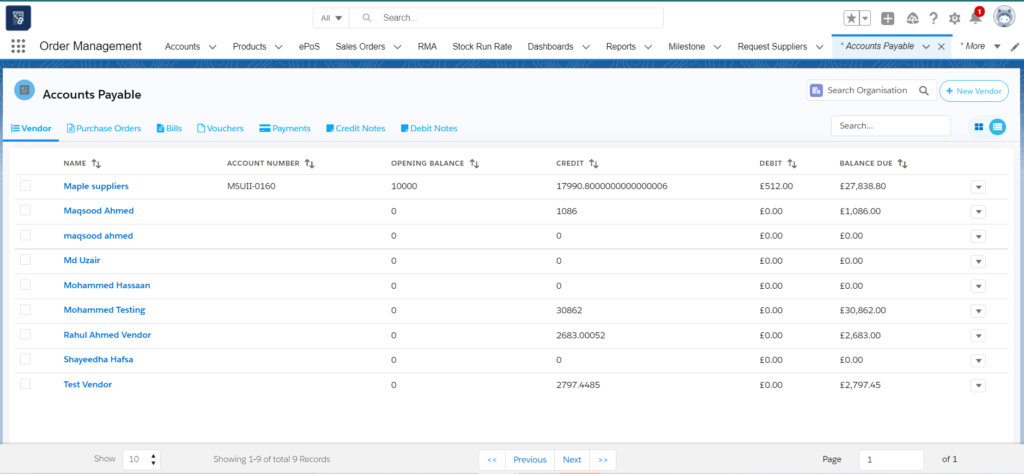
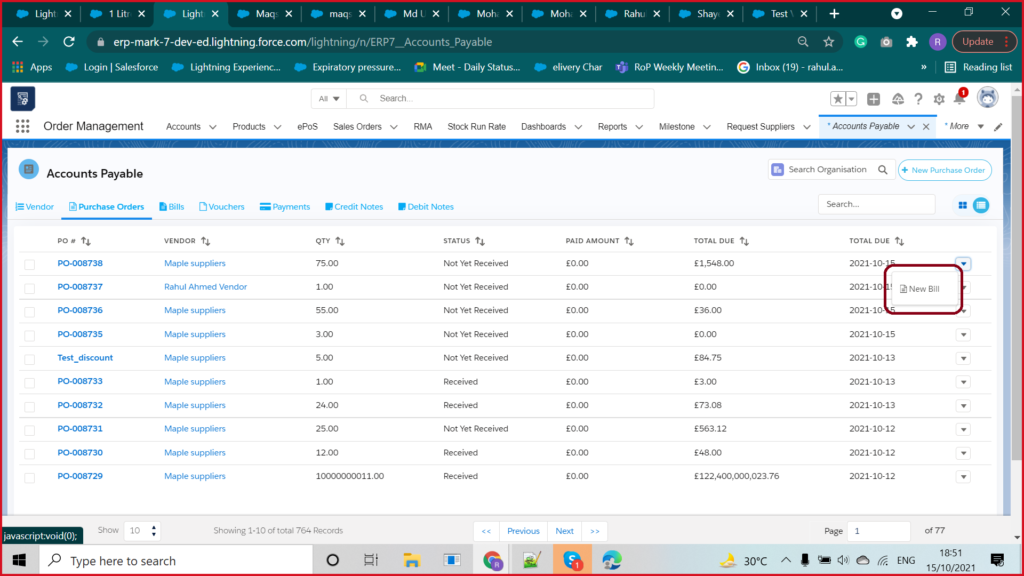
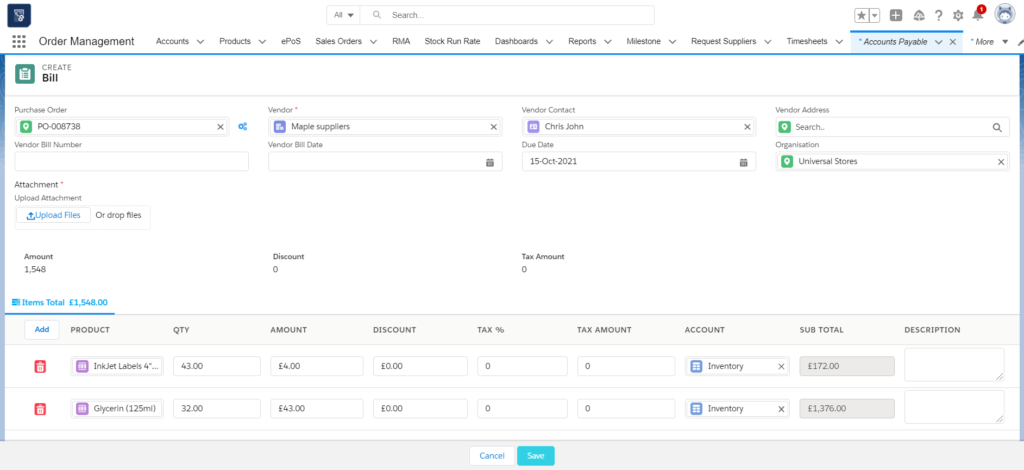
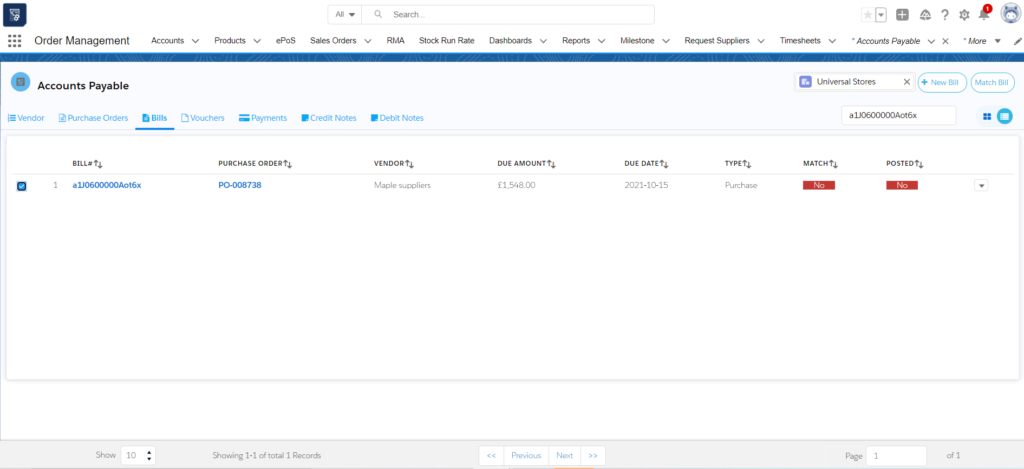
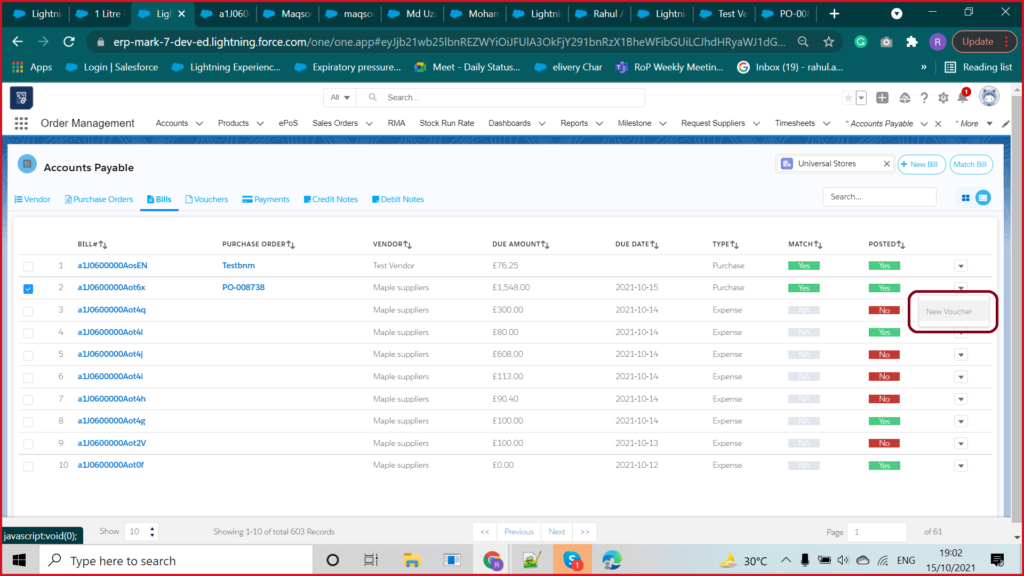
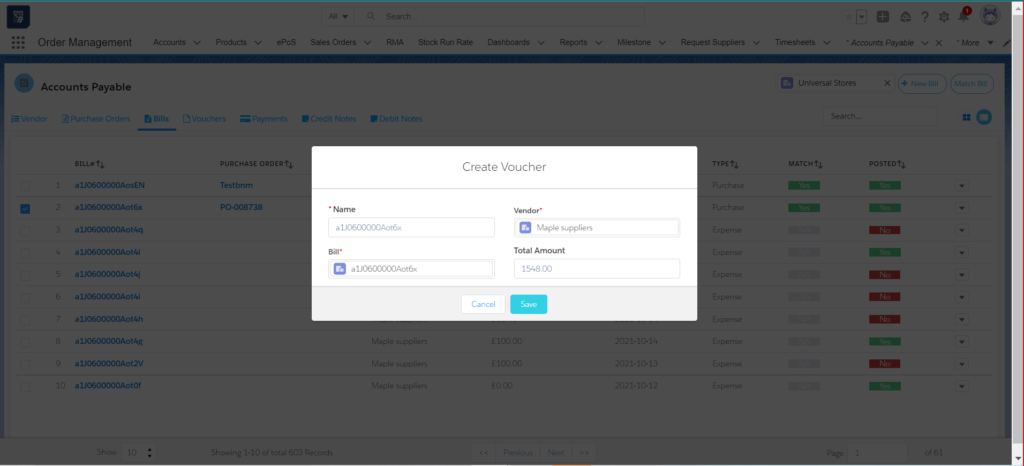
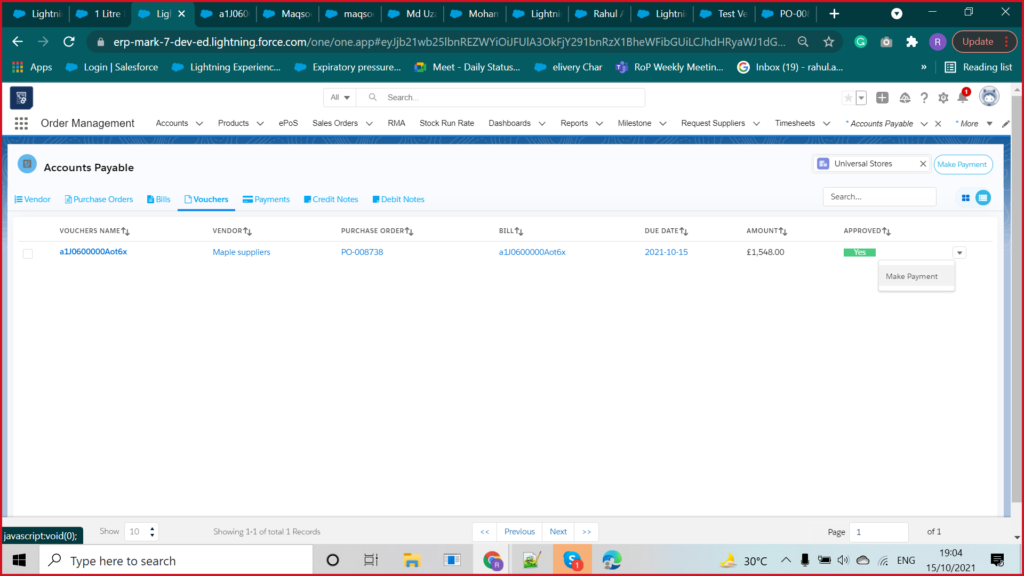
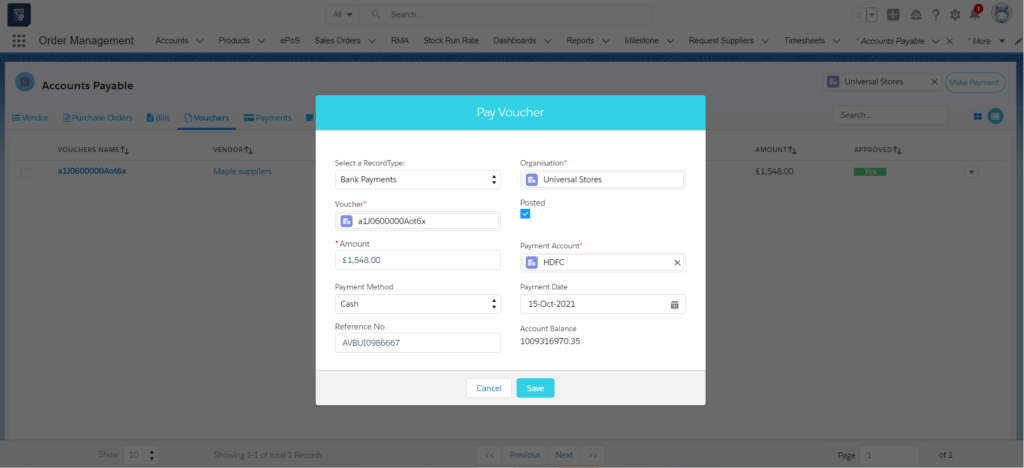
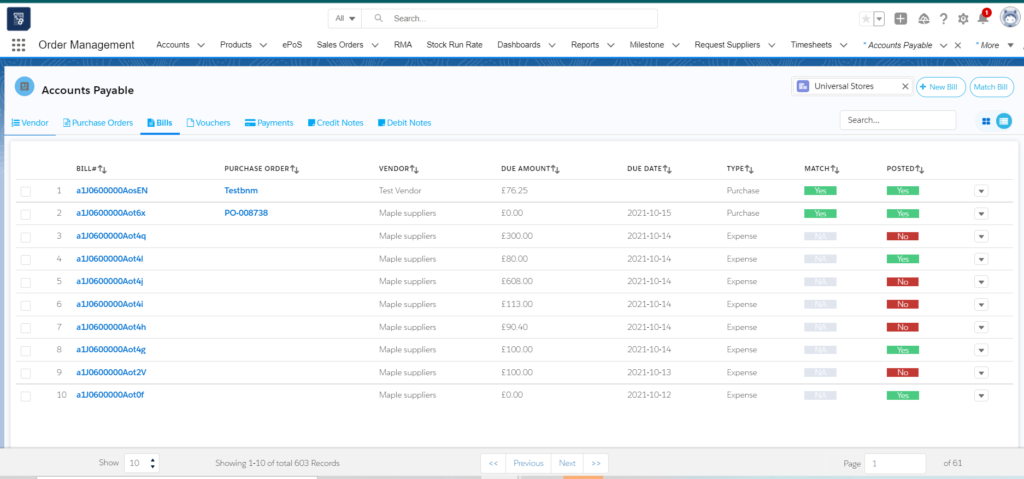
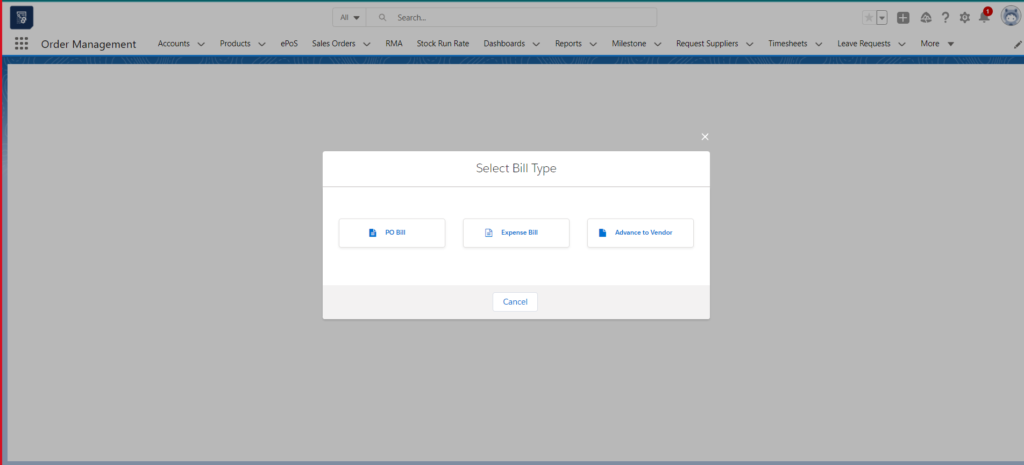

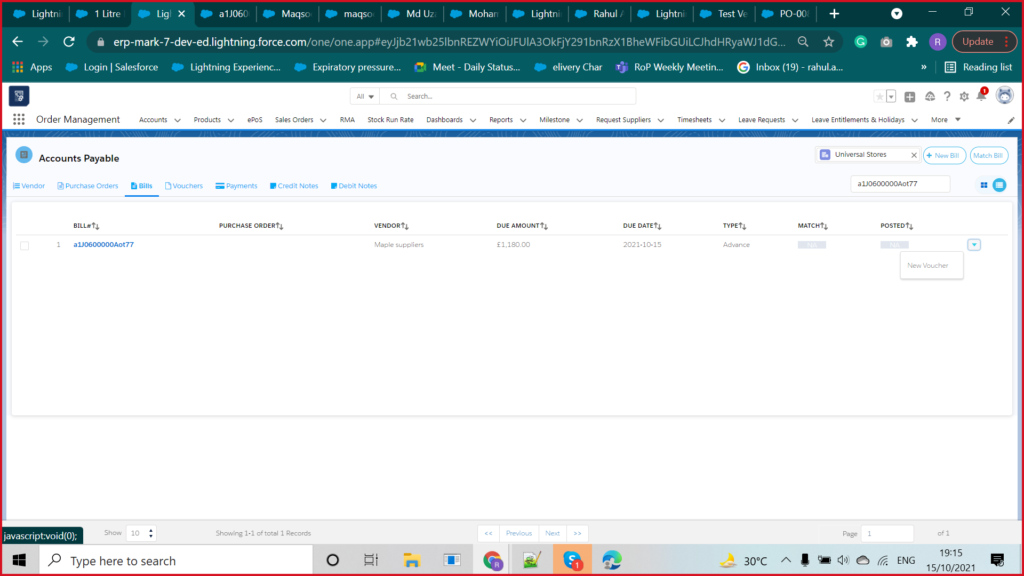
 k the ‘Save’ button. A voucher will be created.
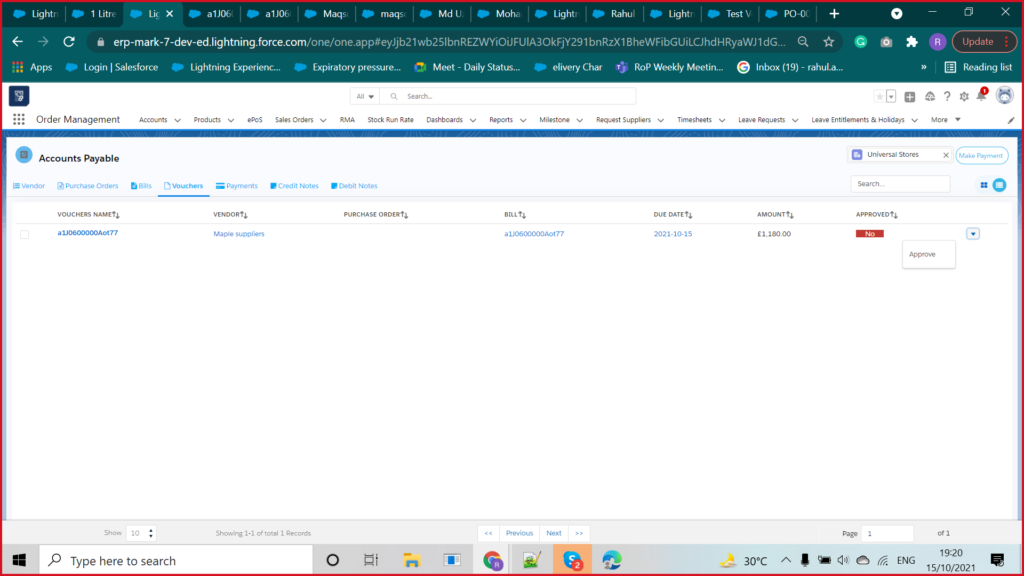
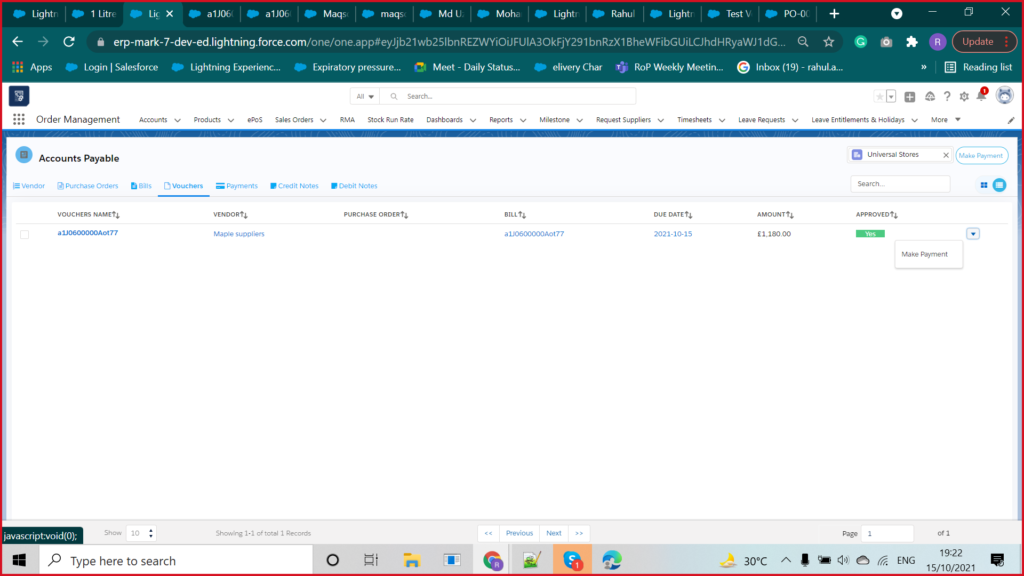

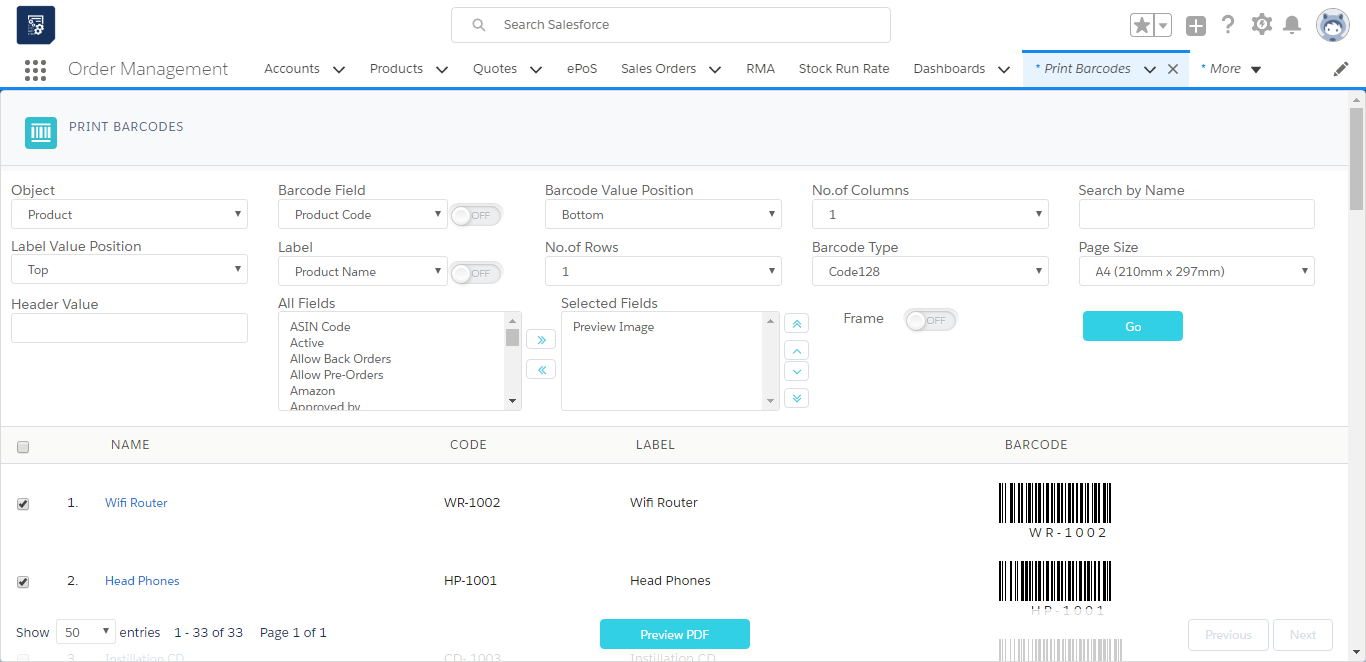
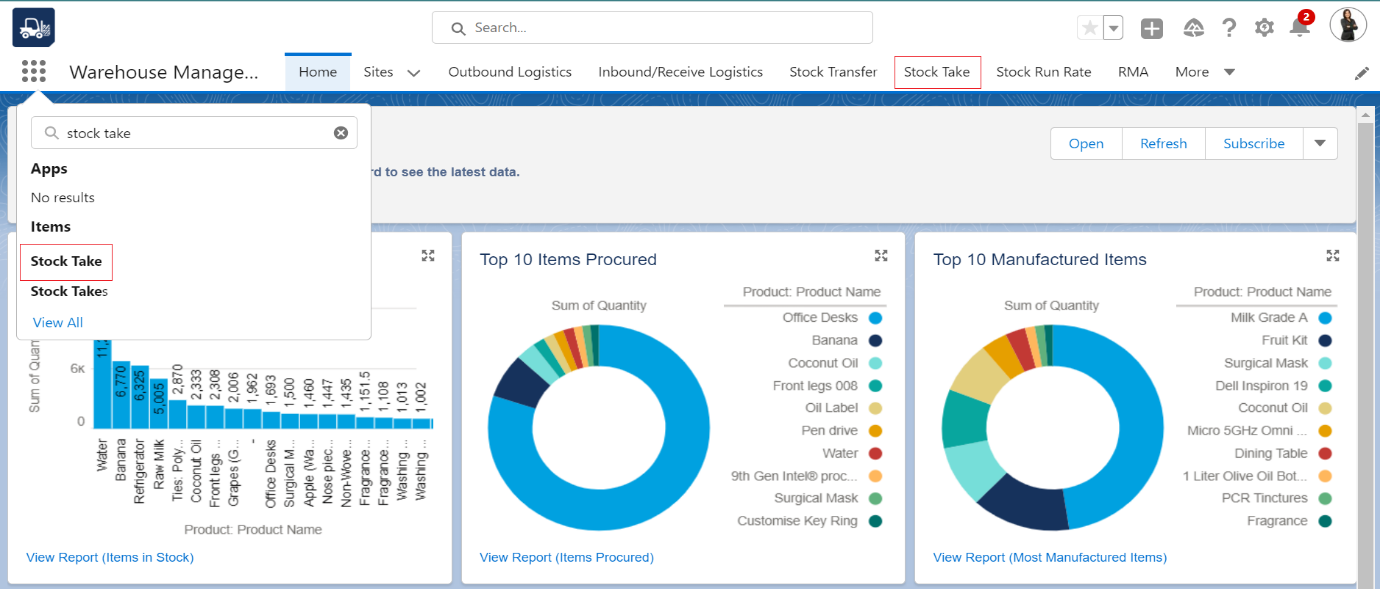 Figure 01 – Stock Take Tab
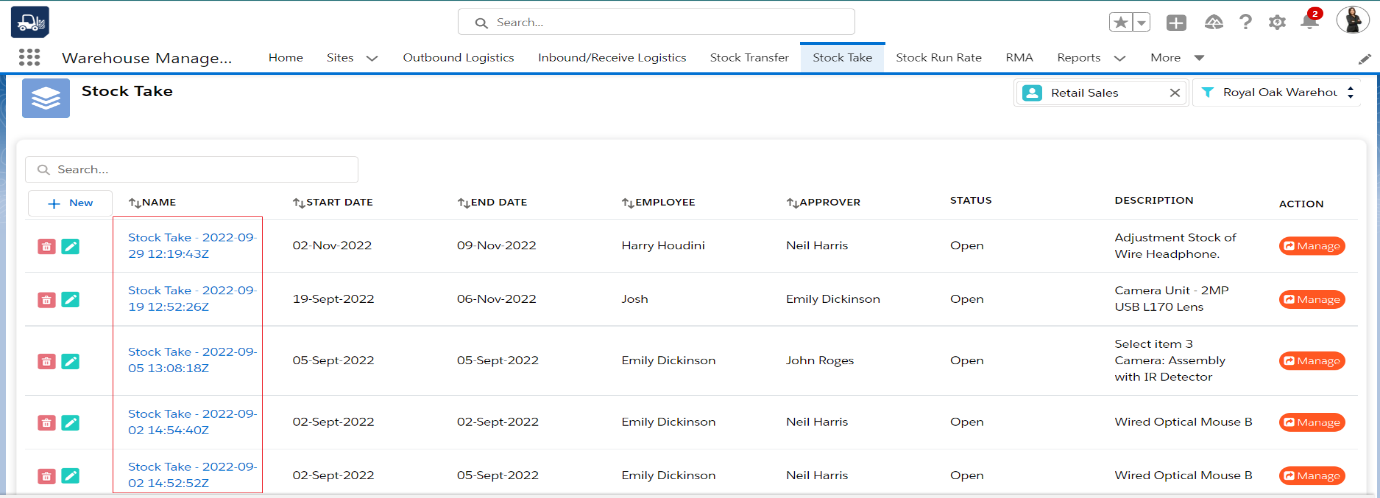 Figure 02 – stock take records
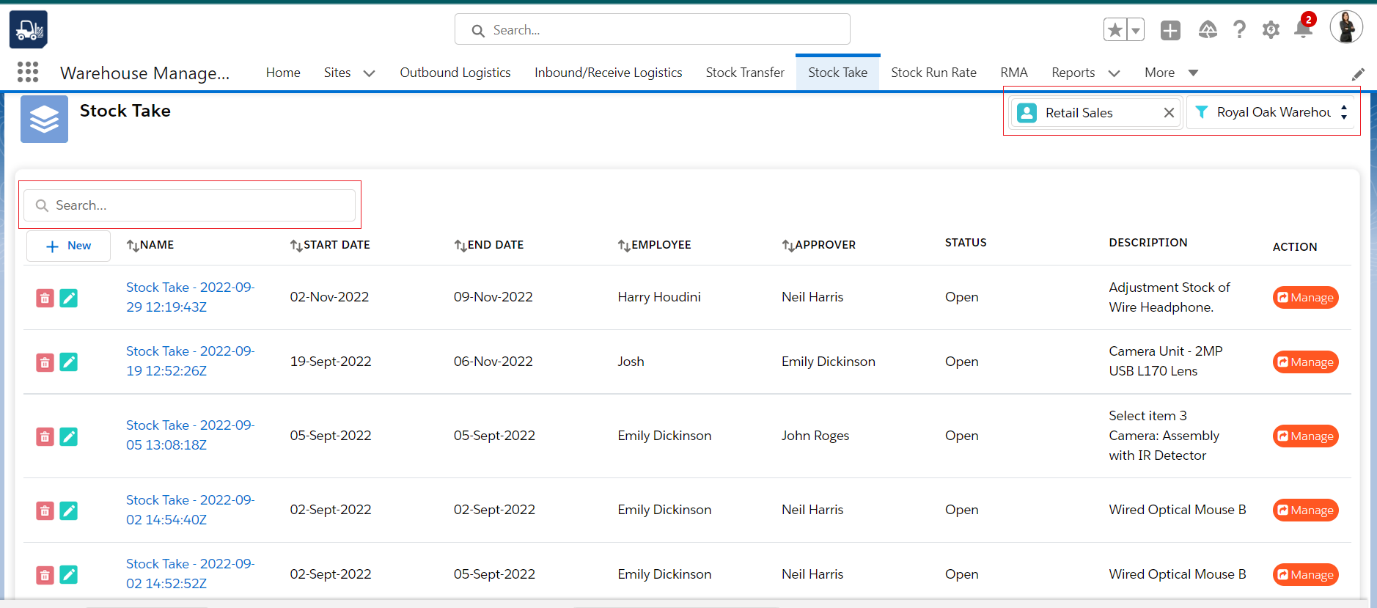 Figure 03 – search/filter stock take records
 Figure 04 – Manage/Update stock Take record
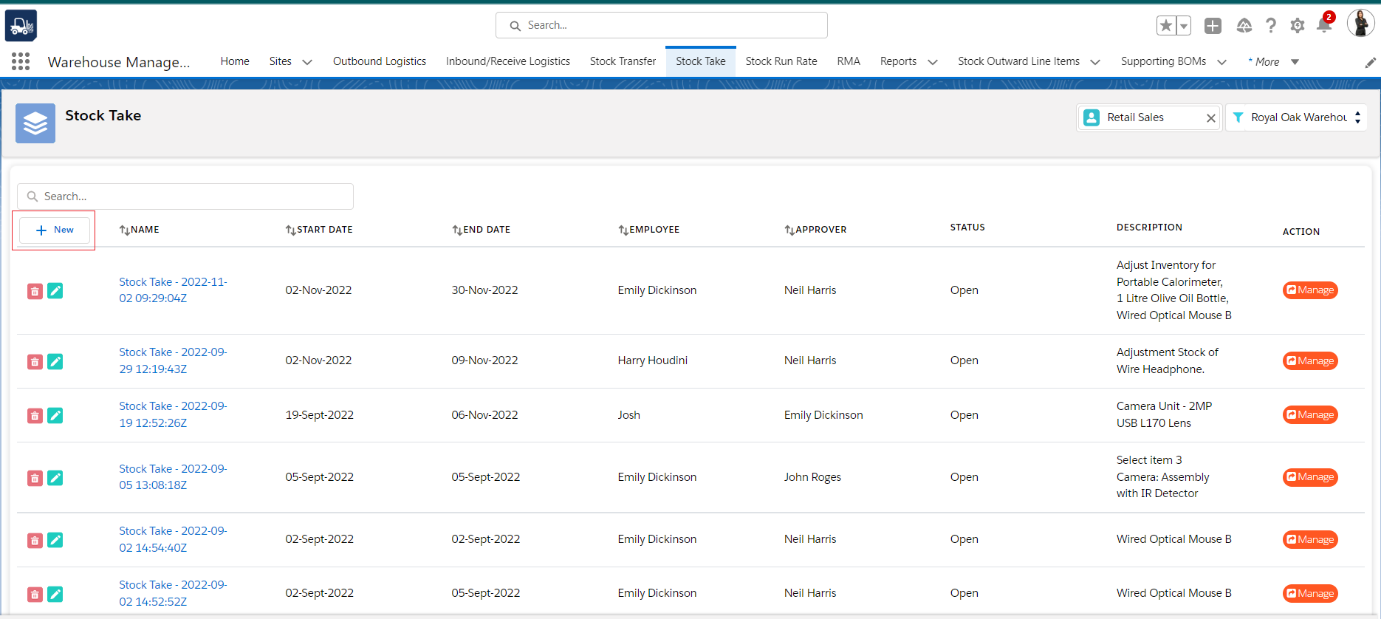 Figure 04.1 – + New button
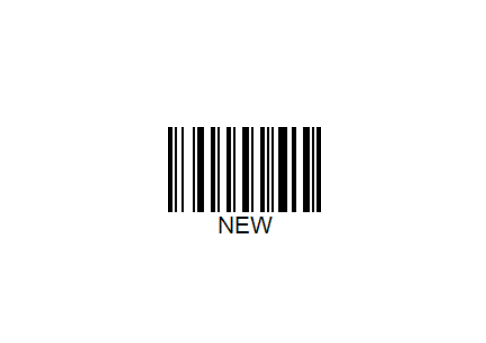
 Figure 05 – Enter the variances
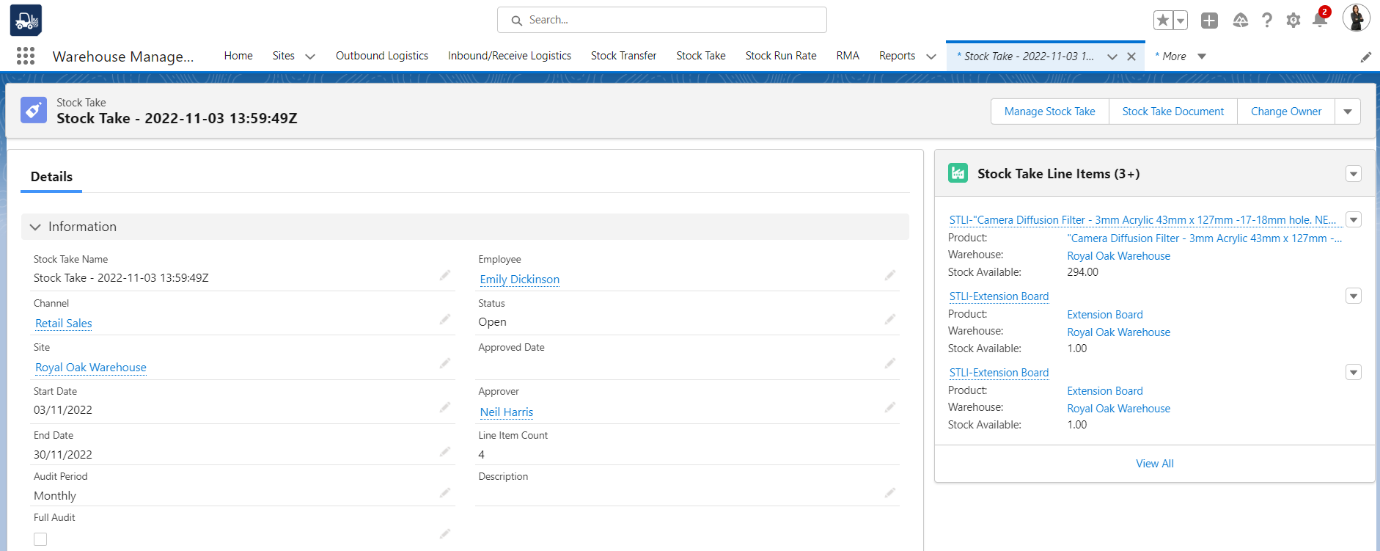 Figure 06 – Created Stock Take record.
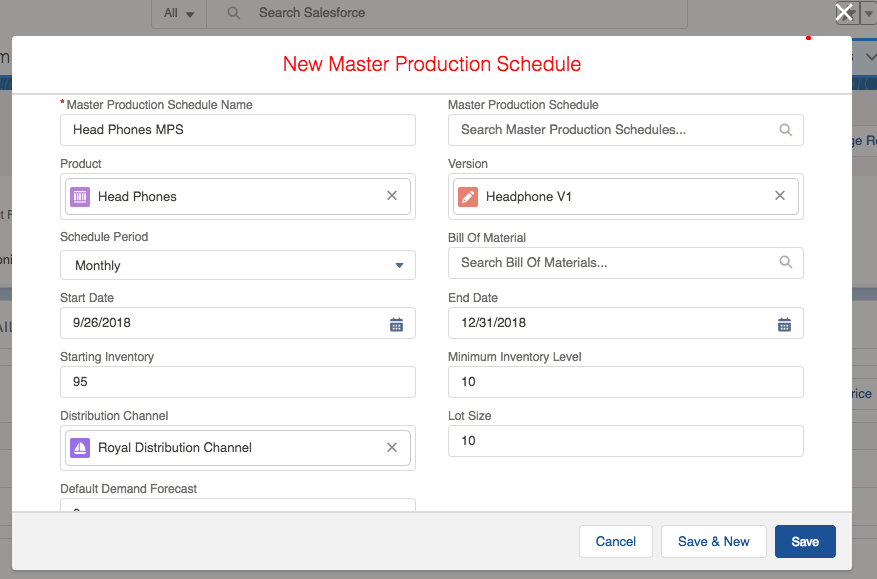
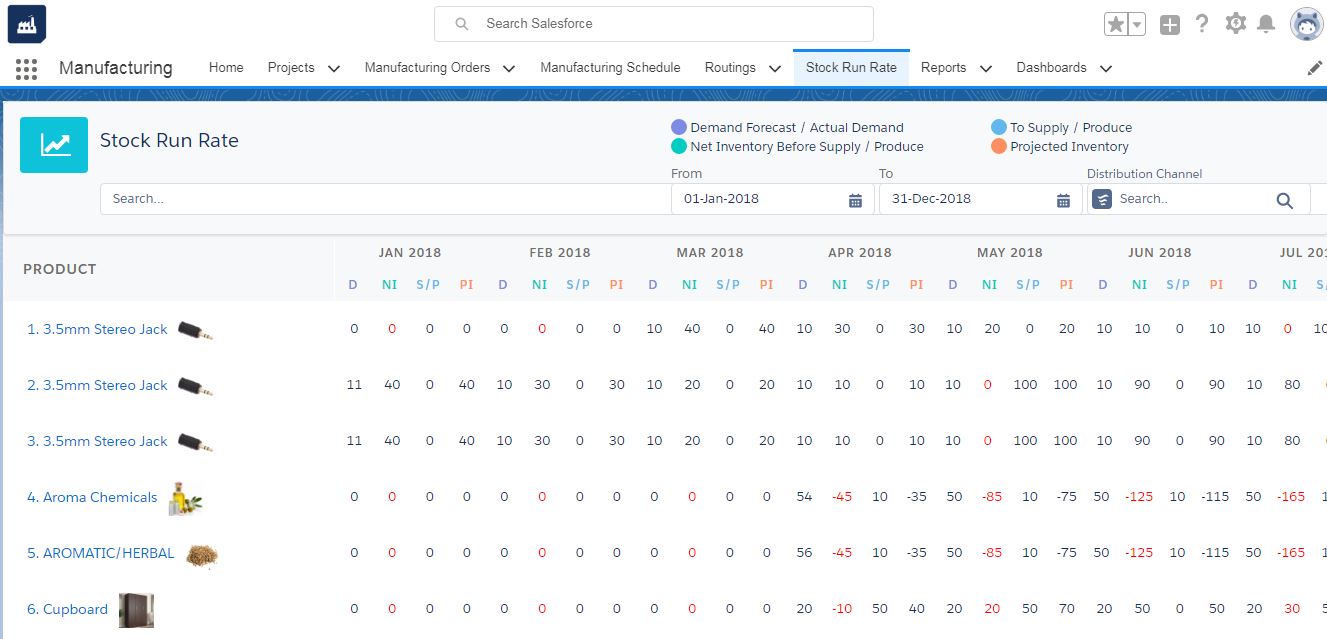
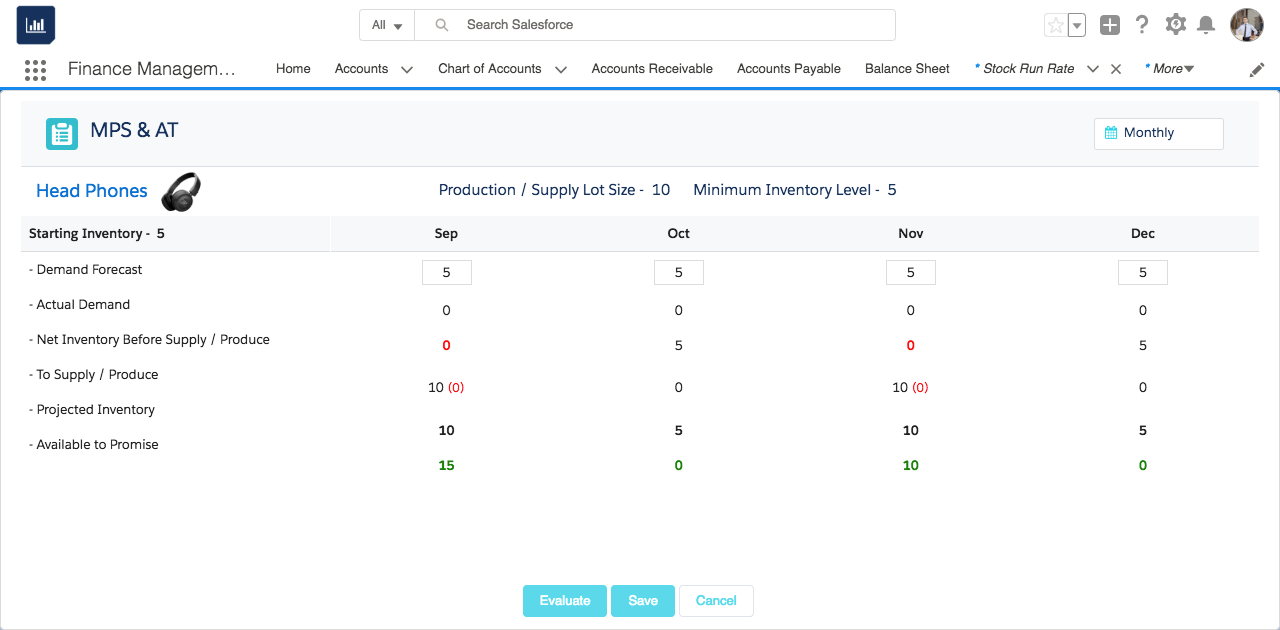
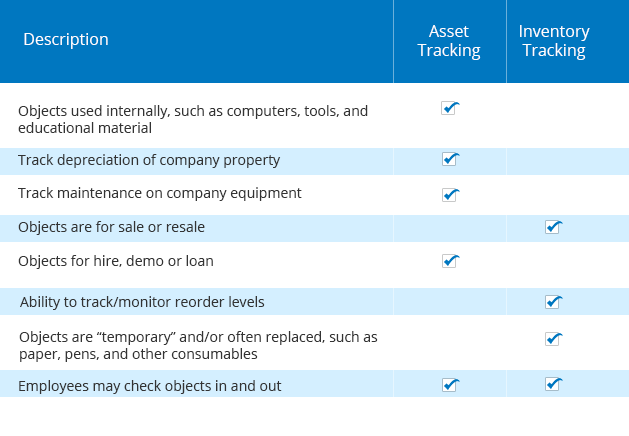
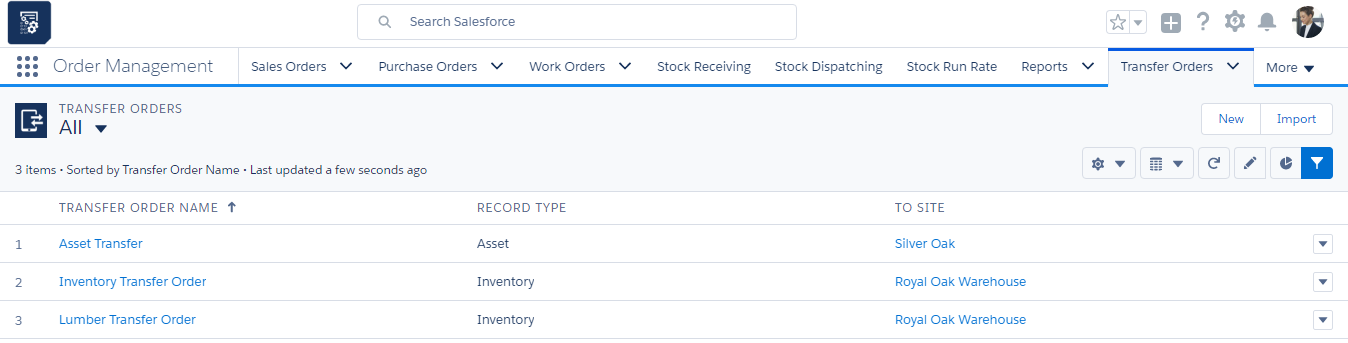


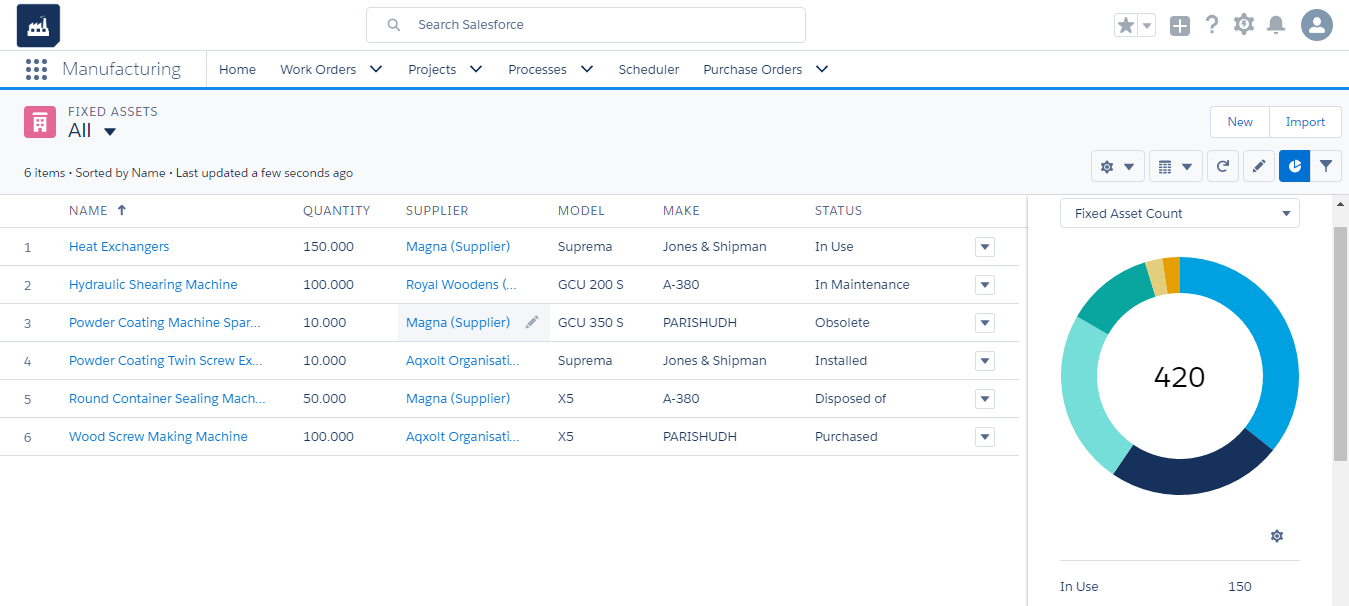 Because the word “asset” has a different meaning in the world of finance and accounting, the phrase “asset tracking” is used to indicate the monitoring of physical asset movement and condition, not the change in the monetary value of an intangible financial asset.
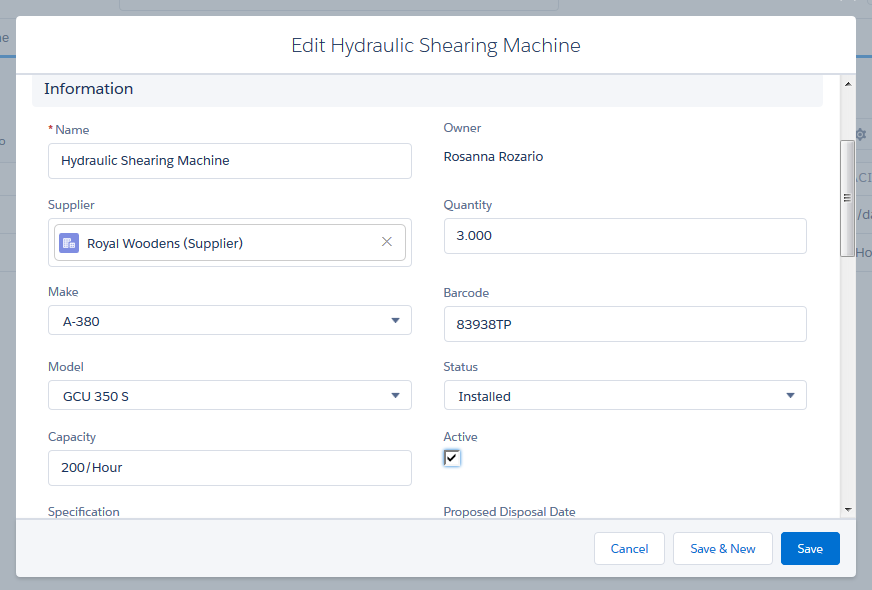 Systematically tracking assets is necessary across every industry to maintain accurate accounting records as well as real-time visibility of operations. For tracking purposes, each asset is tagged with a unique barcode identifier (e.g., make, model, serial number, etc.) and associated with a custodian or location.
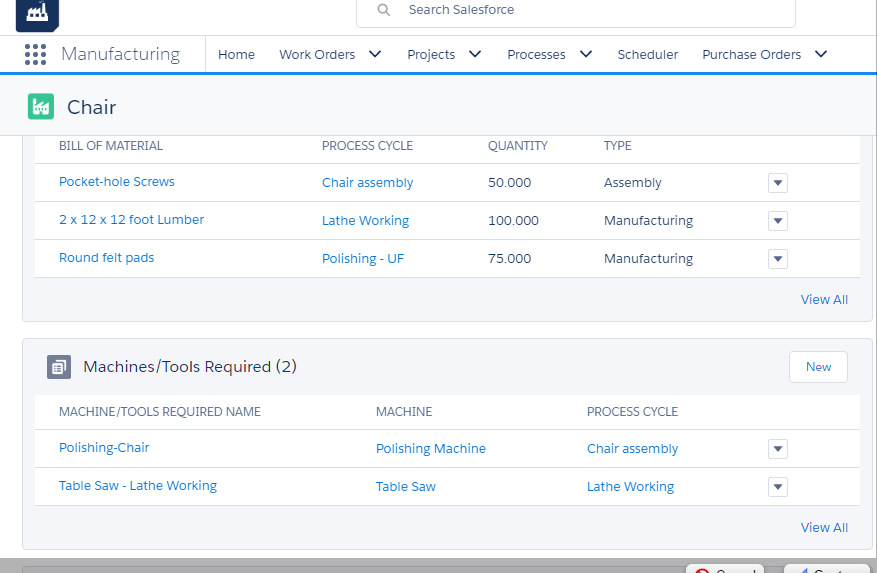


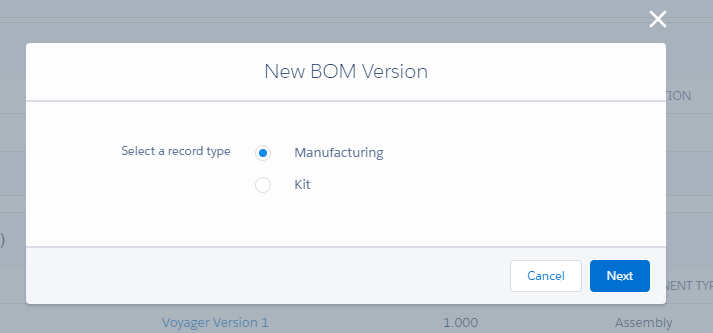
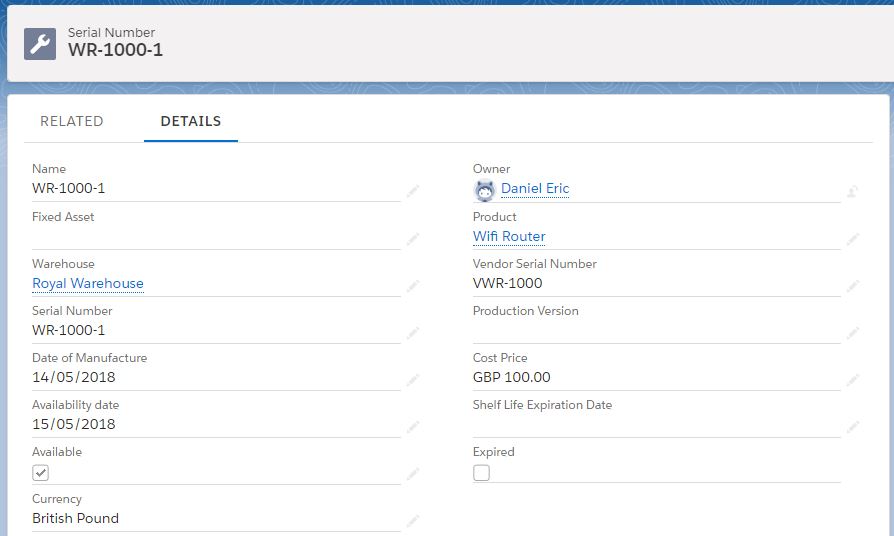
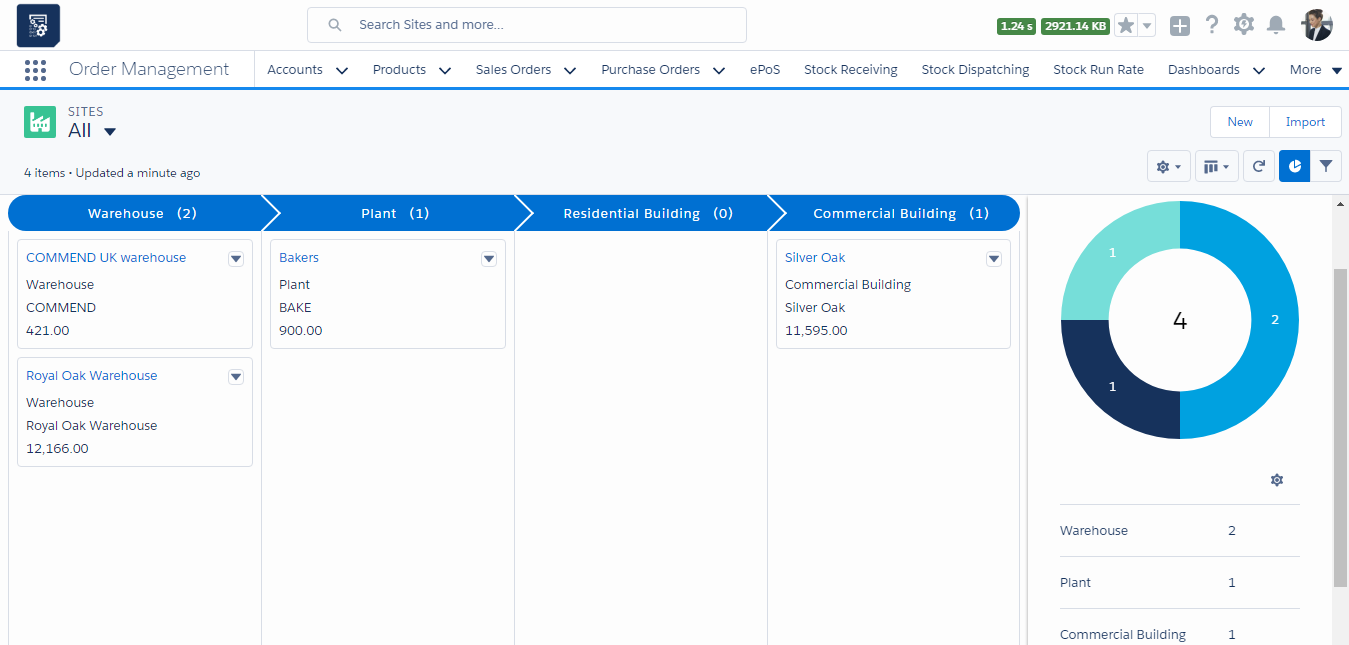
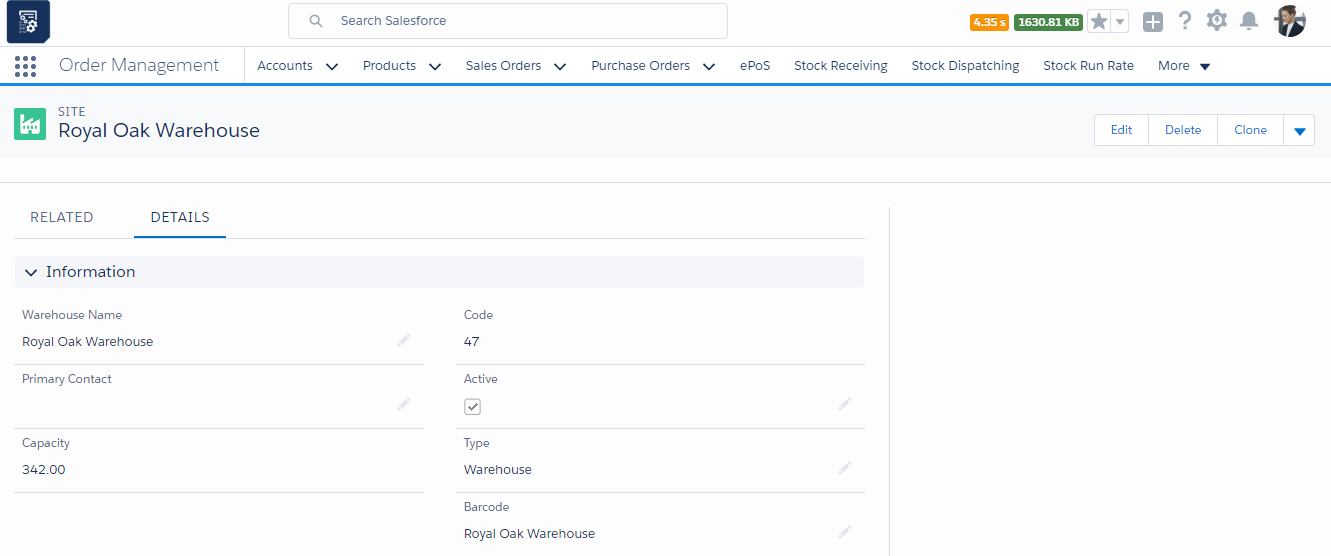
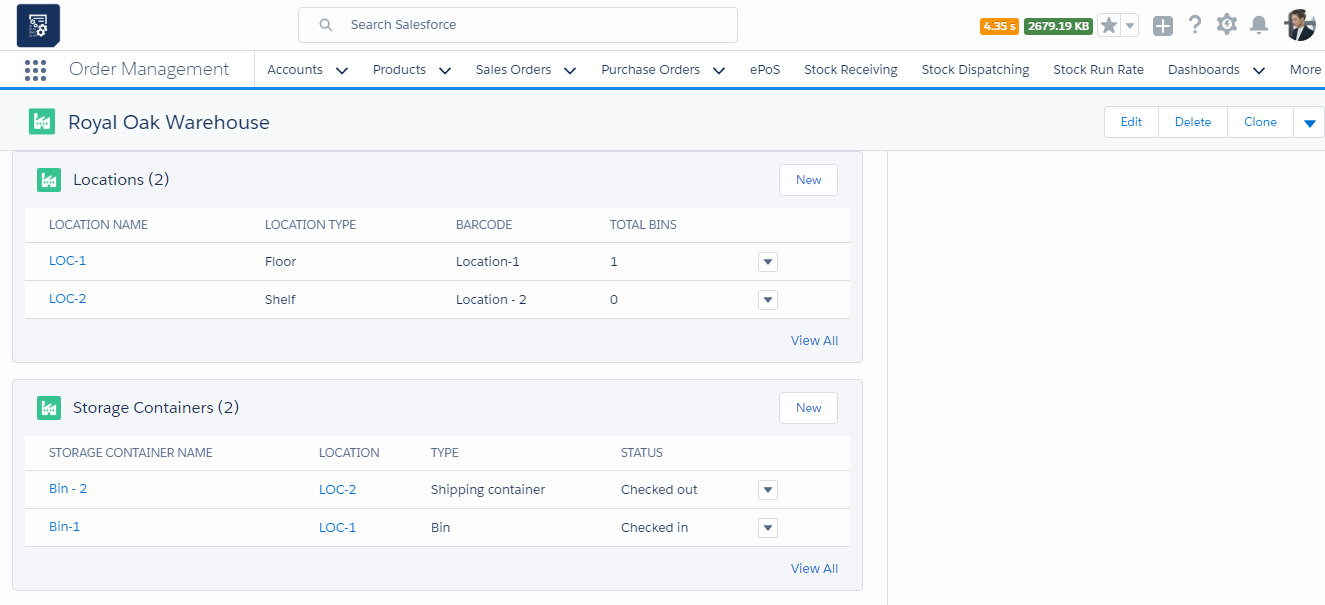
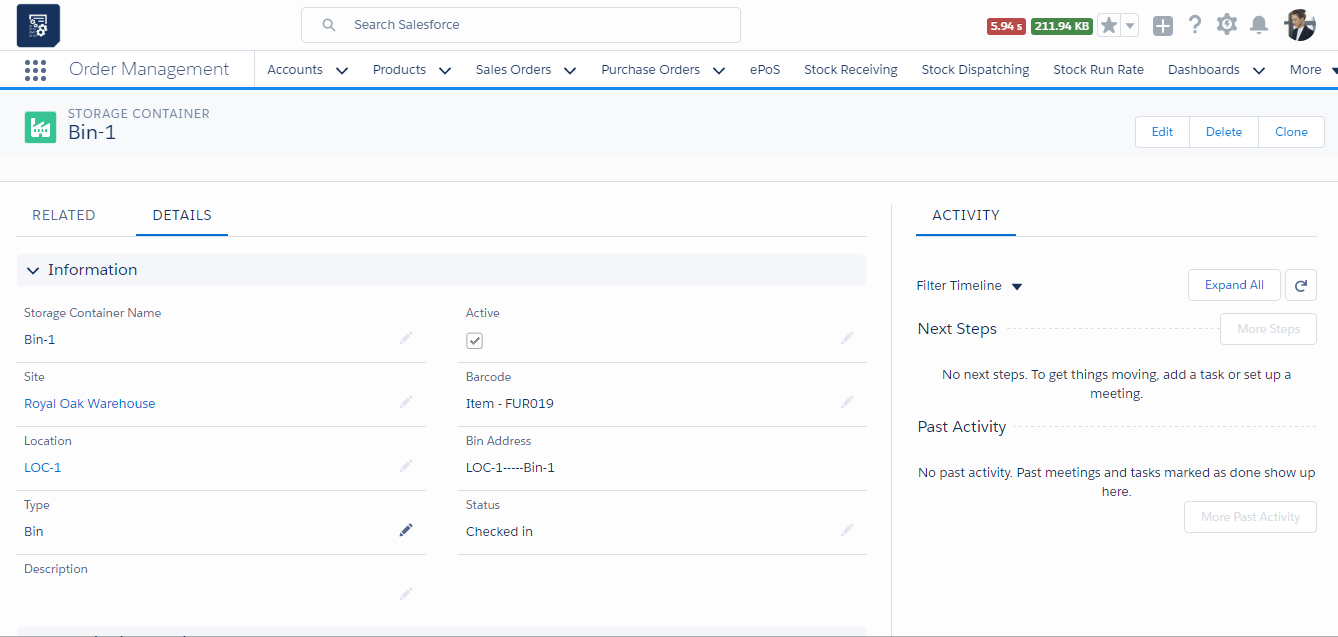
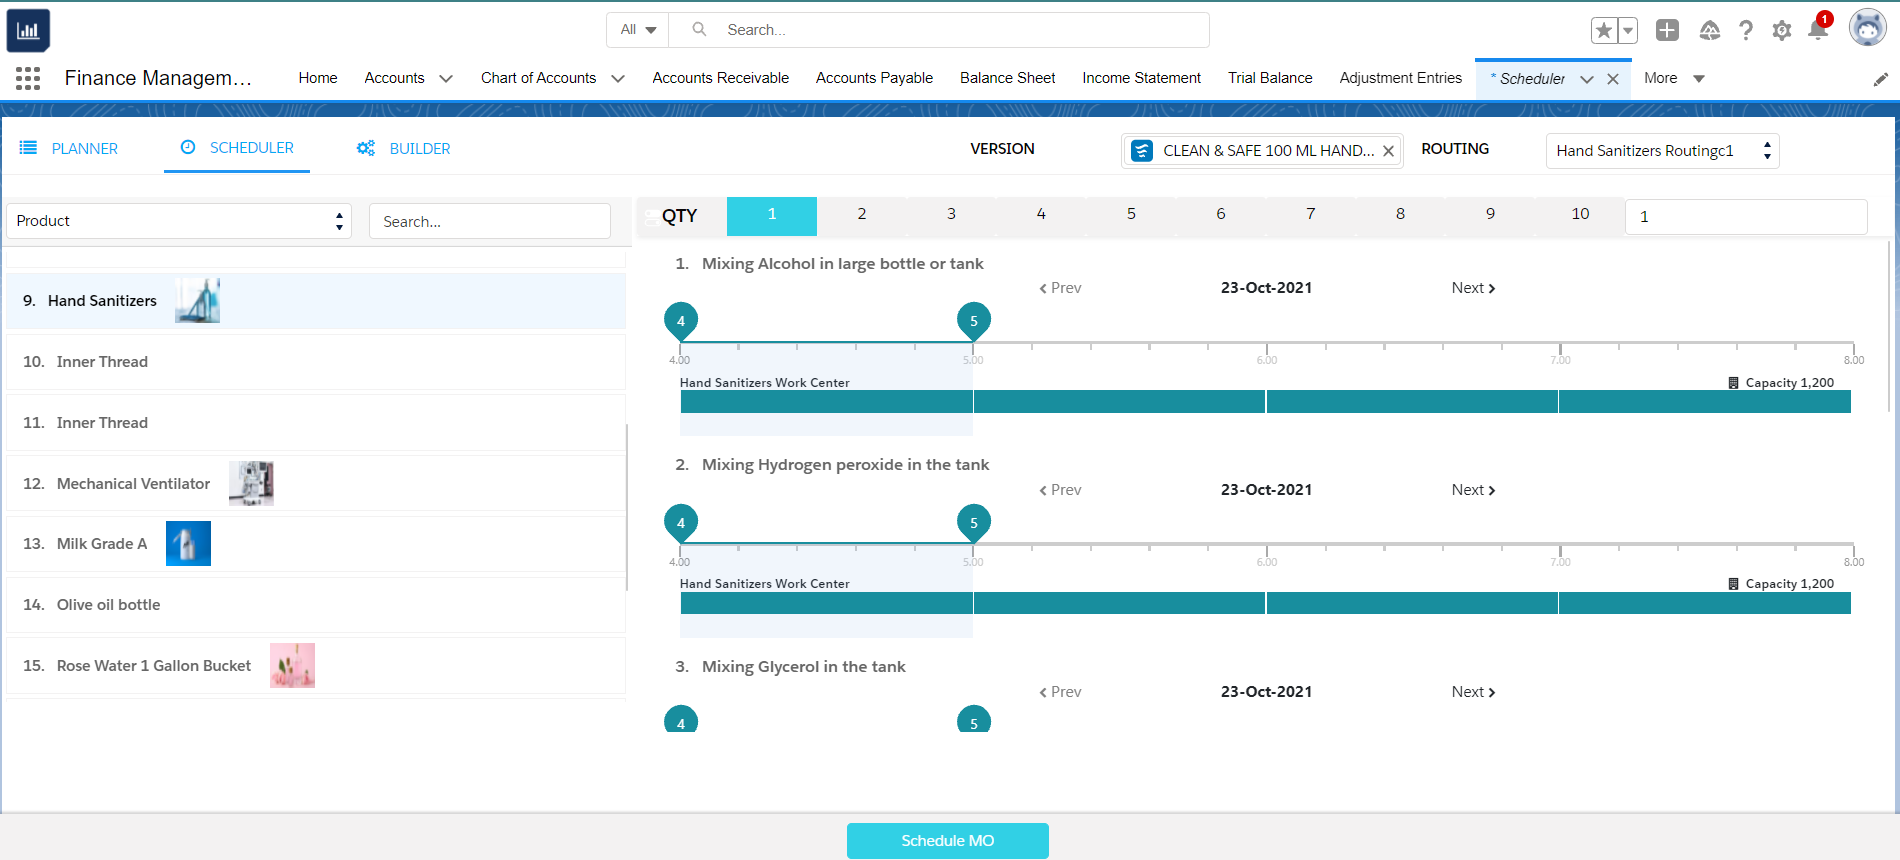
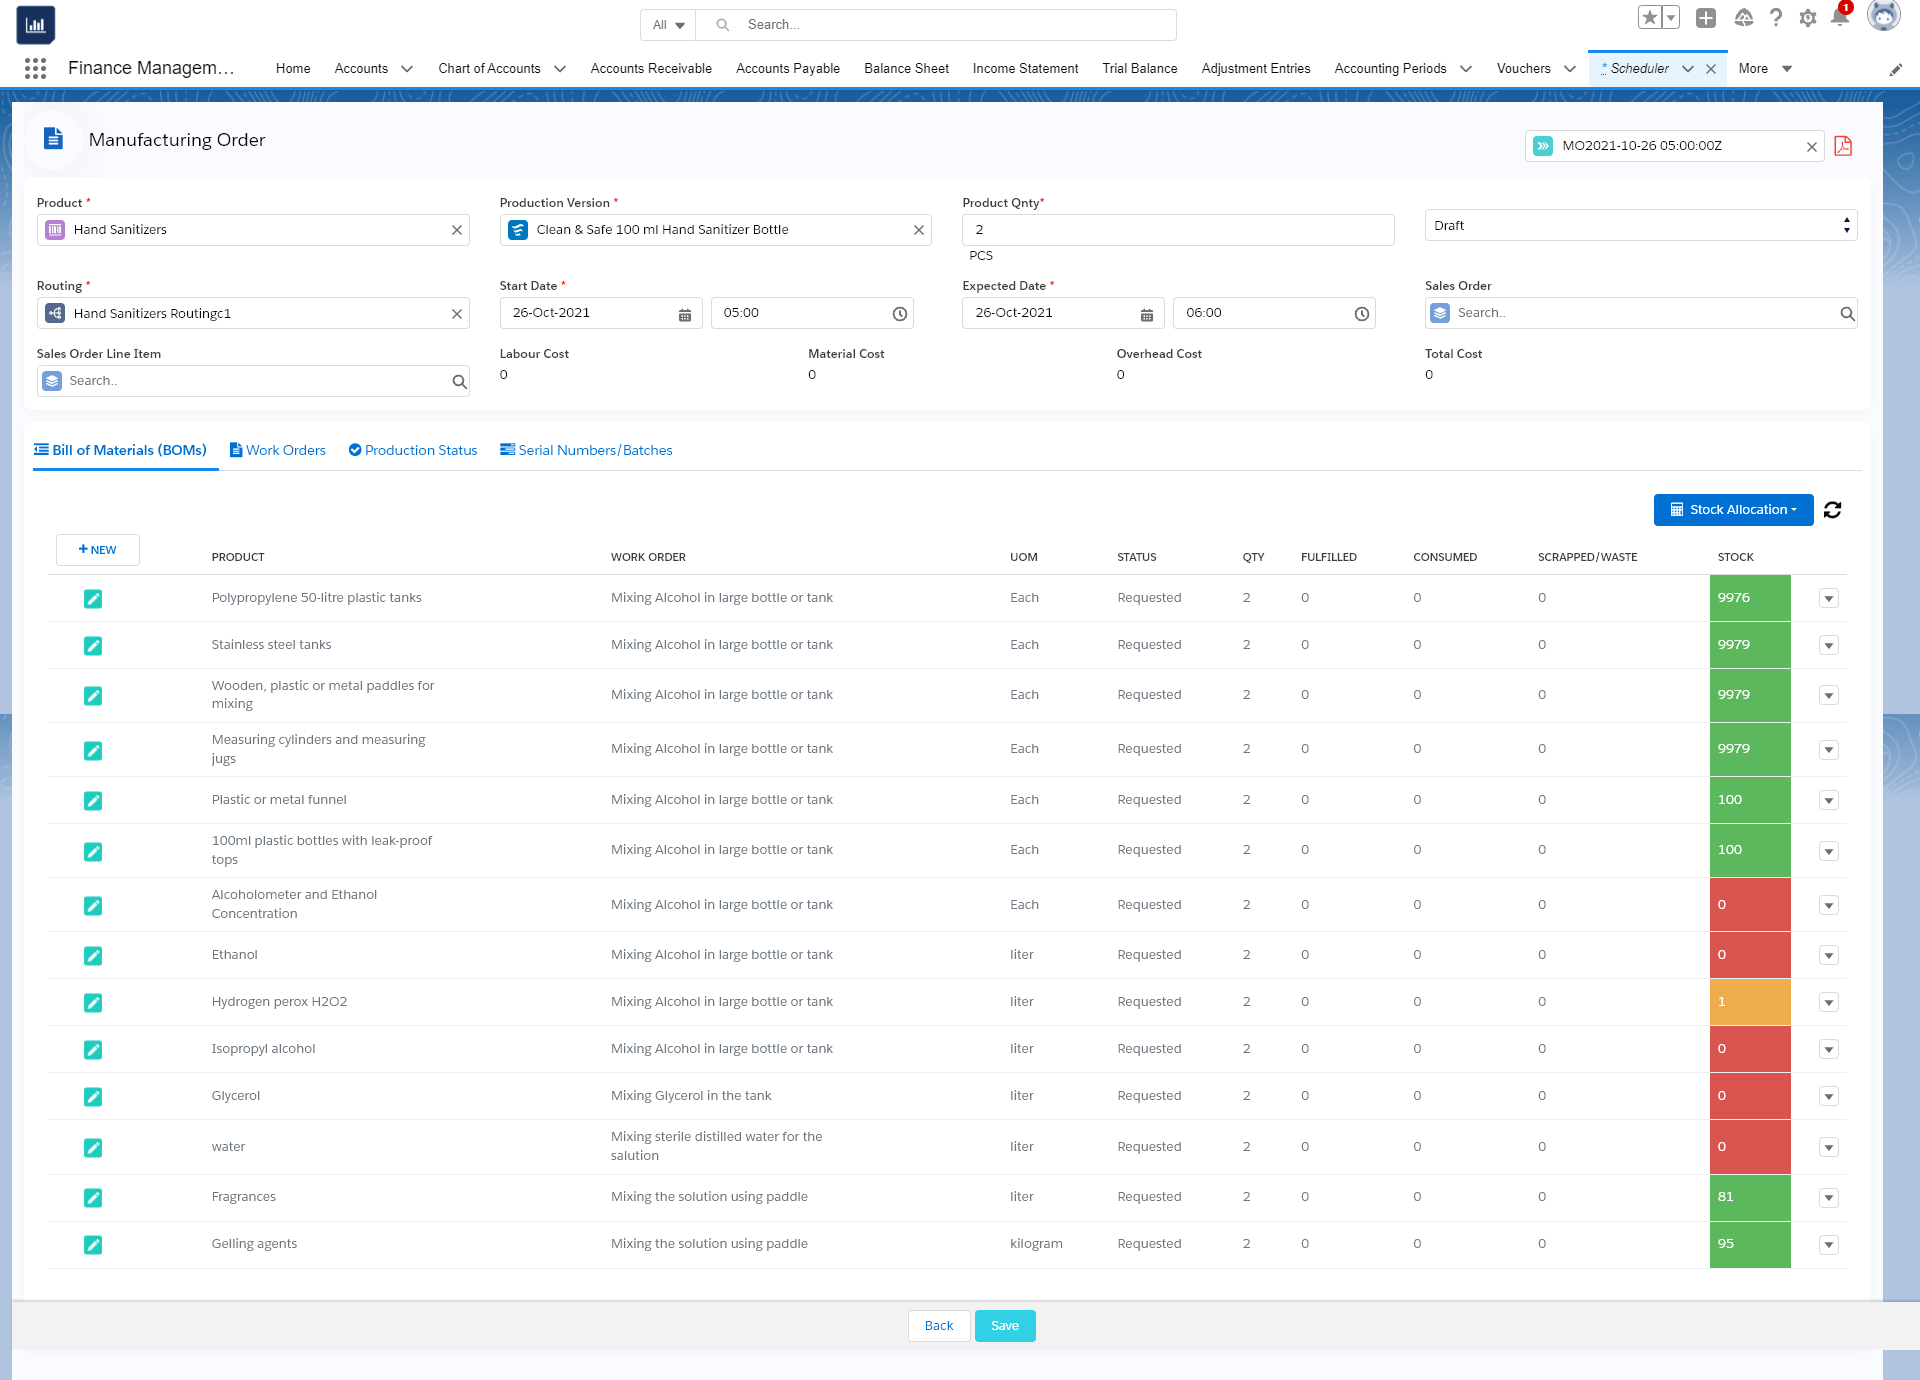
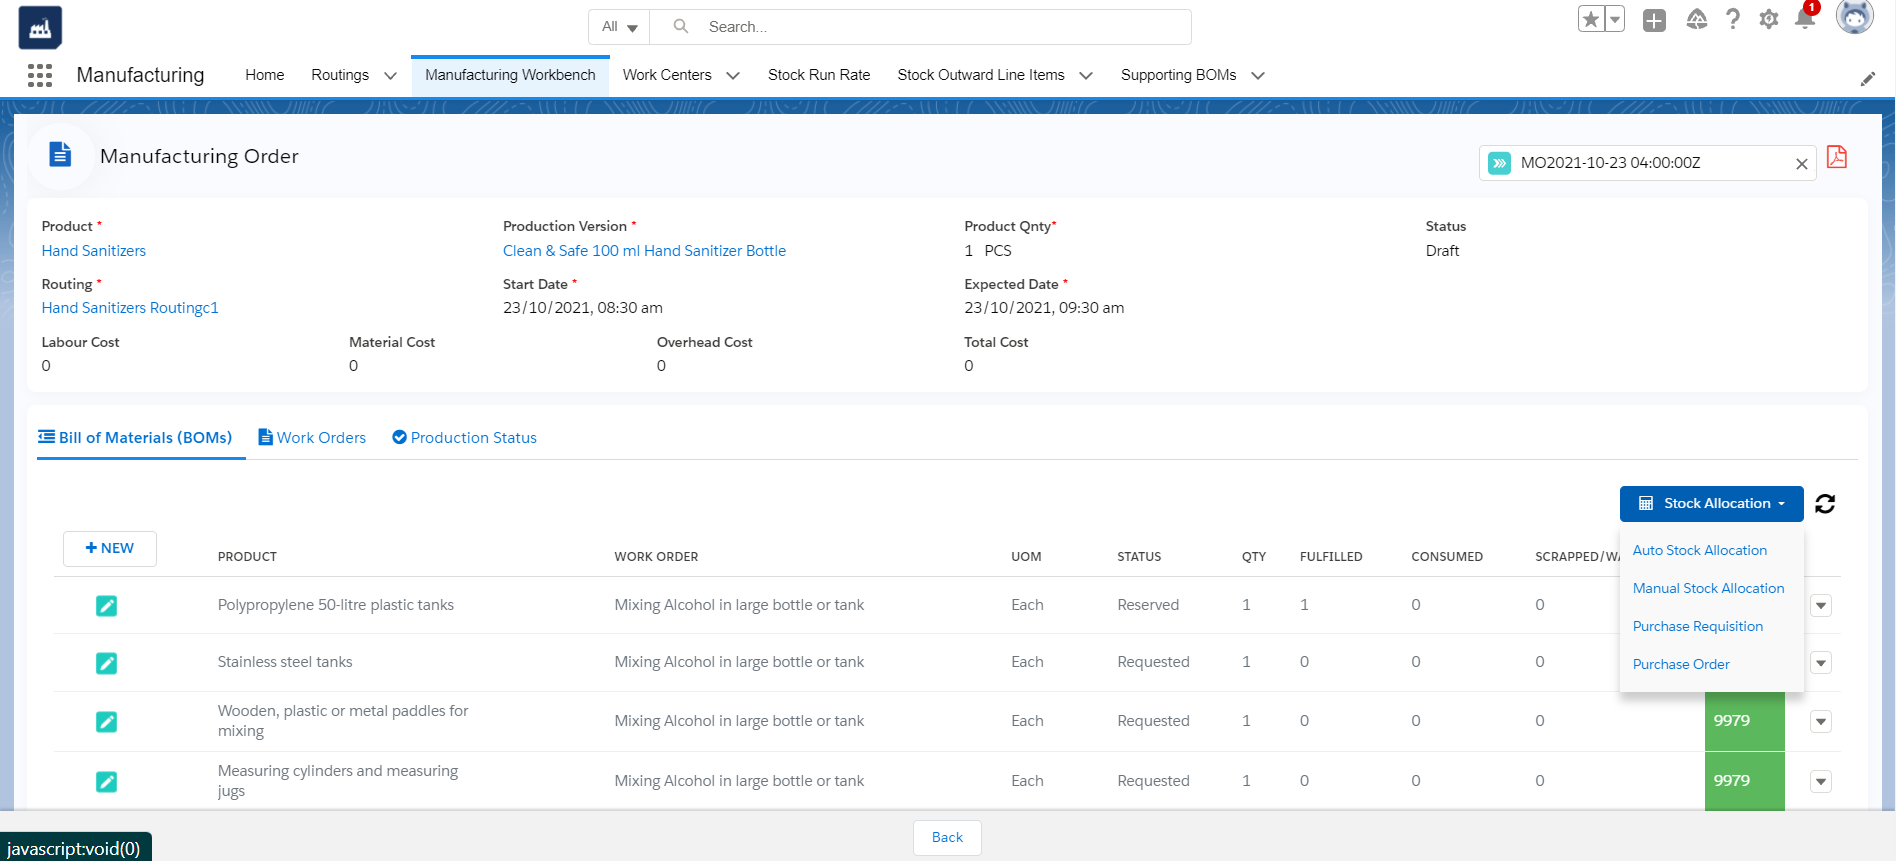
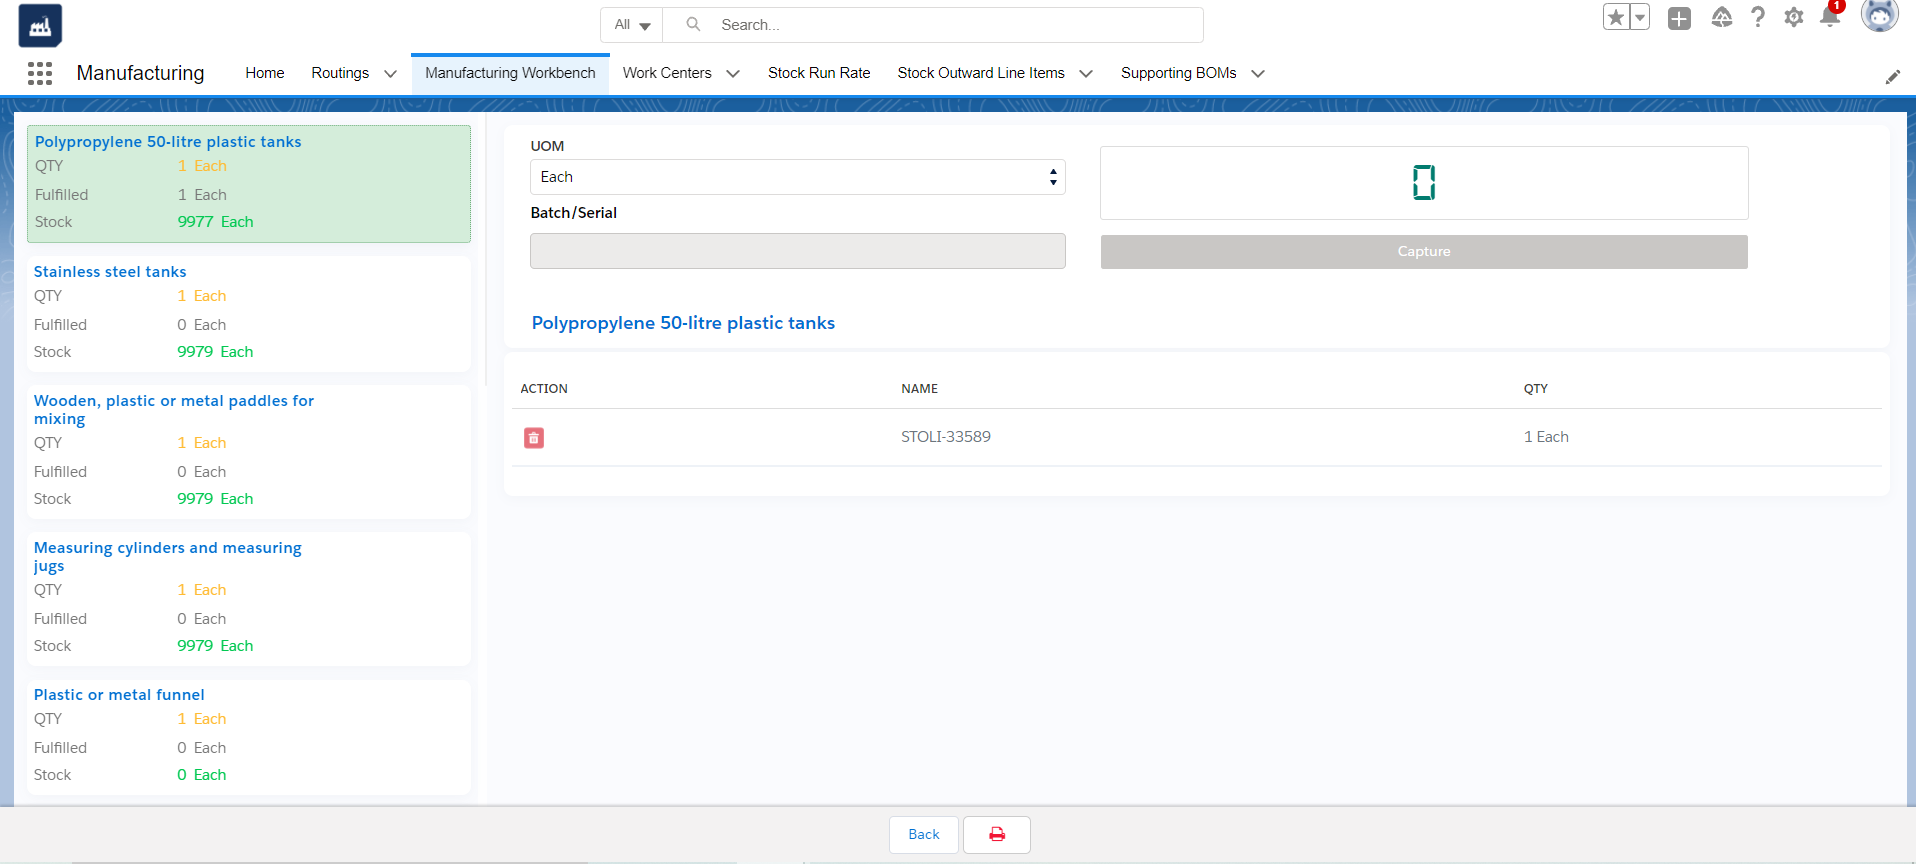
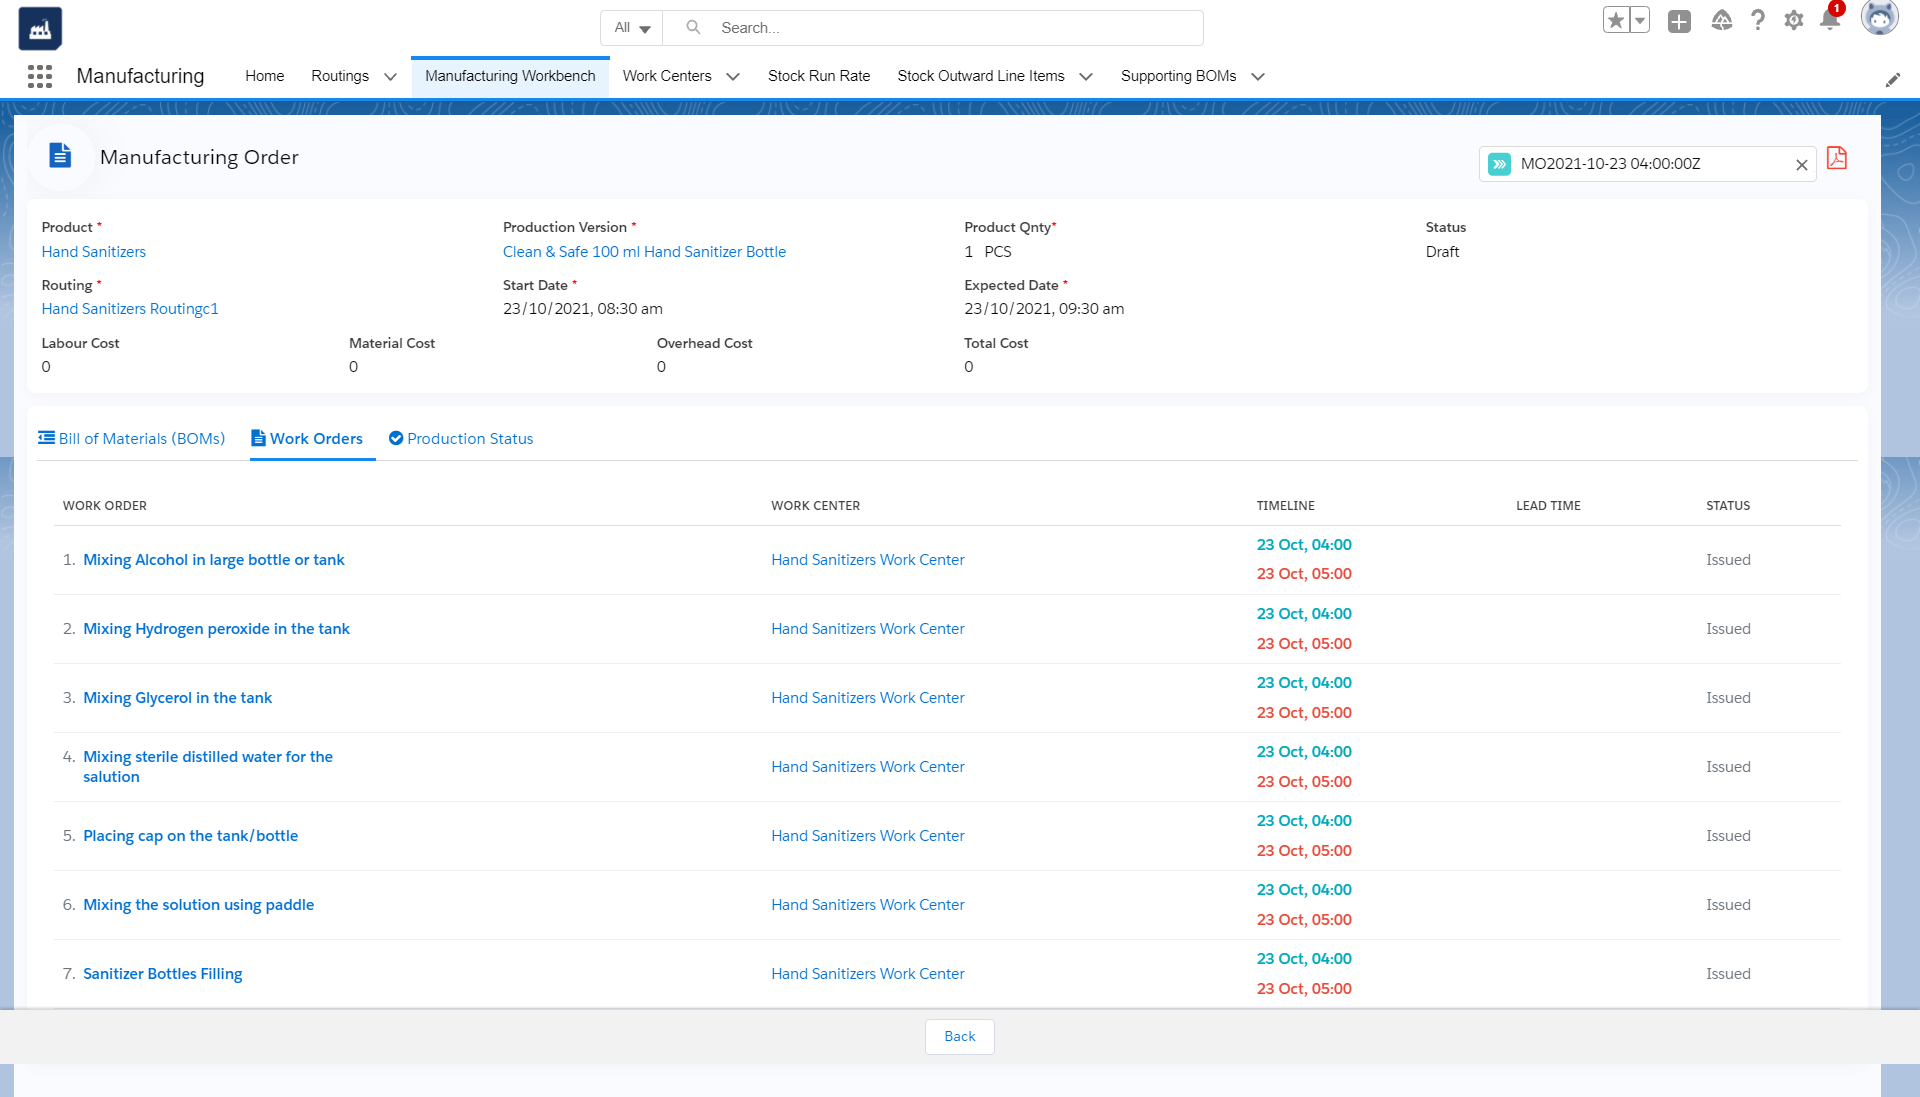
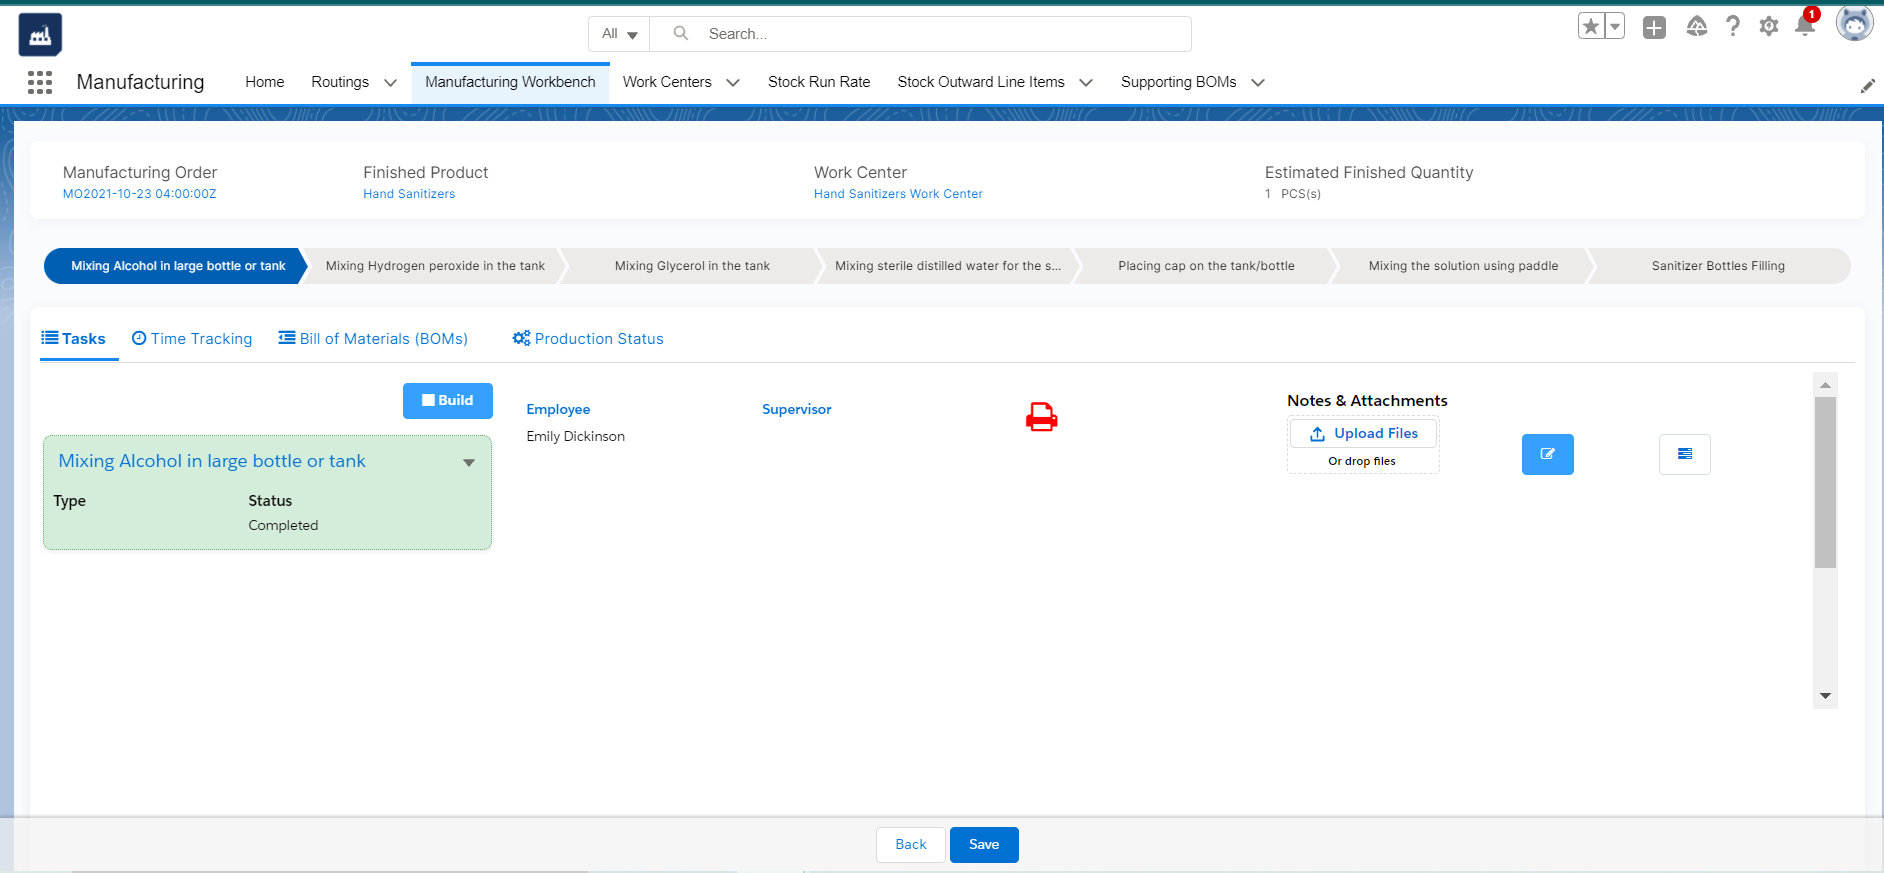
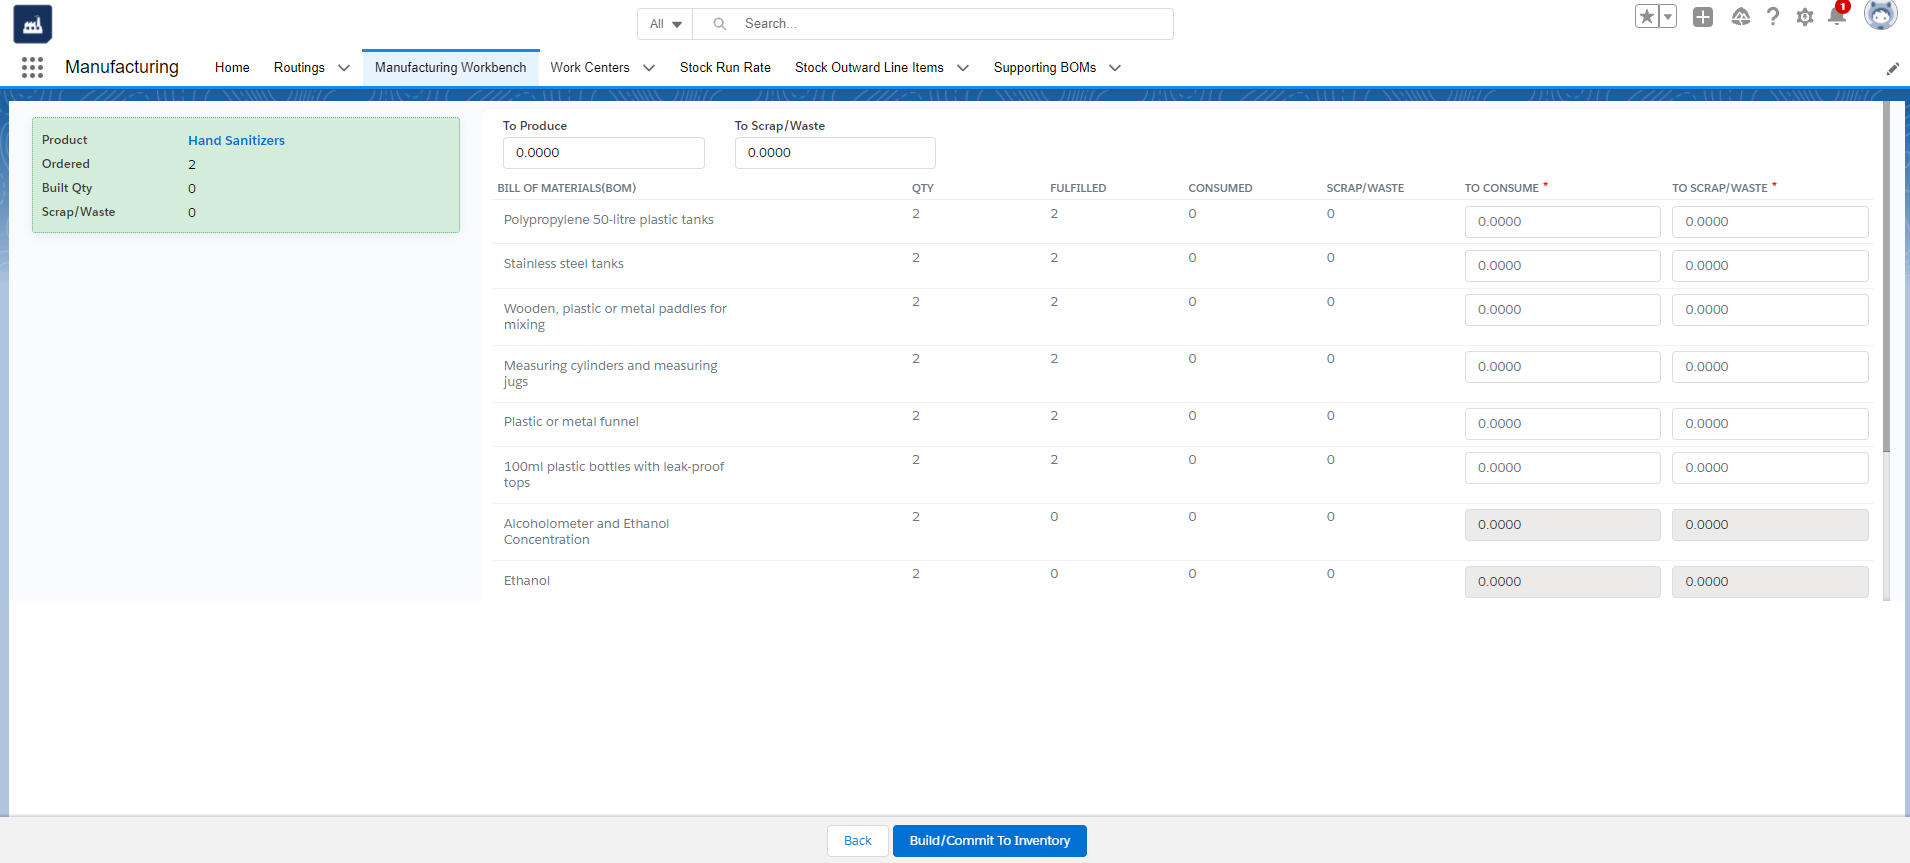

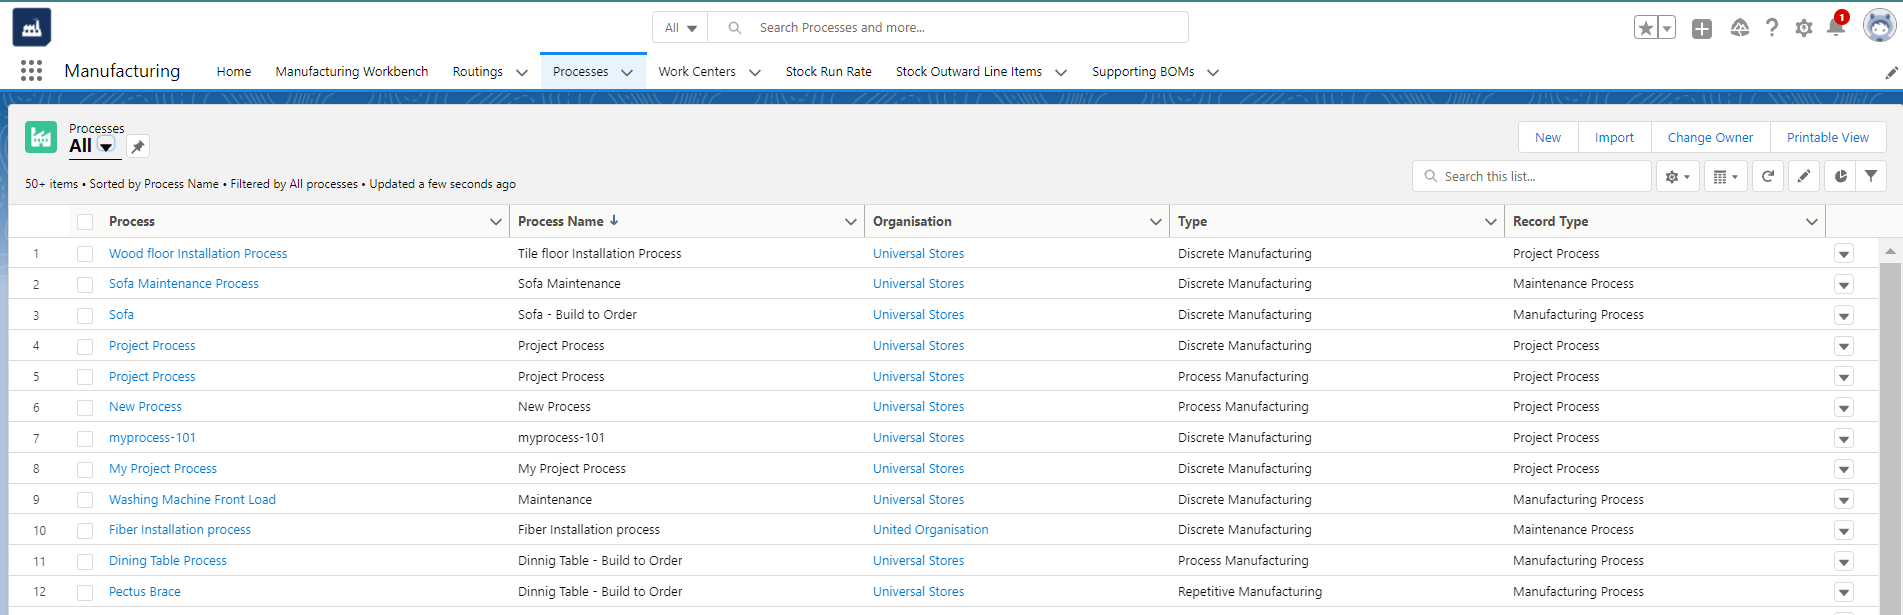
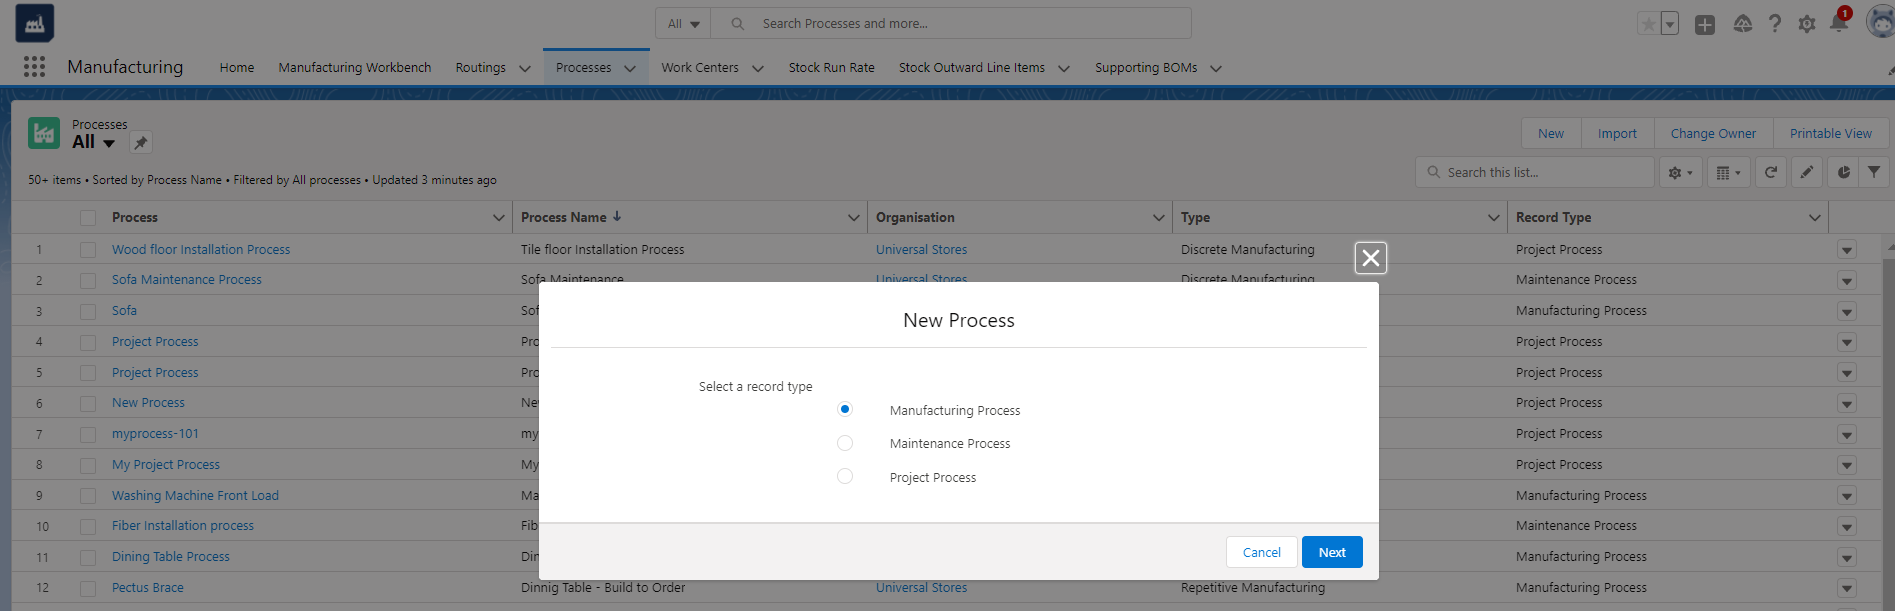
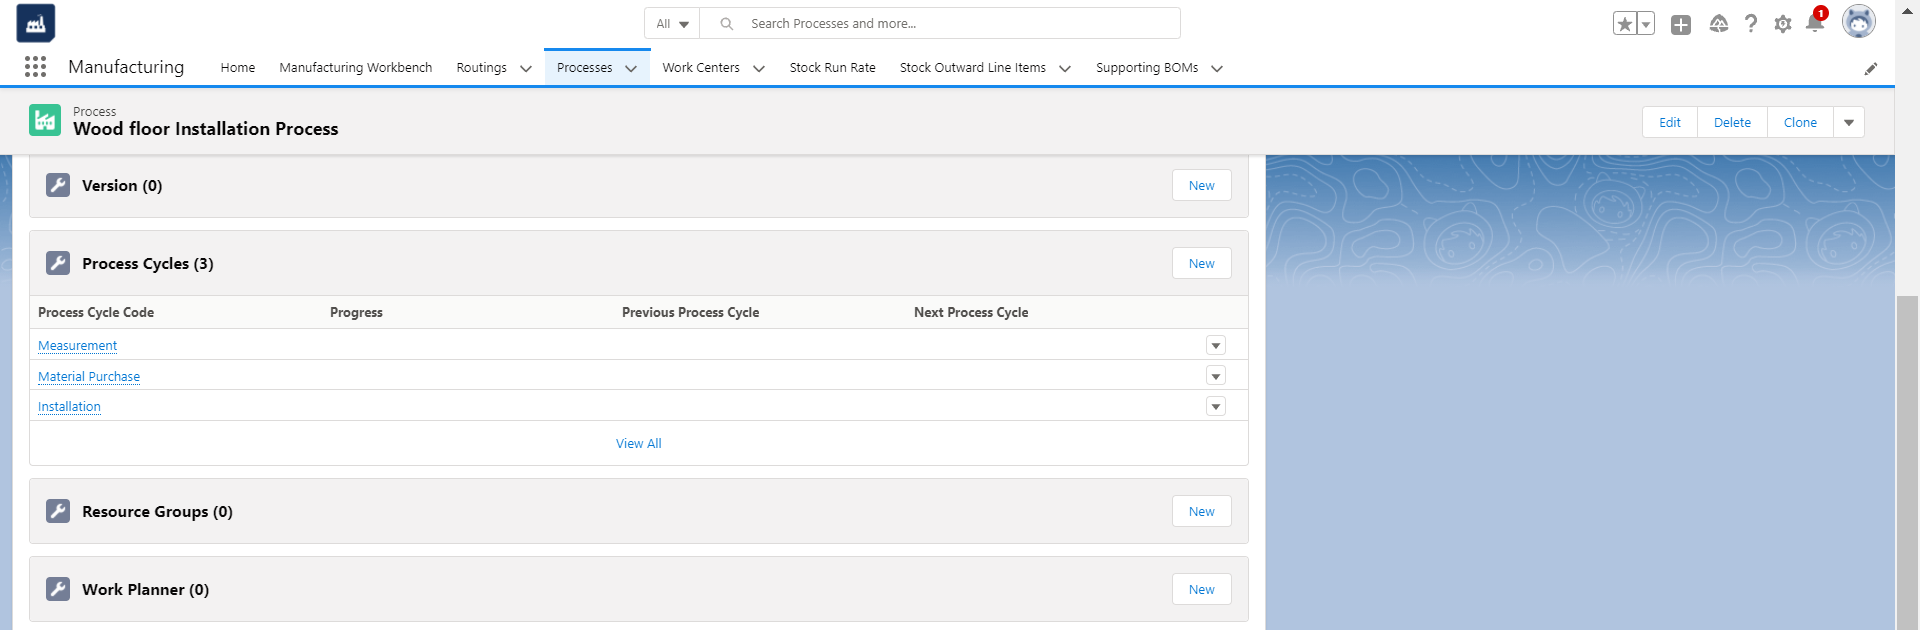
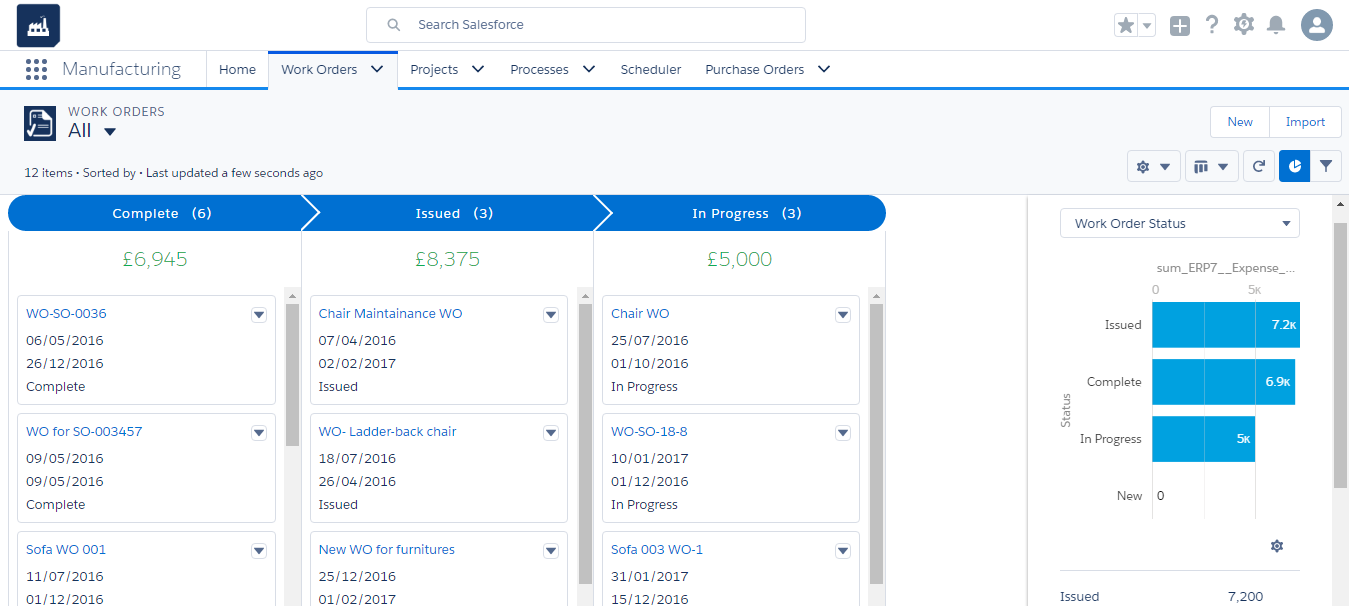
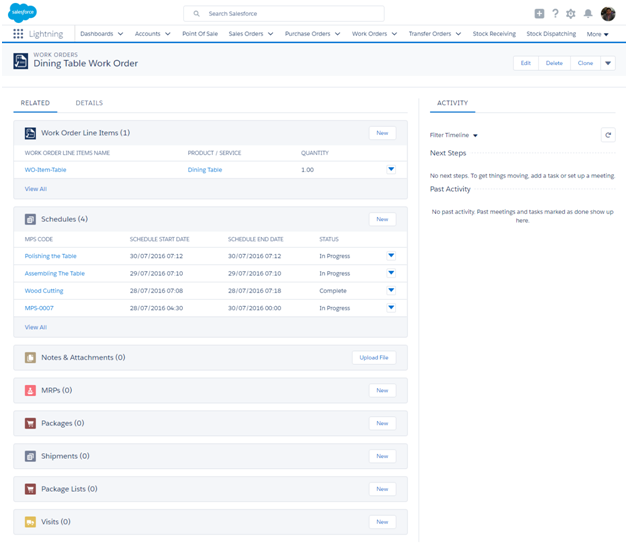
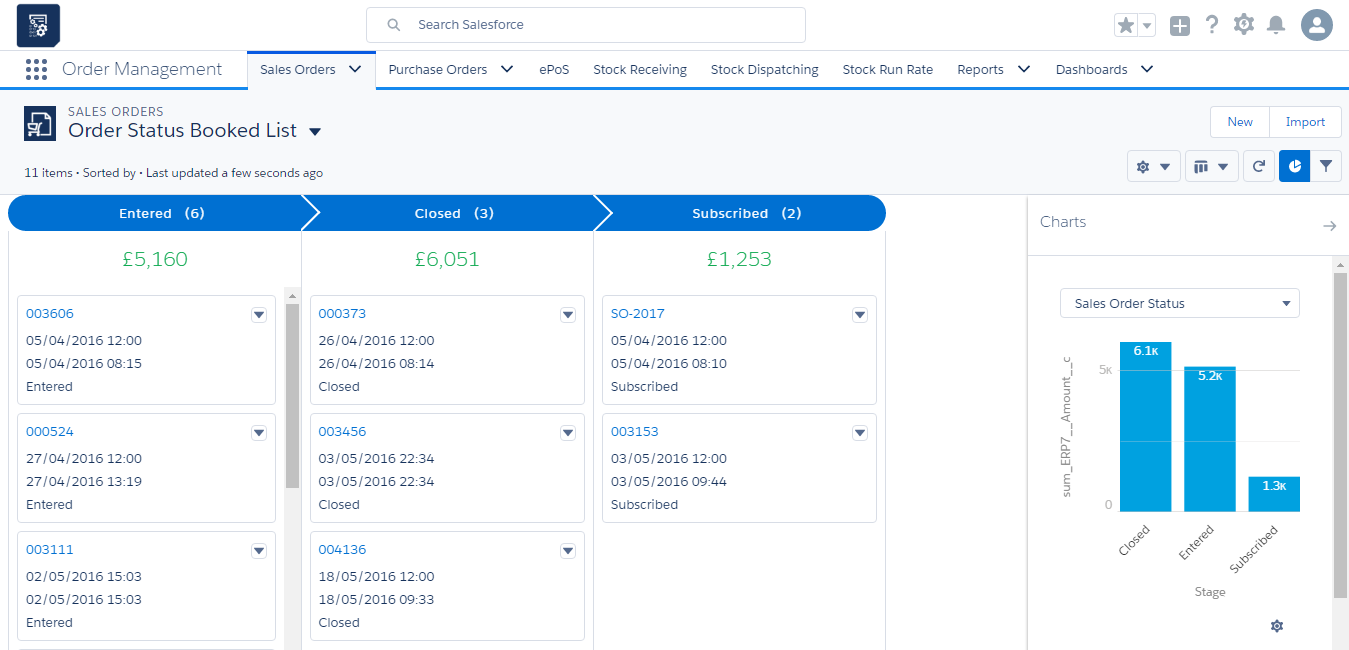
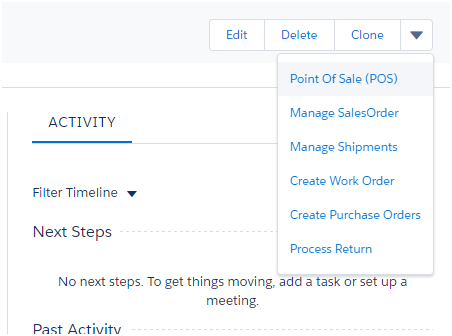
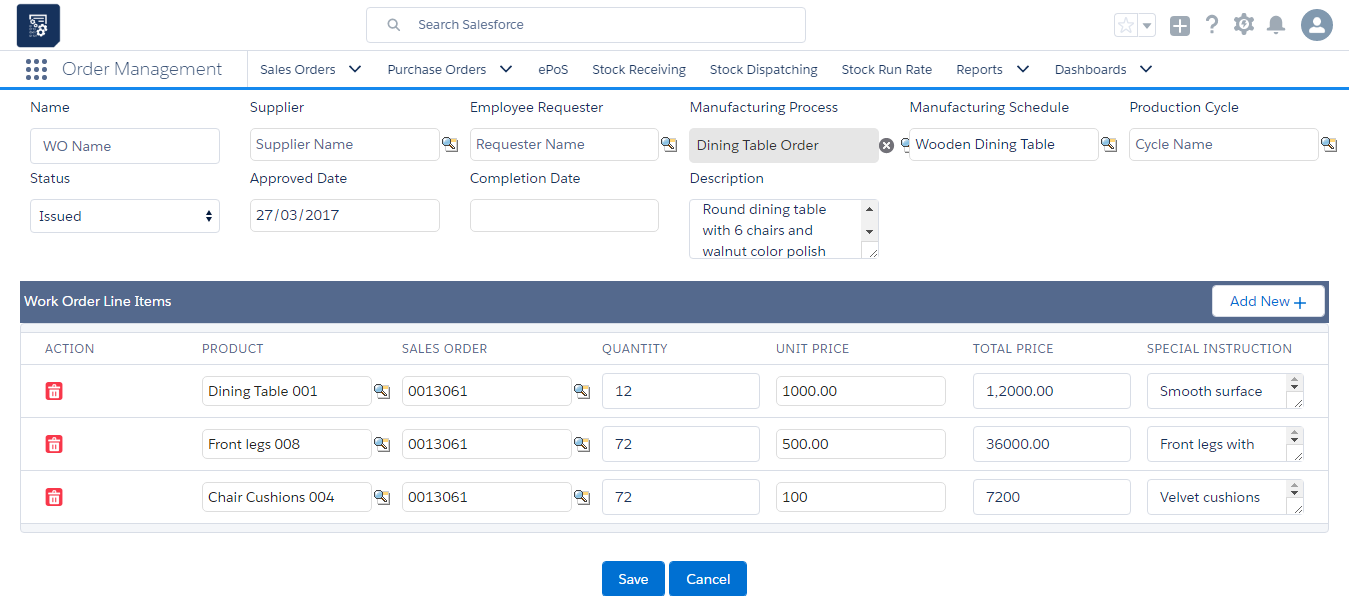
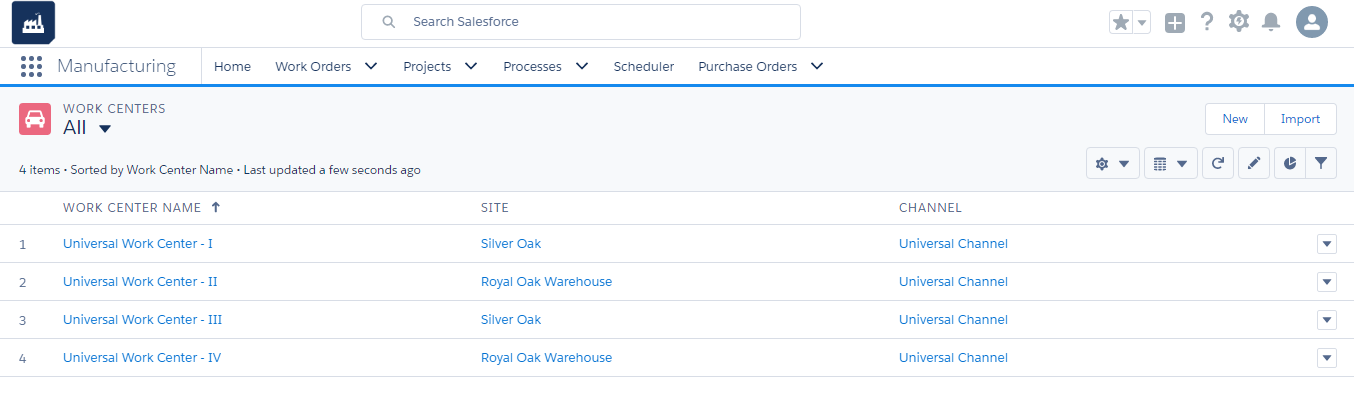

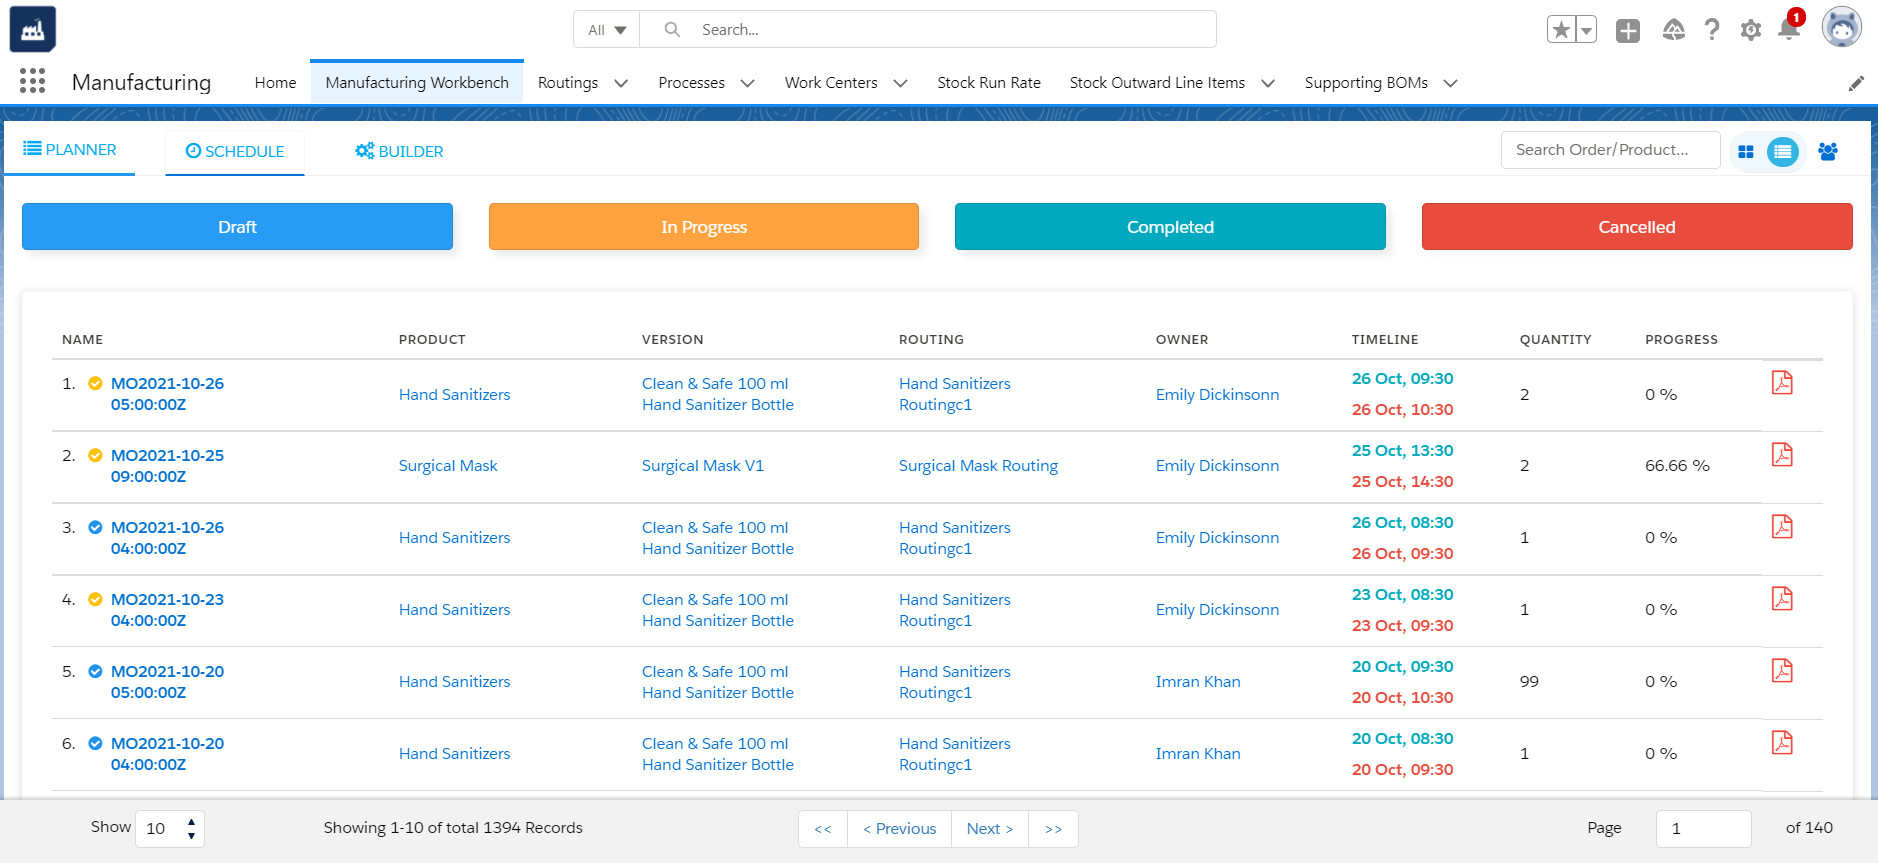
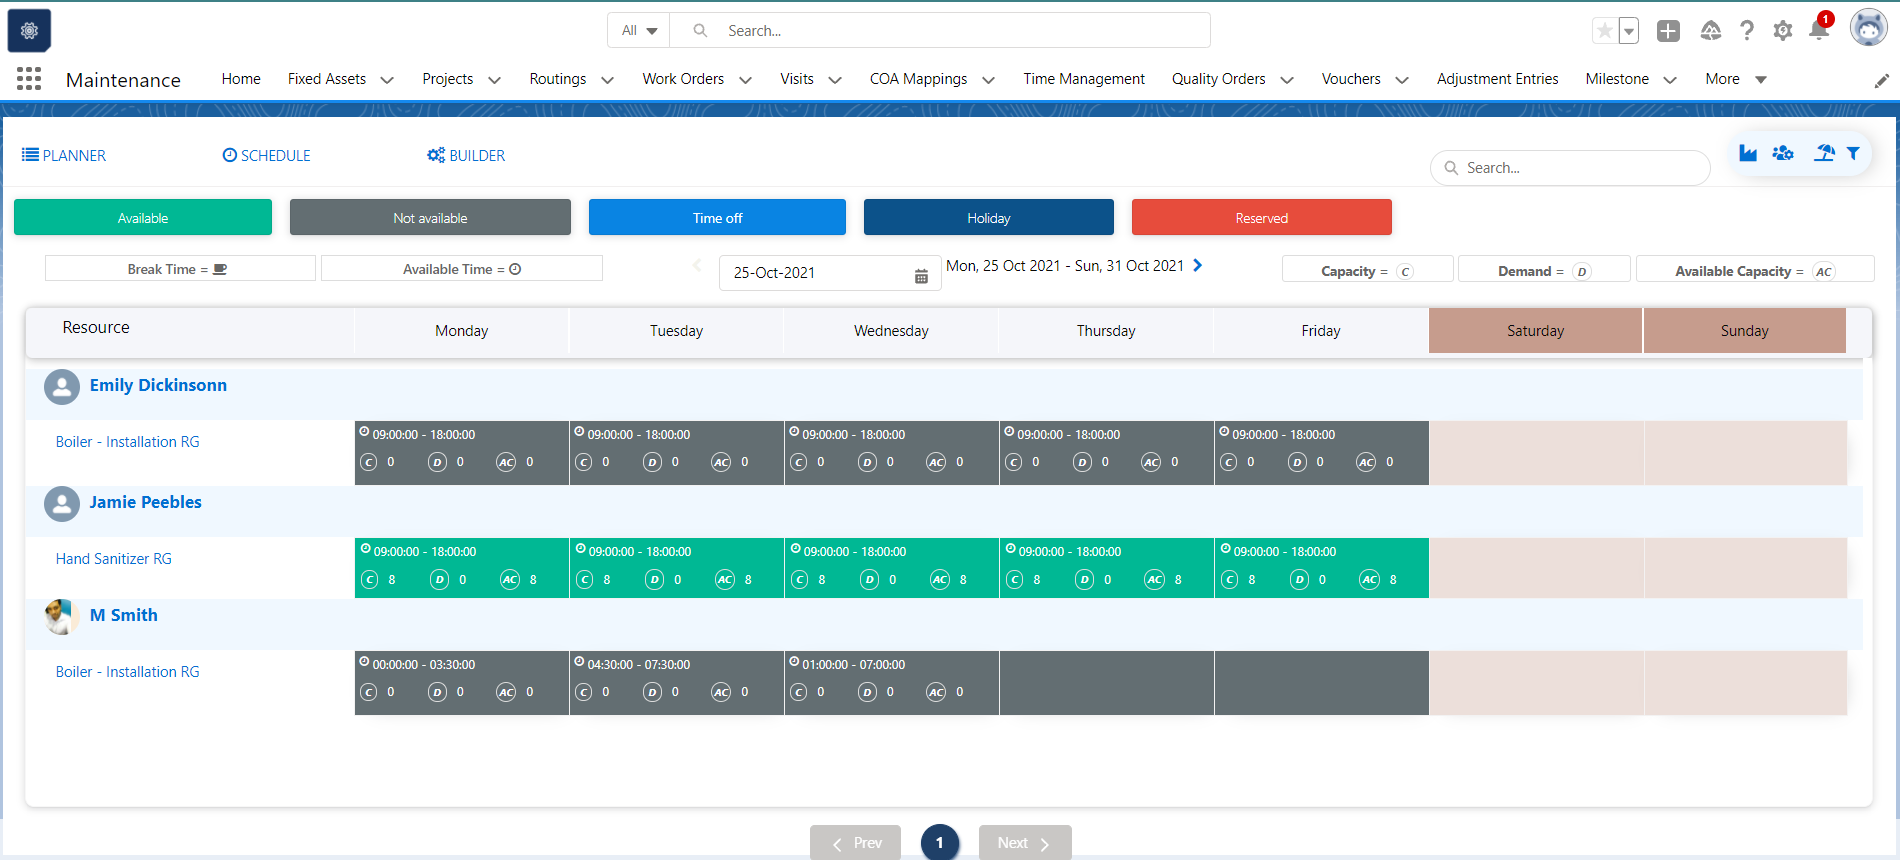


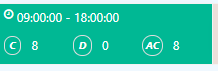
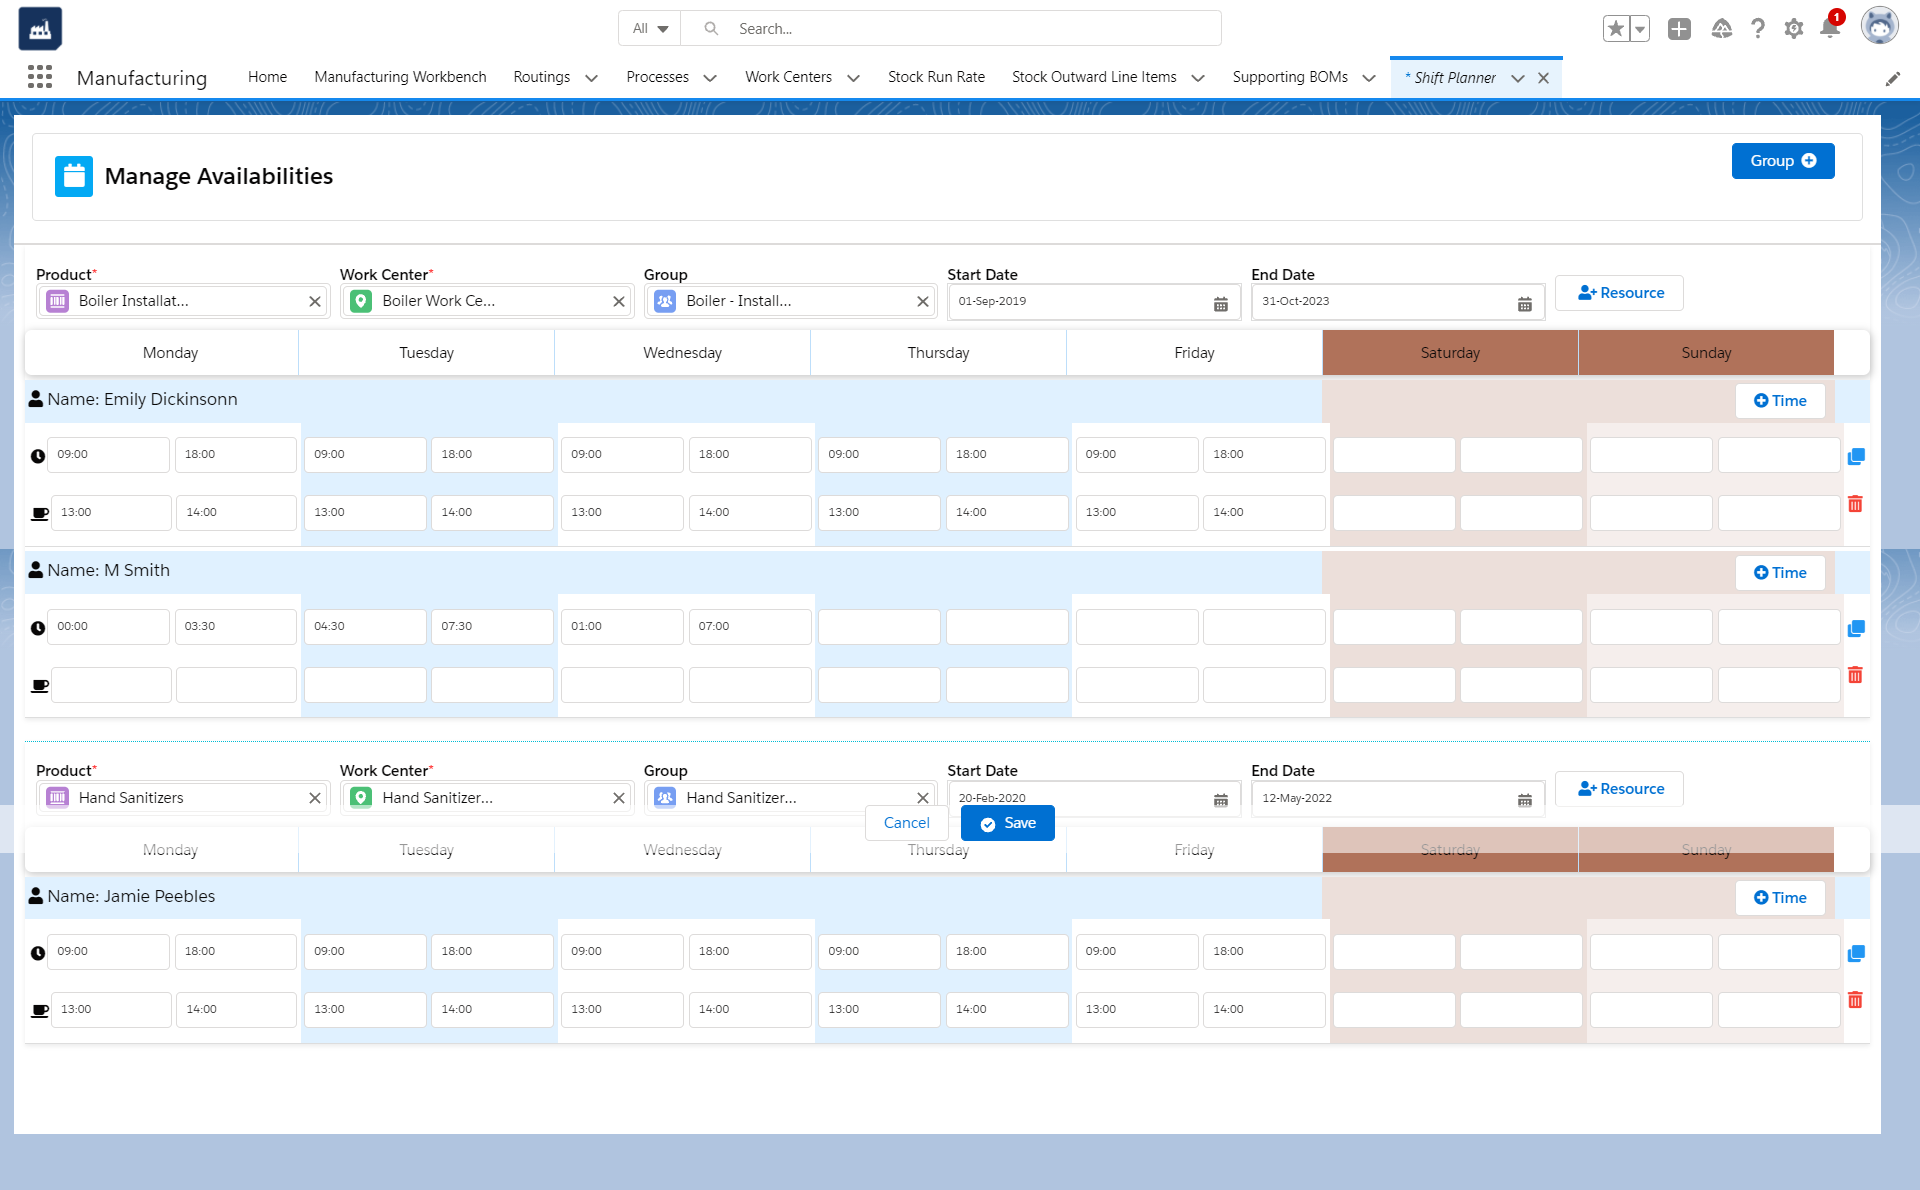

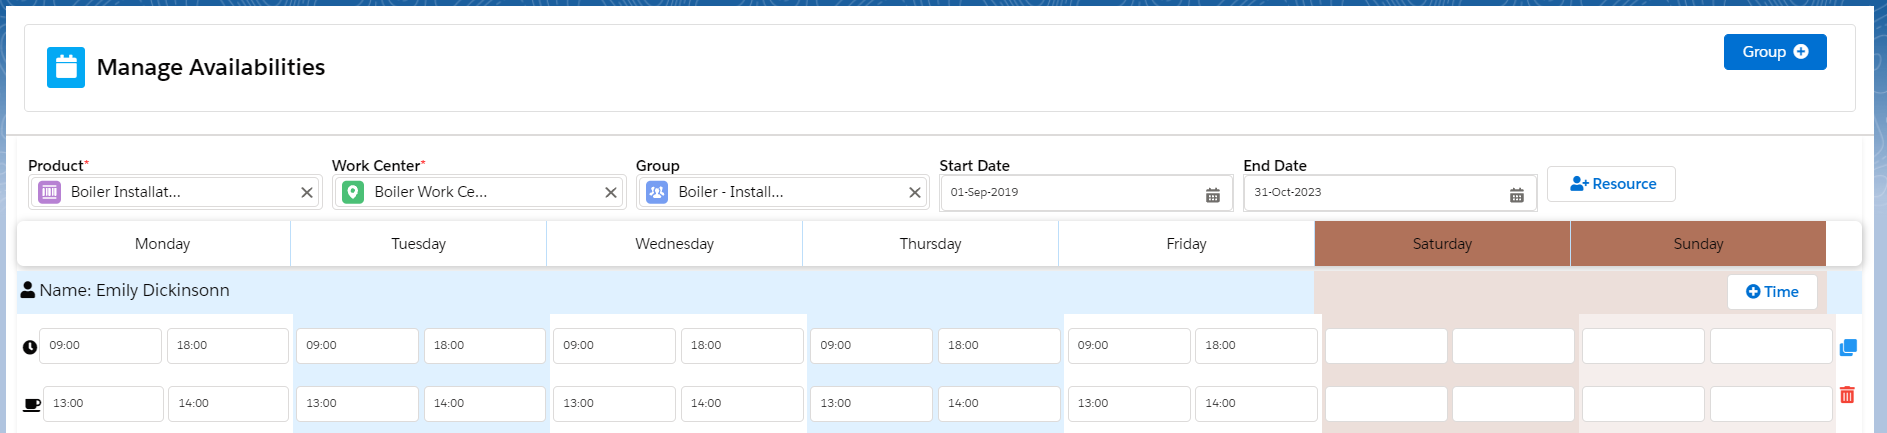
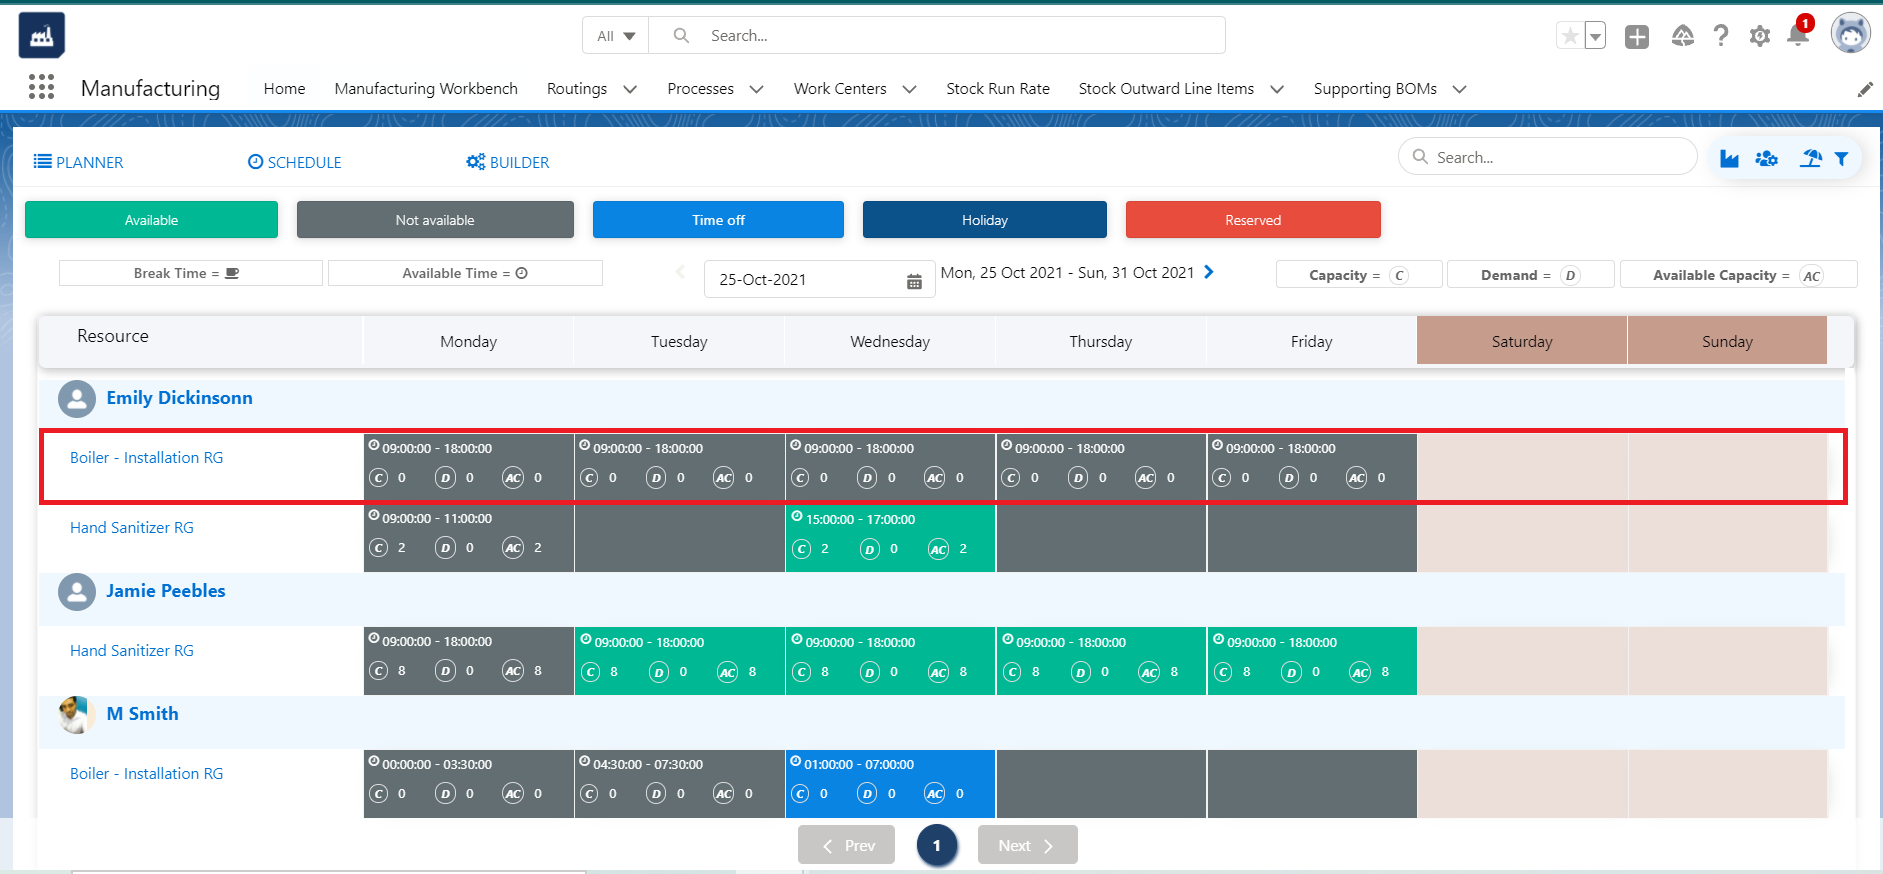
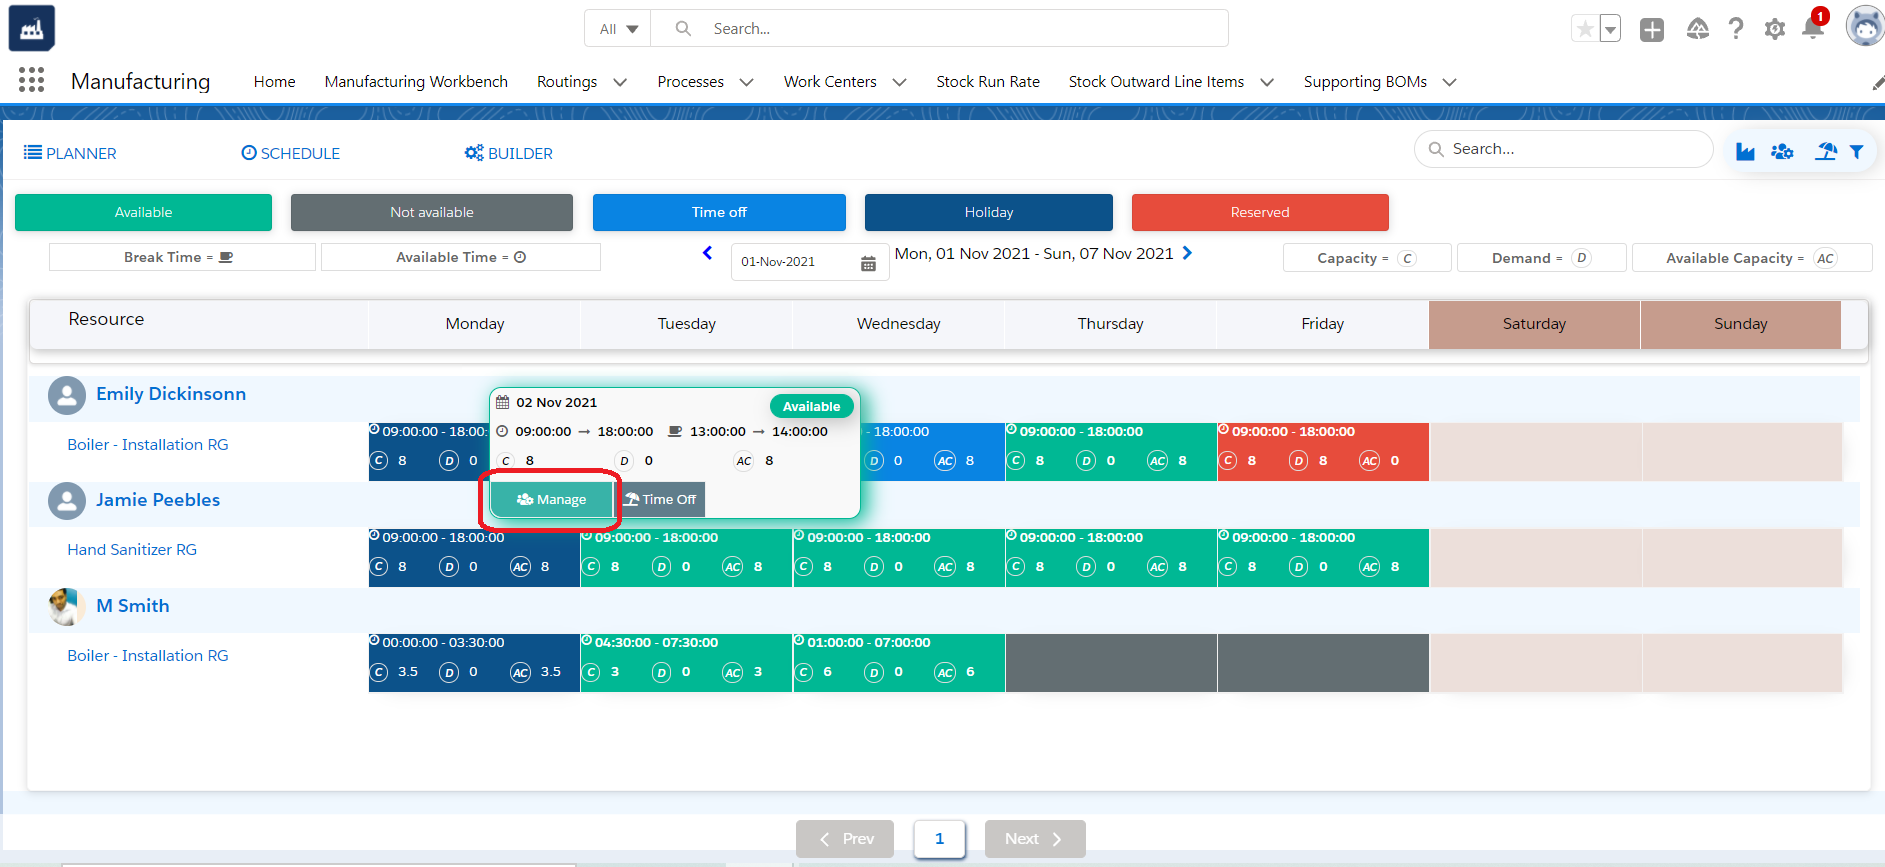

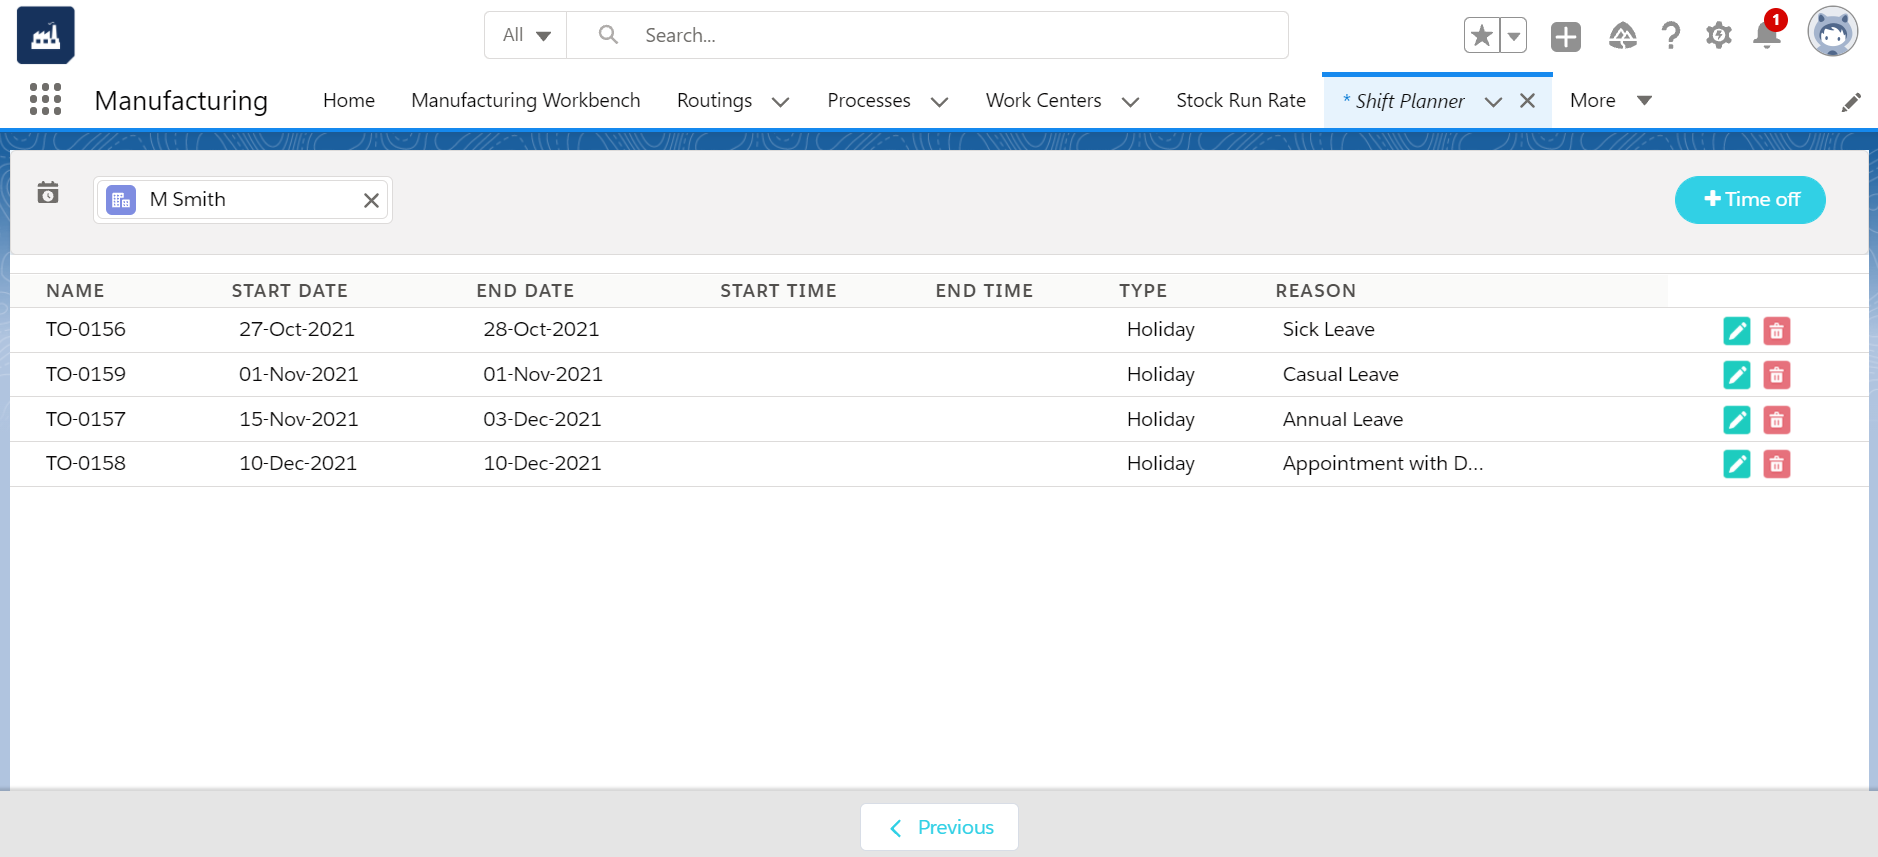
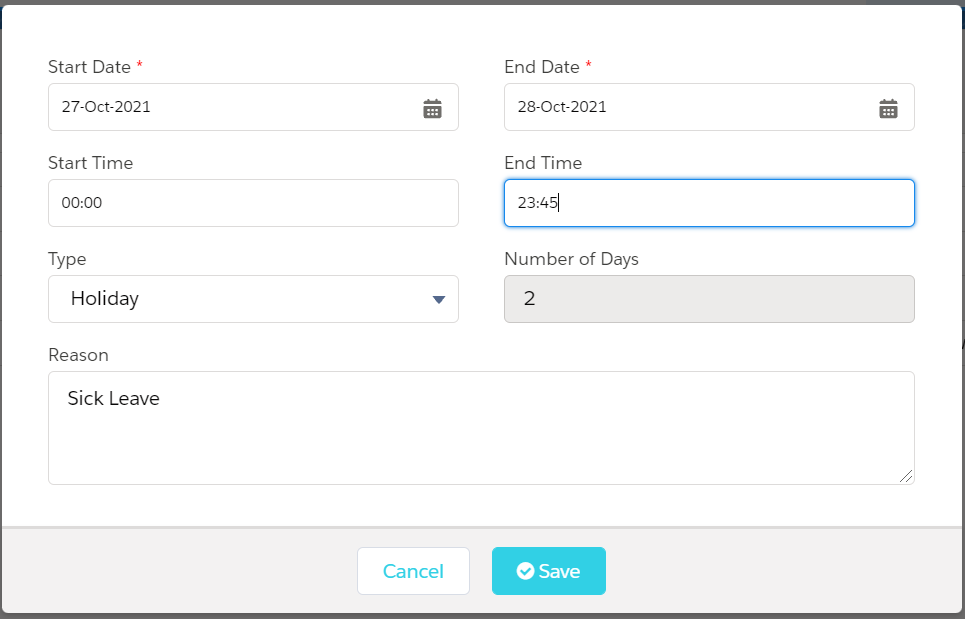
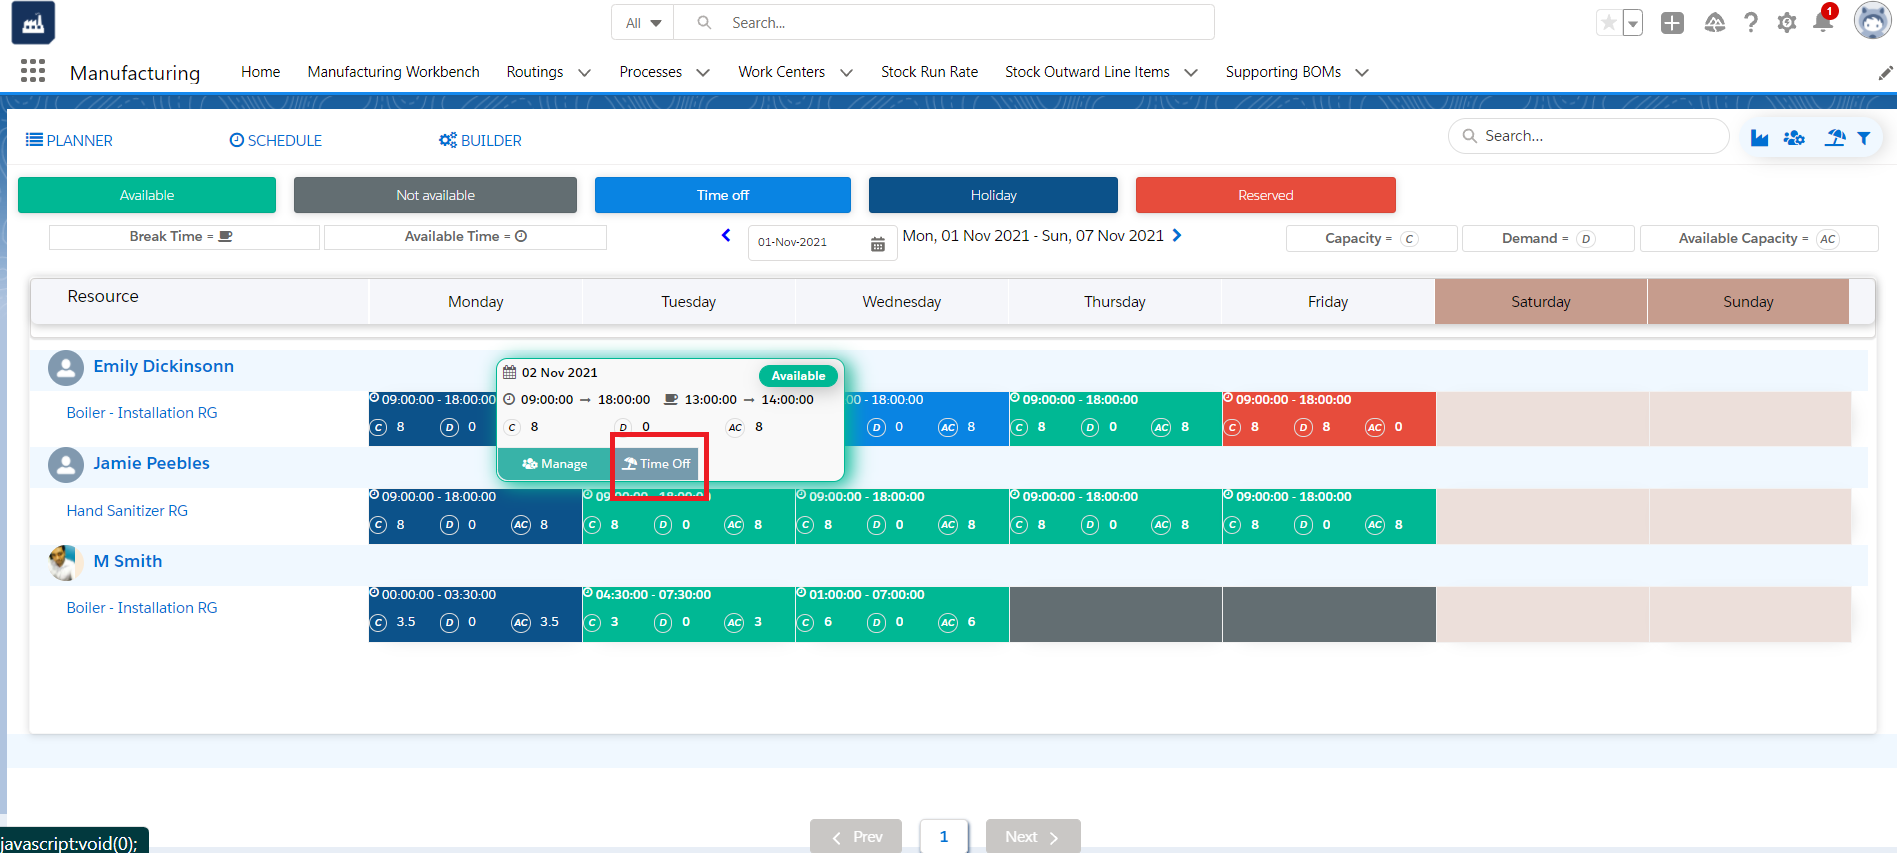
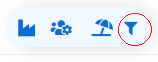

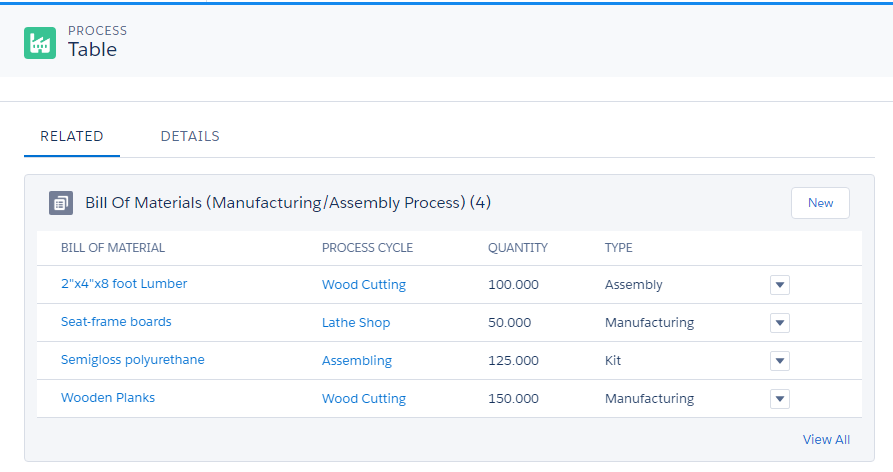
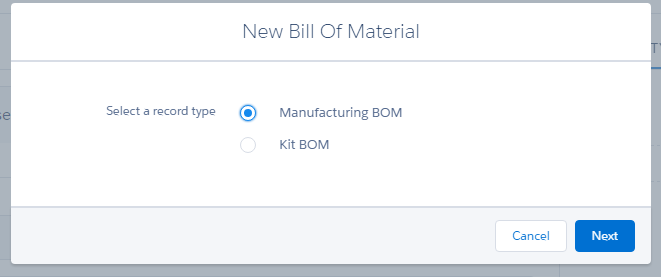
 In Capacity Planning, we can get the daily overview of the work assigned to work centers or Resource Groups.
To Create Capacity Planning
In Capacity Planning, we can get the daily overview of the work assigned to work centers or Resource Groups.
To Create Capacity Planning
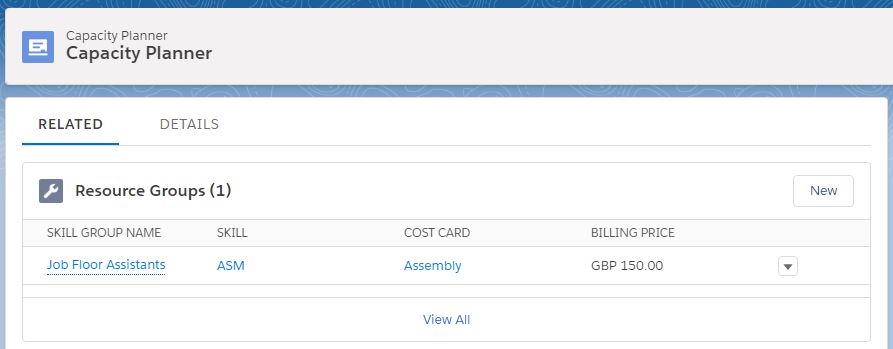

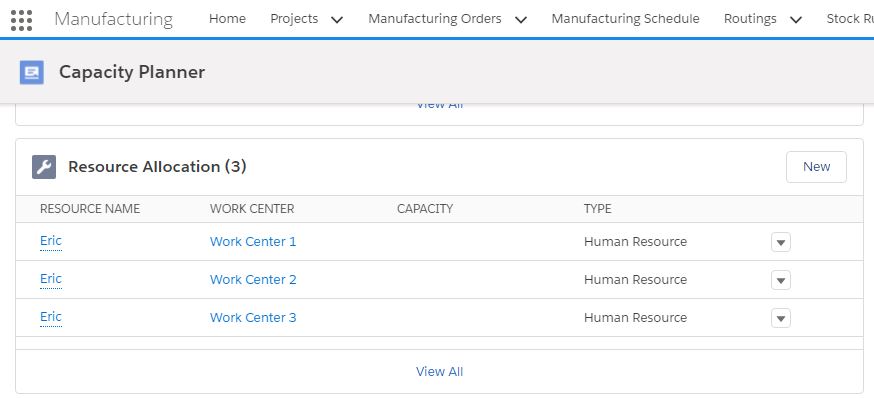
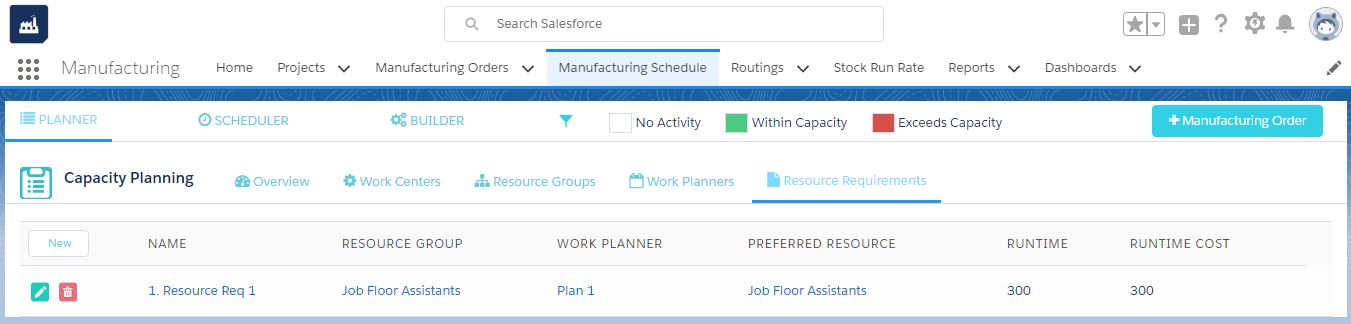
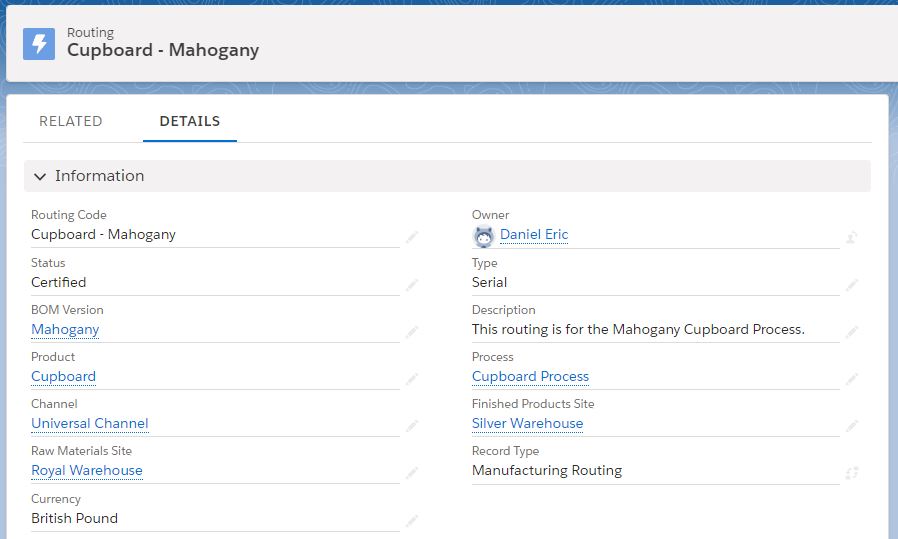
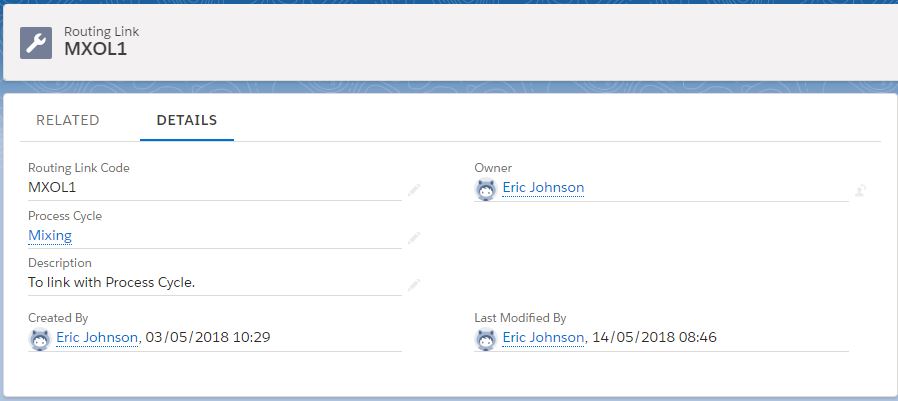
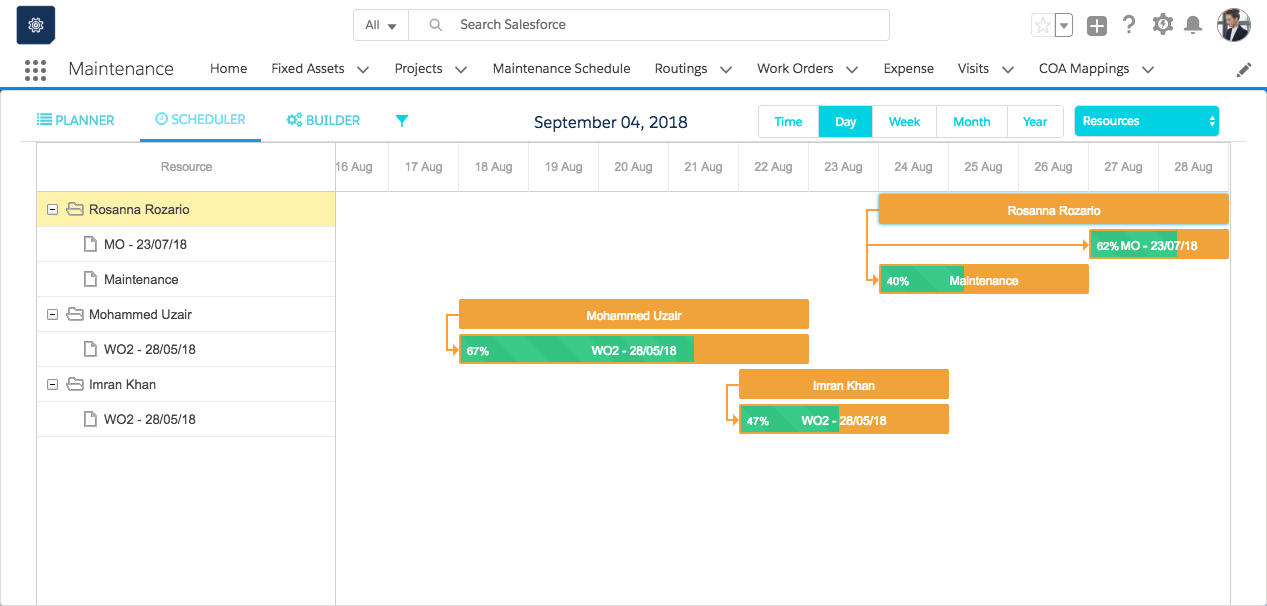
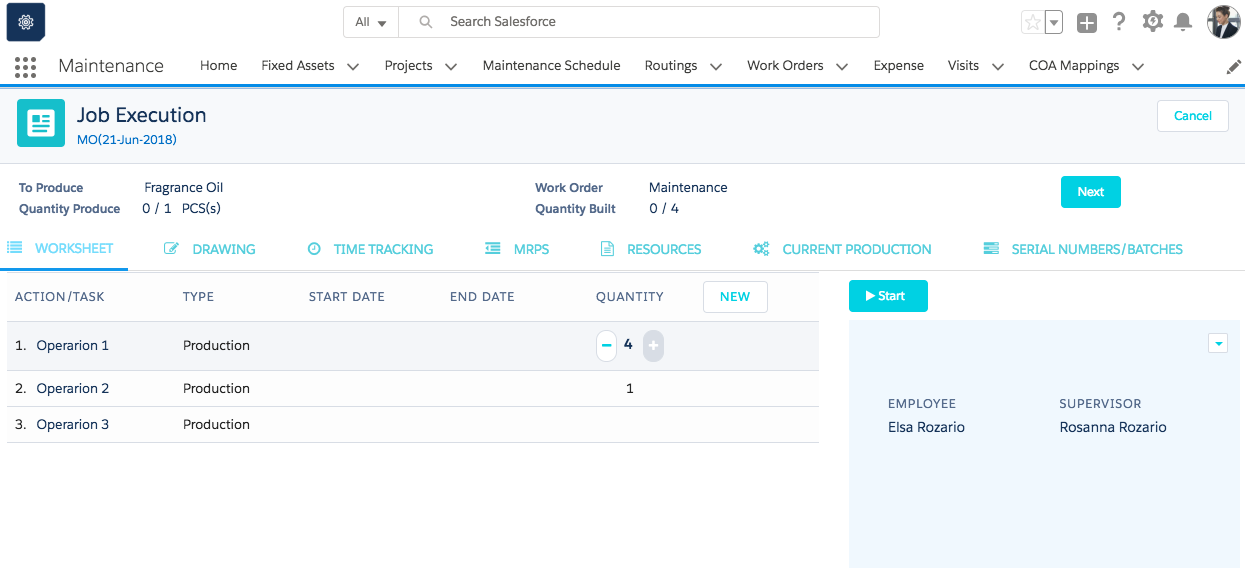

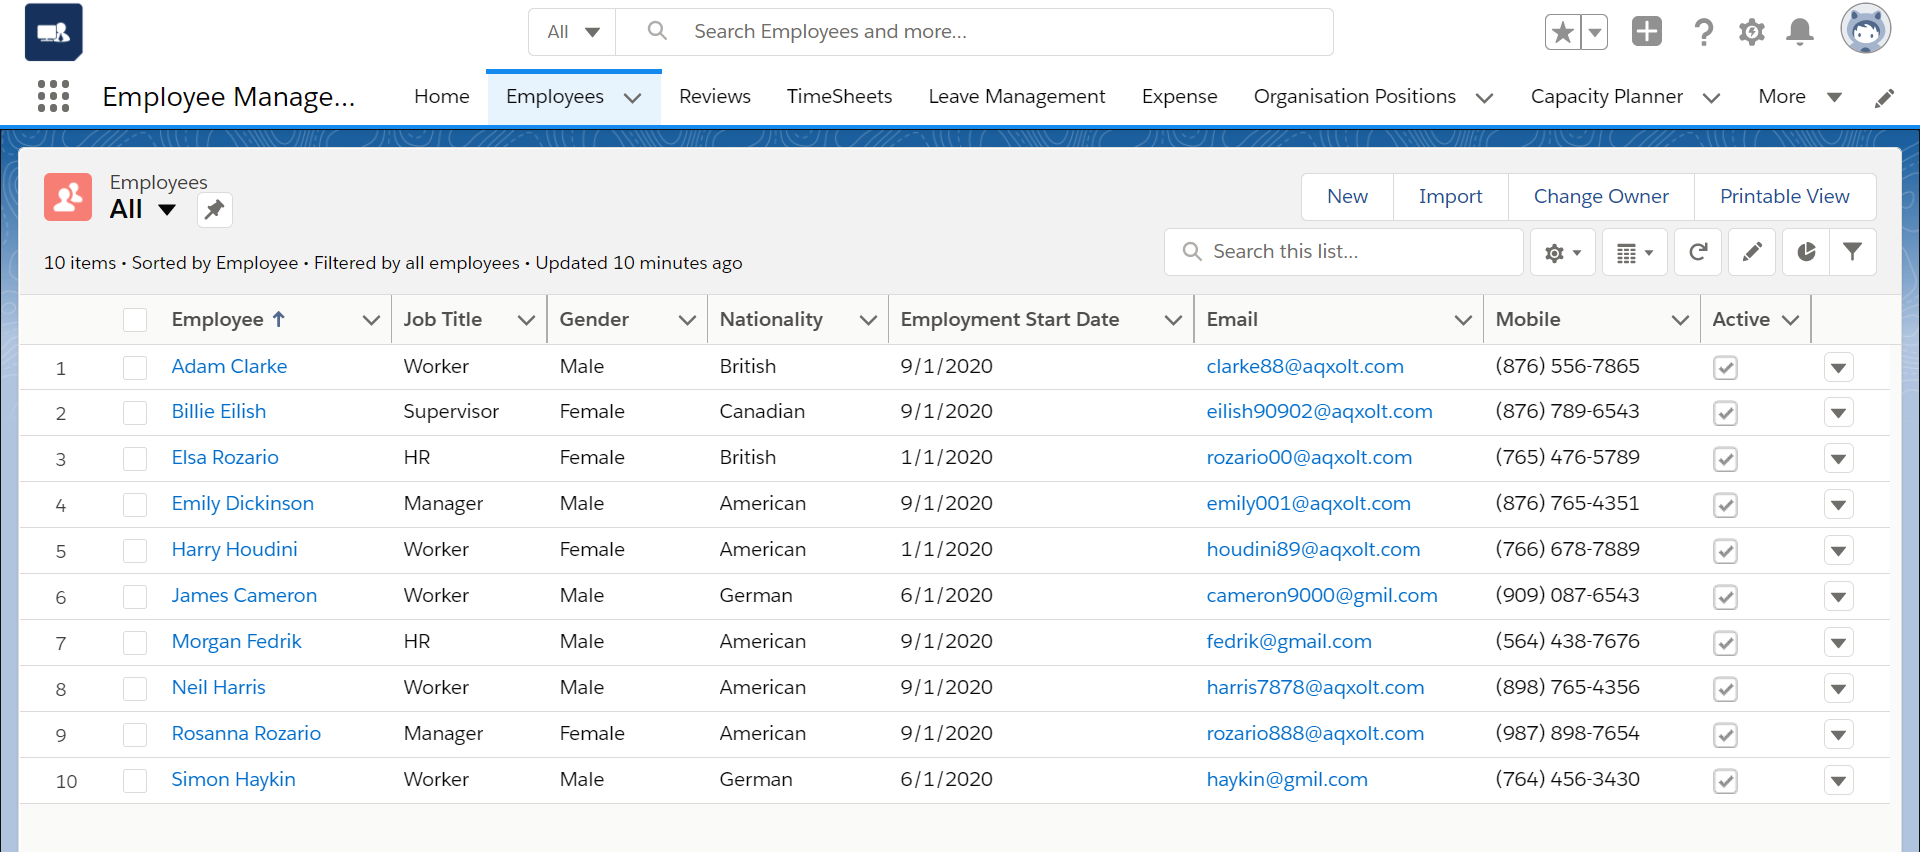 2. Select the employee for whom a Leave request needs to be created from the list of employees
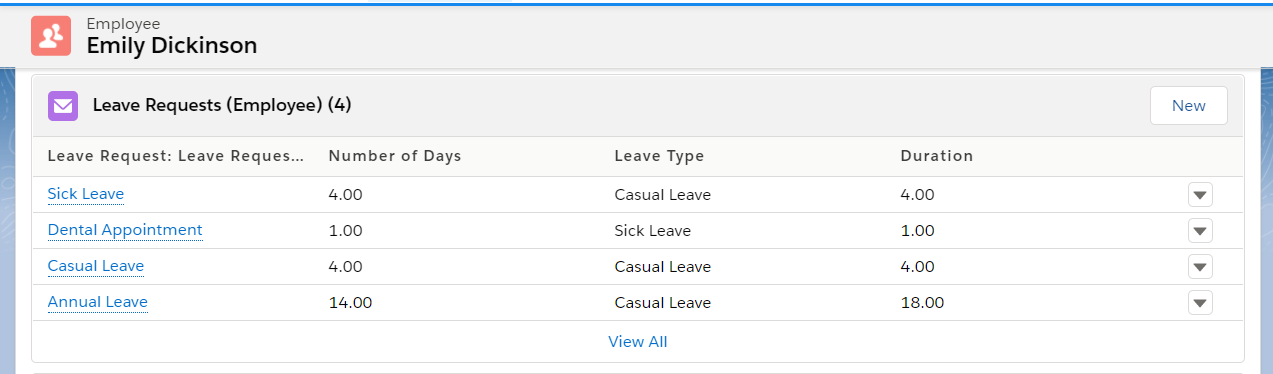
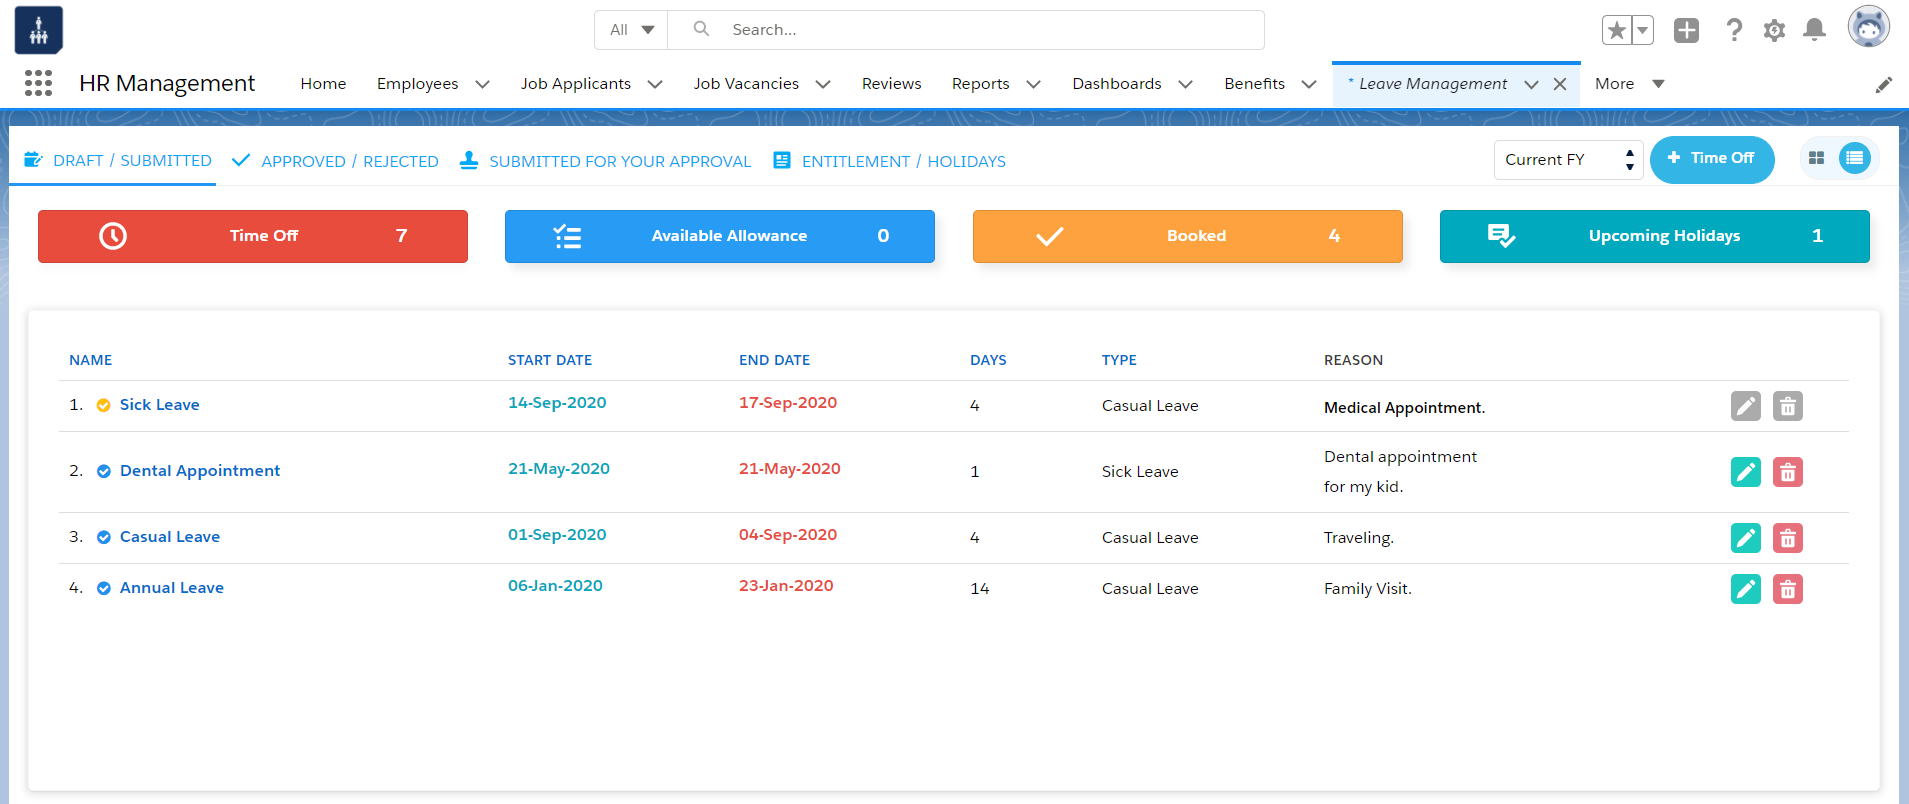 Grid View:
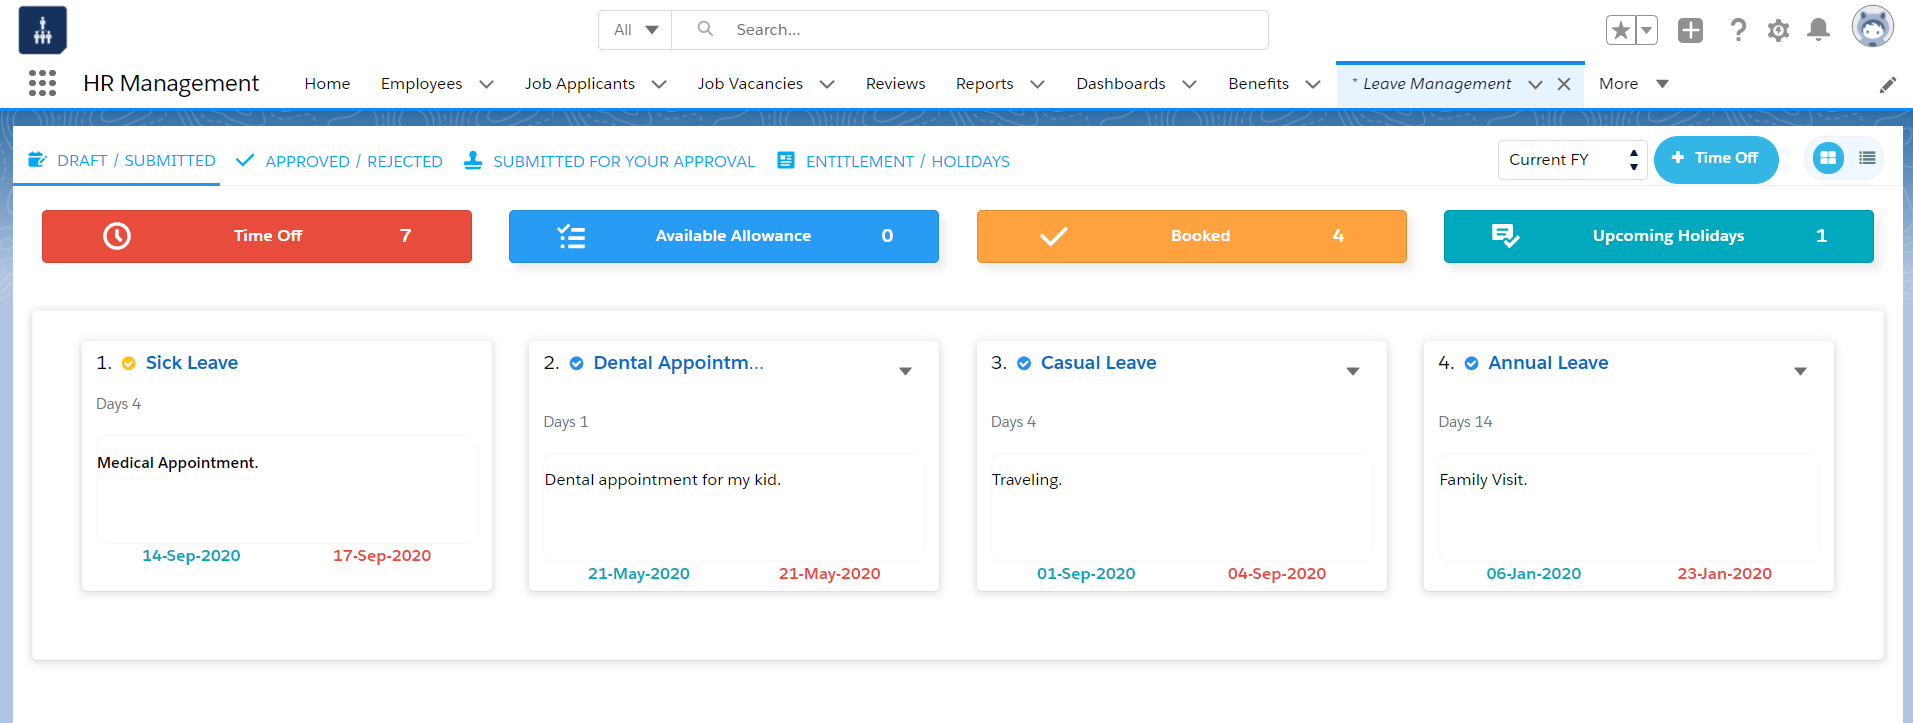 Fields to Note:
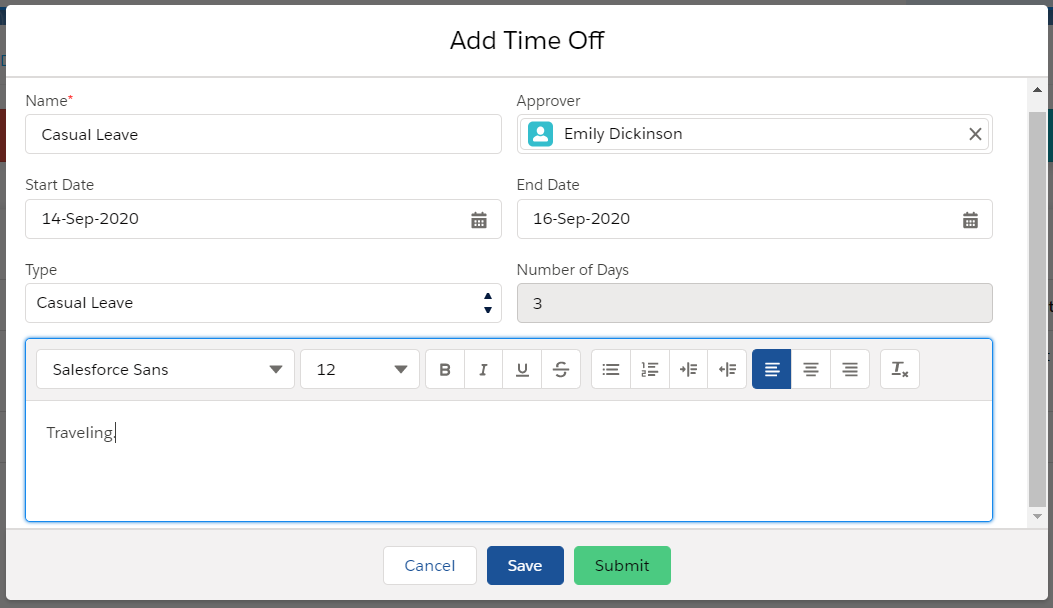
 Submitted for your Approval
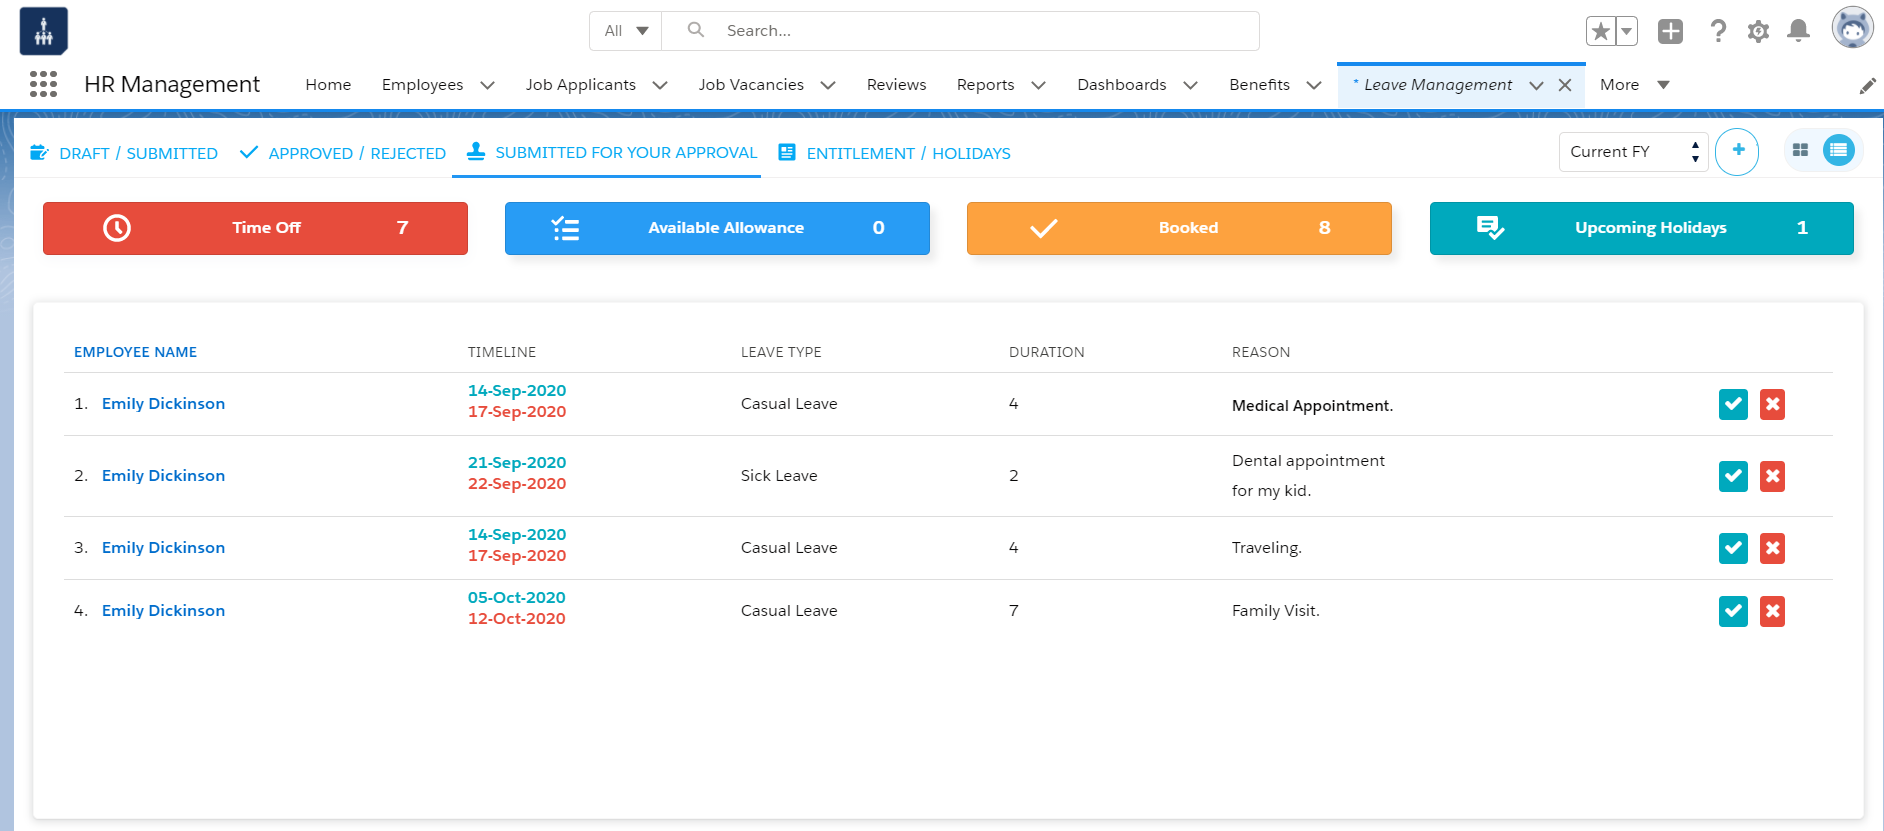 Leave Entitlement
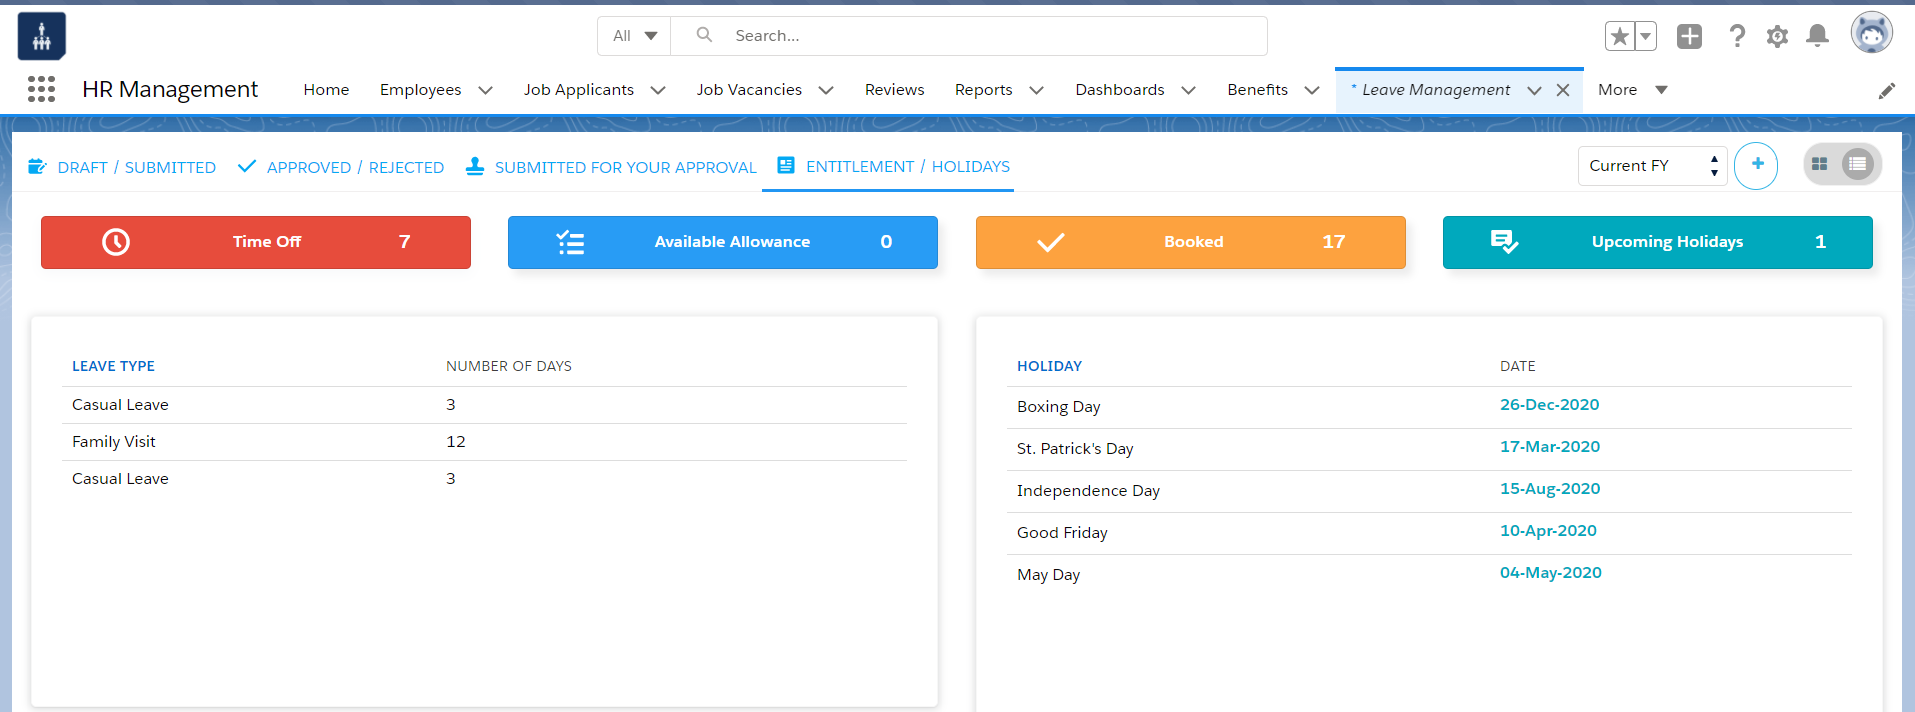

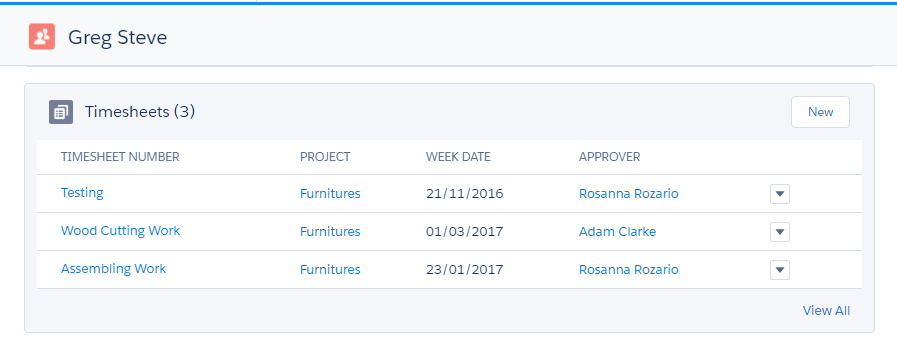
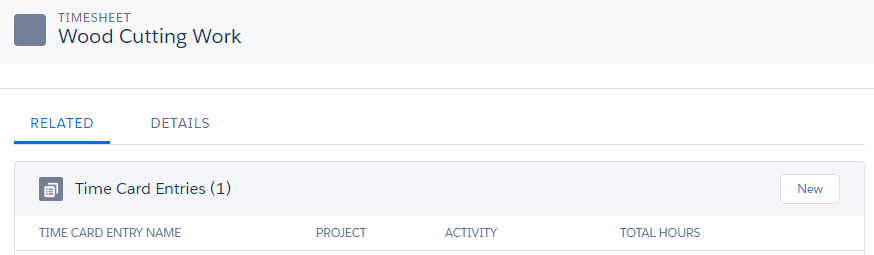
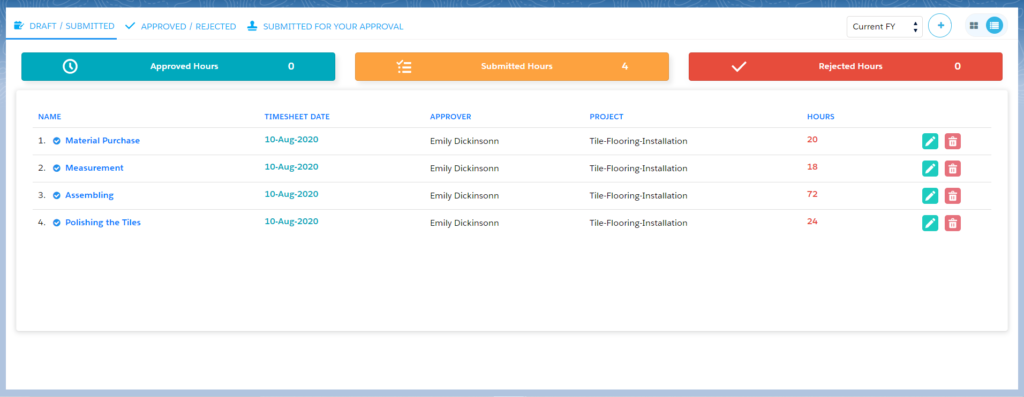
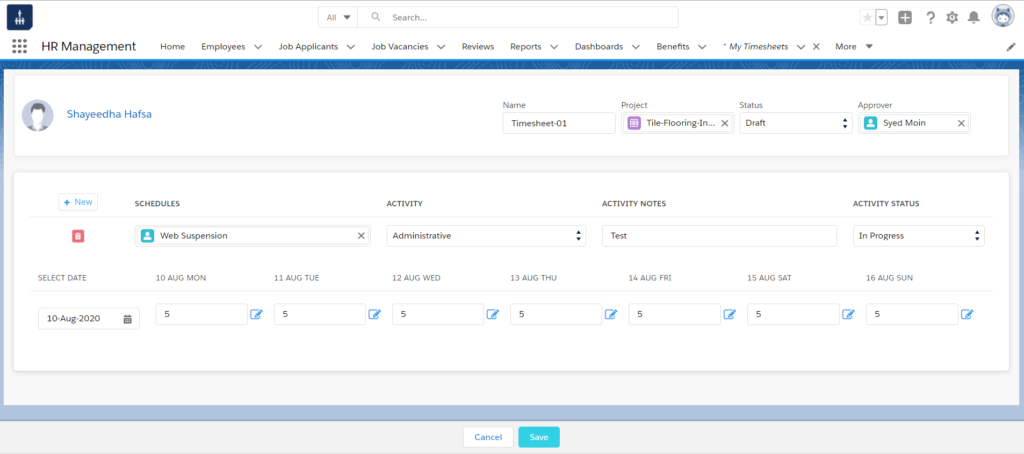
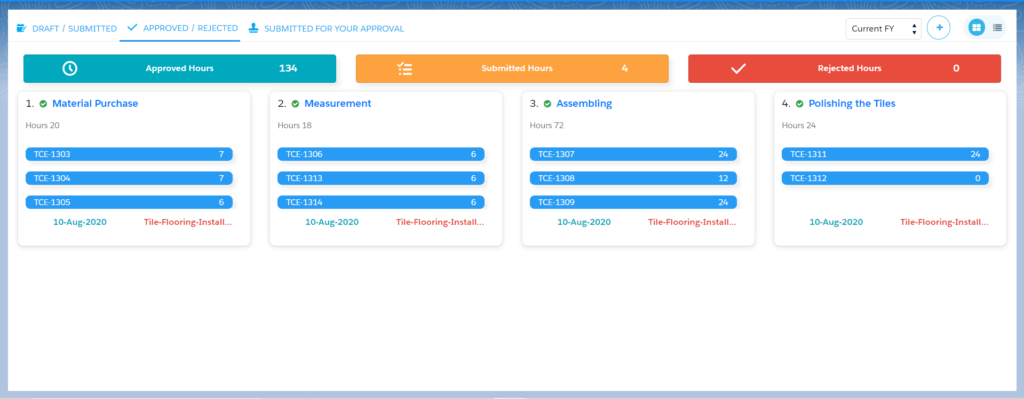
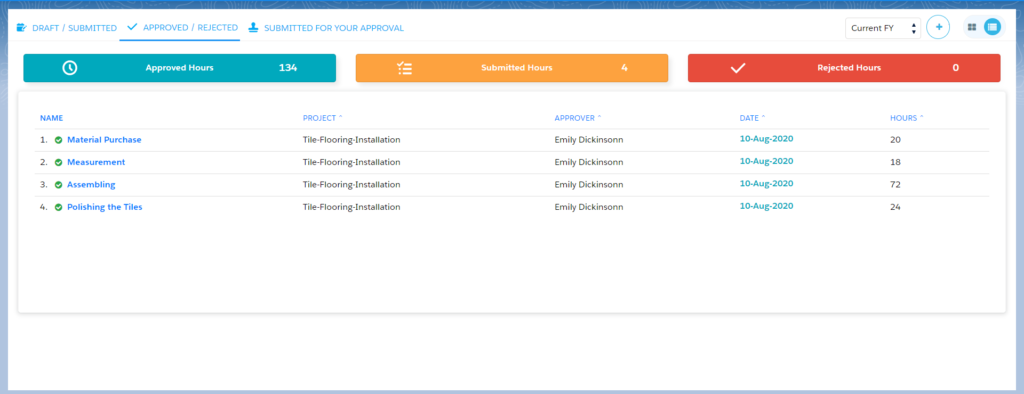

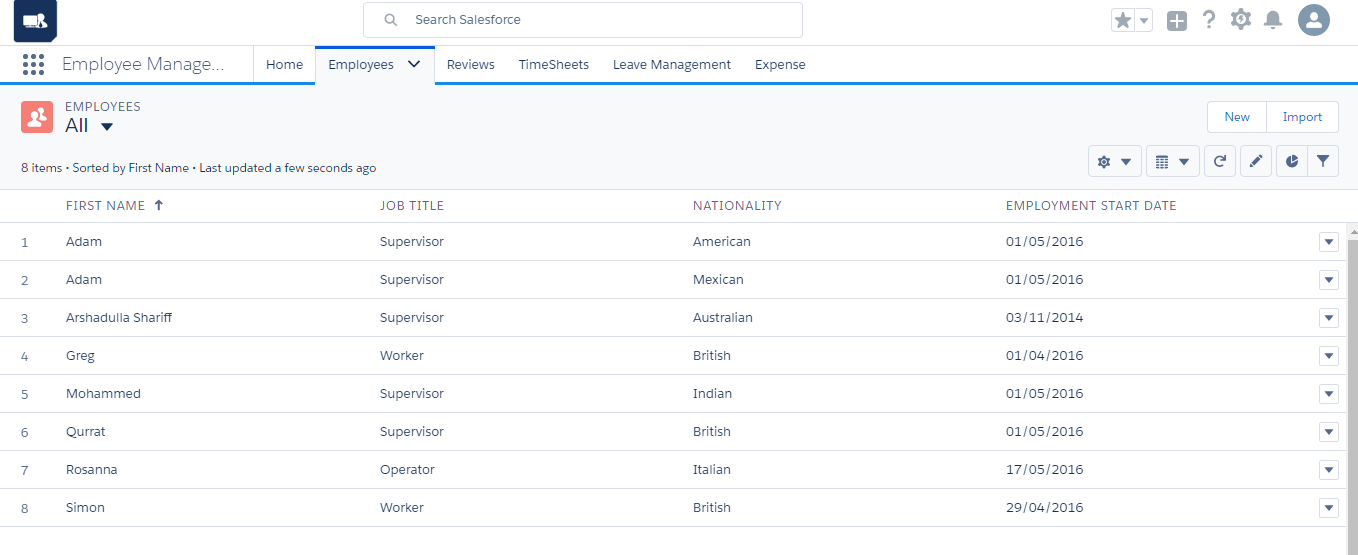

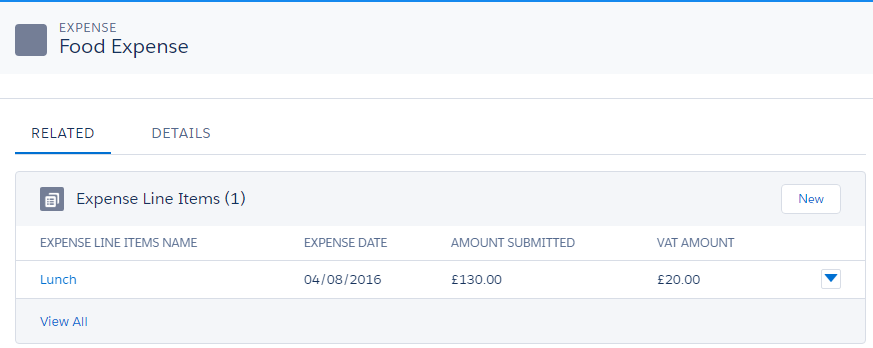
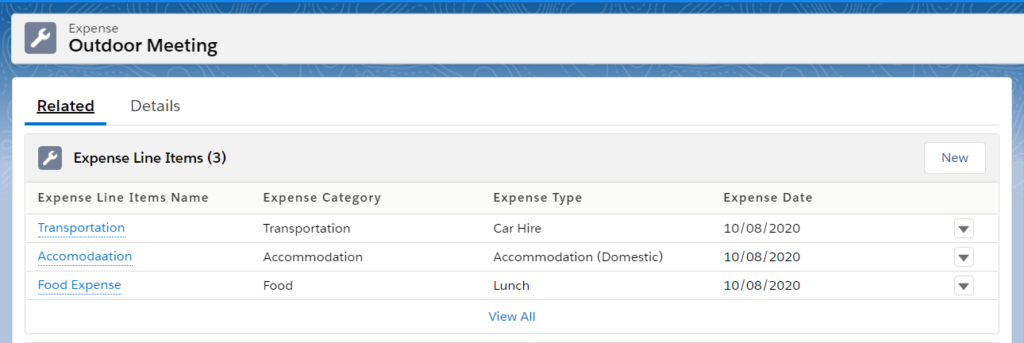

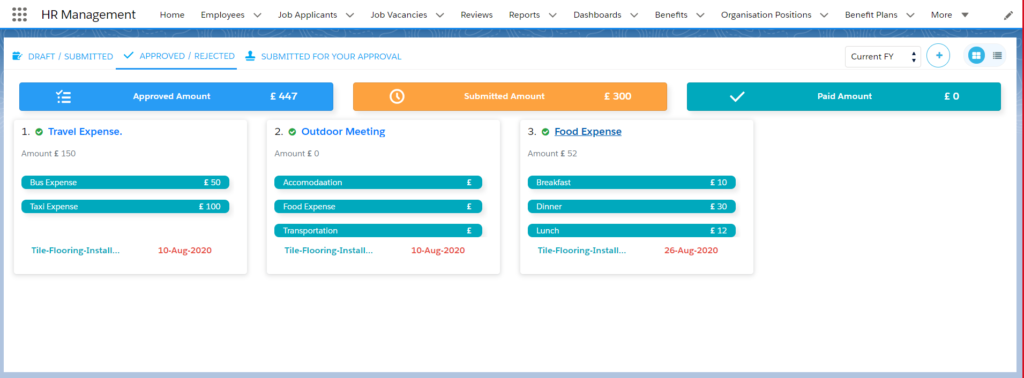

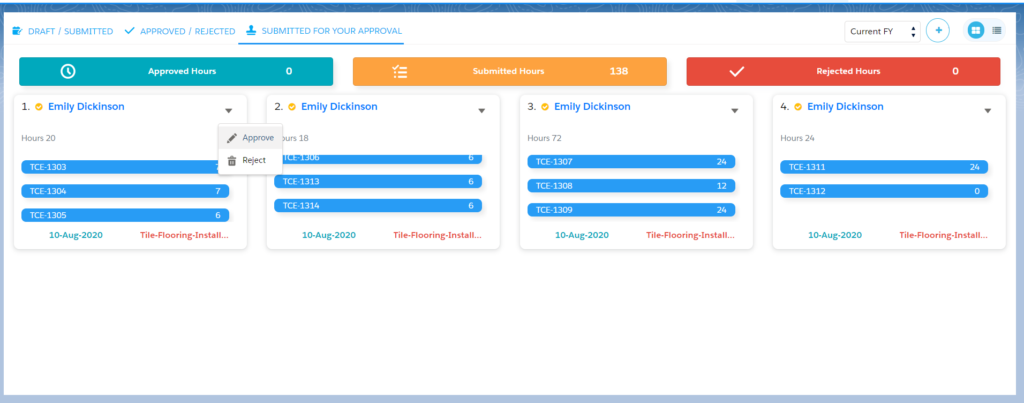
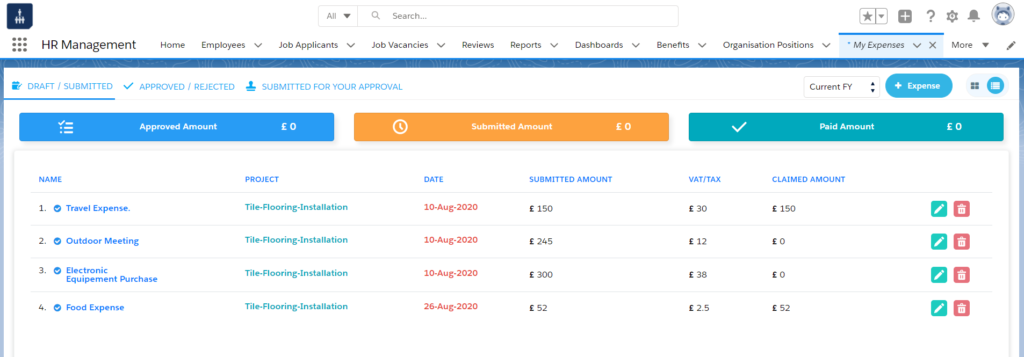
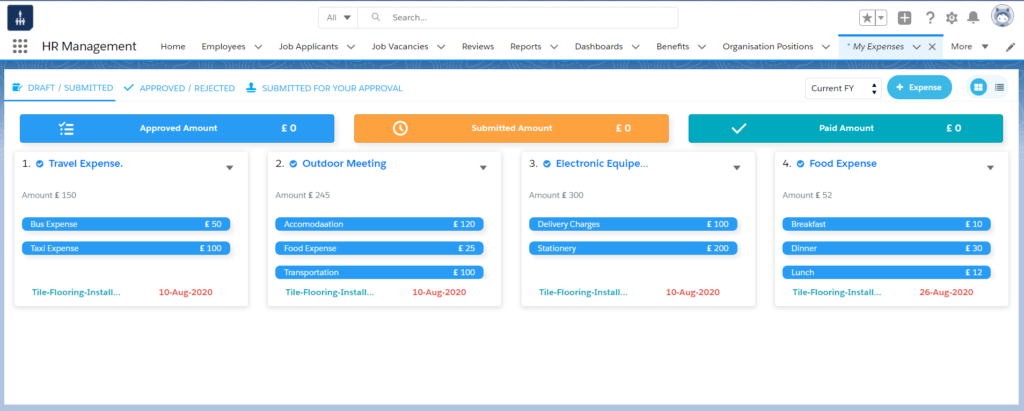
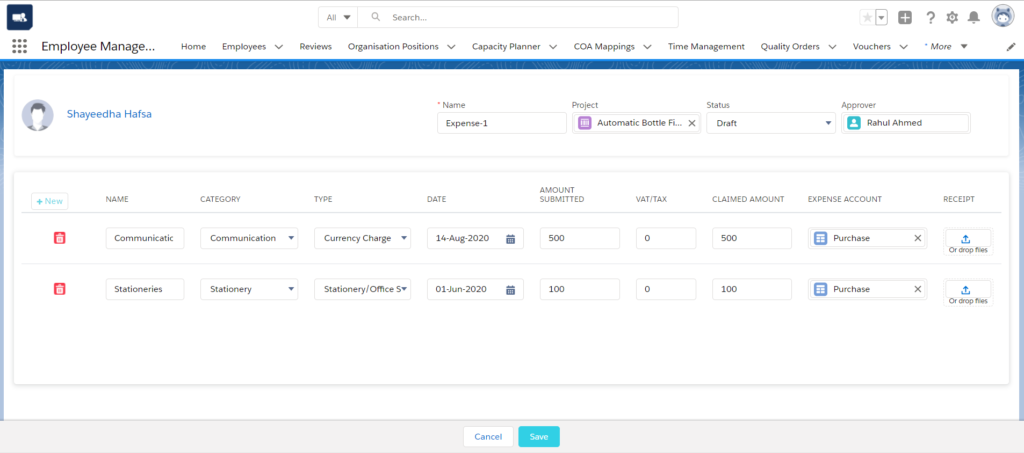

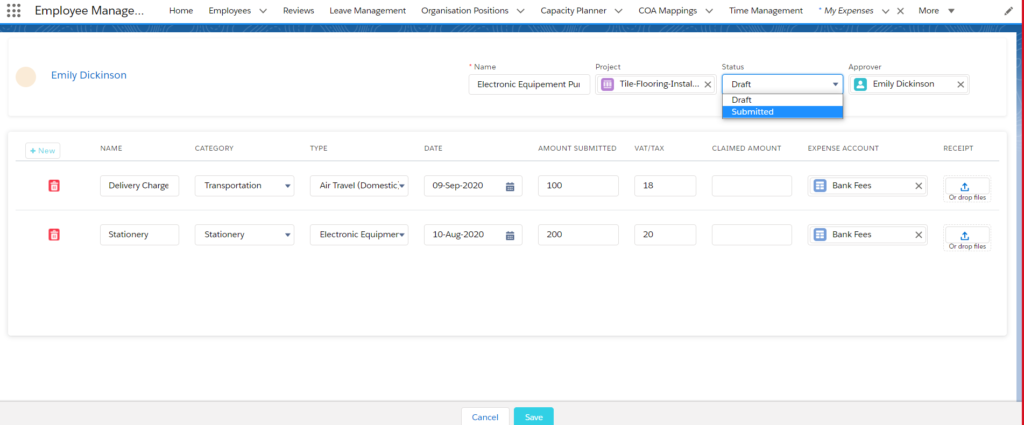
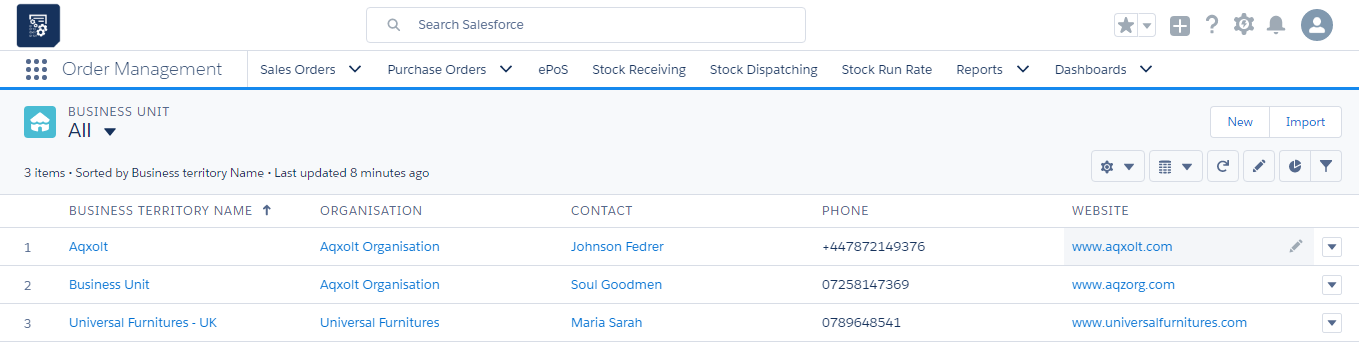
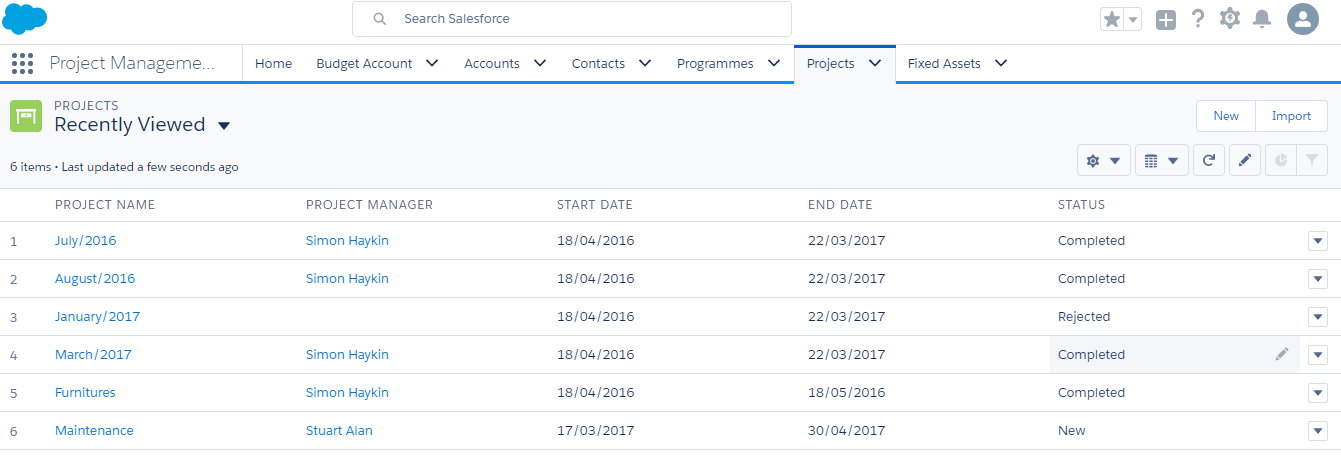
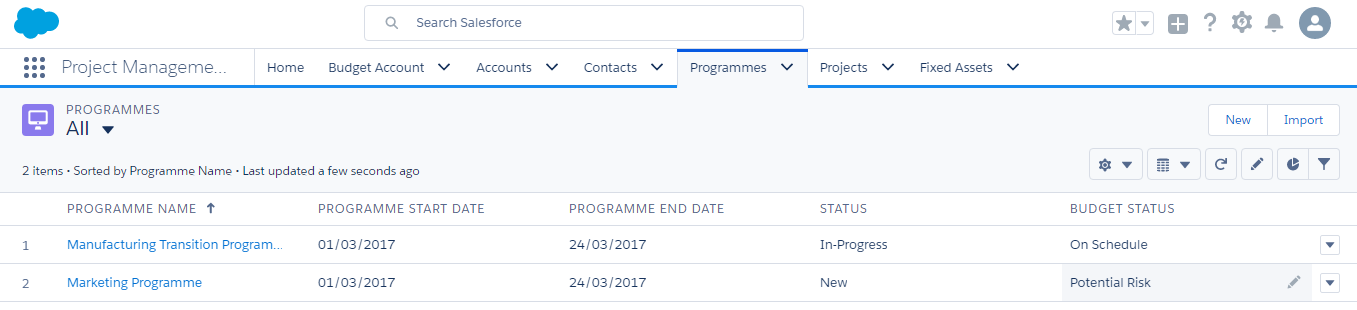
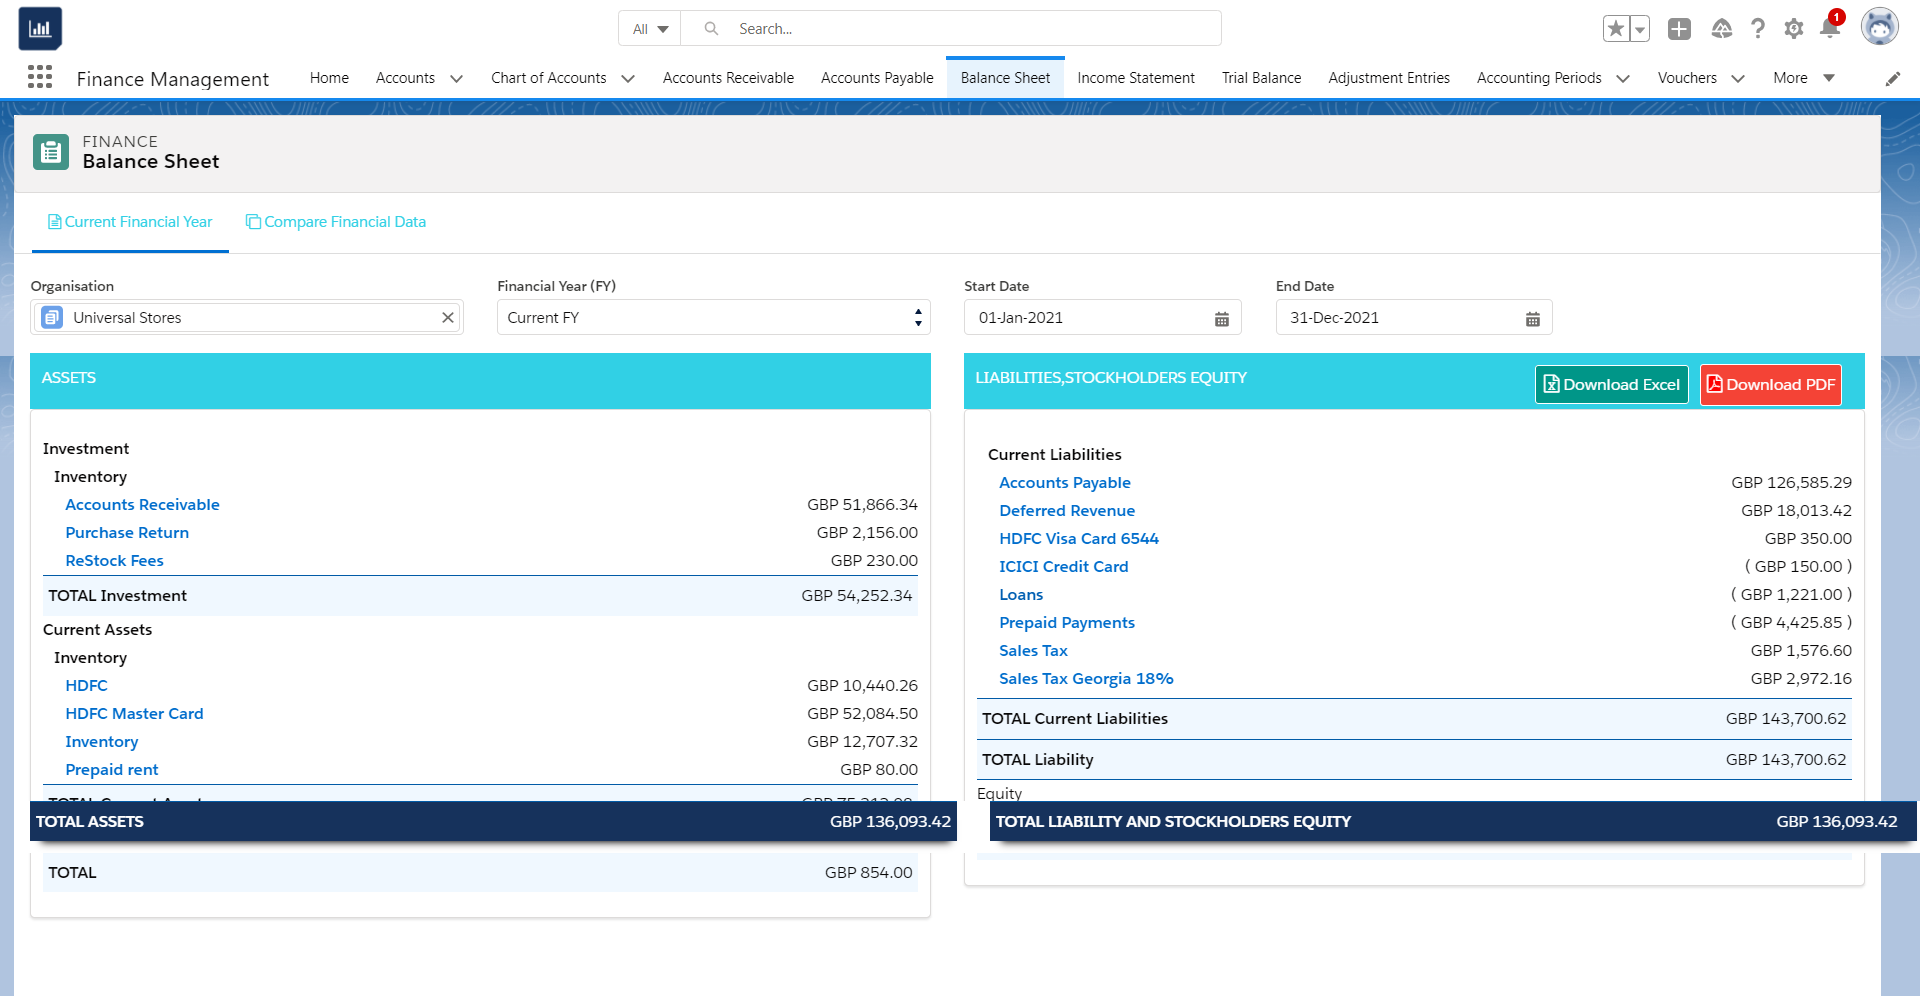
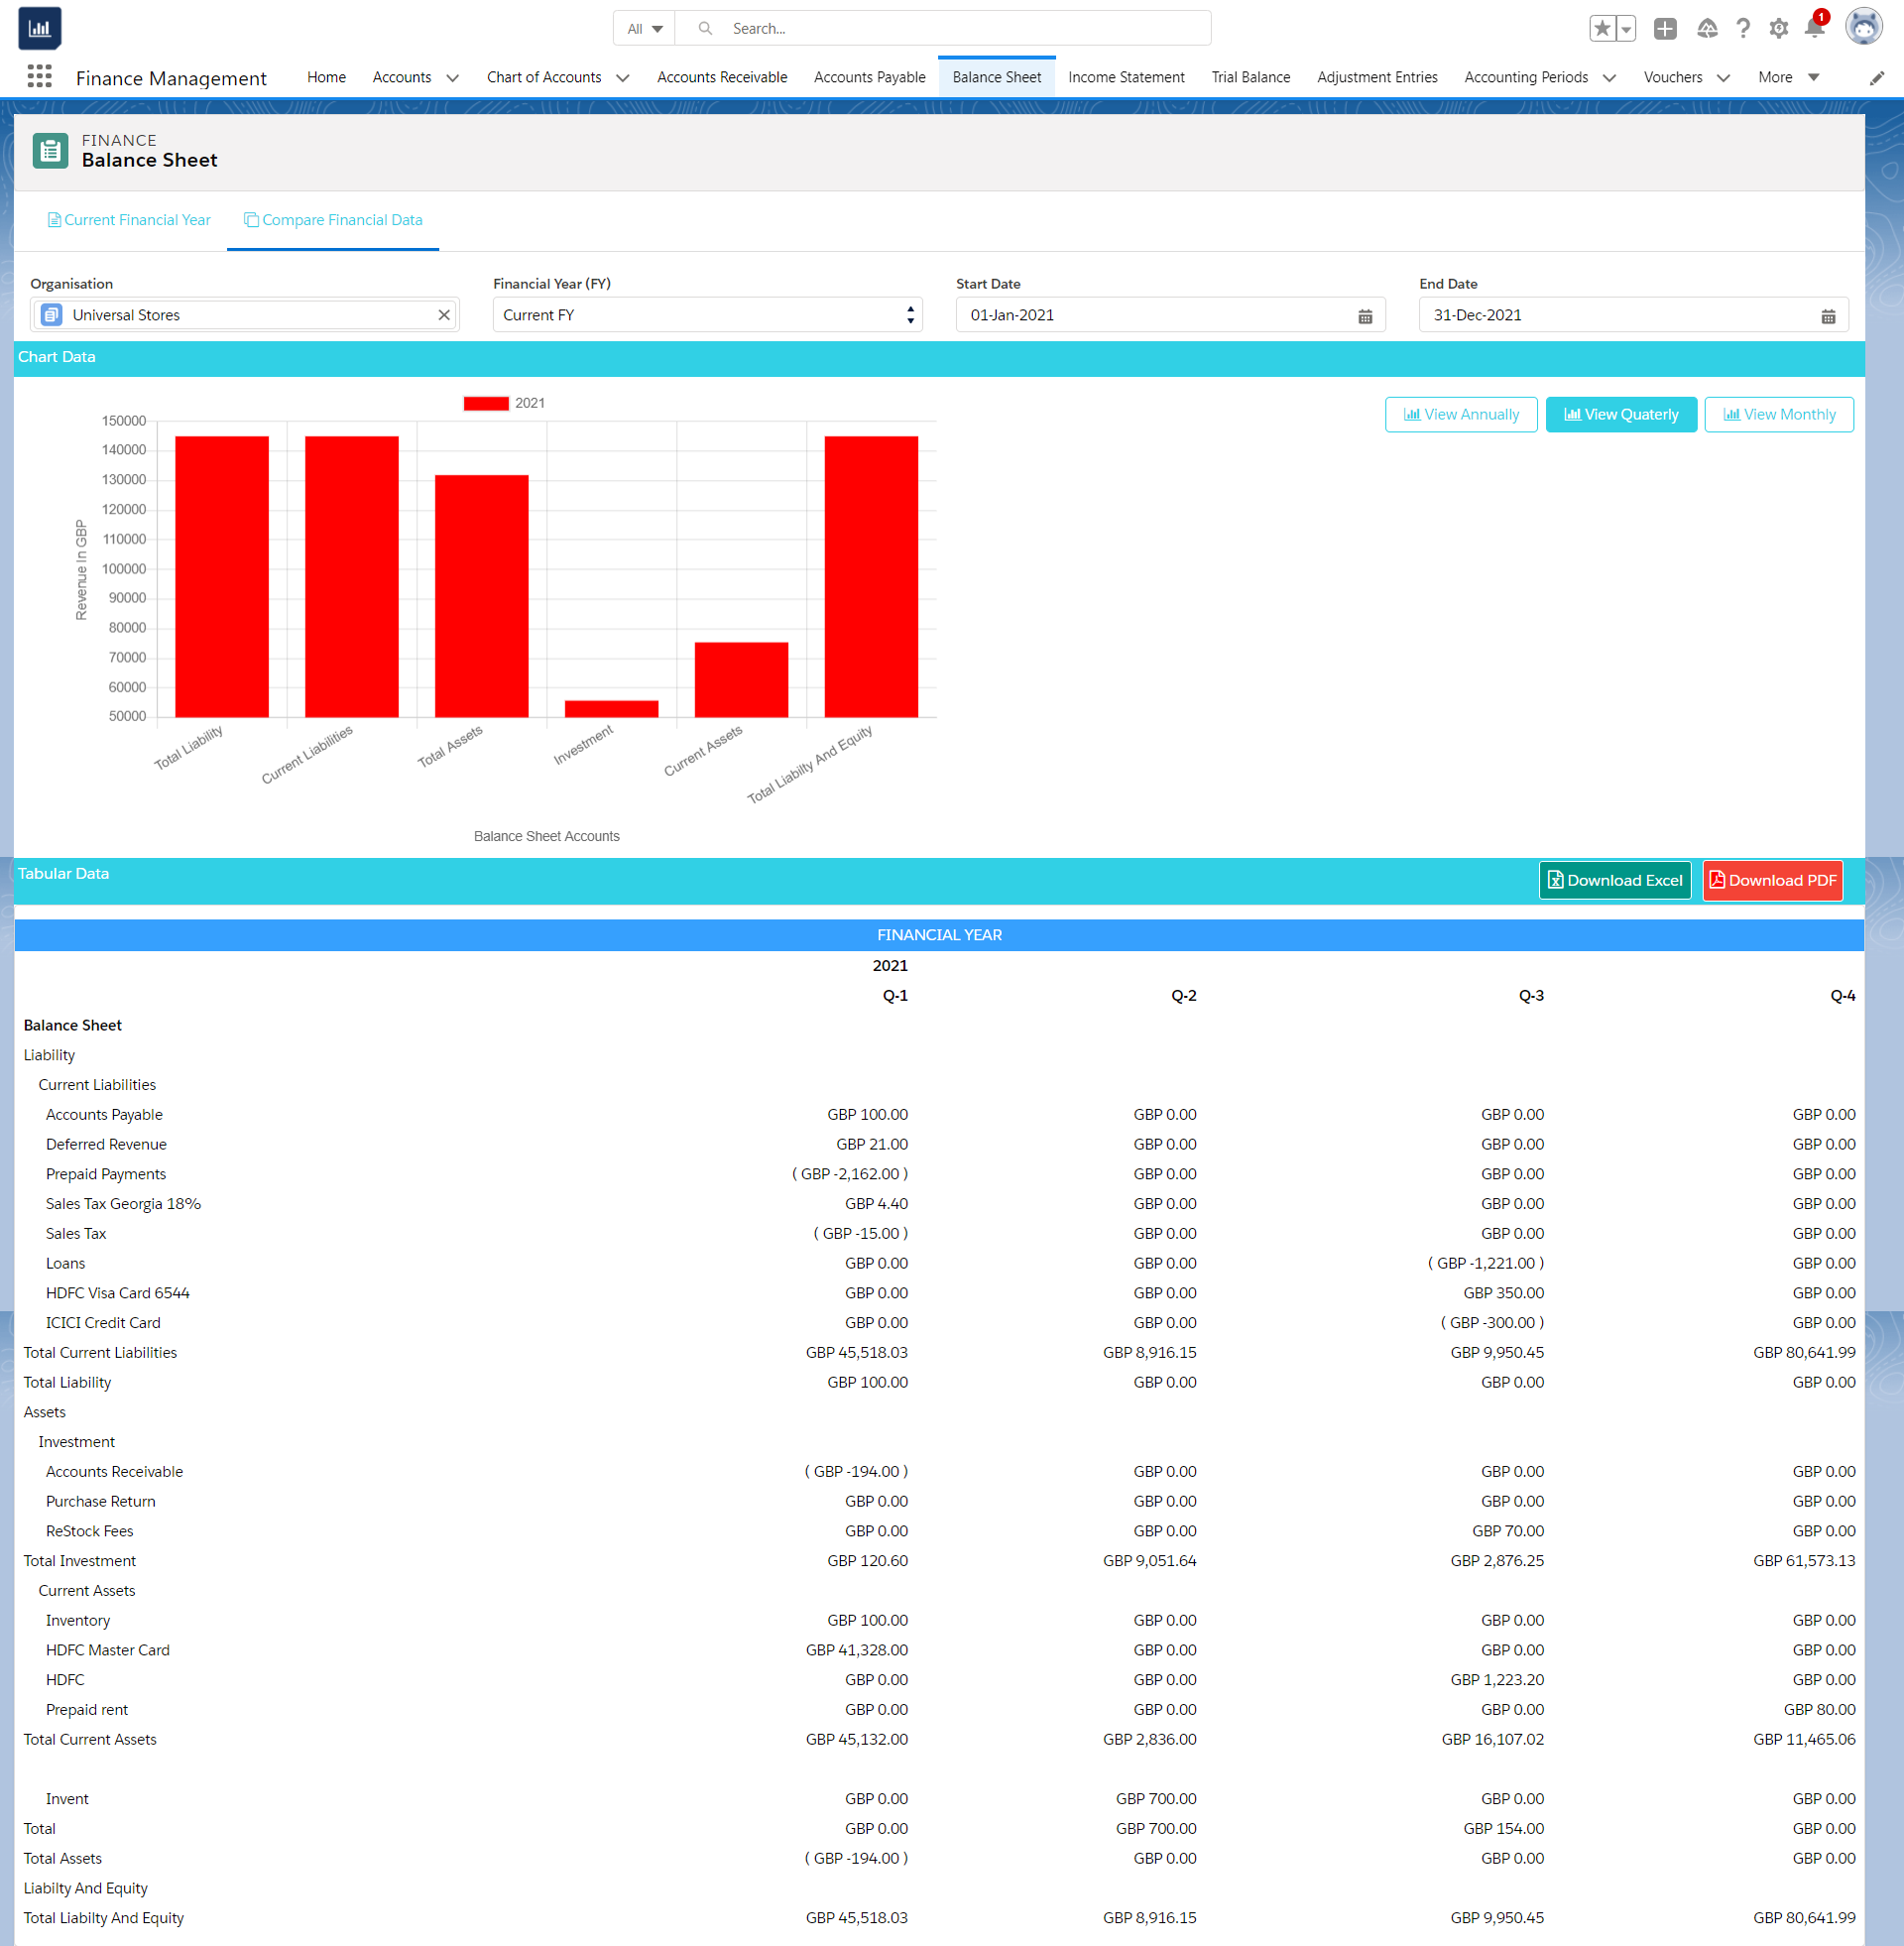


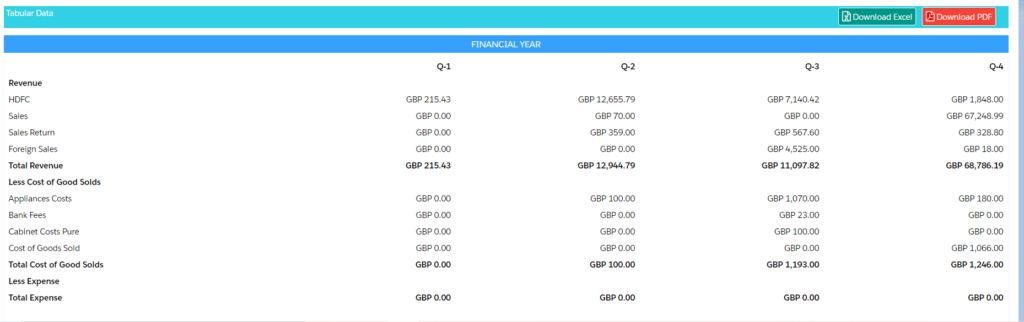

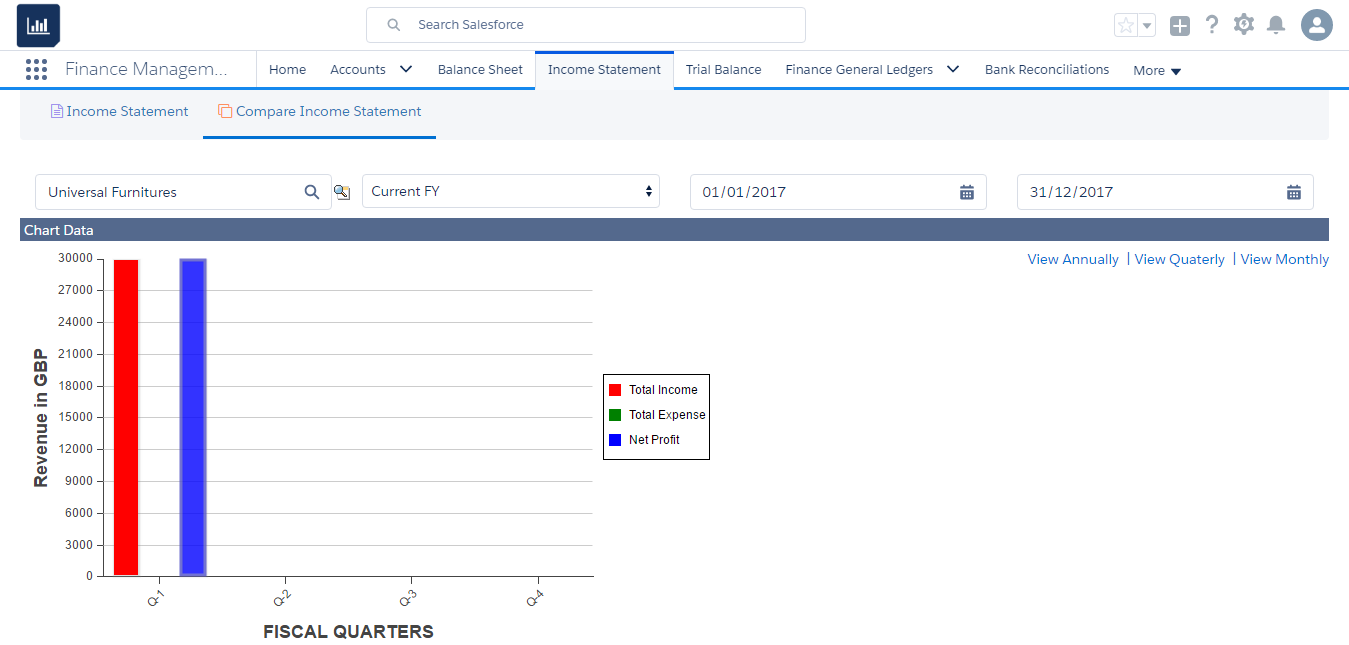
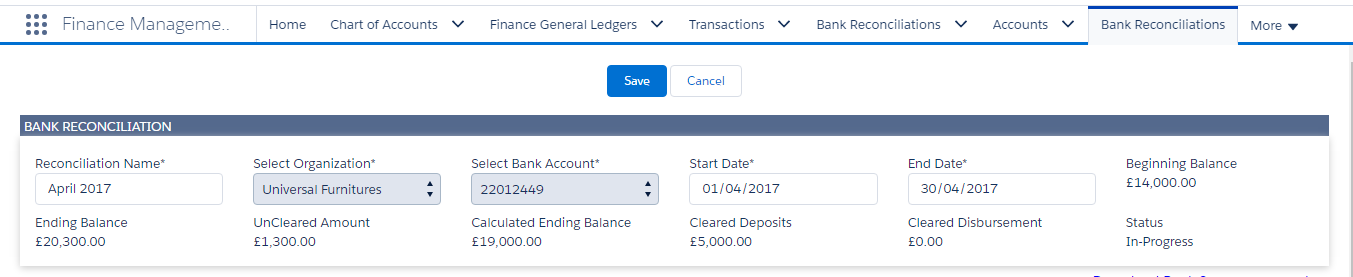
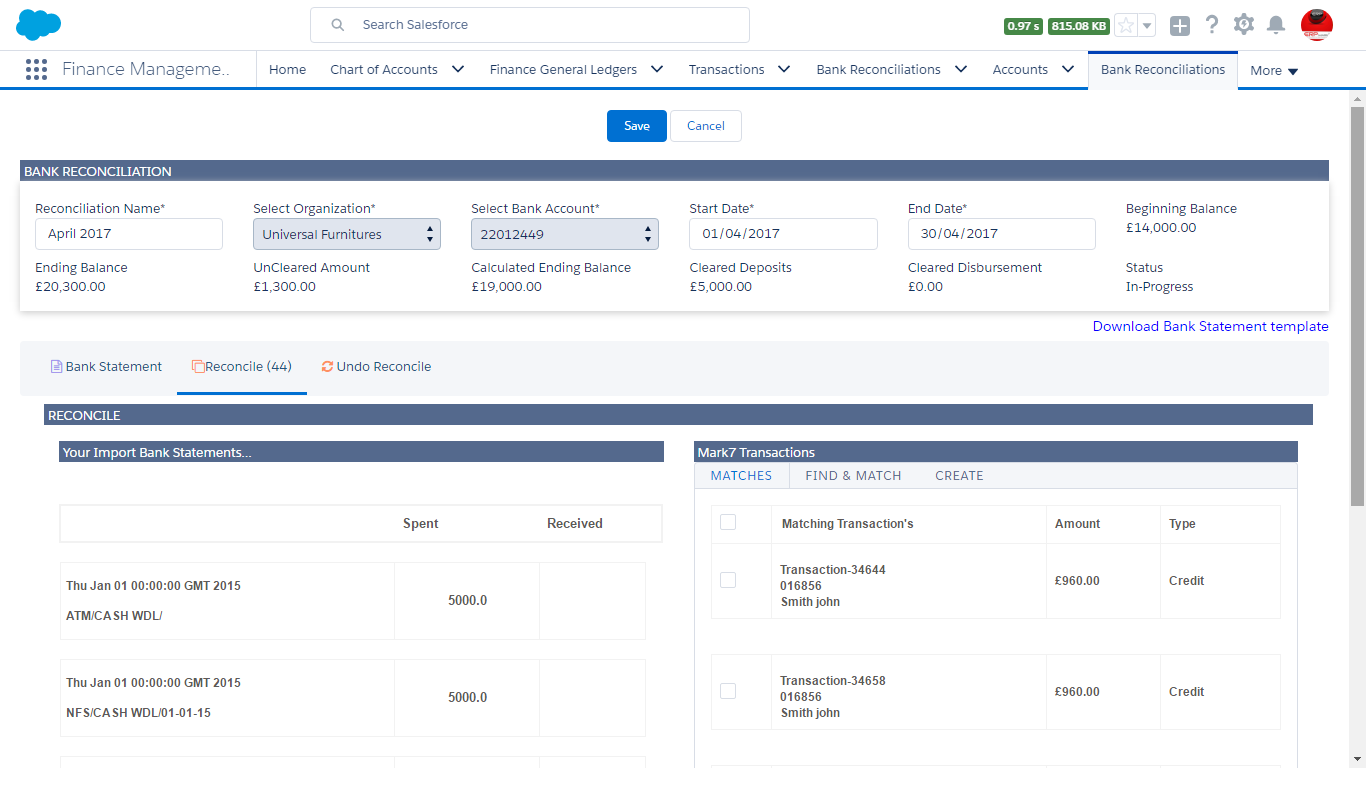
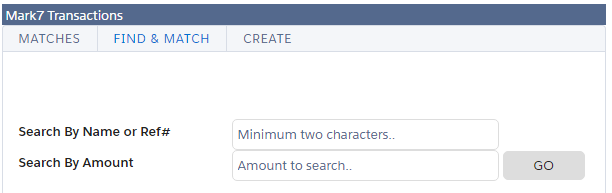
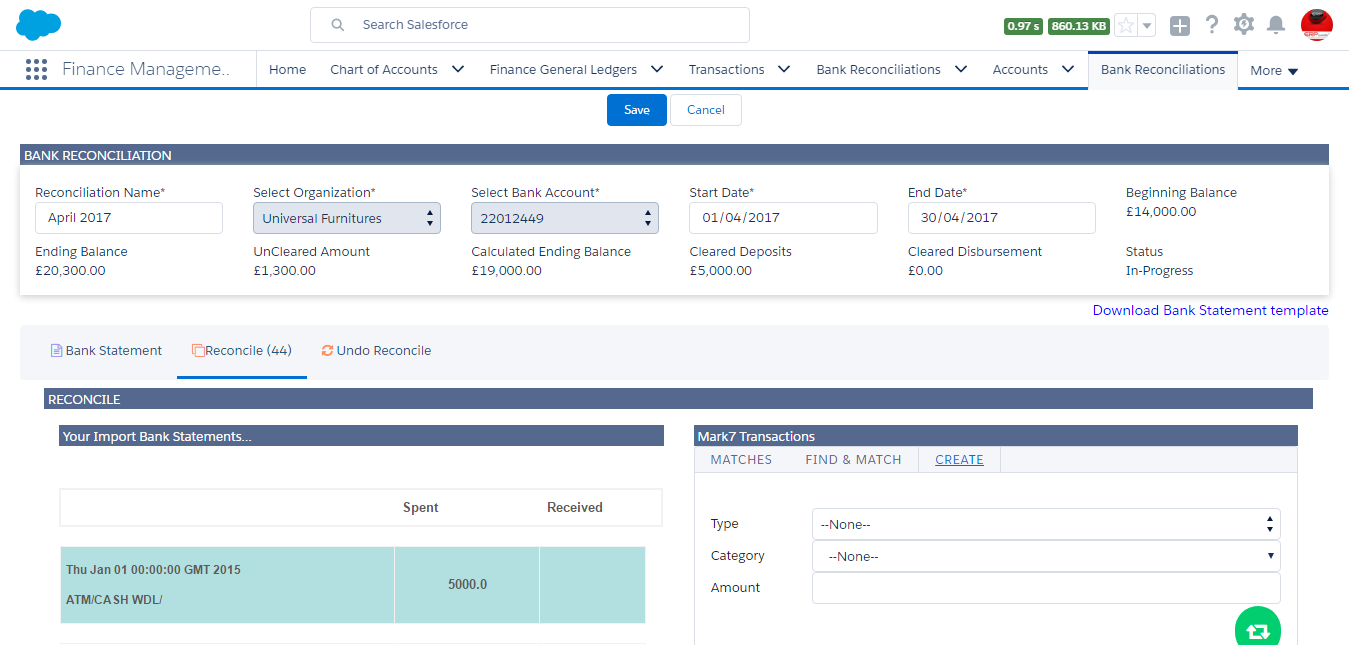
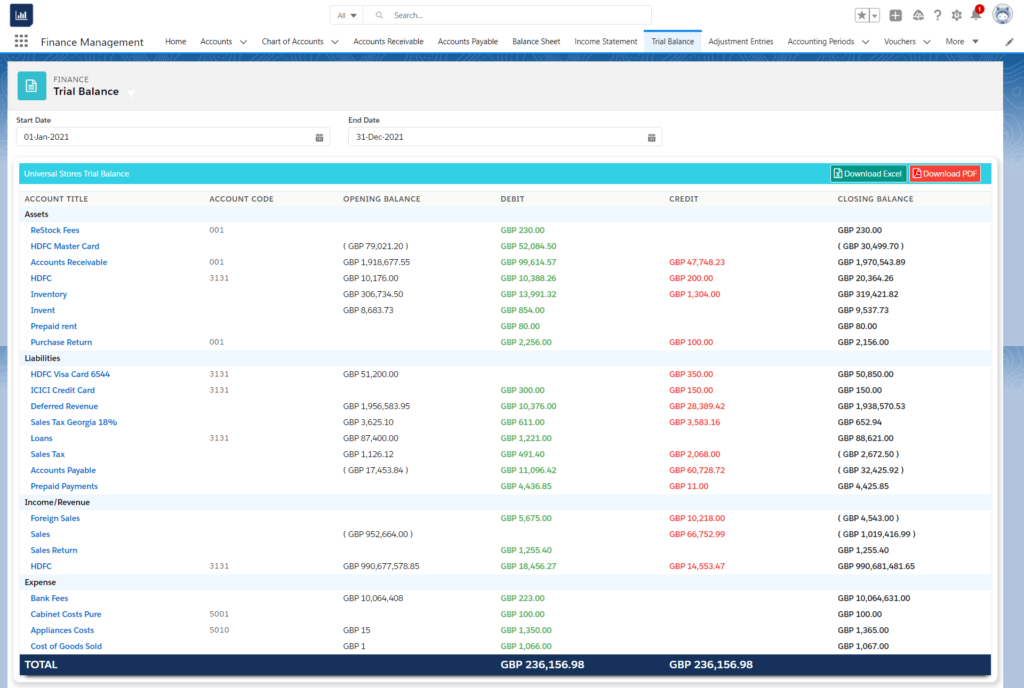
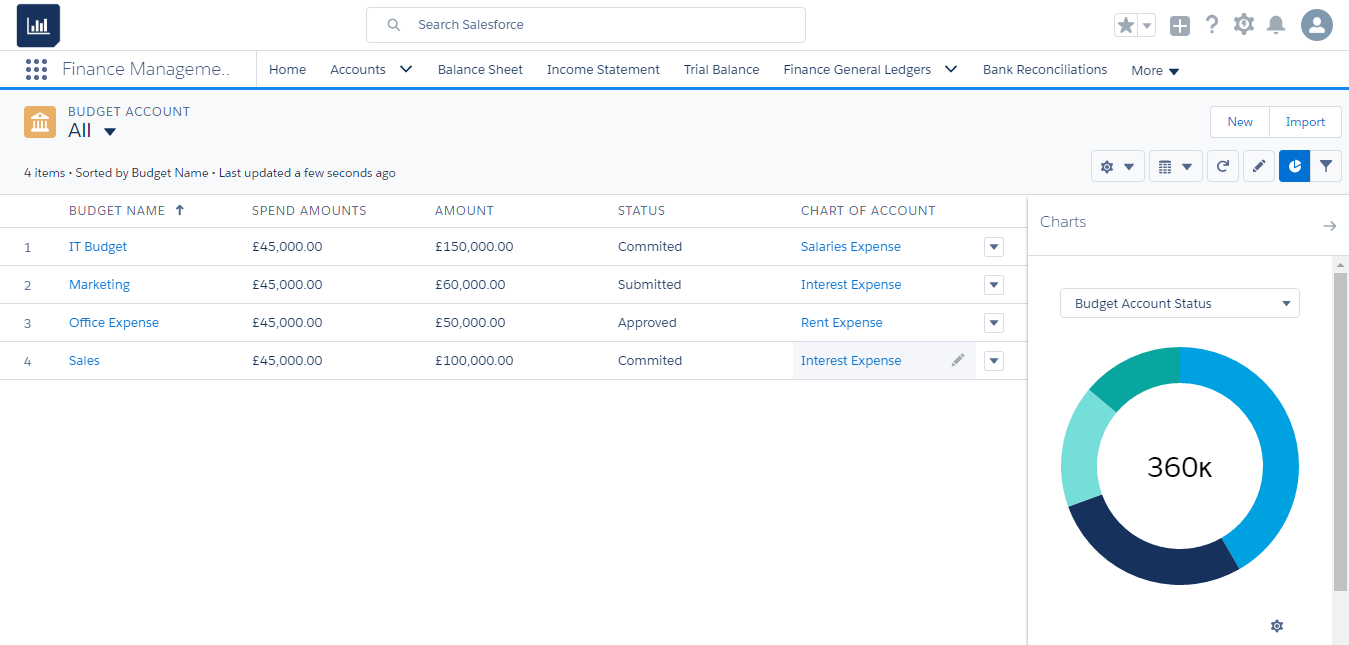


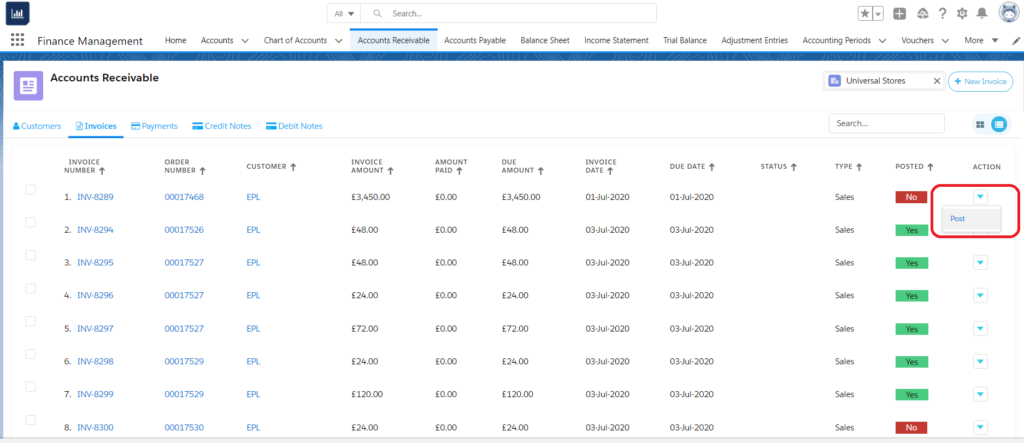

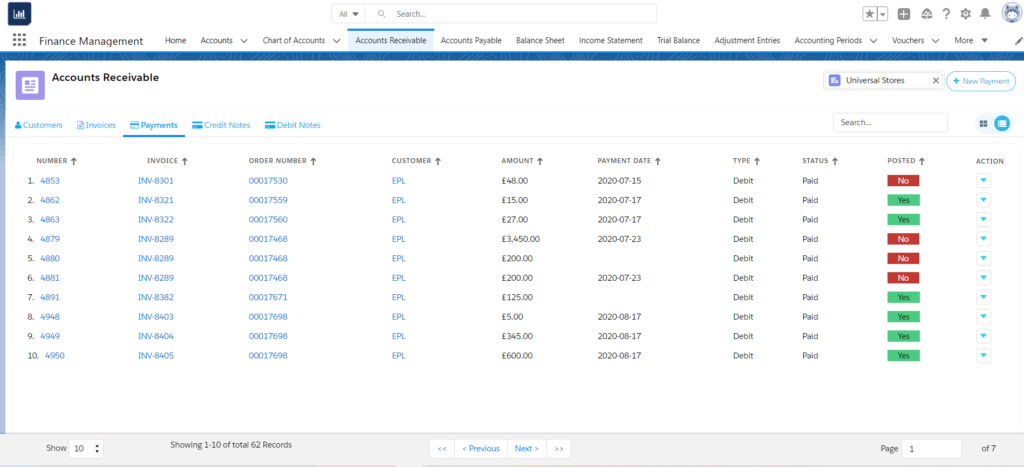
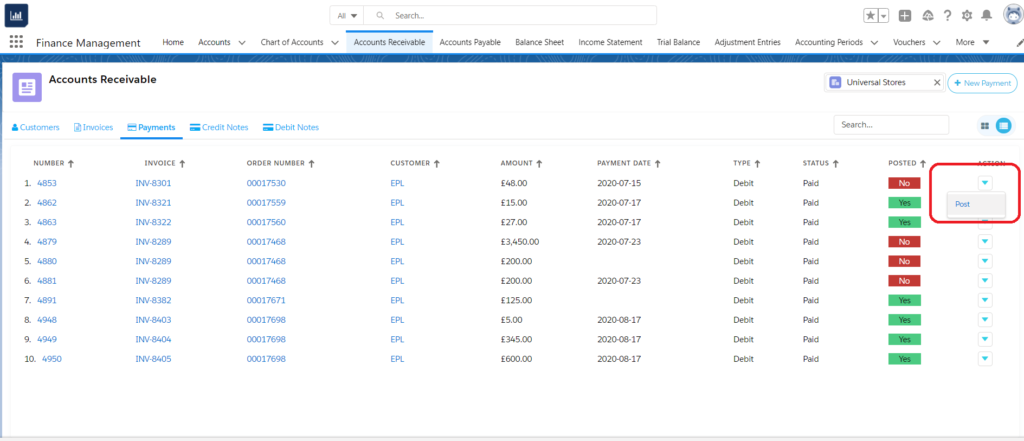
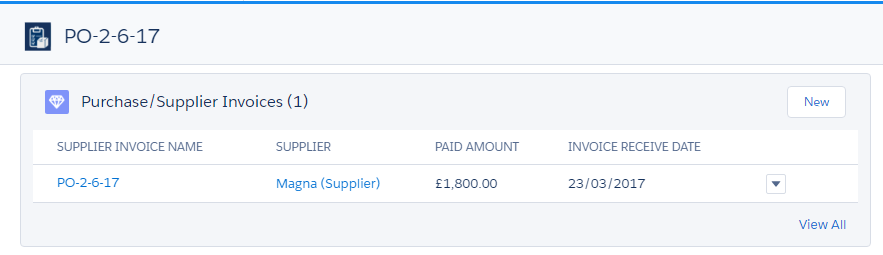
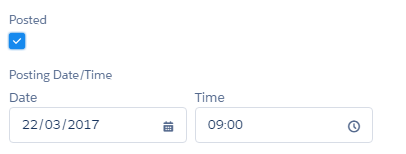


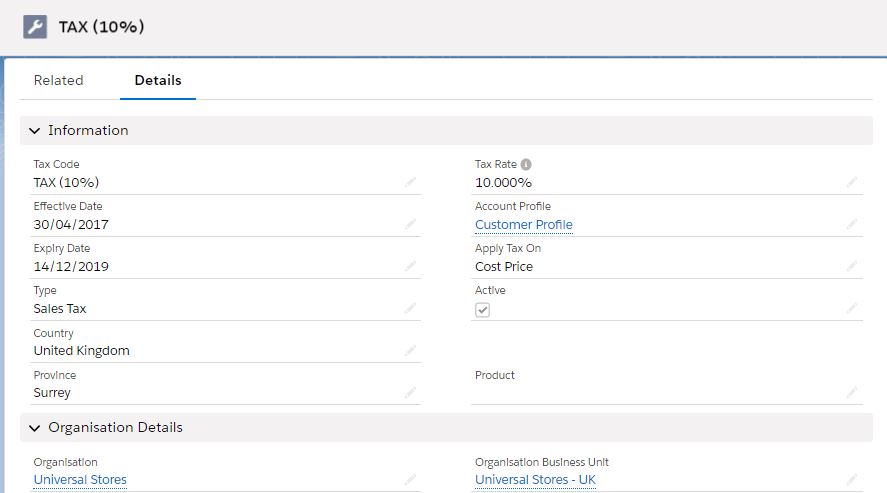
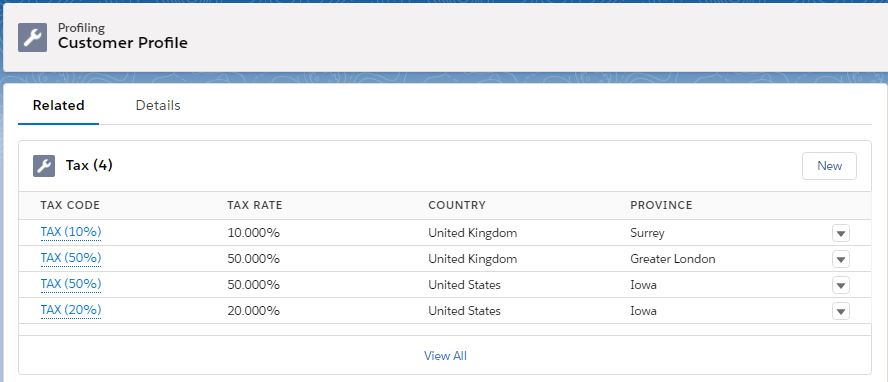
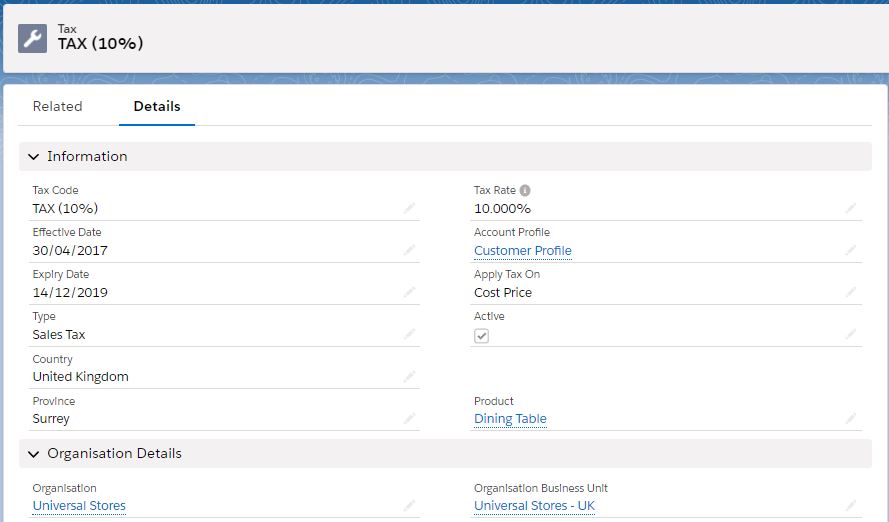
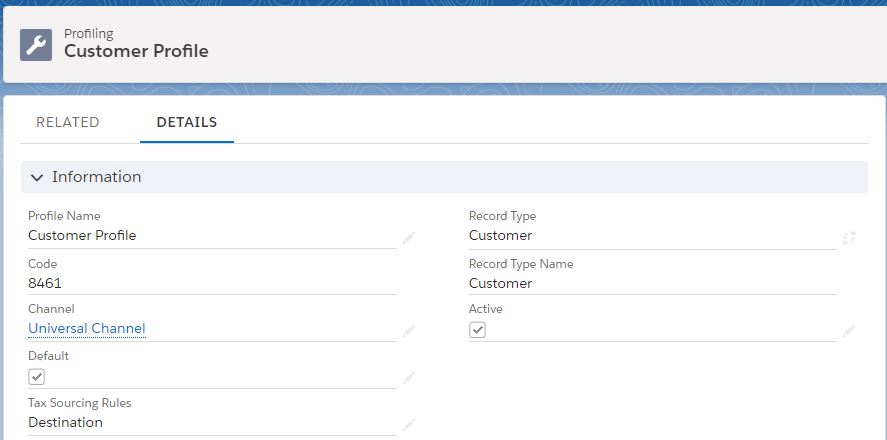


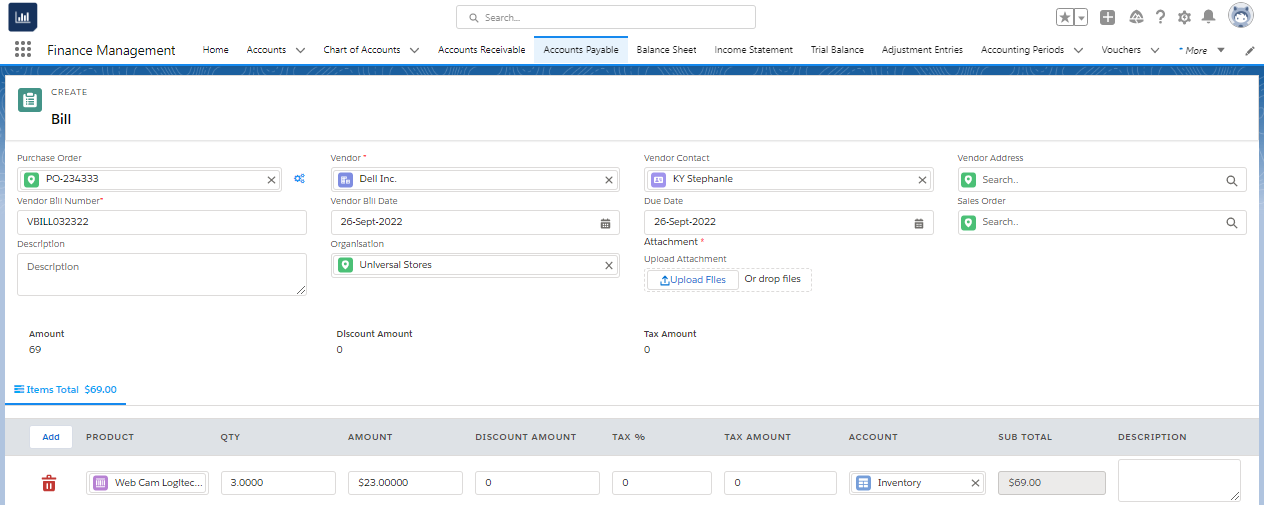

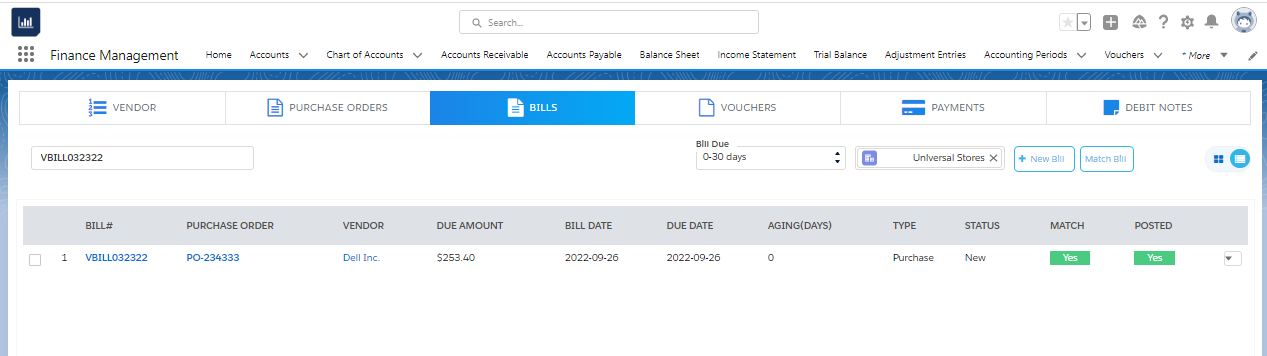
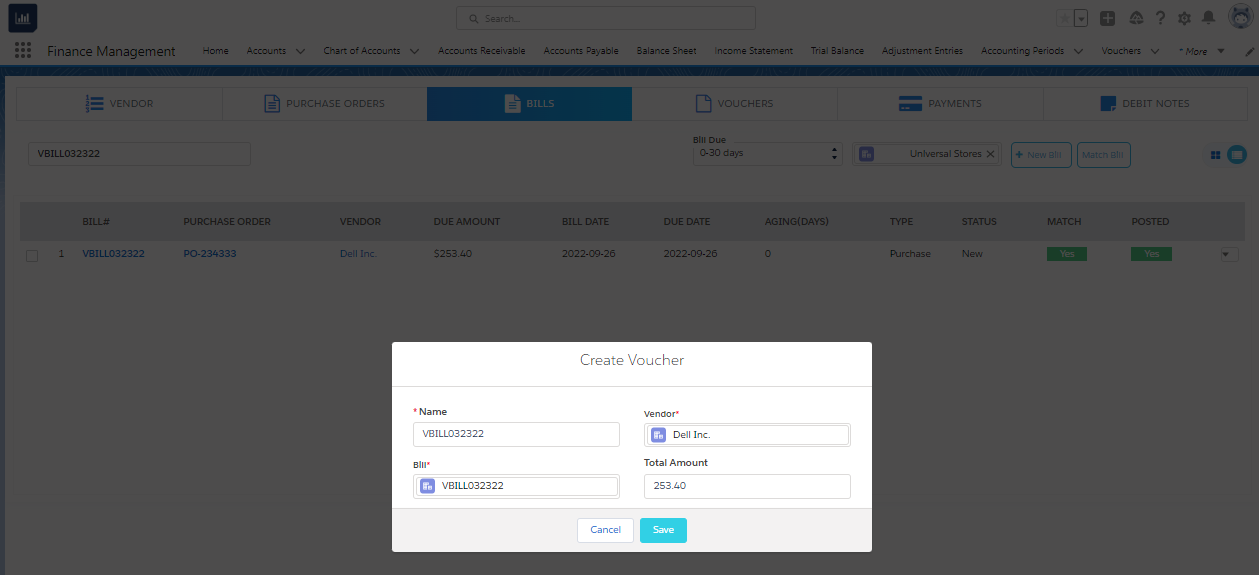
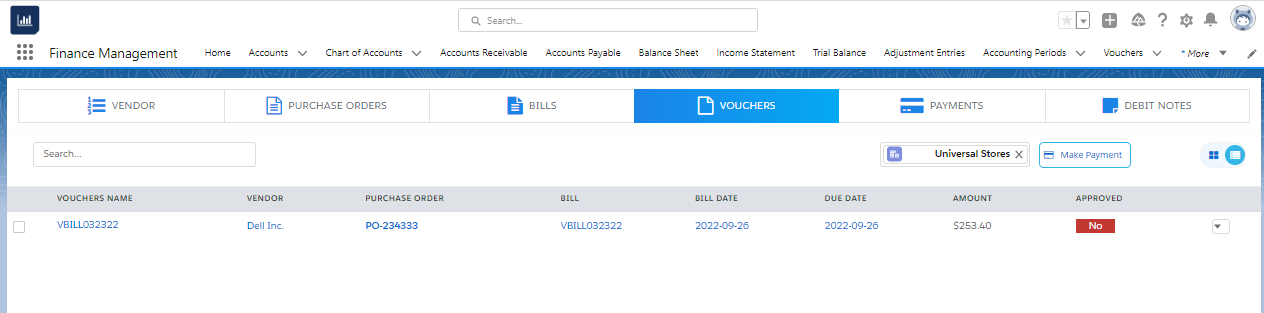
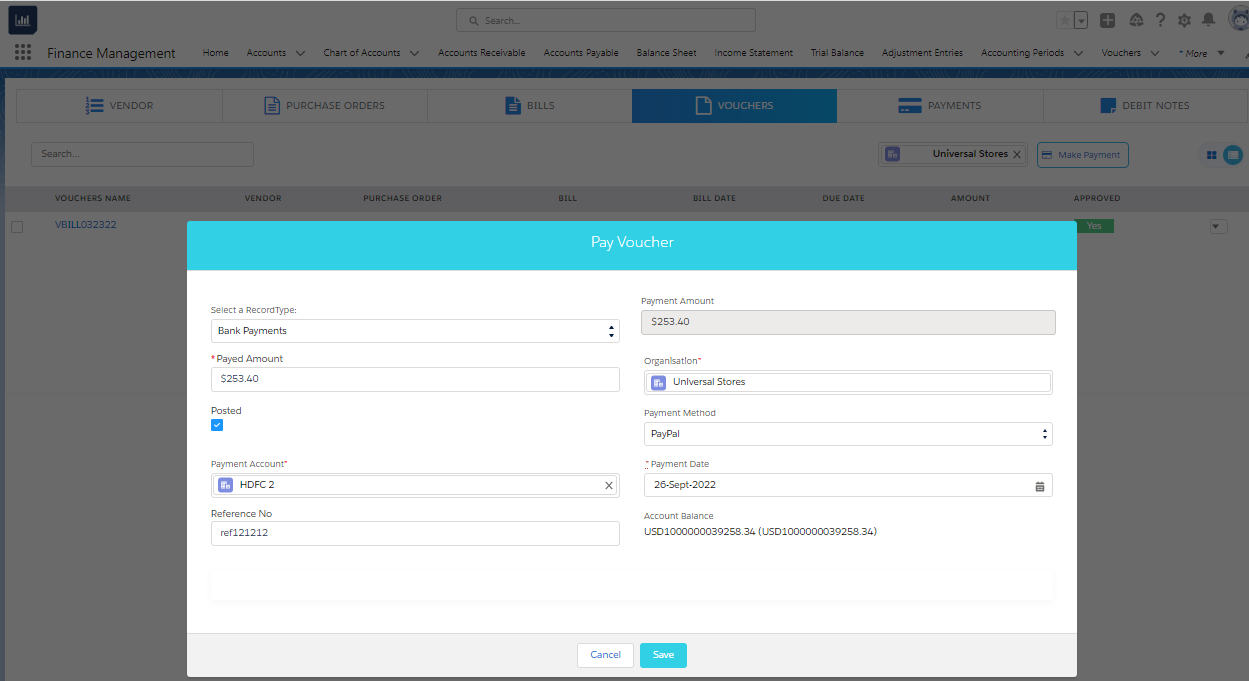
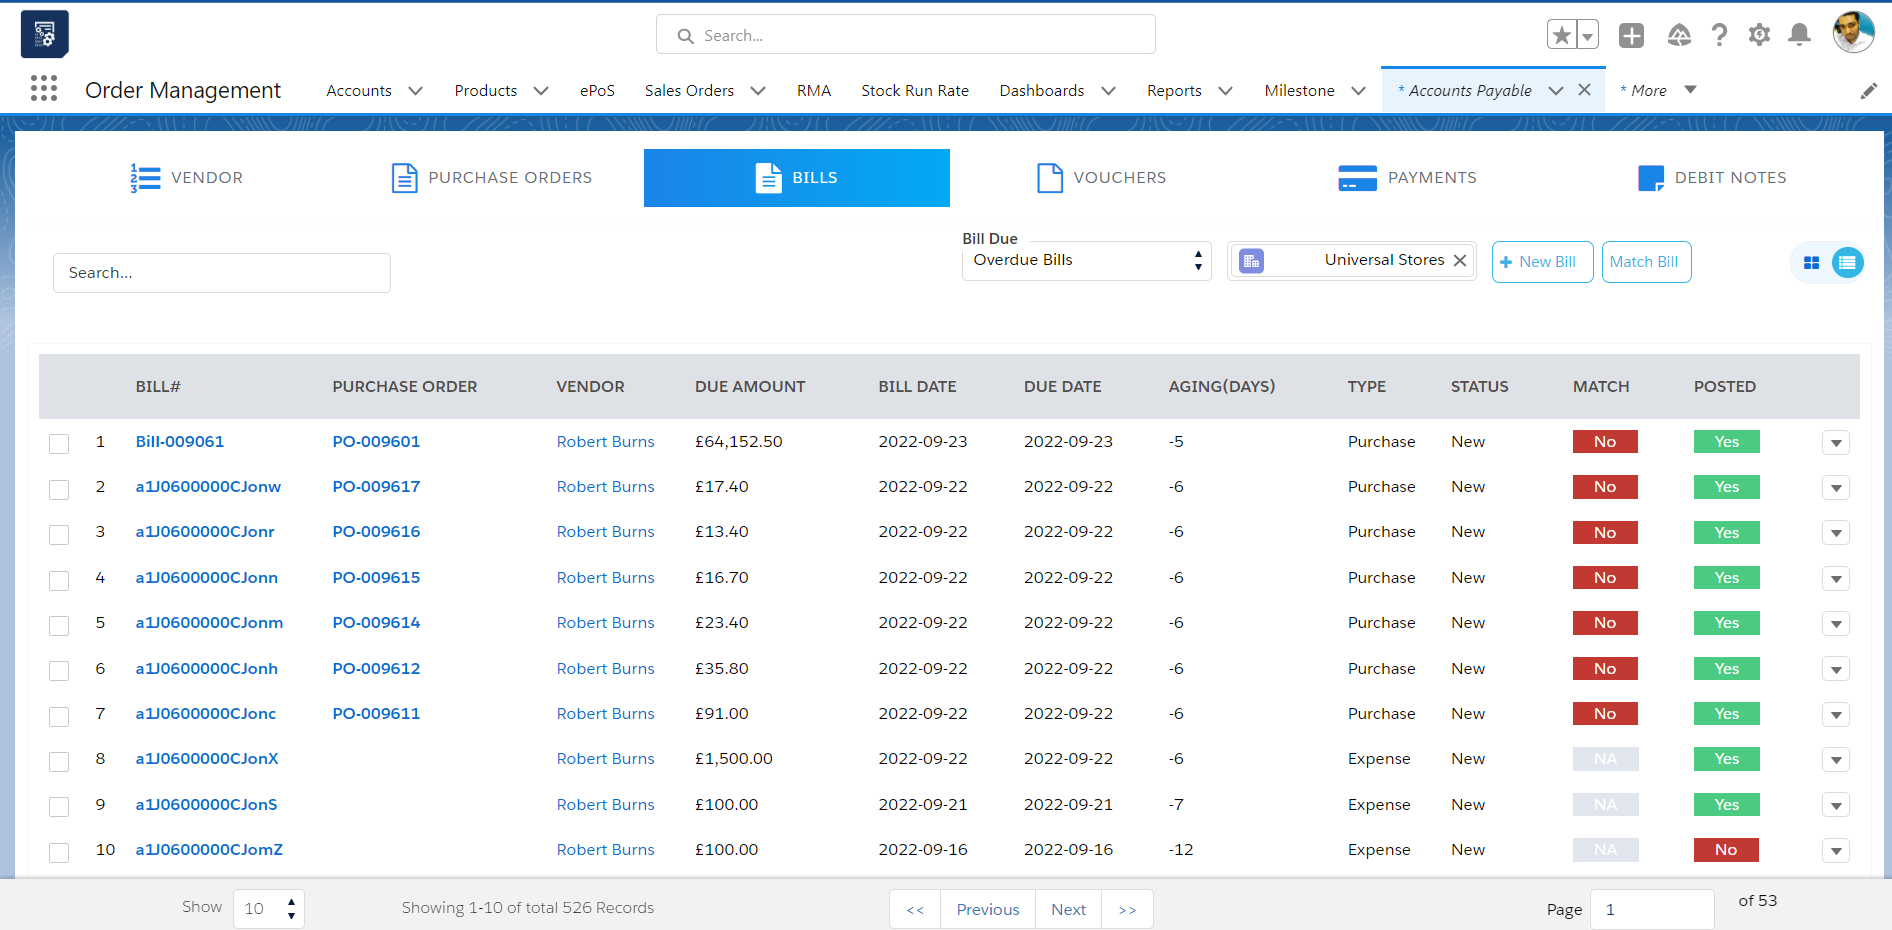
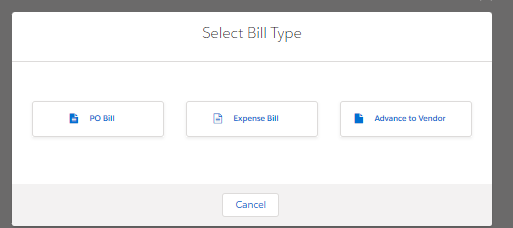

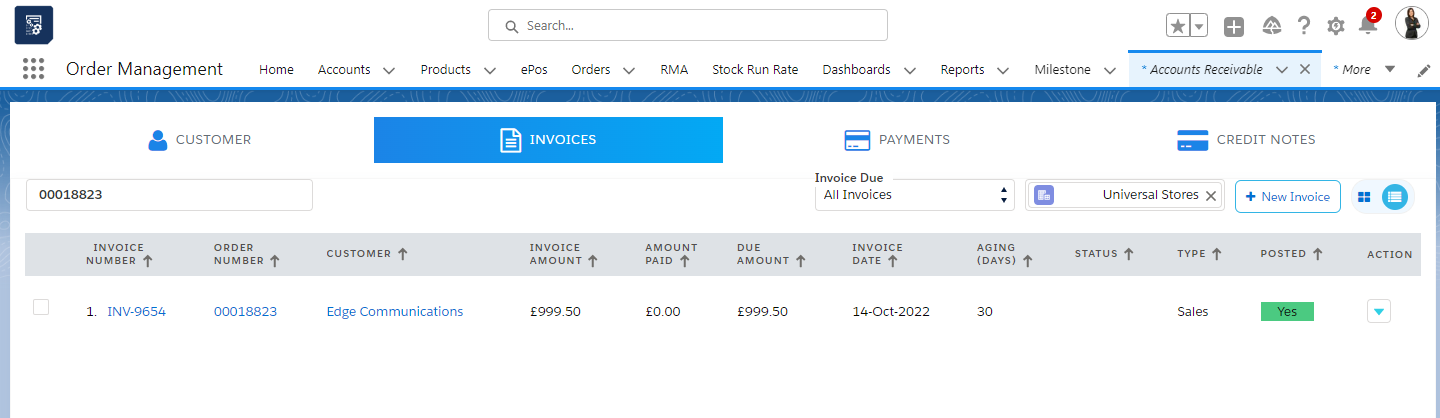

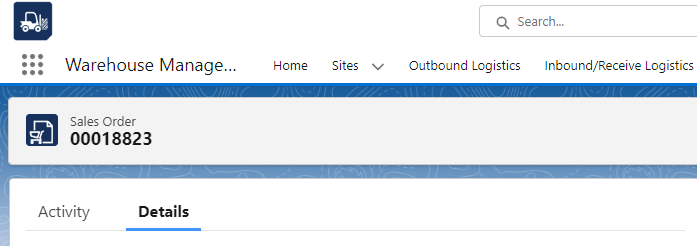
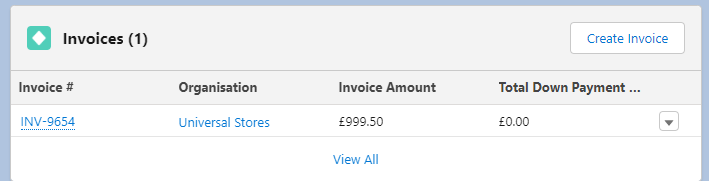

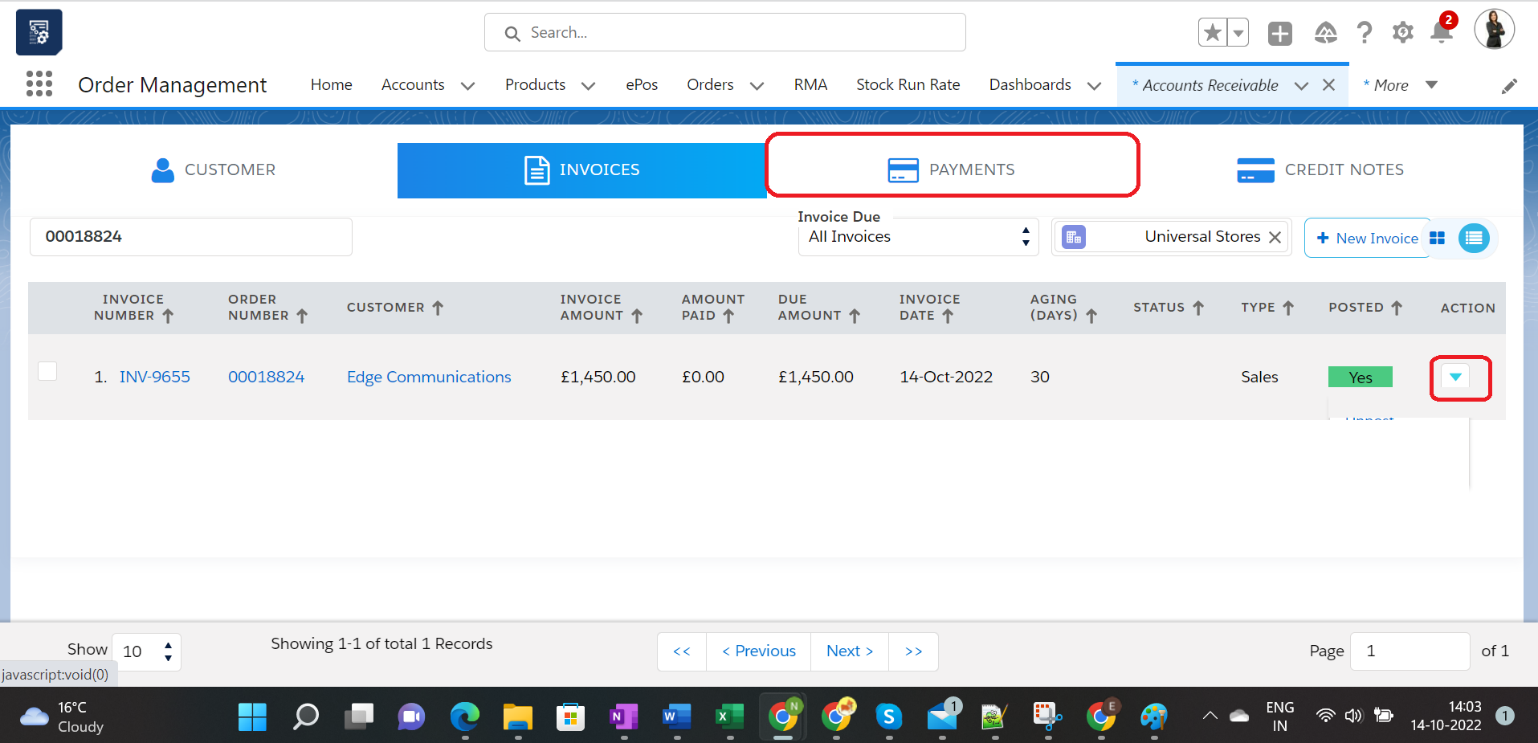
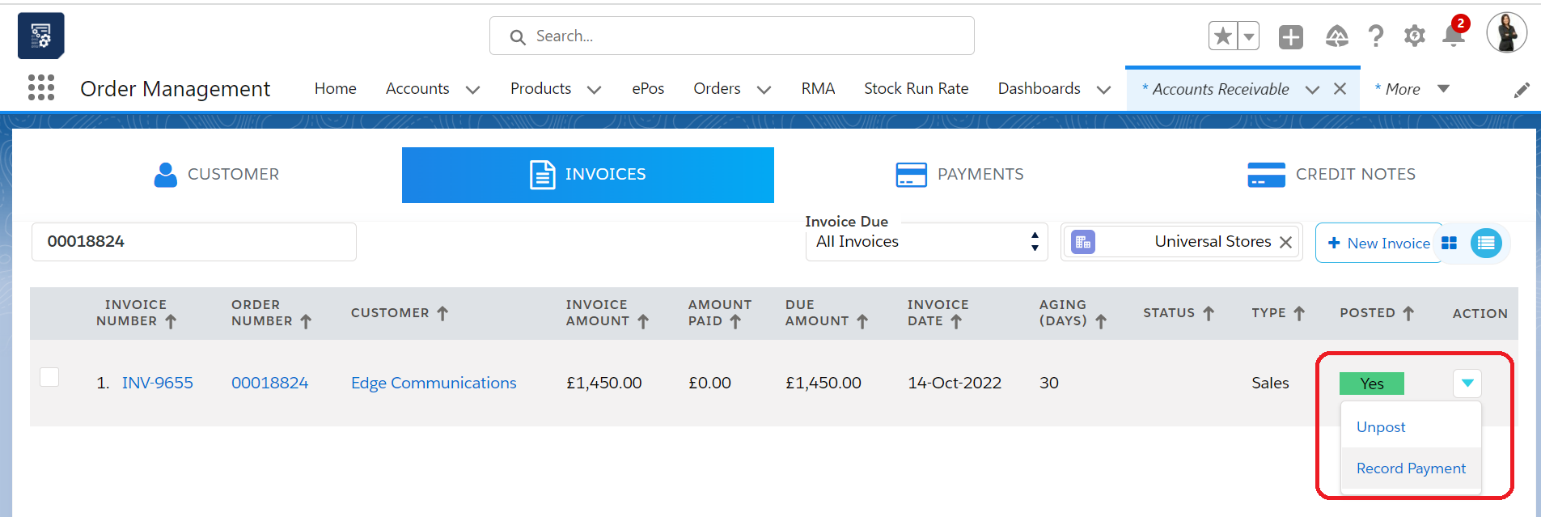
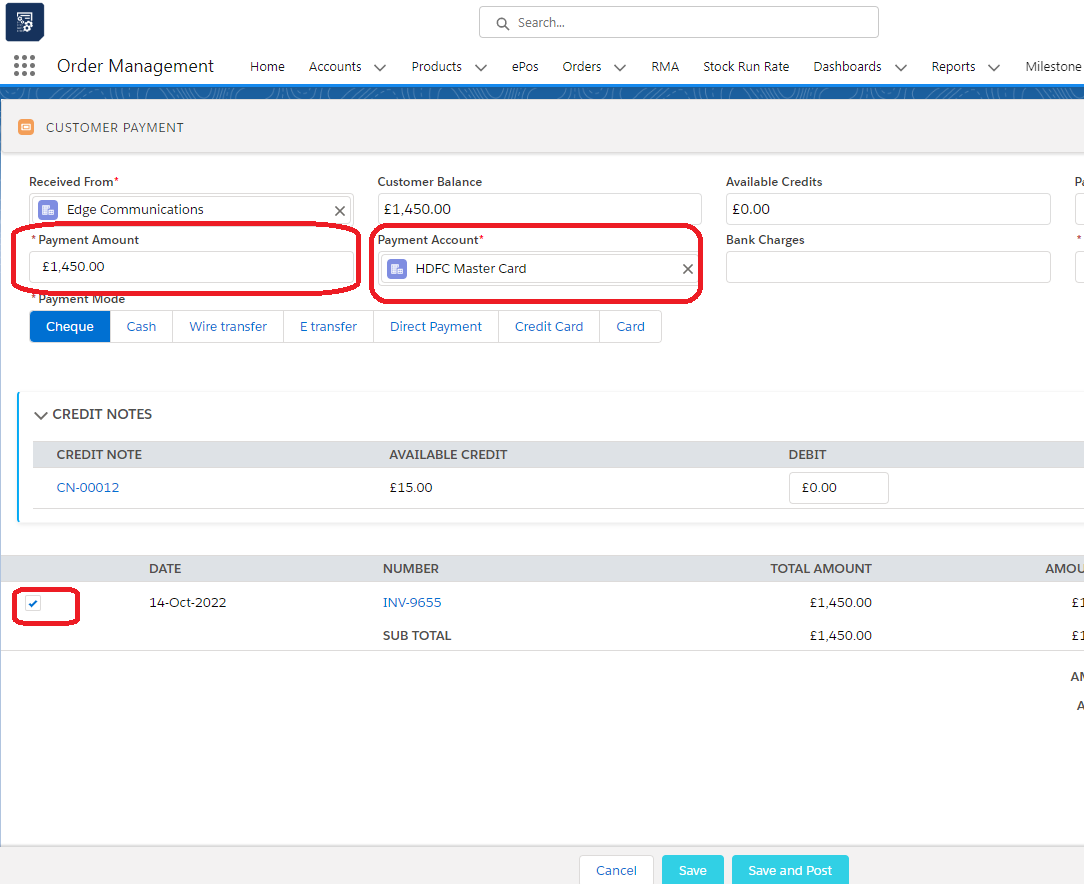

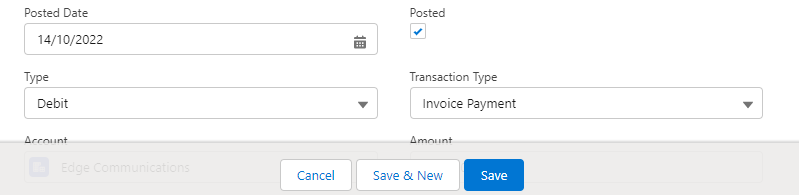
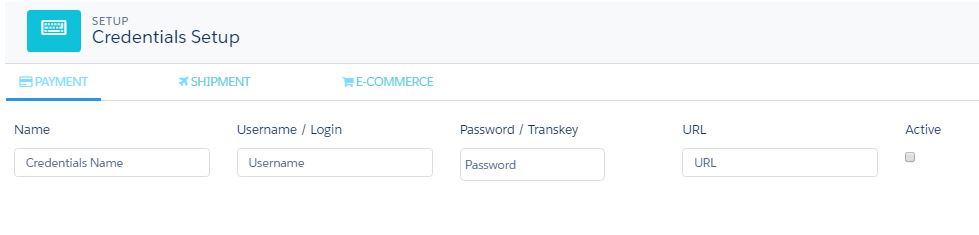
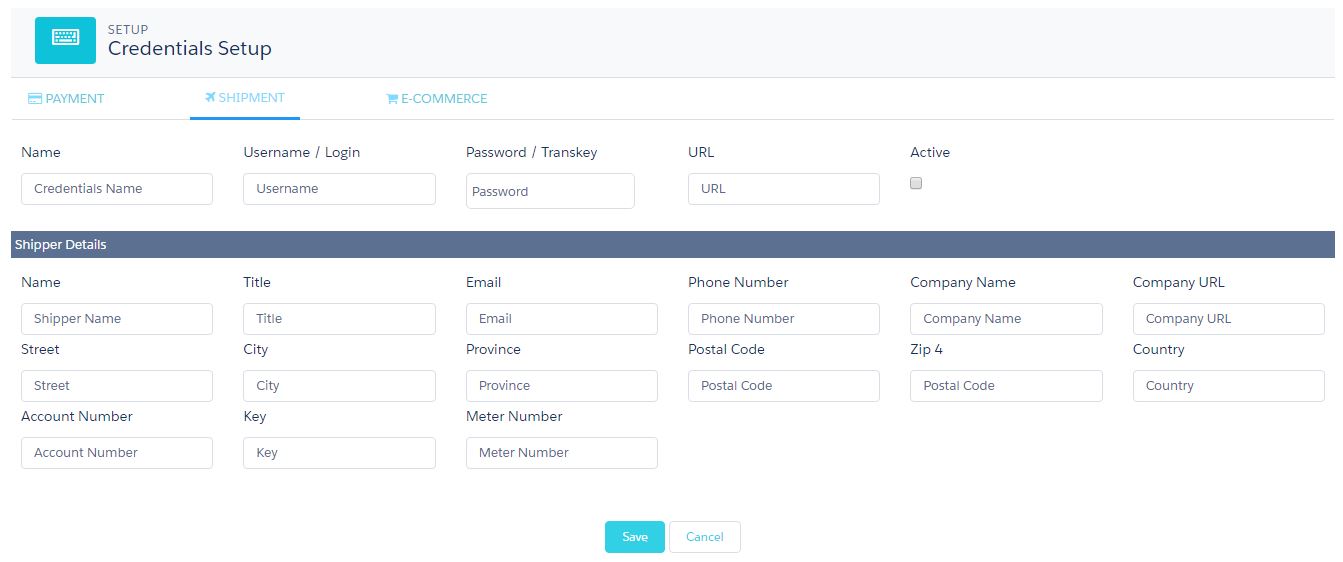

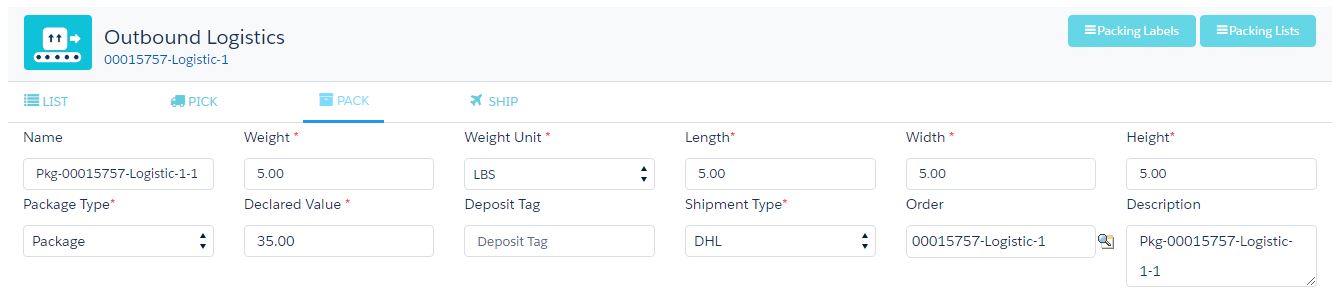
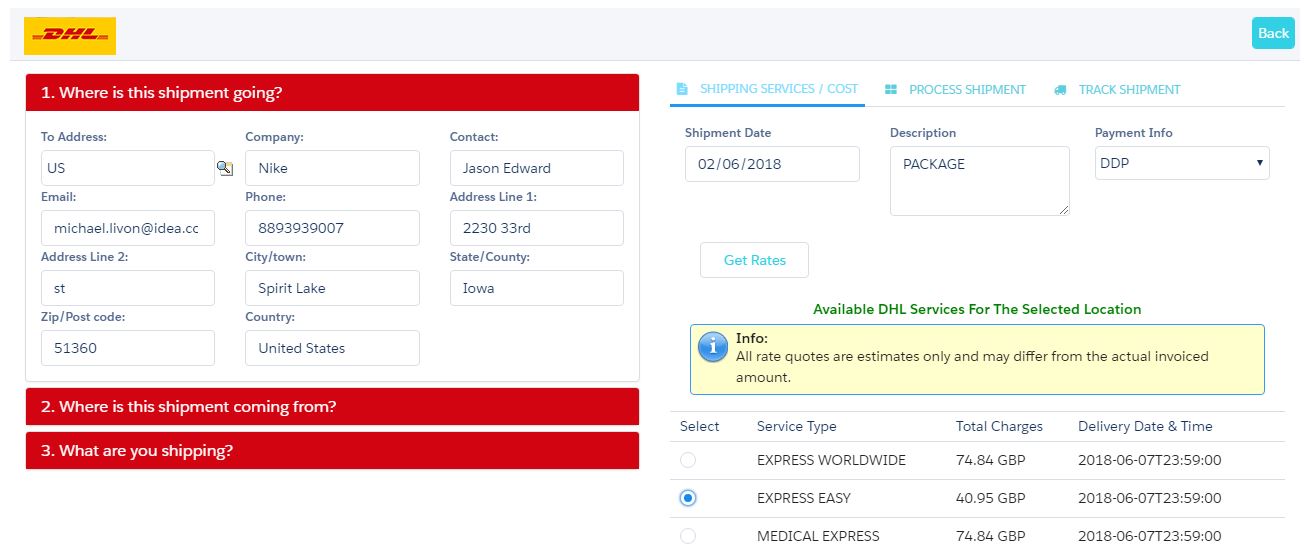
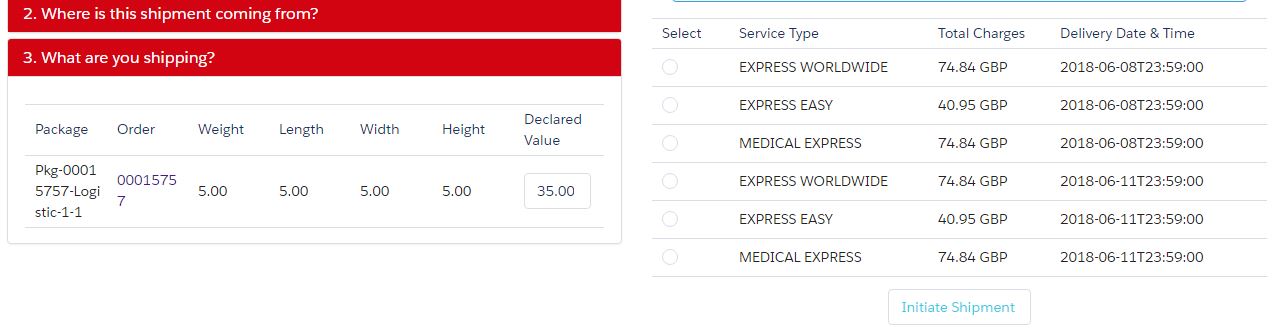
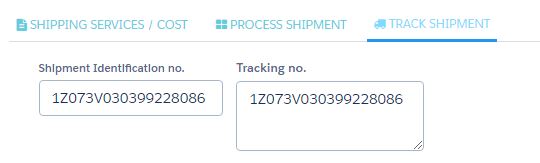
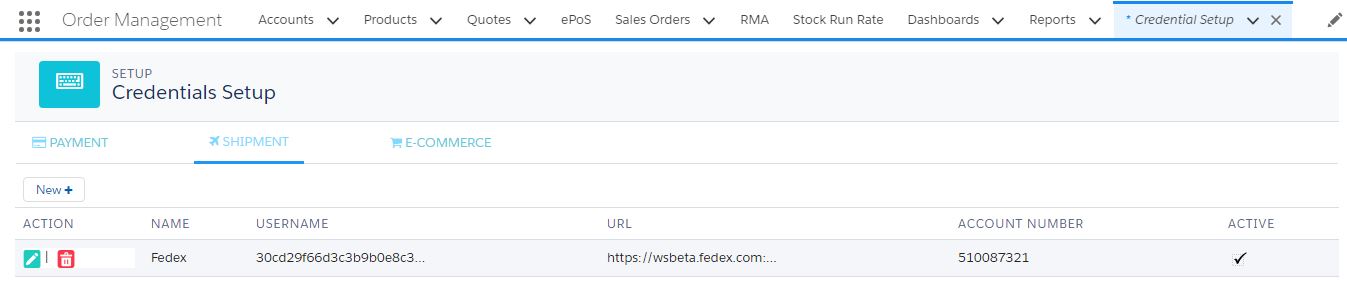
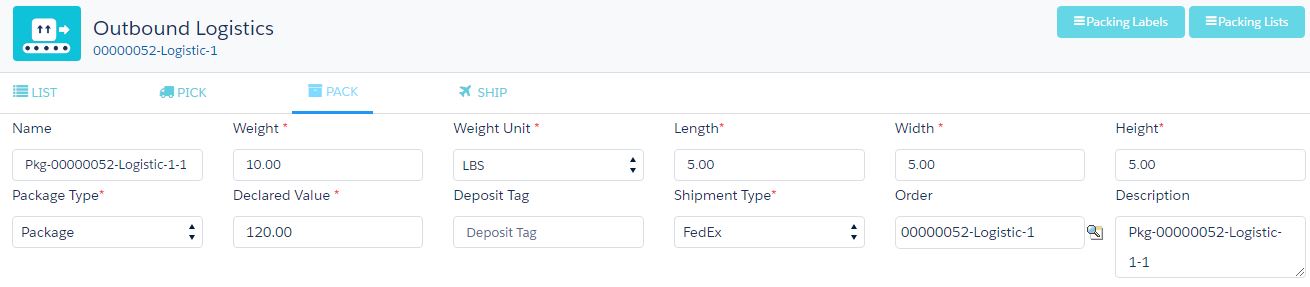
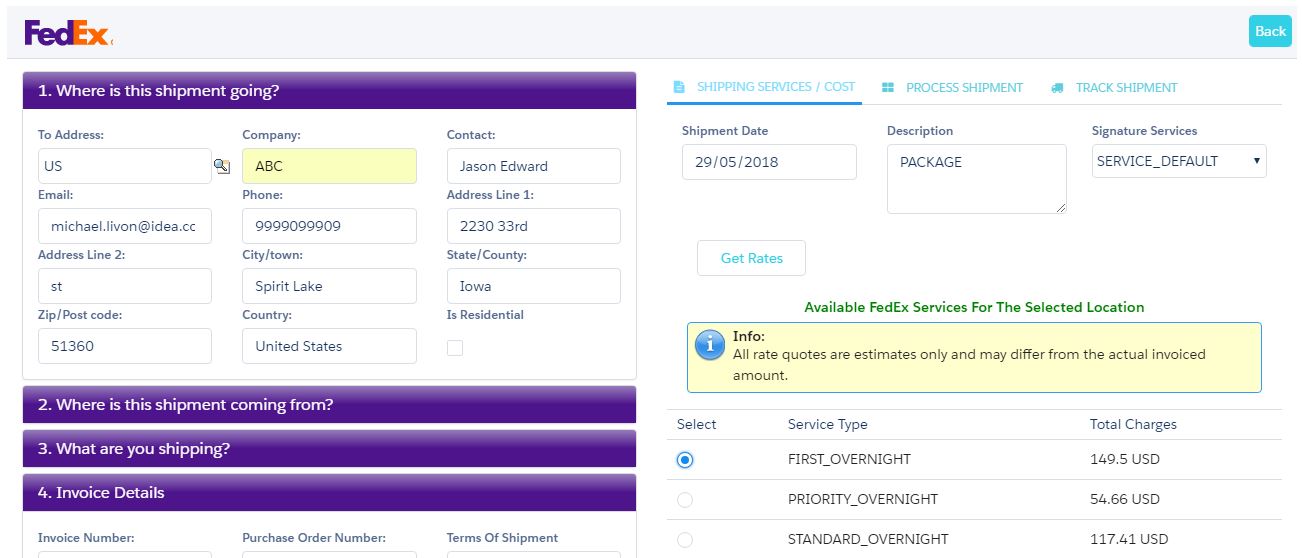

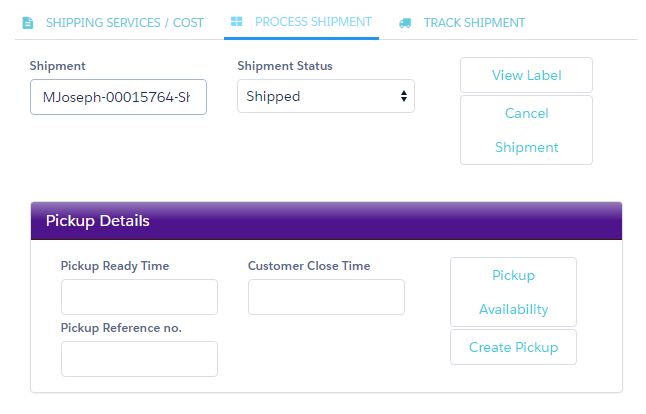

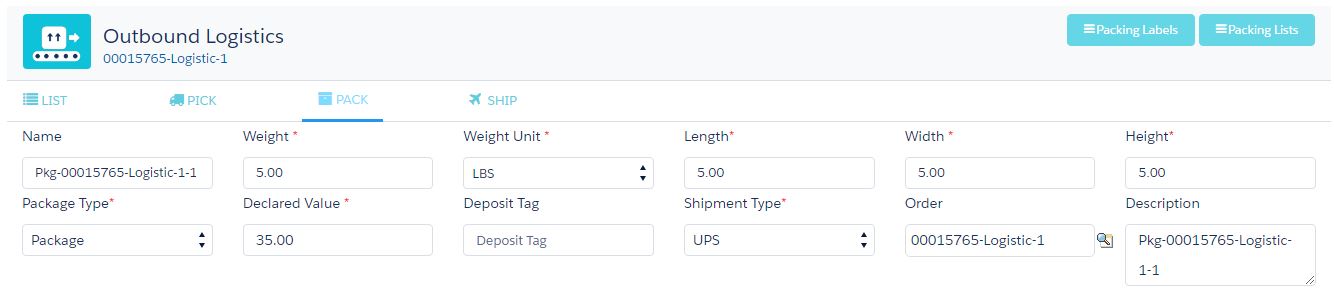
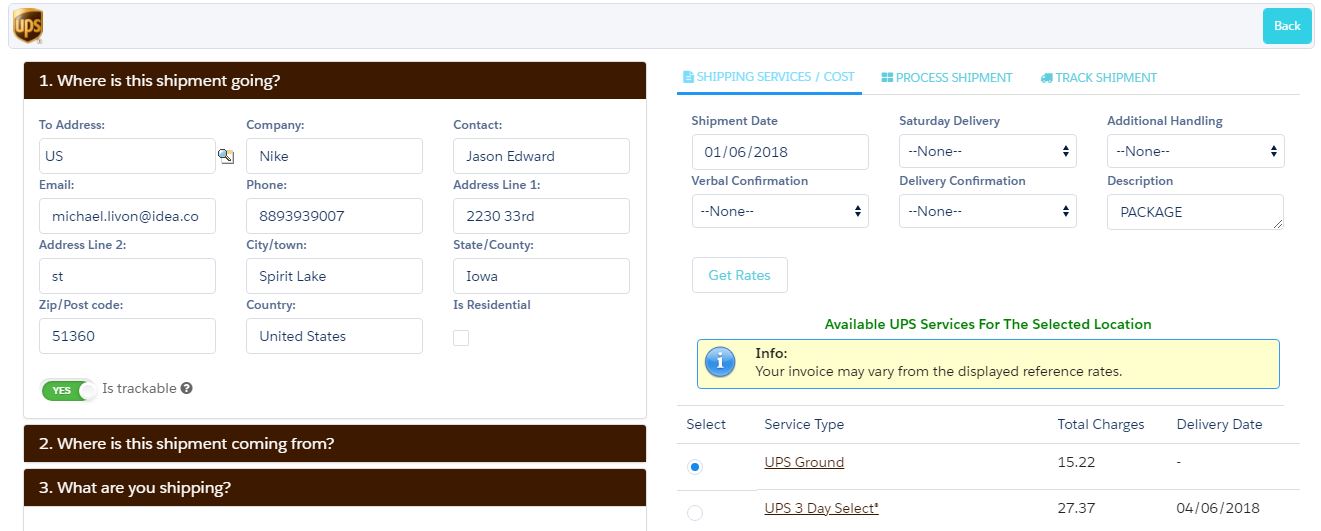
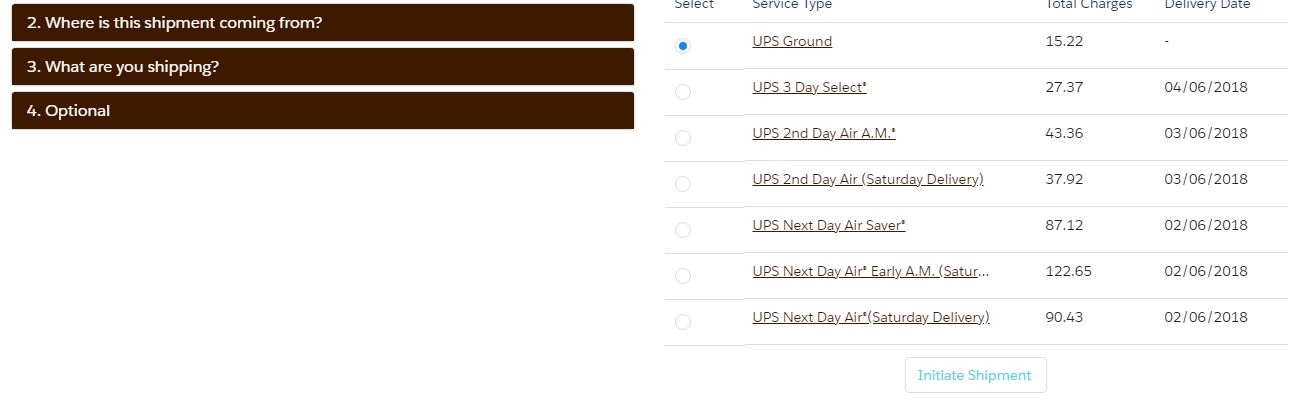
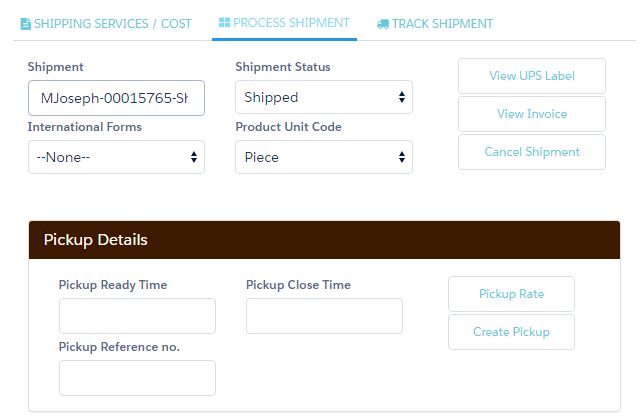
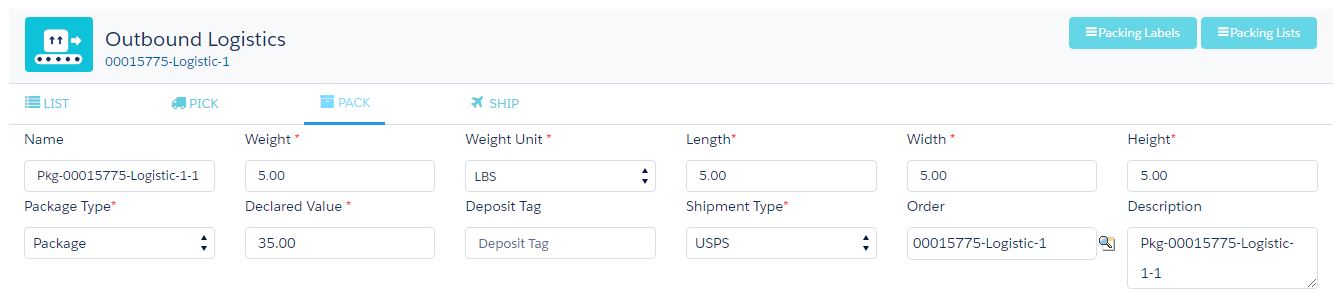
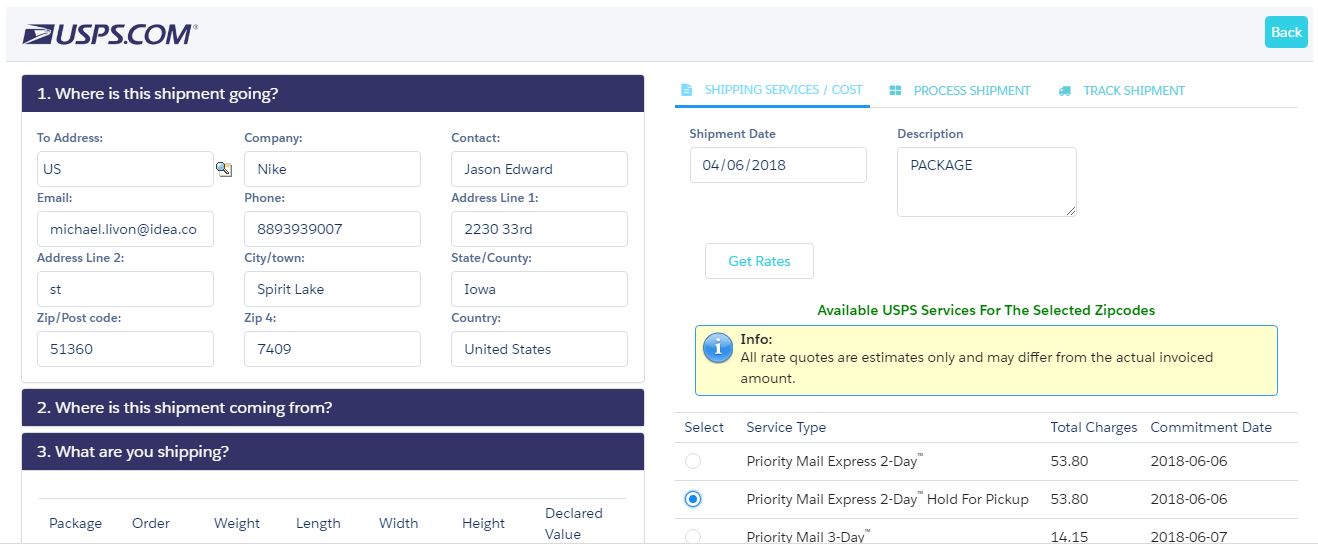
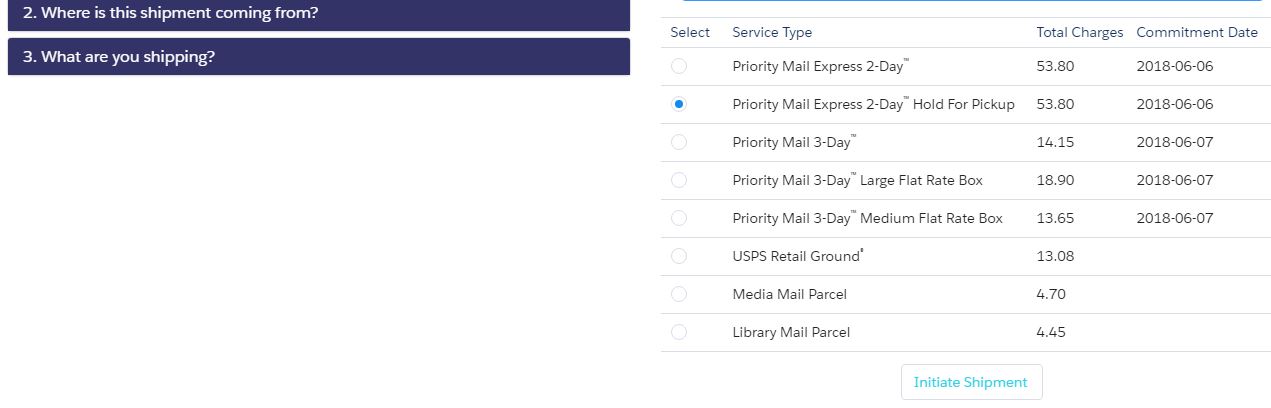

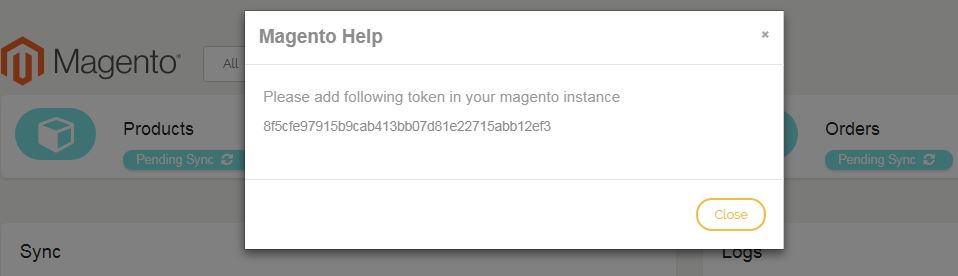
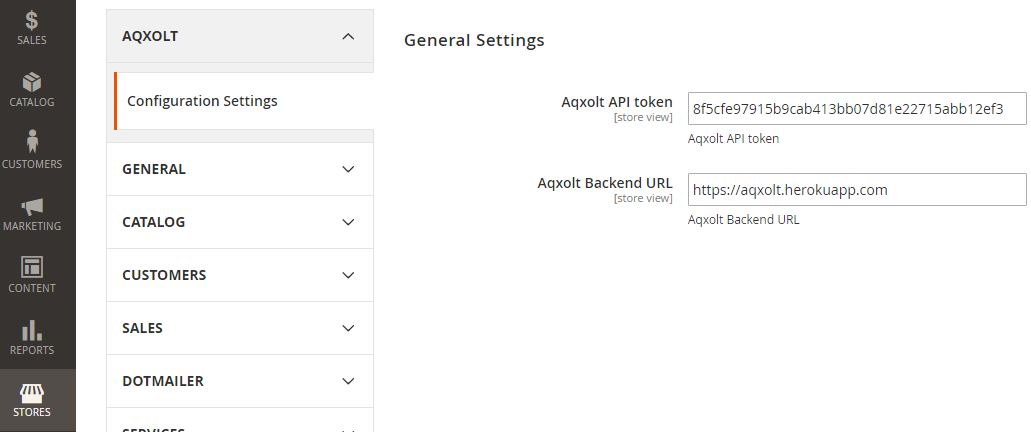
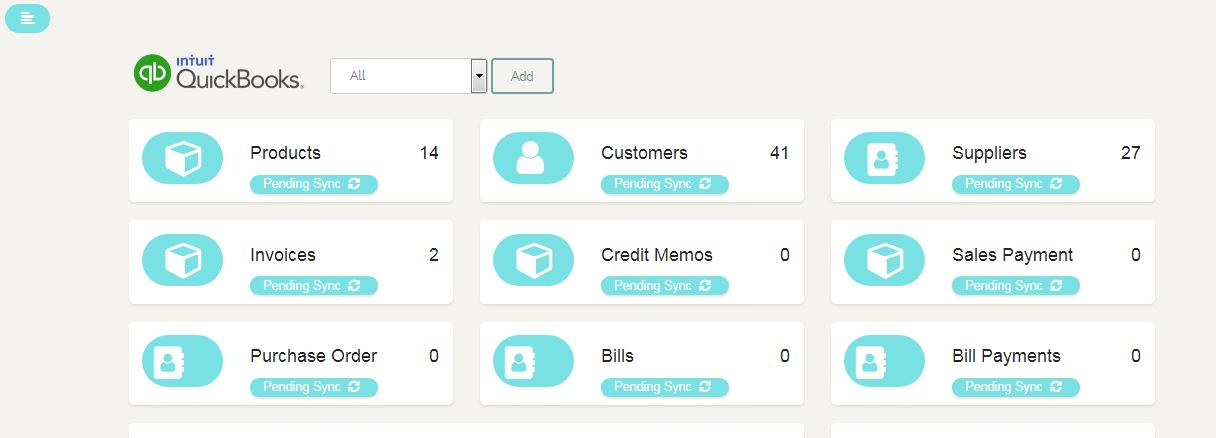
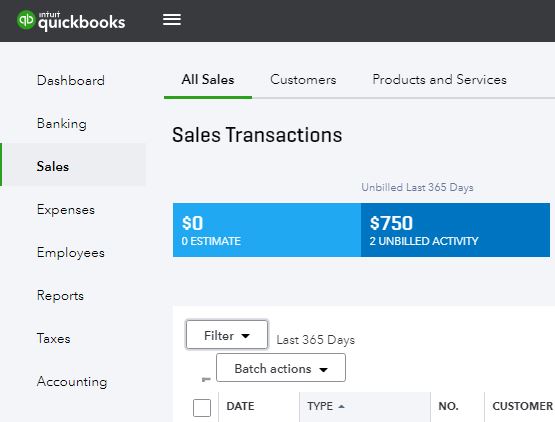
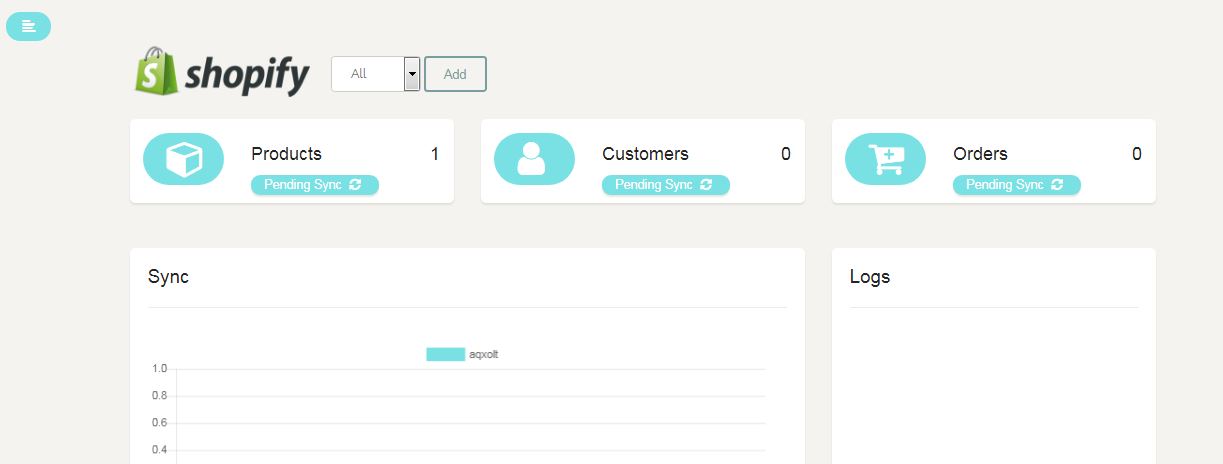
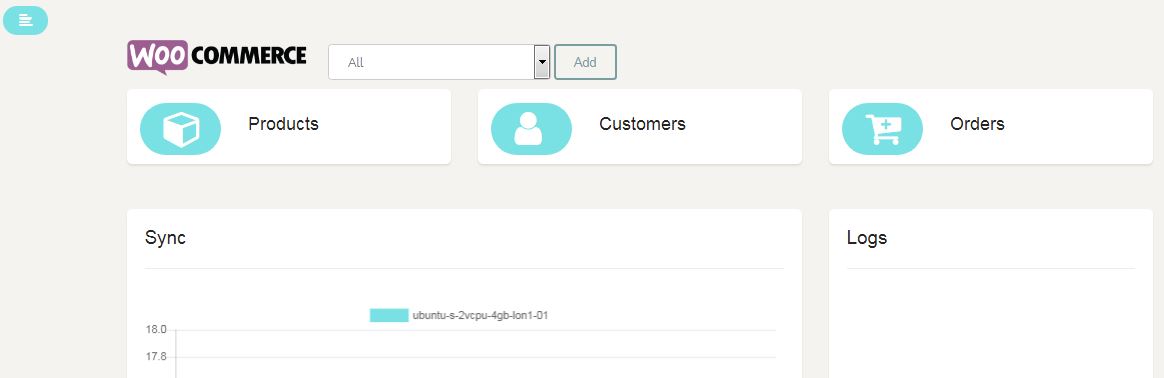
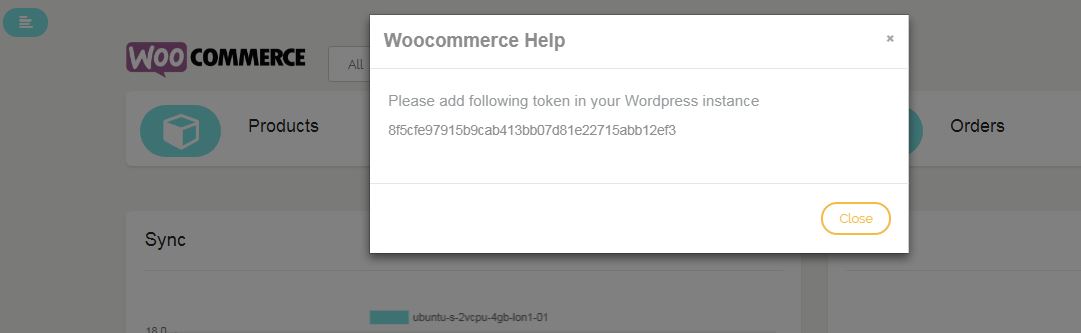
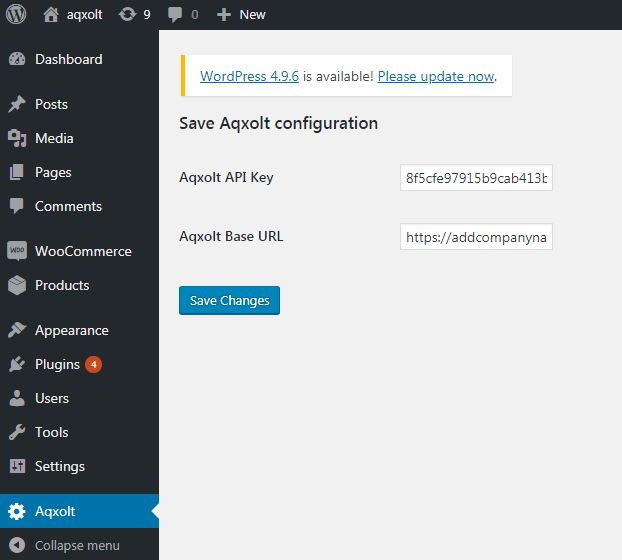
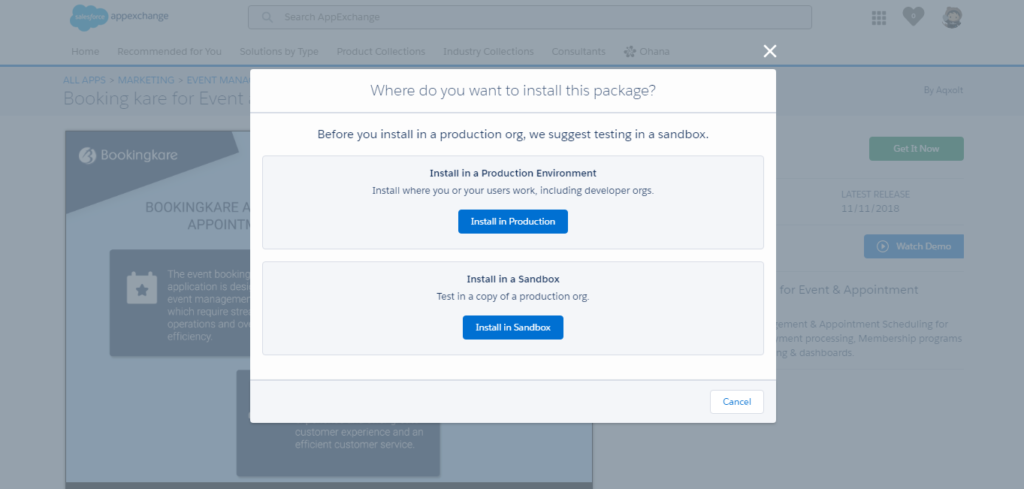
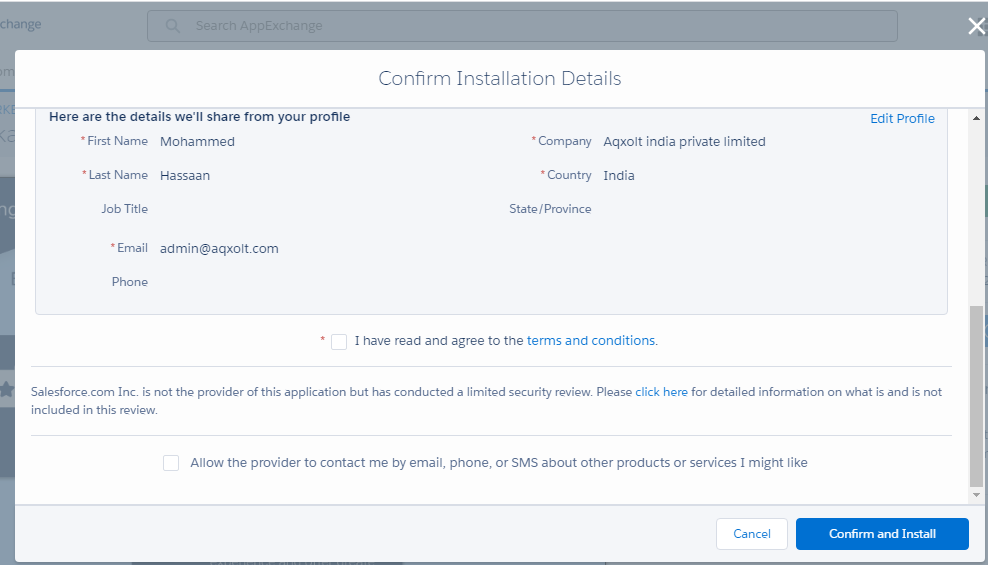
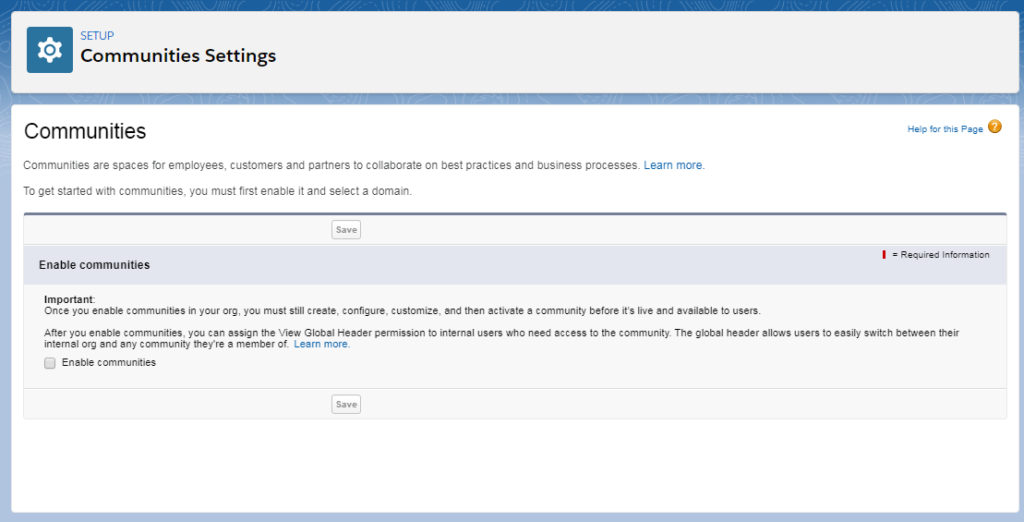
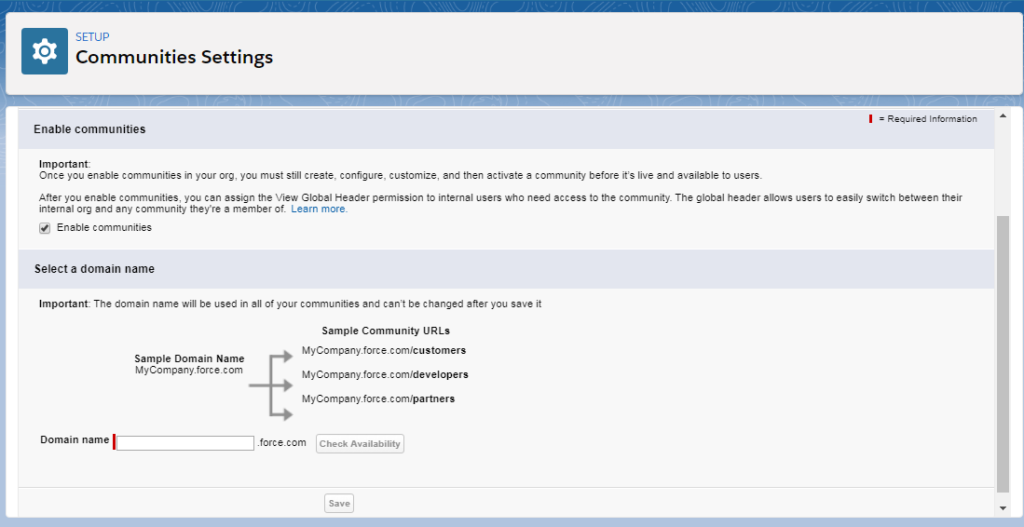
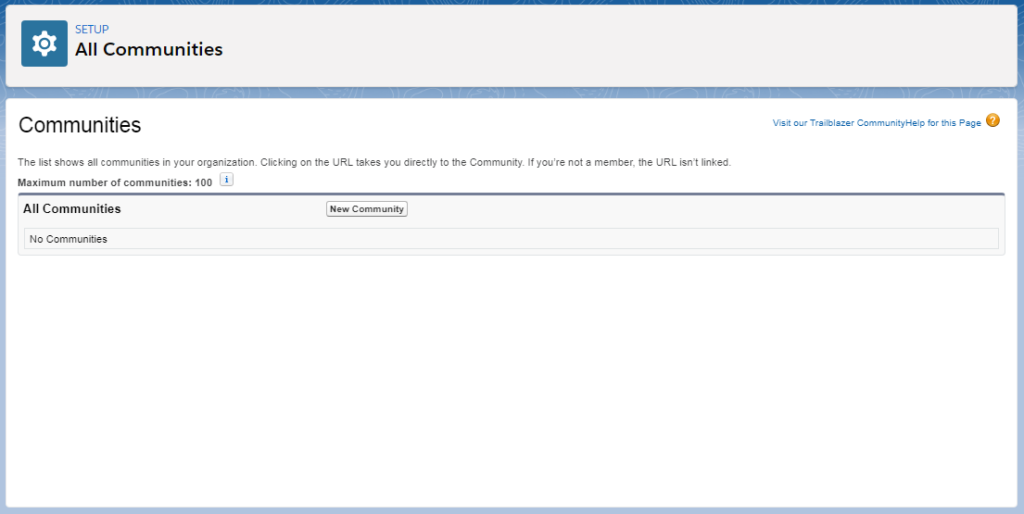
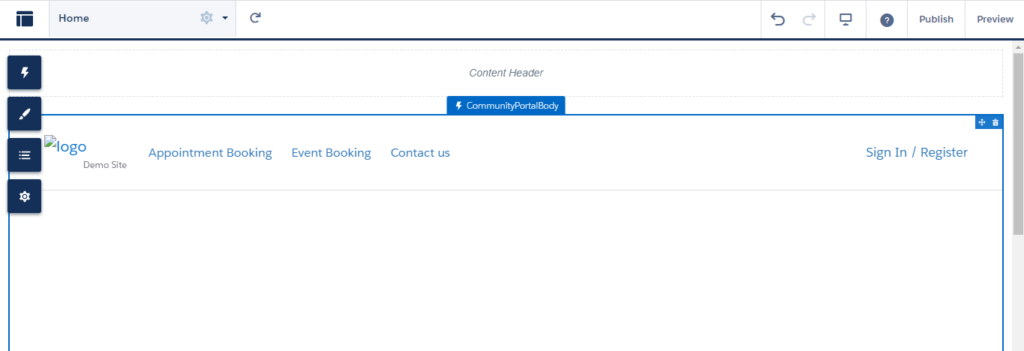
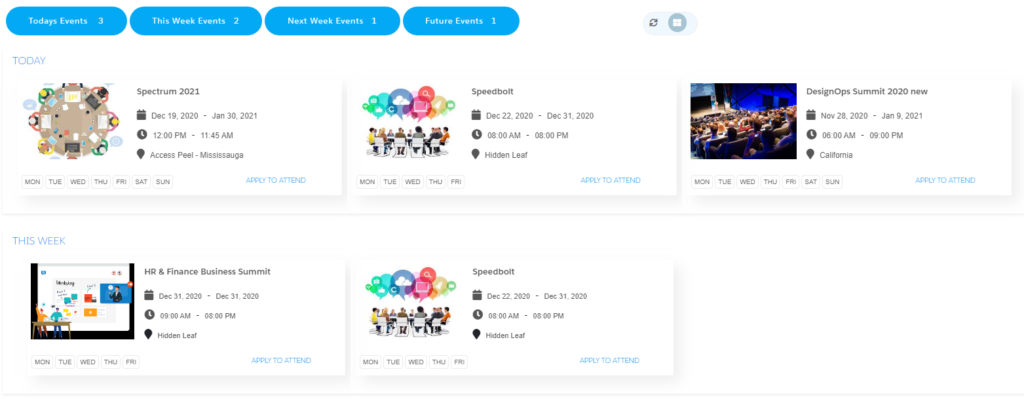
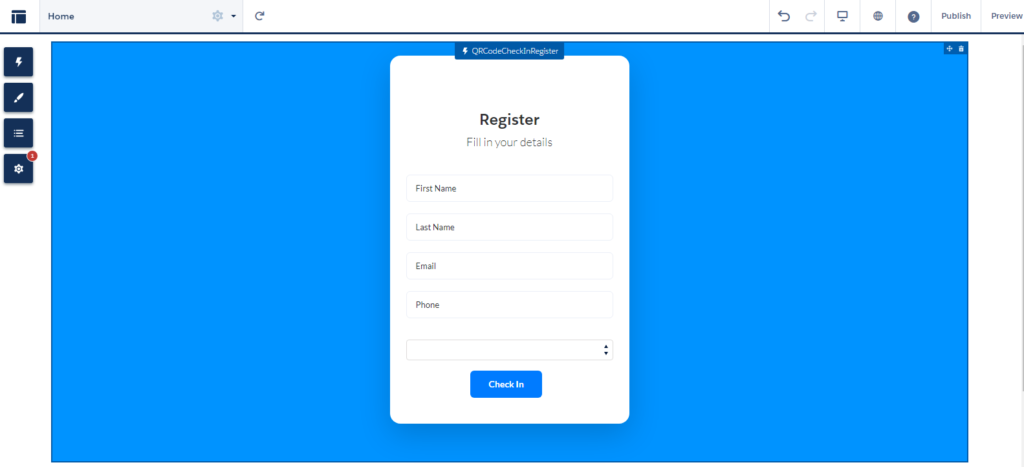
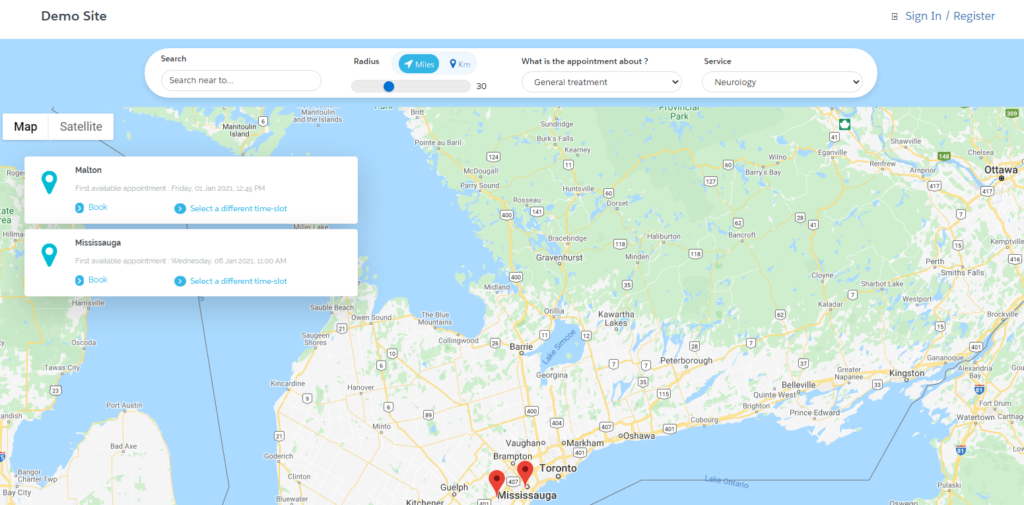
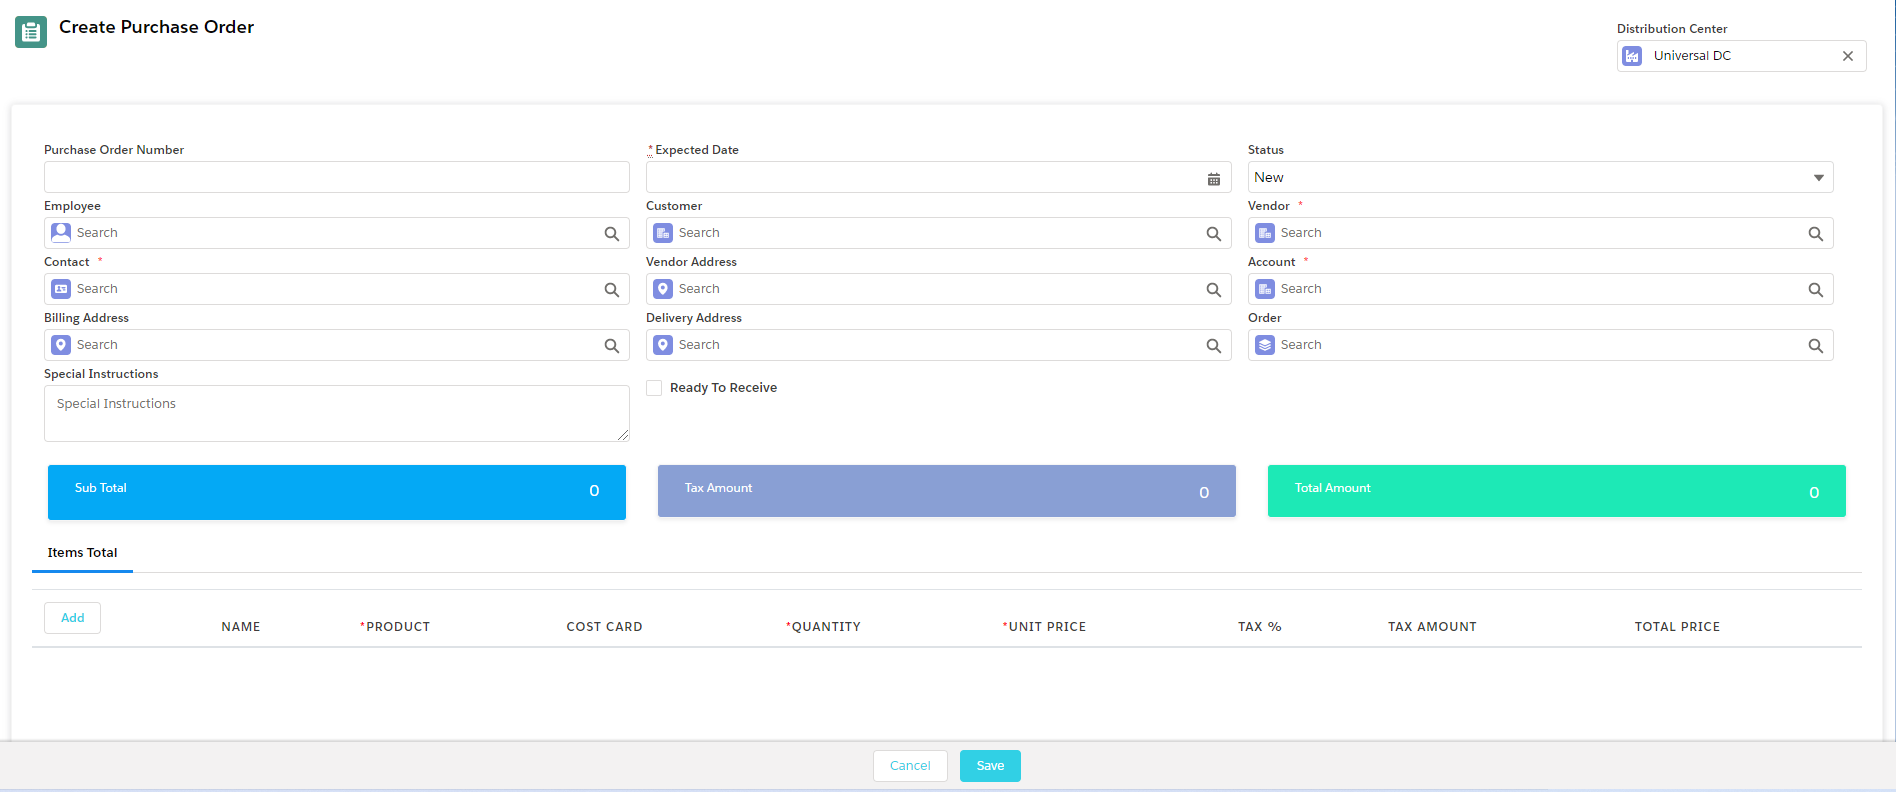
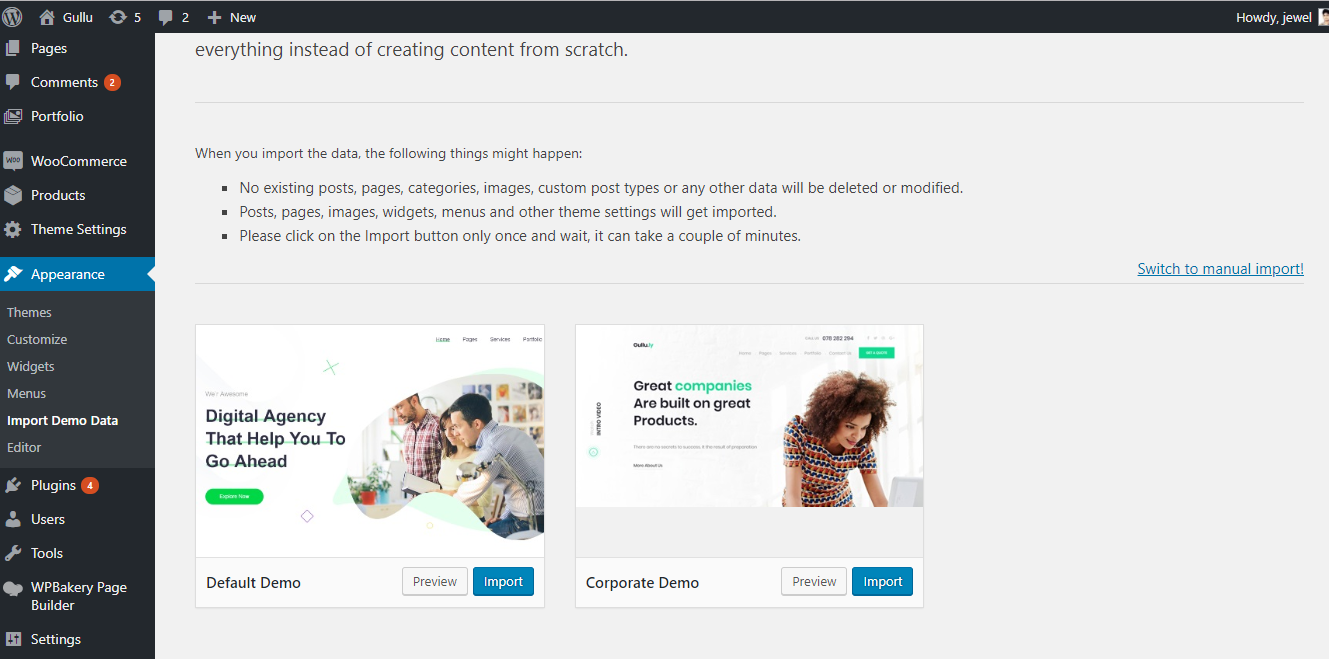


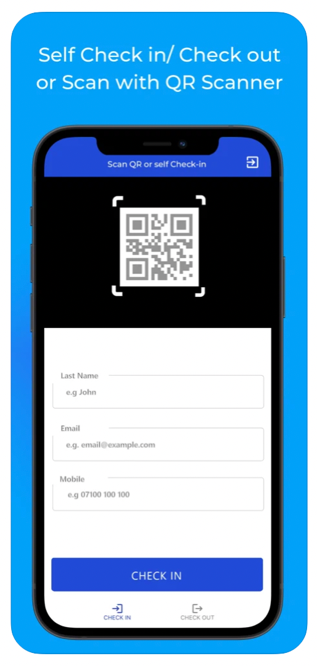
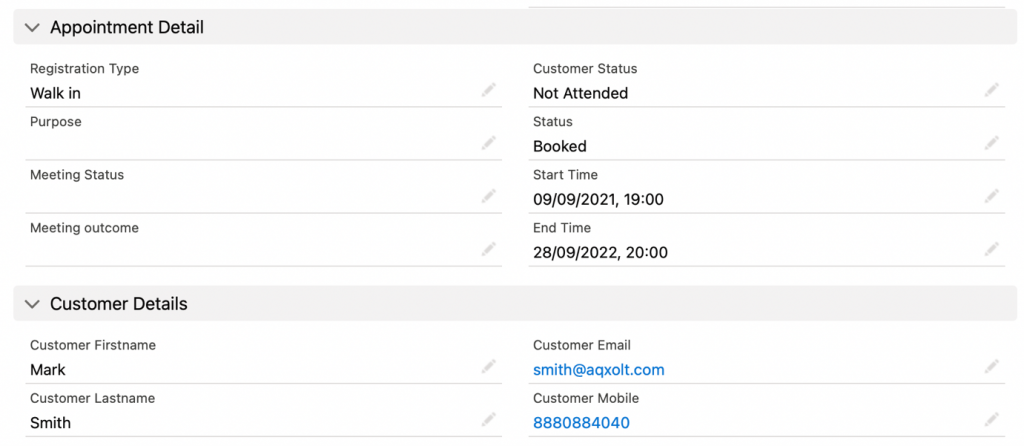
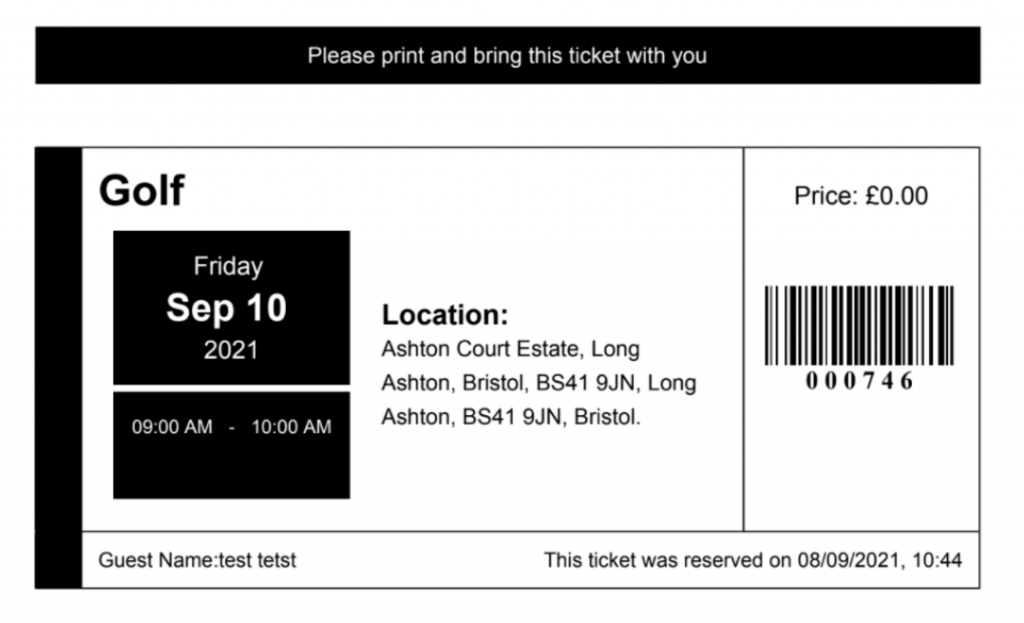
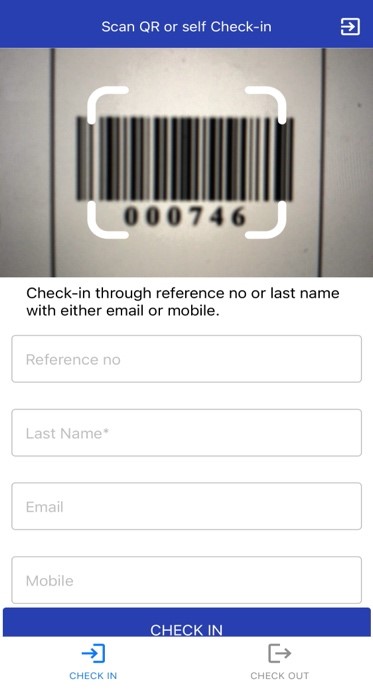
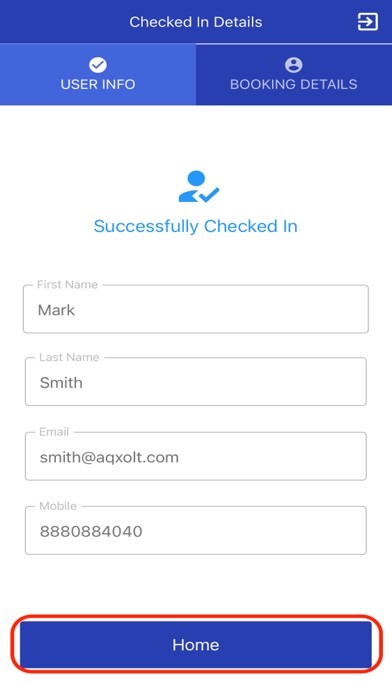
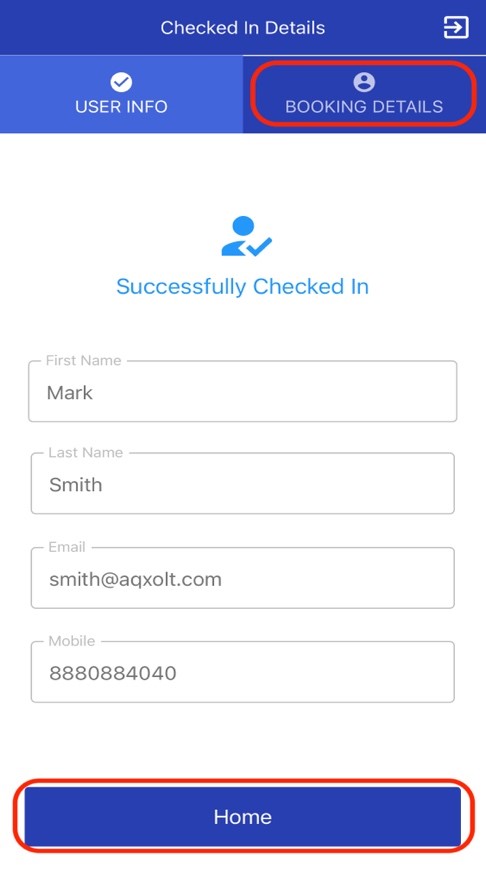
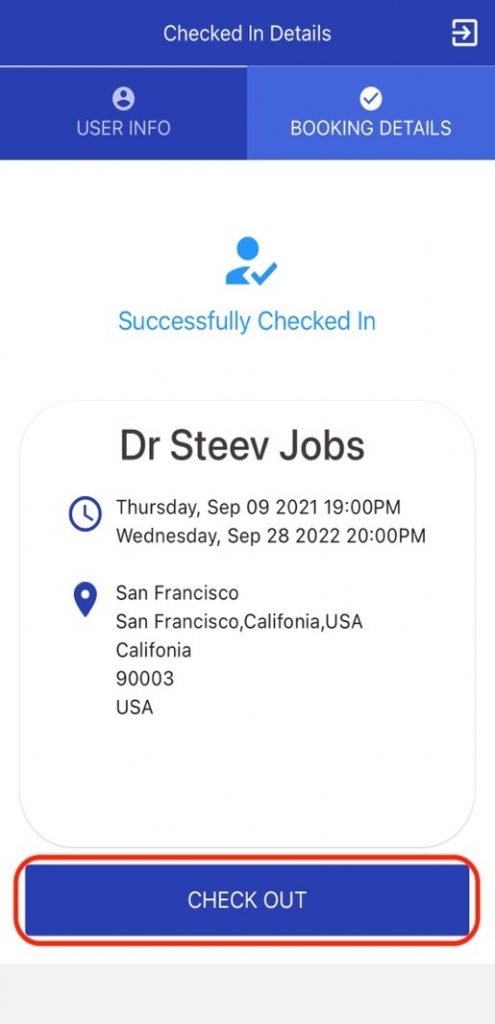
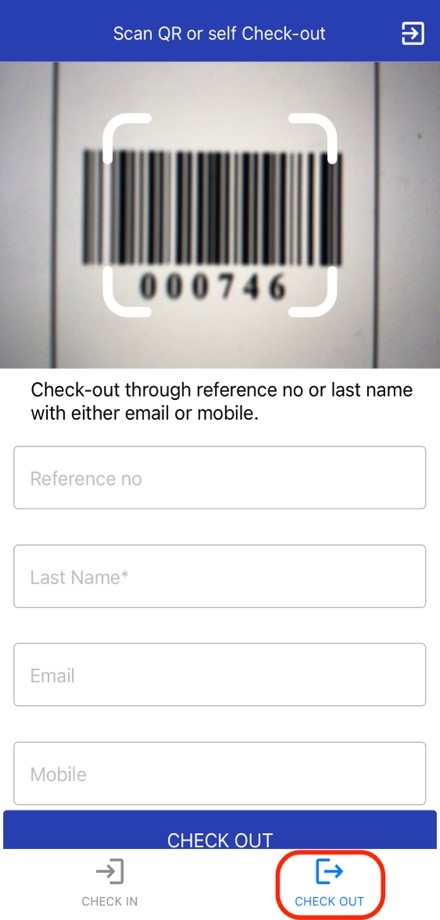


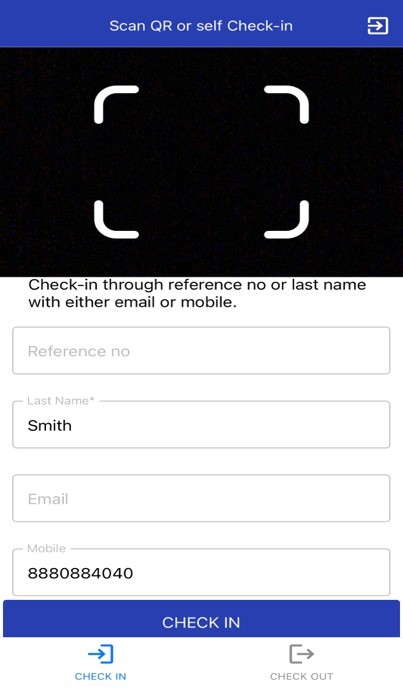
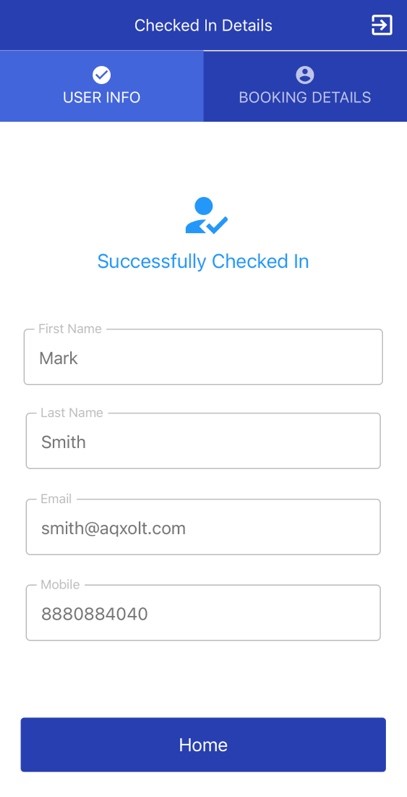
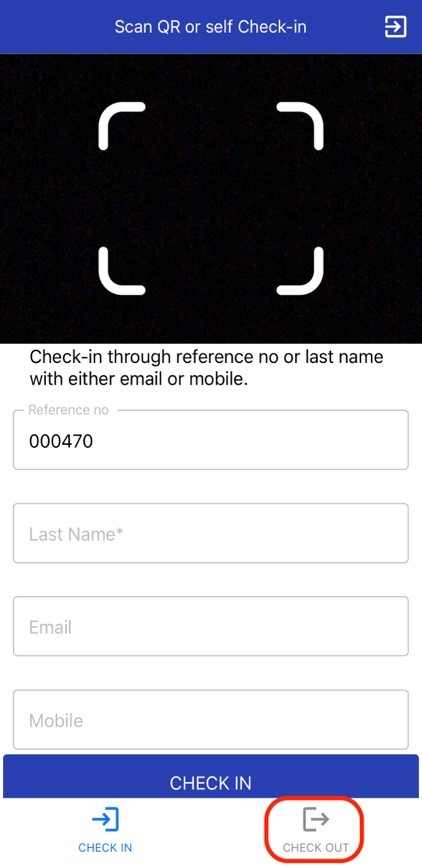

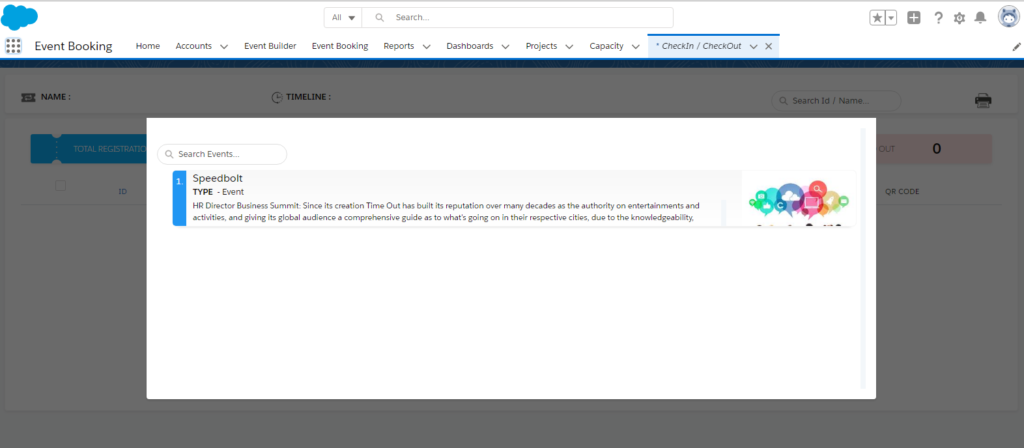

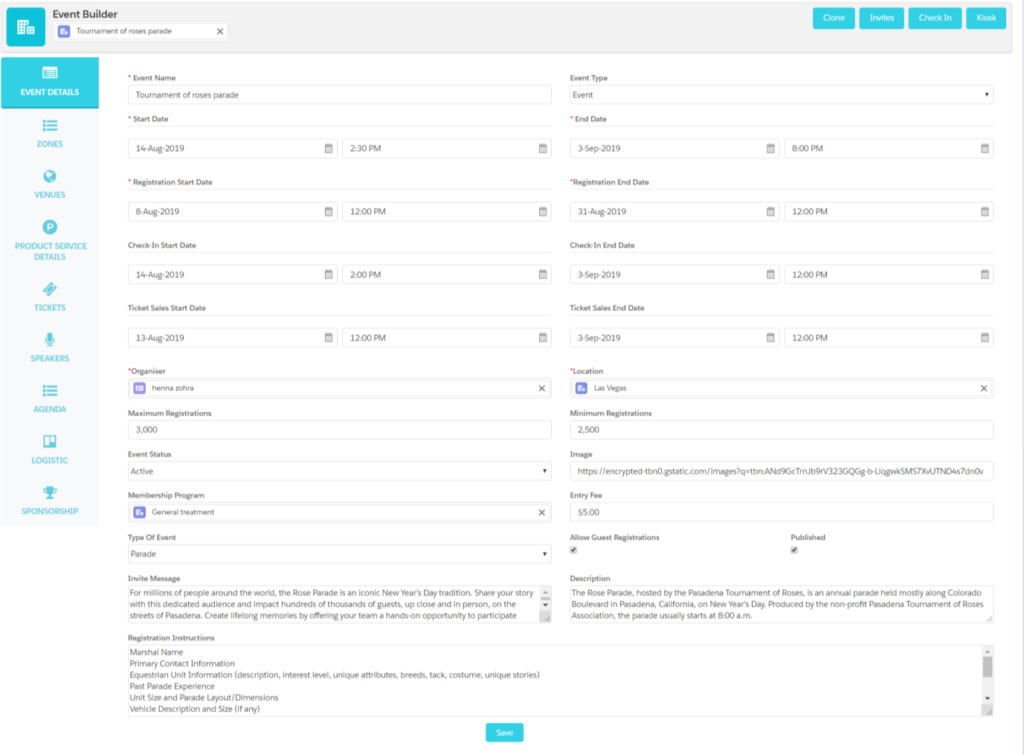
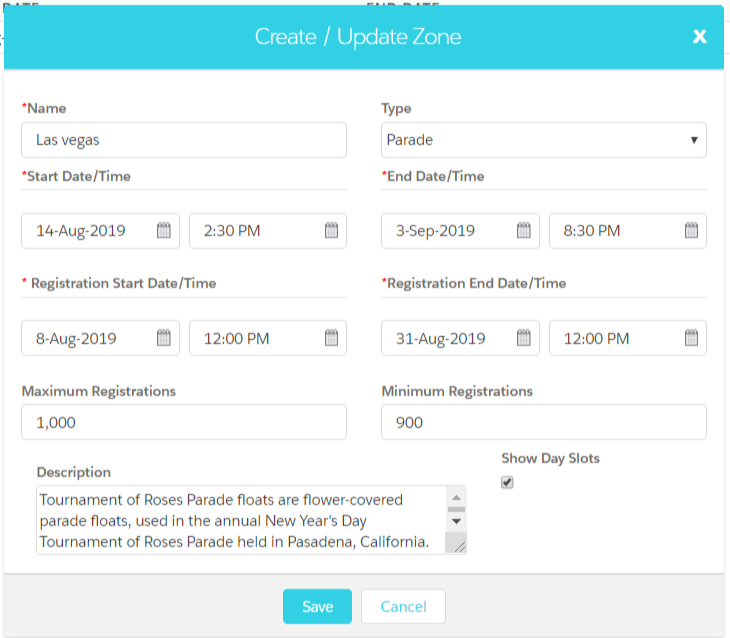
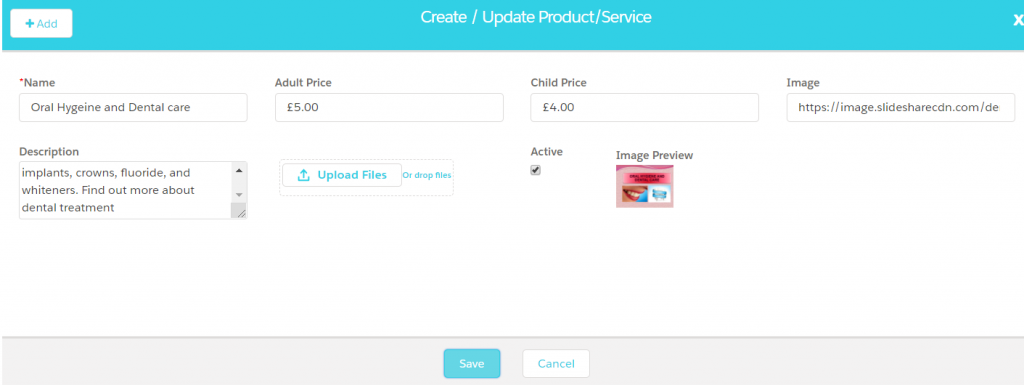
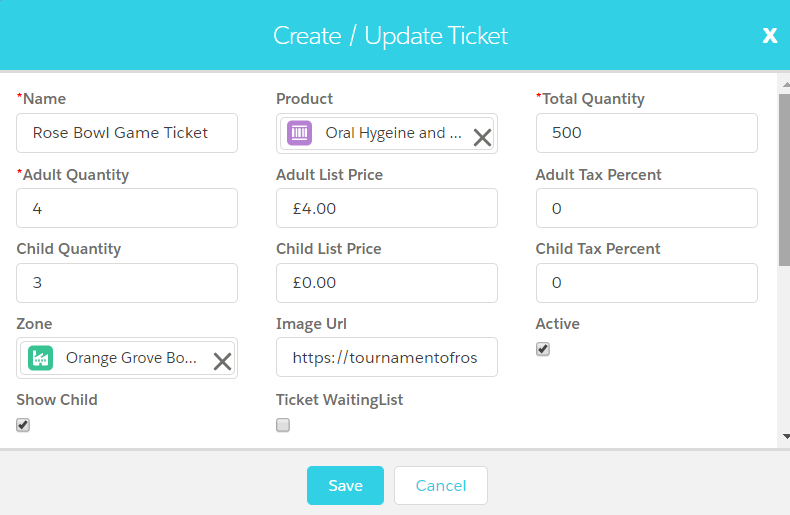
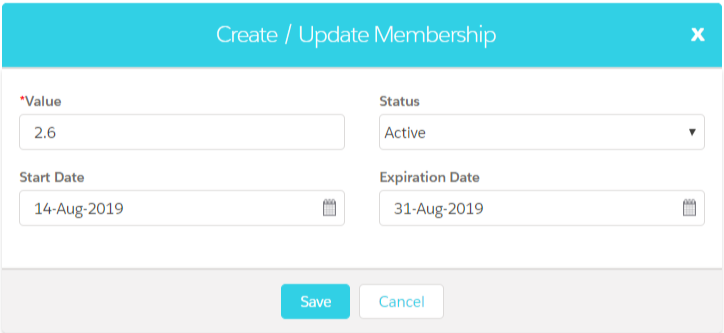
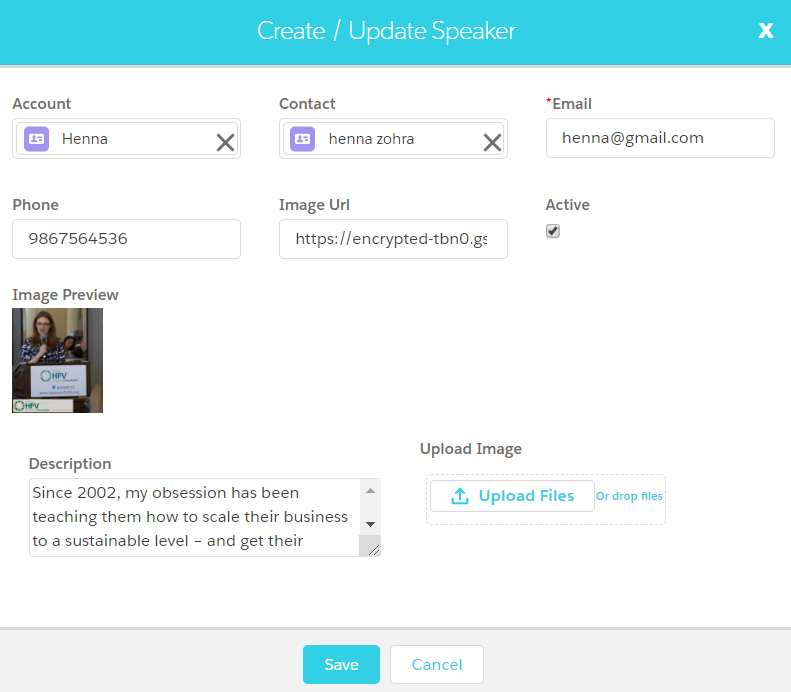
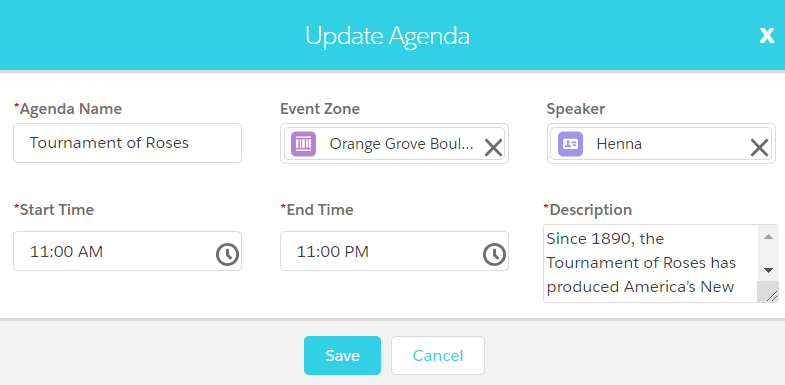
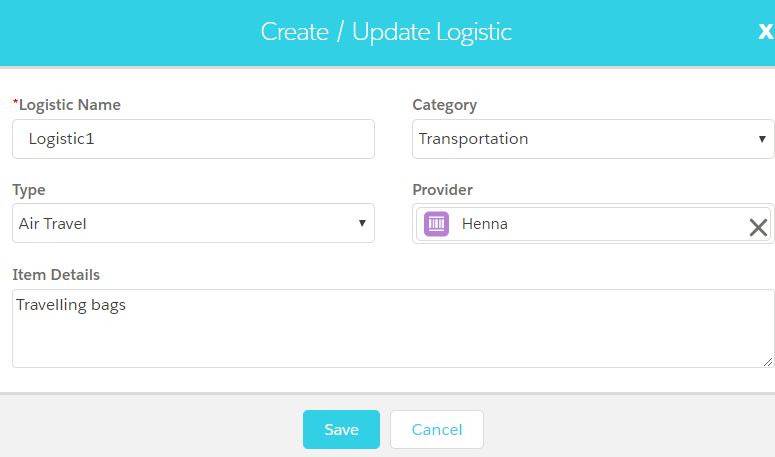
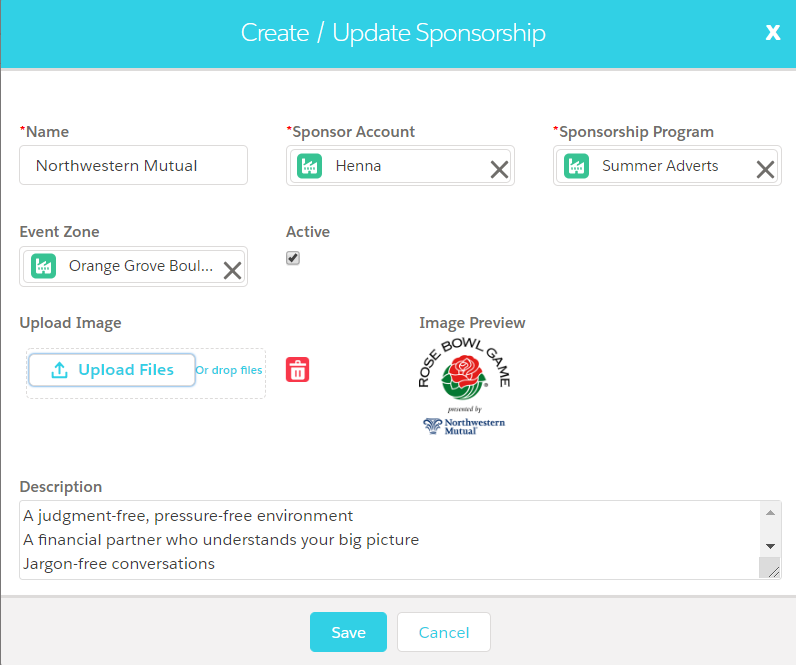
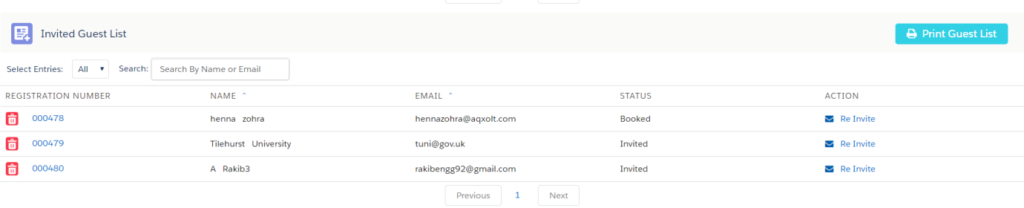
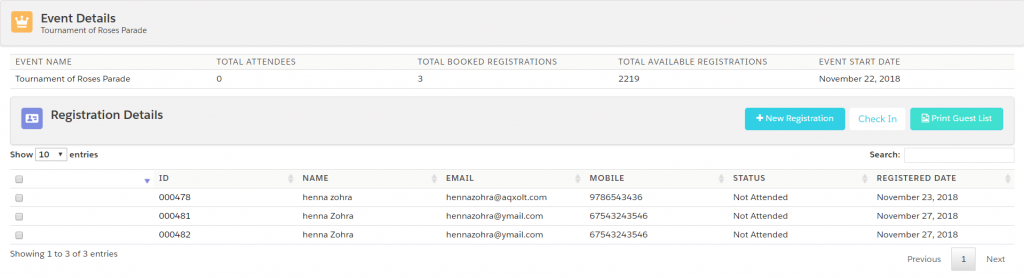
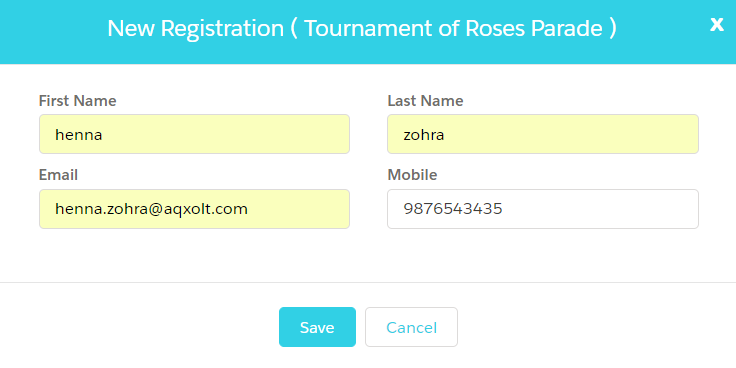

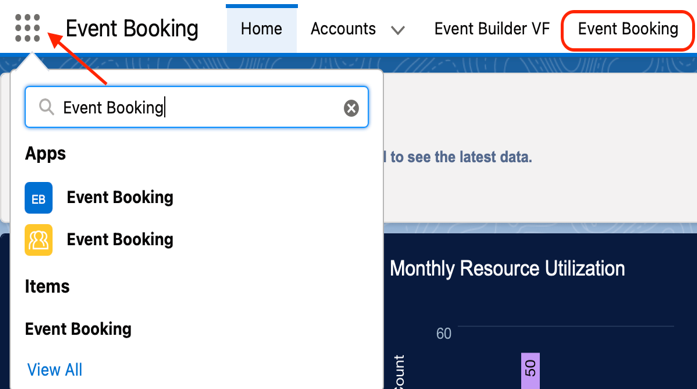
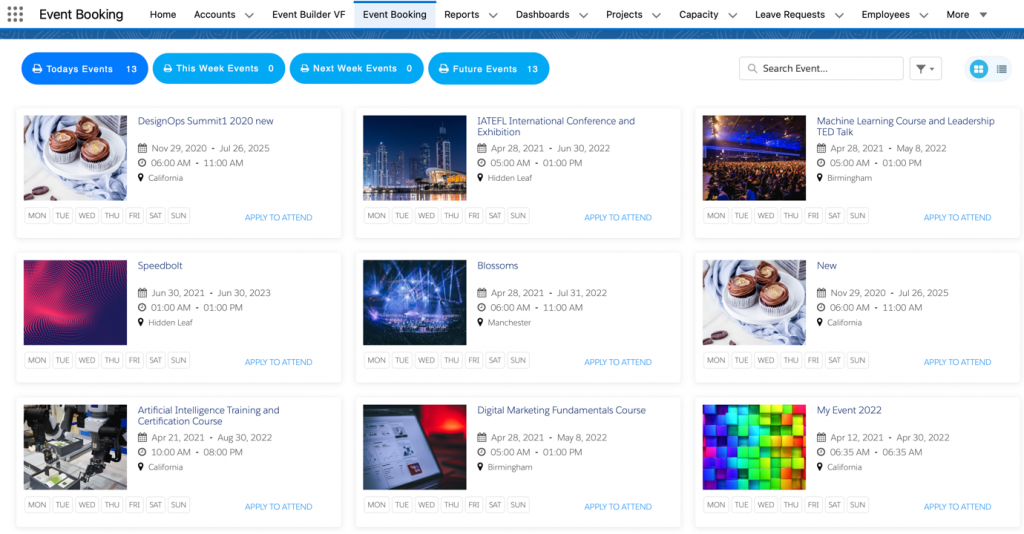
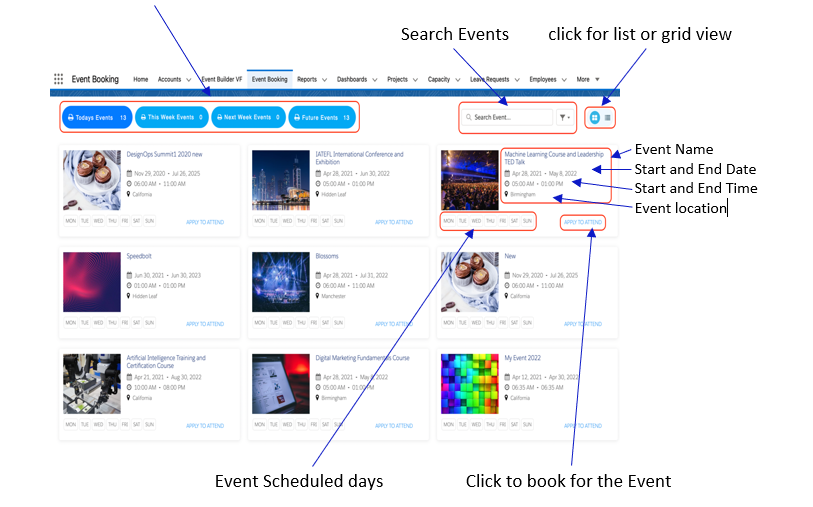
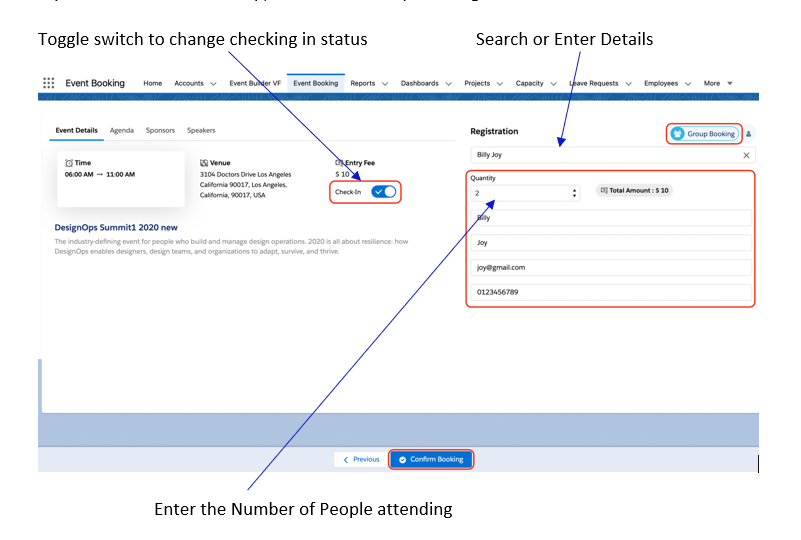
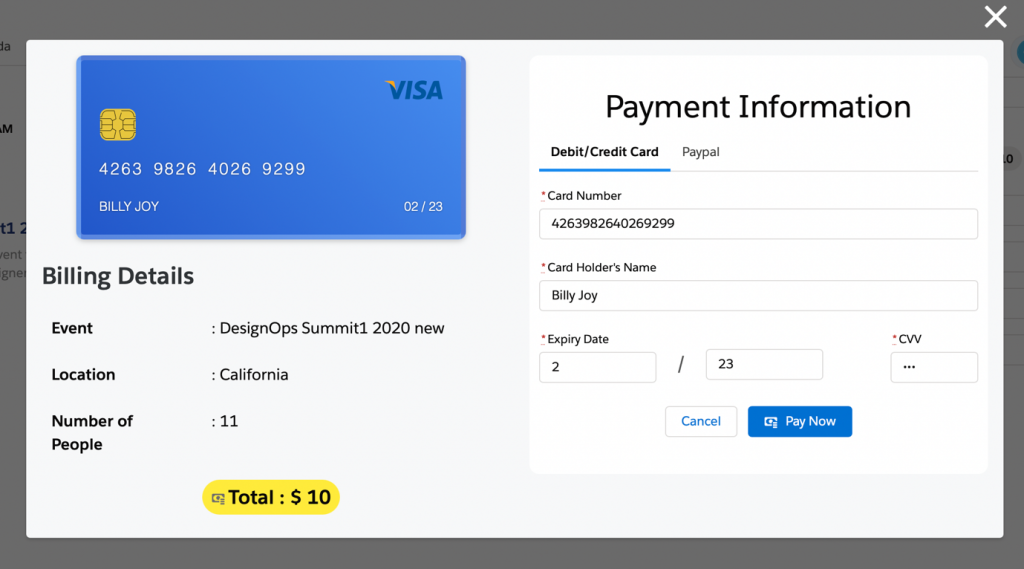
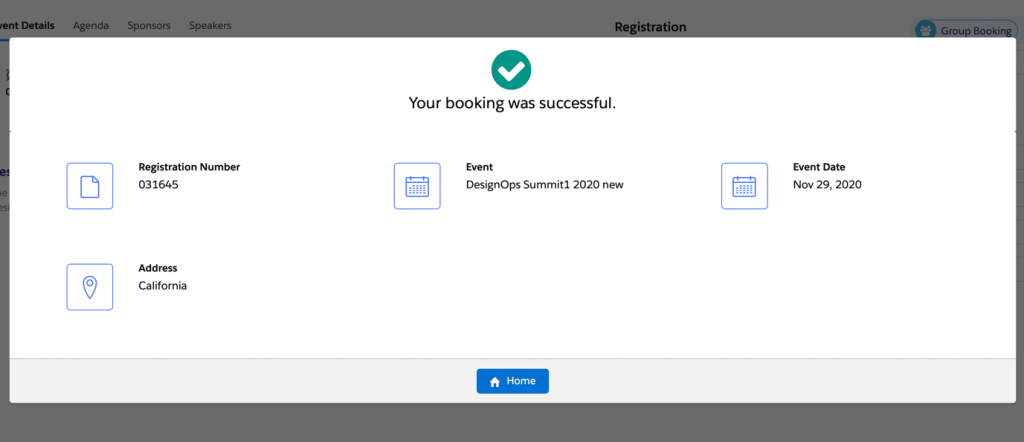
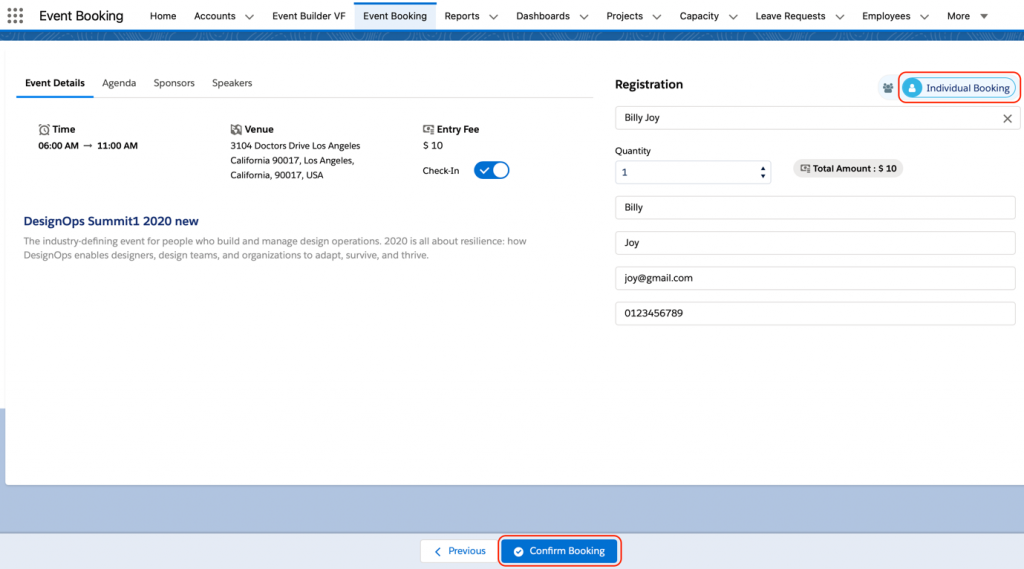

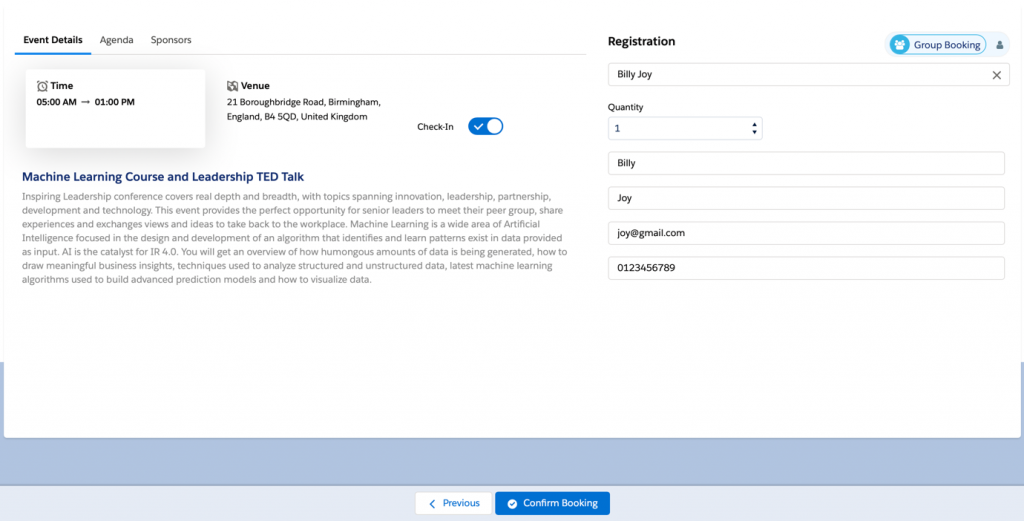
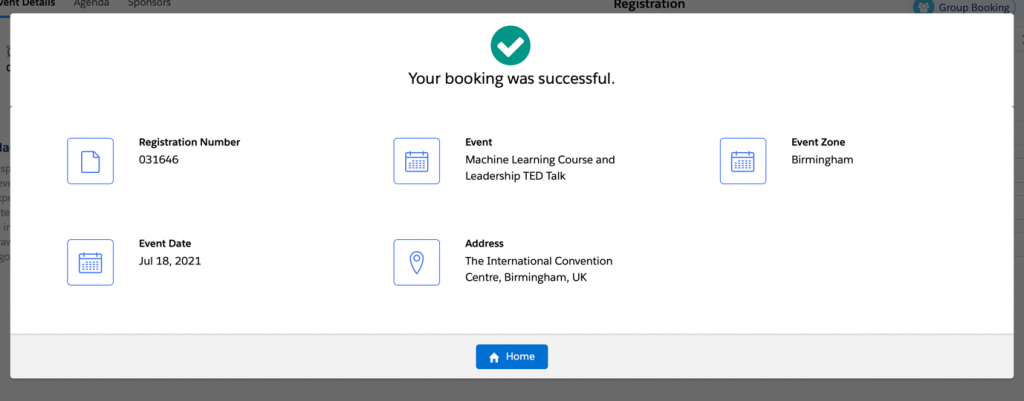
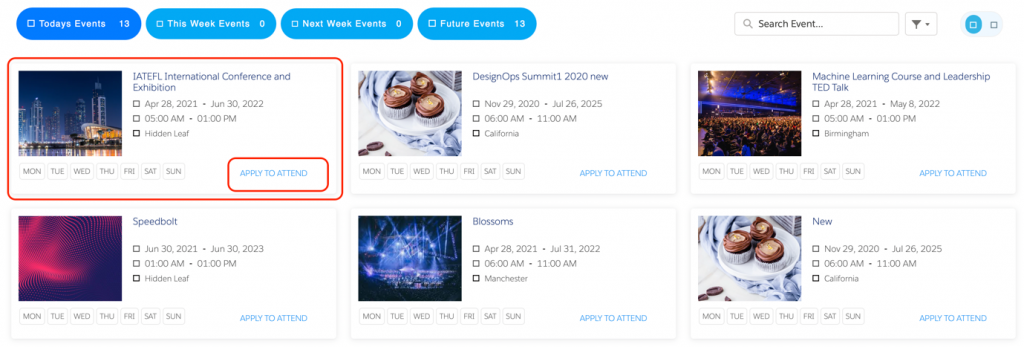

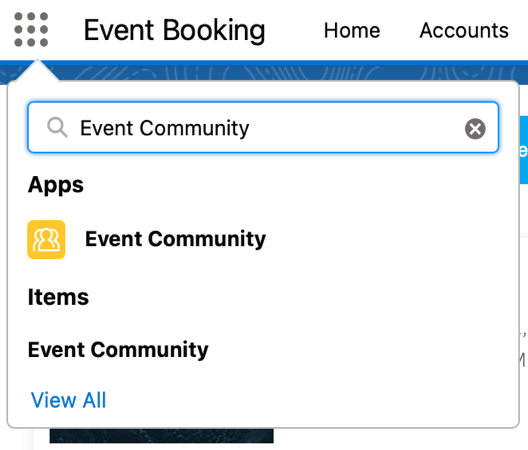
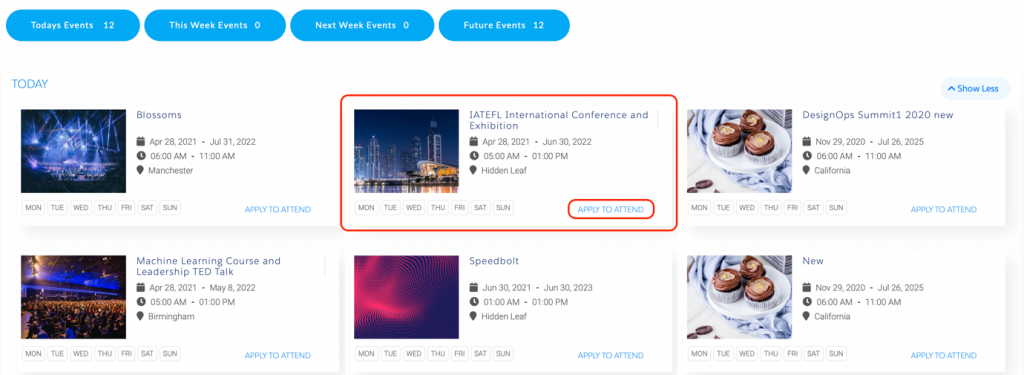
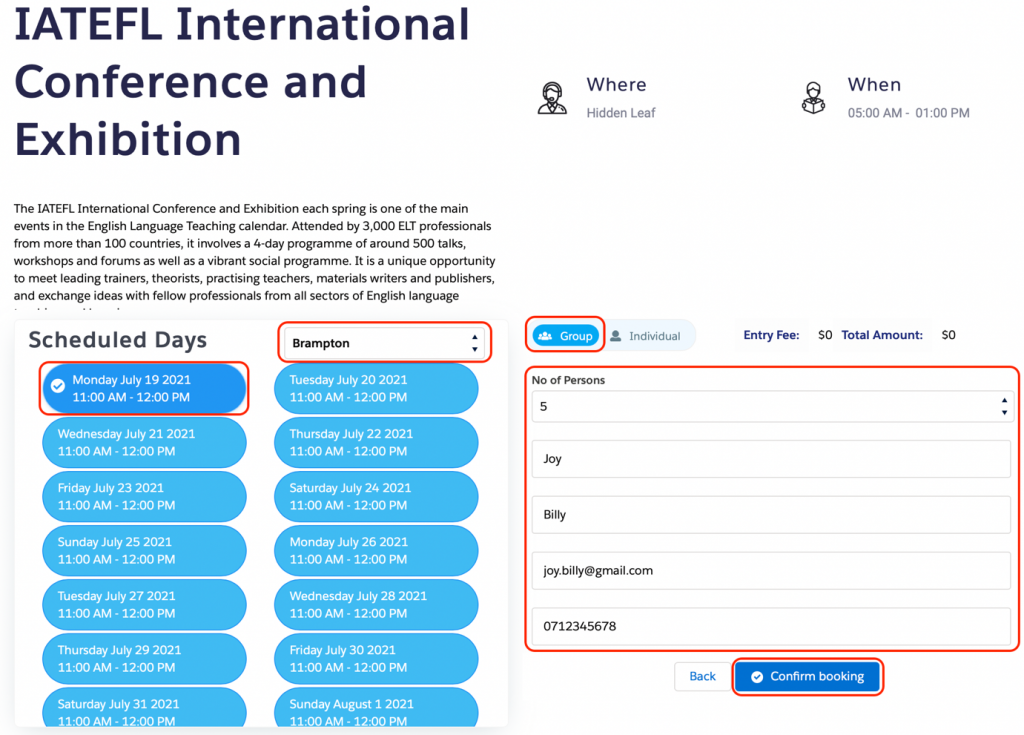
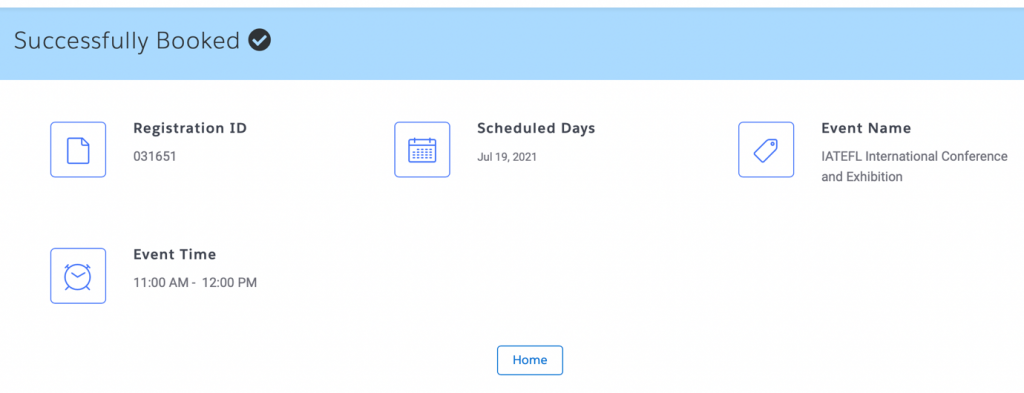
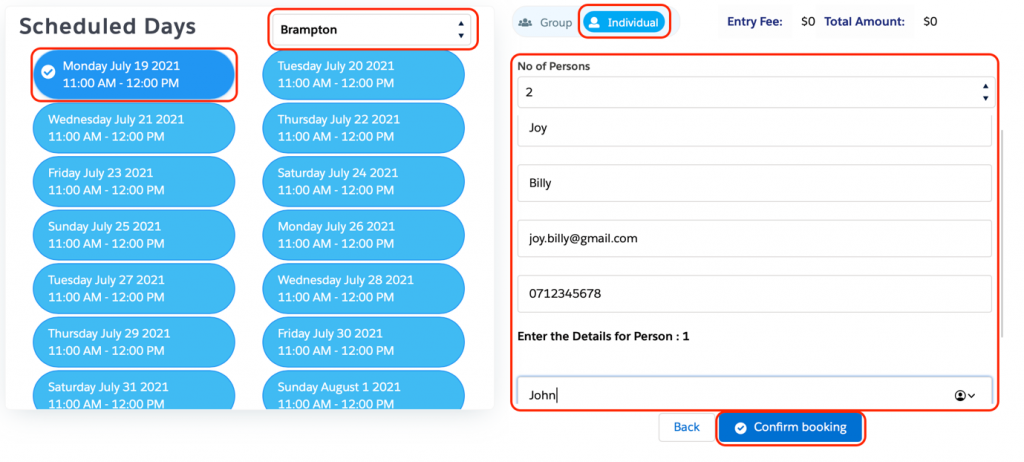
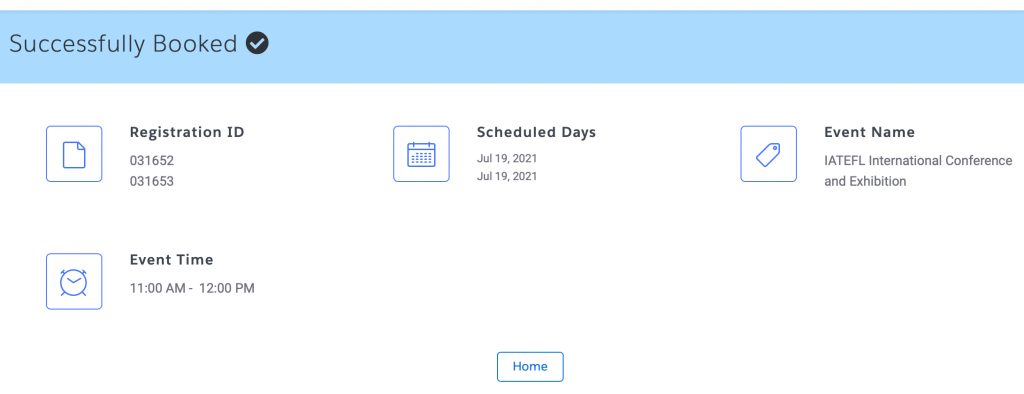
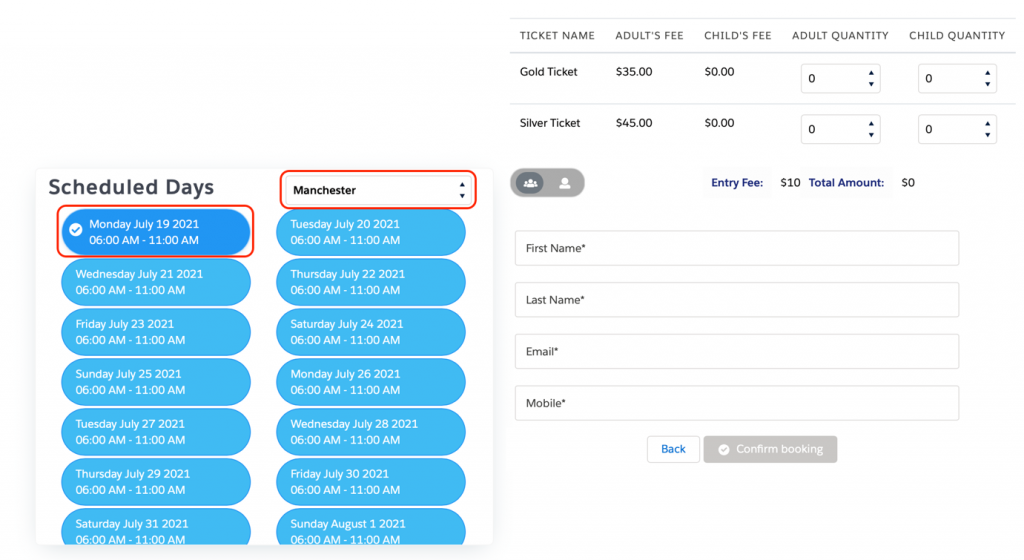
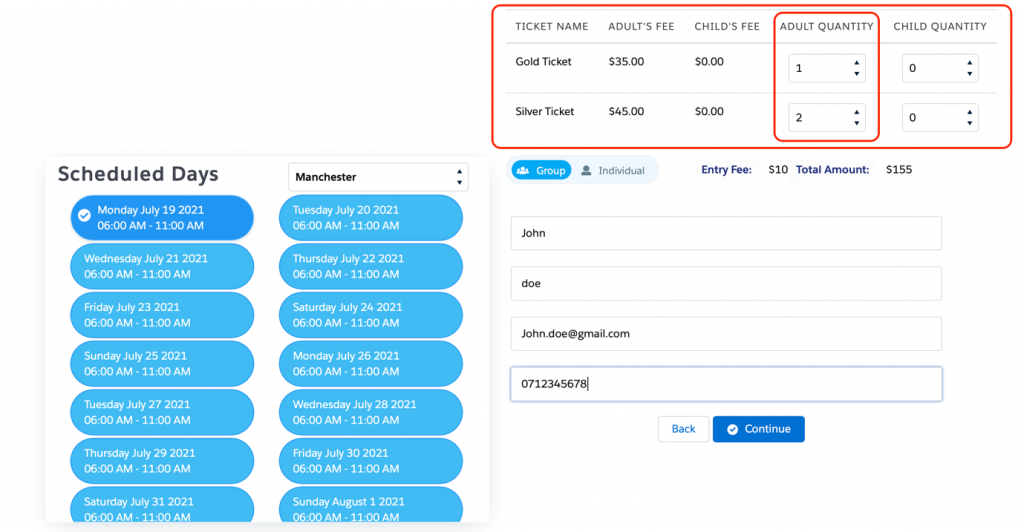

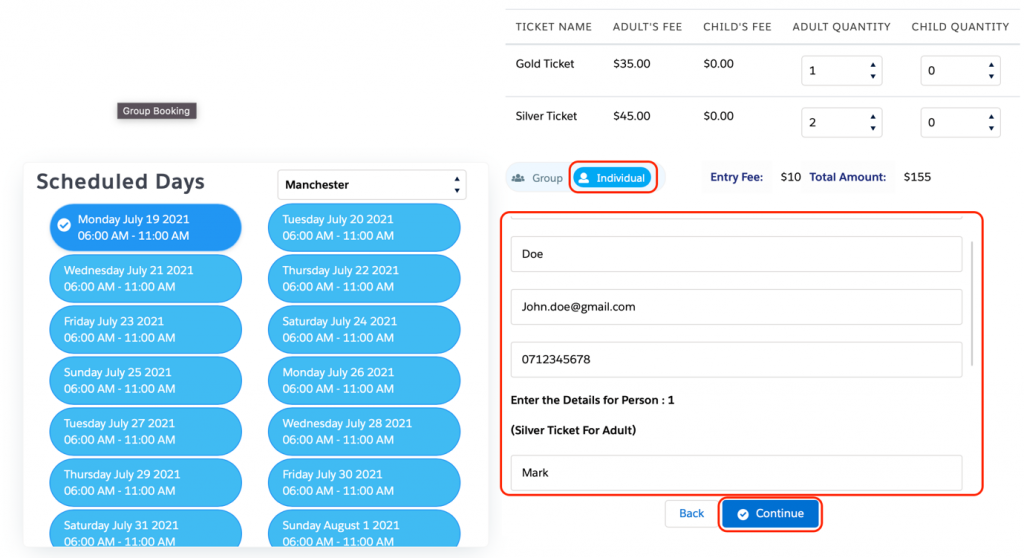
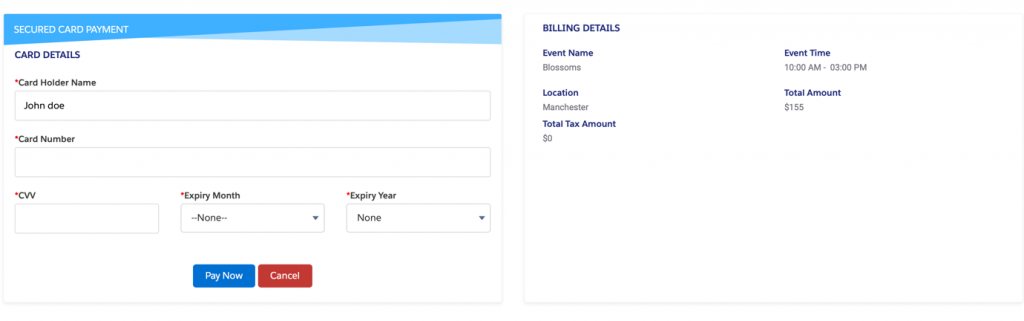
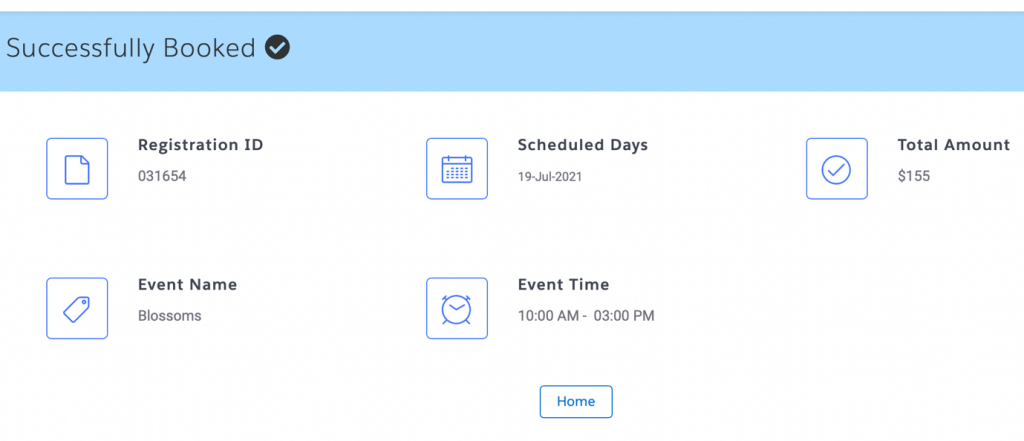

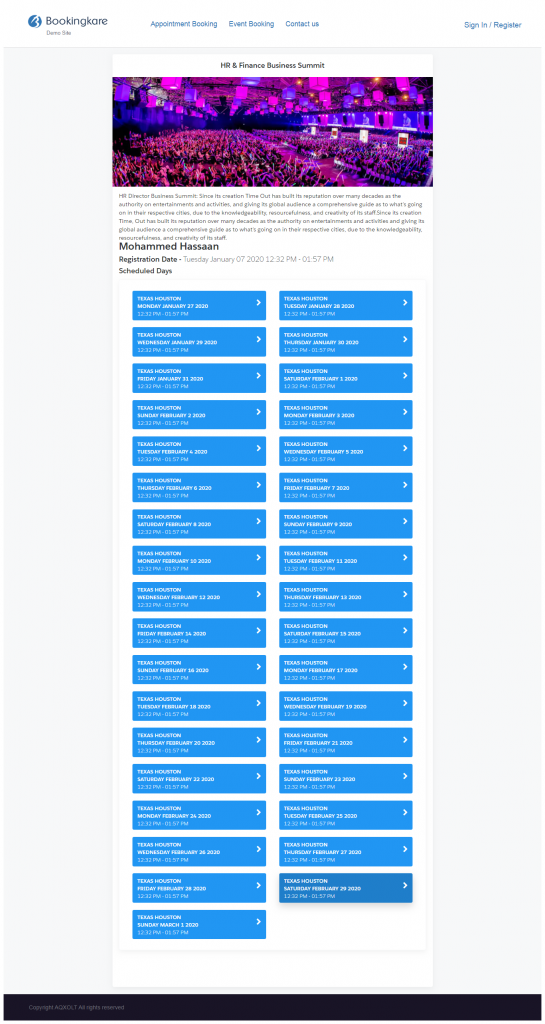
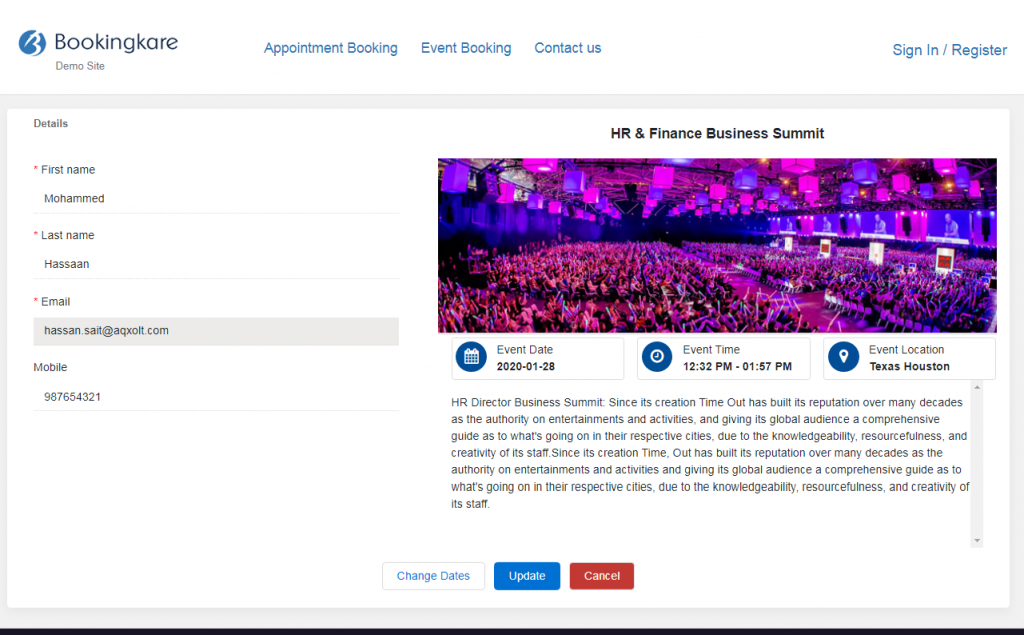
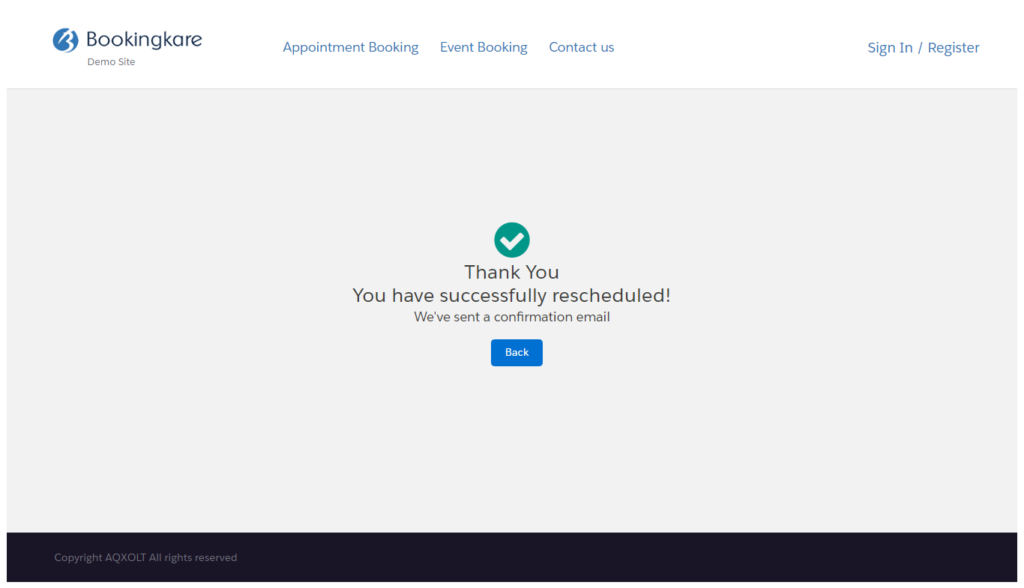
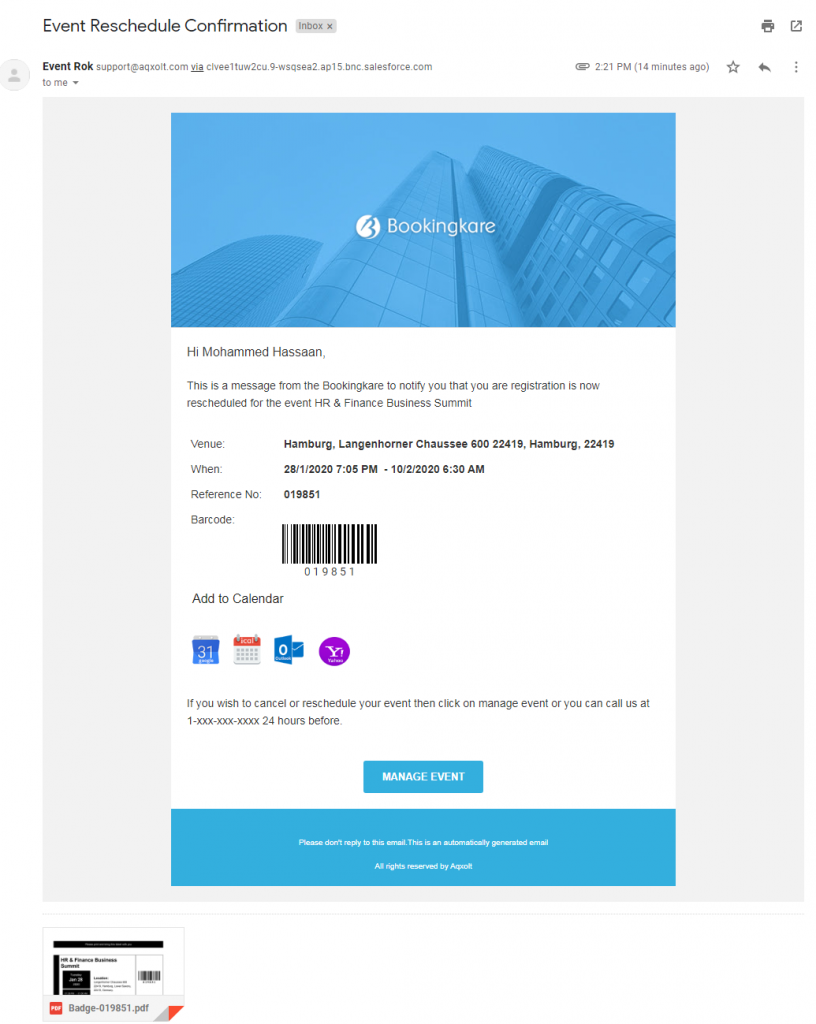
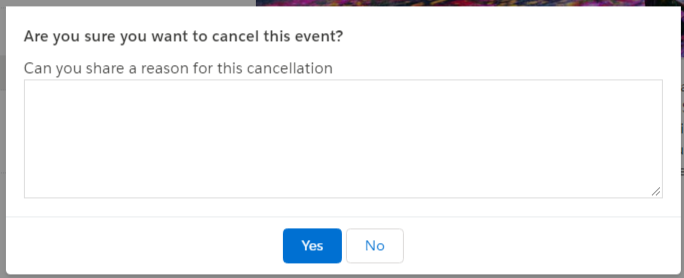
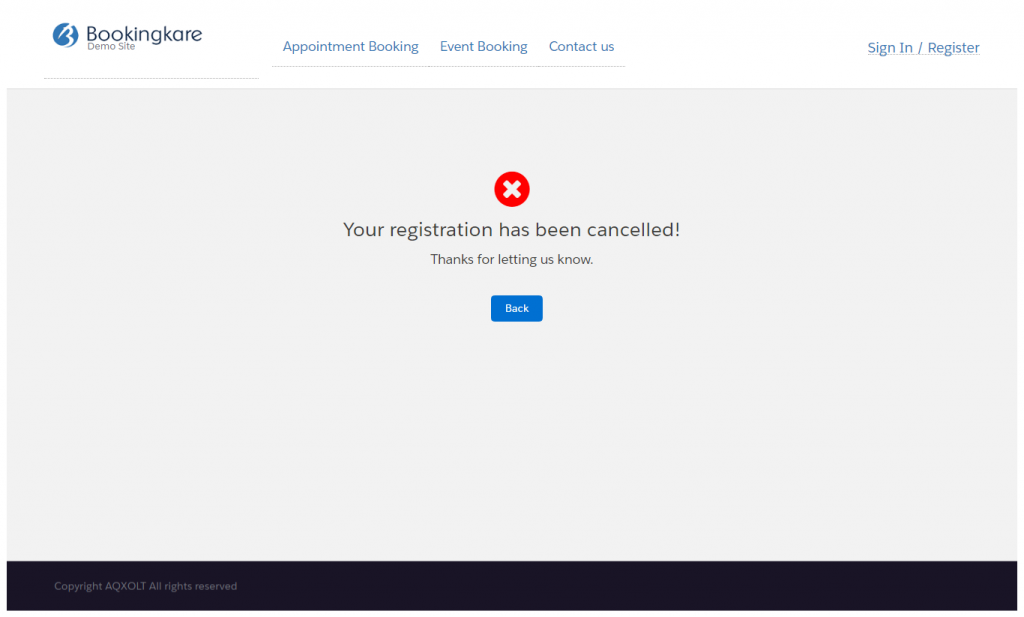
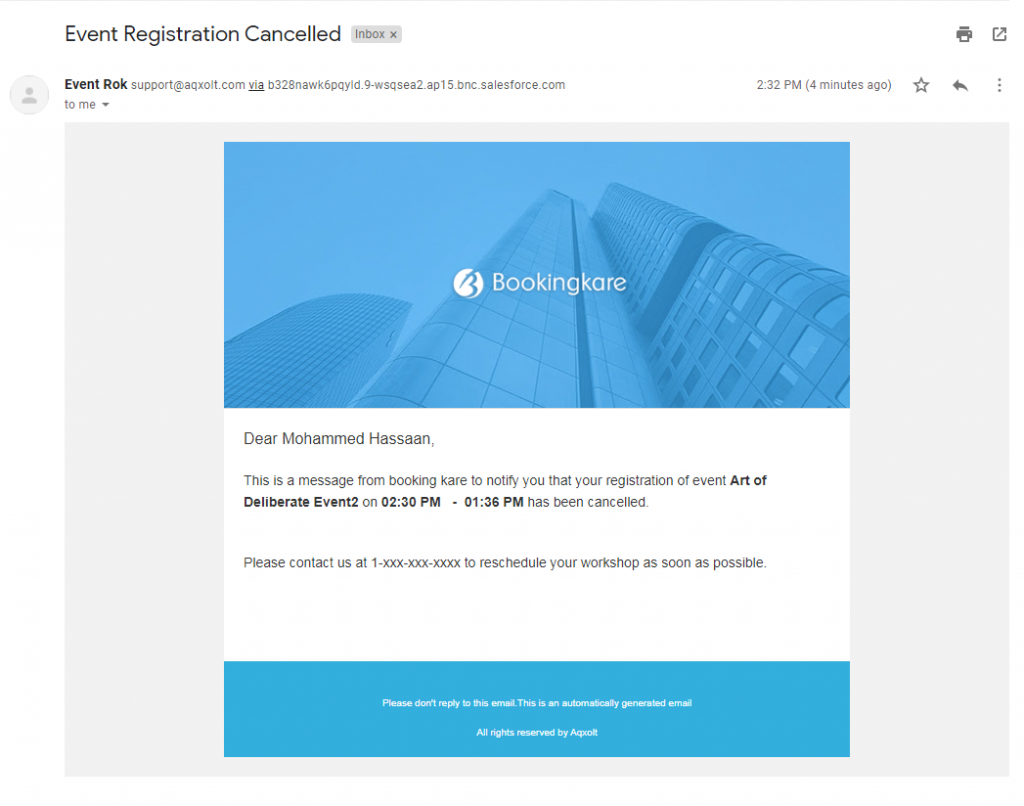
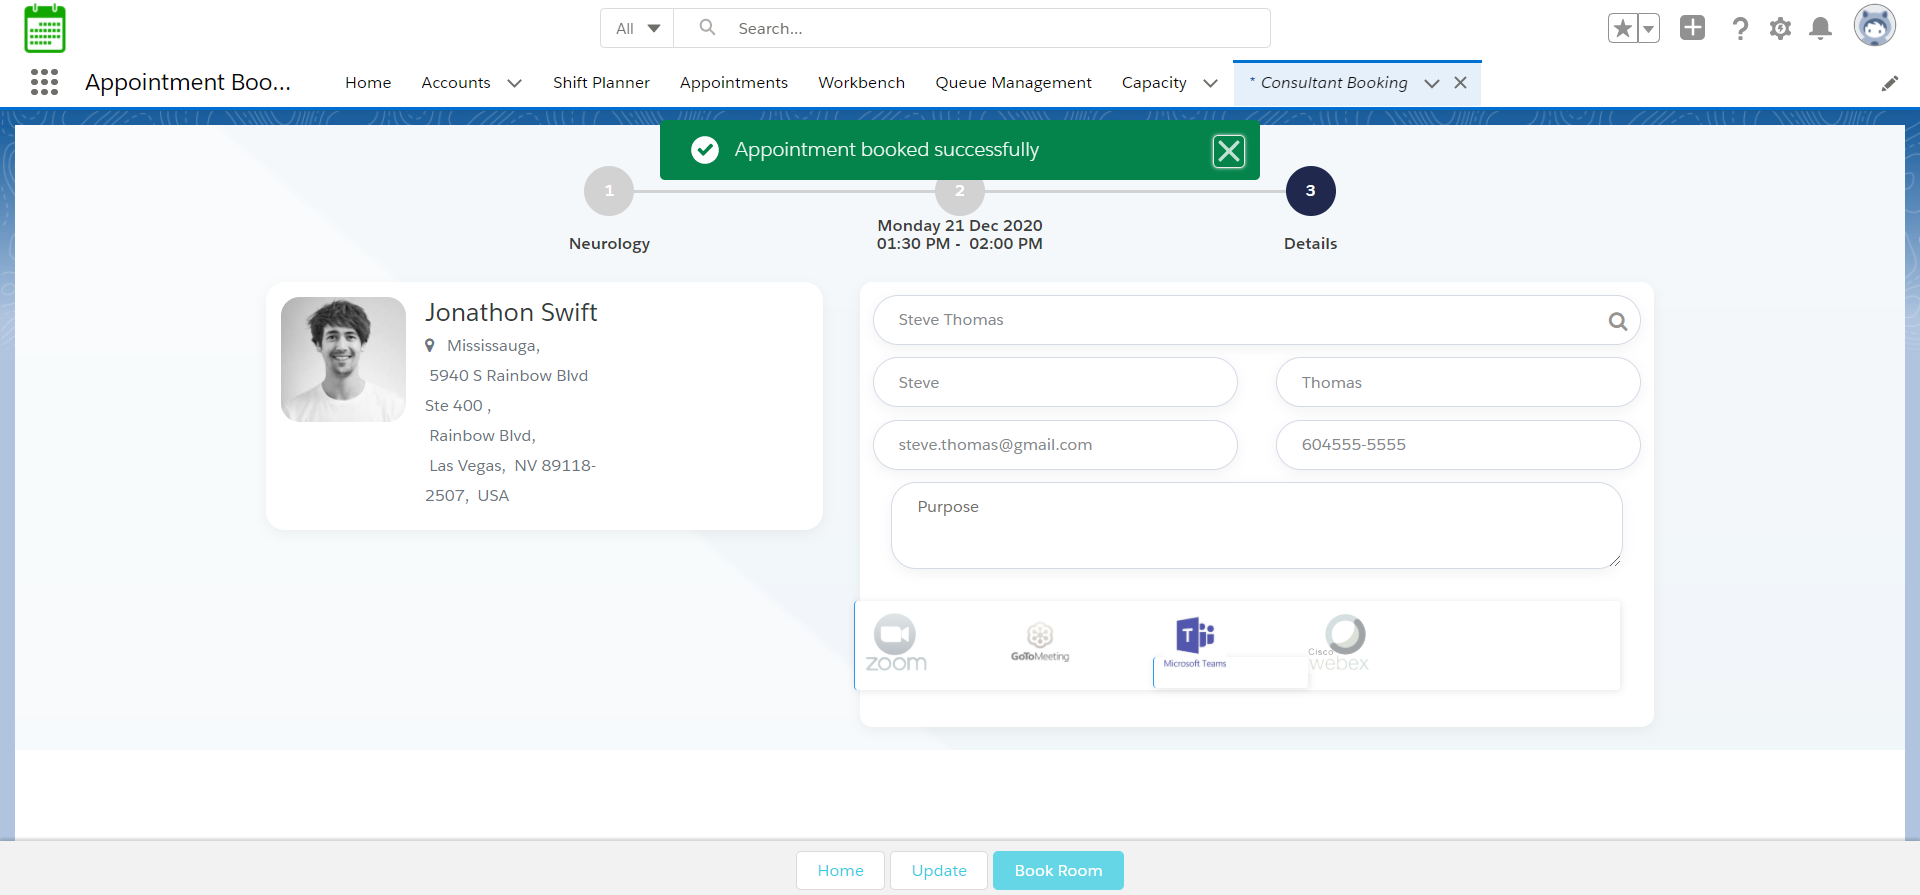
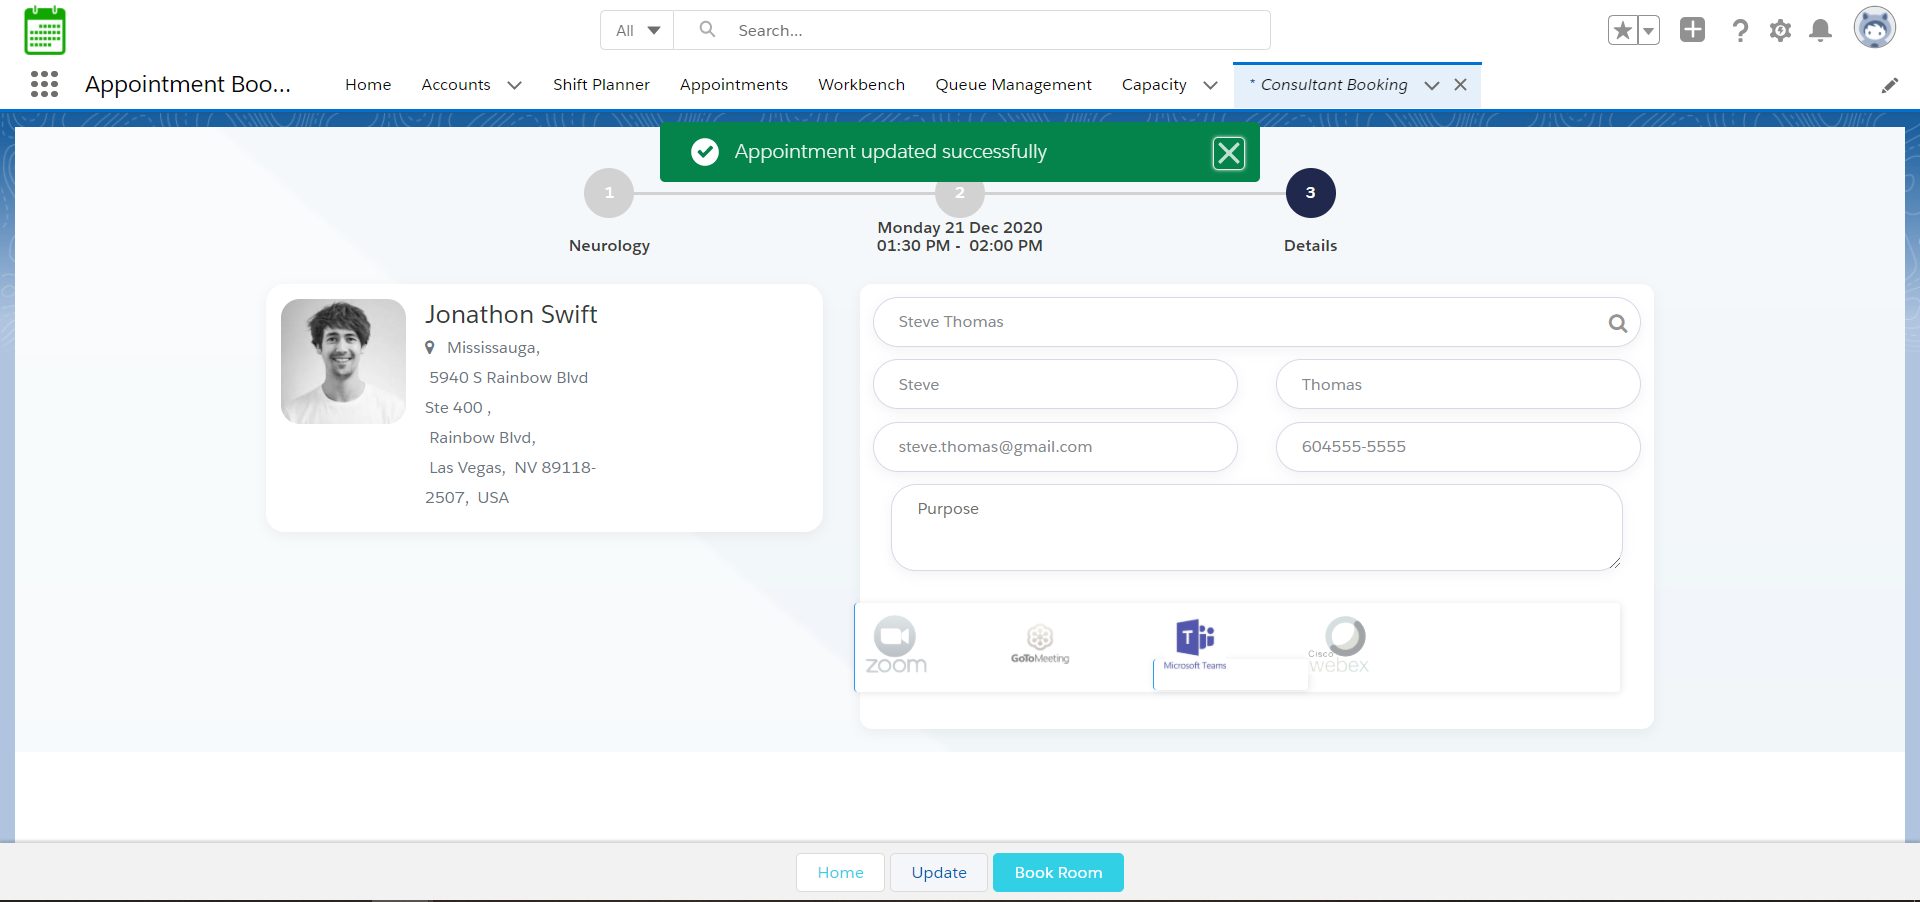
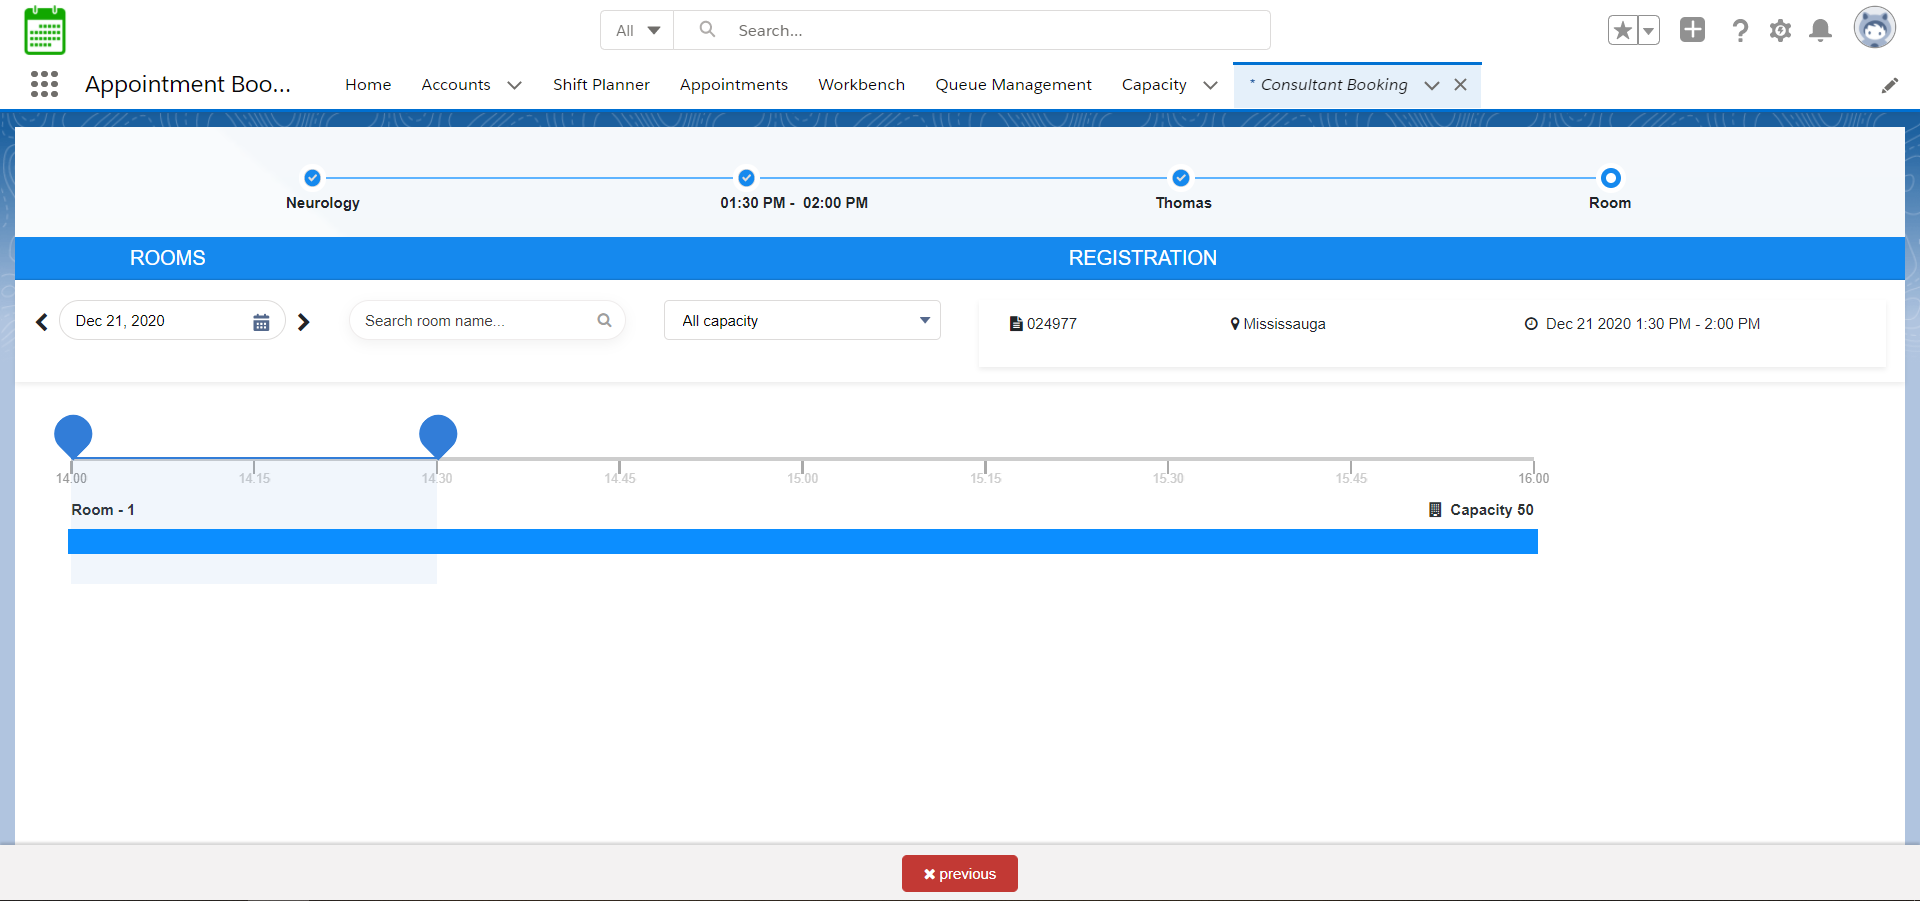
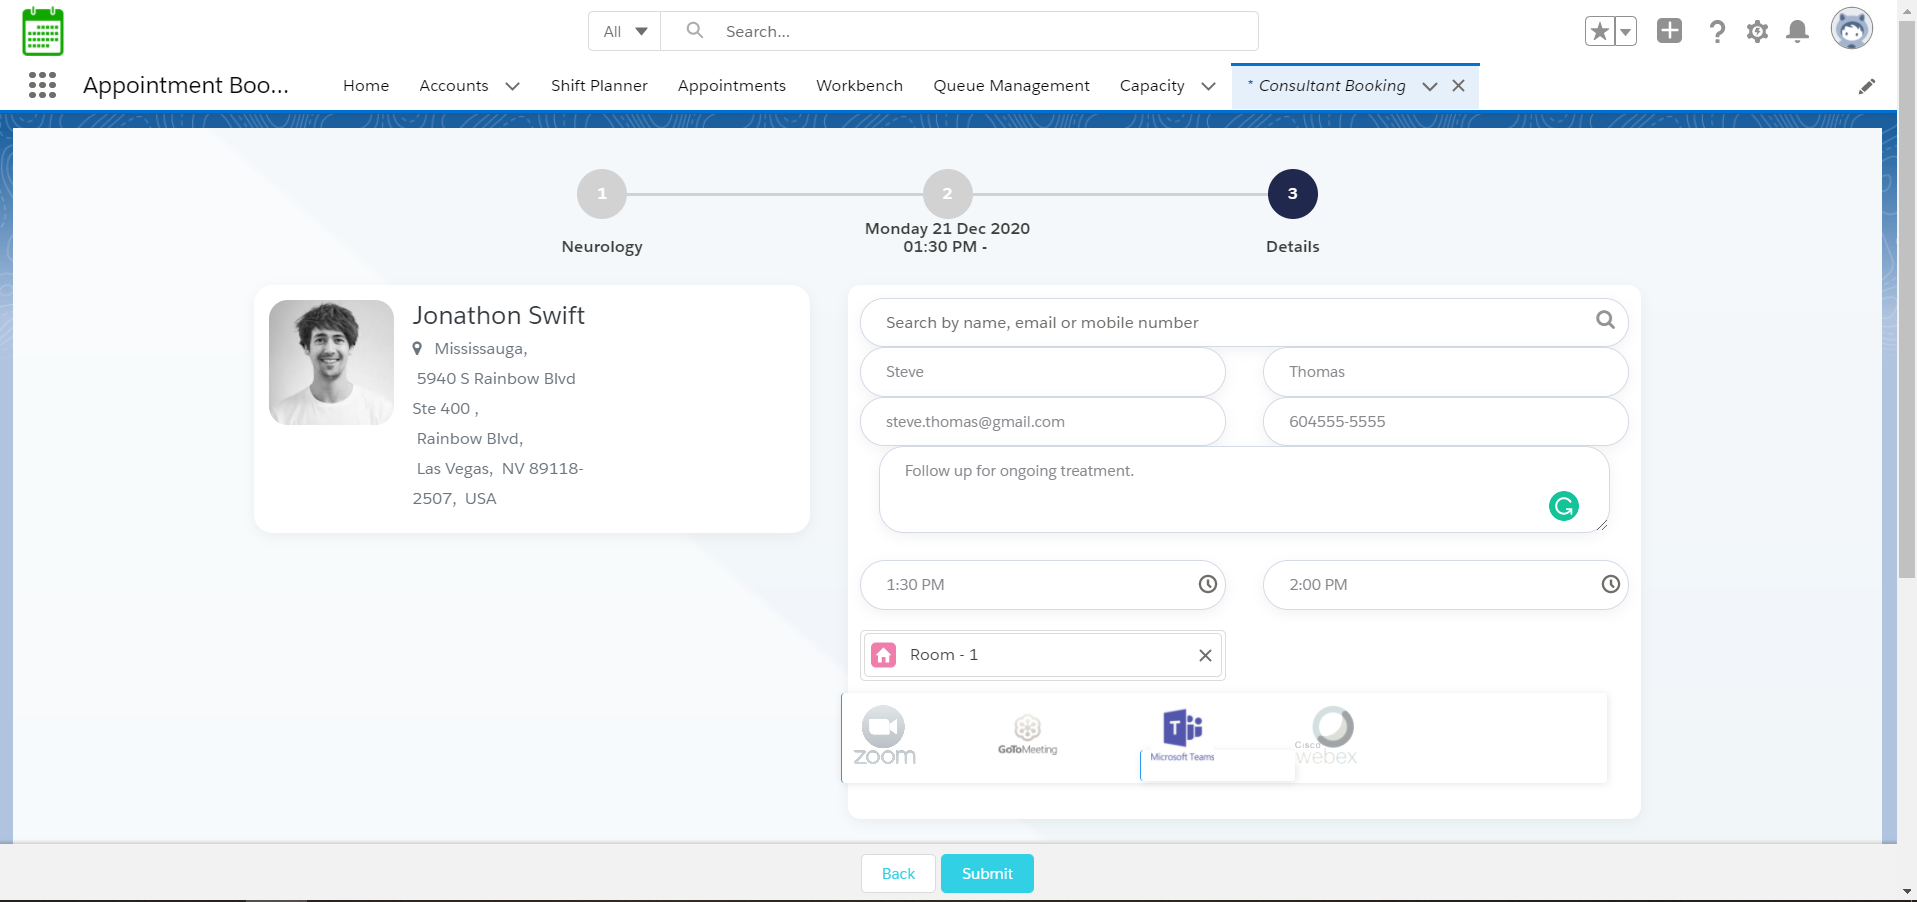
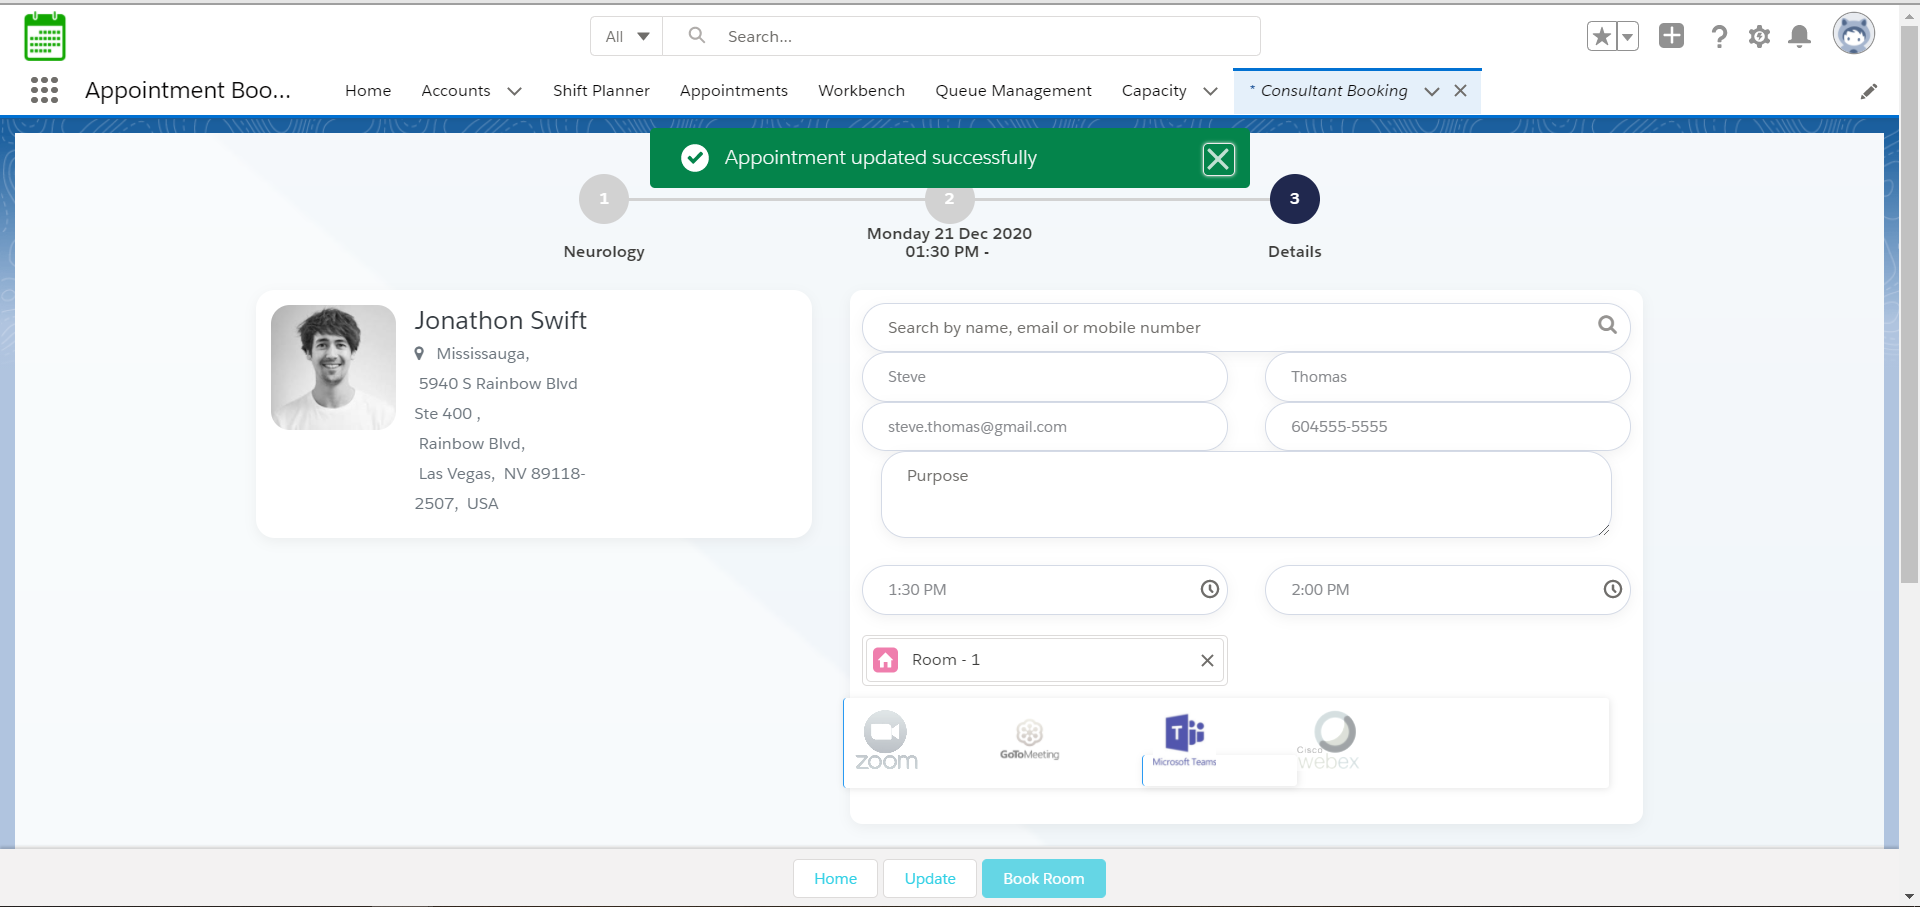
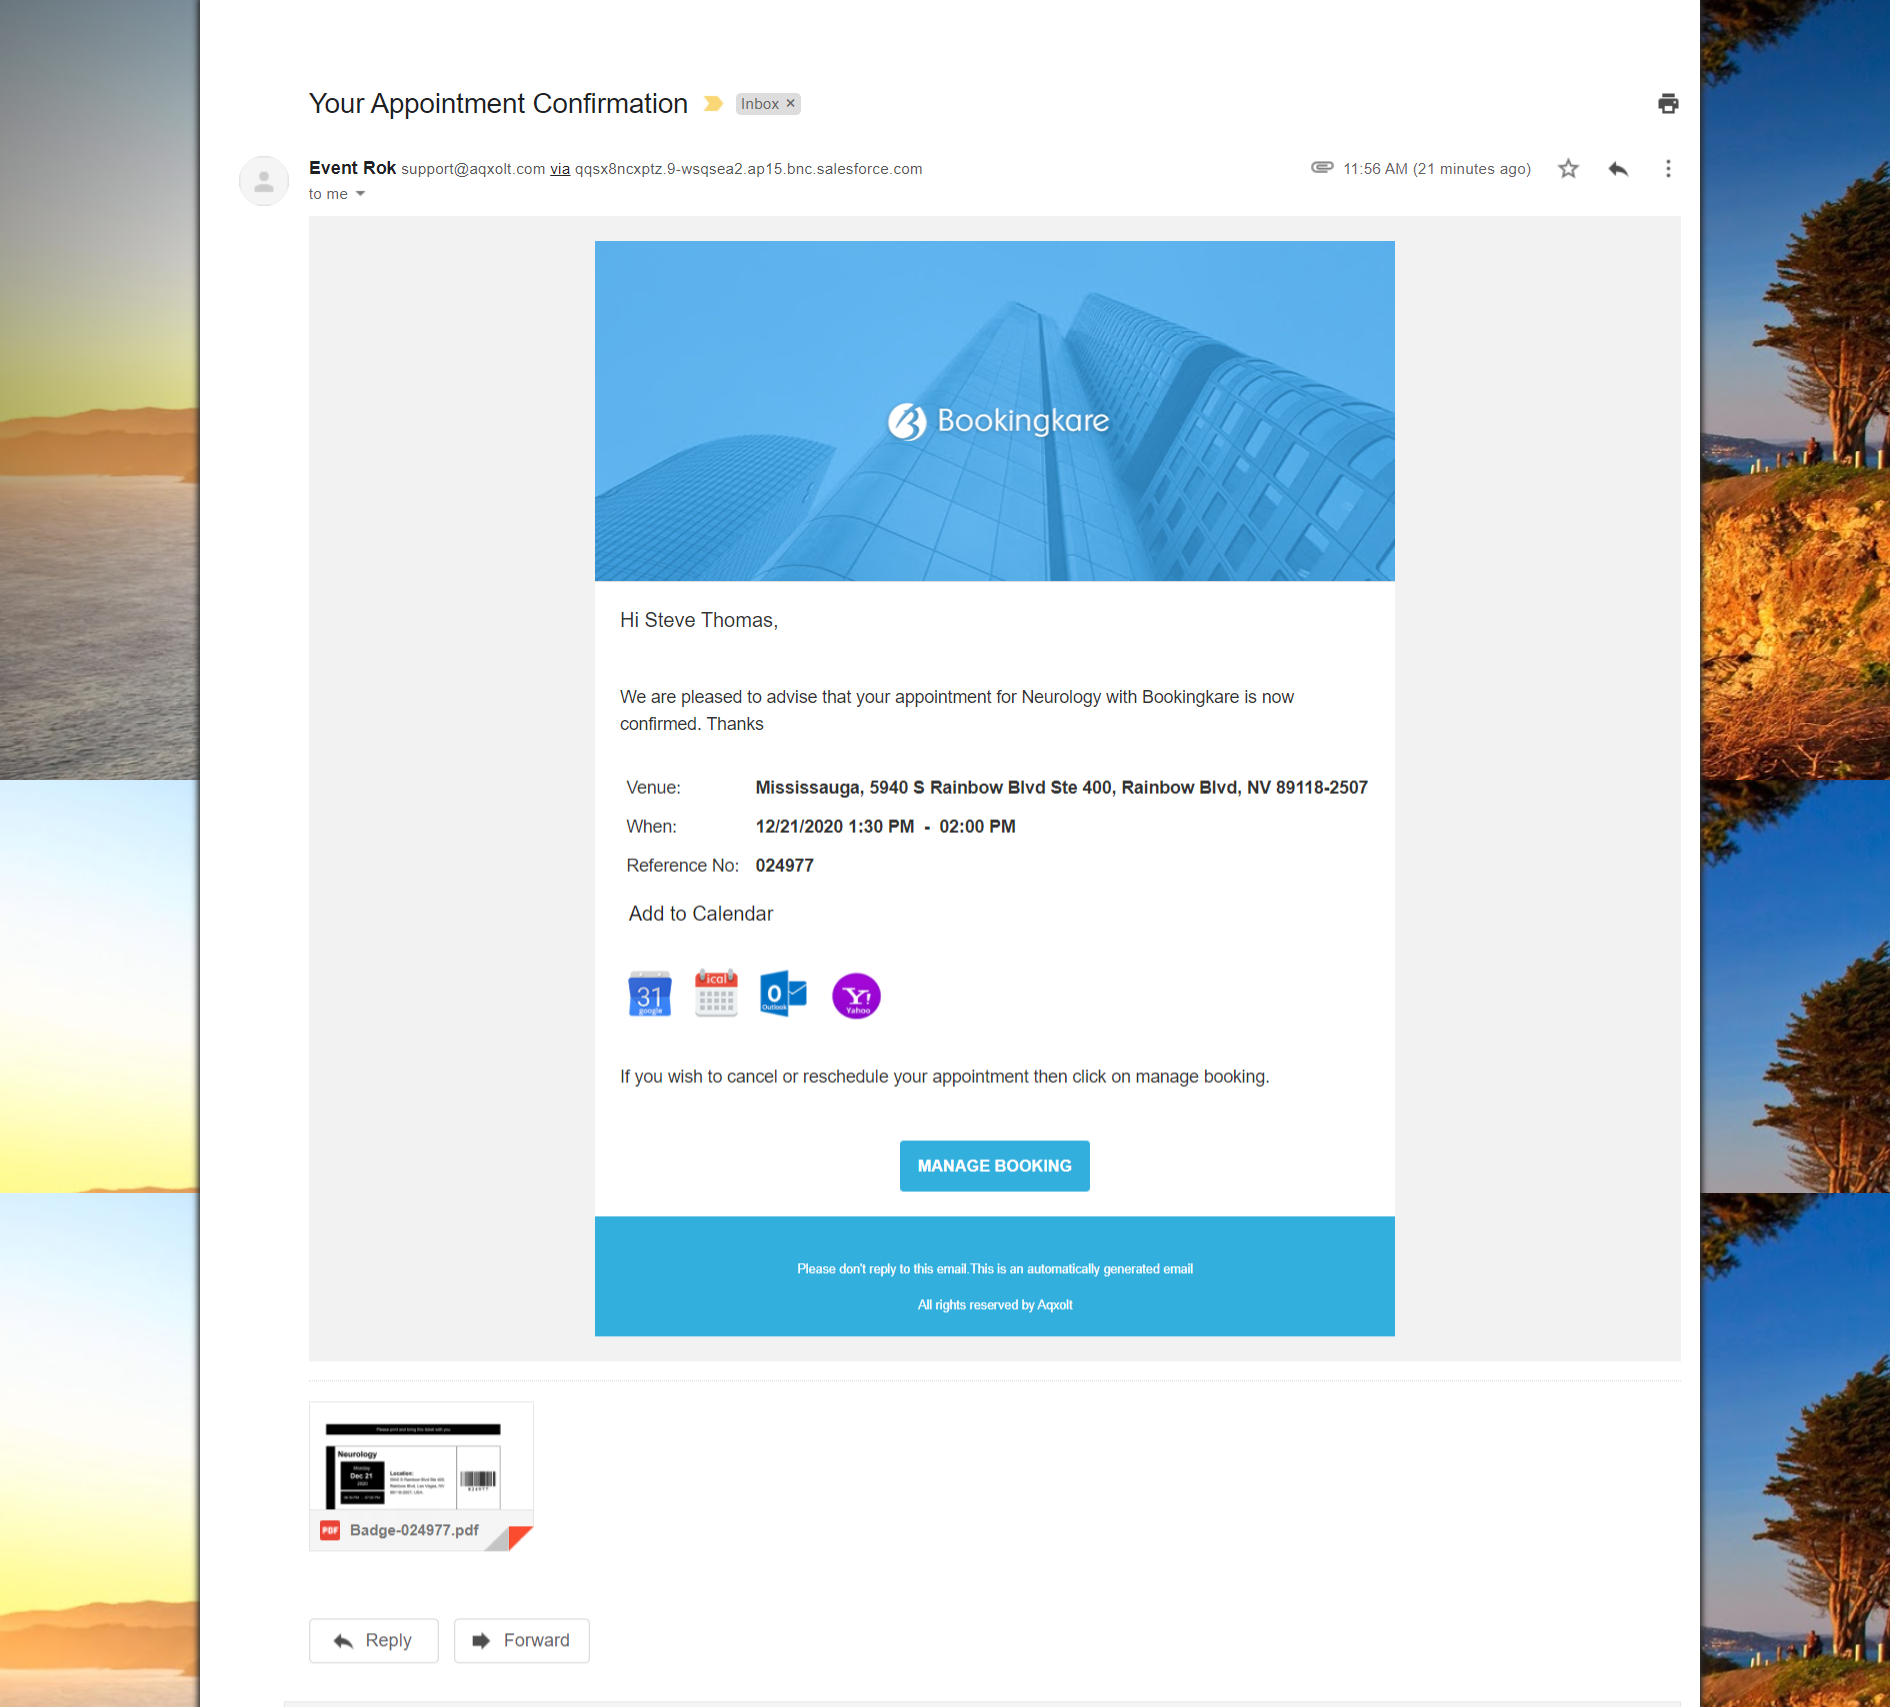
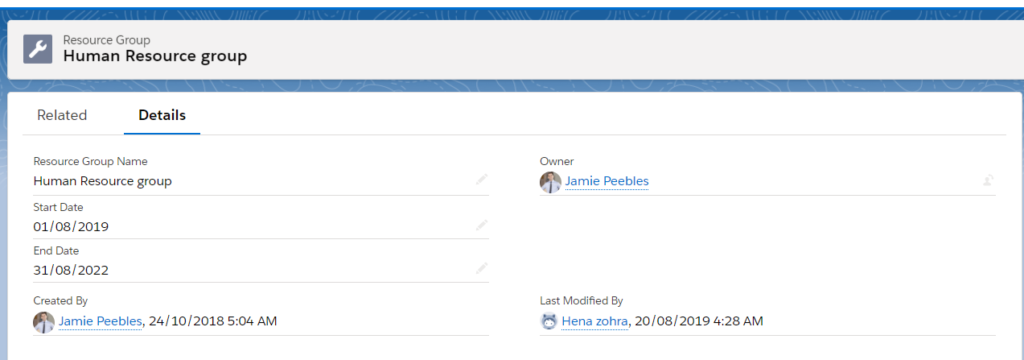

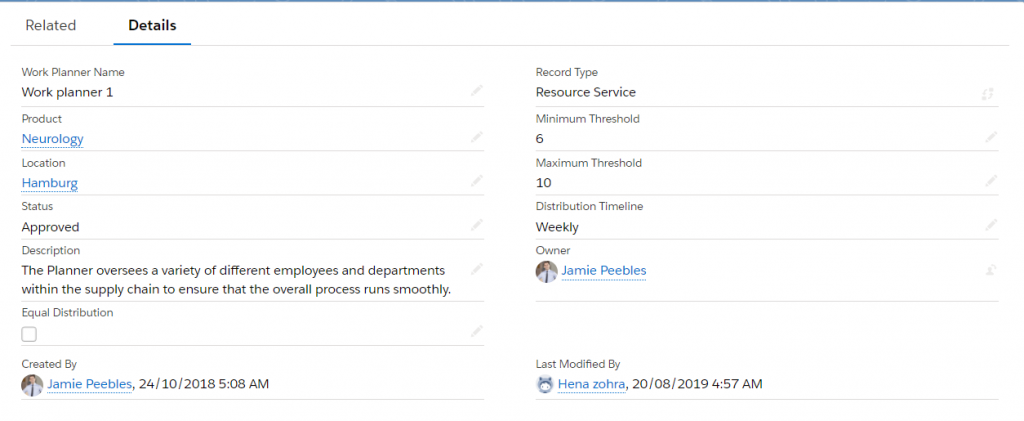
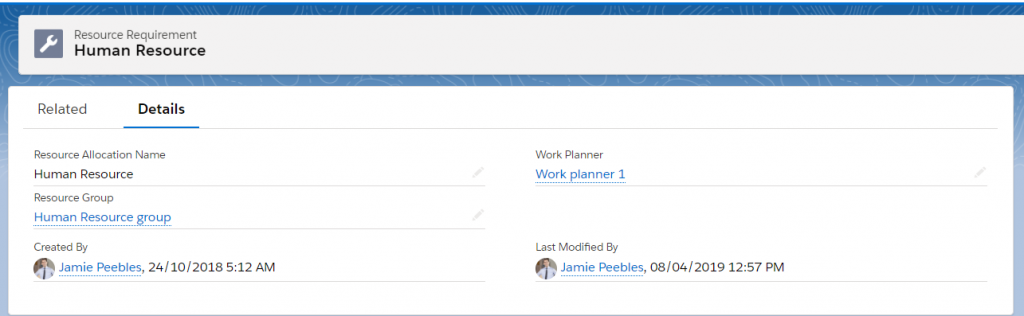
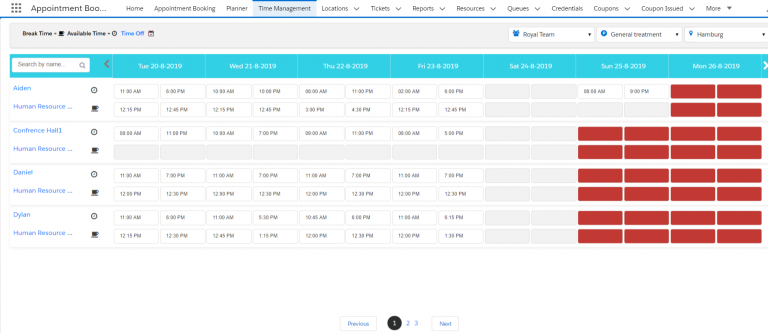
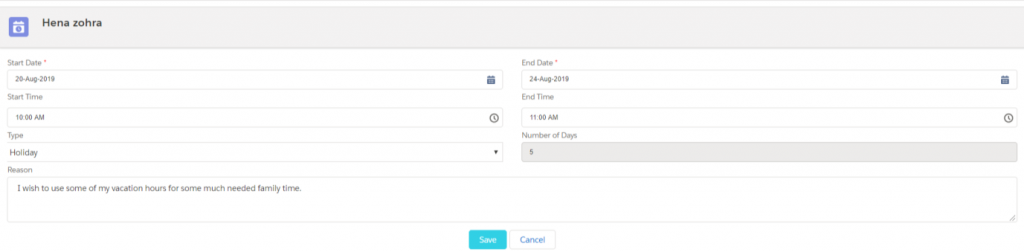
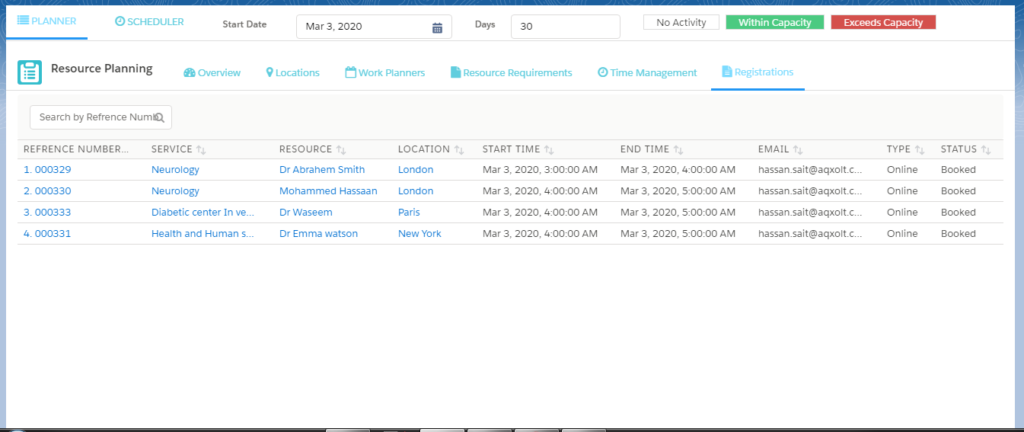
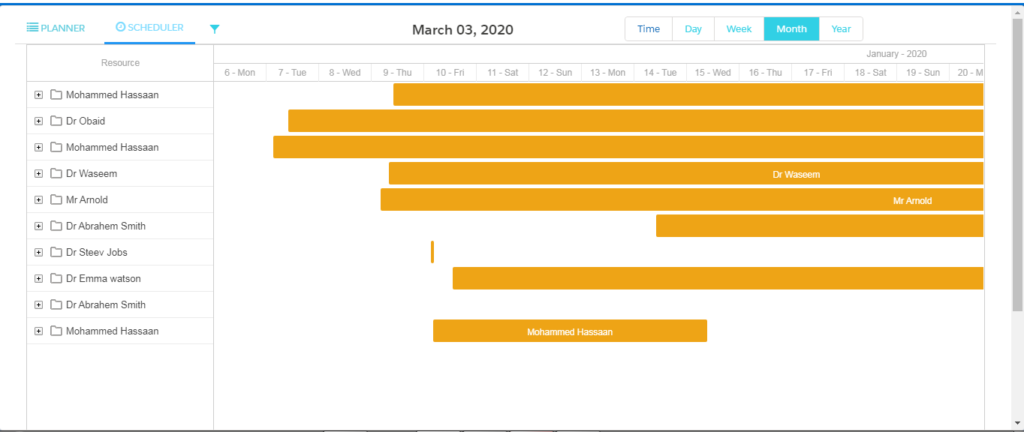
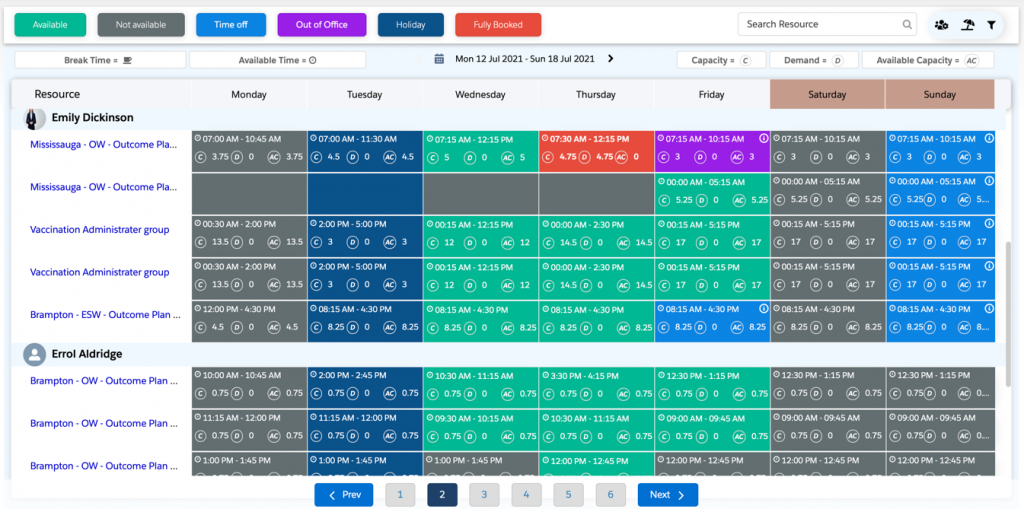

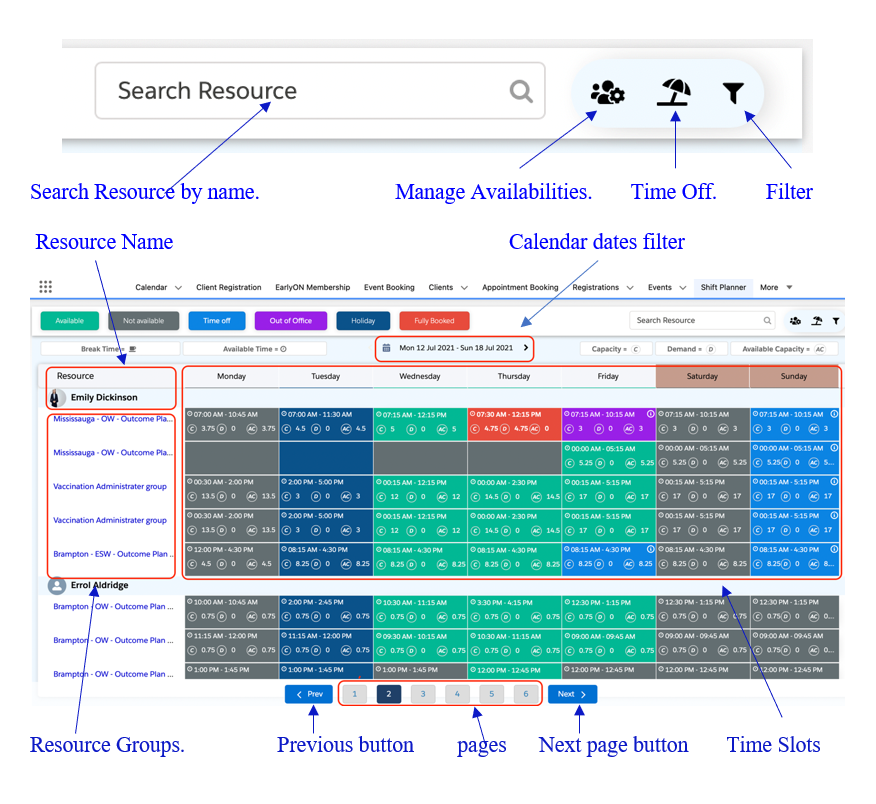

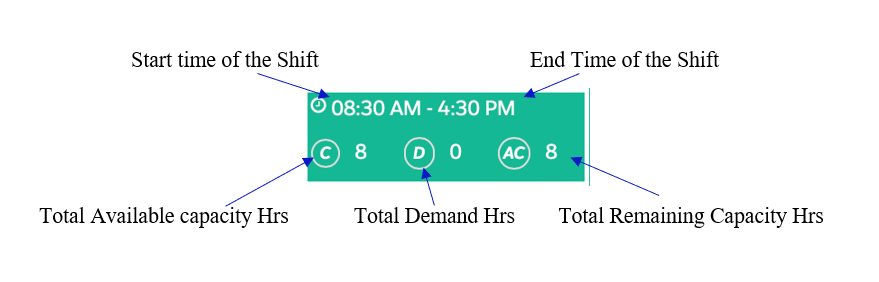
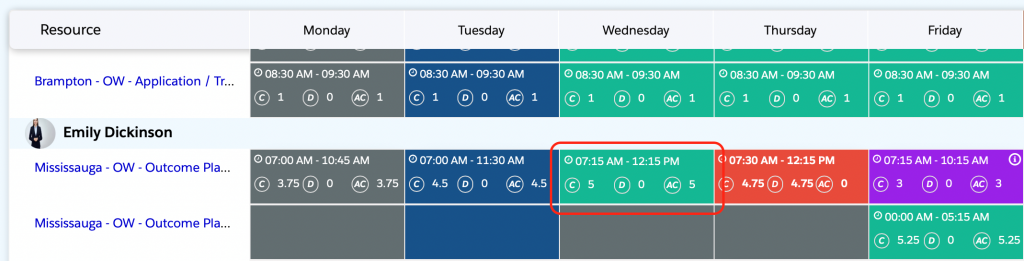
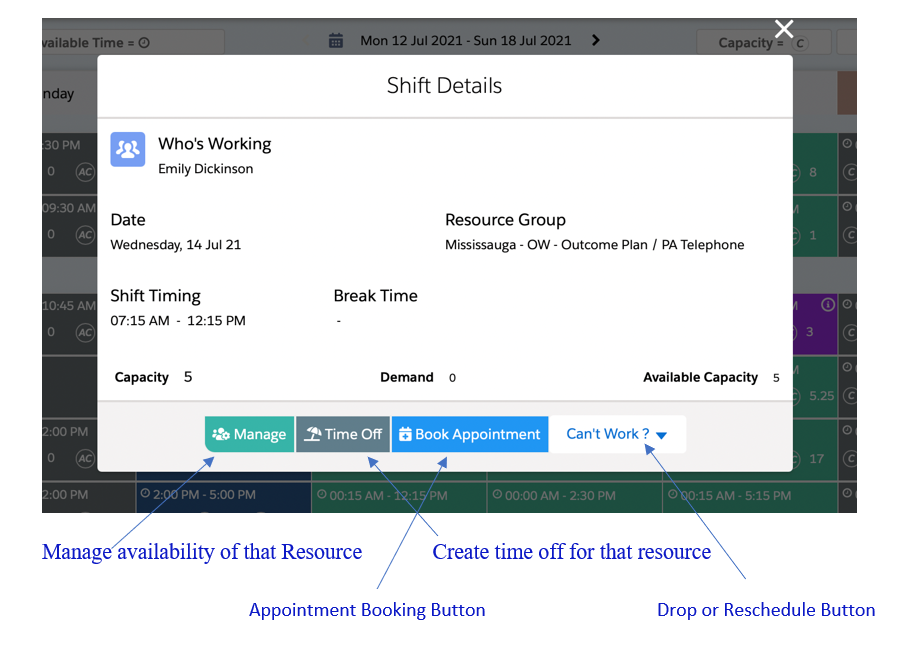
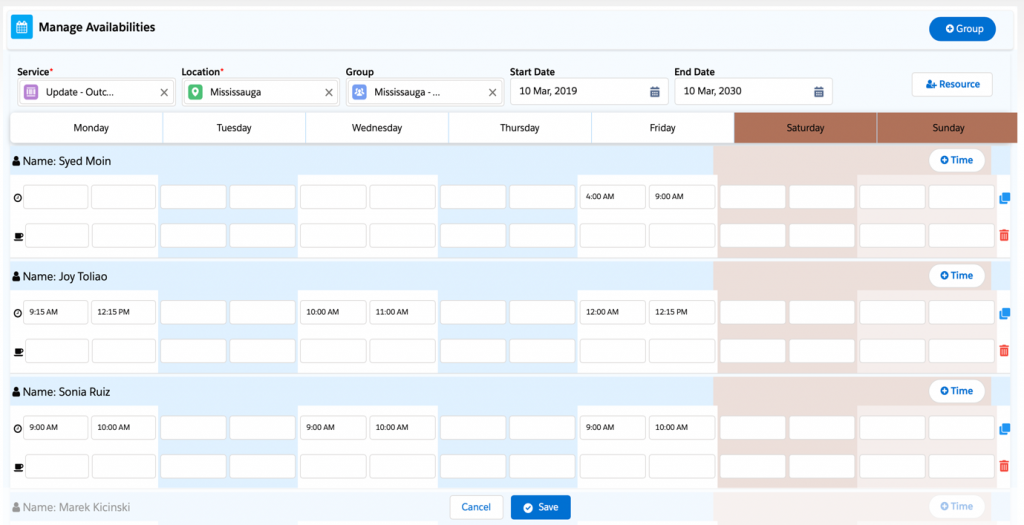
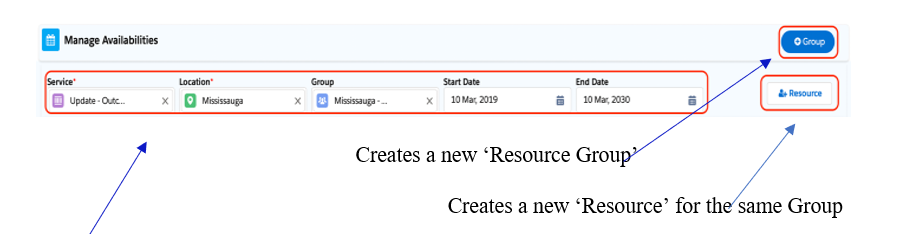
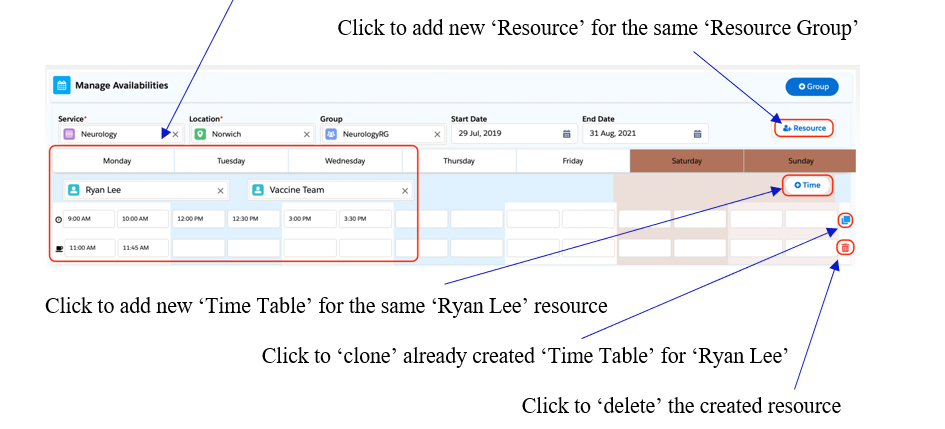
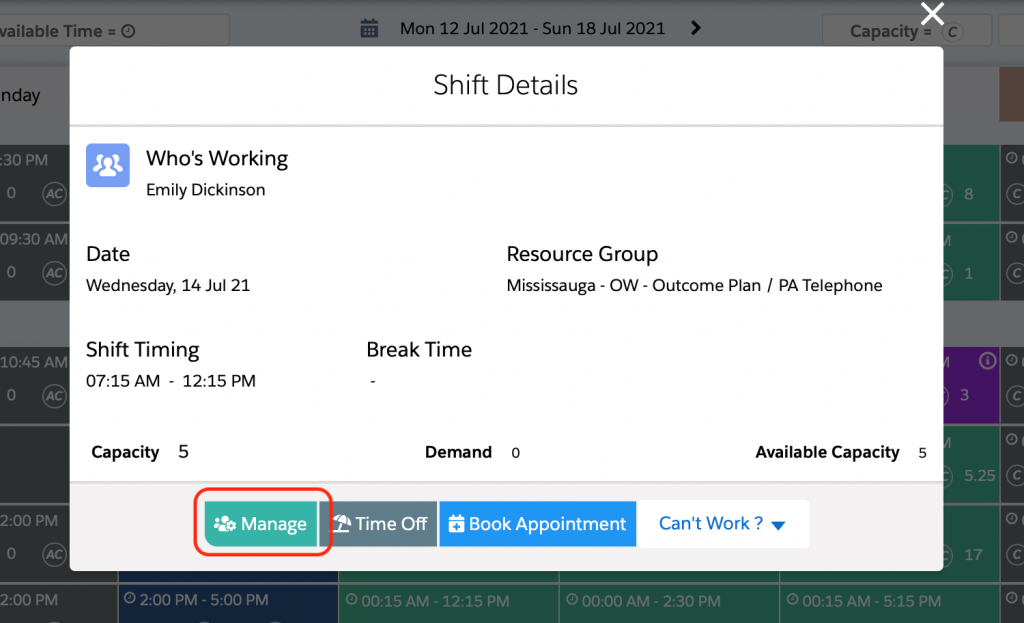
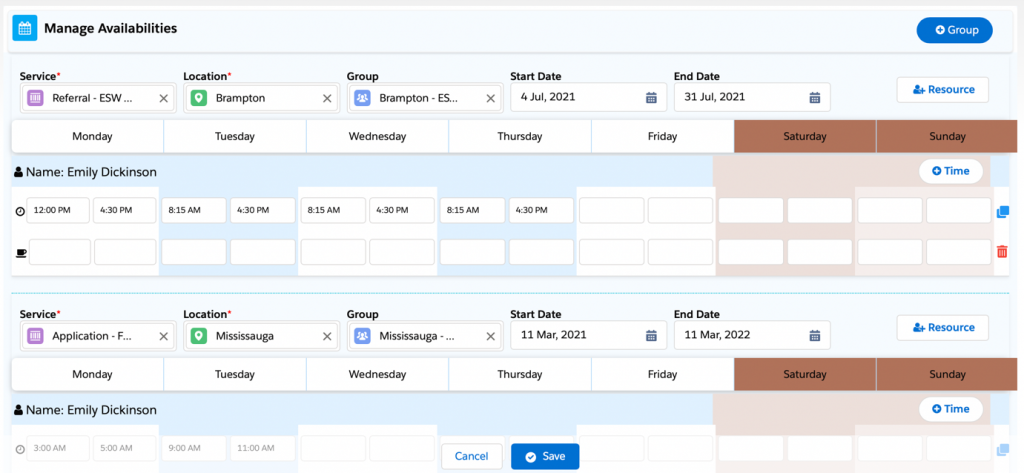
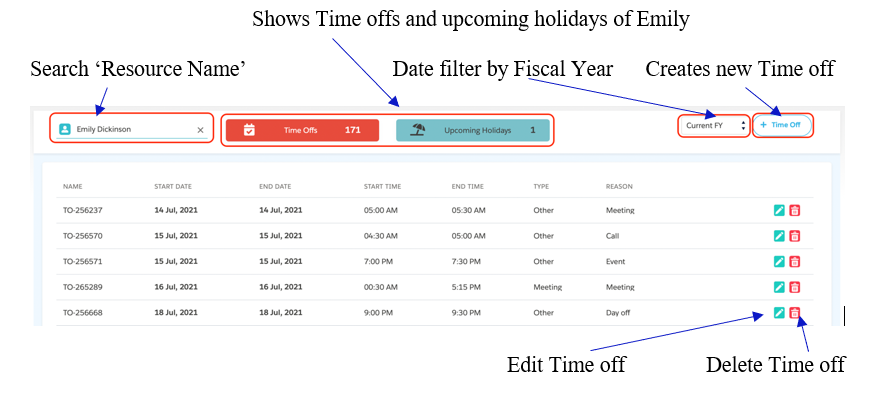
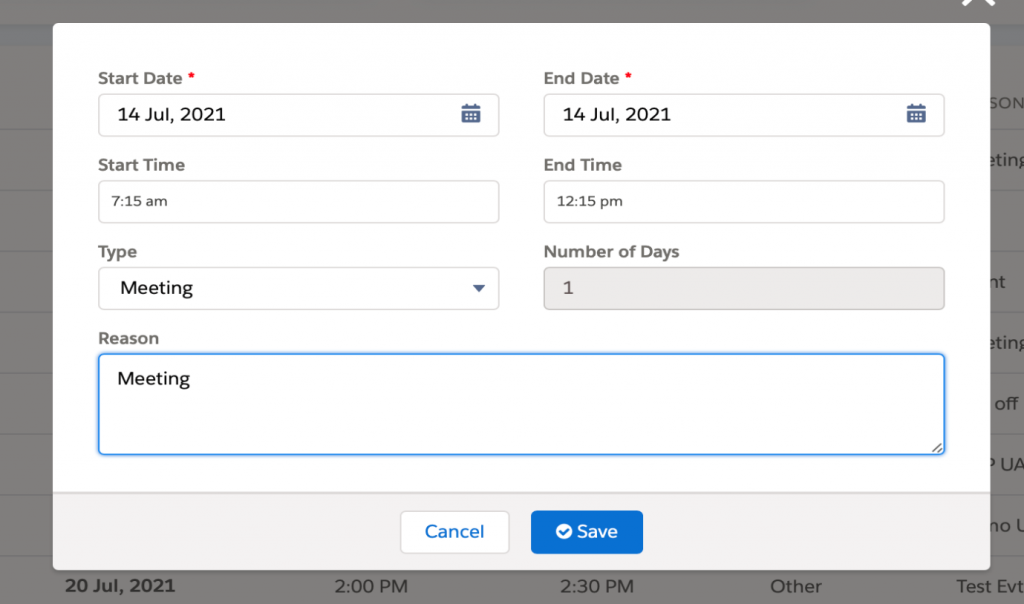

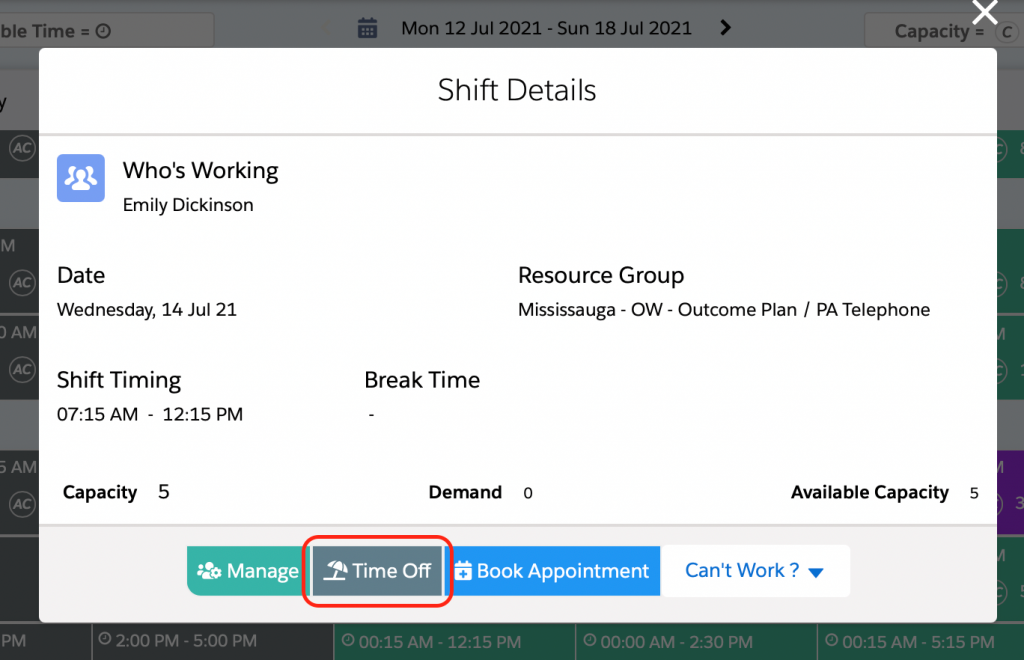

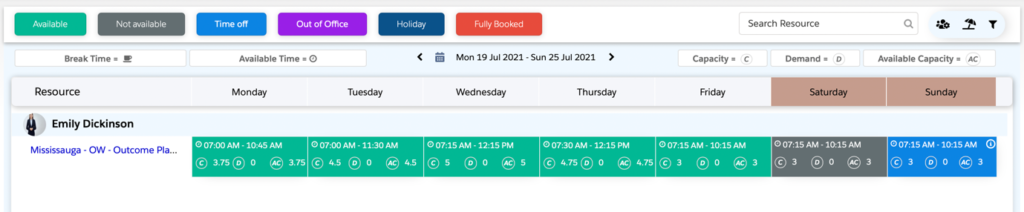
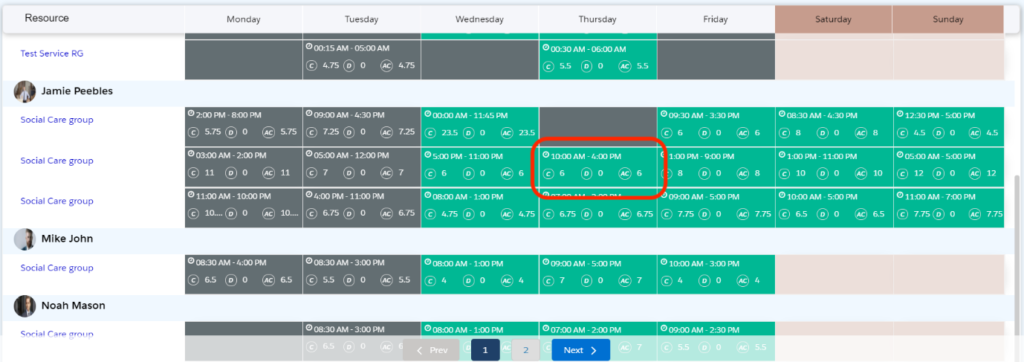
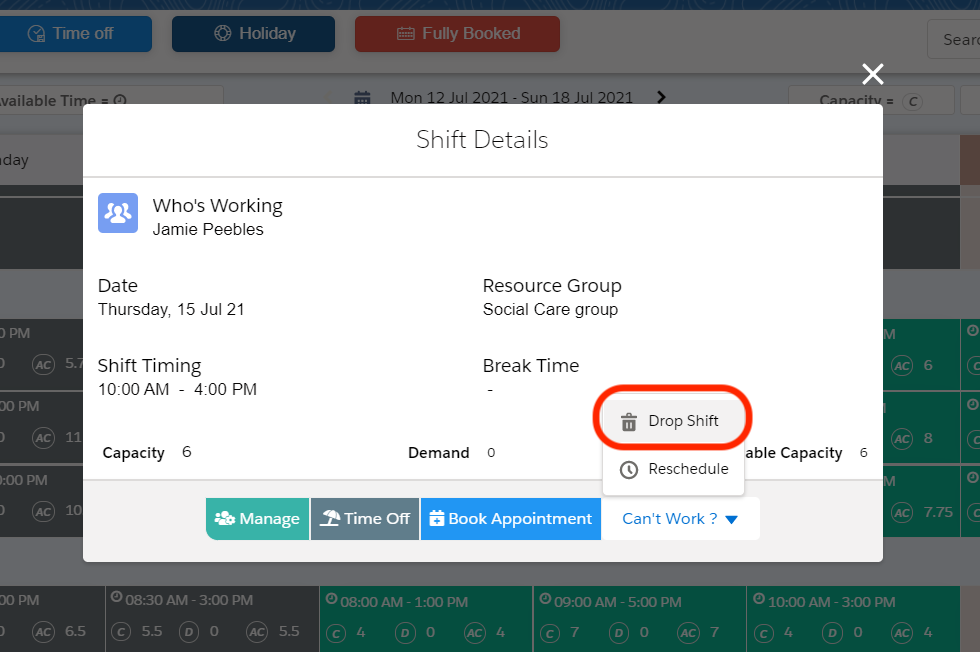
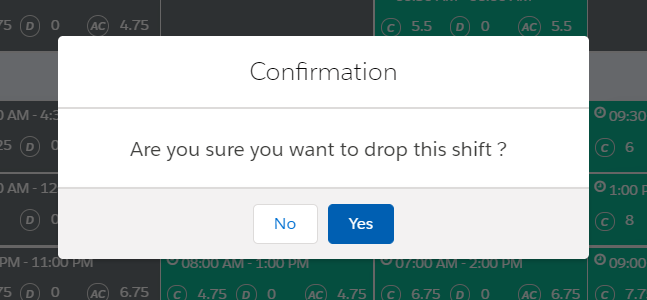

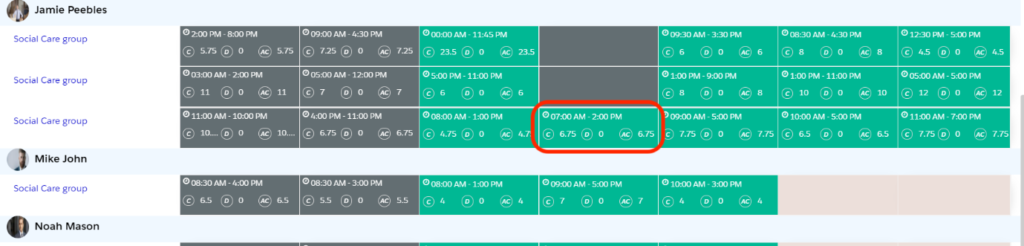

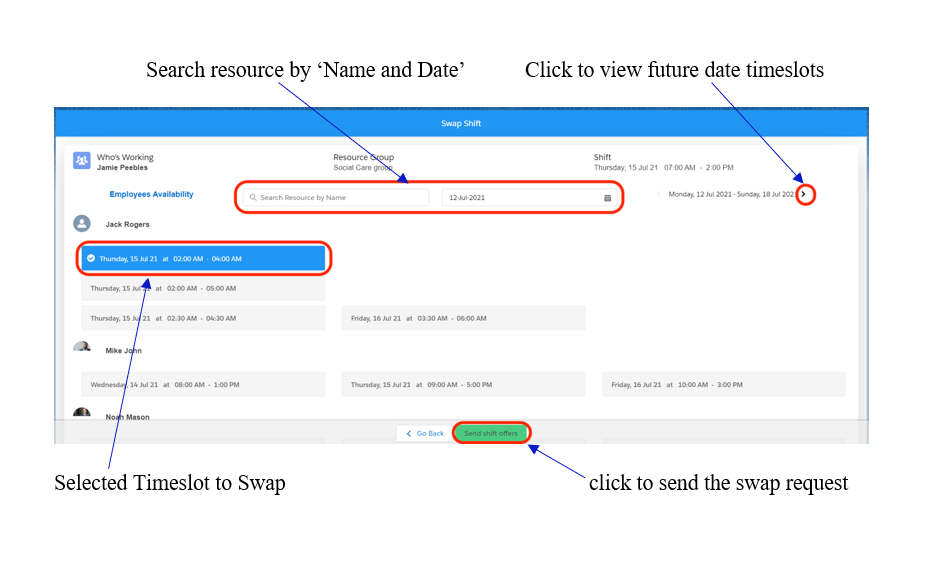
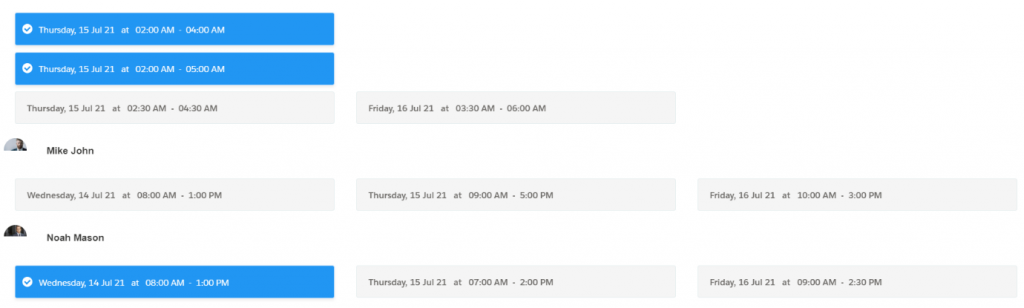
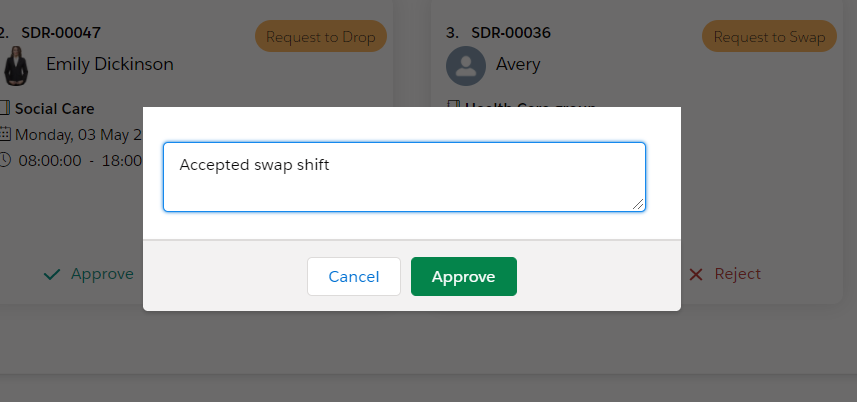
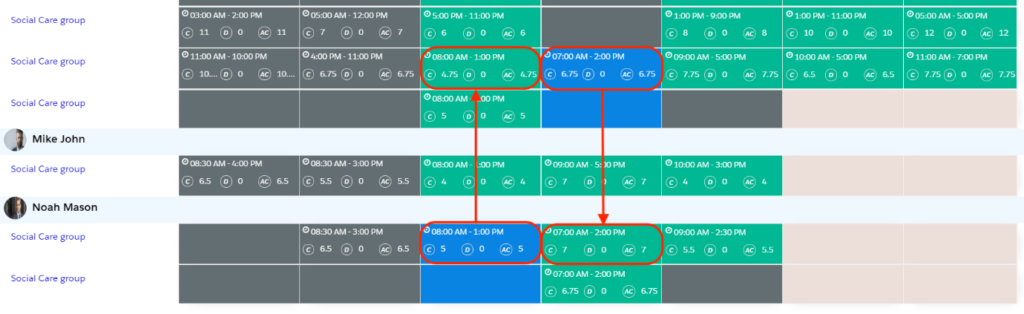
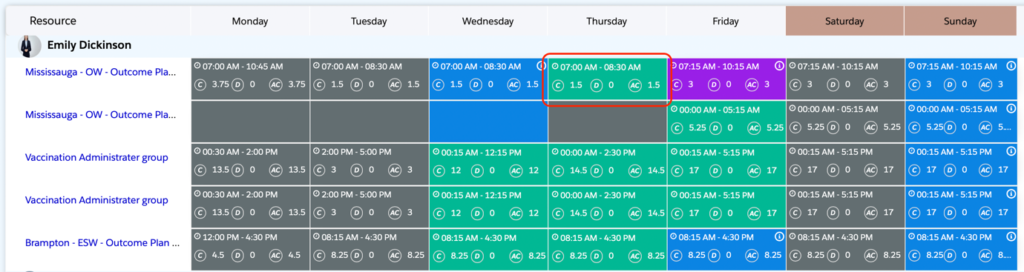
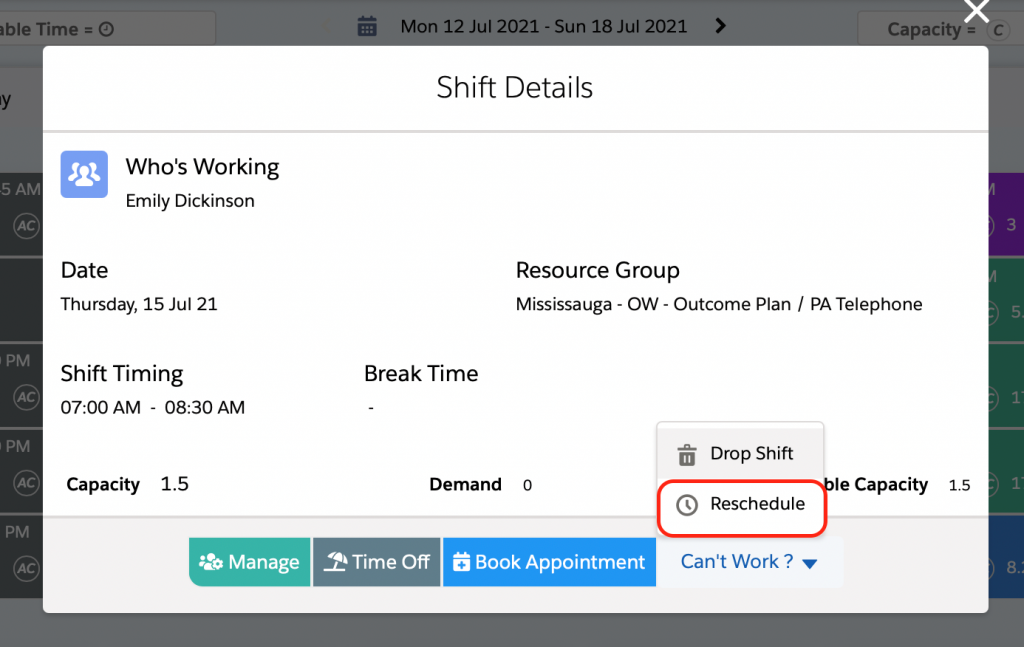


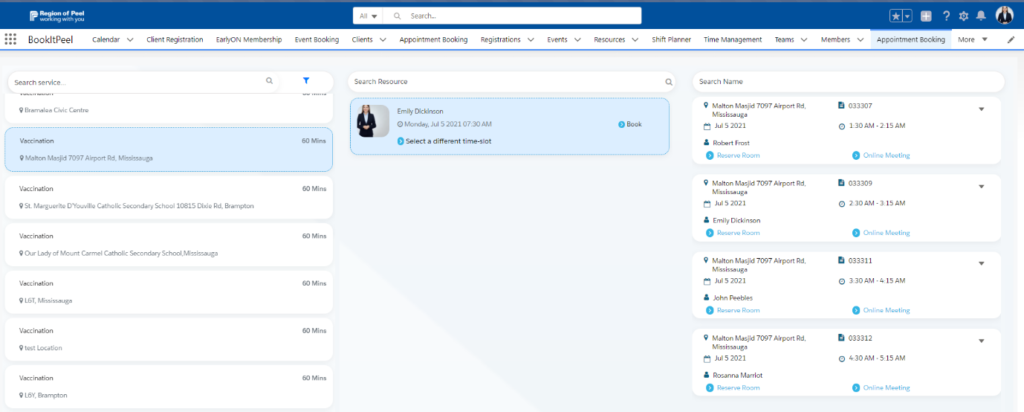
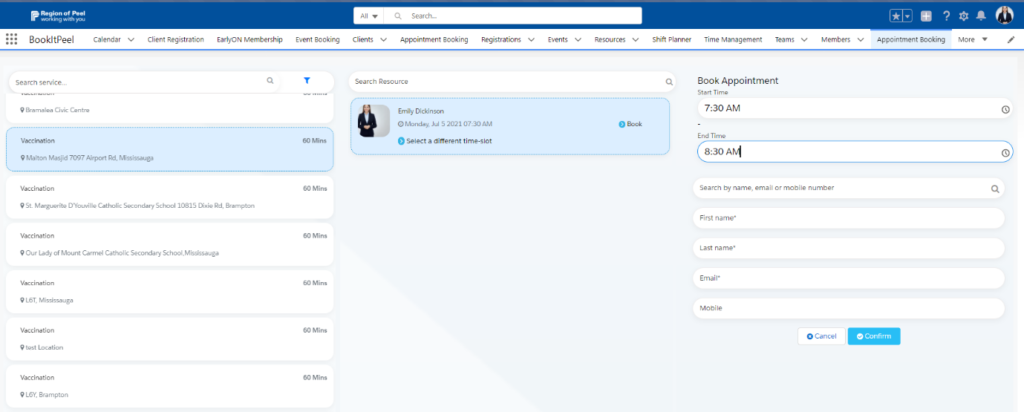
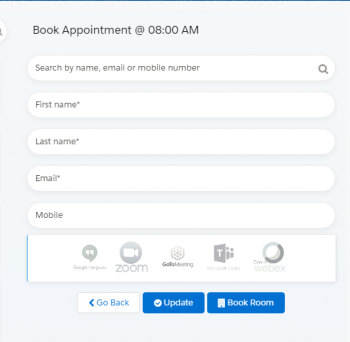
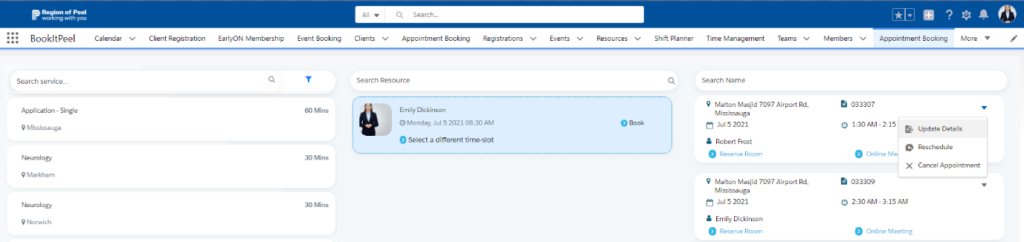
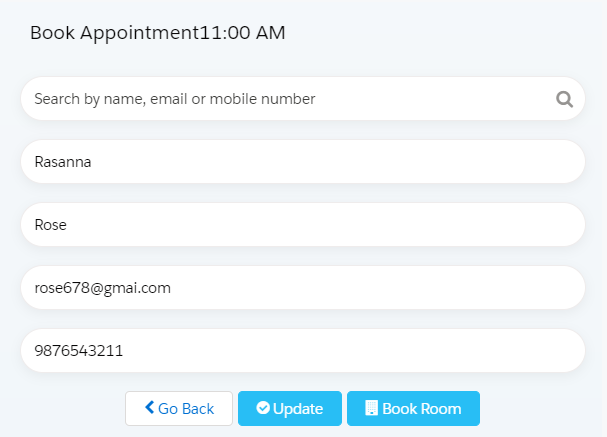
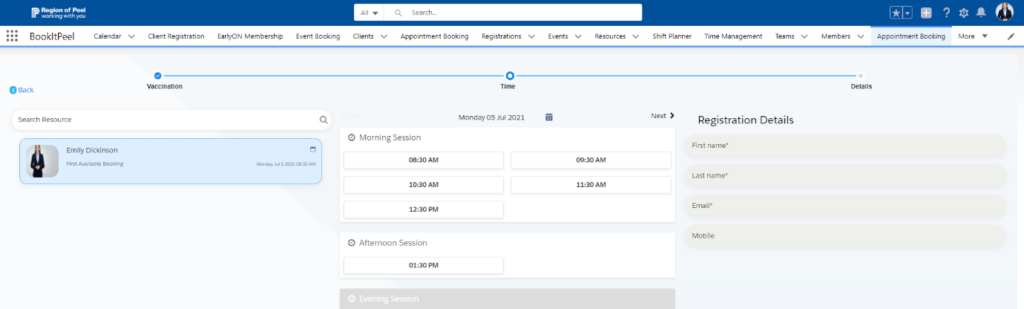
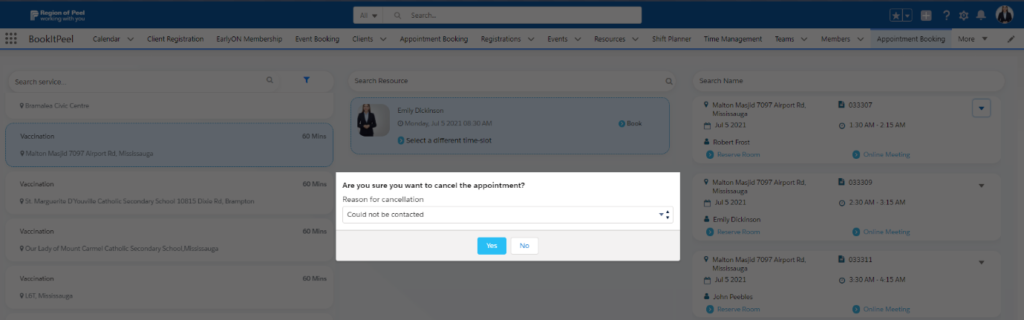
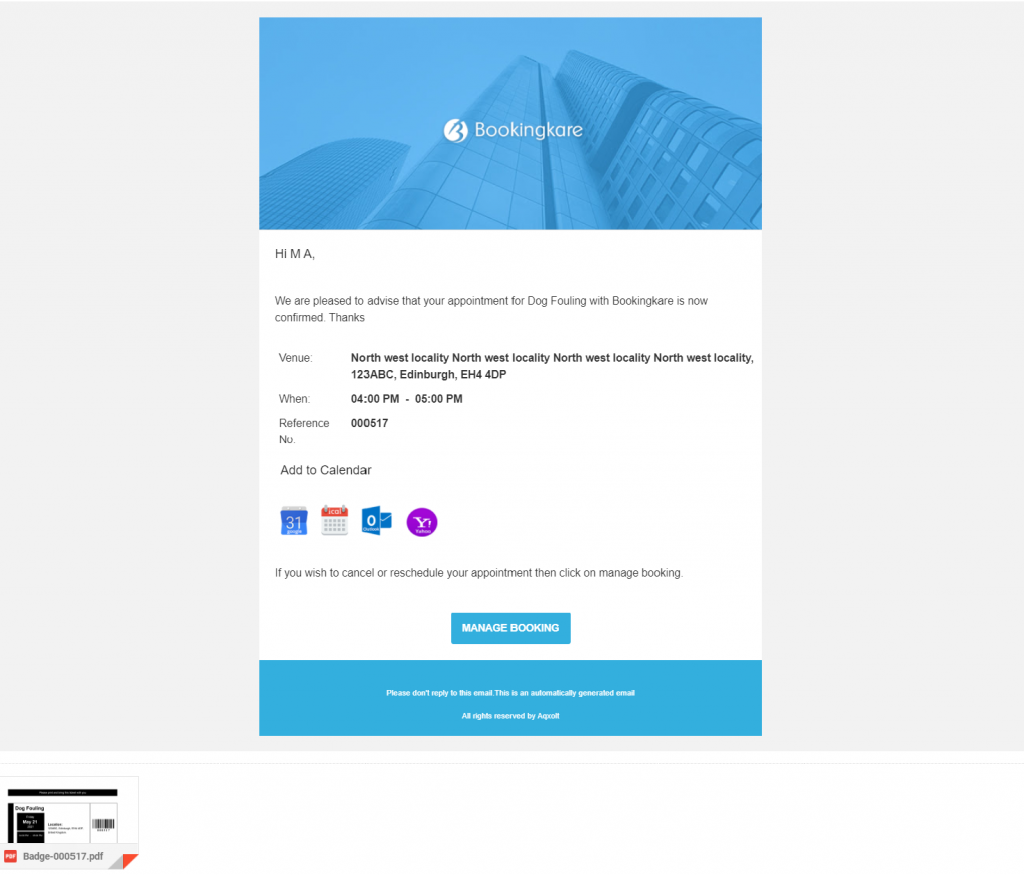
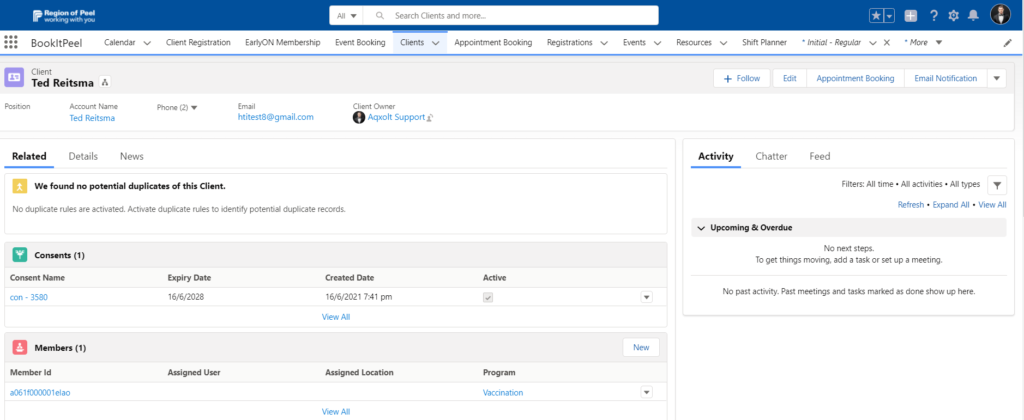

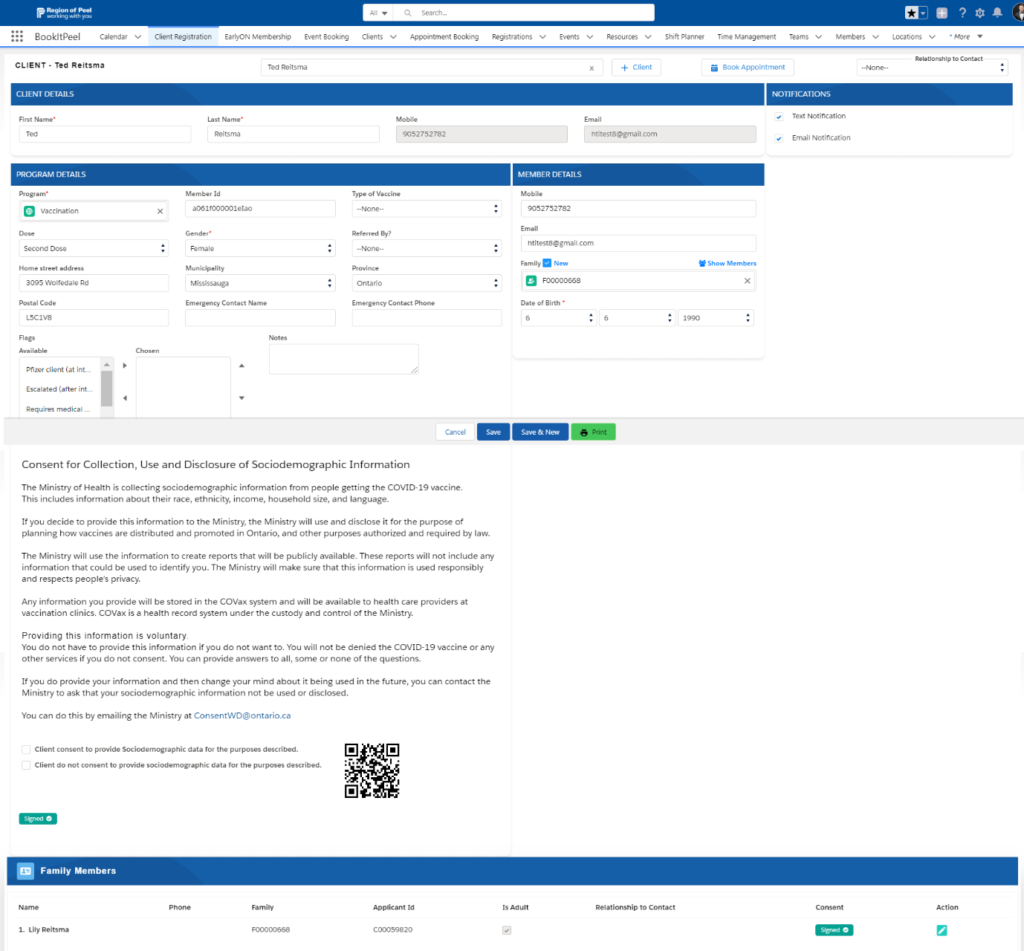

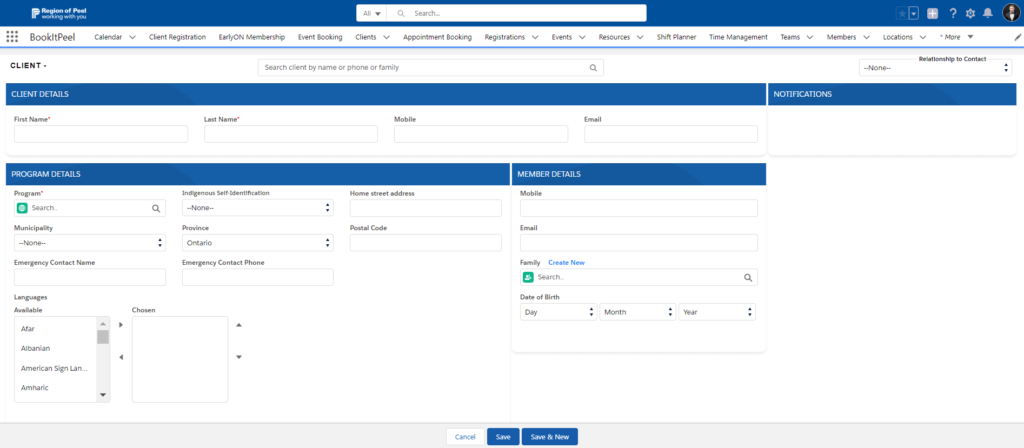
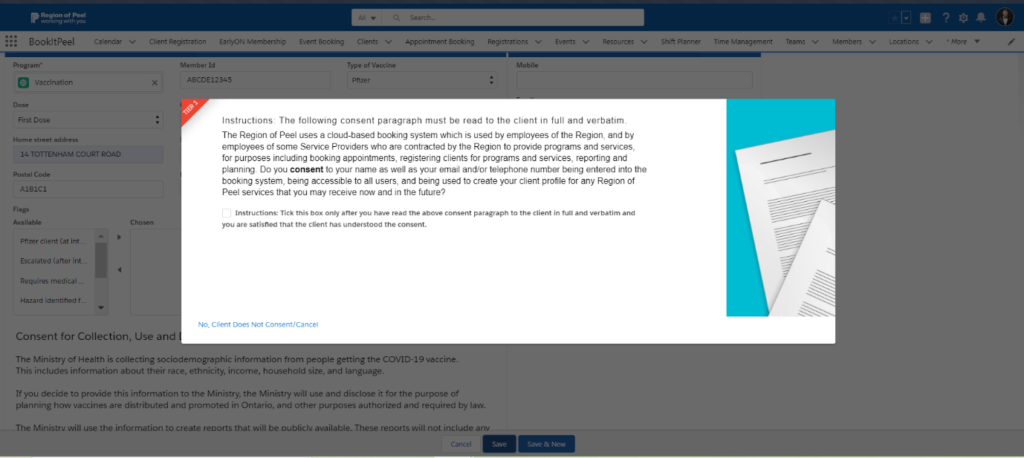
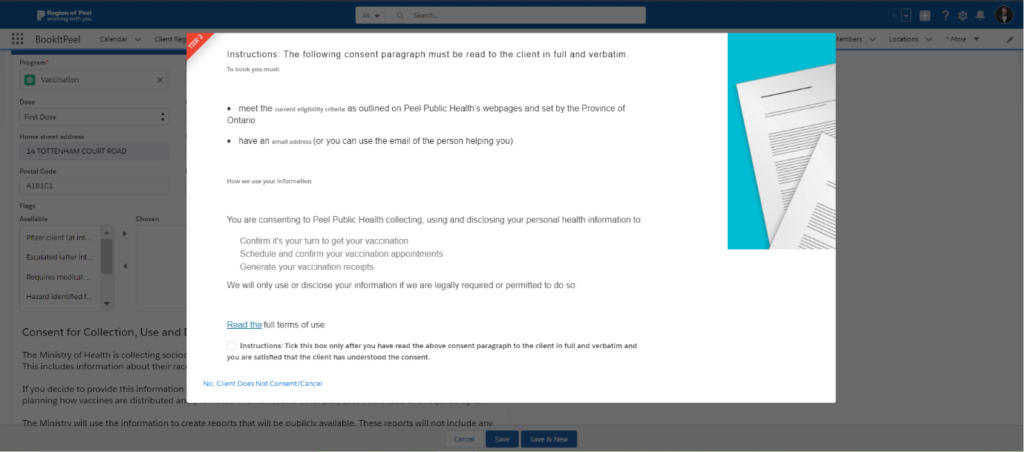
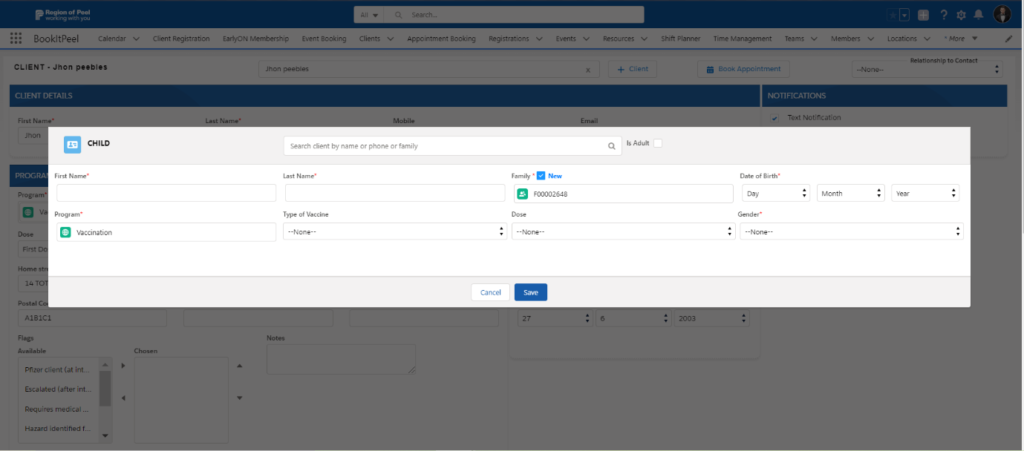
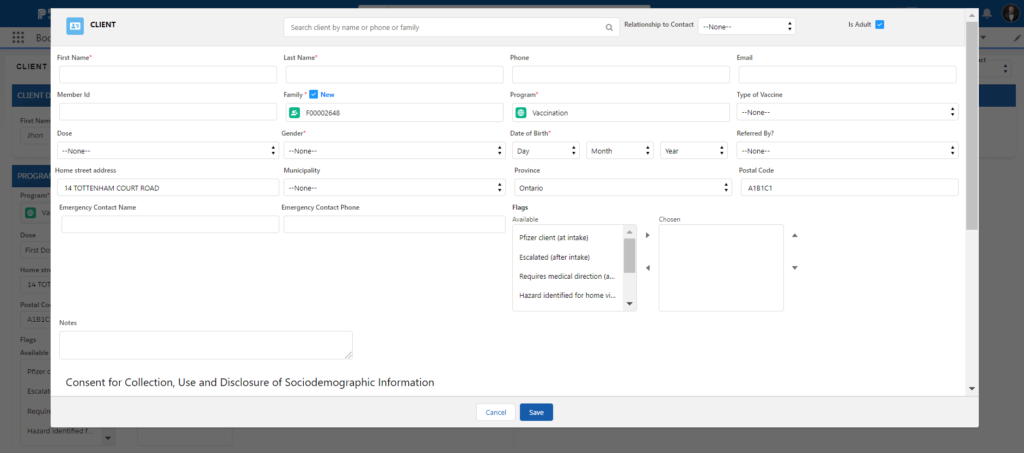
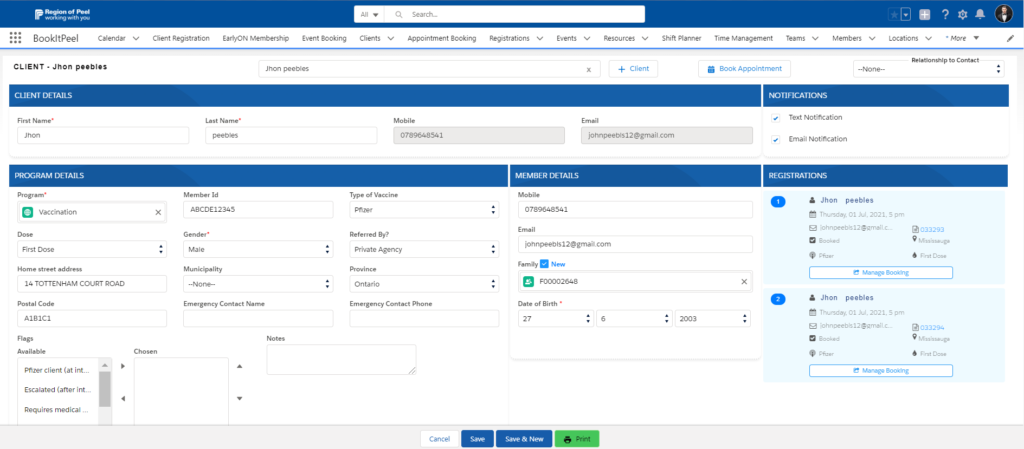
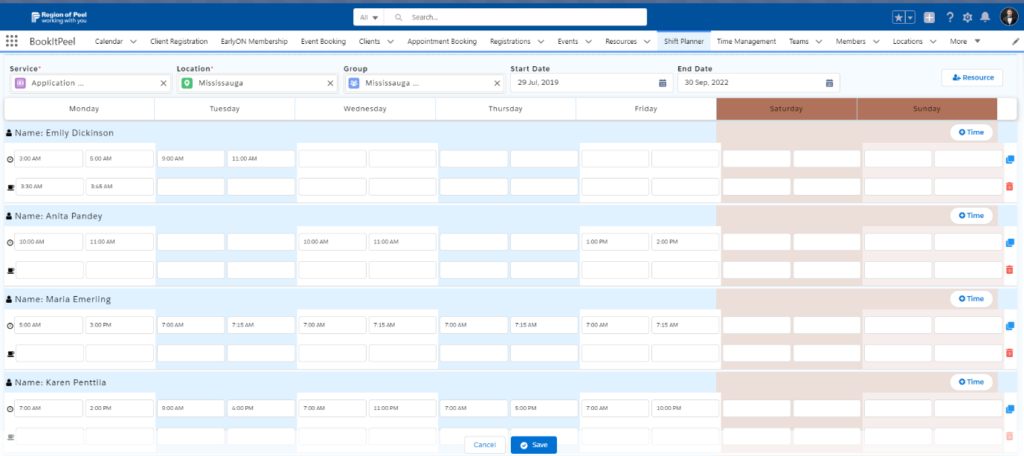
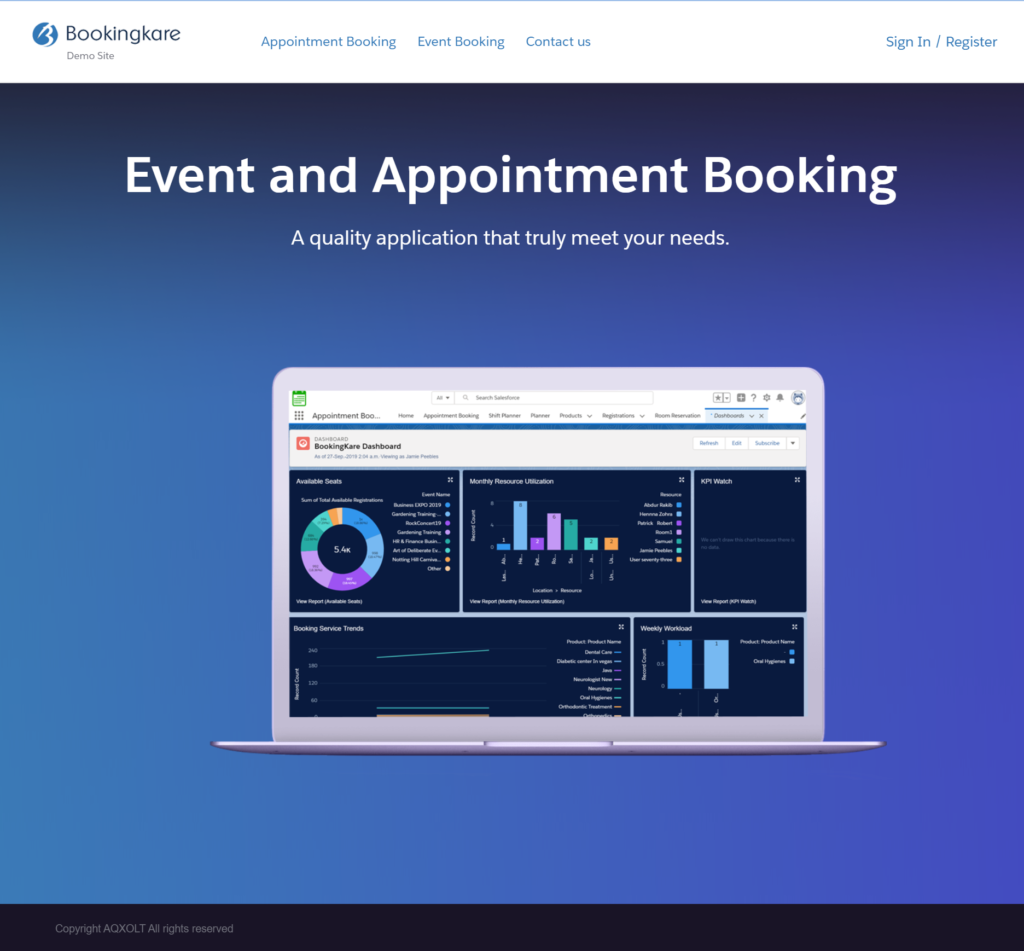
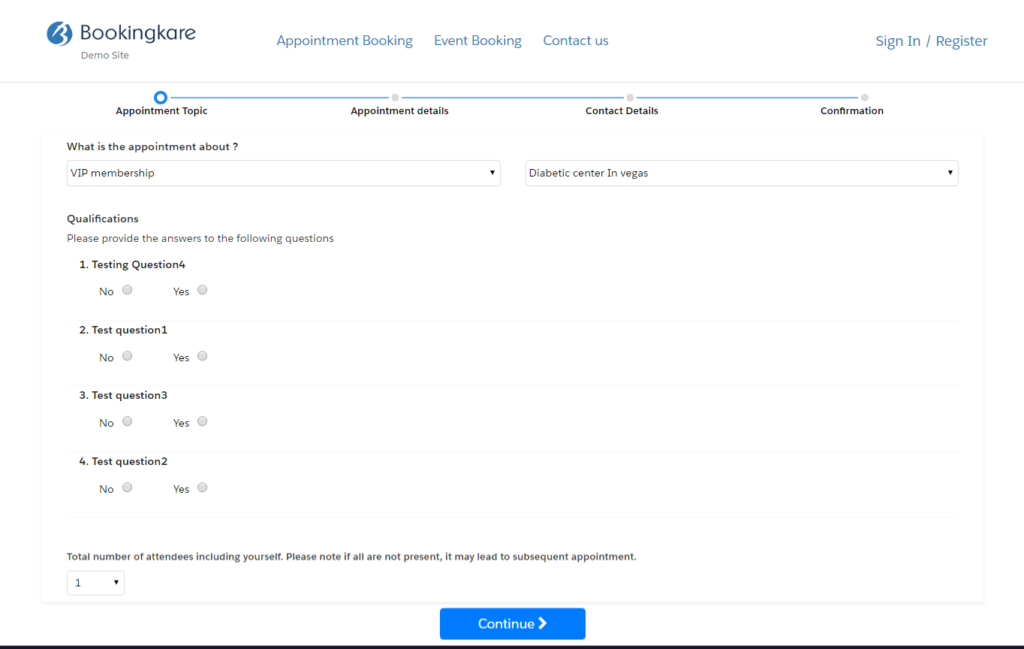
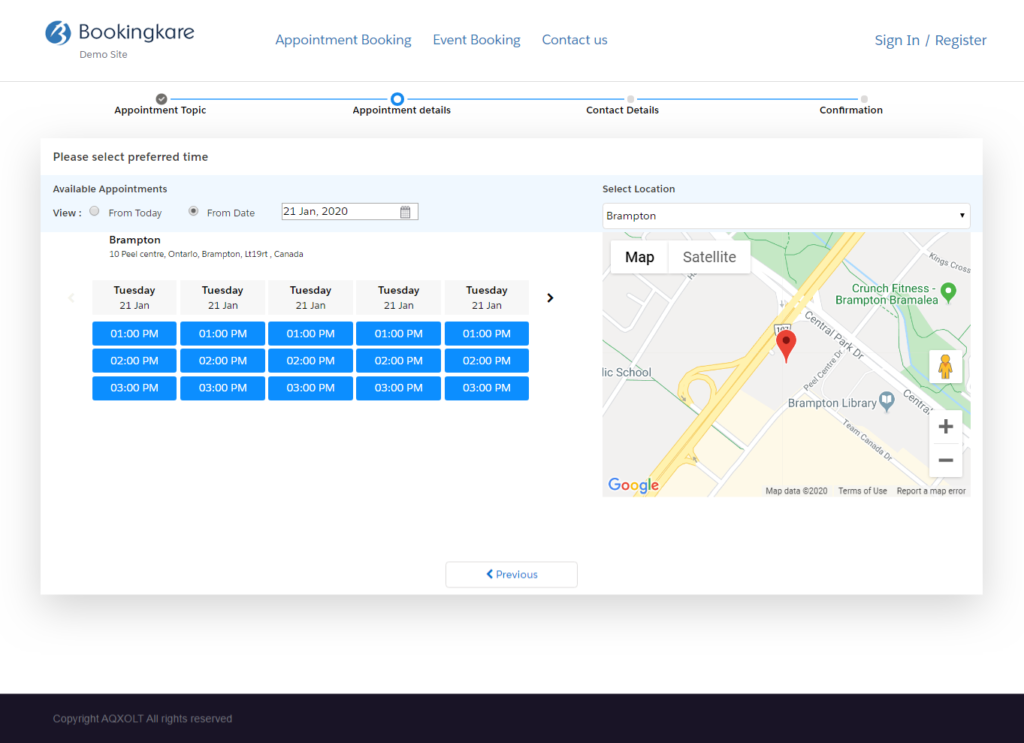


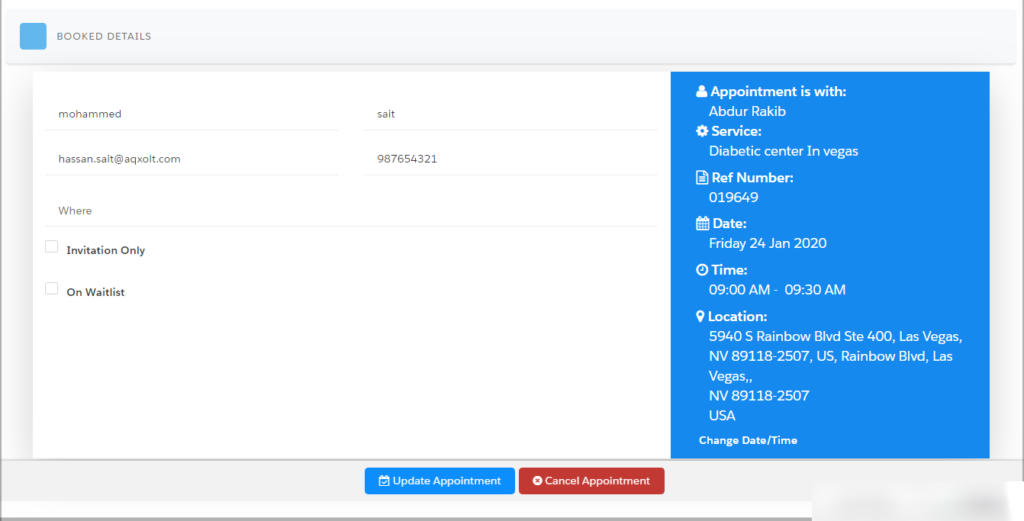
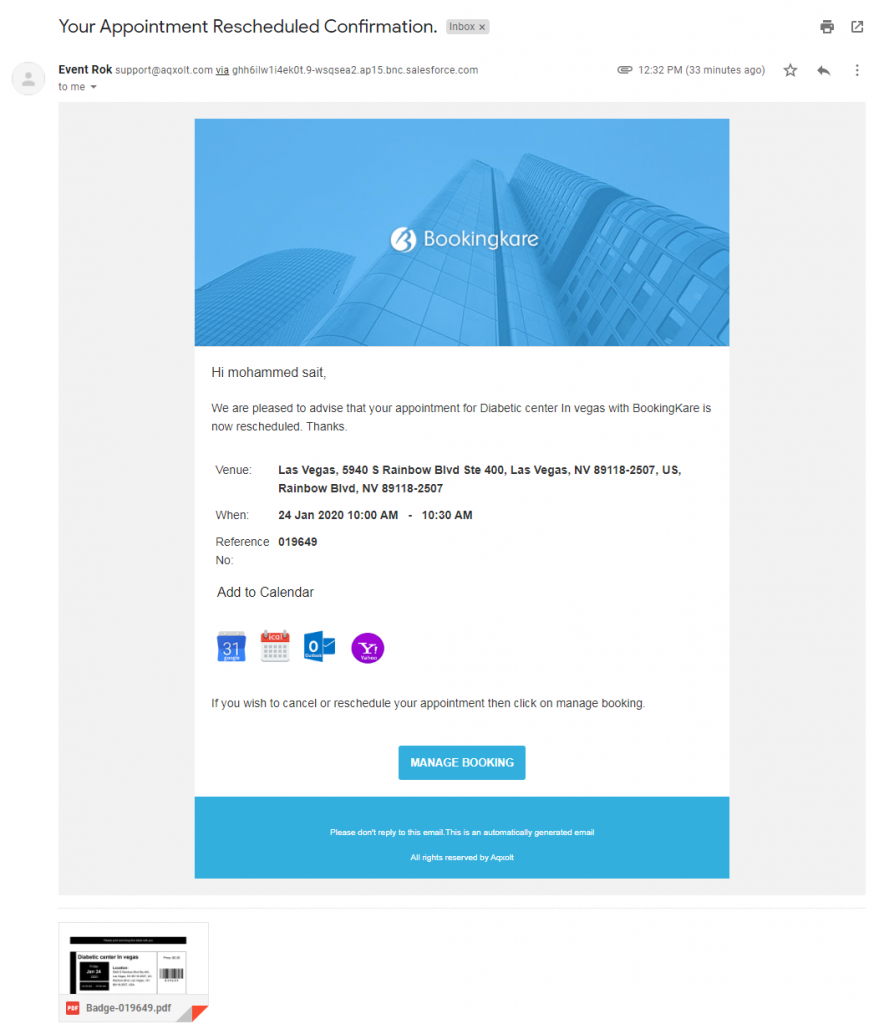
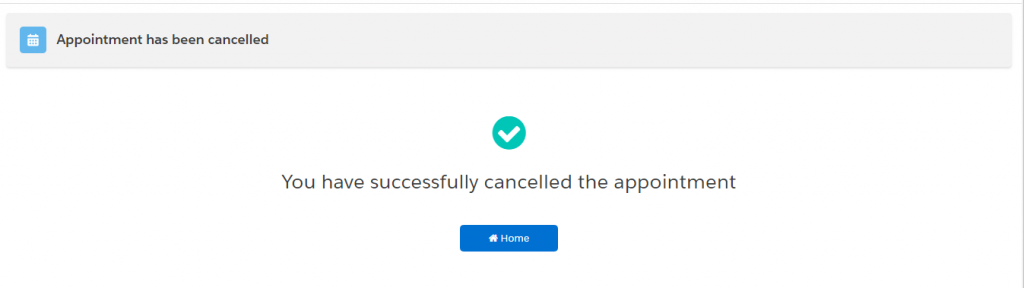

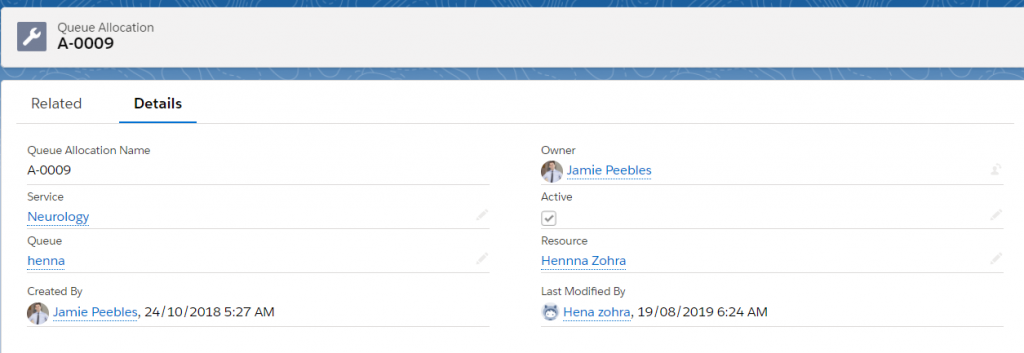
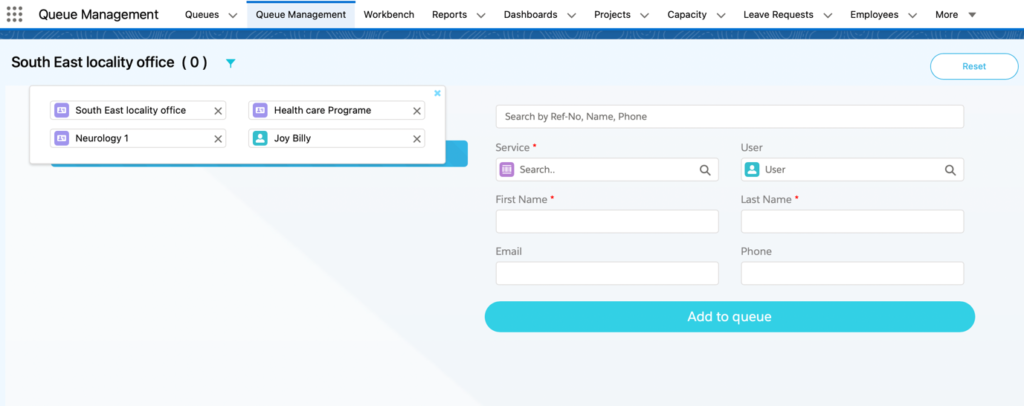
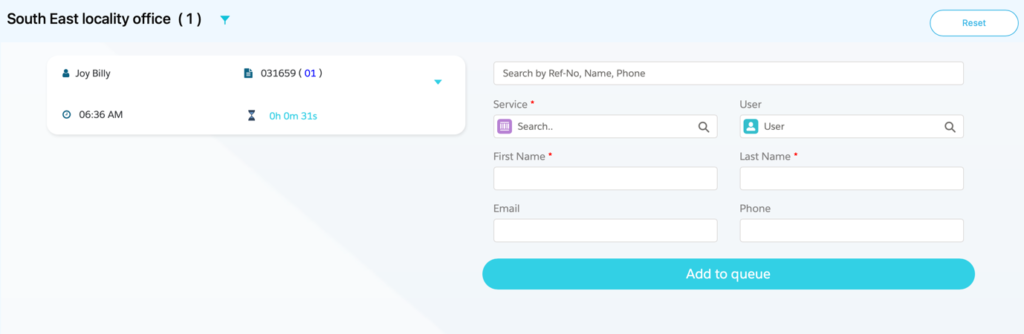
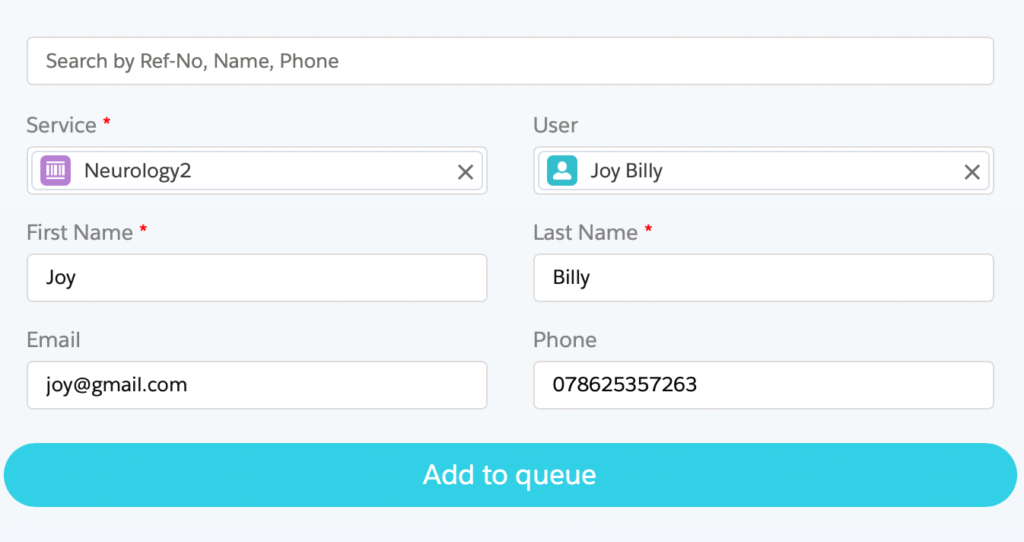


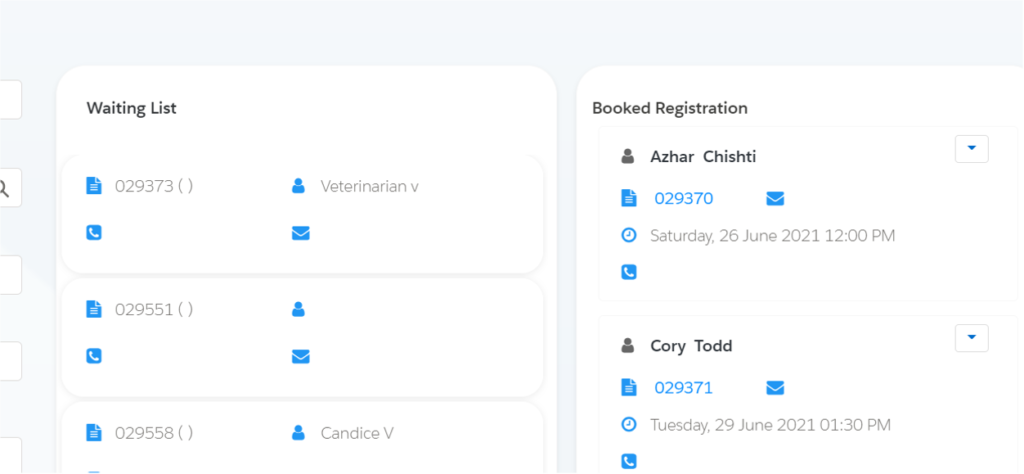
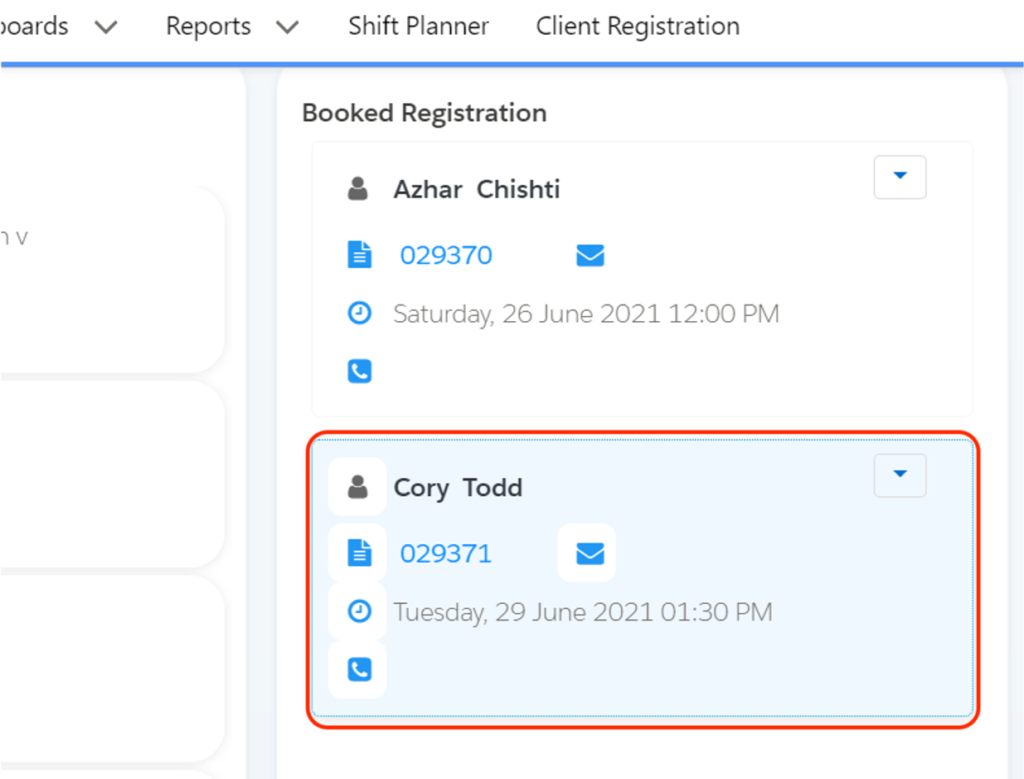
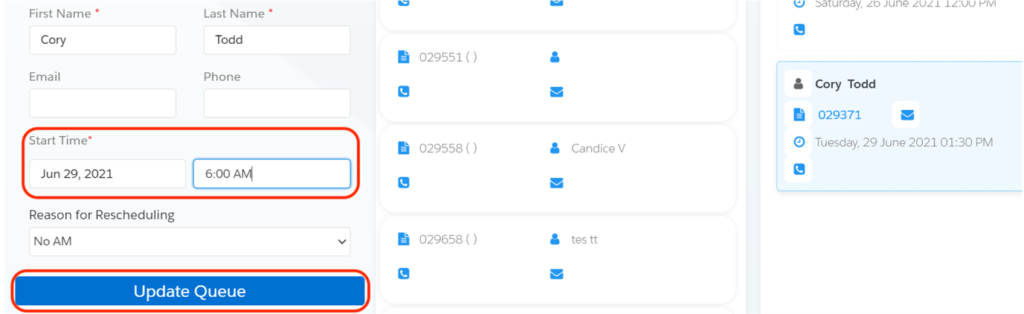
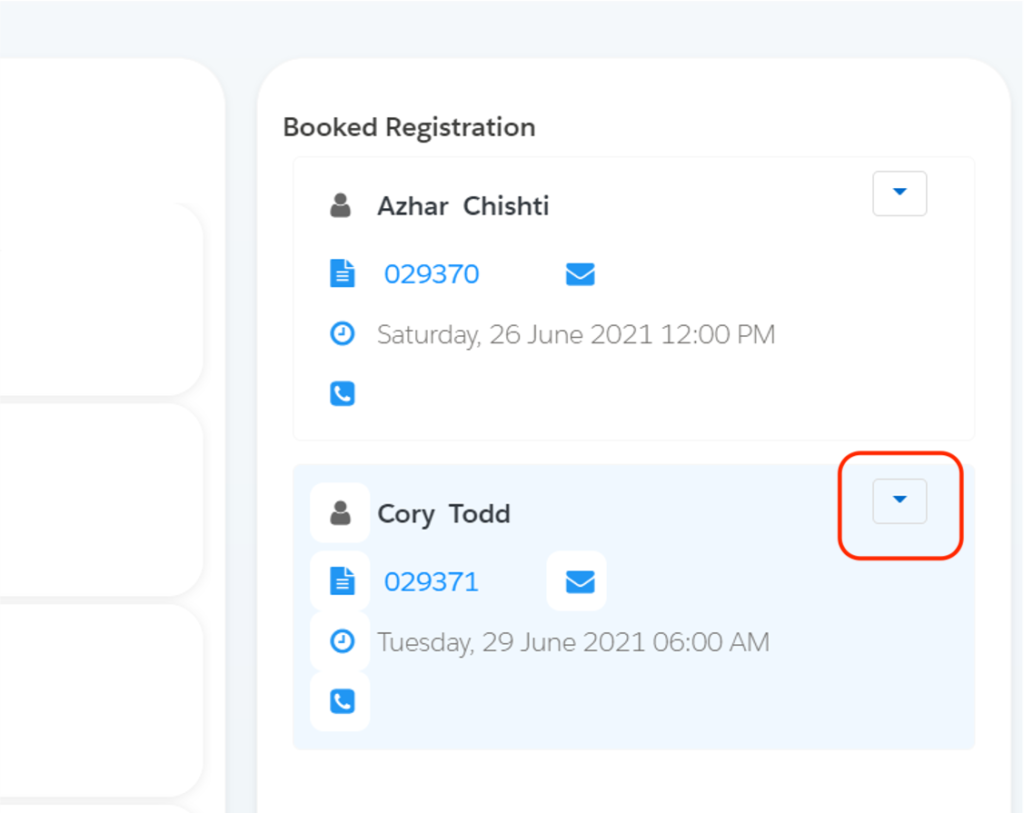


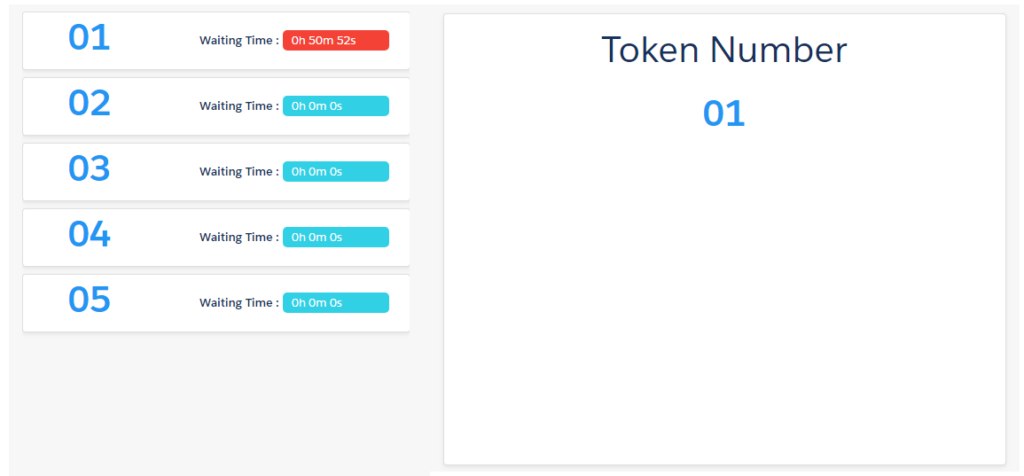
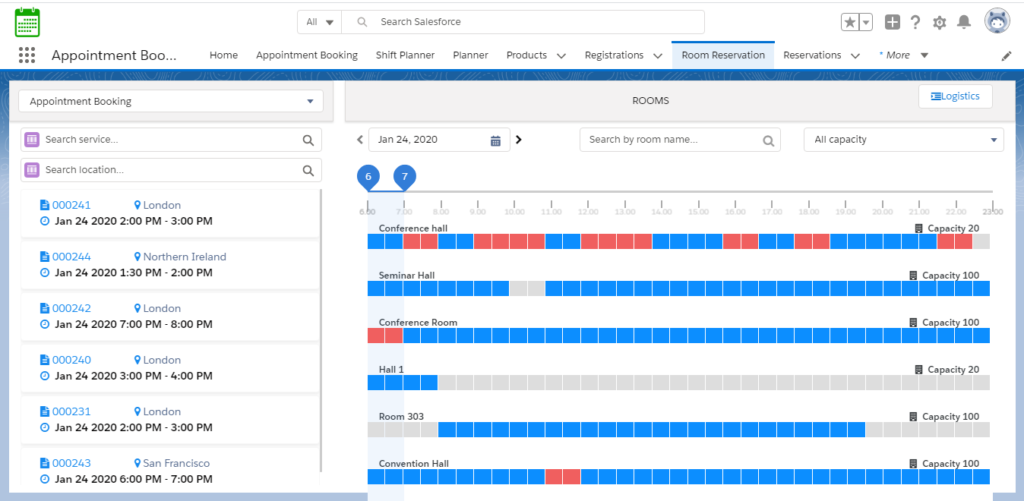
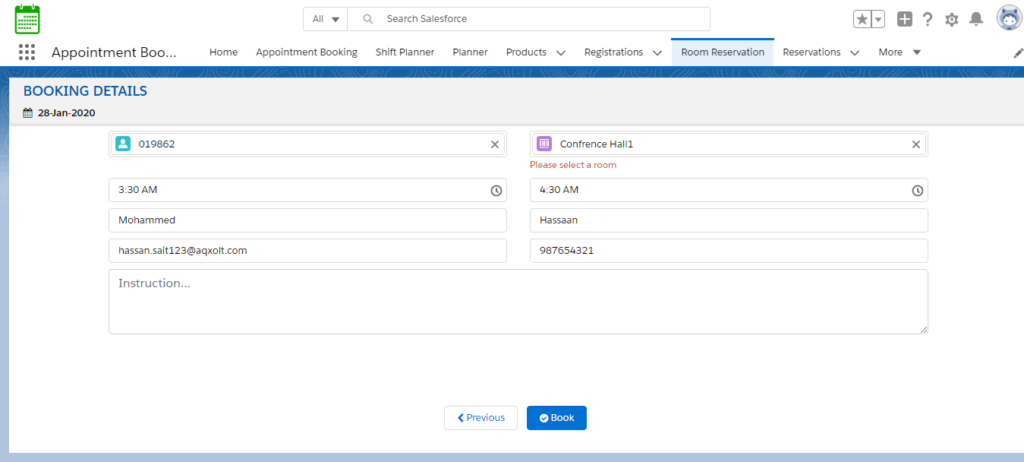
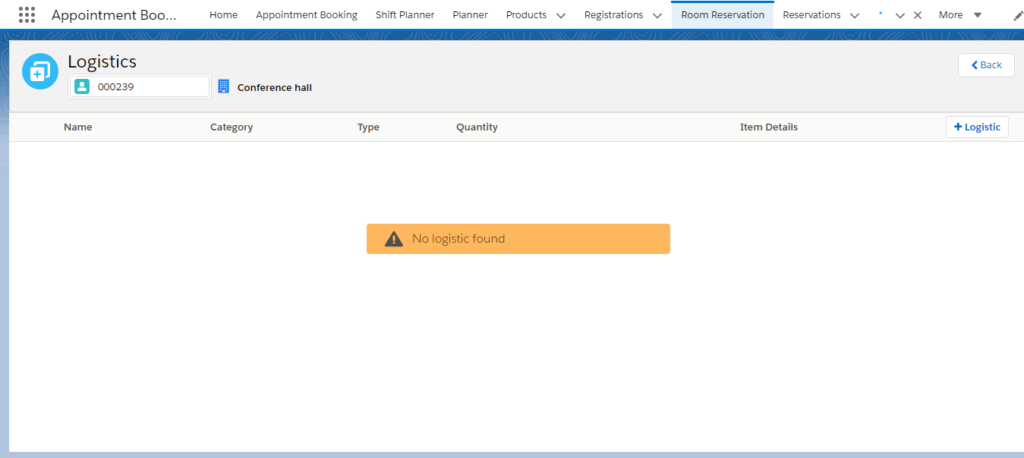
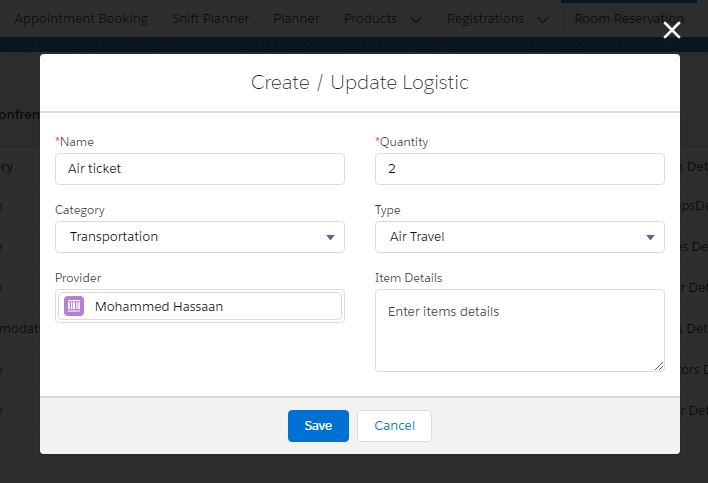
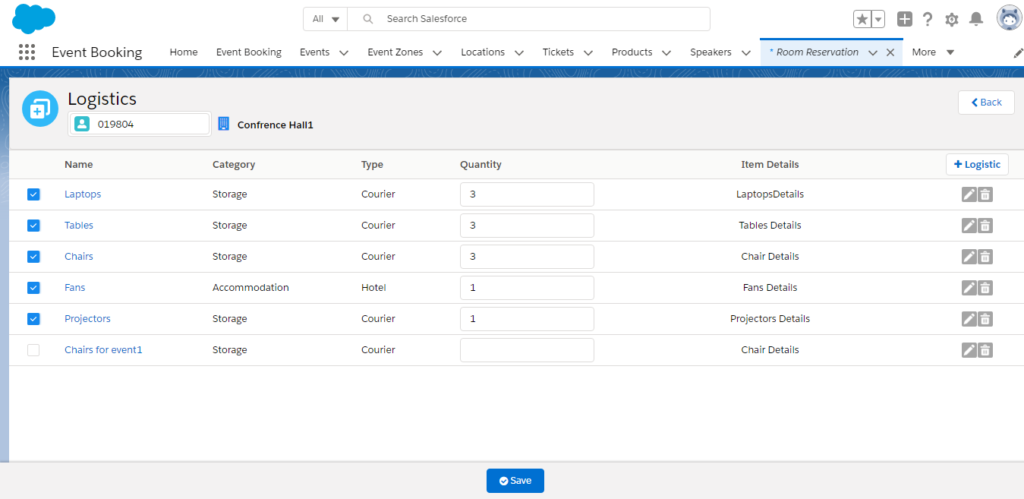


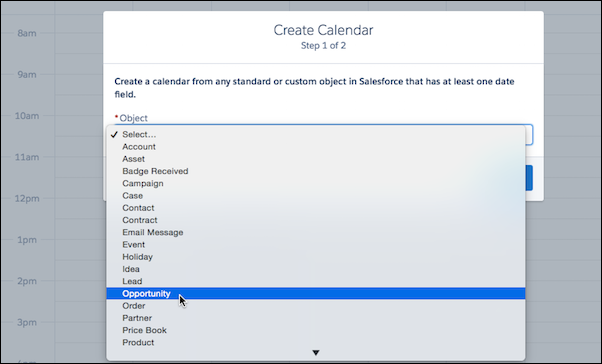
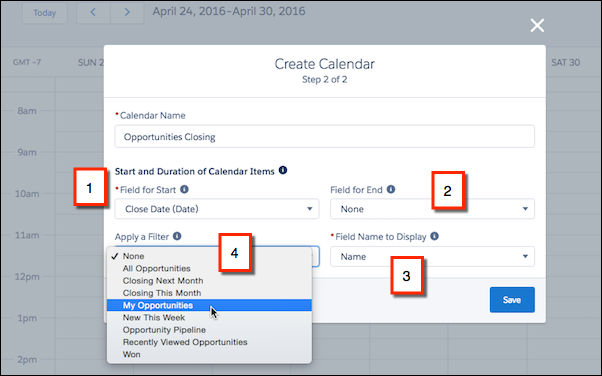


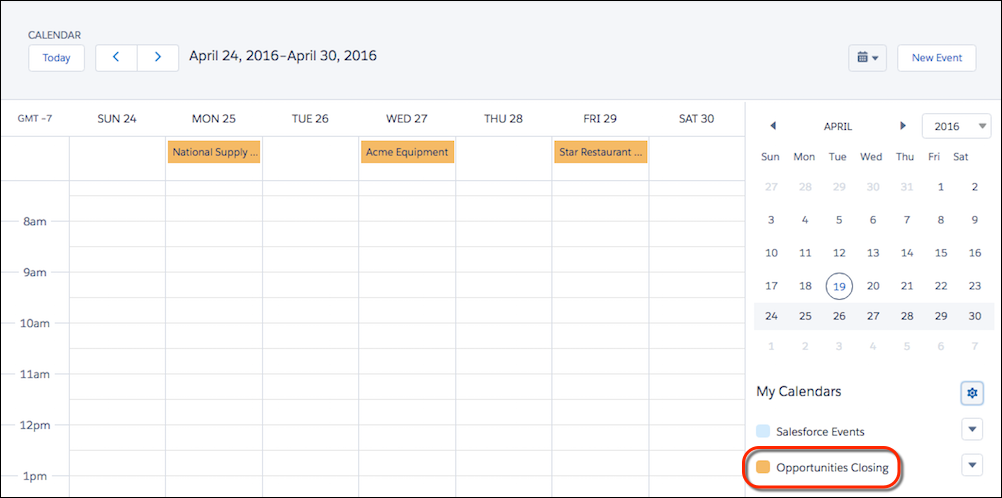
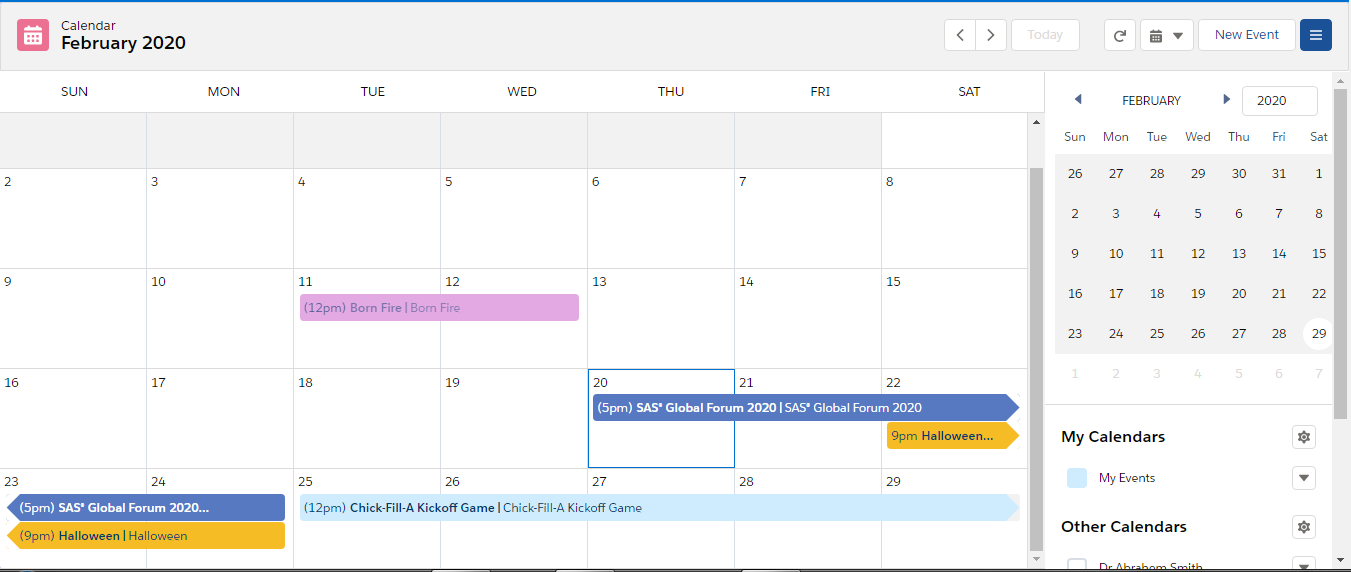
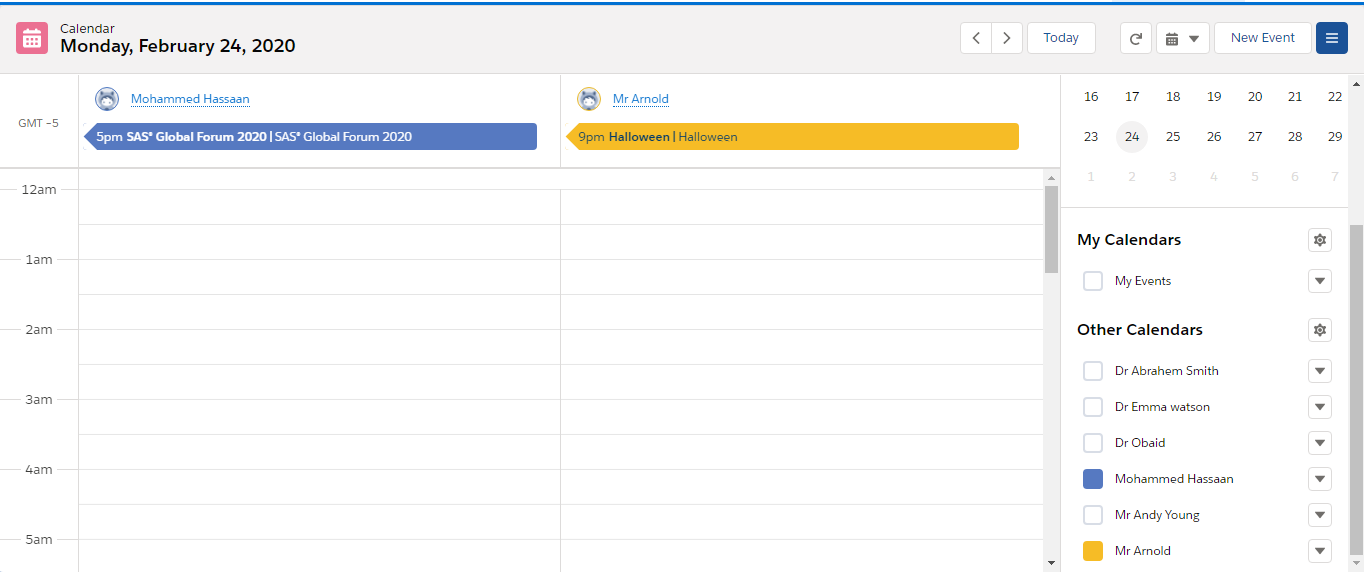
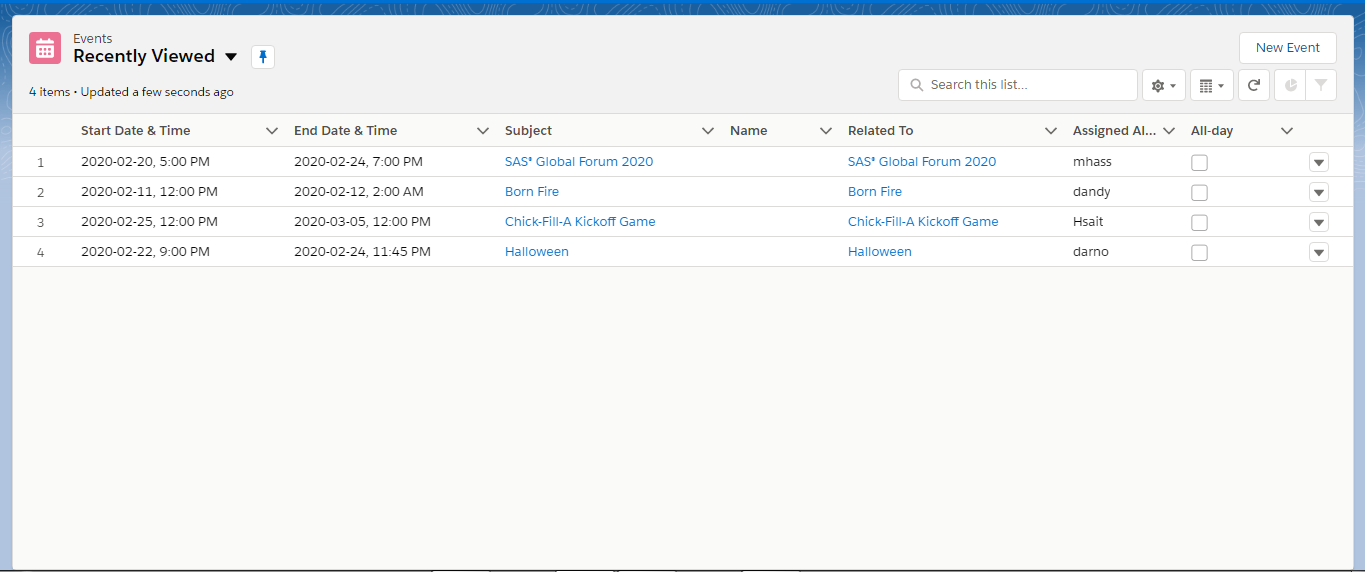
 .
. ,
,  , Today, This Week, or This Month.
 .
. or Today
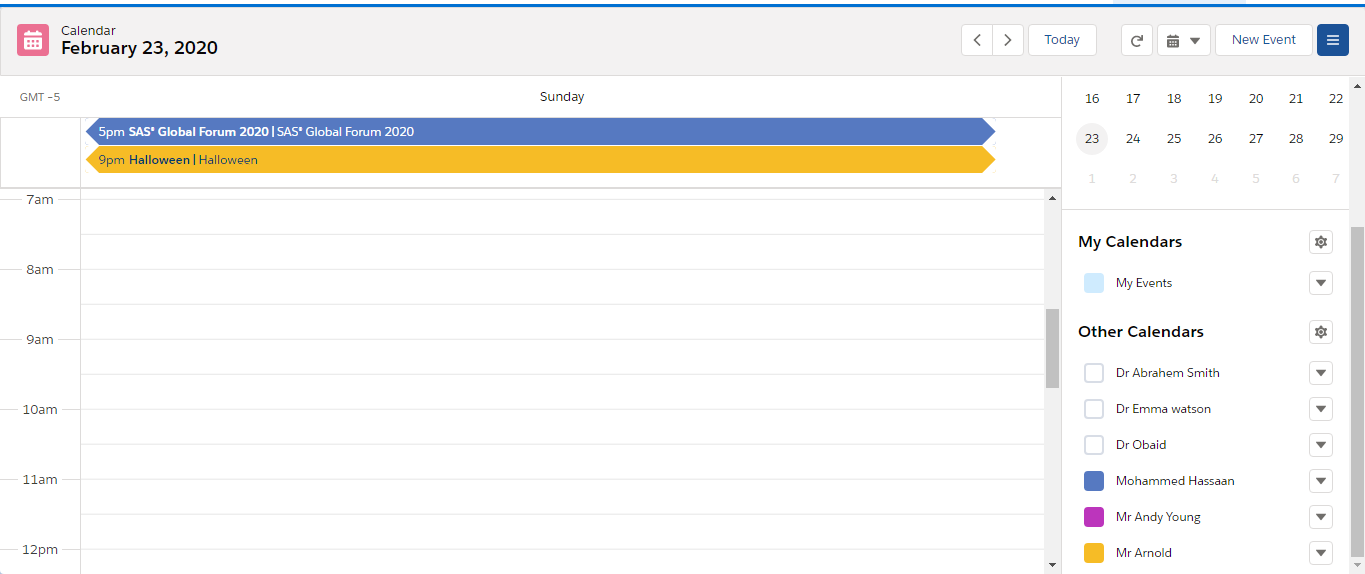
 or This Week
 or This Month
 )
)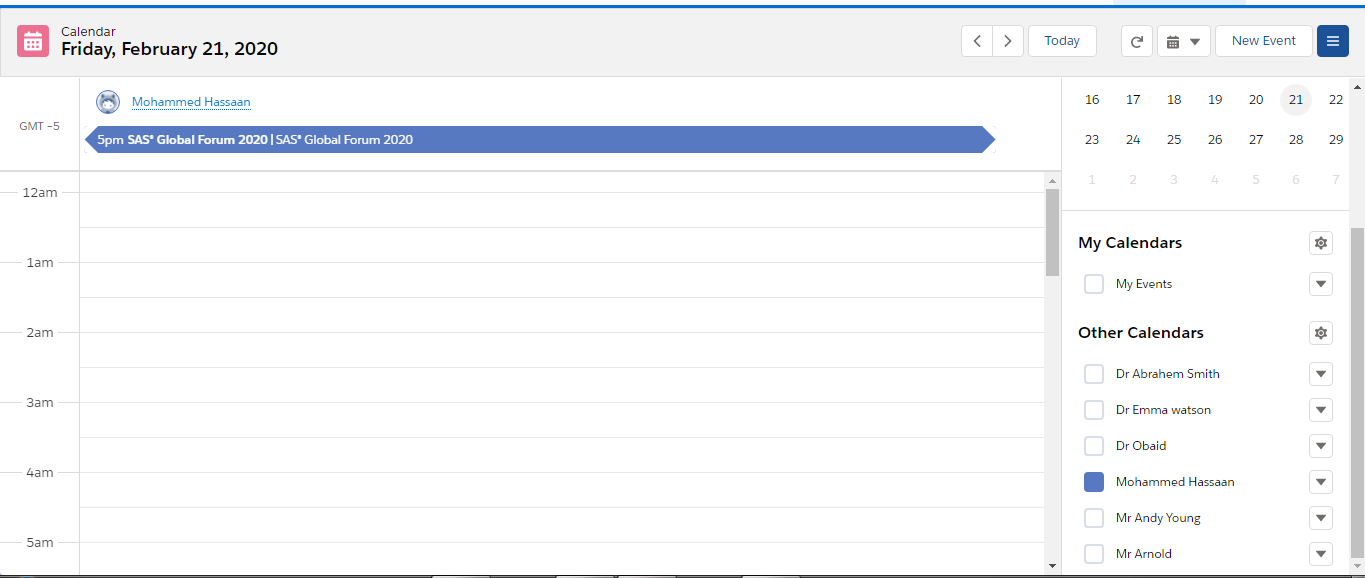
 )
)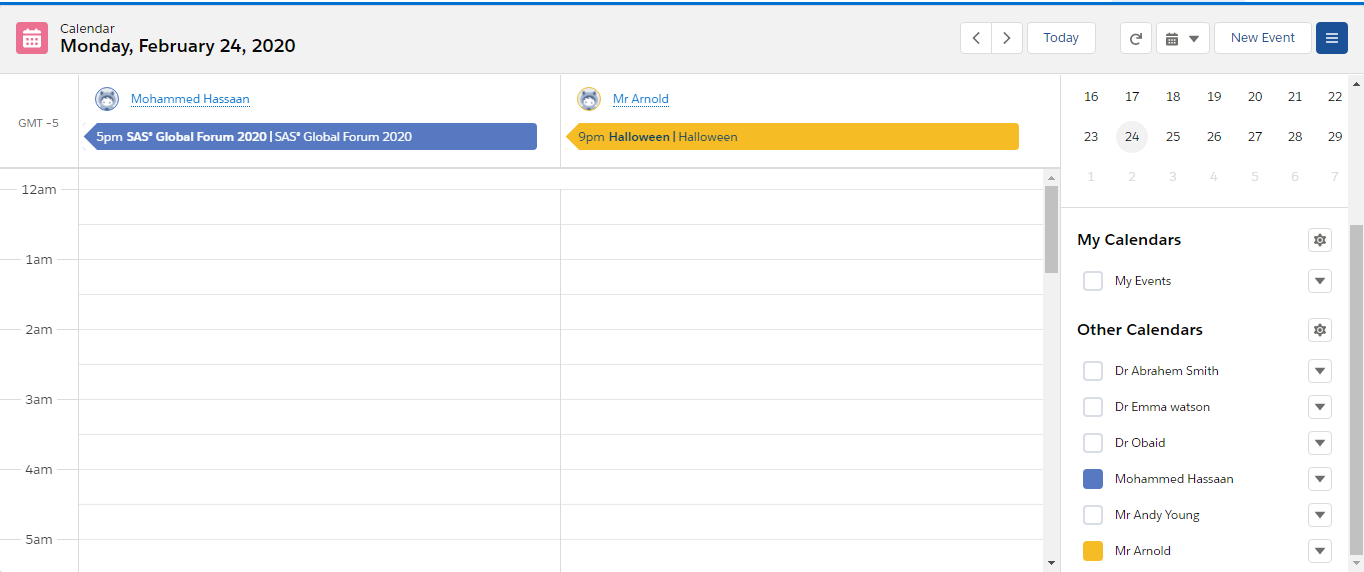
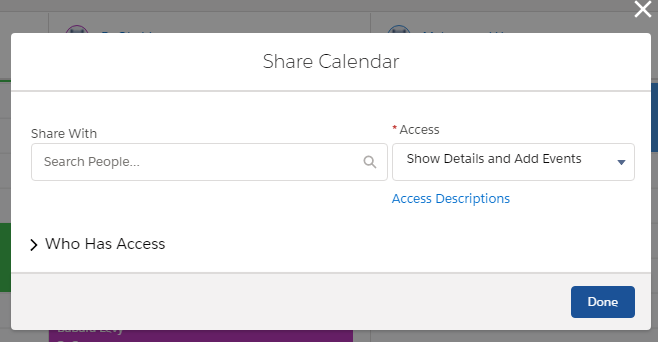
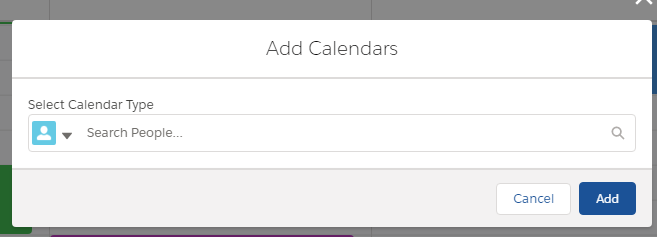
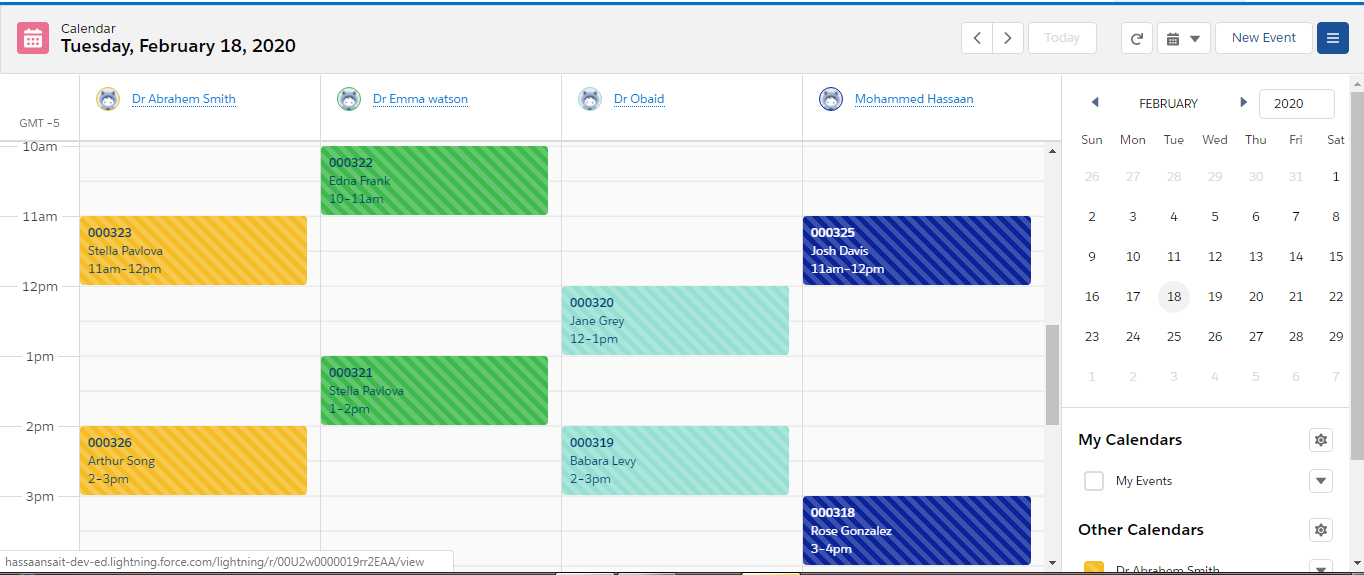
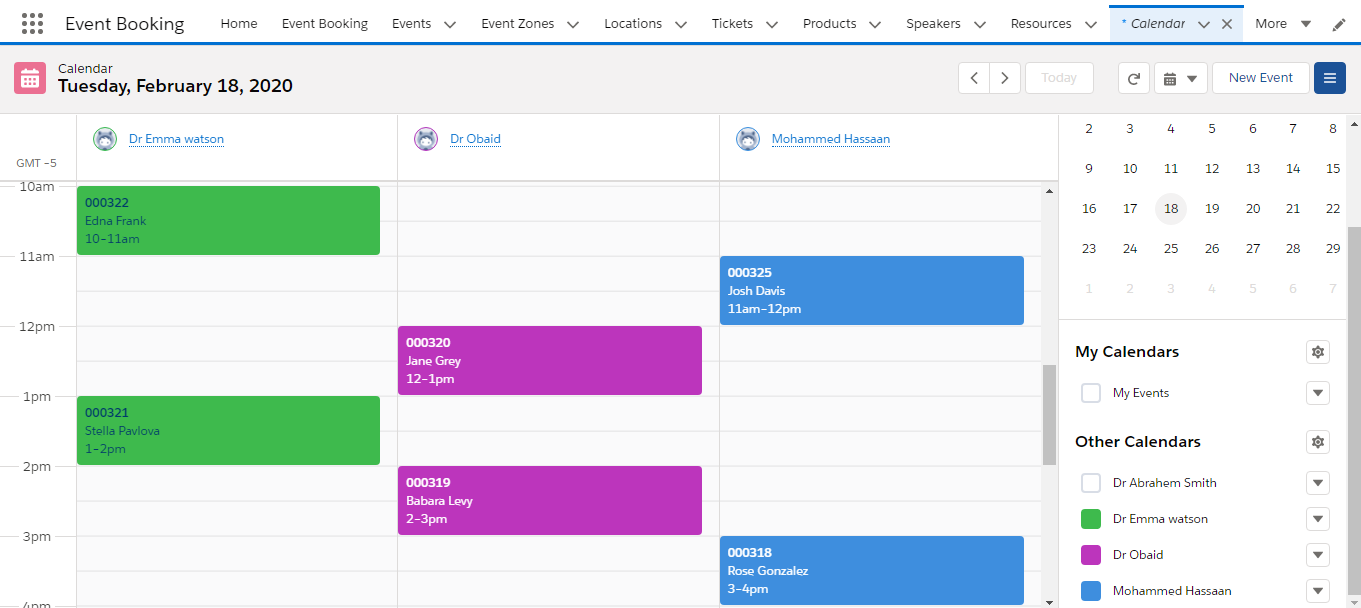
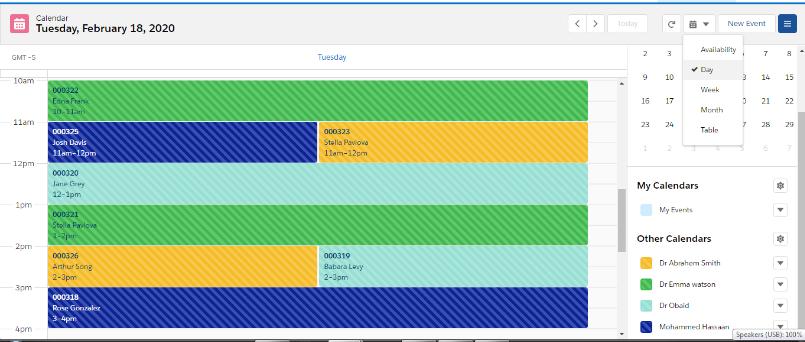

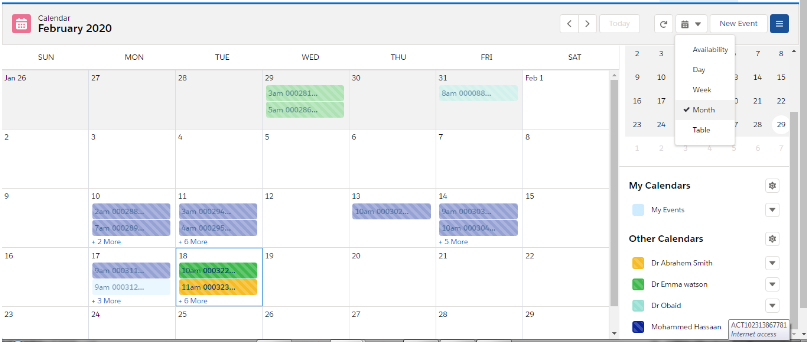


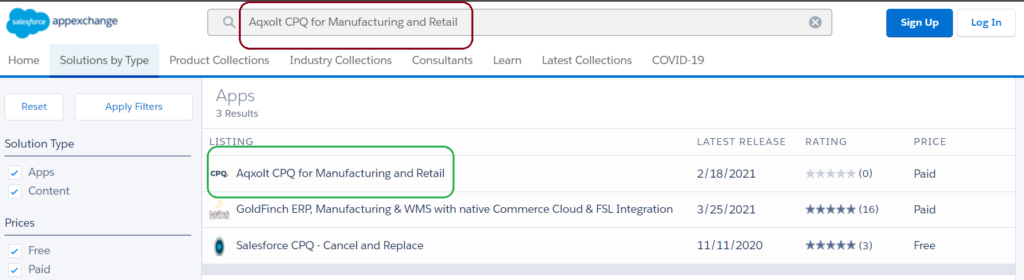
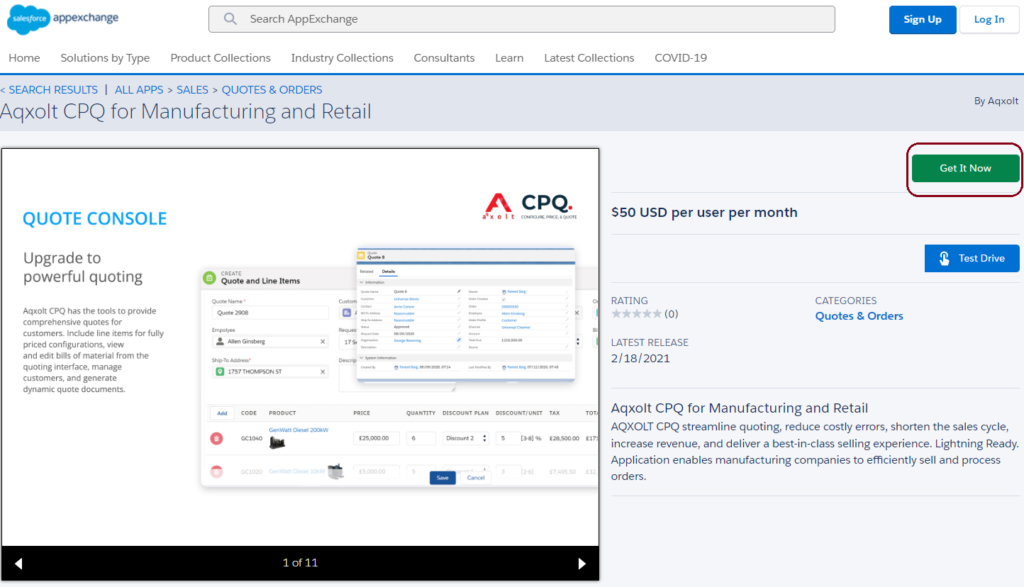


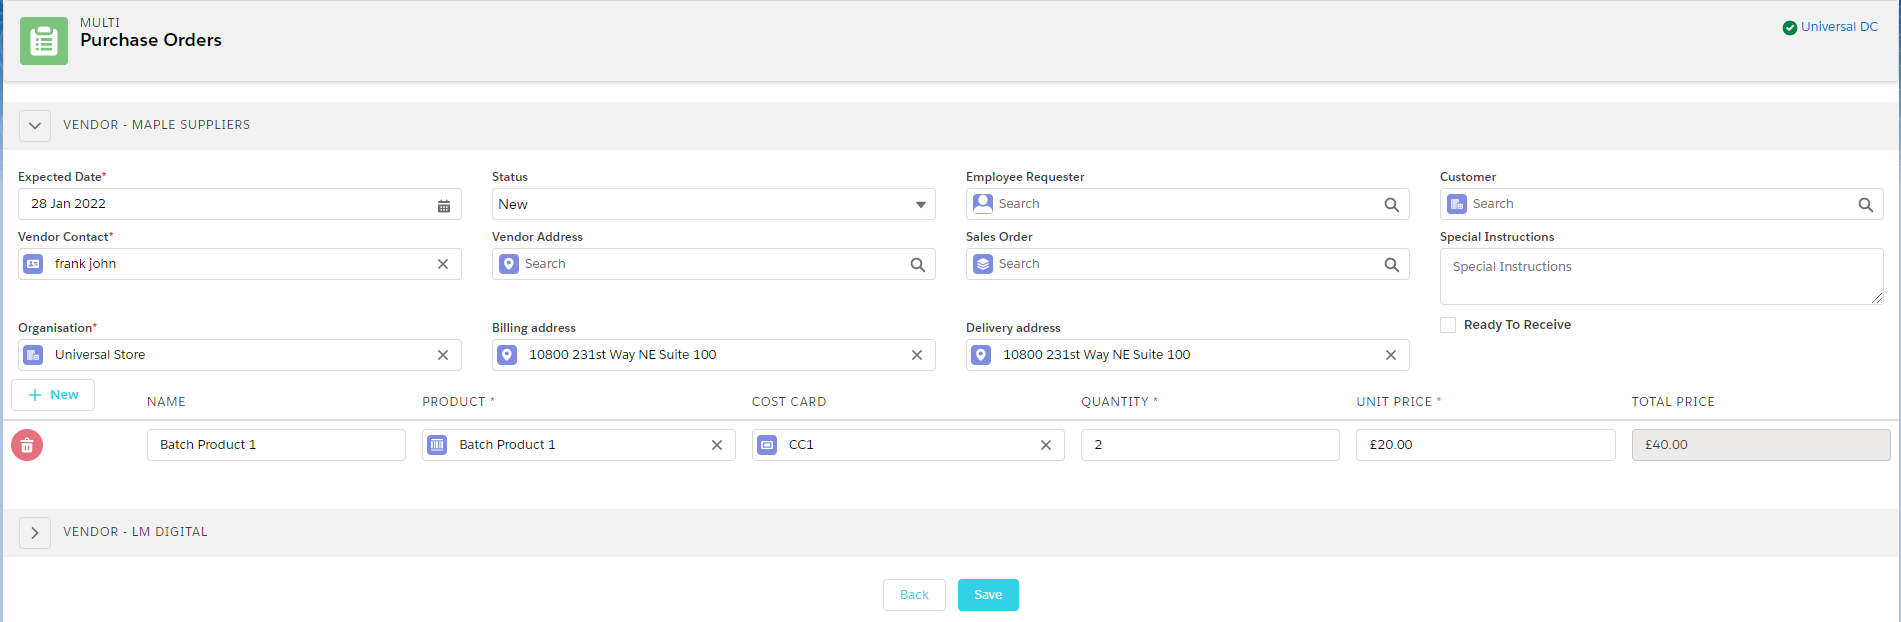
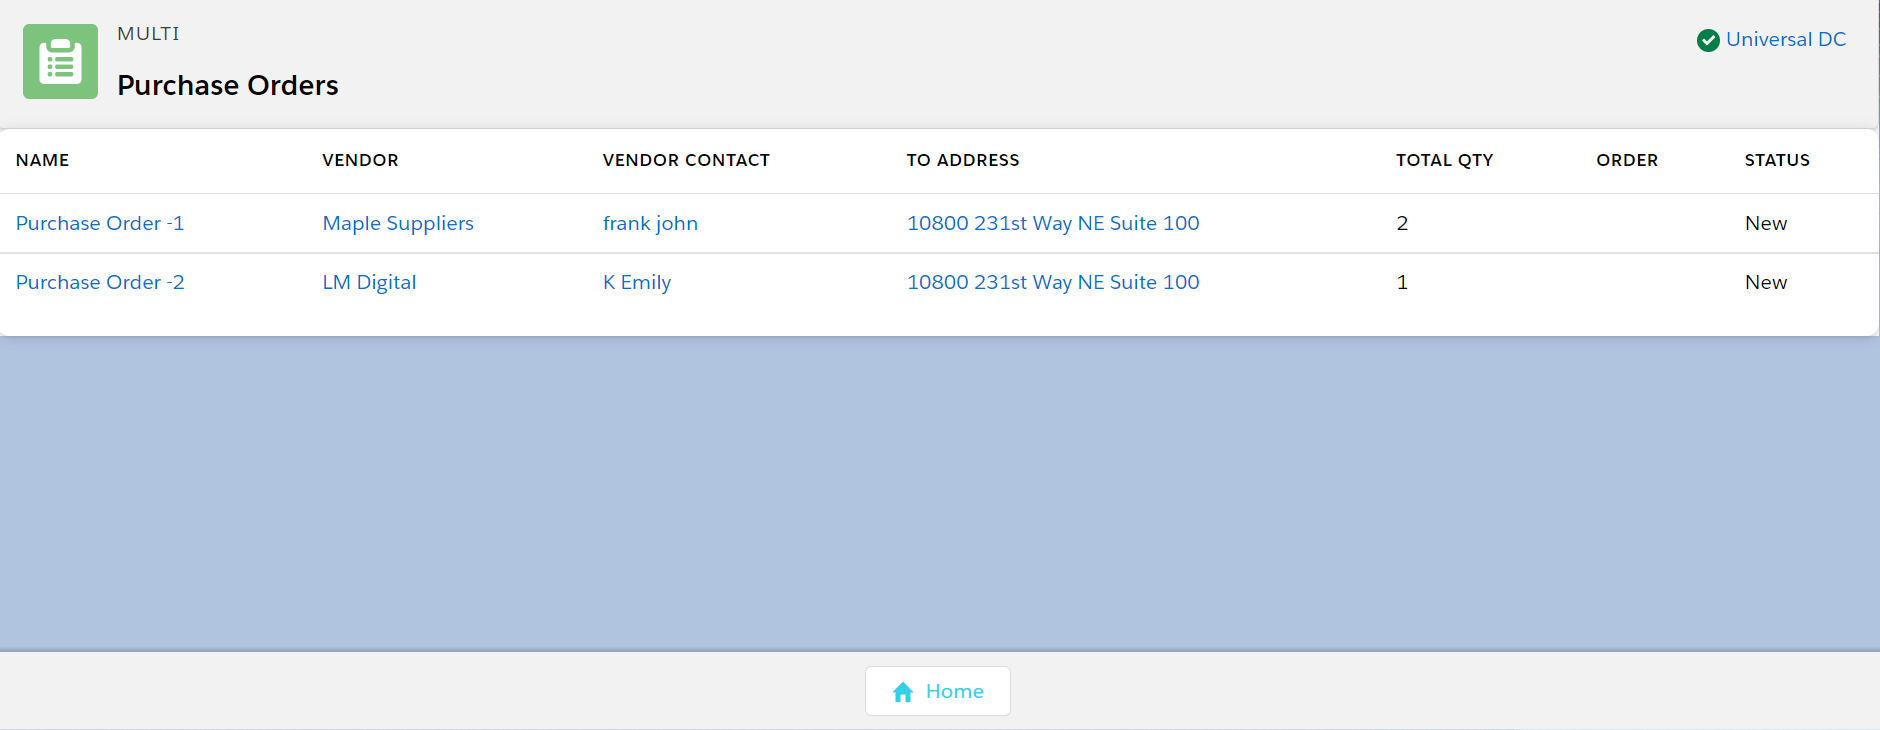

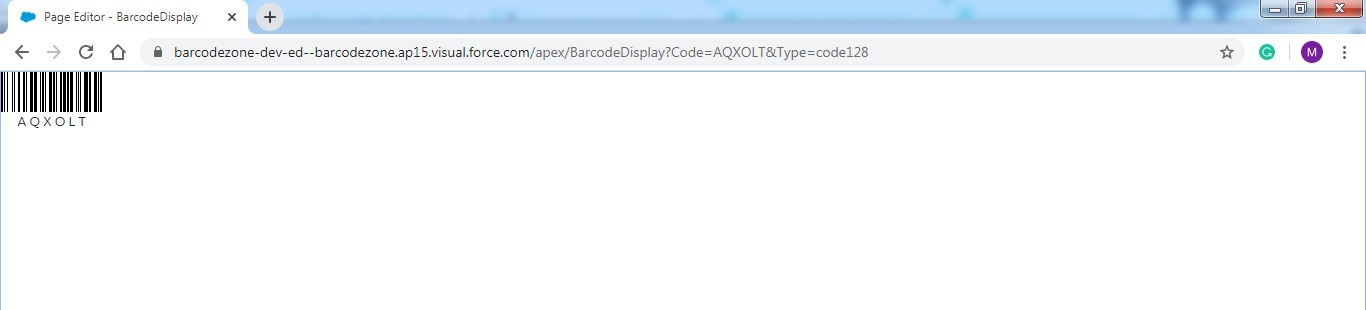

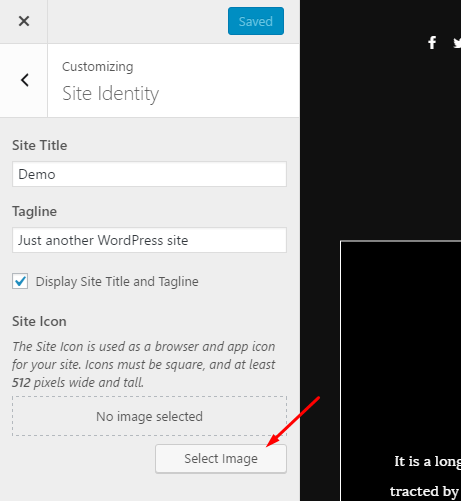


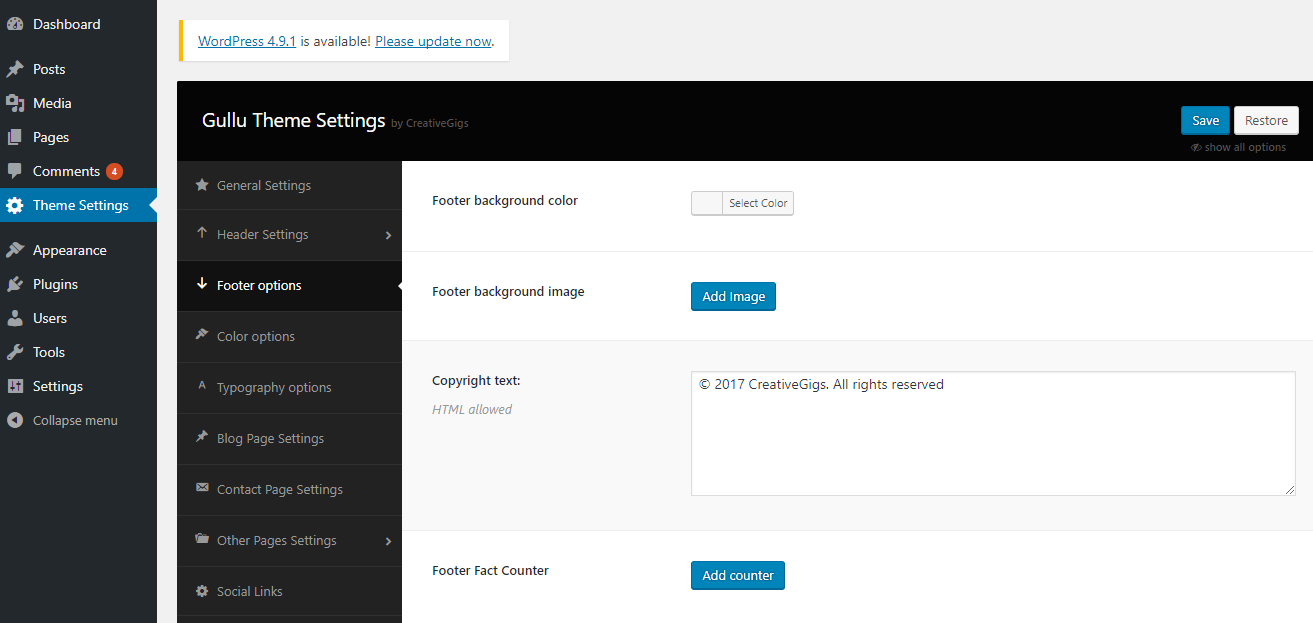
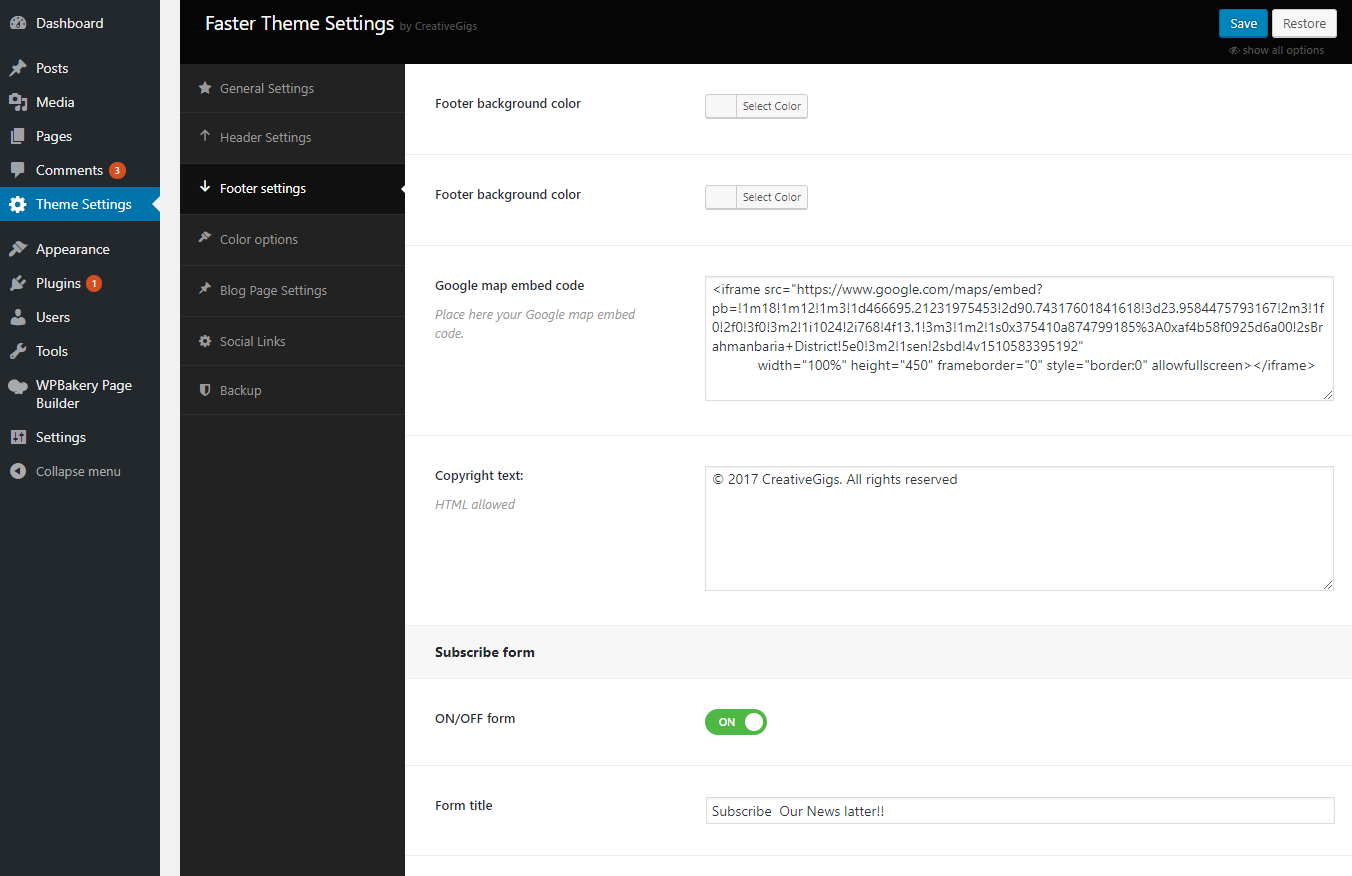


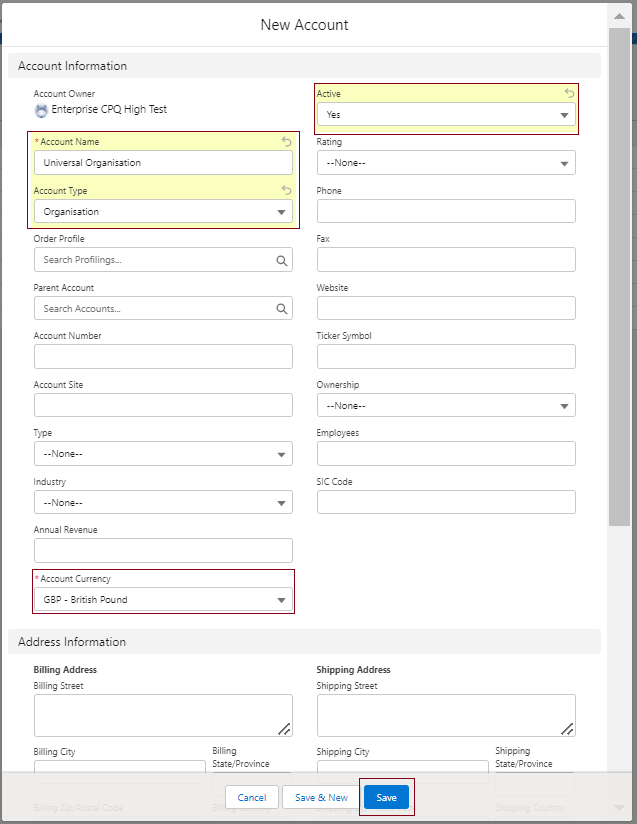
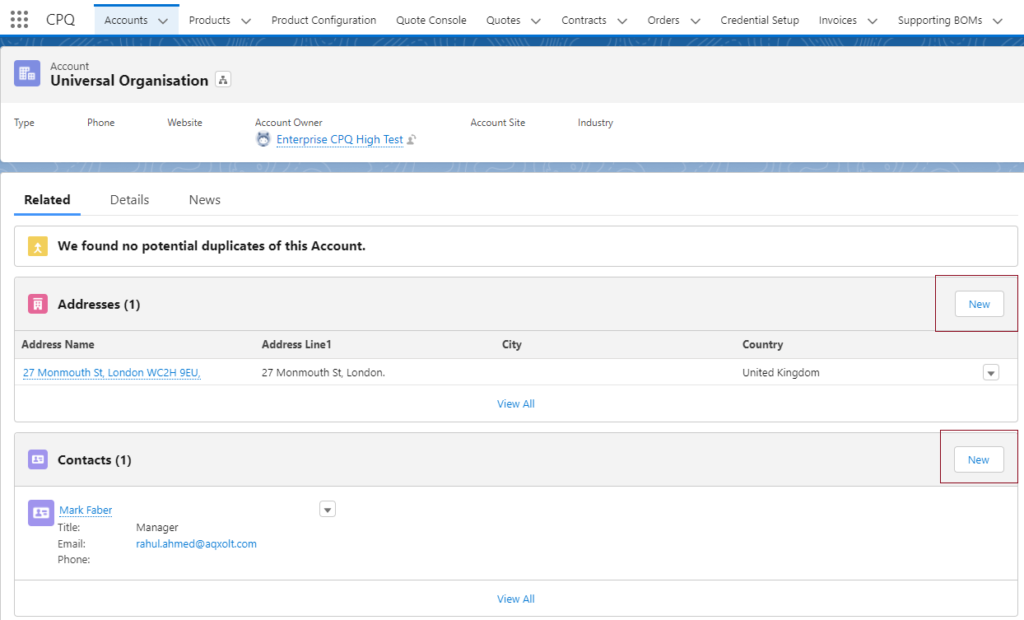
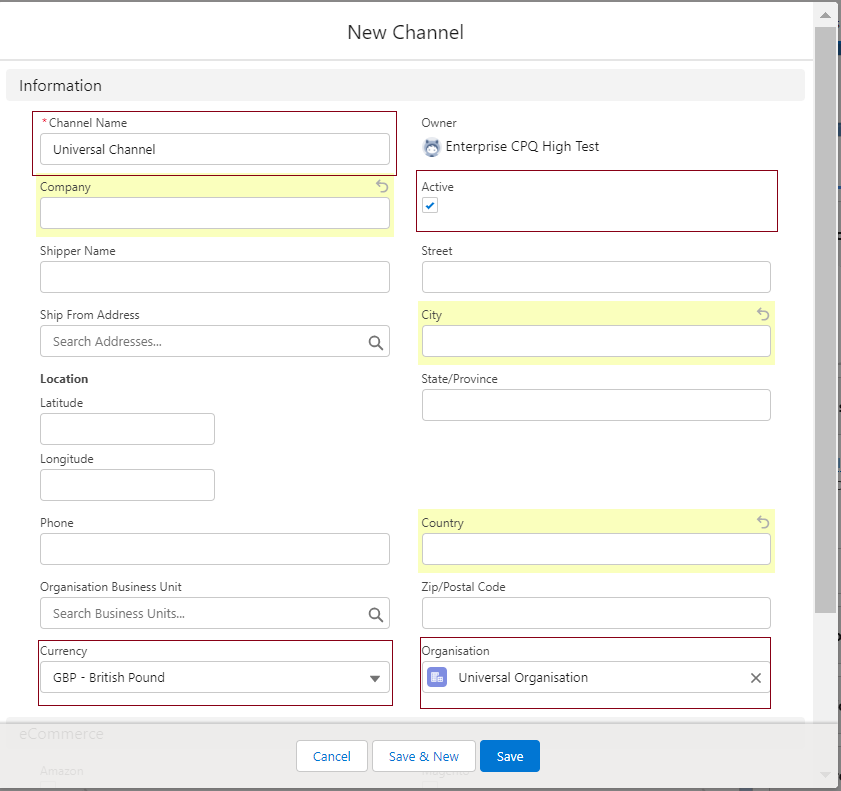

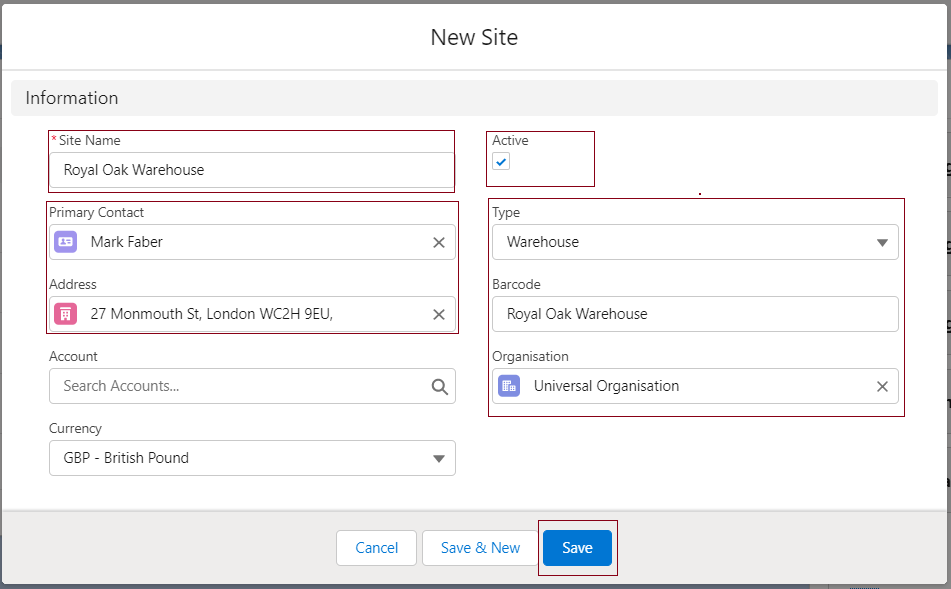
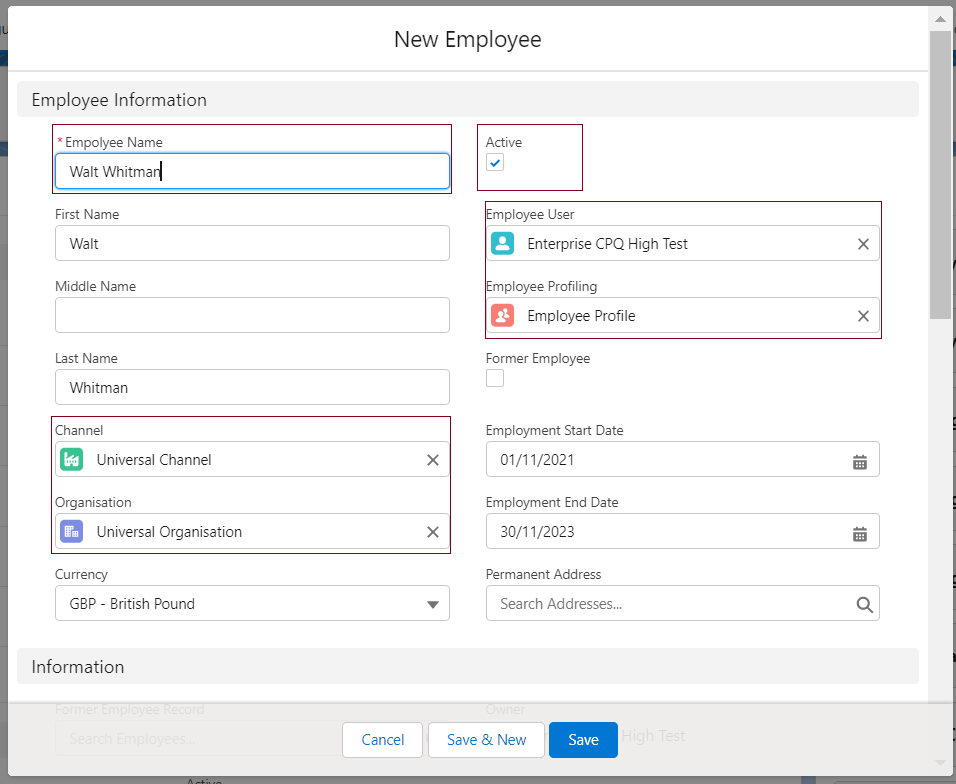

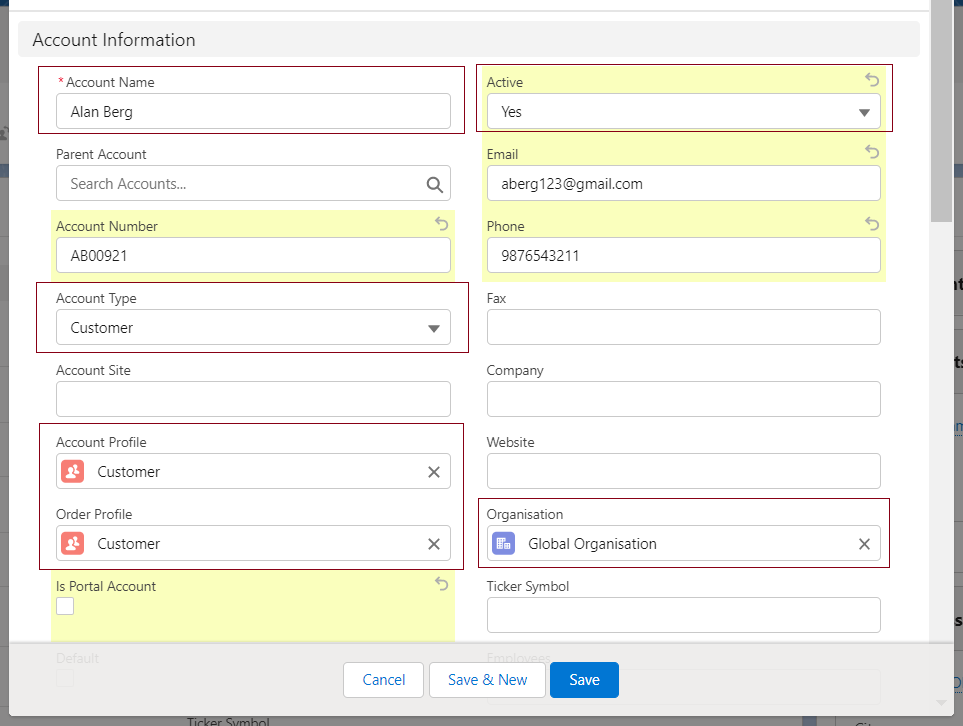

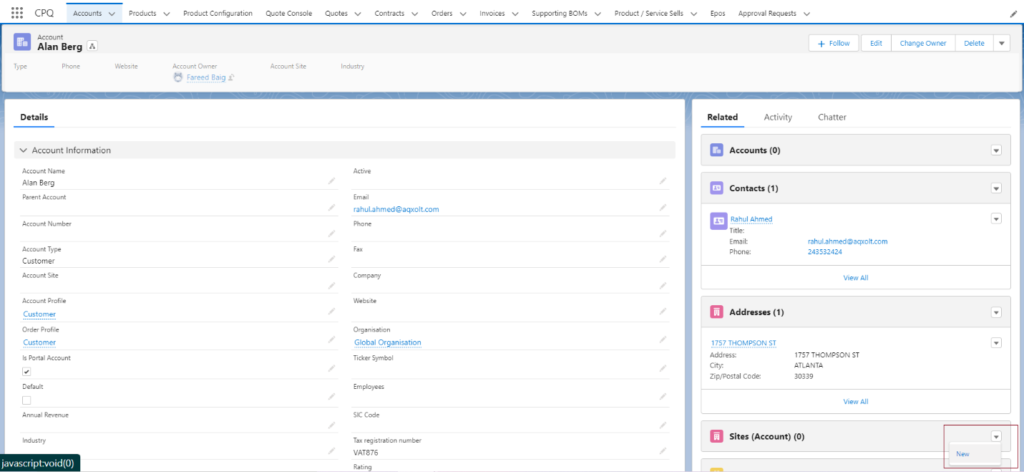

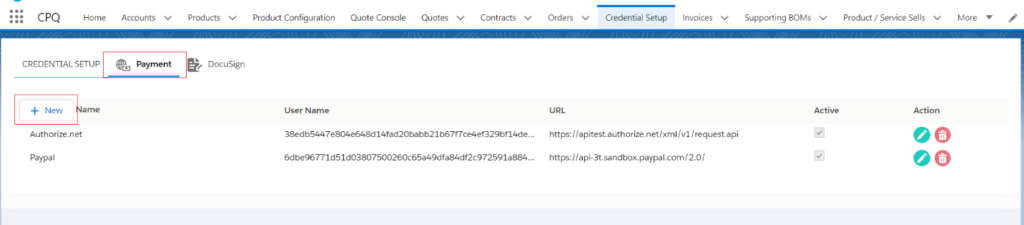
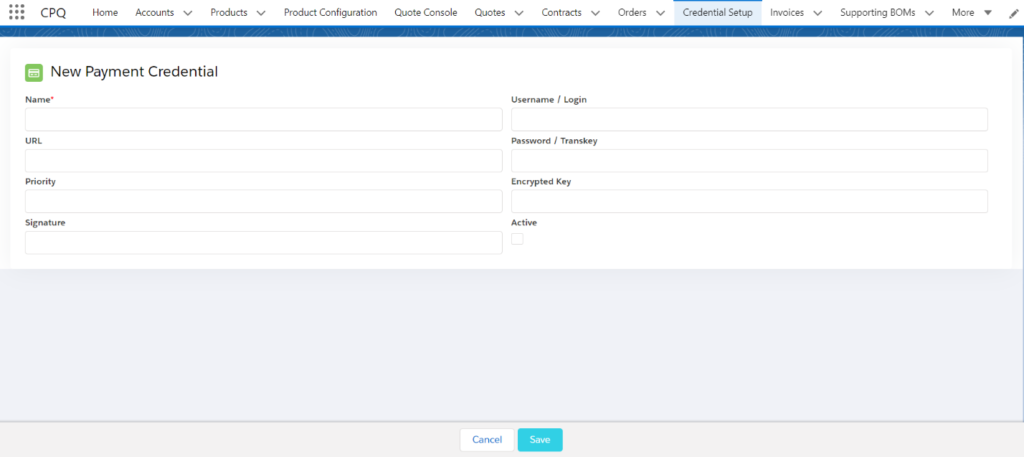
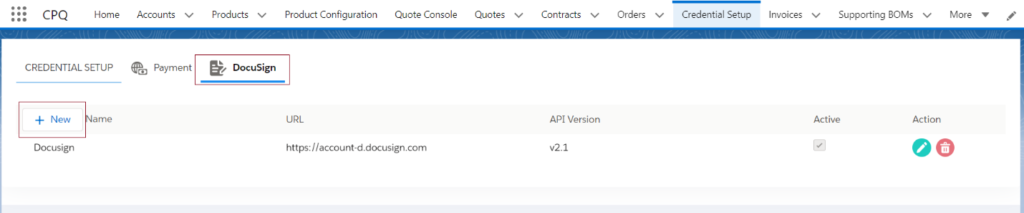


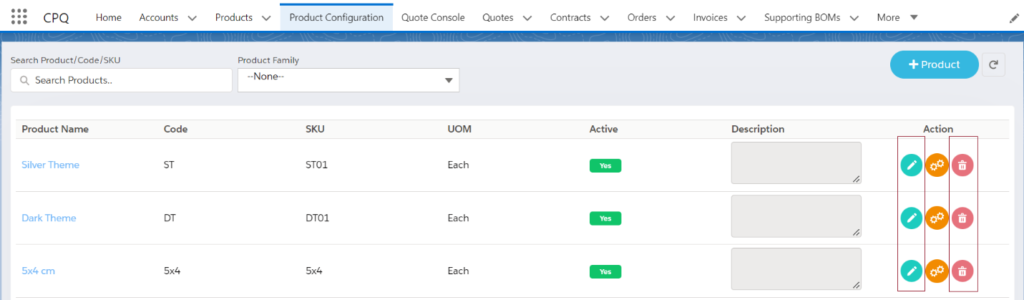
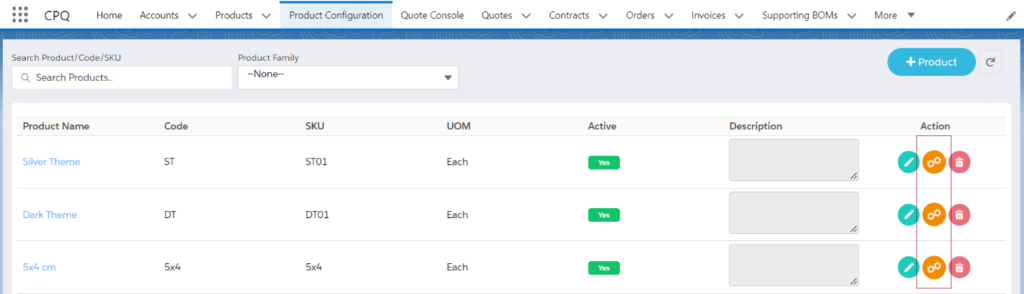

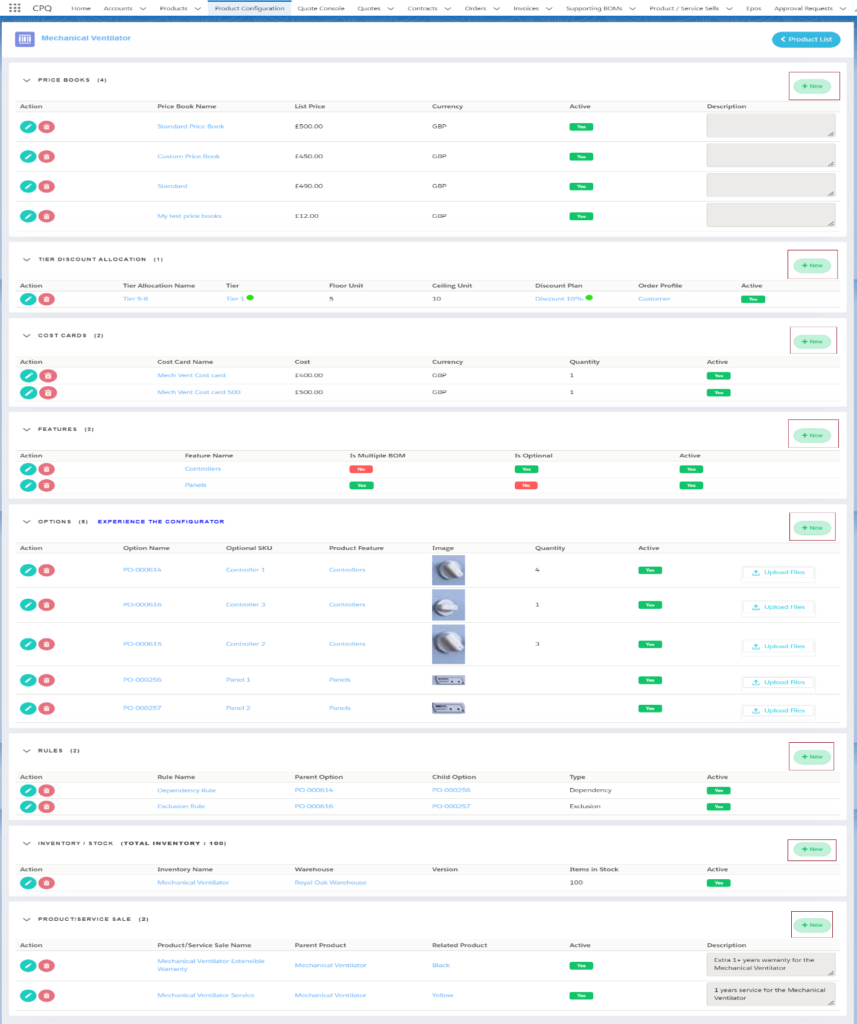

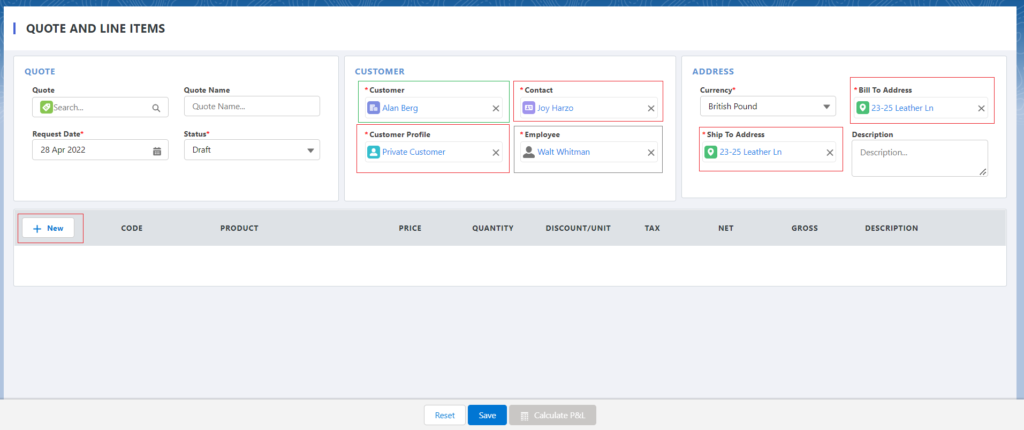
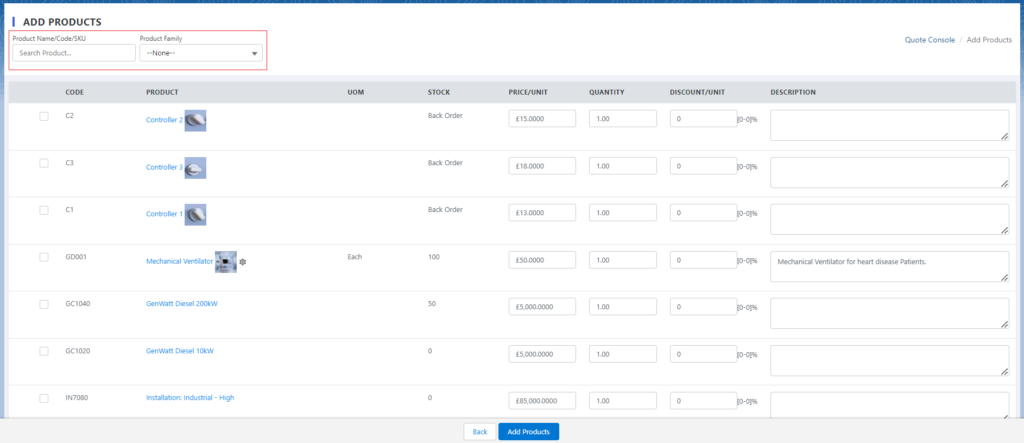

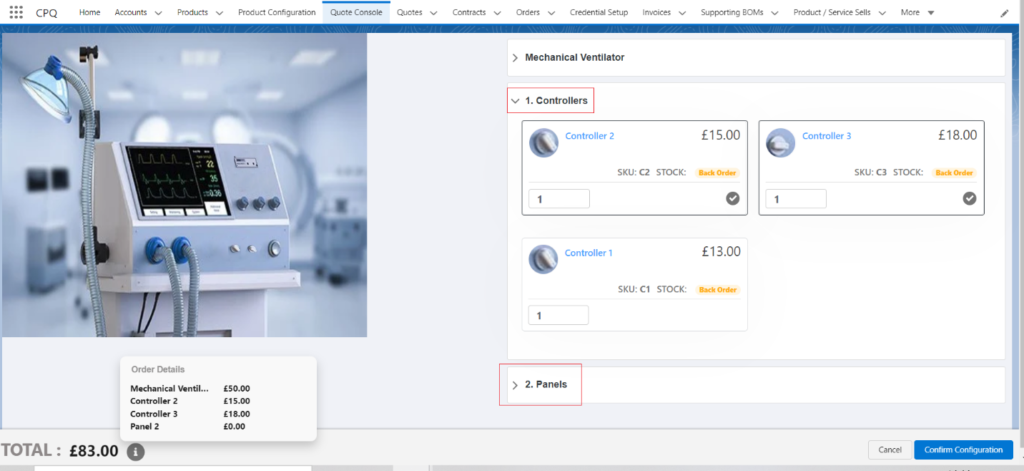

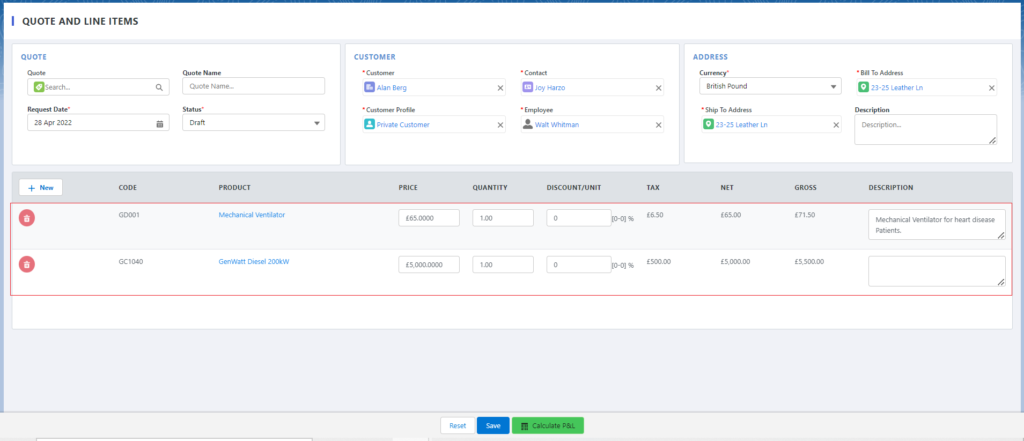
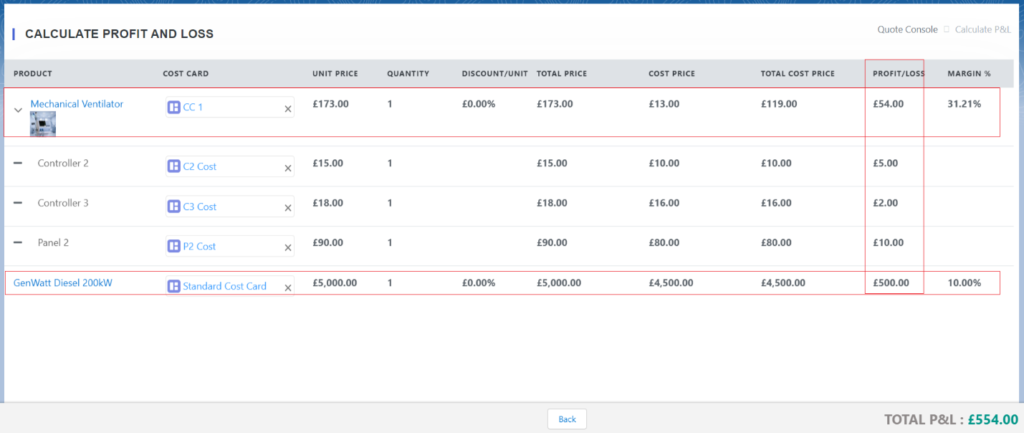

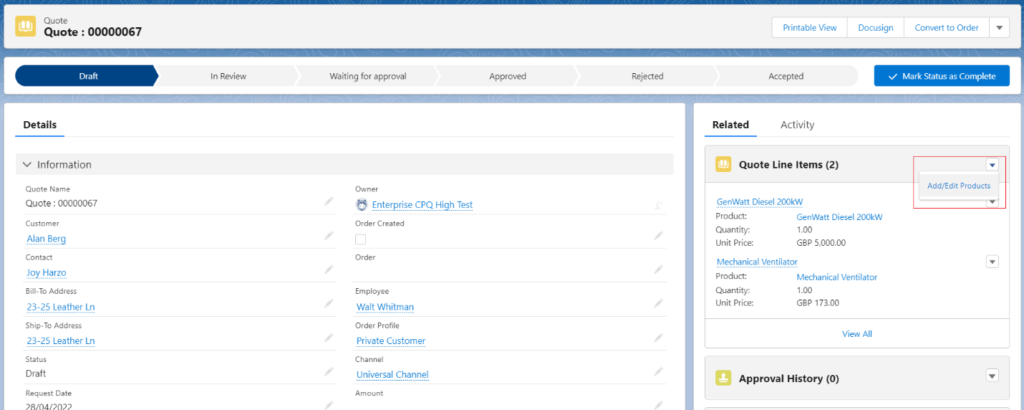
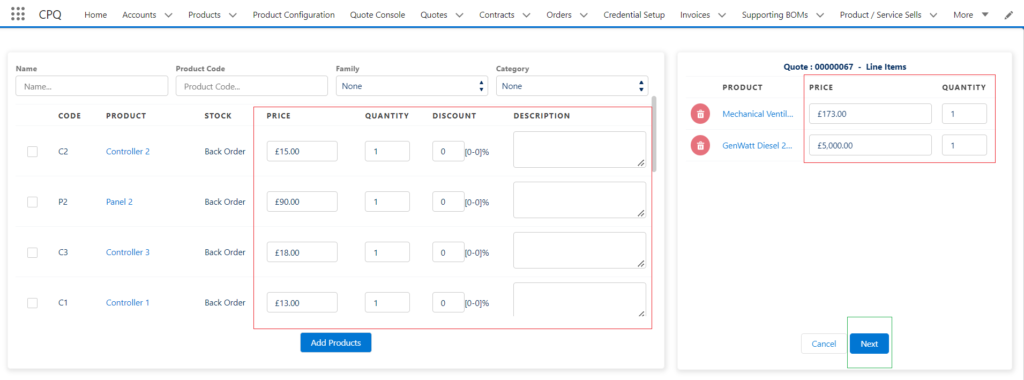
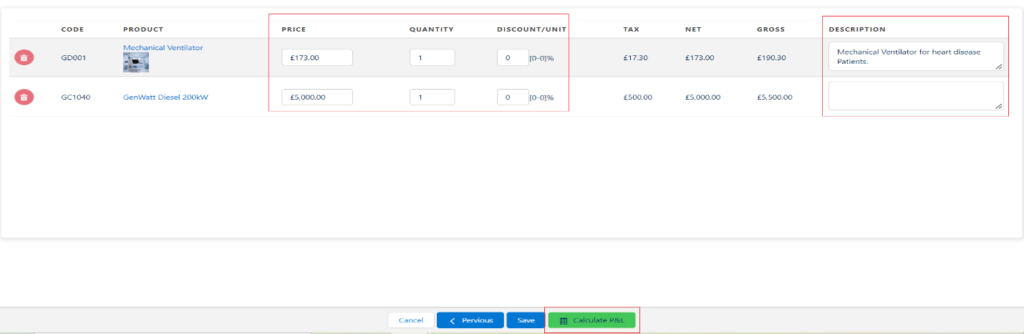
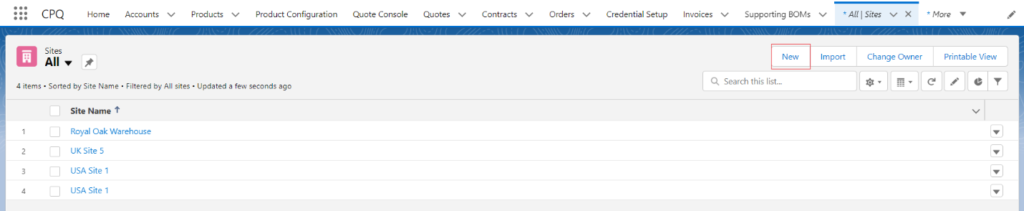
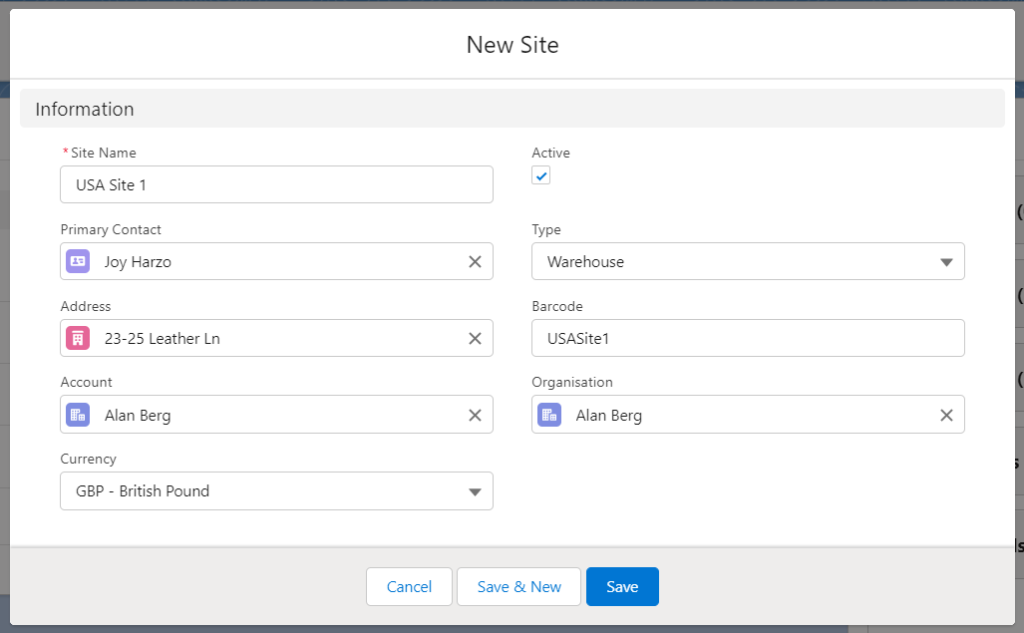
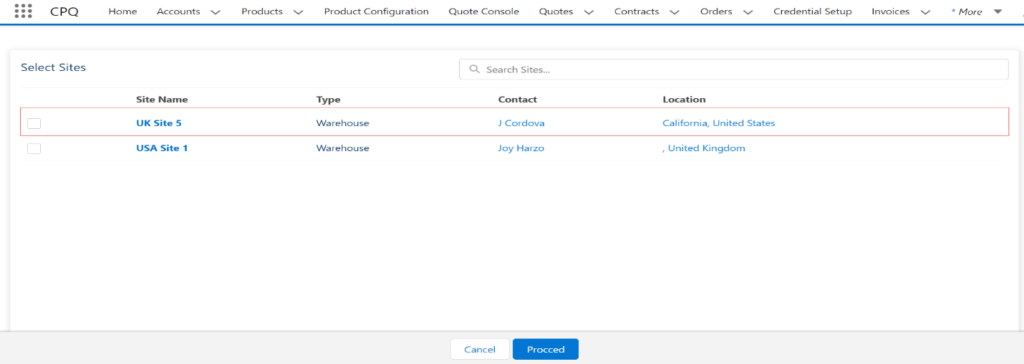
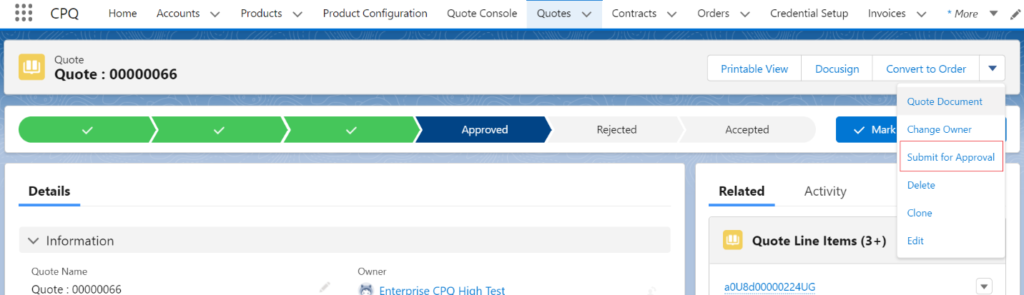
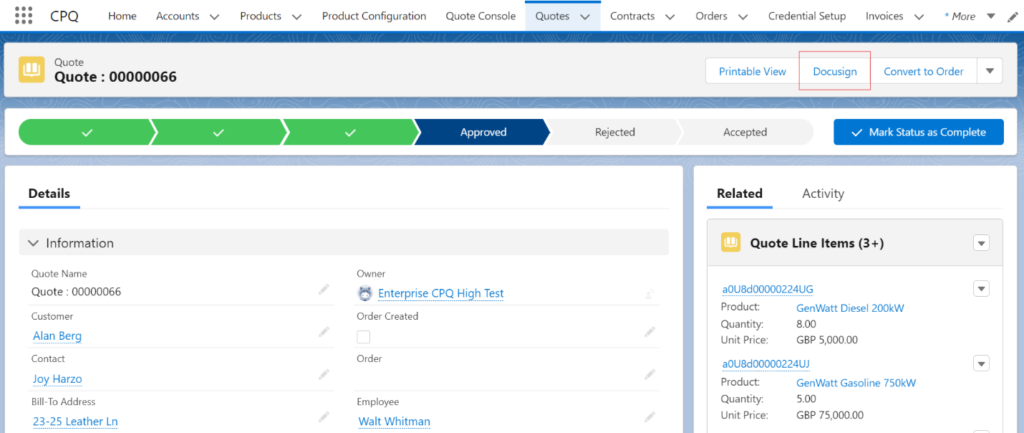
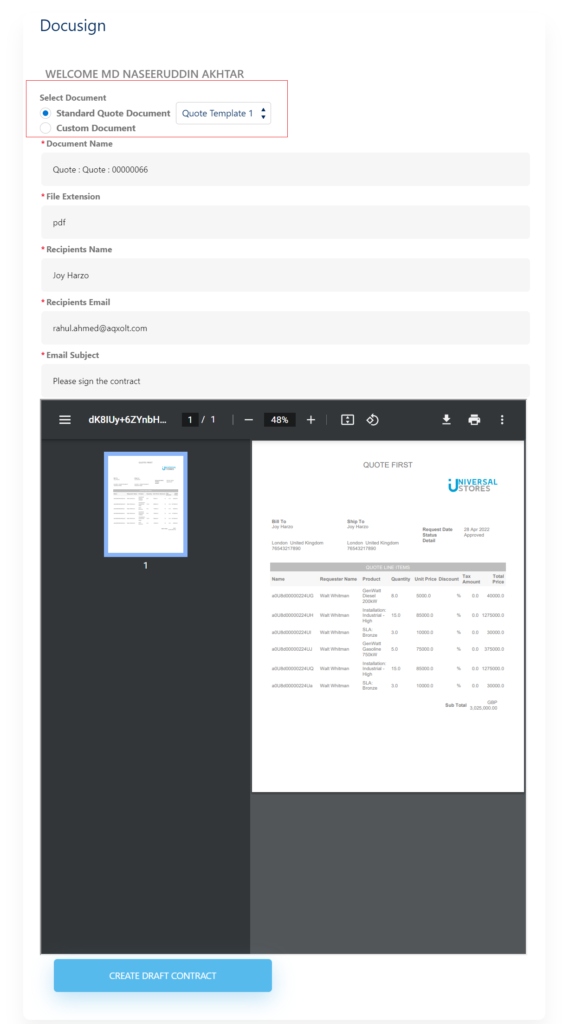
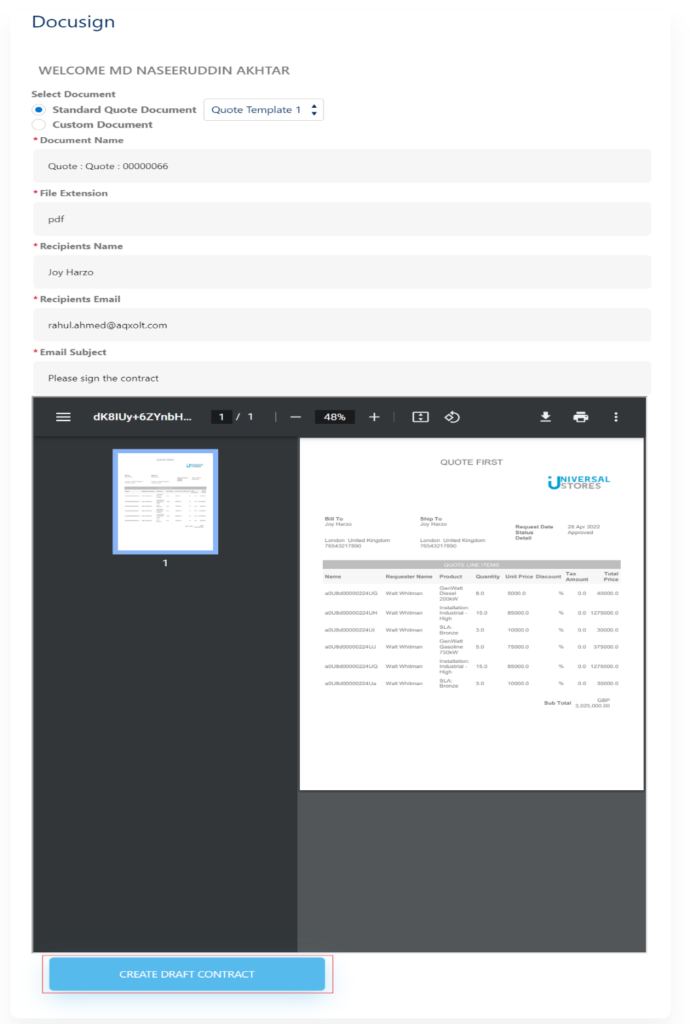
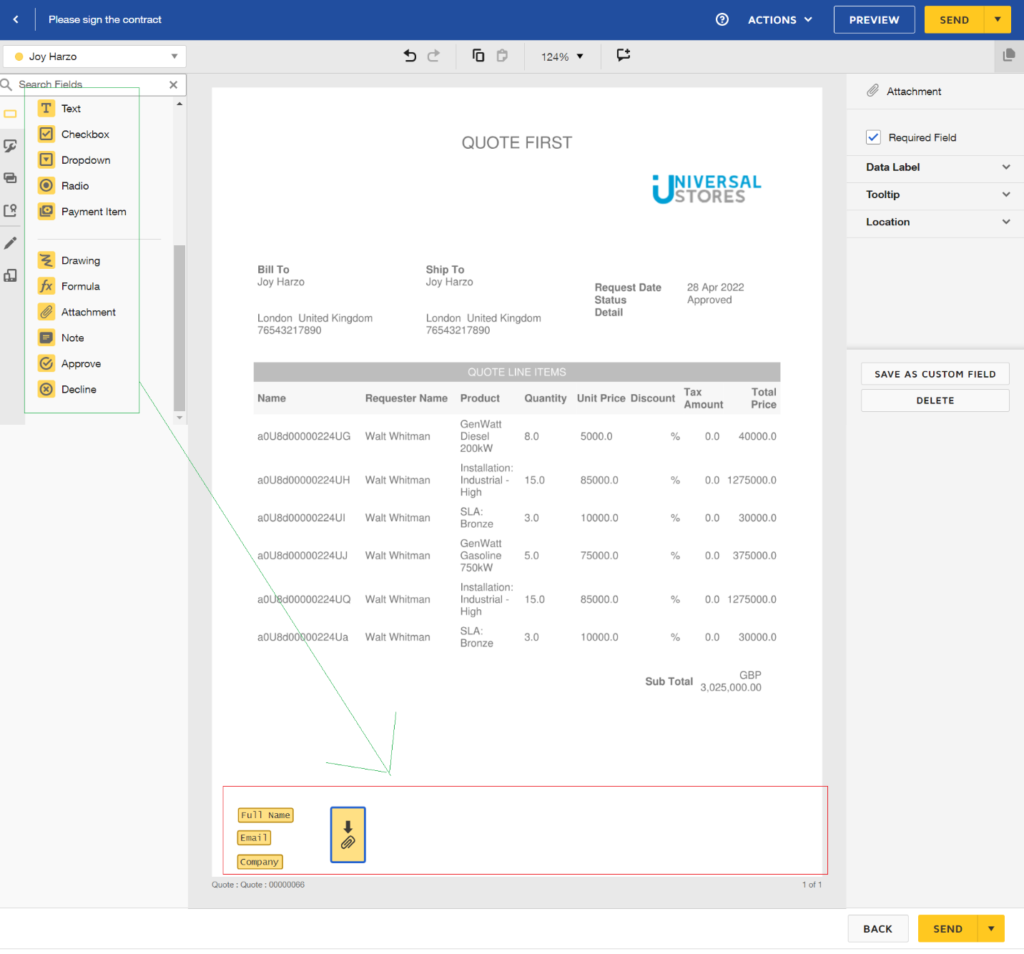
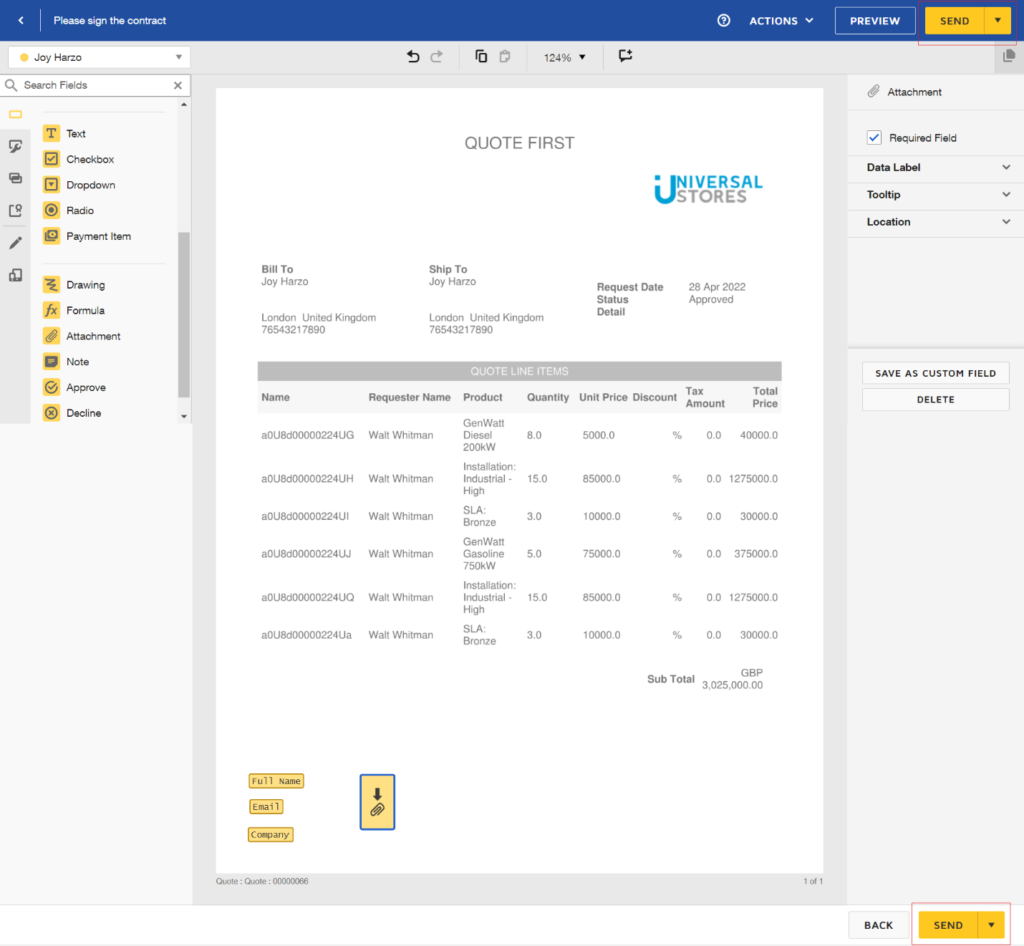
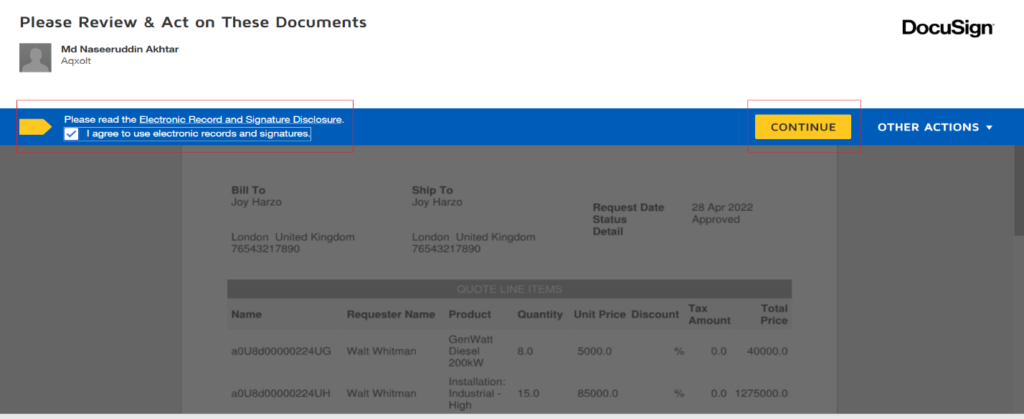
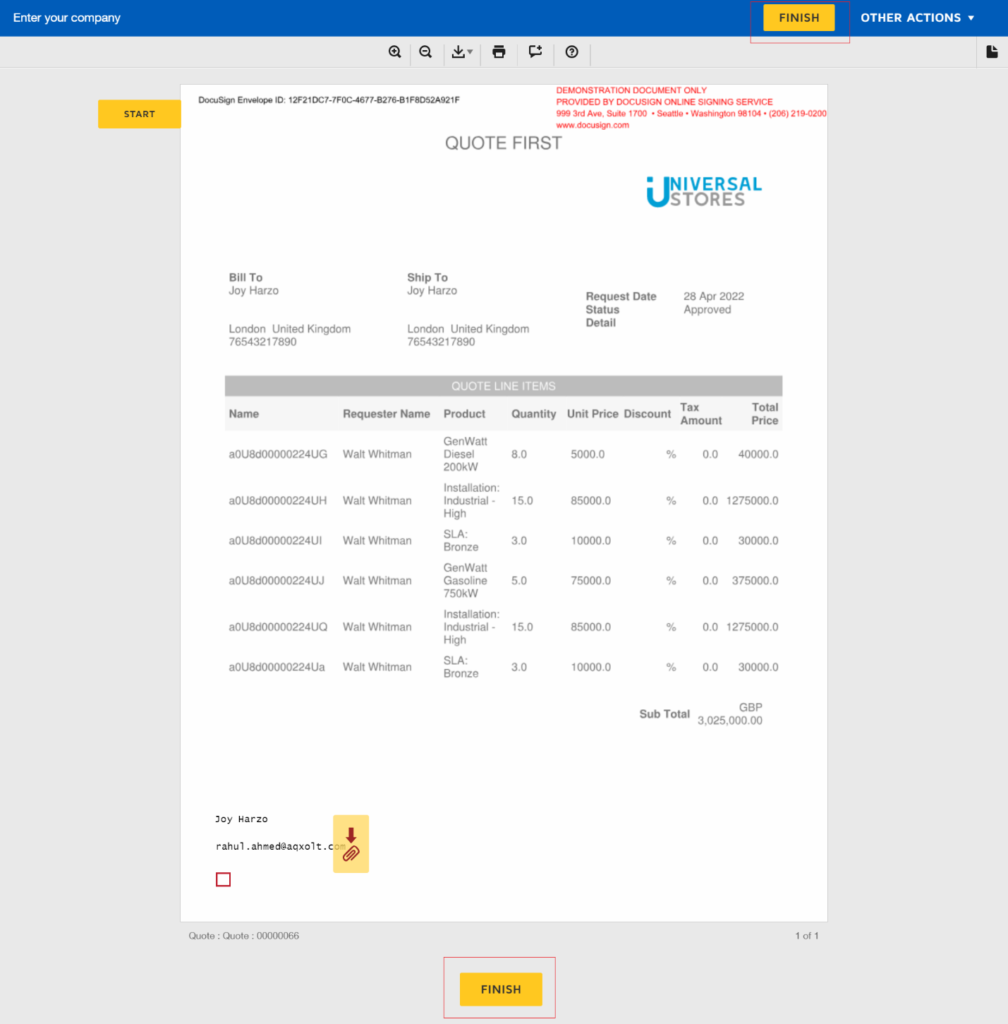
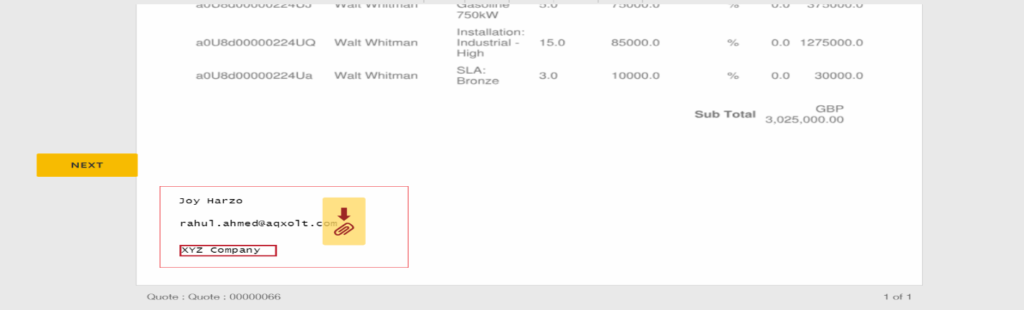
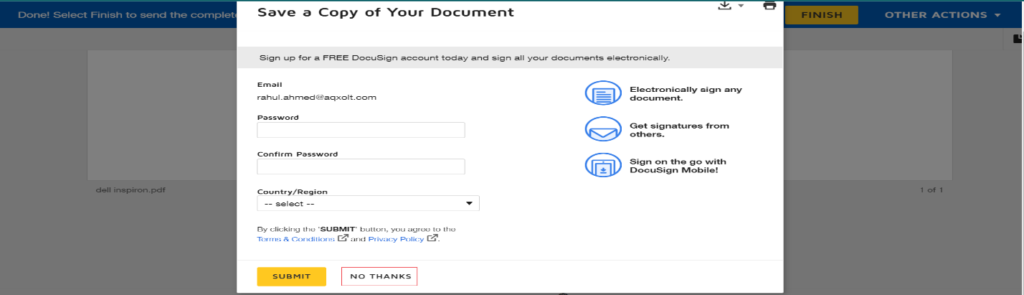
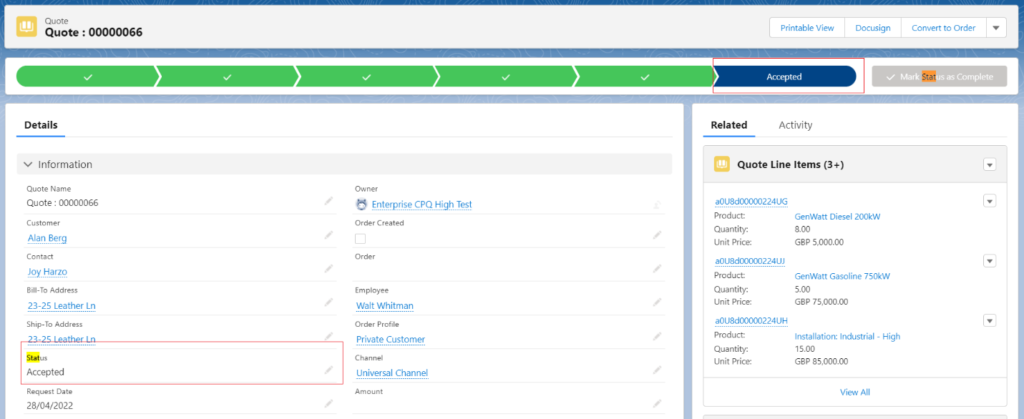


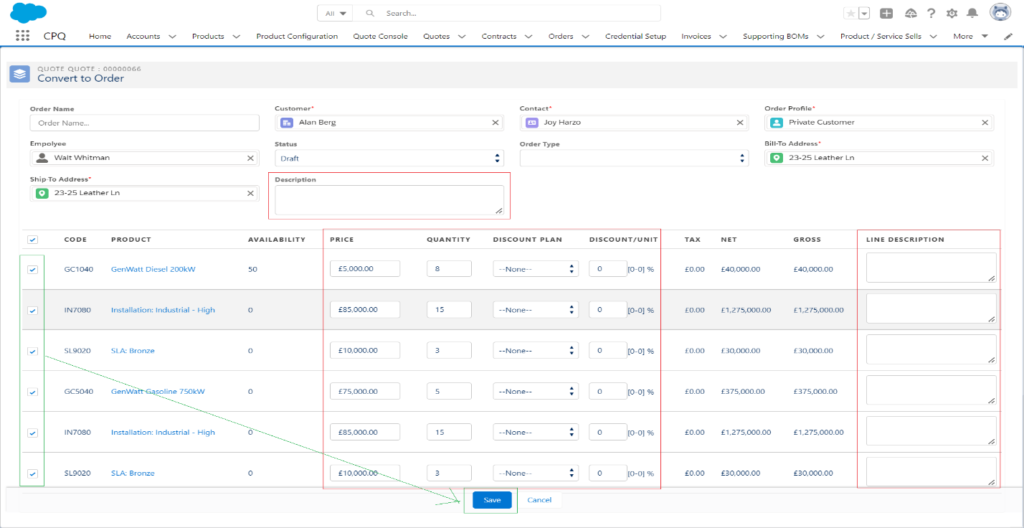
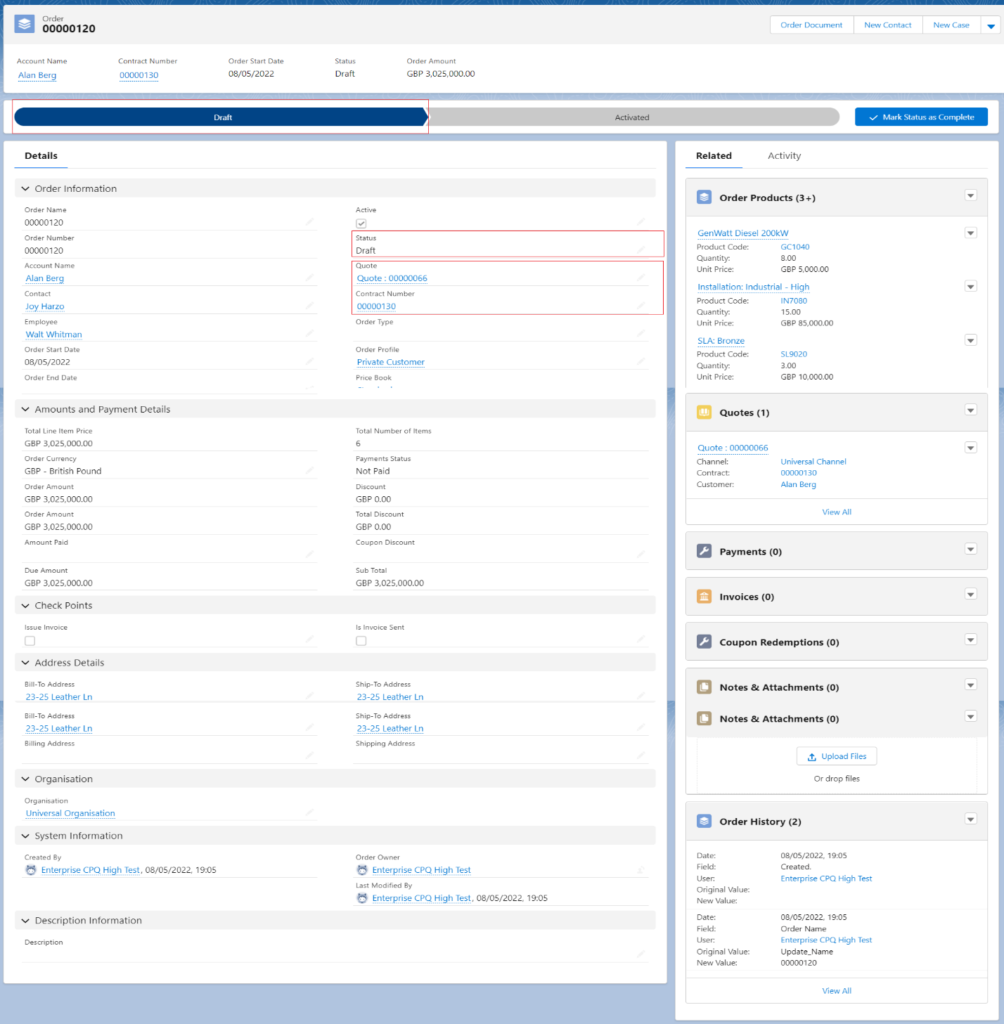


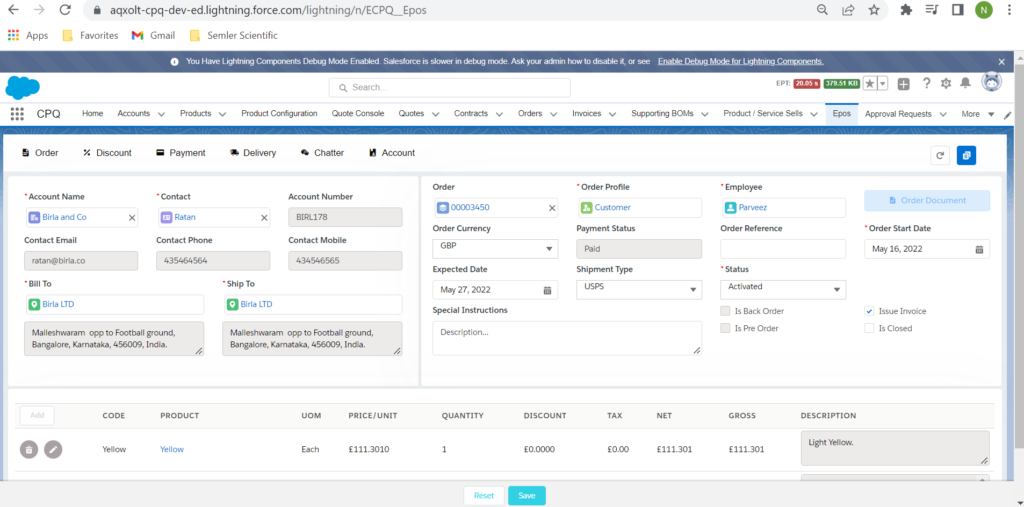
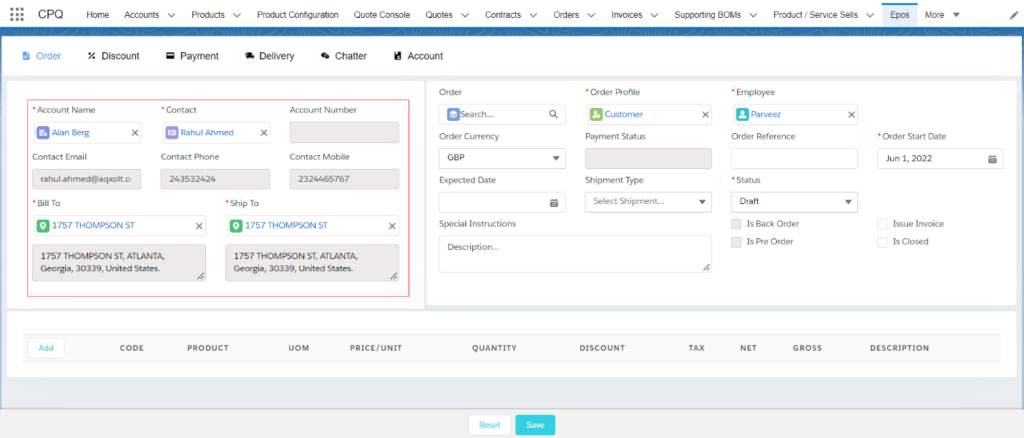
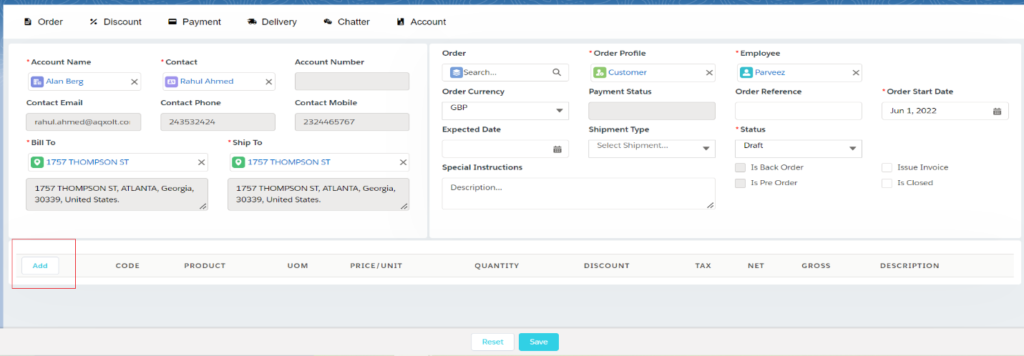
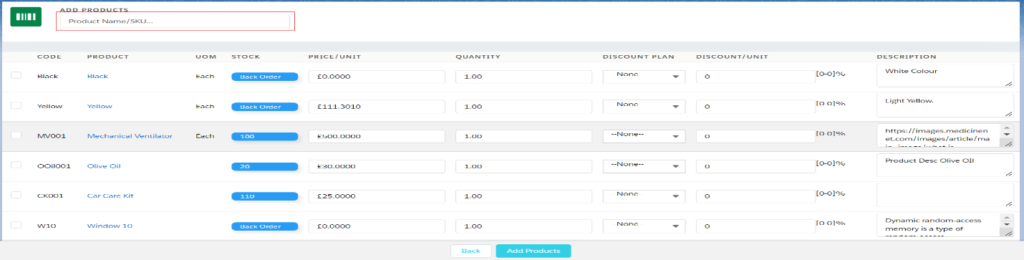
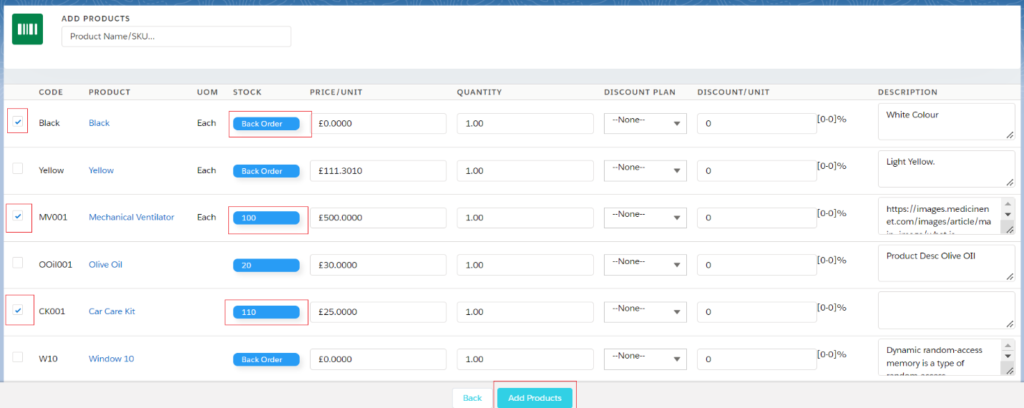

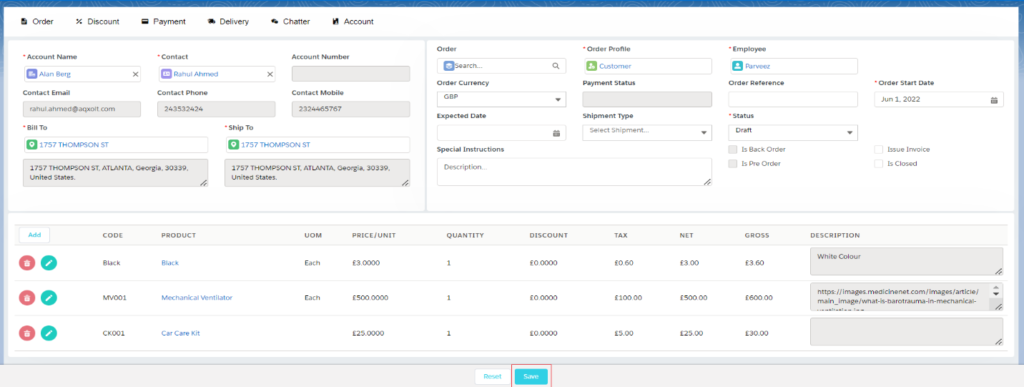
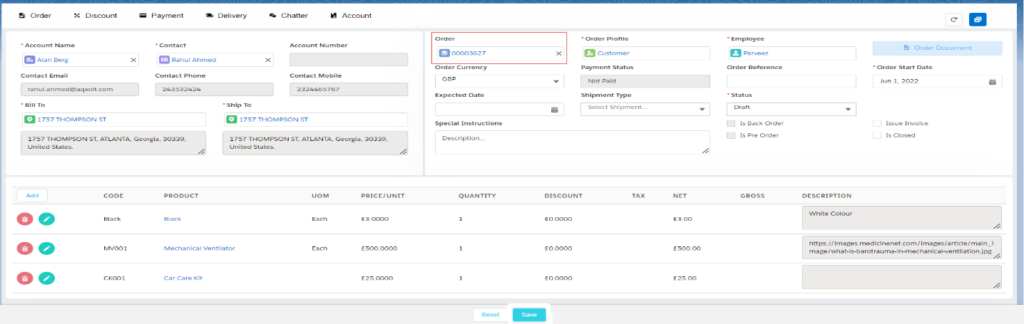

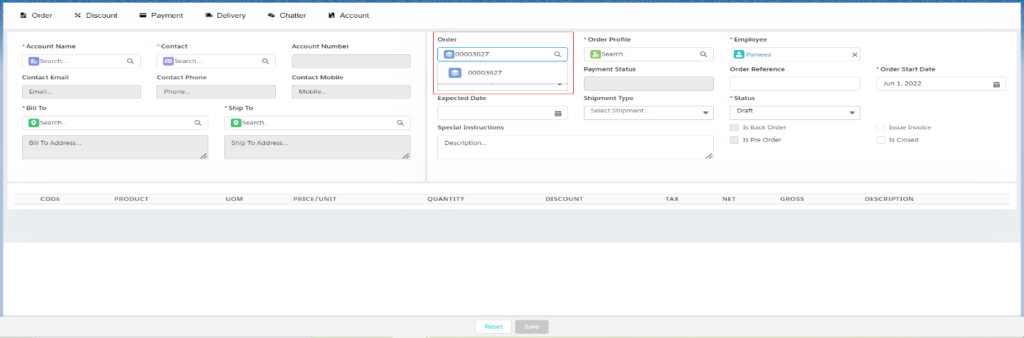
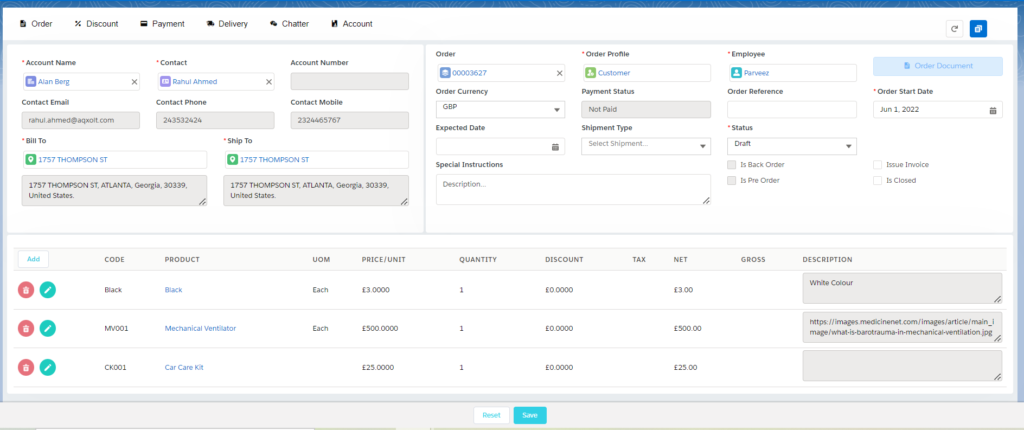
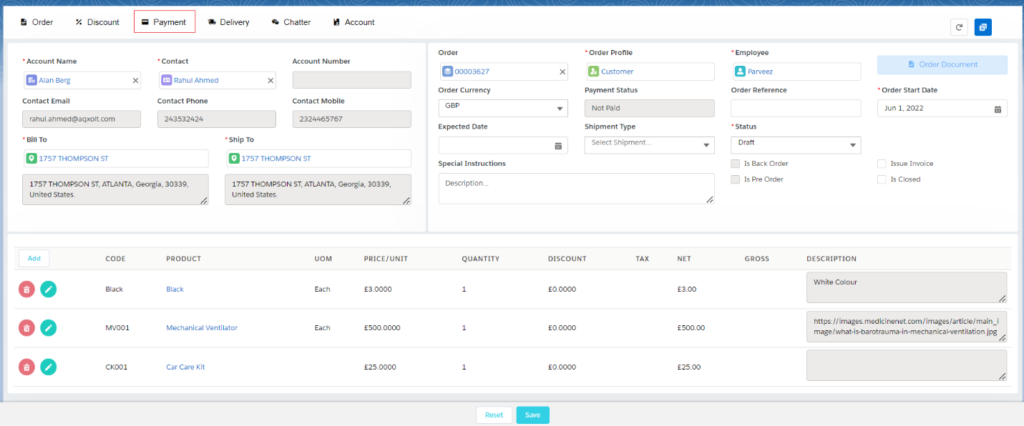
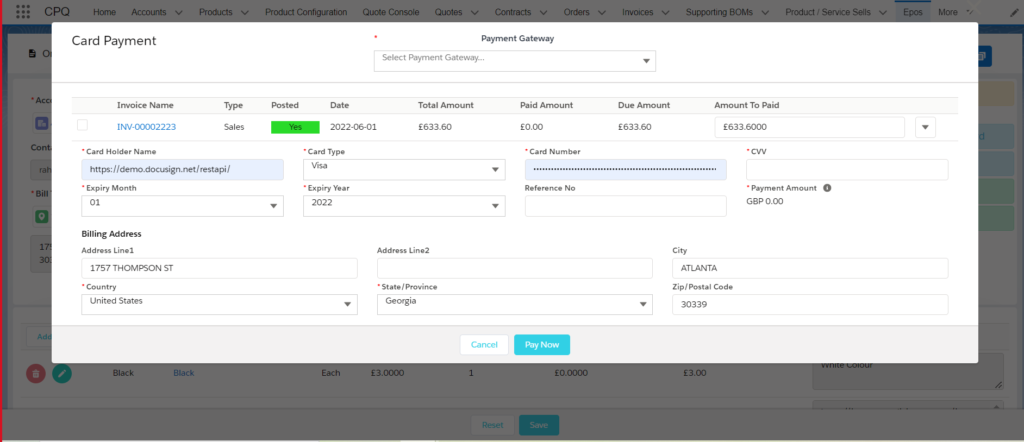
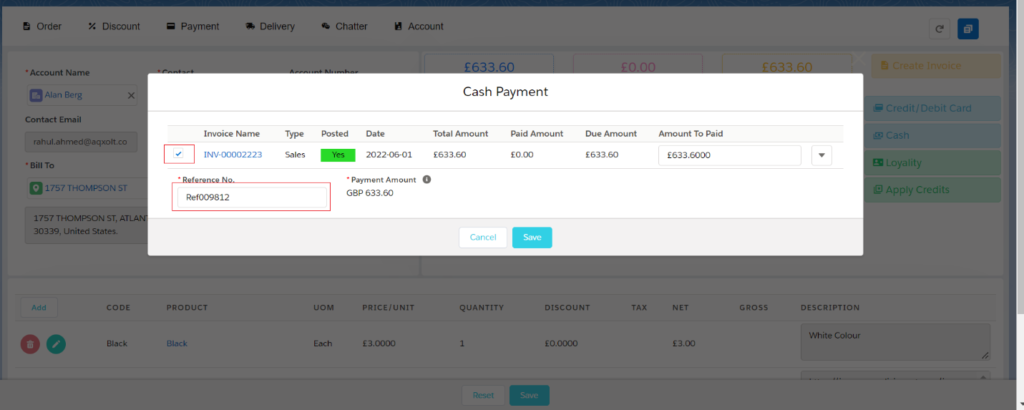
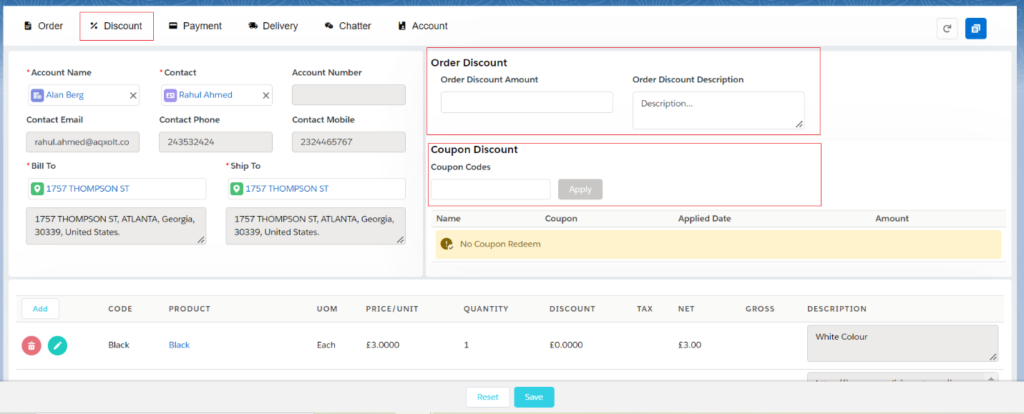
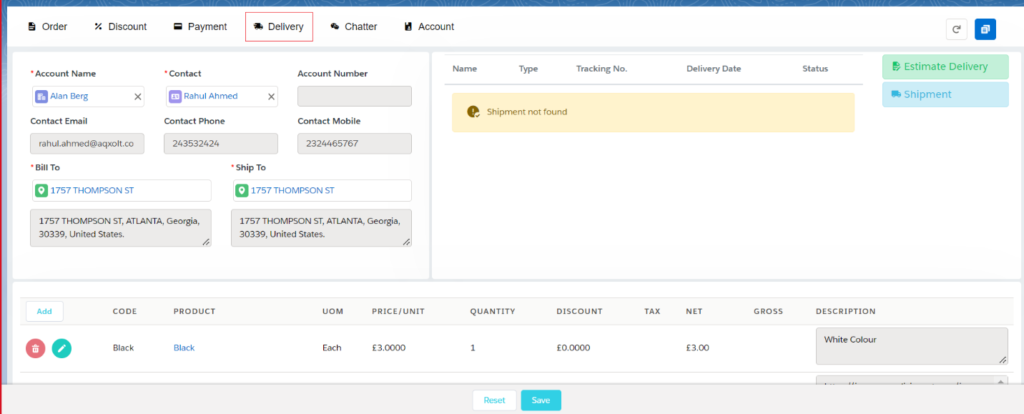
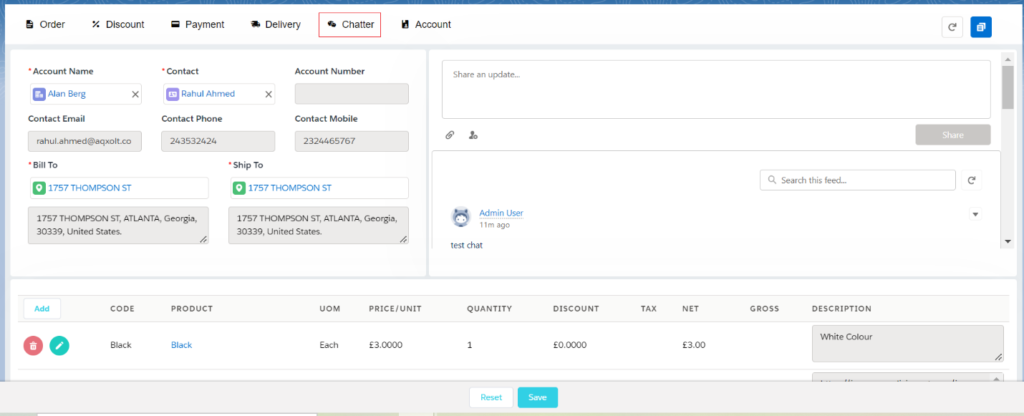
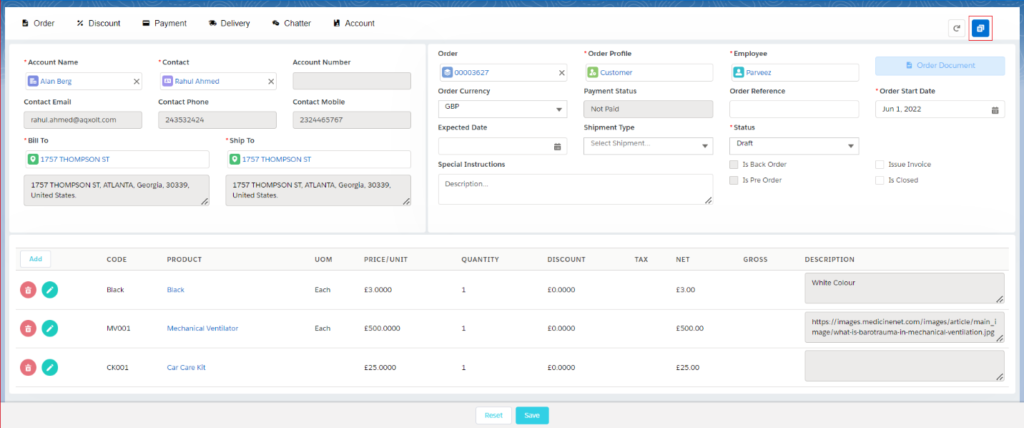
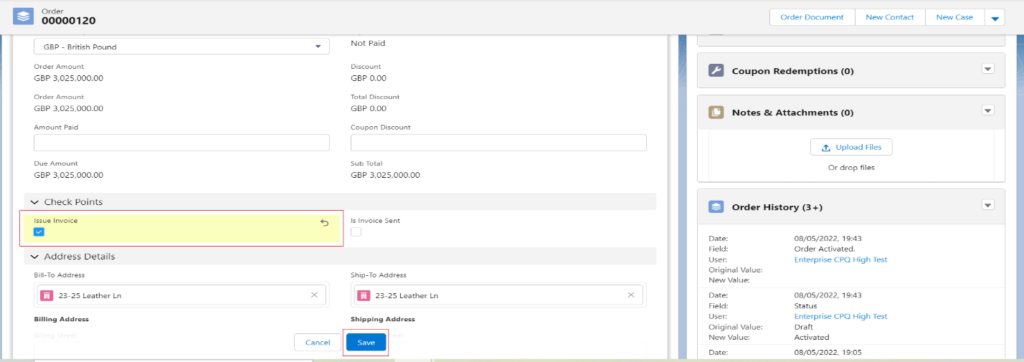
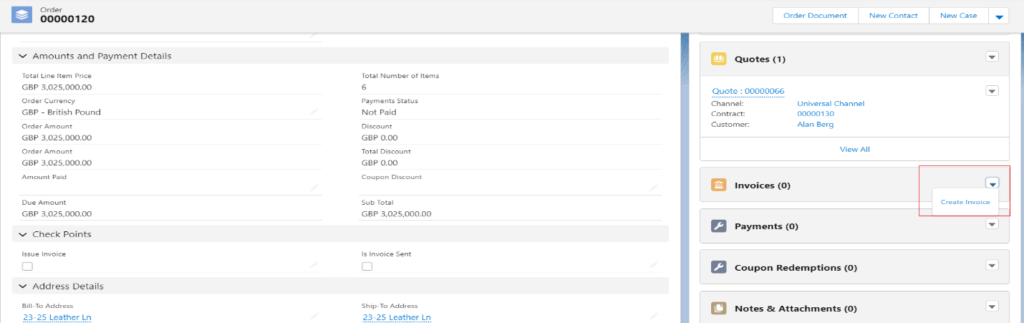
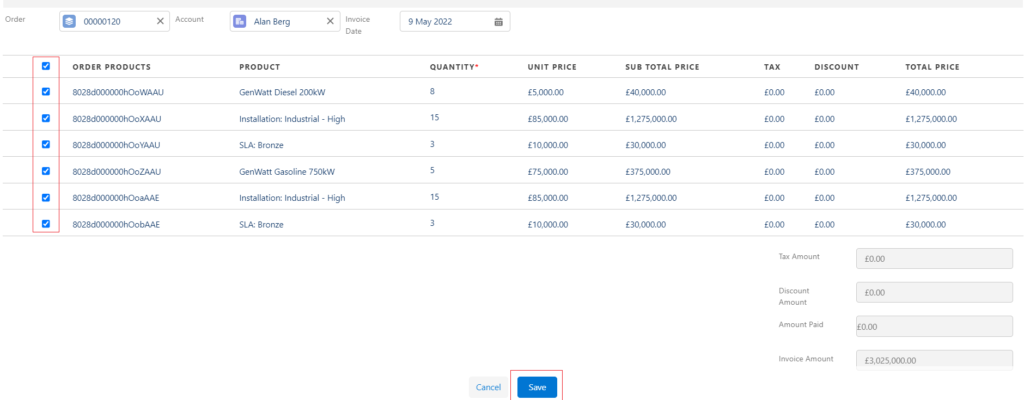
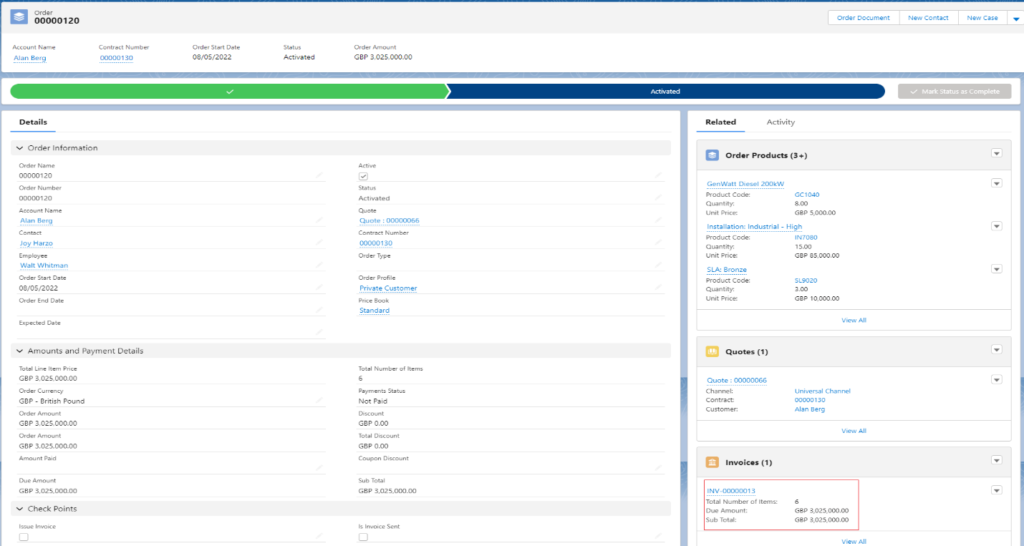

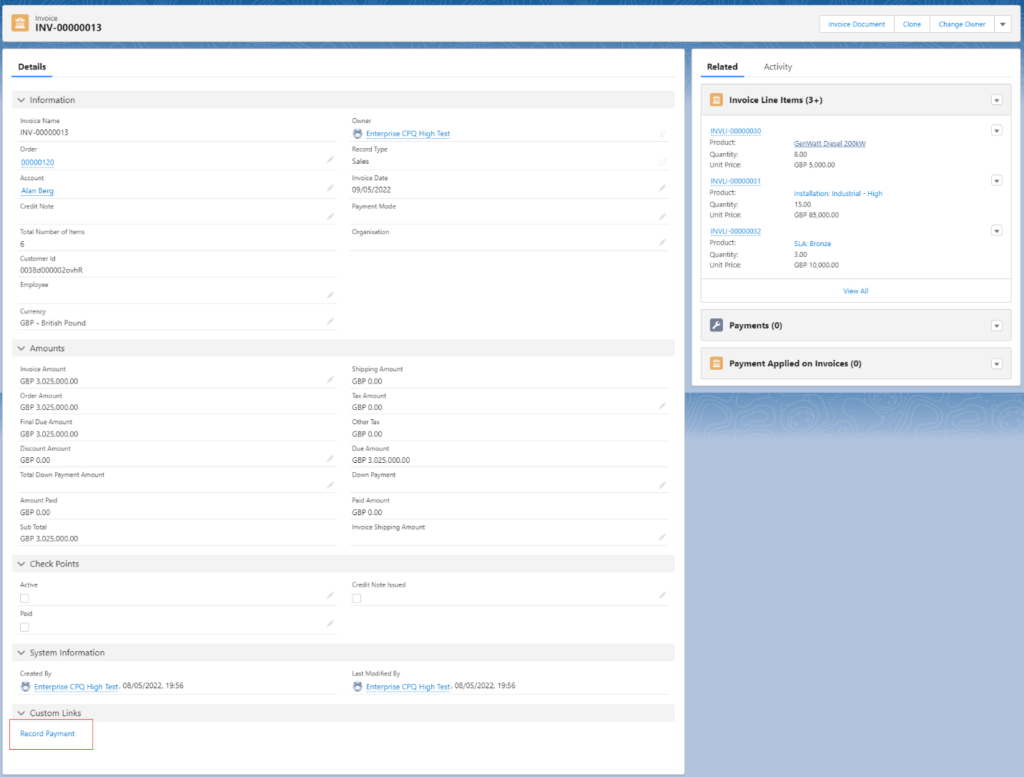
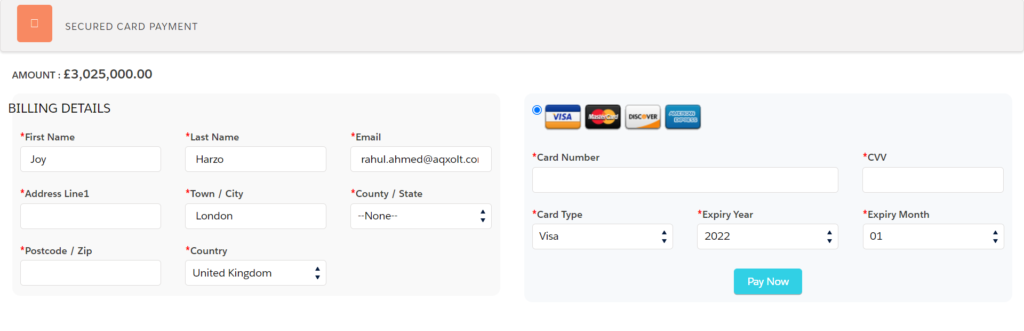
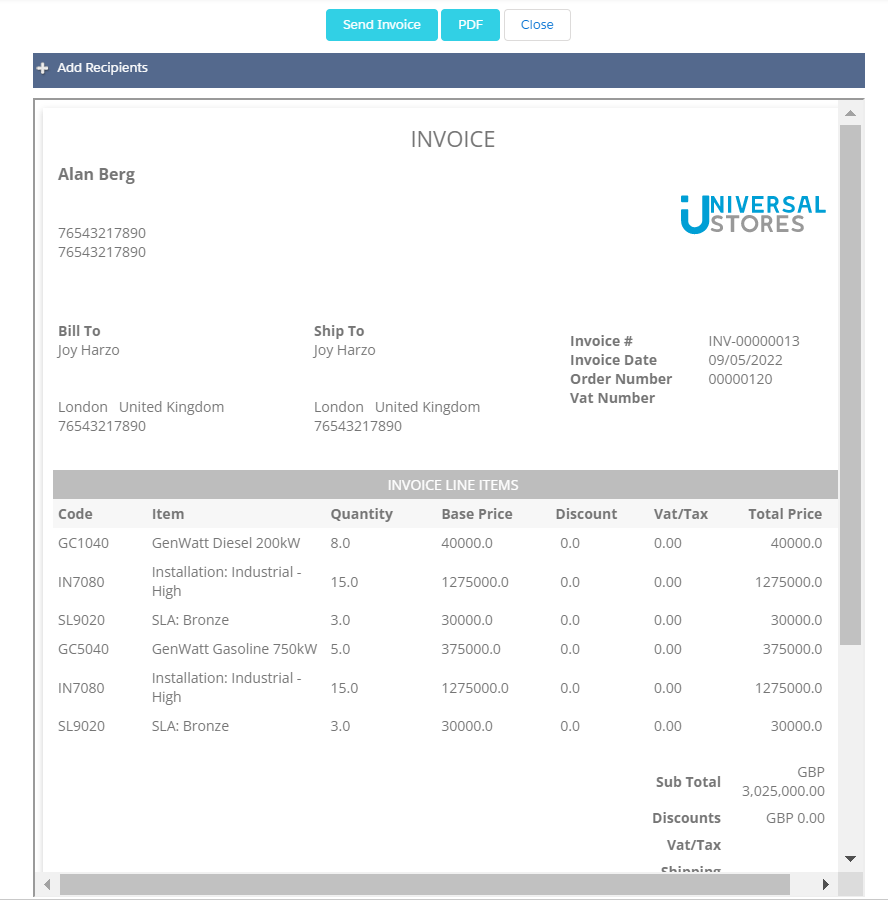
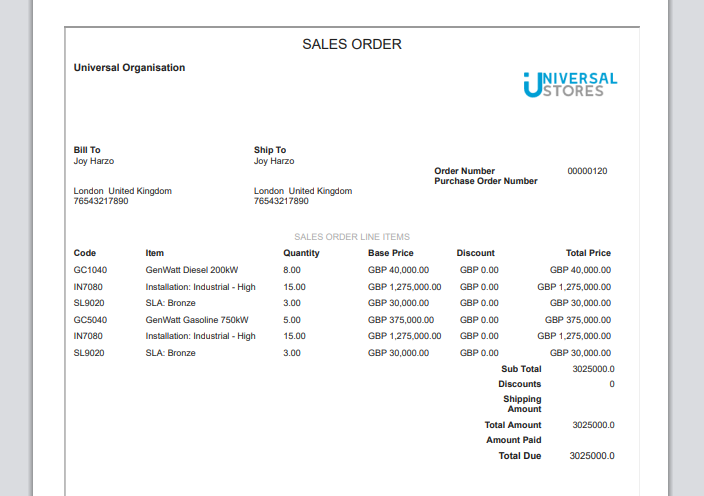

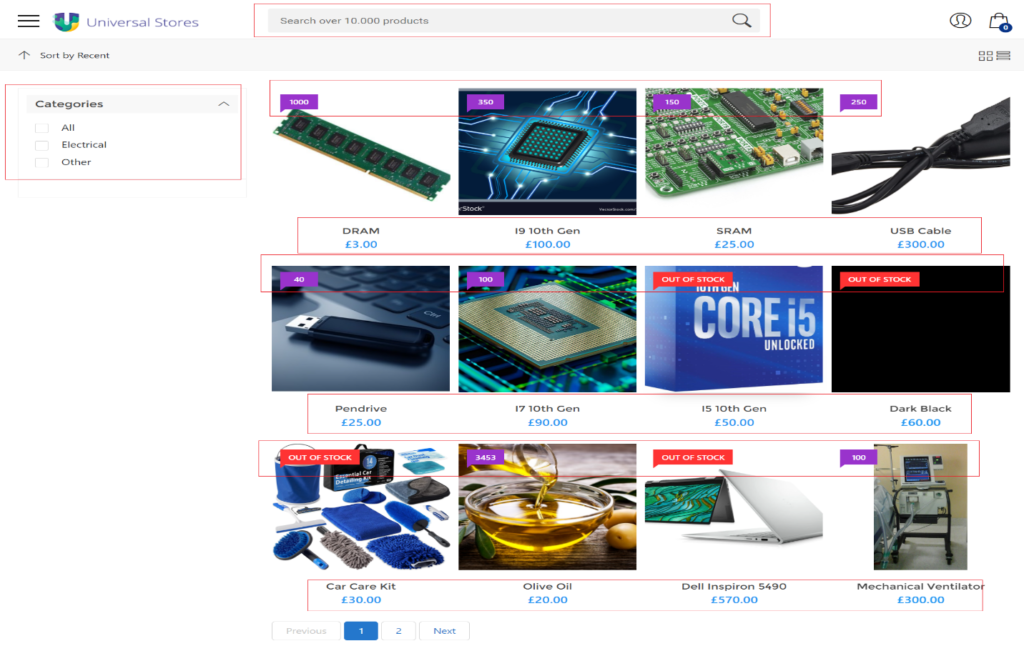
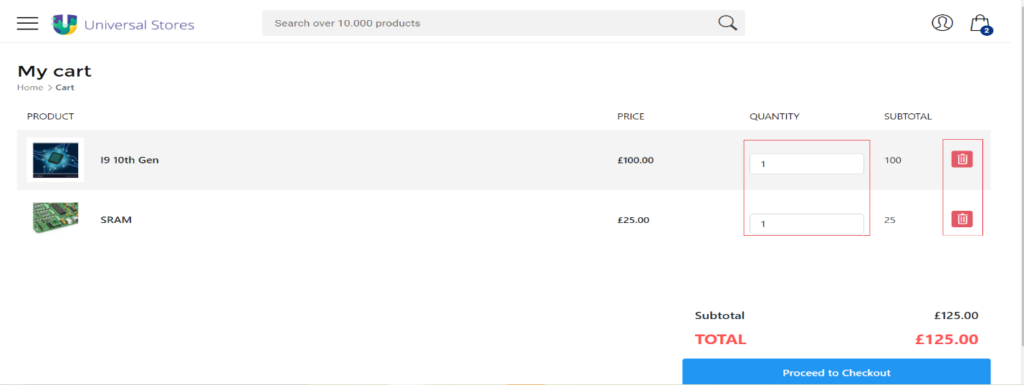
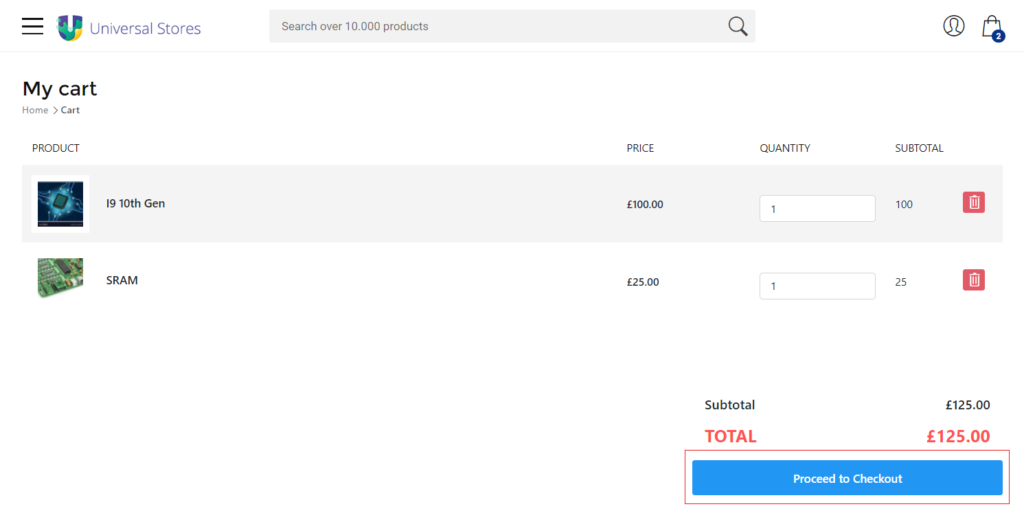

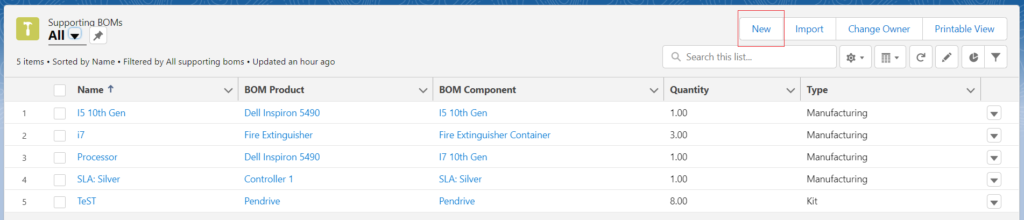
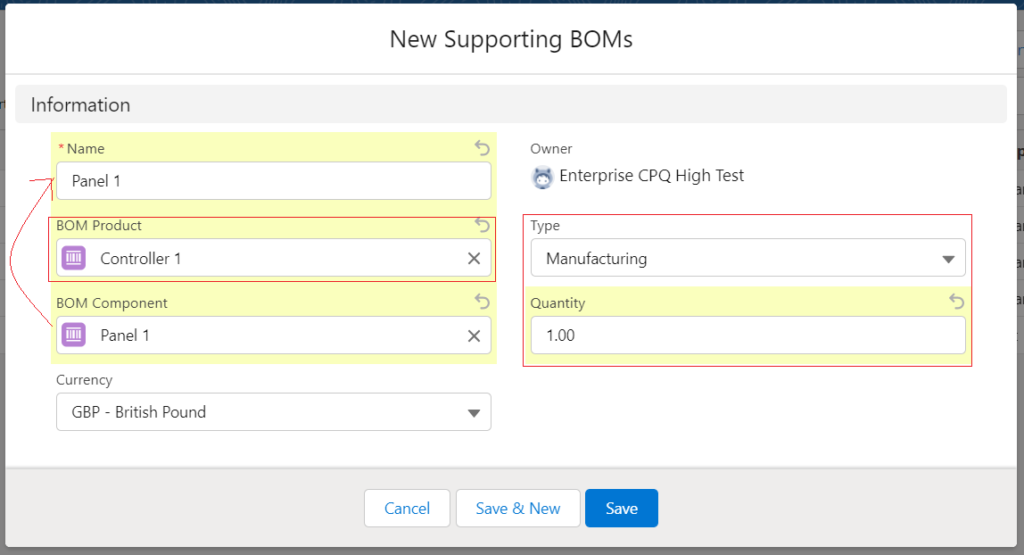
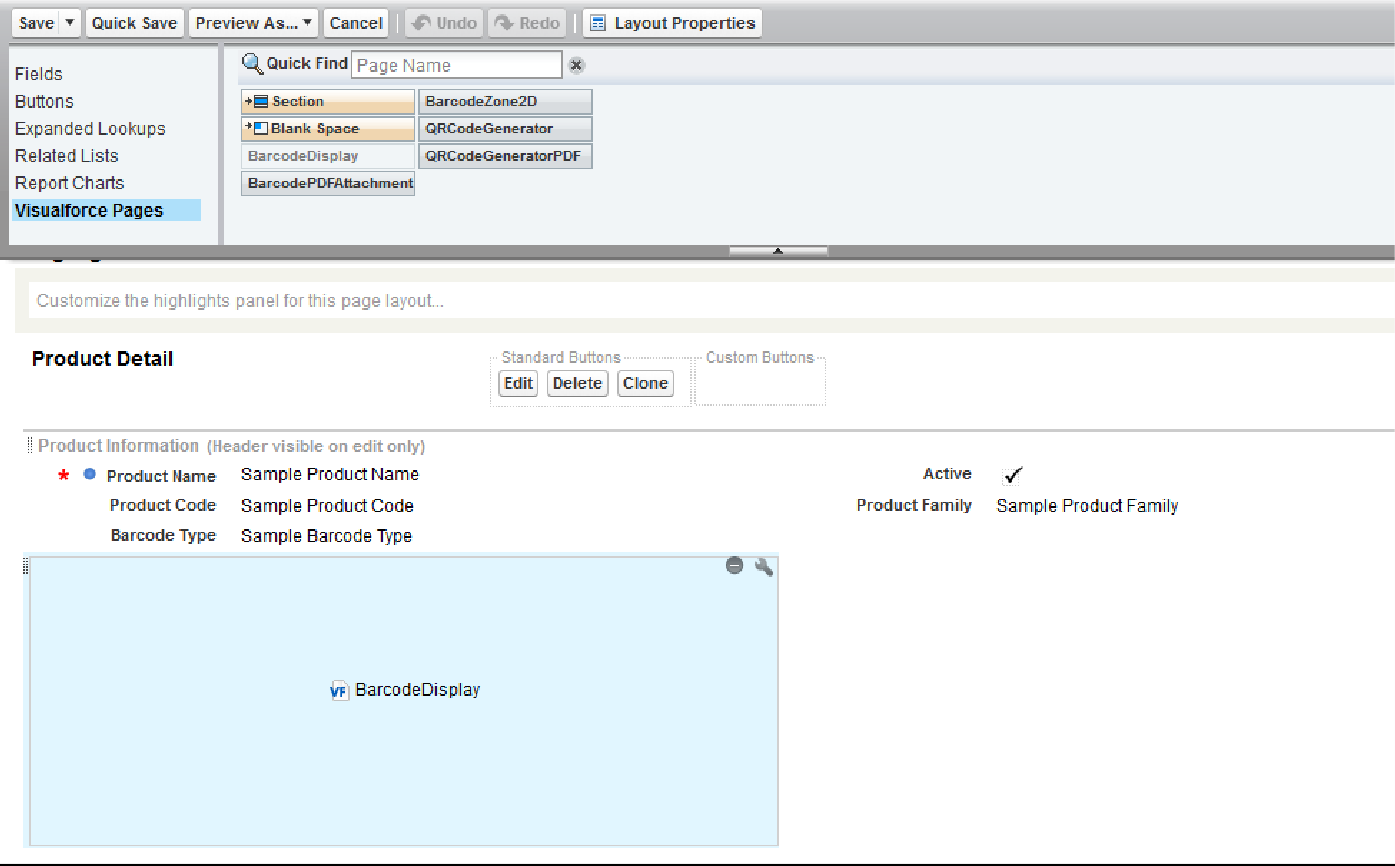 ILLUSTRATIONS
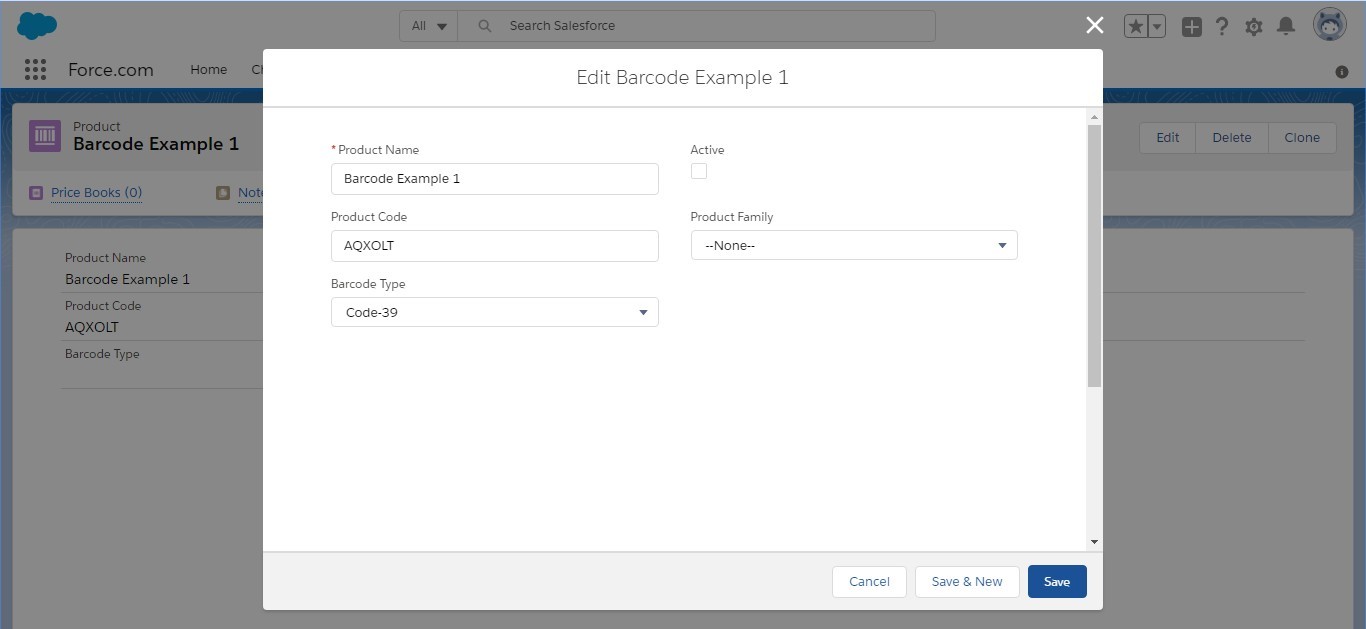
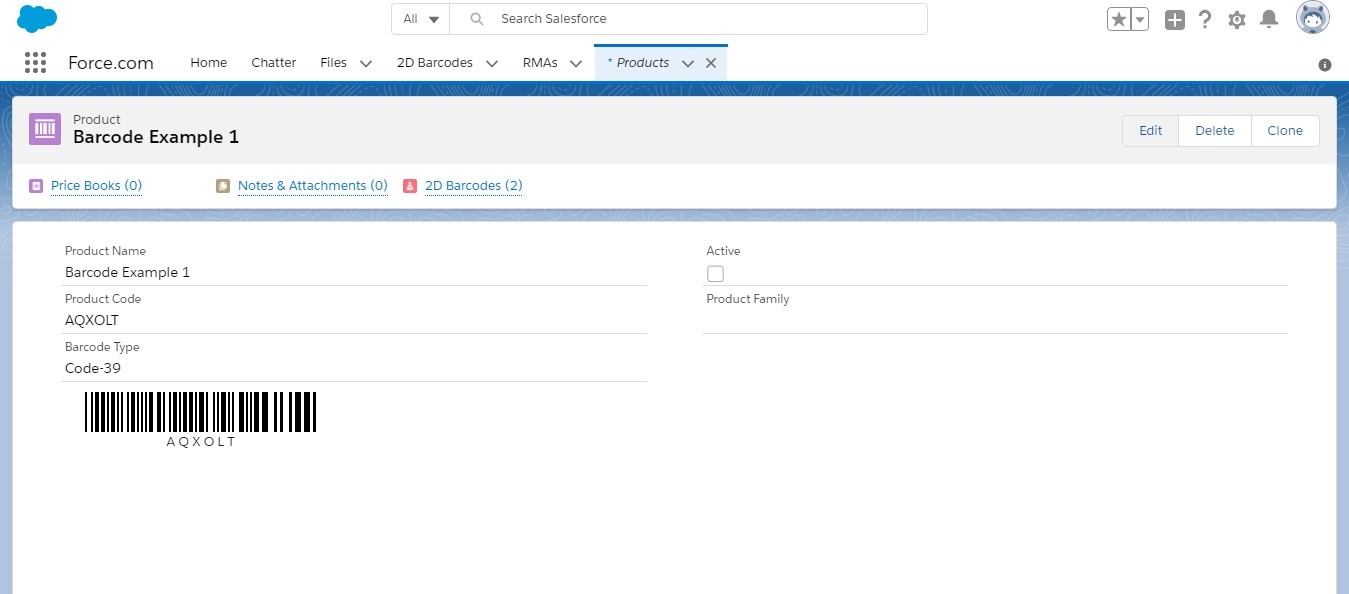
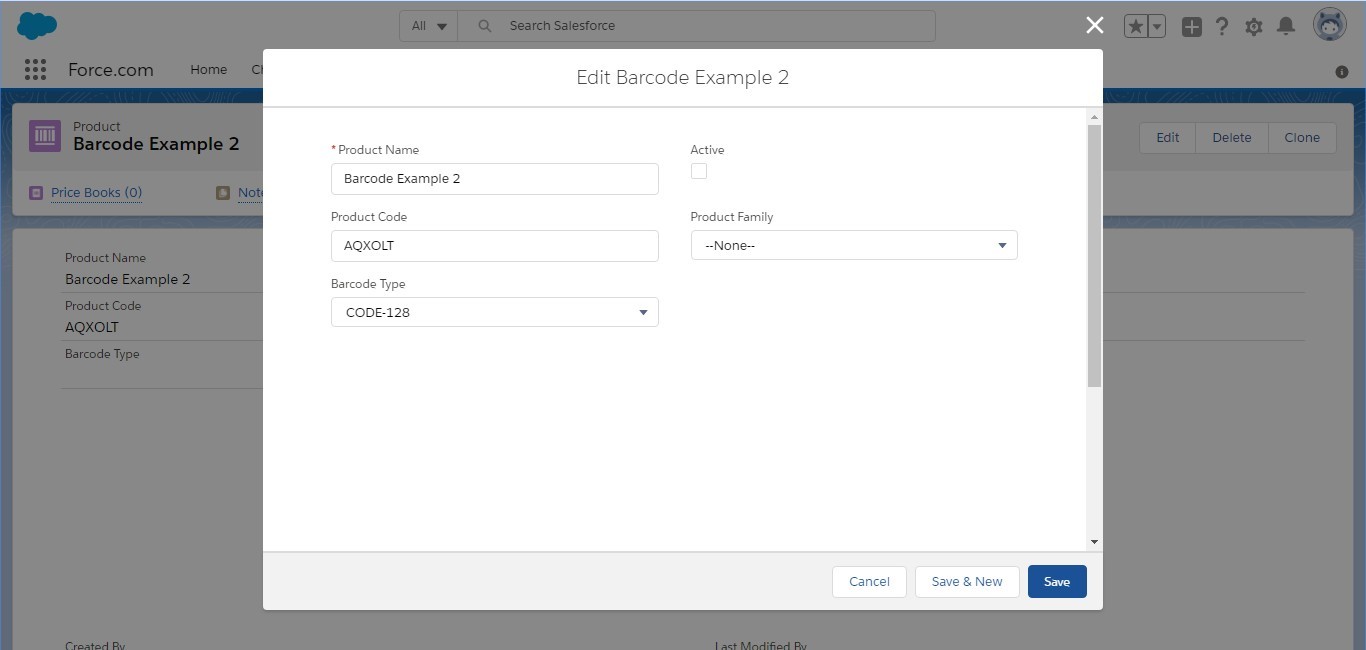

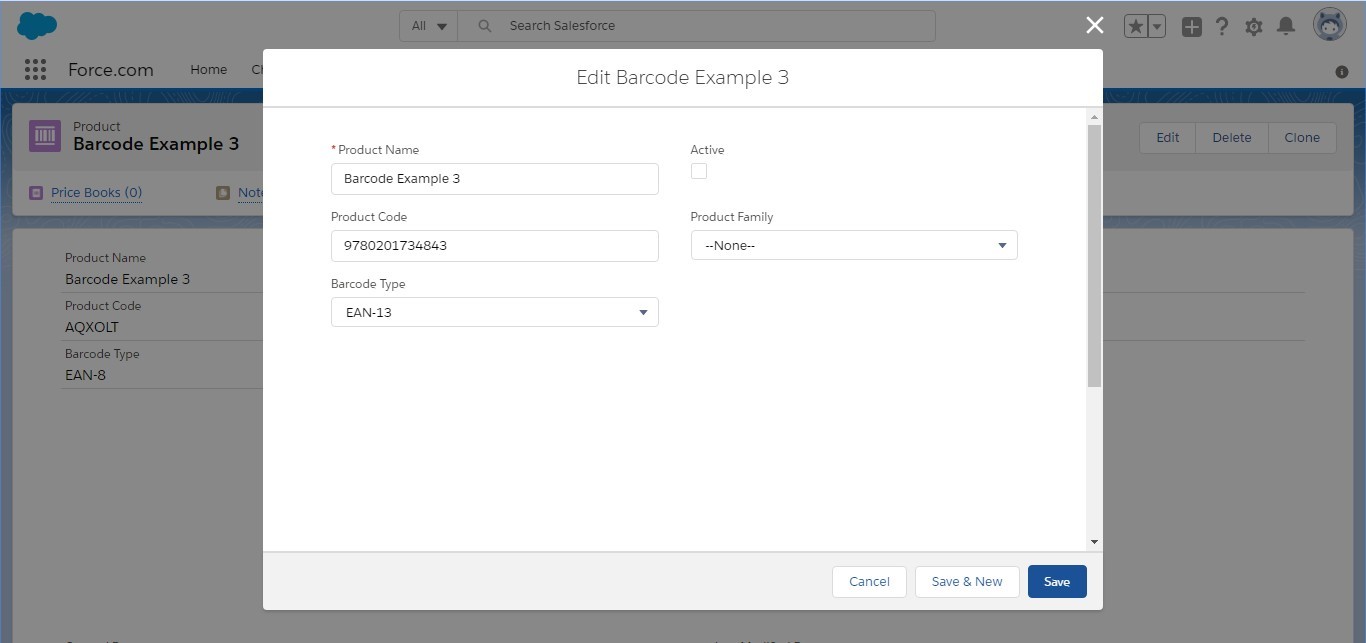
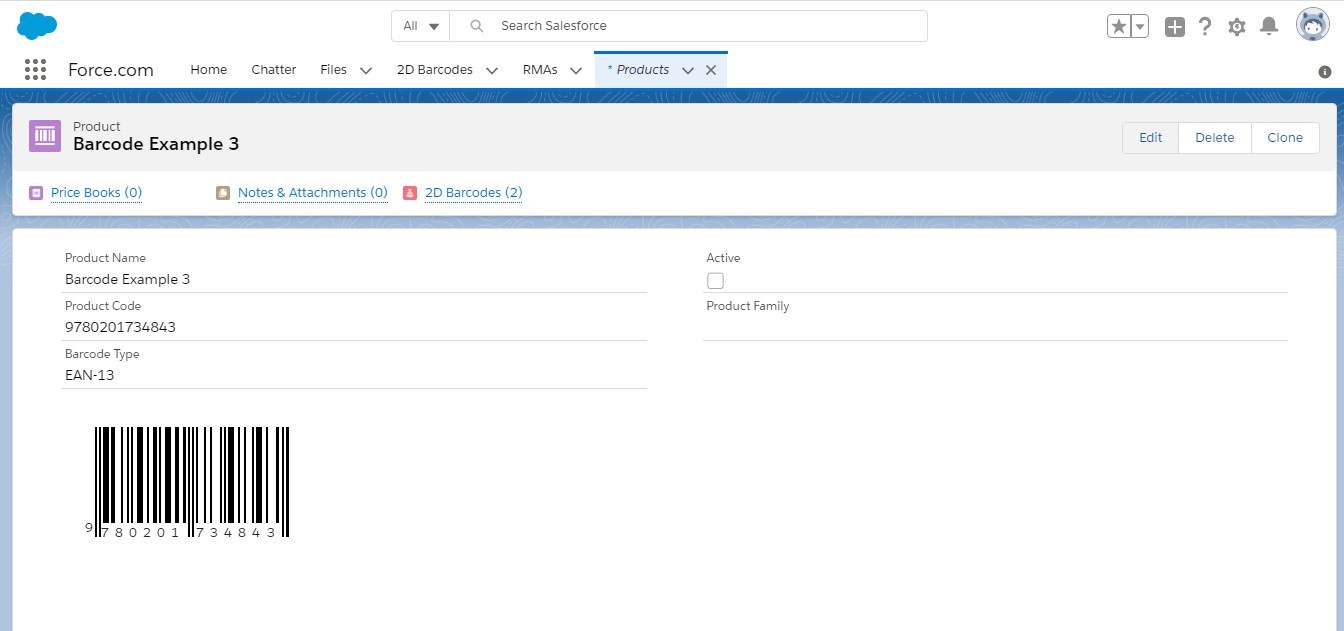
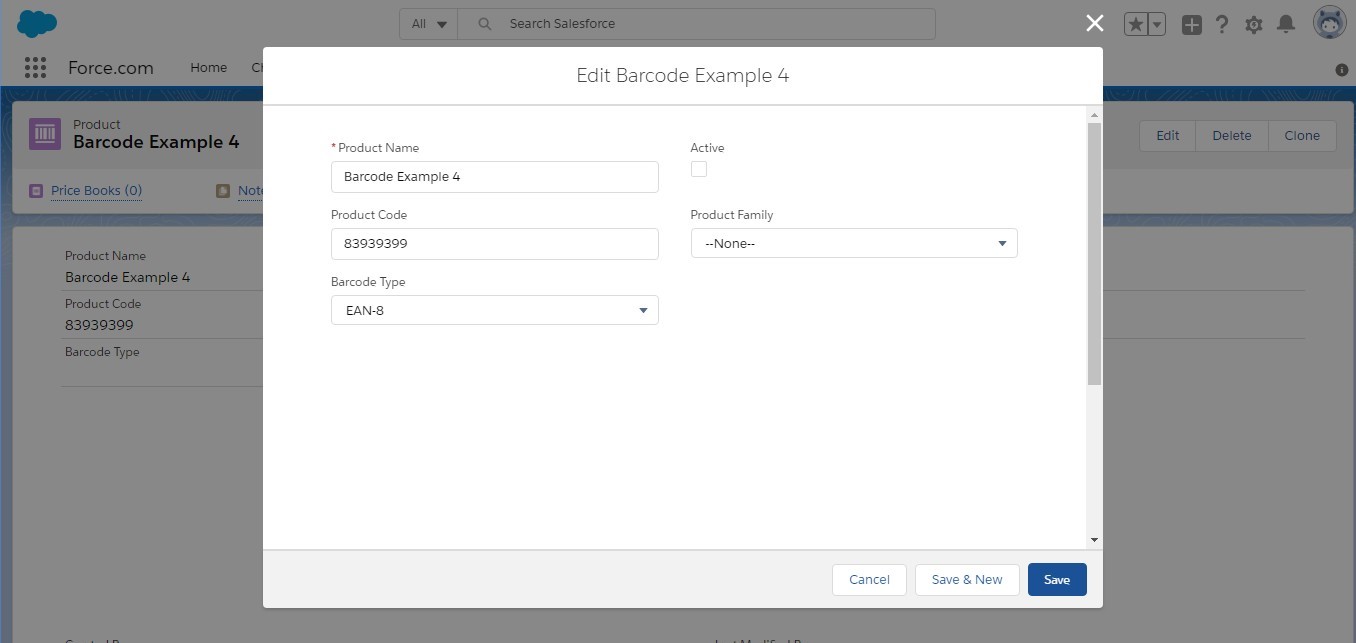
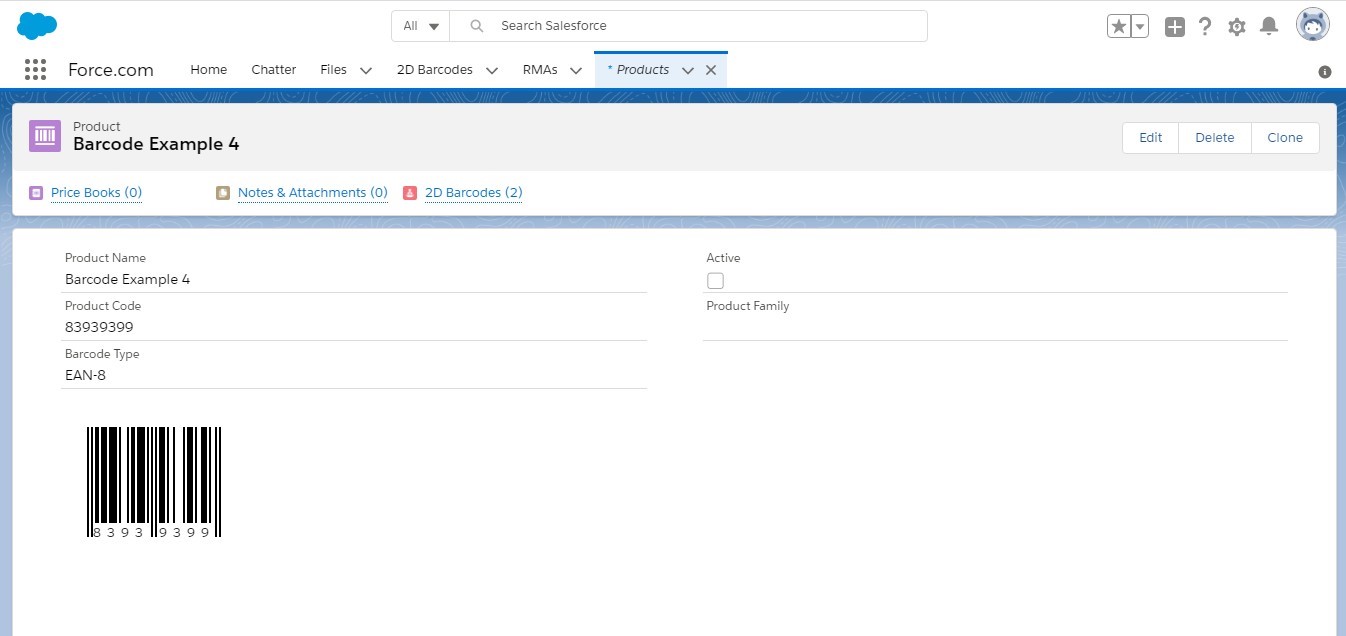
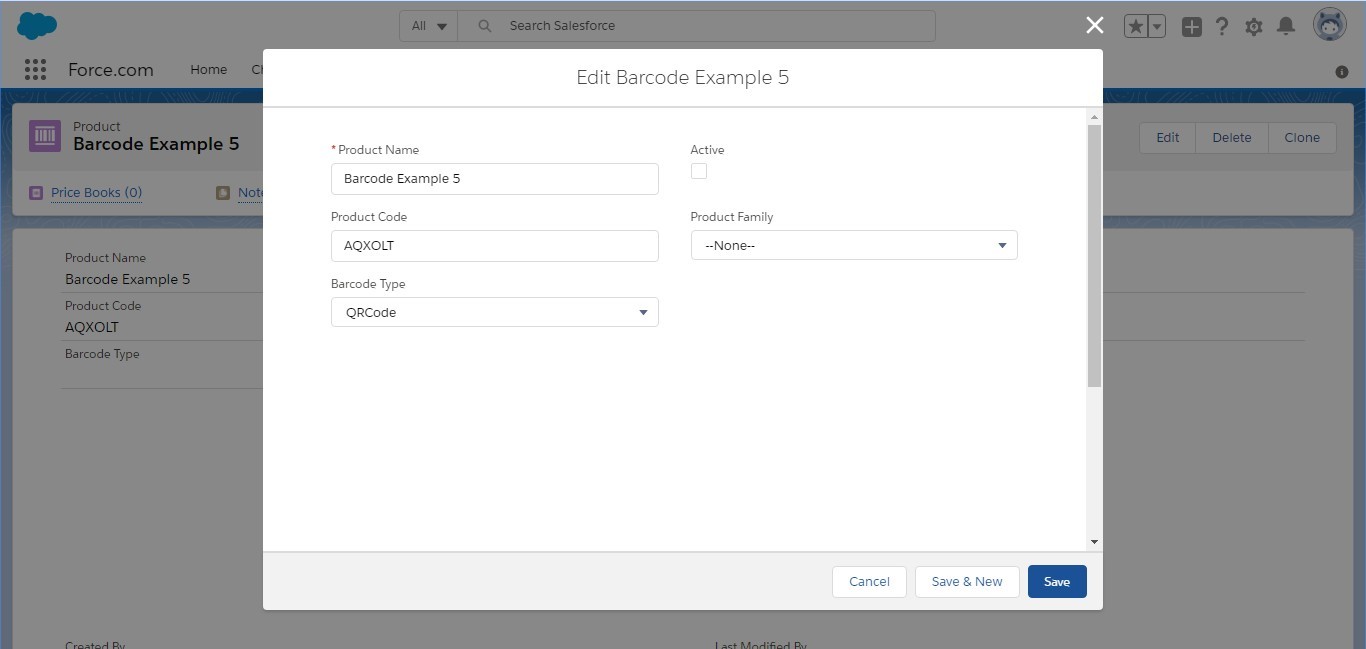
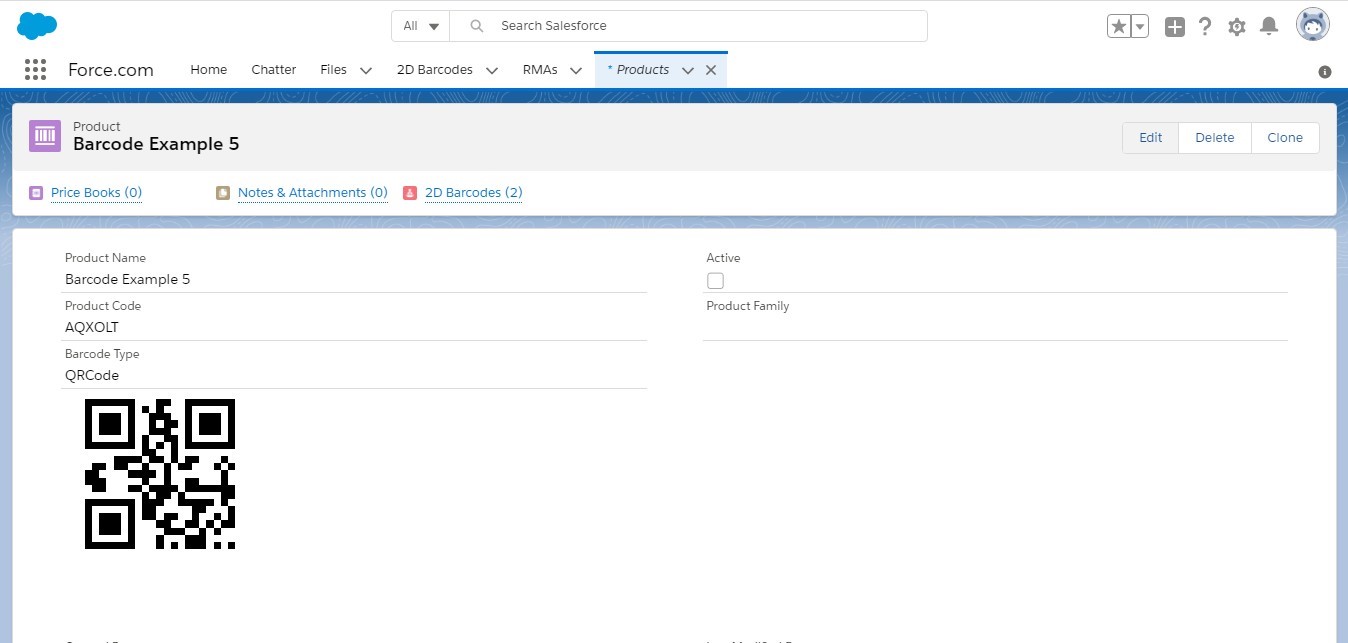
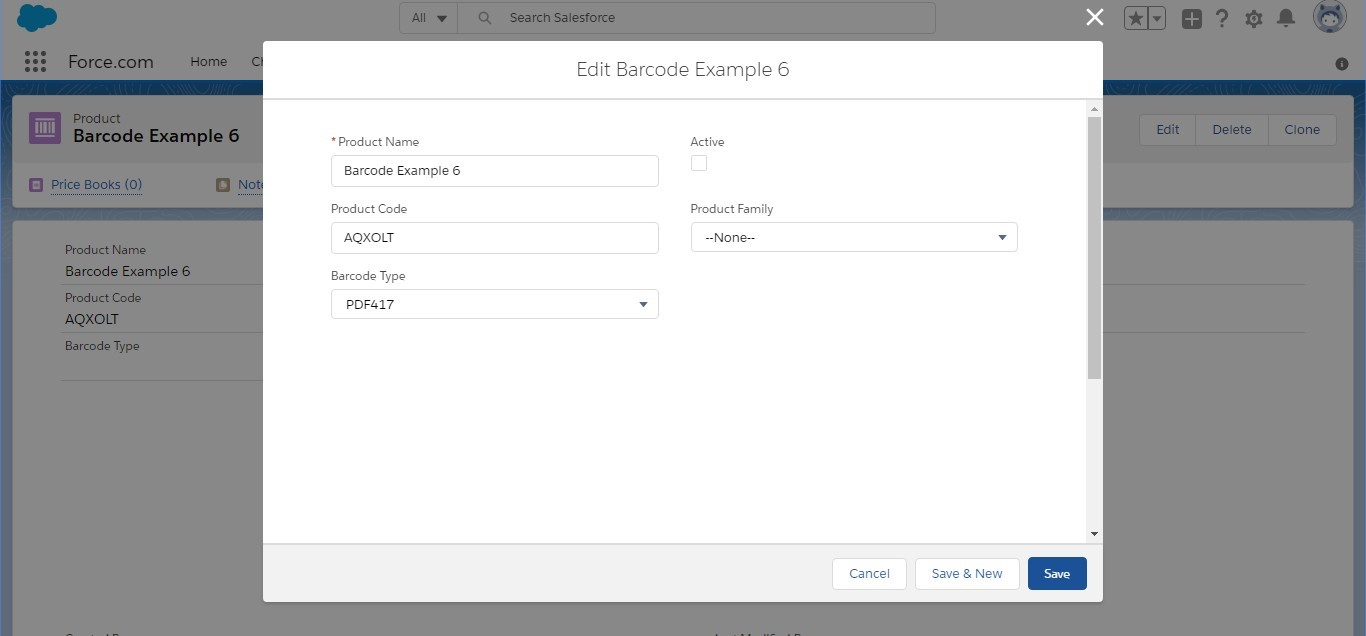
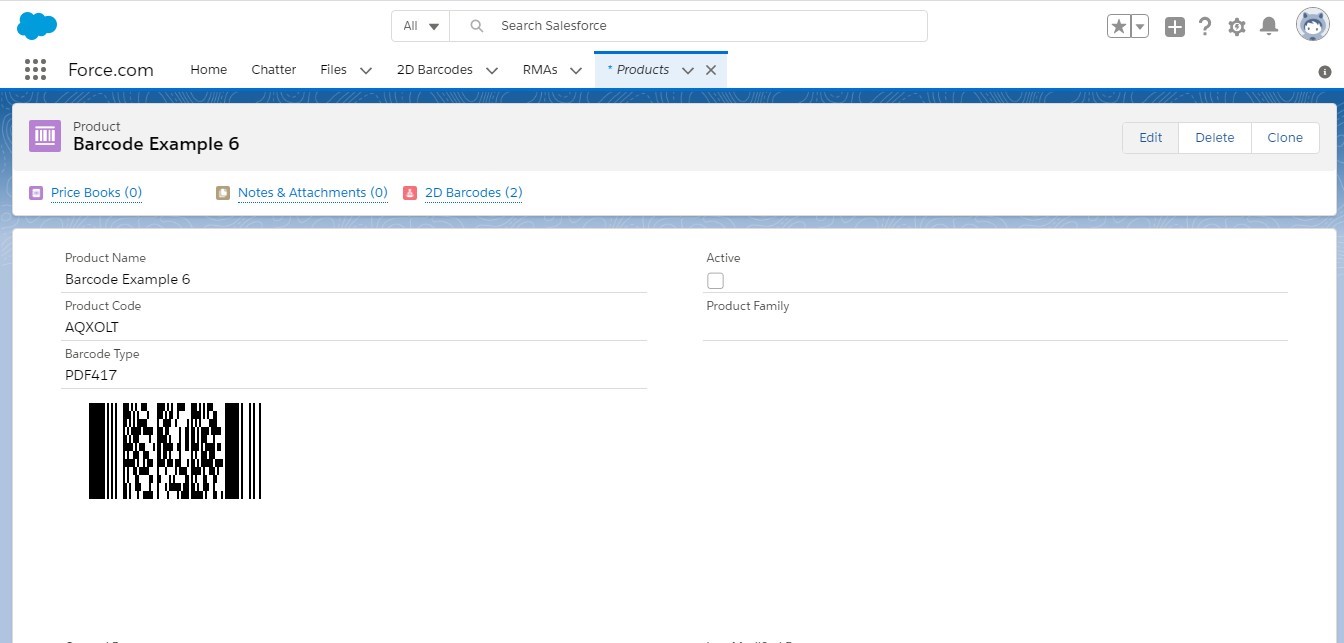


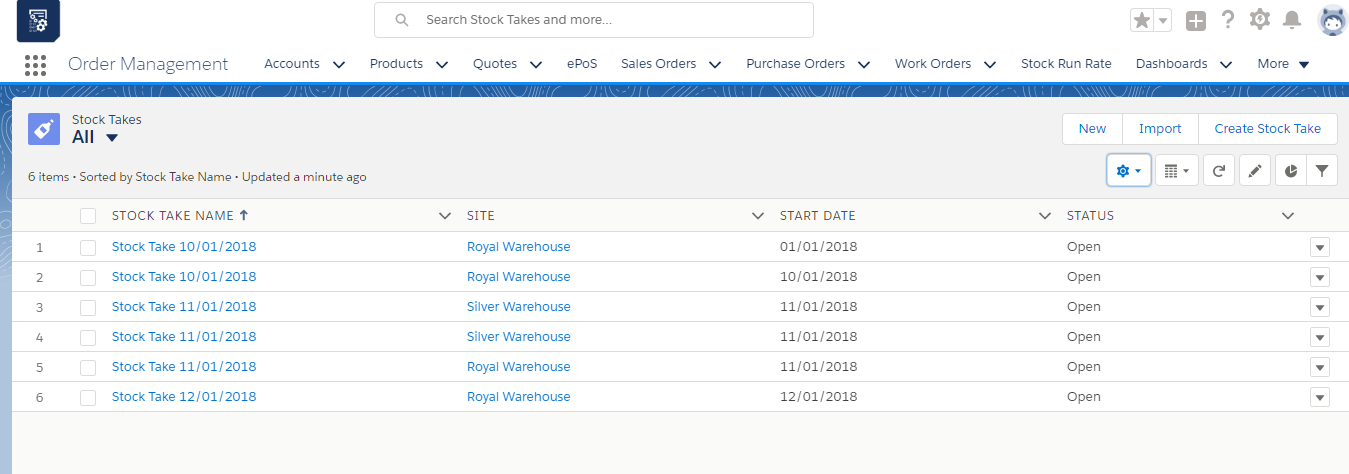
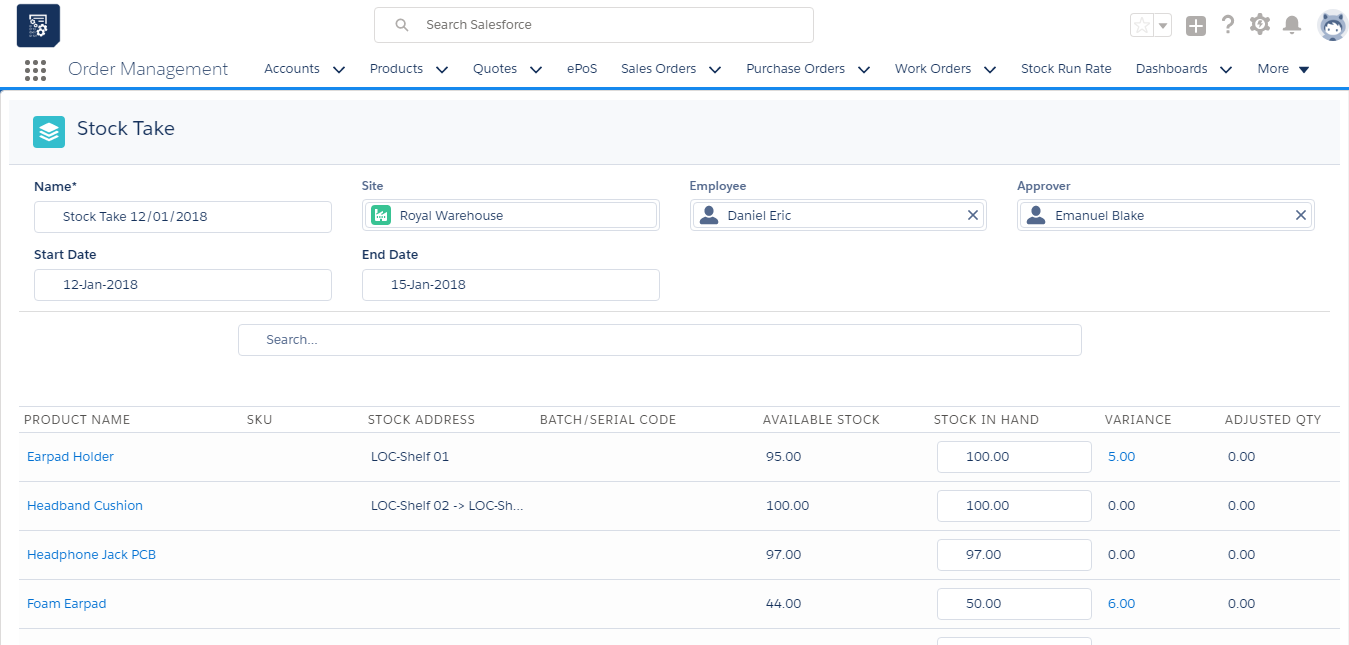
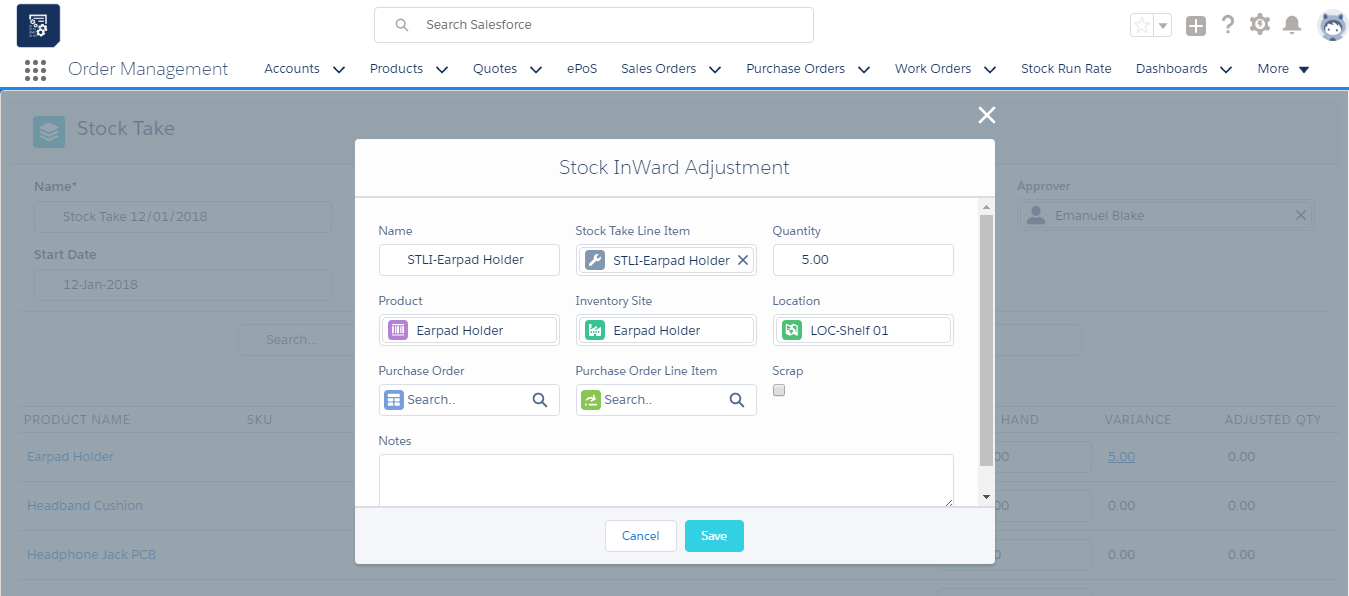
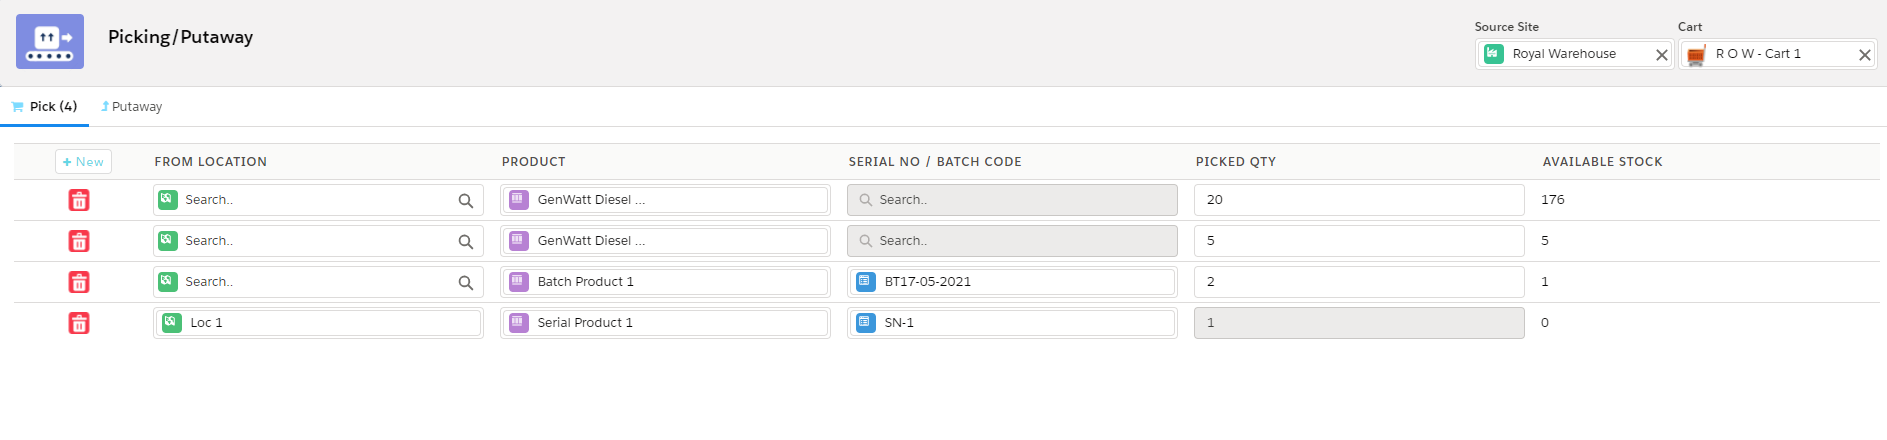
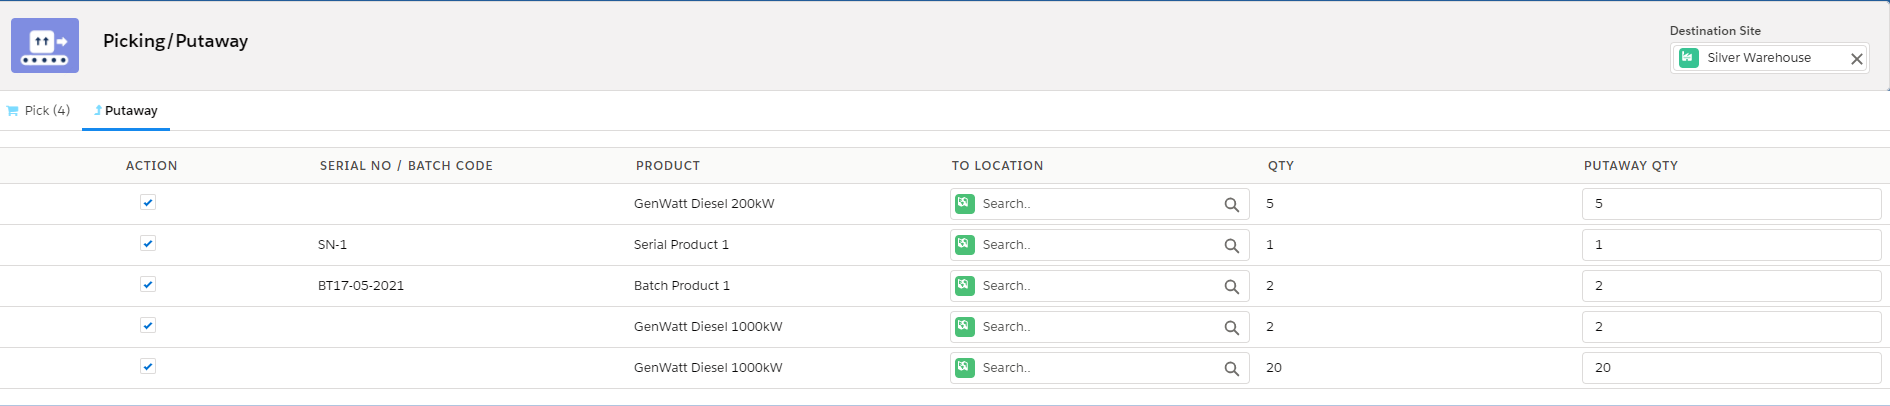
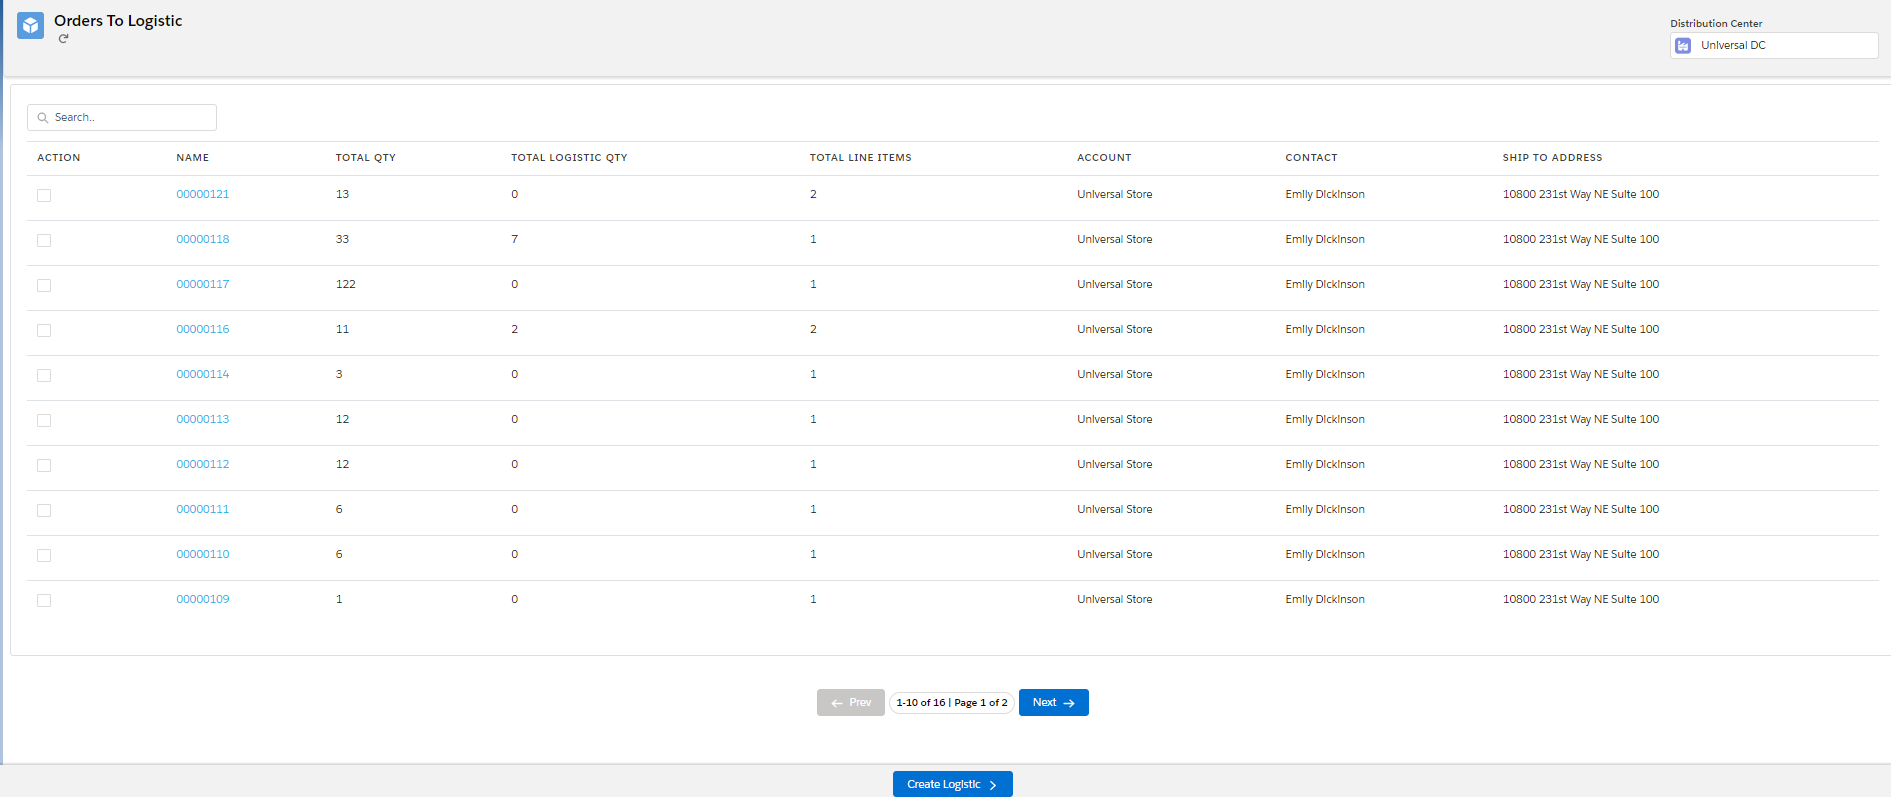
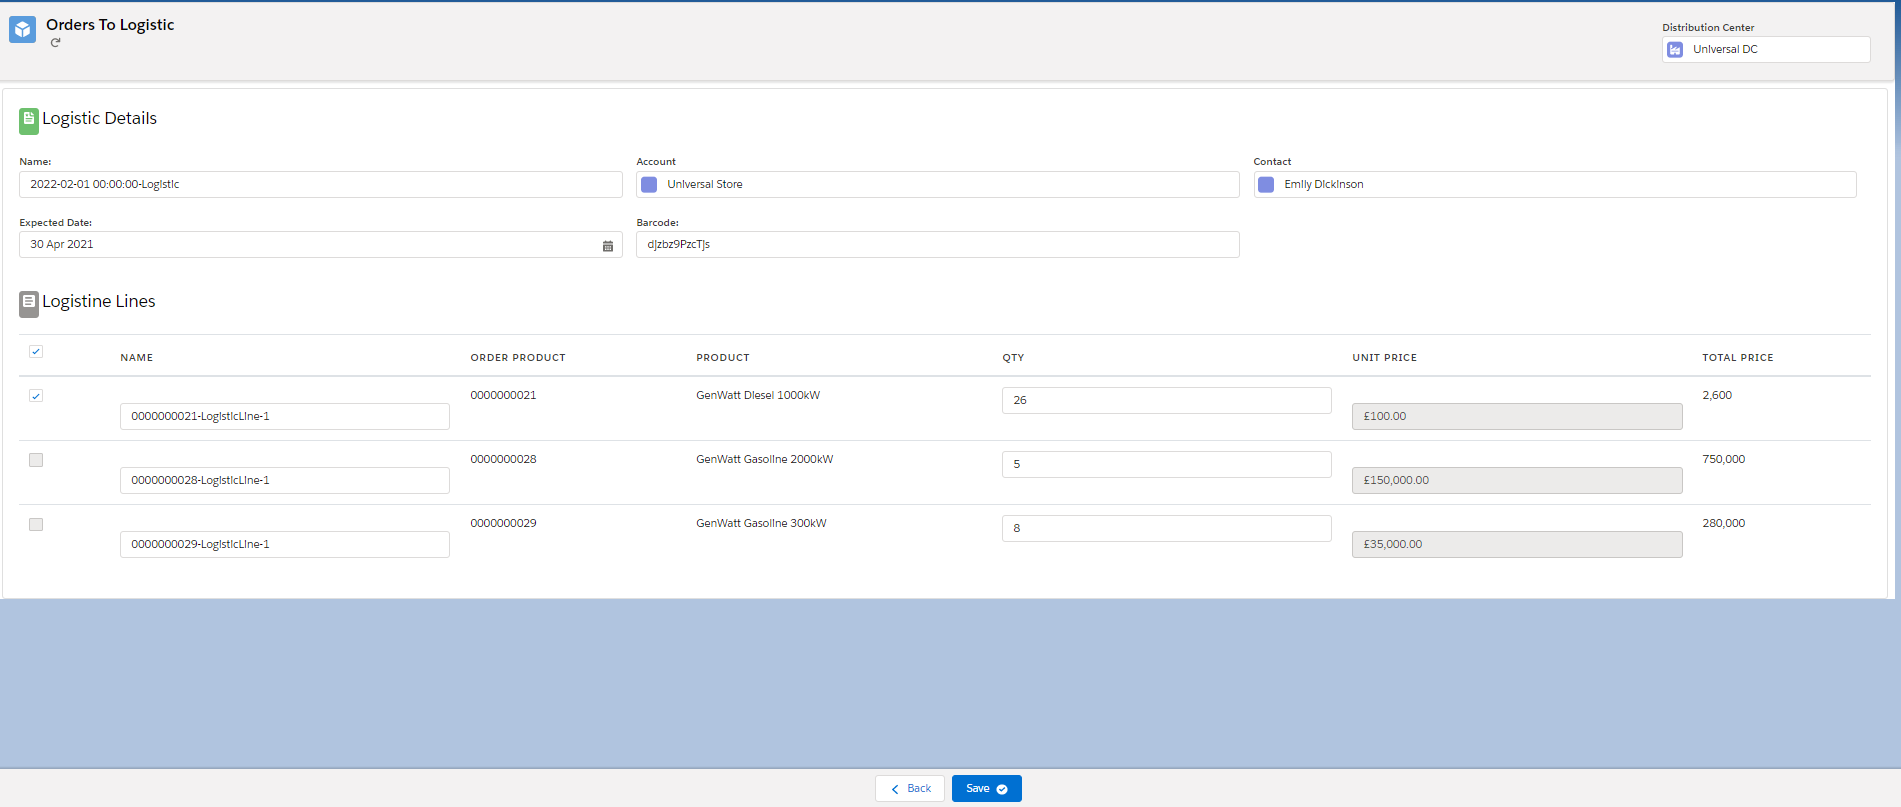
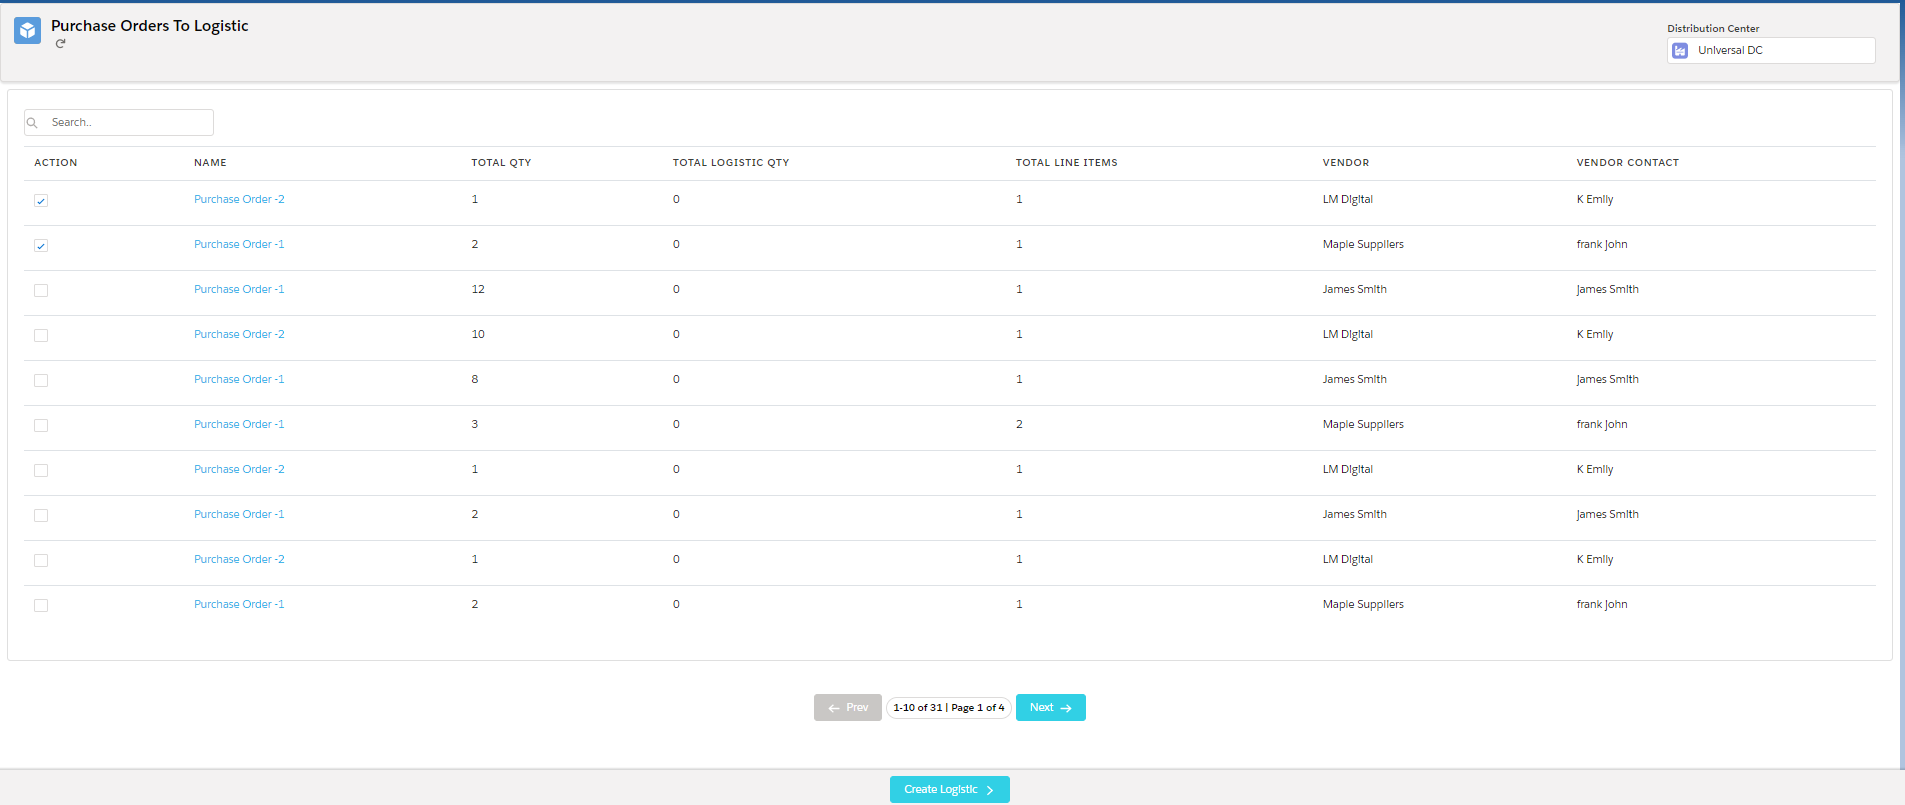


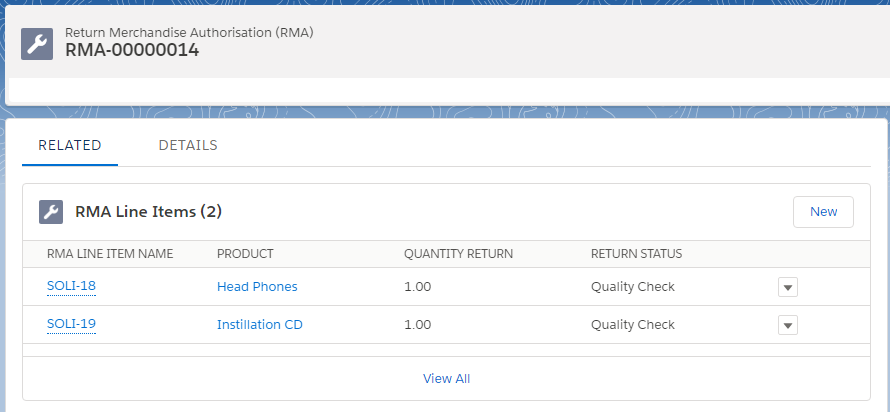
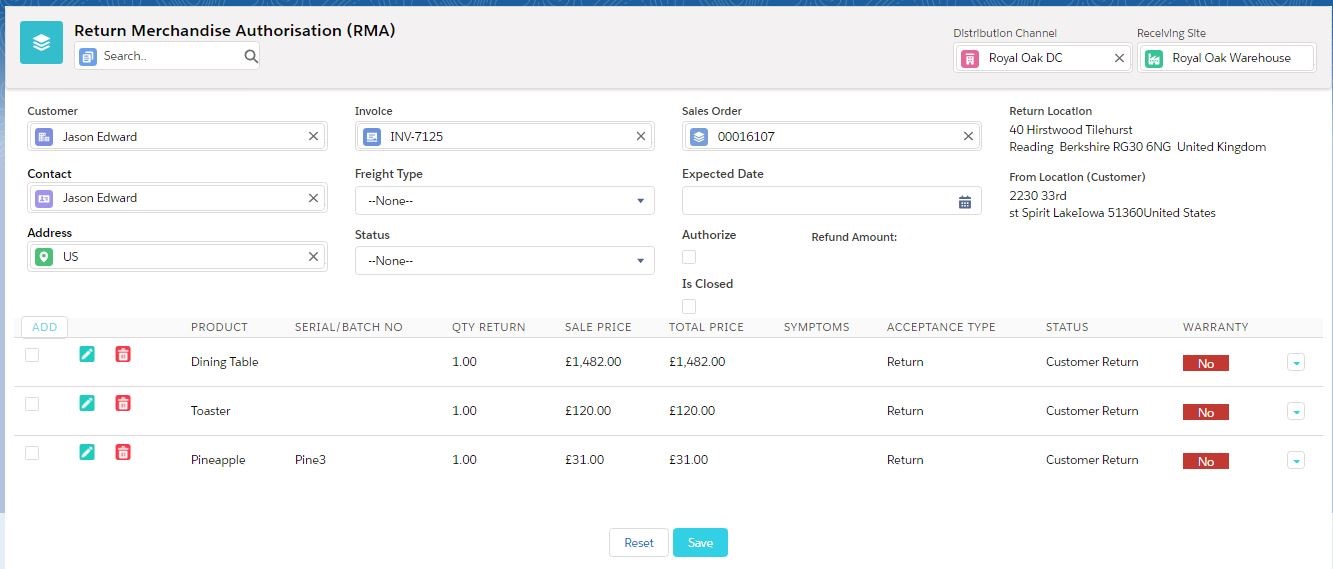
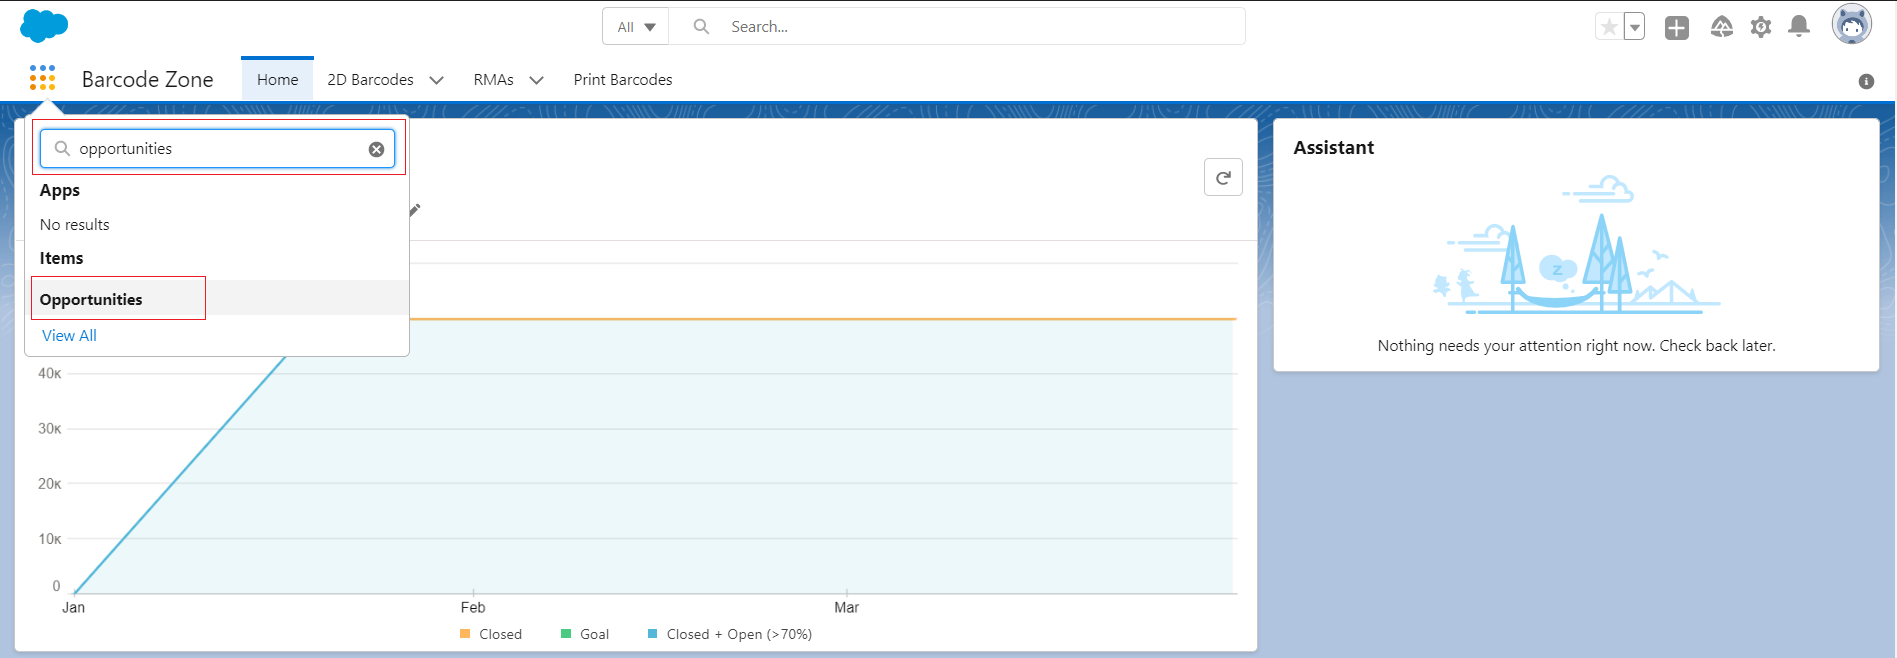
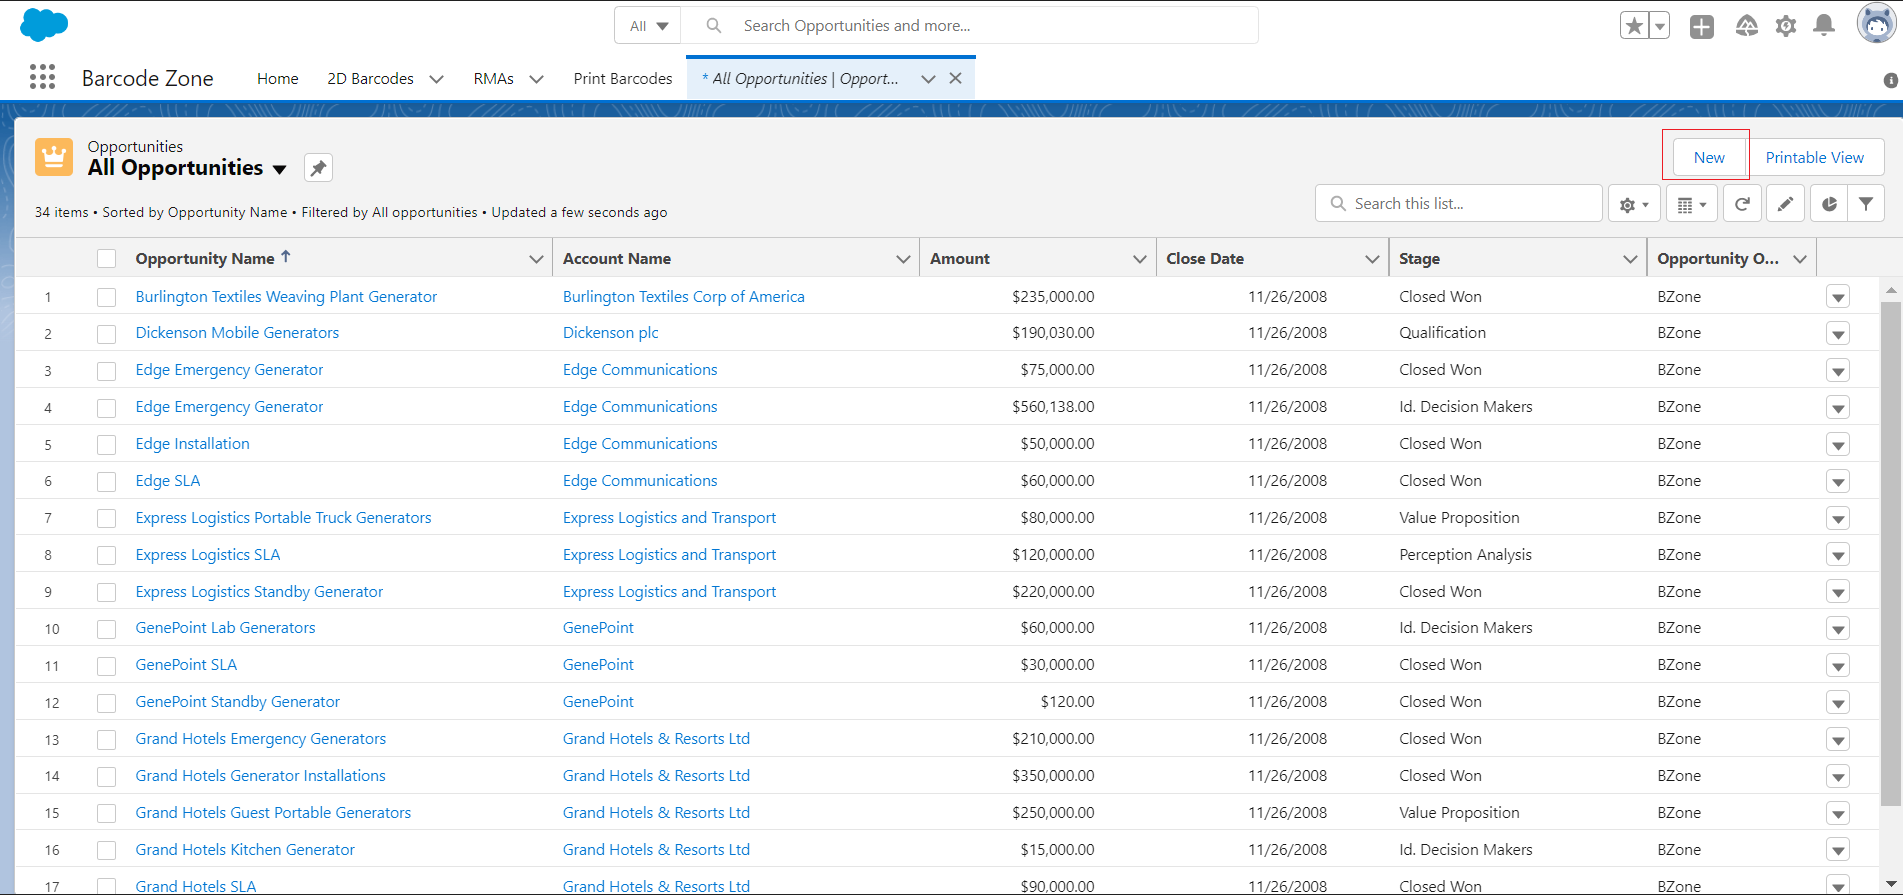
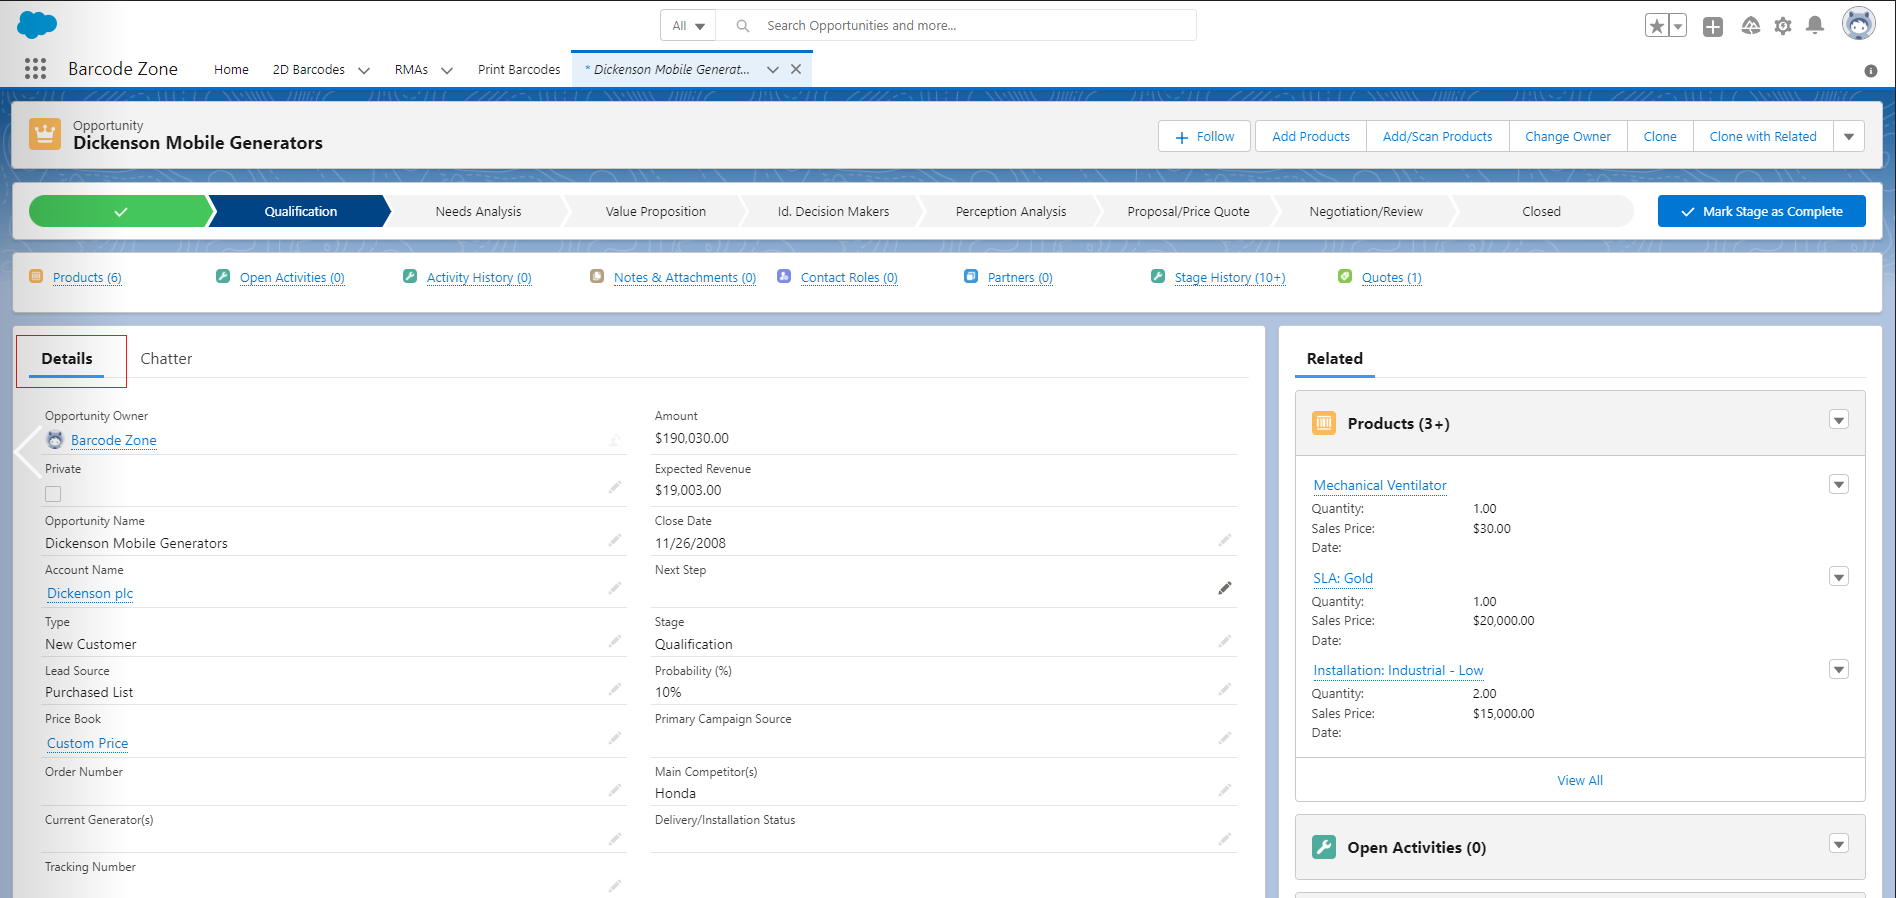

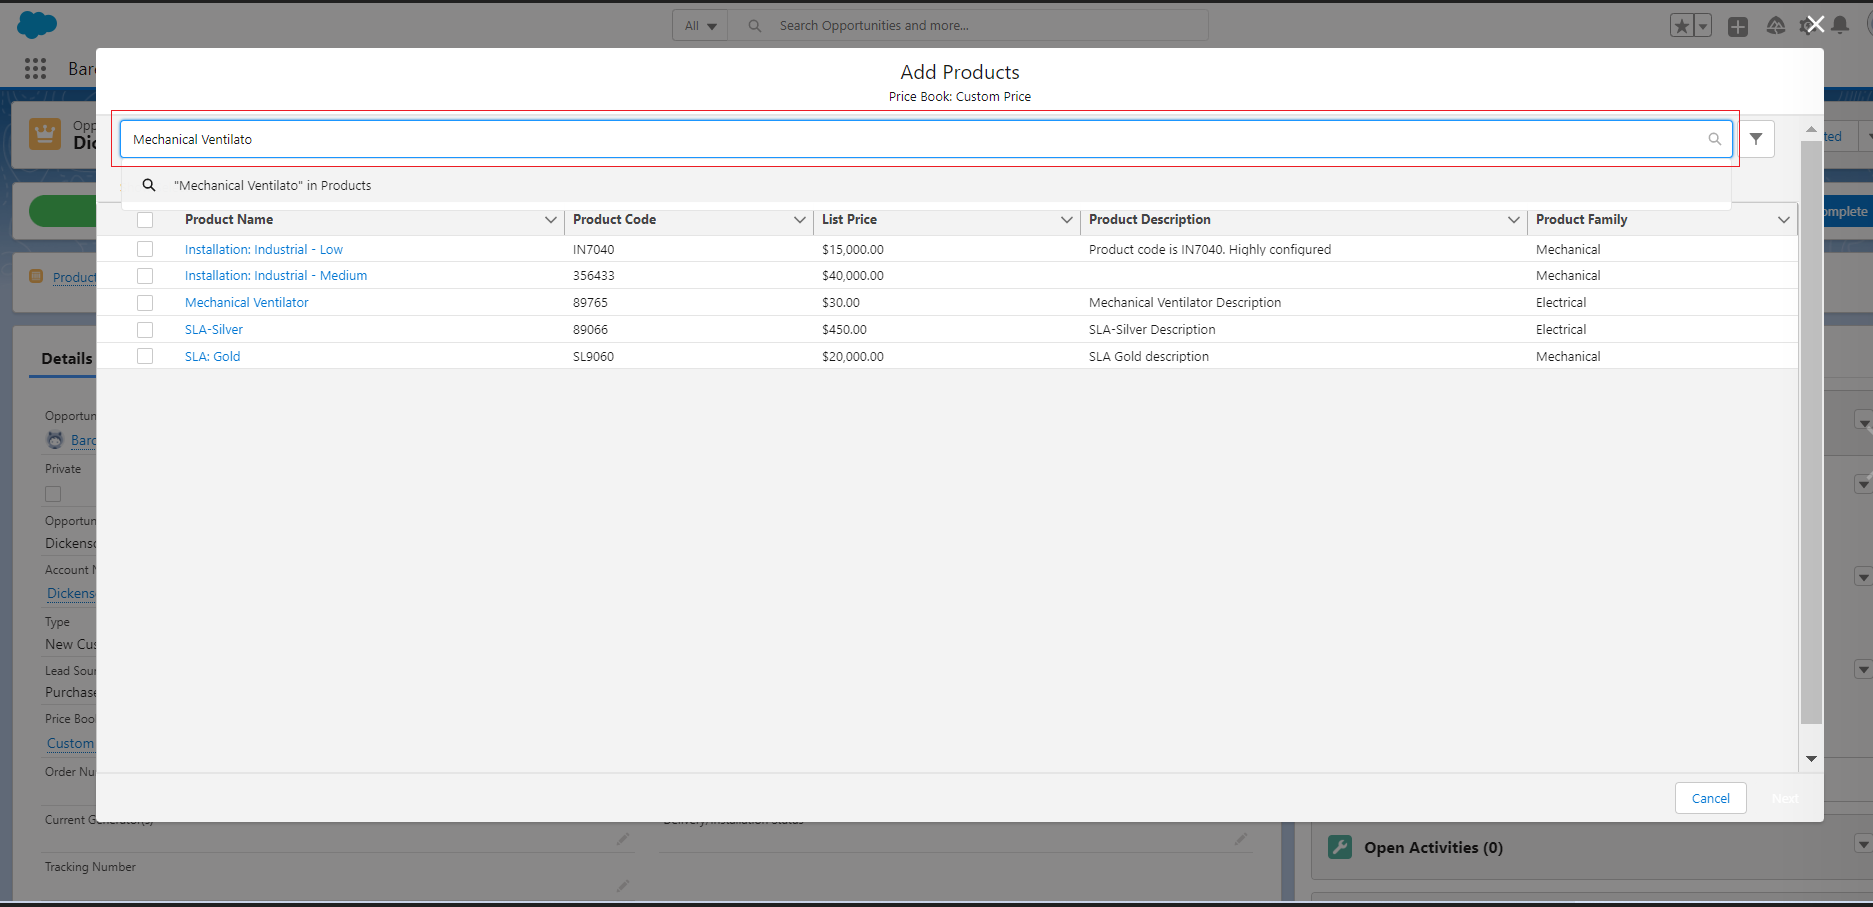
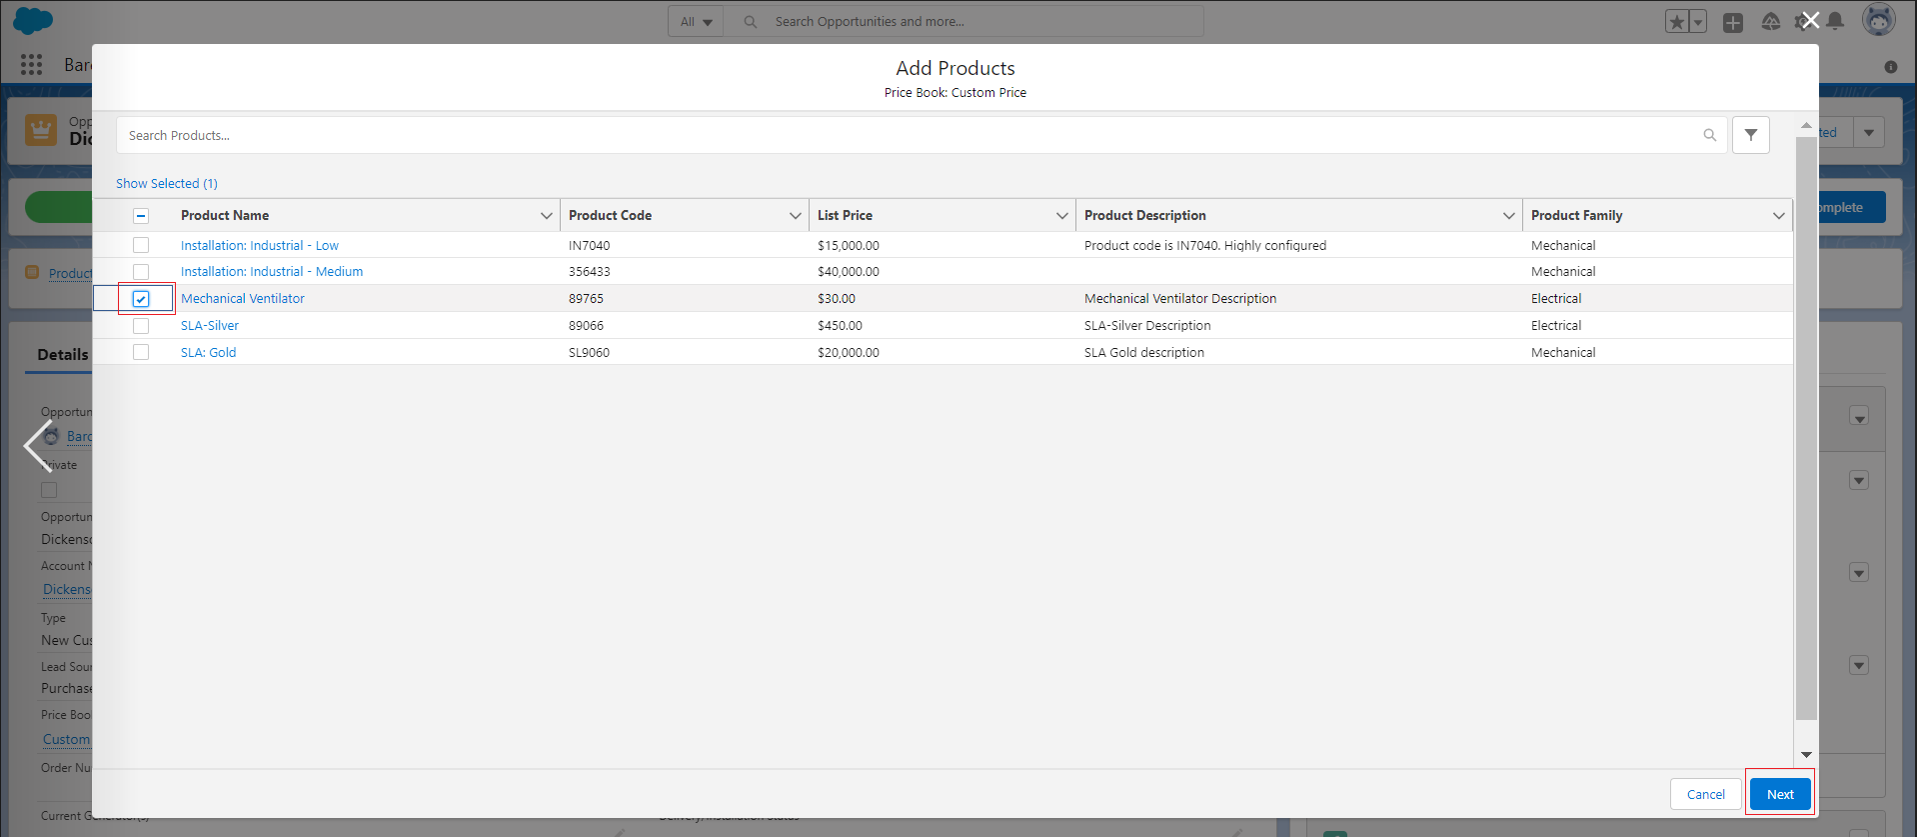
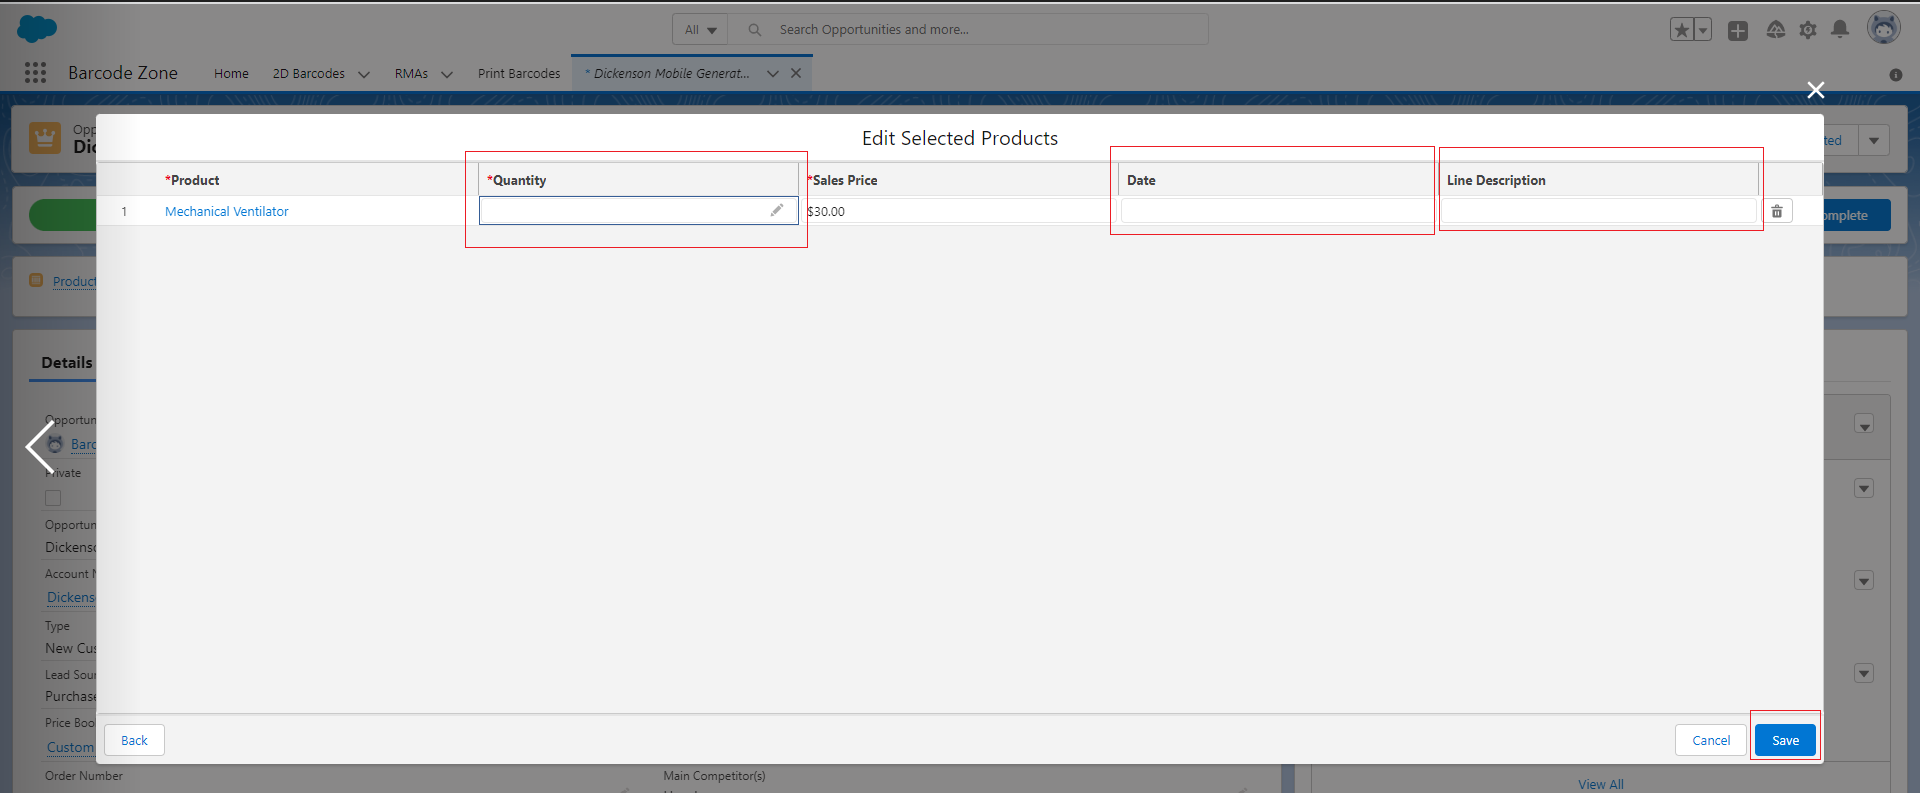


